internet-based information systems
TRANSCRIPT

Internet-Based Information Systems
Lecture Notes
Nikolai Scerbakov IICM, Graz University of Technology,
Graz, Austria
E-mail: [email protected]

2
Abstract
Internet-Based Information Systems occupy a substantial part of the current programming
market. There is definitely a great demand for experts capable of developing such applications
especially in context of the increasing complexity of these systems within organizations. The
book provides a technical overview of all technologies needed to develop such internet-based
information systems. All the typical architectural solutions are also provided and discussed.
The technical overview is not so detailed that can be called a complete handbook, but detailed
enough to get started with practical programming.
The book is organized into eight parts.
Chapter 1 covers the background to the topic, and defines main terminology to be used
throughout the further materials. The chapter introduces also main architectural solutions for
building the systems.
Chapter 2 introduces a so-called PHP server-side technology.
Chapter 3 make a brief overview of the servlet server-side technology.
Chapter 4 introduces JavaScript client-side programming language, and discuss concept of
Dynamic HTML. The AJAX architecture is also explained here.
Chapter 5 continues explanation of JavaScript language and overview main HTML5
extensions.
Chapter 6 discuss main concepts of eXtensible Mark-up Language (XML) such as well-
formed XML, valid XML, DTD, etc.
Chapter 7 can be seen as a short introduction into XML schemas.
Chapter 8 provides all the materials necessary to get started with XSL transformations.
Chapter 9 makes an overview of existing XML standard name spaces that are used for
developing internet-based information systems.
The book explains all the concepts with carefully selected samples that are considered to be a
main contribution of the book into the area.

3
Table of Contents Abstract ...................................................................................................................................... 2
1. Introduction to Internet-Based Information Systems ............................................................. 5
1.1.Internet ............................................................................................................................. 5
1.2.HTTP and WWW ............................................................................................................. 6
1.3.HyperText Mark-up Language ......................................................................................... 8
1.4.Formatting HTML Documents (CSS) ............................................................................ 10
1.5.Architecture of Internet-Based Information Systems ..................................................... 14
1.6.Backend (Server-Side) Programming ............................................................................ 14
1.7.Frontend (Client-Side) Programming ............................................................................. 17
2.PHP-Hypertext Preprocessor ................................................................................................. 21
2.1.PHP Basics ..................................................................................................................... 21
2.2.PHP Variables ................................................................................................................ 22
2.2.PHP Control Statements ................................................................................................. 24
2.3.Getting parameters ......................................................................................................... 27
2.4.PHP Functions and Classes ............................................................................................ 29
2.5.Interface to a DBMS ...................................................................................................... 34
2.5.1. MySQL.* Functions ............................................................................................... 35
2.5.2. MySQLI.* Functions .............................................................................................. 38
2.5.2. MySQLI.* Prepared Statements ............................................................................. 40
3.Java Servlets .......................................................................................................................... 42
3.1.Basic Principles .............................................................................................................. 42
3.2.Processing HTTP Request .............................................................................................. 44
3.3.HTTP Header ................................................................................................................. 46
3.4.Deploying Java servlets .................................................................................................. 47
3.5.Java Data Base Connector .............................................................................................. 48
3.6.Working with a Database ............................................................................................... 49
4.Document Object Model and Java Script .............................................................................. 55
4.1.Java Script Basics ........................................................................................................... 55
4.2.JavaScript Variables and Literals ................................................................................... 56
4.3.JavaScript Control Statements ....................................................................................... 60
4.4.JavaScript Functions and Classes ................................................................................... 62

4
4.5.JavaScript Event Model ................................................................................................. 66
4.6.Document Object Model ................................................................................................ 67
4.7.Sending HTTP requests from JavaScript ....................................................................... 73
4.8.Programming Asynchronous Applications. ................................................................... 74
4.9.AJAX Architecture of Internet-Based Information Systems. ........................................ 75
5. HTML5 ................................................................................................................................. 80
5.1.Forms .............................................................................................................................. 80
5.2.Canvas ............................................................................................................................ 82
5.3.HTML5 Events ............................................................................................................... 87
5.4.HTML5 File API ............................................................................................................ 90
5.5.WEB Socket ................................................................................................................... 94
5.6.HTML5 Local Storage .................................................................................................. 95
6.XML-eXtensible Mark-up Language .................................................................................... 97
6.1. XML Basics ................................................................................................................... 97
6.2.Document Type Definition (DTD) ............................................................................... 102
6.3.DTD Element Attributes (ATTLIST) .......................................................................... 108
7.XML Schema ...................................................................................................................... 113
7.1.XML Schema Basics .................................................................................................... 113
7.2.Simple Element Types ................................................................................................. 114
7.3.Complex Element Types .............................................................................................. 118
7.4.References .................................................................................................................... 123
8. XSL-eXtensible Stylesheet Language ................................................................................ 126
8.1.Introduction to XSL ..................................................................................................... 126
8.2.Transforming XML Documents ................................................................................... 127
8.3.XSL Imperative Statements ......................................................................................... 130
8.4.XSL Formatting Specifications .................................................................................... 135
8.5.XSL Transformers ........................................................................................................ 136
9.XML Standards and WEB Services .................................................................................... 138
9.1.Resource Definition Frameworks (RDF) ..................................................................... 138
9.2.RSS: Really Simple Syndication .................................................................................. 145
9.3.Atom (Atom Syndication Feed) ................................................................................... 149
9.4. WEB Service protocol - RPC (Remote Procedure Call) ............................................. 152
9.4. WEB Service protocol SOAP (Simple Object Access Protocol) ................................ 156

5
9.5.Packaging and Publishing ............................................................................................ 157
1. Introduction to Internet-Based Information Systems
1.1.Internet
Basic terminology that is used throughout the whole script is defined in this section.
Internet is the largest world-wide computer network that exists today.
It is in fact a network of networks that is estimated to connect several million computers and
with over 100 million individual users around the world - and it is still growing rapidly
Fig. 1-1: Internet
Internet brings together multiple hardware and operating system platforms from dozens of
different manufacturers. Communication between these different platforms is possible
because they agree a mutual way of exchanging data - TCP/IP, which is an acronym for
Transmission Control Protocol/Internet Protocol.
TCP/IP specifies the data transport layer of communication. Thus a data transaction between
two computers is treated as a stream of bytes referred to as a transport data unit. Data
exchange between any two computers on the net is supported by TCP/IP if the data is sent in
one or more transport data units. TCP/IP assigns a unique address to every computer in the
world. This "IP address" is a four byte value that, normally, is encoded by converting each
byte into a decimal number (0 to 255) and separating the bytes with a period. For example,
129.27.59.199.
Fig. 1-2: TCP/IP Transport Data Unit.
The IP addresses are suitable for being used by computers and are difficult to be memorize by
human beings. The situation reminds a situation with phone numbers where people often use
phone books to memorize phone numbers. Similarly, servers that translate human-friendly
computer hostnames like "www.tugraz.at", " www.spbstu.ru", etc, into IP addresses
are called Domain Name Servers (DNS). For example, the domain name www.iicm.edu is

6
translated into the IP address 129.27.200.43. Unlike a phone book, DNS server can be
quickly updated, allowing a particular location of computers on the network to change
without affecting access to these computers via the same host name. Users take advantage of
this when they use meaningful domain addresses without having to know how the computer is
located.
Internet Data Service protocols are built on the top of TCP/IP protocol and are used by
internet applications. There are a number of such protocols, each designed for some particular
purpose. There are special protocols, for example, to support distributed collaborative
information systems (HTTP), Internet News System (News), File Transfer Systems (FTP),
etc.
Fig.1-3: Internet Data Service Protocols
1.2.HTTP and WWW
HyperText Transfer Protocol (HTTP) is an example of an Internet Data Service protocol. It is
designed to support communication between so-called clients and information servers, that is
HTTP supports a client-server model of communication:
clients send requests for certain services to a server;
the server responds by sending back relevant data to the clients.
Some requests can also cause side effects in the information maintained by the server, such as
addition or deletion of certain documents on the server. HTTP basically defines the internal
structure of supported requests and responses.
Fig.1-4:Client-Server Communication Model
The World Wide Web (WWW) is a globally distributed collection of so-called WWW
documents. WWW documents are text files written in a mark-up language called a HyperText
Mark-up Language (HTML). The WWW documents residing on some particular server are
made accessible over the net through HTTP. In other words, the WWW can be seen as
multiple HTTP servers on the Internet serving WWW pages to HTML clients.
Functionality of WWW can be seen as a following list of HTTP requests from clients to a
server:
- a client (content consumer) requests a particular document from the server (GET request)
- a client (content producer) sends a document to the server (POST request);
- a client delete an existing document on the server (DELET request).

7
Fig. 1-5: Types of HTTP requests in WWW
Of course, there may be further types of HTTP requests but the three types of HTTP requests
- GET, POST and DELETE are sufficient for further discussion.
An important part of each HTTP request is so-called Internet cookies. Cookies are usually
small text files, that are stored on a client for each server the client communicated with.
Cookies are sent from the client to a server as a component of an HTTP request, server may
modify cookies and send the cookies back to the client.
As soon as a server gets a first HTTP request from a client, the server creates a so-called user
session - personal memory space for each client working with the server. The session consists
of a number of name/value pairs. To understand functionality of these two mechanisms, let us
consider a user authentication procedure.
a user provides his/her credentials to the server (typically, user name and password).
the server checks the info, and place a user name and access permissions into the user
session;
the server add a user session ID to the cookies, and send them back to the client;
client store the cookies on a local drive.
if a client access the server again, session ID is sent to the server as a cookies
component;
the server recovers the user session by the particular ID, and process the next request
in the context of the user session.
Thus, we can see that cookie are used to recognise a particular client accessing the server and
to keep information on such accesses.
.The Uniform Resource Locator (URL) is one of the most important concepts of WWW.
URL is the global address of documents and other resources on the WWW.
[protocol]://[resource name]:[port]/[file]?[extra parameters]
The first part of the URL is called a protocol identifier and it indicates what protocol to use.
The second part is called a resource name and it specifies the IP address or the domain name
where the resource is located
The third part is optional and called a port number. There may be many processes on the
remote server that may serve different requests. In order to pass a request to a process that can
parse this request on the remote server, URL may specify a port number otherwise
conventionally assigned permanent port numbers are used (http = 80, https = 443, ftp = 21,
etc).
The fourth part of an URL is called a filename - the pathname to the file on the machine.

8
Final part of an URL is also optional and called "extra parameters". Extra parameters is a list
of key/value pairs separated with the & symbol. Those parameters are sent to the Web server
as a part of an HTTP request. The Web server accept the extra parameters, and use the values
to do a particular server-site data processing before replying to the request.
Fig. 1-6: Computer-navigable links between WWW documents.
For example,
http://coronet.iicm.edu:80/wbtmaster/master.htm?user=me&reply=text
WWW allows to embed URLs into HTML text documents as a so-called anchors. Such
embedded URLs typically point to other HTML pages, and browser may jump from one
document to another as user clicks on links associated with URLs. This is the basic linking
mechanism in WWW, it is often named a computer-navigable links between WWW
documents.
Thus, the World Wide Web (WWW) can be seen as a huge, distributed collection of HTML
documents interrelated by means of computer-navigable links (see Fig.1-6).
1.3.HyperText Mark-up Language
HTML is the WWW de facto standard for for describing web documents (web pages).
HTML stands for Hyper Text Mark-up Language. Being a commonly accepted standard,
HTML allows different vendors to develop WWW browsers that, while running on different
hardware and software platforms, still display web pages in approximately the same way.
A mark-up language is a set of mark-up tags. An HTML document is simply an ASCII text
incorporating some predefined mark-up tags. Typically, text is bracketed by a start tag and an
end tag, and the text thus enclosed is subject to the properties that the tag describes. We can
say that tags impose some properties onto a text.
HTML tags are distinguished from the text by adopting the following notation:
a start tag is written as "< tag-X >" where tag-X is some reserved code identifier;
the corresponding end tag is written as "</ tag-X >" .
For example;
<tag-X> Text bracketed by "tag-X" and having properties defined by this tag</tag-X>
<tag-Y> Text bracketed by "tag-Y" and having properties defined by this tag</tag-Y>

9
The following set of HTML tags is already sufficient for writing simple HTML documents:
tags <h1> and </h1> define a heading text;
tags <p> and </p> define a paragraph;
tags <i> and </i> define a text written in an italic font face;
tags <b> and </b> define a text written in a bold font face;
tags <u> and </u> define an underlined text;
tag <br/> defines a line break.
HTML tags are case-insensitive, hence tags <H1>, <H2>, ... are equivalent to tags
<h1>, <h2>, ...
HTML tags may be used in combination to achieve multiple text emphasis effects: for
example, the following HTML fragment:
...
<B> <I> bold and italics <U> and underlined;</U> </B> </I>
<br/>
<h2> this line is not underlined and is a header</h2>
and this is back to normal text
...
will display something like the following:
bold and italics and underlined;
this line is not underlined and is a header and this is back to normal text
An HTML document use special tags to define an internal structure of the document:
DOCTYPE declaration is used to define a text to be HTML.
<html> and </html> tags define scope of the HTML mark-up;
<head> and </head> tags are used to define an information about the document
as such - title, encoding, additional files, etc.;
<title> and </title> tags define a title for the document;
<body> and </body> tags define the visible page content.
Thus, we can define an HTML document as the following text:
<!DOCTYPE html>
<HTML>
<HEAD><title>My First HTML Document</title></HEAD>
<BODY>
<B> <I> bold and italics <U> and underlined;</U> </B> </I>
<br/>
<h2> this line is not underlined and is a header</h2>
and this is back to normal text
</BODY></HTML>

10
An HTML document would not be a multimedia document if it only handles text. Other
media objects are introduced as so-called inline objects. These objects exist as files that are
separate from an HTML document and are included at appropriate points using special tags.
An image is included using the tag
<img src="lesson08/file name" ... />
<b>This is a picture: </b><br/>
<img src="lesson08/x.gif"/><br/>
<b>Do you like it ?</b>
This is a picture:
Do you like it ?
As mentioned earlier, a multimedia document becomes a hypermedia document with the
addition of hypertext-style links. Links specified in HTML allows the browser to navigate to
either a new point in the same document or to a different document.
Links are introduced using the anchor tag:
<a href="URL"> anchor </a>
Fig.1-7: Embedding Hypertext References into an HTML document
1.4.Formatting HTML Documents (CSS)
Before we continue with internet-based applications we should get some basic understanding
of so-called CSS (Cascading Style Sheets). Styles refer to HTML objects, i.e. an individual
portions of the document defined by a starting tag and an ending tag.
Each HTML object is displayed within a rectangular area on the screen having certain
coordinates and properties

11
Fig.1-8: HTML objects
Styles define rules on how to display HTML elements. Styles operate with properties of
HTML object such that Font, Border, Background, Offset, Margin, etc.
Fig.1-9: Properties of an HTML object
Styles are defined as a text stored in the document or in a separated Cascading Style Sheets
(CSS) file. Multiple style definitions will cascade into one
HTML tags were originally designed to structure the content of a document. They were
supposed to say "This is a header", "This is a paragraph", "This is a table", by using tags like
<h1>, <p>, <table>, and so on. Presentation layout (graphical view) is defined by so-called
default styles associated with the HTML tags.
For example, we can see that for an <H1> tags styles are set as:
Background:transparent;
Border:0;
Font-size:20px;
Font-weight:bold;
Margin:20px;
If we use just HTML tags this is almost impossible to create Web sites where the content of
HTML documents would be clearly separated from the document's presentation layout. To
solve this problem, the World Wide Web Consortium (W3C) created CSS specifications in
addition to HTML 4.0.

12
Styles in HTML 4.0 define how HTML elements are displayed, and are normally saved in
files external to the HTML document. External CSS files may change the appearance and
layout of a number of HTML documents, just by editing the single CSS file. CSS can save
you a lot of work, if, for example, modifications of visualization rules must be applied to a
number of HTML documents. CSS is a breakthrough in Web design because it allows
developers to control the style and layout of WEB pages. Styles are Inherited, thus
properties set for an HTML element are inherited by all its child-elements, and can be
overridden.
1-10:Inheritance of properties
Multiple Styles cascade Into one, thus, style sheets allow style information to be specified in
many ways. Styles can be specified inside a single HTML element, inside the <head>
element of an HTML page, or in an external CSS file. Even multiple external Style Sheets can
be referenced inside a single HTML document.
What style will be used when
If there is more than one style specified for an HTML element, the styles will "cascade" into a
new "virtual" style sheet by the following rules, where the last rule has the highest priority:
Browser default;
External Style Sheet;
Internal Style Sheet (inside <head> tag);
Inline Style (inside an HTML element)
So, an inline style (inside an HTML element) has the highest priority, which means that it will
override every style declared inside the <head> tag, in an external style sheet, and in a
browser (a default value).
The CSS syntax is made up of three parts: a selector, a property and a value:
selector {property: value}
The selector is the element/tag that is defined, the property is the attribute that is set to a
value. The property and value are separated by a colon and surrounded by curly brackets:
body {color: black}
If the value is multiple words, put quotes around the value:
p {font-family: "sans serif"}
Different properties are separated with a semi-colon. The example below shows how to define
a canter aligned paragraph, with a red text color:
p {text-align: center; color: red}
If a particular property needs to be set for a number of tags, selectors can be grouped into lists
separated with a comma. In the example below, we have grouped all the header elements.
Each header element will be green:

13
h1, h2, h3, h4, h5, h6 { color: green}
With a special class attribute you can define different styles for the same
element. Suppose that you would like to have two types of paragraphs in
your document: one right-aligned paragraph, and one center-aligned
paragraph. Here is how you can do it with styles:
<style>
.right {text-align: right}
.center {text-align: center}
</style>
The class attribute can be added to HTML tags:
<h1 class="center"> Centered <BR>Header</h1>
<p class="right"> This paragraph <BR>will be <BR>right-aligned</p>
<p class="center">This paragraph <BR>will be <BR>center-aligned.</p>
There the following CSS Properties:
font properties
margin and spacing properties
border and padding properties
keeps/breaks
horizontal alignment/justification
etc.
For example:
<style>
.rText {
background-color:#EEEEEE;
margin:25px;
padding:25px;
border: solid 1px blue;
font-family:arial,san-serif;font-size:20px;
text-align: center;
font-weight:bold;
}
</style></head><body>
<p class="rText">Just a sample text</p>

14
1.5.Architecture of Internet-Based Information Systems
WWW is based on the client-server architecture - a client computer sends an HTTP request to
a server, and the server processes the request to generate an HTTP response that, in turn, is
processed by the client. Hence, we can distinguish between two main methods for developing
Web applications:
Server-Side programming
Client-Side programming
Server-site programming is often called "Backend" programming, and deals with developing
software fragments running on the server computer as an extension for functionality of HTTP
server. Typically, an HTTP server gets an HTTP request addressing a particular server-site
software module, from a client. The server parse the request, invoke the required software
module and pass parameters from the HTTP request to such module. The module performs a
necessary data processing algorithm, and generate an response that is send back to the client.
Fig.1-11: Frontend and backend programming
Client-site programming is often called "Frontend" programming, and deals with developing
software fragments running on the client computer as an extension for a particular HTML
document. In a simple case, front end programming just add certain visual effects like pop-
ups, highlights, etc. to an HTML document. In more complex cases, frontend programming
supports a fully fledged graphical user interface (GUI) for a web application, and even
implement a whole data processing circle - generating a request to the server, getting and
parsing response, visualization of the data from the server on the client.
1.6.Backend (Server-Side) Programming
An HTTP server may be seen as a combination of five main components (see Fig. 1-9):
Request scheduler is responsible for building and serving a queue of requests to the
server.
User session manager creates a so-called server sessions - personal memory space for
each client working with the server.
Request Manager retrieves requests from the queue of requests, and process them one-
by-one in context of certain user sessions, and returns resultant data to a client.
Local File System is a tree-like stricture of files and folders available for HTTP
requests. Most requests currently made to WWW servers fetch static data stored in a
portion of the local file system.

15
The CGI interface provides a means for a client to request that an arbitrary program be
executed by the server. The reason for running that program can be to produce side
effects, such as updating a data base or sending e-mail to someone, but more often the
program is run in order to return data directly to the client/user in the form of an
HTML document generated by the program.
Fig.1-12: Components of an HTTP server
The CGI interface provides a very powerful mechanism for building so-called Internet-Based
Information systems. It should be especially noted that CGI applications may communicate
to a file system and other software packages installed on the server (see Fig. 1-10).
For example, CGI scripts may provide an internet access (i.e. WEB interface) to a big local
database, expert system, etc.
Fig.1-13: Architecture of a Web-Based information system
Generally, a CGI script in invoked by an HTTP request looking as follows:
http://[address of the script] ? [extra parameters]
Parameters are passed to a CGI application as a value of special environment variable
"QUERY_STRING". Values are assigned to environment variables by the server before the
CGI program begins execution and, thus, are available to it when it begins.
For example:
http://coronet.iicm.edu/cgi-bin/getMail.cgi?Name=Nick&City=Graz
QUERY_STRING="Name=Nick&City=Graz"
There are three main ways for generating an HTTP request:
Hypertext links;
HTML forms;
Javascript XMLHTTP object.
16
Referencing to WEB resources may be embedded into HTML documents using the tag <a
href="...">. Such hypertext links may address server site scripts, in this case, the request
is generated as a user clicks on an associated anchor. For example,
<a href=
"http://coronet.iicm.edu/cgibin/getMail.cgi?Name=Nick&City=Graz">
Click to get emails</a>
would visualize the anchor "Click to get emails", and send the request with predefined
extra parameters (Name=Nick&City=Graz) to the server "coronet.iicm.edu".
An HTTP request can be generated as a result of processing a so-called HTML form. A form
is defined by the tag <FORM> and terminated by the inverse tag </FORM>. The attributes
of the <FORM> tag includes METHOD and ACTION. For example:
<FORM METHOD="GET" ACTION="http://host/cgi-bin/script_name">
...
</FORM>
METHOD specifies which type of HTTP request will be used to pass the form data to
the server;
ACTION tells the server exactly which script should be invoked.
An HTML form combines a number of interactive user-input elements. Each element defines
a certain parameter of the HTTP request. Obviously values of such parameters can be set
dynamically by end users at run-time. This is a main difference between forms and hypertext
links where extra parameters are defined in advance and cannot be set by end-users.
A form field to request the user to enter text that is to be sent to a server-site script is
introduced by the following tag:
<INPUT TYPE="text" NAME= "Name of the script parameter" .../>
Note that the input data is sent to the server-site script in the form
" Name of the script parameter" = "Entered Value".
The server-site script parse the request, processes the entered data and responds with a new
HTML document.
If a particular form contains multiple elements, the following tag is used to send the input data
to the server-site script:
<INPUT TYPE= "submit" NAME="parameter" VALUE="Value if pressed">
The button will send, in addition to any information entered in the form, the message
"parameter"= "Value if pressed".
For example, the following HTML code:
<form method="get" ACTION="http://host/cgi-bin/script_name">
Parameter 1:<INPUT TYPE="text" NAME= "parameter_1"/><br/>
Parameter 2:<INPUT TYPE="text" NAME= "parameter_2"/><br/>
<INPUT TYPE= "submit" NAME="parameter_3" VALUE="Click Me"/>

17
</form>
defines a form with two text input elements and the "ClickMe" button.
When the user clicks the "submit" button, the browser collects the values of each of the input
fields and sends them to the web server identified in the ACTION keyword of the FORM
open tag. The input values are sent in a form of external parameters. The web server then
passes the parameters to the program identified in the ACTION, using the METHOD
specified.
Implementing a WEB applications using just server-site programming (Fig. 1-10) has a
number of serious disadvantages. Obviously, if all the data processing procedures are
implemented as a number of software modules running on a single server computer,
performance of this server computer becomes a bottleneck for the whole system performance.
In this case, hundreds of more or less powerful client computers simply wait till the single
server process requests, run relevant software modules, and generate output for all clients.
Obviously, data processing algorithms can be implemented on a client computer to equalize a
work load between server and client computers.
As it was mentioned above, this architectural solution supposes that the server generates a
response in a form of HTML file. The HTML file combines requested data and presentation
details (HTML tags) that prescribes how the data should be visualized on a client. Normally,
HTML tags is a substantial part of the whole HTML document. Moreover, in case when the
system functionality require tiny modifications of a user view, for example, adding a line to a
table, pop-up explanatory text, etc. we need to regenerate the whole document and fetch it
again from the server. Thus, we see that our network transactions are overloaded with
presentation details - HTML tags, duplicate HTML fragments, etc.
Note that nowadays, Internet Access is provided from a range of fairly different devices -
desktop computers, laptop computers, tablet PC, Smart phones, eBook readers, etc. Thus, an
Internet Server must analyze parameters of a client, and generates output suitable for this
particular type of a user device. It adds additional work load for the server and overload the
network communication even more. What is perhaps more important, HTTP request contains
only very restricted information on the client that initiated the HTTP request. For example,
there is no information on a screen resolution or additional packages (add-ons) installed on
the client. This information is very important for generating an appropriate user view for this
particular device.
Summarizing, we can say that some data processing procedures must be moved to a client
computer to utilize data processing power of the client workstation, minimize data flow over
the Internet and utilize information on a particular software/hardware of the client computer
for the data processing.
1.7.Frontend (Client-Side) Programming
18
Actually, Internet Browsers are also much more complex software systems than just an
HTML interpreter as we saw it before.
Modern Internet browser allow to use so-called plug-in. Plug ins may run special software
pieces on a client computer as a part of visualization of a particular HTML pages. Nowadays,
watching movies, viewing animations, listening music embedded into an HTML page is a
common case. All these facilities are provided by plug-ins installed on a client computer as
additional components to an ordinary WEB browser.
We will discuss only one particular Plug-In - a so-called Java Run-time Plug-In
(https://www.java.com/de/download/), since it illustrates principles of using other Plug-Ins.
The Java Plug-In needs to be installed on a local computer, and as soon as installed, the
browser obtains a possibility to interpret a so-called Java Applets.
Applets are small software applications implemented in Java. Applets do not run standalone.
Instead, applets comply to a set of conventions that lets them run within a WEB browser. Set
of conventions mentioned above is defined by a special Java class "JApplet". Thus source
code of a Java Class definition that is supposed to implement an applet must begin with the
following declaration:
public class [Name] extends JApplet ...
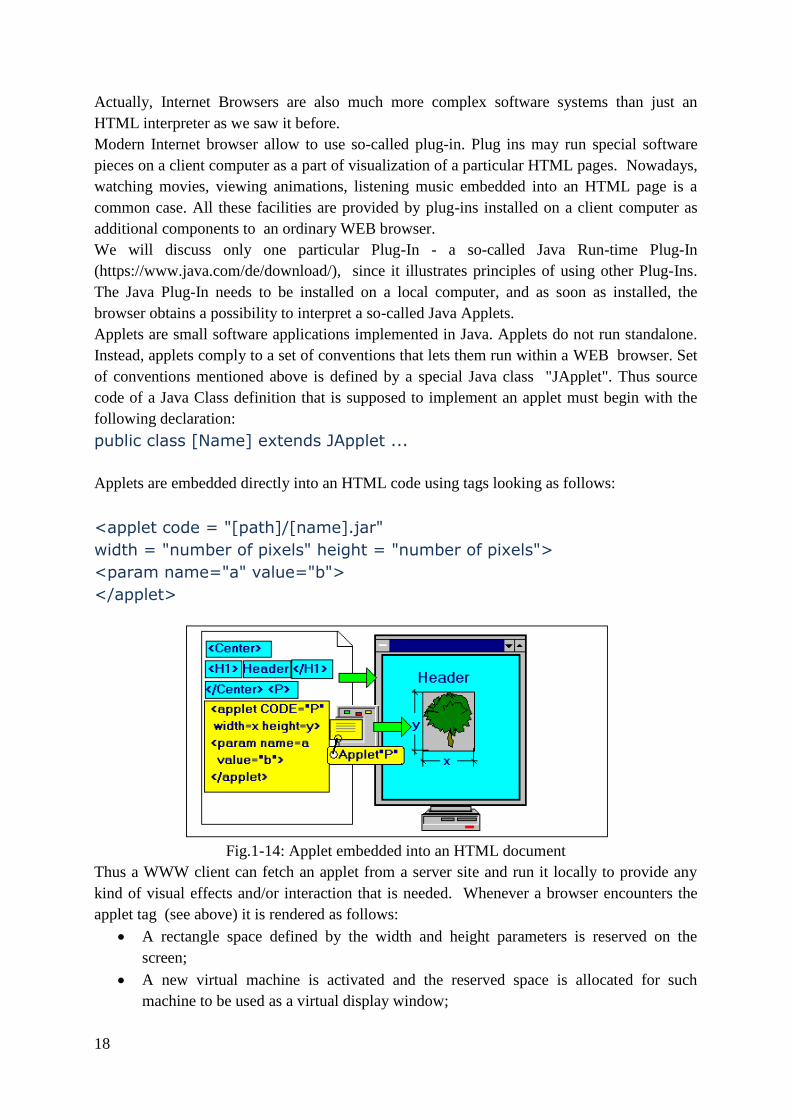
Applets are embedded directly into an HTML code using tags looking as follows:
<applet code = "[path]/[name].jar"
width = "number of pixels" height = "number of pixels">
<param name="a" value="b">
</applet>
Fig.1-14: Applet embedded into an HTML document
Thus a WWW client can fetch an applet from a server site and run it locally to provide any
kind of visual effects and/or interaction that is needed. Whenever a browser encounters the
applet tag (see above) it is rendered as follows:
A rectangle space defined by the width and height parameters is reserved on the
screen;
A new virtual machine is activated and the reserved space is allocated for such
machine to be used as a virtual display window;

19
The code is rendered by the virtual machine using parameters predefined by the applet
tag.
Scripts are just fragments of source code which are embedded directly into HTML
documents. The code is interpreted by the WEB browser as a part of the procedure of the
HTML document visualization. Scripts are embedded using following tags.
<SCRIPT ...>
...
[Source code]
...
</SCRIPT>
In this case, a WEB client does not need to fetch additional files with scripts from the server.
Scripts can be separated from an HTML document and referred to as:
<script src="[path to a script file].js"/>
JavaScript provides all the spectrum of data processing operations: variables, arithmetical,
string operations, control statements, functions, objects, classes, event control, etc.
What is very important from our perspective is a special XMLHTTP JavaScript object that
allows to dynamically (at run-time) generate an HTTP request to a WEB server, and receive a
response from the server to process it locally, on the client site. Thus, JavaScript may fetch
data from a web server and use such data for a client-site data processing.
On the first glance the scripting technique seems to be very similar to applets discussed early.
Fig.1-15: Modifying HTML elements with a Javascript
In reality, these two methods are essentially different:
applets run more or less independently of an HTML document. Browser just allocates
a virtual screen for an applet and let the virtual machine to control it. There is no way
of accessing HTML document elements, or modifying them.
client-site scripts do not have virtual screens, but they can access elements of a current
HTML document to modify them (say, alter links, images, textual fragments, etc.)
HTML documents having embedded JavaScript fragments that modify elements of the
document and, thus, dynamically change appearance of the document (user view), are called
Dynamic HTML (DHTML). We can also say, that DHTML is a technology that combines
HTML and JavaScript languages to control visualization of WEB documents.
Summarising, we can see that
JavaScript is capable of almost any type of data processing operations;
DHTML is capable of visualization of almost any results of data processing.

20
JavaScript is capable of formulating HTTP request to a WEB server, and fetching data
from the server.
The three issues above pave a way to a new architecture of internet-based information
systems called Asynchronous Java and XML (AJAX).
In this case, main components of data processing are implemented on a client-site (Frontend
programming) in a form of a DHTML files (HTML + JavaScript). Client-site scripts send
HTTP requests to a server to fetch data, perform a task-oriented data processing and
dynamically alter the current HTML document to visualize results for the user. The
architecture will be discussed in details in the chapter 4.

21
2.PHP-Hypertext Preprocessor
PHP (recursive acronym for "PHP: Hypertext Preprocessor") is a widely-used Open Source
general-purpose server-side scripting. There are three PHP features that make it, perhaps, a
most popular tool for developing Internet-Based Information systems:
embedding PHP scripts into ordinary HTML pages what allows to combine expressive
power of both languages.
flexible interface to many modern Database Management Systems (MySQL, Oracle,
Sybase, mSQL, Generic ODBC, and PostgreSQL)
possibility to dynamically output different types of files (HTML, XML, CSS,
JavScript, Images, etc.)
2.1.PHP Basics
PHP s what is known as a server-side scripting language. Thus the language interpreter must
be installed and configured on the server before one can execute commands.
Now, we assume that your Web server has the PHP support activated and that all files with
the extension php are handled by PHP interpreter. If that's the case just create .php files, put
them somewhere in your Web server directory and the server will parse them on a request,
outputting whatever the result of the execution may be back to the client. There is no need to
compile anything.
So, let us start, with a file called hello.php that will produce a simple output: "Hello, World"
enclosed by some HTML tags. The code of a PHP script may look as follows:
<html> <head> <title>PHP Test</title> </head> <body>
<B>I say <? PRINT "Hello, World"; ?> </B>
</body> </html>
The PHP interpreter returns the following HTML code:
<html> <head> <title>PHP Test</title> </head> <body>
<B>I say "Hello, World" </B>
</body> </html>
Note that the PHP code is not present in the file returned from the server. PHP instructions are
processed and stripped from the page. PHP preprocessor returns a pure HTML output.
Fragments of PHP code are called place holders, place holders are replaced with a result of
PHP code evaluation that is output by "PRINT" or "ECHO" statements.
For example:
<html> <head> <title>Place Holders</title> </head> <body>
<? PRINT " Place Holder 1"; ?>
<hr>
<? ECHO "Place Holder 2"; ?>

22
</body> </html>
PHP preprocessors recognize three types of tags separating PHP code from pure HTML text.
<? ... ?>
<?php ...?>
<script language="php"> ... </script>
For example, the PHP script may be embedded into HTML using tags looking as follows:
<html> <head> <title>PHP Test</title> </head> <body>
<B>I say
<script language = "php">
PRINT "Hello, World";
</script>
</B>
</body> </html>
2.2.PHP Variables
Variables are named containers to keep values for data processing. Variables are assigned
with the [variable name]=[expression] operator. In PHP, variables do not need to be
declared in advance, variables are always assigned by types of values they get. The value of a
variable is the value of its most recent assignment. Variables in PHP are represented by a
dollar sign followed by the name of the variable. The variable names are case-sensitive. PHP
works with the following types of values.
Integers - for example, 25, 11, 26 ...
Doubles − for example 8.256 or 18,13.
Booleans − either true or false.
NULL − absence of any value.
Strings − sequence of characters, for example 'This is a string'
Arrays − named and indexed set of other values.
Objects − container for other variables and functions that are specific for such objects.
PHP supports an usual set of arithmetical operations: + (plus), - (minus), * (multiply), /
(divide), ++ (increment) and -- (decrement).
For example,
<?
//Integer variables:
$i = 12;
$k = 25;
$i = $i + $k;
echo $i; // outputs - 37
$i = $i - 17;

23
$i = $i / 4:
$i++;
echo $i; // outputs - 6
$A = array(10,20,30); // array of integers
echo $A[1]; // outputs - 20
?>
String values are sequences of symbols placed into single or double quotes. Strings in double
quotes are parsed further, and if the parser find variable names, such names are replaced with
current values of the variables. Strings in single quotes are not parsed further and may contain
any symbols.
For example,
<?
//String variables
$a = "Nick";
$A = "Denis";
echo "$a, $A"; // outputs - Nick, Denis;
echo '$a, $A'; // outputs - $a, $A;
?>
If a string containing double quotes or dollar sign need to be printed, it must be placed into
single quotes or a special escape character must be used.
For example;
echo '<div style="border:solid 1px #cccccc;">';
echo "<div style=\"border:solid 1px #cccccc;\">";
String processing is an important part of developing WEB applications and PHP provides a
rich set of tools for such processing. There is a special operator and assignment statement to
concatenate a number of strings into a new string.
For example,
<?
//String processing
$a = "Nick";
$a = $a . ", Denis"; // concatenation of two strings
echo $a; // outputs - Nick, Denis
$a .= ", Alex"; // concatenation of two strings and assigning result to the
first one
echo $a; // outputs - Nick, Denis, Alex
?>
The following functions might be useful for further processing of string values:
strlen([string]) - gets a string length
strpos([string],[substring]) - gets a position of a substring;

24
str_replace[substring],[substring],[string]) - replaces a substring with another
substring;
substr([string],[position], [length]) - gets a substring starting from a provided
position;
For example,
<?
//String processing
$a = "Nick";
$a .= ", Denis"; // concatenation of two strings
echo $a; // outputs - Nick, Denis
$i = strlen($a);
echo $i; // outputs - 11
$i = strpos($a, "Denis");
echo $i; // outputs - 6
str_replace("Denis","Alex",$a);
echo $a; // outputs - Nick, Alex
$a = substr$a,6,4);
echo $a; // outputs - Alex
?>
2.2.PHP Control Statements
Control statements may change an order in which individual statements, instructions or
function calls are executed. PHP control statements are almost identical to control statements
in C and Java programming languages. The control statements operate with so-called
conditions that may be true or false depending of current values of variables. Conditions
consist of comparisons combined by logical operations. The following comparisons are
supported by PHP: == (equal), != (not equal), > (greater), < (less), >= (greater or equal),
<= (less or equal).
For example,
<?
//comparisons
$a = "Nick";
$b = "Denis";
$a == $b; // false
$a != $b; // true
$i = 22;
$i > 10; // true
$i <= 10; // false
?>
Comparisons may be used as conditions or combined into complex conditions using logical
functions: && (and), || (or), ! (not).

25
For example,
<?
//conditions
$a = "Nick";
$b = "Denis";
$i = 22;
$a != $b && $i <= 10; // false
$a != $b && !($i <= 10); // true
$a != $b || $i <= 10; // true
?>
PHP "if" statement has the following syntax:
if (condition) {code to be executed if condition is true;}
else {code to be executed if condition is false;}
For example,
<?
//if statement
$a = "Nick";
$b = "Denis";
$i = 22;
if($a != $b && $i <= 10){echo 'Condition is true';}
else {echo 'Condition is false';}
?>
the script outputs the "Condition is false" text.
PHP "switch" statement has the following syntax:
switch (n) {
case label1:
code to be executed if n=label1;
break;
case label2:
code to be executed if n=label2;
break;
...
default:
code to be executed if n is different from all labels;
}
For example,
<?
//switch statement
$name = "Hermann";
switch ($name) {

26
case "Nick":
echo "Privet";
break;
case "Hermann":
echo "Servus";
break;
case "John":
echo "Hallo";
break;
default:
echo "Good morning";}
echo " " . $name;
?>
the script outputs the "Servus Hermann" text.
PHP "while" loop statement has the following syntax:
while (condition is true) {code to be executed;}
For example,
<?
$i = 0; // integer
$A = array("First", "Second", "Third");
$length = count($A); // length of the array
while ($i < $length)
{
echo $A[$i];
echo "<br/>";
$i++;
}
?>
The script above outputs the following HTML fragment:
First< br/>Second< br/>Third< br/>
PHP "foreach" loop statement works only on arrays, and has the following syntax:
foreach ($array as $variable) {code to be executed;}
For every iteration, the value of the current array element is assigned to the variable and the
array pointer is moved to a next element, until it reaches the last element.
For example,
<?
$i = 0; // integer
$A = array("First", "Second", "Third");
foreach ($A as $element)
{

27
echo $element;
echo "<br/>";
}
?>
The script above outputs the following HTML fragment:
First< br/>Second< br/>Third< br/>
2.3.Getting parameters
As it was mentioned above, a WEB client sends an information to a remote server by means
of HTTP requests.
There are two types of HTTP requests that are used to communicate to a PHP script:
HTTP GET request;
HTTP POST request.
GET request can be sent using the following mechanisms:
hypertext reference embedded into an HTML file;
HTML form with a parameter method="GET";
XMLHTTP object in JavaScript - xmlhttp.open("GET", ...).
If HTTP GET request is used to send parameters to a server, the parameters are encoded using
a scheme called URL encoding. In this case, parameters are encoded name/value pairs,
different pairs are separated by the "&" sign.
Consider the following hypertext reference:
<a
href="http//[host]/[path]/action1.php?name=Nick&preference=Theater">
Click</a>
The data sent by GET method can be accessed using $_GET superglobal array. Note,
Superglobal variables are always accessible, regardless of scope, that is from any function,
class or file without having to do anything special. Parameters can be retrieved from this array
by their names.
Thus, the HTTP request above is interpreted as follows:
Server creates an $_GET superglobal array, and place two elements:"name" and
"preference" with values received as a part of the request;
Server invokes the script action1.php from the specified directory.
Array elements "name" and "preference" can be processed by PHP imperative
statements as superglobal variables.
For example,
<?
$name = $_GET['name'];
$preference = $_GET['preference'];
echo "Hello, " . $name . "<br/>";
echo "You like $preference.<br/>";
echo "Thank you for your cooperation.";
?>

28
Using GET method require encoding of an HTTP request as a text string that appears in
server logs and in the browser's location address. This situation impose a number of
restrictions:
a whole string representing the request, cannot be longer than 1024 characters
(maximum length of an URL used by browsers).
the method cannot be used to send passwords or other sensitive information to the
server.
the method cannot be used to send binary data ( images, word documents, etc.) to the
server.
The POST method transfers information via HTTP headers. The information is encoded as
described in case of GET method and put into a superglobal array called $_POST.
POST request can be sent using only two mechanisms:
HTML form with a parameter method="POST";
XMLHTTP object in JavaScript - xmlhttp.open("POST", ...).
Consider the following HTML form:
<form action = "action2.php3" method = "POST">
Name: <input type = "text" name = "name" size = "20">
<BR> I prefer:
<select name = "preference">
<option value = Movies>Movies</option>
<option value = Music>Music</option>
<option value = Theater>Theater</option>
</select>
<br/>
<input type = "submit" name="action" value = "Send it" >
</form >
After entering the requested info and pressing "Send it" button. The client will send an HTTP
POST request with three parameters name=[value]&preference=[value]&action=Send+It to
the server:
Server invokes the script action2.php, creates a superglobal array $_POST and place the
elements: "name", "preference" and "action" into the array.
Elements of the array $_POST can be processed by PHP imperative statements as ordinary
superglobal variables.

29
Thus, the script can handle the variables passed from the form mentioned above:
<?
$name = $_POST['name'];
$preference = $_POST['preference'];
$action = $_POST['action'];
echo $name . "[" . $preference . "]";
?>
The POST method does not impose any restriction on a size of data to be sent. The POST
method can be used to send binary data. The data sent by POST method are encoded into
HTTP header and body, so security is defined by a HTTP protocol. Encrypting HTTP
requests (HTTPS protocol) can make sure that the data are protected.
2.4.PHP Functions and Classes
Similar to other programming languages, a PHP function is a piece of code which takes an
input in the form of parameter, does some data processing and returns a value.
A function can return a value using the return statement, as a function returns a value, the
execution of the function is terminated, and returned value is sent back to the calling code.
A function may be defined using the following syntax:
function [name] ([arguments])
{
PHP code to be executed;
return [value]
}
For example, the function "fact" calculates a factorial of any integer sent as parameter, and
returns such calculated value to a calling code.
<?
function fact ($arg)
{
$retval = 1;
var $i = 1;
while ($i <= $arg)
{
$retval = $retval*$i;
$i++;
}
return $retval;
}
?>

30
A PHP function is called simply by its name.
<?
$f3 = fact (3);
echo "$f3"; // outputs 6
?>
By default, arguments are passed to functions by value, that is, as a function is invoked copy
of variables for all parameters are created and get values from original parameters. The copy
of the variable's value is then manipulated by the function without affecting the original value.
<?
function incrementByValue ($arg){$arg++;$arg++;}
$i = 10;
incrementByValue($i);
echo $i; //outputs 10;
?>
It is also possible to pass arguments to functions by reference. In this case, the function gets a
reference to the variable. The variable is directly manipulated by the function. Hence, any
changes of an argument done by the function will change the value of the original variable.
An argument can be passed by reference by adding an ampersand to the variable name in the
function definition.
Following example illustrates the cases.
<?
function incrementByReference (&$arg){$arg++;$arg++;}
$i = 10;
incrementByReference($i);
echo $i; //outputs 12;
?>
Functions create scope for variables. By default, PHP variables are local, that is the variables
are valid only within a particular function, we can say that each function operates with its own
set of internal variables regardless of their names. For example,
<?
$a = 1; /* global scope */
function test(){echo $a; /* reference to local scope variable */ }
test(); // outputs nothing
?>

31
Variables within a function can be declared as global variables. In this case only one copy of
such global variable is used independently of where it is used - within a function or outside.
For example,
<?
$a = 1;
$b = 2;
/* global scope */
function Sum ()
{
global $a, $b;
$b = $a + $b;
}
Sum ();
echo $b; //outputs "3"
?>
Functions may get access to global variables also via a special superglobal array $GLOBALS
where all the values of global variables are available as elements.
For example,
<?
$a = 1;
$b = 2;
/* global scope */
function Sum ()
{
$GLOBALS["b"] = $GLOBALS["a"] + $GLOBALS["b"];
}
Sum ();
echo $b; //outputs "3"
?>
In a similar way, functions make all variables dynamic. That is, if a variable gets an initial
value inside a function, the variable is initiated, and get this initial value every time when the
function is called.
For example,
<?
function test()
{
$a = 0; /* local scope, dynamic*/
/*creates $a, sets $a to 0*/
echo $a; //outputs 0
$a++;

32
}
echo "***First Call=";
test(); //outputs 0
echo "***Second Call=";
test(); //outputs 0
echo "***Third Call=";
test(); //outputs 0
?>
Key word "static" makes certain variables static. A static variable is a variable that doesn't
lose its value when the function exits. That is, a static variable initiated and gets an initial
value when the function is called a first time. All other calls of the same function lets it
operate with the same instance of the static variable.
For example,
<?
function test()
{
static $a = 0; /* local scope, static*/
/*creates $a only in first call of function and every time the test() function
is called, it will print the value of $a and increment it. */
echo $a;
$a++;
}
echo "***First Call=";
test(); //outputs 0
echo "***Second Call=";
test(); //outputs 1
echo "***Third Call=";
test(); //outputs 2
?>
PHP supports rather powerful library of predefined functions. There are functions that you
may use to send emails, open network connections, generate and modify images, calculate
trigonometric functions, etc. A big family of standard PHP functions allows to manipulate
with data residing on different database servers, such as MySQL server, Oracle server, etc.
As a very simple example, we can call a standard PHP function called "date". This function
returns the current date in a specified format:
<?
$today = date("Y-m-d");
echo "Hello, ...";
echo "<br/>";

33
echo "Today is: $today";
?>
PHP class is a combination of so-called private variables (private memory) and a number of
method (functions) operating on such private variables. PHP classes are not executable
entities, a particular instance called an object, must be created before re-using the class
methods.
PHP classes differs from PHP functions in a number of aspects:
there can be multiple instances of a particular PHP class, each instance operates on its
own private memory.,
there may be multiple entry points into a single object called methods;
all methods within a particular object operate on one and the same set of instance
variables.
Multiple instances of a particular PHP class may create problems with addressing variables
and methods having identical names within different instances.
To address a particular variable or method, an asterisk "->" notation is used simila as we
define steps in locating nodes of a tree.
Notation "$this->$var" means start with a current object and then locate a variable $var
inside of this object.
A class is defined using syntax such as the following:
<?
class myVar
{
var $var = 45;
// instance variales
function plus(){
// defining a method "plus"
$this->$var++;
return $var;}
function minus(){
// defining a method "minus"
$this->$var--;
return $var;}
}
Objects are created and methods (functions) are invoked using the following syntax:
<?
class myVar
{
var $var = 45;
function plus(){

34
$this->$var++;
return $var;}
function minus(){
$this->$var--;
return $var;}
}
$a = new myVar();
// create an instance of class "myVar", and let this object be used as a
variable $a
$b = new myVar();
// create another instance of class "myVar", and refer to this object as a
variable $b
echo $a->plus()."\n";
// call the method "plus" of the object "$a"
echo $a->plus()."\n"; // outputs 47
echo $b->plus()."\n";
// call the method "plus" of the object "$b"
echo $b->minus()."\n"; // outputs 45
echo $a->plus()."\n"; // outputs 48
?>
2.5.Interface to a DBMS
Standard PHP distribution comes with a number of standard functions which allow scripts to
communicate to a wide range of currently popular database management systems (DBMS).
There are, for instance, function libraries for manipulating MySQL databases, Oracle
databases, Informix database and others.
Normally a database transactions is carried out as the following sequence of actions:
connect to a DBMS (there may be a DBMS installed on the same server or on another
Internet Server);
select a database (there may be a number of databases accessible via a single DBMS);
send a query as a string to the DBMS;
get a result as an array of tuples;
disconnect;
Consider the following database:
Customer(C#,Cname,Ccity,Phone)
Product(P#,Pname,Price)
Transaction(C#,P#,Date,Qnt)
Suppose, the database is supported by an instance of MySQL DBMS.

35
Fig. 2-2: A sample database
2.5.1. MySQL.* Functions
MYSQL_CONNECT(hostname, user, password) installs a connection between the
script and an DBMS installation where
hostname is a location of the DBMS installation (Local computer in this particular
case);
username and password are credentials to be used to install the connection.
MYSQL_SELECT_DB function selects a particular database supported by the previously
linked DBMS.
MYSQL_QUERY functions sends a certain SQL query defined as a plain string to the linked
DBMS.
A simplest query:
"Get product names for products bought by customer number 1"
is implemented by the following script;
<?
$hostname = "localhost";
$username = "student";
$password = "student";
$dbName = "MyFirm";
// connecting to a DBMS
MYSQL_CONNECT($hostname,$username,$password);
// selecting a database
MYSQL_SELECT_DB("$dbName");
// defining a query as a string "$query "
$query = "SELECT Pname FROM Product,Transaction";
$query .= " WHERE `C#` = 1 AND";
//note using backticks around field names with special characters like "#".
$query .= " Product.`P#` = Transaction.`P#`";
// sending the query to the DBMS
$result = MYSQL_QUERY($query);
?>

36
Obviously, the script can be generalized to allow users to input arbitrary customer number
(C#) and select products bought by this particular customer.
Consider the following HTML form as a user interface:
<form action = "query.php" method = "POST">
Customer: <input type = "text" name = "cnumber" size = "3">
<input type = "submit" value = "Send it!" >
</form >
The script that accepts a customer number from the HTTP requst generated by the form, may
look as follows:
<?
$hostname = "localhost";
$username = "student";
$password = "student";
$dbName = "MyFirm";
$cnumber = $_POST["Cnumber"];
MYSQL_CONNECT($hostname,$username,$password);
MYSQL_SELECT_DB("$dbName");
//defining an SQL query using variable "$cnumber" as a value for C#
$query = "SELECT Pname FROM Product ";
$query = "$query WHERE `P#` IN";
$query = "$query (SELECT `P#' FROM Transaction WHERE `C#` =
$cnumber)
$result = MYSQL_QUERY($query);
?>
From a programmer's point of view, the query result is a two-dimensional table where
rows are addressed by an index columns are addressed by an unique name
For example, consider the following script:
<?
$hostname = "localhost";
$username = "student";
$password = "student";
$dbName = "MyFirm";
MYSQL_CONNECT($hostname,$username,$password);
MYSQL_SELECT_DB("$dbName");
$query = "SELECT * FROM Product";

37
$result = MYSQL_QUERY($query);
?>
Variable $result is a two-dimensional table that may look as follows:
The table can be processes by means of two functions:
MYSQL_NUMROWS returns a total number of the table rows
MYSQL_RESULT returns a value of particular table element
Thus,
MYSQL_NUMROWS($result) returns "2"
MYSQL_RESULT($result, 0, "Pname") returns "CPU"
MYSQL_RESULT($result, 1, "P#") returns "2"
MYSQL_RESULT($result, 1, "Price") returns "1200"
To conclude the example, the result should be returned to the client in a form of a correct
HTML file.
<?
...
$cnumber = $_POST["Cnumber"];
$query = "SELECT Pname FROM Product ";
$query = "$query WHERE `P#` IN";
$query = "$query (SELECT `P#' FROM Transaction WHERE `C#` =
$cnumber)
$result = MYSQL_QUERY($query);
$r = MYSQL_NUMROWS($result);
$i = 0;
if ($r == 0){echo "Customer $cnumber bought no products";}
else
{
echo "Customer $cnumber bought the following products<ul>";
while ($i < $r)
{
$p = MYSQL_RESULT($result, $i, "Pname");
echo "<li> $p";
$i++;
}
echo "</ul>";
}
?>

38
Database can be updated in a very similar way. Let us consider adding new tuples to the
relation "Product", and the following HTML form as a user interface
<form action = "update_product.php" method = "POST">
<b><CENTER>PRODUCT:</CENTER></b>
Number: <input type = "text" name = "Pnumber" size = "3">
Name: <input type = "text" name = "Pname" size = "20">
Price: <input type = "text" name = "Price" size = "6">
<input type = "submit" value = "Send it!" >
</form >
The script below:
connects to the database;
forms an INSERT SQL statement using values received from the HTTP request;
sends the statement to the DBMS, and receives a status value as a result.
<?
$hostname = "localhost";
$username = "student";
$password = "student";
$dbName = "MyFirm";
$Pnumber = $_POST["Pnumber"]; $Pname = $_POST["Pname"]; $Price =
$_POST["Price"];
MYSQL_CONNECT($hostname,$username,$password);
MYSQL_SELECT_DB("$dbName");
$statement = "INSERT INTO Product";
$statement = "$statement VALUES('$Pnumber', '$Pname', '$Price')";
$status = MYSQL_QUERY($statement);
?>
2.5.2. MySQLI.* Functions
The MYSQL_* functions have a number of disadvantages and currently are in process of
replacement with more advanced MYSQLI_* functions. Note that MYSQL_CONNECT
connects the whole PHP script to a single DBMS that makes process of working with
different DBMS installations or different databases rather cumbersome.

39
MYSQLI_CONNECT(hostname, user, password, database) installs a connection
to a particular DBMS and returns a link (variable) that can be used to communicate to this
particular database.
MYSQLI_QUERY functions sends a certain SQL query defined as a plain string using the
particular link to the database.
The previously discussed query:
"Get product ids, names and prices for products bought by customer having a number lower
than 3" is implemented by the following script;
<?
$hostname = "localhost";
$username = "student";
$password = "student";
$dbName = "MyFirm";
// connecting to a database
$link = MYSQLI_CONNECT($hostname,$username,$password,$dbName);
// defining a query as a string "$query "
$query = "SELECT * FROM Product,Transaction";
$query .= " WHERE `C#` < 3 AND";
//note using backticks around field names with special characters like "#".
$query .= " Product.`P#` = Transaction.`P#`";
// sending the query to the DBMS
$result = MYSQLI_QUERY($link, $query);
?>
Variable $result is a two-dimensional table that may look as follows:
The table can be processes by means of two functions:
MYSQLI_NUM_ROWS returns a total number of the table rows
Thus,
MYSQL_NUMROWS($result) returns "2"
MYSQLI_FETCH_ASSOC($result) iterates through the resultant table and returns an
individual row on each step.
The previously mentioned sample script returning SQL query results as an HTML file, may
be redefined using MYSQLI_* functions as follows:
<?
...
$link = MYSQLI_CONNECT($hostname,$username,$password,$dbName);
$cnumber = $_POST["Cnumber"];
$query = "SELECT Pname FROM Product ";

40
$query = "$query WHERE `P#` IN";
$query = "$query (SELECT `P#' FROM Transaction WHERE `C#` =
$cnumber)
$result = MYSQLI_QUERY($link, $query);
$r = MYSQLI_NUMROWS($result);
$i = 0;
if ($r == 0){echo "Customer $cnumber bought no products";}
else
{
echo "Customer $cnumber bought the following products<ul>";
while ($oneRow = MYSQLI_FETCH_ASSOC($result))
{
$p = $oneRow["Pname"];
echo "<li> $p";
}
echo "</ul>";
}
?>
2.5.2. MySQLI.* Prepared Statements
Prepared statements are used to manage variable parts of an SQL query and to prevent a so-
called SQL injections. Consider the same query:
"Get product ids, names and prices for products bought by customer having a number lower
than 3" is implemented by the following script;
<?
$hostname = "localhost";
$username = "student";
$password = "student";
$dbName = "MyFirm";
// connecting to a database
$link = MYSQLI_CONNECT($hostname,$username,$password,$dbName);
// defining a query as a string "$query "
$query = "SELECT * FROM Product,Transaction";
$query .= " WHERE `C#` < ? AND";
//note using a question mark instead of a variable inside an SQL query.
$query .= " Product.`P#` = Transaction.`P#`";
//now we can compile the query for a particular database (link)
// in advance before a real execution:
$pquery = MYSQLI_PREPARE($link, $query);
// now we can replace a previously defined "?" values

41
// with a real parameter or constant
// this is called binding of parameters
$cnumber = $_POST["Cnumber"];
MYSQLI_STMT_BIND_PARAM($pquery, "i", $cnumber);
//finally we can execute the prepared statement as follows:
MYSQLI_STMT_EXECUTE($pquery);
?>
In the prepared query:
SELECT * FROM Product,Transaction WHERE `C#` < ? ...,
we have one parameter “?” to change,
MYSQLI_STMT_BIND_PARAM($pquery, "i", $cnumber);
but if we have more than one, we would specify all the variable types one after the other. If
we need an integer, a string and another integer, the call of the function would look like:
MYSQLI_STMT_BIND_PARAM ($pquery, ‘isi’, $integer, $string, $integer).
Next, we’ll execute the query and bind the result of that query to 3 different variables, one for
the product id, product name and price.
MYSQLI_STMT_EXECUTE($pquery);
MYSQLI_STMT_BIND_RESULT($pquery, $pID, $pName, $pPrise);
Finally we can iterate through the resultant table and output the bound values from each row.
echo "<table>";
while (MYSQLI_STMT_FETCH($pquery))
{
echo "<tr><td>$pID</td>";
echo "<td>$pName</td>";
echo "<td>$pPrise</td></tr> ";
}
echo "</table>";

42
3.Java Servlets
Servlets is another technology that is used to develop WEB applications. Servlets use Java
language as a server-site programming tool. Servlets are small pieces of software that:
are implemented in Java;
are invoked as a server gets an HTTP request;
generate output that is sent back to a client as an HTTP response.
Technically, a servlet is a Java program (Java class) and therefore needs to be instantiated and
executed in a Java VM. The service that loads Servlets and run them is called a servlet
engine.
The servlet engine loads the servlet class as the servlet is requested. Actually the servlet is
multi-threaded object, but we can see it as a normal Java class, that creates a new instance as a
new HTTP request needs to be processed.
Fig.3.1: Servlet in context of a Servlet Engine
Java Servlets are classes that extend a class named HttpServlet. HttpServlet implements
the Servlet interface plus a number of convenience methods. Methods in HttpServlet
corresponds to HTTP request methods that can be used to invoke the servlet and send
parameters to the servlet. Depending on the type of HTTP request it's supposed to process
(GET, POST, etc.) a specific method for each type (doGet, doPost, etc.) is called.
The doGet and doPost methods have two special parameters: HttpServletRequest and
HttpServletResponse.
The objects of class HttpServletRequest give programmers a full access to all
information about the request. The objects of class HttpServletResponse provide
facilities to define a response to the request (HTTP response).
3.1.Basic Principles
The process of receiving HTTP request and generating HTTP response may be described as
follows. When a Servlet Engine receives an HTTP request:
Engine creates a new instance (object) of class HttpServletRequest. The object
supports an interface to read incoming HTTP headers (e.g. cookies) and parameters
(e.g. data the user entered and submitted)
Engine also creates a new instance (object) of class HttpServletResponce. The
object supports an interface to specify the HTTP response line and headers.
Engine creates a new instance (object) of a specified servlet (must be sub-class of
abstract class HttpServlet). The object supports a number of special methods (e.q.
doGet, doPost , etc.).

43
Engine sends doGet or doPost message to the servlet object with
HttpServletRequest and HttpServletResponse objects as parameters.
The servlet object runs the doGet or doPost method which reuse methods defined
for HttpServletRequest and HttpServletResponse objects.
Fig.3.2: Components of a Java Servlet
Developing a Servlet may be seen as the following sequence of steps.
Programmer defines a new sub-class of the abstract data class HttpServlet.
Programmer implements the methods doGet, doPost, doDelete, etc .
Programmer re-use public interface of classes HttpServletRequest and
HttpServletResponse to get HTTP parameters and to form an HTTP response.
Typically a servlet implementation consists of the following blocks:
//import of all classes that are needed for the implementation:
import javax.servlet.ServletException;
import javax.servlet.http. HttpServlet;
import javax.servlet.http. HttpServletRequest;
import javax.servlet.http. HttpServletResponse;
import javax.servlet.http.HttpSession;
import java.io.IOException;
import java.io.PrintWriter;
//Declaration of the servlet name and inheritance from the abstract class HttpServlet
public class myServlet extends HttpServlet{
// Declaration of the method doGet that is initiated as servlet receives a GET request
// Note that parameters of the method are instances of classes HttpServletRequest
// and HttpServletResponse referred to as variables request and responce.
public void doGet(HttpServletRequest request, HttpServletResponse
response)
throws ServletException, IOException{

44
// Code implementing functionality of the method doGet
// Use "request" to read incoming parameters, e.g. request.getParameter("query");
// Use "response" to write text into body of HTTP response
PrintWriter writer = response.getWriter();
writer.println("<html>");
}}
A simplest "Hello World" servlet might look as follows:
import javax.servlet.ServletException;
import javax.servlet.http. HttpServlet;
import javax.servlet.http. HttpServletRequest;
import javax.servlet.http. HttpServletResponse;
import javax.servlet.http.HttpSession;
import java.io.IOException;
import java.io.PrintWriter;
public class helloServlet extends HttpServlet{
public void doGet(HttpServletRequest request, HttpServletResponse
response)
throws ServletException, IOException{
String hello = "Hello World";
response.setContentType("text/html");
PrintWriter writer = response.getWriter();
writer.println("<html>");
writer.println("<head>");
writer.println("<title>" + hello + "</title>");
writer.println("</head>");
writer.println("<body>");
writer.println(hello);
writer.println("</body></html>");
}}
3.2.Processing HTTP Request
Consider the following HTTP request:
http://[host]/[path]/myServlet?name=Nick&preference=Theater
The request sends two parameters: name and preference, the parameters can be processed
using methods defined for instances of the HttpServletRequest class. For instance,
getParameter([argument]) - takes a parameter name as an argument. This method
returns a String if the parameter with the specified name exists, otherwise null is returned.

45
Now we can easily implement a servlet that takes parameters from a GET request.
import ...
public class myServlet extends HttpServlet{
public void doGet(HttpServletRequest request, HttpServletResponse
response)
throws ServletException, IOException{
response.setContentType("text/html");
PrintWriter writer = response.getWriter();
String name = request.getParameter("name");
String preference = request.getParameter("preference");
writer.println("<html><head><title>Accept Parameters</head>");
writer.println("<body>");
writer.println( "hello " + name + ". You prefer " + preference);
writer.println("</body></html>");
}}
Generally "httpServletRequest" object supports the following interface for processing
parameters:
getParameter([argument]) - takes a parameter name as an argument. This
method returns a String if the parameter with the specified name exists, otherwise null
is returned.
getParameterValues([argument]) - takes a parameter name as an argument.
Generally, a parameter may have multiple values. In that case, the method
"getParameter" returns just first value. The method "getParameterValues" returns an
array of Strings if the parameter with the specified name exists, otherwise null is
returned.
getParameterNames() - returns an iterator over the names of all parameters.
Thus, we might use this method get all names of parameters first, and then obtain
values of parameters by means of "getParameter/getParameterValues".
The following servlet processes any parameters submitted by users.
import ...
public class helloServlet extends HttpServlet{
public void doGet(HttpServletRequest request, HttpServletResponse
response)
throws ServletException, IOException{
response.setContentType("text/html");
PrintWriter writer = response.getWriter();

46
writer.println("<html><head><title>All Parameters</head><body>");
Enumeration parameters = request.getParameterNames();
while(parameters.hasMoreElements()){
String key = (String) parameters.nextElement();
String value = request.getParameter(key);
writer.println("Parameter " + key + "=" + value + "<BR>");
}
writer.println("</body></html>");
}}
3.3.HTTP Header
An HTTP header is a collection of fields looking as a pair " key = value". All fields are
optional. These pairs specify meta-information: information about the HTTP request/response
content. The most important fields are:
Content-Type
Content-Transfer-Encoding
Content-Encoding
For example, Content-Type="text/html" tells that content should be processed as an HTML
file. Similarly, Content-Type="text/xml" tells that the content should be processes as a valid
XML file.
Note, HTTP headers are parts of both HTTP request and HTTP response.
httpServletRequest object supports a number of methods for reading such Header
fields.
httpServletResponse object, in turn, supports a number of methods for setting
Header fields for a new HTTP response.
A request header field can be read using simple request.getHeader(key) method. A
response header field can be set using simple response.set(key, value) method.
For example,
import ...
public class myServlet extends HttpServlet{
public void doGet(HttpServletRequest request, HttpServletResponse
response)
throws ServletException, IOException{
// Setting a header field
response.setContentType("text/html");
PrintWriter writer = response.getWriter();
// Reading header parameters
String host = request.getHeader("host");
String browser = request.getHeader("user-agent");
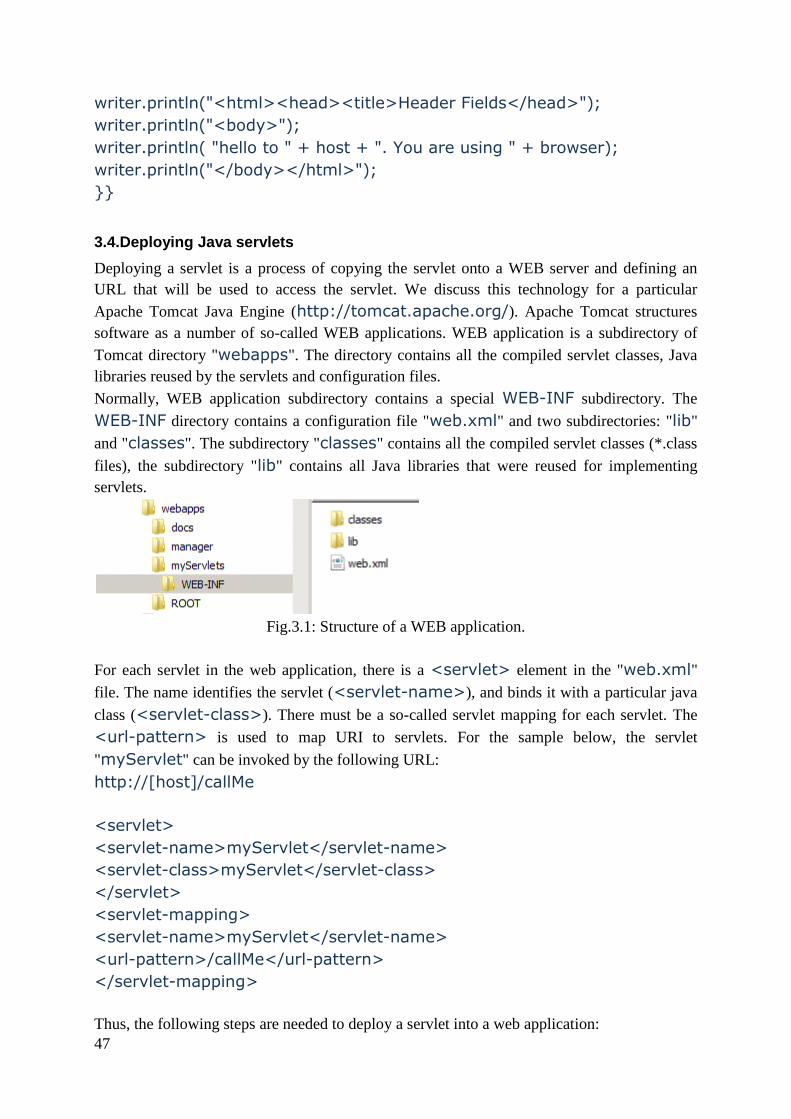
47
writer.println("<html><head><title>Header Fields</head>");
writer.println("<body>");
writer.println( "hello to " + host + ". You are using " + browser);
writer.println("</body></html>");
}}
3.4.Deploying Java servlets
Deploying a servlet is a process of copying the servlet onto a WEB server and defining an
URL that will be used to access the servlet. We discuss this technology for a particular
Apache Tomcat Java Engine (http://tomcat.apache.org/). Apache Tomcat structures
software as a number of so-called WEB applications. WEB application is a subdirectory of
Tomcat directory "webapps". The directory contains all the compiled servlet classes, Java
libraries reused by the servlets and configuration files.
Normally, WEB application subdirectory contains a special WEB-INF subdirectory. The
WEB-INF directory contains a configuration file "web.xml" and two subdirectories: "lib"
and "classes". The subdirectory "classes" contains all the compiled servlet classes (*.class
files), the subdirectory "lib" contains all Java libraries that were reused for implementing
servlets.
Fig.3.1: Structure of a WEB application.
For each servlet in the web application, there is a <servlet> element in the "web.xml"
file. The name identifies the servlet (<servlet-name>), and binds it with a particular java
class (<servlet-class>). There must be a so-called servlet mapping for each servlet. The
<url-pattern> is used to map URI to servlets. For the sample below, the servlet
"myServlet" can be invoked by the following URL:
http://[host]/callMe
<servlet>
<servlet-name>myServlet</servlet-name>
<servlet-class>myServlet</servlet-class>
</servlet>
<servlet-mapping>
<servlet-name>myServlet</servlet-name>
<url-pattern>/callMe</url-pattern>
</servlet-mapping>
Thus, the following steps are needed to deploy a servlet into a web application:
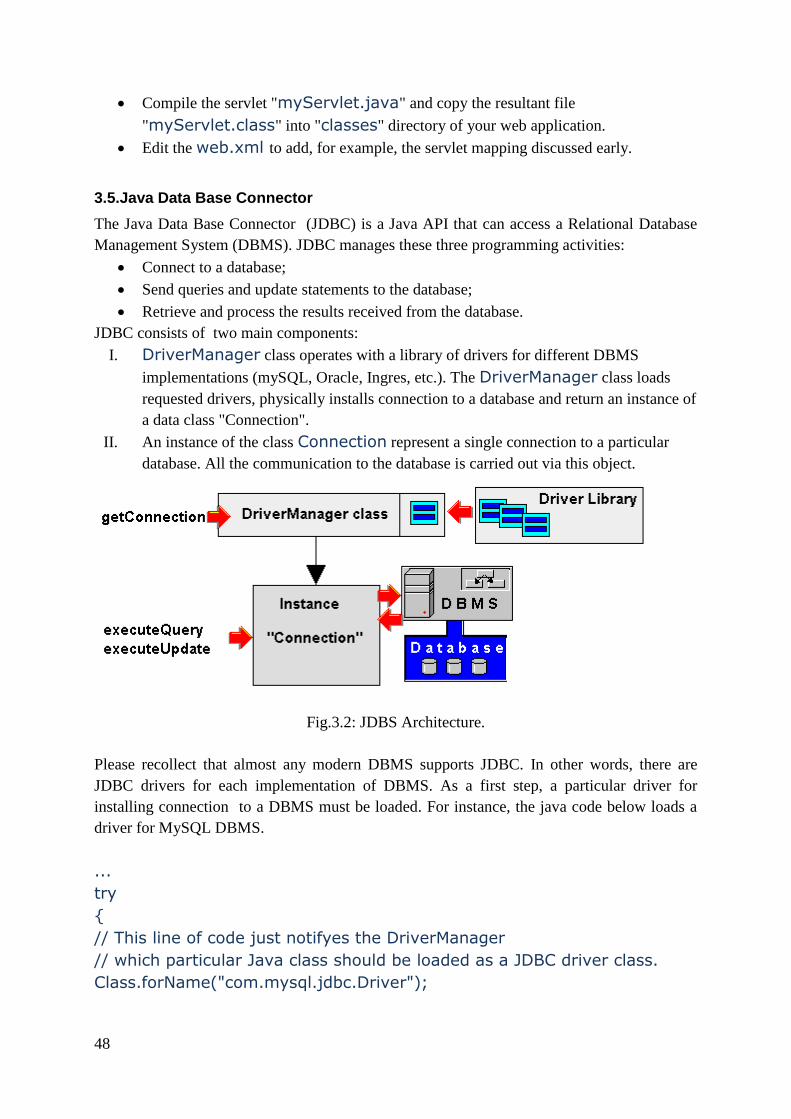
48
Compile the servlet "myServlet.java" and copy the resultant file
"myServlet.class" into "classes" directory of your web application.
Edit the web.xml to add, for example, the servlet mapping discussed early.
3.5.Java Data Base Connector
The Java Data Base Connector (JDBC) is a Java API that can access a Relational Database
Management System (DBMS). JDBC manages these three programming activities:
Connect to a database;
Send queries and update statements to the database;
Retrieve and process the results received from the database.
JDBC consists of two main components:
I. DriverManager class operates with a library of drivers for different DBMS
implementations (mySQL, Oracle, Ingres, etc.). The DriverManager class loads
requested drivers, physically installs connection to a database and return an instance of
a data class "Connection".
II. An instance of the class Connection represent a single connection to a particular
database. All the communication to the database is carried out via this object.
Fig.3.2: JDBS Architecture.
Please recollect that almost any modern DBMS supports JDBC. In other words, there are
JDBC drivers for each implementation of DBMS. As a first step, a particular driver for
installing connection to a DBMS must be loaded. For instance, the java code below loads a
driver for MySQL DBMS.
...
try
{
// This line of code just notifyes the DriverManager
// which particular Java class should be loaded as a JDBC driver class.
Class.forName("com.mysql.jdbc.Driver");

49
}
catch(ClassNotFoundException exc){exc.printStackTrace();}
...
The next step in establishing a database connection is a message to the driver requesting
actual connection to the DBMS. The operation is carried out by sending message
getConnection to the driver manager, that returns a Connection instance that is used for
further operations with the database.
...
try
{
Class.forName("com.mysql.jdbc.Driver");
Connection connection_;
String dbms = "jdbc:mysql://" + host + "/" + db;
connection_ = DriverManager.getConnection(dbms, username,
password);
}
catch(ClassNotFoundException exc){exc.printStackTrace();}
...
The method getConnection(...) accepts three arguments:
A so-called Database URL, which encoded using standard URL syntax (protocol +
host + object). The protocol part starts always with "jdbc:" followed by the name of
the RDBMS (in our case "mysql") and terminated with "://" symbols. Thus, the
protocol part in our example is "jdbc:mysql://". The host part identifies a server
where the DBMS is running. In our case (Servlets engine & DBMS are on the same
computer) "localhost" can be used to identify the host. Finally, the name of a
particular database must be supplied proceeded with the slash character. In our case
this would be "/example".
A registered username that has the proper privileges for manipulating the database.
A password valid for the username.
3.6.Working with a Database
In order to actually work with a database by sending SQL statements to the DBMS, a special
Statement class is used. Instances of the Statement class are created by means of the
method createStatement() of the previously created JDBC connection.
...
try
{
Connection connection_;
String dbms = "jdbc:mysql://" + host + "/" + db;
50
connection_ = DriverManager.getConnection(dbms, username,
password);
// creating an instance of the Statement class
Statement statement = connection_.createStatement();
}
catch(SQLException exc) { exc.printStackTrace(); }
...
If an error occurs during the execution of the createStatement() method, a
SQLException is thrown.
Instances of the Statement Class provides a public interface to insert, update, or retrieve
data from a database. Depending on a particular database operation, an appropriate method
should be invoked. For instance,
executeUpdate(...) can be used to insert data into a relation
executeQuery(...) can be used to retrieve data from a database
...
String table = ...;
String values = ...;
try
{
String insert_sql_stmt = "INSERT INTO " + table + " VALUES(" + values
+ ")";
statement.executeUpdate(insert_sql_stmt);
}
catch(SQLException exc){exc.printStackTrace();}
...
A programmer may use parameters to adjust functionality of the executeUpdate method.
For example, if we need to retrieve keys automatically generated by the executeUpdate
method, we need to add the Statement.RETURN_GENERATED_KEYS argument to the
parameters of the method executeUpdate.
...
try
{
String sql = "INSERT INTO " + table + " VALUES(" + values + ")";
statement.executeUpdate(sql, Statement.RETURN_GENERATED_KEYS);
ResultSet keys = statement.getGeneratedKeys();
}
catch(SQLException exc){exc.printStackTrace();}
...

51
Please note that the example is written without taking into account a so
called "SQL Injection". ...
To comprehend the basic principles of "SQL Injection", consider the following code:
...
response.setContentType("text/html");
PrintWriter writer = response.getWriter();
String cn = request.getParameter("customerID");
String customerName = request.getParameter("customerName");
String customerCity = request.getParameter("customerCity");
try
{
String insert_sql = "INSERT INTO Customer ";
insert_sql += "VALUES('" + cn + "','" + customerName + "','" +
customerCity + "')";
statement = connection.createStatement();
statement.executeUpdate(insert_sql);
...
suppose the user pass a string like this
1','1','1'); DELETE FROM Transaction;
as a value for the parameter customerId (cn). Obviously the string insert_sql will look as:
INSERT INTO Customer VALUES('1','1','1'); DELETE FROM Transaction; '...' ...';
All the tuples of the relation "Transaction" will be deleted !
To prevent such SQL injection, so-called prepared statements can be used. In
this, case, SQL query is not defined as a string containing the source text. SQL
query is a prepared statement with a number of parameters that can be set at
run-time.
...
response.setContentType("text/html");
PrintWriter writer = response.getWriter();
String cn = request.getParameter("customerID");
String customerName = request.getParameter("customerName");
String customerCity = request.getParameter("customerCity");
try
{
String insert_sql = "INSERT INTO Customer " ;
insert_sql += "VALUES(?,?,?)";
PreparedStatement statement =
connection.prepareStatement(insert_sql);
statement.setString(1, cn);
statement.setString(2, customerName);

52
statement.setString(3, customerCity);
statement.executeUpdate();
...
Similarly, to retrieve data from a database we need to obtain an instance of the Statement
class, and then to invoke executeQuery() method on this instance. The method
executeQuery(...) takes a string containing SQL source a parameter.
...
try
{
String sql = "SELECT ...";
ResultSet query_result = statement.executeQuery(sql);
}
catch(SQLException exc){exc.printStackTrace();}
...
Note, that the executeQuery(...) parameter must be a valid SQL Select statement.
The executeQuery(...) method returns an instance of the ResultSet class.
This instances may be seen as a number of rows (tuples) that hold the current results.
The number and type of columns in this object corresponds to the number and types of
columns returned as the result from the database system.
Consider the following sample database:
Customer( cn,cname,ccity);
Product( pn,pname,pprice);
Transaction( cn,pn,tdate,tqnt);
The executeQuery command
String sql = "SELECT * FROM Customer;";
ResultSet query_result = statement.executeQuery(sql);
results in obtaining an instance of the ResultSet class which will hold all tuples from the
Customer table as rows, each row will contain 3 values: "cn", "cname" and "ccity".
Normally, the SQL statement explicitly defines the ResultSet internal structure.
Consider the following sample database:
Customer( cn,cname,ccity);
Product( pn,pname,pprice);
Transaction( cn,pn,tdate,tqnt);
Suppose, data on transactions committed by customers from city "Graz", are retrieved using
the following java code:

53
String sql = "SELECT cname, pname, qnt";
sql = sql + " FROM Customer, Product, Transaction";
sql = sql + " where Customer.ccity = \"Graz\" And";
sql = sql + " Customer.cn = Transaction.cn And";
sql = sql + " Transaction.pn = Product.pn";
ResultSet query_result = statement.executeQuery(sql);
The executeQuery command results in obtaining an instance of the ResultSet class
populated with a number of rows. Each row contains 3 values: "cname", "pname" and
"qnt".
The code above can be generalized to retrieve information on transactions committed by
customers from a particular city. A particular city name is send to the servlet as a parameter of
an HTTP request called "customerCity".
...
response.setContentType("text/html");
PrintWriter writer = response.getWriter();
String customerCity = request.getParameter("customerCity");
try
{
String sql = "SELECT cname, pname, qnt";
sql = sql + " FROM Customer, Product, Transaction";
sql = sql + " where Customer.ccity = " + customerCity + " And";
sql = sql + " Customer.cn = Transaction.cn And";
sql = sql + " Transaction.pn = Product.pn";
ResultSet query_result = statement.executeQuery(sql);
}
From a programmer's perspective, an instance of the ResultSet class is an iterator over the
rows it keeps. There is always the current row, and only the data from the current row can be
retrieved on each step of the iteration.
The iteration cursor is moved to a next row by means of the next() method. At the
beginning, the current row is not set, hence, the next() method should be invoked before
obtaining data from the first row.
...
String customerCity = request.getParameter("customerCity");
try
{
String sql = "SELECT cname, pname, qnt";
sql = sql + " FROM Customer, Product, Transaction";
sql = sql + " where Customer.ccity = " + customerCity + " And";
sql = sql + " Customer.cn = Transaction.cn And";

54
sql = sql + " Transaction.pn = Product.pn";
ResultSet query_result = statement.executeQuery(sql);
// iteration over rows of the resultant set
while(query_result.next())
{
...
}
...
Once a current row of the ResultSet is set, individual values can be accessed by means of a
number of methods. The methods correspond to a column type. Thus, to retrieve a value of a
string column, a getString() method should be used. Similarly, to retrieve an integer value
a getInt() method is appropriate.
...
response.setContentType("text/html");
PrintWriter writer = response.getWriter();
String customerCity = request.getParameter("customerCity");
try
{
String sql = "SELECT cname, pname, qnt";
sql = sql + " FROM Customer, Product, Transaction";
sql = sql + " where Customer.ccity = " + customerCity + " And";
sql = sql + " Customer.cn = Transaction.cn And";
sql = sql + " Transaction.pn = Product.pn";
ResultSet query_result = statement.executeQuery(sql);
while(query_result.next())
{
String customerName = query_result.getString("cname");
String productTitle = query_result.getString("pname");
int productQuantity = query_result.getInt("qnt");
...
}
...
}

55
4.Document Object Model and Java Script
JavaScript is a cross-platform, object-oriented scripting language. It is a compact but
powerful language working inside a web browser. JavaScript contains a standard library of
objects, such as Array, Date, and Math, and a core set of language elements such as variables,
operators, control statements, functions and objects. JavaScript provides convenient tools to
control a browser and its Document Object Model (DOM).
For example, JavaScript allows an application to modify elements of a HTML document, add
new elements, respond to user actions such as pressing a key, manipulating with a mouse,
scrolling a page, etc.
JavaScript is standardized at Ecma International — the European association for standardizing
information and communication systems. This standardized version of JavaScript, called
ECMAScript, the script behaves the same way in all applications that support the standard.
There are two main reasons for embedding JavaScript code into HTML pages:
dynamic generation of HTML fragments directly on a client-site
dynamic manipulation with elements of the HTML document (so-called Dynamic
HTML)
4.1.Java Script Basics
JavaScript is a client-side scripting language. Hence, JavaScript fragments are embedded
directly into an HTML document, and are interpreted by the browser at the same order as
other components of the HTML document. JavaScript fragments are enclosed into HTML by
means of
<SCRIPT>...</SCRIPT> or
<SCRIPT LANGUAGE="JavaScript">...</SCRIPT>
tags.
For example:
<html>
<head>
<title>Java Script Test</title>
</head>
<body>
<B>I say
<SCRIPT LANGUAGE="JavaScript">
// JavaScript Code
document.write("\"Hello, World\"");
</SCRIPT>
</B>
</body>
</html>
The document will be displayed as:
I say "Hello, World"

56
JavaScript can visualize data for users in different ways:
Writing into an alert box, using window.alert(...).
Writing into the HTML output using document.write(...).
Writing into the browser console, using console.log(...).
Using dynamic HTML (will be discussed in chapter 4.3).
Writing into HTML output may be seen as server-side implementation of the placeholder
concept. An HTML fragment is evaluated, stripped from rhe document, and replaced with the
document.write(...) output.
<SCRIPT>
// Placeholder to be replaced with "Hello, World" text.
document.write("\"Hello, World\"");
</SCRIPT>
Writing into an alert box pops up a modal dialog box containing the text provided as a
parameter.
<SCRIPT>
//The broser pops up the text "Hello, World", and stops the script execution till
//the user clicks "Ok" button..
window.alert("\"Hello, World\"");
</SCRIPT>
4.2.JavaScript Variables and Literals
JavaScript operates with five types of literals:
Boolean. true and false.
null. A special keyword denoting a null value.
undefined. Meaning that the value is undefined.
Number. 25 or 5.789. Numbers are written with or without decimals.
String. Strings are text, written within double or single quotes: "Alex Hill", 'This is a
string'.
Variables as symbolic names for values (containers). The names of variables, called
identifiers, must conform to certain rules.
A JavaScript identifier must start with a letter, underscore (_), or dollar sign ($); subsequent
characters can also be digits (0-9). Because JavaScript is case sensitive, letters include the
characters "A" through "Z" (uppercase) and the characters "a" through "z" (lowercase).
In JavaScript, variables may be simply declared by the keyword "var". Types of variables in
JavaScript are dynamical. That means that the data type of a variable does not need to be
specified when the variable is declared. Data types are converted automatically as needed
during script execution.
<SCRIPT LANGUAGE="JavaScript">
var myDocument;
var sring_1;
var Array_1;
var a23;

57
var pi;
</SCRIPT>
A variable can be explicitly created as objects of a particular class, or via assigning values.
For example:
<SCRIPT LANGUAGE="JavaScript">
//creating variables as instances of objects
var myDocument = new Object();
var sring_1 = new String();
//creating variables by assigning values
var A = new Array("First","Second","Third");
var al = 3;
var pi = 3.14;
var string_1 = "This is a string";
</SCRIPT>
JavaScript supports an usual set of arithmetical operations: + (plus), - (minus), * (multiply), /
(divide), ++ (increment) and -- (decrement). For example,
<SCRIPT>
var1 = 4 + 6;
var1 = var1 * 8;
var2 = var1 / 20;
var1++;
alert(var1); /* outputs 81 */
var2--;
alert(var2); /* outputs 5 */
</SCRIPT>
If a string in double quotes contains double quotes it must be placed into single quotes or a
special escape character must be used. Similarly, if a string in sungle quotes contains single
quotes it must be placed into double quotes or a special escape character must be used,
For example;
<script>
var s1 = '<div style="border:solid 1px #cccccc;">';
var s2 = "<div style=\"border:solid 1px #cccccc;\">";
var s3 = "<div style='border:solid 1px #cccccc;'>";
var s4 = '<div style=\'border:solid 1px #cccccc;\'>';
...
</script>
JavaScript provides powerful facilities for string processing. There is a special operator ("+")
to concatenate strings into a new string. For example,
<script>
var s1 = "First" + "Second";

58
s1 = s1 + "\+" + "Third";
alert(s1); /* outputs "FirstSecond+Third" */
</script>
The length of a string is provided by the built in property length. The indexOf() and
lastIndexOf() methods return the position of the first occurrence (indexOf) or the last
occurrence (lastIndexOf) of a specified text in a string. The indexOf() method may define
a beginning position for searching a position as a second parameter. For example,
<script>
var x = "this.is my.file.doc";
alert(x.indexOf('.')); /* outputs 4 */
alert(x.indexOf('.',5)); /* outputs 10 */
alert(x.lastIndexOf('.')); /* outputs 15 */
</script>
The search() method searches a string for a specified value and returns the position of the
match. search() is almost equal to indexOf(), but the search() method can take a
regular expression as a search value.
A regular expression is a common pattern of a sequence of characters.
in a simplest case any string can be seem as pattern for this string.
var patt = /is/;
The patt variable matches any occurrence of the substring "is".
To define a range of characters on a particular position, brackets are used.
For example
[abc] any character "a", "b" or "c"
[^abc] any character that is not "a", "b" or "c"
[0-9] any character that is greater or equal to "0" and less or equal to "9"
[^0-9] any character that is less or equal to "0" and greater or equal to "9"
Quantifiers define a possibility to repeat a template: The "+" quantifier allows to repeat a
pattern any number of times. In a similar way, the "*" quantifier allows to repeat or omit the
pattern.
For example, /This is [a-z,A-Z,0-9]*/
The pattern matches any string that looks as "This is [any string of characters and numbers]".
Metacharacters are combination of characters that have a special meaning in patterns:
. a single character, except newline or line terminator
\w any word character
\W any non-word character
\d a digit
\D a non-digit character
\s a whitespace character
\S a non-whitespace character

59
For example, /[A-Z][a-z, 0-9]*\s/ matches any word consisting of Latin characters and
digits till a whitespace character, first latter must be a capital Latin character..
A part of a string can be extracted using the substring([start], [end]) method. The
method returna a substring of the original string that starts from [start] position and ends on
[end] position. If the [end] parameter is omitted, the string length is used instead.
<script>
var x = "this.is my.file.doc";
alert(x.substring(2,7)); /* outputs "is.is" */
alert(x.substring(11),x.length);/* outputs "file.doc" */
alert(x.indexOf('.',5)+1); /* outputs "file.doc" */
alert(x.substring(x.indexOf('.',5)+1, x.lastIndexOf('.')));
// outputs "file"
</script>
The replace() method is used to replace a specified substring with another substring in a
string. The replace() method can also replace a substring matching a regular expression with
another string. By default, the replace() function replaces only the first match. To replace all
matching substrings, use a regular expression with a "g" flag (for global search). To replace a
string ignoring a text case, use a regular expression with a "i" flag (for ignore case).
<script>
var x = "this.is my.IS.doc";
//Replacing a string
alert(x.replace("is","=")); /* outputs "th=.is my.IS.doc" */
// Replacing a string matching the regular expression
alert(x.replace(/is/g,"="));/* outputs "th=.= my.IS.doc" */
alert(x.replace(/is/gi,"="));/* outputs "th=.= my.=.doc" */
</script>
Assignment operator ("=") assign values to JavaScript variables. The assignment operator
may be combined with arithmetical or string concatenation operators:
x +=y is equal to x = x + y;
x -=y is equal to x = x - y;
x *=y is equal to x = x * y;
x /=y is equal to x = x / y;
<script>
var doc = new Object();
var s = '';
var A = new Array("First","Second","Third");
var a = 0;
s += A[i] +'-'; i++;
s += A[i] +'-'; i++;
s += A[i] +'-'; i++;
60
alert(s); /* outputs "First-Second-Third-" */
</script>
4.3.JavaScript Control Statements
JavaScript supports all the usual comparison operators:
"==" (equal to),
"===" (equal value and equal type),
"!=" (not equal),
"!==" (not equal value or not equal type),
">" (greater than),
"<" (less than),
">=" (greater than or equal to),
"<=" (less than or equal to).
<script>
alert(23 > 12.34); /* outputs "true" */
alert("s1" == "s1"); /* outputs "true" */
alert("a1" <= "b1"); /* outputs "true", lexicographic comparison */
alert("25" == 25); /* outputs "true", equal values */
alert("25" === 25); /* outputs "false", different types*/
</script>
JavaScript control statements are almost identical to control statements in C and Java
programming languages.
The JavaScript "if" statement is used to specify a block of JavaScript code to be executed if a
condition is true.
if (condition) { code to be executed if the condition is true;}
else { code to be executed if the condition is false;}
<script>
var A = new Array("First","Second","Third");
if (A.length >= 3)
{alert('Array A consists of 3 elements or more');}
else { alert('Array A consists of less than 3 elements');}
</script>
The JavaScript "switch" statement is used to specify multiple blocks of JavaScript code to be
executed under different conditions (cases). The syntax of the operator is depicted below.
switch(expression) {
case value1:
JavaScript code 1;
break;
case value2:

61
JavaScript code 2;
break;
...
default:
JavaScript code n;
}
For example,
<script>
var A = new Array("First","Second","Third");
switch (A.length)
{
case 1: alert('Array A consists of 1 element');}
break;
case 2: alert('Array A consists of 2 elements');}
break;
default: alert('Array A consists of 3 elements or more');}
}
</script>
The JavaScript "for" statement is used to a loop controlled by an integer variable. The syntax
of the operator is depicted below.
for ([initial value]; [condition]; [increase/decrease value]) {
//JavaScript Code;
}
Initially, the loop variable gets an initial value. On each step of the loop, the value of the
variable is increased/decreased and the loop is repeated if the condition is true;
<script>
var A = new Array("First","Second","Third");
for (var i=0; i < A.length; i++) {
document.write(A[i] + "<br/>");
}
</script>
The script fragment outputs following HTML encoding::
First<br/>
Second<br/>
Third<br/>
The while loop iterates through a block of code as long as a specified condition is true.
while (condition) {
//JavaScript Code;
62
}
For example,
<script>
var doc = new Object();
var s = new String();
var A = new Array("First","Second","Third");
var al = 3;
i = 0;
while (A[i] != "Third"){
document.write(A[i] + '<br/>' + '\n');
i++;
}
</script>
The script fragment outputs following HTML encoding::
First<br/>
Second<br/>
The JavaScript exceptions (run-time errors) can be processed using the following operator
"try" :
try {
// Main JavaScript code
} catch (e) {
// code to be executed in case of an exception in main code
} finally {
// code to be executed in any case "try" or "catch".
}
The exception object ("e") has the following properties:
name - short name of the exception
message - detailed explanation
For example,
Try{a = b.getType();}
catch(e){alert("An exception " + e.name + '" occured!")}
4.4.JavaScript Functions and Classes
A Java Script function may be defined using syntax such as the following:
functionName(parameter1, parameter2, parameter3) {
//code to be executed;
}
Consider, for example, a function "fact" that calculates and returns a value of factorial of any
integer passed as an argument "arg".

63
<script>
function fact (arg)
{
var retval = 1;
var i = 1;
while (i <= arg){
retval = retval*i;
i++;
}
return retval;
}
</script>
There three ways to invoke a Java Script function:
to call it from another a JavaScript code simply by its name;
to activate a hypertext link pointing to the function;
to associate the function with an event;
For example, the function fact can be called with different parameters using the code below:
<script>
document.write("Factorial(3)=" + fact(3) + "<br/>");
document.write("Factorial(5)=" + fact(5) + "<br/>");
document.write("Factorial(7)=" + fact(7) + "<br/>");
</script>
The code above outputs the following HTML fragment:
Factorial(3)=6<br/>
Factorial(5)=120<br/>
Factorial(7)=5040</br>
A function may be called by activating a hypertext link pointing to the function. Consider, for
example, the following function:
<script>
function factAlert(arg)
{
retval = 1;
i = 1;
while (i <= arg){retval = retval*i; i++;}
alert(retval);
}
</script>

64
The function can be invoked, for instance, by means of the following hypertext link:
<a href="javascript:factAlert(3)">Click</A>
As the "Click" anchor is clicked by a user, the browser will alert the value 6 (factorial(3)).
Finally, a JavaScript Event model (see Chapter 4.5) can be used to call functions.
Consider the following HTML form:
<form>
<input type="button" value="Calculate" onClick="factAlert(5)">
</form>
The form prescribes to call the function factAlert(5) as a user clicks on the button
"Calculate".
If a function is called with missing some arguments, the values of missing arguments are set
to: undefined. For example:
<script>
function mySubstring(myString,p1,p2)
{
var i = 0;
if(p1 != undefined)i = p1;
var j = myString.length;
if(p2 != undefined)j = p2;
return myString.substring(i,j);
}
var x = '012345'
alert(mySubstring(x,2,4)); /*outputs "23" */
alert(mySubstring(x,2)); /*outputs "2345" */
alert(mySubstring(x)); /*outputs "012345" */
</script>
JavaScript pass arguments to a function by values, that is any modifications on arguments
done inside a function does not have any effect on variables used as arguments.
<script>
function modifyString(myString)
{
myString = '6789';
}
var x = '012345'
modifyString(x);
alert(x); /*outputs "012345" */
</script>
Please note, if you pass a reference to an object (variable referring an object) as an argument
to a JavaScript function, the function does not create a copy of the object, but use the
reference to the object. Thus, the function can use methods of the object defined outside of the
function.

65
If a variable is defined outside of a function (or any other closure), it is called a global
variable. Global variables belong to the window object. Global variables can be manipulated
by all scripts and functions on this page. If a variable defined inside a function, the variables
are called local variables. Local variables can be accessed only inside the function.
Global variables can be used (and changed) by all scripts in the page (and in the window).A
function can access all variables defined inside the function, like this:
<script>
var a = 5; /* global variable */
function myFunction1() {
var a = 4; /* local variable */
alert( a * a) /*outputs 16 */;
}
function myFunction2() {
alert( a * a) /*outputs 25 */;
}
myFunction1();
myFunction2();
</script>
JavaScript allows to define classes to have multiple instances of functions and variables. The
keyword "this" is used to distinguish multiple variables having one and the same name.
this.[variable] means a variable inside of the current instance of the class. Methods are
defined as instance variables having a function as a value.
<script>
function Pet(name){
this.name = name;
this.type = "Cat";
this.getInfo = function() {
return this.type + ' ' + this.name;
};
this.getName = function() {
return this.name;
};
}
</script>
Functions assigned to instance variables can be defined separately, see below.
<script>
function Pet(name){
this.name = name;
this.type = "Cat";
this.getName = getCatName;
this.getInfo = getCatInfo;
66
}
function getCatInfo() {
return this.type + ' ' + this.name;
}
function getCatName() {
return this.name;
}
</script>
Instances of such classes (objects) are created by means of the keyword "new", methods are
called as [object].[function].
<script>
var p1 = new Pet("Max");
alert(p1.getInfo()); /*outputs "Cat Max" */
alert(p1.getName());/*outputs " Max" */
var p2 = new Pet("Tiggi");
alert(p1.getInfo()); /*outputs "Cat Tiggi" */
alert(p1.getName());/*outputs " Tiggi" */
</script>
Fragments of JavaScript code can be defined dynamically and evaluated with special
operators "eval(["code"])" and "setTimeout(["code"],[miliseconds]);
In the first case, the statement eval("a = 2*2") simply calculates the expression 2*2 and
assign the result to a global variable "a". In the second case, the statement setTimeout("a =
2*2",1000) will do the same, but with a delay 1 second. Obviously, results of the eval
operation are available for operators following the "eval" operation, results of
"setTimeout" are not available and simply define a schedule for evaluating the statement on
some later time.
In this script, the setTimeout statement is often used inside a function to arrange a loop
with calling this function again. Of course, such call can be implemented as a simple
recursion, but if a call must be done with some delay to let browser complete some other
operations, for example, drawing a picture on the screen, setTimeout can be used. For
example,
function moveIt()
{
...
// the function calls itself till the condition is true
if([condition])setTimeout("moveIt()",50);
}
4.5.JavaScript Event Model
An HTML event is fired up if a user or browser does a certain action..Typical HTML events
are as follows:

67
onLoad - page has been loaded;
onChange - HTML element (for example, input field) was changed;
onClick - HTML element (for example, hypertexr anchor) was clicked;.
onMouseover - a cursor is moved over an HTML element;
onKeydown - a keyboard key was pushed.
JavaScript can execute a code when a particular event is detected (fired up). Many HTML
elements have attributes where event handlers can be added.
<some-HTML-element some-event="some JavaScript function">
In the following example, an onClick and onChange event handlers are added to the form
input element.
<form name="X">
<input name="a" type="text" value="My Text" size=20"
onChange="checkValue()">
<input name="b" type="button" value="Display" onClick="display()">
</form>
Event handlers can be also added to HTML elements using a so-called HTML Document
Object Model (HTML DOM), see the next chapter.
4.6.Document Object Model
When a modern Internet Browser parses an HTML document, it builds a so-called Document
Object Model (DOM).
The document is considered to be an hierarchy of HTML objects. Each object belongs to a
particular class (table, header, form, image, applet, etc.) and may consist of other objects
(Children).
Fig.4.1.: Document Object Model
Each HTML object has
a unique identifier (name or index);

68
a collection of properties (position, coordinates, size, visibility, background, border,
etc.);
a number of methods which are used to access/modify the properties.
Object properties are inherited along the object hierarchy.
Consider, for example, an HTML form as below:
<form name="X">
<input name="a" type="text" value="My Text" size=20"
onChange="CheckIt()">
<input name="b" type="button" value="Display" onClick="display()">
</form>
The DOM hierarchy is depicted on the Fig.4-2. This HTML document consists of the form
"X". The form "X", in turn, consists of two input elements - "a" and "b".
Fig.4.2.: Sample Document Object Model
Properties of objects can be accessed by a Java Script using the following notation:
[Object].[Property]. There are different ways of addressing a particular object in the
DOM hierarchy. We can use names of nodes on the path to a particular node as a unique
address. For example, to address the input element "a", we can write: "document.X.a",
meaning - to find this node, the browser can start from the root element "document", then go
to form "X", and then to input "a".
For example:
<script>
function display()
{
alert("document.X.a.value=" + document.X.a.value);
alert("document.X.b.value=" + document.X.b.value);
}
</script>
Author of the HTML document can assign unique identifies to some nodes by means of "ID"
attribute of a corresponding tag.
<form name="X">
<input name="a" id ="firstInput" type="text" value="My Text" size=20"

69
onChange="CheckIt()">
<input name="b" id ="secondInput" type="button" value="Display"
onClick="display()">
</form>
In this case, JavaScript uses a special method of the document object
getElementById("...") to address such DOM elements. Thus, the function "display"
can use the "ID" attribute as below:
<script>
function display()
{
var a = document.getElementById("firstInput");
// variable "a" keeps a reference to the object with id "firstInput"
var b = document.getElementById("secondInput");
// variable "b" keeps a reference to the object with id "secondInput"
alert("firstInput=" + a.value);
alert("secondInput=" + b.value);
}
</script>
In a similar way, objects can be identified as elements of an array of objects defined with a
certain tag. For example, the document property getElementsByTagName("input")
returns an array of all objects defined using the "input" tag. All the objects are placed into this
array in the same order as they appear in the document. Thus, the notation
document.getElementsByTagName("input")[0]
refers to the first object "input" in the HTML document.
It should be especially noted that properties of objects can be dynamically modified.
Modification of object properties usually change appearance of the document on the user
screen. Thus, we can say that JavaScript can modify user view and, thus, define a user
interface along with interactive HTML objects and event handlers. Object properties are
modified using the following notation: [Object].[Property] = [Value]
For example,
<form name="X">
<input name="a" type="text" value="My Text" size=20">
<input name="b" type="button" value="Display" onClick="modifyIt()">
</form>
<SCRIPT>
function modifyIt()
{
var txt = document.X.a.value;
// copying property "value" to the JavaScript variable
document.X.b.value=txt;

70
// modifying property "value"
document.X.a.value='Done';
}
</SCRIPT>
Initially the form is visualized as the text input field with initial value "My Text", and the
button "Display".
The script "ModifyIt" changes the form appearance, and the form is visualized as below.
The HTML tag <div>...</div> allows to combine a number of HTML elements into a new
"div" DOM element having certain properties and possibly an unique "id".
For example, below a number of HTML elements (hypertext link, image and text) are
combined into a single DOM element with new position, background and identity.
<DIV ID="Y" STYLE="position:absolute; background:#FFFF00; left:100;
top:300;">
<A HREF="javascript:modify()"><B>My Animated Object</B>
<IMG SRC="lesson08/batter.gif" Border=0></A>
</DIV>
Java Script can dynamically modify properties of such compound "div" object.
<SCRIPT>
var x,y;
var o = new Object();
function modify(){
o = document.getElementById("Y");
x = 100; y = 400;
o.style.left = x + 'px'; o.style.top = y + 'px';
// placing the object on a start position with coordinates
// 100 pixels from the left, and 400 pixels from the right
move();}
function move(){
// placing the object of a position defined by "offset" variables "x" and "y"
o.style.left = x + 'px'; o.style.top = y + 'px';
// setting new values of the "offset" variables and
//calling the function "move" again
if (x <= 200){x++;y--;setTimeout("move()",20);}
}
</SCRIPT>

71
In this particular case, the function "move" modifies properties of the "div" object - set new
values for offset from the top and offset from the left, and, thus, animate the compound
object.
One of the most useful properties of such "div" DOM element is called "innerHTML", the
property provides access to the HTML source of all objects combined into the "div" object.
For example, for the "div" element "Y" above, the code:
<script>
o = document.getElementById("Y");
alert(o.innerHTML);
</script>
will output the following HTML text.
<A HREF="javascript:modify()"><B>My Animated Object</B>
<IMG SRC="lesson08/batter.gif" Border=0></A>
In a similar way we could define content of the "div" element dynamically at run-type by
setting the property "innerHTML" in the function "move".
<SCRIPT>
var x,y;
var o = new Object();
function modify(){
o = document.getElementById("Y");
// dynamical setting of the content for the element "Y".
var htmlTXT = 'Modifyed Object<br/>';
htmlTXT += '<img src="new_picture.jpg">';
o.innerHTML = htmlTXT;
x = 100; y = 400;
o.style.left = x + 'px'; o.style.top = y + 'px';
// placing the object on a start position with coordinates
// 100 pixels from the left, and 400 pixels from the right
move();}
...
}
In this case, the object will change its appearance before starting the animation.
Java Script can dynamically define a style of "div" objects along with adding/modifying
HTML fragments.
The code below allows to display any messages ([text]) on the user screen with a particular
offset from left [position-x] by calling the function "myBox([text],[position-x])"
<script>
function myBox(xX,posX)
{
var xlayer = document.getElementById("Level2_1");

72
// setting properties of the "div" object
xlayer.style.left=posX + 'px';
xlayer.style.top=15 + 'px';
xlayer.style.width= 100 + 'px';
xlayer.style.height= 100 + 'px';
xlayer.style.background = "#cccccc";
xlayer.style.visibility='visible';
// setting content of the "div" object
xlayer.innerHTML=xX;
}
myBox ("my first message",55);
</script>
<div id=" Level2_1" style="position:absolute;visibility:hidden;"></div>
JavaScript can dynamically modify HTML DOM itself by adding/removing HTML objects.
New Objects are created by means of the "createElement([tag])" method of the
"document" object. To insert the newly created object into a document DOM, and
appendChild method can be applied to an existing DOM element.
For example,
<script>
// defining event handler for a mouse click
window.onmouseup = processClick;
globalI = 0;
function processClick(tE)
{
globalI++;
// defining coordinates of a mouse click
try{ mouseX = tE.pageX; mouseY = tE.pageY;}
catch(e){mouseX = event.clientX; mouseY = event.clientY;}
// creating a new "div" element
var x=document.createElement("div");
// adding the element to the DOM.
document.getElementsByTagName("body")[0].appendChild(x);
// setting properties and content of the "div" element.
x.className="layer" + globalI.toString();
x.style.width="80px";
x.style.height="20px";
x.style.position="absolute";
x.style.top=mouseY;
x.style.left=mouseX;
x.style.background = "yellow"
x.style.border="solid #000000 1px";

73
x.innerHTML = '<center>Element:' + globalI.toString() + '</center>';
}
</script>
The script above will create new "div" objects (yellow bordered boxes) for each mouse click.
Thus, we have got very powerful facilities for visualizing results of JavaScript data processing
by means of manipulation with HTML objects in the DOM.
4.7.Sending HTTP requests from JavaScript
JavaScript may send HTTP requests to a server to fetch data and process the response from
the server.
The process consists of the following steps:
1. First, an instance of special class XMLHttpRequest is created
var xmlhttp = new XMLHttpRequest();
2. Then, a connection to a particular server is installed by means of the method "open", the
method can install a connection using an HTPP method "GET" or "POST". Second
parameter of the metod is an URL of a server-side script or applet that is supposed to
process this request.
xmlhttp.open("GET/POST", [url], true);
3. The third parameter of the method "open" defines a communication mode to be used,
"true" means that an asynchronous mode is used. Asynchronous mode means that the
browser sends an HTTP request and continue execution of the script. As soon as the
browser gets an HTTP response from the server, a special procedure is called. This
procedure must be set as a value of instance variable "onreadystatechange".
xmlhttp.onreadystatechange=function() {code to be executed}
The function for the response processing may use methods "responseText" and
"readyState" of the xmlhttp object to get the response text and a code representing a
current state of the connection.
Finally, the method "send" can be used to actually send an HTTP request to the server.
xmlhttp.send([argument])
The argument of the method "send" may be "null" if the method "GET" is used, or a string
or file in case of "POST" method.
For example, we can implement a generic JavaScript function that sends HTTP GET requests
to certain URLs and calls a special function for processing responses "serverSend([url],
[function])" as follows:
function serverSend (pX, fX){
var xmlhttp = new XMLHttpRequest();
var url = pX;
xmlhttp.open("GET", url,true);
xmlhttp.onreadystatechange=function() {
if (xmlhttp.readyState==4) {

74
// the "readyState property represents the state of the connection
lastSearch= xmlhttp.responseText;
eval(fX);}}
xmlhttp.send(null);
}
An HTML page that reuse the function "serverSend(...)" to display an output from a
particular server-side script, may look like this:
<html><head>
<script>
var lastSearch; /*global variable to pass text of an HTTP responce.
function displayIt(){
o=document.getElementById("placeD");
o.innerHTML = lastSearch;
}
</script></head><body>
<a href='javascript:serverSend("getTime.php","displayIt()")'>Send
request</a>
<div id="placeD"></div>
</body></html>
4.8.Programming Asynchronous Applications.
Generally, programming asynchronous functions is rather tedious work since each
asynchronous call is splitting into a number of branches that are splinted into a number
branches in turn. Modern programming practice offers to use so-called promises.
A Promise is an object representing the eventual completion or failure of an asynchronous
operation. A promise has 3 states. They are:
promise is pending;
promise is resolved;
promise is rejected.
The promise can be seen as a function that has two other JavaScript functions (resolve, reject)
as parameters and call the first function in case the promise is resolved, the second function is
called if the promise is rejected. A JavaScript function dealing with asynchronous calls may
return a promise as a result, and, thus, create a special single point for processing the
asynchronous call. For example,
function getJsonAsync(url) {
return new Promise(function (resolve, reject) {
// the function returns the Promise
// that requires two functions: one for success, one for failure
var xhr = new XMLHttpRequest();
xhr.open('GET', url);
xhr.onload = () => {
if (xhr.status === 200){resolve(xhr.response);}
// will call the first function as ready

75
else { reject("Error 1");}
// will call the second function as ready
}
xhr.onerror = () => {
reject("Error 2");
};
xhr.send();
});
}
Promises are used as objects via the property “then”. For example,
getJsonAsync(“myFile.json”).then(successCallback(), failureCallback());
the above notation sets the particular functions that will be called as the promise is resolved or
failed.
The above notation can be written also as:
getJsonAsync(“myFile.json”).then(successCallback(),null)
.then(null, failureCallback())
Note that the arguments to then are optional, and catch(failureCallback) is short for
then(null, failureCallback). Hence, the final notation may look as:
getJsonAsync(“myFile.json”).then(successCallback).catch(failureCallback);
getJsonAsync("myFile.json").then(json => {
var result = JSON.parse(json);
alert(result.toString());
}).catch(error => {
alert(error);
});
4.9.AJAX Architecture of Internet-Based Information Systems.
Asynchronous Java And XML (AJAX) is a novel architecture for developing Internet-Based
Information Systems. Essentially, AJAX has the following features that differ this
architecdture from conventional WEB-based applications.
data transfer between client and server as an essential part of page visualization;
transferring only data without presentation specifications (not using HTML for client-
server communication).
visualization of data received from the server without reloading a whole HTML page.
This, AJAX WEB application architecture can be seen as follows:

76
Fig. 4.3: AJAX Architecture
The AJAX application always consists of two software packages - server-side and client-side.
Client-side software is implemented as a collection of client-side scripts (JavaScript)
combined with HTML documents. Server side software is a set of server-side scripts or
servlets. Client-side and server-side packages agree on a certain communication protocol, we
can also say that the server side package provide an interface that is used by client-side
package.
The system works like this:
1. A DHTML web page is loaded from the server and visualized on the user screen.
2. The page generates an HTTP request to the server using XMLHTTPRequest object
as a result of a user action (for example, clicking an anchor or button, moving cursor,
typing a text, etc.)
3. Server-side component receives the request, parse it, access the database, and
generates an HTTP response.
4. Client-side script gets the response, parses it and visualizes the received data using
DHTML (for example, innerHTML method of a "div" object).
5. Now, the process can be repeated starting from the step 2.
As we can see from the name of this architectural solution, initially XML format was
considered to be a primary way of communication between client-side and server-side
components. There were even attempts to develop a generic XML based format to be used as
an common protocol fot communication between AJAX components. Such attempts as
Remote Procedure Call (RPC) or Simple Object Access Protocol (SOAP) will be discussed in
chapters on XML.
Here we will discuss only somewhat simpler protocols - REST and JSON.
The acronym REST stands for Representational State Transfer, this basically means that all
the necessary parameters for calling a server-side component are encoded into an URL.
For example, the URL

77
http://coronet.iicm.edu/wbtmaster/getListOfStudents?course=706045
calls a servlet "getListOfStudents" and the servlet needs just one parameter
(course=706045) that is encoded into the URL.
JSON ( JavaScript Object Notation) operates on so-called JSON objects. JSON Object is a
named collection key/value pairs, the pairs are separated with commas and placed in curly
brackets. JSON's basic types are:
• Number (for example 2, 18, 356.12, etc.)
• String (sequence of symbols placed in double quotes, for example "this is string")
• Boolean (true or false)
For example,
{
"firstName": "Denis",
"familyName": "Codd",
"age": 35,
"teacher":true
}
JSON Objects may be components of other JSON Objects.
Object sample:
{
"Person":
{
"firstName": "Denis",
"familyName": "Codd",
"age": 35,
"Address":
{
"street":"Inffeldgasse",
"city":"Graz",
"state":"Styria",
"postalCode":"A-8010"
},
"PhoneNumbers":
{
"home":"8735618",
"fax":"8735699"
}
}
}
JSON arrays are written inside square brackets. Just like JavaScript, a JSON array can contain
multiple objects:

78
JSON Array sample:
{
"Person":
{
"firstName": "Denis",
"familyName": "Codd",
"age": 35,
"Income": [10000,12000,14000]
"Holiday":
[{"from":"01.01.2016","till":"07.01.2016"},
{"from":"21.06.2016","till":"27.06.2016"}]
}
}
Javascript provides a special object ("JSON") for parsing JSON strings and creating
JavaScript JSON objects. JavaScript JSON objects allows to read all the JSON elements as
the object properties.
<script>
var json1 = '{"firstName": "Denis", "familyName": "Codd", "age": 35,
,"teacher":true}',
obj1 = JSON.parse(json1);
alert(obj1.firstName + ' ' + obj1.familyName + ' (' + obj1.age + ')');
</script>
The script above outputs the "Denis Codd (35)" string.
Recollect that JSON object may contain other JSON objects as elements, in this case, the
properties of objects may be objects in turn.
<script>
var json2 = '{"Person":{"firstName": "Denis","familyName":
"Codd","age": 35,';
json2 += '"Address":';
json2 +=
'{"street":"Inffeldgasse","city":"Graz","state":"Styria","postalCode":"A-
8010"},';
json2 += '"PhoneNumbers":';
json2 += '{"home":"873 56 18","fax":"873 56 99"}';
json2 += '}}'
obj2 = JSON.parse(json2);
obj_Person = obj2.Person;
// property obj2.Person is a JSON object in turn
obj_address = obj_Person.Address;
// property obj_Person.Address is a JSON object as well
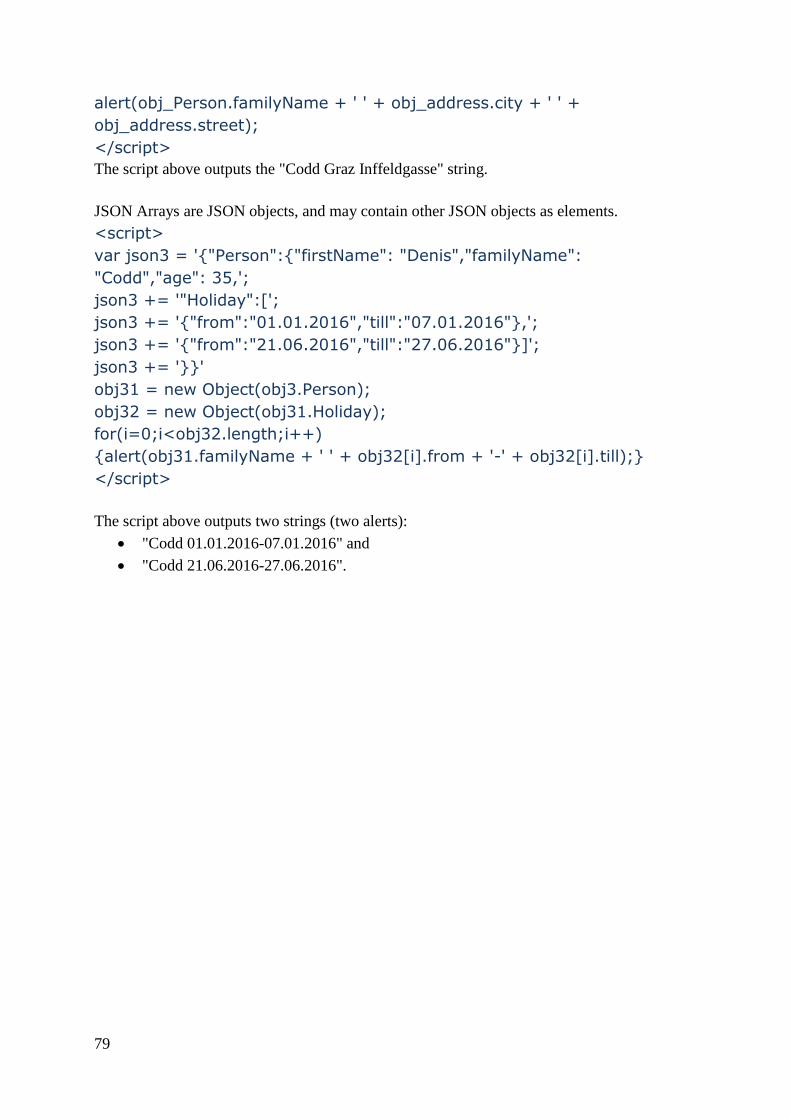
79
alert(obj_Person.familyName + ' ' + obj_address.city + ' ' +
obj_address.street);
</script>
The script above outputs the "Codd Graz Inffeldgasse" string.
JSON Arrays are JSON objects, and may contain other JSON objects as elements.
<script>
var json3 = '{"Person":{"firstName": "Denis","familyName":
"Codd","age": 35,';
json3 += '"Holiday":[';
json3 += '{"from":"01.01.2016","till":"07.01.2016"},';
json3 += '{"from":"21.06.2016","till":"27.06.2016"}]';
json3 += '}}'
obj31 = new Object(obj3.Person);
obj32 = new Object(obj31.Holiday);
for(i=0;i<obj32.length;i++)
{alert(obj31.familyName + ' ' + obj32[i].from + '-' + obj32[i].till);}
</script>
The script above outputs two strings (two alerts):
"Codd 01.01.2016-07.01.2016" and
"Codd 21.06.2016-27.06.2016".

80
5. HTML5
HTML5 is a further development of the HTML. HTML is a mark-up language used for
structuring and presenting content on the World Wide Web. As you saw from the previous
chapters the World Wide Web was born as a huge world-wide repository of information,
subsequently it evolved into a commonly accepted communication platform, and even into an
infrastructure (environment) for developing numerous purpose-oriented information systems.
Obviously, such basic concept of WWW as HTML developed more than 20 years ago lack of
many features that are needed for developing modern information systems. HTML5 offers a
more advanced HTML processing model (DHTML) suitable for more interoperable
implementations, that is HTML5 introduces application programming interfaces (APIs)
suitable for developing more advanced web applications. In this chapter, we will discuss
HTML5 features that are important for implementing an AJAX web architecture.
5.1.Forms
Forms provide a usual way of building a user interface via a WEB browser. HTML form is a
collection of input fields of different types, there may be buttons, files, textareas, text inputs,
checkboxes, radio buttons and selections. Obviously these types of input elements are not
sufficient for building advanced interactive applications. HTML5 offers a number of new
input types.
• number (floats)
• range (slider)
• color (color selector)
For example, "number", "color" and "range" types input fields are defined and visualized as
follows:
<form ...>
Number:<input type="number" id="a" value="0" step="1">
Color:<input type="color" id="b">
Range:<input type="range" id="c">
<input type="submit">
</form>
Since, validation on inputted value constitutes an important task for application programmers.
HTML5 offers also new attributes for the usual input types to simplify the form processing
task..
• placeholder (hint on what action is expected)
• pattern (validation of the value with a regular expression)
• min, max (validation of inputted value)
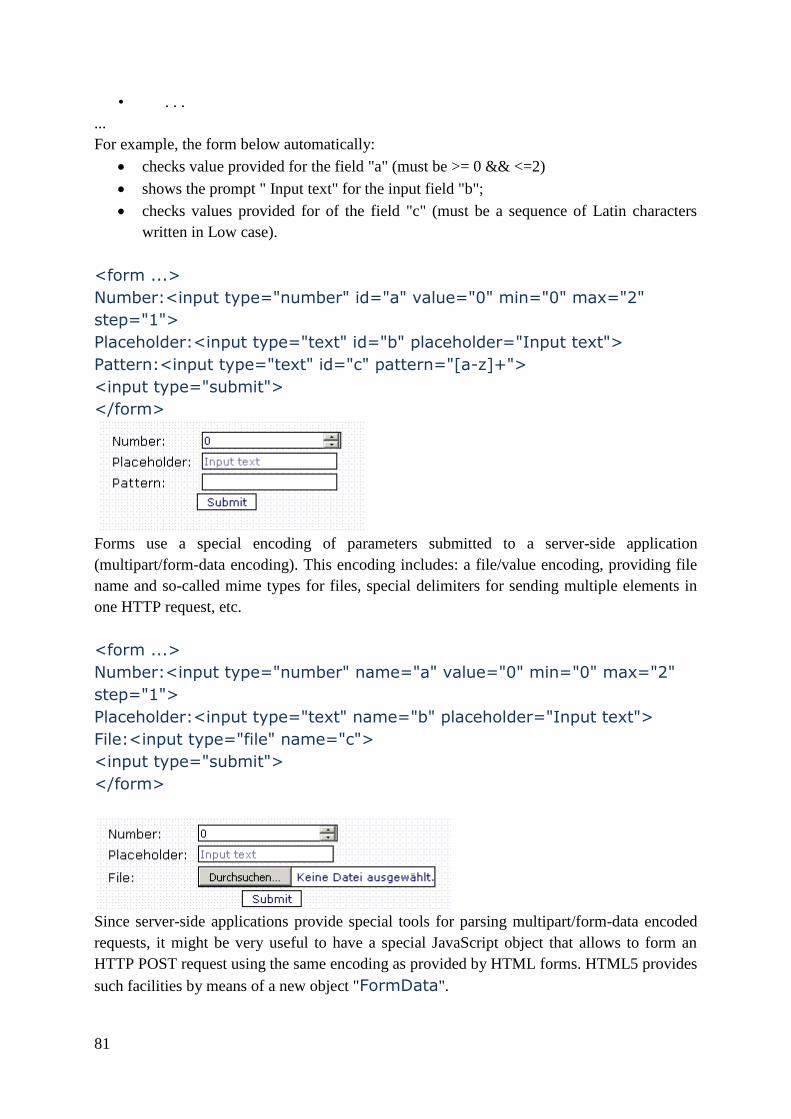
81
• . . .
...
For example, the form below automatically:
checks value provided for the field "a" (must be >= 0 && <=2)
shows the prompt " Input text" for the input field "b";
checks values provided for of the field "c" (must be a sequence of Latin characters
written in Low case).
<form ...>
Number:<input type="number" id="a" value="0" min="0" max="2"
step="1">
Placeholder:<input type="text" id="b" placeholder="Input text">
Pattern:<input type="text" id="c" pattern="[a-z]+">
<input type="submit">
</form>
Forms use a special encoding of parameters submitted to a server-side application
(multipart/form-data encoding). This encoding includes: a file/value encoding, providing file
name and so-called mime types for files, special delimiters for sending multiple elements in
one HTTP request, etc.
<form ...>
Number:<input type="number" name="a" value="0" min="0" max="2"
step="1">
Placeholder:<input type="text" name="b" placeholder="Input text">
File:<input type="file" name="c">
<input type="submit">
</form>
Since server-side applications provide special tools for parsing multipart/form-data encoded
requests, it might be very useful to have a special JavaScript object that allows to form an
HTTP POST request using the same encoding as provided by HTML forms. HTML5 provides
such facilities by means of a new object "FormData".

82
The script below creates an exactly the same HTTP request as the HTML form above, and
sends it to a server that can process a form input and/or dynamically generated input.
<script>
var fData = new FormData();
fData.append("a", 2);
fData.append("b", "Some text");
fData.append("c", myFileInput.files[0]);
var xhr = new XMLHttpRequest();
xhr.open("POST", "/wbtmaster/kindle/dpp.groovy");
xhr.send(fData);
</script>
5.2.Canvas
One of main HTML disadvantages is a lack of possibility to use vector graphics similar to
using text fragments. HTML5 provides an easy and powerful way to draw vector graphics on
a browser screen by means of Canvas elements. Canvas can be seen as rectangular areas of
the screen where vector graphic can be drawn. Canvas are similar to "div" elements and can
be placed on any position within a current HTML document.
Canvas are created by means of "canvas" tags in an HTNL document.
<canvas id="canvas1" width="300" height="100">
</canvas>
The canvas element element has a context into which drawing commands are issued
Context for drawing is created as follows:
<script>
var canvas = document.getElementById('canvas1');
if (canvas && canvas.getContext) {
var ctx = canvas.getContext('2d');
if (ctx) {
//...canvas drawing commands...
}}
</script>
A rectangular can be stroked or filled using the following drawing commands:
strokeRect([x-offset],[x-offset],[width],[height]);
fillRect([x-offset],[x-offset],[width],[height]);
Note that a style that is used for drawing the primitives must set in advance as a property of
the drawing context strokeStyle & fillStyle.
<script>
elem = document.getElementById('canvas1');
ctx = elem.getContext('2d');
ctx.strokeStyle = "#008000";
ctx.fillStyle = "#008000";
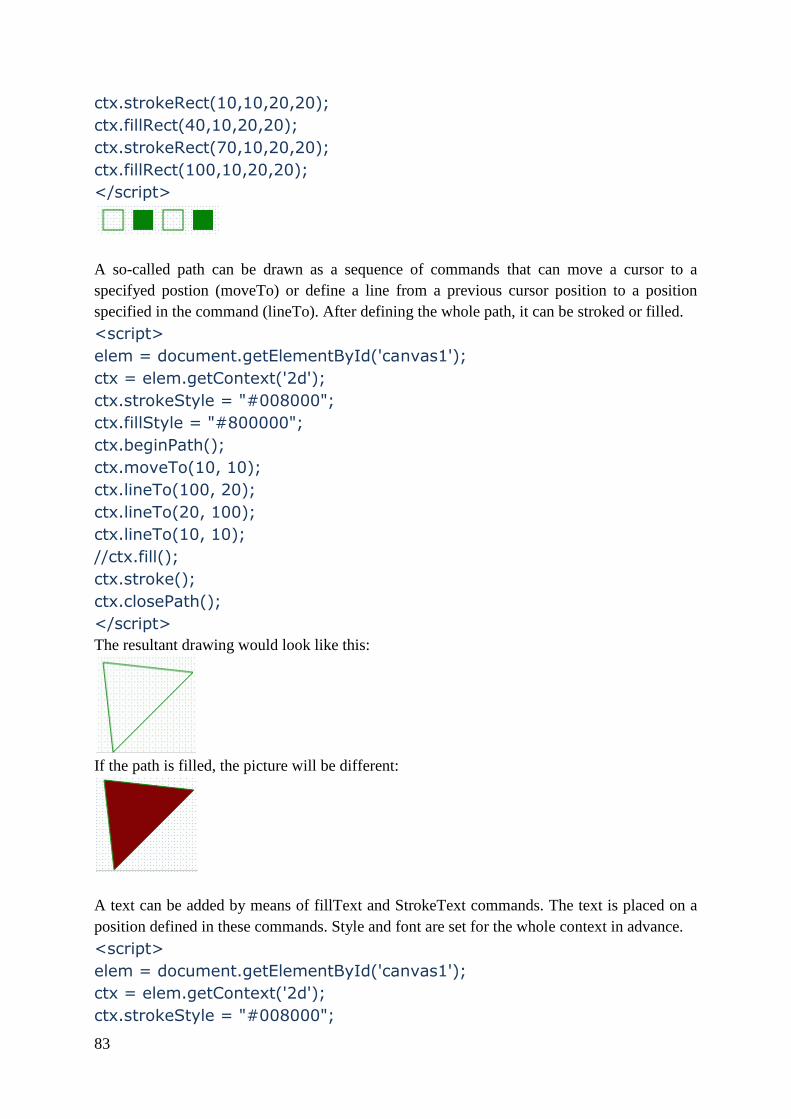
83
ctx.strokeRect(10,10,20,20);
ctx.fillRect(40,10,20,20);
ctx.strokeRect(70,10,20,20);
ctx.fillRect(100,10,20,20);
</script>
A so-called path can be drawn as a sequence of commands that can move a cursor to a
specifyed postion (moveTo) or define a line from a previous cursor position to a position
specified in the command (lineTo). After defining the whole path, it can be stroked or filled.
<script>
elem = document.getElementById('canvas1');
ctx = elem.getContext('2d');
ctx.strokeStyle = "#008000";
ctx.fillStyle = "#800000";
ctx.beginPath();
ctx.moveTo(10, 10);
ctx.lineTo(100, 20);
ctx.lineTo(20, 100);
ctx.lineTo(10, 10);
//ctx.fill();
ctx.stroke();
ctx.closePath();
</script>
The resultant drawing would look like this:
If the path is filled, the picture will be different:
A text can be added by means of fillText and StrokeText commands. The text is placed on a
position defined in these commands. Style and font are set for the whole context in advance.
<script>
elem = document.getElementById('canvas1');
ctx = elem.getContext('2d');
ctx.strokeStyle = "#008000";

84
ctx.fillStyle = "#800000";
ctx.font = 'bold 24px arial';
ctx.textBaseline = 'top';
ctx.fillText('Just a text', 10, 10);
ctx.font = 'bold 24px sans-serif';
ctx.strokeText('Another Text', 100, 50);
</script>
If we use the same context that was used to illustrate drawing a path, the picture would be like
this:
Canvas can be created dynamically similar to creating "div" objects.
The function below dynamically create a canvas object place it on a certain position, and
make drawings in the context of this canvas object.
<script>
var level = 0;
function makeCanvasDinamically(nX,xX,yY)
{
canvas = document.createElement('canvas');
canvas.id = nX;
canvas.width = 300;
canvas.height = 100;
canvas.style.zIndex=level;
level++;
canvas.style.position = "absolute";
canvas.style.border = "0px";
canvas.style.left = xX + "px";
canvas.style.top = yY + "px";
document.body.appendChild(canvas);
elem = document.getElementById(nX);
ctx = elem.getContext('2d');
........
}
</script>
The function makeCanvasDinamically can be invoked as many times as needed to make
identical drawings on different positions of the screen.
<script>
makeCanvasDinamically('canvas1','20','30')
makeCanvasDinamically('canvas2','80','130')
</script>

85
Since we can control a position of canvas object on the screen by setting properties
style.top and style.left, we can implement a function that animates a canvas object by
looping a modification of the canvas position.
function moveIt()
{
elem = document.getElementById('canvas1');
ctx = elem.getContext('2d');
a = gP.split('-');
// we suppose that the global variable "gP" defines a starting position of
the object.
oX = parseInt(a[0]);
oX = oX + 8;
// setting a new "left" offset
elem.style.left = oX.toString() + "px";
oY = parseInt(a[1]);
oY = oY + 1;
Setting a new "top" offset.
elem.style.top = oY.toString() + "px";
gP = oX.toString() + '-' + oY.toString();
if(oX < 400)setTimeout("moveIt()",50);
}
Images (external image files) can be loaded and drawn on a canvas along with the vector
graphic primitives. To draw an image, a special "Image" object is created, and a special
function is defined as a value of the instance variable "onload". The function is called as
soon as the image file has been loaded. The function utilizes the context method
drawImage that refer to the image object as to an argument. The image file URL is
provided as the property "src" of the "image" object. The function "myImage" below
places an image addressed by the first argument on a position addressed by two last
arguments.

86
<script>
function myImage(uX,xX,yY)
{
elem = document.getElementById('canvas1');
ctx = elem.getContext('2d');
var imageObj = new Image();
imageObj.onload = function() {
ctx.drawImage(imageObj, xX, yY);
drawTexts(); /*place additional text on the image*/
};
imageObj.src = uX;
}
myImage ('/pict_1.gif',2,2);
</script>
Canvas interface allows to make snaps of particular parts of canvas display area (method
getImageData), and shot such snaps onto a certain position (putImageData). The function
below makes a snap of 50x50 pixels area, and then shots copies with offset on the same
"canvas" object.
<script>
function snapImage(xX,yY)
{
elem = document.getElementById('canvas1');
ctx = elem.getContext('2d');
var snap = ctx.getImageData(xX,yY,50,50);
ctx.putImageData(snap,xX+70,yY);
ctx.putImageData(snap,xX+130,yY+10);
ctx.putImageData(snap,xX+190,yY+20);
}
snapImage(140,20)
</script>

87
There are also operations that allow to change individual pixels of the "canvas" area. Any area
can be copied into a variable as a special ImageData format. The image data format can be
then converted into array of digits:
For example,
elem = document.getElementById('canvas1');
ctx = elem.getContext('2d');
var snap = ctx.getImageData(xX,yY,50,50);
var px = snap.data;
Each pixel is represented by four one-byte values (red, green, blue, and alpha). The alpha
represents an opacity value. Value 0 means fully transparent (and, thus, invisible), whereas a
value of 100% gives a fully opaque pixel (traditional digital images). The function
changeImage(...) below modifies RGB value for particular pixels on the "canvas" area.
<script>
function changeImage(xX,yY)
{
elem = document.getElementById('canvas1');
ctx = elem.getContext('2d');
var snap = ctx.getImageData(xX,yY,50,50);
var px = snap.data;
for (i=0;i<px.length;i += 4)
{
px[i] = 255 - px[i];
px[i+1] = 255 - px[i+1];
px[i+2] = 255 - px[i+2];
}
ctx.putImageData(snap,xX+70,yY);
var snap = ctx.getImageData(xX,yY,50,50);
var px = snap.data;
for (i=0;i<px.length;i += 4)
{
if(px[i] < 200)px[i] = px[i]+40;
if(px[i+1] < 200)px[i+1] = px[i+1] + 40;
if(px[i+2] < 200)px[i+2] = px[i+2] + 40;
}
ctx.putImageData(snap,xX+130,yY+10);
}
</script>
5.3.HTML5 Events
The traditional JavaScript event model has a number of disadvantages:
Event handling is defined statically in HTML code as "onEvent" attributes of HTML
objects. HTML5 adds dynamically added event listeners.

88
Events are associated with primitive user actions like pressing a key or a button.
HTML5 adds more advanced event such as ondrag, ondrop, ondragstart, ....
Event model does not have connections to events hapenned outside of browser (say,
on the server). HTML5 adds a new EventSource object
HTML5 DOM adds a new method "addEventListener" that can be applied to DOM
objects to add special event handlers (listeners) that would call particular functions in case of
some operations with the object.
The script below dynamically adds even listeners to a number of "div" objects (function
activateMoveEvent()), identifies over which of these object a user moves cursor,
calculates an offset of the current cursor position from borders of this "div" object, and
displays the calculated offset into this particular object (function handleMoveEvent(...)).
<html><head><script>
function handleMoveEvent(e){
var rect = this.getBoundingClientRect();
x = e.clientX - rect.left;
y = e.clientY - rect.top;
l = 'x:' + x + ' y:' + y.toString();
this.innerHTML = l;
}
function activateMoveEvent(){
for(i=0;i<4;i++)
{
var a = document.getElementById("area0" + i.toString());
a.addEventListener('mousemove', handleMoveEvent, false);
}
}
</script>
</head><body>
<div id="area00"
style="width:95px;height:90px;padding:10px;border:1px solid
#aaaaaa;">
<div id="area01"
style="width:95px;height:90px;padding:10px;border:1px solid
#aaaaaa;">
<div id="area02"
style="width:95px;height:90px;padding:10px;border:1px solid
#aaaaaa;">
<div id="area03"
style="width:95px;height:90px;padding:10px;border:1px solid
#aaaaaa;">
</body></html>

89
New types of events allow to define more complex interactions with users than before. The
example script below illustrates a drag/drop interface. A number of "div" and "img" elements
are provided with event handlers for "ondrop ", "ondragleave" and "ondragover" events. The
event handlers along with JavaScript functions implement an interface where users may
drag/drop the image between different div objects on the screen. Note, that parameters may be
transferred via the event object ("ev") using "target", "dataTransfer.setData" and
"dataTransfer.getData" methods.
<script>
function allowDrop(ev) {
var t = ev.target;
t.style.border="solid 2px #ffff00";}
ev.preventDefault();}
function dragLeave(ev) {
var t = ev.target;
t.style.border="solid 1px #cccccc";}
function drag(ev) {
ev.dataTransfer.setData("text", ev.target.id);}
function drop(ev) {
ev.preventDefault();
var data = ev.dataTransfer.getData("text");
ev.target.appendChild(document.getElementById(data));}
</script></head><body>
...
<div id="div1" ondrop="drop(event)" ondragleave="dragLeave(event)"
ondragover="allowDrop(event)" ...
<div id="div2" ondrop="drop(event)" ondragleave="dragLeave(event)"
ondragover="allowDrop(event)" ...
<div id="div3" ondrop="drop(event)" ondragleave="dragLeave(event)"
ondragover="allowDrop(event)" ...
<img id="drag1" src="/pict_1.gif" draggable="true"
ondragstart="drag(event)">
</body></html>
HTML5 EventSource object allows to include external events into the event handling
schema. For example, the object may receive messages from a remote server, and process the
messages by means of a function defined as a value of "onmessage" instance variable.
<html><head><script>
currentMessage = '';

90
if(typeof(EventSource)!=="undefined"){
ll = "/wbtmaster/kindle/serverUpdatesTest.groovy";
// the object checks an event every 10 seconds
source=new EventSource(ll);
source.onmessage=function(event)
{
if(currentMessage != event.data){
// if the remote server sends a new message
currentMessage = event.data;
document.getElementById("div1").innerHTML='<h3>' + event.data +
'</h3>';}
};
}
else{document.getElementById("div1").innerHTML="Sorry";}
</script></head><body>
<div id="div1" ... ></div></body></html>
5.4.HTML5 File API
One of the most severe problems with using JavaScript for implementing a user interface was
absence of access to local file system. If a user selects a particular file by means of a file input
object, the script does not have an access to the file. The script cannot even get a length and
type of the file to check whether the file should be uploaded or not.
The HTML5 file API works with local files (file objects), it provides a number of operations
for selecting such objects and accessing their data and parameters.
The API is based on a number of interfaces:
A FileList interface, which represents an array of individually selected files from the
underlying system.
A File interface, which provides read-only informational attributes about a file such as
its name, length and the date of the last modification (on disk) of the file.
A Blob interface, which represents immutable raw binary data, and allows access to
ranges of bytes within the Blob object as a separate Blob.
A FileReader interface, which provides methods to read a File or a Blob, and an
event model to obtain the results of these reads.
A URL scheme for use with binary data such as files, so that they can be referenced
within web applications.
File objects can be obtained only by means of a user action, for, example a user may select a
number of files by means of the "file" input element.
<input type="file" id="FilesToUploadX"
onchange="handleFileSelectX(this.files)" multiple />
The function that handles the "change" event gets a list of file objects and can process the
list as below:

91
<html><head><script>
function handleFileSelectX(filesToUpload) {
var x = '<ul>';
for(i=0;i<filesToUpload.length;i++)
{
fileObject = filesToUpload[i];
// reading properties of a single file object
x += '<li><b>' + fileObject.name;
x += '</b> ' + parseInt(fileObject.size / 1024, 10) + " kb";
x += ' ' + fileObject.type;
}
x += '<ul>';
var display_zone = document.getElementById('display_zone');
display_zone.innerHTML = x;
}
</script></head>
<body>
<input type="file" id="FilesToUploadX"
onchange="handleFileSelectX(this.files)" multiple />
<div id="display_zone" style="width:400px;border:solid 1px
#333333;background:#ffffff;"></div>
</body></html>
Similarly, such "File" Objects can be got via DragDrop. A programmer defines a certain
HTML object (for example, a "div" object "dropZone") where files can be dropped. A special
event listener for the event "drop" is added to this object. Thus, the function
"handleFileSelect" is called as the user drag/drop files into the designated area. The
"handleFileSelect" function get the event "evt" object as a parameter. The property
"dataTransfer.files" of the event object provides an access to the list of file objects that can be
processed in the same way as above.
<html><head><script>
function activateDrag(){
var dropZone = document.getElementById('drop_zone');
dropZone.addEventListener('dragover', handleDragOver, false);
dropZone.addEventListener('drop', handleFileSelect, false);}
function handleFileSelect(evt) {
evt.stopPropagation();
evt.preventDefault();
filesToUpload = evt.dataTransfer.files;
var x = '<ul>';

92
for(i=0;i<filesToUpload.length;i++)
{
fileObject = filesToUpload[i];
// reading properties of a single file object
x += '<li>' + fileObject.name;
x += ' ' + parseInt(fileObject.size / 1024, 10) + " kb";
x += ' ' + fileObject.type;
}
x += '<ul>';
var dropZone = document.getElementById('drop_zone');
dropZone.innerHTML = x;}
function handleDragOver(evt) {
evt.stopPropagation();
evt.preventDefault();
evt.dataTransfer.dropEffect = 'copy';}
</script></head><body>
<div id="drop_zone" style="height:100px;width:400px;border:solid 1px
#333333;background:#ffff33;>... </div></body></html>
As soon as JavaScript gets a list of file objects, properties of such objects can be read. Such
properties as "name", "size", "lastModifiedDate" and "type" are obvious, and do not
need a further explanation. Another object that worth discussing in context of the file API is
so-called FileReader object. The object may read a content of a file object, and return the
result in different forms, for instance, in the form of URL that can be used in the same way as
URL of a file residing on a remote server. The function "previewFile(...)" below creates an
image object, but set source (property "src") not as a file from a remote server, but as a local
file read as URL (method readAsDataURL([file]).
<script>
function previewFile(fileX) {
var reader = new FileReader();
reader.onloadend = function () {
imgObj = document.createElement("img");
imgObj.width = "100";
document.getElementById("drop_zone").appendChild(imgObj);
imgObj.src=reader.result;}
reader.readAsDataURL(fileX);}
</script>
A file object can be set as a parameter of a FormData object that creates an HTTP post
request using multipart/form-data encoding. The script below uploads local files onto a server
by means of drag/drop interface.

93
<script>
function activateDrag(){
var dropZone = document.getElementById('drop_zone');
dropZone.addEventListener('dragover', handleDragOver, false);
dropZone.addEventListener('drop', handleFileSelect, false);}
function handleFileSelect(evt) {
evt.stopPropagation();
evt.preventDefault();
filesToUpload = evt.dataTransfer.files;
// getting list of file objects
for(i=0;i<filesToUpload.length;i++)
{
fileObject = filesToUpload[i];
// calling a function for uploading an individual file object
uploadFileXHR(fileObject);
}}
function handleDragOver(evt) {
evt.stopPropagation();
evt.preventDefault();
evt.dataTransfer.dropEffect = 'copy';}
function uploadFileXHR(fileX){
var url = '/wbtmaster/kindle/dpp.groovy';
var xhr = new XMLHttpRequest();
var fd = new FormData();
// creating a FORMData object
xhr.open("POST", url, true);
// opening a POST connection to the server
xhr.onreadystatechange = function() {
// function for processing a server response
if(xhr.readyState == 4){
lastSearch= xhr.responseText;
var dropZone = document.getElementById('drop_zone');
dropZone.innerHTML = lastSearch;}
}};
fd.append("URL", fileX);
// adding the file object as an attribute "URL" to the form data.
fd.append("parameter1", "Value1");
fd.append("parameter2", "Value2");
xhr.send(fd);

94
// sending the multipart/form-data encoded file and parameters
// as a POST request to the server
}
</script>
5.5.WEB Socket
HTTP protocol provides unidirectional communication technology - a client generates an
HTTP request, and the server replies with an HTTP response. WEB Socket (WS) is a next-
generation of the internet communication technology. ES is a bidirectional communication
technology for web applications. WS communication operates over a single socket and is
controlled via an HTML5 API. A WS is created as an instance of a special "WebSocke"
object.
var Socket = new WebSocket(url);
WebSocket communicates to a script via a set of events like
onopen occurs when socket connection is established.
onmessage occurs when client receives data from server.
onerror occurs when there is any error in communication.
onclose occurs when connection is closed.
Messages are sent by means of the socket "send" method.
As you can see the WEB socket communication is carried out using a special "WS" protocol,
hence, the server must support this protocol, normally, just an additional server-side
application (so-called WebSocket extension) is sufficient to support the protocol. Once a Web
Socket connection with the web server is installed, the client-side application can
send data from the browser to a server (send method),
receive data from server (onmessage event handler).
A typical WS communication is shown below:
the "mySocket()" function creates a WebSocket object;
set a special JavaScript code as an onopen event handler;
the onopen event handler sends a message to the server (send method);
the function defines another code as the onmessage event handler.
the onmessage event handler process messages received from the server using
data property of the event..
function mySocket(){
var ws = new WebSocket("ws://myserver");
ws.onopen = function(){
ws.send("Message to server");
};

95
ws.onmessage = function (evt){
var received_msg = evt.data;
... Process the message from server...
};
ws.onclose = function(){
... Process the closed connection
};
}
Please note that usage of the WS communicational protocol may create problems with
additional WEB components like Proxy, Reverse Proxy or Load Balancing servers.
5.6.HTML5 Local Storage
With local storage, WEB applications can store data locally within the user's browser.
Functionality of the local storage is very similar to the cookies functionality, but local storage
data are not sent via the Internet with HTTP requests/responses, and, hence, much more
secure. The local storage is designed for storage that is shared by multiple windows and
applications using one and the same domain and protocol. The local storage does not depend
on the current server session, the data are stored with no expiration date. The data will not be
deleted when the browser is closed, and will be available as the page is accessed again.
The local storage limit is fairly large (at least 5MB). The local storage data are persistently
resides on a local client and is never transferred to the server.
Local storage data are accessible per origin (per domain and protocol). All pages, from one
origin, can store and access the same data. Pages from another origin cannot access data from
another origin. Local Storage
The localStorage is an object having just a single instance, and available by its name
localStorage. Properties of the object corresponds to name/value pairs stored into the local
storage. A loca storage element is stored by means of assigning a value to a particular
property of the object, values can be read later on simply by a reference to the property name.
For example, the document below visualizes a text input where a user name is inputted. The
user name is stored into local storage, and recovered every time the document is accessed.
<html><head><script>
function setUserName(){
uN = document.getElementById("newUserName").value;
localStorage.userName = uN;}
function getUserName(){
uN = '';
if(localStorage.userName){
uN = localStorage.userName;}
return uN;}

96
function removeUserName(){
if(localStorage.userName){
uN = localStorage.removeItem("userName");
document.getElementById("newUserName").value = '';
}}
</script></head><body>
<input type="text" id="newUserName"/>
<input type="button" name="Store to Local Storage"/
onClick="setUserName()">
<script>
document.getElementById("newUserName").value = getUserName();
</script>
The "sessionStorage" object is equal to the "localStorage" object, except that it stores the data
temporary till the HTML page is opened by the browser. The data is deleted when the user
closes the specific HTML document. The following example allows to keep a user name in
the current session, and recover it if the page is reloaded.
<html><body><script>
function setUserName(){
uN = document.getElementById("newUserName").value;
sessionStorage.userName = uN;}
function getUserName(){
uN = '';
if(sessionStorage.userName){
uN = sessionStorage.userName;}
return uN;}
function removeUserName(){
if(sessionStorage.userName){
uN = sessionStorage.removeItem("userName");
document.getElementById("newUserName").value = '';
}}
</script></head><body>
<input type="text" id="newUserName"/ onChange="setUserName()">
</script>
document.getElementById("newUserName").value = getUserName();
</script>

97
6.XML-eXtensible Mark-up Language
HTML is one of the most famous computer languages. HTML defines a set of tags that
impose a special properties (formatting rules) on fragments of text.
We can say that syntax and semantics of HTML are fixed, thus, we can list all the tags
available in HTML, and can find what are formatting rules behind each tag. The language is
more suitable for some applications (home page, reference manual, etc.), and less suitable for
others (e-Learning, e-Commerce, Vector Graphics, mathematical documents, chemical
documents, etc.) HTML documents can be read by an HTML processing application (a web
browser, for example) that knows how to display the text according to the formatting rules
defined via tags.
6.1. XML Basics
XML (also known as Extensible Mark-up Language) is a mark-up language which also build
upon the concept of rule-specifying tags and the use of a processing application that knows
how to deal with the tags. Rather than providing a set of predefined tags, as in the case of
HTML, XML specifies the standards with which you can define your own mark-up languages
with their own sets of tags. Thus, XML is a meta- language which is capable of defining an
infinite number of mark-up languages based upon the standards defined by XML.
Let us imagine a language suitable for encoding information about customers: the language
will define tags to represent customers and information about customers.
The set of tags will be simple. However, they will be expressive enough to be used just for
this particular application - defining a set of customers. The XML tags can be immediately
understood just by reading the document.
<CUSTOMER>
<ID>001</ID>
<NAME>Nick Scherbakov</NAME>
<COMPANY>Interactive Internet (I2)</COMPANY>
<EMAIL>[email protected]</EMAIL>
<PHONE>662-9999</PHONE>
<CITY>Graz</CITY>
</CUSTOMER>
To define a new XML based language, a syntax for marking up and a meaning behind the
mark-up must be defined in a precise and none-ambiguity way. In other words, any
processing application must know what a valid mark-up is, and what to do with it if it is
valid?
For example, how does an application know whether the following mark-up valid or not ?
<EMAIL>[email protected]</EMAIL>
<PHONE>662-9999</PHONE>
<CUSTOMER>
<ID>001</ID>
<NAME>Nick Scherbakov</NAME>
<COMPANY>Interactive Internet (I2)</COMPANY>
<CITY>Graz</CITY>

98
</CUSTOMER>
In XML, a valid mark-up is defined a particular name space. The name space is defined by a
Document Type Definition (DTD). The DTD specifies all valid tag, and syntax for nesting
and attributing XML elements.
For example, the following DTD:
<!ELEMENT CUSTOMER (ID, NAME, COMPANY, CITY, PHONE, EMAIL))>
<!ELEMENT ID (#PCDATA)>
<!ELEMENT NAME (#PCDATA)>
<!ELEMENT COMPANY (#PCDATA)>
<!ELEMENT CITY (#PCDATA)>
<!ELEMENT PHONE (#PCDATA)>
<!ELEMENT EMAIL (#PCDATA)>
tells to a processing application that the mark-up:
<CUSTOMER>
<ID>001</ID>
<NAME>Nick Scherbakov</NAME>
<COMPANY>Interactive Internet (I2)</COMPANY>
<CITY>Graz</CITY>
<PHONE>662-9999</PHONE>
<EMAIL>[email protected]</EMAIL>
</CUSTOMER>
is valid.
Meaning of the mark-up must be also defined in a precise way to allow different applications
to process a certain file equally. Of course, such definition of meaning very much depends on
a processing application and the purpose of the XML language. In complex cases like
developing standards for semantic applications, modification notifications, web services, blog
publishing tools, etc., the meaning of a language is defined as an official standard
specification developed by a special committee. In more simple cases when XML files must
be visualized by ordinary WWW browsers, XML documents are associated with style sheets
(XSL - eXtensible Stylesheet Language) which provide visualization instructions for a web
browser.
In this example, the style sheet utilizes the functionality of HTML to define the formatting of
"CUSTOMER" documents.
For example, the following style sheets:
<xsl:template pattern = "CUSTOMER">
<UL><xsl:process-children></UL>
</xsl:template>
<xsl:template pattern = "ID">
<LI><I><xsl:process-children></I></LI>
</xsl:template>
<xsl:template pattern = "NAME">
<LI><B><xsl:process-children></B></LI>
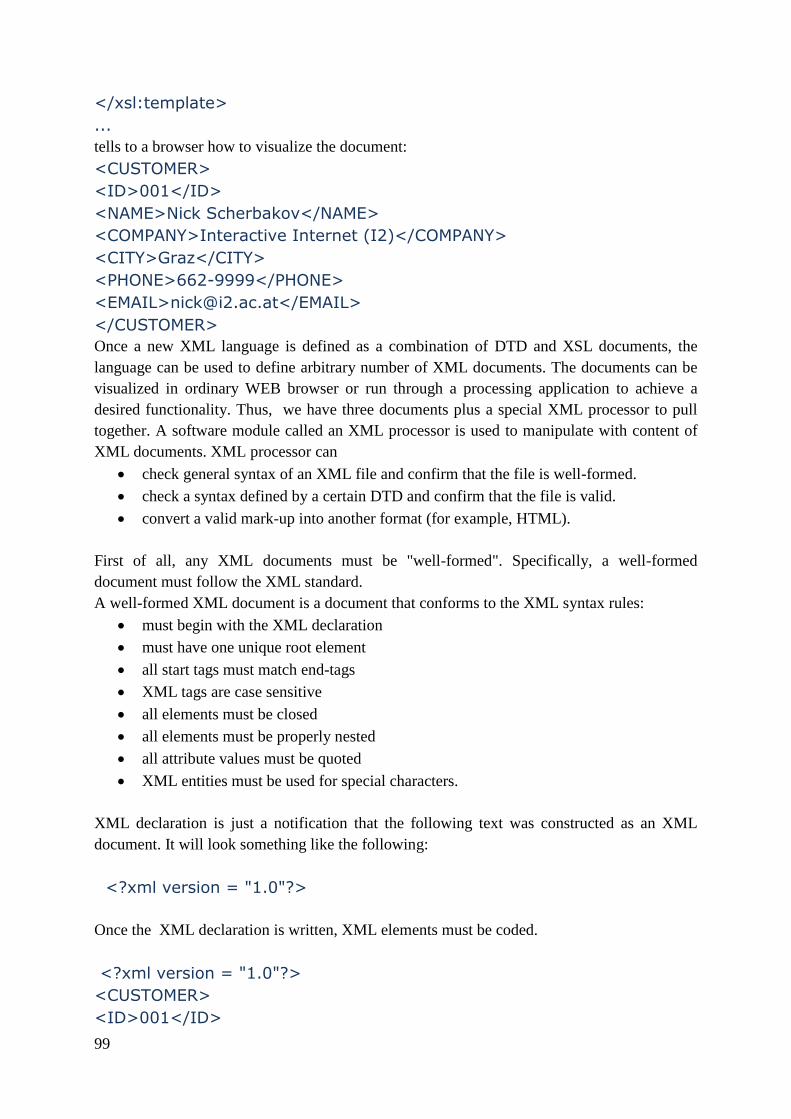
99
</xsl:template>
...
tells to a browser how to visualize the document:
<CUSTOMER>
<ID>001</ID>
<NAME>Nick Scherbakov</NAME>
<COMPANY>Interactive Internet (I2)</COMPANY>
<CITY>Graz</CITY>
<PHONE>662-9999</PHONE>
<EMAIL>[email protected]</EMAIL>
</CUSTOMER>
Once a new XML language is defined as a combination of DTD and XSL documents, the
language can be used to define arbitrary number of XML documents. The documents can be
visualized in ordinary WEB browser or run through a processing application to achieve a
desired functionality. Thus, we have three documents plus a special XML processor to pull
together. A software module called an XML processor is used to manipulate with content of
XML documents. XML processor can
check general syntax of an XML file and confirm that the file is well-formed.
check a syntax defined by a certain DTD and confirm that the file is valid.
convert a valid mark-up into another format (for example, HTML).
First of all, any XML documents must be "well-formed". Specifically, a well-formed
document must follow the XML standard.
A well-formed XML document is a document that conforms to the XML syntax rules:
must begin with the XML declaration
must have one unique root element
all start tags must match end-tags
XML tags are case sensitive
all elements must be closed
all elements must be properly nested
all attribute values must be quoted
XML entities must be used for special characters.
XML declaration is just a notification that the following text was constructed as an XML
document. It will look something like the following:
<?xml version = "1.0"?>
Once the XML declaration is written, XML elements must be coded.
<?xml version = "1.0"?>
<CUSTOMER>
<ID>001</ID>

100
<NAME>Nick Scherbakov</NAME>
<COMPANY>Interactive Internet (I2)</COMPANY>
<CITY>Graz</CITY>
<PHONE>662-9999</PHONE>
<EMAIL>[email protected]</EMAIL>
</CUSTOMER>
Elements are the basic units of XML content. Syntactically, an element is any text put
between a start tag and an end tag. For example, below you can see two XML elements:
"NAME" and "COMPANY".
<NAME>Nick Scherbakov</NAME>
<COMPANY>Interactive Internet (I2)</COMPANY>
A tag is a character string between a "<" sign and a ">" sign. XML is essentially case-
dependent. In other words, the tags <COMPANY> and <company> would not be
equivalent as they would be in HTML.
End tags must be written and capitalized the same way as the start tag counterparts, end tags
starts with a forward slash "/". For example, a start tag of <COMPANY> must be closed
with the </COMPANY> end tag.
if an XML element has no content, a single start tag ending with a back slash such as:
<SALARY ... /> may be used. The "<SALARY ... />" tag is called an "Empty XML
Element" because it has no content. Empty elements often have attributes (name/value pairs
where value is in quotes) that are used by a processing application. For example,
<NAME>Nick Scherbakov</NAME>
<COMPANY>Interactive Internet (I2)</COMPANY>
<SALARY val="3000"/>
XML elements may contain other elements but the nesting of elements must be correct. Note
that the following encoding is not well-formed:
...
<CUSTOMER>
<NAME>Frank Lee
<EMAIL>[email protected]
</CUSTOMER></NAME></EMAIL>
...
The well-formed fragment should be:
...
<CUSTOMER>
<NAME>Frank Lee</NAME>
<EMAIL>[email protected]</EMAIL>
</CUSTOMER>

101
...
An XML document must have exactly one root element, all other elements must be placed
inside the root element. The root element must match the root element name in the DTD
DOCTYPE declaration.
For example, the DOCTYPE declaration
<!DOCTYPE myFirm PUBLIC "http://coronet.iicm.edu"
"http://coronet.iicm.edu/myFirm.dtd">
implies that "myFirm" is the document root element.
<myFirm>
<CUSTOMER>
<ID>001</ID>
<NAME>Nick Scherbakov</NAME>
<COMPANY>Interactive Internet (I2)</COMPANY>
<CITY>Graz</CITY>
<PHONE>662-9999</PHONE>
<EMAIL>[email protected]</EMAIL>
</CUSTOMER>
</myFirm>
Tags may specify any number of supporting attributes. An attribute is a name/value pair,
delimited by equal (=) sign in which the value is delimited by quotation marks such as:
<customer style = "spectator" coloring = "black_and_white">
Unlike HMTL, XML specifies that values MUST be delimited with quotation marks.
< customer style = "spectator" coloring = "black_and_white">
<name>Frank Lee </name>
<email value="[email protected]"/>
<salary val="3000"/>
</customer>
In XML, anything what is placed in tags, is considered to be plain text data, but what to do if
a text containing "<" and ">" needs to be used as a value of an XML element. For example,
suppose an HTML code:
<DOCUMENT>
<NAME>Coleen Merriman</NAME>
<EMAIL>[email protected]</EMAIL>
</DOCUMENT>
needs to be placed into XML tags "Example". There are special CDATA BLOCKs that are
defined using the following notation:
<![CDATA[
// any character string including special symbols and tags
]]>

102
Thus, the above mentioned HTML encoding can be set as a value for one XML tag using the
CDATA block:
<EXAMPLE>
<![CDATA[
<DOCUMENT>
<NAME>Coleen Merriman</NAME>
<EMAIL>[email protected]</EMAIL>
</DOCUMENT>
]]>
</EXAMPLE>
6.2.Document Type Definition (DTD)
In the previous section, the process of creating a "well-formed" XML document was
presented. We cannot guarantee that XML well-formed document will be correctly processed
by an application since it may contain unknown tags, wrong attributes or wrong nesting of
elements. In other words, we have to make sure that the document is valid.
To pass the validity test, an XML document must conform to the specifications defined by a
Document Type Definition (DTD). DTD is a definition of the overall structure and syntax of
the document.
Fig.6-1:Validation of an XML document
The simplest usage of a DTD involves actually adding the DTD into the prologue portion of
your XML document just after the XML processing instruction.
<?xml version = "1.0"?>
<!DOCTYPE MYFIRM [
... ELEMENT DEFINITIONS
]>
<MYFIRM>
<CUSTOMER>
<ID>001</ID>
<NAME>Nick Scherbakov</NAME>
<COMPANY>Interactive Internet (I2)</COMPANY>
<CITY>Graz</CITY>
<PHONE>662-9999</PHONE>

103
<EMAIL>[email protected]</EMAIL>
</CUSTOMER>
</MYFIRM>
Document Type Definitions declare all of the valid document elements using Element Type
Declarations (<!ELEMENT ...>). ETDs specify the name of elements and whether or not
those elements may have any children. The keyword (#PCDATA) allows an element to
contain plain character data. For example the ELEMENT declaration below defines an XML
element " CNAME " that may contain only plain character data.
<?xml version = "1.0"?>
<!DOCTYPE MYFIRM [
. . .
<!ELEMENT CNAME (#PCDATA)>
]>
. . .
<CNAME>Nick Scherbakov</CNAME>
<CNAME>Denis Helic</CNAME>
. . .
Element Type Declaration (ETD) may specify any number of children elements by references
to their names. For example, the CNAME element may be declared as a child of CUSTOMER
element.
<?xml version = "1.0"?>
<!DOCTYPE MYFIRM [
. . .
<!ELEMENT CUSTOMER (CNAME)>
<!ELEMENT CNAME (#PCDATA)>
]>
. . .
<CUSTOMER>
<CNAME>Nick Scherbakov</CNAME>
</CUSTOMER>
<CUSTOMER>
<CNAME>Denis Helic</CNAME>
</CUSTOMER>
. . .
Similarly, ETD may specify an order of child elements.
For example, the NAME, PHONE and EMAIL elements may be declared as children of
CUSTOMER element which may appear in that fixed order.
Note that we used a comma to separated list of children to force the order.
<?xml version = "1.0"?>
<!DOCTYPE MYFIRM [
. . .
<!ELEMENT CUSTOMER (CNAME,PHONE,EMAIL)>
<!ELEMENT NAME (#PCDATA)>

104
<!ELEMENT EMAIL (#PCDATA)>
<!ELEMENT PHONE (#PCDATA)>
]>
. . .
<CUSTOMER>
<NAME>Nick Scherbakov</NAME>
<PHONE>582898</PHONE>
<EMAIL>[email protected]</EMAIL>
</CUSTOMER>
<CUSTOMER>
<NAME>Denis Helic</NAME>
<PHONE>10215027</PHONE>
<EMAIL>[email protected]</EMAIL>
</CUSTOMER>
. . .
The plus sign (+) after an element name means "one or more occurrence" of this element.
Thus we can redefine our DTD to allow one or more EMAIL elements inside any
CUSTOMER element, and one or more CUSTOMER elements inside our XML document
(root tag MYFIRM).
<?xml version = "1.0"?>
<!DOCTYPE MYFIRM [
<!ELEMENT MYFIRM ( CUSTOMER+)>
<!ELEMENT CUSTOMER (NAME,PHONE,EMAIL+)>
<!ELEMENT NAME (#PCDATA)>
<!ELEMENT EMAIL (#PCDATA)>
<!ELEMENT PHONE (#PCDATA)>
]>
<MYFIRM>
<CUSTOMER>
<NAME>Nick Scherbakov</NAME>
<PHONE>582898</PHONE>
<EMAIL>[email protected]</EMAIL>
<EMAIL>[email protected]</EMAIL>
</CUSTOMER>
<CUSTOMER>
<NAME>Denis Helic</NAME>
<PHONE>10215027</PHONE>
<EMAIL>[email protected]</EMAIL>
<EMAIL>[email protected]</EMAIL>
<EMAIL>[email protected]</EMAIL>
</CUSTOMER>
</MYFIRM>

105
The asterisk sign (*) after an element name means "zero or more occurrence" of this element.
Thus we can redefine our DTD to make PHONE elements optional inside any CUSTOMER
element.
<?xml version = "1.0"?>
<!DOCTYPE MYFIRM [
<!ELEMENT MYFIRM ( CUSTOMER+)>
<!ELEMENT CUSTOMER (NAME,PHONE*,EMAIL+)>
<!ELEMENT NAME (#PCDATA)>
<!ELEMENT EMAIL (#PCDATA)>
<!ELEMENT PHONE (#PCDATA)>
]>
<MYFIRM>
<CUSTOMER>
<NAME>Nick Scherbakov</NAME>
<EMAIL>[email protected]</EMAIL>
<EMAIL>[email protected]</EMAIL>
</CUSTOMER>
<CUSTOMER>
<NAME>Denis Helic</NAME>
<PHONE>10215027</PHONE>
<PHONE>8735617</PHONE>
<EMAIL>[email protected]</EMAIL>
<EMAIL>[email protected]</EMAIL>
<EMAIL>[email protected]</EMAIL>
</CUSTOMER>
</MYFIRM>
Elements can be grouped together using brackets, parameters "one or more occurrence" and
"zero or more occurrence" can be applied to groups.
Thus we can redefine our DTD to group PHONE and EMAIL and allows them (PHONE and
EMAIL) appear together one or more times.
<?xml version = "1.0"?>
<!DOCTYPE MYFIRM [
<!ELEMENT MYFIRM (CUSTOMER+)>
<!ELEMENT CUSTOMER (NAME,(PHONE,EMAIL)+)>
<!ELEMENT NAME (#PCDATA)>
<!ELEMENT EMAIL (#PCDATA)>
<!ELEMENT PHONE (#PCDATA)>
]>
<MYFIRM>
<CUSTOMER>

106
<NAME>Nick Scherbakov</NAME>
<PHONE>582898</PHONE>
<EMAIL>[email protected]</EMAIL>
<PHONE>8735618</PHONE>
<EMAIL>[email protected]</EMAIL>
</CUSTOMER>
<CUSTOMER>
<NAME>Denis Helic</NAME>
<PHONE>10215027</PHONE>
<EMAIL>[email protected]</EMAIL>
<PHONE>8735617</PHONE>
<EMAIL>[email protected]</EMAIL>
<PHONE>2731645</PHONE>
<EMAIL>[email protected]</EMAIL>
</CUSTOMER>
</MYFIRM>
The pipe character (|) is used to specify an "OR" operation. Thus, the following DTD specify
an XML document in which all CUSTOMER elements would have a NAME child followed
by either a PHONE or an EMAIL element (but not both).
<?xml version = "1.0"?>
<!DOCTYPE MYFIRM [
<!ELEMENT MYFIRM (CUSTOMER+)>
<!ELEMENT CUSTOMER (NAME,(PHONE | EMAIL))>
<!ELEMENT NAME (#PCDATA)>
<!ELEMENT EMAIL (#PCDATA)>
<!ELEMENT PHONE (#PCDATA)>
]>
<MYFIRM>
<CUSTOMER>
<NAME>Nick Scherbakov</NAME>
<PHONE>582898</PHONE>
</CUSTOMER>
<CUSTOMER>
<NAME>Denis Helic</NAME>
<EMAIL>[email protected]</EMAIL>
</CUSTOMER>
</MYFIRM>
Using the "?" character specifies that the element named is optional. Thus, in the following
code, we specify that every CUSTOMER must have a NAME and either a PHONE or
EMAIL and may have an optional CITY child.
<?xml version = "1.0"?>
<!DOCTYPE MYFIRM [
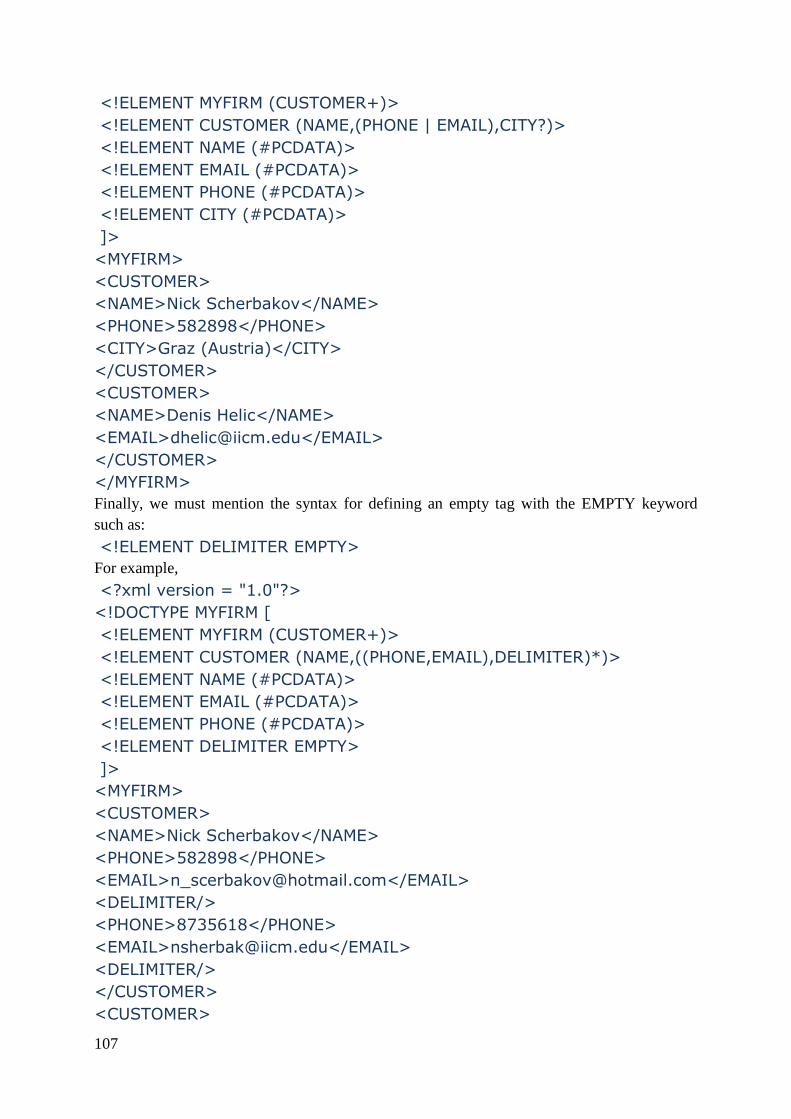
107
<!ELEMENT MYFIRM (CUSTOMER+)>
<!ELEMENT CUSTOMER (NAME,(PHONE | EMAIL),CITY?)>
<!ELEMENT NAME (#PCDATA)>
<!ELEMENT EMAIL (#PCDATA)>
<!ELEMENT PHONE (#PCDATA)>
<!ELEMENT CITY (#PCDATA)>
]>
<MYFIRM>
<CUSTOMER>
<NAME>Nick Scherbakov</NAME>
<PHONE>582898</PHONE>
<CITY>Graz (Austria)</CITY>
</CUSTOMER>
<CUSTOMER>
<NAME>Denis Helic</NAME>
<EMAIL>[email protected]</EMAIL>
</CUSTOMER>
</MYFIRM>
Finally, we must mention the syntax for defining an empty tag with the EMPTY keyword
such as:
<!ELEMENT DELIMITER EMPTY>
For example,
<?xml version = "1.0"?>
<!DOCTYPE MYFIRM [
<!ELEMENT MYFIRM (CUSTOMER+)>
<!ELEMENT CUSTOMER (NAME,((PHONE,EMAIL),DELIMITER)*)>
<!ELEMENT NAME (#PCDATA)>
<!ELEMENT EMAIL (#PCDATA)>
<!ELEMENT PHONE (#PCDATA)>
<!ELEMENT DELIMITER EMPTY>
]>
<MYFIRM>
<CUSTOMER>
<NAME>Nick Scherbakov</NAME>
<PHONE>582898</PHONE>
<EMAIL>[email protected]</EMAIL>
<DELIMITER/>
<PHONE>8735618</PHONE>
<EMAIL>[email protected]</EMAIL>
<DELIMITER/>
</CUSTOMER>
<CUSTOMER>

108
<NAME>Denis Helic</NAME>
<PHONE>10215027</PHONE>
<EMAIL>[email protected]</EMAIL>
<DELIMITER/>
<PHONE>8735617</PHONE>
<EMAIL>[email protected]</EMAIL>
<DELIMITER/>
<PHONE>2731645</PHONE>
<EMAIL>[email protected]</EMAIL>
<DELIMITER/>
</CUSTOMER>
</MYFIRM>
6.3.DTD Element Attributes (ATTLIST)
In the previous section, we saw how DTD can be used to define valid XML elements. DTD
can be also used to define valid element attributes.
Early we used the following example of XML attributes:
<CUSTOMER style = "spectator" coloring = "black_and_white">
The general format for a declaration of XML attributes in the DTD looks as follows:
<!ATTLIST [element] [attribute] [type] [default value]>
[element] is a reference to an XML element
[attribute] is equal to the name of the attribute such as "STYLE" or "COLORING"
in the example above.
[default value] specifies the value that is used if none is specified by the document
author.
[type] specifies one of the valid attribute types.
For example, validity of the attributes above may be defined with this DTD:
<?xml version = "1.0"?>
<!DOCTYPE CUSTOMER [
<!ELEMENT CUSTOMER (NAME,((PHONE,EMAIL),DELIMITER)*)>
<!ELEMENT NAME (#PCDATA)>
<!ELEMENT EMAIL (#PCDATA)>
<!ELEMENT PHONE (#PCDATA)>
<!ELEMENT DELIMITER EMPTY>
<!ATTLIST CUSTOMER
STYLE CDATA #REQUIRED
COLORING CDATA #REQUIRED
>
]>
Below you see a valid fragment of an XML sample text:
<CUSTOMER STYLE = "ordinary" COLORING = "windows">
<NAME>Nick Scherbakov</NAME>
<PHONE>582898</PHONE>

109
<EMAIL>[email protected]</EMAIL>
<DELIMITER/>
<PHONE>8735618</PHONE>
<EMAIL>[email protected]</EMAIL>
<DELIMITER/>
</CUSTOMER>
Default value is defined by one of the following key-words:
REQUIRED - there is no default value provided by the DTD, the attribute when
actually implemented in an XML document must define a value.
IMPLIED - a default value is specified by the DTD. If the document author does not
override this default, the default will be used.
FIXED - a default value is specified by the DTD. The document author may not
modify this value.
The following DTD allows to skip an attribute "CDATA", but attributes "COLORING" and
"EURO" are obligatory.
<?xml version = "1.0"?>
<!DOCTYPE CUSTOMER [
<!ELEMENT CUSTOMER (NAME,(PHONE,EMAIL)*,SALARY)>
<!ELEMENT NAME (#PCDATA)>
<!ELEMENT EMAIL (#PCDATA)>
<!ELEMENT PHONE (#PCDATA)>
<!ELEMENT SALARY EMPTY>
<!ATTLIST CUSTOMER
STYLE CDATA #IMPLIED
COLORING CDATA #REQUIRED>
<!ATTLIST SALARY
EURO CDATA #REQUIRED>
]>
<CUSTOMER COLORING = "windows">
<NAME>Nick Scherbakov</NAME>
<PHONE>582898</PHONE>
<EMAIL>[email protected]</EMAIL>
<PHONE>8735618</PHONE>
<EMAIL>[email protected]</EMAIL>
<SALARY EURO="3000"/>
</CUSTOMER>
there are 10 TYPEs of content for attributes including:
CDATA
Enumerated
ID
IDREF

110
IDREFS
ENTITY
ENTITIES
NMTOKEN
NMTOKENS
NOTATION
CDATA refers to plain old character data that may be any string of characters that does not
include ampersands (&), less than signs, (<), or quotation marks (").
For example,
<?xml version = "1.0"?>
<!DOCTYPE MYFIRM [
<!ELEMENT MYFIRM (CUSTOMER+)>
<!ELEMENT CUSTOMER (NAME,(PHONE,EMAIL)*,SALARY?)>
<!ELEMENT NAME (#PCDATA)>
<!ELEMENT EMAIL (#PCDATA)>
<!ELEMENT PHONE (#PCDATA)>
<!ELEMENT SALARY EMPTY>
<!ATTLIST CUSTOMER
STYLE CDATA #IMPLIED
COLORING CDATA #REQUIRED>
<!ATTLIST SALARY
EURO CDATA #REQUIRED>
]>
<MYFIRM>
<CUSTOMER COLORING = "windows">
<NAME>Nick Scherbakov</NAME>
<PHONE>582898</PHONE>
<EMAIL>[email protected]</EMAIL>
<PHONE>8735618</PHONE>
<EMAIL>[email protected]</EMAIL>
<SALARY EURO="3000"/>
</CUSTOMER> </MYFIRM>
ID represents a unique ID name within an XML document. ID usually appears in conjunction
with the #REQUIRED default.
For example, the DTD specification requires to provide each "CUSTOMER" object with a
unique CUSTOMER_ID attribute.
<?xml version = "1.0"?>
<!DOCTYPE MYFIRM [
<!ELEMENT MYFIRM (CUSTOMER+)>
<!ELEMENT CUSTOMER (NAME,(PHONE,EMAIL)*,SALARY?)>

111
<!ELEMENT NAME (#PCDATA)>
<!ELEMENT EMAIL (#PCDATA)>
<!ELEMENT PHONE (#PCDATA)>
<!ELEMENT SALARY EMPTY>
<!ATTLIST CUSTOMER
CUSTOMER_ID ID #REQUIRED>
]>
<MYFIRM>
<CUSTOMER CUSTOMER_ID= "x1">
<NAME>Nick Scherbakov</NAME>
<PHONE>582898</PHONE>
<EMAIL>[email protected]</EMAIL>
</CUSTOMER> <CUSTOMER CUSTOMER_ID= "x33">
<NAME>Denis Helic</NAME>
<PHONE>8735612</PHONE>
<EMAIL>[email protected]</EMAIL>
</CUSTOMER>
</MYFIRM>
The IDREF type allows the value of one attribute to be a reference to the same value of
another attribute. In other words, the value of the IDREF is the ID value of other XML
elements in the same XML document. IDREFS type allows multiple values of such attribute
(list of references)..
For example, the DTD below requires products be coded with attribute "CUSTOMERS" that
refer to unique identifications of customers in the same file.
<?xml version = "1.0"?>
<!DOCTYPE MYFIRM [
<!ELEMENT MYFIRM (CUSTOMER+,PRODUCT+)>
<!ELEMENT CUSTOMER (CNAME)>
<!ELEMENT PRODUCT (PNAME)>
<!ELEMENT CNAME (#PCDATA)>
<!ELEMENT PNAME (#PCDATA)>
<!ATTLIST CUSTOMER
CUSTOMER_ID ID #REQUIRED>
<!ATTLIST PRODUCT
CUSTOMERS IDREFS #REQUIRED>
]>
<MYFIRM>
<CUSTOMER CUSTOMER_ID= "x1">
<CNAME>Nick Scherbakov</CNAME>
</CUSTOMER>
<CUSTOMER CUSTOMER_ID= "x33">

112
<CNAME>Denis Helic</CNAME>
</CUSTOMER>
<PRODUCT CUSTOMERS= "x1 x33">
<PNAME>Pentium 4</PNAME>
</PRODUCT>
</MYFIRM>
The NMTOKEN and NMTOKENS types are used to specify temporary access right
permissions (token). The attributes are normally set by an XML generating application
and validated by another processing applications to check, for example, that the
element can be stored into a database.
<?xml version = "1.0"?>
<!DOCTYPE MYFIRM [
<!ELEMENT MYFIRM (CUSTOMER+,PRODUCT+)>
<!ELEMENT CUSTOMER (CNAME)>
<!ELEMENT PRODUCT (PNAME)>
<!ELEMENT CNAME (#PCDATA)>
<!ELEMENT PNAME (#PCDATA)>
<!ATTLIST CUSTOMER
CUSTOMER_ID ID #REQUIRED
ONLINE NMTOKEN #IMPLIED>
<!ATTLIST PRODUCT
DEMO NMTOKEN #IMPLIED>
]>
<MYFIRM>
<CUSTOMER CUSTOMER_ID= "1" ONLINE="0001">
<CNAME>Nick Scherbakov</CNAME>
</CUSTOMER>
<CUSTOMER CUSTOMER_ID= "33" ONLINE="0002">
<CNAME>Denis Helic</CNAME>
</CUSTOMER>
<PRODUCT DEMO="0003">
<PNAME>Pentium 4</PNAME>
</PRODUCT>
</MYFIRM>
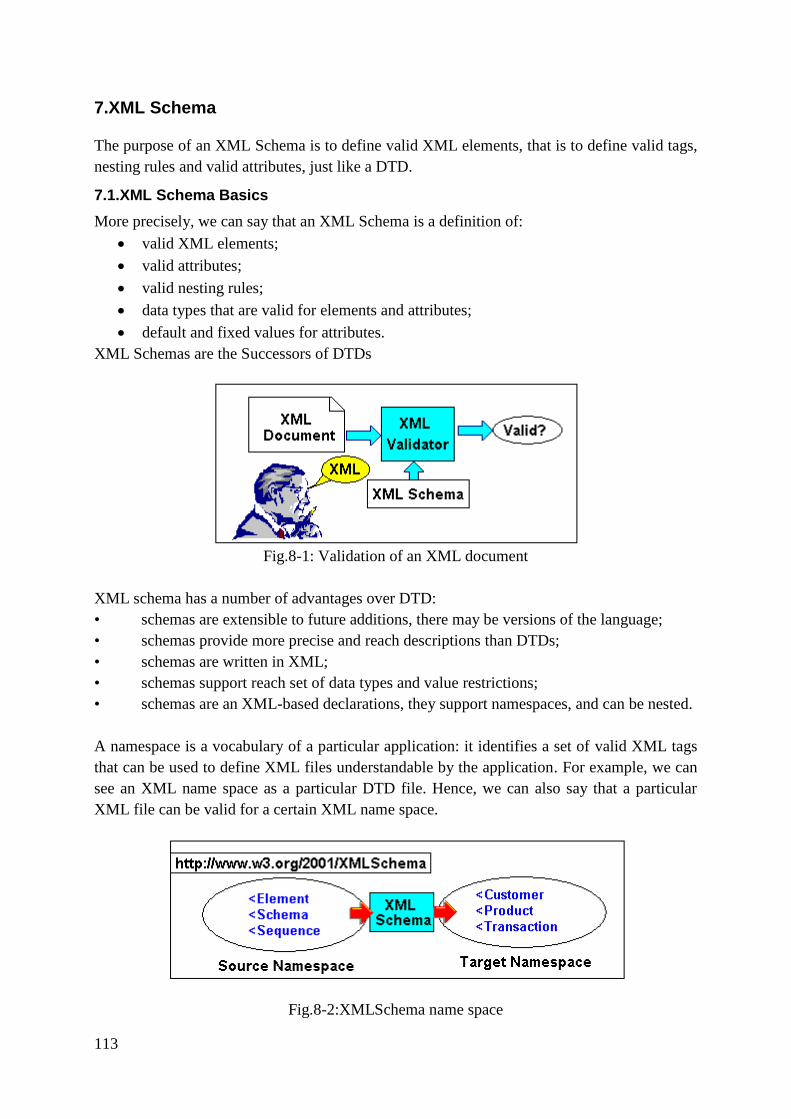
113
7.XML Schema
The purpose of an XML Schema is to define valid XML elements, that is to define valid tags,
nesting rules and valid attributes, just like a DTD.
7.1.XML Schema Basics
More precisely, we can say that an XML Schema is a definition of:
valid XML elements;
valid attributes;
valid nesting rules;
data types that are valid for elements and attributes;
default and fixed values for attributes.
XML Schemas are the Successors of DTDs
Fig.8-1: Validation of an XML document
XML schema has a number of advantages over DTD:
• schemas are extensible to future additions, there may be versions of the language;
• schemas provide more precise and reach descriptions than DTDs;
• schemas are written in XML;
• schemas support reach set of data types and value restrictions;
• schemas are an XML-based declarations, they support namespaces, and can be nested.
A namespace is a vocabulary of a particular application: it identifies a set of valid XML tags
that can be used to define XML files understandable by the application. For example, we can
see an XML name space as a particular DTD file. Hence, we can also say that a particular
XML file can be valid for a certain XML name space.
Fig.8-2:XMLSchema name space

114
XML Schema is an XML file that is valid for the special "XMLSchema" name space, and
defines a new name space.
One difference between XML Schemas and DTDs is that the XML Schema vocabulary is
associated with a namespace, and can be easily modified providing new versions of the
language. Likewise, the new vocabulary that you define must be associated with a new
namespace.
For example, the following notation:
<?xml version="1.0"?>
<xsd:schema xmlns:xsd="http://www.w3.org/2001/XMLSchema"
targetNamespace="myFirsm.xsd">
<xsd:element name="PName" type="xsd:string"/>
</xsd:schema>
defines
"http://www.w3.org/2001/XMLSchema" as a source namespace
"myFirsm.xsd" as a target namespace
prefix "xsd:" as a precedence for any valid element defined in the source namespace
new element "PName" to be part of the target namespace
Any string can be set as a unique identifier of a name space, historically, name spaces are
referred to as URLs of the name space definition files (schema or DTD). For example, the
notation above refer to the string "http://www.w3.org/2001/XMLSchema" as to unique
identifier of the name space. We can also expect that we would find the XML DTD or XML
Schema as a file with this URL, but this is optional.
7.2.Simple Element Types
A simple element is an XML element that can contain only string of characters. It cannot
contain any other elements or attributes. The content of a simple XML element can be of
many different types. It can be one of the types that are included in the XML Schema name
space (boolean, string, integer, date, etc.), or it can be a custom type that is defined as a part of
the schema definition.
Consider the following XML schema definition:
<?xml version="1.0"?>
<xsd:schema xmlns:xsd=“http://www.w3.org/2001/XMLSchema“>
…
<xsd:element name="PName" type="xsd:string"/>
<xsd:element name="PPrice" type="xsd:integer"/>
...
</xsd:schema>
a valid XML fragment may look as follows:
<?xml version="1.0"?>
<myFirm xmlns:xsi="http://www.w3.org/2001/XMLSchema-instance"
xsi:noNamespaceSchemaLocation="myFirm.xsd">

115
. . .
<PName>Graphic Card</PName>
<PPrice>98</PPrice>
. . .
</myFirm>
Note again that the notation
<myFirm xmlns:xsi="http://www.w3.org/2001/XMLSchema-instance"
xsi:noNamespaceSchemaLocation="myFirm.xsd">
basically means that
the XML file is based on the syntax defined by an instance of XML schema
"http://www.w3.org/2001/XMLSchema"
the name space defined by this particular schema definition text can be referred to as a
string "myFirm.xsd"
Simple elements can have a default value or a fixed value set. A default value is automatically
assigned to the element when no other value is specified.
For example,
<?xml version="1.0"?>
<xsd:schema xmlns:xsd=“http://www.w3.org/2001/XMLSchema“>
…
<xsd:element name="PName" type="xsd:string"
default="No name yet"/>
<xsd:element name="PPrice" type="xsd:integer"
default="100"/>
...
</xsd:schema>
the two XML fragments below are identical:
<?xml version="1.0"?>
<myFirm xmlns:xsi="http://www.w3.org/2001/XMLSchema-instance"
xsi:noNamespaceSchemaLocation="myFirm.xsd">
. . .
<PName>No name yet</PName>
<PPrice>100</PPrice>
. . .
<PName></PName>
<PPrice/>
. . .
</myFirm>
As you see we use XML attributes to define type of an element and default value.
Alternatively an element may be declared by means of nested XML Tags. Thus a tag
"restriction" can define a type of the element and values that are valid for the element.
<?xml version="1.0"?>

116
<xsd:schema xmlns:xsd=“http://www.w3.org/2001/XMLSchema“>
…
<xsd:element name="PName">
<xsd:simpleType>
<xsd:restriction base="xsd:string"></xsd:restriction>
</xsd:simpleType>
</xsd:element>
<xsd:element name="PPrice">
<xsd:simpleType>
<xsd:restriction base="xsd:integer"></xsd:restriction>
</xsd:simpleType>
</xsd:element>
...
</xsd:schema>
a XML fragment valid for this schema may look as follows:
<?xml version="1.0"?>
<myFirm xmlns:xsi="http://www.w3.org/2001/XMLSchema-instance"
xsi:noNamespaceSchemaLocation="myFirm.xsd">
. . .
<PName>Graphic Card</PName>
<PPrice>99</PPrice>
. . .
</myFirm>
In more general sense, restrictions are used to control acceptable values for XML elements or
attributes. Restrictions on XML elements are also called facets. For example, facets can set
minimum and maximum integer values.
<?xml version="1.0"?>
<xsd:schema xmlns:xsd=“http://www.w3.org/2001/XMLSchema“>
…
<xsd:element name="PName">
<xsd:simpleType>
<xsd:restriction base="xsd:string"></xsd:restriction>
</xsd:simpleType>
</xsd:element>
<xsd:element name="PPrice">
<xsd:simpleType>
<xsd:restriction base="xsd:integer">
<xsd:minInclusive value="0"/>
<xsd:maxInclusive value="100"/>
</xsd:restriction>
</xsd:simpleType>

117
</xsd:element>
...
</xsd:schema>
a valid XML fragment may look as follows:
<?xml version="1.0"?>
<myFirm xmlns:xsi="http://www.w3.org/2001/XMLSchema-instance"
xsi:noNamespaceSchemaLocation="myFirm.xsd">
. . .
<PName>Graphic Card</PName>
<PPrice>99</PPrice>
. . .
</myFirm>
Facets can be of many different types, They can define a syntax of an element content by
means of a regular expression, set restrictions on a length of the element, and so on.
<?xml version="1.0"?>
<xsd:schema xmlns:xsd=“http://www.w3.org/2001/XMLSchema“>
…
<xsd:element name="PName">
<xsd:simpleType>
<xsd:restriction base="xsd:string">
<xsd:pattern value="[A-Z]([a-z][A-Z][0-9])+"/>
<xsd:minLength value="5"/>
<xsd:maxLength value="48"/>
</xsd:restriction>
</xsd:simpleType>
</xsd:element>
<xsd:element name="PPrice">
<xsd:simpleType>
<xsd:restriction base="xsd:integer">
<xsd:minInclusive value="0"/>
<xsd:maxInclusive value="100"/>
</xsd:restriction>
</xsd:simpleType>
</xsd:element>
...
</xsd:schema>
a valid XML fragment may look as follows:
<?xml version="1.0"?>
<myFirm xmlns:xsi="http://www.w3.org/2001/XMLSchema-instance"
xsi:noNamespaceSchemaLocation="myFirm.xsd">

118
. . .
<PName>SyR9xP8</PName>
<PPrice>99</PPrice>
. . .
</myFirm>
7.3.Complex Element Types
A complex element is an XML element that can contain other elements and/or may have
attributes. A complex element is declared using an XML schema tag "compexType" and
nested definition of all its components.
For example,
<?xml version="1.0"?>
<xsd:schema xmlns:xsd=“http://www.w3.org/2001/XMLSchema“>
…
<xsd:element name="Product">
<xsd:complexType>
<xsd:sequence>
<xsd:element name="PName" type="xsd:string"/>
<xsd:element name="PPrice" type="xsd:integer"/>
</xsd:sequence>
</xsd:complexType>
</xsd:element>
...
</xsd:schema>
Note that the definition of child elements, "PName" and "PPrice", are surrounded by the
"sequence" XML schema tags. This means that the child elements must appear in the same
order as they are declared; "PName" first and "PPrice" second.
Thus, a valid XML fragment may look as follows:
<?xml version="1.0"?>
<myFirm xmlns:xsi="http://www.w3.org/2001/XMLSchema-instance"
xsi:noNamespaceSchemaLocation="myFirm.xsd">
. . .
<Product>
<PName>Graphic Card</PName>
<PPrice>98</PPrice>
</Product>
<Product>
<PName>LAN Card</PName>
<PPrice>178</PPrice>
</Product>
. . .

119
</myFirm>
In a similar way, the "all" indicator specifies that the child elements can appear in any order
and that each child element must occur only once:
<?xml version="1.0"?>
<xsd:schema xmlns:xsd=“http://www.w3.org/2001/XMLSchema“>
…
<xsd:element name="Product">
<xsd:complexType>
<xsd:all>
<xsd:element name="PName" type="xsd:string"/>
<xsd:element name="PPrice" type="xsd:integer"/>
</xsd:all>
</xsd:complexType>
</xsd:element>
...
</xsd:schema>
In this case, a valid XML fragment may look like this:
<?xml version="1.0"?>
<myFirm xmlns:xsi="http://www.w3.org/2001/XMLSchema-instance"
xsi:noNamespaceSchemaLocation="myFirm.xsd">
. . .
<Product>
<PName>Graphic Card</PName>
<PPrice>98</PPrice>
</Product>
<Product>
<PPrice>12</PPrice>
<PName>LAN Card</PName>
</Product>
. . .
</myFirm>
The "choice" indicator specifies that either one child element or another can occur:
<?xml version="1.0"?>
<xsd:schema xmlns:xsd=“http://www.w3.org/2001/XMLSchema“>
…
<xsd:element name="Product">
<xsd:complexType>
<xsd:choice>
<xsd:element name="PName" type="xsd:string"/>

120
<xsd:element name="PPrice" type="xsd:integer"/>
</xsd:choice>
</xsd:complexType>
</xsd:element>
...
</xsd:schema>
In this case, "Product" XML elements may have only one child - "PName" or "PPrice".
<?xml version="1.0"?>
<myFirm xmlns:xsi="http://www.w3.org/2001/XMLSchema-instance"
xsi:noNamespaceSchemaLocation="myFirm.xsd">
. . .
<Product><PName>Graphic Card</PName></Product>
<Product><PPrice>12</PPrice></Product>
. . .
</myFirm>
The "sequience", "all" and "choice" indicators can be nested to define more complex
orders of child elements
<?xml version="1.0"?>
<xsd:schema xmlns:xsd=“http://www.w3.org/2001/XMLSchema“>
…
<xsd:element name="Product">
<xsd:complexType>
<xsd:sequence>
<xsd:element name="PName" type="xsd:string"/>
<xsd:choice>
<xsd:element name="Price_Dollar" type="xsd:integer"/>
<xsd:element name="Price_Euro" type="xsd:integer"/>
</xsd:choice>
</xsd:sequence>
</xsd:complexType>
</xsd:element>
...
</xsd:schema>
Thus, a valid XML fragment may include a sequence of two elements: "PName" on the first
position, and either element "Price_Euro" or "Price_Dollar" on the second position:
<?xml version="1.0"?>
<myFirm xmlns:xsi="http://www.w3.org/2001/XMLSchema-instance"
xsi:noNamespaceSchemaLocation="myFirm.xsd">
. . .
<Product>

121
<PName>Graphic Card</PName><Price_Euro>87</Price_Euro>
</Product>
<Product>
<PName>LAN Card</PName><Price_Dollar>18</Price_Dollar>
</Product>
. . .
</myFirm>
The maxOccurs/minOccurs attributes of an element definition specify the
maximum/minimum number of times an element may occur. For example the definition
below allows to repeat the element "Product" any number of times, the element "PPrice"
can be omitted or repeated up to 5 times.
<?xml version="1.0"?>
<xsd:schema xmlns:xsd=“http://www.w3.org/2001/XMLSchema“>
<xsd:element name="myFirm">
<xsd:complexType>
<xsd:sequence>
<xsd:element name="Product" maxOccurs="unbounded">
<xsd:complexType>
<xsd:sequence>
<xsd:element name="PName" type="xsd:string"/>
<xsd:element name="PPrice" type="xsd:integer"
minOccurs="0" maxOccurs="5"/>
</xsd:sequence>
</xsd:complexType>
</xsd:element>
</xsd:sequence>
</xsd:complexType>
</xsd:element>
</xsd:schema>
Thus, a valid XML document may look as follows:
<?xml version="1.0"?>
<myFirm xmlns:xsi="http://www.w3.org/2001/XMLSchema-instance"
xsi:noNamespaceSchemaLocation="myFirm.xsd">
<Product>
<PName>Graphic Card</PName>
</Product>
<Product>
<PName>LAN Card</PName>
<PPrice>18</PPrice>
<PPrice>19</PPrice>
<PPrice>20</PPrice>

122
</Product>
</myFirm>
Elements may have attributes. If an element has attributes, it is considered to be of complex
type. The attribute itself is declared with a nested tag
"<xsd:attribute name="xxx" type="yyy"/>".
For example, an attribute "Euro" for the XML element "PPrice" is defined as follows:
<?xml version="1.0"?>
<xsd:schema xmlns:xsd=“http://www.w3.org/2001/XMLSchema“>
<xsd:element name="myFirm"><xsd:complexType><xsd:sequence>
<xsd:element name="Product" maxOccurs="unbounded">
<xsd:complexType><xsd:sequence>
<xsd:element name="PName" type="xsd:string"/>
<xsd:element name="PPrice" minOccurs="1" maxOccurs="5">
<xsd:complexType>
<xsd:attribute name="Euro" type="xsd:integer"/>
</xsd:complexType>
</xsd:element>
</xsd:sequence></xsd:complexType>
</xsd:element></xsd:sequence>
</xsd:complexType></xsd:element>
</xsd:schema>
A valid XML document may specify attributes "Euro" for XML objects "PPrice "
<?xml version="1.0"?>
<myFirm xmlns:xsi="http://www.w3.org/2001/XMLSchema-instance"
xsi:noNamespaceSchemaLocation="myFirm.xsd">
<Product>
<PName>Graphic Card</PName>
<PPrice Euro="67"/>
</Product>
<Product>
<PName>LAN Card</PName>
<PPrice Euro="18"/>
<PPrice Euro="19"/>
<PPrice Euro="20"/>
</Product></myFirm>
All attributes are optional by default. To explicitly specify that the attribute is required, the
"use" attribute must be specified as "required":
<?xml version="1.0"?>
<xsd:schema xmlns:xsd=“http://www.w3.org/2001/XMLSchema“>
<xsd:element name="myFirm"><xsd:complexType><xsd:sequence>

123
<xsd:element name="Product"
maxOccurs="unbounded"><xsd:complexType>
<xsd:sequence>
<xsd:element name="PName" type="xsd:string">
<xsd:element name="PPrice" minOccurs="1" maxOccurs="5"/>
<xsd:complexType>
<xsd:attribute name="Euro" type="xsd:integer"
use="required"/>
</xsd:complexType>
</xsd:element></xsd:sequence></xsd:complexType>
</xsd:element></xsd:sequence></xsd:complexType></xsd:element>
...
</xsd:schema>
7.4.References
Types defined in XML schema may be named and elements can simply refer to a named type.
For example, we moght define a special complex type "productinfo"
<?xml version="1.0"?>
<xsd:schema xmlns:xsd=“http://www.w3.org/2001/XMLSchema“>
…
<xsd:complexType name="productinfo">
<xsd:sequence>
<xsd:element name="PName" type="xsd:string"/>
<xsd:element name="PPrice" type="xsd:integer"/>
</xsd:sequence>
</xsd:complexType>
and simply refer to such complex type as we define new XML elements "BestSeller" and
"Product".
<xsd:element name="BestSeller" type="productinfo"/>
<xsd:element name="Product" type="productinfo"/>
...
</xsd:schema>
In this case, we conside that "Product" and "BestSeller" are different kind of the
"productinfo". Thus, a valid XML fragment may look as follows:
<?xml version="1.0"?>
<myFirm xmlns:xsi="http://www.w3.org/2001/XMLSchema-instance"
xsi:noNamespaceSchemaLocation="myFirm.xsd">
. . .
<Product>
<PName>Graphic Card</PName><PPrice>98</PPrice>
</Product>

124
<BestSeller>
<PName>LAN Card</PName><PPrice>178</PPrice>
</BestSeller>
. . .
</myFirm>
Complex element types can be based on an existing complex type and extended with new
elements.
For example, "bestinfo" type is based on the "productinfo" type, but an additional
"DeliveryType" attribute is added. In other words, XML elements of type "bestinfo" may
include an additional XML attribute "DeliveryType", while elements of type "productinfo"
may not.
<?xml version="1.0"?>
<xsd:schema xmlns:xsd=“http://www.w3.org/2001/XMLSchema“>
…
<xsd:complexType name="productinfo">
<xsd:sequence>
<xsd:element name="PName" type="xsd:string"/>
<xsd:element name="PPrice" type="xsd:integer"/>
</xsd:sequence>
</xsd:complexType>
<xsd:complexType name="bestinfo">
<xsd:complexContent>
<xsd:extension base="productinfo">
<xsd:attribute name="DeliveryTime"
type="xsd:integer"/>
</xsd:extension>
</xsd:complexContent>
</xsd:complexType>
<xsd:element name="BestSeller" type="bestinfo"/>
<xsd:element name="Product" type="productinfo"/>
...
</xsd:schema>
A valid XML fragment may look as below:
<?xml version="1.0"?>
<myFirm xmlns:xsi="http://www.w3.org/2001/XMLSchema-instance"
xsi:noNamespaceSchemaLocation="myFirm.xsd">
. . .
<Product>
<PName>Graphic Card</PName>
<PPrice>98</PPrice>
</Product>
<BestSeller DeliveryTime="3">

125
<PName>LAN Card</PName>
<PPrice>178</PPrice>
</BestSeller>
. . .
</myFirm>

126
8. XSL-eXtensible Stylesheet Language
As it was mentioned early, XML does not prescribe a set tags to be used, we can use any tags
we want, and the meaning of these tags are not automatically understood by the browser: For
examplw, the tag <table > could mean a HTML table or an XML element for describing the
piece of furniture. XML is a meta-language for defining other languages, and there is no
standard way to display XML tags.
8.1.Introduction to XSL
In order to visualize an XML document, a special mechanism for describing how the
document should be displayed is needed. XSL (eXtensible Stylesheet Language) is a special
language for defining such rules for visualization of XML documents.
XSL (eXtensible Stylesheet Language) is entirely based on XML and on concept of
namespaces
Fig.8-1: Transforming an XML document
XSL consists of two parts that are defined by different namespaces:
a method for transforming XML documents (TAGs that can filter and sort XML data
defined by namespace "http://www.w3.org/1999/XSL/Transform" )
a method for formatting XML documents (TAGs that can format XML data, based on
the data value defined by namespace "http://www.w3.org/1999/XSL/Format")
Fig.8-2: XSL Name Spaces
Recollect that the notation:
<xsl:stylesheet version="1.0"

127
xmlns:xsl="http://www.w3.org/1999/XSL/Transform"
xmlns:fo="http://www.w3.org/1999/XSL/Format">
means that
the transformation TAGs defined by "http://www.w3.org/1999/XSL/Transform" are
prefixed with "xsl:"
the formatting TAGs defined by "http://www.w3.org/1999/XSL/Format" are prefixed
with "fo:"
8.2.Transforming XML Documents
XSL defines templates for XML elements. The templates are used for replacing XML TAGs
with valid HTML fragments.
One critical capability of such a transformation language is to locate source elements to be
replaced. XSL, for example, does this with so-called "selectors."
Most templates have the following form:
<xsl:template match=[selector]>
<HTML TAGs><xsl:apply-templates/></HTML TAGs>
</xsl:template>
The code defining a template for replacing "CUSTOMER" XML elements must start with the
selector:
<xsl:template match="CUSTOMER">
then an HTML encoding to be used to replace the element must be defined:
<UL><xsl:apply-templates/></UL>
the <xsl:apply-templates/> transformation specification means that the content of the
replaced element must be further processed here.
Finally, the end tag </xsl:template> must finalized the template definition. Note that the
usage of the prefix "xsl:" for the tags defining transformation specifications clearly
distinguish them from an HTML encoding.
For example, the transformation specifications below:
<xsl:template match="CUSTOMER">
<UL><xsl:apply-templates/></UL>
</xsl:template>
<xsl:template match="NAME">
<LI>Name: <xsl:apply-templates/></LI>
</xsl:template>
<xsl:template match="PHONE">
<LI>Phone: <xsl:apply-templates/></LI>
</xsl:template>
would convert the XML code:
<CUSTOMER>
<NAME>Nick Scherbakov</NAME>
<PHONE>582898</PHONE>
</CUSTOMER>
<CUSTOMER>

128
<NAME>Denis Helic</NAME>
<PHONE>10215027</PHONE>
</CUSTOMER>
into the following HTML fragment:
<UL>
<LI>Name: Nick Scherbakov</LI>
<LI>Phone: 582898</LI>
</UL>
<UL>
<LI>Name: Denis Helic</LI>
<LI>Phone: 10215027</LI>
</UL>
Similarly to parsing HTML, when a XSL transformer parses an XML document, it builds a
so-called XML Document Object Model (XML DOM). The document is considered to be an
hierarchy of XML elements. Each element belongs to a particular type and may consist of
other elements (Children).
For example,
<DOCUMENT>
<CUSTOMER>
<NAME>Nick Scherbakov</NAME>
<PHONE>582898</PHONE>
<EMAIL>[email protected]</EMAIL>
</CUSTOMER>
<CUSTOMER>
<NAME>Denis Helic</NAME>
<PHONE>10215027</PHONE>
<EMAIL>[email protected]</EMAIL>
</CUSTOMER>
</DOCUMENT>
Fig.8-3: XML DOM Tree
In context of an XML DOM, selectors may have more complex format.
For example,
"/" Matches the root of the document
"CUSTOMER|PRODUCT" Matches <CUSTOMER> or <PRODUCT> elements

129
The value of the required "match" attribute may contain an XPath expression. XPath works
like navigating a file system where a forward slash ("/") separates directories and
subdirectories on a path to a particular node..
"CUSTOMER/NAME" Matches all <NAMES> elements that have a parent of type
<CUSTOMER>
"PRODUCT/NAME" Matches all <NAMES> elements that have a parent of type
<PRODUCT>
Consider the following transformation specifications:
<xsl:template match="CUSTOMER|PRODUCT">
<UL><xsl:apply-templates/></UL>
</xsl:template>
<xsl:template match="CUSTOMER/NAME">
<LI>Customer name: <xsl:apply-templates/></LI>
</xsl:template>
<xsl:template match="PRODUCT/NAME">
<LI>Product name: <xsl:apply-templates/></LI>
</xsl:template>
The XML document:
<PRODUCT><NAME>WBT-Master</NAME></PRODUCT>
<CUSTOMER><NAME>Nick Scherbakov</NAME></CUSTOMER>
<CUSTOMER><NAME>Denis Helic</NAME></CUSTOMER>
will be converted into the following HTML:
<UL><LI>Product name: WBT-Master</LI></UL>
<UL><LI>Customer name: Nick Scherbakov</LI></UL>
<UL><LI>Customer name: Denis Helic</LI></UL>
Attribute values may be also used to locate XML element
For example,
"CUSTOMER[@TYPE='Individual']" Match <CUSTOMER> elements that
have "TYPE" attribute with the value "Individual".
The following transformation specification:
<xsl:template match="CUSTOMER">
<UL><xsl:apply-templates/></UL>
</xsl:template>
<xsl:template match="CUSTOMER[@TYPE='Individual']/NAME">
<LI>Customer name: <xsl:apply-templates/></LI>
</xsl:template>
<xsl:template match="CUSTOMER[@TYPE='Corporative']/NAME">
<LI>Firm name: <xsl:apply-templates/></LI>
</xsl:template>
will transform the sample XML document:

130
<CUSTOMER TYPE="Corporative">
<NAME>MM International</NAME>
</CUSTOMER>
<CUSTOMER TYPE="Individual">
<NAME>Denis Helic</NAME>
</CUSTOMER>
into the following HTML encoding:
<UL><LI>Firm name: MM International</LI></UL>
<UL><LI>Customer name: Denis Helic</LI></UL>
8.3.XSL Imperative Statements
XML elements may be selected using a procedural approach like in programming. In this
case, templates are defined using imperative commands to select elements of an XML
document and retrieve their content and values of attributes.
For example, the command <xsl:value-of select="myFirm/NAME"/> selects a first
element <NAME> and returns its content.
For example, in the sample below we do not describe rules to be used to replace any XML
element of a certain type with a template, we, rather, isse an imperative command "retrieve
value of this XML element and place it on a certain position.
<xsl:stylesheet xmlns:xsl="http://www.w3.org/1999/XSL/Transform">
<xsl:template match="/">
<html><body>
<UL>
<LI><xsl:value-of select="myFirm/NAME"/></LI>
</UL>
</body></html>
</xsl:template>
</xsl:stylesheet>
The XML document:
<myFirm>
<NAME>Nick Scherbakov</NAME>
<NAME>Denis Helic</NAME>
<PHONE>10215027</PHONE>
<EMAIL>[email protected]</EMAIL>
</myFirm>
will be converted into the following HTML document:
<html><body>
<UL>
<LI>Nick Scherbakov</LI>
</UL>
</body></html>
131
The <xsl:for-each specification scans and converts a set of elements in the XML
document. All other select statements nested into the loop locates a child in the hierarchy.
The specification below scans all the "myFirm/CUSTOMER" elements, retrieves a value of
"NAME" elements from each of them, and build an HTML fragment.
<xsl:template match="/">
<html><body>
<xsl:for-each select="myFirm/CUSTOMER">
<UL>
<LI><xsl:value-of select="NAME"/></LI>
</UL>
</xsl:for-each>
</body></html>
</xsl:template>
The XML document:
<myFirm>
<CUSTOMER>
<NAME>Nick Scherbakov</NAME>
<PHONE>582898</PHONE>
<EMAIL>[email protected]</EMAIL>
</CUSTOMER>
<CUSTOMER>
<NAME>Denis Helic</NAME>
<PHONE>10215027</PHONE>
<EMAIL>[email protected]</EMAIL>
</CUSTOMER>
</myFirm>
will be converted into the following HTML:
<html><body>
<UL>
<LI>Nick Scherbakov</LI>
</UL>
<UL>
<LI>Denis Helic</LI>
</UL>
</body></html>
Some XML elements can be excluded from a transformation by means of so-called filters.
Thus, in a simplest case, a particular value of an attribute can be used as a filter. In the sample
transformation below, we scan and transform all the elements "<CUSTOMER
TYPE="Individual">" first, and on the second step, we scan and transform the elements
"<CUSTOMER TYPE="Corporative">".
<xsl:template match="/">

132
<html><body>
<xsl:for-each select="myFirm/CUSTOMER[@TYPE='Individual']">
<UL>
<LI><xsl:value-of select="NAME"/></LI>
</UL>
</xsl:for-each>
<xsl:for-each select="myFirm/CUSTOMER[@TYPE='Corporative']">
<H2><xsl:value-of select="FIRM"/></H2>
</xsl:for-each>
</body></html>
</xsl:template>
The XML document:
<myFirm>
<CUSTOMER TYPE="Corporative">
<FIRM>MM Internationsl</FIRM>
<PHONE>582898</PHONE>
<EMAIL>[email protected]</EMAIL>
</CUSTOMER>
<CUSTOMER TYPE="Individual">
<NAME>Denis Helic</NAME>
<PHONE>10215027</PHONE>
<EMAIL>[email protected]</EMAIL>
</CUSTOMER>
</myFirm>
will be converted into the following HTML:
<html><body>
<UL>
<LI>Denis Helic</LI>
</UL>
<H2>MM International</H2>
</body></html>
A similar notation is used by so-called conditional XSL patterns. In the sample transformation
below, we scan all the elements <CUSTOMER", transformation of the elements is done
differently depending on a particular value of attribute "TYPE".
<xsl:template match="/">
<html><body>
<xsl:for-each select="myFirm/CUSTOMER">
<xsl:if test="@TYPE='Individual'">
<UL><LI><xsl:value-of select="NAME"/></LI></UL>
</xsl:if>
<xsl:if test="@TYPE='Corporative'">
<H2><xsl:value-of select="FIRM"/></H2>

133
</xsl:if>
</xsl:for-each>
</body></html>
</xsl:template>
The XML document:
<myFirm>
<CUSTOMER TYPE="Corporative">
<FIRM>MM Internationsl</FIRM>
<PHONE>582898</PHONE>
<EMAIL>[email protected]</EMAIL>
</CUSTOMER>
<CUSTOMER TYPE="Individual">
<NAME>Denis Helic</NAME>
<PHONE>10215027</PHONE>
<EMAIL>[email protected]</EMAIL>
</CUSTOMER>
</myFirm>
will be converted into the following HTML:
<html><body>
<H2>MM International</H2>
<UL>
<LI>Denis Helic</LI>
</UL>
</body></html>
A conditional choose test against the XML content, is defined by means of specifications:
xsl:choose, xsl:when (multiple) and xsl:otherwise in an XSL document
For example,
<xsl:template match="/">
<html><body>
<xsl:for-each select="myFirm/CUSTOMER">
<xsl:choose>
<xsl:when test="@TYPE='Individual'">
<UL><LI><xsl:value-of select="NAME"/></LI></UL>
</xsl:when>
<xsl:when test="@TYPE='Corporative'">
<H2><xsl:value-of select="FIRM"/></H2>
</xsl:when>
<xsl:otherwise>
<B>Invalid Customer Type!</B>
</xsl:otherwise>
</xsl:choose>

134
</xsl:for-each>
</body></html>
</xsl:template>
The XML document:
<myFirm><CUSTOMER>
<FIRM>MM Internationsl</FIRM>
<PHONE>582898</PHONE>
<EMAIL>[email protected]</EMAIL>
</CUSTOMER>
<CUSTOMER TYPE="Individual">
<NAME>Denis Helic</NAME>
<PHONE>10215027</PHONE>
<EMAIL>[email protected]</EMAIL>
</CUSTOMER> </myFirm>
will be converted into the following HTML:
<html><body>
<B>Invalid Customer Type!</B>
<UL><LI>Denis Helic</LI></UL>
</body></html>
To sort elements of an XML file we can use a sort instruction. The sort instruction defines
sorting criteria (select) and an ascending or descending sort order.
<xsl:template match="/">
<html><body>
<xsl:for-each select="myFirm/CUSTOMER">
<xsl:sort select="@CUSTOMER_ID" data-type="number"
order="ascending"/>
<UL><LI><xsl:value-of select="NAME"/></LI></UL>
</xsl:for-each>
</body></html>
</xsl:template>
The XML document:
<myFirm><CUSTOMER CUSTOMER_ID="33">
<NAME>Nick Scherbakov</NAME>
<PHONE>582898</PHONE>
<EMAIL>[email protected]</EMAIL>
</CUSTOMER>
<CUSTOMER CUSTOMER_ID="22">
<NAME>Denis Helic</NAME>
<PHONE>10215027</PHONE>
<EMAIL>[email protected]</EMAIL>
</CUSTOMER> </myFirm>

135
will be converted into the following HTML:
<html><body>
<UL><LI>Denis Helic</LI></UL>
<UL><LI>Nick Scherbakov</LI></UL>
</body></html>
8.4.XSL Formatting Specifications
The XSL formatting model is based on rectangular boxes called areas that can contain text,
empty space, images, or other formatting objects.
The "fo:block" identifies a rectangular area and impose a certain formatting properties onto
all objects inside the block. The formatting properties are fairly similar to style properties in
CSS (see the Section 1.4). Thus we can set font, background, color, margin, border, etc. There
are special properties for setting a document as such and setting page printing preferences.
XSL-FO needs special formatting software to produce output (normally a PDF file).
For example,
<xsl:template match="DOC">
<fo:root xmlns:fo="http://www.w3.org/1999/XSL/Format">
<fo:layout-master-set>
<fo:simple-page-master master-name="my-page">
<fo:region-body margin="1in"/>
</fo:simple-page-master>
</fo:layout-master-set>
<xsl:apply-templates/>
</xsl:template>
...
<xsl:template match="CUSTOMER">
<fo:block font-size="12pt" space-before="20px"
margin-left="1px" margin-right="1px"
border-width="1px" border-color="blue"
text-align="justified">
Customer:<UL><xsl:apply-templates/></UL>
</fo:block>
</xsl:template>
<xsl:template match="NAME">
<fo:block font-size="12pt">
<LI><xsl:value-of select="NAME"/></LI>
</fo:block>
</xsl:template>
would be used to produce a PDF document out of an XML file like this:
<DOC> <CUSTOMER>

136
<NAME>Nick Scherbakov</NAME>
<PHONE>582898</PHONE>
<EMAIL>[email protected]</EMAIL>
</CUSTOMER>
<CUSTOMER>
<NAME>Denis Helic</NAME>
<PHONE>10215027</PHONE>
<EMAIL>[email protected]</EMAIL>
</CUSTOMER> </DOC>
8.5.XSL Transformers
XSL transformer is a software component that access two files (XML source file and XSL
specification file) and returns a valid HTML text (see Fig.8-1: Transforming an XML
document).
Almost all server-side scripting engines contains an XSL transformer as a special component.
In this section, we discuss a typical XSL transformation by means of PHP.
The XML transformer in PHP is implemented as a special class that simplifies its integration
into a particulr PHP script. The transformation can be done as simple as this:
// $xml - XML file
// $xsl - XSL file
/* Create an XSLT processor */
$proc = new XsltProcessor;
$proc->importStyleSheet($xsl);
/* Perform the transformation */
$html = $proc->transformToXML($xml);
/* Output the resulting HTML */
echo $html;
The XSL transformation task can be also done on a client. In this case, an XML file is
provided with a reference to an XSL transformation specifications resided on the HTTP
server.

137
For example, you can use an XML capable client to transform an XML file if the following
reference is provided .
<?xml version=\"1.0\" encoding="UTF-8"?>
<?xml-stylesheet type="text/xsl" href="[XSL specification].xsl"?>
........... valid XML encoding ..............
Note, the server should inform client about MIME type of the file (text/xml) to initiate the
transformation. In other words, the header of HTTP response should contain the following
line: Content-Type: text/xml;
If an XML file is generated dynamically by means of a server-side script (for example, by
means of PHP), the script should take care about setting a correct MIME type into the HTTP
header.
Thus, PHP generates an XML file that can be transformed on the client as follows:
<?
header("Content-Type: text/xml");
$xml = "<";
$xml .= "?xml version=\"1.0\" encoding=\"UTF-8\"?";
$xml .= ">\n";
$xml .= "<";
$xml .= "?xml-stylesheet type=\"text/xsl\" href=\"x.xsl\"?";
$xml .= ">\n";
// further generating XML text into $xml variable
echo $xml;
?>

138
9.XML Standards and WEB Services
Nowadays, functionality of WWW significantly differs from being simply a huge repository
of HTML documents. There is a lot of internet-based applications that perform functions far
beyond providing an ordinary access to remote HTML documents. For example, social
networks, electronic libraries , individual blogs, etc. to mention just a few.
Such innovative functionality normally is referred to as WEB 2.0. We can identify a number
of technical features that are trade mark of WEB 2.0 functionality:
- processing metadata and semantic networks;
- delivering content instead of browsing content.
- web services and reusing functionality over Internet.
- packaging content.
XML plays a significant role in implementation of such WEB 2.0 functionality. There is a
number of commonly accepted standards that are implemented as an XML name space. Some
WEB 2.0 applications and XML standards are overviewed below.
9.1.Resource Definition Frameworks (RDF)
RDF is a method for describing WEB resources, it can be seen as a meta-definition of such
resources. We can see the RDF functionality as a big number of Internet servers that describe
their content if a unified way using a common language - RDF. All the RDS descriptions are
syndicated into a meta-description, and can be used to search/browse the content without
accessing individual information servers.
Fig.9-1: Syndicating RDF descriptions.
Thus, RDF is a common XML based language to describe WEB resources so the meta-data
can be read and processed by computer applications:
Basic RDF Element is called a Triple: a triple consists of a subject, predicate and object.
For example, consider the following meta-data on a web resource "http://coronet.iicm.edu/is".
"The creator of http://coronet.iicm.edu/is is Nick".
In this case, we can define:

139
The subject as the resource itself: http://coronet.iicm.edu/is
The predicate as a property name: Creator
The object as a value of the property: Nick
<RDF>
<Description about="http://coronet.iicm.edu/is">
<creator>Nick</creator>
</Description>
</RDF>
We can also say that RDF defines common properties of WEB resources, for example, the
above RDF statement defines a property "Creator" of the WEB resource
"http://coronet.iicm.edu/is". In RDF terminology, a resource is anything that can have a URI,
such as "http://coronet.iicm.edu/is". A property is a value or resource that has a name, such
as "Creator" or "Homepage", property has a value such as "Nick" or "http://coronet.iicm.edu"
(note that a property value can be another resource).
An RDF Statement may describe a number of triples having one and the same subject or in
other words a number of properties of a particular resource. The following RDF document
could describe the resource "http://coronet.iicm.edu/is":
<RDF>
<Description about="http://coronet.iicm.edu/is">
<creator>Nick</creator>
<homepage>http://coronet.iicm.edu</homepage>
</Description>
</RDF>
Obviously, one and the same properties must be named equally, and different properties must
be named differently. For example, two different persons could describe one and the same
resource as the following:
<RDF>
<Description about="http://coronet.iicm.edu/is">
<creator>Nick</creator>
<homepage>http://coronet.iicm.edu</homepage>
</Description>
</RDF>

140
<RDF>
<Description about="http://coronet.iicm.edu/is">
<author>Nick</author>
<index>http://coronet.iicm.edu</index>
</Description>
</RDF>
In this case, the descriptions cannot be properly syndicated and processed, and a common
thesaurus of property names is needed. The Dublin Core XML name space is a set of
predefined properties for describing resources.
The following example demonstrates the use of some of the Dublin Core properties in an RDF
document:
<?xml version="1.0"?>
<rdf:RDF xmlns:rdf="http://www.w3.org/1999/02/22-rdf-syntax-ns#"
xmlns:dc= "http://purl.org/dc/elements/1.1/">
The RDF declaration just says that the text will be defined using tags from two different name
spaces RDF and Dublin Core. The tags from the RDF name space will be prefixed with
"rdf:". The tags from Dublin Core name space will be prefixed with "dc:".
<rdf:Description rdf:about="http://coronet.iicm.edu/is">
<dc:Creator>Nick</dc:Creator>
<dc:Subject>http://coronet.iicm.edu</dc:Subject>
</rdf:Description>
</rdf:RDF>
Please note also that properties of resources can be defined as attributes "resource" of
corresponding XML tags. For example, the notation
<dc:Creator rdf:resource="Nick"/>
defined the value of "Creator" Dublin Core property as "Nick".
<?xml version="1.0"?>
<rdf:RDF xmlns:rdf="http://www.w3.org/1999/02/22-rdf-syntax-ns#"
xmlns:dc= "http://purl.oclc.org/DC/">
<rdf:Description rdf:about="http://coronet.iicm.edu/is">
<dc:Creator rdf:resource="Nick"/>
<dc:Subject rdf:resource="http://coronet.iicm.edu"/>
</rdf:Description>
</rdf:RDF>
An RDF document is a list of descriptions. Each description is applied to one resource and
contains a list of properties. Property values are literals, URIs or other Descriptions
The following example demonstrates the use of an RDF Description to define a property
"Creator":

141
<?xml version="1.0" encoding="UTF-8" ?>
<rdf:RDF xmlns:rdf="http://www.w3.org/1999/02/22-rdf-syntax-ns#"
xmlns:dc= "http://purl.org/dc/elements/1.1/">
xmlns:os="http://somesite.org/Schema/">
<rdf:Description about="http://coronet.iicm.edu">
<dc:Title>WBT-Master</dc:Title>
<dc:Creator>
<rdf:Description about="mailto:[email protected]">
<os:Team rdf:resource="mailto:[email protected]"/>
<os:Team rdf:resource="mailto:[email protected]"/>
</rdf:Description>
</dc:Creator>
</rdf:Description>
</rdf:RDF>
RDF containers are used to define a set of properties. A container is a resource that contains
multiple properties. The contained properties are called members. The following example
demonstrates the use of an RDF Bag Container to define a property "Creator":
<?xml version="1.0" encoding="UTF-8" ?>
<rdf:RDF xmlns:rdf="http://www.w3.org/1999/02/22-rdf-syntax-ns#"
xmlns:dc= "http://purl.org/dc/elements/1.1/">
<rdf:Description about="http://coronet.iicm.edu">
<dc:Title>WBT-Master</dc:Title>
142
<dc:Creator>
<rdf:Bag>
<rdf:li>mailto:[email protected]</rdf:li>
<rdf:li>mailto:[email protected]</rdf:li>
<rdf:li>mailto:[email protected]</rdf:li>
</rdf:Bag>
</dc:Creator>
</rdf:Description>
</rdf:RDF>
The Dublin Core name space was intended primarily for description of items in digital
libraries. The Friend of a Friend (FOAF) name space provides a dictionary of named
properties and classes oriented on social WEB applications. In other words, the FOAF
vocabulary devoted to linking people, defining groups of people and communication using the
Web. Core FOAF classes are Agent, Project, Organization, Group, Person, Document, etc..
Core properties are: name, knows, member, age, homepage, img, etc. For example, a FOAF
description of a person may look as follows:
<?xml version="1.0" encoding="UTF-8" ?>
<rdf:RDF xmlns:rdf="http://www.w3.org/1999/02/22-rdf-syntax-ns#"
xmlns:foaf="http://xmlns.com/foaf/0.1/">
<foaf:Person rdf:about="http://coronet.iicm.edu/N_Scerbakov">
<foaf:name>Nick Scerbakov</foaf:name>
<foaf:homepage rdf:resource="http://coronet.iicm.edu/N_Scerbakov"/>
</foaf:Person>
Similarly, a FOAF description of a group may look as follows:
<?xml version="1.0" encoding="UTF-8" ?>
<rdf:RDF xmlns:rdf="http://www.w3.org/RDF/RDF/"
xmlns:foaf="http://xmlns.com/foaf/0.1/">
<foaf:Group>
<foaf:name>TC Development Team</foaf:name>
<foaf:member>
<foaf:Person rdf:about="http://coronet.iicm.edu/N_Scerbakov">
<foaf:name>Nick Scerbakov</foaf:name>
<foaf:homepage rdf:resource="http://coronet.iicm.edu/N_Scerbakov"/>
</foaf:Person>
</foaf:member>
<foaf:member>
<foaf:Person>
<foaf:name>Denis Helic</foaf:name>
<foaf:homepage rdf:resource="http://coronet.iicm.edu/N_Scerbakov"/>
</foaf:Person>
</foaf:member>
</foaf:Group>

143
RDF Schema is a further extension of the RDF language. Plain RDF allows to define
properties of WEB resources. RDF schema provides a possibility to structure WEB resources
into so-called classes and sub-classes. Many RDFS components are included in the more
expressive Web Ontology Language (OWL). In this document, we refer to the RDFS and
OWL name spaces together as to a special set of tags extending facilities for the resource
definition. Let us implement a sample eLearning ontology. First we have to define all the
name spaces that we need to define classes, sub-classes and individual RDF elements.
<rdf:RDF
xmlns:rdf="http://www.w3.org/1999/02/22-rdf-syntax-ns#"
xmlns:rdfs="http://www.w3.org/2000/01/rdf-schema#"
xmlns:owl="http://www.w3.org/2002/07/owl#"
xmlns:dc="http://purl.org/dc/elements/1.1/">
Ontology is a named collection of classes, sub-classes, individual RDF elements and
relationships between them. Thus we have to define a name and description of the ontology.
<owl:Ontology>
<dc:title>Example E-Learning Ontology</dc:title>
<dc:description>An example ontology written for the
LinkedDataTools.com RDFS & OWL introduction tutorial</dc:description>
</owl:Ontology>
Classes are defined as a description of a certain WEB resource by means of RDFs properties
"label" and "comment". Each class is uniquely identified as a resource using the following
notation:
<owl:Class rdf:about="http://coronet.iicm.edu/elearning">
<rdfs:label>E-Learning Document</rdfs:label>
<rdfs:comment>This is an E-Learning Document.</rdfs:comment>
</owl:Class>
A sub-class is defined as a class with a special RDFs property "subClassOf". For example,
we can define the class hierarchy:
1. E-Learning
1.1. Databases
1.1.1.SQL
1.2.WEB-Programming
by means of the following notation.
<owl:Class rdf:about="http://coronet.iicm.edu/elearning">
<rdfs:label>E-Learning Document</rdfs:label>
<rdfs:comment>This is an E-Learning Document.</rdfs:comment>
</owl:Class>
<owl:Class rdf:about="http://coronet.iicm.edu/elearning#databases">
<rdfs:subClassOf rdf:resource="http://coronet.iicm.edu/elearning"/>
<rdfs:label>Databases</rdfs:label>
<rdfs:comment>E-Learning Document on Databases.</rdfs:comment>
</owl:Class>

144
<owl:Class rdf:about="http://coronet.iicm.edu/elearning#wp">
<rdfs:subClassOf rdf:resource="http://coronet.iicm.edu/elearning"/>
<rdfs:label>WEB Programming</rdfs:label>
<rdfs:comment>Document on WEB Programming.</rdfs:comment>
</owl:Class>
<owl:Class rdf:about="http://coronet.iicm.edu/elearning#sql">
<rdfs:subClassOf
rdf:resource="http://coronet.iicm.edu/elearning#databases"/>
<rdfs:label>SQL</rdfs:label>
<rdfs:comment>Document on SQL.</rdfs:comment>
</owl:Class>
After definition a particular class hierarchy individual resources may be described with an
attribute "type" as belonging to a certain class.
<rdf:Description rdf:about=
"http://coronet.iicm.edu/lesson1/page01.htm">
<rdf:type rdf:resource="http://coronet.iicm.edu/elearning#sql"/>
</rdf:Description>
Now, we can, for example, browse the class hierarchy to identify all the documents on "SQL",
on "WEB programming", etc. As we access a particular description, we can find out to which
classes the subject belongs.
SPARQL is a special query language for searching information in RDF descriptions. Recall
that RDF is build of triples comprised of a subject, predicate and object. A SPARQL query
operate with templates that also consist of triples where the subject, predicate and/or object
can consist of variables. The idea is to query the existing RDF triples and find values of
variables matching the triples in the SPARQL query. A SPARQL query is executed on a RDF
dataset. Consider, for example, the following RDF data set:
<RDF>
<Description about="http://coronet.iicm.edu/is">
<rdf:type rdf:resource="http://coronet.iicm.edu/elearning#databases"/>
< dc:creator>Nick</dc:creator>
</Description>
<Description about="http://carrl.iicm.edu/dbase">
<rdf:type rdf:resource="http://coronet.iicm.edu/elearning#sql"/>
<dc:creator>Nick</dc:creator>
</Description>
</RDF>
And we want to find resources authored by "Nick". This SPARQL query would look like:
SELECT ?x
WHERE {
?x dc:creator "Nick"
}
In this particular case we define the query template as a triple
[any resource] dc:creator "Nick"
145
?x is a SPARQL variable, and takes corresponding values from matching triples.
In this case, the subject is a variable while the predicate and object are constant values. This
triple in the query is evaluated against all the RDF triples. Constant values in the query triples
are matched with constant values of the RDF triples.
Thus, both triples
http://coronet.iicm.edu/is dc:creator "Nick"
http://carrl.iicm.edu/dbase dc:creator "Nick"
match the template. Since, we required selecting the values of the variable ?x, the query
returns:
"http://coronet.iicm.edu/is" and
"http://carrl.iicm.edu/dbase"
In a similar way, we could require selecting of all resources created by "Nick" on a topic
"SQL".
SELECT ?x
WHERE {
?x dc:creator "Nick" .
?x rdf:type http://coronet.iicm.edu/elearning#sql" .
}
9.2.RSS: Really Simple Syndication
Originally, www offers just a single method of accessing an information content - a user
accesses a particular server and uses hypertext links to browse the information content. In
some cases, this method is not acceptable, consider, for example, a number of E-Learning
courses that consist of many documents, discussion forums and other purpose-oriented WEB
applications such as quizzes, student uploads, comments to the documents, etc. Obviously, the
students and especially the teacher must be notified on any modifications in the WEB site. For
example, as soon as a student publishes a question, the teacher must be notified to provide an
answer in time. In a similar way, the students must be notified on new answers published by
the teacher, etc. RSS (Really Simple Syndication or Rich Site Summary) is an XML name
space (data encoding standard) that is supposed to be used to notify a client computer on
modifications done on the server. Thus, RSS allows people regularly working with a WEB
site to stay informed by delivering the latest content from the WEB site directly on a client
computer. Nowadays, almost all sites dealing with dynamically updated content, offeer RSS
feeds.
Feed Reader or News Aggregator software is needed to read the RSS feeds from various sites
and display them in an easily readable form. RSS Readers are available for different
platforms, even any News Reader or Email client now has a built-in RSS reader.

146
Fig.9-2:Usage of RSS for a client notification
More generally, speaking, we can say that RSS is a method of distributing links to resources
on a particular WEB site that can be used by others.
RSS technology uses the following terminology:
"RSS Item" a description element, that describes a particular resource (URL);
"RSS Channel" a set of description elements having one source of data;
"RSS Feed" a subscription element delivering to a particular client;
Fig.9-3: RSS terminology
An RSS feed consists of one or more "channels." A single channel will be sufficient for the
majority of sites. Each channel, in turn, contains information about one or more Web
resources.
An RSS channel consists of the following required elements:
Title: the name of the channel
Link: the URL for the channel's main web page
Description: a description of the channel's purpose and content
pubDate: date of publication

147
<?xml version="1.0" encoding="iso-8859-1"?>
<rss version="2.0"
xmlns:content="http://purl.org/rss/1.0/modules/content/"
xmlns:dc="http://purl.org/dc/elements/1.1/">
<channel>
<title>Modern Information Systems</title>
<link>http://coronet.iicm.edu/wbtmaster/courses/is</link>
<pubDate>Sat, 03 Nov 2007 18:22:08 GMT</pubDate>
....
</channel>
</rss>
RSS items consist of the following XML elements:
Title: this is the headline that will be displayed for this resource
Link: the URL where the resource can be found
Description: a description of the resource - sometimes referred to as a "teaser".
pubDate: date of publication
For example,
....
<item>
<title>[Curriculum]-Questionnaire</title>
<link>http://coronet.iicm.tugraz.at/wbtmaster/is</link>
<pubDate>Sat, 03 Nov 2007 11:01:00 GMT</pubDate>
<description>
The Questionnaire consists of 10 questions on main concepts of Data-
Management.
</description>
</item>
....
There are additional attributes that can be embedded into an RSS Item. The attribute
"creator" is often used to personalized and filter RSS feeds. The attribute "quid" is a unique
identifier of a particular RSS item. The attribute can be modified for a certain item to
distinguish between versions of one and the same resource. The attribute "category" is used
for automatic classification of items by a RSS reader software. Please note also using XML
construction ![CDATA[ for encoding HTML tags into an item description
....
<item>
<title>Curriculum]-Questionnaire</title>
<link>http://coronet.iicm.tugraz.at/wbtmaster/is</link>
<pubDate>Sat, 03 Nov 2007 11:01:00 GMT</pubDate>
<dc:creator>mailto:[email protected]</dc:creator>
<category>Curriculum</category>
<guid isPermaLink="false">c1605042009_22.htm</guid>

148
<description>
<![CDATA[The Questionnaire
consists of 10 questions on
main concepts of Data-Management.
<UL><LI> IS and Relational DM
.....
</UL>]]>
</description>
</item>
....
More or less working sample of a RSS feed may look as follows:
<?xml version="1.0" encoding="iso-8859-1"?>
<rss version="2.0"
xmlns:content="http://purl.org/rss/1.0/modules/content/"
xmlns:dc="http://purl.org/dc/elements/1.1/">
<channel>
<title>Modern Information Systems</title>
<link>http://coronet.iicm.tugraz.at/wbtmaster/is</link>
<pubDate>Sat, 03 Nov 2007 18:22:08 GMT</pubDate>
<item>
<title>Curriculum]-Questionnaire</title>
<link>http://coronet.iicm.tugraz.at/wbtmaster/courses/lv706002_panel5.
htm</link>
<pubDate>Sat, 03 Nov 2007 11:01:00 GMT</pubDate>
<dc:creator>mailto:[email protected]</dc:creator>
<category>Curriculum</category>
<guid isPermaLink="false">c1605042009_22.htm</guid>
<description>
<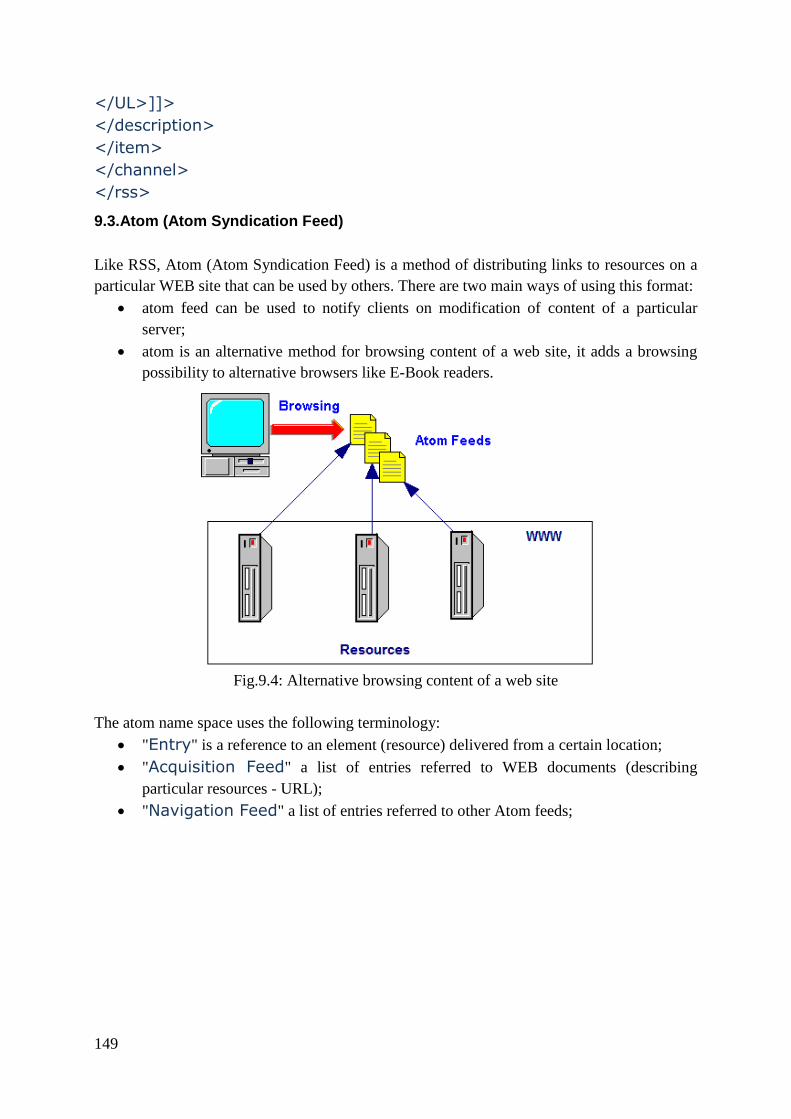
149
</UL>]]>
</description>
</item>
</channel>
</rss>
9.3.Atom (Atom Syndication Feed)
Like RSS, Atom (Atom Syndication Feed) is a method of distributing links to resources on a
particular WEB site that can be used by others. There are two main ways of using this format:
atom feed can be used to notify clients on modification of content of a particular
server;
atom is an alternative method for browsing content of a web site, it adds a browsing
possibility to alternative browsers like E-Book readers.
Fig.9.4: Alternative browsing content of a web site
The atom name space uses the following terminology:
"Entry" is a reference to an element (resource) delivered from a certain location;
"Acquisition Feed" a list of entries referred to WEB documents (describing
particular resources - URL);
"Navigation Feed" a list of entries referred to other Atom feeds;

150
Fig.9.5: Atom terminology
An Atom Feed consists of the following required elements:
title: the name of the Feed
description: a description of the Feed's purpose and content
updated: date of publication
author: author of publication
<feed xmlns:dc="http://purl.org/dc/terms/"
xmlns="http://www.w3.org/2005/Atom">
<author> <name>Teach Center</name></author>
<title><![CDATA[TeachCenter]]></title>
<id>urn:uuid:1012161146</id>
<updated>2010-12-16T11:46:00+1.00</updated>
<description>Teach Center Content</description>
<entry> ... </entry>
....
<entry> ... </entry>
</feed>
An Atom Acquisition Entry consists of the following required elements:
title: the name of the document;
description: a description of the document;
updated: date of document publication;
author: author of the publication;
link: reference to the resource.
<entry>
<title>PDF Document</title>
<id>urn:wbtmaster_create_DjVU_1</id>
<updated>2010-10-24T18:16:00Z</updated>
<dc:language>de</dc:language>

151
<dc:issued>2010</dc:issued>
<link href="http://www.austria-forum.org/
threads/simpleCourse/wbtmaster_create_DjVU_1.pdf"
type="application/pdf" />
<description type="text">Step-by-step manual on creating
DjVU!</description>
<author><name>Expert WBT</name></author>
</entry>
An Atom Navigation Entry consists of the following required elements:
title: the name of the entry;
description: a description of the entry's purpose and content;
updated: date of publication;
author: author of publication;
link: reference to another Atom Feed.
<entry>
<title><![CDATA[TU Library]]></title>
<link href="http://wwwcoronet.org/opds_get.groovy?room=TUlibrary"
type="application/atom+xml" />
<id>urn:TUlibrary</id>
<updated>2010-08-21T11:15:00+01:00</updated>
<dc:language>de</dc:language>
<dc:issued>2010</dc:issued>
<author><name><![CDATA[Expert WBT]]></name></author>
<description>Simple Course</description>
</entry>
Alternative browsing that is by simple mobile devices, the browsing can be seen as a
visualization of navigation and acquisition feeds in a form of a tree (see below).
Fig.9.6: Alternative browsing using Atom feeds

152
9.4. WEB Service protocol - RPC (Remote Procedure Call)
WEB service is a method for implementing of a complex WEB application functionality by
means of sharing a complex data processing over a number of individual servers. Individual
servers send requests to other servers, and process responses. One of the most important
component of such shared data processing is a protocol to be used by all servers for
exchanging with data
Fig.9.7: WEB Services
RPC is a protocol supporting programming over set of servers using sounded software
engineering methods. In accordance with the protocol, a WEB application is perceived as a
big collection of Abstract Data Objects (ADO). Each ADO supports a number of methods that
can be invoked (called) locally or by means of the Remote Procedure Call means.
Fig.9.8: RPC services and abstract data objects
Thus, RPC is used to encode procedure calls and responses. XML-RPC uses XML to encode
requests and responses. An RPC requests consists of a procedure name and parameter values.
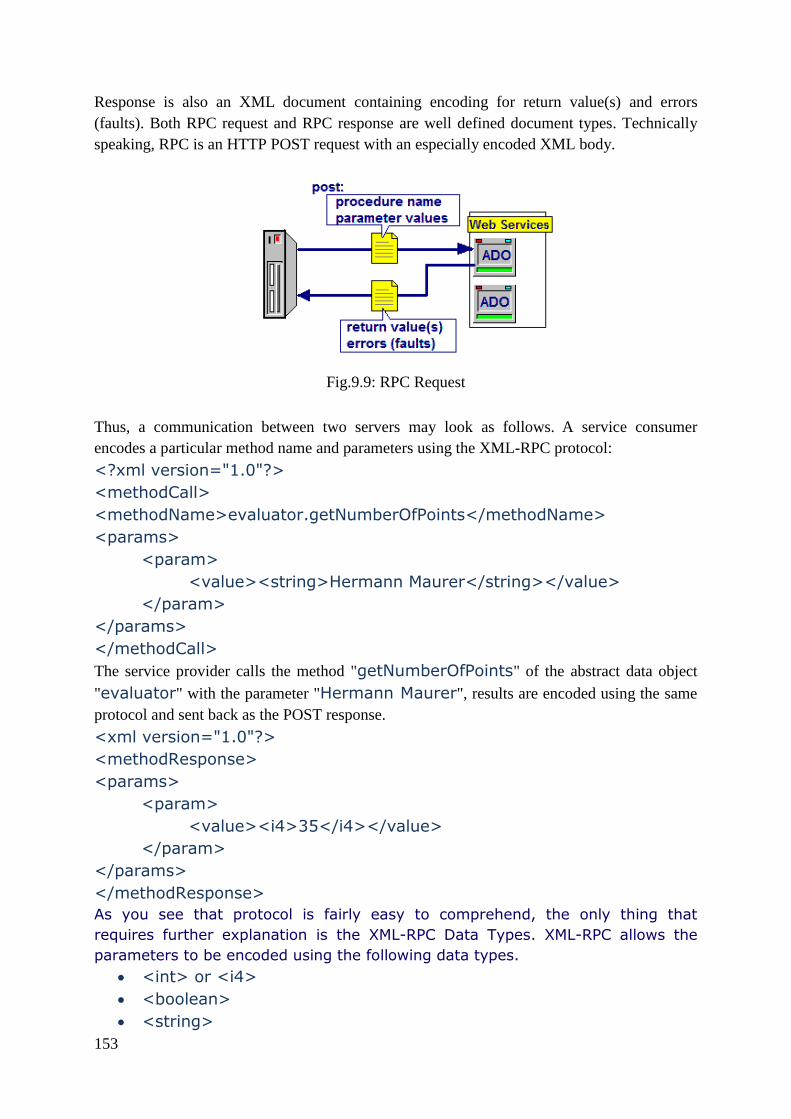
153
Response is also an XML document containing encoding for return value(s) and errors
(faults). Both RPC request and RPC response are well defined document types. Technically
speaking, RPC is an HTTP POST request with an especially encoded XML body.
Fig.9.9: RPC Request
Thus, a communication between two servers may look as follows. A service consumer
encodes a particular method name and parameters using the XML-RPC protocol:
<?xml version="1.0"?>
<methodCall>
<methodName>evaluator.getNumberOfPoints</methodName>
<params>
<param>
<value><string>Hermann Maurer</string></value>
</param>
</params>
</methodCall>
The service provider calls the method "getNumberOfPoints" of the abstract data object
"evaluator" with the parameter "Hermann Maurer", results are encoded using the same
protocol and sent back as the POST response.
<xml version="1.0"?>
<methodResponse>
<params>
<param>
<value><i4>35</i4></value>
</param>
</params>
</methodResponse>
As you see that protocol is fairly easy to comprehend, the only thing that
requires further explanation is the XML-RPC Data Types. XML-RPC allows the
parameters to be encoded using the following data types.
<int> or <i4>
<boolean>
<string>

154
<double>
<dateTime.iso8601>
<struct>
<array>
<int>, <boolean>, <string>, <double> and <dateTime> data types are used to
encode atomic values. XML-RPC structure is a collection of named members that are in turn
can be structures, arrays or atomic values.
<struct>
<member>
<name>Name</name>
<value>
<string>Hermann Maurer</string>
</value>
</member>
<member>
<name>Email</name>
<value>
<string>[email protected]</string>
</value>
</member>
<member>
<name>Number of Publications</name>
<value>
<int>421</int>
</value>
</member>
</struct>
XML-RPC array is a collection of elements that can be in turn atomic values, structures and
arrays.
For example,
...
<array>
<data>
<value><string>Hermann Maurer</string></value>
<value><boolean>0</boolean></value>
<value><i4>1945</i4></value>
<value><i4>11</i4></value>
</data>
</array>
...
Thus, XML-RPC Programming may be described in the following way. A server consumer
generates an HTTP request using method "POST" to a service provider. The requests

155
contains an XML document in the body, the document address a method to be called on the
service provider, and some parameters of the method.
The service provide gets the request, extracts, parses the XML code and call the requested
method with parameters got from the request. If the process was successful, the results are
sent back to the service consumer, otherwise special faults (errors) are sent back.
There is a number of other communication standards based on the XML-RPC basic standard.
For example, a so-called remote publishing "metaWeblog API" is used to publish blog
documents directly from a client computer without even accessing the blog server with a
browser.
For example, the code below allows to publish a new blog document entitled ""
<?xml version="1.0" encoding="utf-8"?>
<methodCall>
<methodName>metaWeblog.newPost</methodName><params>
<param>
<value>
<array>
<data>
<value><string>0</string></value>
<value><string>tugllxaustriaforum</string></value>
<value><string>6f273a8e</string></value>
<value><struct>
<member>
<name>title</name>
<value><string>
Modern Information Systems
</string></value>
</member>
<member>
<name>description</name>
<value><string>
That's it !
</string></value>
</member>
<member>
<name>mt_keywords</name>
<value><string>
TeachCenter,Modern Information Systems,
</string></value>
</member>
</struct></value>
<value><boolean>1</boolean></value>
</data>

156
</array></value></param></params>
</methodCall>
9.4. WEB Service protocol SOAP (Simple Object Access Protocol)
In WEB 2.0, web applications communicate over the Internet. XML-RPC offers a
"programming" metaphor for such communication, servers use messages to call methods of
objects residing on other servers. SOAP provides another metaphor for the communication
that reminds a functionality of an ordinary post or a parcel delivery service. In SOAP, servers
exchange with envelopes containing some information to be parsed and processed by the
servers.
A SOAP message is an ordinary XML document containing the following elements:
An Envelope element that identifies the XML document as a SOAP message
A Header element that contains header information
A Body element that contains call and response information
A Fault element containing errors and status information
All the elements above are declared in the default namespace for the SOAP envelope:
http://www.w3.org/2003/05/soap-envelope/
the name space does not define a particular way of encoding information that is put into the
SOAP envelope. The "encodingStyle=URL" attribute is used to define the data
types used in the document, it is a reference to an encoding schema defined in the
"URL" name space. The "encodingStyle" can be defined as an attribute of any
SOAP element. The selected encoding schema is applied to the element's contents
and all child elements. The default namespace for SOAP encoding and data types is:
http://www.w3.org/2003/05/soap-encoding
<?xml version="1.0"?>
<soap:Envelope
xmlns:soap="http://www.w3.org/2003/05/soap-envelope/"
soap:encodingStyle="http://www.w3.org/2003/05/soap-encoding">
<soap:Header> ... </soap:Header>
<soap:Body>
...
<soap:Fault>
...
</soap:Fault>
...
</soap:Body>
</soap:Envelope>

157
A SOAP Envelope/Body may contain encoding using arbitrary name spaces and binary
encoding. For example, the SOAP body below encode body using another XML name space
"http://www.w3.org/2003/05/soap-encoding" and encodes a binary file by means
of Base64 schema.
<soap:Envelope
xmlns:soap="http://www.w3.org/2003/05/soap-envelope/"
soap:encodingStyle="http://www.w3.org/2003/05/soap-encoding">
< soap:Body>
<UploadDocument xmlns="http://microsoft.com/webservices/">
<code>xxxx@xxxxx</code>
<firstName>Hermann</firstName>
<lastName>Maurer</lastName>
<studentNumber>9346189</studentNumber>
<fileName>threads/plag01/UE10530036.doc</fileName>
<file>..base64 Encoding..</file>
<processType>3</processType>
</UploadDocument>
</soap:Body>
</soap:Envelope>
A SOAP Body may contain a <soap:Fault> description that is encode using "faultcode" and
"faultstring" elements. For example,
<?xml version="1.0" encoding="utf-8"?>
<soap:Envelope
xmlns:soap="http://schemas.xmlsoap.org/soap/envelope/">
<soap:Body>
<soap:Fault>
<faultcode>soap:Server</faultcode>
<faultstring>
Server was unable to process request.
</faultstring>
</soap:Fault>
</soap:Body>
</soap:Envelope>
9.5.Packaging and Publishing
WEB services provide a possibility to reuse functionality of a WEB site (service provider) as
a seamless component of another WEB site (service consumer). The packaging formats
provides a possibility to reuse chunks of WEB content (content packages) in different
contexts. WEB content is supposed to be HTML images, Java Scripts or other media that can
run on its own.
Typical examples would be reusable E-Learning components, E-Books, etc. In the E-Learning
area, it is now rather common to develop reusable components (training objects) that can be

158
further exported by different Learning Management Systems (LMS) and added to other E-
Learning pages creating a particular learning course. In a similar way, E-Books can be read
and reused on various electronic devices from a desktop computer till smart phones and
especially designated E-Book readers.
Fig.9.10: Packaging a WEB content for different devices
The most widely used content packaging format was defined by IMS Global, the IMS format
uses an XML manifest file called imsmanifest.xml placed inside a zip file. The WEB
content itself is included in the zip file or referred to as URLs from the manifest. The IMS
XML name spaces are as follows:
<manifest xmlns="http://www.imsproject.org/xsd/imscp_rootv1p1p2"
xmlns:imsmd="http://www.imsproject.org/xsd/ims_md_rootv1p1"
xmlns:dc= "http://purl.oclc.org/DC/">
The package manifest is an XML encoded description of the package metadata and all media
files. More specifically, the package manifest consists of three sections:
metadata;
organisation;
resources.
The metadata element of the package can contain wide ranging information about the
publication. To keep manifest as open as possible, the metadata of an manifest package
makes use of another open standard, namely the Dublin Core metadata standard.
...
<metadata>
<schema>ADL SCORM</schema>
<schemaversion>1.2</schemaversion>
<dc:title>Databases 1 (Demo Test)</dc:title>
<dc:description>Databases 1 (Demo Test)</dc:description>
</metadata>

159
....
The IMS organization section define all the resources that form the package. A particular
resource may be seen as an individual component of the package that can be used on its own,
a resource is roughly equivalent to a position in a navigation as the package is rendered. Each
resource in the "organization" section is defined as an IMS item.
<item identifier="item_1" identifierref="q_1" isvisible="true">
<title>Question 1</title>
<summary>Exported from TC</summary>
</item>
Each "item" element has an "identifier" attribute which identifies this element uniquely
within the package. The "title" and "summary" components of the "item" element have an
obvious meaning and are used to visualize the item in a user-readable form. The "isvisible"
attribute is set to "false" in such rare cases when an item is defined to be internally used by
other items, and should not be visualized as such. The "identifierref" attribute points to a
such resource definition in the section "resources" that has the same value as an "identifier"
attribute.
For example,
...
<item identifier="item_1" identifierref="q_1" isvisible="true">
<title>Question 1</title>
<summary>Exported from TC</summary>
</item>
...
<resource identifier="q_1" type="webcontent">
<file href="question_nsherbak110206175202.htm" />
<file href="rdbq6_1b.gif" />
<file href="rdbq6_1c.gif" />
<file href="css/style.css" />
</resource>
...
The resource section of an IMS manifest is a collection of resource definition elements. A
particular resource is a set of references to files that are needed to properly visualize a
particular item of the package. Resources are defined as a set of hypertext references (HREF)
to files or URLs (see above). The "type" attribute in this example shows that the resource
should be handled as a WEB document.
The IMS format is part of so-called SCORM (Sharable Content Object Reference Model)
packaging format, and typically every sharable content object is defined by an IMS content
package. IMS content packages are often used in e-learning to define reusable chunks of
learning content, assessments and exercises that can be reused in context of different E-
Learning courses or other E-Learning applications. Nowadays, IMS content packaging is a
standard way for distribution of sharable learning content that can be used by different
Learning Management Systems (LMS).

160
The Open Packaging Format (OPF) is an XML based packaging format that is more suitable
for electronic publications (so-called, E-Books). OPF defines a special format for describing
components of an electronic publication. Technically speaking, an OPF specification:
Defines a structure of the publication - components of the publication (e.g.
HTML/XML files, images, navigation structures) and references between such
components.
Provides necessary metadata. For example, information about the eBook such as
author and title can be included into the meta-data.
Provides a mechanism to specify a table of contents.
The OPF formatting is most notably used for so-called ePub book publishing. ePub is
basically is prefefined structure of folders and files to be compressed into a "zip" archive
called an ePub file.
Fig.9.11: Internal structure of an ePub file
The OPF file can be located anywhere, but usually it is located in the "OPS" directory. There
is a folder called META-INF that must always be present in ePub archive. Inside there must
be a file having a fixed name "container.xml". The content of that container file points to the
OPF file. It might look like:
<?xml version="1.0"?>
<container version="1.0"
xmlns="urn:oasis:names:tc:opendocument:xmlns:container">
<rootfiles>
<rootfile full-path="OPS/content.opf"
media-type="application/oebps-package+xml"/>
</rootfiles>
</container>
The OPF file consists of three components:
Header
Package
Table of Contents
Fig.9.12: Structure of an OPF Package

161
The OPF package file is a main publication description, it consists of a "metadata" and
"manifest" sections. The "metadata" section provides information about the publication such
as title, author, publisher, ISBN, publishing date, etc. The "manifest" section is basically a list
of media files that are needed to display the book correctly. Each entry in the list of media
files consists of an "item" element:
<item id="chapter-001" href="chapter-001.xml"
media-type="application/xhtml+xml"/>
Each "item" element has an "id" attribute which identifies this resource uniquely within the
publication. It has also an "href" attribute which points to the content document, in the
example above it's an XML document called "chapter-001.xml". The "media-type"
attribute in this example shows that the resource should be handled as an XHTML document.
There may be other media types, for example,
<item id="1_mov" href="Herwig_Habenbacher_eReader.mp4"
media-type="video/mp4"/>
<item id="2_pdf" href="Herwig_Habenbacher_eReader.pdf"
media-type="application/pdf"/>
<item id="mobile_scenario" href="mobile_scenario.png"
media-type="image/png"/>
A sample OPF package file is provided below:
<?xml version="1.0" encoding="ISO-8859-1"?>
<package xmlns="http://www.idpf.org/2007/opf" version="2.0"
unique-identifier="2118-4" xmlns:dc="http://purl.org/dc/elements/1.1/">
<metadata>
<dc:title>MLearn Short for Demo</dc:title>
<dc:creator role="aut">AdminWalther</dc:creator>
<dc:date>2009-12-26</dc:date>
<dc:identifier id="BookId">
urn:uuid:3B949EF6-C2AD-41BA-8696-0A82D4E09109
</dc:identifier>
<dc:language>de</dc:language>
<dc:description>Teach Center eBook</dc:description>
<meta name="cover" content="cover"/>
</metadata>
<manifest>
<item id="ncx" href="EE.ncx" media-type="application/x-dtbncx+xml"/>
<item id="id0001" href="eBook.css" media-type="text/css"/>
<item id="c-image" href="wbtbook_cover.png"
media-type="image/png"/>
<item id="c-page" href="xcover.html"

162
media-type="application/xhtml+xml"/>
<item id="0" href="0.html" media-type="application/xhtml+xml"/>
<item id="screen_298a" href="screen_298a.html"
media-type="application/xhtml+xml"/>
......
<item id="1_mov" href="Herwig_Habenbacher_eReader.mp4" media-
type="video/mp4" fallback="1_html"/>
<item id="1_html" href="Herwig_Habenbacher_eReader_fb.html" media-
type="application/xhtml+xml"/>
<item id="2_pdf" href="Herwig_Habenbacher_eReader.pdf" media-
type="application/pdf" fallback="2_html"/>
<item id="2_html" href="Herwig_Habenbacher_eReader_fb.html" media-
type="application/xhtml+xml"/>
<item id="mobile_scenario" href="mobile_scenario.png" media-
type="image/png"/>
<item id="screenshot_mobile" href="screenshot_mobile.png" media-
type="image/png"/>
<item id="22" href="22.jpg" media-type="image/jpeg"/>
</manifest>
</package>
NCX (Navigation Control for XML) is an XML name space to define a navigation in a set of
media files. NCX is a standard way of declaring a Table of Contents of a E-Book.
The "media-type="application/x-dtbncx+xml" indicates that the resource should be handled as
an NCX document. NCX is defined as a hierarchy of so-called navigational points
(navPoint), each navigational points has an unique ID, textual label and content. As usual,
id is used for cross references;
label is used for visualization of the navigational point in a readable for;
content is an individual document that is referred to by this particular navigational
point.
Note, that a "navPoint" element may be defined inside of another "navPoint" element
creating a hierarchical structure of the Table of Contents.
<?xml version="1.0" encoding="ISO-8859-1"?>
<!DOCTYPE ncx PUBLIC "-//NISO//DTD ncx 2005-1//EN"
"http://www.daisy.org/z3986/2005/ncx-2005-1.dtd">
<ncx xmlns="http://www.daisy.org/z3986/2005/ncx/" version="2005-1"
xml:lang="de-DE">
....
<navMap>

163
<navPoint id="0" playOrder="1">
<navLabel><text>MLearn Short for Demo</text></navLabel>
<content src="0.html"/>
</navPoint>
<navPoint id="screen_298" playOrder="2">
<navLabel><text>Concept 298</text></navLabel>
<content src="screen_298.html"/>
<navPoint id="screen_298a" playOrder="3">
<navLabel><text>Sub-Concept 298a</text></navLabel>
<content src="screen_298a.html"/>
</navPoint>
</navPoint>
....
</navMap>
</ncx>
As we speak about WEB content packages that are reused on different devices, we should
take into account that some media types cannot be visualized on certain devices, for example,
adobe flash documents cannot be visualized on android mobile devices, movies cannot be
viewed on devices with E-Ink (electronic ink) screens, etc. OPF offers an elegant way for
defining alternative media files to be used if a main media type fails on a certain device. In
this case, areference to an alternative media type is defined as a "fallback" attribute. For
example:
.........
<item id="1_mov" href="Herwig_Habenbacher_eReader.mp4"
media-type="video/mp4" fallback="1_html"/>
<item id="1_html" href="Herwig_Habenbacher_eReader_fb.html"
media-type="application/xhtml+xml"/>
<item id="2_pdf" href="Herwig_Habenbacher_eReader.pdf"
media-type="application/pdf" fallback="2_html"/>
<item id="2_html" href="Herwig_Habenbacher_eReader_fb.html"
media-type="application/xhtml+xml"/>
.........