interplay sphere installation and configuration guide - avid
TRANSCRIPT

Avid® Interplay®
Sphere Installationand Configuration Guide
Interplay v2.7 and Interplay v3.0

2
Legal NoticesProduct specifications are subject to change without notice and do not represent a commitment on the part of Avid Technology, Inc.
This product is subject to the terms and conditions of a software license agreement provided with the software. The product may only be used in accordance with the license agreement.
This product may be protected by one or more U.S. and non-U.S patents. Details are available at www.avid.com/patents.
This document is protected under copyright law. An authorized licensee of Interplay Assist may reproduce this publication for the licensee’s own use in learning how to use the software. This document may not be reproduced or distributed, in whole or in part, for commercial purposes, such as selling copies of this document or providing support or educational services to others. This document is supplied as a guide for Interplay products. Reasonable care has been taken in preparing the information it contains. However, this document may contain omissions, technical inaccuracies, or typographical errors. Avid Technology, Inc. does not accept responsibility of any kind for customers’ losses due to the use of this document. Product specifications are subject to change without notice.
Copyright © 2013 Avid Technology, Inc. and its licensors. All rights reserved.
The following disclaimer is required by Apple Computer, Inc.:APPLE COMPUTER, INC. MAKES NO WARRANTIES WHATSOEVER, EITHER EXPRESS OR IMPLIED, REGARDING THIS PRODUCT, INCLUDING WARRANTIES WITH RESPECT TO ITS MERCHANTABILITY OR ITS FITNESS FOR ANY PARTICULAR PURPOSE. THE EXCLUSION OF IMPLIED WARRANTIES IS NOT PERMITTED BY SOME STATES. THE ABOVE EXCLUSION MAY NOT APPLY TO YOU. THIS WARRANTY PROVIDES YOU WITH SPECIFIC LEGAL RIGHTS. THERE MAY BE OTHER RIGHTS THAT YOU MAY HAVE WHICH VARY FROM STATE TO STATE.
The following disclaimer is required by Sam Leffler and Silicon Graphics, Inc. for the use of their TIFF library:Copyright © 1988–1997 Sam Leffler Copyright © 1991–1997 Silicon Graphics, Inc.
Permission to use, copy, modify, distribute, and sell this software [i.e., the TIFF library] and its documentation for any purpose is hereby granted without fee, provided that (i) the above copyright notices and this permission notice appear in all copies of the software and related documentation, and (ii) the names of Sam Leffler and Silicon Graphics may not be used in any advertising or publicity relating to the software without the specific, prior written permission of Sam Leffler and Silicon Graphics.
THE SOFTWARE IS PROVIDED “AS-IS” AND WITHOUT WARRANTY OF ANY KIND, EXPRESS, IMPLIED OR OTHERWISE, INCLUDING WITHOUT LIMITATION, ANY WARRANTY OF MERCHANTABILITY OR FITNESS FOR A PARTICULAR PURPOSE.
IN NO EVENT SHALL SAM LEFFLER OR SILICON GRAPHICS BE LIABLE FOR ANY SPECIAL, INCIDENTAL, INDIRECT OR CONSEQUENTIAL DAMAGES OF ANY KIND, OR ANY DAMAGES WHATSOEVER RESULTING FROM LOSS OF USE, DATA OR PROFITS, WHETHER OR NOT ADVISED OF THE POSSIBILITY OF DAMAGE, AND ON ANY THEORY OF LIABILITY, ARISING OUT OF OR IN CONNECTION WITH THE USE OR PERFORMANCE OF THIS SOFTWARE.
The following disclaimer is required by the Independent JPEG Group:This software is based in part on the work of the Independent JPEG Group.
This Software may contain components licensed under the following conditions:Copyright (c) 1989 The Regents of the University of California. All rights reserved.
Redistribution and use in source and binary forms are permitted provided that the above copyright notice and this paragraph are duplicated in all such forms and that any documentation, advertising materials, and other materials related to such distribution and use acknowledge that the software was developed by the University of California, Berkeley. The name of the University may not be used to endorse or promote products derived from this software without specific prior written permission. THIS SOFTWARE IS PROVIDED ``AS IS'' AND WITHOUT ANY EXPRESS OR IMPLIED WARRANTIES, INCLUDING, WITHOUT LIMITATION, THE IMPLIED WARRANTIES OF MERCHANTABILITY AND FITNESS FOR A PARTICULAR PURPOSE.
Copyright (C) 1989, 1991 by Jef Poskanzer.
Permission to use, copy, modify, and distribute this software and its documentation for any purpose and without fee is hereby granted, provided that the above copyright notice appear in all copies and that both that copyright notice and this permission notice appear in supporting documentation. This software is provided "as is" without express or implied warranty.
Copyright 1995, Trinity College Computing Center. Written by David Chappell.

3
Permission to use, copy, modify, and distribute this software and its documentation for any purpose and without fee is hereby granted, provided that the above copyright notice appear in all copies and that both that copyright notice and this permission notice appear in supporting documentation. This software is provided "as is" without express or implied warranty.
Copyright 1996 Daniel Dardailler.
Permission to use, copy, modify, distribute, and sell this software for any purpose is hereby granted without fee, provided that the above copyright notice appear in all copies and that both that copyright notice and this permission notice appear in supporting documentation, and that the name of Daniel Dardailler not be used in advertising or publicity pertaining to distribution of the software without specific, written prior permission. Daniel Dardailler makes no representations about the suitability of this software for any purpose. It is provided "as is" without express or implied warranty.
Modifications Copyright 1999 Matt Koss, under the same license as above.
Copyright (c) 1991 by AT&T.
Permission to use, copy, modify, and distribute this software for any purpose without fee is hereby granted, provided that this entire notice is included in all copies of any software which is or includes a copy or modification of this software and in all copies of the supporting documentation for such software.
THIS SOFTWARE IS BEING PROVIDED "AS IS", WITHOUT ANY EXPRESS OR IMPLIED WARRANTY. IN PARTICULAR, NEITHER THE AUTHOR NOR AT&T MAKES ANY REPRESENTATION OR WARRANTY OF ANY KIND CONCERNING THE MERCHANTABILITY OF THIS SOFTWARE OR ITS FITNESS FOR ANY PARTICULAR PURPOSE.
This product includes software developed by the University of California, Berkeley and its contributors.
The following disclaimer is required by Nexidia Inc.:© 2010 Nexidia Inc. All rights reserved, worldwide. Nexidia and the Nexidia logo are trademarks of Nexidia Inc. All other trademarks are the property of their respective owners. All Nexidia materials regardless of form, including without limitation, software applications, documentation and any other information relating to Nexidia Inc., and its products and services are the exclusive property of Nexidia Inc. or its licensors. The Nexidia products and services described in these materials may be covered by Nexidia's United States patents: 7,231,351; 7,263,484; 7,313,521; 7,324,939; 7,406,415, 7,475,065; 7,487,086 and/or other patents pending and may be manufactured under license from the Georgia Tech Research Corporation USA.
The following disclaimer is required by Paradigm Matrix:Portions of this software licensed from Paradigm Matrix.
The following disclaimer is required by Ray Sauers Associates, Inc.:“Install-It” is licensed from Ray Sauers Associates, Inc. End-User is prohibited from taking any action to derive a source code equivalent of “Install-It,” including by reverse assembly or reverse compilation, Ray Sauers Associates, Inc. shall in no event be liable for any damages resulting from reseller’s failure to perform reseller’s obligation; or any damages arising from use or operation of reseller’s products or the software; or any other damages, including but not limited to, incidental, direct, indirect, special or consequential Damages including lost profits, or damages resulting from loss of use or inability to use reseller’s products or the software for any reason including copyright or patent infringement, or lost data, even if Ray Sauers Associates has been advised, knew or should have known of the possibility of such damages.
The following disclaimer is required by Videomedia, Inc.:“Videomedia, Inc. makes no warranties whatsoever, either express or implied, regarding this product, including warranties with respect to its merchantability or its fitness for any particular purpose.”
“This software contains V-LAN ver. 3.0 Command Protocols which communicate with V-LAN ver. 3.0 products developed by Videomedia, Inc. and V-LAN ver. 3.0 compatible products developed by third parties under license from Videomedia, Inc. Use of this software will allow “frame accurate” editing control of applicable videotape recorder decks, videodisc recorders/players and the like.”
The following disclaimer is required by Altura Software, Inc. for the use of its Mac2Win software and Sample Source Code:©1993–1998 Altura Software, Inc.
The following disclaimer is required by Ultimatte Corporation:Certain real-time compositing capabilities are provided under a license of such technology from Ultimatte Corporation and are subject to copyright protection.
The following disclaimer is required by 3Prong.com Inc.:Certain waveform and vector monitoring capabilities are provided under a license from 3Prong.com Inc.

4
The following disclaimer is required by Interplay Entertainment Corp.:The “Interplay” name is used with the permission of Interplay Entertainment Corp., which bears no responsibility for Avid products.
This product includes portions of the Alloy Look & Feel software from Incors GmbH.
This product includes software developed by the Apache Software Foundation (http://www.apache.org/).
© DevelopMentor
This product may include the JCifs library, for which the following notice applies:JCifs © Copyright 2004, The JCIFS Project, is licensed under LGPL (http://jcifs.samba.org/). See the LGPL.txt file in the Third Party Software directory on the installation CD.
Avid Interplay contains components licensed from LavanTech. These components may only be used as part of and in connection with Avid Interplay.
Interplay Production Streaming Server includes Live555, which is covered by the GNU Lesser General Public License. “Live555 is Copyright (c) 1996-2011, Live Networks, Inc. and is licensed under the terms of the GNU Lesser General Public License, which is included with this product.”
This product includes software developed by Indiana University Extreme! Lab (http//:www.extreme.indiana.edu/)/
Attn. Government User(s). Restricted Rights LegendU.S. GOVERNMENT RESTRICTED RIGHTS. This Software and its documentation are “commercial computer software” or “commercial computer software documentation.” In the event that such Software or documentation is acquired by or on behalf of a unit or agency of the U.S. Government, all rights with respect to this Software and documentation are subject to the terms of the License Agreement, pursuant to FAR §12.212(a) and/or DFARS §227.7202-1(a), as applicable.
Trademarks003, 192 Digital I/O, 192 I/O, 96 I/O, 96i I/O, Adrenaline, AirSpeed, ALEX, Alienbrain, AME, AniMatte, Archive, Archive II, Assistant Station, AudioPages, AudioStation, AutoLoop, AutoSync, Avid, Avid Active, Avid Advanced Response, Avid DNA, Avid DNxcel, Avid DNxHD, Avid DS Assist Station, Avid Liquid, Avid Media Engine, Avid Media Processor, Avid MEDIArray, Avid Mojo, Avid Remote Response, Avid Unity, Avid Unity ISIS, Avid VideoRAID, AvidRAID, AvidShare, AVIDstripe, AVX, Axiom, Beat Detective, Beauty Without The Bandwidth, Beyond Reality, BF Essentials, Bomb Factory, Boom, Bruno, C|24, CaptureManager, ChromaCurve, ChromaWheel, Cineractive Engine, Cineractive Player, Cineractive Viewer, Color Conductor, Command|24, Command|8, Conectiv, Control|24, Cosmonaut Voice, CountDown, d2, d3, DAE, Dazzle, Dazzle Digital Video Creator, D-Command, D-Control, Deko, DekoCast, D-Fi, D-fx, Digi 003, DigiBase, DigiDelivery, Digidesign, Digidesign Audio Engine, Digidesign Development Partners, Digidesign Intelligent Noise Reduction, Digidesign TDM Bus, DigiLink, DigiMeter, DigiPanner, DigiProNet, DigiRack, DigiSerial, DigiSnake, DigiSystem, Digital Choreography, Digital Nonlinear Accelerator, DigiTest, DigiTranslator, DigiWear, DINR, DNxchange, DPP-1, D-Show, DSP Manager, DS-StorageCalc, DV Toolkit, DVD Complete, D-Verb, Eleven, EM, Euphonix, EUCON, EveryPhase, Expander, ExpertRender, Fader Pack, Fairchild, FastBreak, Fast Track, Film Cutter, FilmScribe, Flexevent, FluidMotion, Frame Chase, FXDeko, HD Core, HD Process, HDPack, Home-to-Hollywood, HYBRID, HyperControl, HyperSPACE, HyperSPACE HDCAM, iKnowledge, Image Independence, Impact, Improv, iNEWS, iNEWS Assign, iNEWS ControlAir, Instantwrite, Instinct, Intelligent Content Management, Intelligent Digital Actor Technology, IntelliRender, Intelli-Sat, Intelli-sat Broadcasting Recording Manager, InterFX, Interplay, inTONE, Intraframe, iS Expander, ISIS, IsoSync, iS9, iS18, iS23, iS36, ISIS, IsoSync, KeyRig, KeyStudio, LaunchPad, LeaderPlus, LFX, Lightning, Link & Sync, ListSync, LKT-200, Lo-Fi, Luna, MachineControl, Magic Mask, Make Anything Hollywood, make manage move | media, Marquee, MassivePack, Massive Pack Pro, M-Audio, M-Audio Micro, Maxim, Mbox, Media Composer, MediaFlow, MediaLog, MediaMatch, MediaMix, Media Reader, Media Recorder, MEDIArray, MediaServer, MediaShare, MetaFuze, MetaSync, MicroTrack, MIDI I/O, Midiman, Mix Rack, MixLab, Moviebox, Moviestar, MultiShell, NaturalMatch, NewsCutter, NewsView, Nitris, NL3D, NLP, Nova, NRV-10 interFX, NSDOS, NSWIN, Octane, OMF, OMF Interchange, OMM, OnDVD, Open Media Framework, Open Media Management, Ozone, Ozonic, Painterly Effects, Palladium, Personal Q, PET, Pinnacle, Pinnacle DistanTV, Pinnacle GenieBox, Pinnacle HomeMusic, Pinnacle MediaSuite, Pinnacle Mobile Media, Pinnacle Scorefitter, Pinnacle Studio, Pinnacle Studio MovieBoard, Pinnacle Systems, Pinnacle VideoSpin, Podcast Factory, PowerSwap, PRE, ProControl, ProEncode, Profiler, Pro Tools LE, Pro Tools M-Powered, Pro Transfer, Pro Tools, QuickPunch, QuietDrive, Realtime Motion Synthesis, Recti-Fi, Reel Tape Delay, Reel Tape Flanger, Reel Tape Saturation, Reprise, Res Rocket Surfer, Reso, RetroLoop, Reverb One, ReVibe, Revolution, rS9, rS18, RTAS, Salesview, Sci-Fi, Scorch, Scorefitter, ScriptSync, SecureProductionEnvironment, Serv|LT, Serv|GT, Session, Shape-to-Shape, ShuttleCase, Sibelius, SIDON, SimulPlay, SimulRecord, Slightly Rude Compressor, Smack!, Soft SampleCell, Soft-Clip Limiter, Solaris, SoundReplacer, SPACE, SPACEShift, SpectraGraph, SpectraMatte, SteadyGlide, Streamfactory, Streamgenie, StreamRAID, Strike, Structure, Studiophile, SubCap, Sundance Digital, Sundance, SurroundScope, Symphony, SYNC HD, Synchronic, SynchroScope, SYNC I/O, Syntax, TDM FlexCable, TechFlix, Tel-Ray, Thunder, Titansync, Titan, TL Aggro, TL AutoPan, TL Drum Rehab, TL Everyphase, TL Fauxlder, TL In Tune, TL MasterMeter, TL Metro, TL Space, TL Utilities, tools for storytellers, Torq, Torq Xponent, Transfuser, Transit, TransJammer, Trigger Finger, Trillium Lane Labs, TruTouch, UnityRAID, Vari-Fi, Velvet, Video the Web Way, VideoRAID, VideoSPACE, VideoSpin, VTEM, Work-N-Play, Xdeck, X-Form, Xmon, XPAND!, Xponent, X-Session, and X-Session Pro are either registered trademarks or trademarks of Avid Technology, Inc. in the United States and/or other countries.

5
FootageArri — Courtesy of Arri/Fauer — John Fauer, Inc.Bell South “Anticipation” — Courtesy of Two Headed Monster — Tucker/Wayne Atlanta/GMS.Canyonlands — Courtesy of the National Park Service/Department of the Interior.Eco Challenge British Columbia — Courtesy of Eco Challenge Lifestyles, Inc., All Rights Reserved. Eco Challenge Morocco — Courtesy of Discovery Communications, Inc.It’s Shuttletime — Courtesy of BCP & Canadian Airlines. Nestlé Coffee Crisp — Courtesy of MacLaren McCann Canada. Saturn “Calvin Egg” — Courtesy of Cossette Communications. “Tigers: Tracking a Legend” — Courtesy of www.wildlifeworlds.com, Carol Amore, Executive Producer."The Big Swell" — Courtesy of Swell Pictures, Inc.Windhorse — Courtesy of Paul Wagner Productions.
Arizona Images — KNTV Production — Courtesy of Granite Broadcasting, Inc., Editor/Producer Bryan Foote.Canyonlands — Courtesy of the National Park Service/Department of the Interior.Ice Island — Courtesy of Kurtis Productions, Ltd.Tornados + Belle Isle footage — Courtesy of KWTV News 9.WCAU Fire Story — Courtesy of NBC-10, Philadelphia, PA.Women in Sports – Paragliding — Courtesy of Legendary Entertainment, Inc.
News material provided by WFTV Television Inc.
Avid Interplay Sphere Installation and Configuration Guide • Created 6/26/13 • This document is distributed by Avid in online (electronic) form only, and is not available for purchase in printed form.

6
Contents
Chapter 1 Interplay Sphere Installation and Configuration . . . . . . . . . . . . . . . . . . . . . . 9
Overview . . . . . . . . . . . . . . . . . . . . . . . . . . . . . . . . . . . . . . . . . . . . . . . . . . . . . . . . . . . . . . 9
Prerequisites for a Sphere Installation . . . . . . . . . . . . . . . . . . . . . . . . . . . . . . . . . . . . . . 10
Sphere Installation and Configuration Overview . . . . . . . . . . . . . . . . . . . . . . . . . . . . . . . 11
Installing the Sphere Support Software (Windows). . . . . . . . . . . . . . . . . . . . . . . . . . . . . 12
Selecting the Transcode for Interplay Sphere Option During the Transcode Installation. . . . . . . . . . . . . . . . . . . . . . . . . . . . . . . . . . . . . . . . . . . . . . 14
Verifying the Installation . . . . . . . . . . . . . . . . . . . . . . . . . . . . . . . . . . . . . . . . . . . . . . 14
Configuring the Sphere Remote Editor Components (Windows) . . . . . . . . . . . . . . . . . . 16
Start Interplay Access to Test Your Connection. . . . . . . . . . . . . . . . . . . . . . . . . . . . 16
Checking the Lookup Service Connection . . . . . . . . . . . . . . . . . . . . . . . . . . . . . . . . 17
Configuring the Media Indexer . . . . . . . . . . . . . . . . . . . . . . . . . . . . . . . . . . . . . . . . . 19
Working with Avid ISIS Client Software . . . . . . . . . . . . . . . . . . . . . . . . . . . . . . . . . . 23
Establishing a Connection to Your Interplay Environment . . . . . . . . . . . . . . . . . . . . . . . 23
Maintenance and Trouble Shooting . . . . . . . . . . . . . . . . . . . . . . . . . . . . . . . . . . . . . . . . 24
Interplay Sphere and Dynamic Relink . . . . . . . . . . . . . . . . . . . . . . . . . . . . . . . . . . . 24
Maintaining the Avid Transcode Folder . . . . . . . . . . . . . . . . . . . . . . . . . . . . . . . . . . 24
Optimizing Sphere Remote Upload Speeds for 4G or Low Latency LAN . . . . . . . . 25
Update your Network Interface Card (NIC) . . . . . . . . . . . . . . . . . . . . . . . . . . . . 25
Modify the FTPFileTransfer.properties File . . . . . . . . . . . . . . . . . . . . . . . . . . . . 25
Troubleshooting . . . . . . . . . . . . . . . . . . . . . . . . . . . . . . . . . . . . . . . . . . . . . . . . . . . . 27
Chapter 2 Setting Up Systems in the Interplay Environment . . . . . . . . . . . . . . . . . . . . 28
Overview . . . . . . . . . . . . . . . . . . . . . . . . . . . . . . . . . . . . . . . . . . . . . . . . . . . . . . . . . . . . . 28
Network Considerations for Sphere . . . . . . . . . . . . . . . . . . . . . . . . . . . . . . . . . . . . . . . . 29
Name Resolution . . . . . . . . . . . . . . . . . . . . . . . . . . . . . . . . . . . . . . . . . . . . . . . . . . . 29
VPN Connections and Port Usage . . . . . . . . . . . . . . . . . . . . . . . . . . . . . . . . . . . . . . 29
Setting up the ICPS Server . . . . . . . . . . . . . . . . . . . . . . . . . . . . . . . . . . . . . . . . . . . . . . . 30

7
Obtain and Install the Sphere License for the Interplay Engine . . . . . . . . . . . . . . . . . . . 30
Update the Interplay Environment to be Compatible with the Remote Editing System . 31
Installing and Configuring the Delivery Receiver Service. . . . . . . . . . . . . . . . . . . . . 31
Understanding the Delivery Service and Delivery Receiver Service . . . . . . . . . 32
Identifying the Sphere Components . . . . . . . . . . . . . . . . . . . . . . . . . . . . . . . . . . . . . . . . 33
Identifying the Delivery Receiver System. . . . . . . . . . . . . . . . . . . . . . . . . . . . . . . . . 33
Identifying the FallBack Shared Storage Server . . . . . . . . . . . . . . . . . . . . . . . . . . . 34
Identifying the Interplay Media Indexer (Interplay v3.0 and Later) . . . . . . . . . . . . . . 35
Identifying the ICPS Server . . . . . . . . . . . . . . . . . . . . . . . . . . . . . . . . . . . . . . . . . . . 36
Selecting the Sphere Proxy Bit Rate . . . . . . . . . . . . . . . . . . . . . . . . . . . . . . . . . . . . 37
Chapter 3 Setting Up Mac Clients for Sphere . . . . . . . . . . . . . . . . . . . . . . . . . . . . . . . . 40
Overview . . . . . . . . . . . . . . . . . . . . . . . . . . . . . . . . . . . . . . . . . . . . . . . . . . . . . . . . . . . . . 40
Supported Software . . . . . . . . . . . . . . . . . . . . . . . . . . . . . . . . . . . . . . . . . . . . . . . . . . . . 40
Configuring Sphere for Interplay v3.0 and Later . . . . . . . . . . . . . . . . . . . . . . . . . . . . . . . 41
Installation Requirements. . . . . . . . . . . . . . . . . . . . . . . . . . . . . . . . . . . . . . . . . . . . . 41
Identifying the Media Indexer in the Interplay Administrator Tool . . . . . . . . . . . . . . 41
Installing Avid Interplay v3.0 Sphere Components on Mac OS X . . . . . . . . . . . . . . 41
Checking Installed Sphere Components and Restarting Services. . . . . . . . . . . . . . 43
Connecting the Sphere Client to an Interplay v3.0 Environment . . . . . . . . . . . . . . . 44
Working with Avid ISIS Client Software . . . . . . . . . . . . . . . . . . . . . . . . . . . . . . . . . . 47
Restarting the Media Indexer Service on Interplay v3.0. . . . . . . . . . . . . . . . . . . . . . 47
Connecting to the Avid Service Framework . . . . . . . . . . . . . . . . . . . . . . . . . . . . . . . 47
Configuring Sphere for Interplay v2.7 . . . . . . . . . . . . . . . . . . . . . . . . . . . . . . . . . . . . . . . 48
Installation Requirements. . . . . . . . . . . . . . . . . . . . . . . . . . . . . . . . . . . . . . . . . . . . . 48
Installing Access and Media Indexer on Mac OS X. . . . . . . . . . . . . . . . . . . . . . 48
Java Issues with Media Indexer on Mac OS X. . . . . . . . . . . . . . . . . . . . . . . . . . . . . 51
Configuring the Sphere Remote Editor Components (Interplay v2.7). . . . . . . . . . . . . . . 52
Start Interplay Access to Test Your Connection. . . . . . . . . . . . . . . . . . . . . . . . . . . . 52
Starting the Interplay Administrator Tool . . . . . . . . . . . . . . . . . . . . . . . . . . . . . . . . . 53
Checking the Lookup Service Connection . . . . . . . . . . . . . . . . . . . . . . . . . . . . . . . . 55
Configuring the Media Indexer . . . . . . . . . . . . . . . . . . . . . . . . . . . . . . . . . . . . . . . . . 57
Running the Editing Application Software . . . . . . . . . . . . . . . . . . . . . . . . . . . . . . . . 63
Checking the Media Creation Tool Settings . . . . . . . . . . . . . . . . . . . . . . . . . . . 64

8
Working with Avid ISIS Client Software . . . . . . . . . . . . . . . . . . . . . . . . . . . . . . . . . . 64
Troubleshooting the Connections to the Workgroup and Media Indexer . . . . . . . . . . . . 65
Known Issues Running Avid Service Framework on a Mac OS. . . . . . . . . . . . . . . . 65
Restarting the Media Indexer Service . . . . . . . . . . . . . . . . . . . . . . . . . . . . . . . . 66
Uninstalling and Reinstalling the Media Indexer . . . . . . . . . . . . . . . . . . . . . . . . 67
Running the configure.sh Command. . . . . . . . . . . . . . . . . . . . . . . . . . . . . . . . . 68
Running the Interplay Administrator Tool as root on a Mac . . . . . . . . . . . . . . . 69
Configuring the Workgroup Name, Lookup Service, and Media Indexer on a Mac OS. . . . . . . . . . . . . . . . . . . . . . . . . . . . . . . . . . . . . . . . . . . . . . . . . . . . . 70

1 Interplay Sphere Installation and Configuration
Overview
The following tasks are required for setting up and configuring Interplay Sphere:
• Install and configure the Interplay Sphere components on the Avid editing system that will be used for remote editing.
• Perform a number of installation and configuration tasks in the main Interplay environment.
This document makes a distinction between the remote editing system and the Interplay environment. The remote editing system can be anywhere in the world that is accessible to the Interplay environment via an internet connection. For example, one workflow involves a broadcast journalist preparing a sequence for upload from a remote site to the main broadcast station.
n For information on installing Sphere components on a Mac OS X system, see “Setting Up Mac Clients for Sphere” on page 40.
This section contains the following topics:
• Prerequisites for a Sphere Installation
• Sphere Installation and Configuration Overview
• Installing the Sphere Support Software (Windows)
• Configuring the Sphere Remote Editor Components (Windows)
• Establishing a Connection to Your Interplay Environment
• Maintenance and Trouble Shooting

Prerequisites for a Sphere Installation
10
Prerequisites for a Sphere Installation
The following table lists the prerequisites for a successful installation.
n An ISIS client is not required for remote editing. If you have an ISIS client installed, disconnect the ISIS client while running as a Sphere remote editor.
n A Media Services or Transcode dongle is not required for a remote editing system.
Sphere Installation Prerequisites
Task Additional Information
Sphere client system requirements: Quad Core Processor with 8 GB RAM
See the Interplay Sphere Readme for any additional information.
Interplay Client and Server Installers The Interplay Client Installer has the components needed for the remote editing system. The Interplay Server installer is required to update the Interplay Engine and other components in the Interplay environment.
For additional information, see the Interplay Sphere ReadMe.
Avid editing application installer Use the standard installation process for your Avid editing application.
Avid editing application license or hardware key (dongle)
See the editing application documentation for additional information.
Avid Interplay license key for Sphere users.
See “Prerequisites for a Sphere Installation” on page 10
Obtain the following information from your Interplay environment:
• Name of the Interplay workgroup (case sensitive)
• Interplay login name and password
• Names of the systems running the Interplay Engine and the Avid Service Framework Lookup service
• Names of the systems running the ICPS server and the Interplay Delivery Receiver service

Sphere Installation and Configuration Overview
11
Sphere Installation and Configuration Overview
The following table shows the installation checklist.
There are also a number of tasks that need to be performed by an administrator in the Interplay environment. See “Setting Up Systems in the Interplay Environment” on page 28.
Sphere Installation Check List
Task Additional Information
Make sure you have everything listed in the prerequisite section.
See “Prerequisites for a Sphere Installation” on page 10.
Install the Sphere Support components on the remote editing system.
See “Installing the Sphere Support Software (Windows)” on page 12 and “Setting Up Mac Clients for Sphere” on page 40.
Install the Avid editing application software and install QuickTime.
Use the standard Avid editing application installation process. On a Windows system, obtain the latest QuickTime installer from the Apple web site. QuickTime is already installed on Mac OS X.
For Mac OS X systems using Interplay v2.7, check the Java version.
Type the following command in a Terminal window:
java -version
If the version is 1.6.0_35 or higher, see “Java Issues with Media Indexer on Mac OS X” on page 51.
(Interplay v.2.7) Configure the following Sphere components while the system is connected to the workgroup :
• Connect to the Lookup Service
• Connect to the Media Indexer HAG
See “Configuring the Sphere Remote Editor Components (Windows)” on page 16 and “Configuring the Sphere Remote Editor Components (Interplay v2.7)” on page 52.
(Interplay v.3.0) Configure the following Sphere components while the system is connected to the workgroup :
• Connect to the Lookup Service
• Do not use the Service Configuration tool to connect to the HAG.
See “Configuring the Sphere Remote Editor Components (Windows)” on page 16 and “Configuring the Media Indexer” on page 19.

Installing the Sphere Support Software (Windows)
12
Installing the Sphere Support Software (Windows)
This section describes how to install the Interplay Sphere components on the remote editing system.
You must install Avid Media Composer or Avid NewsCutter to use Avid Interplay Sphere. Avid editing applications in Interplay Sphere configurations require a different transcode service from those editing applications that do not use Sphere. These transcode services are not compatible, and only one installs with Media Composer and NewsCutter.
• If you install the Interplay Sphere components first, installing Media Composer or NewsCutter does not install Editor Transcode so Interplay Sphere can access Interplay Sphere Transcode for background transcode and remote upload operations.
• If you install Media Composer or NewsCutter first, installing Interplay Sphere uninstalls Editor Transcode and installs Interplay Sphere Transcode.
For instructions on installing Media Composer or NewsCutter, see the Installation Guide for Avid Editing Applications and the Avid Editing Application ReadMe.
To install the Interplay Sphere Support Software:
1. On the remote editing system, open the Interplay Client installer USB flash drive or installer software folder and double click the autorun.exe installer.
The Interplay Production installation screen opens.
2. Click Clients, and then click Avid Interplay Sphere Support.
3. Do one of the following:
- Click “All Interplay Sphere Components” (recommended)
- If you need to update or reinstall individual components, install the components as described in the following table.
Software Installation Description
All Interplay Sphere Components Installs all of the Interplay Sphere components. This is the recommended method to install the Sphere components.
Note that the installer does not prompt for a workgroup when installing the Avid Service Framework and you must enter it later. See “Checking the Lookup Service Connection” on page 17.
If you need to update or reinstall any of the Sphere components, you can use the individual installers listed below.

Installing the Sphere Support Software (Windows)
13
4. If you installed Media Composer or NewsCutter before you install the Sphere components, you might receive a warning: “Avid Editor Transcode is installed on this system. Sphere components are incompatible. You must remove Editor Transcode before installing Sphere components. Proceed with uninstallation?” Click OK.
Avid Service Framework This is the default 64-bit client installation.
If you are using the individual installer, enter the name of the workgroup when prompted. The name is case sensitive. Then accept the rest of the defaults.
Interplay Access Accept the defaults.
Interplay Media Indexer Accept the defaults.
After the installation is completed, perform the following tasks:
• Check the connection to the Interplay workgroup as described in “Checking the Lookup Service Connection” on page 17.
• (Interplay v2.7) Configure the Media Indexer to connect to the High Availability group (HAG) in the Interplay environment. See “Checking the Lookup Service Connection” on page 17.
Interplay Remote Upload Service
Accept the defaults.
Interplay Media Services Accept the defaults.
Interplay Delivery Accept the defaults.
Interplay Transcode Accept the defaults until the system displays the “Choose how Transcode will be used” dialog. Then select the following option:
Transcode for Interplay Sphere
See “Selecting the Transcode for Interplay Sphere Option During the Transcode Installation” on page 14. Accept the defaults for the rest of the installation.
Note that the Transcode installation requires a reboot so you may want to perform this installation at the end of the install.
Software Installation Description

Installing the Sphere Support Software (Windows)
14
5. After you complete the installation, reboot the system if requested. A reboot may be required if you perform the full installation or run the individual installer for Interplay Transcode.
Selecting the Transcode for Interplay Sphere Option During the Transcode Installation
If you select the “All Interplay Sphere Components” install option, the installer automatically installs the Sphere version of Interplay Transcode. If you use the individual Transcode installer, the system displays the following dialog box during the installation. Select Transcode for Interplay Sphere and click OK.
Verifying the Installation
You do not need to configure the local Media Services Engine or the Transcode and Delivery providers on a remote editing system. The applications run as 64-bit services and the Transcode and Delivery providers are automatically registered with the local Media Services Engine.

Installing the Sphere Support Software (Windows)
15
To verify the installation:
1. Click Start, right-click Computer, and select Manage.
2. Select Services and verify that the following services are running:
- Avid Interplay Media Indexer
- Avid Interplay Sphere Database Engine
- Avid Interplay Sphere Delivery
- Avid Interplay Sphere Media Services Engine
- Avid Interplay Sphere Remote Upload Service
- Avid Interplay Sphere Remote Upload Status
- Avid Interplay Sphere Transcode
- Avid Machine Monitoring Service
- Avid Services Starter Service
- Avid Time Synchronization Service
The following illustration shows the services running.

Configuring the Sphere Remote Editor Components (Windows)
16
Configuring the Sphere Remote Editor Components (Windows)
This section describes the tasks that you perform while the Sphere editing system is connected to the Interplay workgroup. In order to perform these operations you must be connected to the Interplay workgroup in one of the following ways:
• Connected to the network in the Interplay environment back at the station or production facility.
• Connected via a VPN connection as a remote editing client. See “Establishing a Connection to Your Interplay Environment” on page 23.
Start Interplay Access to Test Your Connection
Running Access is a good way to test your connection because it requires a connection to the Interplay Engine. You should be able to log in to Access using the system name of the Interplay Engine.
To start Interplay Access:
1. Click Start and select Programs > Avid > Avid Interplay Access.
The Interplay Access log in screen opens.
2. Select the server you want to work with by doing one of the following:

Configuring the Sphere Remote Editor Components (Windows)
17
- Accept the server that is displayed (the last server connected).
- Click the arrow for the Server list and select the server name from the list.
- Click the arrow for the Server list and select Add Server. Type a new server name or IP address.
n In order to ensure you have a good connection to the Interplay environment, you should be able to log in using the name of the Interplay Engine server.
3. Select the AvidWG database.
4. Type your user name and password.
The Avid Interplay Access window opens, with the primary database displayed in the Folders pane.
If you are able to log into Access using the Interplay Engine system name, it means you have a good connection. You can proceed to the next sections to connect to the Lookup service and Media Indexer HAG
Checking the Lookup Service Connection
After you install the Avid Services Framework, check the connections to the Workgroup and Lookup service and establish the connection if necessary.
n On a Mac OS X system on Interplay v3.0 you do not need to configure the Workgroup and Lookup service. It is still recommended on a Windows system.
To check the workgroup name and the connection to the Lookup Service:
1. Click the Start button, and then select All Programs > Avid > Avid Service Framework > Avid Workgroup Properties.
2. On the Services tab, make sure the workgroup name is correct. Click the Edit key to change the name if necessary. Recall that the name is case sensitive.
3. Click the Lookup tab. If the workgroup name is not present in the Workgroup area on the left, click the Add button and add the name. Recall that the name is case sensitive.
Example Workgroup name
Configuring the Sphere Remote Editor Components (Windows)
18
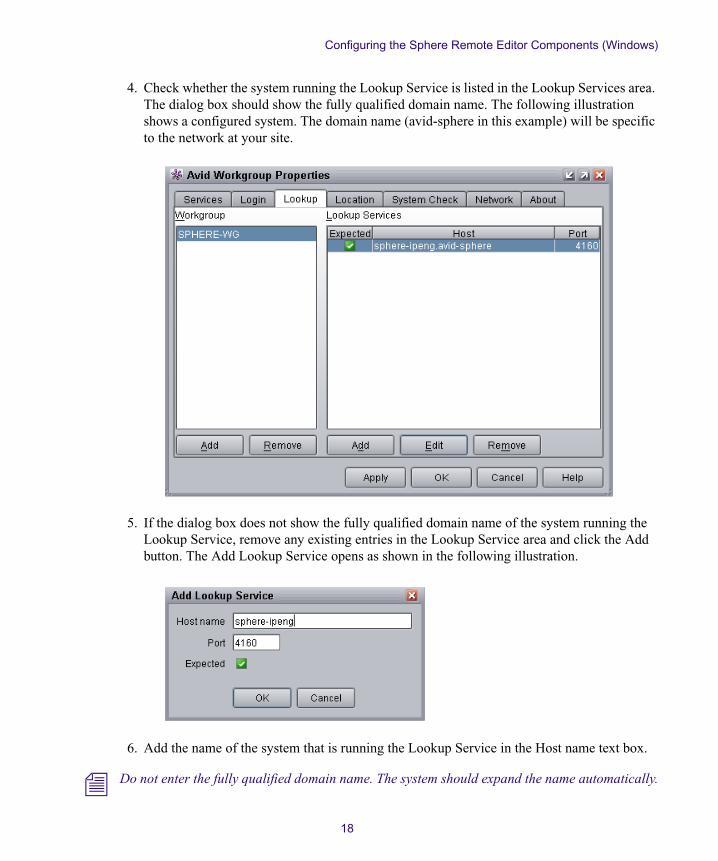
4. Check whether the system running the Lookup Service is listed in the Lookup Services area. The dialog box should show the fully qualified domain name. The following illustration shows a configured system. The domain name (avid-sphere in this example) will be specific to the network at your site.
5. If the dialog box does not show the fully qualified domain name of the system running the Lookup Service, remove any existing entries in the Lookup Service area and click the Add button. The Add Lookup Service opens as shown in the following illustration.
6. Add the name of the system that is running the Lookup Service in the Host name text box.
n Do not enter the fully qualified domain name. The system should expand the name automatically.

Configuring the Sphere Remote Editor Components (Windows)
19
7. Keep the default port number and click the Expected check box. Then click OK.
The system may display a message that DNS has found the proper host name and ask if you want to use that name. Click OK.
8. Click Apply. The system states that it must restart the Avid services for changes to take effect. Click OK.
9. Test the connection to the workgroup by opening the Avid Service Framework Service Configuration tool. Your system should appear in the list. It may take a few minutes to populate the list if you are working remotely.
If the workgroup systems do not appear in the Service Configuration tool it means that you do not have a good connection to the workgroup.
Configuring the Media Indexer
The local Media Indexer on the Sphere editing client performs the following tasks:
• The Media Indexer monitors Avid MediaFiles folders on the local system. It performs this task automatically if you use the default setting in the Media Creation window on the editing application. The following illustration shows the Media Creation window with the default setting.
You typically keep the default option turned on for a Sphere editing client. If you turn off auto-indexing, you need to manually configure the Media Indexer to monitor the local drives.

Configuring the Sphere Remote Editor Components (Windows)
20
To access the Media Creation settings in the Avid editing application, click the Settings tab in the Project window and double-click Media Creation.
• When you are connected to the Interplay environment, the local Media Indexer communicates with the Media Indexer in the High Availability Group (HAG). Information about availability of remote media is retrieved through that connection. Note that the method for connecting to the HAG is different between Interplay v2.7 and Interplay v3.0.
To connect the local Media Indexer to the HAG (Interplay v3.0 and later)
1. Start the Avid editing application and log into Interplay database.
You should automatically connect to the HAG after you log into the Interplay database. This is because the Admin tool has been set up to recognize the Media Indexer HAG.
n Do not use the Service Configuration tool to connect to the HAG in an Interplay v3.0 environment.
2. (Option) Open the Media Indexer web interface, select the Avid editing system, and view the connection to the HAG. Use the following steps:
a. Open the web interface on the Media Indexer server using the following URL:
http://<MI system name>:8888/mi/
where <MI system name> is the server name or IP address of the system running the Media Indexer.
b. Click Configuration and click Storage Locations. You should see the HAG associated with the Interplay Engine and any configured local storage locations.
To connect the local Media Indexer to the HAG (Interplay v2.7):
1. Click the Start button, and then select All Programs > Avid > Avid Service Framework > Avid Service Configuration.
2. Locate your Avid editing system in the list and select the Avid Interplay Media Indexer service.
The system prompts you for the Service Framework administrator password. By default, there is no password.
3. Click Yes when the system displays a message asking if you want to allow the service to run with unrestricted security.

Configuring the Sphere Remote Editor Components (Windows)
21
The following illustration shows an Avid editing system named betalab_z400.
4. Click Configure.
The Configure Storages dialog box opens. In the following illustration the system is already monitoring the local drives.

Configuring the Sphere Remote Editor Components (Windows)
22
5. Click Add.
The Add Storage dialog box opens.
6. Select Avid Interplay Media Indexer and click OK.
The Avid Interplay Media Indexer dialog box opens.
7. Do the following:
a. Select Connect to a High Availability Media Indexer Group.
b. Select the name of the HAG from the Group Name menu. In this example the name of the HAG is SPHERE-HAG.
c. Select Load Balanced from the Mode menu.
d. Click Apply, and then click OK.

Establishing a Connection to Your Interplay Environment
23
The system displays the high availability group in the Configure Storages dialog box as shown in the following illustration.
c Do not check the Remote Mode check box at the bottom of the Configure Storages dialog box. This feature is intended for a future release and is not used by Interplay Sphere.
8. Click OK to close the Configure Storages dialog box.
You are now ready to start and run the Avid editing application as a remote editor. For additional information, see Avid Interplay Sphere Remote News Editing Workflow Guide. Also search for Sphere in the Editor Help or the Interplay Help.
Working with Avid ISIS Client Software
Use the following guidelines for working with an ISIS client:
• If you plan to use your system both remotely and back at the station, install the ISIS client. Make sure to disconnect the ISIS client while you are working remotely. Then when you are back at the station you can connect the ISIS client and mount workspaces as usual.
• If your system will only be used remotely, there is no need to install the ISIS client software.
Establishing a Connection to Your Interplay Environment
In order to perform remote editing, you must be able to establish a connection to your Interplay environment. If connecting from the public internet, you will typically use a virtual private network (VPN) account provided by your IT organization.
Depending on how your site decides to implement the connection, your remote computer must be able to resolve the system names and IP addresses of the following systems in the Interplay environment:
• Interplay Engine
• ICPS server

Maintenance and Trouble Shooting
24
• System running Service Framework Lookup Service
• System running the Interplay Delivery Receiver service.
Your Interplay DNS servers need to be integrated with your corporate DNS servers so that name lookup requests will be forwarded to the appropriate authoritative zone servers. Please work with your IT organization to ensures proper DNS configuration. See “Network Considerations for Sphere” on page 29 for additional information.
Maintenance and Trouble Shooting
Interplay Sphere and Dynamic Relink
When you upload media to your Interplay environment at the broadcast station or production facility, you use dynamic relink to link the clips in your sequence to the high resolution uploaded media.
Because the clips in your sequence initially link to the source clips’ original location and not to the uploaded media, they might display as offline when you open your sequence back at the station or production facility, or when you open the sequence from another remote system, unless you first enable dynamic relink. If you examine the clips in Interplay Access, you might see that the file paths for uploaded clips point to their original remote editing location, and the status of the media displays as offline or not available in the target resolution. You use dynamic relink to resolve the links between the sequence and clips checked in to Interplay and the uploaded media.
See the “Documentation Changes” section in the Interplay Sphere Readme for additional information.
Maintaining the Avid Transcode Folder
The Transcode application maintains a folder for temporary files on the remote editing system in the following location:
C:\Avid Transcode\Avid MediaFiles
The Transcode software creates a folder for each transcode job within the Avid MediaFiles folder. Then it stores temporary files in the folder.
The Transcode software automatically deletes the temporary files but leaves the job folders behind. Avid recommend that you periodically check the main folder and delete the job folders. You can delete everything under the following directory:
C:\Avid Transcode\Avid MediaFiles

Maintenance and Trouble Shooting
25
n Do not delete the job folders while a Remote Upload job is running. Also, do not configure the Media Indexer to monitor the Avid Transcode folder. It is not necessary and can adversely affect the Remote Upload performance.
Optimizing Sphere Remote Upload Speeds for 4G or Low Latency LAN
By default, the Avid Interplay Sphere Delivery service on the Sphere client is optimized for a 4G connection. This uses relatively small internal cache sizes for gathering and sending data across the 4G network. If your sphere client is connected to the Interplay environment via a low latency LAN, you can increase the internal cache sizes that the Sphere Delivery Service uses for Remote Uploads in order to speed up the process.
A low latency LAN is defined as one that has fast switches, fewer hops between connections. If you have a high latency LAN it doesn’t help to increase your buffer size.
n These optimizations are for Remote Uploads. They do not affect Remote Playback speeds.
Update your Network Interface Card (NIC)
If you use a LAN connection for remote uploads, check the following on your NIC.
To update your network interface card for Sphere Uploads (need more info here):
1. Make sure you have the latest driver for your NIC.
2. Set the following options on your NIC:
- Set the receive and transmit buffers to 1024 bytes. Depending on the NIC card, the default might be as low as 256 bytes.
n The version of the drivers for your particular NIC card may provide other options for increasing your network speed. Note that these procedures should be performed by your IT department or other qualified personnel
Modify the FTPFileTransfer.properties File
You can replace the default FTPFileTransfer.properties file with a version that can be more easily modified. Besides making it easy to switch between low latency LAN and 4G speeds, it gives you the opportunity to fine tune the settings for your own network. You can experiment with the medium LAN speeds until you find one that works best for your network. The process works as follows.

Maintenance and Trouble Shooting
26
During a remote upload, one thread continually reads data from disk and writes it into an internal cache while a second thread removes data from the cache and sends it across the network. The following variable names are used in the file:
• buffersize: The amount of memory to reserve for the internal cache. For example, 64 MB = 64 x 1024 X 1024 = 67108864 bytes
• isisreadsize: The amount of data to read from disk and place in the internal cache. For example, 16 MB = 16 x 1024 x 1024 = 16777216 bytes
• networksize: The amount of data to remove from the internal cache and send across the network.
Using a larger internal cache and sending larger chunks of data can increase the speed as long as the network is optimized for the larger chunk size. If the network is not optimized for the larger chunks of data it can have a negative effect on performance.
To modify the contents of the FTPTransfer.properties file:
1. Navigate to the following directory on the Windows Sphere client:
C:\Program Files\Avid\Interplay Sphere Delivery
2. Open FTPFileTransfer.properties in an editor such as Notepad and replace the contents with the following:
## Note that values must be based on 1024. # For example, 64 MB = 64 x 1024 x 1024 = 67108864 # Incorrect values can affect performance.## Use this setting for low latency LAN#buffersize=67108864 isisreadsize=16777216netwritesize=16777216### Use this setting for medium LAN##buffersize=67108864#isisreadsize=8388608#netwritesize=8388608## Use this setting for 4G connection# #buffersize=8192#isisreadsize=8192#netwritesize=4096#

Maintenance and Trouble Shooting
27
n The above file uses the low latency LAN settings. Other settings are commented out with hash marks (#).
3. Open Services and Applications > Services, and restart the following service:
Avid Interplay Sphere Delivery
To reset the system for a 4G or Medium LAN connection:
1. Edit the file and do the following:
a. Add hash marks (#) to the start of the variable lines for low latency LAN.
b. Remove hash marks from the three variables for 4G connections or Medium LAN.
c. Save and close the file.
2. Restart the following service:
Avid Interplay Sphere Delivery
n If the Sphere users at your site frequently switch between 4G and low latency LAN connections, you can write a script that changes the values depending on the network you are working on.
Troubleshooting
This following list applies to trouble shooting a remote editing system.
• See the latest version of the Interplay Sphere ReadMe for a list of limitations and tips.
• If you get an error similar to the following, see “Identifying the FallBack Shared Storage Server” on page 34.
“check to see if the <ISIS System Director server name>/news/avidmediafiles/mxf… has enough...”
• If you change your connection to Interplay by disconnecting an Ethernet cable and activating a wireless connection and then restart your Avid editing application, the editor may not connect to the local Media Indexer.
Workaround: Open the Avid Service Framework Workgroup Properties tool, click the Advanced tab, and restart all of the Service Framework services.

2 Setting Up Systems in the Interplay Environment
Overview
This section describes tasks that you need to perform in the main Interplay environment in order to establish the communication with the remote editing system. This document makes a distinction between the remote editing system and the Interplay environment. The remote editing system can be anywhere in the world that is accessible to the Interplay environment via an internet connection. In a Broadcast workflow, the Interplay environment is referred to as “back at the station.”
The following table lists the tasks that need to be performed in the Interplay environment.
Interplay Environment Check List
Task Additional Information
Prepare your VPN connections and open ports for Sphere operations.
See “Network Considerations for Sphere” on page 29.
Set up the ICPS server. See “Setting up the ICPS Server” on page 30.
Install the Sphere license for the Interplay Engine.
See “Obtain and Install the Sphere License for the Interplay Engine” on page 30.
Update the Interplay environment with the version that supports Sphere.
See “Update the Interplay Environment to be Compatible with the Remote Editing System” on page 31 and “Installing and Configuring the Delivery Receiver Service” on page 31.

Network Considerations for Sphere
29
Network Considerations for Sphere
This section describes name resolution and VPN connection information for Interplay Sphere.
Name Resolution
Depending on how your site decides to implement the connection, the remote Sphere computer must be able to resolve the system names and IP addresses of the following systems in the Interplay environment:
• Interplay Engine
• ICPS server
• Media Indexers in the HAG
• System running Service Framework Lookup Service
• System running the Interplay Delivery Receiver service.
Your Interplay DNS servers need to be integrated with your corporate DNS servers so that name lookup requests will be forwarded to the appropriate authoritative zone servers. Please work with your IT organization to ensures proper DNS configuration.
VPN Connections and Port Usage
Remote editors using Sphere typically access the Interplay environment “back at the station” or “back at the production facility” using a secure VPN connection. Any VPN, Firewall, IPS or other network security devices between the Sphere clients and Interplay core network need to be
Use the Interplay Admin tool to identify the following components:
• Delivery Receiver
• Fallback shared storage server
• Media Indexer URL (Interplay v3,0 and later)
• ICPS server
• Proxy bit rate
See “Identifying the Sphere Components” on page 33.
Interplay Environment Check List (Continued)
Task Additional Information

Setting up the ICPS Server
30
configured to allow access to the Interplay Sphere servers. These security devices may require access configuration based on IP addresses as well as the TCP and UDP ports used by the Sphere services.
It is important to note that, depending on the security at your site, a VPN connection might not guarantee full access to the Interplay servers. The VPN is one layer of security and in many cases internal security devices might also need to be modified. It is the responsibility of the site network administrators to ensure that the Sphere users have access to the Interplay servers.
For additional information, see Avid Interplay Sphere Network Information and Port Usage on the Avid Knowledge Base.
Setting up the ICPS Server
The Interplay Common Playback Server (ICPS) is used to display remote clips on the remote editing system. For details on setting up and configuring the server, see the Interplay Common Playback Service Installation and Configuration guide and the Interplay Common Playback Service Release Notes. See the Sphere Readme for the ICS versions that match your Interplay version.
Obtain and Install the Sphere License for the Interplay Engine
Interplay Sphere requires a license file for Sphere users. The license file is generated for a particular Interplay Engine. See your Avid representative for information on obtaining a license file. It may involve exporting your current license and installing a new license as described in this section.
You can view and export the current licenses in the Licenses view of the Interplay Administrator tool. The Sphere license is identified as Key-XA.
To export your license information:
1. Open the Interplay Administrator’s tool and open the Licenses view.
2. Click the Export license button.
3. Type or browse to a .nxn file name.
4. Select Save.
5. Contact your Avid representative about how to obtain the updated license file.

Update the Interplay Environment to be Compatible with the Remote Editing System
31
To install a license:
1. Start and log in to the Interplay Administrator.
2. Make a folder for the license file on the root directory (C:\) of the Interplay Engine server or another server. For example:
C:\Interplay_Licenses
3. Copy the license file (*.nxn) into the new folder you created.
4. In the Server section of the Interplay Administrator window, click the Licenses icon.
5. Click the Import license button.
6. Browse for the *.nxn file.
7. Select the file and click Open.
You see information about the permanent license in the License Types area.
Note that the Sphere License is identified as Key-XA.
Update the Interplay Environment to be Compatible with the Remote Editing System
Make sure that the Interplay environment software is compatible with the remote editor software. See the Interplay Sphere Readme for additional information. For information on updating Interplay software, see the Avid Interplay Software Installation and Configuration Guide.
Installing and Configuring the Delivery Receiver Service
You install the Deliver Receiver in the Interplay environment. The service is required to receive the data sent from the remote editing system. The service is typically installed on the Media Services Engine server in the Interplay environment. Note that the Delivery Receiver does not require a Media Services Engine to work with Interplay Sphere.
To install the Delivery Receiver service:
1. On the Media Services Engine server (not on the remote editing system), open the Interplay Server installer USB flash drive or software installation folder and double click the autorun.exe installer.
2. Navigate to the following installer page:
Servers > Avid Interplay Media Services > Install WAN Workflow Support
3. Double-click the Delivery Receiver installer and follow the system prompts to install the software.

Update the Interplay Environment to be Compatible with the Remote Editing System
32
4. When the installer displays the following dialog, select “Delivery Receiver with Sphere option” and click OK.
5. After you finish the installation, use the Interplay Admin tool to register the Delivery receiver system for Sphere. See “Identifying the Delivery Receiver System” on page 33.
Understanding the Delivery Service and Delivery Receiver Service
Avid Interplay Delivery is a service that is part of Interplay Media Services. You install the service description file and register the provider like other Interplay Media Services.
Avid Interplay Delivery Receiver is also a service that is part of Interplay Media Services. However, it runs as a Windows service and you do not install a service description or register it as a provider. You install the Delivery Receiver service on a server in the workgroup to which you are delivering the assets and media.
n Interplay Delivery uses FTP, which has a separation of the command port and data port. There is one command port that defaults to 33321, and up to 1000 data ports (you can configure the number of data ports). There are no in/out ports. The sending side uses only the “out” ports and the receiving side uses only the “in” ports.

Identifying the Sphere Components
33
Identifying the Sphere Components
This section describes how to register the following components with the Interplay Admin tool:
• Delivery Receiver
• Fallback shared storage server
• ICPS Server
• Sphere proxy bit rate
Identifying the Delivery Receiver System
The Delivery workflow requires that you register one Delivery Receiver service system with the receiving Interplay workgroup. This system will be used as the default Delivery Receiver. The Avid Interplay Administrator site setting, Server Hostname Settings, contains the settings for registering the default provider. You can use a profile to specify additional Delivery Receivers.
The Delivery workflow uses FTP (File Transfer Protocol), specifically, passive FTP mode.
You need to enter the hostname and port number of the system where the Delivery Receiver service is installed. The port number in this view is the command port number. By default, the command port number is 33321.
To register the default Delivery Receiver:
1. Click Start and select Programs > Avid > Avid Interplay Access Utilities > Avid Interplay Administrator.
2. Log in to the Interplay Engine.
3. In the Site Settings area, click Server Hostname Settings.
4. In the Interplay Media Services Settings area, type the computer name of the system that you want to register as the default Delivery Receiver.
By default, the command port number is 33321. Use the default port number or enter another port number and ensure that the system can communicate on that port.

Identifying the Sphere Components
34
5. Click Apply Changes.
Identifying the FallBack Shared Storage Server
The Remote Upload Service requires that the name of the Fallback Shared Storage Server in the Interplay Admin tool matches the name of the ISIS System Director server. If the name does not match, the system displays an error similar to the following:
check to see if the <ISIS System Director server name>/news/avidmediafiles/mxf… has enough...
To set the Fallback Shared Storage Server:
1. Click Start and select Programs > Avid > Avid Interplay Access Utilities > Avid Interplay Administrator.
2. Log in to the Interplay Engine.
3. In the Site Settings area, click Server Hostname Settings.
4. In the Workgroup and Media Indexer Settings area, make sure that the name of your ISIS server is correctly spelled in the Fallback Shared Storage Server text box.
By default, the name is automatically filled in the first time you connect to shared storage.
n Also check that the name of your workgroup is correctly entered. Recall that the name is case sensitive
5. Click Apply Changes.

Identifying the Sphere Components
35
Identifying the Interplay Media Indexer (Interplay v3.0 and Later)
As part of the configuration back at the station or back at the production facility, an administrator must identify the Interplay v3.0 Media Indexer in the Interplay Administrator tool.
To identify the MI Connection URL in the Interplay Administration tool:
1. Open the Interplay Administrator tool and open the Server Hostname Settings view.
2. In the Workgroup and Media Indexer Settings section, locate the Server MI Connection URL section.
3. Click the Add button to add a Media Indexer server.
The following illustration shows a completed section.
4. Add the name of the MI server and click Apply Changes.
5. If you have more than one MI in the HAG, add the other MI servers also. Note that additional Media Indexer servers must join the HAG in order to connect to the URL.

Identifying the Sphere Components
36
The system creates a URL for the Media Indexer server and displays the URL below the MI Servers window. The URL contains the MI server name and port 61717. This is the default port used to connect to the Media Indexer server.
Identifying the ICPS Server
After you install and configure the ICPS server you must enter the name in the Interplay Administration tool.
To set the ICPS Server name:
1. Click Start and select Programs > Avid > Avid Interplay Access Utilities > Avid Interplay Administrator.
2. Log in to the Interplay Engine.
3. In the Application Settings area, click Application Database Settings.
4. Select the Interplay workgroup in the left pane, select the Editor Settings tab, and scroll down to the bottom of the window as shown in the following illustration.

Identifying the Sphere Components
37
5. In the Interplay Common Playback Service area, enter the following information:
a. The name of the ICPS server.
b. The administrator user name and password for the ICPS server.
6. Click Apply at the bottom right of the window.
Selecting the Sphere Proxy Bit Rate
You can choose between the following H.264 bit rates for remote uploads:
• 2.0 Mbps
• 800 Kbps

Identifying the Sphere Components
38
The format that the system uses depends on your editor project type. See the Sphere ReadMe for the list of supported project types. For details on the supported formats, see “H.264 Resolutions in Interplay” in the Interplay Best Practices Guide v2.7 or higher or the Interplay Help.
To set the Sphere Proxy Resolution:
1. Click Start and select Programs > Avid > Avid Interplay Access Utilities > Avid Interplay Administrator.
2. Log in to the Interplay Engine.
3. In the Application Settings area, click Application Database Settings.
4. Select the Interplay workgroup in the left pane, select the Editor Settings tab, and scroll down to the bottom of the window as shown in the following illustration.

Identifying the Sphere Components
39
5. Select the proxy bit rate and click the Apply button.
n For Interplay v2.7 and higher, the default is 2Mbps. For Interplay v2.5 and v2.6, 800kbps is the only available option.

3 Setting Up Mac Clients for Sphere
Overview
This chapter contains the following topics:
• Supported Software
• Configuring Sphere for Interplay v3.0 and Later
• Configuring Sphere for Interplay v2.7
• Configuring the Sphere Remote Editor Components (Interplay v2.7)
• Troubleshooting the Connections to the Workgroup and Media Indexer
Supported Software
Media Composer v6.5.2 and Symphony v6.5.2 and later support Interplay Sphere on Mac OS as shown in the following table.
n ISIS versions are for the System Director. You do not use an ISIS client on a Sphere editing system.
Mac OS Interplay Version ISIS Version Remote Playback Remote Upload
Mac OS v10.7.x v2.7, v2.6, v2.5 v4.0, v4.1, v4.2 Yes No
Mac OS v10.8.x v2.7 and later v4.2 and later Yes No
Mac OS v10.8.x (Media Composer 7.0 and later)
v3.0 and later v4.2 and later Yes Yes

Configuring Sphere for Interplay v3.0 and Later
41
Configuring Sphere for Interplay v3.0 and Later
This section describes how to use the Interplay v3.0 version of the Sphere components to connect to an Interplay v3.0 environment.
Installation Requirements
A Sphere client running on a Mac OS X system in an Interplay v3.0 environment requires the following software:
• Media Composer v7.0 or Symphony v7.0 or later. These applications contain an AVX plug-in named MSP_Sphere.avx that is required for Sphere. The Plug-in resides in the following folder:
<MacBootDrive>/Library/ApplicationSupport/Avid/AVX2_Plug-ins/AMA
• Interplay Access v3.0 or later and Interplay Media Indexer v3.0 or later.
If you install the components for Avid Interplay Sphere, you cannot use background consolidate or transcode with Avid Media Composer. If you work with a Sphere configuration, remote upload automatically consolidates and transcodes clips in the background, but this functionality only applies when you upload media clips to Interplay remotely. All other consolidate and transcode operations occur in the foreground as you work on your editing project.
Identifying the Media Indexer in the Interplay Administrator Tool
As part of the configuration back at the station or back at the production facility, an administrator must identify the Interplay v3.0 Media Indexer in the Interplay Administrator tool. See “Identifying the Interplay Media Indexer (Interplay v3.0 and Later)” on page 35.
Installing Avid Interplay v3.0 Sphere Components on Mac OS X
The Avid Interplay Sphere installation procedure installs the following applications on your system:
• Interplay Sphere Delivery Support
• Interplay Sphere Media Services Engine
• Interplay Sphere Transcode
• Interplay Sphere Remote Upload Service
• Interplay Access
• Interplay Media Indexer
• Interplay Sphere Uninstaller

Configuring Sphere for Interplay v3.0 and Later
42
You must install Avid Media Composer to use Avid Interplay Sphere. Avid recommends that you install the Interplay Sphere components first.
To install the Avid Interplay Sphere components:
1. If you are upgrading a system that used Interplay v2.7 Sphere components, uninstall the Avid editing application and uninstall the Media Indexer. The Media Indexer v2.7 uninstaller is located in the following directory:
<MacBootDrive>/Applications/Avid_Uninstallers/Media Indexer
After you uninstall the software, delete the Media Indexer folder in the following directory.
/Applications/Avid/Media Indexer
2. Open the Interplay Sphere download folder, and then double-click Interplay_3_0_0_Client_Mac.dmg.
The Interplay installation dialog box opens.
3. Double-click Install Interplay Sphere.
4. Click Continue when prompted to accept the default installation, and then click Install.
When the Interplay Sphere installation completes, a dialog box asks you to restart your system.
5. Click Restart.
6. Install the Avid editing software and restart the system.

Configuring Sphere for Interplay v3.0 and Later
43
When you install Media Composer, you receive a warning message: “Transcode Conflict: Uninstall Interplay Sphere Transcode before installing Editor Transcode.” Click OK to install Media Composer without Editor Transcode. You cannot run Interplay Sphere if you install Editor Transcode. For more information on installing Media Composer, see the Installation Guide for Avid Editing Applications and the Avid Editing Application ReadMe.
Checking Installed Sphere Components and Restarting Services
You can view the versions of all Interplay Sphere components installed on your system and the status of your Sphere services by using the checksphere utility. You can also use the utility to restart the following Interplay Sphere services:
• Interplay Remote Upload Status
• Interplay Remote Upload
• Interplay Media Services Engine
• Interplay Sphere Delivery
• Interplay Sphere Transcode
• Interplay Sphere Transcode Service Worker
To view Interplay Sphere version information and restart services:
1. Navigate to the following folder: Applications/Avid/Interplay\ Remote\ Upload\ Service.
2. Double-click checksphere.command.
A terminal window opens.
3. Type your password, and then press Enter.
The console displays a list of Interplay components on your system and the version of the installed packages, and the status of Interplay services. If the service is running, it is followed by a process ID number (“PID” = [number]).

Configuring Sphere for Interplay v3.0 and Later
44
4. If you want to restart all Interplay services (except for Media Indexer), type Restart, and then press Enter.
The utility stops and restarts the Interplay services, and then the terminal window displays a list of Interplay services currently running.
n This tool does not restart the Media Indexer service. See “Restarting the Media Indexer Service on Interplay v3.0” on page 47.
5. Press any key other than “l” (lowercase “L”) and then press Enter to exit the utility.
Connecting the Sphere Client to an Interplay v3.0 Environment
If the “Server MI Configuration URL” is correctly set in the Interplay Administration tool, the Avid editing application will automatically connect to the HAG when you log into Interplay. You do not need to use the Avid Service Framework tools to connect to the workgroup in the Interplay environment.
n Do not use the Service Configuration tool to connect the local Media Indexer to the HAG. This is done automatically when you log into the Interplay database from the editing application.

Configuring Sphere for Interplay v3.0 and Later
45
In order to work as a Sphere client, you must be connected to the Interplay workgroup in one of the following ways:
• Connected to the network back at the station or production facility in the Interplay environment.
• Connected via a VPN connection as a remote editing client. See “Establishing a Connection to Your Interplay Environment” on page 23.
Running Interplay Access is a good way to test your connection because it requires a connection to the Interplay Engine. You should be able to log in to Access using the system name of the Interplay Engine.
To start Interplay Access:
1. Start Interplay Access from the following folder: Applications > Avid > Avid Interplay Access > InterplayAccess.
The Interplay Access log in screen opens.
2. Select the server you want to work with by doing one of the following:
- Accept the server that is displayed (the last server connected).
- Click the arrow for the Server list and select the server name from the list.
- Click the arrow for the Server list and select Add Server. Type a new server name or IP address.
3. Select the AvidWG database.

Configuring Sphere for Interplay v3.0 and Later
46
4. Type your Interplay user name and password.
The Avid Interplay Access window opens, with the primary database displayed in the Folders pane.
If you are able to log into Access using the Interplay Engine system name, it means you have a good connection to the Interplay environment. You can proceed to the next section to start the editor and connect to the Media Indexer HAG.
To connect your Sphere client to the Media Indexer HAG and start editing:
1. Start the Avid editing application on your Sphere client.
n Do not use the Service Configuration tool to connect the local Media Indexer to the HAG. This is done automatically when you log into the Interplay database from the editing application.
2. Log into the Interplay Engine database in the Select Projects window. You can also login using the Interplay User and Interplay Server dialogs in the Settings window.
After you log into the Interplay database, your local Media Indexer will automatically connect to the Media Indexer in the HAG.
At this point you should be able to open the Interplay window and play media that resides in the Interplay environment.
n The Avid editing application restarts the local Media Indexer service each time you restart the editor application.
n When you start the Avid editing application, there is an initialization period named “Connecting to the Media Indexer.” This process connects to the local Media Indexer.
3. (Option) Open the Media Indexer web interface, select the Avid editing system, and view the connection to the HAG. Use the following steps:
a. Open the web interface on the Media Indexer server using the following URL:
http://<MI system name>:8888/mi/
where <MI system name> is the server name or IP address of the system running the Media Indexer.
b. Click Configuration and click Storage Locations. You should see the HAG associated with the Interplay Engine and any local storage locations.

Configuring Sphere for Interplay v3.0 and Later
47
Working with Avid ISIS Client Software
Use the following guidelines for working with an ISIS client:
• If you plan to use your system both remotely and back at the station, install the ISIS client. Make sure to disconnect the ISIS client while you are working remotely. Then when you are back at the station you can connect the ISIS client and mount workspaces as usual.
• If your system will only be used remotely, there is no need to install the ISIS client software.
Restarting the Media Indexer Service on Interplay v3.0
This section describes how to restart the Media Indexer service. Note that every time you restart the Avid editing application in Media Composer v7.0 the system automatically restarts the Media Indexer service.
n This utility script named restartMI does not work for Interplay v3.0.
To restart the Media Indexer process from a Terminal window:
1. Navigate to the Media Indexer/bin directory as follows:
cd /Applications/Avid/Media\ Indexer/bin
2. Type the following commands in the bin directory:
sudo ./mi.sh removesudo ./mi.sh install
where:
- sudo instructs the system to run the command as “super user” or root.
- the characters ./ instruct the system to “run the following command that resides in the current directory”.
n You must have an Administrator login to perform commands that begin with “sudo.”
Connecting to the Avid Service Framework
You do not have to connect to the Avid Service Framework (ASF) in order to connect to the Media Indexer HAG. If you would like to connect to ASF in order to view your system in the Service Configuration tool you can use one of two ways to connect to the workgroup:
• If your Interplay environment has only one Lookup Service, you can run the configure.sh script to change the workgroup name and the name of the Lookup Service.
• If your system has two Lookup services, see “Running the Interplay Administrator Tool as root on a Mac” on page 69.

Configuring Sphere for Interplay v2.7
48
To run the configure.sh script:
1. Open a terminal window and navigate to the bin folder as follows:
cd /Applications/Avid/Media\ Indexer/bin
Note that the back slash ( \ ) is used to add a space to the path name.
2. The Terminal window might prompt for your password. Type your administrator password and press Return.
3. Type the following command:
sudo ./configure.sh <Workgroup name> <name of Lookup Service system>
enter the workgroup name and the name of the system running the Lookup Service separated by a space. For example:
sudo ./configure.sh UptimeWG burl-mi02
4. Restart the Media Indexer. See “Restarting the Media Indexer Service” on page 66.
Configuring Sphere for Interplay v2.7
Installation Requirements
A Sphere client running on a Mac requires the following software:
• Media Composer v6.5.2, NewsCutter v10.5.2, or Symphony v6.5.2 and higher. These applications contain an AVX plug-in named MSP_Sphere.avx that is required for Sphere. The Plug-in resides in the following folder:
<MacBootDrive>/Library/ApplicationSupport/Avid/AVX2_Plug-ins/AMA
• Interplay Access v2.7 or higher and Interplay Media Indexer v2.7 or higher. When you install the Media Indexer, identify the workgroup name (case sensitive) and the system running the Lookup Service.
Installing Access and Media Indexer on Mac OS X
The Interplay Access installer automatically installs components from the Avid Service Framework that are required to connect to the Workgroup and to the Media Indexer in the HAG. In addition, the Media Indexer contains components that allow you to restart the Avid Service Framework services by restarting the Media Indexer.
To install Interplay Access on a Mac OS X system:
1. Open the Avid Interplay Clients Installer folder.
2. Open the Installers folder.
3. Copy the Mac_Installers folder to your desktop.

Configuring Sphere for Interplay v2.7
49
4. Open the Mac_Installers folder.
Three folders are displayed: Access, MediaIndexer, and TransferClient.
5. Open the Access folder and double-click the file “InterplayAccessInstallerMac.zip.”
A program named “install.app” is expanded and displayed in the Access folder.
6. Double-click “install.app” and follow the system prompts to complete the installation.
By default, Interplay Access is installed in the following folder:
Applications/Avid/Avid Interplay Access
If necessary, the installation program uninstalls the previous version of Interplay Access before it installs the current version.

Configuring Sphere for Interplay v2.7
50
Note that there is no uninstaller for Access on a Mac OS X system. If you need to uninstall Access completely from the Mac, see the Interplay Software Installation and Configuration Guide.
To install Media Indexer on a Mac OS X system:
1. In the Mac Installers folder, open the MediaIndexer folder and double-click the file “Avid Media Indexer.pkg.tar.gz.”
The file “Avid Media Indexer.pkg” is unarchived and displayed in the MediaIndexer folder.
2. Double-click “Avid Media Indexer.pkg.”
A message asks if you want to continue the installation.

Configuring Sphere for Interplay v2.7
51
3. Click Continue and follow the system prompts.
4. When prompted, enter the workgroup name and the computer name of the system running the Interplay Lookup service.
c The workgroup name is case-sensitive.
5. Continue with the installation. When prompted, enter a user name and password for an account that is allowed to install software.
6. When prompted, restart the system.
To uninstall Media Indexer, see “Uninstalling and Reinstalling the Media Indexer” on page 67.
Java Issues with Media Indexer on Mac OS X
UDevC00174012. This section describes a problem that can occur if you update the Java version on your Mac client. Java versions 1.6.0_35 and higher are not compatible with Media Indexer v2.7. You can experience problems connecting to the Media Indexer after updating Java on a Mac client. The system will not appear in the Service Configuration tool and the editor application will not connect to the Media Indexer when launching. The system may also display the following error:
I/O error reading from mux connection: java.io.EOFException

Configuring the Sphere Remote Editor Components (Interplay v2.7)
52
You may also experience problems opening the Service Configuration tool. The tool does not open and the Interplay Administrator displays error messages regarding the ummdworker and Media Indexer.
This problem can occur if you update the software on a Mac client. It can also occur on a new installation. During the install, do not select the option “java 2012-005.” If you select this option, the Mac installer installs Java version 1.6.0_35 which is incompatible with Media Indexer.
n The problem may also occur with newer Java updates as they become available.
Workaround: If you encounter the problem, downgrade the Java version on the Mac client to version 1.6.0_29. For instructions on how to do this, search the Knowledge Base for the article containing the following text in the title: “error reading from mux connection”.
To determine the version of Java on your system, type the following in a Terminal window:
java -version
See your Avid representative for the software required to downgrade your system to Java v1.6.0_29.
Configuring the Sphere Remote Editor Components (Interplay v2.7)
This section describes the tasks that you perform while the Sphere editing system is connected to the Interplay workgroup. In order to perform these operations you must be connected to the Interplay workgroup in one of the following ways:
• Connected to the network back at the station or production facility in the Interplay environment.
• Connected via a VPN connection as a remote editing client. See “Establishing a Connection to Your Interplay Environment” on page 23.
Start Interplay Access to Test Your Connection
Running Access is a good way to test your connection because it requires a connection to the Interplay Engine. You should be able to log in to Access using the system name of the Interplay Engine.

Configuring the Sphere Remote Editor Components (Interplay v2.7)
53
To start Interplay Access:
1. Start Interplay Access from the following folder: Applications > Avid > Avid Interplay Access > InterplayAccess.
The Interplay Access log in screen opens.
2. Select the server you want to work with by doing one of the following:
- Accept the server that is displayed (the last server connected).
- Click the arrow for the Server list and select the server name from the list.
- Click the arrow for the Server list and select Add Server. Type a new server name or IP address.
3. Select the AvidWG database.
4. Type your Interplay user name and password.
The Avid Interplay Access window opens, with the primary database displayed in the Folders pane.
If you are able to log into Access using the Interplay Engine system name, it means you have a good connection to the Interplay environment. You can proceed to the next section to connect to the Lookup service and Media Indexer HAG.
Starting the Interplay Administrator Tool
You launch the Service Framework tools from within the Interplay Administrator tool.

Configuring the Sphere Remote Editor Components (Interplay v2.7)
54
To start the Interplay Admin tool:
1. Do one of the following:
t If Interplay Access is open, select Tools > Open Interplay Administrator.
t Start the Interplay Admin tool from the following location: Applications > Avid > Avid Interplay Access > InterplayAdministrator.
2. Login as described for Interplay Access. See “Start Interplay Access to Test Your Connection” on page 52.
3. Scroll to the bottom of the windows and select either the Workgroup Properties tool or the Service Configuration tool from the Avid Services view as shown in the following illustration.
For information on running the Interplay Admin tool as the root user for troubleshooting purposes, see “Running the Interplay Administrator Tool as root on a Mac” on page 69.

Configuring the Sphere Remote Editor Components (Interplay v2.7)
55
Checking the Lookup Service Connection
Open the Workgroup Properties tool to check the connections to the Workgroup and Lookup service.
To check the workgroup name and the connection to the Lookup Service:
1. Start the Interplay Admin tool and select the Workgroup Properties tool as described in “Starting the Interplay Administrator Tool” on page 53.
2. If the system displays the Select Workgroup dialog, select your workgroup from the list.
3. On the Services tab, make sure the workgroup name is correct.
Avid Interplay Administrator tool, with a sample workgroup name
n If the workgroup name is not correct, see the information on the Workgroup Properties tool in “Known Issues Running Avid Service Framework on a Mac OS” on page 65.
4. Click the Lookup tab.
5. Check that the correct workgroup name is listed in the Workgroup area and that the system running the Lookup Service is listed in the Lookup Services area. The dialog box should show the fully qualified domain name. The following illustration shows a configured system. The domain name (global.avidww.com in this example) will be specific to the network at your site.

Configuring the Sphere Remote Editor Components (Interplay v2.7)
56
n If the names are not correct, click the Menu button on the Interplay Admin tool to close the Workgroup Properties tool. Then restart the Media Indexer. Then reopen the tool and check the names again. If they are still not correct or don’t appear at all, see the information on the Workgroup Properties tool in Known Issues Running Avid Service Framework on a Mac OS.
n If your Interplay environment uses two Lookup Service systems, you must run the Interplay Admin tool as root to add the second system. See “Running the Interplay Administrator Tool as root on a Mac” on page 69.
6. Test the connection to the workgroup by opening the Avid Framework Service Configuration tool as described in the following section. Your system should appear as a bold (dark) item in the list. It may take a few minutes to populate the list if you are working remotely.

Configuring the Sphere Remote Editor Components (Interplay v2.7)
57
Configuring the Media Indexer
The local Media Indexer on the Sphere editing client performs the following tasks:
• The Media Indexer monitors Avid MediaFiles folders on the local system. It performs this task automatically if you use the default setting in the Media Creation window on the editing application. See “Checking the Media Creation Tool Settings” on page 64.
• When you are connected to the Interplay environment, the local Media Indexer communicates with the Media Indexer in the High Availability Group (HAG) back at the station or production facility. Information about the availability of remote media is retrieved through that connection.
To connect the local Media Indexer to the HAG:
1. If its not already running, start the Interplay Admin tool and open the Service Configuration tool in the Avid Services view. See “Starting the Interplay Administrator Tool” on page 53.
If the Service Configuration tool does not open, see “Java Issues with Media Indexer on Mac OS X” on page 51.
2. If prompted, select the workgroup that corresponds to your Interplay environment as shown in the following illustration.
Your Sphere client should appear in the Hosts list as a bold (dark colored) entry. The following illustration shows the client system (docmacbookpro) in the list. In this illustration, the host entry is open to show the Avid Interplay Media Indexer service.

Configuring the Sphere Remote Editor Components (Interplay v2.7)
58
n If your system does not appear in the list or appears in the list and is not bold, click the Menu button at the top of the Interplay Admin window to close the Service Configuration tool and then restart the Media Indexer service (see “Restarting the Media Indexer Service” on page 66). Then open the Service Configuration tool again. If it still does not appear correctly, restart the Media Indexer one more time.
If you still don’t see your system, you may need to reset the workgroup name and Lookup Service system. See “Known Issues Running Avid Service Framework on a Mac OS” on page 65.
3. Open the host name as shown in the above illustration and click the Avid Interplay Media Indexer service.
The system prompts you for the Service Framework administrator password. By default, there is no password. Either click OK with no password or enter your password and click OK

Configuring the Sphere Remote Editor Components (Interplay v2.7)
59
If the system does not display the password dialog box or displays the following “Connecting” dialog box, close the Service Configuration tool and restart the Media Indexer. Then open the tool again and check whether you can connect to the Media Indexer,
If the system still cannot connect to the Media Indexer or if the system is no longer visible in the list, restart the Media Indexer a second time. If this does not solve the problem, start the Interplay Admin tool as the root user and recheck your connection to the workgroup as described in “Configuring the Workgroup Name, Lookup Service, and Media Indexer on a Mac OS” on page 70.
4. After you click OK in the password dialog box, click Yes when the system displays a message asking if you want to allow the service to run with unrestricted security.
The following illustration shows the Avid Interplay Media Indexer tab and the Configure button.

Configuring the Sphere Remote Editor Components (Interplay v2.7)
60
5. Click Configure.
The Configure Storages dialog box opens.
6. If the Media Indexer HAG from your Interplay environment does not appear in the list, click Add.
The Add Storage dialog box opens. In the following illustration, the Media Table list shows that the Media Indexer is monitoring local storage (/volumes) but does not have the HAG listed.

Configuring the Sphere Remote Editor Components (Interplay v2.7)
61
7. Select Avid Interplay Media Indexer and click OK.
The Avid Interplay Media Indexer dialog box opens.

Configuring the Sphere Remote Editor Components (Interplay v2.7)
62
8. Do the following:
a. Select Connect to a High Availability Media Indexer Group.
b. Select the name of the HAG from the Group Name menu. In this example the name of the HAG is Isis.
c. Select Load Balanced from the Mode menu.
d. Click Apply, and then click OK.
The system displays the high availability group in the Configure Storages dialog box as shown in the following illustration.
c Do not check the Remote Mode check box at the bottom of the Configure Storages dialog box. This feature is intended for a future release and is not used by Interplay Sphere.
9. Click OK to close the Configure Storages dialog box.
You are now ready to start and run the Avid editing application as a remote editor. For additional information, see Avid Interplay Sphere Remote News Editing Workflow Guide or search for Sphere in the Editor Help or the Interplay Help.

Configuring the Sphere Remote Editor Components (Interplay v2.7)
63
Running the Editing Application Software
After you confirm your connections to the Workgroup and Media Indexer HAG, you can start the Avid editing application. While the editing application is launching, it can take several minutes for the “Connecting to Media Indexer” process to complete for a remote login. The following illustration shows the Connecting to MediaIndexer status window.
If the “Connecting to Media Indexer” step fails, recheck your connections to the Workgroup and the Media Indexer as described in “Configuring the Workgroup Name, Lookup Service, and Media Indexer on a Mac OS” on page 70. Also make sure you can ping the following systems by system name once you have established your VPN connection:
• Interplay Engine
• ICPS server
• Media Indexers in the HAG
• System running Service Framework Lookup Service
• System running the Interplay Delivery Receiver service.
For additional information, see “Network Considerations for Sphere” on page 29. For a description of how to ping a system on a Mac OS X system, see “Known Issues Running Avid Service Framework on a Mac OS” on page 65.

Configuring the Sphere Remote Editor Components (Interplay v2.7)
64
Checking the Media Creation Tool Settings
The Media Indexer automatically monitors local Avid MediaFiles folders if you use the default setting in the Media Creation window on the Avid editing application. The following illustration shows the Media Creation window with the default setting.
You typically keep the default option turned on for a Sphere editing client. If you turn off auto-indexing, you need to manually configure the Media Indexer to monitor the local drives.
To access the Media Creation settings in the Avid editing application, click the Settings tab in the Project window and double-click Media Creation.
Working with Avid ISIS Client Software
Use the following guidelines for working with an ISIS client:
• If you plan to use your system both remotely and back at the station, install the ISIS client. Make sure to disconnect the ISIS client while you are working remotely. Then when you are back at the station you can connect the ISIS client and mount workspaces as usual.
• If your system will only be used remotely, there is no need to install the ISIS client software.

Troubleshooting the Connections to the Workgroup and Media Indexer
65
Troubleshooting the Connections to the Workgroup and Media Indexer
This section applies to Interplay v2.7. The topics “Know Issues Running Avid Service Framework on a Mac OS” and “Running the Interplay Administrator Tool as root on a Mac” also apply to Interplay v3.0.
Use this section if you encounter difficulties with the standard check of the Service Framework settings described in “Configuring the Sphere Remote Editor Components (Interplay v2.7)” on page 52. Note that most problems encountered with a Mac client involve changing the workgroup. When you do that or need to add a second Lookup Service to your configuration, it is best to run the Interplay Administrator tool as the root user.
Known Issues Running Avid Service Framework on a Mac OS
The following information applies to the Avid Service Framework:
• There is not a separate installer for Avid Service Framework on the Mac OS. The Avid Service Framework software installs automatically with Interplay Access. You can open the Workgroup Properties tool and the Service Configuration tool from within the Interplay Administrator tool.
• To restart the Avid Service Framework services on the Mac, you need to restart the Media Indexer service (mi.sh) from either a Terminal window or by running a utility script. See “Restarting the Media Indexer Service” on page 66.
The following limitations apply to running the Avid Service Framework and Media Indexer on a Mac:
• There is a known problem regarding using the Workstation Properties tool to change the workgroup or add a Lookup Service. The system displays an error “unexpected failure to store workgroups” and the changes do not take effect. There are several workarounds:
- Uninstall and reinstall the Media Indexer. This allows you to name the workgroup and identify the system that runs the Lookup Service. See “Uninstalling and Reinstalling the Media Indexer” on page 67.
- Run the tool named configure.sh in the Media Indexer/bin directory. This allows you to name the Workgroup name and identify the system running the Lookup Service. See “Running the configure.sh Command” on page 68.
- Run the Interplay Admin tool as root and then make the changes in the Workgroup Properties tool. During the process, restart the Media Indexer service to restart the Framework services and save your changes. See “Running the Interplay Administrator Tool as root on a Mac” on page 69.

Troubleshooting the Connections to the Workgroup and Media Indexer
66
• The only way to add a second Lookup Service system to a Mac client is to run the Administrator tool as root. See “Running the Interplay Administrator Tool as root on a Mac” on page 69.
• If you change from a wireless to wired connection you must restart the Media Indexer service. If your system changes its IP address during the connection to the Interplay environment then you must also restart the Media Indexer service. For example, this can happen if your Mac system powers down for power saving options. If you have to reconnect to your wireless network when the system wakes up then you will have to restart the Media Indexer service. See “Restarting the Media Indexer Service” on page 66.
n To check your IP address on a Mac, type hostname in a Terminal window. Then type ping hostname as shown in the following example. Type CTRL-C to stop the ping process.
• There is a know problem with certain Java versions and Media Indexer v2.7. See “Java Issues with Media Indexer on Mac OS X” on page 51.
Restarting the Media Indexer Service
This section describes how to restart the Media Indexer service.
To restart the Media Indexer service using the Avid utility script:
1. Obtain the compressed file restartMI.zip from your Avid representative and copy the file to your Mac system.
2. Open the compressed file and place the two files — RestartMIonMac.sh and restartMI.command — in the following location:
/Applications/Avid Media Indexer/bin
n You can create a shortcut to restartMI.command and place it another location — for example, on your desktop.
3. Double-click the file named restartMI.command. A Terminal window opens.

Troubleshooting the Connections to the Workgroup and Media Indexer
67
4. If prompted, type your administrative password and press Return.
The utility notifies you when the Media Indexer service stops and when it successfully restarts.
5. Close the Terminal window.
To restart the Media Indexer process from a Terminal window:
1. Navigate to the Media Indexer/bin directory as follows:
cd /Applications/Avid\ Media\ Indexer/bin
2. Type the following commands in the bin directory:
sudo ./mi.sh removesudo ./mi.sh install
where:
- sudo instructs the system to run the command as “super user” or root.
- the characters ./ instruct the system to “run the following command that resides in the current directory”.
n You must have an Administrator login to perform commands that begin with “sudo.”
Uninstalling and Reinstalling the Media Indexer
The uninstaller for Media Indexer is located in the following folder:
<MacBootDrive>/Applications/Avid Uninstallers/Avid Media Indexer
When you reinstall the Media Indexer you can identify the workgroup name (case sensitive) and the system running the Lookup Server. The following illustration shows the installer screen.

Troubleshooting the Connections to the Workgroup and Media Indexer
68
If your system has two Lookup services, see “Running the Interplay Administrator Tool as root on a Mac” on page 69.
Running the configure.sh Command
If your Interplay environment has only one Lookup Service, you can run the configure.sh script to change the workgroup name and the name of the Lookup Service. If your system has two Lookup services, see “Running the Interplay Administrator Tool as root on a Mac” on page 69.
To run the configure.sh script:
1. Open a terminal window and navigate to the bin folder as follows:
cd /Applications/Avid\ Media\ Indexer/bin
Note that the back slashes ( \ ) are used to add spaces to the path name.
2. The Terminal window might prompt for your password. Type your administrator password and press Return.
3. Type the following command:
sudo ./configure.sh <Workgroup name> <name of Lookup Service system>
enter the workgroup name and the name of the system running the Lookup Service separated by a space. For example:
sudo ./configure.sh UptimeWG burl-mi02
4. Restart the Media Indexer. See “Restarting the Media Indexer Service” on page 66.

Troubleshooting the Connections to the Workgroup and Media Indexer
69
Running the Interplay Administrator Tool as root on a Mac
In order to make changes to the Workgroup properties tool on a Mac, you can run the Interplay Admin tool as the root user (also known as super user) and start the Workgroup Properties tool from within the Interplay Admin tool. You need to do this if you want to add a second Lookup Service in the Workgroup Properties tool.
To run the Interplay Admin tool as root and change the Workgroup Properties:
1. Navigate to the folder that contains the Admin tool executable as follows:
For Interplay v2.7:
cd /Applications/Avid/Avid\ Interplay\ Access/InterplayAdministrator.app/Contents/MacOS
For Interplay v3.0:
cd /Applications/Avid/Interplay\ Access/InterplayAdministrator.app/Contents/MacOS
Note that the back slash ( \ ) is used to add or “escape” a space in the path name.
2. Type the following command:
sudo ./AvidInterplayAdministrator
The Interplay Administrator tool starts. If the command does not start the application, restart your Mac system and try again.
n You must have an Administrator login to perform commands that begin with “sudo.”
3. Open the Workgroup Properties tool in the Avid Services view.
4. If necessary, change the workgroup name and add or change the system that runs the Lookup Service and click Apply.
5. After you make the changes, restart the Media Indexer service to restart the Framework services. See “Restarting the Media Indexer Service” on page 66.
n When you click Apply in the Workstation Properties tool, the system asks whether you want to restart the services. However, it does not restart the services automatically on a Mac. You must restart the Media Indexer service manually.
The following illustration shows the commands in a Terminal window. After you exit the application, the system displays a message about the Logging Subsystem. You can ignore the message.

Troubleshooting the Connections to the Workgroup and Media Indexer
70
Configuring the Workgroup Name, Lookup Service, and Media Indexer on a Mac OS
This procedure runs the Interplay Admin tool as the root user (also known as super user). This is a good troubleshooting technique if you are having problems connecting to the Workgroup, Lookup Service, or the Media Indexer HAG. For a simpler technique to check your connections, see “Configuring the Sphere Remote Editor Components (Interplay v2.7)” on page 52.
To configure a Sphere client on a Mac OS system:
1. Start the Interplay Administration tool as root. See “Running the Interplay Administrator Tool as root on a Mac” on page 69.
2. Open the Workgroup Properties tool in the Avid Services view.
3. Make sure the correct workgroup (case sensitive) is listed on the Services tab. If you need to change the name, click the Edit button. If you change the name, click OK and then click Apply at the bottom right corner of the Workgroup Properties tool. Then restart the Media Indexer.
n When you click Apply in the Workstation Properties tool, the system asks whether you want to restart the services. However, it does not restart the services automatically on a Mac. You must restart the Media Indexer service manually to restart the services.
4. Click the Login tab and make sure the workgroup you want to connect to is listed as the preferred workgroup. If you will be changing workgroups as part of your workflow, do not click the “Automatically join the preferred workgroup” check box. When this option is deselected, the system prompts you for a workgroup name when you login to the Workgroup Properties tool.
5. Click the Lookup tab and check that the correct workgroup name and system running the Lookup Service are listed. These values are specified when you install the Media Indexer or run the configure.sh command. Duplicate entries of the Lookup Service system are

Troubleshooting the Connections to the Workgroup and Media Indexer
71
acceptable, but one entry for each server should have the fully qualified domain name. The following illustration shows an example for an Interplay environment with two Lookup Services.
If you don’t see a fully qualified domain name for each Lookup Service, close the Workgroup Properties tool and restart the Media Indexer service. This will restart the Avid Service Framework services. Then open the Workgroup Properties tool again and check the values.
6. Change the workgroup name or name of the Lookup Service as needed.
7. If you change the values, click Apply and then restart the Media Indexer service manually.
8. To close the Workgroup Properties tool, click the Menu button in the top left corner of the Interplay Admin tool window.
9. Open the Service Configuration tool in the Avid Services view.
10. If prompted, select the workgroup that corresponds to your Interplay environment.
11. Locate your editing system in the list of hosts and select the Avid Interplay Media Indexer service. If your editing system does not appear in the list as a bold entry or if you cannot connect to the Media Indexer service on that system, do the following:
a. Click the Menu button at the top of the Interplay Admin tool to close the Service Configuration tool, and then open the Workstation Properties tool.
b. Check that the correct workgroup name and system running the Lookup Service are listed. Change values as needed.
c. Restart the Media Indexer service. Restart the Media Indexer even if the workgroup and Lookup Services values are correct. This will restart the Avid Service Framework services. See “Restarting the Media Indexer Service” on page 66.
d. Open the Service Configuration tool and check for your system again. If you can’t see your system in the list or if you can’t connect to the Media Indexer service, restart the Media Indexer a second time.
If you still can’t connect to the Media Indexer, make sure you have a good network connection to your Interplay environment. See the discussion of systems that you should be able to ping in “Running the Editing Application Software” on page 63.

Troubleshooting the Connections to the Workgroup and Media Indexer
72
n It is important to restart the Media Indexer after you make changes in the Workgroup Properties and the Service Configuration tool. Otherwise the changes will not take effect. It is also useful to restart the Media Indexer whenever you think you should restart the Service Framework services.
12. After you select the Media Indexer service, the system asks for your Avid Service Framework Administrator password. The default installation uses no password and you can just click OK. If your system requires a password, enter it and click OK.
13. Click OK in the Allow Unrestricted Security window.
14. Click Configure to view the current Media Indexer configuration. If you haven’t done so already, add the Media Indexer from the HAG as described in “Configuring the Media Indexer” on page 57. The following illustration shows an example configuration.
In the above illustration, the name of the HAG is Uptime. The path that starts with /volumes identifies local storage used by the editor. This path is added automatically by the editor the first time that you successfully run the editor on your Mac system. See “Checking the Media Creation Tool Settings” on page 64.