intro to maya_ class breakdown_(week_1)
TRANSCRIPT
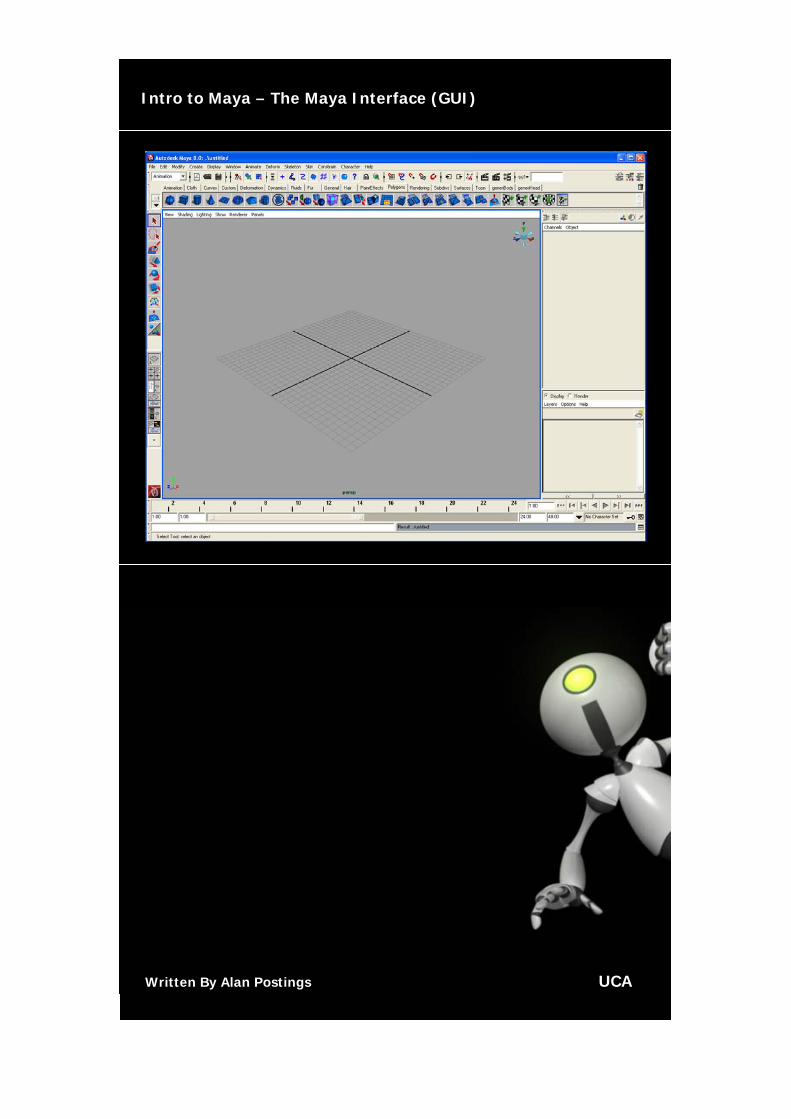
Intro to Maya – The Maya Interface (GUI)
Written By Alan Postings UCA

Maya Intro Class Breakdown – Key Topics
New Project
Save Scene - Binary vs ASCII
View Tools – Alt Control
Interface Overview – Map
Title Bar
Common Menus vs Menu Sets (Amin etc) F1 – F5
Help Menu
Status Line – Icons
Numeric Input – Status Line
Shelves – Custom, Saving, Button Creation – CTRL + SHIFT
Tool Box: Selection
Tool Box: Manipulators (QWERTY)
Tool Box: Universal Manipulators
Tool Box: Soft Modification Tool
Tool Box: Show Manipulator Tool
Tool Box: Transform Manipulators (+/-)
Layouts - 4 view View, Custom, Panels Menu, Expanded Views
Channel Box, Layer / Render Editor
Manipulator + Mouse Dragging
The Timeline, Range Slider, and Play Back Controls
The Animation Preferences Window
Auto Keyframes.

The Command Line
The Feedback Line
The Script Editor
The Help Line
View Compass
Channel Box – Virtual Slider & Manipulator Preferences
Channel Box Preferences
Numeric Input – Channel Box (Boolean & Float).
Channel Box - Pop up menu. Setting Keyframes, Lock & Hide, Names
UI Preferences – Hide & Restore
Undo’s and History
Creation History & Nodes
Display Options 1-3
Display Options 4-7
High Quality Shading
Lighting Menu
Menus – Options and Tearing
The Hotbox: Hotbox and Marking Menus
Pivot Points
The Attribute Editor
Outliner & Visor
Hypergraph
Hypershade
Maya Intro Class: Also to be Discussed During This Class
Dependency Graphs
UV Co-Ordinates and UV Texture Editor
Graph Editor
Expressions Editor
Grouping vs Parenting (Root & Leaf Nodes / Child and Parent)
Duplicating vs Copying
Selection Mode: Pop-up Selection Menu (Component)
Combining Selection Modes: Selection + Ctrl
Primitives & Interactive Creation
The Standard Maya Interface (GUI – General User Interface

1) Maya Intro: Creating a New Project Directory
When starting a new project it is important that a ‘Scene Directory’ is
created. This contains named groups which are intended to house
different aspects of the Maya scene, including textures, reference
images, and the saved scene file (Figure 1)
To create a new ‘Scene Directory’ go to ‘File – Project – New’. The
following dialogue window will appear (Figure 2).
Figure 1: My Documents / Maya / Projects / New_Project_01

Figure 2 – Initial Empty New Project Directory
In the ‘New Project’ window click ‘Use Defaults’ and in the ‘Name’ box
type ‘New_Project_01’
Finally click ‘Accept’.

Note that by clicking ‘Use Defaults’ a default folder structure is created
in your ‘My Documents – Maya – Project’ directory. The folders are
named based upon common input and output elements found in Maya
scenes (Figure 1 & 3).
Figure 3: Default Project Directory Folders

2) Maya Intro: Saving a Maya Scene – Maya Binary vs Maya Ascii
In Maya save your scene by choosing ‘File – SaveAs – Options (small
box next to the text)’. Make sure the ‘File Type’ is set to ‘mayaBinary’
and click ‘Save As’.
In the ‘Save As’ window enter ‘Scene_01_Binary’ and click ‘Save’.
Repeat this by choosing ‘File – SaveAs – Options (small box next to
the text)’. Make sure the ‘File Type’ is set to ‘mayaAscii’ and click ‘Save
As’.
In the ‘Save As’ window enter ‘Scene_01_Ascii’ and click ‘Save’.
Note: The both versions of the Maya scene are now saved into the
‘scenes’ folder of the ‘New_Project_01’ directory.
In Windows XP go to the ‘Start’ menu and choose ‘All Programs –
Accessories – WordPad’
In ‘WordPad’ choose ‘File – Open’ and in the ‘Open’ window set the
‘Files of Type’ pull down menu to ‘All Documents’. Finally navigate to
the ‘My Documents / Maya / Projects / New_Project_01/scenes’
directory.
Select ‘Scene_01_Binary’ and click ‘Open’
In WordPad make a visual note of the text which is now being
displayed. Much of the text appears to be jumbled and unreadable
(Figure 4).

Figure 4: Maya Binary File
To compare this to a ‘Maya Ascii’ file choose ‘File – Open’ in WordPad
Select ‘Scene_01_Ascii’ and click ‘Open’
Note the text which is now being displayed. This is now much clearer
and readable.
CONCLUSION: By saving the scene as a ‘Maya Binary File’ a
structure is created which relies upon binary language (zero’s and
ones). This type of file will be smaller in memory size but will be
unreadable by a text editor and therefore impossible to edit. However,
a ‘Maya Ascii’ file relies upon a standard text based programming
language. This gives the added advantage of being able to edit of
repair the file. Note: Maya Ascii files work well in situations of migration
between Apple Mac and Windows versions of Maya.

Figure 5: Maya Ascii
3) Maya Intro: Navigation – Alt + Mouse Button Ctrl
Navigation in the main Maya views is achieved by using a combination
of left, middle, and right mouse buttons whilst the ‘Alt’ key is held down
on the keyboard. These are as follows:
Rotation of View (Tumble): Alt + Left Mouse Button
Translation of View (Pan): Alt + Middle Mouse Button
Scaling of View (Zoom): Alt + Left & Middle Mouse Button
Zooming Alternative: Alt + Right Mouse Button

4) Maya Intro: The Maya Interface (Overview).
The Maya interface offers different methods of interaction with Maya
scene depending upon desired functionality and output. The default
interface gives a ‘generic’ set of options to the user which may or may
not be fully utilised. The Maya interface is fully customisable and can
be adapted to suit the user. In Maya there are many ways to achieve
the same results (Figure 6: Overleaf).

Figure 6 – The Maya Interface

5) Maya Intro: The Maya Interface (Breakdown) – Menus & Title Bar
The ‘Title Bar Directory’: The scene name and location is displayed in
the ‘Title Bar’. This is directly linked to creating and new project.
Figure 7: Title Bar
The ‘Standard Menu’ set: A generic set of menus which stay present
throughout. These contain common elements to all processes within
Maya as well as elements pertaining to the structure of interface and
the input of data.
Figure 8: Standard Menus
‘Menu’ sets: A set of menus which appear when switching between
‘Menu Sets. These contain tools and functionality based upon function.
For example ‘Animation, Modelling, Dynamics, and Rendering’. The
shortcuts for these are ‘F2 – F6’ on the keyboard.
Figure 9: Menu Sets

The ‘Help’ menu: The ‘Help’ menu resource contains reference
information and tutorials about Maya as well as acting as a database of
scripting language (MEL). The shortcut for this is ‘F1’ on the keyboard.
Figure 10: The Help Menu
6) Maya Intro: The Maya Interface (Breakdown) – Status Line
The ‘Status Line’: The ‘Status Line’ contains sets of buttons which
deal with files, the selection of objects, snapping, history, rendering,
and selection.
Figure 11: Status Line
The ‘Status Line – Scene’: The ‘Status Line – Files’ buttons offer
short cuts (left to right). Creating a New Document, Save Scene As,
and Save Scene
Figure 12: Status Line - Scene

The ‘Status Line – Select by Type’: The ‘Status Line – Type’ buttons
offer short cuts (left to right) Select by Hierarchy, Select by Object,
Select by Object.
Figure 13: Status Line - Select by Types
The ‘Status Line – Selection Masks’: The ‘Selection Masks’ buttons
offer selection masking of objects. Once switched on, objects which are
masked will no longer be able to be selected.
From left to right: All objects on/off, locators, joints, curves, surfaces,
deformers, dynamics, rendering, miscellaneous, lock / unlock current
selection, and highlight selection mode on/off.
Figure 14: Status Line – Selection Masks
The ‘Status Line – Snapping’: The ‘Selection Masks’ buttons offer
different types of movement ‘snapping’. Once switched on objects will
snap during movement (lock to).
From left to right: Grid snap, Curve snap, Point snap, Image plane
snap, and Make live.

Figure 15: Status Line – Snapping
The ‘Status Line – History’: The ‘History’ buttons offer short cuts to
the history stored in the Maya memory.
From left to right: Undo, Redo, Construction History On/Off.
Figure 16: Status Line – History
The ‘Status Line – Rendering’: The ‘Rendering’ buttons offer short
cuts to the ‘Render Settings’ menu.
From left to right: Render, Instant Preview Render, Render Settings.
Figure 16: Status Line – Rendering
The ‘Status Line – Selection, Rename, & Numeric Input Field: The
‘Selection, Rename, & Numeric Input’ field offers a text based method
of object movement, renaming, and selection via a pull down menu.
In the pull down menu Quick Selection, Quick Rename, Numeric Input
Absolute, and Numeric Input Relative. This will be discussed in further
detail later in this document.

Figure 16: Status Line – Selection, Rename, & Numeric Input Field
7) Maya Intro: The Maya Interface (Breakdown) – Shelves.
‘Shelves’: Maya ‘Shelves’ house shortcuts to the to tools and
functionality which exists within ‘Menu Sets’. Such as ‘Animation.
Modelling, Rendering etc.
Figure 17: Shelves
Custom shelves can be created and saves (Black arrow on the left of
the shelves) in order to house the users preferred toolset. By holding
down ‘CTRL + SHIFT’ prior to the selection of a tool from a menu a
‘MEL Button’ will be created that reselects that tool.
For example: Select the ‘Custom’ shelf tab. Hold down the ‘CTRL &
SHIFT’ keys and using the left mouse button select ‘Windows –
Outliner’. A button will appear on the custom shelf. Finally left mouse
button click on the small black arrow (left of shelves) and choose ‘Save
All Shelves’ to save the new button.
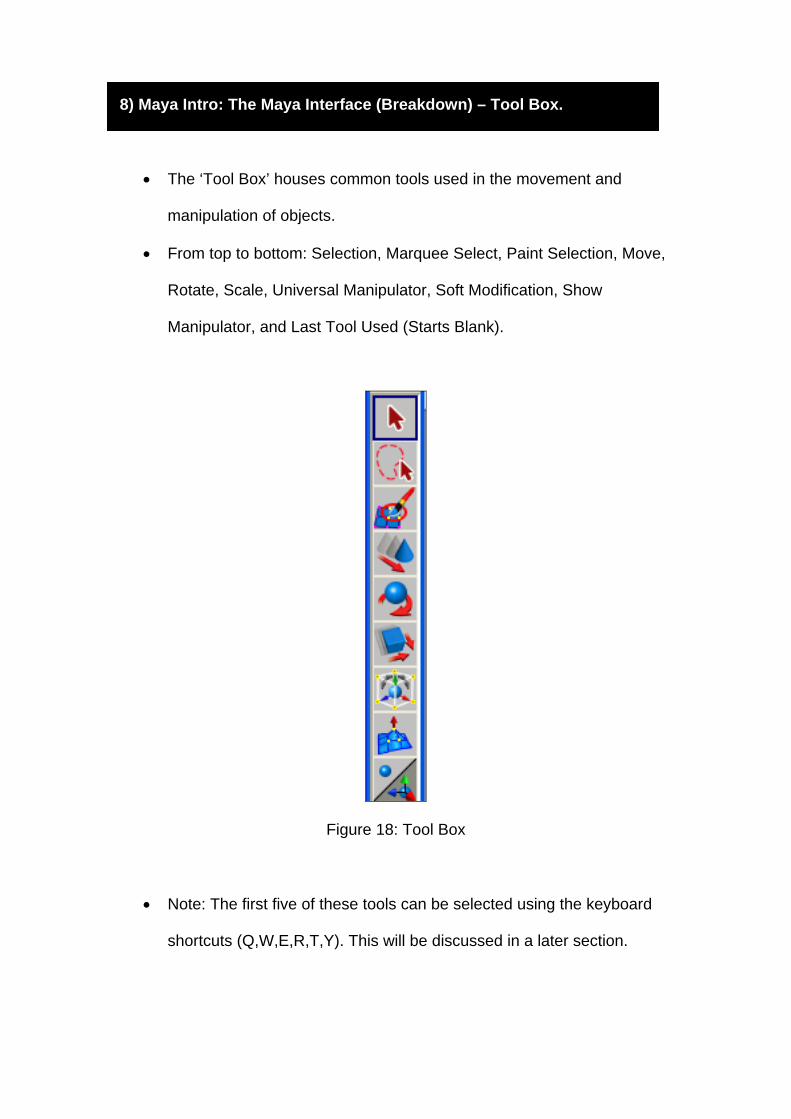
8) Maya Intro: The Maya Interface (Breakdown) – Tool Box.
The ‘Tool Box’ houses common tools used in the movement and
manipulation of objects.
From top to bottom: Selection, Marquee Select, Paint Selection, Move,
Rotate, Scale, Universal Manipulator, Soft Modification, Show
Manipulator, and Last Tool Used (Starts Blank).
Figure 18: Tool Box
Note: The first five of these tools can be selected using the keyboard
shortcuts (Q,W,E,R,T,Y). This will be discussed in a later section.

9) Maya Intro: The Maya Interface (Breakdown) – 4 View Panel Display
The ‘Four View Panel Display’ is the default view port layout in Maya.
This contains the Top, Side, Front and Perspective Views as standard
but can be customised to contain any window.
The layout of the windows can also be changed to the preference of
the user, including ‘One Pane, Two Panes, and Three Panes’. These
can also be configured in different combinations ie, ‘Three Panes Split
Top.’
Shown in Figure 19 are the two menus which control the view ports.
These are – (Left) Preset layouts and (Top) Panels Menu. By click on
the Preset Layouts you can use or adapt a pre-saved view layout. By
using the ‘Panel’ menu of each of the view ports it is possible to switch
between window types.

Figure 19: Four View Panel Display, Preset Layouts, & Panel Menu
10) Maya Intro: The Maya Interface (Breakdown) – Expanded View.
To access the ‘Expanded Perspective’ click in any window and press
the ‘Spacebar’. To exit the view press the space bar again.
Figure 20: Expanded View
11) Maya Intro: The Maya Interface (Breakdown) – The Channel Box.
The Channel box houses the attributes of a selected object or node.
Commonly these will be movement and transformation attributes
(channels) that control the position, scale, and visibility of an object.

The Channel Box also holds ‘Creation’, ‘Construction’ , and
‘Modification history.
Figure 21: The Channel Box

12) Maya Intro: The Maya Interface (Breakdown) – Display Layer Editor.
The Display Layer Editor allows the creation of layers on to which
objects can be added. Once assigned the mode of the layer can be
switched between ‘Visible & non-visible, templated, and referenced.
Figure 22: Display Layer Editor
13) Maya Intro: The Maya Interface (Breakdown) – Render Layer Editor.
The Render Layer Editor allows the creation of render layers on to
which different objects can be added based upon render requirements.
For example, colour and shadow could be rendered separately in order
to be composited.

Figure 22: Display Layer Editor
14) Maya Intro: The Maya Interface (Breakdown) – The Timeline.
The ‘Timeline’ displays time in frames. The length of the which, can be
adjusted to the required of animation. However, this is directly related
to the ‘Time’ in the ‘Settings’ menu of Maya’s preferences. For example
’25 frames per second’ (PAL) as opposed to ’30 frames per second’
(NTSC). Animation ‘Keyframes’ are also displayed on the timeline as
are sound.
Figure 23: The Timeline

15) Maya Intro: The Maya Interface (Breakdown) – Timeline Controls.
The ‘Timeline’ controls act as set of forwards and backwards ‘Playback’
controls. There are also controls which are directly related to single
frames and keyframes. These are (from Left to Right) ‘Current frame
(number field), go to start, step back one frame, step back to next
keyframe, play in reverse, play forward, step forward to next keyframe,
step forward one frame, go to end.
Figure 24: Timeline Controls
16) Maya Intro: The Maya Interface (Breakdown) – The Range Slider.
The ‘Range Slider’ controls the length of the timeline of the timeline
and also what part of the timeline is currently being displayed. By
adjusting the ‘outer number fields’ on either side of the ‘Range Slider’
the timelines length is altered. By adjusting the ‘inner number fields’ the
‘Range Slider’ can be altered to display more or less of the timeline.
NOTE: Playback in Maya will only occur for the timeline currently
displayed. If the ‘Range Slider’ is only allowing part of a longer timeline
to be displayed playback will only occur for section currently shown. To
view the timeline in its entirety make sure the ‘Range Slider’ is set to
the same length as the ‘Timeline’.

Figure 25: The Range Slider
17) Maya Intro: The Maya Interface (Breakdown) – Auto Keyframe.
The ‘Auto Keyframe’ button allows Maya to automatically write a new
keyframe when a channel is manipulated. However, an initial keyframe
must be set on the channel in order for this to begin working.
Figure 26: Auto Keyframe
18) Maya Intro: The Maya Interface (Breakdown) – Command Line.
The ‘Command Line’ allows the user to enter ‘MEL’ (Maya embedded
Language) code. This has many uses including creating nodes or
loading custom scripts. A command is inputted into the ‘Command
Lline’ and ‘Enter’ on the numeric keypad is pressed to execute the
command.
Figure 27: The Command Line

19) Maya Intro: The Maya Interface (Breakdown) – Feedback Line.
The ‘Feedback Line’ displays to the user the result of an action
(command). This will be displayed in the form of text and colour – For
example, the successful creation of a layer would display as a ‘Grey
filed’ and read ‘Result: layer1’. When a command is successful the box
will stay ‘Grey’. However, when a command is unsuccessful it will
display as a ‘Red field’ and an error feedback will be shown.
Figure 28: The (Command) Feedback Line
20) Maya Intro: The Maya Interface (Breakdown) – Preferences Window.
The ‘Preferences Window Button’ is a short cut that allows quick
access to Maya’s Preferences Window. This contains all the
preferences for all major functions in Maya. In particular this shortcut is
used to obtain quick access to the ‘Animation Preferences’ which
directly affects the timeline.
Figure 29: Preferences Window Button

21) Maya Intro: The Maya Interface (Breakdown) – Script Editor
The ‘Script Editor Button’ is a short cut that allows quick access to
Maya’s ‘Script Editor’ window. The ‘Script Editor’ is used to write
custom ‘MEL’ code. It also allows for the loading of custom script and
the manipulation of ‘MEL’ history.
Figure 29: Script Editor Button
22) Maya Intro: The Maya Interface (Breakdown) – Help Line
The ‘Help Line’ displays information about current selections, tools, and
actions. For example, when the mouse is moved over a tool the ‘Help
Line’ will display the name of the tool or attribute. For more complex
tools it will, on selection suggest steps to be taken to ensure the order
of events are correct.
Figure 29: Script Editor Button

23) Maya Intro: The Maya Interface (Breakdown) – View Cube
The ‘View Cube’ allows quick control over the ‘World Space’ views. By
Clicking on one of the faces of the cube you can switch between
‘Orthographic’ views. By clicking on the ‘House’ icon you will return to
the Perspective view.
Figure 30: View Compass
24) Maya Intro: The Maya Interface (Breakdown) – Manipulator Control
Directly connected to the channel box the ‘Manipulator’ control
preferences allow for different types of ‘Channel Box + View port’
‘scrubbing’. By highlighting the name next to a channel in the Channel
Box and then middle mouse button scrubbing in any view port a
channel can be manipulated (For example, translated, rotated, or
scaled).
The ‘Manipulator’ control preferences change the functionality of this
action. By clicking on the first button (left) it is possible to switch
between ‘Manipulators’, No Manipulators, and ‘Channels’.

The first (Manipulators) (default) allows for the use of box the Channel
Box and the ‘Tool Box’. For example the Translate manipulator
(arrows).
The second (No Manipulators) allows for the use of the ‘Tool Box’ only.
Finally the third (Channels) allows only the use of the Channel Box.
However, once the third option is selected the final two buttons become
active (middle and right). The middle sets the speed of the channel
‘scrubbing’. Whilst the right changes the speed from ‘Linear’ to
‘Hyperbolic’. This is the difference between constant speed and
speeding up and slowing down.
Figure 31: Manipulator Control
25) Maya Intro: The Maya Interface (Breakdown) – Channel Box Prefs
The ‘Channel Box’ preference buttons allow switching between channel
box elements, such as the ‘Channel Box and the Layer / Render Editor.
From left to right: Channel Box only, Layer / Render Editor only, both
Channel Box and Layer / Render Editor.
Figure 32: Channel Box Preferences

26) Maya Intro: Channel Box Numeric Input – Boolean, Integer, & Float
The numeric channels found in the ‘Channel Box’ are set depending
upon the functionality required. Because these depend upon ‘numeric’
data functionality is derived from numeric properties. For example,
common properties found in mathematics and computer code such as
‘Vectors, Integers, Floats, Booleans, Enum (Enumerated Type), and
String’ functions.
Float: All numbers (Whole and Decimal).
Integer: Whole numbers (1,2,3….etc)
Vector: Coordinate based numbers e.g. XYZ
or RGB values (Scale 1,1,1 etc)
Boolean: On / Off function (0 and 1)
Enum: Enumerated Type: Rule based number
system (Identifiers). For example a set
of ‘Playing Cards’ has ‘Four Suits’ as
part of its system.
String: Ordered sequence of symbols based
upon a predetermined set. MEL
Language for example.
For example, by default an object is created with a ‘Transform Node’
which houses Translate, Rotate, Scale, and Visibility numeric data. In
this case Translate, Rotate, and Scale are ‘Float’ functions which

means ‘All Numbers’ can be used. Such as, whole and decimal. Where
as the ‘Visibility’ channel works using a ‘Boolean’ function of on and off
(0, 1). To use this simply type ‘0’ in the visibility channel to switch the
visibility ‘off’ and the type ‘1’ to turn it ‘on’.
Figure 33: Channel Box Channels
27) Maya Intro: Channel Box Menu – Lock, Keyframe, & Names Menu.
In the ‘Channel Box’, by highlighting a channels text and right mouse
clicking (hold) on it a pull down menu will appear. The central focus of
this menu is derived from the selected channel and contains
functionality as well as shortcuts to other Maya windows which directly
affect the channel in question.
For example, by using this menu and choosing ‘Set Keyframe’ an
animation keyframe will be set on the timline for this channel. Where as
choosing ‘Expressions Editor’ the address of the channel will be loaded

into the ‘Expressions Editor’ window ready for use. Both of these will be
discussed further later in this documents
The Keyframe Menu:
Key Selected: Set a single channel keyframe (Red).
Key All: Sets a keyframe on all channels.
Breakdown Selected: Sets an individual breakdown key (Green).
Breakdown All: Sets a breakdown key on all channels.
Mute Selected: Mutes the channels keyframe animation
(Turns off).
Mute All: Mutes all keyframe animation (Turns off).
Unmute Selected: Unmutes the channels keyframe
animation (Turns On).
Unmute All: Unmutes all keyframe animation
(TurnsOn).
The Cut, Copy, Paste Menu:
Cut Selected: Cuts keyframe animation data.
Copy Selected: Copies keyframe animation data.
Paste Selected: Pastes keyframe animation data.
Delete Selected: Deletes keyframe animation data.
The Break Connections Menu:
Break Connections: Breaks any connection made with the

selected channel. This includes,
keyframes animation, connected
channels, and scripted expressions.
The Lock & Hide Menu:
Lock Selected: Locks the channel so no manipulation can
occur. This does not include connections.
Unlock Selected: Unlocks the channel.
Hide Selected: Hides the channel from the user. Note:
There is no ‘Show Selected’ in this menu.
To show a hidden channel open the
Windows – General Editors – Channel
Control.
Lock & Hide Selected: Locks and hides the selected channel.
Make Sel Non-Keyable: Restricts the channel so it cannot hold
keyframe animation.
Make Selected Keyable: Opens the channel so it can hold
keyframe animation.
The Window Shortcut Menu:
Expressions: Opens the Expressions Editor and loads
the current channels address.
Set Driven Key: Opens the Set Driven Key window and

loads the current channels address.
Channel Control: Opens Channel Control Window and
loads the current channels attributes.
Connection Editor: Opens the Connection Editor and loads
the current channels address.
The Attribute Menu:
Add Attribute: Opens the Add Attribute window for the
creation of new custom channels.
Edit Attribute: Opens the Edit Attribute window to allow
editing of new custom channels.
Delete Attribute: Deletes custom channels.
The Settings Menu:
Settings Menu (Upper): This is the menu version of the Channel
Box Manipulator preferences (see step
24).
Change Precision: Changes the precision of the numeric data
(Decimal Places). By default this is set to
3 decimal places.
Restore to Default: Restores the default preferences for the
channel box.

The Channel Names Menu:
Nice: This is default setting with capitol letters at
the start of each channel name.
Long: This setting concurs with the longhand
version of MEL scripting language.
Short: This setting concurs with the shorthand
version of MEL scripting language.
28) Maya Intro: User Interface Preferences – Hide, Show, & Restore
User Interface (UI) components can have their visibility switched off at
any time in the main view by clicking on the ‘collapse arrow’ (figure 34)
Figure 34: UI Collapse Button (Arrow).
However, all of Maya’s User Interface components are stored within
the ‘UI Elements’ list found under the ‘Display’ menu. The components
which are currently visible will be ‘ticked’. Should a UI component
become deleted from view it can reactivated using this menu.

At the bottom of this list are Hide UI Elements, Show UI Elements, and
Restore UI Elements. These hide and show all of the UI elements as
well as restoring them to their default positions and display properties.
29) Maya Intro: Undo, Redo and History
History: Whilst working in Maya you will build up ‘History’ data which is
derived from the use of tools and operations. History data builds up
‘Per Object’ and can be commonly seen as a list in the ‘Channel Box’.
Keeping this data can cause the draw on the computers memory to be
high and will slow the motion of the screen. Deleting ‘History’ is
common practice however in certain circumstances keeping history
data can also be desirable.
To delete ‘All History’ go to ‘Edit – Delete by Type – History’. It is also
possible using the ‘Delete by Type – Non-Deformer History’ menu to
delete all history except that which is derived from the use of
‘Deformers’.
Undo: Undo allows the user to step backwards in the operations queue
to ‘undo’ the affects of the last operation or tool. There are by default a
limited number of ‘Undo’s’ (50). However, this can be changed in the
Maya preferences to either a new number or be set to infinity. NOTE:
Setting a high or infinite number of Undo’s can cause ‘sluggish’
feedback within Maya due to the high requirements demanded on
computer memory storage.

Redo: This allows the user to set forward in the operations queue and
redo the last operation.
30) Maya Intro: Nodes & Creation History
Nodes: A node is a visual display of a possible input and output
connections. In real world terms it is much like a ‘Train station’ with
trains entering and exiting on different lines. A connection between
nodes is shown using a ‘Purple Line’ with a directional arrow (figure
35). The function of this line will be discussed later in this document.
Figure 35: Nodes (Primitive Object)
When a modelling ‘Primitive’ object is initially created it is made up of
four ‘Nodes’ – A ‘Transform Node’, ‘Shape Node’ ‘Construction (Make),
and Initial Shading Group’ (figure 35). The ‘Transform Node’ holds
transformation information. The ‘Shape Node’ holds the objects
attribute based information (ie, display properties). The ‘Creation Node
(Make)’ holds information regarding the initial construction of the
object. The ‘initialShadingGroup (render engine)’ holds all data
referring to the objects surface upon render.

Creation History: The information stored under the ‘Creation Node
(Make)’ will be different for each primitive object. For example, ‘Radius’
will change the overall radius for a NURBS Sphere but will not exist for
a NURBS cube. Instead this will be replaced by a ‘Width’ channel
(figure 36).
Figure 36: Creation Nodes (Primitive NURBS Objects)
However, these channels can only be used before further editing of the
surface using modelling tools. Once used the object cannot update in
the correct manner causing it to deform or distort.
31) Maya Intro: Hardware Display Options Number Keys 1 – 3 & 4 - 7
Keys 1, 2, and 3 on the main keyboard control the display complexity
of NURBS objects and also previews the conversion of Polygon objects
into Sub-Division Objects. Shown in figure 37 is the same NURBS

sphere at different levels of display complexity: Low (1), Medium (2),
and High (3).
Figure 37: NURBS Objects Display Complexity
Keys 4 & 5 switch between ‘Wireframe (4)’ and ‘Shaded (5)’ display
modes. Shown in figure 38 are the two different states. NOTE: This
image was constructed in Photoshop and cannot be achieved in the
Maya interface.

Figure 38: Wireframe & Shaded Display
Key 6 switches to ‘Textured Mode’. Allowing textures to be displayed in
the Maya views. This by default is set to ‘Low Quality’ in order to speed
up feedback and interaction (The texture will appear blurred). It is
possible to set this to ‘High Quality’ which enhances the clarity of the
view but feedback can become slow (Figure 39).
Figure 39: Wireframe & Shaded Display
Key 7 switches to ‘Light Mode’. Allowing the influence of lights in the
scene to be displayed on an objects surface (Figure 39).
32) Maya Intro: High Quality Rendering (Hardware Texture Display)
As mentioned in section 31 by default the ‘Texture View – Key 6’ is set
to ‘Low Quality’ so interactivity and feedback is fast but display of the
texture is low. To change this it is possible to set to ‘High Quality’ under
the ‘Renderer’ menu in each of the views (Figure 40).
Figure 40: High Quality Display
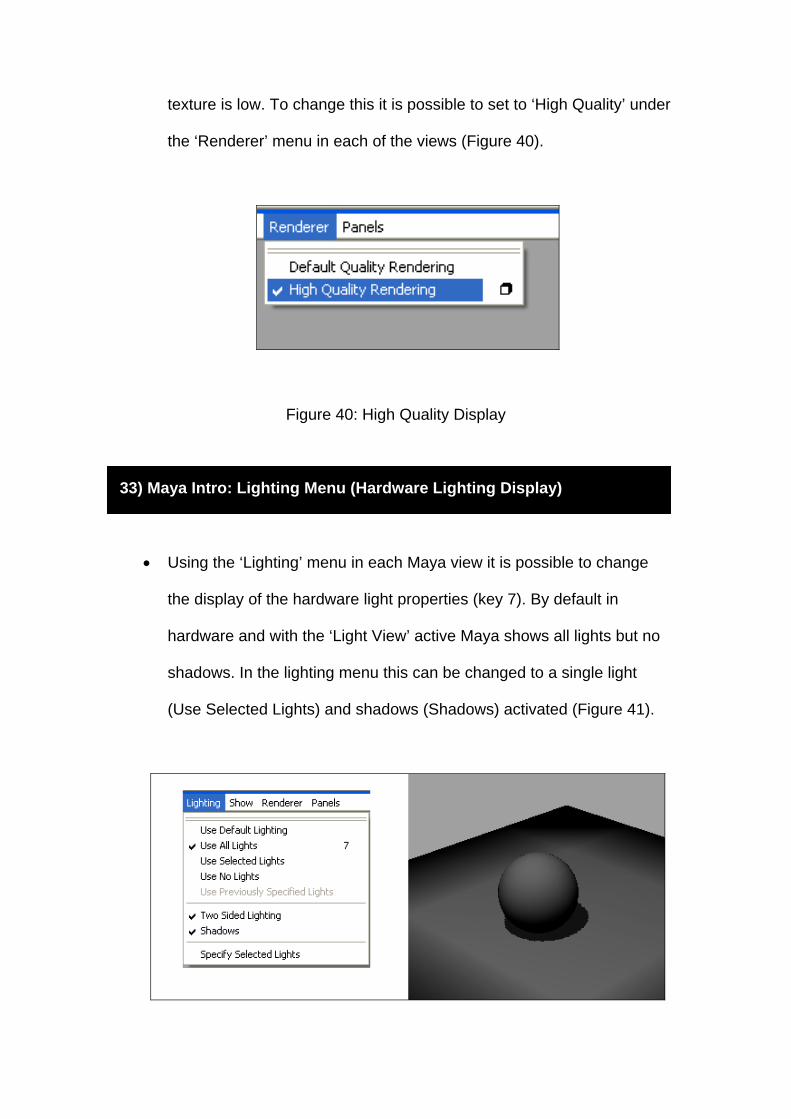
33) Maya Intro: Lighting Menu (Hardware Lighting Display)
Using the ‘Lighting’ menu in each Maya view it is possible to change
the display of the hardware light properties (key 7). By default in
hardware and with the ‘Light View’ active Maya shows all lights but no
shadows. In the lighting menu this can be changed to a single light
(Use Selected Lights) and shadows (Shadows) activated (Figure 41).

Figure 41: Hardware Lighting Quality & Preferences Display
34) Maya Intro: Menu Options & Tearing
Menu Options: Many of the Maya tools have ‘Options’ which can be
modified prior to use. These often dramatically change the outcome of
the operation. To access the options click on the small square next the
name of the tool (Figure 42). However, not all tools have options.
Menu Tearing: In many cases you will need to repeatedly revisit the
same menu. This can become time consuming and laborious.
Therefore, it is possible to ‘Tear Off’ menus from their current positions
so they become ‘Floating Menus’. To do this left mouse button click on
the strip at the top of each menu and drag the menu away from it
current position (Figure 42).
Figure 42: Menu Options and Tearing

35) Maya Intro: The Hot Box & Marking Menus
Hotbox: As mentioned before there are many ways to navigate and
access information in Maya. In the previously sections the standard ‘UI
interface’ has been discussed however it is possible to access all
aspect of Maya without the use of the standard interface. This is done
by using the ‘Hotbox’. To access the ‘Hotbox’ click in any view and hold
down the ‘Space Bar’ on the keyboard (Figure 43). This now displays
the menus which currently exist at the top of the standard Maya
interface. By clicking on each menu name the standard drop down
menu will appear.
Figure 43: The Hot Box
Marking Menus: Once the ‘Hotbox’ is open a secondary set of
navigation options are also available. By clicking in the areas
surrounding the Hotbox menus ‘Marking Menus’ will appear. These are

shortcuts to windows, menu sets, views, and standard UI elements. To
select one drag the ‘Line’ from the centre of the selection onto the
desired button. NOTE: Marking menus are fully customisable and can
be changed to the suit the user. Many professionals train themselves to
work completely using ‘Marking Menus’ in order to maximise the
viewing area (Real Estate).
36) Maya Intro: Pivot Points
When a default object is created in Maya its pivot point is positioned in
the centre of the object. However, it is possible to change the position
of the pivot point in order to change the functionality of the channels.
For example, by placing the ‘Pivot Point’ away from the object the
translation, rotation, and scale channels will have a relative effect –
Scaling for example will be based from the new position of the pivot
point (Figure 44).
Figure 44: Pivot Points

To change an objects pivot point select the object and press ‘Insert’ on
the keyboard. Move the resulting manipulator to its new location and
then press ‘Insert’ again to exit.
37) Maya Intro: The Attribute Editor
The Attribute Editor stores all the information related to a selected
object. In figure 45 the object being displayed is a ‘NURBS Sphere’.
Note that the four nodes (section 30) which are present at the objects
creation are being displayed as ‘Tabs’. Under each tab are series of
channels and attributes which can be edited or changed according to
the functionality of each node. The shortcut for this is CTRL + A.
Figure 45: The Attribute Editor
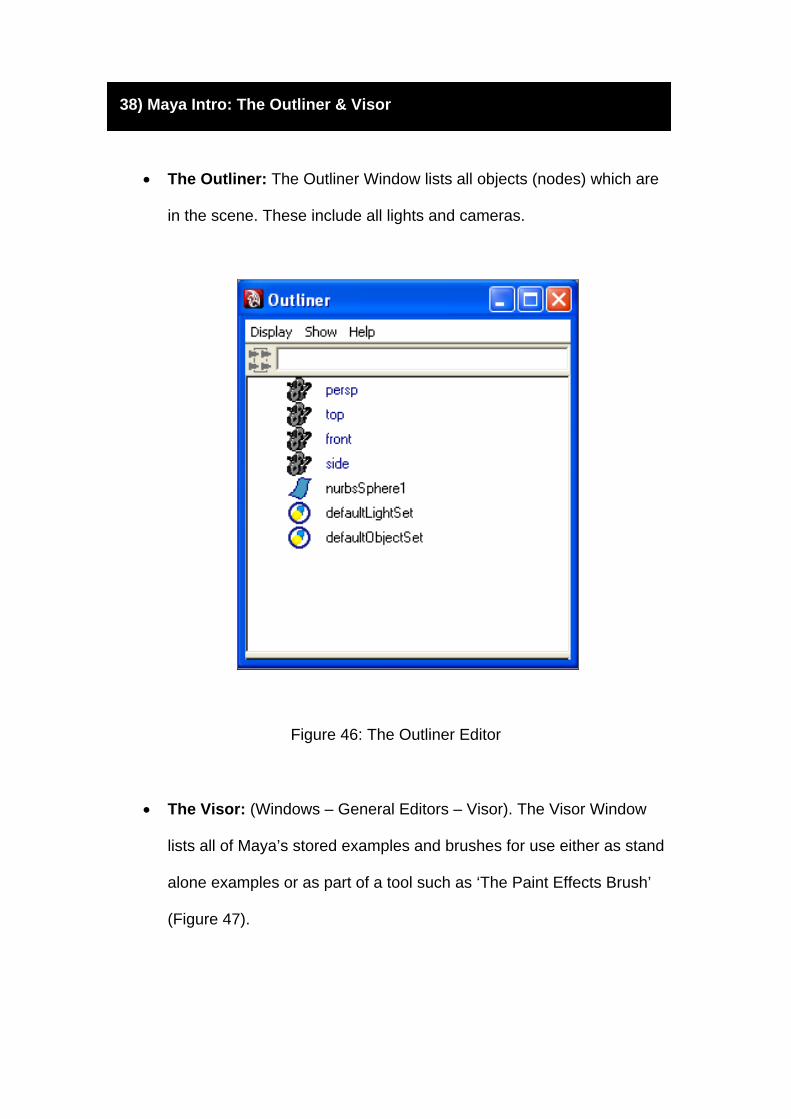
38) Maya Intro: The Outliner & Visor
The Outliner: The Outliner Window lists all objects (nodes) which are
in the scene. These include all lights and cameras.
Figure 46: The Outliner Editor
The Visor: (Windows – General Editors – Visor). The Visor Window
lists all of Maya’s stored examples and brushes for use either as stand
alone examples or as part of a tool such as ‘The Paint Effects Brush’
(Figure 47).

Figure 47: The Visor
39) Maya Intro: The Hypergraph – Scene Hierarchy & Input / Output
The Hypergraph Scene Hierarchy shows all of the nodes which exist
in the current scene (figure 48).
The Hypergraph Input / Output Connections shows all connections
for the currently selected nodes (figure 49). It is possible to connect
and disconnect nodes within the hypergraph. These connections are
know as a ‘Dependency Graph’.

Figure 48: The Hypergraph – Scene Hierarchy
Figure 49: The Hypergraph – Input / Output Connections
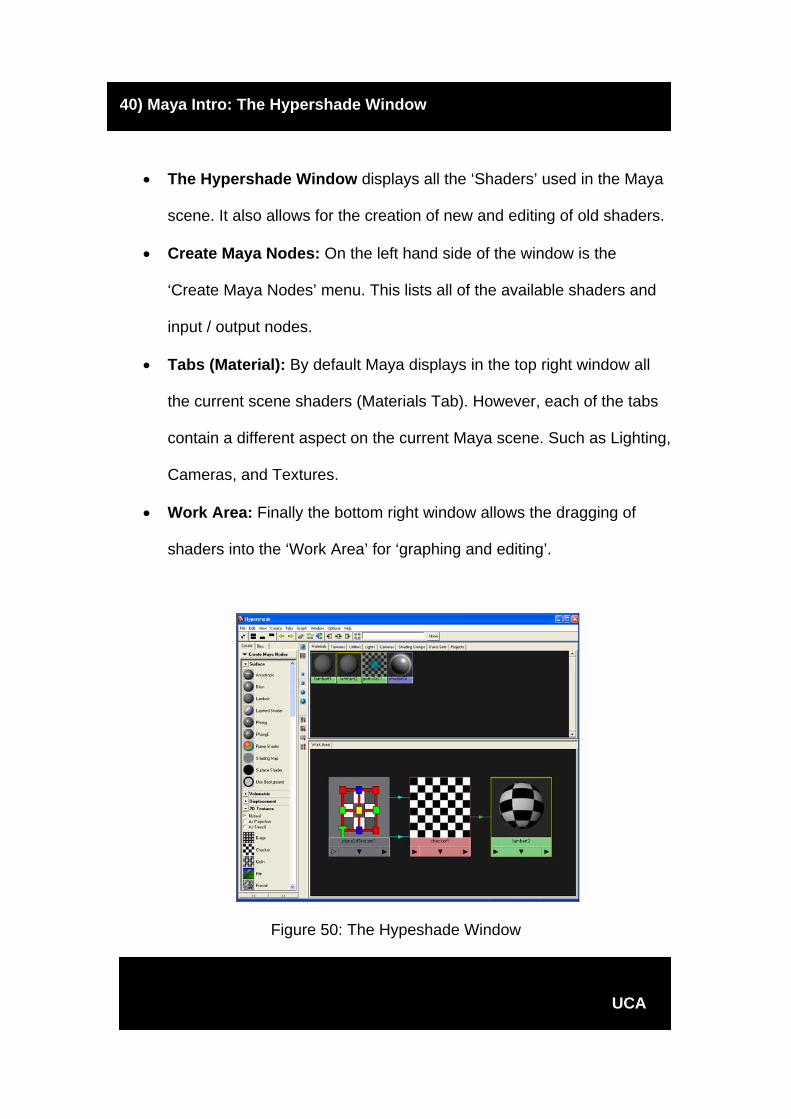
40) Maya Intro: The Hypershade Window
The Hypershade Window displays all the ‘Shaders’ used in the Maya
scene. It also allows for the creation of new and editing of old shaders.
Create Maya Nodes: On the left hand side of the window is the
‘Create Maya Nodes’ menu. This lists all of the available shaders and
input / output nodes.
Tabs (Material): By default Maya displays in the top right window all
the current scene shaders (Materials Tab). However, each of the tabs
contain a different aspect on the current Maya scene. Such as Lighting,
Cameras, and Textures.
Work Area: Finally the bottom right window allows the dragging of
shaders into the ‘Work Area’ for ‘graphing and editing’.
Figure 50: The Hypeshade Window
UCA