introduction - pyrobin shells3.pdf · (a. fulcanelli, in the often-referred-to pyrotechnica ix and...
TRANSCRIPT

Introduction
In this series I'm exploring the possibility of arriving at the fireworks event with only a few chemicals, some other materials, some tools and equipment, but with no completed pyrotechnic compositions, and then producing good traditional paper ball shells from scratch.
One might ask, "Why paper ball shells? Couldn't you make plastic shells, or maybe pasted or rinfasciature cylinder shells?" (A. Fulcanelli, in the often-referred-to Pyrotechnica IX and XI series on cylinder shell construction, describes rinfasciature as "a traditional method by means of which shells may be made with dry paper wrap in lieu of pasted wrap.")
I could, but I like paper shells because they employ such simple, traditional, biodegradable materials. In the long run, I think there will be fewer and fewer places where we are welcome to shoot plastic shells.
I also like ball shells for the nice, round, symmetrical breaks that are possible with them. But, of course, these are just my 'druthers.
RECAP
You may want to review the project "How to Make Charcoal" which detailed the charcoal options for this project. It included the production of homemade charcoal to be used in the various components of the shells. The charcoal-making step of the process would occur at home prior to travelling to the pyro get-together.
In "How to Use a Ball Mill Safely and Effectively", ball milling materials, skills and techniques were addressed. (Ball milling will be put into immediate action once we arrive at the site and begin actual production of these shells in this part of the series.)
Friday Morning, 8am - 9am, Arriving and Setting Up
Well, I've arrived on site at our pyro event with homemade charcoal and all the other supplies and equipment I'll need. At the end of this series of articles I'll include a complete checklist of all the materials and tools I've used in this project.
A pop-up tent is useful for shelter from the sun and possible rain. A couple of folding tables and a chair are also necessary. I like to bring an extra chair or two because the manufacturing area always becomes the place of choice for socializing and educational experiences.
If electric power is not available at the site, a small, portable generator will be required, along with a can of gas for it. In either case, a few 100' extension cords will be needed. It can be nice to barricade the sound from the generator with a sheet of plywood. (Honda makes some nice, very quiet generators, but they're not cheap.)
I organize the tools on my table, and I set up the ball mill and associated barricading in a safe, remote location.

9am - 10am, First Ball Mill Run
First of all, I am scaling this project to the production of two 8" Tiger Willow ball shells. The first manufacturing order of business will be to ball mill a batch of black powder (BP) with dextrin in it for use in the making of burst powder.
I run a 100' extension cord to the mill, plugged into a timer at an electric outlet or at the generator. I set the timer for a one-hour mill run time.
I use a small ball mill, with the jar half filled with ball milling media. This mill/media combination is very efficient, turning out very finely milled black powder in an hour. For this project I'll typically mill a 40-42 ounce batch at a time. (Please see the Ball Milling 101 article in Skylighter Fireworks Tips #91 and/or Lloyd Sponenburgh's Ball Milling Theory and Practice for the Amateur Pyrotechnician, for more information on ball milling.)
Note: Normally, as I indicated in the article on ball milling, I only charge the mill jars with 20-21 ounces of materials to mill black powder. This is the optimal charge for these one-gallon jars to achieve the most efficient milling. But, for this project, I have doubled that material charge amount to speed up the process. This produces powder whose performance is adequate for this endeavor.
I mill a batch of BP with 30 oz. of potassium nitrate, 6 oz. of homemade airfloat charcoal, 4 oz. of sulfur, and 2 oz. of dextrin.
While this batch is milling, I continue to unpack and organize my tools and materials.
When the milling is done, I separate the powder from the media using a 5 gallon bucket separation screen, inserted in another 5 gallon bucket.
10:00 - 10:30 am
I now fill the mill jar with the next 42 oz. batch of BP chemicals to be milled, put the jar in the mill, and set the timer for the second one-hour mill run. From 10:15 - 11:15 am, I run the mill for second batch.
10:30 - 11:00am, Making the Burst Powder
For single petal ball shells, I like to use black powder, coated onto either puffed rice cereal or rice hulls, for the burst. I prefer BP on rice hulls, specifically for multiple petal shells where the burst powder needs to be packed tightly into narrow spaces. I'd refer the reader to the Passfire website fordetailed investigations/instructions concerning burst powders and coating various cores with them.
I'm going to coat the 42 ounces of mill-dust/dextrin onto 6 oz. of puffed rice which has been screened with a 10 mesh screen, kitchen colander to remove the dust and chaff. (I use the cheap, puffed rice cereal which comes in 6 ounce bags in the breakfast foods aisle of my grocery store.)

Sift Dust Out of Puffed Rice with Colander Screen
I use a Hobby Fireworks star roller with the original plastic drum replaced by a stainless steel pot tocoat the powder onto the puffed rice.
Hobby Fireworks Star Roller and Garden Sprayer
Hobby Fireworks is now out of business. One alternative star roller that many folks use is a cement

mixer with the mixing blades removed, and any holes in the drum plugged. Below is a photo of a plastic-drum mixer that I bought at Lowe's for $300. The blades easily unbolted from the inside of the drum, and I simply covered the holes with duct tape.
Star Roller Made From a Cement Mixer
Warning: A cement mixer is a direct drive machine. It is next to impossible to stop the barrel by hand when it is turning. That is why I plugged the holes in it with duct tape. I did not want any rivets, bolts, etc., sticking out of the barrel, ready to grab my clothing. I checked the barrel to make sure it was smooth and had no projections. I have short hair and no ponytail, I wear no "bling" chains around my neck or wrists, and I don’t wear loose clothing when I'm using this roller. Please be careful if you convert a cement mixer to a star roller.
Wearing gloves and a respirator, I run the star roller on medium speed, and start spraying the puffed rice with water, sprayed out of a little hand-held, garden-sprayer bottle. Once the rice is dampened abit and starts to stick together, I add a cup of the milled BP. I alternate spraying the rice with water and adding the BP, breaking up any clumps of cereal that form with my gloved hand.
Coating BP onto Puffed Rice in Star Roller

As I roll the BP on, I use my gloved hand and a plastic-mesh scouring pad to continually scrape off any BP which starts to stick onto the sides or bottom of the barrel.
Keeping Roller Barrel Clean with a Scouring Pad
I slowly spray on enough water so that all the loose, powdered BP is picked up by the puffed rice.
I don't want the rice to get so wet that the kernels look glossy-wet, but I do add enough water to form a nicely consolidated shell of BP on the rice. This simply takes a bit of practice. I keep this process up, spraying water and adding powder, until all 42 oz. of the BP has been rolled onto the puffed rice. Then, with the roller still running on slow speed, I tip it forward to dump the burst granules into a bucket.
Bucket of BP-Coated Puffed Rice
A bucket of water and a sponge comes in handy for washing tools, hands, and the star roller. If thereis a water faucet available, a hose and nozzle are useful as well.
Drying Chamber and Drying Screens
I have made a little drying chamber and screens which stack inside of it. Read more about how to make two kinds of drying chambers.
Learn to make a Drying Chamber and Drying Screens...

BP-Coated Puffed Rice in Drying Tray
I pour the coated puffed rice out in thin layers on two of the screens, insert the screens into the dryer, install the lid, and plug the heater in. The burst powder will be dry in about 12- 24 hours.
It is important to locate the dryer in a safe, protected location, as one would do with drying any pyrotechnic devices or compositions. There should be no possibility of anyone smoking in its vicinity. I also think it's a good idea to locate it in the same remote location that the ball mill is in, just in case some sort of ignition occurs.
So, now we've used the first mill run of BP to make the burst granules, and they are drying in the chamber.
11:15 - 12:30 pm, Making 36 Feet of Black Match
First, I empty the jar from the second BP ball mill run, and reload it with a 40-ounce batch which has 30 oz. of potassium nitrate, 6 oz. of airfloat charcoal, and 4 oz. of sulfur, but no dextrin in this run. This mill run takes from 11:30 to 12:30.
Half of the second batch of powder, 21 ounces with dextrin in it, is now used to make my own blackmatch. I want to make this homemade match and quickmatch, starting this project with no pyrotechnic materials at all. The other 21-ounce half of the second batch gets set aside in a covered container marked "BP with dextrin."
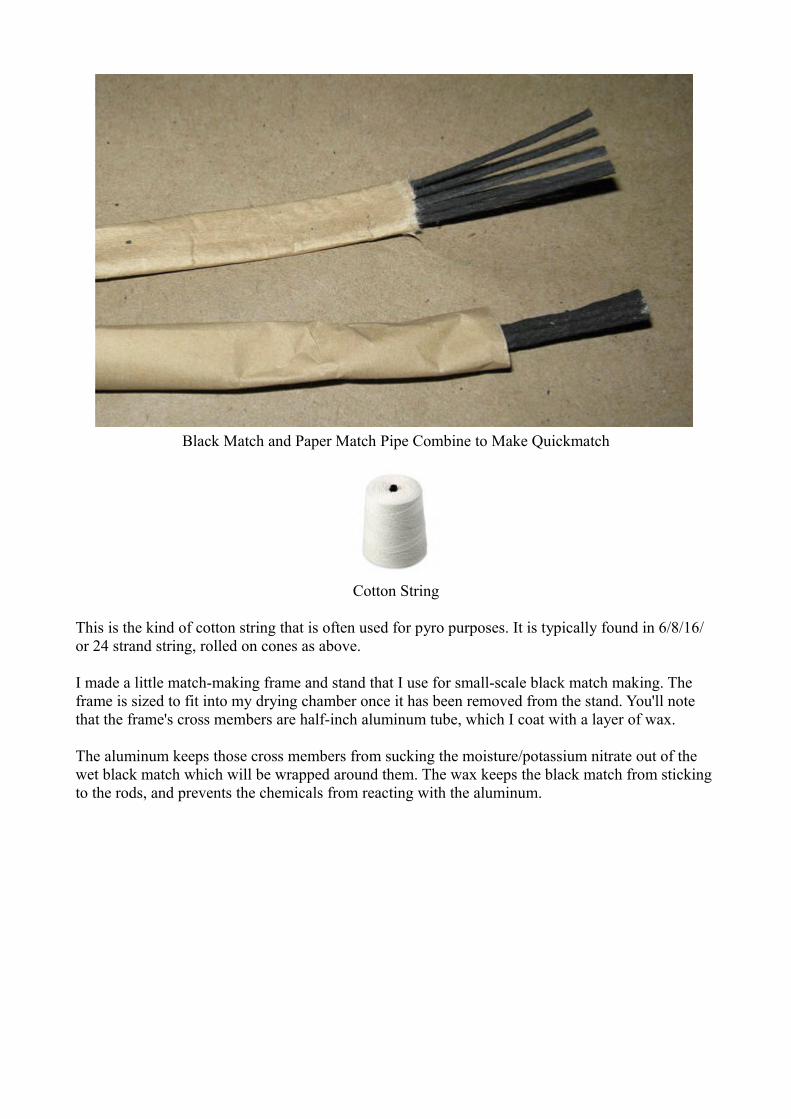
Black Match and Paper Match Pipe Combine to Make Quickmatch
Cotton String
This is the kind of cotton string that is often used for pyro purposes. It is typically found in 6/8/16/ or 24 strand string, rolled on cones as above.
I made a little match-making frame and stand that I use for small-scale black match making. The frame is sized to fit into my drying chamber once it has been removed from the stand. You'll note that the frame's cross members are half-inch aluminum tube, which I coat with a layer of wax.
The aluminum keeps those cross members from sucking the moisture/potassium nitrate out of the wet black match which will be wrapped around them. The wax keeps the black match from sticking to the rods, and prevents the chemicals from reacting with the aluminum.

Match Making Frame
Coating Cross Members with Wax
I tie one end of the string I'm using onto one of the frame cross-members near one end, and wind string onto the frame at about 3/4" intervals.

String Wound onto Frame
Taking the Twist Out with a Drill
This measures off about 36 feet of 12-to-24 strand cotton string. I tie one end to something stationary, unwind the string from the frame as I walk backwards, and tie a knot in the other end. I then insert that free end into the chuck on my drill, and pull the string tight while running the drill inreverse to take the twist out of the string. My goal is to end up with all the individual strands in the string lying fairly flat next to each other.
It helps if I have my lovely assistant walk the string toward me from the far end, with her hands

separating the strands into two halves, as I take the twist out of the string. (My wife, Molly, is much happier to help with these projects if I call her my "lovely assistant," so I don't hesitate to do so.)
Then I wind the untwisted strands of string back onto the frame.
Untwisted String on Match Frame
Using a paint stick and a plastic tub (about the size Skylighter uses for 5 lbs. of chemicals), I stir about 9 ounces of water into the 21 oz. of BP-with-dextrin from the second mill batch. Stir the water in slowly, and stop adding it when the slurry gets to a thick, pancake-batter-consistency. Don'tmake it too thin.
I slowly work the string into the slurry, starting from one end of the string, and patting the string down into the slurry a few inches at a time, unwinding it from the frame as I go. The goal is to thoroughly impregnate the string with the BP mix. I'll pat and knead the string in the slurry for 5 minutes or so, being careful to press the mass, but avoid tangling the string.

Working String into Black Powder Slurry
I cut a section out of the nozzle of a tube of caulk to create a little forming die to pull the wet match through as it comes out of the tub. The die removes excess slurry and regulates the diameter of the match. (I've seen video of Maltese fireworkers using a rubber baby-bottle nipple for this purpose.) I want an exit hole in the small end of the die of about 1/8" - 3/16". It's best to start out on the small side with this hole, and enlarge it if necessary.
Plastic Forming Die with String Being Threaded Through It
I put the end of the wet match through this die, and then tie that end onto the drying frame. Pulling the match through the die, I then wind the match onto the drying frame, revolving the frame as I go,until I get to the other end of the match. I then tie that end onto the frame, also.
Pulling Wet Black Match through Die, and Winding It onto Frame

Frame Full of Wet Black Match
I now loosen the screws which hold the frame to the stand, and put the frame into the drying chamber on top of the two screens which contain the burst powder. This match will be dry in about 12-24 hours as well.
Only 8-12 ounces of the slurry will actually be taken up by the string in the above process. But I made up 30 ounces of it because I wanted the string and match to stay nice and wet during its impregnation and pulling through the die. If less slurry is used, too much is sucked up by the string. Then the slurry gets dry, and the match becomes hard to pull through the die.
The leftover slurry can be highly diluted with water and disposed of in a safe location.
12:30 pm - 1:00 pm
Dump the third ball milled batch of BP, screen out the mill media, add another 40 oz. batch of BP chemicals into the mill (same proportions as the third batch, no dextrin), and run the mill for another hour, 12:45 - 1:45.
1:00 - 2:00 pm, Press Lift Powder
Note: There are various ways to make very satisfactory black powder for lifting shells. I have experimented with using BP-coated rice hulls, and they work just fine in the same amount that I would use of commercial 2FA.

I have also granulated BP dust, straight out of the ball mill, by adding denatured alcohol in which red gum has been dissolved (red gum = 1% of BP weight, 1 3/4 cups of alcohol for 40 ounces of mill dust). I granulate this 'putty' through a 1/4" mesh screen onto kraft-paper lined trays and allow to dry. When using BP made this way, I only have to use 3/4 of the amount that I would of commercial 2FA.
For me, so much of the fun of fireworking is this sort of curiosity, pondering, experimenting, recording and comparing results, drawing conclusions which I can use in the future, and so forth. This is science combined with the art, which I find so satisfying.
For this project, I am making the BP in a more traditional manner, making pucks and granulating them after they are dry.
I add 2 oz. of water to 20 oz. of the ball milled BP dust (half of the third mill batch, no dextrin) and knead the water into the powder thoroughly in a small bucket with my gloved hands. Then I force the dampened comp through a fine, 20 mesh-screen (a kitchen colander) to further distribute the water in the BP.
Screening Black Powder to Incorporate Water
Below is a photo which shows a 3 1/2" comet pump from Rich Wolter with a block of aluminum to use under the pump while pressing. Also shown is a brass 2" comet pump from Skylighter.

2" and 3 1/2" Comet Pumps
I use one of these pumps, along with my 12 ton hydraulic press, to press the dampened BP dust into 1/8"-thick pucks, using about 7 tons of force on the large pump, or 5 tons on the small pump. I can press 1 1/4 ounces of BP at a time with the large pump, and 1/2 ounce with the smaller one. I apply enough pressure with the press that water starts to seep out between the comet pump and the aluminum plate.
When I add the powder to the large comet pump, with the sleeve sitting on the aluminum block, I use a small dowel to distribute the powder evenly at the bottom of the pump sleeve so that a nice puck of even density is produced.
I add the BP to the small comet pump while holding it upside-down, and lightly press the powder into the pump so that it stays in place when I turn the pump right-side-up.

Distributing Black Powder in Comet Pumps
Pressing Pucks with a Hydraulic Press
Note: It is possible to hand-ram the powder in the brass pump to consolidate it, using a pounding-post, a cutting board, wax paper, and a rawhide mallet. The pucks that are made this way will not bequite as dense as the ones made with the hydraulic press, but they ought to be quite usable, nevertheless.
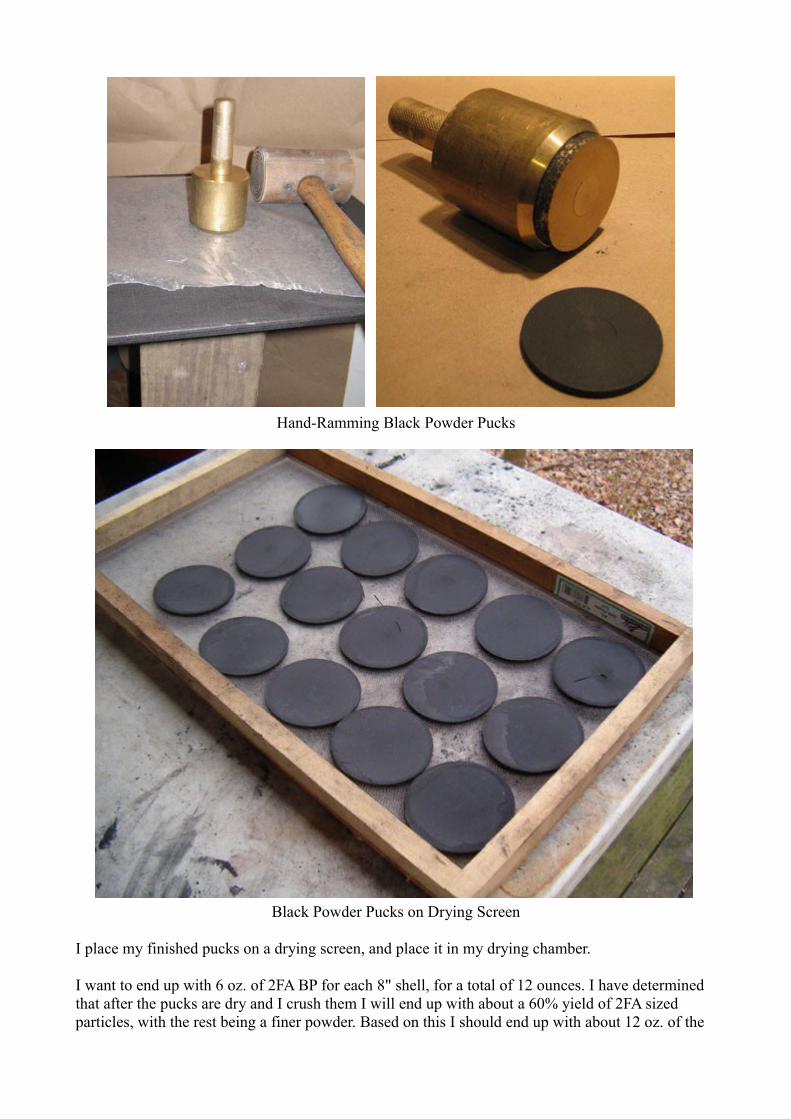
Hand-Ramming Black Powder Pucks
Black Powder Pucks on Drying Screen
I place my finished pucks on a drying screen, and place it in my drying chamber.
I want to end up with 6 oz. of 2FA BP for each 8" shell, for a total of 12 ounces. I have determined that after the pucks are dry and I crush them I will end up with about a 60% yield of 2FA sized particles, with the rest being a finer powder. Based on this I should end up with about 12 oz. of the

2FA from the 20 oz. batch which was just pressed into pucks.
A note on presses: I use two presses that I bought from Hobby Fireworks, a 4 ton and a 12 ton. But since Hobby Fireworks is no longer in business, you might want to look online at the various shop presses available at places like Harbor Freight, Northern Tool, or Greg Smith Equipment. There is a very nice 12 ton hydraulic shop press, with a pressure gauge and lots of adjustability, available at Greg Smith for only $159. That is the type of unit I'd be looking at for a starter press.
Greg Smith 12 Ton Press
A ball mill, a star roller, and a hydraulic press, are the 3 basic machines that are very useful in this hobby.
2:00 - 4:00pm, Pressing Stars
I've formulated a star comp, which is halfway between Tiger Tail and Willow, which I refer to as Tiger Willow. I've further modified this comp by replacing 5 of the airfloat charcoal percent in the formula with lampblack, which increases the sparks' hang time. The lampblack can be replaced withthe original, equal amount of charcoal if desired.
My adjusted comp is as follows, using the 60 ounces of BP mill dust (half the third, and all of the fourth batches, which had no dextrin in them).
Tiger Willow Star Component Weight
BP Mill Dust 60 oz.Homemade airfloat charcoal 36 oz.Dextrin 8 oz.Sulfur 4.2 oz.
Lampblack 5.7 oz.

Total dry weight 113.9 oz.
I screen all the ingredients through a 40 mesh screen, and mix them thoroughly in a 5 gallon bucket with a tight lid. Then I screen them all together one more time and shake them in the bucket again. 14 ounces by weight of 3/1 water/denatured alcohol is blended into the comp, first with gloved hands, and then by screening the comp through the 20 mesh screen. This produces a slightly dampened, fine flowing composition.
I press the stars using a star plate from Rich Wolter, which produces 49 three-quarter inch stars at a time, with all 12 tons of force from my press. It takes a bit of practice to evenly fill the plate, tamp the comp down with the pin plate, fill it again, tamp it down again, and fill it to the top one last time, before the final compaction in the press.
Loading Composition into Star Plate (on Aluminum Plate)

Pressing Star Plate in 12-ton Press
The goal is to produce 3/4" long, 3/4" diameter stars of equal density. The stars are then stacked on drying screens and placed in the dryer.
Stars Ready for Drying
Note: As an alternative to pressing the stars with the relatively expensive star plate and hydraulic press, a smaller, less expensive Skylighter star plate can be used. This plate produces a dozen 9/16" diameter stars at a time.
While this diameter is a bit smaller than the 3/4" stars produced by the above method, the stars can still be rammed 3/4" long. The amount of composition that was mixed up would still all be used, butmore stars would be made in this smaller size.
This plate can be used with the mallet, cutting board, wax paper, and a pounding post.

Skylighter Star Plate
Loading Star Plate with Comp
Ramming and Ejecting Stars

This is the second part of a series of 3 articles by PGI Grandmaster Ned Gorski, detailing the production of 8" ball shells in a minimum timeframe, possibly at a 3-day fireworks club event. The original series ran in 2007 in the Pyrotechnic Guild International's Bulletins #152-155. This is a somewhat revised re-issue of that series.
Introduction
This is a continuation of a series of articles that details the production of good, traditional, paper ball shells in a minimum timeframe, possibly at a three-day fireworks club event. I'm exploring the possibility of arriving at the meet with only a few chemicals, some other materials, some tools and equipment, but with no completed pyrotechnic compositions, and then producing these shells from scratch.
The original series of articles ran in 2007 in the Pyrotechnics Guild International's Bulletins #152-155, and this is a somewhat revised and expanded re-issue of that series.
RECAP
You may want to review the project "How to Make Charcoal" which detailed the charcoal options for this project. It included the production of homemade charcoal to be used in the various components of the shells. The charcoal-making step of the process would occur at home prior to travelling to the pyro get-together.
In "How to Use a Ball Mill Safely and Effectively", ball milling materials, skills and techniques were addressed.
In Part 1, "Tiger Willow Shells in 2-1/2 Days, Day 1", production of the black powder (BP) shell burst granules, black match, shell lift powder, and charcoal tailed stars were begun. Options for star rollers, drying chambers, hydraulic presses, star plates, and homemade shell casings were alsodiscussed.
Goals for Today - Saturday
Today I want to check on how dry the items in the drying chamber are. I also want to granulate the BP pucks, prime the stars and finish drying them, make the spolette time fuses, assemble the shells and paste them in so that they can dry overnight.
8:00 - 8:15 am, Like Christmas Morning
I woke up this morning wondering how everything in the dryer was doing. I opened it up, took two stars out of the top screen, and tapped them together. I've learned that when they are pretty dry they

produce a crisp, clacking sound like two stones being knocked together. The stars are doing just that.
I then took a couple of the stars out to a safe place and lit them one at a time with the propane torch,tossing them into the air when lit. They both ignited well and burned with nice spark trails, burning out just after hitting the ground. This is just how I want this star to burn.
Back in the drying chamber, under the star screens, I unearthed the screen with the BP pucks on it. Istacked the pucks up and weighed them. Yesterday, I started with 20 oz. of mill dust and added 2 oz.of water, so when the pucks are totally dry they ought to weigh 20 oz. again. They now weigh 20.2 oz, so they have just a bit to go. When the pucks are completely dry, they "clink" when they are tapped together, sounding like pieces of pottery or china. This morning they have a slightly duller sound.
I cut a 6" piece of the black match off of the match frame and took it out into the field to light it. It was nice and stiff and it burned well and consistently.
And, from one of the bottom frames, I removed a very small handful of the burst granules. Putting them on a rock out in the field, I inserted a 6" piece of the blackmatch and lit it. Great. A quick poofand the puffed rice cores disappeared in the flame. Good and dry.
Ah, life is good. Warning: I have a buddy who wanted to demonstrate how his BP rough powder burned. He made a pile of it and lit it with the torch. The whole backside of his arm got badly burned. Always test burn compositions and devices by installing a piece of fuse so that you can retreat before it all ignites.
8:15 - 9:00 am, Crush BP Pucks
Now I want to crush the black powder pucks and screen the granules into usable sizes. First, I put a puck in a little plastic baggie. Then I put the baggie on top of my 6x6 pounding post and whack it with a metal-headed meat-tenderizing hammer until the puck is busted into about 2FA (about 1/4 inch) size granules.
"Corning" (Breaking Up) Black Powder Pucks
I do this with all the pucks, one at a time, and dump the BP into a 4 mesh sorting screen.
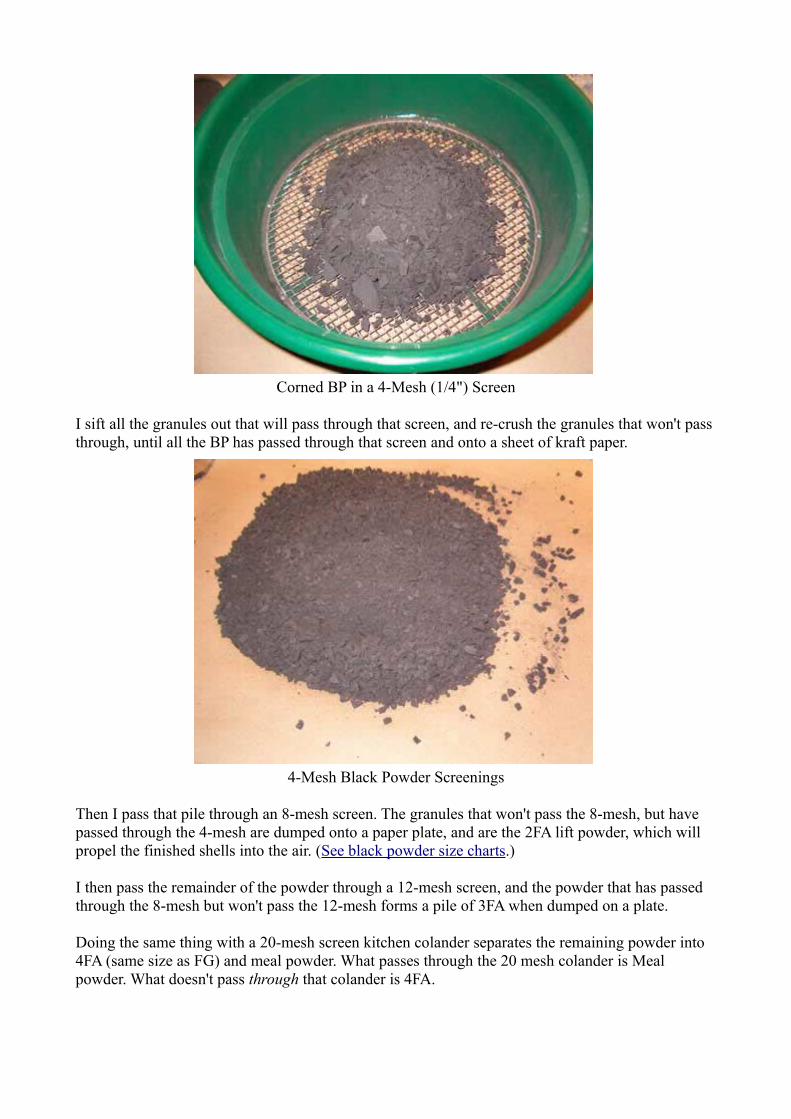
Corned BP in a 4-Mesh (1/4") Screen
I sift all the granules out that will pass through that screen, and re-crush the granules that won't passthrough, until all the BP has passed through that screen and onto a sheet of kraft paper.
4-Mesh Black Powder Screenings
Then I pass that pile through an 8-mesh screen. The granules that won't pass the 8-mesh, but have passed through the 4-mesh are dumped onto a paper plate, and are the 2FA lift powder, which will propel the finished shells into the air. (See black powder size charts.)
I then pass the remainder of the powder through a 12-mesh screen, and the powder that has passed through the 8-mesh but won't pass the 12-mesh forms a pile of 3FA when dumped on a plate.
Doing the same thing with a 20-mesh screen kitchen colander separates the remaining powder into 4FA (same size as FG) and meal powder. What passes through the 20 mesh colander is Meal powder. What doesn't pass through that colander is 4FA.
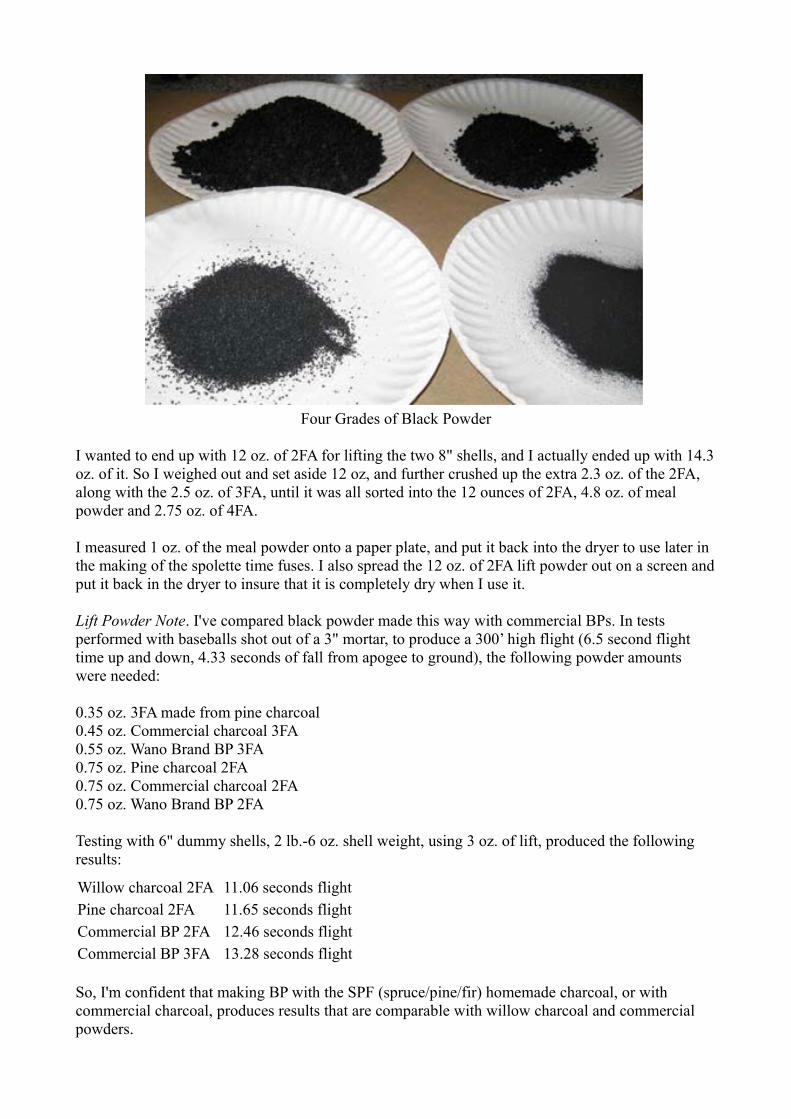
Four Grades of Black Powder
I wanted to end up with 12 oz. of 2FA for lifting the two 8" shells, and I actually ended up with 14.3oz. of it. So I weighed out and set aside 12 oz, and further crushed up the extra 2.3 oz. of the 2FA, along with the 2.5 oz. of 3FA, until it was all sorted into the 12 ounces of 2FA, 4.8 oz. of meal powder and 2.75 oz. of 4FA.
I measured 1 oz. of the meal powder onto a paper plate, and put it back into the dryer to use later in the making of the spolette time fuses. I also spread the 12 oz. of 2FA lift powder out on a screen andput it back in the dryer to insure that it is completely dry when I use it.
Lift Powder Note. I've compared black powder made this way with commercial BPs. In tests performed with baseballs shot out of a 3" mortar, to produce a 300’ high flight (6.5 second flight time up and down, 4.33 seconds of fall from apogee to ground), the following powder amounts were needed:
0.35 oz. 3FA made from pine charcoal 0.45 oz. Commercial charcoal 3FA0.55 oz. Wano Brand BP 3FA 0.75 oz. Pine charcoal 2FA0.75 oz. Commercial charcoal 2FA0.75 oz. Wano Brand BP 2FA
Testing with 6" dummy shells, 2 lb.-6 oz. shell weight, using 3 oz. of lift, produced the following results:
Willow charcoal 2FA 11.06 seconds flightPine charcoal 2FA 11.65 seconds flightCommercial BP 2FA 12.46 seconds flightCommercial BP 3FA 13.28 seconds flight
So, I'm confident that making BP with the SPF (spruce/pine/fir) homemade charcoal, or with commercial charcoal, produces results that are comparable with willow charcoal and commercial powders.
Note: In a future article, I'll be detailing various black powder production methods, and procedures for testing the various powders and comparing them with each other. Stay tuned.
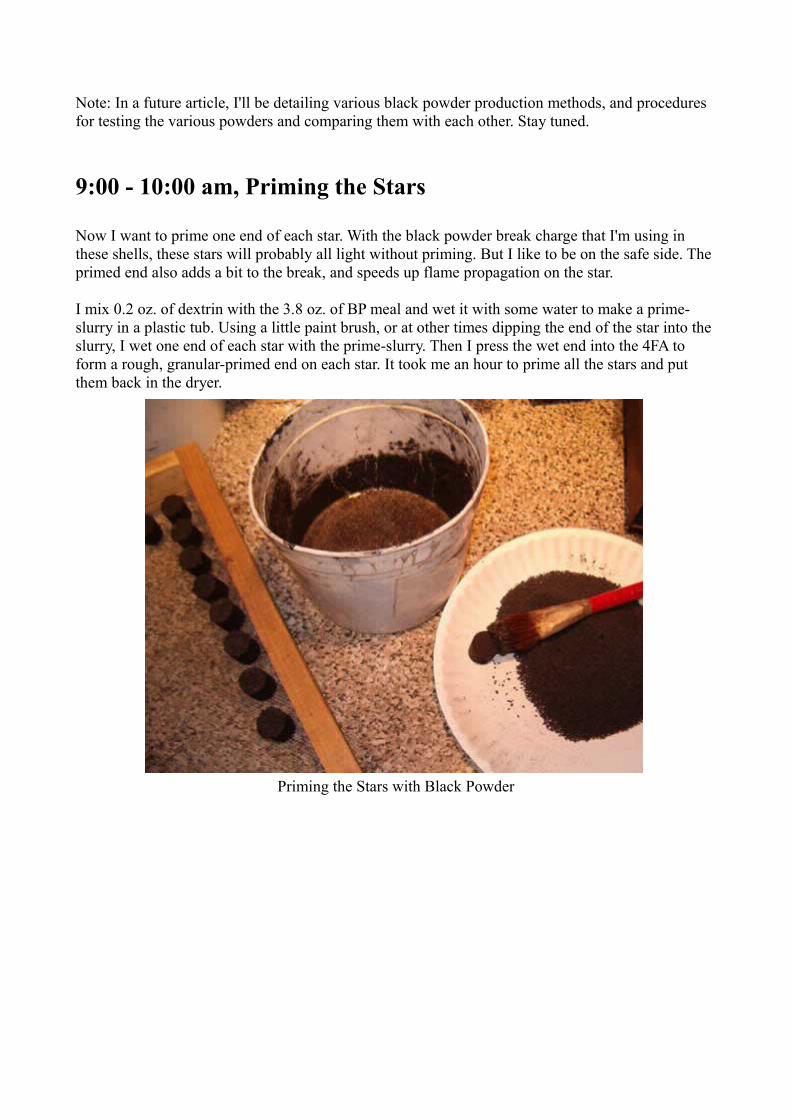
9:00 - 10:00 am, Priming the Stars
Now I want to prime one end of each star. With the black powder break charge that I'm using in these shells, these stars will probably all light without priming. But I like to be on the safe side. The primed end also adds a bit to the break, and speeds up flame propagation on the star.
I mix 0.2 oz. of dextrin with the 3.8 oz. of BP meal and wet it with some water to make a prime-slurry in a plastic tub. Using a little paint brush, or at other times dipping the end of the star into the slurry, I wet one end of each star with the prime-slurry. Then I press the wet end into the 4FA to form a rough, granular-primed end on each star. It took me an hour to prime all the stars and put them back in the dryer.
Priming the Stars with Black Powder

Star Primed with Meal & 4FA BP
Note: The method of priming stars outlined above is not my favorite or standard method. I employed it in this project to speed the process up, since the stars can be primed, dried, and assembled in the shells the same day.
My regular method of priming these 113.9 ounces of stars would be as follows:
• Make a "scratch-mix," BP prime by screening together:
Component Weight
Potassium Nitrate 24.9 oz.Airfloat Charcoal 4.9 oz.Dextrin 1.7 oz.Sulfur 3.5 oz.
Total Weight 35 oz.
(This is a 15/3/2/1 ratio of the ingredients)
(Referring back to Part 2 of this series, 21 ounces of BP mill-dust, including dextrin, was set aside from the second ball-mill batch. This could be used as part of the above prime. To this 21 ounces, 9.9 ounces of potassium nitrate, 1.9 ounces of airfloat charcoal, 1.5 ounces of sulfur, and 0.7 ounces of dextrin, would be added and screened into the mill-dust to make the prime.)
• Divide the stars into five lots, about 23 ounces each lot
• Divide the prime into five batches, 7 ounces per batch
• Put one lot of the stars into the star roller

Small Star Roller
(This is assuming that I'd be using my smaller, stainless-steel pot roller. If I was using my larger, cement mixer roller, I would experiment with priming 2 or 3 of the 23 ounce lots or even all of the stars at one time.)
• Out of one of the batches of prime, take 1/4 cup of the prime powder, place it in a paper cup,and add 2 tablespoons of water to it, stirring to mix up a thin prime "slurry."
• Start the star roller with the 23 ounces of stars in it, and dump the slurry onto the rolling stars, using gloved hands to thoroughly coat the stars.
• Slowly add the remaining dry prime powder out of the 7 ounce batch, 1/4 cup at a time, working the stars with the gloved hand to keep them separated, and spraying with water as necessary, until all the prime has been taken up by the stars and they have a nice, solid, "crusty" looking coating of prime on them.
• Dump that batch of stars onto a drying screen
• Prime the remaining 4 lots of stars in the same manner
The disadvantage of this method, from the viewpoint of this project, is that it takes 24 hours for the stars to completely dry. If I had that extra day, I would employ this method for the star priming.
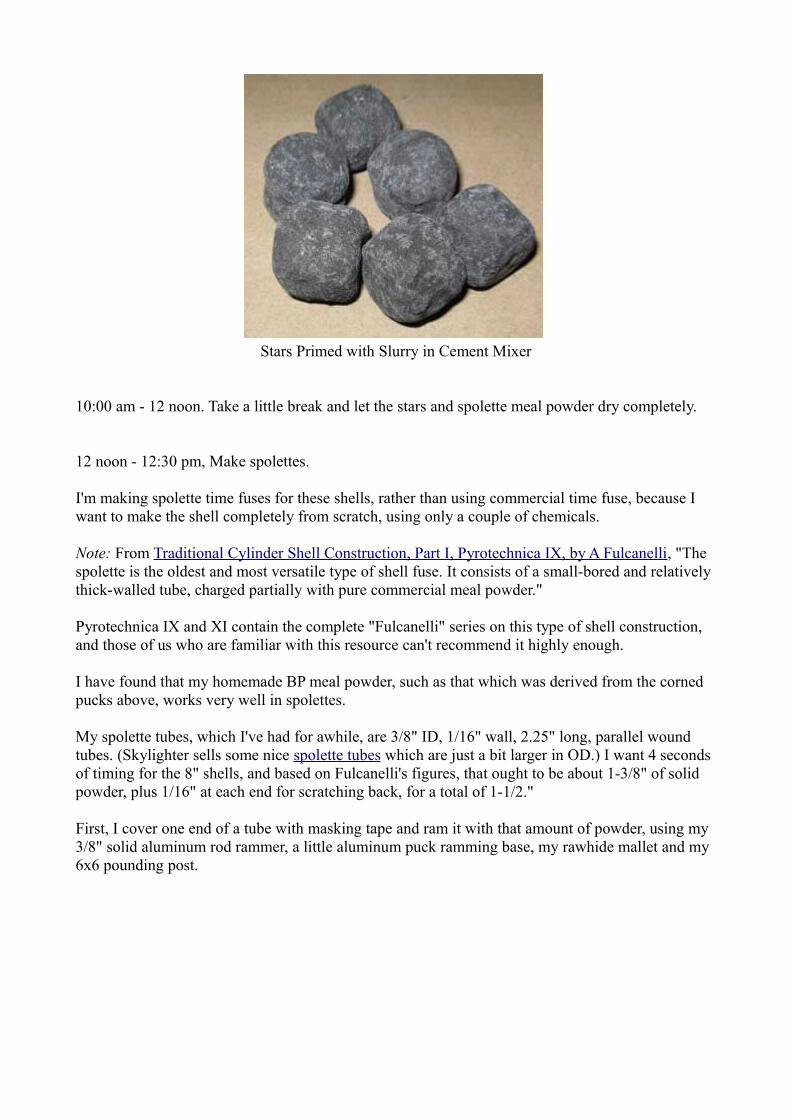
Stars Primed with Slurry in Cement Mixer
10:00 am - 12 noon. Take a little break and let the stars and spolette meal powder dry completely.
12 noon - 12:30 pm, Make spolettes.
I'm making spolette time fuses for these shells, rather than using commercial time fuse, because I want to make the shell completely from scratch, using only a couple of chemicals.
Note: From Traditional Cylinder Shell Construction, Part I, Pyrotechnica IX, by A Fulcanelli, "The spolette is the oldest and most versatile type of shell fuse. It consists of a small-bored and relatively thick-walled tube, charged partially with pure commercial meal powder."
Pyrotechnica IX and XI contain the complete "Fulcanelli" series on this type of shell construction, and those of us who are familiar with this resource can't recommend it highly enough.
I have found that my homemade BP meal powder, such as that which was derived from the corned pucks above, works very well in spolettes.
My spolette tubes, which I've had for awhile, are 3/8" ID, 1/16" wall, 2.25" long, parallel wound tubes. (Skylighter sells some nice spolette tubes which are just a bit larger in OD.) I want 4 seconds of timing for the 8" shells, and based on Fulcanelli's figures, that ought to be about 1-3/8" of solid powder, plus 1/16" at each end for scratching back, for a total of 1-1/2."
First, I cover one end of a tube with masking tape and ram it with that amount of powder, using my 3/8" solid aluminum rod rammer, a little aluminum puck ramming base, my rawhide mallet and my 6x6 pounding post.

Ramming Black Powder in Paper Tube to Make Spolettes
I pound 1/8 teaspoon at a time, which produces 3/16" increments, until I have a solid powder column in the tube 1.5" long. Then I scratch both ends of the solid powder core with an awl to a depth of 1/16," and attach a piece of visco fuse with masking tape.
Spolette Ready to Test
Burning that spolette in a safe location, and timing it with my stopwatch, reveals a time of 3.2 seconds with this black powder. I recalculate the length of the powder core I'll need for 4 seconds, and arrive at 1-3/4," plus 1/16" inch on both ends for scratching back.
I make a spolette with 1-7/8" of powder, scratch the ends, burn it and time it, and get 4.1 seconds. Perfect. I then pound two spolettes with the 1-7/8" powder column (this takes 0.2 oz. of powder for each spolette) and scratch the inside powder with the awl. Note that the finished spolette has powder flush with one end of the tube and covered with masking tape, and leaves 3/8" of the tube still open and not filled with powder.
Note: A friend recently gave me a nice tool set for making spolettes. It is similar to what Rich

Wolter makes (wolterpyrotools.com) and may have been made by him. It has been machined to work with the size tubes I am currently using. The grooves on the shaft of the ram, 1/4" apart, come in handy for gauging the height/timing of the powder column which has been rammed.
Spolette Tool Set and Tube
12:30 - 12:50 pm, Insert spolettes in shell hemispheres.
I'm using commercially produced, Chinese, strawboard hemispheres for these shells.
My spolette has a 1/2 inch outer diameter. So, using my half inch steel punch, I knock a hole in two of the hemis, using my rawhide mallet and the 6x6 pounding post.

Punching Hole in Shell Casing
Note: Awhile back I purchased an inexpensive set of gasket punches at http://harborfreight.com/. These punches come in handy for punching holes in stuff like the shell casing above.
Harbor Freight Gasket Punches
I then hot-glue the spolettes in the two hemis, forming nice fillets of glue on both the inside and the outside, allowing 1" of the flush end of the spolette to stick out on the outside.
Spolette Glued into Shell Casing
I removed the masking tape to insert the spolette. Now I cover the outside end of the spolette with tape again, making a little "flag" with the tape for orientation during the pasting process.
On the inside of the hemi, I take a 5" x 5" piece of 40# kraft paper and make a passfire tube with three turns of the paper rolled up on a half-inch dowel. Then I hot-glue the tube over the spolette tube. I've enlarged the dowel just a bit with some masking tape to make sure the passfire tube will fit over the spolette tube.
Sighting across the plane of the hemi equator, I use scissors to clip the passfire tube off flush with that plane. I then insert two pieces of black match, making sure they fit down into the spolette tube and are pressed against the scratched column of black powder, and sticking out of the passfire tube about 1/2." I then tie the end of the passfire tube with a clove hitch, and use my awl to punch a vent into the passfire tube below the string.

Black Match and Passfire Tube Installed, with Vent Hole
Note: here's where you can see one way to tie a clove hitch knot.
The clove hitch is the most-used and versatile knot employed in fireworking, and there are several ways to tie one. At one time, I spent some time sittin’ in my LaZBoy chair, with a piece of string, and practicing the various ways of tying a clove hitch until they became second nature.
12:50 - 1:40 pm, Filling the Stars into the Hemis
I remove my stars from the dryer and try to pry the prime off of one of them. The prime is very hardand dry, and pulls off some of the star along with it. This indicates it is thoroughly dry and fully adhered.
I like to hot-glue my stars into the hemis with a small stripe of glue on each star, applied to the end opposite the primed end, beginning with the stars at the equator. I use four rings of 4" PVC pipe as stands for the hemis during this process.

Shell Hemisphere on 4" PVC Pipe Work-Stand
I glue the stars in about 1/8" below the equator because the angle of the hemi brings the inside edge of the stars just above the equatorial plane, where they will mesh with the stars in the other hemi.
Hot-Glued Stars around Equator of Shell
I then fill the rest of the hemis with stars, lightly gluing each one in.
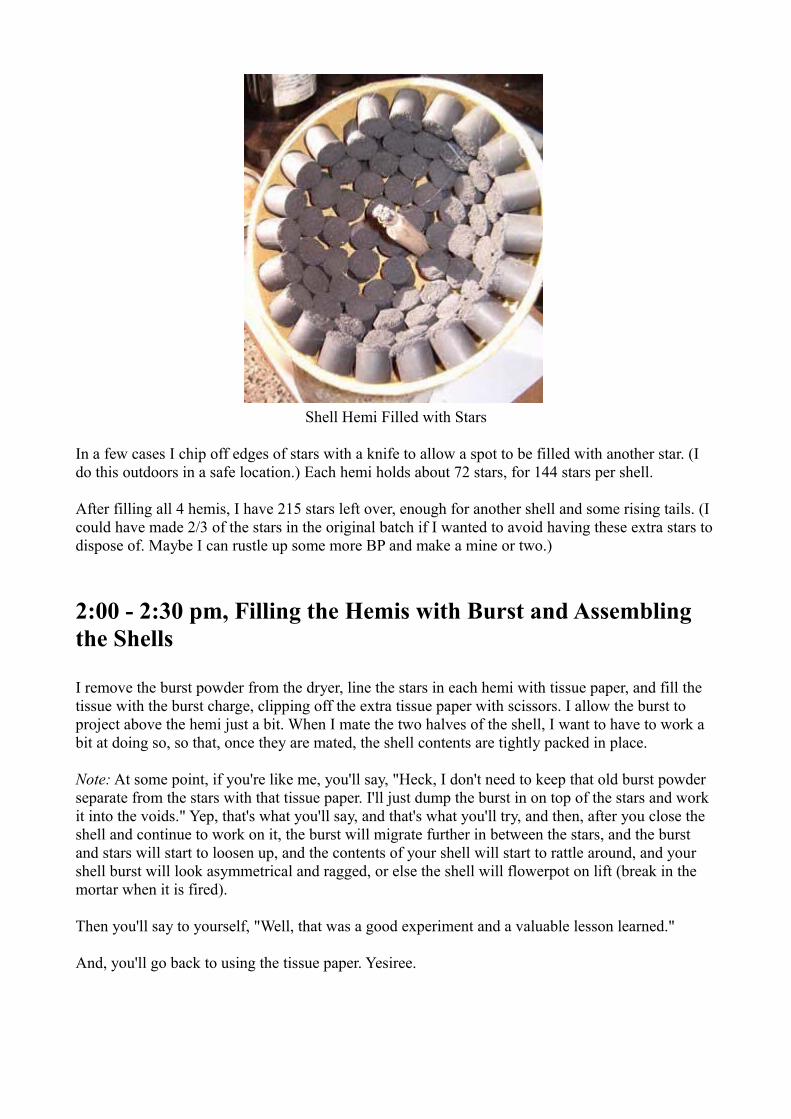
Shell Hemi Filled with Stars
In a few cases I chip off edges of stars with a knife to allow a spot to be filled with another star. (I do this outdoors in a safe location.) Each hemi holds about 72 stars, for 144 stars per shell.
After filling all 4 hemis, I have 215 stars left over, enough for another shell and some rising tails. (I could have made 2/3 of the stars in the original batch if I wanted to avoid having these extra stars todispose of. Maybe I can rustle up some more BP and make a mine or two.)
2:00 - 2:30 pm, Filling the Hemis with Burst and Assembling the Shells
I remove the burst powder from the dryer, line the stars in each hemi with tissue paper, and fill the tissue with the burst charge, clipping off the extra tissue paper with scissors. I allow the burst to project above the hemi just a bit. When I mate the two halves of the shell, I want to have to work a bit at doing so, so that, once they are mated, the shell contents are tightly packed in place.
Note: At some point, if you're like me, you'll say, "Heck, I don't need to keep that old burst powder separate from the stars with that tissue paper. I'll just dump the burst in on top of the stars and work it into the voids." Yep, that's what you'll say, and that's what you'll try, and then, after you close the shell and continue to work on it, the burst will migrate further in between the stars, and the burst and stars will start to loosen up, and the contents of your shell will start to rattle around, and your shell burst will look asymmetrical and ragged, or else the shell will flowerpot on lift (break in the mortar when it is fired).
Then you'll say to yourself, "Well, that was a good experiment and a valuable lesson learned."
And, you'll go back to using the tissue paper. Yesiree.
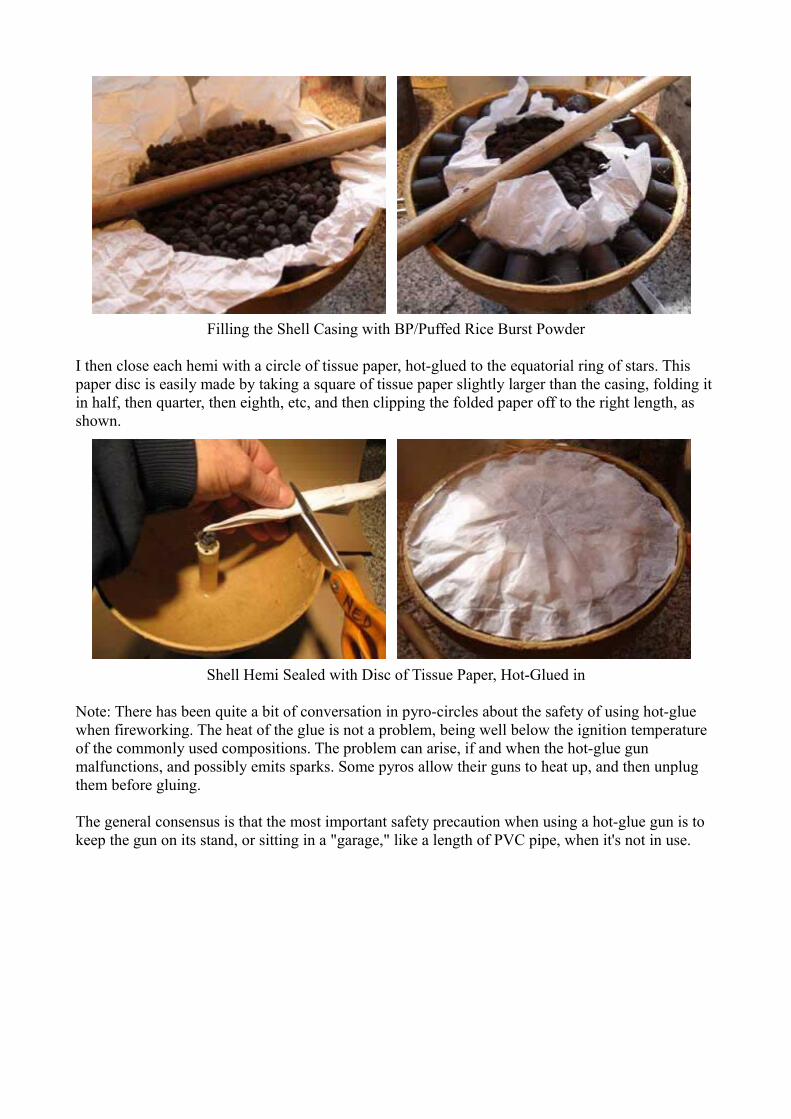
Filling the Shell Casing with BP/Puffed Rice Burst Powder
I then close each hemi with a circle of tissue paper, hot-glued to the equatorial ring of stars. This paper disc is easily made by taking a square of tissue paper slightly larger than the casing, folding it in half, then quarter, then eighth, etc, and then clipping the folded paper off to the right length, as shown.
Shell Hemi Sealed with Disc of Tissue Paper, Hot-Glued in
Note: There has been quite a bit of conversation in pyro-circles about the safety of using hot-glue when fireworking. The heat of the glue is not a problem, being well below the ignition temperature of the commonly used compositions. The problem can arise, if and when the hot-glue gun malfunctions, and possibly emits sparks. Some pyros allow their guns to heat up, and then unplug them before gluing.
The general consensus is that the most important safety precaution when using a hot-glue gun is to keep the gun on its stand, or sitting in a "garage," like a length of PVC pipe, when it's not in use.

Hot-Glue Gun in Its "Garage"
That also keeps its innards from getting gummed up with excess glue, a common cause of malfunction. If one lays the gun down on its side while it's being used, the excess glue ends up all over it, and some ends up seeping into its bowels. My guns, when used this way are a mess. But when a gun is stored during use with the tip pointing down, either on its stand or sitting in a "garage," the excess glue just drips off the tip. The glue stays new, shiny as the day it was born, and not all gummed up inside.
It's also probably a good idea to avoid using those "dollar-store," el-cheapo hot-glue guns.
Now it's time to mate the hemis by flipping one of them over quickly and onto the other one, and then setting them tightly against each other by applying pressure with my hand and lightly tapping with my rawhide mallet. Then the hemis are secured together with high-adhesion masking tape.
Completely Assembled Fireworks Aerial Shell Ready for Pasting
2:30 - 6:30 pm, Pasting the Shells
I know what you're asking, "Does this guy ever take a break or eat?"
I am determined to get these shells pasted-in and in the dryer before dark and the beginning of the evening's festivities. And, no, nobody ever accused me of passing up on a meal.
"Pasting" a shell is the process of applying layers of reinforcing paper onto the exterior of the assembled shell hemispheres.
I mix up some wheat paste (the good stuff from pyrosupplies.com) in my blender until it is about the consistency of yogurt. Wheat paste is the old-fashioned wallpaper paste. I know, I know, how

would you fellas, who are reading this, know what the consistency of yogurt is? Real men don't eat yogurt. Go buy a little tub of it and check it out. I like strawberry. (No, you cannot paste your shell in with strawberry yogurt!). But I digress.
I like to paste 8" shells with 1" x 9" strips of 40# virgin kraft paper. I have an 18" wide roll of this paper in a dispenser. I tear off twelve 9" long sheets, and do this four times, making 4 stacks of 12 sheets. I am going to use one stack of 12 sheets for each application.
I can only cut through 6 layers of the paper with my sharp knife (which I keep really sharpened). SoI paste up 6 pieces of the paper on my cutting board. I apply paste to the cutting board; paste both sides of the first sheet and then lay down the rest of the sheets, feathering them as I go, and pasting only the top side of those 5 sheets.
Applying Wheat Paste to Kraft Paper Using a Paintbrush
Now, after marking my 1" widths with my marking screw-board (there are screws every 2," and I eyeball the intermediate cut marks), I cut the sheets into 1" wide strips.
Marking Pasted Paper and Cutting It into 1" Wide Strips
Now I pick up one stack of 6 strips at a time, and lay down 9 of the stacks on top of each other, feathering the ends as I go. Then I roll them up into a little roll.

Pasted Paper Strips, Stacked and Rolled
I do this twice for each cutting board batch, and there are two of these batches for the total of 12 sheets, so I end up with 4 of the little rolls of strips.
By the way, this paper and this method require no "breaking" of the paper. (Breaking paper, as described by Fulcanelli, entails crumpling it up to incorporate the paste and break the grain of the paper.)

Shell, Pasted Paper Strips, and Wheat Paste
The first thing I like to do is to brush some paste onto the shell and smear it around with my hands, preparing the shell casing so the pasted strips of paper will really adhere to it.
I like to apply the strips in the "9 axis system" described by Jim Widmann in his PGI Bulletin article, Bulletin #123, March/April 2001. This system uses the 3 main axes, x/y/z, as well as the 6 intermediate axes, which are rotated 45 degrees from each of the main ones. The little masking tape flag on the spolette is used to keep track of the axes as the pasting progresses.
Don't worry if this is not immediately clear. I lay awake for a bit on a couple of nights visualizing all of this until the light went on inside my head. The purpose of this system is to rotate the "poles" of the layers of paper, so that the final, consolidated wrap of paper has a consistent thickness and strength.
Applying the First Layer of Pasted Paper Strips to the Shell
As seen in the above photos, there are open spaces left at the north and south "poles" left after applying the 9" strips, and these poles are covered with torn strips of paper.
Each roll of strips is sufficient for one axis application, which produces 2 layers of paper on the shell since the strips are lapped by half over each other as they are applied. So, the 4 rolls are good for the first 4 axes, or 8 layers of paper.
As I apply successive layers of the paper strips, I keep the shell nice and wet with the paste, by applying a bit with the paint brush and smearing it around with my hands.

Shell, Wet with Paste, with More Strips Applied
After applying the first 12 sheets/4 rolls/4 axes/8 layers of paper to the first shell, I place it in the drying chamber, with the shell resting on two strips of wood which lie across one of the drying screens. (The shells may be too heavy to rest directly on the screen, and I don't want them sticking to it.)
While the first shell is drying a bit, I apply the first 8 layers to the second shell. The first shell has taken about an hour to paste, and it dries for an hour while I'm pasting the second shell. Once this is accomplished, I switch the shells in the dryer and make the second 8-layer application to the first shell, then switch them again, and apply the final 8 layers to the second shell. Now I have 16 layers of pasted paper on each shell.
Sometimes, if I'm getting fancy, I apply a few drops of red or green food coloring on the shell as I'mapplying the last layers of pasted paper. This results in uniquely colored shells.
"Christmas" Shells

Note: One alternative method for pasting the shells is to use gummed, kraft-paper tape, and a tape wetting/dispensing machine. The tape would be applied to the shells in similar lengths and fashion as the pasted paper above. I like to use 1-1/4" wide, 35-40# tape on 8" shells.
Using Gummed Kraft Paper Tape to Paste Shells
6:30 pm, Two Shells in the Drying Chamber. It's Miller Time.

This is the final installment in a series of articles chronicling Ned Gorski's efforts to produce two traditional 8", Tiger-Willow, paper ball shells, including handmade stars, burst powder, spolette timefuse, lift powder and quickmatch, all at a weekend pyro event.
The original series ran in 2007 in the Pyrotechnic Guild International's Bulletins #152-155. This is asomewhat revised re-issue of that series.
RECAP
You may want to review the project "How to Make Charcoal" which detailed the charcoal options for this project. It included the production of homemade charcoal to be used in the various components of the shells. The charcoal-making step of the process would occur at home prior to travelling to the pyro get-together.
In "How to Use a Ball Mill Safely and Effectively", ball milling materials, skills and techniques were addressed.
In Part 1, "Tiger Willow Shells in 2-1/2 Days, Day 1", production of the black powder (BP) shell burst granules, black match, shell lift powder, and charcoal tailed stars were begun. Options for star rollers, drying chambers, hydraulic presses, star plates, and homemade shell casings were alsodiscussed.
And then in Part 2, "Tiger Willow Shells in 2-1/2 Days, Day 2", I addressed granulating the black powder, priming the stars, making spolette time fuses, and assembling and pasting the shells.
Now it's time to finish these shells up and get ready to put them into the air.
Sunday Morning
Well, the shells are dry in the drying chamber. Today I will "lift and leader" them, and tonight fire those babies up, two and a half days after starting this project.
9:00 - 10:00 am, Make Match Pipe and Lift Cups
Making Match Pipe
My 8" mortar is 42" long on the inside, so I'm going to want two quickmatch shell leaders about 48"long. The leader is the fuse which leads from the shell at the bottom of the mortar, up and out of the mortar (the "gun"). The leaders for large aerial fireworks shells are typically made of quickmatch, which is blackmatch inserted into a paper tube called match "pipe."
To make match pipe for these leaders, I roll 3" x 34" pieces of 40# virgin kraft paper around a 3/8" x 36" aluminum rod (or you could use a wooden dowel), gluing the edge of the paper down with white glue. This will produce double wall pipe.
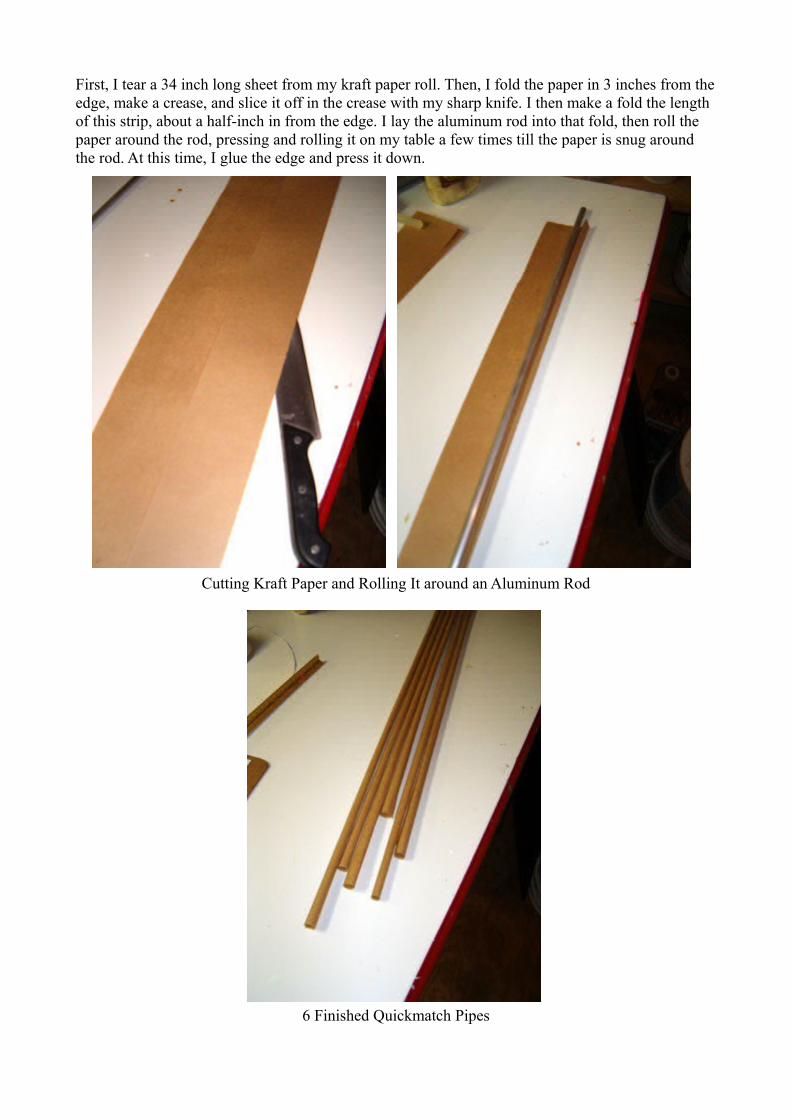
First, I tear a 34 inch long sheet from my kraft paper roll. Then, I fold the paper in 3 inches from theedge, make a crease, and slice it off in the crease with my sharp knife. I then make a fold the length of this strip, about a half-inch in from the edge. I lay the aluminum rod into that fold, then roll the paper around the rod, pressing and rolling it on my table a few times till the paper is snug around the rod. At this time, I glue the edge and press it down.
Cutting Kraft Paper and Rolling It around an Aluminum Rod
6 Finished Quickmatch Pipes
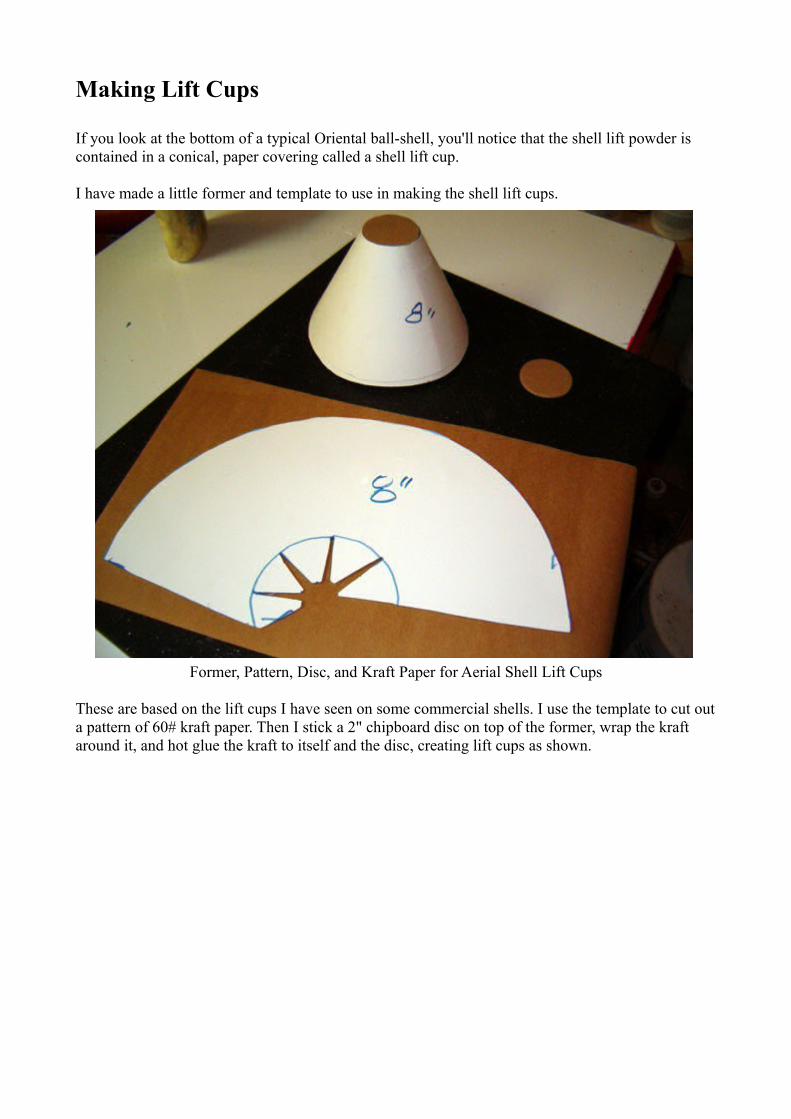
Making Lift Cups
If you look at the bottom of a typical Oriental ball-shell, you'll notice that the shell lift powder is contained in a conical, paper covering called a shell lift cup.
I have made a little former and template to use in making the shell lift cups.
Former, Pattern, Disc, and Kraft Paper for Aerial Shell Lift Cups
These are based on the lift cups I have seen on some commercial shells. I use the template to cut outa pattern of 60# kraft paper. Then I stick a 2" chipboard disc on top of the former, wrap the kraft around it, and hot glue the kraft to itself and the disc, creating lift cups as shown.

Finished Shell Lift Cups
10:00 - 12 noon, Lift and Leader the Shells
Making the Quickmatch
I want two 50" pieces of quickmatch for the shell leaders. I'll be using 1-1/2 pieces of the match pipe for each leader. I like to put two pieces of black match into each pipe to insure flame propagation past any potential weak places in the black match.
After gently unrolling the dry black match off the match frame, I cut four 54" pieces of match. First,I insert two of the pieces into a 34" piece of match pipe. Then I slide a 17" piece of the pipe onto thematch, inserting the end of it about an inch into the longer pipe, and taping the joint well with masking tape. That produces a 50" piece of quickmatch with black match sticking out of each end.

Quickmatch Shell Leaders
Lift Powder
Now I take the screen of 2FA black powder out of the drying chamber and dump it onto some kraft paper. The BP is divided into two 6 oz. amounts and put into two small plastic baggies.
One end of a quickmatch leader is inserted into the lift powder in the baggie, the baggie is gathered around the match pipe, and a band of masking tape secures the baggie closed. The extra baggie plastic is trimmed off with scissors and the first tape band is secured to the match pipe with another band of masking tape.
Now, on the shell, I mark the pole opposite the spolette. Holding the baggie of lift powder there, I hot-glue the leader to the shell down to the equator.
Baggie of Lift Powder, and Leader, Glued to Shell
Then I hot-glue a lift cup onto the bottom of the shell, covering the lift powder.

Lift Cup, Covering Lift Powder, Glued to Shell
Note: I am top fusing these shells because they use spolettes, which are more susceptible to pressureand blow-through than time fuse is.
Matching the Spolette
After turning the shell upright, the masking tape flag/cover is removed from the end of the spolette, and the powder core is scratched in an X pattern with an awl. An 'h' made from 5 inches of black match is hot glued and tied onto the spolette.

Blackmatch Hot-Glued and Tied to Spolette, after Scratching BP
Then the quickmatch leader is brought up to the bottom of the spolette where it is bent and then hot glued to the upper hemi of the shell and the side of the spolette.
I pierce the side of the leader above the spolette and cut a little 'door' in the side of the match pipe just above the top of the spolette. Then I insert an extra piece of black match as well as the upper leg of the spolette 'h' match into the leader pipe, and cover the junction with masking tape. This insures that a lot of fire is going to be transferred to the top of the spolette when the leader burns to that point.
Shell Leader and Spolette Match Joined and Secured

Then the whole leader/spolette assembly is covered with a kraft paper bucket, consisting of two turns of 40# kraft paper and tied with clove hitches at the top and bottom. I then tug on the leader tomake sure it is tightly secured to the shell, since it serves as the lifting rope, which is sufficient for ashell weighing as little as this one does.
Paper Bucket Covering Spolette and Blackmatch
Finishing the Shell
The shell leader is 'S' folded back and forth onto itself to form a bundle. A band of masking tape, sticky-side-out, secures the bundle, and then the sticky side of that band is covered with a layer of masking tape, sticky-side-in. This forms an easily torn band which is not adhered to the leader. A piece of visco fuse is taped into the end of the leader.
Two of the Tiger Willow stars are hot glued on either side of the spolette to serve as rising tails. Then the tails are covered with rounds of tissue paper, which are tied on with clove hitches, and the labels are glued on.

Rising, Comet "Tails" Attached to Shell and Covered with Tissue Paper
Note: This method of attaching the rising tails works well with my glitter comets, which are made of a composition which gets very hard when it is dry. The glitter tails stay attached to the shell very well.
The tails used above, being made from a higher-charcoal-content comp, were softer. I accidentally bumped one of them and it popped off. I then re-glued it, and also completely covered the sides of all the tails with a layer of hot-glue, right down to the glue attached to the shell. This strengthened the tails and ensured that they stayed on during the lift and ascent of the shell. Another approach uses masking tape around the comet, then little strips of masking tape going down the comet and onto the shell body.
12 noon on the third day of the process, and the shells are ready to drop and fire when it gets dark.

Finished Shells, Ready to Be Loaded and Fired
So, What am I, Nuts?
After about 16 hours of work, I have two 8" shells. Similar Chinese ones could have been purchasedfor under $100 or so. Yeah, I guess I'm nuts, but there is something tremendously satisfying about being able to start from scratch, with no pyrotechnic materials, make a little charcoal, get some chemicals, add some paper and glue and string, and end up with these two shells.
I guess that's what I always wanted to know how to do ever since getting into this art almost 20 years ago. I also wanted to know if it could be done in a weekend.
The Shells in Action
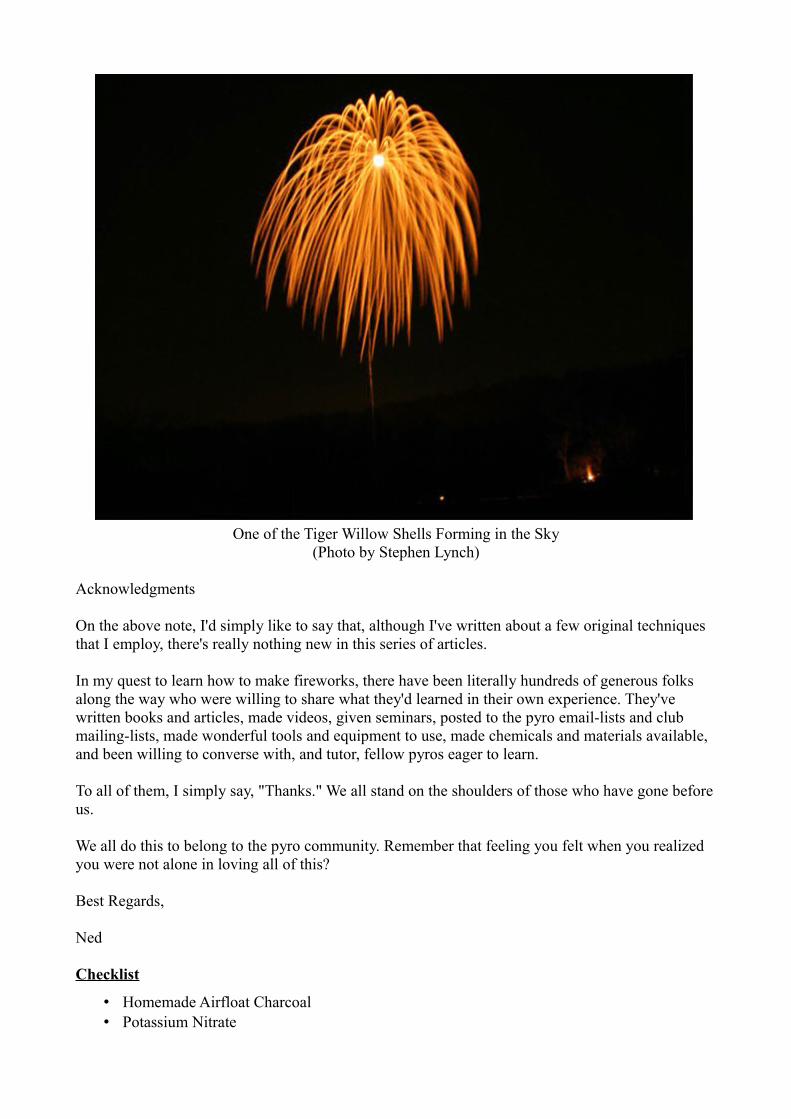
One of the Tiger Willow Shells Forming in the Sky
(Photo by Stephen Lynch)
Acknowledgments
On the above note, I'd simply like to say that, although I've written about a few original techniques that I employ, there's really nothing new in this series of articles.
In my quest to learn how to make fireworks, there have been literally hundreds of generous folks along the way who were willing to share what they'd learned in their own experience. They've written books and articles, made videos, given seminars, posted to the pyro email-lists and club mailing-lists, made wonderful tools and equipment to use, made chemicals and materials available, and been willing to converse with, and tutor, fellow pyros eager to learn.
To all of them, I simply say, "Thanks." We all stand on the shoulders of those who have gone beforeus.
We all do this to belong to the pyro community. Remember that feeling you felt when you realized you were not alone in loving all of this?
Best Regards,
Ned
Checklist
• Homemade Airfloat Charcoal• Potassium Nitrate

• Sulfur• Dextrin• Wheat paste
Note: It is possible to make one's own dextrin and wheat paste from corn starch and flour, respectively. This would further reduce a pyro's dependence on outside sources of supplies. "Post-Apocalyptic Pyro" may be the way of the future.