introduction - faithfulltools.com · this advanced electronic detector can detect and locate wooden...
TRANSCRIPT


This advanced electronic detector can detect and locate wooden studwork, metal and AC voltage, providing a clear indication of concealed objects prior to drilling, nailing or screwdriving.
1. Find wood and metal studs.2. Find and identify a stud centre3. Find AC voltage and scan to trace live cables.4. Metal scanning to find, nails, pipes, rebar and other hidden metal objects.
This detector may be used to carry out the following operations:
1. Find metal pipes in concrete.2. Find wooden studwork3. Find electrical box, exhaust vent, conduit, rebar, and ducting.4. Find and trace live cable behind ceiling, floors and walls.
2
INTRODUCTION
FEATURES
APPLICATION


3. Bottom Signal LEDThere are 2 bottom signal LEDs. In most situations, the two bottom signal LEDs turn on first when the detector approaches the target object.
4. Power LEDIt lights as a power indicator when the TEST button is pressed.
5. TEST buttonUse to turn the detector on. You must depress and hold this switch down to calibrate the detector or when you wish to perform detection operation.
6. Selector switchA three position switch used to select the required scan mode. Available scanning modes are:
STUD ------- Stud scan modeMETAL ------ Metal scan modeAC WIRE --- AC voltage scan mode
7. MARK buttonIn some conditions it is not suitable to make marks with pencil. You can press this button to mark dots on the wall surface.
4

Stud Detection Procedure
1. Set the selector switch to "STUD" position.
2. Calibration: Place the unit against wall. Depress and hold the TEST button down, the detector will begin calibration. When it sounds two beeps, the calibration is complete. Always keep the TEST button depressed throughout all the following procedures.
3. Detection: a. Place the detector on the surface and slowly move the unit sideways (fig 1). When the detector moves closer and closer to the stud, the signal LEDs will light sequentially from bottom to the top. When the top signal LED lights and the built-in buzzer sounds continuously, the unit has detected the stud's edge. Stop moving and mark a spot in the detectors groove on the walls surface (fig 2).
5
OPERATING INSTRUCTIONS
Fig.1 Fig.2 Fig.3

b. Continue moving sideways across wall until all the signal LEDs and the buzzer turn off, then reverse direction and locate opposing edge by using the same procedure. When the LED lights and buzzer sounds continuously stop moving and mark a spot in the detectors groove on the walls surface (fig 3), the midpoint between two marks is the centre of the stud.
Note1. Stud detection can be carried out on standard plasterboard walls. However, it may not function on some types of foil backed or metallic fabric surfaces.2. If the detector is placed over a wall batten or stud when performing a calibration, the detector will not work correctly.3. The surface of wall along which you want to detect should be flat and dry.4. We recommend that you also carry out a metal detection scan to ensure that the detected batten or stud is not a metal pipe. Please note that some small securing screws or nails or metal objects may be detected.5. Keep your other hand away from the detector when carrying out a scan.6. Wall studs will be approximately 40cm to 60cm apart with a width of about 3.8cm. 7. If two studs are adjacent the unit may not detect them accurately.8. After you release the TEST button, the detector must perform a calibration sequence again before use.9. Do not move the detector too quickly as the RED signal LEDs will not light sequentially.
6
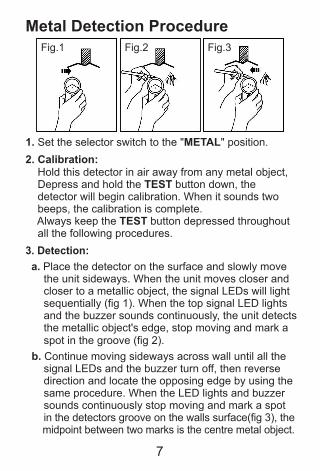
Metal Detection Procedure
1. Set the selector switch to the "METAL" position. 2. Calibration: Hold this detector in air away from any metal object, Depress and hold the TEST button down, the detector will begin calibration. When it sounds two beeps, the calibration is complete. Always keep the TEST button depressed throughout all the following procedures.3. Detection: a. Place the detector on the surface and slowly move the unit sideways. When the unit moves closer and closer to a metallic object, the signal LEDs will light sequentially (fig 1). When the top signal LED lights and the buzzer sounds continuously, the unit detects the metallic object's edge, stop moving and mark a spot in the groove (fig 2). b. Continue moving sideways across wall until all the signal LEDs and the buzzer turn off, then reverse direction and locate the opposing edge by using the same procedure. When the LED lights and buzzer sounds continuously stop moving and mark a spot in the detectors groove on the walls surface(fig 3), the midpoint between two marks is the centre metal object.
7
Fig.1 Fig.2 Fig.3

AC Voltage Detection Procedure
For maximum sensitivity, begin by placing the detector in a position away from live wiring.
1. Set the selector switch to the "AC WIRE" position.2. Calibration: Depress and hold the TEST button down , the detector will begin calibration. When it sounds two beeps, the calibration is complete. Always keep the TEST button depressed throughout all the following procedures.3. Detection: a. Place the detector on the surface and slowly move the unit sideways (fig 1). When the top signal LED lights and buzzer sound continuously, stop moving, the detector has located the edge of a live wire, mark a spot in the groove on the walls surface (fig 2). b. Continue moving sideways across wall until all the signal LEDs and the buzzer turn off, then reverse direction and locate the opposing edge by using the same procedure. When the LED lights and buzzer sounds continuously stop moving and mark a spot in the detectors groove on the walls surface (fig 3), the midpoint between two marks is the centre of live wire.
8
Fig.1 Fig.2 Fig.3

Note1. Wires deeper than the detection limit from surface, in conduit or behind plywood shear wall will not be detected use caution when using the detector under these circumstances.
2. Rubbing or banging the unit on the wall may generate static electricity and cause a false indication.
3. Leakage Currents Because of the extremely small current required to cause a reading on the detector, an apparent false reading may be seen in some situations, If a live wire with poor insulation is touching a damp wall, the detector will show a voltage on the walls surface In this situation, the detector is indicating a potential hazard which should be checked using a voltmeter.
9

1. Depending on the proximity of electrical wiring or pipes to the wall surface, the unit may detect them in the same manner as studs. Caution should always be used when nailing, sawing, or drilling into walls, floors, and ceilings that may contain wiring or pipes.
2. When working near electrical wires, always turn off the mains power.
3. To avoid unexpected problems please be aware that different types of material may be close together. A stud, joist, pipe, metal object or wire may be adjacent to each other.
4. If you do not intend to use the detector for an extended time, please remove the battery before storage.
5. For an accurate locating result, it is recommended that user repeats the detection scan around the detected object in different directions.
6. Shielded wires or live wires encased in metal conduits, casings, metal walls or thick, dense walls will not be detected.
10
NOTE

11
Detection depth
SPECIFICATION
NOTE:Detection depth and edge detection can vary due to moisture content of materials, wall texture, paint, etc.
Operation condition -7~40°C below 75% RH
Storage condition -20~50°C below 85% RH
Battery 9V, 6F22 or equivalent
Dimension 163 x 74 x 26mm
Weight approx164g (including battery)
Stud mode
Metal mode
AC mode
Wood stud of 30x30mm: ≤14mm
Iron pipe of dia. 25mm: ≤25mm
Typical depth of 50mm for 90-250V at 50-60Hz.

If the built-in buzzer sounds 5 quick beeps after you start depressing and holding the TEST button, you should replace the battery immediately. Remove the battery door, and disconnect the depleted battery and replace with a new equivalent 9V battery. Replace the battery door correctly. Depleted batteries should be disposed of at your local recycling facility.
12
DISPOSAL OF THIS PRODUCTDear Customer,If you at some point intend to dispose of this article, then please keep in mind that many of its components consist of valuable materials, which can be recycled.Please do not dispose of it in the rubbish bin, but check with your local council for recycling facilities in your area.
BATTERY REPLACEMENT