introduction to 7.9 dashboards and reports - northshore … · · 2014-01-15out. to help, you can...
TRANSCRIPT

Introduction to 7.9 Dashboards and Reports
(Schools)

2
Table of Contents
How to Access 7.9 Dashboard .................................................................................. 3
IFAS Dashboard – Home Page .................................................................................. 4
How to Run a Report .................................................................................................. 5
1. From your dashboard ........................................................................................................... 5 2. From the report menu .......................................................................................................... 6
Rules for Report Prompts .......................................................................................... 8
Tips for Prompts ........................................................................................................ 8
Navigating 7.9 Reports .............................................................................................. 9
Saving Reports as Adobe PDF Document ................................................................................... 9
Printing 7i Reports ....................................................................................................................... 10
Sending 7i Reports to Excel ........................................................................................................ 10
Drilling Down on Reports ........................................................................................ 11
Viewing Attachments ................................................................................................................... 12
Help Running Reports ............................................................................................. 13
Frequently Used Reports – School Dashboard ..................................................... 14
All POs by # .................................................................................................................................. 14
ASB Account Balance .................................................................................................................. 15 Budget and Expenditures ............................................................................................................ 16
Budget Only by Account Code.................................................................................................... 17 Budget Transfers.......................................................................................................................... 18 Running Balance by Department ................................................................................................ 19
School Bldg Budget – Labor Only .............................................................................................. 20 School Bldg Budget – NERCs Only ............................................................................................ 21
School Revenue Transaction Detail by Department ................................................................. 22 School Technology Budgets ....................................................................................................... 23
Summary by District Program ..................................................................................................... 24 Transaction Detail by PEID # ....................................................................................................... 25

3
How to Access 7.9 Dashboard
Double-click on the 7i icon found on the desktop. After double-clicking, you will see the logon screen. If you do not have an icon to access 7i you should contact the help desk and request that it gets set up. You can also get access by going to http://ifas79.nsd.org.
Type in your IFAS Username (8 characters max – all lowercase)
Typically the first letter of your first name and first 7 letters of your last name.
Type in your assigned IFAS Password (mixture of uppercase, lowercase, and special characters)
Click on the “Login” button or press return/enter key.
Within a few seconds you will see your dashboard.

4
IFAS Dashboard – Home Page
This is the screen that you will see when you login to 7i. Above is a sample dashboard for Arrowhead Elementary. When you login, you will see your school’s dashboard. Dashboards will look slightly different for other groups of employees based on their job duties. Your dashboard should display things that are pertinent to your job in Bi-Tech. WorkFlow Tasks: Any transactions that require your attention in Bi-Tech will come to you through workflow. This will be where you will approve purchase order requests.

5
How to Run a Report There are two ways to run reports:
1. From your dashboard Frequently used reports are on the “home” page of your dashboard. Click on a report name that you want to run. A prompt box will appear with information defaulted into the prompts.
You don’t need to change the prompts to get information on your school. The Account Code prompt is defaulted with your schools first three digits. This will run the report on all of your schools accounts. However, you may want to change the prompts if you wish to view more specific data.
Once the prompts are complete, click on “Submit” or hit the “Enter” key to run the report.
6
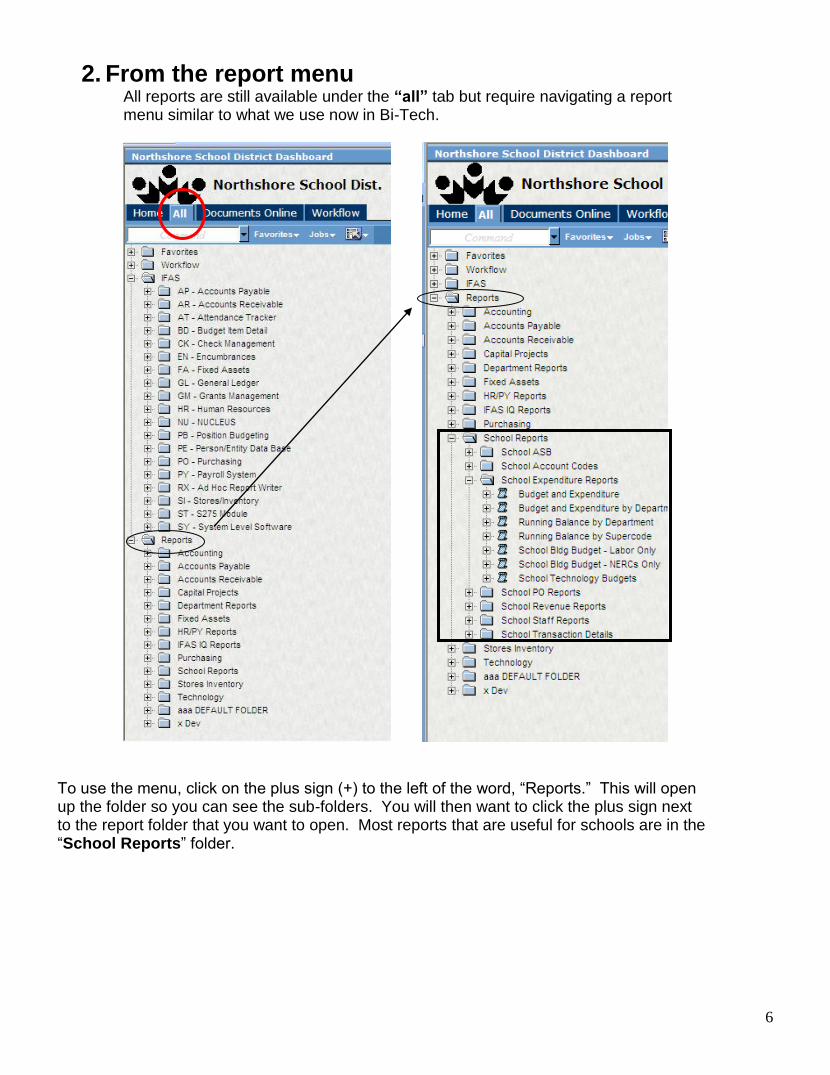
2. From the report menu All reports are still available under the “all” tab but require navigating a report menu similar to what we use now in Bi-Tech.
To use the menu, click on the plus sign (+) to the left of the word, “Reports.” This will open up the folder so you can see the sub-folders. You will then want to click the plus sign next to the report folder that you want to open. Most reports that are useful for schools are in the “School Reports” folder.

7
The report prompts show up on the far right so it can be difficult to know which prompt you are filling out. To help, you can click on the prompt name and tab over to the prompt field to make your entries. This will also highlight which prompt you are working on as shown below.
Once you’ve completed the prompts, click “Submit” or hit the “Enter” key to run the report.

8
Rules for Report Prompts 1. Bi-Tech report prompts ONLY recognize upper case user input. It may be helpful to
press your Caps Lock key in the down position before running reports.
2. All of the prompts must have something entered, they can’t be left blank. You’ll notice that many prompts contain wild cards “*” (also known as “splats”). This means it will include everything for the selection criteria.
3. Make sure that if the report prompt fields contain wild cards “*” that at least one field has actual data input (for instance, an account code or a PO #) or the report will run against the whole database and will take a long time to run. Most of the reports are set up w/ a default value in one of the prompts to avoid this scenario.
4. If you run a report and no data are returned, it can be for various reasons. - invalid account code - wrong date - lower case input - occasionally a report “breaks” either due to a change in the fiscal year or a Bi-tech
upgrade. Please contact the help desk or one of us if a known report suddenly stops working.
Tips for Prompts
1. Start Date and End Date: In most prompts the start date is the first day of the current fiscal year. The end date is usually the day that you are running the report. You can use different dates by typing them in or selecting the calendar to the right of the prompt. To run reports on past fiscal years you want to select the first day of the fiscal year (FY 2008-09 would be 9/1/2008) for the start date and the last day of the fiscal year (FY 2008-09 would be 8/31/2009) for the end date. The reports don’t run properly when you try to combine more than one fiscal year. They also don’t run if you try to use a wild card “*” in the date prompt.
2. Account Code: Usually this is the prompt that you want to have something entered so that you are getting information that pertains to your school. Account codes are 10 digits long but to run a report on all accounts for a particular school you only need to enter the first three digits and a wild card “*.” For example, 001* will give you information on all Arrowhead Elementary Account Codes.
3. Pick Lists: Sometimes you’ll see an ellipsis (…) next to the right of a prompt. This allows you to choose from a variety of options.

9
Navigating 7.9 Reports
Takes you to the beginning of the report
Move back a page
Move forward a page
Takes you to the end of the report
Tells you how many pages are in the report and what page you are on
Saving Reports as Adobe PDF Document Unlike old Bi-Tech reports, 7i Reports can be saved as a PDF document on your computer. Just remember that information is always being updated in 7i. If you need accurate, up-to-date information it is always a good idea to run a new report. Saving a report as PDF can be useful for reviewing historical data, however, you can always change the date prompts to get the same information.
To save a report as a PDF Document: 1. First run the report that you’d like to save. 2. Click on the Adobe PDF Icon at the top of the report.
3. Clicking on the icon takes you to the PDF version of the document. 4. Click on “Save a Copy” Icon
5. Change the document name and select where you want it to save

10
Printing 7i Reports There are two ways to print reports:
1. Click on the options button and select print.
2. Click on PDF Icon and print from the PDF document by clicking the printer icon.
then
Sending 7i Reports to Excel
Click on the options button
Highlight “Export” and the select “Excel”
This will send a report to Excel so that you can manipulate the data. The only issue with sending a report to Excel is that it will require quite a bit of formatting (deleting columns and rows, adjusting cell width, etc.):
11
Drilling Down on Reports
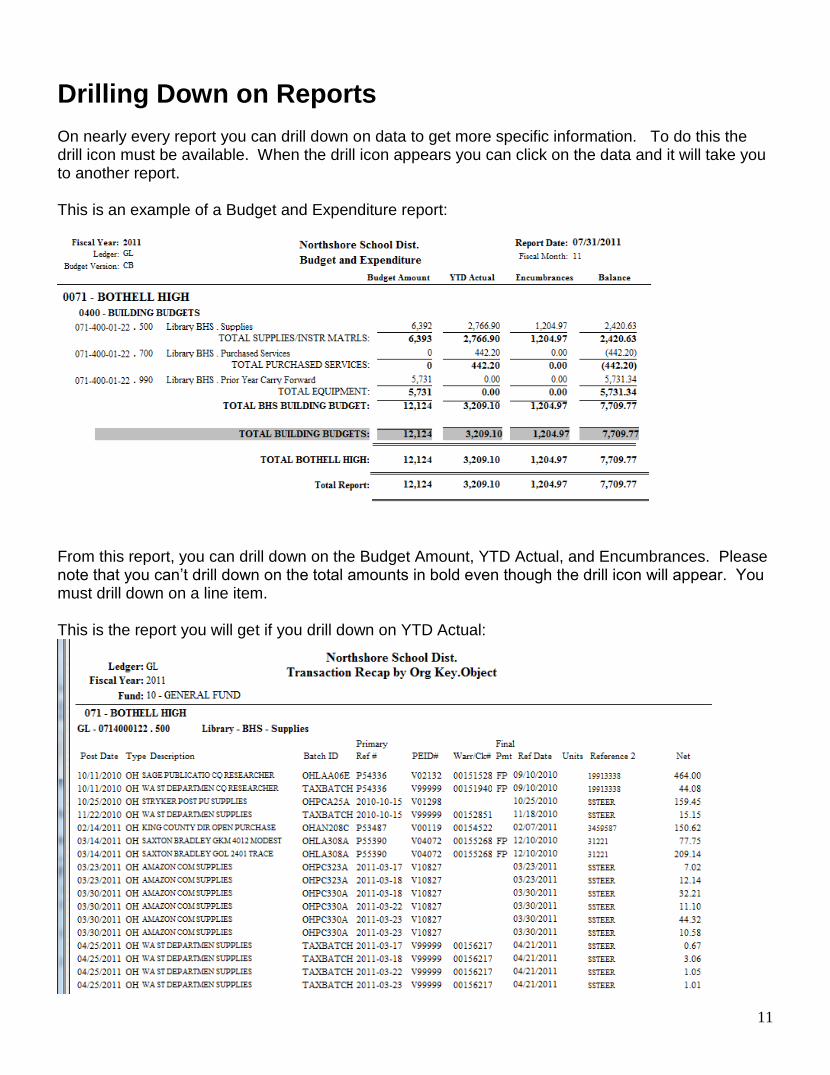
On nearly every report you can drill down on data to get more specific information. To do this the drill icon must be available. When the drill icon appears you can click on the data and it will take you to another report. This is an example of a Budget and Expenditure report:
From this report, you can drill down on the Budget Amount, YTD Actual, and Encumbrances. Please note that you can’t drill down on the total amounts in bold even though the drill icon will appear. You must drill down on a line item. This is the report you will get if you drill down on YTD Actual:

12
Viewing Attachments
From the Transaction Recap Report you can drill down on the Primary Reference (the PO#) to view a Purchase Order Status report as shown below:
From this report you can drill down on the invoice # from the Purchase Order Status Report (POST) to get an attachment of the invoice (circled above). You can also drill down on the invoice number in “Reference 2” on the Transaction Detail Report to see an image of the invoice attachment. You can view an attachment whenever you see the “camera” when you highlight the invoice in Reference 2. Not everything in “Reference 2” will allow you to see an attachment.
.

13
Help Running Reports You are always welcome to contact me if you need help running a report: Chris Brenengen (425) 408-7633. If you have problems running a report and need to call me or the help desk, it will be helpful to have the report ID that is in caps with underscores. You can find the report id by hovering over the report name with your mouse. I’ve include the report id for all of the frequently used reports that are on your dashboard.
You can also find the report name at the bottom of every report.

14
Frequently Used Reports – School Dashboard
All POs by # PO_ALL_SUMM_PO_NUMBER_NSD_NEW
Use this report to list all PO’s sorted by PO number. Use these reports to determine the status of any PO (open, partially paid, or fully paid). Use as a quick reference to determine whether follow up is necessary.
In this example I’ve selected account # 022* and all vendors that start with “N.” This will show me all PO #’s for Hollywood Hill that start with the letter “N”.

15
ASB Account Balance
ASB_FundBalTsf_kr
This report tells you the fund balance for ASB accounts. It shows the beginning balance, revenues, transfers in/(out), expenditures, encumbrances, and ending fund balance.
In this example I’ve selected all of Kenmore Junior High’s ASB accounts by entering 42* for the Account Code.

16
Budget and Expenditures
GL_SCHL_DTL_NO_PGBRK_SCHLDEPT_NEW Use this report to find the balance of your budgets or a subset of budgets. Drill down for additional details (budget, actual, or encumbrances).
The Start Date defaults to the start of the fiscal year (always September 1st). End Date defaults to the current date. You may change these dates to get prior year info. In this example I’ve entered 009* to view Lockwood Elementary.
You may drill down on the Budget Amount, YTD Actual, or the Encumbrances column to get the details of the transactions that add up to the value displayed.

17
Budget Only by Account Code GL_DEPT_EXP_NOENC_RESP_WPGB_RR This report will display only the budget amounts (no expenditures and encumbrances).
In this example I entered “071*” for the account code to view the budgets for Bothell High School.
Result:

18
Budget Transfers BU_BUDGET_TRANSFERS_NSD_NEW2 This report shows the transactions that make up the budget amount. It is the same as if you “drilled down” on the budget amount in a Budget and Expenditure report, however, unlike the single drill down it can be run on multiple account numbers. This report is useful for finding budget adjustments that have been made to your account(s). This report will show you the beginning balance for an account code and any increases or (decreases) that have been made to the budget.
In this example I changed the Account Code to 0154000127 to see any budget adjustments made to Kokanee’s building budget.

19
Running Balance by Department GL_RUNNING_BAL_DEPT_NSD_021109
This report resembles a checkbook. This report lists detail budget, revenues, expenditures, and encumbrances for any given account number. It’s as if you’ve run a Budget and Expenditure report and “drilled down” on every field. (Please note: this report has difficulties displaying use tax. We have not yet been able to fix this glitch).
In this example I changed the account code to 0670320127. This will show you information for Sorenson’s Certificated Building Inservice account.

20
School Bldg Budget – Labor Only GL_SCHL_LABOR
This report will only show labor costs for your building budget. This report will not show mandatory benefits associated with these costs.
In this example I ran the report on Hollywood Hills.

21
School Bldg Budget – NERCs Only GL_SCHL_NERC_BLDGBUD_ONLY_NEW This report will only show non-employee related costs for your building budget.
This is an example for Lockwood Elementary school.

22
School Revenue Transaction Detail by Department
GL_TRX_REVENUE_NEW Use this report to find details of transactions that make up the revenue totals for your school accounts. This will display all revenue transaction details (while the drill down in the “Revenue by District Program: report will display one line item at a time).
In this example we are looking at the revenue transactions for Kokanee’s Community Partnership account.

23
School Technology Budgets JL_SCH_TECH_BUDG_NSD_NEW
School technology projects are funded from the capital projects fund, not the general fund. In general, you will not see this account information in the other reports that you run. This report shows the budget, expenditures, encumbrances, and balance in the school’s technology accounts.
In this example we are looking at Canyon Creek’s Technology Account.
24
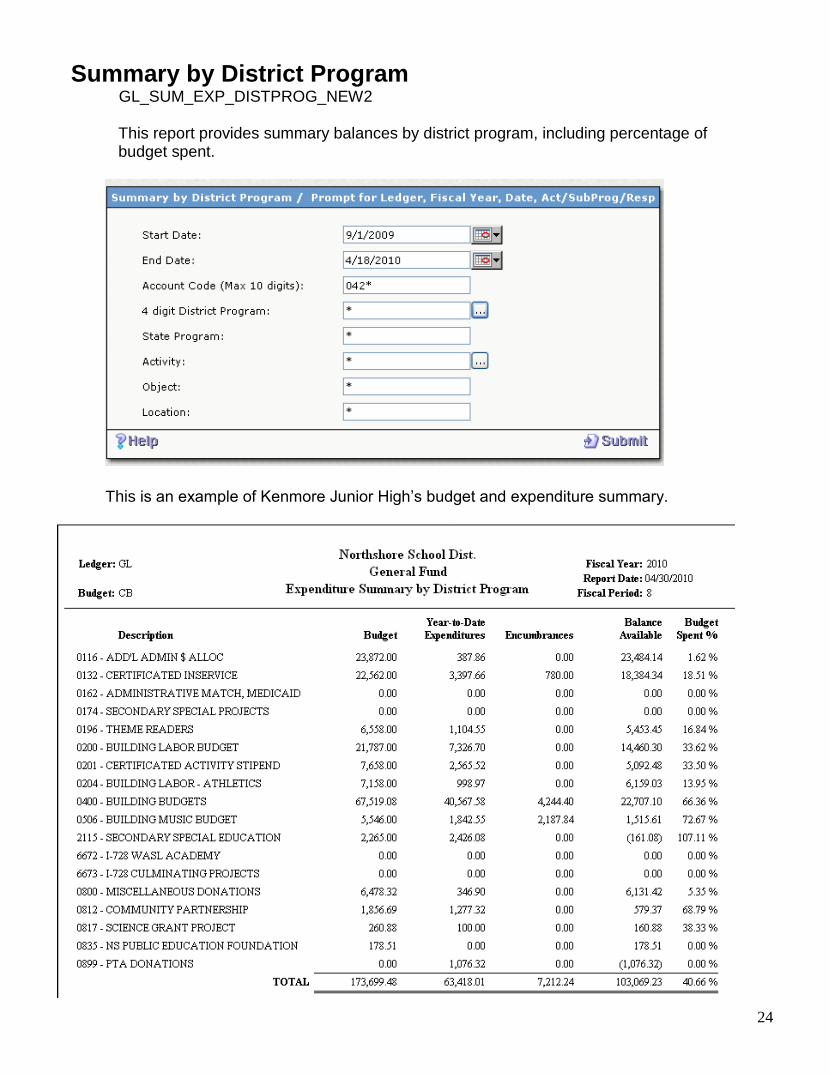
Summary by District Program GL_SUM_EXP_DISTPROG_NEW2
This report provides summary balances by district program, including percentage of budget spent.
This is an example of Kenmore Junior High’s budget and expenditure summary.

25
Transaction Detail by PEID # GL_TRAN_DTL_PEID_KEY_OBJ_NEW PEID stands for Person/Entity Identification. IDs are assigned to all employees and vendors (any person or entity that the Northshore School District makes payments to), as well as for customers who make payments to us. This report shows all payments or receipts, for all account #s, for the selected time frame.
This is an example of all transactions for Pacific Northwest Supplies, PEID # V22623, at Hollywood Hills Elementary.