introduction to ansys designmodeler - mr-cfd to ansys...© 2012 ansys, inc. june 13, 2013 5 release...
TRANSCRIPT

© 2012 ANSYS, Inc. June 13, 2013 1 Release 14.5
14. 5 Release
Introduction to ANSYS DesignModeler
Workshop 1 DesignModeler Basics

© 2012 ANSYS, Inc. June 13, 2013 2 Release 14.5
Introduction
Background
• This workshop assumes little or no prior experience of DesignModeler. Basic principles will be demonstrated through the creation of a simple pipe intersection.
Objectives
• Creating a Workbench project
• Starting DesignModeler
• Creating a sketch
• Creating 3d geometry
• Updating and modifying geometry
• GUI navigation
• Saving the project

© 2012 ANSYS, Inc. June 13, 2013 3 Release 14.5
Project Startup
Create the Project
• Start Workbench.
– Start All Programs ANSYS 14.5 Workbench 14.5
– Expand Component Systems and drag and drop a Geometry component system into the Project Schematic.
– Double click on the Geometry cell (A2) to start DesignModeler.

© 2012 ANSYS, Inc. June 13, 2013 4 Release 14.5
Starting the DesignModeler Session
Set Units
• When starting a new DesignModeler session the application will first require you to specify units.
• In this session we will be using inches.
• In the Units specification box select Inch.
• Click OK.

© 2012 ANSYS, Inc. June 13, 2013 5 Release 14.5
Preparation
Planning
• Before starting it’s a good idea to think about how the geometry can be defined in terms of sketches and modelling operations.
– Sketches are 2D entities. 3D Geometry is created by applying modelling operations using the sketches as input.
• This basic geometry can be defined by two simple sketches centred about the global origin.
• The larger of the two can then be extruded vertically whilst the smaller extruded horizontally.

© 2012 ANSYS, Inc. June 13, 2013 6 Release 14.5
Sketch Creation
Create a Sketch
• In the Tree Outline, select the XY Plane.
• Click the Look At button in the toolbar.
• Select the Sketching Mode Tab.
– This will display the Sketching Toolboxes
• Clicking on each bar displaying the name of each Toolbox will activate it and display the available tools.
• Select the Draw Toolbox.

© 2012 ANSYS, Inc. June 13, 2013 7 Release 14.5
Sketch Creation
Create a Sketch (Continued)
• Select the Circle Tool.
– When any sketching tool is selected the information bar provides instructions.
1. Move the cursor over the origin until a letter ‘P’ appears then click once (‘P’ is a point constraint).
2. Move the cursor away from the origin to define the radius and click once again.
• Don’t worry about the exact size, dimensions are added in a separate step.
• You can use the Undo button if you make a mistake.
1 2

© 2012 ANSYS, Inc. June 13, 2013 8 Release 14.5
Sketch Creation
Adding Dimensions
• Select the Dimensions Toolbox
• Make sure the General tool is selected.
• Following the sequence shown below.
1. Click once on the circle edge.
2. Move the cursor away and click once again to set the position of the dimension.
1 2
© 2012 ANSYS, Inc. June 13, 2013 9 Release 14.5
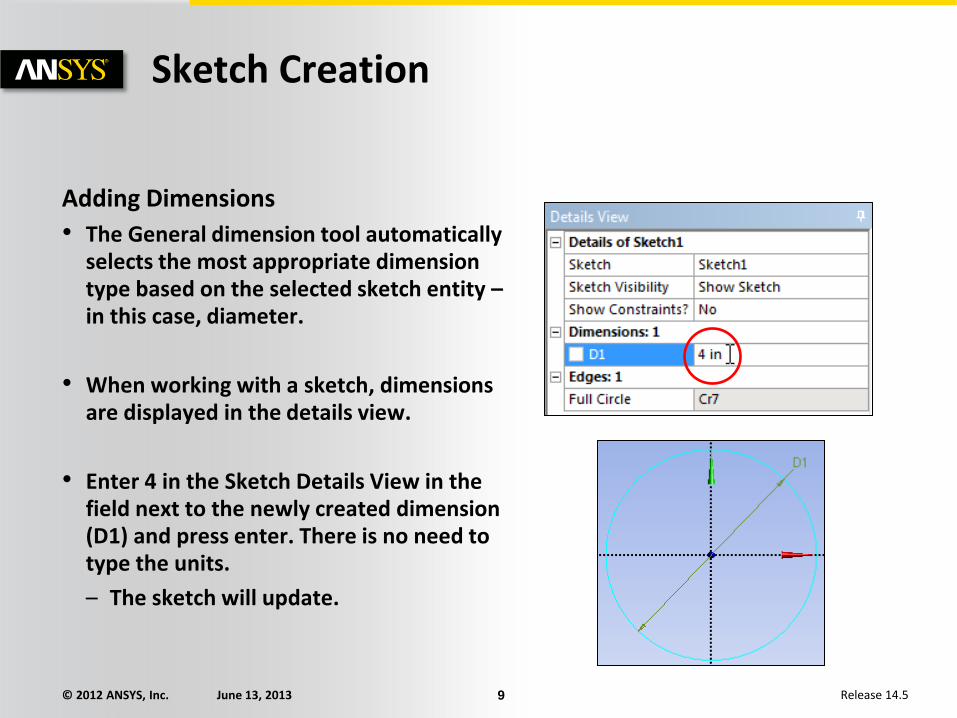
Sketch Creation
Adding Dimensions
• The General dimension tool automatically selects the most appropriate dimension type based on the selected sketch entity – in this case, diameter.
• When working with a sketch, dimensions are displayed in the details view.
• Enter 4 in the Sketch Details View in the field next to the newly created dimension (D1) and press enter. There is no need to type the units.
– The sketch will update.

© 2012 ANSYS, Inc. June 13, 2013 10 Release 14.5
Sketch Creation
Create the Second Sketch
• Click the ISO ball on the axis triad to snap to the isometric view.
• We can see that the larger circle must be created on the ZX Plane.
• Change the Active Plane to the ZX Plane using the drop down box.
– The view will automatically orientate.

© 2012 ANSYS, Inc. June 13, 2013 11 Release 14.5
Sketch Creation
Create the Second Sketch
• Create a circle centred on the ZX Plane origin and add a dimension using the same procedure as before. As a reminder;
– Select the Draw Toolbox.
– Select the Circle tool.
– Click on the origin, then click to define the radius.
– Select the Dimension Toolbox.
– Select the General tool.
– Click on the circle then click to position the dimension.
• Set the Dimension to 6 and select the Modeling Mode tab.

© 2012 ANSYS, Inc. June 13, 2013 12 Release 14.5
Modeling Operations
View Both Sketches
• Expand both the XY and ZX Planes in the Tree Outline as shown.
• The two sketches you have just created are listed below their respective planes.
– By default only the last active sketch is displayed. Right click on each sketch in the Outline Tree and select “Always Show Sketch” to ensure both are displayed.
• Select the isometric view by clicking the iso ball.
• Check you have two sketches orientated as shown.

© 2012 ANSYS, Inc. June 13, 2013 13 Release 14.5
Modeling Operations
Add a Modeling Feature
• Click on Sketch 1 in the Tree Outline and select the Extrude feature from the Create menu.
– The Extrude command will be inserted into the Tree Outline.
– Commonly used features also have shortcut buttons in the toolbar.

© 2012 ANSYS, Inc. June 13, 2013 14 Release 14.5
Modeling Operations
Add a Modeling Feature (Continued)
• In the Details View set the extrusion depth to 14.75 leaving all other fields set at default values.
• Click Generate.

© 2012 ANSYS, Inc. June 13, 2013 15 Release 14.5
Modeling Operations
Add a Modeling Feature (Continued)
• Now we’ll create the longer section by extruding the second sketch.
• Click on Sketch 2 in the tree and select the Extrude feature again from the create menu or toolbar.
– Because the sketch lies in the middle of the required geometry we’ll need to extrude it symmetrically by an equal distance.
• In the Details View set Direction to ‘Both Symmetric’ by clicking in the field and using the drop down box.
• Set the extrusion depth to 14.
• Click Generate.

© 2012 ANSYS, Inc. June 13, 2013 16 Release 14.5
Notes
• The geometry is now complete
• The following slides will demonstrate how DesignModeler processes changes to sketch dimensions and general GUI operations.
Review

© 2012 ANSYS, Inc. June 13, 2013 17 Release 14.5
Modifying the Geometry
Edit a Sketch Dimension
• Select Sketch 1 in the Tree Outline.
• In the Details View change the dimension to 2, press enter.
– Note that the sketch updates in the Graphics Window but the Geometry remains the same.
– When a change is made like this any dependent features downstream in the Tree Outline will require regeneration – denoted by the generate symbol.
• Click Generate.
• Reset the dimension to 4 and Generate to restore the geometry.

© 2012 ANSYS, Inc. June 13, 2013 18 Release 14.5
Using the GUI
Controlling the View
• Use the Axis Triad to quickly align views.
• Select +Z.
• Selecting the opposite side of the any axis will align the view to the reverse normal – select –Y as shown.
• Click the View Back button.
– This will restore the previous view.
• Restore isometric by click the iso ball.

© 2012 ANSYS, Inc. June 13, 2013 19 Release 14.5
Using the GUI (2)
Rotating & Zooming
• Set the cursor to Rotate.
• Click once on the geometry surface approximately where indicated.
– The red ball indicates the new rotation origin location.
• The model will now rotate around this point.
• Use the box zoom button to zoom in as shown.
• Right click in the Graphics Window, select Zoom to Fit to restore the default zoom level. Use the iso ball to set the view to isometric.

© 2012 ANSYS, Inc. June 13, 2013 20 Release 14.5
Using the GUI (3)
Hiding Faces
• Set the Selection Filter to Faces.
• Select the face as shown.
• Right click, Hide Face(s).
• To restore, right click, Show all Faces.
• Spend some time practising using the view manipulation tools demonstrated over the last few slides.
• With larger, complex models proficiency with the viewing controls will make tasks much easier.

© 2012 ANSYS, Inc. June 13, 2013 21 Release 14.5
• This completes the workshop.
• From the main menu select File Close DesignModeler
– Workbench will save any application data.
• From the Workbench Project Page use the file menu and save the project as “DMWS1.wbpj” to your working folder.
Saving the Project