introduction to data templates and value … to data templates and value converters in silverlight 3...
TRANSCRIPT

Introduction to Data Templates and Value Converters in Silverlight 3
An overview of Data Templates and Value Converters by JeremyBytes.com
OverviewBusiness applications are all about data, and laying out that data is critical to creating a good user experience. Fortunately, Silverlight 3 has several tools, including Data Templates and Value Converters, that make this easier for the business application developer to manage. Today we’ll take a look at consuming a WCF service and creating the layout of the data. By the time we’re done, you should have a good understanding of the basics of Data Templates and Value Converters.
The Set UpWe’ll start with a skeleton of a Silverlight 3 project that contains a WCF service. You can download the source code for the application here: http://www.jeremybytes.com/Downloads.aspx. The download includes the starter application and the completed code. The starter application contains the following.
ProjectsThe solution contains 2 projects. DataTemplatesAndConverters is the Silverlight 3 project; DataTemplatesAndConverters.Web is the aspx hosting application. These were both created by choosing new “Silverlight Application” and then opting to “Host the Silverlight application in a new Web site” (the default value).
UpdatesIn the Silverlight application, I made a few modifications to MainPage.xaml user control. Here’s what we’re starting with:
<UserControl x:Class="DataTemplatesAndConverters.MainPage" ... mc:Ignorable="d" d:DesignWidth="640" d:DesignHeight="480" Height="400" Width="500"> <Border x:Name="LayoutRoot" Padding="5" BorderBrush="Black" BorderThickness="2" Background="White"> <Grid> <Grid.ColumnDefinitions> <ColumnDefinition Width="*" /> <ColumnDefinition Width="*" /> </Grid.ColumnDefinitions>
</Grid> </Border></UserControl>
Data Templates & Value Converters presented by JeremyBytes.com©Jeremy Clark 2010 Page 1
In the Web application, I added a WCF Service called PersonService. This has the following interface (as defined in IPersonService.cs):
[ServiceContract] public interface IPersonService { [OperationContract] List<Person> GetPeople(); }
public class Person { public string FirstName; public string LastName; public DateTime StartDate; public int Rating; }
This is a simple service that defines a Person object with 4 properties and a single operation to get a list of Person objects. The service implementation is a hard-coded list in PersonService.cs (you can check the downloaded code for details). Obviously a real scenario would have more interesting data access. But we are focusing on the data display here.
A few more notes on the Web application: I updated the Web.config so that the WCF service is using basicHttpBinding (rather than wsHttpBinding). I also set DataTemplatesAndConvertersTestPage.aspx to be the startup page in the project.
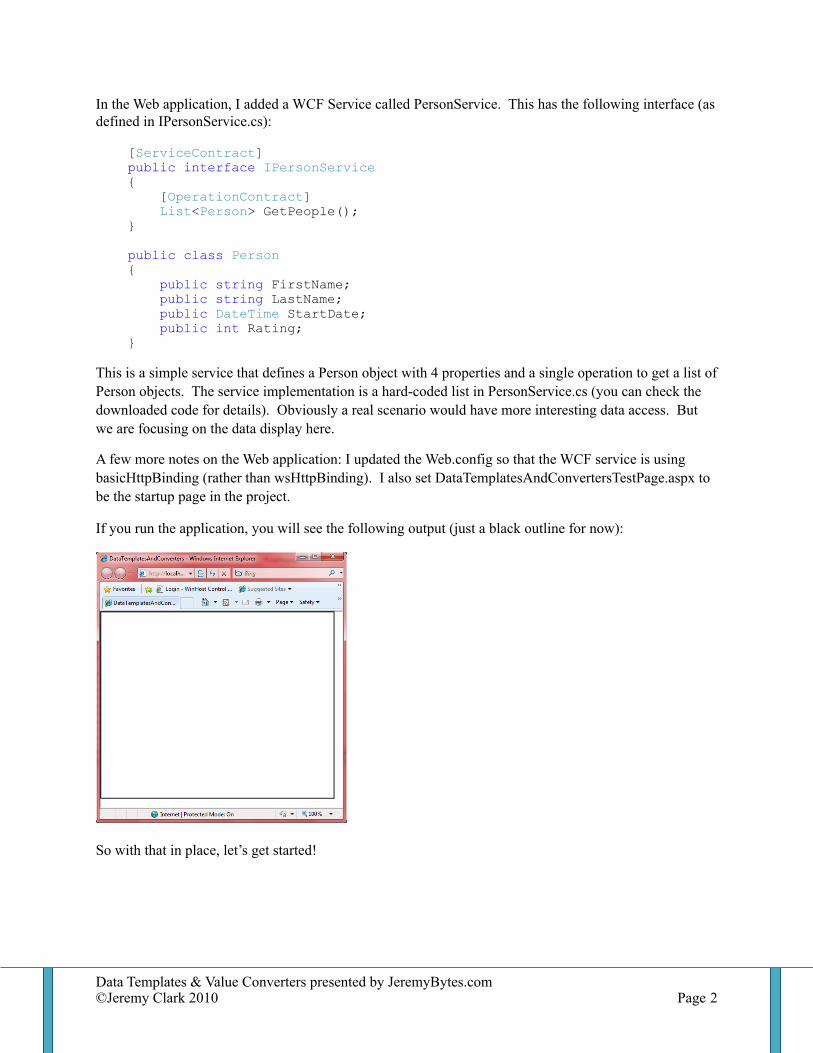
If you run the application, you will see the following output (just a black outline for now):
So with that in place, let’s get started!
Data Templates & Value Converters presented by JeremyBytes.com©Jeremy Clark 2010 Page 2

Connecting the ServiceFirst, we’ll add a reference to the WCF service in our Silverlight application. Right-click on the References folder and select “Add Service Reference.” In the dialog, click the “Discover” button, and it will search the solution for available services. It will find the PersonService. Now, we just fill in the Namespace (we’ll use “PersonService”). The dialog should look like the following:
Now we just click “OK”, and we’ll get a Service Reference and a ServiceReferences.ClientConfig. Now our service is available to us in our application. Let’s set up some UI elements.
Adding a ListBoxWe’ll go to our MainPage.xaml and add a ListBox for us use for data display. Here’s a snippet of the XAML:
<Grid> <Grid.ColumnDefinitions> <ColumnDefinition Width="*" /> <ColumnDefinition Width="*" /> </Grid.ColumnDefinitions>
<ListBox x:Name="PersonList" Grid.Column="0" Margin="5" DisplayMemberPath="FirstName" BorderBrush="Green" BorderThickness="2"> </ListBox>
</Grid>
Data Templates & Value Converters presented by JeremyBytes.com©Jeremy Clark 2010 Page 3
Let’s take a look at the properties we set here.
• x:Name=”PersonList” – A name for the control that we can reference elsewhere in our XAML and in our code.
• Grid.Column=”0” – Denotes that this will be in the first column (we’ll use the second column for a Details section later on).
• Margin=”5” – Gives us a little spacing.• DisplayMemberPath=”FirstName” – Denotes which property we want to display in our list.• BorderBrush=”Green” BorderThickness=”2” – Sets up a border around the list.
Now that we have somewhere to put our data, let’s populate the box.
Fetching the DataIn the code-behind (MainPage.xaml.cs), we’ll start by adding a reference to our Service namespace: “using DataTemplatesAndConverters.PersonService;” We want to fetch the data right when we start up, so we would normally think about adding this to the constructor of our user control. A best practice for adding things you want to run at start up is to hook up the “Loaded” event handler.
After the “InitializeComponent()” call, just start typing “Loaded +=”. Visual Studio IntelliSense will offer to create a new event handler. If you press Tab twice, it will add the reference and generate the stub.
public MainPage() { InitializeComponent(); Loaded += new RoutedEventHandler(MainPage_Loaded); }
void MainPage_Loaded(object sender, RoutedEventArgs e) { throw new NotImplementedException(); }
In the Loaded handler, we’ll create our service proxy and call our service. This consists of 3 steps.
1. Create a proxy:
var proxy = new PersonServiceClient();
2. Hook up the service Completed event handler / callback. As above, we’ll let Visual Studio create the reference and stub for us:
proxy.GetPeopleCompleted += new EventHandler<GetPeopleCompletedEventArgs>(proxy_GetPeopleCompleted);
3. Call the Async method to kick off the method:
proxy.GetPeopleAsync();
This will start the call to the WCF service asynchronously (as all Silverlight calls are). When the service call returns, the Completed event handler / callback will run. When it does, we’ll just use the result of the
Data Templates & Value Converters presented by JeremyBytes.com©Jeremy Clark 2010 Page 4

service as the ItemSource of our list box. As a final step, we’ll set the selection to the first item in the list (the reason for this will be apparent in a bit). Here’s the code in its entirety:
public MainPage() { InitializeComponent(); Loaded += new RoutedEventHandler(MainPage_Loaded); }
void MainPage_Loaded(object sender, RoutedEventArgs e) { var proxy = new PersonServiceClient(); proxy.GetPeopleCompleted += new EventHandler<GetPeopleCompletedEventArgs>( proxy_GetPeopleCompleted); proxy.GetPeopleAsync(); }
void proxy_GetPeopleCompleted(object sender, GetPeopleCompletedEventArgs e) { PersonList.ItemsSource = e.Result; PersonList.SelectedIndex = 0; }
Based on this, here is our output:
Our output shows the FirstName field from our Person objects (what we specified in the DisplayMemberPath property of the list box). As you can see, the output is not very useful, especially considering that 3 of the people on the list have the first name of John.
Data Templates & Value Converters presented by JeremyBytes.com©Jeremy Clark 2010 Page 5

An Initial Data TemplateSo, let’s get started with using a Data Template. Let’s look at the XAML, then walk through it.
<ListBox x:Name="PersonList" Grid.Column="0" Margin="5" BorderBrush="Green" BorderThickness="2"> <ListBox.ItemTemplate> <DataTemplate> <TextBlock Text="{Binding FirstName}" /> </DataTemplate> </ListBox.ItemTemplate> </ListBox>
We added an ItemTemplate to the ListBox. This contains a DataTemplate, and the DataTemplate contains a TextBlock that is bound to the FirstName property. An important note: we removed the “DisplayMemberPath” property that we specified previously. ItemTemplate and DisplayMemberPath are mutually exclusive. If you try to specify both, you will get a compiler error.
If you run the application now, you’ll see that we get the same output as we did previously. But here’s the cool part: we can now put whatever we want into the DataTemplate.
A More Useful Data TemplateThe DataTemplate can only have a single child element. This means that in order to add more than one item, we need to have some sort of container to put them in. For ListBoxes, StackPanels work quite well, but you can use whatever type of container you like. Here’s a more useful DataTemplate:
<DataTemplate> <StackPanel> <StackPanel Orientation="Horizontal"> <TextBlock Text="{Binding FirstName}" FontWeight="Bold" FontSize="14" /> <TextBlock Text=" " /> <TextBlock Text="{Binding LastName}" FontWeight="Bold" FontSize="14" /> </StackPanel> <StackPanel Orientation="Horizontal"> <TextBlock Text="{Binding StartDate}" FontWeight="Bold"/> <TextBlock Text=" - Rating: " /> <TextBlock Text="{Binding Rating}" FontWeight="Bold"/> </StackPanel> </StackPanel> </DataTemplate>
Using some nested StackPanels (some vertical (default) and some horizontal), we end up with 2 lines. The first line contains the First Name and Last Name properties separated by a space. The second line contains the Start Date and Rating properties (along with a little separating text).
If you run the application now, you can see that our list box is much more useful.
Data Templates & Value Converters presented by JeremyBytes.com©Jeremy Clark 2010 Page 6

However, even though the layout is better, I would like to make some updates to how the data comes out – specifically the date format and the rating format. This is where we’ll use Value Converters.
Creating a Value ConverterInstead of showing the complete Start Date property, I just want to display the decade: 1950s, 1960s, 1970s, etc. We will do this with a Value Converter. The Value Converter is simply a way to convert one value to another. In this particular case, we will convert a date to a decade string.
To create a Value Converter, we just create a class that implements the IValueConverter interface. The interface consists of 2 methods: Convert and ConvertBack. Convert is used for conversion to the display format; ConvertBack is used to convert the display format back to the underlying value (such as for data entry). We’ll look at Convert now and ConvertBack in just a little bit.
Let’s go step by step in creating a decade Converter for the Start Date property. In the Silverlight project, add a new Class. We’ll be using the same file to hold all of our converters (4 all together), so we will just call it “Converters.cs”. Then in the file, we’ll rename the “Converters” class to “DecadeConverter” and add the IValueConverter interface. IValueConverter is in the System.Windows.Data namespace, so you’ll need to add this to the “using” block as well.
We’ll let Visual Studio help us implement the interface. Just right-click on “IValueConverter” and select “Implement Interface” and then “Implement Interface” again. This will create the stubs for the Convert and ConvertBack methods. Let’s look at our completed code:
Data Templates & Value Converters presented by JeremyBytes.com©Jeremy Clark 2010 Page 7

public class DecadeConverter : IValueConverter { #region IValueConverter Members
public object Convert(object value, Type targetType, object parameter, System.Globalization.CultureInfo culture) { int year = ((DateTime)value).Year; return string.Format("{0}0s", year.ToString().Substring(0, 3)); }
public object ConvertBack(object value, Type targetType, object parameter, System.Globalization.CultureInfo culture) { throw new NotImplementedException(); }
#endregion }
The “value” parameter is the underlying property value. In our case, this is the Start Date property and is of type DateTime. Since the parameter is of type object, the first thing we need to do is cast it to a DateTime. From here, we’ll extract the year and create a variable.
The next step in our method is using a string.Format method that takes a year, such as “1956” and turns it into a decade, such as “1950s”. We could have also done this all in one line of code, but I think we would be heading for some serious obfuscation there.
ConvertBack is not implemented since we are only doing a one-way conversion. We’ll look at a converter that does two-way conversion a little later.
Using the Value ConverterNow that we have the DecadeConverter, how do we use it? There are 3 steps (all in our XAML). First, we need to add a reference to the namespace with the converters, next we add the converter as a static resource, then we reference the converter in our binding statement. So, let’s walk through these.
To add the namespace to our user control, we’ll let Visual Studio do most of the work. In the markup for the User Control, we’ll type “xmlns:local=”. IntelliSense will pop up a list of namespaces for us to use. You’ll see that the first one is “DataTemplatesAndConverters”, the one that we’re looking for.
Then we need to add the Static Resource:
<UserControl x:Class="DataTemplatesAndConverters.MainPage" ... xmlns:local="clr-namespace:DataTemplatesAndConverters" ...> <UserControl.Resources> <local:DecadeConverter x:Key="myDecadeConverter"/> </UserControl.Resources>
Data Templates & Value Converters presented by JeremyBytes.com©Jeremy Clark 2010 Page 8

Finally, we reference the Value Converter in our binding statement for the Start Date:
<TextBlock Text="{Binding StartDate, Converter={StaticResource myDecadeConverter}}" FontWeight="Bold"/>
The syntax does look a little strange at first since there are nested braces, but if you look a little more closely, you’ll see that the Binding is simply referencing the Path (StartDate) and Converter. It just so happens that the Converter references a Static Resource.
Running the application now will give the following results:
While we’re here, let’s add another converter called “RatingConverter” which will update how the Rating field is output. We’ll add the class to the Converters.cs file that we already have. Here’s the completed code:
public class RatingConverter : IValueConverter { #region IValueConverter Members
public object Convert(object value, Type targetType, object parameter, System.Globalization.CultureInfo culture) { int rating = (int)value; return string.Format("{0}/10 Stars", rating.ToString()); }
Data Templates & Value Converters presented by JeremyBytes.com©Jeremy Clark 2010 Page 9

public object ConvertBack(object value, Type targetType, object parameter, System.Globalization.CultureInfo culture) { throw new NotImplementedException(); }
#endregion }
You can see that this is fairly simple as well. We take the integer value of the rating and turn it into a string such as “7/10 Stars”.
Then we’ll add the static resource:
<UserControl.Resources> <local:DecadeConverter x:Key="myDecadeConverter"/> <local:RatingConverter x:Key="myRatingConverter"/> </UserControl.Resources>
And the Binding:
<TextBlock Text="{Binding Rating, Converter={StaticResource myRatingConverter}}" FontWeight="Bold"/>
And the output:
Moving the Data TemplateBefore we go on, let’s move our Data Template out of the list box markup and into the Resources. This is as simple as moving the “DataTemplate” markup (as a section) into the Resources section and giving it a Key.
Data Templates & Value Converters presented by JeremyBytes.com©Jeremy Clark 2010 Page 10

<UserControl.Resources> <local:DecadeConverter x:Key="myDecadeConverter"/> <local:RatingConverter x:Key="myRatingConverter"/> <DataTemplate x:Key="PersonListTemplate"> <StackPanel> <StackPanel Orientation="Horizontal"> <TextBlock Text="{Binding FirstName}" FontWeight="Bold" FontSize="14" /> <TextBlock Text=" " /> <TextBlock Text="{Binding LastName}" FontWeight="Bold" FontSize="14" /> </StackPanel> <StackPanel Orientation="Horizontal"> <TextBlock Text="{Binding StartDate, Converter={StaticResource myDecadeConverter}}" FontWeight="Bold"/> <TextBlock Text=" - Rating: " /> <TextBlock Text="{Binding Rating, Converter={StaticResource myRatingConverter}}" FontWeight="Bold"/> </StackPanel> </StackPanel> </DataTemplate> </UserControl.Resources>
Now, we just need to modify our ListBox markup to reference the Resource:
<ListBox x:Name="PersonList" Grid.Column="0" Margin="5" BorderBrush="Green" BorderThickness="2" ItemTemplate="{StaticResource PersonListTemplate}"> </ListBox>
The advantage of this is that we can centralize our Data Templates in our application (such as in a Resource Dictionary) and keep our individual pages relatively clean.
Adding a Detail SectionNow, let’s create a detail panel. This will give us an opportunity to set up a couple of interactive controls to see how the two-way converters work. Note: if we really wanted to, we could add these controls to the list box, but it wouldn’t make for a very good user experience.
Here’s the XAML for the detail panel (which is placed under the ListBox inside the Grid):
<!-- Detail Panel --> <StackPanel x:Name="DetailPanel" Grid.Column="1" Margin="5" DataContext="{Binding ElementName=PersonList, Path=SelectedItem}"> <TextBlock Text="First Name: " /> <TextBlock Text="{Binding FirstName}" FontWeight="Bold" FontSize="14"/> <TextBlock Text="Last Name: " /> <TextBlock Text="{Binding LastName}" FontWeight="Bold" FontSize="14"/> <TextBlock Text="Starting Decade: " />
Data Templates & Value Converters presented by JeremyBytes.com©Jeremy Clark 2010 Page 11
<TextBlock Text="{Binding StartDate, Converter={StaticResource myDecadeConverter}}" FontWeight="Bold" FontSize="14"/> <TextBlock Text="Rating: " /> <TextBlock Text="{Binding Rating, Converter={StaticResource myRatingConverter}}" FontWeight="Bold" FontSize="14"/> <TextBlock Text="Rating (Stars): " /> <TextBox Text="{Binding Rating}" FontWeight="Bold" FontSize="14"/> <TextBlock Text="Rating (Slider): " /> <Slider Minimum="0" Maximum="10" Value="{Binding Rating, Mode=TwoWay}" /> </StackPanel>
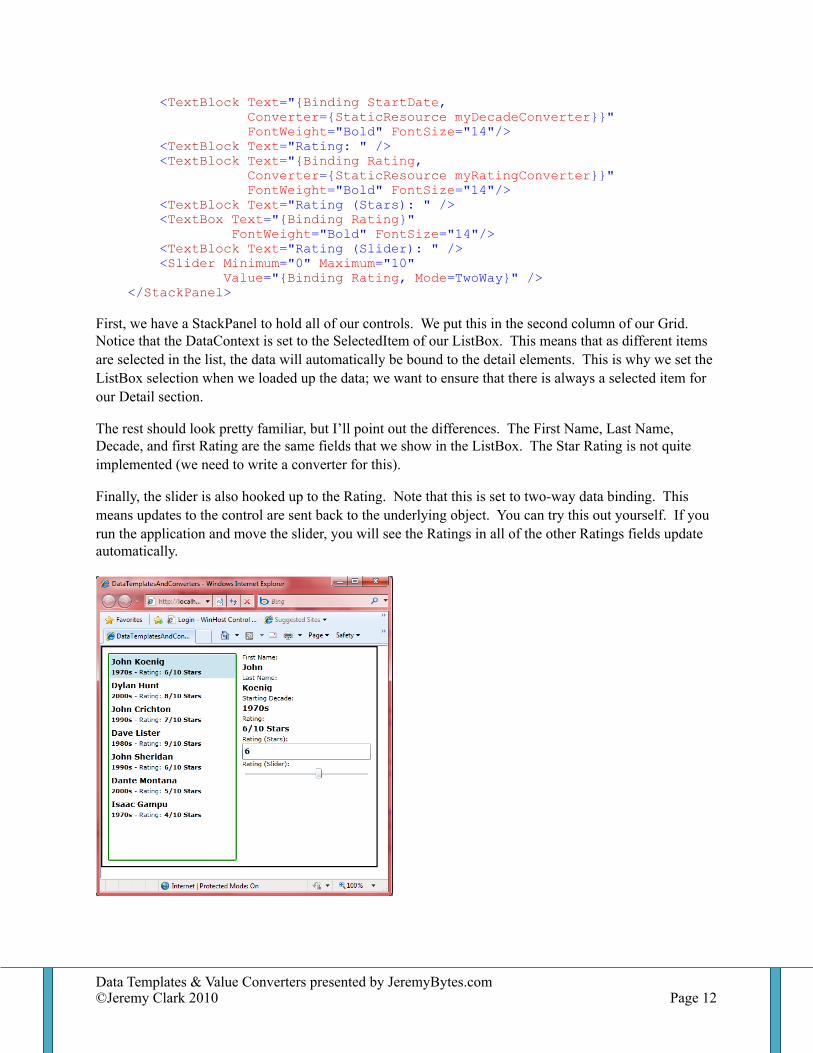
First, we have a StackPanel to hold all of our controls. We put this in the second column of our Grid. Notice that the DataContext is set to the SelectedItem of our ListBox. This means that as different items are selected in the list, the data will automatically be bound to the detail elements. This is why we set the ListBox selection when we loaded up the data; we want to ensure that there is always a selected item for our Detail section.
The rest should look pretty familiar, but I’ll point out the differences. The First Name, Last Name, Decade, and first Rating are the same fields that we show in the ListBox. The Star Rating is not quite implemented (we need to write a converter for this).
Finally, the slider is also hooked up to the Rating. Note that this is set to two-way data binding. This means updates to the control are sent back to the underlying object. You can try this out yourself. If you run the application and move the slider, you will see the Ratings in all of the other Ratings fields update automatically.
Data Templates & Value Converters presented by JeremyBytes.com©Jeremy Clark 2010 Page 12

A Two-Way ConverterFor a two-way converter, we’ll output the rating field as a series of stars (asterisks). We will also use the input from this field to update the rating. First step: create a “RatingStarConverter” in the “Converters.cs” file. Here’s the code:
public class RatingStarConverter : IValueConverter { #region IValueConverter Members
public object Convert(object value, Type targetType, object parameter, System.Globalization.CultureInfo culture) { int rating = (int)value; string output = string.Empty; return output.PadLeft(rating, '*'); }
public object ConvertBack(object value, Type targetType, object parameter, System.Globalization.CultureInfo culture) { string input = (string)value; int rating = 0;
foreach (var ch in input) if (ch == '*') rating++;
return rating; }
#endregion }
What you’ll see here is for the Convert method, we are taking the Rating (integer) and simply building a string that has that number of stars (asterisks).
The ConvertBack is a little more interesting. The goal here is to parse a string for the number of asterisks it contains and put that into the Rating field. The parameters for ConvertBack work like those of Convert. The value parameter is our incoming value (the string with stars), and the return value is the output value (integer).
If you want to get a little fancier in ConvertBack, you can add “using System.Linq;” and use the following code:
string input = (string)value; return input.Count(c => c == '*');
Data Templates & Value Converters presented by JeremyBytes.com©Jeremy Clark 2010 Page 13

Next steps are to add the Resource to the XAML and update the Binding:
<local:DecadeConverter x:Key="myDecadeConverter"/> <local:RatingConverter x:Key="myRatingConverter"/> <local:RatingStarConverter x:Key="myRatingStarConverter"/> ... <TextBlock Text="Rating (Stars): " /> <TextBox Text="{Binding Rating, Mode=TwoWay, Converter={StaticResource myRatingStarConverter}}" FontWeight="Bold" FontSize="14"/>
Notice that we have put the TwoWay Mode on the Star Rating text box as well. Here’s the output:
Now in addition to moving the slider, you can also change the number of stars in the text box and have it affect the ratings. Note: because of the way that data binding works in Silverlight, the text box value is not actually updated until after you exit the box. So, you will need to make changes and then tab out for them to be reflected in the other controls.
Another interesting note: since we are only looking for stars in the text box, we can actually type in whatever we want in the box, but only the ‘*’ characters will get counted in the rating. If we were to fully productionalize this, we would want to put in some error handling to make sure that the user does not put in more than 10 stars, but I’ll leave that as an exercise for the reader.
One Last ThingOkay, so before we leave this, I want to add one last Value Converter and one last update to the Data Template. I want to add a border around each item in the list. And the color of the border should vary with the decade of the Start Date. This means that our converter will be converting from a DateTime to a Brush.
Data Templates & Value Converters presented by JeremyBytes.com©Jeremy Clark 2010 Page 14

First, we’ll create a “DecadeBrushConverter” in our “Converters.cs” file. This is pretty straight forward:
public class DecadeBrushConverter : IValueConverter { #region IValueConverter Members
public object Convert(object value, Type targetType, object parameter, System.Globalization.CultureInfo culture) { int year = ((DateTime)value).Year;
if (year >= 1970 && year < 1980) return new SolidColorBrush(Colors.Green); if (year >= 1980 && year < 1990) return new SolidColorBrush(Colors.Blue); if (year >= 1990 && year < 2000) return new SolidColorBrush(Colors.Red); if (year >= 2000 && year < 2010) return new SolidColorBrush(Colors.Cyan); else return new SolidColorBrush(Colors.Black); }
public object ConvertBack(object value, Type targetType, object parameter, System.Globalization.CultureInfo culture) { throw new NotImplementedException(); }
#endregion }
You can see that here, we’re using a simple if/else statement to determine the decade and then assigning a SolidColorBrush based on that.
For the rest, we’ll add the Static Resource. Then in the DataTemplate, we’ll wrap the whole thing in a Border. We’ll bind the BorderBrush to the StartDate field and specify our new Converter.
<UserControl.Resources> <local:DecadeConverter x:Key="myDecadeConverter"/> <local:RatingConverter x:Key="myRatingConverter"/> <local:RatingStarConverter x:Key="myRatingStarConverter"/> <local:DecadeBrushConverter x:Key="myDecadeBrushConverter"/> <DataTemplate x:Key="PersonListTemplate"> <Border BorderBrush="{Binding StartDate, Converter={StaticResource myDecadeBrushConverter}}" BorderThickness="4" Width="220"> <StackPanel> <StackPanel Orientation="Horizontal"> <TextBlock Text="{Binding FirstName}" FontWeight="Bold" FontSize="14" /> <TextBlock Text=" " /> <TextBlock Text="{Binding LastName}" FontWeight="Bold" FontSize="14" /> </StackPanel> <StackPanel Orientation="Horizontal">
Data Templates & Value Converters presented by JeremyBytes.com©Jeremy Clark 2010 Page 15

<TextBlock Text="{Binding StartDate, Converter={StaticResource myDecadeConverter}}" FontWeight="Bold"/> <TextBlock Text=" - Rating: " /> <TextBlock Text="{Binding Rating, Converter={StaticResource myRatingConverter}}" FontWeight="Bold"/> </StackPanel> </StackPanel> </Border> </DataTemplate> </UserControl.Resources>
This leaves us with the following final output:
Wrap UpData Templates and Value Converters are invaluable tools when displaying data. We’ve seen how we can customize the layout and look of various data elements, and use Value Converters to alter the way that we display and collect that data. With this as a starting point, we can move forward with additional styling and layout to create a pleasing and useful interactive experience.
Happy coding!
Data Templates & Value Converters presented by JeremyBytes.com©Jeremy Clark 2010 Page 16