introduction to internet of things prof. sudip misra ... · introduction to raspberry pi– 1 in...
TRANSCRIPT

Introduction to Internet of ThingsProf. Sudip Misra
Department of Computer Science & EngineeringIndian Institute of Technology, Kharagpur
Lecture – 28Introduction to Raspberry Pi– 1
In this lecture on the introduction to Raspberry Pi, you will learn about what Raspberry
pi is what are the different functions of Raspberry pi and more importantly about why
Raspberry pi is so important in the development of IOT.
So, Raspberry pi compared to Arduino is more powerful, it is more powerful in terms of
the computation or processing power. Additionally it has better memory capacity and
also it can integrate different types of sensors and actuators and this part is more
attractive than compared to the similar kind of feature of Arduino. So, we can do
different types of sensors integration in Raspberry pi and due to the feature that it can
process more compared to Arduino it has better processing capabilities and more features
and so on. This is particularly attractive for sensors which have which require more
processing for example, imaging sensors multimedia different types of multimedia
sensors which require more processing you know this sort of device becomes more
useful.
So, in the same way as we can have an Arduino based IOT node here also we can have
using Raspberry pi, we can have a Raspberry pi enabled IOT node and this IOT node
would be more powerful compared to the Arduino based node. Additionally we have to
keep in mind that although it has better capabilities, but it comes at more cost the cost of
purchasing Raspberry pi is more than the cost of Arduino in general. So, there is a trade
off of course; however, it all depends on the requirements if the requirement of the
particular IOT application that is being developed is to have some nodes which you
know which should act as a server then Raspberry pi would be a better option than
Arduino.
Second thing is that you know with Raspberry pi you can configure Raspberry pi as a
web server you can even configure Raspberry pi as an edge device and so on. So, there
are different capabilities that are there, but at the same time you know more computation
means more power consumption. So, if you have the same kind of you know application

with a more power consumption requirements, etcetera, etcetera and if that is not a
problem then you know one can go for raspberry pi; however, this particular issue is a
little bit you know tricky because there are certain scenarios where Arduino can also
come to be beneficial with respect to this.
So, we are going to go through the different aspects of Raspberry pi and try to
understand how Raspberry pi can be used. So, I said before you know if you have a
Raspberry pi module along with you can practice as we explain to you the different steps
the different features and. So, on in this lecture and the subsequent one the next one in
both of these we are going to teach you about raspberry pi. So, I have along with me; my
TA for this course Mr. Anandroop Mukherjee; like the previous few lectures you know
he is going to take you through the hands on aspects of Raspberry pi.
Hello, today this lecture will cover an introduction to Raspberry pi. So, this will be again
a 2 part lecture and the part first part will cover the basic introduction to what is
Raspberry pi the hardware system and how you go about installing basic operating
system on the Raspberry pi and how to access that device. So, what exactly is Raspberry
pi?
(Refer Slide Time: 04:36)
It is basically micro sized computer or commonly in common terms it is said as a
computer in your palm more specifically it is a single board computer which is very low
cost device and which is very easy to access. So, these are one of the main reasons these
are some of the main reasons why Raspberry pi has become. So, popular with respect to
IOT as well as hobby electronics people.
(Refer Slide Time: 05:03)
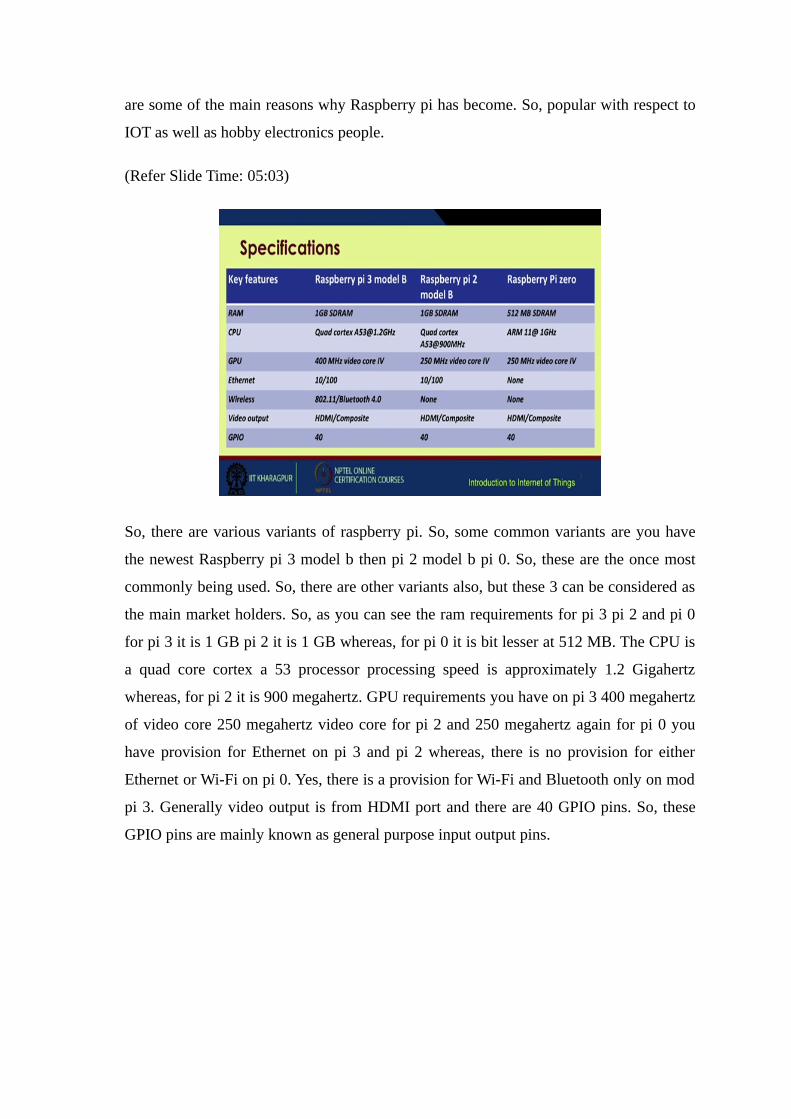
So, there are various variants of raspberry pi. So, some common variants are you have
the newest Raspberry pi 3 model b then pi 2 model b pi 0. So, these are the once most
commonly being used. So, there are other variants also, but these 3 can be considered as
the main market holders. So, as you can see the ram requirements for pi 3 pi 2 and pi 0
for pi 3 it is 1 GB pi 2 it is 1 GB whereas, for pi 0 it is bit lesser at 512 MB. The CPU is
a quad core cortex a 53 processor processing speed is approximately 1.2 Gigahertz
whereas, for pi 2 it is 900 megahertz. GPU requirements you have on pi 3 400 megahertz
of video core 250 megahertz video core for pi 2 and 250 megahertz again for pi 0 you
have provision for Ethernet on pi 3 and pi 2 whereas, there is no provision for either
Ethernet or Wi-Fi on pi 0. Yes, there is a provision for Wi-Fi and Bluetooth only on mod
pi 3. Generally video output is from HDMI port and there are 40 GPIO pins. So, these
GPIO pins are mainly known as general purpose input output pins.

(Refer Slide Time: 06:39)
So, this is the basic functional architecture of a raspberry pi. So, at the center you have a
CPU or GPU you have various input output ports connected to it you have a RAM you
have a USB hub from which you can connect an Ethernet as well as you have various
USB ports to which you can connect regular USB devices. So, in short this thing is as
similar to your normal PC, right.
(Refer Slide Time: 07:11)
So, this is the picture of a raspberry pi. So, I have one Raspberry pi with me right now.
So, if you can see this is a Raspberry pi 3 model b.

(Refer Slide Time: 07:22)
So, over here you have one HDMI port this small port is for the power adapter these are
the GPIO pins interlaced with some power pins like 5 volt 3.3 volt in ground and you
have this processors this is the arm base processor you have four USB ports you have
one Ethernet port. So, and you have one sound card output also and turning it over to the
other side you can see there is a small memory card attached. So, if you take it out. So,
we are using a 32 GB memory card, but generally 8 to 16 GB memory cards are
sufficient. So, the main function of this memory card is it actually holds the OS of the
raspberry pi.
So, first step towards initializing Raspberry pi is you download the OS available on
freely online you load the OS on the memory card and you just plug this thing into your
memory card slot on the raspberry pi. So, in goes like this and your system is ready then
we need some basic configurations to get this up and running and available on the
network.
So, once your system is up and running you can see will you may access the Raspberry
pi based OS which is primarily a GUI based system.

(Refer Slide Time: 09:05)
.
So, it is quite similar to your normal logo on base systems. So, you can see you have
various programming languages which are already available within this you do not need
to externally install it you see your python 2 python 3 scratch blue j which is a Distro for
java and various other options you have some office options also so on. So, basically you
get the idea there is one symbol for Bluetooth the symbol for increasing decreasing the
sound this one shows the ram usage time and so on. So, it is quite similar to your normal
oven to based systems.
(Refer Slide Time: 09:59)

So, these Raspberry pi GPIOs or the general purpose input outputs they can act as both
digital output as well as digital input it is quite similar to your input output digital input
output pins on the Arduino boards we covered previously. So, if you pay attention to this
thing.
(Refer Slide Time: 10:24)
So, these GPIO pins these are a bit confusing. So, I have included one chart descript
describing the pin configurations over here these 2 red pins are the five volt power pins
the black ones over here are the ground pins and the remaining are GPIO pins. So, you
have certain GPIO pins which act as you know your qart txt an rxt; that means,
transmission and for reception there are normal GPIO pins and this chart or this
configuration is very easily available online.

(Refer Slide Time: 11:14)
So, the basic setup for this Raspberry pi will require a few components first and foremost
when you are setting up the Raspberry pi for the very first time you will require a
external monitor you will require an HDMI cable to connect the monitor and the
Raspberry pi you will require a keyboard and mouse a basic 5 volt adapter to power up
the pi LAN cable and your memory card which will include the operating system on it.
(Refer Slide Time: 11:47)

(Refer Slide Time: 11:56)
So, we will come to the set up orbit later will I will give a demonstration of how to set up
the whole system. So, regarding the operating system certain official bestows for
Raspberry pi or Raspbian and Noobs and some third party OSs which can also be
installed on the Raspberry pi are this UBANTU made Snappy Ubuntu core you even
have nowadays windows ten core for Raspberry pi is finite and so on.
(Refer Slide Time: 12:21)
So, you can download your Raspberry pi normal Raspbian image distribution from this
link you otherwise you go on to this site you search for Raspbian distribution there are

various versions of various releases you select the most appropriate one and that is it.
And once the download is finished you will end up with a zip file you unzip it you will
get a image file and you just write that image onto the memory card.
(Refer Slide Time: 12:54)
So, for windows based systems since most of the people use a windows based system;
the installation for this image is quite easy you require a software called win 32 disk
imager. It is freely available online you run this disc imager software plug in the SD card
into your PC you will need an USB adapter for the a SD card you select the device
browse for the image file which contains that Raspbian image and you just select write.
So, it will take around anything between 15 minutes to half an hour. So, once your
writing is finished your memory card is ready to be integrated with the Raspberry pi.
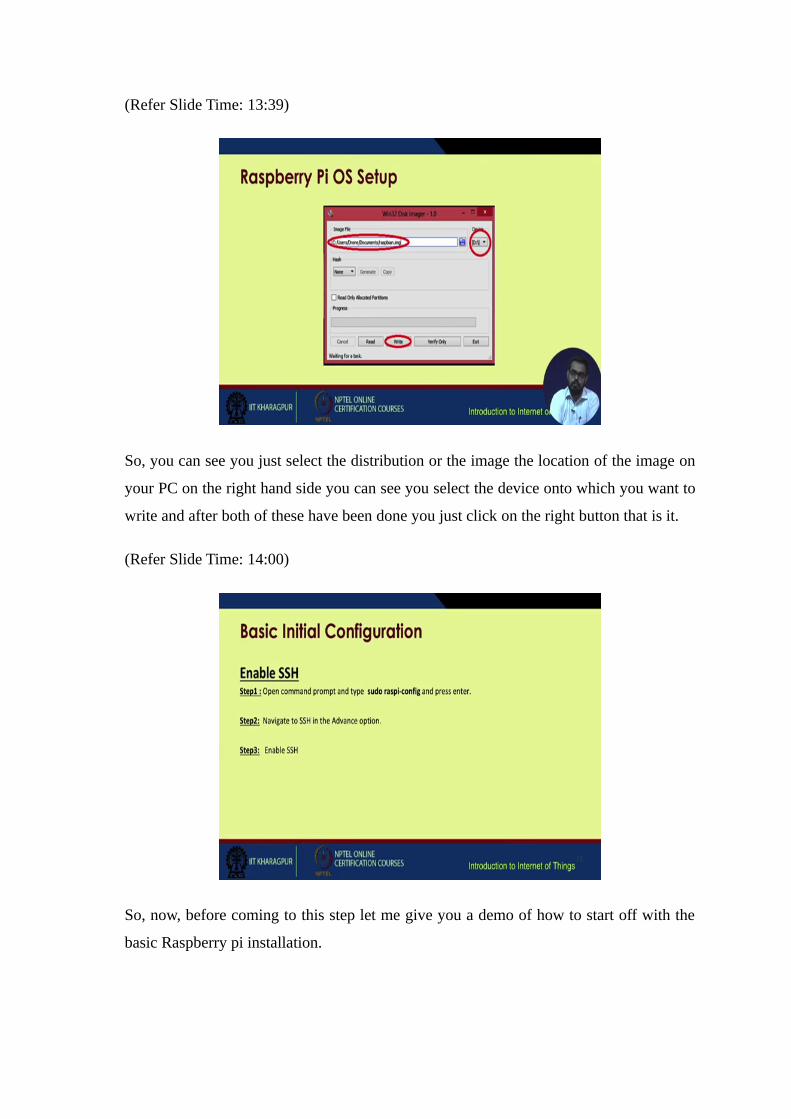
(Refer Slide Time: 13:39)
So, you can see you just select the distribution or the image the location of the image on
your PC on the right hand side you can see you select the device onto which you want to
write and after both of these have been done you just click on the right button that is it.
(Refer Slide Time: 14:00)
So, now, before coming to this step let me give you a demo of how to start off with the
basic Raspberry pi installation.

(Refer Slide Time: 14:15)
So, over here first of all I have a keyboard and mouse I will just connect them to the
USB ports choose any USB port I have a LAN cable ready I am connecting it to the
Ethernet port this is an a small monitor portable monitor. So, it is being powered by a
external power supply and it is connected it will be connected to the Raspberry pi via this
HDMI cable on this HDMI port. So, once all of these have been done you just plug in
your power supply for the Raspberry pi you already check whether you already have the
memory card in place. So, it is there you just plug it in.
So, now if you pay attention on the screen you are booting starts. So, once the boot is
finished you get a GUI based interface. So, just like the screen shot in the previous light.
So, you have got one terminal you have got a start menu option you can access various
programming languages. You can access internet options have got options for mail you
have got options for other things you can also set up a VNC server or VNC viewer on
raspberry pi so that you can remotely access the user interface on the network.
So, once the Ethernet cable has been plugged see this Ethernet has been plugged. So, it is
showing one IP. So, this IP will be required to remotely access your PC Raspberry pi
from your pc. So, best practice is you go to terminal right.

(Refer Slide Time: 16:38)
One more thing; the default name for the Raspberry pi distribution is pi p I and the
password is Raspberry; ra sp be rry. So, whenever you are remotely logging into the
system you give the; I username as pi and the password as raspberry. So, first of all I will
check for the IP of the system. So, I give the command IP config. So, you see various
interfaces have been located. So, I am more interested in the first part. So, this is going to
be my required IP. So, now, I will store this IP and I can remotely login to the system
using this IP. So, now, my Raspberry pi is ready to be accessed remotely. So, now, I do
not need to use the monitor anymore. So, the main function of the monitor is to initially
get the IP address for your system and for basic configurations.
So, coming back to the presentation; so, initial configuration we have done now enabling
this SSH option SSH as you know is stands for secure shell login. So, just check on your
Raspberry pi; go to the go again to the terminal you give the command Pseudo Raspberry
pi config and press enter. So, you will get something like this, right.

(Refer Slide Time: 18:19)
Since I am already using this Raspberry pi for quite some time this is not a fresh install.
So, all the operations have already been performed, but post first time installation of your
Raspberry pi you need to expand your file system because these images are more or less
compressed and if you expand the file system it will cover your entire memory card. So,
your entire memory card; suppose I am using a 32 GB memory card, but the image was 2
GB approximately. So, it will now expand to cover the maximum of the memory card.
So, you will have lots of space for additional functions installing new softwares putting
on files etcetera. So, once you expand the file system after this operation is done you
reboot the system. So, I will go to advanced options.

(Refer Slide Time: 19:45)
Sorry, I will go to advanced options as you can see there are variation of options for over
scan resolution audio driver and so on and there should be one option for and go to
interfacing options for this distribution you have your enable SSH in the interface
options under Raspberry config.
(Refer Slide Time: 20:23)

(Refer Slide Time: 20:27)
So, you select SSH and press enter and once your SSH is enabled you reboot your
system. So, this will allow you to access your Raspberry pi over the network from any
remote PC from windows based systems you can use software such as putty or any SSH
plant from Ubuntu based systems or MAC based systems you can only use the terminal
to perform this SSH operation. So, my SSH is already enabled you can also enable your
additional options like if you have a Raspberry pi camera there are these are special
cameras which can be integrated to as Raspberry pi. You can obviously, integrate USB
cameras to wireless USB ports and there are as you can see there are various other
options if you need to use the VNC server you enable this VNC option and so on.

(Refer Slide Time: 21:39)
(Refer Slide Time: 21:45)
So, I hope you get the idea. So, I will escape this thing now coming back to the
presentation once the SSH has been enabled. So, we have covered this thing.

(Refer Slide Time: 21:51)
(Refer Slide Time: 21:57)
Then file system expansion we have explained. So, as you remember from the live demo
this option was there the first option expand file system.

(Refer Slide Time: 22:06)
So, post this as I have already told you the basic default programming languages which
are installed are Python, Java, C, C++, Scratch and Ruby. So, more or less any language
that will compile for arm version six can be used easily with Raspberry pi.
(Refer Slide Time: 22:29)
So, some basic and very popular applications you will come across on the internet for
Raspberry pi based systems mostly they are media streamers home automation systems
controlling abort virtual private networks a lightweight web server for IOT. So, like
instead of having a dedicated big server for running IOT based applications suppose you

want to install a small IOT network in your home maybe for home automation or home
monitoring you can; obviously, go for a Raspberry pi base system. So, this system will
act as a server whereas, your devices will start uploading data to the server you can even
run various analytics on the Raspberry pi based server and then you; obviously, have a
tablet computer based system. So, this Raspberry pi is already a computer just interface a
monitor and some external peripheral devices any other and you are ready to go.
(Refer Slide Time: 23:38)
So, coming back once again to the system; so, I do not require this anymore I just close it
now I will do one thing let me access this pi base system from my PC I already have the
IP. So, I will write for my since my PC is running a MAC based system I will write the
command SSH minus y then space pi at the rate the IP address for your raspberry pi. So,
once I press enter it will start it will ask for the address as I have told you; the default
sorry it will ask for the password the default password is raspberry once you enter the
password you are ready to go first it will give some basic information about the system
and then you will see a prompt which will say pi at the rate Raspberry pi.
So; that means, you are ready to go. So, you can just see your file system what exactly
are there you can give a basic LS command or list file. So, these are some of the
directories or files put in your Raspberry pi you can even remotely start restart your PC
or raspberry pi. So, for the end of this lecture I will just reboot my raspberry pi. So, I

write pseudo reboot, press enter ok. So, as you can see over the monitor my Raspberry pi
has gone into reboot again it is starting up. So, this was the end of our part one lecture.
Thank you.