introduction to myob accountright plus -...
TRANSCRIPT

1 Introduction to
MYOB AccountRight Plus
An introduction to the basic operations of a computer-based accounting system using MYOB AccountRight Plus.
After completing this chapter you will be able to:
1 Select a Command Centre and options within that centre.
2 Open an existing MYOB AccountRight Plus data file.
3 Carry out MYOB AccountRight Plus essential operations.
4 Use the keyboard and mouse of your computer to enter some everyday transactions using MYOB AccountRight Plus.
5 Record transactions and exit a file correctly.
6 Backup a file.
7 Display financial reports on the screen.
8 Print a balance sheet and a profit and loss statement.
sample
page
s
Computer accounting using MYOB business software
1-2
Introduction
The aim of this book is to help people learn the accounting process using a modern integrated accounting package. People in education and those small businesses contemplating MYOB AccountRight Plus should find it a useful addition to the manual and tutorial supplied by the distributors of MYOB AccountRight Plus. The exercises are designed to reinforce the MYOB AccountRight Plus tutorial as well as helping with –
the design of the accounting system accounting for transactions not covered in the tutorial accounting for different types of businesses.
To cater for training courses requiring assessment (usually part of an accounting course) there are assessment exercises or tests. The format of this book is therefore –
notes, ‘How to …’ lists followed by examples and screen layouts solutions self-test problems with solutions at the end of each chapter assessment exercises at the end of each chapter which can be marked by
course leaders.
It is not necessary to go through the chapters in any particular order as each will commence as a separate module – for example, the chapter on cash book will start by learning how to process transactions through a cash book where the accounting system is already set up. A simple set-up of accounts will then be undertaken so that any person may use the cash book ‘stand-alone’. Later chapters will integrate the cash book with other modules (called command centres in MYOB AccountRight Plus).
Included in this edition is a chapter on MYOB AssetManager Pro v3.5, a stand-alone package for keeping track of assets.
Conventions used in this book
In this book, the following conventions will apply (usually to avoid repetition):
This symbol will indicate that you should tap the ENTER or RETURN key. For example, an instruction to “Enter Account Number 4-1100” tells you to type in the account number 4-1100 and tap the Enter key to complete.
Command centre The command centre to be selected will be in italics – For example, select Accounts will mean pointing to the Accounts command centre icon and click. Selections within the command centres will also be stated with italics – For example, select Accounts List will mean point to the Accounts List option in the Accounts command centre and click.
sample
page
s

Chapter 1: Introduction to MYOB AccountRight Plus
“Text and numbers” Text and numbers to be entered will be enclosed in double quotes – do NOT type these quotes in! – For example, an instruction to enter “2778” in the debit column will mean that you would type in 2778 when the cursor is blinking in the space under the column headed debit.
‘Field label’ A field for the purpose of this book will be any entry required on a screen. Each field has a label describing the entry required. Examples of fields are customer name, address, account number, amount, quantity, etc. Fields will be indicated by single quotes. For example, with the cursor on ‘Supplier:’ field type “D” will mean that you type D (or d) when the cursor is blinking on the screen in the field next to the label Supplier: and then tap the Enter key.
Buttons Rectangular buttons to be selected (point and click) will be in italics. These buttons include OK, Record, Use Account, and Close. Square buttons containing icons will also be in italics. The first time a button is used it is sometimes shown in the text like the following instruction to click the Print button –
Windows Windows used will be noted in italics. For example, an instruction to “Close the Sales – New Item window” will require you to use the windows close button, or click on the Close button at the foot of the Sales – New Item window.
Using the ‘How to ...’ lists
Throughout this book, instructions are given in generic lists that always start with the words ‘How to’. The word “generic” means that the list can be applied to any situation requiring the particular action. For example, a list of instructions on “How to open an existing file” means that these instructions can be followed to open any MYOB AccountRight Plus data file. To use these lists effectively, you should read them as you go through each chapter. The ‘How to …’ list is followed by an example and often a self-test exercise. When you cannot remember how to carry out a task that was demonstrated in an earlier chapter, you can look up the ‘How to …’ index at the front of the book. This index is shown by chapter, and by function. For example, if you are using the payroll chapter and you are asked to “Open the file dem81.myo” and you cannot remember how to open an existing file, you can look up the instruction in the list by chapters or
1-3
sample
page
s
Computer accounting using MYOB business software
in the list by function. This will give you the page in the book that has the step-by-step instructions to open an existing file.
MYOB AccountRight Plus and the GST
The Goods and Services Tax (GST) applies to most goods and services sold in Australia. It is not the purpose of this book to instruct people in the legal aspects of the GST. However, all of the demonstrations, self-test exercises and assignment material include the GST where necessary. You will not be required to determine the GST status of any particular transaction, as the instructions will make this clear. A very brief introduction to the GST, setting up additional tax codes and using/printing the Business Activity Statement (BAS) is shown in Chapter 2.
Opening an existing file
The authors have already set up the files for demonstrations and most exercises in this book. If you are using MYOB AccountRight Plus on your own computer, you should download the files from the CD provided with the text. Make an extra copy of any file you are using so that they can be re-installed if you save changes to them when practising. If you are using MYOB AccountRight Plus in a classroom, make sure that you are using copies of the demonstration files on your own data disk (do NOT experiment with the demonstration file on the classroom files!).
The following instructions are used to open an existing file.
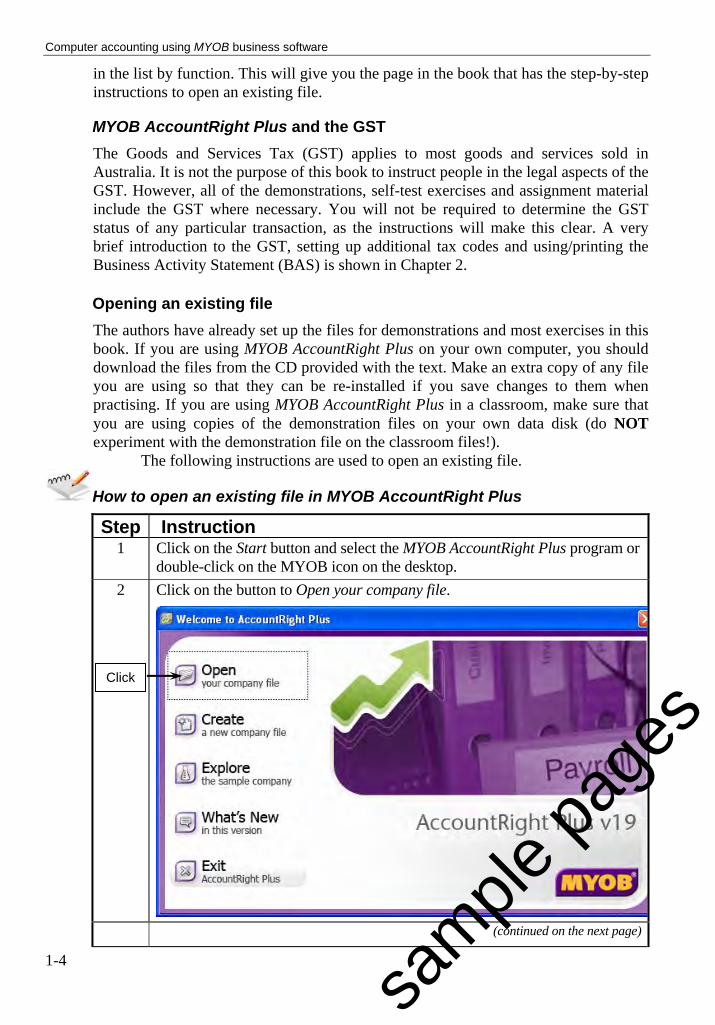
How to open an existing file in MYOB AccountRight Plus
Step Instruction 1 Click on the Start button and select the MYOB AccountRight Plus program or
double-click on the MYOB icon on the desktop.
2 Click on the button to Open your company file.
(continued on the next page)
Click
1-4
sample
page
s

Chapter 1: Introduction to MYOB AccountRight Plus
1-5
Step Instruction 3 From the list of files on your disk, highlight the file required and click the
Open button (or double click on the file name). The following picture shows the file called dem11.myo in a folder called MYOBDATA on the hard disk selected:
4 The ‘User ID:’ field will show “Administrator”. You are strongly advised
NOT to use passwords in exercises. Click on the OK button as shown below:
Leave the ‘User ID:’ as “Administrator”, do not enter a password, and click on the OK button.
Don’t forget your password!
sample
page
s

Computer accounting using MYOB business software
Video: A video showing you how to open an existing file is on the CD-ROM
Self-test exercise 1.1
Start MYOB AccountRight Plus. Open the file called dem11.myo and sign on as the “Administrator” without a
password. What is the name of the business?
MYOB AccountRight Plus essentials
You need to know general aspects of MYOB AccountRight Plus to use the package efficiently. Later chapters will expect you to know how to carry out these operations or how to look up the ‘How to …’ index at the front of the book. These general aspects cover file operations, setting preferences, using “cards” and printing operations.
Command centres
A major difference between MYOB AccountRight Plus and other accounting packages is its menu system. Rather than produce a list for selection, it displays icons or names that are selected by pointing to them with the mouse and clicking. Figure 1.1 shows the selections available when the Accounts command centre button is selected:
Accounts command centre selected
Figure 1.1: The Accounts command centre options
The icons along the top of the window are the command centres and the “Flow-chart” type names in the window beneath the command centre are the available options.
Every command centre window has four other options with drop-down selections at the bottom of the window. These are the To Do List, Find Transactions, Reports and Analysis. Figure 1.2 on the next page shows the To Do List window as at 15
1-6
sample
page
s

Chapter 1: Introduction to MYOB AccountRight Plus
August 2011 with the A/P (accounts payable) tab chosen (overdue days will depend on your system date):
Figure 1.2: An example of a To Do List for accounts payable
Figure 1.3 shows the result of using Find Transactions in an account:
Figure 1.3: An example of using Find Transactions on a general ledger account
MYOB AccountRight Plus command centres also have an option to use
the M-Powered Services Centre – this enables a business to connect electronically to banks, suppliers and superannuation funds. A business needs to subscribe (pay) for this additional service.
1-7
sample
page
s

Computer accounting using MYOB business software
To select a command centre (or an option within a command centre) you use the mouse to move the on-screen arrow so that the point of the arrow is in the object being selected. The mouse button is then “clicked” – a quick press of the left-hand button. This process is called “point and click”. An instruction in these notes to “Select ...” will mean that you use the mouse to move the on-screen pointer (arrow) so that the point of the arrow is on the item to be selected and you tap (click) the mouse button – do not hold your finger down on the button, but give it a quick press.
Video: A video about command centres is on the CD-ROM
Self-test exercise 1.2
The file dem11.myo should be open. Answer the following: (a) How many command centres are there? What are the principal functions of
the following command centres? (Hint: Use Help as outlined in Chapter 12 on the CD)
Banking Sales Card File. (b) Which command centre would you use to: Enter sales? Pay bills from suppliers? Spend money? Set item prices? Print Payment Summaries? Prepare time billing invoice? Reconcile accounts?
Menu system
Menus allow you to select from displayed alternatives. You have already been using one of the MYOB AccountRight Plus menus – clicking on a displayed command centre area selects that command centre. You will have noticed that each command centre has a different set of options displayed, and these options represent another level of menu – clicking on an option selects a particular course of action.
Another menu system is displayed at the top of the MYOB AccountRight Plus window. These are the pull-down (or drop-down) menus, which will be familiar to anyone who has used any Windows based program. In Windows XP, the title bar and menu bar with the Setup pull-down menu selected will look like Figure 1.4 on the next page.
A drop-down menu item may have a small arrow at the right-hand side and this indicates that a sub-menu exists. Click on the small arrow to display a sub-menu: Figure 1.5 on the next page shows a sub-menu for the Payroll Categories item in the Lists menu.
1-8 Menu bar Setup drop-down menu with Company Information
sample
page
s

Chapter 1: Introduction to MYOB AccountRight Plus
Figure 1.4: Setup drop-down menu
Click to see a sub-menu
Figure 1.5: The Lists drop-down menu and Payroll Categories sub-menu
Video: A video on using menus is on the CD-ROM
1-9
sample
page
s

Computer accounting using MYOB business software
Dialogue boxes and selections
Windows and Macintosh applications make use of dialogue boxes – windows that allow for selections. The simplest might be one that asks the operator to either continue an operation or cancel it. Figure 1.6 is an example of typical selections that can be made. Only one selection can be made from a set of option buttons (circular buttons), but several checkboxes (square boxes) can be selected (ticked).
Only one option button in a group may be selected at any one time
Any number of checkboxes may be selected
Figure 1.6: Options and checkboxes in a dialogue box
Preferences and security
Under the Setup pull-down menu is an option for preferences. The preferences window has tabs for some command centres, under which there are several options. Some of these will be looked at when examining the particular command centre. There is also a tab for system preferences, windows, reports and forms setup and for security. For the purpose of class work, preferences will be set to make it easier to use MYOB AccountRight Plus. Some of the preferences will probably not mean a great deal at the moment, but the following notes are appropriate at this stage.
Security
The files provided with this book have been set up so that changes can be readily made and errors corrected easily. This is not necessarily the best internal control procedure and in practice the first security option should be turned on and password protected. This forces people to reverse incorrect entries so as to leave a trail. When you create a new file in class for an exercise however, this facility for easy correction may be barred, and you may need to re-set the security options. Figure 1.7 shows the preferences window with the security selections.
1-10
sample
page
s

Chapter 1: Introduction to MYOB AccountRight Plus
Figure 1.7: Security preferences
How to set the security preferences and add users with passwords
Step Instruction 1 Select the Setup pull-down menu.
2 Select the Preferences item from the menu.
3 Click on the tab for Security.
4 There are several items which can be turned on or off by clicking in the appropriate selection checkbox. For ease of correcting errors or cancelling a transaction, the first checkbox should be turned off (no tick in the box). If you do not want a backup message to appear when you exit MYOB AccountRight Plus, turn the third checkbox off.
5 The second item has a drop-down selection list. Tick this preference and point to the white box and drag down to make your selection.
6 To add users and set passwords, click on the User IDs button at the foot of the security window.
7 Only the person logged in as the Administrator with the master password can add or edit users and their passwords. To add a user click on the New button.
8 Enter a ‘User ID:’ and TAB to the ‘Password’ field.
9 Type in a Password and TAB.
10 Type in the password again to confirm.
11 You can copy a set of restrictions from another user by selecting the other user from the drop-down list in the ‘Copy Restrictions’ field.
12 Click on the OK button.
(continued on the next page)
1-11
sample
page
s

Computer accounting using MYOB business software
1-12
Step Instruction 13 To stop a user using a particular function, make sure the user is selected on
the left-hand side of the User Access window and click in the column headed ‘Not Allowed’ against the function that is barred. (Clicking on a function heading selects all of the functions under that heading.)
14 Click on the OK button.
Example 1.1—Adding a user and password
1. Use the file dem11.myo. The exercise month is July 2011. You should be signed on as the Administrator.
2. Select the Preferences item from the Setup menu.
3. Click on the Security tab in the Preferences window.
4. Click on the User IDs button.
5. Click on the New button to add a user.
6. Type in “OZZIE” as the ‘User ID’ and use the TAB key.
7. Type in the ‘Password’ as “HATARI” (all in capital letters) and use the TAB key.
8. Repeat the password “HATARI” in the ‘Confirm Password’ field and click on the OK button if your New User Details window looks like Figure 1.8:
Figure 1.8: User ID and password set up
Note: You can use the drop-down list at the end of the ‘Copy Restrictions:’ field if you already have another user set up with the same restrictions as this new user.
sample
page
s

Chapter 1: Introduction to MYOB AccountRight Plus
9. In this example, the user “OZZIE” is not allowed to access any Banking functions. In the right-hand side of the User Access window, scroll down and click against the Banking function as shown in Figure 1.9:
Click in this column to stop a user accessing the function
Figure 1.9: User “OZZIE” not allowed to access Banking functions
10. Click on the OK button.
Video: A video on how to add a new user is on the CD-ROM
System preferences
The preferences are set and removed by clicking in the checkbox next to the preference. A checkbox with a tick in it means that the preference is “on”. The system preferences that may be selected are shown in Figure 1.10:
Figure 1.10: System preferences
1-13
sample
page
s

Computer accounting using MYOB business software
Self-test exercise 1.3
Start MYOB AccountRight Plus.
If the file dem11.myo is not open, open this file and sign on as the “Administrator” without a password.
Change the security preferences so that they are as per Figure 1.7.
Change the system preferences so that they appear as in Figure 1.10.
Add a ‘User ID’ of “MKUBWA”. Set a master password called “DIMBULA”. This user is not allowed to use the Banking, Payroll or Setup functions.
Reports and Forms
In the Reports and Forms preferences you select the option button for the method of ageing to be used: daily ageing periods or monthly ageing periods. Turn the checkboxes on (ticked) for the preferences required.
The Reports and Forms buttons in the bottom left-hand corner are clicked to set font styles for reports and forms. In the Reports preferences, each section of the report can be set up for fonts and colours. You use the Email button to set up the default message and subjects for emailing invoices and purchase orders.
Self-test exercise 1.4
Open the file called dem11.myo and sign on as the “Administrator” without a password. Select the Setup pull-down menu Preferences item and click on the Reports & Forms tab at the top of the Preferences window. Edit the preferences so that they agree with those shown in Figure 1.11 on the next page.
Click on the Reports button at the foot of the Reports & Forms window and change the font for the main body of a report to Times New Roman 12 point.
Click the Emails button and add “Please check this statement against your records and report any differences to our accountant ([email protected])” to the Statement Message.
How do I send an email complaining about my statement?
1-14
sample
page
s

Chapter 1: Introduction to MYOB AccountRight Plus
Figure 1.11: Preferences for Reports & Forms
Windows
The Windows preferences determine how the windows will look and act when entering or selecting fields. Figure 1.12 shows the setup for the file dem11.myo.
Click on the Spelling button to select the spell check options.
Figure 1.12: Windows preferences
1-15 Video: A video on selecting preferences is on the CD-ROM
sample
page
s

Computer accounting using MYOB business software
1-16
Memo: Account name or account number? A most important Windows preference shown in Figure 1.12 that you may select is the choice of listing and selecting accounts by either the name of the account or the account number. A tick in the fourth box from the top as shown above will mean that accounts will be listed by name. If the tick is removed, the accounts will be listed by account number. Throughout this book, you may use whichever option
f
Printing (in general)
Printing in MYOB AccountRight Plus often causes a certain amount of confusion because there are a number of ways of obtaining printouts.
In general, there are many windows or reports that can be printed by clicking on the Print button in the bottom of a window. Printing consumes paper (and therefore forests), so make sure before using this button that the report is what you really want!
Options for printing documents are available directly from the command centre menus. For example, the three options shown above are directly available from the Sales command centre. Similar options will be found in the other command centres. They are restricted to printing all or a “run” of documents each with the same attribute.
You can click on the Reports button in the bottom of a window to select reports in the command centre currently selected.
Clicking on the down arrow on the Reports button lists the command centres for pre-selection. The picture on the left shows the Accounts command centre reports selected while in the Banking command centre.
OR
Using the Reports pull-down menu at the top of the screen and selecting Index to Reports as shown here accesses all reports. If you are not in the correct command centre, click on the tab in the reports window and select the report required.
sample
page
s

Chapter 1: Introduction to MYOB AccountRight Plus
Select the Customise button to change the report’s features – for example, you may or may not want accounts with zero balances shown in a balance sheet
printout, or you may want to specify the amount of detail shown on any report by selecting the report level. Note that if you set the preferences as per Figure 1.11, a customise window will be displayed automatically when you print a report.
Before sending the report to the printer it is a good idea to look at it on the screen by clicking on the Display button, which is found in the bottom right-hand corner.
The Format button in a display window allows you to customise the colours and fonts for sections of the particular report to be printed. Unlike the Reports button in Figure 1.10, this customisation only covers the current report to be printed.
The Send To button allows you to export the report instead of printing. The report can be exported to an Excel spreadsheet, emailed, set as a “PDF” or an “HTML” file or a simple text file. You must have the requisite programs installed on your computer for all of these to work.
“Zoom” or “Detail” Arrows
Throughout MYOB AccountRight Plus you will notice small arrows to the left of certain items or fields. Clicking on these will reveal details about that particular item or field. Depending on the preferences set up earlier, some of these detail arrows may be shaded, and this indicates that the details cannot be altered.
Example 1.2—Using zoom (or detail) arrows
1. Use the file dem11.myo. You should be signed on as the Administrator.
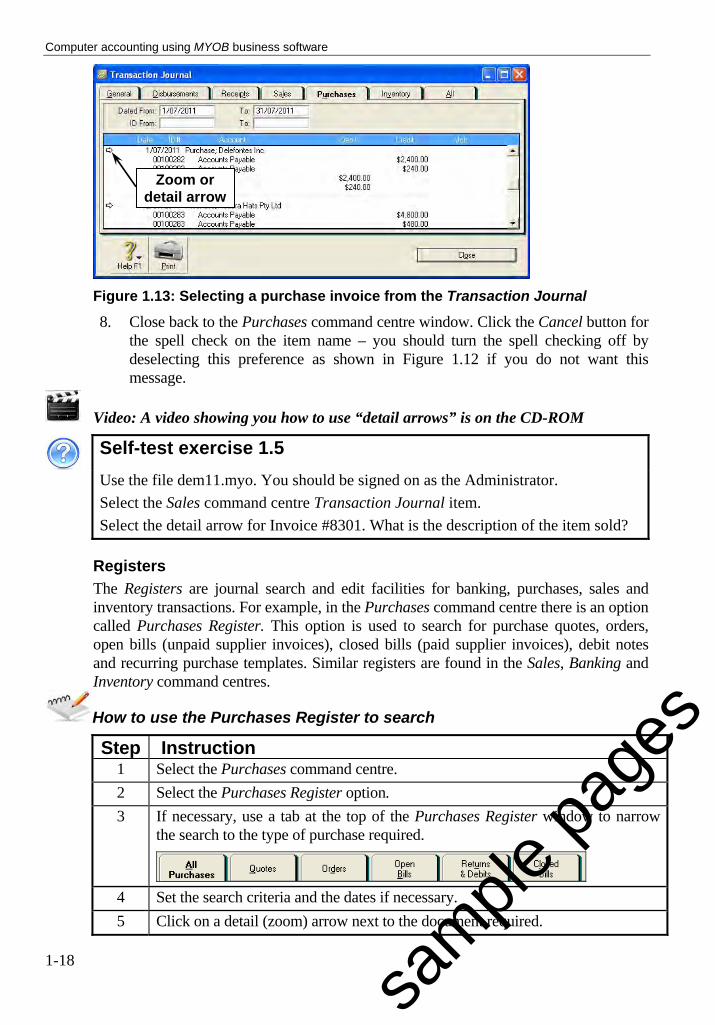
2. Select the Purchases command centre and the Transaction Journal item.
3. Make sure dates stated at the top of the window are from 1/7/2011 to 31/7/2011.
4. Click on the detail arrow next to the transaction on 1/7/2011 with ID# 100282 as shown in Figure 1.13 on the next page.
5. In the Purchases – Edit Item window, click on the detail arrow next to the item number “D-118”.
6. Click on the Selling Details tab at the top of the Item Information window.
7. Check that the ‘Base Selling Price’ of this item is $48.00 each, the ‘Tax Code When Sold:’ field is ‘GST’, and that sales prices are tax exclusive (checkbox not ticked).
1-17
sample
page
s
Computer accounting using MYOB business software
Zoom or detail arrow
Figure 1.13: Selecting a purchase invoice from the Transaction Journal
8. Close back to the Purchases command centre window. Click the Cancel button for the spell check on the item name – you should turn the spell checking off by deselecting this preference as shown in Figure 1.12 if you do not want this message.
Video: A video showing you how to use “detail arrows” is on the CD-ROM
Self-test exercise 1.5
Use the file dem11.myo. You should be signed on as the Administrator.
Select the Sales command centre Transaction Journal item.
Select the detail arrow for Invoice #8301. What is the description of the item sold?
Registers
The Registers are journal search and edit facilities for banking, purchases, sales and inventory transactions. For example, in the Purchases command centre there is an option called Purchases Register. This option is used to search for purchase quotes, orders, open bills (unpaid supplier invoices), closed bills (paid supplier invoices), debit notes and recurring purchase templates. Similar registers are found in the Sales, Banking and Inventory command centres.
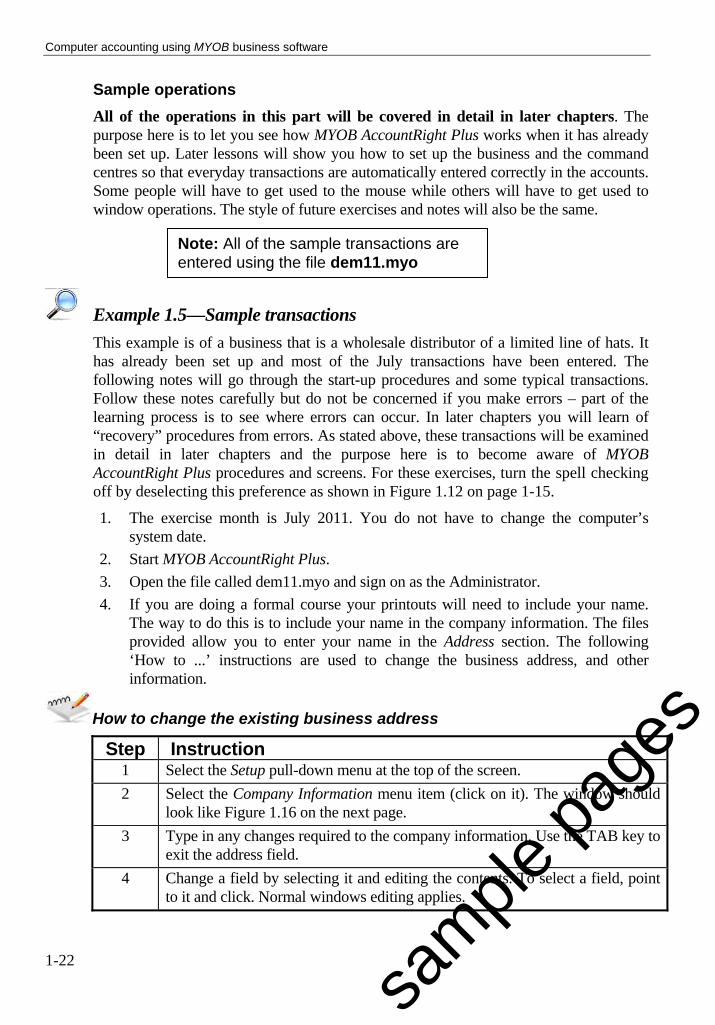
How to use the Purchases Register to search
Step Instruction 1 Select the Purchases command centre.
2 Select the Purchases Register option.
3 If necessary, use a tab at the top of the Purchases Register window to narrow the search to the type of purchase required.
4 Set the search criteria and the dates if necessary.
5 Click on a detail (zoom) arrow next to the document required.
1-18
sample
page
s

Chapter 1: Introduction to MYOB AccountRight Plus
Example 1.3—Using the purchases register In this example, a quote received from Marbuk Imports is looked up.
1. Use the file dem11.myo. You should be signed on as the Administrator.
2. Select the Purchases command centre and the Purchases Register option.
3. Click on the Quotes tab at the top of the Purchases Register window. Make sure dates stated at the top of the window are from 1/7/2011 to 31/7/2011. There is only one quote and it should be highlighted as shown in Figure 1.14:
Figure 1.14: List of Quotes in the Purchases Register
4. Click on the detail (zoom) arrow for the quote from Marbuk Imports dated 1 July 2011. The quote shown in the Purchases – Edit Item window is for 100 of item I444 “Golf Caps” at $22 (including GST). This quote is shown in Figure 1.15:
Figure 1.15: Quote received from Marbuk Imports
5. Click OK to close the Purchases – Edit Item window and close the Purchases Register.
Video: A video on registers is on the CD-ROM
1-19
sample
page
s

Computer accounting using MYOB business software
Self-test exercise 1.6
Use the file dem11.myo. You should be signed on as the Administrator.
Use the Sales Register option in the Sales command centre and look up an Open Invoice number 8302 for Macho Menswear. What is sold on this invoice?
Backing up a file
You will see reminders throughout this book to back up the MYOB data file. You should put the backup file in a separate location (not on the same disk that contains your original file). The backup file is a condensed “zip” file that you should rename if necessary to distinguish it from other backups.
How to backup a data file
Step Instruction 1 Select the File pull-down menu.
2 Select Backup option.
3 Select Backup Company File and M-Powered Services Centre only and either with or without checking for errors and click on Continue. If you selected Check Company File for errors a message will report any errors found. Check it and click the OK button.
4 Type in the file name of the backup file (it usually has a .zip extension). Note: MYOB AccountRight Plus default backup name is MYOBmmdd.zip The mmdd is the date in the format of month and day. For example, if you are backing up on 30 June the default name would be MYOB0630.zip. Usually a business would only have one MYOB AccountRight Plus data file but numerous backup files, each identified by the date in the name. As a student you will be working with a number of data files and it is necessary to name the backup files differently (i.e. use the original file name but with the .zip extension).
5 Change Drive and Folder if necessary (the default is a folder called Backup in the directory containing the main file).
6 Click the OK button.
1-20
sample
page
s

Chapter 1: Introduction to MYOB AccountRight Plus
Note: MYOB AccountRight Plus will NOT save a backup file to a floppy disk if the original (source) file is also located on the floppy.
Example 1.4—Backing-up a data file 1. If not already open, open the file called dem11.myo.
2. Select the File pull-down menu.
3. Click on the menu item called Backup.
4. Select the two options:
Backup Company File and M-Powered Services Centre only and Check Company File for errors.
5. Click on the Continue button.
6. Check the message for any errors and click the OK button.
7. Type the file name as: dem11.zip, change the Drive to drive C: and the Folder to TEMP i.e. C:\TEMP. (Note if the folder c:\Temp does not exist, select another suitable folder.)
8. Click on the Save button to create the backup file.
Video: A video on making a backup is on the CD-ROM
How to exit MYOB AccountRight Plus
Step Instruction 1 Select the File pull-down menu.
2 Select the Exit menu item (click on it).
3 Answer any notices. The notices will depend on the preferences set (see Figure 1.7 on page 1-11 for preferences on closing).
4 Select Yes if you want to make a backup of your file, and select the backup file name and destination (see example 1.4 above).
Self-test exercise 1.7
Exit the file dem11.myo and MYOB AccountRight Plus without a backup.
1-21
sample
page
s
Computer accounting using MYOB business software
Sample operations
All of the operations in this part will be covered in detail in later chapters. The purpose here is to let you see how MYOB AccountRight Plus works when it has already been set up. Later lessons will show you how to set up the business and the command centres so that everyday transactions are automatically entered correctly in the accounts. Some people will have to get used to the mouse while others will have to get used to window operations. The style of future exercises and notes will also be the same.
Note: All of the sample transactions are entered using the file dem11.myo
Example 1.5—Sample transactions
This example is of a business that is a wholesale distributor of a limited line of hats. It has already been set up and most of the July transactions have been entered. The following notes will go through the start-up procedures and some typical transactions. Follow these notes carefully but do not be concerned if you make errors – part of the learning process is to see where errors can occur. In later chapters you will learn of “recovery” procedures from errors. As stated above, these transactions will be examined in detail in later chapters and the purpose here is to become aware of MYOB AccountRight Plus procedures and screens. For these exercises, turn the spell checking off by deselecting this preference as shown in Figure 1.12 on page 1-15.
1. The exercise month is July 2011. You do not have to change the computer’s system date.
2. Start MYOB AccountRight Plus.
3. Open the file called dem11.myo and sign on as the Administrator.
4. If you are doing a formal course your printouts will need to include your name. The way to do this is to include your name in the company information. The files provided allow you to enter your name in the Address section. The following ‘How to ...’ instructions are used to change the business address, and other information.
How to change the existing business address
Step Instruction 1 Select the Setup pull-down menu at the top of the screen.
2 Select the Company Information menu item (click on it). The window should look like Figure 1.16 on the next page.
3 Type in any changes required to the company information. Use the TAB key to exit the address field.
4 Change a field by selecting it and editing the contents. To select a field, point to it and click. Normal windows editing applies.
1-22
sample
page
s

Chapter 1: Introduction to MYOB AccountRight Plus
Self-test exercise 1.8
Change the business address in the Company Information window by inserting your own name where it shows << your name >>.
Figure 1.16: Company Information window
Try your first self-assessment! Before continuing, check that you can now confidently do the following:
I can now do the following:
1 Start MYOB AccountRight Plus
2 Open an existing MYOB AccountRight Plus file
3 Select a command centre
4 Use a pull-down menu
5 Access and change the business information
6 Use the MYOB AccountRight Plus zoom arrows
7 Exit MYOB AccountRight Plus
8 Smile
1-23
sample
page
s

Computer accounting using MYOB business software
General journal entry
The first entry to try is a general journal entry to reverse accrued wages on 1 July 2011. General journal entries are usually the domain of accountants. Don’t worry if you do not understand all of this section – just see if you can follow the instructions to see how MYOB AccountRight Plus works. Of course, those using this book in a computer accounting subject will need to know how to enter general journal entries. At 1 July 2011 there is a credit of $2,778 in an account called ‘Accruals’. A reversal entry for this in a hand-written general journal would be –
Debit Credit Accruals $2,778.00 Salaries and wages $2,778.00 Reversal of accrued wages
To record this in the file dem11.myo you –
1. Select the Accounts command centre.
2. Select Record Journal Entry option.
3. The system date should be highlighted – type “1/07/2011” . If you are entering this before 1 July 2011, you will receive a warning as this is the security option selected as per Figure 1.7 on page 1-11.
4. An explanation of the entry is entered in the ‘Memo’ field (equivalent to a “narration” in hand written records). Type in the Memo as “Reversal of accrued wages” .
5. If you have not changed the Windows preference from that shown in Figure 1.12 (see page 1-15 where the preference is set to list accounts by name), the cursor should be on the first line of the journal ‘voucher’ under the column headed ‘Account’. To enter an account name you may:
Tap the Enter key and select the account from the resulting list; or
Use the selection list icon at the end of the field and select from the list; or
Type in the first letter, or some of the first few letters, of the name and ; or
Type in the full name and .
If you are using account numbers in a form you may either type it in (including the mandatory prefix), or tap the enter key for a selection list. You can then select the correct account from the list.
For this demonstration, type in the first few letters of “Accruals” until the full account name is shown and then use TAB to go to the ‘Debit’ column.
6. Enter “2778” in the Debit column and . Unlike many other accounting packages, MYOB AccountRight Plus will not object to the dollar sign or commas in the entry of dollar amounts, but you need not type them if you set the preferences to include them.
1-24
sample
page
s

Chapter 1: Introduction to MYOB AccountRight Plus
7. You could also allocate the amount to a particular job by entering in a job reference in the ‘Job’ column. An additional Memo may also be entered for each line of the journal entry in the ‘Memo’ column. The first line of the journal entry should show a default tax code of “N-T”. This tax code is used for any entry that has no effect on GST collected or paid. For tax codes and their meaning look at Chapter 2.
8. Type “Sa” to select the “Salaries and Wages” account or type the account number for “Salaries & Wages”.
9. TAB to the ‘Credit’ column and enter “2778” and (Note: The TAB key is used extensively in MYOB AccountRight Plus whenever a line of a journal or document is being entered).
10. Make sure that at the bottom of the window the totals of the Debits and Credits agree and that the ‘Out of Balance’ field is $0.00. Your Record Journal Entry window should look like Figure 1.17.
11. If you have made a mistake, point to the field, click and correct the error. If you want to cancel the whole entry, use the EDIT pull-down menu and select Erase General Journal Transaction.
12. Before you record any transaction you can use the EDIT pull-down menu at the top of the screen and select the Recap Transaction menu item. This will give you a preview of how the transaction will affect the accounts in the general ledger. Figure 1.18 on the next page is the Recap Transaction window for the journal entry shown in Figure 1.17.
13.
Figure 1.17: A general journal entry in the Record Journal Entry window
1-25
sample
page
s

Computer accounting using MYOB business software
Figure 1.18: Recap Transaction for a general journal entry
14. Click the OK button to close the Recap Transaction window.
15. Click on the Record button.
16. Click on the Journal button at the bottom of the Record Journal Entry window. The beginning and ending dates at the top of the Transaction Journal window should be set from 1/07/2011 to 31/7/2011. The entry just recorded should appear as an entry.
17. Click on the Close button to close the Transaction Journal window.
18. Close the Record Journal Entry window by clicking the Cancel button.
Video: A video on recording a general journal entry is on the CD-ROM
Purchase of an inventory item on credit
This transaction will be for the purchase of 100 hats (Item # D-113) from a supplier called Delefontes Inc. on the 28 July 2011. The purchase base price is $18 each (excluding the GST) and the tax code is GST. The Purchases command centre and inventory item has been set up to automatically increase inventory, increase accounts payable and record the GST input tax credit when this purchase is recorded.
In Chapter 6 the purchasing procedure of obtaining quotations, ordering the goods and receiving a supplier invoice (a bill) will be examined. For this introductory example, a bill will be recorded for goods received.
1. Select the Purchases command centre.
2. Select the Enter Purchases option.
3. Make sure that the document selected is a Bill (top of the Purchases – New Item window).
4. In this example, the window should be headed Purchases – New Item. In other
cases, this can be changed to a services purchase by selecting the Layout button at the foot of the window. A purchase order may be for an item of inventory or for a service (e.g. repairs to a fork lift).
1-26
sample
page
s
Chapter 1: Introduction to MYOB AccountRight Plus
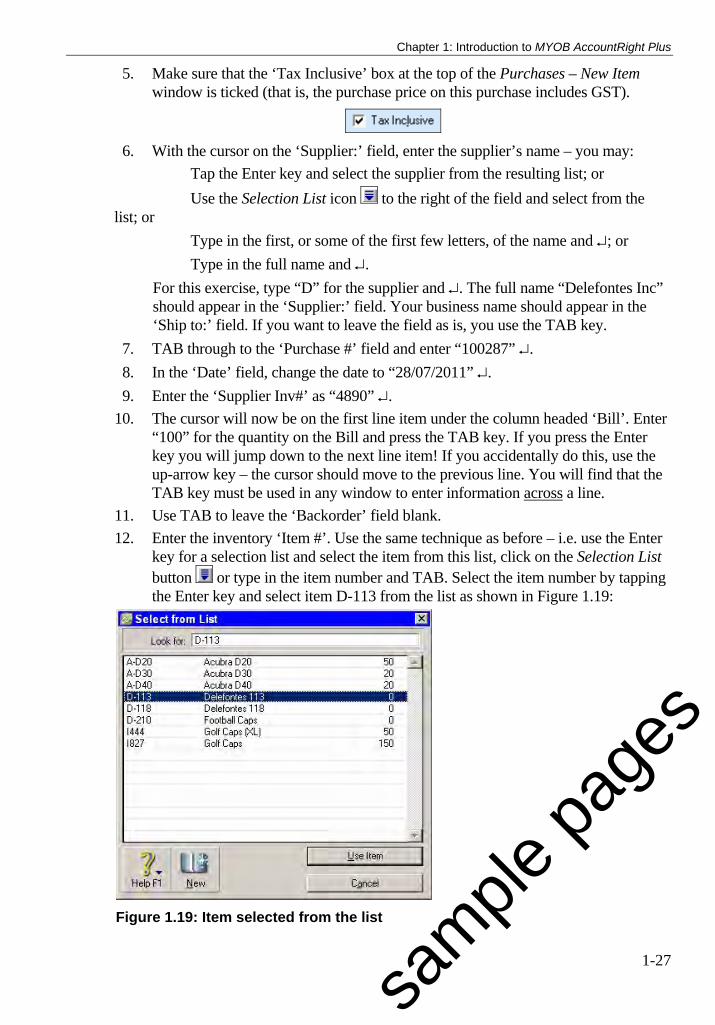
5. Make sure that the ‘Tax Inclusive’ box at the top of the Purchases – New Item window is ticked (that is, the purchase price on this purchase includes GST).
6. With the cursor on the ‘Supplier:’ field, enter the supplier’s name – you may:
Tap the Enter key and select the supplier from the resulting list; or
Use the Selection List icon to the right of the field and select from the list; or
Type in the first, or some of the first few letters, of the name and ; or
Type in the full name and .
For this exercise, type “D” for the supplier and . The full name “Delefontes Inc” should appear in the ‘Supplier:’ field. Your business name should appear in the ‘Ship to:’ field. If you want to leave the field as is, you use the TAB key.
7. TAB through to the ‘Purchase #’ field and enter “100287” .
8. In the ‘Date’ field, change the date to “28/07/2011” .
9. Enter the ‘Supplier Inv#’ as “4890” .
10. The cursor will now be on the first line item under the column headed ‘Bill’. Enter “100” for the quantity on the Bill and press the TAB key. If you press the Enter key you will jump down to the next line item! If you accidentally do this, use the up-arrow key – the cursor should move to the previous line. You will find that the TAB key must be used in any window to enter information across a line.
11. Use TAB to leave the ‘Backorder’ field blank.
12. Enter the inventory ‘Item #’. Use the same technique as before – i.e. use the Enter key for a selection list and select the item from this list, click on the Selection List button or type in the item number and TAB. Select the item number by tapping the Enter key and select item D-113 from the list as shown in Figure 1.19:
Figure 1.19: Item selected from the list
1-27
sample
page
s

Computer accounting using MYOB business software
13. TAB across to the ‘Price’ column and type in “19.8” .
14. The Purchase – New Item window should look like Figure 1.20:
Figure 1.20: A Bill for the purchase of items on credit
15. The Total column should show the extension of $1,980.00. The code ‘GST’ should also appear in the Tax column. The summary at the bottom of the invoice should also show that $1,980.00 is the total amount and the balance on this invoice due ($1,800.00 plus GST of $180.00). You could change the ‘Journal Memo’ and other fields by pointing to them, clicking and entering in different data. You can also add comments to the Purchase Order. This will be covered in Chapter 6.
16. If your screen is not as per Figure 1.20 you may point to any incorrect field, click, and re-enter the correct data. You may also abandon this purchase by selecting Erase Purchase from the Edit pull-down menu and re-do the entry
17. Use the Edit menu, Recap Transaction menu item and compare the transaction with Figure 1.21. Click on the OK button to close the Recap Transaction window.
Figure 1.21: Recap Transaction for an item purchase
18. Select the Record button to enter this as an actual purchase.
1-28
sample
page
s

Chapter 1: Introduction to MYOB AccountRight Plus
19. Click on the Cancel button to close the Purchases – New Item window. You will return to the Purchases command centre window.
20. Click on the Transaction Journal option. Set the dates from 1/7/2011 to 31/7/2011.
21. Use the scroll bar to go to the end of the journal display and you should see your entry for the $1,800 plus $180 GST for goods purchased from Delefontes Inc.
22. Close the Transaction Journal window.
Video: A video on recording a bill for purchasing an item is on the CD-ROM
Sale of inventory items on credit
This transaction will be for the sale of 60 D-113 hats and 100 I827 Golf Hats to Macho Menswear on Invoice Number 8303. The sale date is 29 July 2011. The Sales command centre and inventory items have been set up to automatically record a sale as an increase in the amount owing by a customer and increase the sales income account. It will decrease the inventory for the cost of the goods sold, increase the account for Cost of Goods Sold (this is explained in detail later in Chapter 7) and record the GST liability on the sale.
In Chapter 5 the full sales procedure of giving quotations, receiving an order for the goods or services and issuing an invoice to the customer will be examined. For this introductory example, an invoice will be recorded for goods sold without recording a quote and an order.
1. Select the Sales command centre.
2. Select the Enter Sales option.
3. The window title should be Sales – New Item. This can be changed to a services sale by selecting the Layout button at the foot of the window. A sales invoice may be for an item of inventory or for a service (e.g. software support).
4. Make sure that the document selected is an Invoice (top of the Sales – New Item window).
5. Make sure that the ‘Tax Inclusive’ box at the top of the Sales – New Item window
is ticked (that is, the sales price on this sales invoice includes GST).
6. With the cursor on the ‘Customer:’ field, enter the customer name – you may
Tap the Enter key and select the customer from the resulting list; or Use the Selection List icon to the right of the field and select from the
list; or Type in the first letter, or some of the first few letters, of the name and ;
or Type in the full name and .
1-29
sample
page
s

Computer accounting using MYOB business software
For this exercise, type “m” for the customer and . There are two customers with names beginning with “M”, but ‘Macho Menswear’ is the first name in alphabetical order and is displayed in the field. The full delivery address for Macho Menswear should appear in the ‘Ship to:’ field.
7. TAB through to the ‘Date’ field and enter the date “29/07/2011” and .
8. Enter “3686” as the ‘Customer PO #:’ (purchase order number) and .
9. Enter “60” for the quantity under the ‘Ship’ field and use the TAB key.
10. TAB to leave the ‘Backorder’ field blank.
11. Enter the ‘Item Number’. Use the same technique as before – i.e. tap the Enter key for a selection list and select the item from this list, or type in the item number and , or use the Selection List button . Select the item number “D-113”. Tap the Enter key to go to the next line of the invoice.
12. Enter “100” for the quantity to ship and TAB to the ‘Item Number’ field.
13. Select “I827” as the ‘Item Number’ and . The sales invoice should appear as in Figure 1.22:
Figure 1.22: A new sale invoice for items sold on credit
14. If your screen is not as per Figure 1.22 you may point to any incorrect field, click, and re-enter the correct data. You may also abandon this sale by selecting Erase Sale from the Edit pull-down menu and re-do the entry.
15. Use the Edit menu, Recap Transaction menu item and compare the transaction with Figure 1.23 on the next page. As a perpetual inventory system is used with items of inventory, the entry combines the sale to a customer and the transfer of cost from inventory to the cost of goods sold account. Click on the OK button to close the Recap Transaction window.
16. Select the Record button to enter this as an actual sale.
17. Click on the Cancel button to close the Sales – New Item window.
1-30
sample
page
s

Chapter 1: Introduction to MYOB AccountRight Plus
18. Click on the Transaction Journal option. Set the dates at the top of the window from 1/7/2011 to 31/7/2011.
Figure 1.23: Recap Transaction journal for sale of inventory items
19. Use the scroll bar to go to the end of the journal display and you should see your entry for the sale to Macho Menswear on the 29 July 2011.
20. Close the Transaction Journal window.
Video: A video on recording an inventory sale on credit is on the CD-ROM
Receipt of money from a customer (accounts receivable)
This transaction will record the receipt of $5,280 from an account receivable called “Jag Gear Pty Ltd”. This amount is paying Invoice # 8288 and is received on 30 July 2011. The file has been set up to automatically record this money in an account called “Undeposited Funds” and to decrease the amount owing by the debtor. The next section will show how to deposit this receipt into the bank.
1. Select the Sales command centre.
2. Select the Receive Payments option.
3. With the cursor on the ‘Customer:’ field, enter the customer name – you may:
Tap the Enter key and select the customer from the resulting list; or
Use the Selection List icon to the right of the field and select from the list; or
Type in the first letter, or some of the first few letters, of the name and ; or
Type in the full name and .
For this exercise, enter “j” for Jag Gear Pty Ltd and .
4. Enter “5280” as the amount received .
5. Jag Gear has paid by cheque. Use the Selection List icon in the ‘Payment Method:’ field and select “Cheque” from the list of methods. You can also type “ch” for a cheque.
1-31
sample
page
s

Computer accounting using MYOB business software
6. TAB or ENTER to the ‘Memo:’ field and accept the default .
7. Leave the ‘ID #’ as is and . This cash receipt number is automatically produced in numerical sequence and only needs to be changed if a receipt is cancelled.
8. The date of this transaction is “30 July 2011” .
9. TAB to the column headed ‘Amount Applied’. The amount of $5,280.00 should appear in this column and should relate to Invoice # 8288. Tap the Enter key. You may use the mouse to point to the line of invoice being paid if the first line is not correct. The Receive Payments window should look like Figure 1.24:
Figure 1.24: Payment received from a customer
10. If your Receive Payments window is not as per Figure 1.24 you may point to any incorrect field, click and re-enter the correct data. You may also abandon this receipt by selecting Erase Payment from the Edit pull-down menu and re-do the entry.
11. Use the Edit menu, Recap Transaction menu item and you should see that the account “Undeposited Funds” has been debited, with a credit to “Accounts Receivable” account. Click on the OK button to close the Recap Transaction window.
12. Click on the Record button.
13. Click on the Cancel button to close the Receive Payments window.
14. Click on the Transaction Journal option and the Receipts tab. If necessary, set the dates at the top of the window for July 2011.
15. You should see your entry for the receipt of $5,280.00 from Jag Gear Pty Ltd on 30 July 2011.
16. Close the Transaction Journal window.
1-32
sample
page
s

Chapter 1: Introduction to MYOB AccountRight Plus
Video: A video on recording a receipt from a customer is on the CD-ROM
Make a deposit
The previous section showed the receipt of a cheque from an account receivable. There could be several cheques received in any one day in addition to other methods of payment. You will see in Figure 1.24 that the money received has been debited to an account called “Undeposited Funds”, and this must now be deposited at the bank. The Prepare Bank Deposit option is used to bank these payments in a single deposit to the bank.
1. Select the Banking command centre.
2. Click on the Prepare Bank Deposit option.
3. Enter the date as “30/07/2011” .
4. Leave the ‘Select Receipts by:’ field as “All Methods” and the ‘Memo:’ as “Bank Deposit”.
5. In the ‘Deposit’ column, click against the cheque that is going to be deposited and a “√” should show. The total deposit should show $5,280.00 as in Figure 1.25:
Figure 1.25: Cheque received now deposited at bank
6. Click on the Record button.
7. Click on the Cancel button to close the Prepare Bank Deposit window.
8. Click on the Transaction Journal option and the Receipts tab. Set the dates from 1/7/2011 to 31/7/2011.
9. You should now see that the receipt of $5,280.00 from Jag Gear Pty Ltd recorded earlier into “Undeposited Funds” has now been deposited at the bank.
10. Close the Transaction Journal window.
Video: A video on making a deposit is on the CD-ROM
1-33
sample
page
s

Computer accounting using MYOB business software
1-34
Memo: If you only have a single receipt in a day, you can override the default setup in this file and record the receipt directly to the bank account. At the top of the Receive Payments window in Figure 1.24 you will see that the receipt from Jag Gear was debited to “Undeposited Funds”. If you select the option button for Deposit to Account, the receipt is debited to the account for “Corporate State Bank” and you would not use Prepare Bank Deposit.
Payment of money to an account payable
This transaction will record the payment of $3,850 to an account payable called “Marbuk Imports”. This amount pays Purchase # 100280 and is paid on 31 July 2011. The file has been set up to automatically decrease the amount in the bank account and to decrease the amount owing to the creditor.
1. Select the Purchases command centre.
2. Select the Pay Bills option.
3. With the cursor on the ‘Supplier:’ field, enter the account payable name – you may:
Tap the Enter key and select the supplier from the resulting list; or
Use the Selection List icon to the right of the field and select from the list; or
Type in the first letter, or some of the first letters, of the name and ; or
Type in the full name and . For this exercise, type “m” for Marbuk Imports .
4. Use the TAB key to leave the ‘Payee:’, ‘Memo:’ and ‘Cheque No.:’ fields as they are and enter the date as “31/07/2011” .
5. Enter “3850” as the amount .
6. TAB to the ‘Amount Applied’ column and apply the $3,850 to Purchase # 100275 and . The Pay Bills window should look like Figure 1.26 on the next page.
7. If your Pay Bills window is not as per Figure 1.26 you may point to any incorrect field, click, and re-enter the correct data. You may also abandon this receipt by selecting Erase Payment from the Edit pull-down menu and re-do the entry.
8. Use the Edit menu, Recap Transaction menu item and you should see that “Accounts Payable” account has been debited, with a credit to the bank account “Corporate State Bank”. Click on the OK button to close the Recap Transaction window.
9. Click on the Record button.
10. Click on the Cancel button to close the Pay Bills window.
11. Click on the Transaction Journal option and the Disbursements tab. Set the dates from 1/7/2011 to 31/7/2011.
12. You should see your entry for the payment to Marbuk Imports on 31 July 2011 (Cheque ID# 250161).
13. Close the Transaction Journal window.
sample
page
s

Chapter 1: Introduction to MYOB AccountRight Plus
Figure 1.26: Payment made to a supplier
Video: A video on recording a payment to an account payable is on the CD-ROM
Payment of money for a service
This transaction will record the payment of $462 (including $42 GST) to the Prospero County Council for electricity. This has not previously been recorded as owing. The payment is made on 31 July 2011. The Banking command centre automatically reduces the amount of money in the nominated bank account, but the account to be debited (charged) in the General Ledger must be entered by the operator – in this case it will be an expense account for electricity. The account name is the preferred method of showing the accounts list in this chapter.
1. Select the Banking command centre.
2. Select the Spend Money option.
3. Make sure that the ‘Tax Inclusive’ box at the top of the Spend Money window is ticked (that is, the amount we will record on this cheque includes the GST).
4. Type in the date, which is “31 July 2011” .
5. Enter “462” as the amount .
6. At the ‘Card:’ field use the TAB key to move through to the ‘Payee’ field (the use of Cards will be explained in detail later).
7. In the ‘Payee:’ field type in “Prospero County Council” and use the TAB key to move to the ‘Memo:’ field. (If you use the Enter key in the ‘Payee:’ field it will only move down one line in that field because you can enter a multi-line address).
1-35
sample
page
s
Computer accounting using MYOB business software
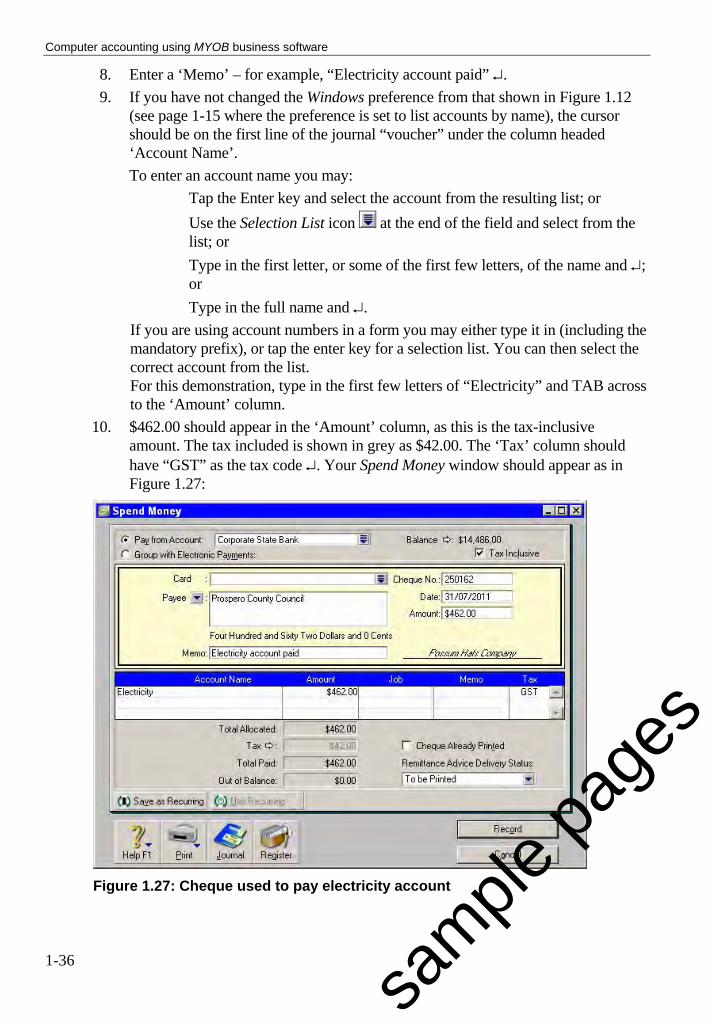
8. Enter a ‘Memo’ – for example, “Electricity account paid” .
9. If you have not changed the Windows preference from that shown in Figure 1.12 (see page 1-15 where the preference is set to list accounts by name), the cursor should be on the first line of the journal “voucher” under the column headed ‘Account Name’.
To enter an account name you may:
Tap the Enter key and select the account from the resulting list; or
Use the Selection List icon at the end of the field and select from the list; or
Type in the first letter, or some of the first few letters, of the name and ; or
Type in the full name and .
If you are using account numbers in a form you may either type it in (including the mandatory prefix), or tap the enter key for a selection list. You can then select the correct account from the list. For this demonstration, type in the first few letters of “Electricity” and TAB across to the ‘Amount’ column.
10. $462.00 should appear in the ‘Amount’ column, as this is the tax-inclusive amount. The tax included is shown in grey as $42.00. The ‘Tax’ column should have “GST” as the tax code . Your Spend Money window should appear as in Figure 1.27:
Figure 1.27: Cheque used to pay electricity account
1-36
sample
page
s

Chapter 1: Introduction to MYOB AccountRight Plus
11. If your Spend Money window is not as per Figure 1.27 you may point to any incorrect field, click, and re-enter the correct data. You may also abandon this receipt by selecting Erase Cheque Transaction from the Edit pull-down menu.
12. Use the Edit menu, Recap Transaction menu item and you should see that account number 6-1050 “Electricity” has been debited with $420 (the expense excluding the GST), account number 2-1430 “GST Paid” has been debited with $42, and the bank account number 1-1120 “Corporate State Bank” has been credited with $462. Click on the OK button to close the Recap Transaction window.
13. Click on the Record button.
14. Click on the Cancel button to close the Spend Money window.
15. Click on the Transaction Journal option. If your system date has been set correctly you will see the journal entries for all the payments in July 2011 (if not, set the beginning and ending dates at the top of the window).
16. You should see your entry for the payment of $462.00 to Prospero County Council on 31 July 2011 ($420.00 for electricity and $42.00 for the GST paid).
17. Close the Transaction Journal window.
Video: A video on recording a cheque for an expense is on the CD-ROM
How to recall, edit or delete a transaction
Step Instruction 1 Select the transaction journal concerned.
2 Use the scroll bar to locate the transaction required.
3 To Recall the transaction, click on the detail arrow to open it. Go to step 5.
To Edit the transaction do steps 4 & 5.
To Delete the transaction go to step 6.
4 Edit the transaction if necessary (and if allowed).
5 Click on the OK button to record any changes or click on the Cancel button to exit without changes.
6 To delete, select Delete ‘Transaction’ menu item from the Edit pull down menu.
IMPORTANT: Transactions cannot be modified and/or deleted if the first box in the Security tab of the Preferences is ticked on: ‘Transactions CAN’T be Changed …’ See Figure 1.7 on page 1-11.
Video: A video on editing and deleting transactions is on the CD-ROM
1-37
sample
page
s

Computer accounting using MYOB business software
Self-test exercise 1.9
Using the file dem11.myo, recall sales invoice #8301 made out to Jag Gear Pty Ltd on 3 July 2011. The transaction journal is for sales. Answer the following:
(a) What is the description of the item that was sold on this invoice?
(b) How many hats were sold on this invoice?
(c) Who was the salesperson?
(d) Use the Selection List icon at the ‘Salesperson’ field and write down the number of employees. Click the Cancel button to return to the invoice.
(e) Which carrier was used to transport the goods?
(f) What is the full comment on this invoice? Write it down.
(g) What was the promised delivery date?
(h) What is Jag Gear’s ‘Ship To’ address?
Print financial statements
Printing in general was looked at earlier. The example has been set up to produce a Balance Sheet and an Income Statement in a particular format. Follow the ‘How to ...’ instructions below and complete self-test exercises 1.10 and 1.11.
How to print general ledger reports
Step Instruction 1 Select the Accounts command centre and click on the Reports button.
OR Click on the down arrow on the Reports button while in any command
centre and select Accounts.
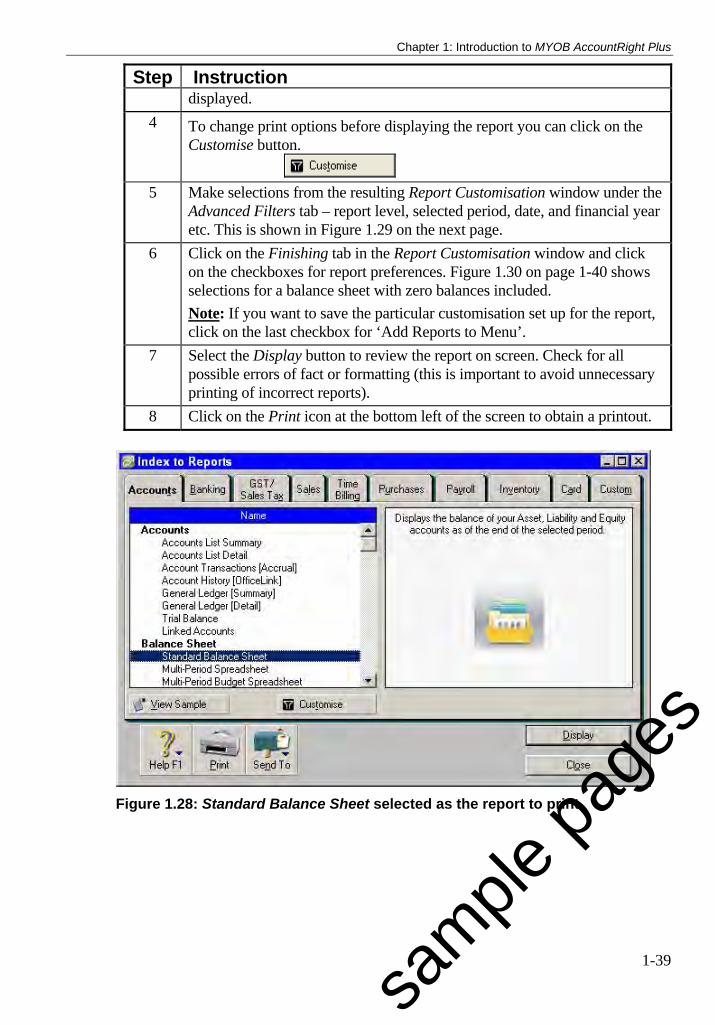
2 To select a report, click on its name. Select Standard Balance Sheet in the
Index to Reports window. Your screen should be similar to Figure 1.28 on the next page, which shows the Standard Balance Sheet report selected.
(continued on the next page)
3 Click on the Display button to review the report on screen.
If you set up preferences to always show Customise options (as per Figure 1.11 on page 1-15 earlier), the Report Customisation window will be
Click
Click
Drag down and select from drop-down list
1-38
sample
page
s
Chapter 1: Introduction to MYOB AccountRight Plus
1-39
Step Instruction displayed.
4 To change print options before displaying the report you can click on the Customise button.
5 Make selections from the resulting Report Customisation window under the Advanced Filters tab – report level, selected period, date, and financial year etc. This is shown in Figure 1.29 on the next page.
6 Click on the Finishing tab in the Report Customisation window and click on the checkboxes for report preferences. Figure 1.30 on page 1-40 shows selections for a balance sheet with zero balances included.
Note: If you want to save the particular customisation set up for the report, click on the last checkbox for ‘Add Reports to Menu’.
7 Select the Display button to review the report on screen. Check for all possible errors of fact or formatting (this is important to avoid unnecessary printing of incorrect reports).
8 Click on the Print icon at the bottom left of the screen to obtain a printout.
Figure 1.28: Standard Balance Sheet selected as the report to print
sample
page
s

Computer accounting using MYOB business software
Figure 1.29: Report Customisation – Advanced Filters for a balance sheet
Figure 1.30: Report Customisation – Finishing options for a balance sheet
Video: A video on printing reports is on the CD-ROM
Self-test exercise 1.10
Using the file dem11.myo, select the report called Standard Balance Sheet from the Accounts index to reports.
Set the filter selections as per Figures 1.29 and 1.30 and display the balance sheet on the screen (expand the window to see more of it at one time).
Print the balance sheet. Compare your printout with the answer to this exercise.
1-40
sample
page
s

Chapter 1: Introduction to MYOB AccountRight Plus
Self-test exercise 1.11
Using the file dem11.myo, select the report called Profit & Loss [Accrual] from the Accounts index to reports.
Set the filter selections to include zero balances and with dates from 1/7/2011 to 31/7/2011.
Display the profit & loss statement on the screen.
Print the profit & loss statement and check against the answer.
How to close a MYOB AccountRight Plus session
Step Instruction 1 Close any window back to the Command Centre window.
2 Select Exit from the File pull-down menu.
Self-test exercise 1.12
Exit MYOB AccountRight Plus.
Try self-test exercise 1.13. Remember that the purpose in this introduction is to become familiar with MYOB AccountRight Plus, the mouse and Windows. If you look back at pages 1-22 to 1-39 for examples, the following transactions will follow the order given on those pages.
Self-test exercise 1.13
Use the file dem11.myo. This self-test problem follows on from the Hat business example above.
All of the following entries are at 31 July 2011.
Record a general journal entry to accrue $2,438 salaries and wages at the end of the month. This entry is – Debit Credit Salaries and Wages $2,438.00 Accruals $2,438.00 Accrued salaries and wages at 31/7/2011 (see page 1-24 for example)
Record a bill for the purchase of 60 A-D40 hats from Acubra Hats Pty Ltd on credit at $49.50 each (including GST). Supplier invoice number is 8948. Select the comment “We appreciate your business” and the Ship Via is Best Way Transport (see page 1-26 for example).
Record an invoice for the sale of 40 Golf Caps (Item # I827) on credit to Jag Gear Pty Ltd at $22.00 each (including GST) – (their PO #482). Ship via Hills Transport (see page 1-29 for example).
(continued on the next page)
1-41
sample
page
s

Computer accounting using MYOB business software
Self-test exercise 1.13 (continued)
Use Prepare Bank Deposit and bank the $5,390.00 received from Jag Gear Pty Ltd (see page 1-33 for example).
Paid $8,250.00 to Acubra Hats Pty Ltd on PO #100281 (see page 1-34 for example).
Paid $50.60 ($46 plus GST) to Norman’s Newsagency for newspapers supplied in July. Charge this to the account called “Office Expenses” (see page 1-35 for example).
Print a Standard Balance Sheet as at 31 July 2011 and a Profit & Loss [Accrual] for July 2011. This time do NOT include zero balances (see page 1-38 for instructions).
Complete the final competency checklist.
Competency checklist
I can now do the following:
1 Start MYOB AccountRight Plus
2 Open an existing MYOB AccountRight Plus file
3 Use a pull-down menu
4 Access and change the business information
5 Select a Command Centre
6 Select an option in a Command Centre
7 Exit MYOB AccountRight Plus
8 Use the TAB key correctly in document entry
9 Use the Selection List icon to produce a selection list
10 Use the detail arrow to examine the detail for an item
11 Select and print a financial statement report
12 Use the Customise windows to set required output in a report
13 Display a general ledger report on the screen
End
You should now have a general idea of how MYOB AccountRight Plus works. Do not worry if you are not fully conversant with how to enter some of the transactions. You are not yet expected to be able to repeat the entries shown in this chapter as an assessment exercise. In later chapters you will learn to set up MYOB AccountRight Plus correctly and learn in greater detail the various options available. You will also get plenty of practice in transaction entry!
1-42
sample
page
s

Chapter 1: Introduction to MYOB AccountRight Plus
1-43
Chapter 1: Assessment exercises 1.1 The month for this exercise is July 2011.
Start MYOB AccountRight Plus.
Open the existing file ass11.myo. Sign on as the Administrator without a password.
Change the company information so that your name appears in the address field.
Write down answers to the following:
What is the company name?
Display the Accounts List on screen. What is the balance of the National Bank account?
Display the sales transaction journal for July 2011. Use the ‘zoom’ arrow next to invoice # 1027 on 18 July and write down the items that were sold, and the salesperson.
Select the Card File command centre, Cards List option and click on the Supplier tab. Use the ‘zoom’ arrow next to “Mwangi Mills” and write down the phone number and contact name.
Print a balance sheet as at 31 July 2011 (include zero balances).
How much is the liability for the Goods and Services Tax (GST)?
Exit MYOB AccountRight Plus.
1.2 The month for this exercise is July 2011.
Start MYOB AccountRight Plus.
Open the existing file ass12.myo. Sign on as the Administrator without a password.
Change the company information so that your name appears in the address field.
Write down answers to the following:
What is the company name?
Display the Accounts List on screen. What is the balance of the Colonial State Bank (Account 1-1100)? How much is the GST liability (Account 2-1200)?
Display the sales transaction journal for July 2011. Use the ‘zoom’ arrow next to Invoice ID# 1333 and write down the items that were sold, the amount of GST on the invoice, the salesperson and the transport company.
Select the Card File command centre, the Cards List option and Employee tab. Use the ‘zoom’ arrow and write down Peter Kosiak’s salutation and
email address.
Print the accounts list summary (include zero balances).
Exit MYOB AccountRight Plus.
sample
page
s
Computer accounting using MYOB business software
1-44
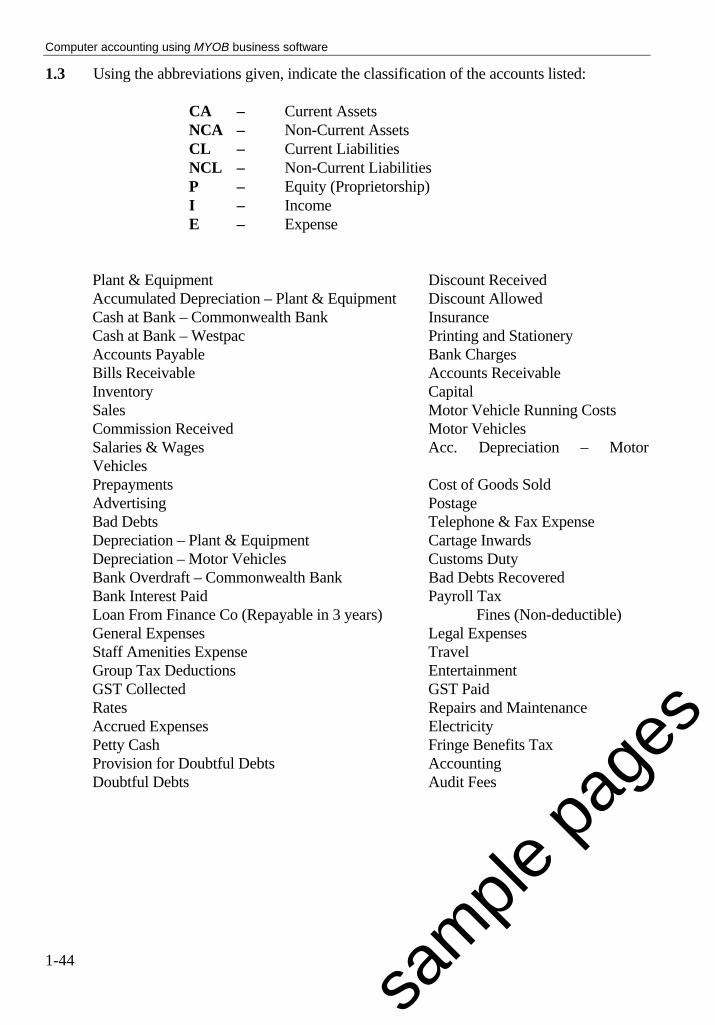
1.3 Using the abbreviations given, indicate the classification of the accounts listed: CA – Current Assets NCA – Non-Current Assets CL – Current Liabilities NCL – Non-Current Liabilities P – Equity (Proprietorship) I – Income E – Expense
Plant & Equipment Discount Received Accumulated Depreciation – Plant & Equipment Discount Allowed Cash at Bank – Commonwealth Bank Insurance Cash at Bank – Westpac Printing and Stationery Accounts Payable Bank Charges Bills Receivable Accounts Receivable Inventory Capital Sales Motor Vehicle Running Costs Commission Received Motor Vehicles Salaries & Wages Acc. Depreciation – Motor Vehicles Prepayments Cost of Goods Sold Advertising Postage Bad Debts Telephone & Fax Expense Depreciation – Plant & Equipment Cartage Inwards Depreciation – Motor Vehicles Customs Duty Bank Overdraft – Commonwealth Bank Bad Debts Recovered Bank Interest Paid Payroll Tax Loan From Finance Co (Repayable in 3 years) Fines (Non-deductible) General Expenses Legal Expenses Staff Amenities Expense Travel Group Tax Deductions Entertainment GST Collected GST Paid Rates Repairs and Maintenance Accrued Expenses Electricity Petty Cash Fringe Benefits Tax Provision for Doubtful Debts Accounting Doubtful Debts Audit Fees
sample
page
s

Chapter 1: Introduction to MYOB AccountRight Plus
1.4 Using the information in Question 1.3 (and your answer), prepare a draft balance sheet. Use group headings, indent account names for items that will be totalled, and indicate where totals will appear. Here is a start –
Assets Current Assets Cash Commonwealth Bank Westpac Petty Cash Total Cash Accounts Receivable Accounts Receivable Provision For Doubtful Debts Net Accounts Receivable Bills Receivable Inventory Prepayments Total Current Assets Non-Current Assets etc.
Note: In the example above, there are four indents (or margins). From left to right they go from the most general heading to the most specific posting account. This four-level layout, and the difference between headings and posting accounts is most important in designing a Chart of Accounts in MYOB
AccountRight Plus.
1.5 List the advantages of using a computerised bookkeeping system rather than a manual system. Are there any disadvantages?
1-45
sample
page
s

Computer accounting using MYOB business software
Chapter 1: Answers to self-test exercises (where applicable) 1.1 The business name for the dem11.myo file is “Possum Hats Company”. 1.2 (a) There are 8 Command Centres. The Banking Command Centre contains options
for receiving and paying money. This includes electronic payments and bank deposits. The other principal option in this Command Centre is “Reconcile Accounts” and this is used mainly for bank reconciliations.
The Sales Command Centre is used to record invoices for goods and services sold to customers on credit and to record payments received from them. There are also options for printing or emailing documents.
The Card File Command Centre is used to maintain (add/edit/delete) information about customers, suppliers, employees and personal contacts. Options are also available to use the card information for labels and form letters.
(b)
Enter sales – Sales Command Centre Pay bills from suppliers – Purchases Command Centre
Spend money – Banking Command Centre Set item prices – Inventory Command Centre Print Payment Summaries – Payroll Command Centre Prepare time billing invoice – Time Billing Command Centre
Reconcile accounts – Banking Command Centre 1.3 The preferences are shown in Figures 1.9 and 1.10. Part of the User Access window
for the user called “MKUBWA” is:
1-46
sample
page
s
Chapter 1: Introduction to MYOB AccountRight Plus
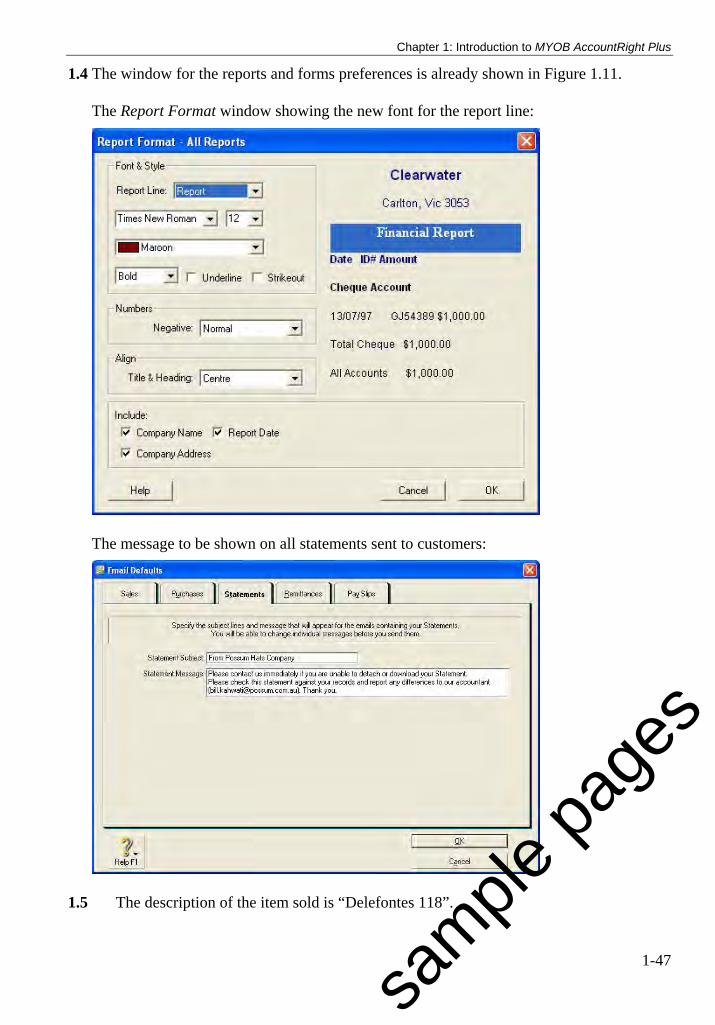
1.4 The window for the reports and forms preferences is already shown in Figure 1.11. The Report Format window showing the new font for the report line:
The message to be shown on all statements sent to customers:
1.5 The description of the item sold is “Delefontes 118”.
1-47
sample
page
s

Computer accounting using MYOB business software
1.6 Sales Register window – Open Invoices
Open Invoice 8302
1.7 No answer – you should be able to exit and to make a backup of your file.
1-48
sample
page
s

Chapter 1: Introduction to MYOB AccountRight Plus
1.8
1.9 The details on Invoice #8301 made out to Jag Gear on 3 July are: (a) The description of the item sold was “Delefontes 118” (b) 100 hats were sold on this invoice (c) The salesperson was Aravinda Wickeramasinge (d) There are two employee cards (e) The carrier as per the ‘Ship To:’ field was “Hills Transport” (f ) The full comment is “Call Steven on 0457 893 456 for next month’s specials” (g) The promised delivery date was 15/7/2011 (h) The delivery address for Jag Gear is 44A Silvertail Drive, Manly, NSW 2095
1-49
sample
page
s

Computer accounting using MYOB business software
1-50
1.10 Possum Hats Company
Answer to self-test exercise 1.10
Balance Sheet
As of July 2011
Assets Current Assets Cash and Bank Corporate State Bank $14,024.00 Petty Cash $500.00 Undeposited Funds $0.00 Electronic Clearing $0.00 Payroll Cheque Account $0.00 Total Cash and Bank $14,524.00 Accounts Receivable Accounts Receivable $43,296.00 Provision for Doubtful Debts ($500.00) Total Accounts Receivable $42,796.00 Inventory $14,440.00 Deposits $0.00 Prepayments $2,100.00 Total Current Assets $73,860.00 Non-Current Assets Furniture & Fixtures Furn. & Fittings – at cost $11,800.00 Acc. Depreciation – F&F ($2,360.00) Total Furniture & Fixtures $9,440.00 Office Equipment Office Equipment – at cost $26,000.00 Acc. Depreciation – Off.Equip. ($8,400.00) Total Office Equipment $17,600.00 Motor Vehicles Motor Vehicles – at cost $88,000.00 Acc. Depreciation – Motor Veh. ($18,200.00) Total Motor Vehicles $69,800.00 Deposits Paid $0.00 Total Non-Current Assets $96,840.00 Total Assets $170,700.00 Liabilities Current Liabilities Accounts Payable $29,975.00 Sundry Creditors $0.00 Accruals $0.00
sample
page
s

Chapter 1: Introduction to MYOB AccountRight Plus
1-51
1.10 (continued) PAYG Withholding Payable $1,664.00 Payroll Liabilities $0.00 GST Control GST Collected $18,426.00 GST Paid ($20,079.71) Total GST Control ($1,653.71) Customer Deposits $0.00 Unearned Service Contracts $0.00 Total Current Liabilities $29,985.29 Non-Current Liabilities Loan – D. Doubleday & Crap $5,000.00 Loan – A.G.C. Finance $15,000.00 Total Non-Current Liabilities $20,000.00 Total Liabilities $49.985.29 Net Assets $120,714.71 Equity Capital – P. Doubleday $92,931.15 Drawings $0.00 Retained Earnings $0.00 Current Year Earnings $3,004.91 Reserves $24,778.65 Historical Balancing $0.00 Total Proprietorship $120,714.71 1.11
Possum Hats Company
Answer to self-test exercise 1.11
Profit & Loss Statement
July 2011
Income Sales – Acubras $19,600.00 Sales – Delefontes $6,960.00 Sales – Imports $5,900.00 Total Income $32,460.00 Cost of Sales Cost of Goods Sold – Acubras $12,440.00 Cost of Goods Sold – Delefontes $3,480.00 Cost of Goods Sold – Imports $4,500.00 Total Cost of Sales $20,420.00 Gross Profit $12,040.00
sample
page
s

Computer accounting using MYOB business software
1-52
1.11 (continued) Expenses Advertising $413.23 Bank Charges $56.00 Depreciation $0.00 Discount Allowed $0.00 Electricity $420.00 Employer Expenses $0.00 Insurance $661.15 Interest $28.00 Motor Vehicle $401.66 Office Expenses $206.61 Postage $71.07 Professional Fees $0.00 Rent $1,652.89 Repairs & Maintenance $56.20 Salaries & Wages $4,222.00 Telephone $347.11 Travel $499.17 Payroll Tax $0.00 Workers Compensation $0.00 Penalties (non-deductible) $0.00 Entertainment (non-deductible) $0.00 Total Expenses $9,035.09 Operating Profit $3,004.91 Other Income Interest Received $0.00 Commission Received $0.00 Total Other Income $0.00 Net Profit/(Loss) $3,004.91 1.12 No answer – you should be able to exit an MYOB file.
sample
page
s

Chapter 1: Introduction to MYOB AccountRight Plus
1-53
1.13 Possum Hats Company Answer to self-test exercise 1.13 Balance Sheet As of July 2011
Assets Current Assets Cash and Bank Corporate State Bank $11,113.40 Petty Cash $500.00 Total Cash and Bank $11,613.40 Accounts Receivable Accounts Receivable $38,786.00 Provision for Doubtful Debts ($500.00) Total Accounts Receivable $38,286.00 Inventory $16,540.00 Prepayments $2,100.00 Total Current Assets $68,539.40 Non-Current Assets Furniture & Fixtures Furn. & Fittings – at cost $11,800.00 Acc. Depreciation – F&F ($2,360.00) Total Furniture & Fixtures $9,440.00 Office Equipment Office Equipment – at cost $26,000.00 Acc. Depreciation – Off.Equip. ($8,400.00) Total Office Equipment $17,600.00 Motor Vehicles Motor Vehicles – at cost $88,000.00 Acc. Depreciation – Motor Veh. ($18,200.00) Total Motor Vehicles $69,800.00 Total Non-Current Assets $96,840.00 Total Assets $165,379.40 Liabilities Current Liabilities Accounts Payable $24,695.00 Accruals $2,438.00 PAYG Withholding Payable $1,664.00 GST Control GST Collected $18,506.00 GST Paid ($20,354.31) Total GST Control ($1,848.31) Total Current Liabilities $26,948.69 Non-Current Liabilities Loan – D. Doubleday & Crap $5,000.00 Loan – A.G.C. Finance $15,000.00 1.11 (continued)
sample
page
s
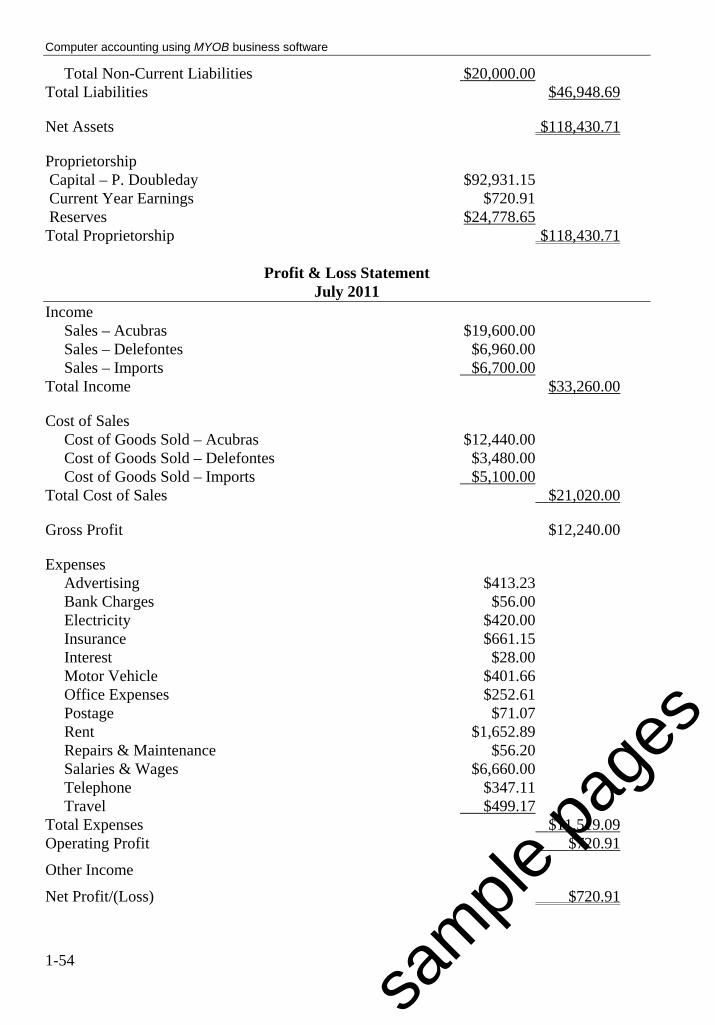
Computer accounting using MYOB business software
1-54
Total Non-Current Liabilities $20,000.00 Total Liabilities $46,948.69
Net Assets $118,430.71
Proprietorship Capital – P. Doubleday $92,931.15 Current Year Earnings $720.91 Reserves $24,778.65 Total Proprietorship $118,430.71
Profit & Loss Statement July 2011
Income Sales – Acubras $19,600.00 Sales – Delefontes $6,960.00 Sales – Imports $6,700.00 Total Income $33,260.00
Cost of Sales Cost of Goods Sold – Acubras $12,440.00 Cost of Goods Sold – Delefontes $3,480.00 Cost of Goods Sold – Imports $5,100.00 Total Cost of Sales $21,020.00
Gross Profit $12,240.00
Expenses Advertising $413.23 Bank Charges $56.00 Electricity $420.00 Insurance $661.15 Interest $28.00 Motor Vehicle $401.66 Office Expenses $252.61 Postage $71.07 Rent $1,652.89 Repairs & Maintenance $56.20 Salaries & Wages $6,660.00 Telephone $347.11 Travel $499.17 Total Expenses $11,519.09 Operating Profit $720.91
Other Income
Net Profit/(Loss) $720.91
sample
page
s