introduction to programming with java - team up...
TRANSCRIPT

Act 1
Introduction to Programming with
Java

Legal Mumbo Jumbo
Based on content shamelessly stolen from FIRST Team 1764.
No Robots we harmed in the making of these slides.

Expectations
● Programming can be hard.● It takes years to master a programming
language.● Don't expect to fully learn Java in this
session...it's just an introduction.● Start Learning Now!

What is Java?
● Java is an object oriented programming language that compiles its programs to byte code and executes within a Java virtual machine.
● The Java virtual machine enables the program to be (theoretically) architecture agnostic.

Compiled vs. Interpreted Languages
● Interpreters run source program, "interpreting" the source code on the fly.● Compilers translate the source program to machine language.
– Well, actually, they usually translate it to object code.
– The object code is "linked" with other code by a linker.
● Speed– Compilers win
– Optimizing compilers really win
– (In Java automatic garbage collector runs as a low-priority background thread e.g. improves response.)
● Security, viruses etc.– Fully interpreted languages win
● Java is interpreted.– Well, actually, it's compiled to "bytecodes".
– Bytecodes are interpreted by a virtual machine.
– The virtual machine executes the bytecode
● Java is a trade off between speed and security.

Why Use Java?
● Provides a simpler approach to multi- architecture programming.
● To some degree provides a portable platform to run executable code.
● Due to Java’s ability to port the virtual machine to multiple architecture’s, Java is found in devices ranging from toasters, TV’s, mobile phones, cameras, blue-ray players and more.
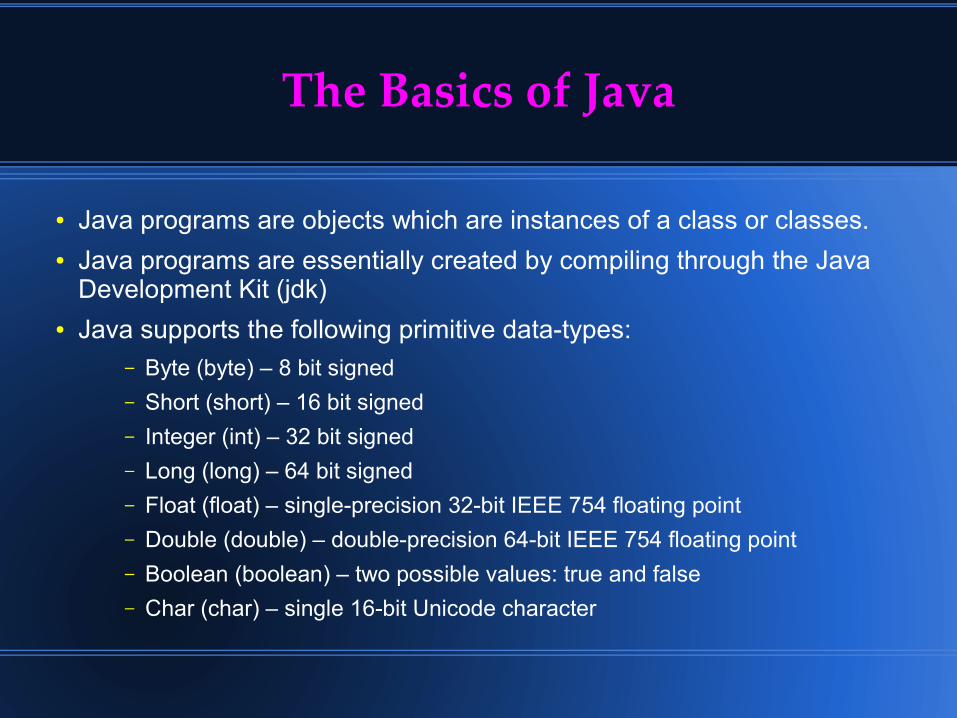
The Basics of Java
● Java programs are objects which are instances of a class or classes.● Java programs are essentially created by compiling through the Java
Development Kit (jdk)● Java supports the following primitive data-types:
– Byte (byte) – 8 bit signed
– Short (short) – 16 bit signed
– Integer (int) – 32 bit signed
– Long (long) – 64 bit signed
– Float (float) – single-precision 32-bit IEEE 754 floating point
– Double (double) – double-precision 64-bit IEEE 754 floating point
– Boolean (boolean) – two possible values: true and false
– Char (char) – single 16-bit Unicode character

How simple is it to write a Java program? What do I need?
● The Java Runtime Environment – JRE● The Java Development Kit – JDK● Minimally a text editor such as notepad (real men
use vim, or notepad++). Those beginning may want an IDE such as:
– Eclipse
– NetBeans (FRC currently prefers)
– IntelliJ IDEA
– JCreator

Java Programming
● Source code for a Java program (or class), the un-compiled program, is typically stored in text files ending with the extension .java.
● Compiled Java classes (or programs) are stored using the file extension .class.
● Sometimes the source packages are stored in executable formats with the extension .jar. Typically they are executed through the following command “java –jar <jarname>”.

The Basic Process of Designing a Java Program (In Summary)
● Code● Compile (through the JDK)● Execute (through the Java VM)● Frantically push the stop button● Scratch Head (or repair wall)● Realize you disabled the stop button via code● Debug● Test● Debug● Test

What does a simple Java program look like?
Program Code Output – Command Windowimport java.lang.*;
public class myProgram { public static void main(String[] args) { System.out.println(“Hello world!”); }}
Hello world!

Defining Variables and Constants
● Variable(data type) => attribute name ;– int x;
– float y;
– char z;
● Constant => final attribute name = value;– final int THISYEAR = 2011;

Java Syntax Usage
● Simple assignments listed above by using the = sign or small expression.
– int e = 1;– String str = “Hello”;– int j = 1+ e;
● Invoking procedures– Procedure name (Optional parameters)
● printMyName(nameIn);● printMyName();

Java Syntax – Math Operators
● + for addition● - for subtraction● * for multiplication● / for division● % (modulus) the remainder after division● Math.sqrt(x) the square root of a number x.● Math.abs(x) the absolute value of a number x.● Math.sin(x), Math.cos(x), Math.tan(x)

Java Syntax – Comparison Operators
● Comparison operators will return true (when a value falls within the comparison parameter) or false when it does not.
– < less than– <= less than or equal to
– == equal to
– >= greater than or equal to– > greater than
– != not equal
● To help compare ranges you can use the following statements with in your statements.
– && implies AND
– || implies OR

Java Syntax
● Compound syntax
– Selection statements
– If
– If/else
– Switch/case
– Repetition / iteration
– while
– Do
– For

Java Syntax - Continued
● Methods are procedures that are called upon can take a parameter, and can return a data value.
● Method names typically start with a lowercase letter.
● attribute methodName (parameter list)– IE: int addOneToX(int x) { x = x+1; return x; }
– String helloName(String nameIn) {return “Hello “ + nameIn; }

Java Syntax - Arrays
● Arrays are collections of a single data-type either in a single dimension or a multi-dimension.
● Array sizes are declared before the array can be used.
● Things can be placed into a direct index and thus can be retrieved through that index.

Array - Sample
int myNumbers[] = new Int[4];
myNumbers[0] = 4;
myNumbers[1] = 2;
myNumbers[2] = 3;
myNumbers[3] = 5;
System.out.println(myNumbers[0]);
-----------Output--------------
4

Other Java statements
● Exceptions – Occur when an input or error in processing occurs which the program or the java virtual machine is unable to cope with.
● In a “perfect world”, make sure that inputs are within in processing range and/or data-type.
● Or use a Try/Catch statement.
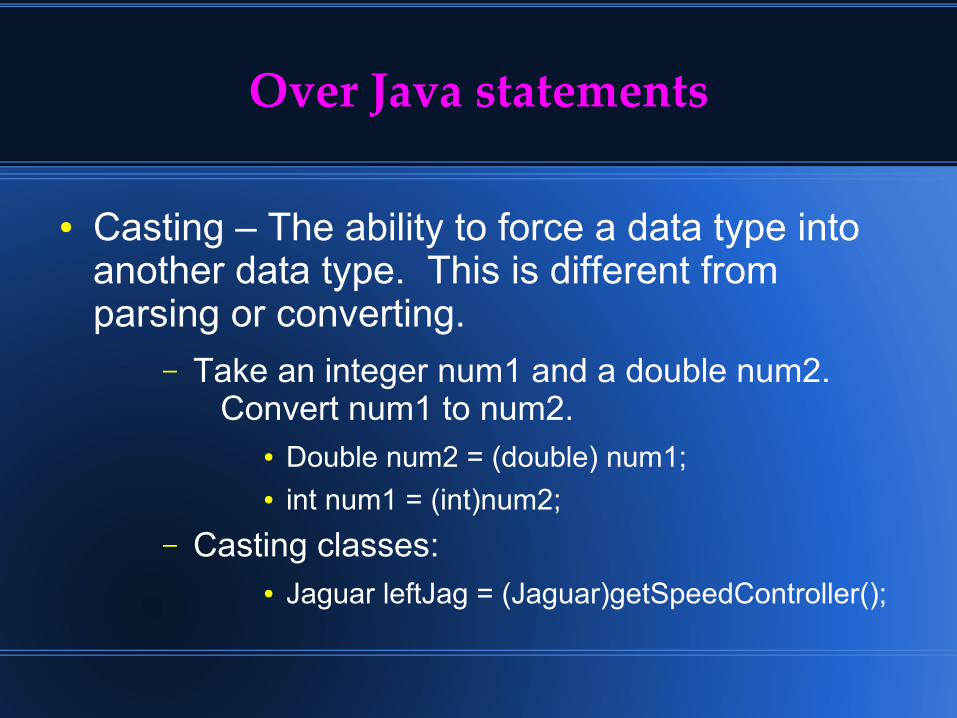
Over Java statements
● Casting – The ability to force a data type into another data type. This is different from parsing or converting.
– Take an integer num1 and a double num2. Convert num1 to num2.
● Double num2 = (double) num1;● int num1 = (int)num2;
– Casting classes:● Jaguar leftJag = (Jaguar)getSpeedController();

Java stores libraries into classes which are stored into packages.
● Typically called through the import command.– import java.lang.*;
– import java.io.*;
– import java.net.*;

What is a class and how is it used?
● “A class is an unstructured type that encapsulates a fixed number of data components (data members) along with the functions (called member functions or methods) that manipulate them.” - CST 271 Notes.

Class Example
● Take a house for example. What describes a house?
– Size
– Number of bedrooms
– Number of bathrooms
– Address
– Color
– Does it have a garage…? If so how big is it?

Class – House example
public class house {public String color;public String address;public double totalSize = 0.0;public int numberOfBedrooms = 0;public int numberOfBathrooms = 0;public boolean doesGarageExist = false;public double sizeOfGarage = 0.0;//End variable declaration.
public house() {//This is the constructor for the object.
}
public String returnSumary() {String out = “The house at “ + this.address + “\n”;out += “has “ + this.numberOfBedrooms + “ number of bedrooms\n”;out += “ and “ + this.numberOfBathrooms + “ number of bathrooms\n”;
if(this.doesGarageExist) {out += “This house contains a “ + this.sizeOfGarage + “ sq. feet garage\n”;
}
out += “The house color is “ + this.color + “\n”;out += “The house contains “ + this.totalSize + “ square feet”;return out;
}}
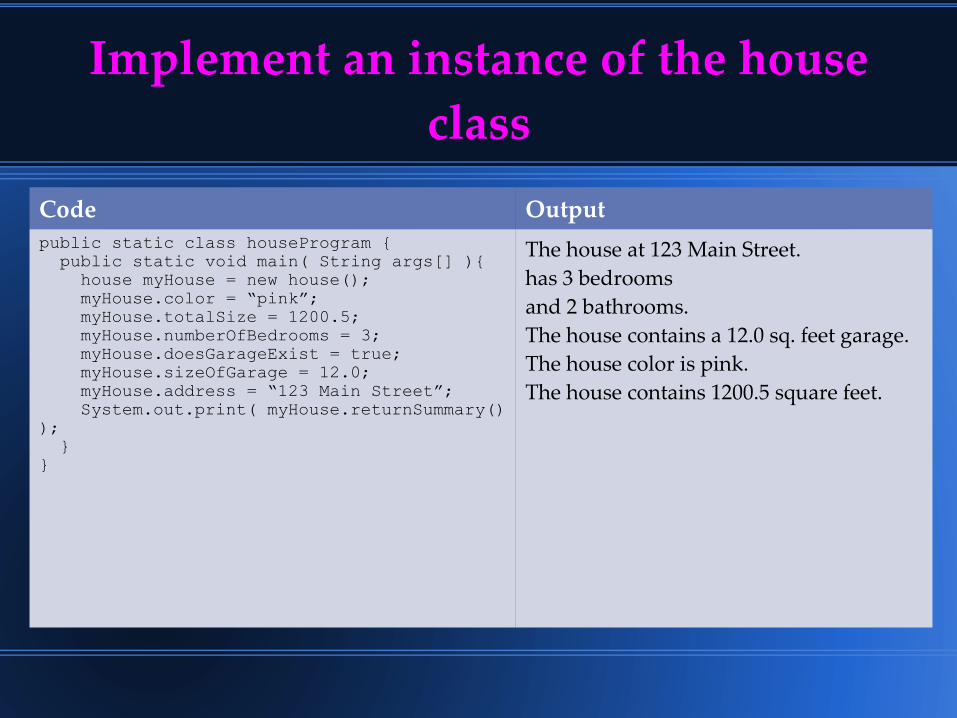
Implement an instance of the house class
Code Outputpublic static class houseProgram { public static void main( String args[] ){ house myHouse = new house(); myHouse.color = “pink”; myHouse.totalSize = 1200.5; myHouse.numberOfBedrooms = 3; myHouse.doesGarageExist = true; myHouse.sizeOfGarage = 12.0; myHouse.address = “123 Main Street”; System.out.print( myHouse.returnSummary() ); }}
The house at 123 Main Street.has 3 bedroomsand 2 bathrooms.The house contains a 12.0 sq. feet garage.The house color is pink.The house contains 1200.5 square feet.

Class Inheritance
● Class inheritance is the process of extending a parent class.
● Example creating a mansion class which extends from the house class
– Public class mansion extends house
● In this fashion, methods and certain variables from the parent class are brought into the mansion class. You can build upon those or override them.

Java variable/procedure/function/class restrictions
Can be accessed from the same class
Can be accessed from the same package
Can be accessed from any child class
Can be accessed from any class
(default) Yes Yes No No
private Yes No No No
protected Yes Yes Yes No
public Yes Yes Yes yes

Getting Started with Netbeans

NetBeans – New Generic Project (console application)
● Click on File -> New Project. ● Under “Categories” select “Java” ● Under “Projects” select “Java Application” then
click “Next”.

NetBeans – New Generic Project (Console Application) – Continued
● Under “Project Name” use “MyFirstConsoleApplication”, then click finish.

NetBeans - Layout

NetBeans – Continued

Act 2
Programming Your FRC Robot With
Java

Moving on to FRC Java Robotics – What You Will Need
● A copy of the CRIO imaging tool (Kit of parts)– Format the CRIO with the Java option.
● NetBeans with the Java JDK (You may need to have administrative access to install)
● The FRC WPI java library plug-ins for NetBeans.– Install instructions available at First Forge
● http://firstforge.wpi.edu/
– Plugin Path for NetBeans● http://first.wpi.edu/FRC/java/netbeans/update/updates.xml
● Documentation– WPILib JavaDoc
– JDK JavaDoc
●

Installing the plug-in to NetBeans
● Download the FRC WPI library to your system. Extract the ZIP to a (easily found) location.
● Open Netbeans, under the “Tools” menu select “Plugins”.
● Under the Plugin dialog choose the “Downloads” tab. Then choose “Add Plugins”. Select all files in the dialog and click “Open”
● Click “Install”. When prompted. Restart “IDE”.

NetBeans WPI Library Successful Install
● When the FIRST/WPI Library tools are installed successfully, you should be able to see the following:
– FRC Icon in the toolbar
– Template projects
– Sample Projects

FRC Java – Built-In Robot Classes
● Simple Robot– By default contains (base methods of robot main) and two methods by default
(autonomous and operator control.
– Designed for simpler state machines.
– Con: Since it is simpler it will continue to run calls made in the autonomous method until everything is done and exits, which could overlap into teleop mode.
● Iterative Robot– More methods available, which allows for granular control over each mode.
– Con: Can cause code to become complex fast.
● RobotBase– Is what the Simple and Iterative Robot templates are based upon. If you were to
make a derivative of this class, you would inherit this class as the parent.

Command Based-Programs
● Command-Based Programs are organized around two fundamental concepts:
– Subsystems
– Commands.
● Based on IterativeRobot● Command-Based Programs are:
– Fully Object Oriented– Extremely versatile
– Very Organized– A bit complicated
● See the WPILib Cookbook on First Forge

FRC – Simple Robot
● Go to File -> New Project - > Under the “FRC Java” category, choose “SimpleRobotTemplateProject”.
● For the project name supply Team<teamnumber>_SimpleRobot

FRC – Simple Robot Generated Source Code
● Expand the “src” folder and “edu.wpi.first.wpi….” folder. Double click on “RobotTemplate.java”

What will we need to get before we can drive?
● A joystick class – to control the robot.● At least two Jaguar or alternative relays.● And Robot drive (if you're not growing your
own).● To accomdate this, we will make classes easily
accessible through the import statements.– import edu.wip.first.wpilibj.*;

Import Statements
Import edu.wpi.first.wpilibj.SimpleRobot;
Import edu.wpi.first.wpilibj.WatchDog;
Import edu.wpi.first.wpilibj.Joystick;
Import edu.wpi.first.wpilibj.RobotDrive;
Import edu.wpi.first.wpilibj.Timer;

Declare Device Variables
Above the void autonomous() add the following.
Joystick jsL = new Joystick(1);
Joystick jsR = new Joystick(2);
RobotDrive rd;
Jaguar jag1 = new Jaguar(1);
Jaguar jag2 = new Jaguar(2);
Jaguar jag3 = new Jaguar(3);
Jaguar jag4 = new Jaguar(4);

What it should look like at this point

Write the operatorControl method
While(isEnabled() && isOperatorControl())
{
rd = new RobotDrive(jag1, jag2, jag3, jag4);
//Declare inputs to mecanum class.
rd.mecanumDrive_Cartesian(jsL.getX(), jsL.getY(), jsL.getTwist(), 0.0);
//Add gyro later.
}

What it should look like at this point

Now Let’s Run This
● Before we run this we will have to check a few things.
Change the Team number . Go under tools -> options.
– Choose “Miscellaneous”, then go under “FRC Configuration” tab.

NOTE

Test the Simple Robot
● When ready click the Green Play icon (aka “Run Main Project”)
● In the Task pane you will see an output of the cRIO executing the JAVA code.
● Once the cRIO has restarted, using the FRC driver station you should be able to enable the robot in teleop and drive the robot.

What is going on when I have the robot run the program?
● NetBeans issues a series of command to compile the java code. Then uses a component called Sunspot to format it to the class code of the Squawk Java ME (VM)
● The command is issued to restart the cRIO and to look at the robotMain method().
● Squawk VM then executes the java program to that line on the cRIO.

NetBeans Running the Java Code

Debugging
● NetBeans and Squawk (Sunspot) allows you to debug the project while the code is running.
● Why debug– To understand what is going on with the robot code– To troubleshoot an error(s).
● How can this be done– Through the output console or breakpoints. Which
can be established before you re-deploy the program.

Attach a Debugger
● Next to the Green Play icon there is a smaller one. Click on the drop down and select “Attach Debugger”. Supply 2900 in the Port field.

NetBeans Layout Will Change (Debug Mode)

Debug – When an Error Occurs
● When an error occurs that is not caught a message will appear in the output console. (Example below). You can use breakpoints to help troubleshoot before the statements.

Adding a println to the Code(my favorite way to debug)
● At any point in the java program, you can add a System.out.println(“your text”); which will print to the console and is extremely useful for debugging purposes.

Resources
● http://teamupnext.com/java/
● http://firstforge.wpi.edu/
– http://firstforge.wpi.edu/sf/docman/do/downloadDocument/projects.wpilib/docman.root.c_and_java_documentation/doc1199
– http://firstforge.wpi.edu/sf/docman/do/downloadDocument/projects.wpilib/docman.root.c_and_java_documentation/doc1297
● http://docs.oracle.com/javase/tutorial/
● http://www.oregonfirst.org/wp/wp-uploads/2009/04/FRC-Java-Introduction.pdf
● http://www.codeproject.com/KB/java/javabasicsio.aspx

The End
Thank You

That Annoying After the Credits Scene
Use a Source Code Versioning System!
Up Next! Loves Git
(there's also subversion, mercurial, cvs, and others)