introduction to web development with dreamweaver · introduction to web development with...
TRANSCRIPT
Page 1
ITS Training Introduction to Web Development with Dreamweaver
In this Workshop In this workshop you will be introduced to HTML basics and using Dreamweaver to create and edit web files. You will learn how to use the Dreamweaver interface to:
• make web pages • move web files from your local site to the web server • move web files from the web server to your local site • make changes to the page attributes • work with CSS styles • insert images, insert text, insert links
Page 2
Table of Contents ITS Training .......................................................................................................................................................................................................... 1
In this Workshop ............................................................................................................................................................................................ 1
First Things First – What is HTML? .................................................................................................................................................................. 4
Basic Structure of an HTML Page ............................................................................................................................................................... 4
HTML Tags ...................................................................................................................................................................................................... 5
A Little about Cascading Style Sheets (CSS) ........................................................................................................................................... 6
Starting Dreamweaver ................................................................................................................................................................................ 7
Viewing the Dreamweaver Window ........................................................................................................................................................ 7
Work Space Layout ...................................................................................................................................................................................... 8
Local and Remote Websites ...................................................................................................................................................................... 8
Defining .......................................................................................................................................................................................................... 9
Defining the Local Site ................................................................................................................................................................................. 9
Defining the Server Information ............................................................................................................................................................... 10
Modifying a Site Definition ................................................................................................................................................................... 11
Creating a Blank Web Page .................................................................................................................................................................... 12
New Blank Web Page ........................................................................................................................................................................... 13
Save the File ................................................................................................................................................................................................ 13
Working with the Files Panel ..................................................................................................................................................................... 13
Add Folder Containing Images to Local Site Folder ............................................................................................................................ 13
Rename File or Folder ................................................................................................................................................................................ 14
Connecting to the Web Server ................................................................................................................................................................ 14
Viewing the Remote and Local files through Expanded View .......................................................................................................... 15
Switching Between Local View and the Remote Server ..................................................................................................................... 15
Putting and Getting Files (Moving files between the Local and Remote sites) .............................................................................. 15
Opening a File from the Local Files ......................................................................................................................................................... 18
Exploring the Dreamweaver Interface ................................................................................................................................................... 18
Title ................................................................................................................................................................................................................ 18
Adding Text ................................................................................................................................................................................................. 19
Formatting Text ........................................................................................................................................................................................... 20
Inserting Links ............................................................................................................................................................................................... 20
Adding Images ........................................................................................................................................................................................... 21
The Property Inspector .............................................................................................................................................................................. 23
Text ........................................................................................................................................................................................................... 23
Images ..................................................................................................................................................................................................... 23
Setting Page Properties ........................................................................................................................................................................ 23
Making Changes to Text on the Page Using Cascading Style Sheets (CSS) ................................................................................... 24
Creating a one-time use style (Inline Style) ....................................................................................................................................... 25
Creating a re-usable style for this page only (Internal Styles) ....................................................................................................... 25
Creating a style sheet that can be used on all pages ................................................................................................................... 27
Page 3
Applying External Stylesheet to another Page ................................................................................................................................. 29
Previewing the Page in a Browser ........................................................................................................................................................... 29
Further Help ................................................................................................................................................................................................. 30
Appendix A: Synchronizing Files .............................................................................................................................................................. 31
Synchronizing the Local and Remote Sites ....................................................................................................................................... 31
Page 4
HTML
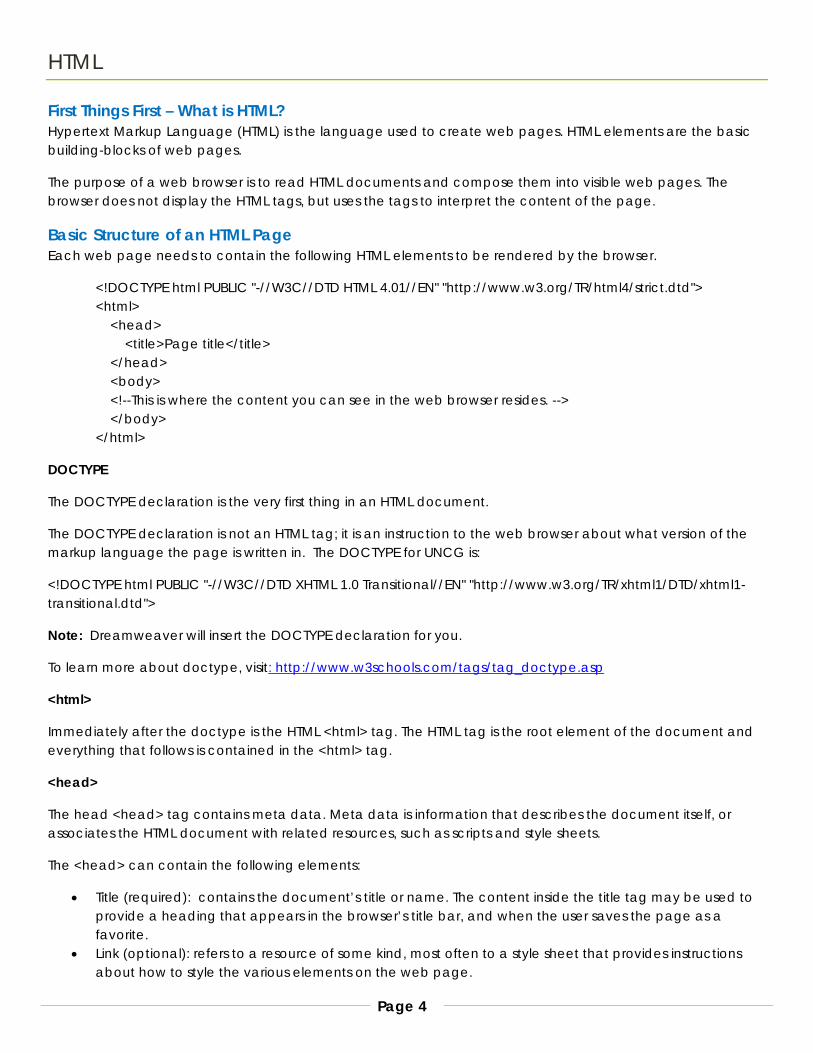
First Things First – What is HTML? Hypertext Markup Language (HTML) is the language used to create web pages. HTML elements are the basic building-blocks of web pages.
The purpose of a web browser is to read HTML documents and compose them into visible web pages. The browser does not display the HTML tags, but uses the tags to interpret the content of the page.
Basic Structure of an HTML Page Each web page needs to contain the following HTML elements to be rendered by the browser.
<!DOCTYPE html PUBLIC "-//W3C//DTD HTML 4.01//EN" "http://www.w3.org/TR/html4/strict.dtd"> <html> <head> <title>Page title</title> </head> <body> <!--This is where the content you can see in the web browser resides. --> </body> </html>
DOCTYPE
The DOCTYPE declaration is the very first thing in an HTML document.
The DOCTYPE declaration is not an HTML tag; it is an instruction to the web browser about what version of the markup language the page is written in. The DOCTYPE for UNCG is:
<!DOCTYPE html PUBLIC "-//W3C//DTD XHTML 1.0 Transitional//EN" "http://www.w3.org/TR/xhtml1/DTD/xhtml1-transitional.dtd">
Note: Dreamweaver will insert the DOCTYPE declaration for you.
To learn more about doctype, visit: http://www.w3schools.com/tags/tag_doctype.asp
<html>
Immediately after the doctype is the HTML <html> tag. The HTML tag is the root element of the document and everything that follows is contained in the <html> tag.
<head>
The head <head> tag contains meta data. Meta data is information that describes the document itself, or associates the HTML document with related resources, such as scripts and style sheets.
The <head> can contain the following elements:
• Title (required): contains the document’s title or name. The content inside the title tag may be used to provide a heading that appears in the browser’s title bar, and when the user saves the page as a favorite.
• Link (optional): refers to a resource of some kind, most often to a style sheet that provides instructions about how to style the various elements on the web page.
Page 5
• Meta (optional): provides additional information about the page; for example, which character encoding the page uses, a summary of the page’s content, instructions to search engines about whether or not to index content, etc.
• Script (optional): used either to embed or refer to an external script. • Style(optional): provides an area for defining embedded (page-specific) CSS styles.
All of these elements can appear in any order within the head tag. Note that none of these elements actually appear on the rendered page, but they are used to affect the content on the page.
<body>
This is where the bulk of the page is contained. Everything that you can see in the browser window is contained inside the body tag. Inside the body tag you will have paragraphs, lists, links, images, tables, and more.
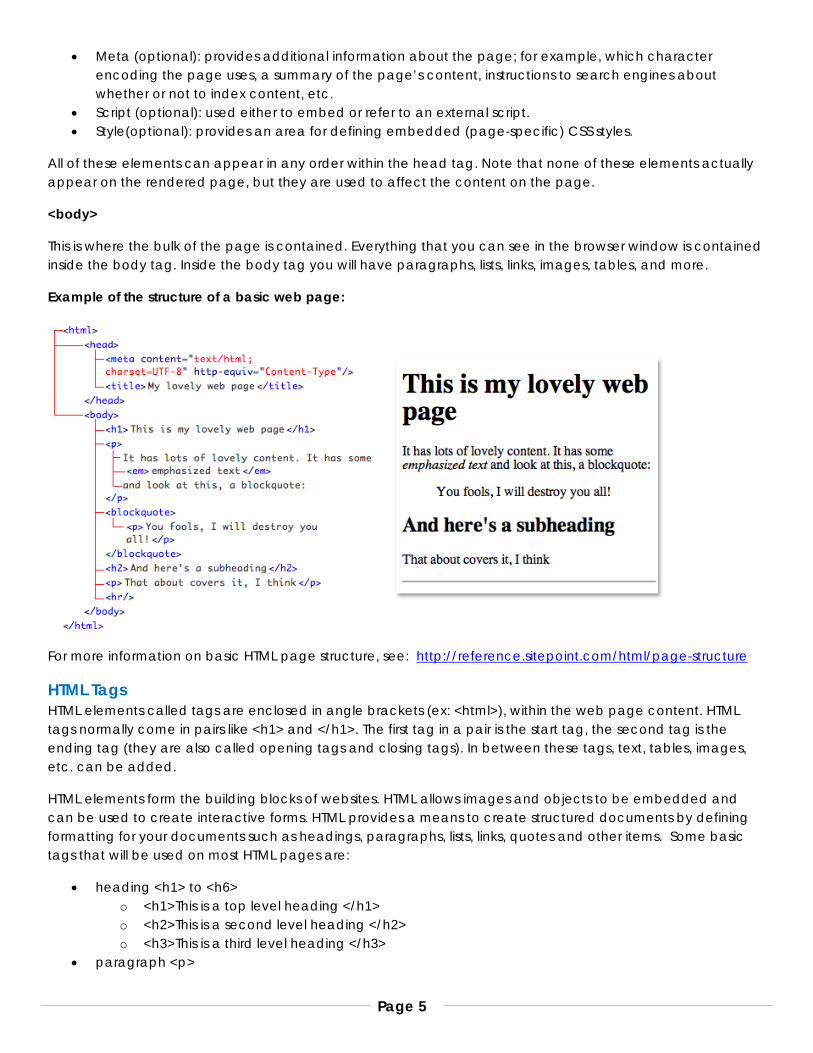
Example of the structure of a basic web page:
For more information on basic HTML page structure, see: http://reference.sitepoint.com/html/page-structure
HTML Tags HTML elements called tags are enclosed in angle brackets (ex: <html>), within the web page content. HTML tags normally come in pairs like <h1> and </h1>. The first tag in a pair is the start tag, the second tag is the ending tag (they are also called opening tags and closing tags). In between these tags, text, tables, images, etc. can be added.
HTML elements form the building blocks of websites. HTML allows images and objects to be embedded and can be used to create interactive forms. HTML provides a means to create structured documents by defining formatting for your documents such as headings, paragraphs, lists, links, quotes and other items. Some basic tags that will be used on most HTML pages are:
• heading <h1> to <h6> o <h1>This is a top level heading </h1> o <h2>This is a second level heading </h2> o <h3>This is a third level heading </h3>
• paragraph <p>
Page 6
o <p>This is a paragraph.</p> o <p>This is another paragraph.</p>
• link <a href = …> o <a href="http://www.uncg.edu">UNCG Website</a>
• image <img src=…> o <img src="/images/uncg_logo.jpg" alt=”UNCG logo” />
• unordered list <ul> o <ul>
<li>Eng 101</li> <li>Eng 150</li> </ul>
• order list <ol> o <ol>
<li>BUS 101</li> <li>BUS 150</li> </ol>
Don’t worry, Dreamweaver will create the HTML tags for you. It is still important that you understand the code behind the design of your web pages.
For more information about HTML tags, visit: http://www.w3schools.com/html/default.asp
A Little about Cascading Style Sheets (CSS) Web browsers can also refer to Cascading Style Sheets (CSS) to define the appearance and layout of text and other material.
To learn more about CSS, visit: http://www.w3schools.com/css/
Page 7
Dreamweaver
Starting Dreamweaver The first time you start Dreamweaver, you will see a window that allows you to choose from several options. From this window you can choose to create a new page from scratch, open an item you worked on recently, or create a new page from a sample page.
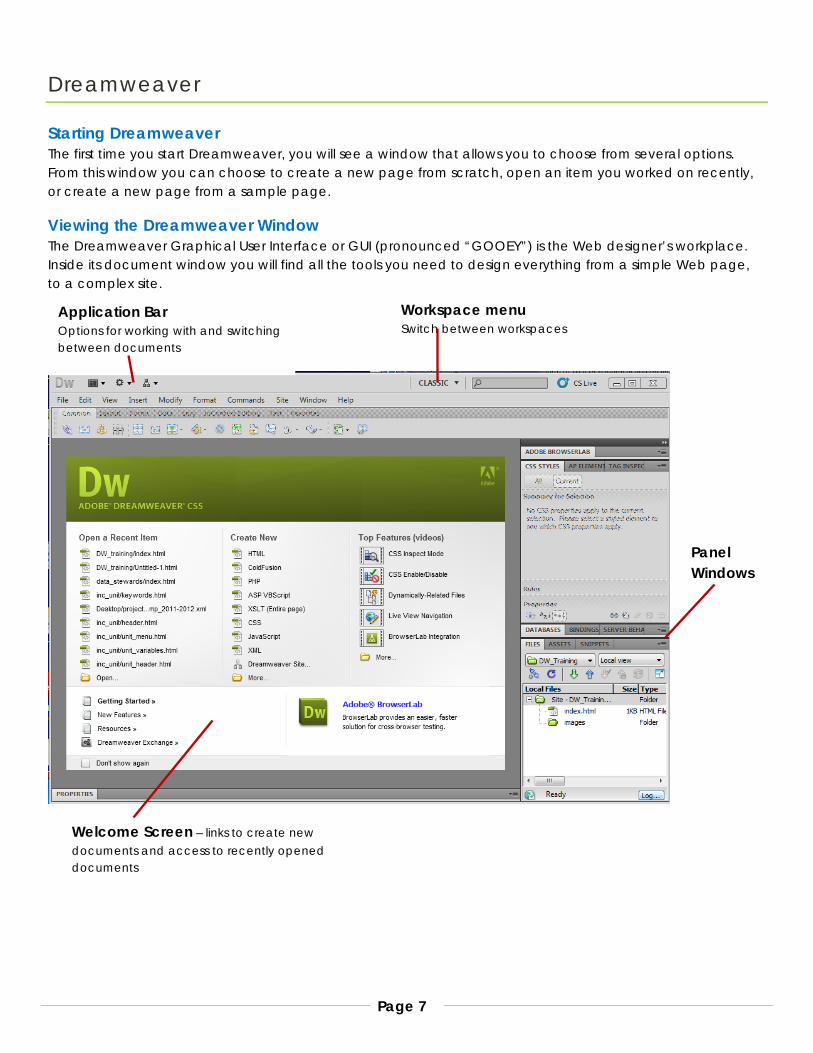
Viewing the Dreamweaver Window The Dreamweaver Graphical User Interface or GUI (pronounced “GOOEY”) is the Web designer’s workplace. Inside its document window you will find all the tools you need to design everything from a simple Web page, to a complex site.
Application Bar Options for working with and switching between documents
Workspace menu Switch between workspaces
Panel Windows
Welcome Screen – links to create new documents and access to recently opened documents
Page 8
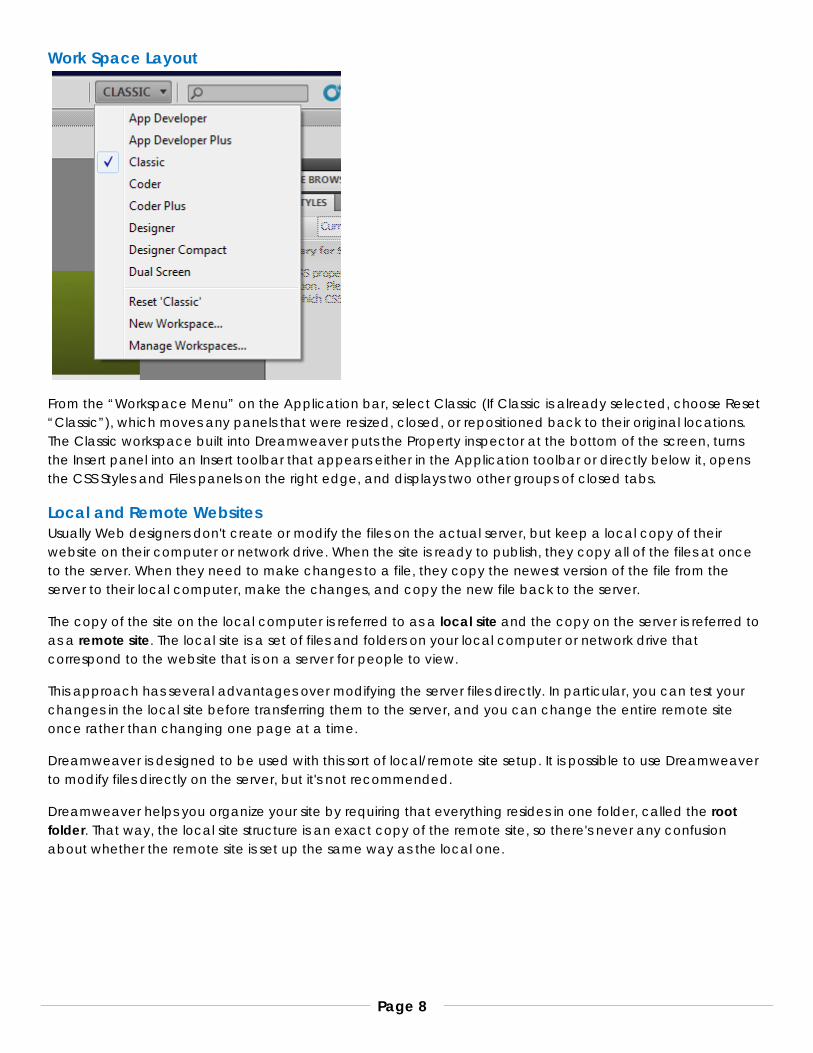
Work Space Layout
From the “Workspace Menu” on the Application bar, select Classic (If Classic is already selected, choose Reset “Classic”), which moves any panels that were resized, closed, or repositioned back to their original locations. The Classic workspace built into Dreamweaver puts the Property inspector at the bottom of the screen, turns the Insert panel into an Insert toolbar that appears either in the Application toolbar or directly below it, opens the CSS Styles and Files panels on the right edge, and displays two other groups of closed tabs.
Local and Remote Websites Usually Web designers don't create or modify the files on the actual server, but keep a local copy of their website on their computer or network drive. When the site is ready to publish, they copy all of the files at once to the server. When they need to make changes to a file, they copy the newest version of the file from the server to their local computer, make the changes, and copy the new file back to the server.
The copy of the site on the local computer is referred to as a local site and the copy on the server is referred to as a remote site. The local site is a set of files and folders on your local computer or network drive that correspond to the website that is on a server for people to view.
This approach has several advantages over modifying the server files directly. In particular, you can test your changes in the local site before transferring them to the server, and you can change the entire remote site once rather than changing one page at a time.
Dreamweaver is designed to be used with this sort of local/remote site setup. It is possible to use Dreamweaver to modify files directly on the server, but it's not recommended.
Dreamweaver helps you organize your site by requiring that everything resides in one folder, called the root folder. That way, the local site structure is an exact copy of the remote site, so there's never any confusion about whether the remote site is set up the same way as the local one.
Page 9
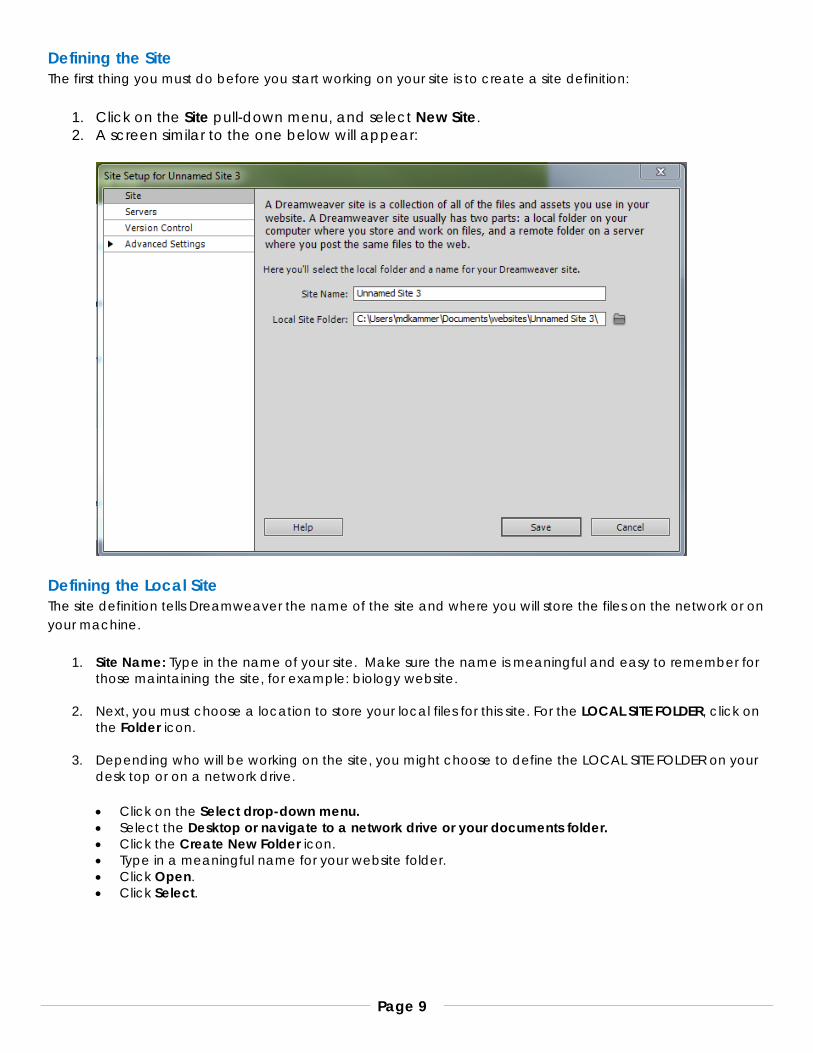
Defining the Site The first thing you must do before you start working on your site is to create a site definition:
1. Click on the Site pull-down menu, and select New Site. 2. A screen similar to the one below will appear:
Defining the Local Site The site definition tells Dreamweaver the name of the site and where you will store the files on the network or on your machine.
1. Site Name: Type in the name of your site. Make sure the name is meaningful and easy to remember for those maintaining the site, for example: biology website.
2. Next, you must choose a location to store your local files for this site. For the LOCAL SITE FOLDER, click on the Folder icon.
3. Depending who will be working on the site, you might choose to define the LOCAL SITE FOLDER on your desk top or on a network drive.
• Click on the Select drop-down menu. • Select the Desktop or navigate to a network drive or your documents folder. • Click the Create New Folder icon. • Type in a meaningful name for your website folder. • Click Open. • Click Select.
Page 10
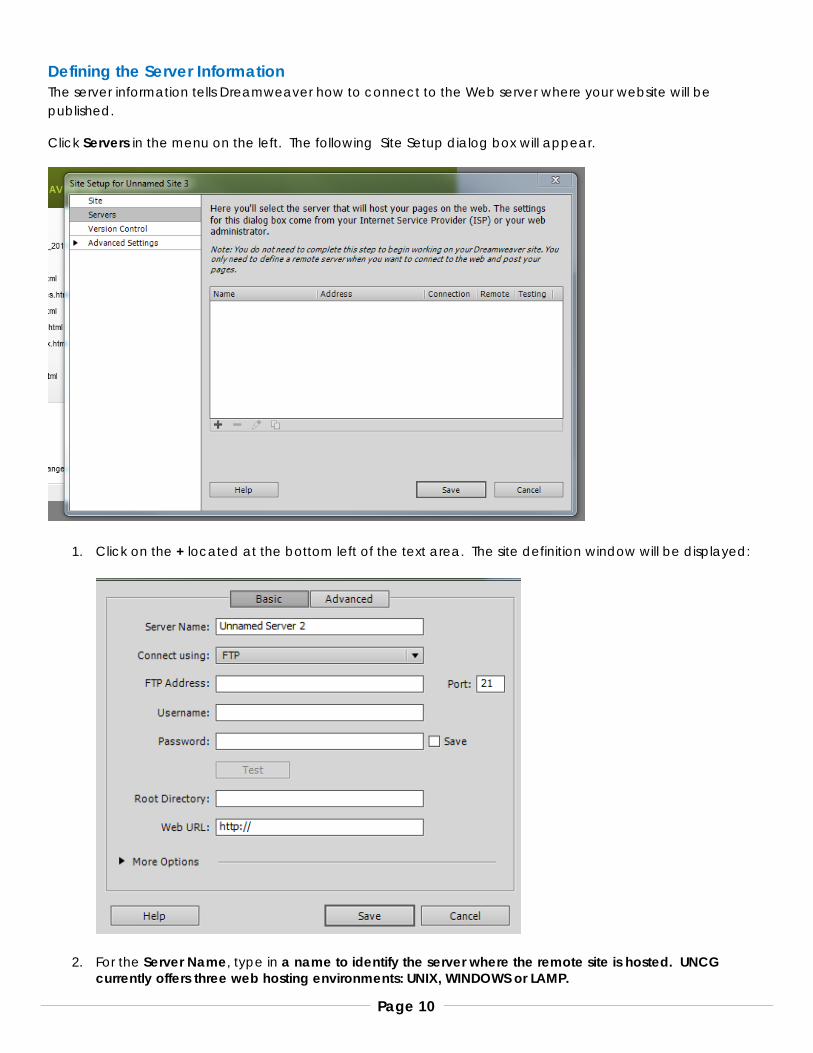
Defining the Server Information The server information tells Dreamweaver how to connect to the Web server where your website will be published.
Click Servers in the menu on the left. The following Site Setup dialog box will appear.
1. Click on the + located at the bottom left of the text area. The site definition window will be displayed:
2. For the Server Name, type in a name to identify the server where the remote site is hosted. UNCG currently offers three web hosting environments: UNIX, WINDOWS or LAMP.
Page 11
3. Populate the fields based on your hosting type in the table below.
LAMP Unix Windows
Connect Using SFTP FTP FTP
FTP Address <sitename>.uncg.edu linux.uncg.edu web.uncg.edu
Port 115 Use default value Use default value
Username LAMP account id Your user name “uncg\<your-user-name>”
Password LAMP account password Your user password Your user password
Root Directory public_html /afs/uncg.edu/html/<three letter dept code>
/website/<three letter dept code>/
or /website/<three letter dept code>/website.uncg.edu
4. Web URL: Dreamweaver will fill this in for you. In certain cases where a virtual host is used, you will need to specify the web URL.
5. Click the Test button to test your connection to the FTP Host and Host Directory. If your test is successful, you will be able to upload and download files. If the test is not successful, make sure you are typing in your username, password correctly and check the file path.
6. Press Save.
7. Press Save.
8. Press Done.
9. Your local root folder will appear under files.
Modifying a Site Definition You may need to modify your site definition if your password changes or if you incorrectly set up your site definition the first time. To modify a site definition in the future, do the following:
1. Click on the Site pull-down menu, and choose Manage Sites.
2. Choose the desired site from the list and click Edit.
3. Make the changes and click OK and Done.
Page 12
Creating a Blank Web Page
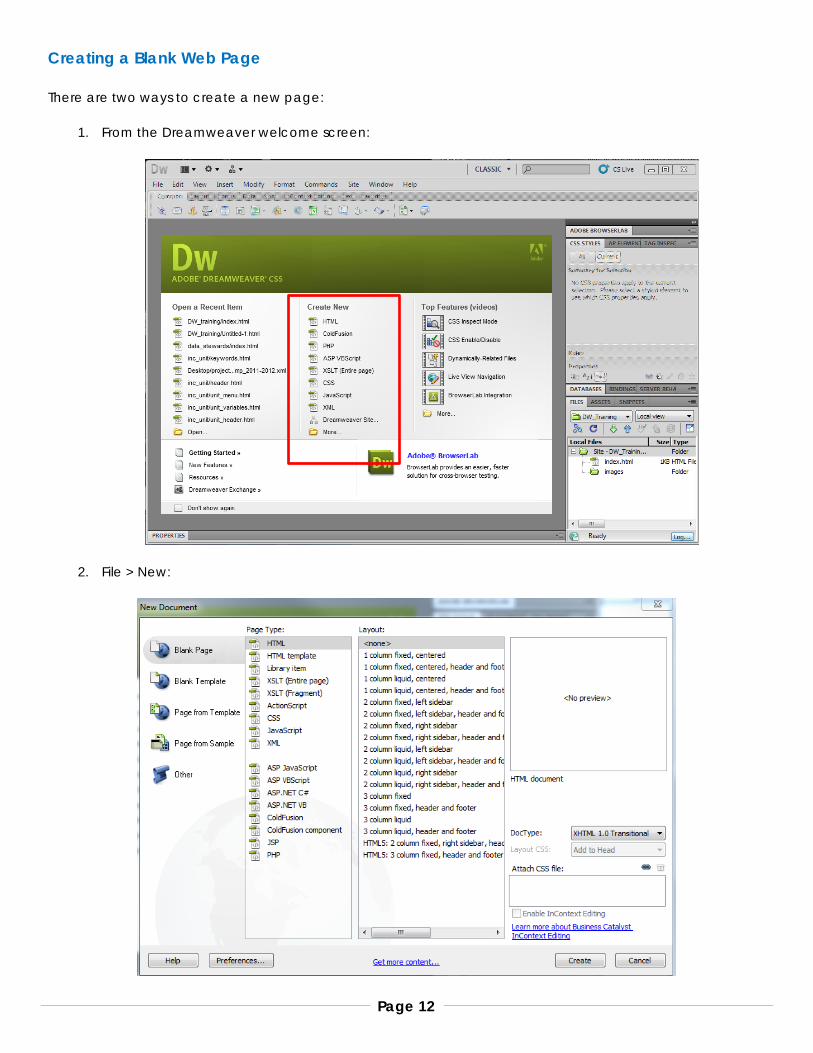
There are two ways to create a new page:
1. From the Dreamweaver welcome screen:
2. File > New:
Page 13
New Blank Web Page 1. Click the File menu, and then click New. The New Document dialog box opens. 2. Click the Blank Page category. 3. Select the Page Type you want (in this example, HTML). 4. Select the Layout you want. 5. Click the DocType list arrow and select the option you want. 6. Click Create. 7. Save your HTML page as index.html or another .html file name inside of your Local Site Folder. The file
name index.html is used as the landing page for your site. Make sure you use lower case letters in the file name. Servers are case sensitive.
Save the File There are several ways to save a file. Make sure you give your file an appropriate name and save it in your local root folder. If your site is going to be large, it is best to organize your website into folders and save your HTML document in the appropriate folder.
• File menu > Save • CTRL + S • The save icon on the Standard Toolbar (To turn on the Standard Tool bar, click the View pull-down menu
> Toolbars > Standard)
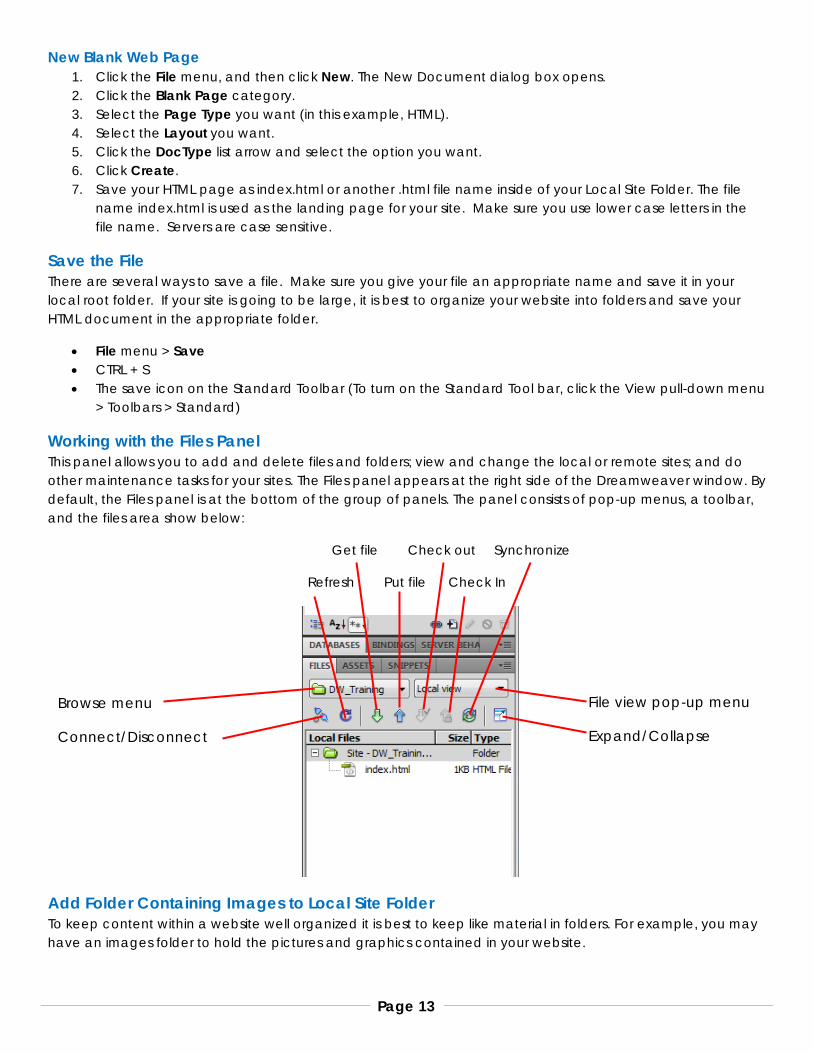
Working with the Files Panel This panel allows you to add and delete files and folders; view and change the local or remote sites; and do other maintenance tasks for your sites. The Files panel appears at the right side of the Dreamweaver window. By default, the Files panel is at the bottom of the group of panels. The panel consists of pop-up menus, a toolbar, and the files area show below:
Get file Check out Synchronize
Refresh Put file Check In
Add Folder Containing Images to Local Site Folder To keep content within a website well organized it is best to keep like material in folders. For example, you may have an images folder to hold the pictures and graphics contained in your website.
Browse menu
Connect/Disconnect
File view pop-up menu
Expand/Collapse
Page 14
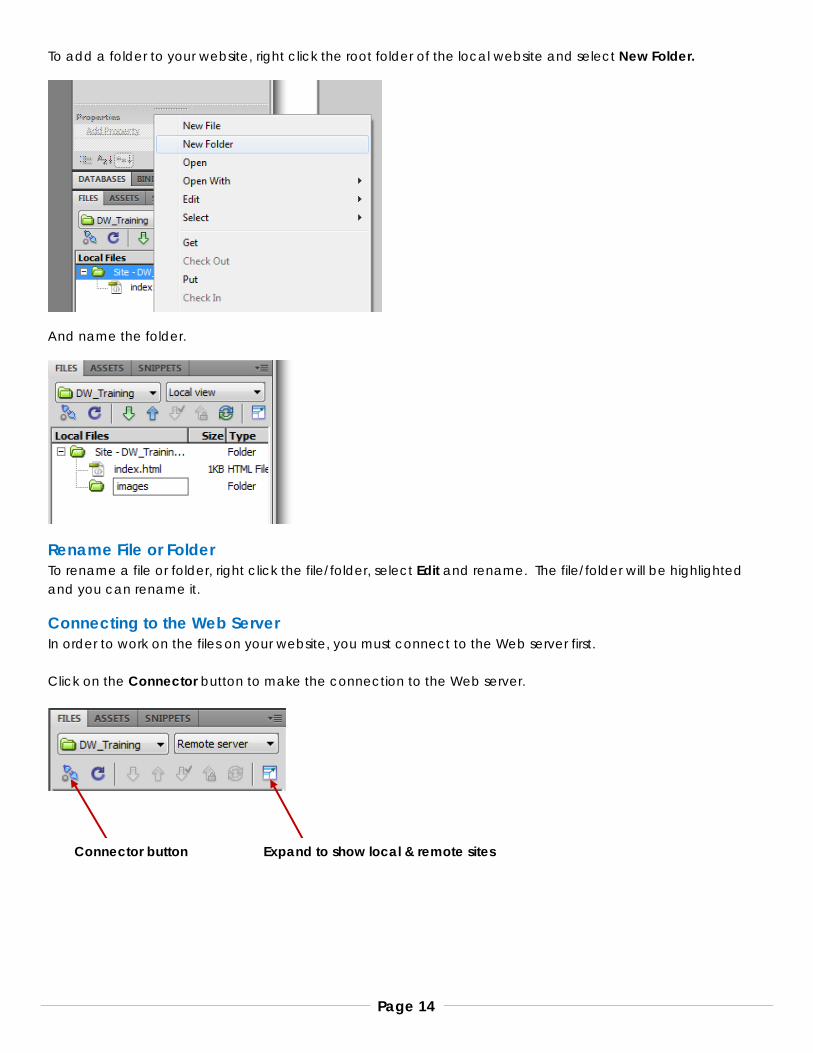
To add a folder to your website, right click the root folder of the local website and select New Folder.
And name the folder.
Rename File or Folder To rename a file or folder, right click the file/folder, select Edit and rename. The file/folder will be highlighted and you can rename it.
Connecting to the Web Server In order to work on the files on your website, you must connect to the Web server first.
Click on the Connector button to make the connection to the Web server.
Connector button Expand to show local & remote sites
Page 15
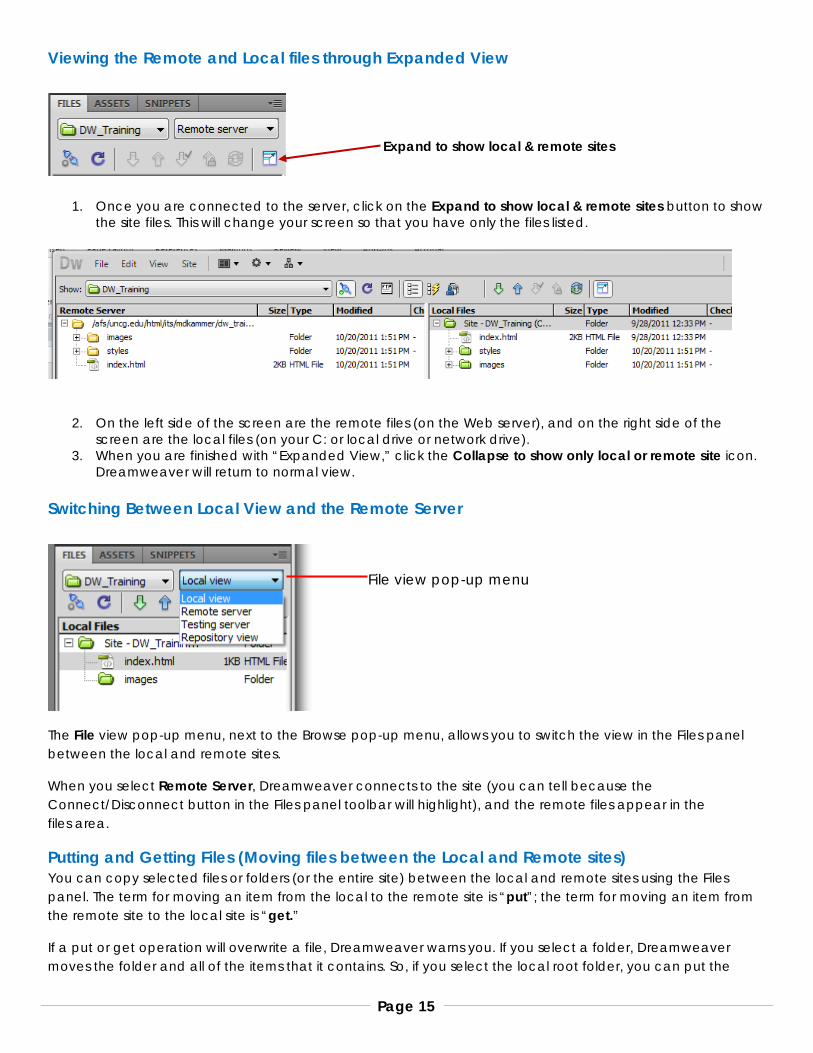
Viewing the Remote and Local files through Expanded View
1. Once you are connected to the server, click on the Expand to show local & remote sites button to show the site files. This will change your screen so that you have only the files listed.
2. On the left side of the screen are the remote files (on the Web server), and on the right side of the screen are the local files (on your C: or local drive or network drive).
3. When you are finished with “Expanded View,” click the Collapse to show only local or remote site icon. Dreamweaver will return to normal view.
Switching Between Local View and the Remote Server
The File view pop-up menu, next to the Browse pop-up menu, allows you to switch the view in the Files panel between the local and remote sites.
When you select Remote Server, Dreamweaver connects to the site (you can tell because the Connect/Disconnect button in the Files panel toolbar will highlight), and the remote files appear in the files area.
Putting and Getting Files (Moving files between the Local and Remote sites) You can copy selected files or folders (or the entire site) between the local and remote sites using the Files panel. The term for moving an item from the local to the remote site is “put”; the term for moving an item from the remote site to the local site is “get.”
If a put or get operation will overwrite a file, Dreamweaver warns you. If you select a folder, Dreamweaver moves the folder and all of the items that it contains. So, if you select the local root folder, you can put the
File view pop-up menu
Expand to show local & remote sites
Page 16
entire site up on the remote server in just a couple of clicks. Sometimes, however, you’ll want to use Dreamweaver’s site synchronization feature rather than putting or getting individual items. For more information about synchronization see Appendix A.
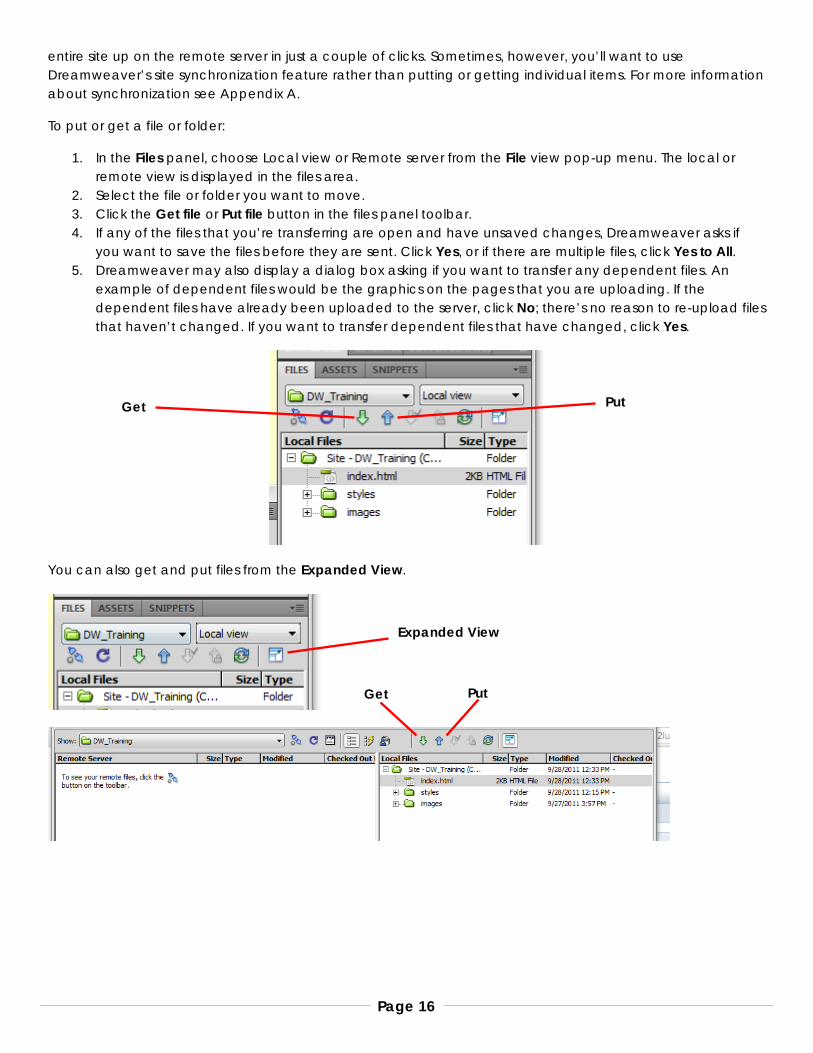
To put or get a file or folder:
1. In the Files panel, choose Local view or Remote server from the File view pop-up menu. The local or remote view is displayed in the files area.
2. Select the file or folder you want to move. 3. Click the Get file or Put file button in the files panel toolbar. 4. If any of the files that you’re transferring are open and have unsaved changes, Dreamweaver asks if
you want to save the files before they are sent. Click Yes, or if there are multiple files, click Yes to All. 5. Dreamweaver may also display a dialog box asking if you want to transfer any dependent files. An
example of dependent files would be the graphics on the pages that you are uploading. If the dependent files have already been uploaded to the server, click No; there’s no reason to re-upload files that haven’t changed. If you want to transfer dependent files that have changed, click Yes.
You can also get and put files from the Expanded View.
Get Put
Expanded View
Get Put
Page 17
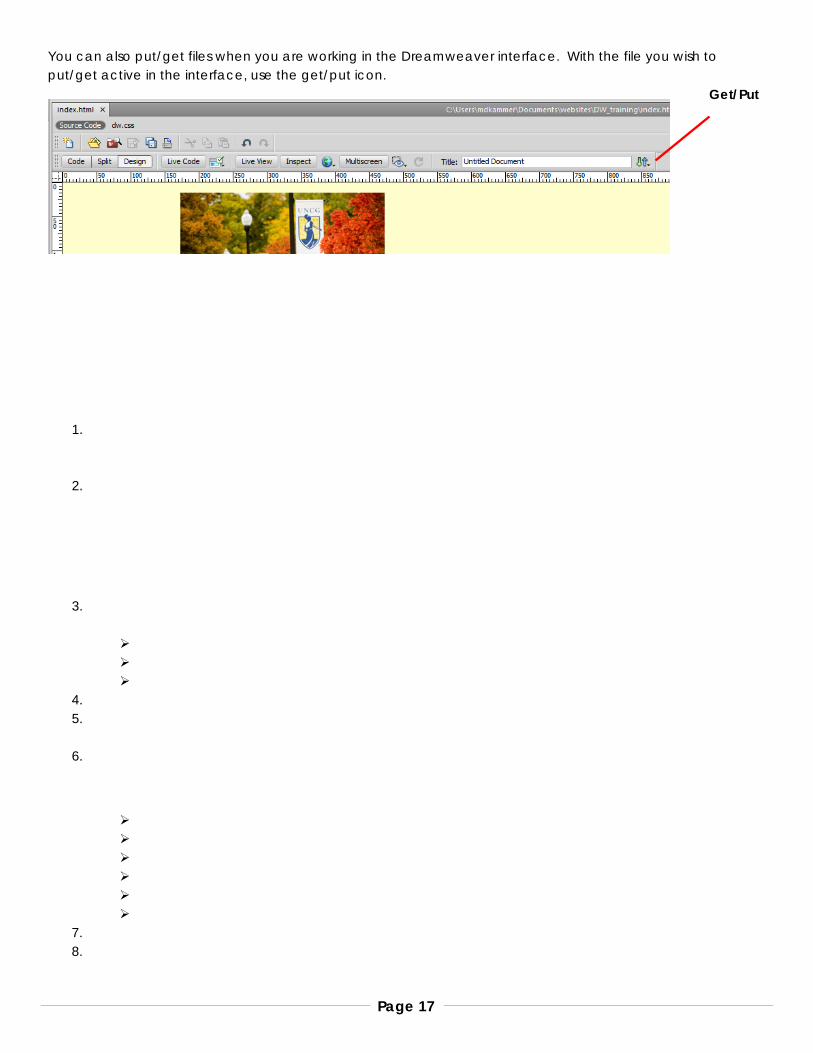
You can also put/get files when you are working in the Dreamweaver interface. With the file you wish to put/get active in the interface, use the get/put icon.
1.
2.
3.
4. 5.
6.
7. 8.
Get/Put
Page 18
Opening a File from the Local Files You can either double-click a file from the Remote files to automatically Get it AND open it, OR, you can Get it and then open it from the Local files.
Exploring the Dreamweaver Interface When you open an HTML page, the Dreamweaver workspace is arranged with a large window on the left for composing the page and panels on the right that are “docked” together and have tabs that can be clicked on to bring them to the front.
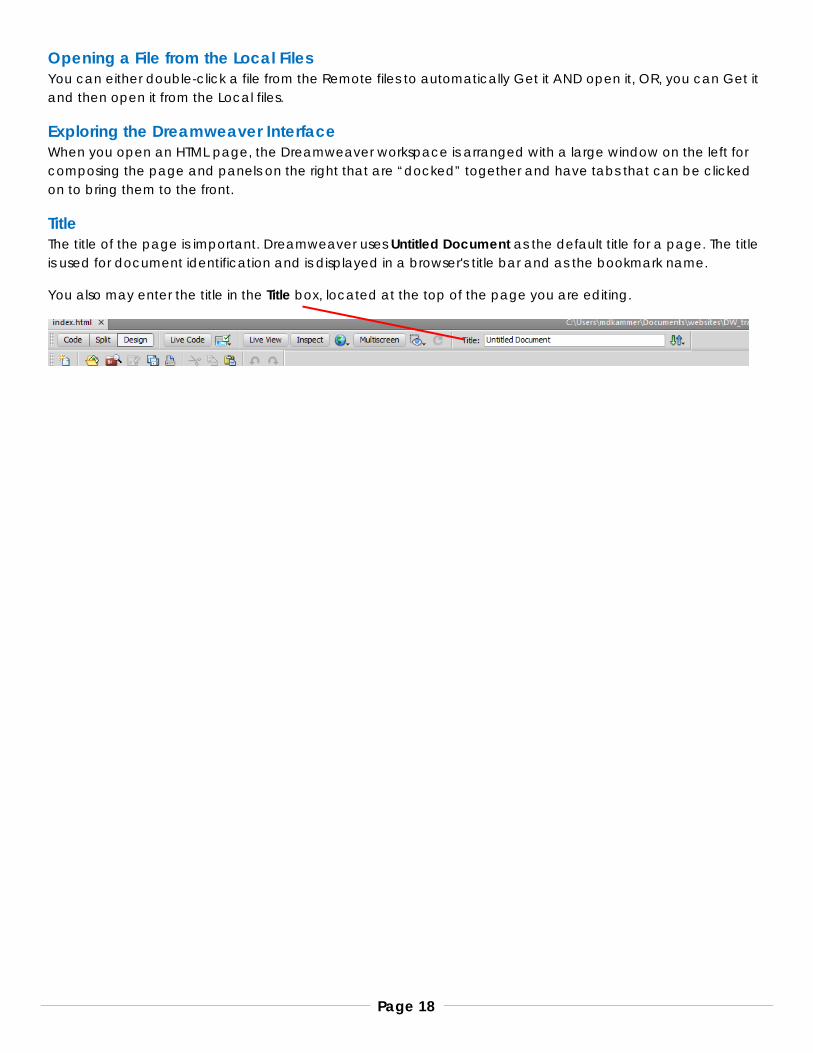
Title The title of the page is important. Dreamweaver uses Untitled Document as the default title for a page. The title is used for document identification and is displayed in a browser's title bar and as the bookmark name.
You also may enter the title in the Title box, located at the top of the page you are editing.
Page 19
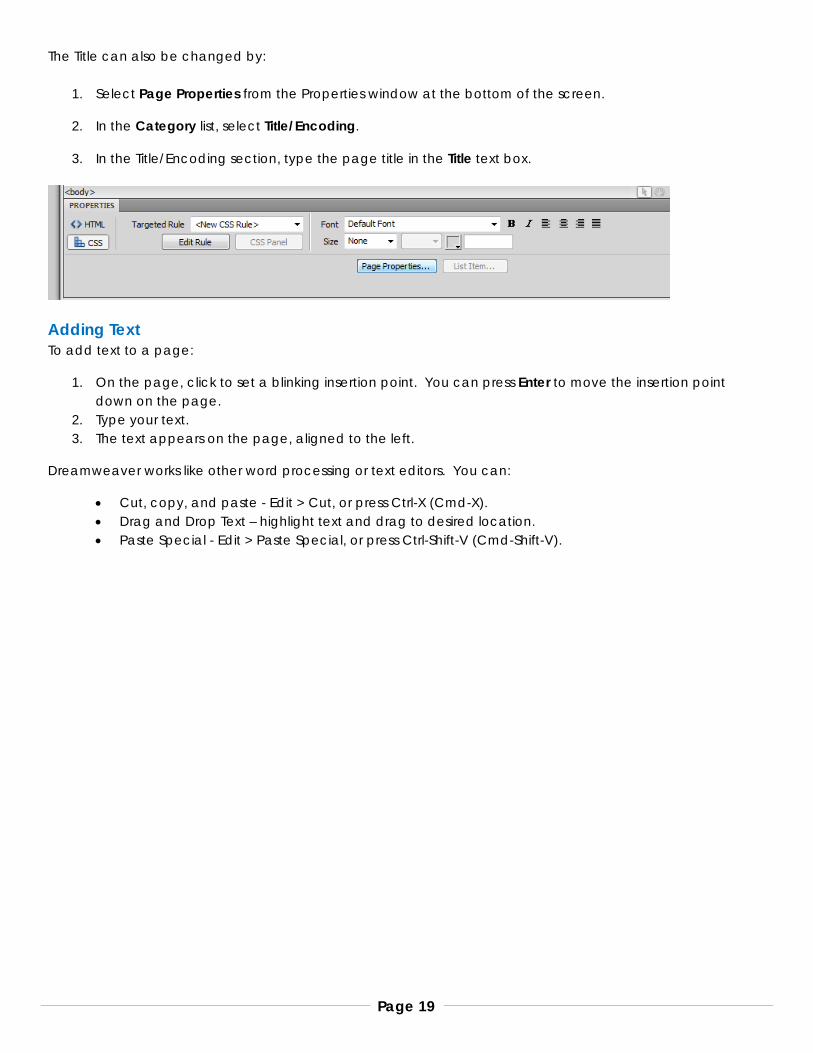
The Title can also be changed by:
1. Select Page Properties from the Properties window at the bottom of the screen.
2. In the Category list, select Title/Encoding.
3. In the Title/Encoding section, type the page title in the Title text box.
Adding Text To add text to a page:
1. On the page, click to set a blinking insertion point. You can press Enter to move the insertion point down on the page.
2. Type your text. 3. The text appears on the page, aligned to the left.
Dreamweaver works like other word processing or text editors. You can:
• Cut, copy, and paste - Edit > Cut, or press Ctrl-X (Cmd-X). • Drag and Drop Text – highlight text and drag to desired location. • Paste Special - Edit > Paste Special, or press Ctrl-Shift-V (Cmd-Shift-V).
Page 20
Formatting Text The Properties Inspector allows you to make changes to text on the page. You can make some changes in the HTML coding, but some changes, such as font color, require you to use Cascading Style Sheets (CSS) to make the changes. There will be more about CSS later in this document.
To format the text:
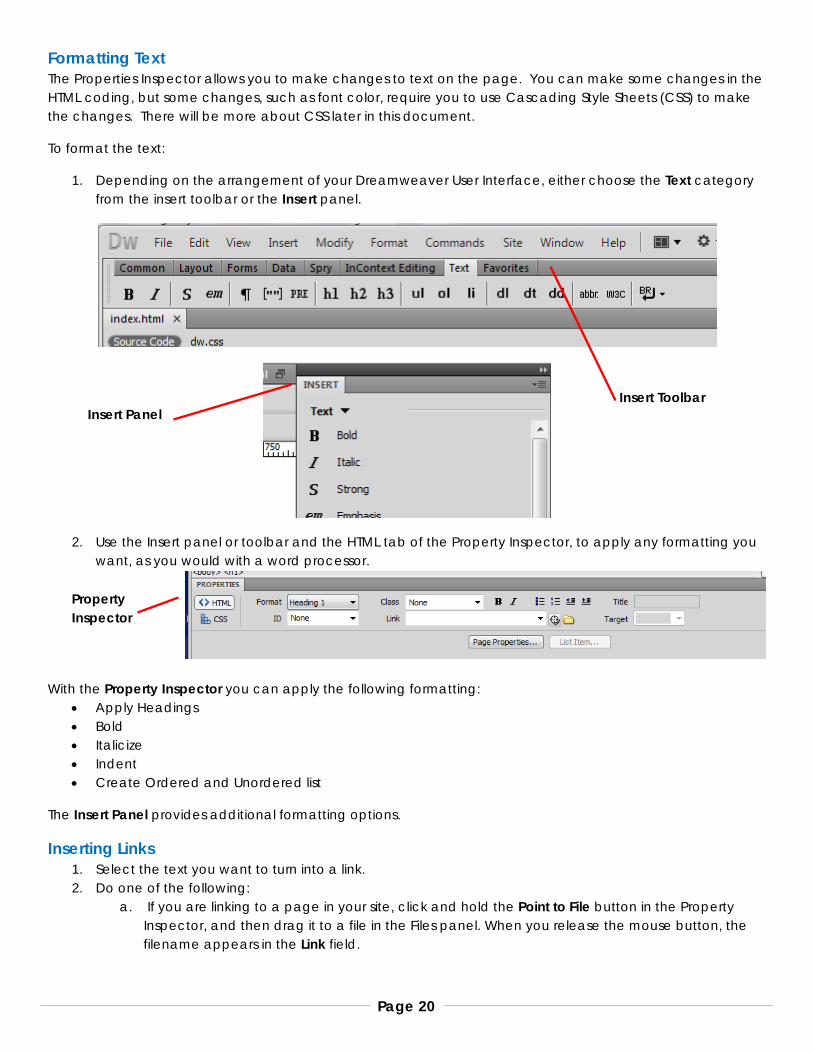
1. Depending on the arrangement of your Dreamweaver User Interface, either choose the Text category from the insert toolbar or the Insert panel.
2. Use the Insert panel or toolbar and the HTML tab of the Property Inspector, to apply any formatting you want, as you would with a word processor.
With the Property Inspector you can apply the following formatting: • Apply Headings • Bold • Italicize • Indent • Create Ordered and Unordered list
The Insert Panel provides additional formatting options.
Inserting Links 1. Select the text you want to turn into a link. 2. Do one of the following:
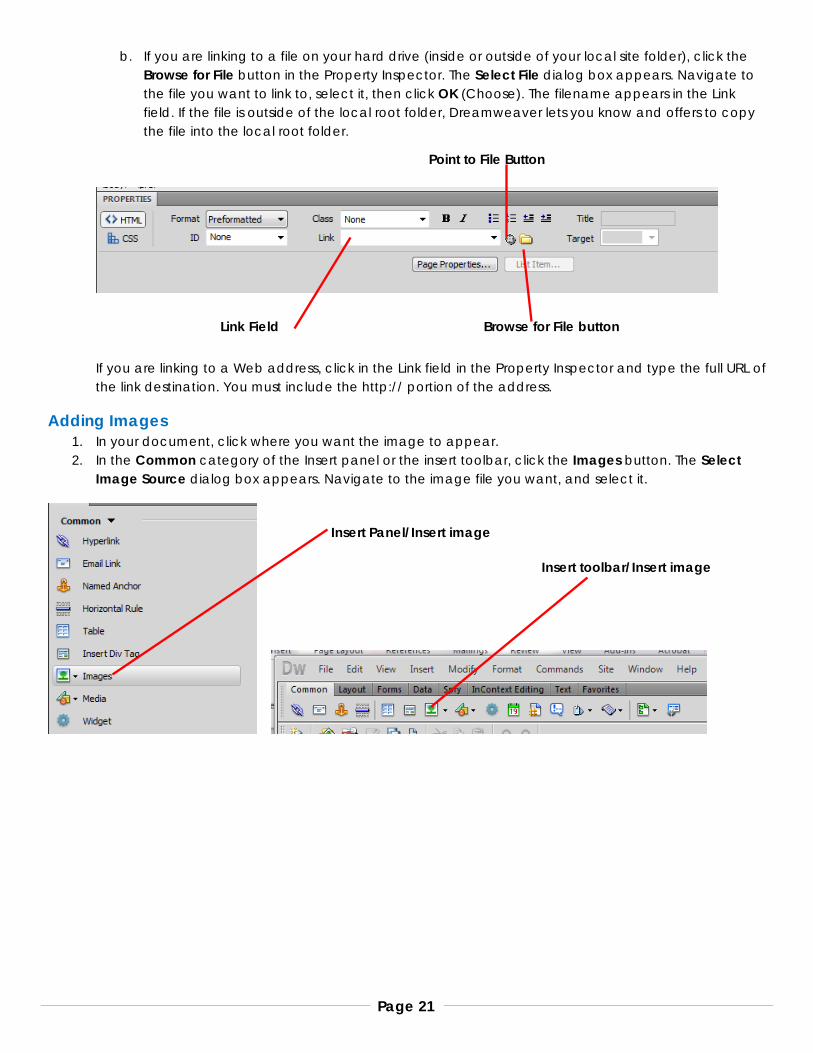
a. If you are linking to a page in your site, click and hold the Point to File button in the Property Inspector, and then drag it to a file in the Files panel. When you release the mouse button, the filename appears in the Link field.
Insert Panel
Property Inspector
Insert Toolbar
Page 21
b. If you are linking to a file on your hard drive (inside or outside of your local site folder), click the Browse for File button in the Property Inspector. The Select File dialog box appears. Navigate to the file you want to link to, select it, then click OK (Choose). The filename appears in the Link field. If the file is outside of the local root folder, Dreamweaver lets you know and offers to copy the file into the local root folder.
If you are linking to a Web address, click in the Link field in the Property Inspector and type the full URL of the link destination. You must include the http:// portion of the address.
Adding Images 1. In your document, click where you want the image to appear. 2. In the Common category of the Insert panel or the insert toolbar, click the Images button. The Select
Image Source dialog box appears. Navigate to the image file you want, and select it.
Point to File Button
Browse for File button Link Field
Insert Panel/Insert image
Insert toolbar/Insert image
Page 22
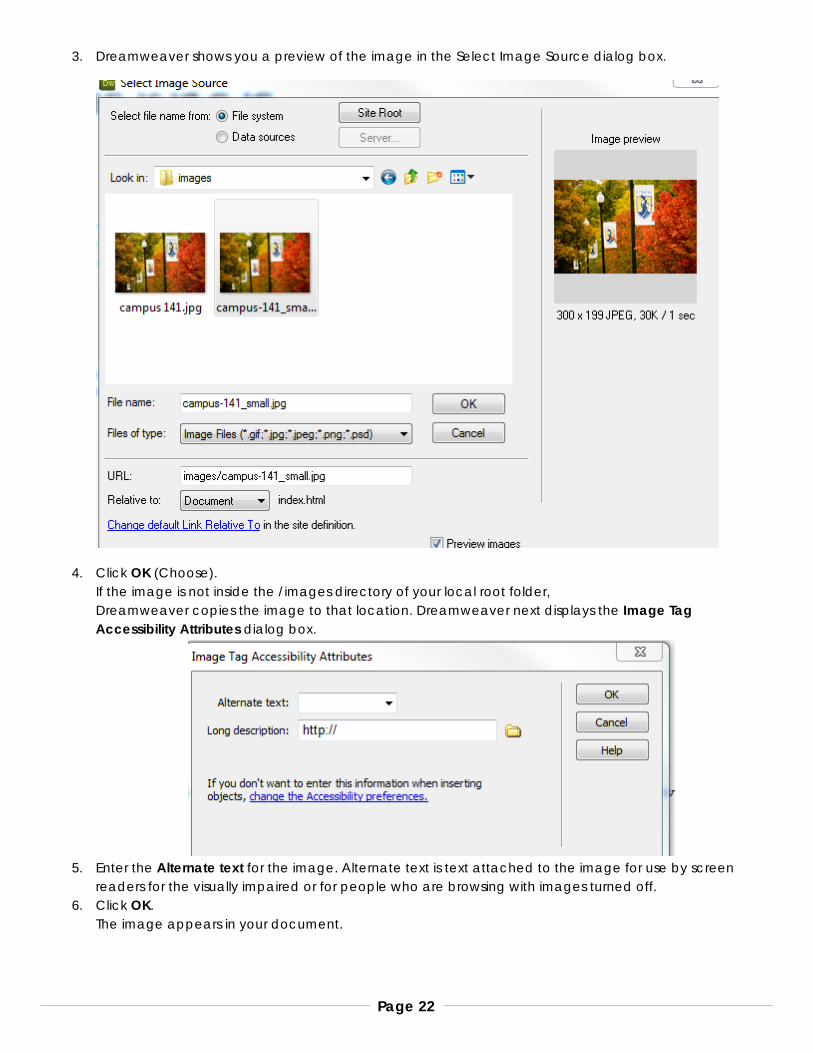
3. Dreamweaver shows you a preview of the image in the Select Image Source dialog box.
4. Click OK (Choose). If the image is not inside the /images directory of your local root folder, Dreamweaver copies the image to that location. Dreamweaver next displays the Image Tag Accessibility Attributes dialog box.
5. Enter the Alternate text for the image. Alternate text is text attached to the image for use by screen
readers for the visually impaired or for people who are browsing with images turned off. 6. Click OK.
The image appears in your document.
Page 23
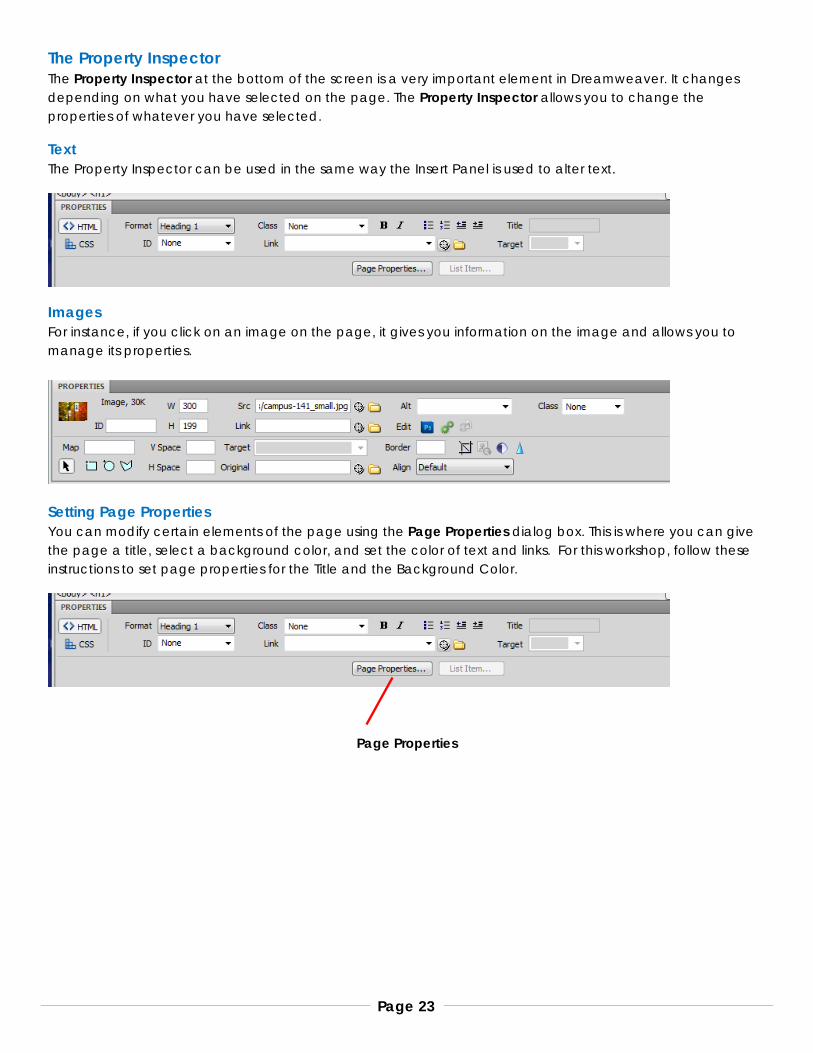
The Property Inspector The Property Inspector at the bottom of the screen is a very important element in Dreamweaver. It changes depending on what you have selected on the page. The Property Inspector allows you to change the properties of whatever you have selected.
Text The Property Inspector can be used in the same way the Insert Panel is used to alter text.
Images For instance, if you click on an image on the page, it gives you information on the image and allows you to manage its properties.
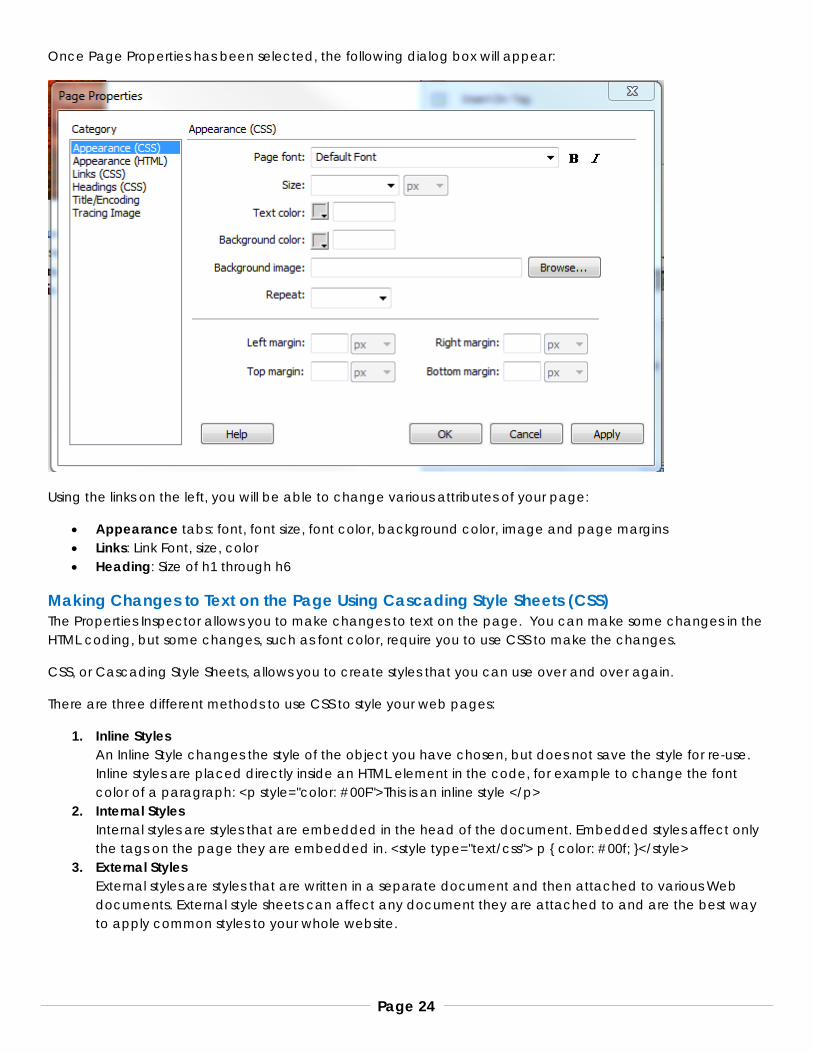
Setting Page Properties You can modify certain elements of the page using the Page Properties dialog box. This is where you can give the page a title, select a background color, and set the color of text and links. For this workshop, follow these instructions to set page properties for the Title and the Background Color.
Page Properties
Page 24
Once Page Properties has been selected, the following dialog box will appear:
Using the links on the left, you will be able to change various attributes of your page:
• Appearance tabs: font, font size, font color, background color, image and page margins • Links: Link Font, size, color • Heading: Size of h1 through h6
Making Changes to Text on the Page Using Cascading Style Sheets (CSS) The Properties Inspector allows you to make changes to text on the page. You can make some changes in the HTML coding, but some changes, such as font color, require you to use CSS to make the changes.
CSS, or Cascading Style Sheets, allows you to create styles that you can use over and over again.
There are three different methods to use CSS to style your web pages:
1. Inline Styles An Inline Style changes the style of the object you have chosen, but does not save the style for re-use. Inline styles are placed directly inside an HTML element in the code, for example to change the font color of a paragraph: <p style="color: #00F">This is an inline style </p>
2. Internal Styles Internal styles are styles that are embedded in the head of the document. Embedded styles affect only the tags on the page they are embedded in. <style type="text/css"> p { color: #00f; }</style>
3. External Styles External styles are styles that are written in a separate document and then attached to various Web documents. External style sheets can affect any document they are attached to and are the best way to apply common styles to your whole website.
Page 25
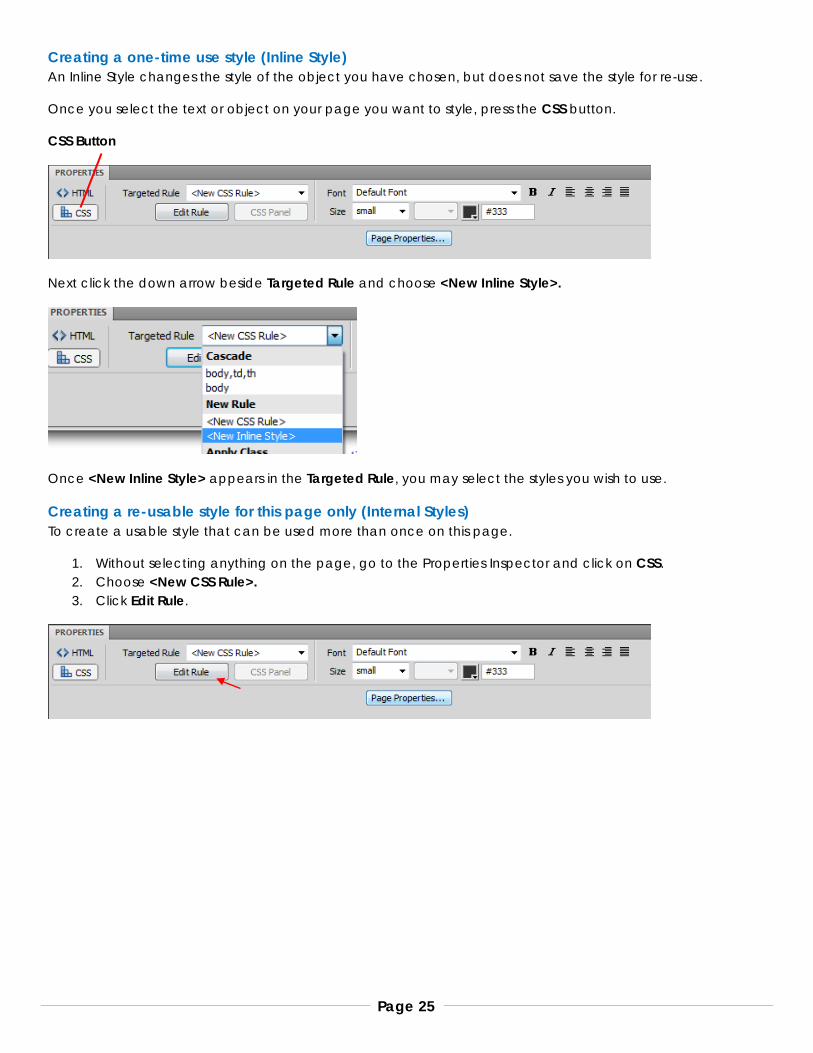
Creating a one-time use style (Inline Style) An Inline Style changes the style of the object you have chosen, but does not save the style for re-use.
Once you select the text or object on your page you want to style, press the CSS button.
CSS Button
Next click the down arrow beside Targeted Rule and choose <New Inline Style>.
Once <New Inline Style> appears in the Targeted Rule, you may select the styles you wish to use.
Creating a re-usable style for this page only (Internal Styles) To create a usable style that can be used more than once on this page.
1. Without selecting anything on the page, go to the Properties Inspector and click on CSS. 2. Choose <New CSS Rule>. 3. Click Edit Rule.
Page 26
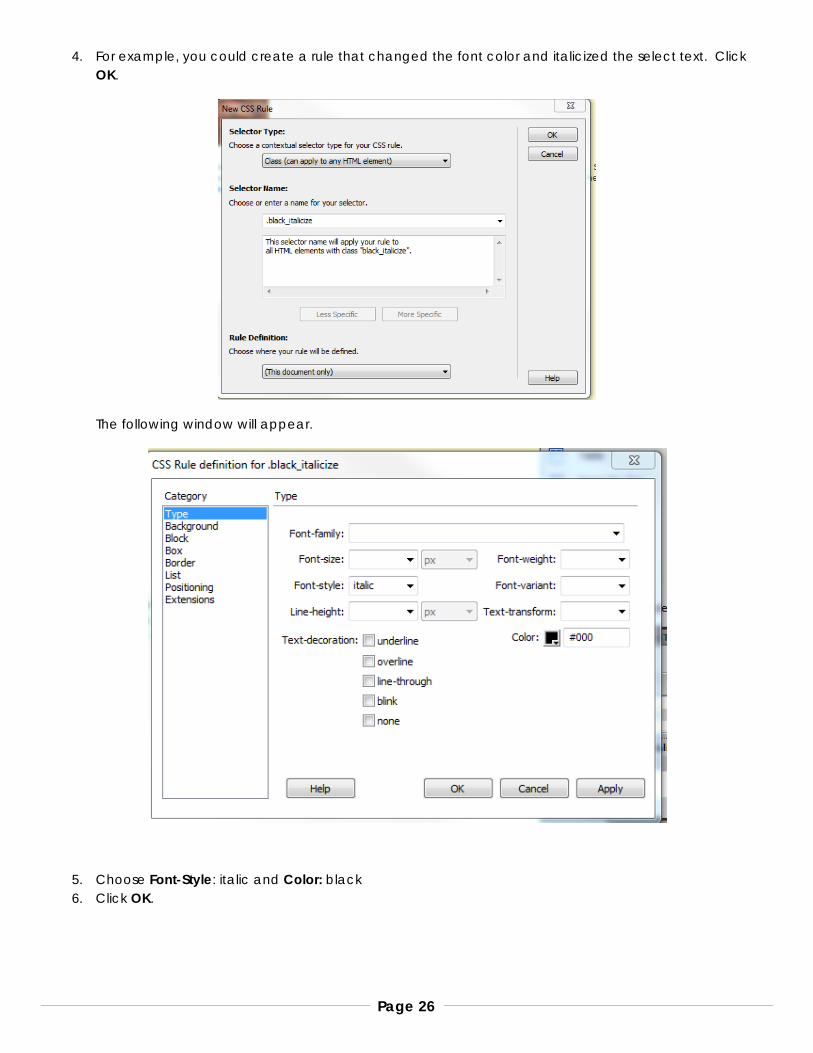
4. For example, you could create a rule that changed the font color and italicized the select text. Click OK.
The following window will appear.
5. Choose Font-Style: italic and Color: black 6. Click OK.
Page 27
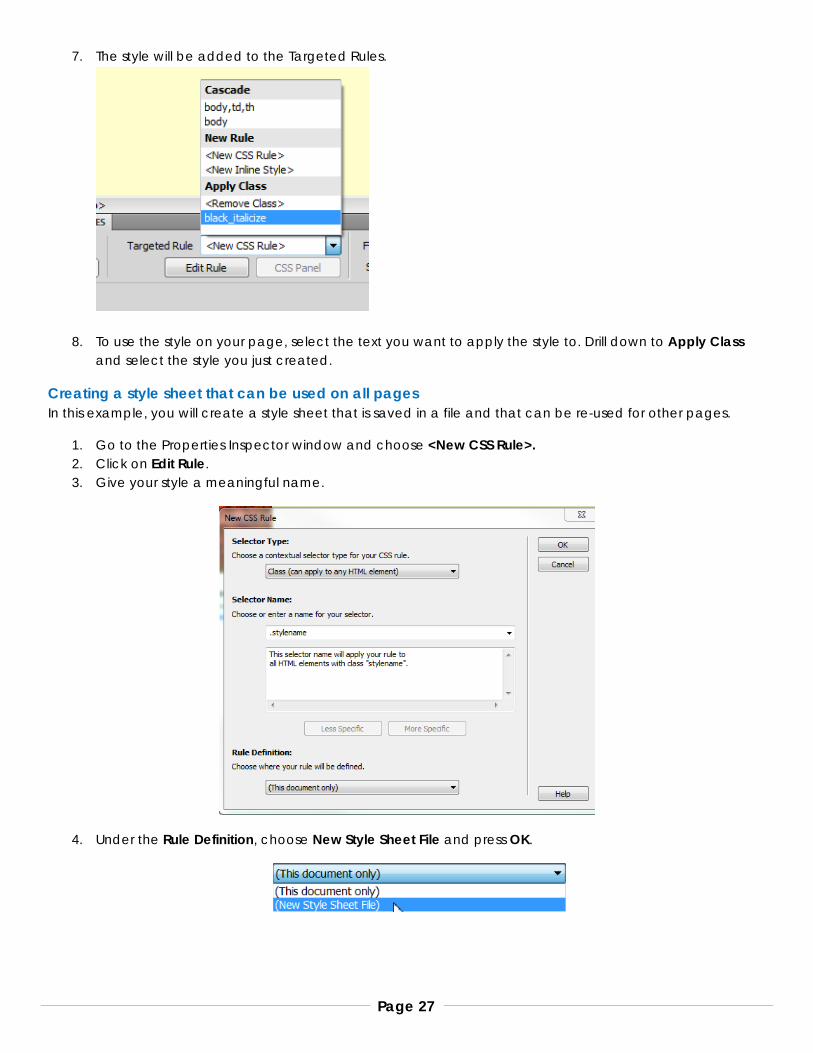
7. The style will be added to the Targeted Rules.
8. To use the style on your page, select the text you want to apply the style to. Drill down to Apply Class and select the style you just created.
Creating a style sheet that can be used on all pages In this example, you will create a style sheet that is saved in a file and that can be re-used for other pages.
1. Go to the Properties Inspector window and choose <New CSS Rule>. 2. Click on Edit Rule. 3. Give your style a meaningful name.
4. Under the Rule Definition, choose New Style Sheet File and press OK.
Page 28
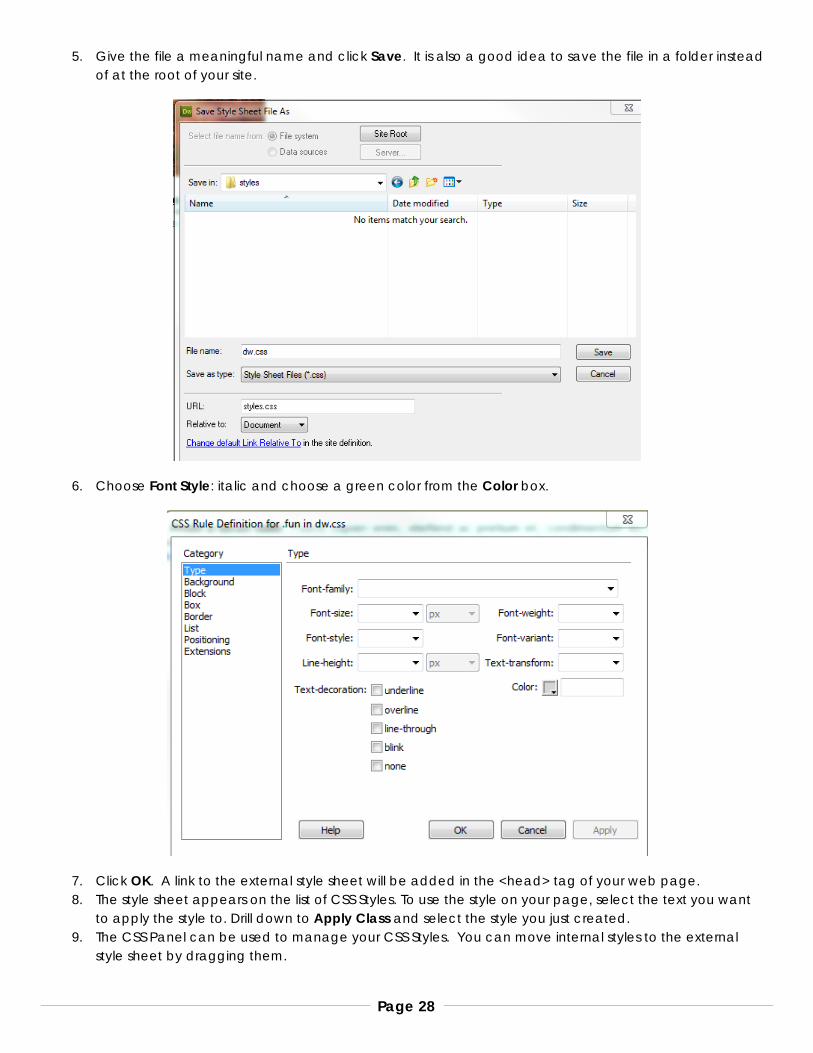
5. Give the file a meaningful name and click Save. It is also a good idea to save the file in a folder instead of at the root of your site.
6. Choose Font Style: italic and choose a green color from the Color box.
7. Click OK. A link to the external style sheet will be added in the <head> tag of your web page. 8. The style sheet appears on the list of CSS Styles. To use the style on your page, select the text you want
to apply the style to. Drill down to Apply Class and select the style you just created. 9. The CSS Panel can be used to manage your CSS Styles. You can move internal styles to the external
style sheet by dragging them.

Page 29
Applying External Stylesheet to another Page In the next examples, you will be using a file called services.html.
Go to File, then choose Open, then choose index.html or another .html page that you have created.
1. To apply the new CSS Style Sheet to this page, go to Format, CSS Styles, Attach Style Sheet.
2. Select the file .css file you created in the previous lesson and click OK.
3. The styles you created before and saved in this file will now be available for you to use.
Previewing the Page in a Browser Previewing the page lets you see what the pages will look like in the browser once you put them on the Web server.
There are several ways you can view your page in the browser.
• F12 • File > View in Browser • View > Toolbars > Document – use the world Icon.

Page 30
Further Help Dreamweaver has training built-in. Click on the Help pull-down menu and select Dreamweaver Help. You can also go to www.adobe.com/devnet/dreamweaver and click the Getting Started tab for help, tutorials, and more.
To learn HTML and more about Web Publishing, try www.w3schools.com. They have free tutorials on many different web publishing subjects, such as HTML, XHTML, CSS, and more.
Page 31
Appendix A: Synchronizing Files
Synchronizing the Local and Remote Sites Having two copies of a website, one local and the other on a Web server, can lead to trouble. It’s possible to lose track of just which files you changed. In that case, it might be difficult for you to determine which copy of the site (local or remote) has the latest version of the files.
Dreamweaver’s Synchronize command compares the local and remote sites and transfers the newer files in either direction.
To synchronize local and remote sites:
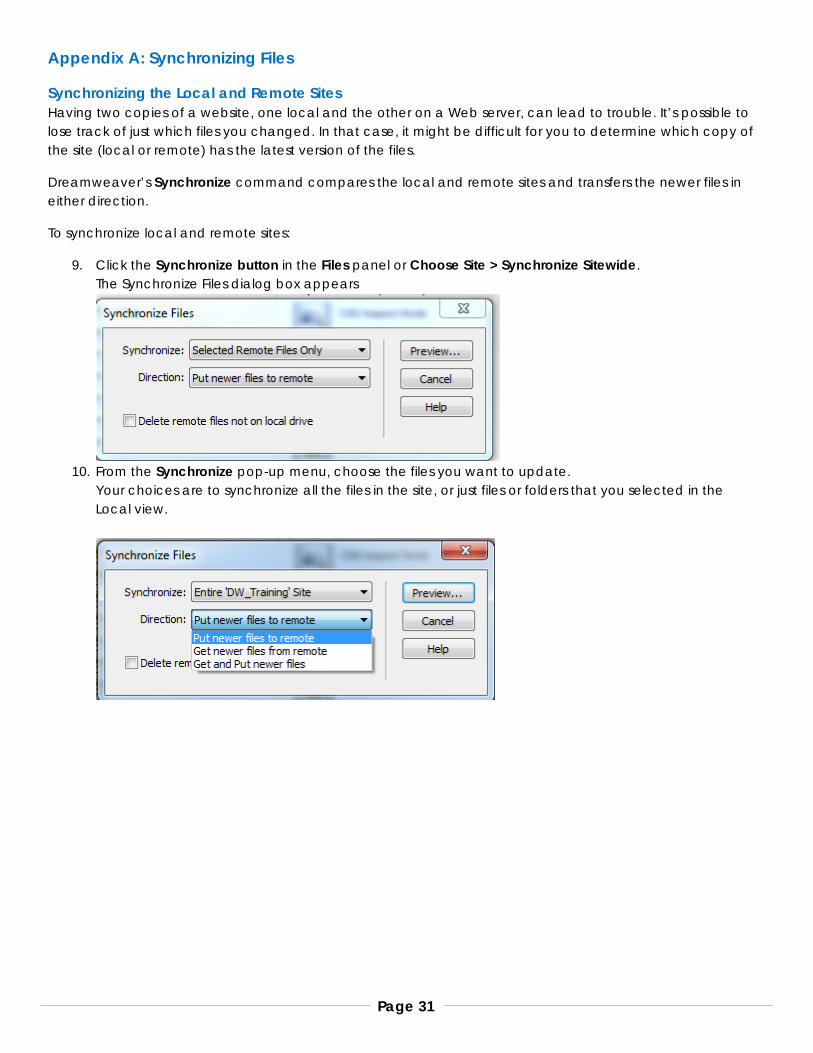
9. Click the Synchronize button in the Files panel or Choose Site > Synchronize Sitewide. The Synchronize Files dialog box appears
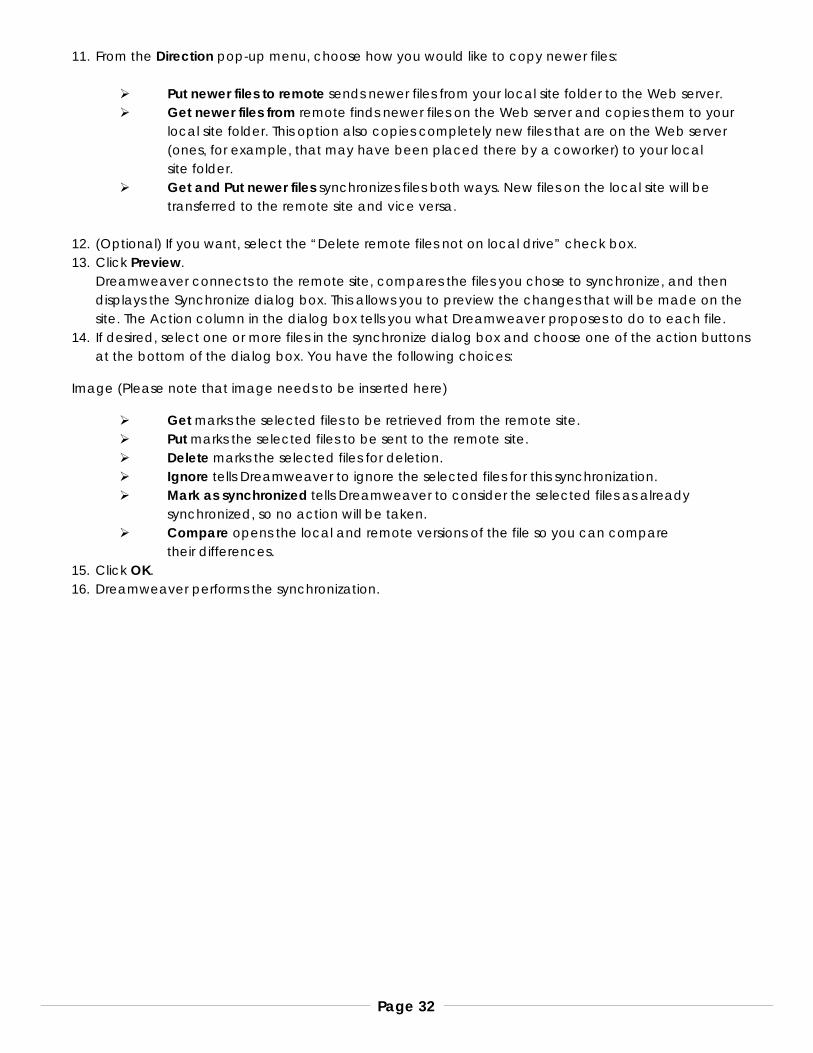
10. From the Synchronize pop-up menu, choose the files you want to update.
Your choices are to synchronize all the files in the site, or just files or folders that you selected in the Local view.
Page 32
11. From the Direction pop-up menu, choose how you would like to copy newer files:
Put newer files to remote sends newer files from your local site folder to the Web server. Get newer files from remote finds newer files on the Web server and copies them to your
local site folder. This option also copies completely new files that are on the Web server (ones, for example, that may have been placed there by a coworker) to your local site folder.
Get and Put newer files synchronizes files both ways. New files on the local site will be transferred to the remote site and vice versa.
12. (Optional) If you want, select the “Delete remote files not on local drive” check box. 13. Click Preview.
Dreamweaver connects to the remote site, compares the files you chose to synchronize, and then displays the Synchronize dialog box. This allows you to preview the changes that will be made on the site. The Action column in the dialog box tells you what Dreamweaver proposes to do to each file.
14. If desired, select one or more files in the synchronize dialog box and choose one of the action buttons at the bottom of the dialog box. You have the following choices:
Image (Please note that image needs to be inserted here)
Get marks the selected files to be retrieved from the remote site. Put marks the selected files to be sent to the remote site. Delete marks the selected files for deletion. Ignore tells Dreamweaver to ignore the selected files for this synchronization. Mark as synchronized tells Dreamweaver to consider the selected files as already
synchronized, so no action will be taken. Compare opens the local and remote versions of the file so you can compare
their differences. 15. Click OK. 16. Dreamweaver performs the synchronization.