introduction to workplace ergonomics
TRANSCRIPT
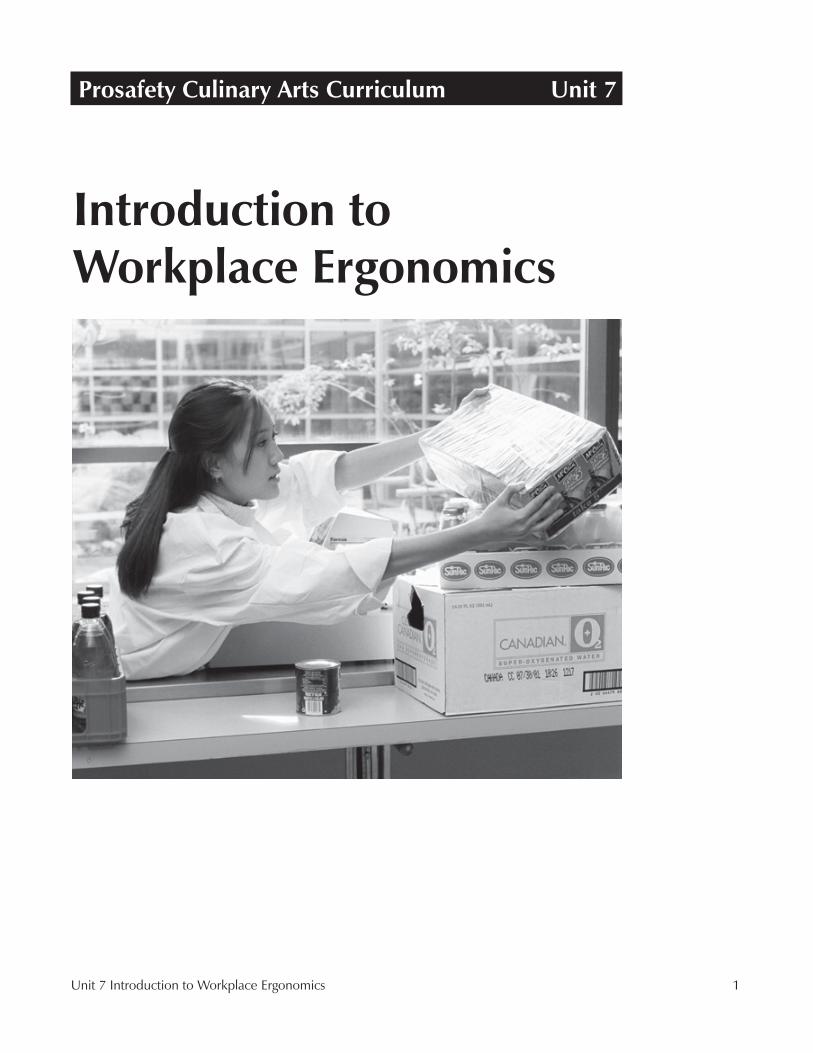
Unit 7 Introduction to Workplace Ergonomics 1
Introduction to Workplace Ergonomics
Prosafety Culinary Arts Curriculum Unit 7

2

Unit 7 Introduction to Workplace Ergonomics 3
Unit 7 Overview This unit introduces your students to basic ergonomics information and concepts that are relevant to workers of all ages and to all types of work-places. Students are introduced to ergonomic risk factors by watching a DVD. Students then participate in some simple hands-on activities where they experience and try to apply some of these basic ergonomic concepts.
Activity A. Introduction: Why Is This Subject Important?This section gives both the instructor and their students a brief overview of what ergonomics is and why it is important for all workers, including teen workers.
Activity B. DVD and DiscussionStudents view the video Dr. Ergo, which introduces them to diff erent ergo-nomic risk factors found in all jobs and workplaces.
Activity C. Experiencing Injury Risk FactorsStudents participate in hands-on activities that help to demonstrate some ergonomic risk factors. The fi rst activity compares the strength of a power grip verses a pinch grip. It is followed by an activity where students look at posture, force and eff ort while lift ing and holding a box.
Activity D. Practice Safe Lifting: Lifting Loads at the PizzeriaIn this activity students practice safe lift ing, while the other students evaluate their technique. Students will also lift and hold a box in diff erent positions, and evaluate the physical eff ort required to lift and hold the box using a rat-ing scale.
Activity E. Analyzing a Task for Ergonomic Hazards (Optional)In this activity, teams of students evaluate the ergonomic risk factors for spe-cifi c job tasks using a risk factor checklist.
4 Prosafety Culinary Arts Curriculum
Washington State Essential Academic Learning Requirements (EALRs)
Health and Fitness 1.2. Safely participates in a variety of developmentally appropriate physical
activities. Incorporates safety procedures into activities and individual fi tness plans for leisure and employment.
2.3. Acquire skills to live safely and reduce health risks.
3.1. Understand how environmental factors aff ect one’s health (air, water, noise, chemicals). Assess how the environment impacts choosing healthy places to live, work, and recreate.
3.2. Gather and analyze health information. Solve a health and fi tness prob-lem or issue:
• List alternative courses of action.
• Choose the course that most fully addresses the needs and requirements of the situation.
• Back up the choice with evidence.
• Evaluate the outcome.
4.1 Analyze health and safety information. Investigate the health and fi tness requirements for occupational/career areas of interest.
Communication 3.2 Work cooperatively as a member of a group
3.3 Seek agreement and solutions through discussion
Reading3.1 Read to learn new information
3.3 Read to perform a task
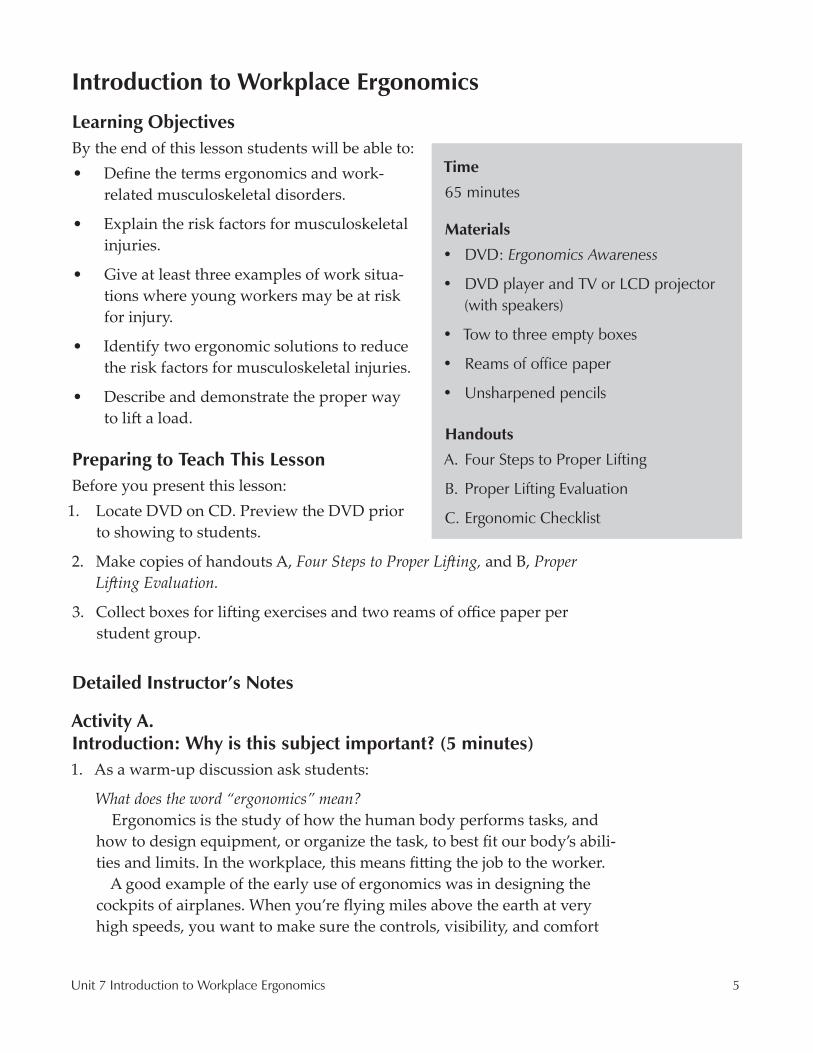
Unit 7 Introduction to Workplace Ergonomics 5
Introduction to Workplace Ergonomics
Learning Objectives By the end of this lesson students will be able to: • Defi ne the terms ergonomics and work-
related musculoskeletal disorders.
• Explain the risk factors for musculoskeletal injuries.
• Give at least three examples of work situa-tions where young workers may be at risk for injury.
• Identify two ergonomic solutions to reduce the risk factors for musculoskeletal injuries.
• Describe and demonstrate the proper way to lift a load.
Preparing to Teach This LessonBefore you present this lesson:
1. Locate DVD on CD. Preview the DVD prior to showing to students.
2. Make copies of handouts A, Four Steps to Proper Lift ing, and B, Proper Lift ing Evaluation.
3. Collect boxes for lift ing exercises and two reams of offi ce paper per student group.
Detailed Instructor’s Notes
Activity A. Introduction: Why is this subject important? (5 minutes)1. As a warm-up discussion ask students:
What does the word “ergonomics” mean?Ergonomics is the study of how the human body performs tasks, and
how to design equipment, or organize the task, to best fi t our body’s abili-ties and limits. In the workplace, this means fi tt ing the job to the worker.
A good example of the early use of ergonomics was in designing the cockpits of airplanes. When you’re fl ying miles above the earth at very high speeds, you want to make sure the controls, visibility, and comfort
Time
65 minutes
Materials
• DVD: Ergonomics Awareness
• DVD player and TV or LCD projector (with speakers)
• Tow to three empty boxes
• Reams of office paper
• Unsharpened pencils
Handouts
A. Four Steps to Proper Lifting
B. Proper Lifting Evaluation
C. Ergonomic Checklist

6 Prosafety Culinary Arts Curriculum
are as good as they can be so pilots can do their work safely and make the right decisions.
In more typical workplaces, it means sett ing up the worksite to meet the needs of the workers. In ergonomics, the worker is the central fi gure. When worksites are designed to suit the needs of the worker there are fewer cases of work-related musculoskeletal disorders (WMSDs), fewer days absent, higher productivity, and more comfortable workers.
2. Why is ergonomics important?
Injuries that result from poor ergonomics are some of the most common and frequent kinds of injuries, and they are found in all kinds of work-places and occupations. Many of these are musculoskeletal injuries, which we commonly refer to as strains and sprains. These oft en aff ect the back but other body parts are also involved such as hands and wrists, shoulder, neck, and knee.
The rise in the use of computers has contributed to a dramatic increase in injuries due to ergonomic factors. We don’t yet know what a lifetime of working on a personal computer does to the body, because we only have about 25 years of experience. Ergonomic-related injuries can be serious and disabling.
Young people who get back injuries are more likely to have lifelong back problems, which can limit both work and recreational activities.
Using the principles of ergonomics, it is possible to reduce the risk of injury.
Activity B. DVD and Discussion (25 minutes)1. Explain that the class will now watch a 14-minute DVD, Ergonomics
Awareness, created by the Washington State Department of Labor and Industries.
Ask students to keep in mind these questions while they watch the DVD:a. What are the key ergonomic risk factors?
b. What kinds of jobs have you done that involve these risk factors?
c. What kinds of changes can be made to protect workers from these risks?
2. Show the DVD.
3. Aft er showing the DVD, discuss the following questions with the class:
What are the key ergonomic risk factors?• Working in awkward positions

Unit 7 Introduction to Workplace Ergonomics 7
• Using high hand force
• Performing repetitive motions
• Using the hand or knee to make repeated impacts
• Heavy, frequent or awkward lift ing
• Exposure to moderate to high levels of vibration
• Standing too long in one position
• Mechanical pressure (leaning against a hard edge)
What kinds of jobs have you done that involve these risk factors?• Construction: lift ing, vibrating tools, awkward positions, pinch grips
• Offi ce work: repetitive keyboarding, lift ing, sitt ing in one position for a long time
• Restaurant work: lift ing, standing for long periods, repetitive kitchen work
• Other
4. Explain that the class will discuss these jobs and risks in more detail, along with possible solutions, in a later activity.
Activity C. Experiencing Injury Risk Factors (15 minutes)Certain body positions and postures are naturally stronger than others. Two exercises will demonstrate this for the hands/wrists and the lower back.
Strong and Weak GripsGrip Strength Tug-o-WarStudents pair off and compete in a tug-o-war competition using pencils. Two separate comparisons will illustrate the diff erence between 1) a pinch grip competing with a power grip and 2) a neutral wrist competing with a bent wrist posture. Students compare their strength using both techniques.
Fig. A Fig. B Fig. C

8 Prosafety Culinary Arts Curriculum
1. The fi rst student holds the pencil in a pinch grip as in fi gure A. The other student tries to pull the pencil out of the grip. Then the fi rst student holds the pencil in a power grip, fi gure B. The other student again tries to pull the pencil out of the fi rst student’s hand.
Ask students:
Which was easier to pull out, the pinch grip or the power grip? Why?
What does that tell you about doing a task with the hand in a pinch grip rather than a power grip?
The power grip is the stronger grip since all of the fi ngers and palm are supporting the pencil.
2. Reverse roles and have the second student hold the pencil as in B (power grip with a straight wrist). Now the fi rst student tries to pull it out. Now hold the pencil the same way but bend the wrist forward (down) as far as you can. Student 2 now tries to pull it out again.
Ask students:Which was easier to pull out this time, straight wrist or bent wrist?
For the student holding the pencil what did it feel like trying to hold it with the wrist bent so far?
The straight wrist is stronger, which is the neutral posture for the wrist. Holding the wrist bent and trying to grip is uncomfortable.
Posture, Force, and Eff ortStudents will lift and hold a box in four positions: without a box, close to their body, midway from their body, and low/away from their body. Following the directions on part 1 of Handout A, Four Steps to Proper Lift ing, students will assess posture, fatigue, and strength using a 1–10 scale. To set up for this activity, you will need to place two reams of offi ce paper in each box. One ream of offi ce paper weighs approximately fi ve pounds.
Safety Note: Students with back or shoulder injuries should either not par-ticipate actively or lift only one ream of paper.

Unit 7 Introduction to Workplace Ergonomics 9
Activity D. Practice Safe Lifting: Lifting Loads at the Pizzeria (20 minutes)
1. Divide students into groups of 2–4. Present them with this scenario:
You have a new job working in the kitchen of a pizzeria. Every morn-ing boxes of ingredients are delivered to the back door of the kitchen. One of your job duties is to move these boxes into the kitchen. At the end of your shift , you also have to empty all the trash cans and carry the garbage to the dumpster behind the shop. Aft er three weeks on the job, you have noticed that your back has started to feel sore and tired by the end of your shift .
Give students copies of Handout A, Four Steps to Proper Lift ing and B, Proper Lift ing Evaluation.
2. Give each group two or three empty boxes. Tell them their task is to prac-tice lift ing and moving the boxes using the techniques from the handout. Aft er reading Four Steps to Proper Lift ing, each person takes a turn lift ing the boxes and moving them to a location you specify. The other students in the small group use the safe lift ing checklist from part two of Handout B, Proper Lift ing Evaluation to evaluate the lift .
3. Aft er everyone is done and you get back together as one group, discuss how it felt to use the proper lift ing techniques. The students may say that it feels funny bending the knees and lift ing with the legs. Emphasize that many lift ing tasks are not as straightforward as lift ing compact boxes. Materials are oft en bulky, odd-shaped, and too heavy for any one person to lift safely. Sometimes what you’re lift ing is a person, as in a hospital or nursing home. Here lift ing with your knees may be impossible. Therefore it’s very important to look for solutions that go beyond proper body

10 Prosafety Culinary Arts Curriculum
movement to protect the health of your back. There are ways to change the workplace or the task to make lift ing easier. Ask the students to think of some of these types of changes.
Some examples:• Store boxes off the ground so they are at a height between the knees
and the shoulders, in order to avoid high or low lift s.• Have orders delivered in smaller (lighter) boxes.• Use two people to lift .• Use cranes, dollies, or other lift ing devices.
Leave students with the message that good back care is important on and off the job, but it’s always important to look at the job and equipment as well as what you can do yourself to protect your back.
Note: If students suggest wearing back belts, tell them that NIOSH (the National Institute for Occupational Safety and Health) does not recom-mend them. Back belts do not specifi cally protect the back and may even be hazardous themselves. They may give people the false impression that they can lift more than they should. Following safe lift ing techniques is always essential.
Activity E. (Optional) Analyzing a Task for Ergonomic Hazards (15 minutes)
1. Divide the class into groups of three or four. Assign each group one of the jobs mentioned in the previous discussion or a job shown below. Give students Handout C, the Ergonomics Checklist.
2. Ask each group to identify all the possible ergonomic risks involved in that job, using the checklist. Suggest that one person in the group mime diff erent aspects of the job, so that the others can observe and identify possible risks. Ask each group to report back the following information:
• All ergonomic risk factors
• At least three possible changes that could be made to address those risks.
3. Bring the class back together. Ask each group to report back on their fi ndings.
4. Review key points.

Unit 7 Introduction to Workplace Ergonomics 11
Handout A Four Steps to Proper Lifting

12

Unit 7 Introduction to Workplace Ergonomics 13
Handout B Proper Lifting Evaluation
Posture, Force, and EffortEach partner will take turns lift ing and holding the box in diff erent positions. Use the Physical Eff ort Rating Scale to fi ll out the table. For each position, pro-vide the Physical Eff ort Rating and write down where in your body you felt discomfort or fatigue aft er holding the position for 15 seconds.
Physical Effort ObservationsPosition Partner 1 Partner 2No box
Pretend as if you have a box to lift and follow the basic procedure. Stand for 15 seconds before lowering.
Rating
Discomfort/fatigue:
Rating
Discomfort/fatigue:
Box held close
Lift and then hold the box close, about 1–2” in front of your body at waist level. Do not allow the box to touch or rest on your body. Hold for 15 seconds and then lower the box.
Rating
Discomfort/fatigue:
Rating
Discomfort/fatigue:
Box held at the middle distance with slight bend in elbows
Lift and then hold the box 8–10” in front of you with elbows bent. Hold for 15 seconds and then lower the box.
Rating
Discomfort/fatigue:
Rating
Discomfort/fatigue:
Box held low and far away
Hold the box in front of you, about 10–12” off the ground. Hold for 15 seconds and then lower the box.
Rating
Discomfort/fatigue:
Rating
Discomfort/fatigue:
Physical Effort Rating ScaleUse this scale to answer the questions above.10. Very, very diffi cult
9. Very diffi cult
8. Diffi cult
7. Somewhat diffi cult
6. A litt le diffi cult
5. Moderate eff ort
4. Litt le eff ort
3. Very litt le eff ort
2. Easy
1. No eff ort
Safety Note: If lift ing and holding the box with two reams of paper is too heavy for you, feel free to remove one ream of paper from the box.

14 Prosafety Culinary Arts Curriculum
Handout B Proper Lifting Evaluation
Safe Lifting ChecklistWatch your fellow students lift the boxes. See if they follow the safe lift ing method. Help them if they miss a step.
Did they... Yes No
Know where the boxes will be placed?
Check for obstacles and clear a path before moving the material?
Check the weight of the load before lift ing it?
Have two or more people lift (or use a lift device) if necessary?
Avoid twisting while carrying?
Keep the load as close as possible to the body?
Lift with the legs and not with the back?
Lift the load slowly, avoiding fast jerky movements?
Use their leg and back muscles by bending their knees when sett ing the load down?
Comments
Unit 7 Introduction to Workplace Ergonomics 15
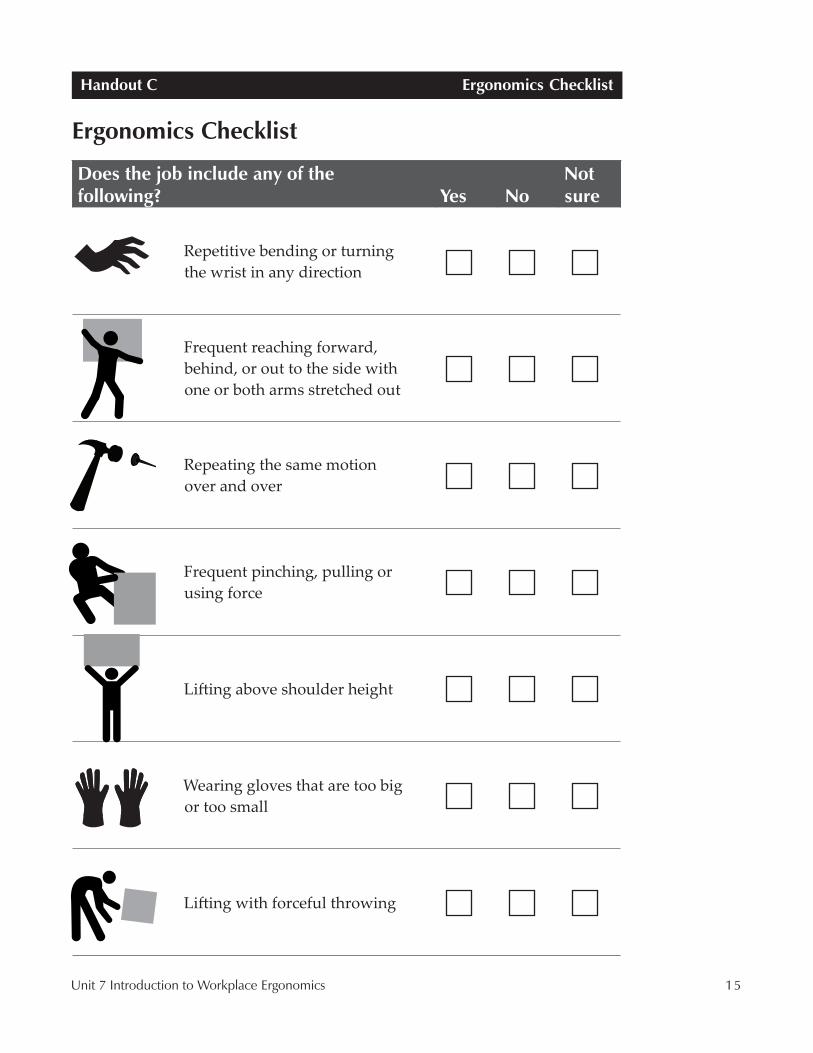
Handout C Ergonomics Checklist
Ergonomics Checklist
Does the job include any of the following? Yes No
Not sure
Repetitive bending or turning the wrist in any direction
Frequent reaching forward, behind, or out to the side with one or both arms stretched out
Repeating the same motion over and over
Frequent pinching, pulling or using force
Lift ing above shoulder height
Wearing gloves that are too big or too small
Lift ing with forceful throwing
16 Prosafety Culinary Arts Curriculum
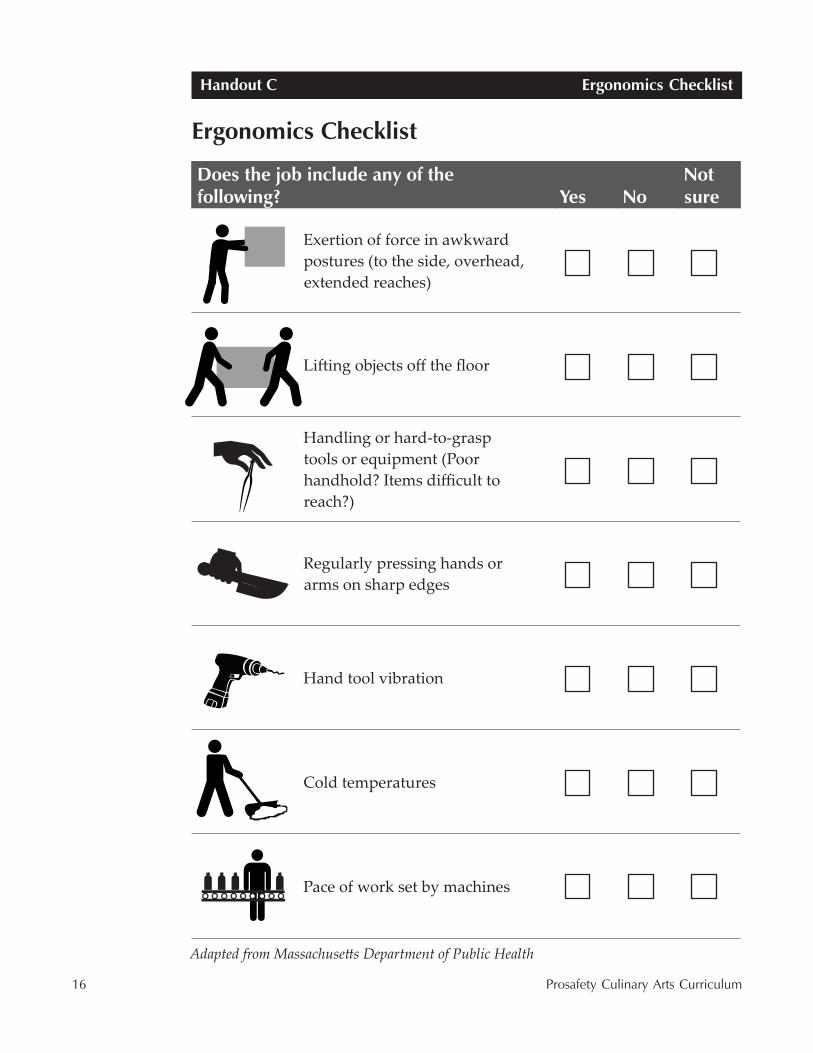
Does the job include any of the following? Yes No
Not sure
Exertion of force in awkward postures (to the side, overhead, extended reaches)
Lift ing objects off the fl oor
Handling or hard-to-grasp tools or equipment (Poor handhold? Items diffi cult to reach?)
Regularly pressing hands or arms on sharp edges
Hand tool vibration
Cold temperatures
Pace of work set by machines
Adapted from Massachusett s Department of Public Health
Handout C Ergonomics Checklist
Ergonomics Checklist