introduction - mailchimpstatic.mailchimp.com/www/guides/understanding-reports/package/... ·...
TRANSCRIPT


IntroductionYou’ve imported your list, created a beautiful campaign, and sent it to your
loyal subscribers. Now it’s time to sit back, relax, and watch your reports
come in.
Unlike print or traditional direct marketing, email marketing allows you to
track how many people opened your email campaigns and see exactly what
they clicked. Watching your stats is fun because you get to see how your
campaigns performed, but it’s useless if you don’t understand how they
work and how you can use them to improve your campaigns going forward.
In this guide, we’ll cover:
How to track opens and clicks in MailChimp
What open and click tracking means
How to view your MailChimp reports
What the statistics mean and how to use them
Advanced reports, integrations, and plugins
How to access reports from your smartphone
If you have any questions that aren’t addressed here, feel free to contact our
support staff at mailchimp.com/support.

Track Opens andClicksIf you want opens and clicks to show up in your reports, make sure you’re
tracking them. Log in to MailChimp and click Create Campaign. Select the
campaign type and choose your list, then you’ll see the Campaign Info and
tracking section in the Setup step of the campaign builder. On the left side,
you’ll fill in your usual campaign information. The box to the right asks you
what you want to track within the campaign you’re creating. We check the
opens and HTML clicks boxes for you by default, but if you want to track
plain-text clicks or add Google Analytics tracking (more on that later), you’ll
need to check the appropriate box. Clicks are automatically tracked for
users on free plans.

What is ClickTracking?Curious about how click tracking works? Here’s a little technical information:
Say you put a link in your campaign that points to your website, and you
want to track how many times it was clicked. MailChimp will save your link
in its database and replace it with our own redirect link. The redirect link
routes people to our server first (where we track the click), and then quickly
sends them to your intended destination. It happens instantaneously, so the
entire experience is seamless and invisible to your subscribers. But redirect
links do have certain implications.
What redirects mean for you and your emails
When you code a link in your HTML email like this...
<a href="http://www.mywebsite.com/mypage.html">Visit mywebsite</a>
...and then you select Track clicks in MailChimp, we’ll automatically alter
the URL in your link with a MailChimp redirect. Your code will end up looking
something like this:
<a href="http://www.mcsv.net/cgi-bin/redir?id=xyz345">Visit my website</a>

Some email programs display warnings when they see tracked links in your
email. They do it because scammers often send emails designed to look like
they came from a trusted source (like your local bank), but when you click
their link inside, you’re redirected to a site designed to steal your password.
Because of these phishing scams, some email programs don’t like any
redirect scripts. They’re usually not a problem, as long as you avoid links
where the description is the URL. This kind of HTML code will set off
phishing warnings in some email programs:
Please visit <a href="http://www.our-website.com">http://www.our-website.com</a>
Because email programs see this when tracking redirect links are used:
Please visit <a href="http://www.mcsv.net/cgi-bin/redir?id=xyz345">http://www.our-website.com</a>
In the example above, the description of the link (what the human eye sees)
says that the link will take you to “our-website.com.” However, your email
program sees that it’s really taking you to “mcsv.net.” This looks suspicious
to them, so they pop up a warning.
Coding links like this will NOT set off alarms:
Please visit <a href="http://www.our-website.com">ourwebsite</a>
In this example, whenever we add redirect tracking links, there’s no
mismatch between the actual URL of the link and the description. In your
HTML email, you don’t have to worry about the URL being changed,
because your recipients will only see the “Visit my website” part of the link,
while the redirect code stays behind the scenes. But in your plain-text
alternative emails, you can’t hide the URL behind the code.
Tracked links in plain-text emails
When you track a link in an HTML email, nobody sees the redirect link
behind the scenes. They just see “Click here.”

In your plain-text alternative email, you can’t hide your link code. You can’t
make text like “Visit our website” clickable like you can in HTML email.
When you want to point people to your website from a plain-text email, it’ll
have to look like:
To go to our website, visit this URL in your browser:http://www.mywebsite.com.
If you were to activate click tracking in plain-text email, it would look like
this:
To go to our website, visit this URL in your browser:http://www.mcsv.net/cgi-bin/redir?id=xyz345
Some of your recipients would be suspicious about that “mcsv.net” redirect
URL, so they wouldn’t click. That’s why a lot of our users choose not to
track clicks in their plain-text emails. We give you the option to turn it off.

What is OpenTracking?When you check the box to track opens in MailChimp, we place a tiny,
invisible graphic at the bottom of your HTML email. Each time your HTML
email is displayed in a recipient’s inbox, that unique graphic for your
campaign gets downloaded from our server, which we track as an open.
HTML Email Only
First of all, image tracking only works in the HTML version of your email.
That’s because you obviously can’t place any graphics into plain-text
messages (that’s why they’re called “plain”, after all). So you’re not going to
be able to measure opens from the people who viewed the plain-text
version of your email (actually, there is a way to sort of track opens in your
plain-text emails—if MailChimp tracks a click from plain-text, we also
register that as an open).

Turn On Images
A lot of email applications block images from being automatically displayed
in HTML email. When an HTML email is initially loaded, you’ll see
placeholders where all the images should be. Users have to click a button to
turn on images. This is a privacy measure that’s becoming standard in most
email programs. They do it because some spammers could theoretically use
image tracking for evil by tracking whether or not your email account was
alive (and then send you more spam). With these privacy measures in place,
it gets extremely difficult for email marketers to accurately measure their
open rates. Unfortunately, you’ll just have to take your open stats with a
grain of salt.
Now you know how to track clicks and opens, and you know what exactly
we’re doing when you tell us to track your clicks and opens. Next, we’ll go
over how to view your reports.

View YourReportsTo view your MailChimp campaign reports, just log in to MailChimp and click
the Reports tab. You’ll see a list of campaigns you’ve sent. Click on the
name of a campaign to see its report.

You’ll go to a screen that looks something like this—it’s your Report
Overview (we’ll break down the stats a little later):
Further down the same screen, you’ll see Performance Advice. If your stats
are a lot lower than the average, you might adjust your content, or use
MailChimp’s Inbox Inspector for your next campaign.

We also show you Opens by Location:
That’s the info you have to work with. Next we’ll break down the details of
all those handy charts and graphs.

What the StatsMeanThese are the basic stats you’ll find in MailChimp campaign reports—you
should know exactly what they mean, and how you can use them to manage
your list and target your audience.
1. Recipients: This one’s fairly self-explanatory.
2. Opens: This is the amount of your readers who opened your email.
3. Unopened: The inverse of #2.
4. Clicks: How many readers clicked on links in your email.
5. Unsubscribers: This one’s kind of a bummer—the number of people
who chose to stop receiving your campaigns. We see an average
unsubscribe rate of less than half of one perfecent. Much more than
that, and you might be doing something wrong.
6. Complaints: When you get junk mail, you can click a button that
says “Junk” or “Report as Spam.” Every time you do that, a report
and copy of the offending email goes to your ISP. Your ISP sends a
warning to the sender that says, “too many complaints, and we’ll
block future emails from you.” When you send with MailChimp, we
track the complaints your recipients submit. We also automatically
remove people who complain about you from your list.
7. Successful Deliveries: Some emails bounce or get blocked by spam
filters and firewalls. This number shows you how many of your emails
actually got through to your recipients’ receiving servers.
8. Bounced: The inverse of #7.
9. Total Times Opened: This includes multiple opens per user, so don’t
let the stat go to your head. It’s not a totally useless stat, however.
For example, if you sell banner advertisements in your email
campaigns, then an open is an impression, and you’ll want to show
your advertisers total impressions.

10. Last Open: Some people post special landing pages that they point
their campaigns to. Over time, they have tons of landing pages on
their server, and they want to delete some to make room. But what if
some of your recipients are still opening that email you sent five
months ago? This stat will help.
11. Clicks/Unique Open: The percentage of licks that came from unique
opens. Which is to say: We don’t include people who opened the
email more than once.
12. People Who Clicked: Another self-explanatory one, but it’s perhaps
worth noting that if you have five readers click on your email 20 times,
this stat will say five, not 100.
13. Total Clicks: This is the total number (the 100 from #12). It’s also a
handy way to determine how much overall web traffic you’ll get to
your website (or other websites you link to) after a campaign is sent.
14. Last Click: See #10, except it’s clicks instead of opens.

AdvancedReportsMailChimp’s standard reports are powerful, but we also offer some
advanced reports, integrations, and plugins that can help you learn even
more about how your campaigns are performing and who’s reading them.
Subscriber Activity Reports
If you want to know even more about individual customers and how they’re
responding to your email campaigns, then check out our free SubscriberActivity Reports.
They tell you exactly who opened your email (as opposed to how many
people), and what those people clicked. You can see real-time reports for
each recipient’s activities, when they opened and when they came back for
more. You can even generate a list of who didn’t open—this is good
information if you want to send that group a modified campaign. And to
make it all even easier, you can download Subscriber Activity Reports as a
Microsoft Excel spreadsheet and pass it along to your sales team for follow-
up.
Click the Subscriber Activity pull-down menu to choose a specific stat, or
click through to see them all on one page.
To download the report, just click Download to Excel.

Compare Campaigns (BARF Reports)
MailChimp’s Big Ass Report Files are giant, downloadable reports that
contain all your stats for every campaign you’ve ever sent. They’re slightly
intimidating at first, but we think it’s pretty darn cool that you can download
all this data in one Excel spreadsheet, and manipulate it however you see
fit. In your Reports tab, click Compare Campaigns on the right side.

Rebrandable Campaign Reports
If you manage a MailChimp account for a client or boss, or you’re a web
developer or designer, you might want to show someone a MailChimp report
without giving them full access to the account.
Our VIP reports allow you to customize your campaign reports so that you’d
never even be able to tell they came from MailChimp.
Go to any campaign’s report area and click Share.
On the next screen, you can customize the report’s header and navigation
tabs to match your brand’s look and feel. Upload your logo and choose from
one of our built-in color palettes.

When you click Send Report, Those people will receive an email that links
them to your rebranded reports page. They don’t even have to know
MailChimp exists, and they’ll be quite impressed.
Google Analytics Integration
Our Analytics 360 integration mashes your Google Analytics stats with your
MailChimp reports, so you can instantly see ROI for the campaign (if
eCommerce tracking is enabled), conversion rates, revenue generated,
average value per visitor, ecommerce transactions and goals completed.
Check one box, and MailChimp will add tracking code to your email
campaign links, which enables you to get all this good information. The
summary will appear as part of your Google Analytics reports, or MailChimp
can pull the relevant data from Google Analytics and insert it back into your
campaign reports—that way, you can instantly see summaries of specific
campaigns, right inside the MailChimp application.
To activate the integration, go to Account > Integrations > Google, and
click Authorize connection. Make sure you have your Google Analytics
account set up on your website, and that it’s tracking conversions.
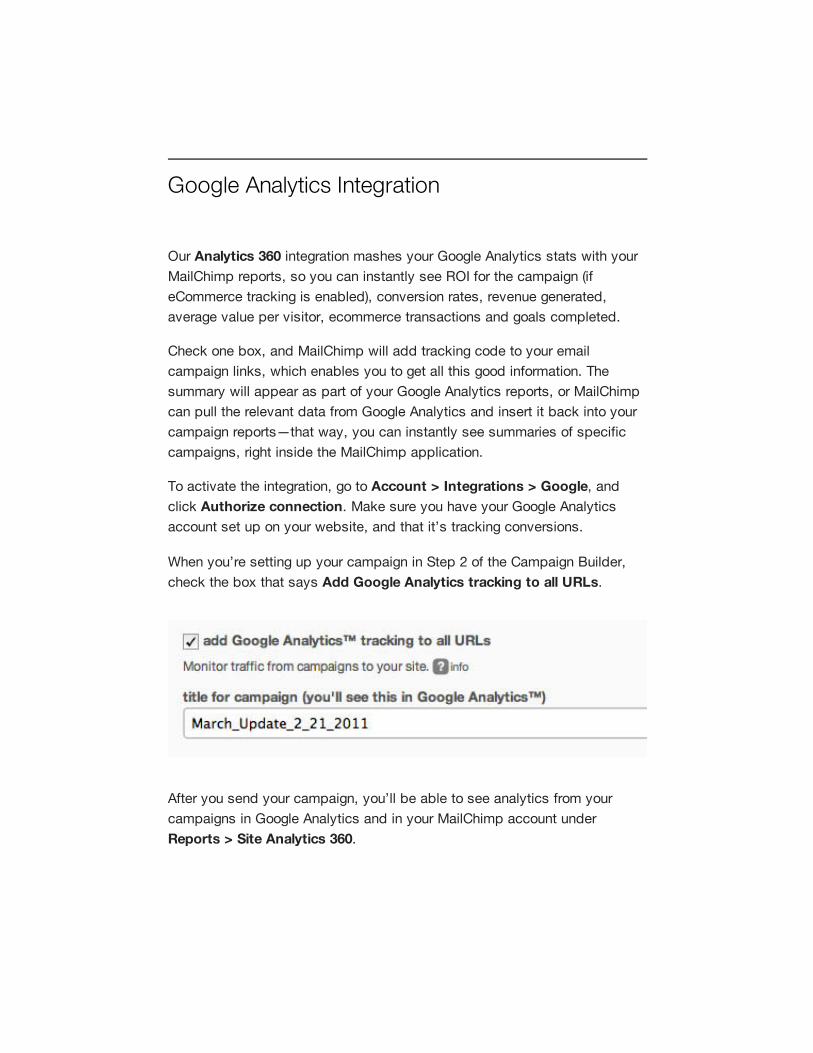
When you’re setting up your campaign in Step 2 of the Campaign Builder,
check the box that says Add Google Analytics tracking to all URLs.
After you send your campaign, you’ll be able to see analytics from your
campaigns in Google Analytics and in your MailChimp account under
Reports > Site Analytics 360.


eCommerce360 plugin
The MailChimp eCommerce tracking plugin helps you measure the ROI of
your email campaigns. When you sync MailChimp’s API with your
eCommerce shopping cart, you can find out when people click from your
email campaigns, visit your website, and purchase something. The plugin
collects the details of the order (order number, total amount, tax, shipping,
product category, product name and ID, quantity of each item, cost of each
item). It doesn’t collect any of your customers’ private data. We aggregate
all that information for you and display it in your MailChimp report.
The eCommerce plugin is a free add-on, and it works well with the Google
Analytics integration. To install the plugin, you have to install the appropriate
plugin (mailchimp.com/plugins/e-commerce-360) on your eCommerce site.
Then, activate the add-on in your MailChimp account by clicking Account >
Add-ons.

Mobile Reportsand MoreMailChimp for Smartphones
MailChimp’s mobile web app allows you to access your full reports, even
when you’re on the go. Find out how your campaigns are performing from
home, the car (not while driving though!), the waiting room, wherever you are.
Supported operating systems include iOS (iPhone, iPod Touch), Android,
webOS 2.0, BlackBerry 6 and Palm Pre 2.0.
If you’re looking for a native app to install on your mobile device, MailChimp
for iPhone is available for free on the app store, and MiniChimp for
Blackberry is available for free at minichimp.com.

Golden Monkeys App
Your list probably has some VIPs on it. If you want to know if those specific
people are enjoying your campaigns without having to look through your
detailed reports, check out our free Golden Monkeys iPhone app.
Golden Monkeys offers real-time alerts when your special subscribers read
and click within your emails, and you can easily share the info. It’s available
on the app store and the android market.

Chimp Chatter
Chimp Chatter is a friendly feed of useful updates about your campaigns, all
from within your MailChimp dashboard. It lets you know when people
subscribe, unsubscribe, update their preferences, like a campaign or
comment on a campaign. And the best part is, we’ll even show you their
faces—because we think email marketing should be a little more human.

You don’t have to do anything special to access Chimp Chatter—it’ll be
waiting for you every time you log in to MailChimp.
You can set your own Chimp Chatter preferences, so you only see news
you’re interested in.

Thanks for taking the time to learn about MailChimp’s reporting features. We
hope you’ll take full advantage of all the powerful reports and integrations
we have to offer. If you have more questions about your reports, feel free to
contact our support team at mailchimp.com/support.