investigation of material properties - materials education
TRANSCRIPT

1
Investigation of Material Properties
Ann Kaiser ProjectEngin, LLC
http://www.projectengin.com/ e-mail: [email protected]
Phone: (401) 578-8281
Gabriel Rodriguez La Salle Academy 612 Academy Ave
Providence, RI 02908 e-mail: [email protected]
Copyright Edmonds Community College 2016. This material may be used and reproduced for
non-commercial educational purposes only.
Abstract of Module: Traditional high school chemistry includes minimal exposure to the solid state. In an effort to connect science into the real world and introduce engineering design into the curriculum a unit of study was created to include solid materials. This unit consisted of a number of modules that lead the students on a journey of discovery that took them from a real world look at the materials around them towards the development of a microscopic model which was used to explain the macroscopic properties observed earlier in the unit. This module is the introductory component that focuses on the properties of solid materials and generating a technical description of and classification system for those materials. If an instructor chooses to focus solely in this module it is suggested that they allow 2 - 3 weeks of class time. Alternatively, components of this module can be interwoven through a traditional chemistry curriculum. Objective:
To increase student engagement and to support visualization of atomic and molecular structures through the investigation of solid materials and their properties.
Student Learning Objectives (Students will be able to - SWBAT):
Identify and classify various materials around the classroom based on their properties. Create procedures that will allow students to quantify and qualify properties. Reclassify and arrange materials based on properties defined by testing into a Periodic
Table-like configuration. Keywords: Solid State, Chemistry, Material Properties, Classification, Experimental Design, Periodic Table, Modeling

2
Grade Level: Grade 6 through Grade 12 Prerequisite Knowledge: None. This activity can be tailored for grade level and degree of previous study.
Equipment & Supplies: Bunsen burner Tongs Rulers Lab Safety Equipment Post-its Various Example Materials to be Tested Some additional equipment may be needed based upon student generated material
testing procedures. Curriculum overview: This curriculum was developed based on the need to connect science to the real world and to incorporate engineering design practices into the curriculum (NGSS). Students are surrounded by objects engineered with solid state materials but are given little exposure to solids in high school chemistry. The overall flow of the curriculum is to begin with a recognition that the materials around them are made of chemical elements. Students then worked to characterize and classify those materials for further study. As an understanding of atomic and molecular structure and bonding develops, students then reconcile what they observed macroscopically with their developing understanding of microstructure. Further experimentation and investigation is then conducted to verify their model. Overall Sequence and Instructor Notes:
1. Students will identify solid materials around them (see handouts 1 and 2). Student groups collect solid materials/objects from class and home. They should be encouraged to obtain a variety of objects in order to aid in the development of a comprehensive list of material properties and a classification scheme. Student groups of four are suggested.
2. Students will develop descriptive terms to begin categorizing materials (see handout 3).
Students develop a list of “properties” to classify materials. They should be encouraged to use their own lexicon and to specify what they mean by specific terms. A discussion of intrinsic vs extrinsic properties should be included. The goals of this activity are to have students realize that descriptions have meaning, are logical, and can aid in categorization.

3
3. Students will design experiments/tests to further classify materials (see handout 4).
The goals of this activity are to focus on proper experimental design and technical writing skills. Student groups will be assigned a particular property to test for, outline a procedure, detail experimental setup, and determine criteria for classifying results. A form for this is attached to this document. 6-8 (student designed) stations will be set up around the room on testing day and paperwork describing proper procedures/meaning of results will be found at each station. Groups rotate through the stations, testing a variety of the materials they gathered and described in Steps 1 and 2. Students will be responsible for developing a data table for recording observations and testing results.
4. Appropriate technical terminology will be introduced (see handouts 4, 5 and 6). Students will be introduced to actual terminology for material properties. In addition, videos and images of actual materials testing procedures will be presented. It is critical that links and connections to student generated terms and tests be made. Students need to see that their approaches are generally very close to that used by experts. Real terminology and testing will have more meaning if this connection is made.
5. Given some knowledge of the periodic table, students will begin to arrange materials/identify elements present (see handouts 4, 5 and 6).
This follows some instruction about atomic structure, electron configuration, and the trends and organization seen in the periodic table using a variety of active learning pedagogies. Students create a dichotomous key to help classify their materials and to aid in the identification of patterns. They then create their own “periodic table” by making a note card/Post-It for each of their materials, noting what it is and the observed and tested properties. Students then attempt to organize these based on trends in Rows and Columns. Students groups will cite one Group (column) and Family (row) and their understanding of trends moving down or across. They create their own trends to organize their materials and develop a rationale for their table or chart design. Templates for materials properties cards and a rationale for the table are attached to this document. It is suggested that this activity be done by small groups at first. As an extension, the results and ideas can be compiled and discussed with the goal of creating a class periodic table. Module procedure for the students: Procedures for students are included in the handouts, listed below. Teachers are encouraged to read through the handouts and provide extra support to their students based on the ability of each group. These activities should be done in order for best comprehension.

4
Supporting Handouts (appended below):
1. Properties of Matter BrainStorm Handout (Use this hand out when addressing instructor notes 1 & 2)
2. Identification of Material Properties Lab Handout (Use this hand out when addressing instructor note 3)
3. Technical Terminology Handout (Use this hand out when addressing instructor note 4) 4. Creating a Dichotomous Key Handout (Use this hand out when addressing instructor
note 5) 5. Material Cards Template Handout (Use this hand out when addressing instructor note
5) 6. Rationale for the Periodic Table of “Stuff” Handout (Use this hand out when addressing
instructor note 5) Author Bio Ann Kaiser is a STEM Education Consultant and CEO of ProjectEngin LLC, a firm providing professional and curriculum development services focused on the inclusion of engineering in K-12 education. A graduate of Columbia University’s School of Engineering (B.S. Metallurgy and Materials Science) and the School of International and Public Affairs, Ann is a former metallurgical engineer with 16 years of experience in secondary education. Ann was named a Fulbright Distinguished Teacher in 2013, and researched the role of engineering in secondary physics curriculum in Singapore. She has been a presenter and keynote speaker at numerous national and international conferences. Gabriel Rodriguez is a Teacher of Chemistry at La Salle Academy, a private catholic school. A graduate of Rhode Island College (B.A. Biology, Chemistry minor, M. Ed. Advanced Studies in Teaching and Learning), Gabriel has seven years of experience in secondary education. Gabriel has focused his time on developing labs and activities that would engage learners with the task of doing science, in contrast to performing science experiments. Most recently, Gabriel has been constructing pedagogies for improving science literacy by using choice, self-assessment and opportunities for revision. He has been a presenter at various local and regional conferences.

5
HANDOUTS:
1. Material Properties BrainStorm
Objectives: Identify various solid state materials that are used within their classroom.
Identify the various properties of the identified materials.
Categorize the identified material properties into those that are intrinsic to the material and those that are extrinsic to the material.
Prerequisites: Previous to beginning this activity students should be able to define what matter and materials are. They should also be familiar with the states of matter (as they will be asked to focus on those materials that are solid). Students will not need to know the technical terms for each of the properties that they will identify (they will be introduced to the difference between intrinsic and extrinsic properties during the activity). Equipment: There is no special equipment needed for this activity. Instructor Notes:
1. After having reviewed the definitions of matter and the different states of matter, hand the handout to the students.
2. Help the students come to an agreed upon definition for materials being sure that they have distinguished a material from an object (write the definition in the appropriate box on the handout). Ex. A book is made of paper, cardboard, glue, fabric, etc. (depending on the fanciness of the book), but the book is the object; the stuff that the book is made of are the materials. Students can get confused when objects are made of one type of material, like a rubber band, help them through that as needed.
3. Ask the students to explore their surroundings (they can do this individually or with a group) and list as many materials as they can identify in the box under the definition for materials. The students may need help identifying materials that may be hidden such as those inside their cellular phones or within wire casings, behind walls, etc. Any old appliances, etc. that are handy and can be easily dismantled can be conspicuously left around the room (though this make things more interesting, it is not necessary to do). Also, make it clear to the students that they must distinguish between types of similar materials. Otherwise they will end up with a long list of plastic and metal. To accomplish this they can simply name the object from which the material is found (i.e. plastic from a phone case vs plastic from a water bottle).
4. After compiling the list of materials, have the students study the materials and question them with regards to ways of categorization. Guide them to the idea that each material has unique properties that allow that material to be used in specific ways.
5. Help the students come to an agreed upon definition for properties of matter. 6. In the box following the definition of properties of matter have the students work together to
identify and list as many properties of matter as they can. Do not allow them to look up the properties online because they will find and use terms that they will not know (learning the technical names of the properties comes later in this unit). For now, encourage them to create names for the different “things” that the materials can do.

6
7. After compiling a list of material properties have the students study the list and question them with regards to the types of properties that they have identified (write all or some of the properties on the board). Guide them towards the notion that some properties can be affected by changing the amount of a substance while other properties are independent from amount.
8. Help the students come to an agreed upon definition for intrinsic properties and extrinsic properties.
9. Have the students categorize their compiled list of material properties by using the definitions to help place them into the intrinsic or extrinsic boxes. (The students can also add to the list as they may be inspired by the notion of having a nearly empty box of extrinsic properties.) Review their choices.
10. Conclude the activity by having the students work in groups to answer the post activity questions.
7
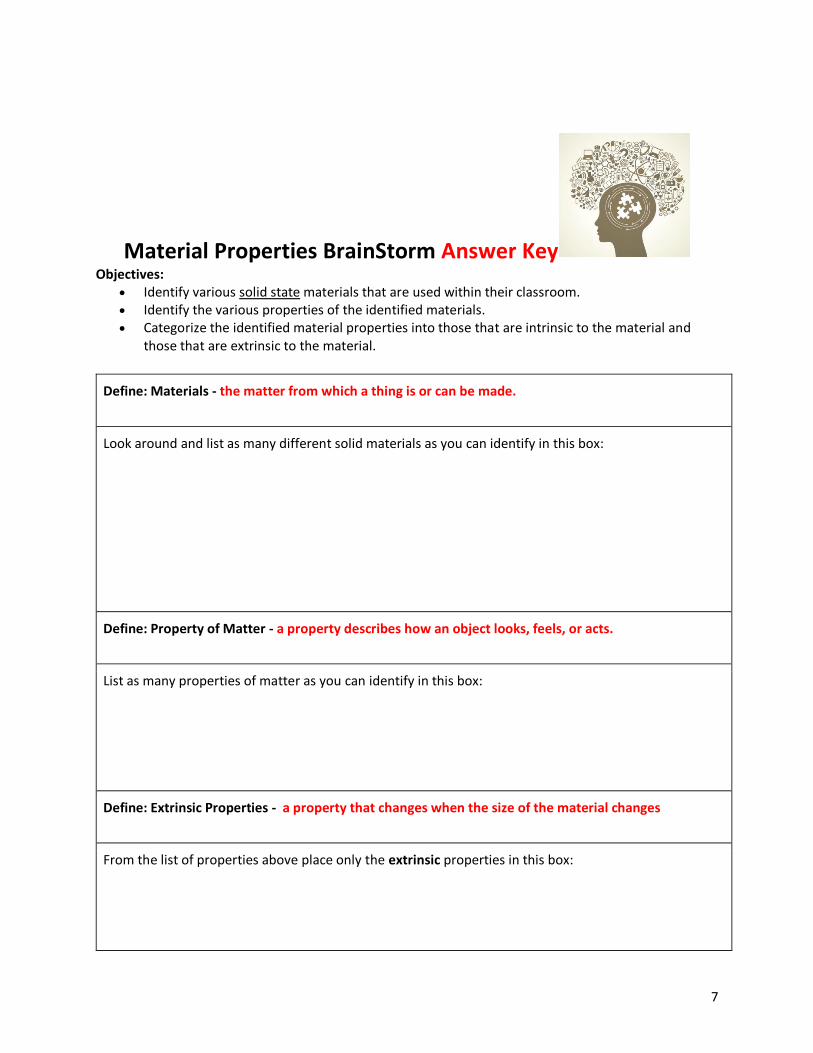
Material Properties BrainStorm Answer Key
Objectives: Identify various solid state materials that are used within their classroom. Identify the various properties of the identified materials. Categorize the identified material properties into those that are intrinsic to the material and
those that are extrinsic to the material.
Define: Materials - the matter from which a thing is or can be made.
Look around and list as many different solid materials as you can identify in this box:
Define: Property of Matter - a property describes how an object looks, feels, or acts.
List as many properties of matter as you can identify in this box:
Define: Extrinsic Properties - a property that changes when the size of the material changes
From the list of properties above place only the extrinsic properties in this box:
8
Define: Intrinsic Properties - a property that does not change when the size of the material changes
From the list of properties above place only the intrinsic properties in this box:
Using the list of materials above as inspiration try and identify properties that have not already been listed.
Use a different color pencil or pen to list the newly identified properties. Post Activity Questions: 1. Why would making a hairbrush out of stiff cardboard be a bad idea? An acceptable answer would be anything that alludes to the rapid breakdown and consequent uselessness of the brush do to normal use as a result of the poor choice of material. Ex. Hair is brushed when it’s wet. Therefore, the cardboard will fall apart is a common response. 2. You were given the task of developing a new pillow. (Answer either a OR b - not both )
a. What kinds of materials would you try using? WHY? b. What kinds of properties would you be looking for in your materials? WHY?
Here you want to see that the students are choosing materials based on the properties (or visa versa) that are best suited to create pillows out of. Look for connections between the materials and their properties. 3. Reflecting on your thinking for questions 1 & 2:
a. My experience tells that while attempting to answer question 2 (developing a pillow) the types of properties being discussed were intrinsic to the materials.
b. Why is that? Any answer that shows reflection back to the notion of intrinsic properties with reference to the making of a product would be acceptable. While pillows may be large or small, pillows should be soft. “Softness” is the property of a pillow that matters the most and changing the size of the pillow wouldn’t change that.
4. Why is it important for engineers to be knowledgeable about various properties that different
materials have? The material must meet/satisfy the need/requirements for a given product/use. In the pillow example: a lightweight and soft material is required (for the cover and for the stuffing). Steel wool wouldn’t be used for a pillow for example; it might be lightweight, but definitely not soft.

9
Student Worksheet
Material Properties BrainStorm
Objectives:
Identify various solid state materials that are used within their classroom. Identify the various properties of the identified materials. Categorize the identified material properties into those that are intrinsic to the material and
those that are extrinsic to the material.
Define: Materials -
Look around and list as many different solid materials as you can identify in this box:
Define: Property of Matter -
List as many properties of matter as you can identify in this box:
Define: Extrinsic Properties -
From the list of properties above place only the extrinsic properties in this box:

10
Define: Intrinsic Properties -
From the list of properties above place only the intrinsic properties in this box:
Using the list of materials above as inspiration try and identify properties that have not already been listed.
Use a different color pencil or pen to list the newly identified properties. Post Activity Questions: 1. Why would making a hairbrush out of stiff cardboard be a bad idea?
2. You were given the task of developing a new pillow. (Answer either a OR b - not both) a. What kinds of materials would you try using? WHY? b. What kinds of properties would you be looking for in your materials? WHY?
3. Reflecting on your thinking for questions 1 & 2: a. My experience tells that while attempting to answer question 2 (developing a pillow) the
types of properties being discussed were intrinsic to the materials. b. Why is that?
4. Why is it important for engineers to be knowledgeable about various properties that different materials have?

11
2. Identification of Material Properties Lab
Objectives: Develop a standard that defines a chosen material property. Design an experiment to test for the property of a material.
Prerequisites:
Previous to beginning this activity students should have completed the “Material Properties Brainstorm” activity where they would have generated a list of various common solid materials and a list of the properties of those materials. The students should also have recently reviewed or learned the process of how to develop a standard which allows one to determine the parameters of a given property, how to write a procedure for an experiment and how to draw a labeled sketch of a lab set-up. Equipment: The equipment required for this activity depends upon the experiments which are designed by the students. As such, students should be guided according towards using equipment that can be made available to them. The materials to be tested should be supplied by the students. Encourage them to bring in a diverse variety of materials. Ultimately, they should test at least 30 different materials collectively (per the class when the data is pooled). Instructor Notes:
1. As soon as possible have the students begin to collect and bring in as many different materials as they can gather. Inform the students not to bring in any material that they would not like to have destroyed because the materials will likely be destroyed during the testing process. Making everyone bring in “their own” materials should produce a larger pile of “stuff” than having the students create a class pile.
2. Begin by reviewing/discussing the list of intrinsic properties that the students generated in the “Material Properties Brainstorm”. Write the properties on the board or have a slideshow prepared. The goal of the review/discussion is to get the students ready to choose several properties that they will be designing experiments to test (unless the properties are chosen for them). The number of properties to be tested may vary based on class size and space issues; six properties per class have produced enough good data for use in future activities.
3. After the six properties to be tested have been chosen and the students have been organized into six groups, assign one property to each group.
4. Give the students time to complete the handout. Depending on the student’s ability level, be prepared to guide them as needed on each section and adjust the amount of time you give them to write the procedures, etc. Including revisions, three class periods should be enough (assuming that the work is done in class and not as homework). As the students work on their procedures etc. have them rotate to other groups so that they can occasionally get a fresh set of eyes on their work to help get them to write procedures that are more clear. Setting up the stations early so that each group can do some preliminary testing - so that they can tweak their standards and/or their procedures as needed - is recommended.
5. Once their procedures are adequately written print and tape them to their respective lab stations. Each group of students are then provided with data tables (the data tables can be electronic, but if computers are not available they can be printed). Review the directions and the data tables with the students. Due to the increased amount of movement that this lab will have compared to more traditional labs it may be necessary to model to the lab movement with

12
the students. The data tables should be modified by changing the property names and the number of data spaces for each property as needed.
6. Before the lab begins calculate how long the groups will stay at each station (5 - 10 minutes per station should be enough). Have the students gather a bunch of different materials and move to the station for which they wrote the procedure. They will start the rotation there in order to make sure that everything is working as it should and end there in order to help reset it to its starting glory. In order to ensure a larger set of class data make sure that they take their materials with them as they move from station to station. Otherwise, the each material will be tested for the same property repeatedly which will limit the data set.
7. Give the students one last reminder to distinguish between materials by naming the object from which the material is found (i.e. plastic from a phone case vs plastic from a water bottle).
8. Let the data collection begin. 9. After the day or two of the lab where the data is collected, prepare another blank electronic
copy of the data table where each group’s data can be pooled. Google docs can be used to share the document with the class so that each group can cut and past their data into the appropriate section.
10. After the data has been pooled have the students find and delete any duplicate data. To do this, have the students review the data for the same property that they had previously written the procedure for while deleting any materials that were tested more than once.
* The pooled data will be used later when the students prepare the “Material Cards”. ** The graphic of the procedure on how to make a cup of coffee is meant only to remind the students of what a procedure might look like. *** The spaces on this handout are adjusted to allow for the handout to fit on one side of one page. Change the spacing on the handout before printing as needed to provide students with enough room to do their work.

13
Identification of Material Properties Lab Objectives:
Develop a standard that defines a chosen material property. Design an experiment to test for the property of a material.
Name of Property to be Tested:
Names of Group Members:
How will other students know of the material that they are testing IS or is NOT flammable or bendy or … ? Please provide a short description that other students can use in order to decide how to categorize their materials.
Standard:
How will other students know what to do once they get to your station? Please provide clear step by step instructions describing what should be done at your assigned station.
Procedure:
1. 2. 3. 4. 5. 6.

14
How should it look when your experiment is being performed?
Labeled Sketch of Lab Set-Up:
How will students know what to be careful of at your station? Please list any and all safety precautions that should be taken at your station so that no one gets injured during the lab.
Safety Concerns: 1. Safety goggles must be worn at all times. 2. Safety apron must be worn at all times. 3. 4.

15
Material Property Lab Data Tables The following directions should be applied to each test that is performed.
1. When recording each material use a descriptive name (ex. plastic from a water bottle). 2. When recording the observation be as descriptive as reasonable using quantitative data
whenever possible. 3. To determine the assigned property use the standard provided at each station. 4. Rate each material’s property on a scale of 1 to 5 where 1 weakly represents the property and 5
strongly represents the property (ex. glass from a light bulb would be a 5 for breakability and a 1 for bendiness).
5. Add more rows to each section of the data table as needed in order to collect as much data as possible.
Bendiness
Material
Observation: How much/How easy was the material to bend?
Assigned Property Scale of Property
Flammability
Material
Observation: How quickly/slowly did the material seem to burn?
Assigned Property Scale of Property

16
Hardness
Material
Observation: How big of a dent/scratch was made on the
material?
Assigned Property
Scale of Property
Stretchiness
Material
Observation: How many centimeters did the material stretch?
Assigned Property Scale of Property
Breakability
Material
Observation: How much did the material break?
Assigned Property Scale of Property
17
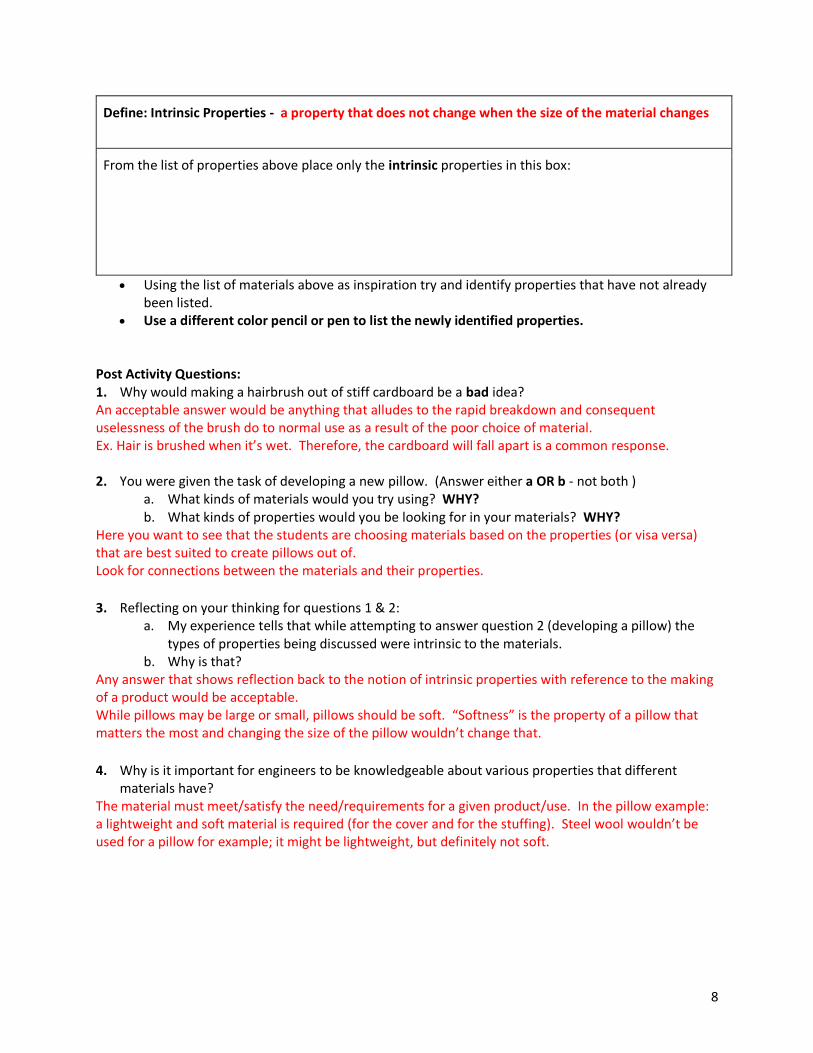
Bounciness
Material
Observation: How many centimeters high did the material
bounce?
Assigned Property
Scale of Property

18
3. Technical Terminology
Objective:
Provide a definition for technical terms of various material properties.
Prerequisites:
Previous to beginning this handout the students should have completed the “Material Properties Brainstorm” and the “Material Properties Lab”. Basically, the students should have identified, named and developed a significantly good understanding of various material properties on their own. Equipment: No special equipment will be needed for this handout. Instructor Notes:
1. The “Bank of Student Named Properties” may be modified based on the names of properties that the students have created in previous class activities/discussions of the activities.
2. Review the directions listed on the worksheet with the students, while modeling for them the process of rewriting definitions and choosing the “Best Fits” word. Be sure to explain that there is not a one to one ratio for the banked words to technical terms. In fact, they may find that the “Student Named Terms” are less precise (which should be a point of discussion) than the technical terms. For example, the Student Term “Bendable” could be used to describe either Ductility or Malleability.
3. Depending on the age group and ability level of the students the amount of technical terms can be reduced by choosing those terms/ properties that are considered to be most important. Reducing the amount of technical terms can be achieved by removing some of the properties that are similar. For example, ductility and malleability are both thought of by students as bendy so, choose ductile and omit malleable because ductility is a more common among the materials that the students observe.
4. This handout can be assigned this as homework as it can be completed fairly easily by the students on their own.
5. Be sure to inform the students that after completing this handout they are expected to use the technical terms when describing the properties of materials.
19
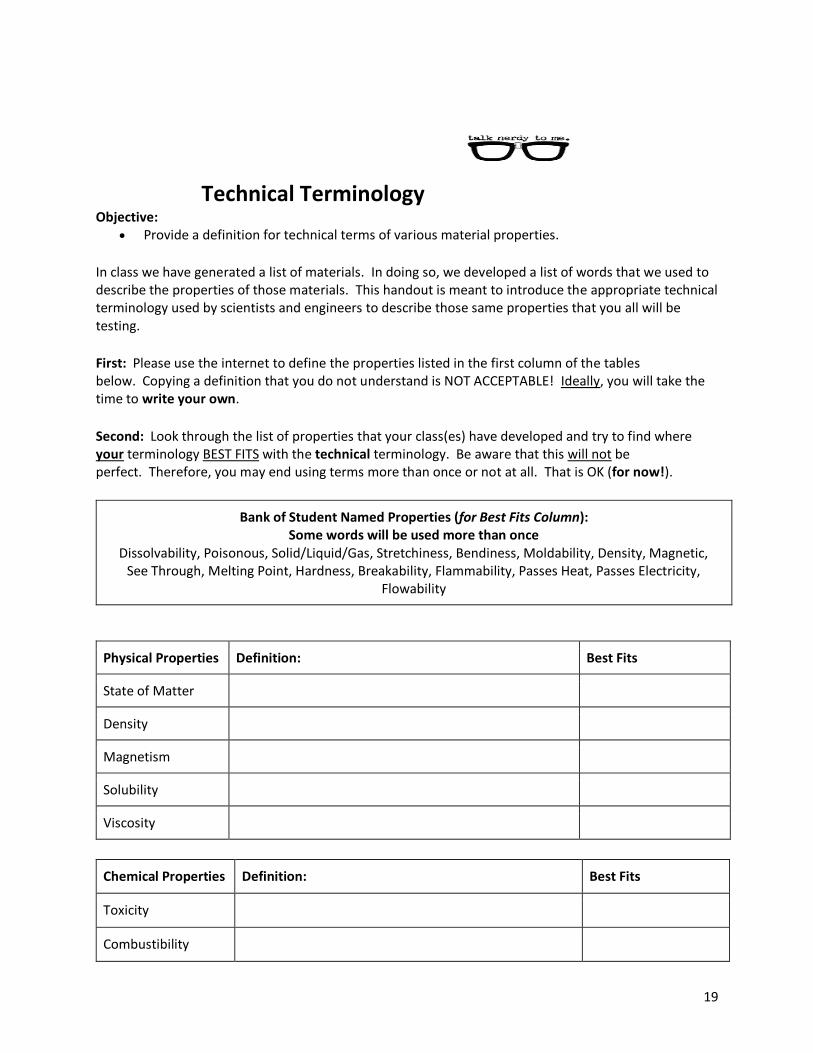
Technical Terminology
Objective: Provide a definition for technical terms of various material properties.
In class we have generated a list of materials. In doing so, we developed a list of words that we used to describe the properties of those materials. This handout is meant to introduce the appropriate technical terminology used by scientists and engineers to describe those same properties that you all will be testing. First: Please use the internet to define the properties listed in the first column of the tables below. Copying a definition that you do not understand is NOT ACCEPTABLE! Ideally, you will take the time to write your own. Second: Look through the list of properties that your class(es) have developed and try to find where your terminology BEST FITS with the technical terminology. Be aware that this will not be perfect. Therefore, you may end using terms more than once or not at all. That is OK (for now!).
Bank of Student Named Properties (for Best Fits Column): Some words will be used more than once
Dissolvability, Poisonous, Solid/Liquid/Gas, Stretchiness, Bendiness, Moldability, Density, Magnetic, See Through, Melting Point, Hardness, Breakability, Flammability, Passes Heat, Passes Electricity,
Flowability
Physical Properties Definition: Best Fits
State of Matter
Density
Magnetism
Solubility
Viscosity
Chemical Properties Definition: Best Fits
Toxicity
Combustibility

20
Mechanical Properties Definition Best Fits
Malleability
Ductility
Hardness
Brittleness
Elasticity
Plastic Deformation
Stiffness
Electrical Properties Definition Best Fits
Electrical Conductivity
Thermal Properties Definition Best Fits
Thermal Conductivity
Melting Point
Optical Properties Definition Best Fits
Transmissivity
21
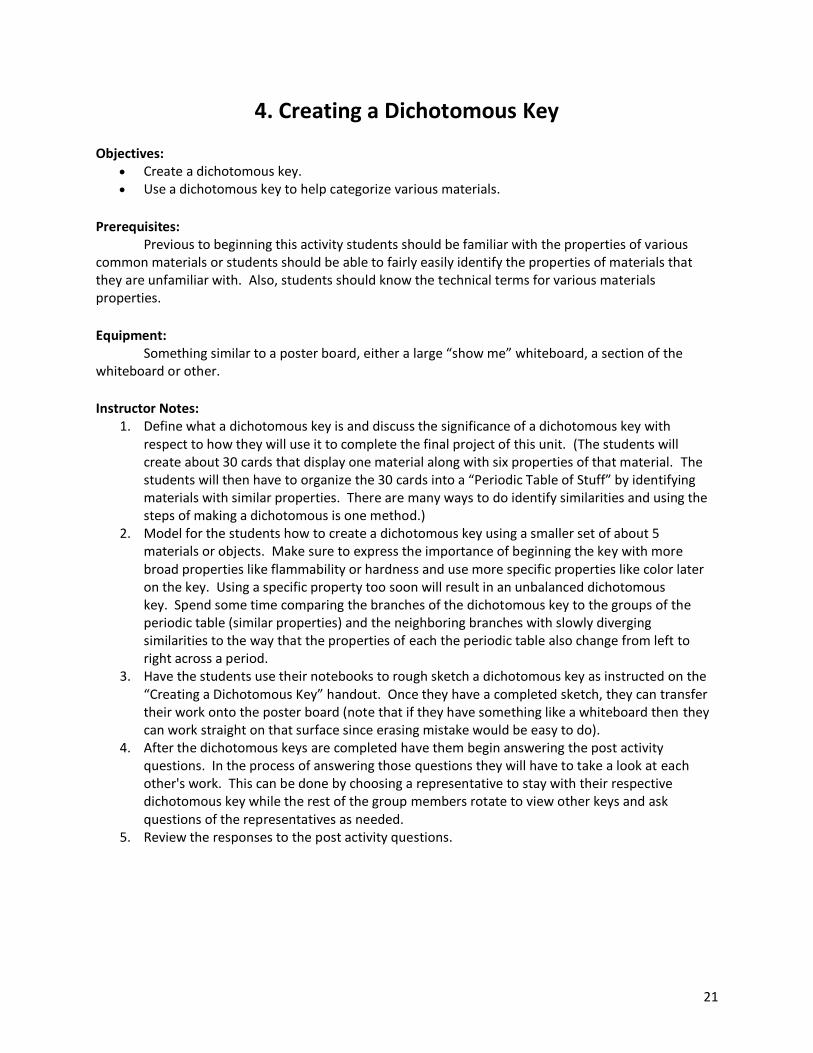
4. Creating a Dichotomous Key
Objectives:
Create a dichotomous key. Use a dichotomous key to help categorize various materials.
Prerequisites:
Previous to beginning this activity students should be familiar with the properties of various common materials or students should be able to fairly easily identify the properties of materials that they are unfamiliar with. Also, students should know the technical terms for various materials properties. Equipment: Something similar to a poster board, either a large “show me” whiteboard, a section of the whiteboard or other. Instructor Notes:
1. Define what a dichotomous key is and discuss the significance of a dichotomous key with respect to how they will use it to complete the final project of this unit. (The students will create about 30 cards that display one material along with six properties of that material. The students will then have to organize the 30 cards into a “Periodic Table of Stuff” by identifying materials with similar properties. There are many ways to do identify similarities and using the steps of making a dichotomous is one method.)
2. Model for the students how to create a dichotomous key using a smaller set of about 5 materials or objects. Make sure to express the importance of beginning the key with more broad properties like flammability or hardness and use more specific properties like color later on the key. Using a specific property too soon will result in an unbalanced dichotomous key. Spend some time comparing the branches of the dichotomous key to the groups of the periodic table (similar properties) and the neighboring branches with slowly diverging similarities to the way that the properties of each the periodic table also change from left to right across a period.
3. Have the students use their notebooks to rough sketch a dichotomous key as instructed on the “Creating a Dichotomous Key” handout. Once they have a completed sketch, they can transfer their work onto the poster board (note that if they have something like a whiteboard then they can work straight on that surface since erasing mistake would be easy to do).
4. After the dichotomous keys are completed have them begin answering the post activity questions. In the process of answering those questions they will have to take a look at each other's work. This can be done by choosing a representative to stay with their respective dichotomous key while the rest of the group members rotate to view other keys and ask questions of the representatives as needed.
5. Review the responses to the post activity questions.

22
Creating a Dichotomous Key Answer Key
Objectives:
Create a dichotomous key. Use a dichotomous key to help categorize various materials.
What are they? Dichotomous keys are a fun and interesting way to identify objects, usually used with plant identification, but can be the “key” to unlock the “treasure” of knowledge of many different things! How are they used? Di means two; therefore dichotomous keys are made of pairs of opposing statements, (blue vs not blue). By observing and noting differences (and similarities) in objects, and by making logical decisions between 2 statements, one can categorize any number of objects based on their properties. The ‘key to keys’ is keen observation. ‘Key’ tips:
Try and use more broad properties (metals vs nonmetals) early before getting too specific (magnetic vs nonmagnetic).
You are done when each material is alone at the end of its branch. Never use the same property more than once on any branch of the ‘key’.
Using the technical names of material properties create a dichotomous key that will categorize the materials listed below. List of materials:
Rubber from a Car Tire Wood Leather
Copper Rubber from Rubber Band Glass
Cardboard Gold Paper
List of Properties:
You do not have to use them all. You can use them more than once, but not on the same branch. You can find other properties to use *as long as you use the technical term).
Density Magnetism Malleability

23
Ductility Hardness Toughness
Brittleness Elasticity Plastic Deformation
Stiffness Electrical Conductivity Flammability
Thermal Conductivity Transmissivity Luster
Post Activity Questions: 1. Review the dichotomous key that you produced. Compare the properties and materials of the
different branches. In what ways were the materials grouped on your dichotomous key? The materials within the same branch have several properties in common while the materials in other branches have different properties. Depending on the choices that students made there may be some materials with similar properties in other branches.
2. Compare the dichotomous keys produced by your classmates to your own. In what ways did they group their materials differently?
Some similar properties may have been used, but the properties were used at different points along the dichotomous key. The result is that the materials were grouped differently along each branch.
3. You should have noticed some differences in the way that the materials were organized on different dichotomous keys. Was any one way better than the others? Explain.
Assuming that there were no errors in the keys, there should not be a better or worse way of organizing the key; making different choices only results in a different variety of groupings.
4. You will be asked to produce a periodic table of elements using the materials that your class listed earlier in this unit. How might you use the patterns or relationships described in question one to help you create your own Periodic Table of Stuff?
The branches of the dichotomous key could be analogous to the groups of the periodic table because they have similar properties. Neighboring branches of the dichotomous key could be analogous to a period because the properties of each branch progressively get more different.

24
Creating a Dichotomous Key
Objectives: Create a dichotomous key. Use a dichotomous key to help categorize various materials.
What are they? Dichotomous keys are a fun and interesting way to identify objects, usually used with plant identification, but can be the “key” to unlock the “treasure” of knowledge of many different things! How are they used? Di means two; therefore dichotomous keys are made of pairs of opposing statements, (blue vs not blue). By observing and noting differences (and similarities) in objects, and by making logical decisions between 2 statements, one can categorize any number of objects based on their properties. The ‘key to keys’ is keen observation. ‘Key’ tips:
Try and use more broad properties (metals vs nonmetals) early before getting too specific (magnetic vs nonmagnetic).
You are done when each material is alone at the end of its branch. Never use the same property more than once on any branch of the ‘key’.
Using the technical names of material properties create a dichotomous key that will categorize the materials listed below. List of materials:
Rubber from a Car Tire Wood Leather
Copper Rubber from Rubber Band Glass
Cardboard Gold Paper
List of Properties:
You do not have to use them all. You can use them more than once, but not on the same branch. You can find other properties to use *as long as you use the technical term).

25
Density Magnetism Malleability
Ductility Hardness Toughness
Brittleness Elasticity Plastic Deformation
Stiffness Electrical Conductivity Flammability
Thermal Conductivity Transmissivity Luster
Post Activity Questions: 1. Review the dichotomous key that you produced. Compare the properties and materials of the
different branches. In what ways were the materials grouped on your dichotomous key?
2. Compare the dichotomous keys produced by your classmates to your own. In what ways did they group their materials differently?
3. You should have noticed some differences in the way that the materials were organized on different dichotomous keys. Was any one way better than the others? Explain.
4. You will be asked to produce a periodic table of elements using the materials that your class listed earlier in this unit. How might you use the patterns or relationships described in question one to help you create your own Periodic Table of Stuff?

26
5. Material Cards Template
Objective: Students will be able to list the various properties of various materials.
Prerequisites: Previous to beginning this activity the students should have completed the “Material Properties Brainstorm”, the “Material Properties Lab” and the “Technical Terminology” worksheet. At this point the students are still getting to know the technical terms for the material properties of interest. This activity will help them gain mastery of the technical terminology. Equipment: Gather enough scissors for the students to be able to cut the material cards. Roughly two per group or better. Instructor Notes:
1. Remind or inform the students of where they can access the pooled data gathered in the Identification of Material Properties Lab.
2. Have the students retrieve their copies of the “Technical Terminology” worksheet. 3. Explain to the students that they will either choose a group or be placed into a group that will
work on this unit’s final project together (this is the start of creating the “Periodic Table of Stuff” which is the culminating project for this unit).
4. Have the students work in their groups to complete one material card per material from their pooled data sheet. In order for them to create a periodic table of stuff they should have about 30 material cards. They might have some gaps in data, but they should be able to fill this in by using their experience from the lab, their life or the internet to identify properties for materials that may not have been tested.
5. The material cards should be filled in using both the student made up names as well as the technical names of the properties in order to help the students continue to associate the two and thus be better able to remember the technical names. (See the example card below.)
6. Once all 30 material cards are filled out they can be cut out. After the cutting out, they are ready to for the last part of the project.
7. Be sure to store the cards in the room. Allowing the students to leave the room with them may result in headaches later. For example, if the student who was “holding the cards” is absent on the day that the cards are needed.

27
Sample Material Card:
Material Name: Copper (From the Inside of a Wire)
Made up Property Name Technical Property Name Scale
Bendiness Ductility 5
Bendiness Malleability 2
Hardness Hardness 5
Not Flammable Flammability 1
Not Stretchy Elasticity 1
Passes Electricity Electrical Conductivity 5

28
Scale each property from 1 to 5 where 1 is “not very ___” and 5 is “very ___”. Example for Flammability: Cotton Balls = 5 // Cotton Jeans = 3
Material Name:
Made up Property Name Technical Property Name Scale
Material Name:
Made up Property Name Technical Property Name Scale
Material Name:
Made up Property Name Technical Property Name Scale
Material Name:
Made up Property Name Technical Property Name Scale

29
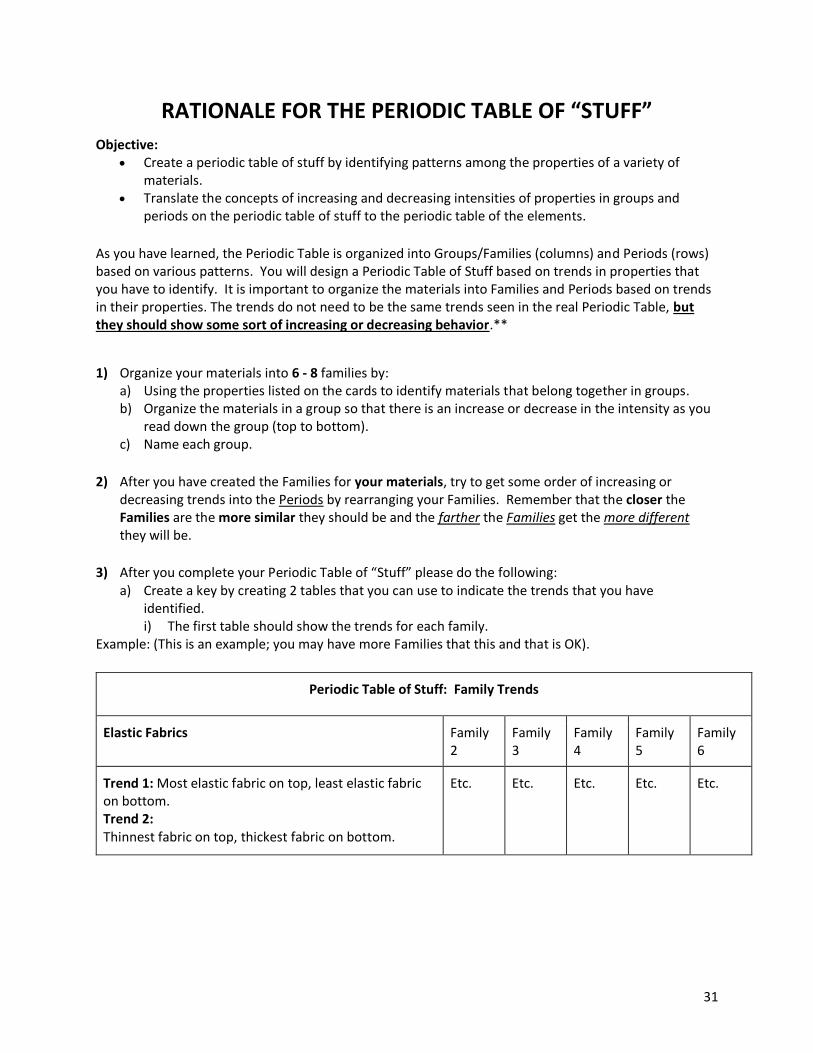
6. RATIONALE FOR THE PERIODIC TABLE OF “STUFF”
Objective: Create a periodic table of stuff by identifying patterns among the properties of a variety of
materials. Translate the concepts of increasing and decreasing intensities of properties in groups and
periods on the periodic table of stuff to the periodic table of the elements.
Prerequisites: Previous to beginning this activity the students should have completed the “Material Cards”, have had practice creating dichotomous keys, and have a general understanding of the difference between groups and periods on the periodic table. Highlight the following: Groups on the periodic table are composed of elements with similar properties and that the intensity of those properties increases or decreases as one moves from top to bottom of the periodic table. For example, the alkali metals get more reactive as one reads from Li down to Fr. Then, the groups that are positioned near each other have properties that are similar while groups that are farther away have more different properties. Point out how metals become metalloids then finally nonmetals. Equipment: For this project plenty of scotch tape will be needed (1 roll per group per class) and crayons or colored pencils. Markers will not work as well here because shading is more difficult to accomplish. Instructor Notes:
1. The students should be in the same groups that they were in when they made the material cards.
2. Review the instructions for the project with the students. As much as possible model for them what they should be doing. Try to avoid using direct examples because the students will then try “doing” the example.
3. For step 1a on the instruction sheet remind the students that using the process of creating a dichotomous key might be useful for them as a means of developing groups. Along with this explain that because their goal is slightly different (creating groups as opposed to going through to the end) that they should stop dividing the branches after they have created between 6 - 8 small piles of at least 3 cards per pile. Any less than 3 cards in a pile would result in a group that is too small for future steps.
4. For step 1b on the instruction sheet remind the students what is meant by an increasing or decreasing intensity of a property in each group (showing a YouTube video of the increasing reactivity of alkali metals with water is a good way to introduce the concept of an increasing intensity of a property). Explain to the students that they should find a trend in the properties listed on the material cards so that the scale of the property is increasing or decreasing. Be prepared to constantly remind them of this as they work with their groups to complete the project.
5. For step 1c on the instruction sheet explain that the name given to the group should reflect the similar properties that were identified as a result of creating the group. Additionally, that the trending step from 1b can, but does not have to, reflect the same material properties that they have used in step 1c.

30
6. Once the groups have been organized they should be taped together. At this point your students should have between 6 - 8 well organized groups that are separate from each other. Tell the students to tape the back of the table so that they can later color the front (crayons do not work well over tape).
7. For step 2 on the instruction sheet show the students how they can rearrange the groups by shuffling them back and forth to find which positions allows them to best fulfill the requirement of placing similar groups near each other and more different groups farther away.
8. Steps 3a and 3b on the instruction sheets are the most difficult for the students to complete. Try to explain that all they need to do is to communicate the trends that they have identified in each group individually along with the direction of increasing and decreasing intensity. Then, on a separate section or sheet to provide a description or justification of their alignment of groups from left to right across their “Periodic Table of Stuff”.
9. Step 4 is meant to help them create a visual that will remind them of the existing patterns of properties on the periodic table by color coding it. Stress the significance of the color shading and color choice. (The shading should show how the properties become more or less intense. The colors should be similar for neighboring groups and become more different as the groups get farther apart.)
10. After Periodic Table of Stuff is colored and the keys are taped on, then the project is complete and ready to be displayed around the room for decoration/inspiration and for use at later dates with other lessons.
Sample Images of completed Periodic Table of Stuff:
31
RATIONALE FOR THE PERIODIC TABLE OF “STUFF”
Objective: Create a periodic table of stuff by identifying patterns among the properties of a variety of
materials. Translate the concepts of increasing and decreasing intensities of properties in groups and
periods on the periodic table of stuff to the periodic table of the elements.
As you have learned, the Periodic Table is organized into Groups/Families (columns) and Periods (rows) based on various patterns. You will design a Periodic Table of Stuff based on trends in properties that you have to identify. It is important to organize the materials into Families and Periods based on trends in their properties. The trends do not need to be the same trends seen in the real Periodic Table, but they should show some sort of increasing or decreasing behavior.**
1) Organize your materials into 6 - 8 families by:
a) Using the properties listed on the cards to identify materials that belong together in groups. b) Organize the materials in a group so that there is an increase or decrease in the intensity as you
read down the group (top to bottom). c) Name each group.
2) After you have created the Families for your materials, try to get some order of increasing or
decreasing trends into the Periods by rearranging your Families. Remember that the closer the Families are the more similar they should be and the farther the Families get the more different they will be.
3) After you complete your Periodic Table of “Stuff” please do the following:
a) Create a key by creating 2 tables that you can use to indicate the trends that you have identified. i) The first table should show the trends for each family.
Example: (This is an example; you may have more Families that this and that is OK).
Periodic Table of Stuff: Family Trends
Elastic Fabrics Family 2
Family 3
Family 4
Family 5
Family 6
Trend 1: Most elastic fabric on top, least elastic fabric on bottom. Trend 2: Thinnest fabric on top, thickest fabric on bottom.
Etc. Etc. Etc. Etc. Etc.

32
ii) The second table should be a flow chart that shows how the properties of neighboring families change as you read across the period (left to right).
Periodic Table of Stuff: Period Trends
Elastic → Ductile, but not elastic → Stiff → etc.
4. The periodic table of stuff is color coded by coloring the borders of each material card. Same color for each group (darker colors mean more intense properties, lighter colors mean less intense properties). Groups that are next to each other should be similar colors (blue next to purple …).
Exceeds Standard Meets Standard Nearly Meets Standard
Below Standard
Groups Materials are placed into groups according to two common properties and the materials are organized according to intensity of their properties.
Materials are placed into groups according to one common property and the materials are organized according to intensity of their properties.
Materials are placed into groups according to one common property, but the materials are not organized according to intensity of their properties.
Materials are not placed into groups according to any common properties.
Periods Groups are organized into periods so that similar properties are near each other and very different properties are on opposite sides of the table there are no exceptions.
Groups are organized into periods so that similar properties are near each other and very different properties are on opposite sides of the table there is one exception.
Groups are organized into periods so that similar properties are near each other and very different properties are on opposite sides of the table there are more than one exception.
Groups are not organized into periods so that similar properties are near each other and very different properties are on opposite sides of the table.
Aesthetics The periodic table of stuff is color coded by coloring the borders of each material card using the same color for each group (darker colors mean more intense properties, lighter colors mean less intense properties).
Groups that are next to each other should be similar colors (blue next to purple …).
The cards are colored neatly.
The periodic table of stuff is color coded by coloring the borders of each material card using the same color for each group (darker colors mean more intense properties, lighter colors mean less intense properties).
Groups that are next to each other should be similar colors (blue next to purple …).
The periodic table of stuff is color coded by coloring the borders of each material card, using the same color for each group.
Groups that are next to each other should be similar colors (blue next to purple …).
The periodic table of stuff is color coded by coloring the borders of each material card, using the same color for each group.
33
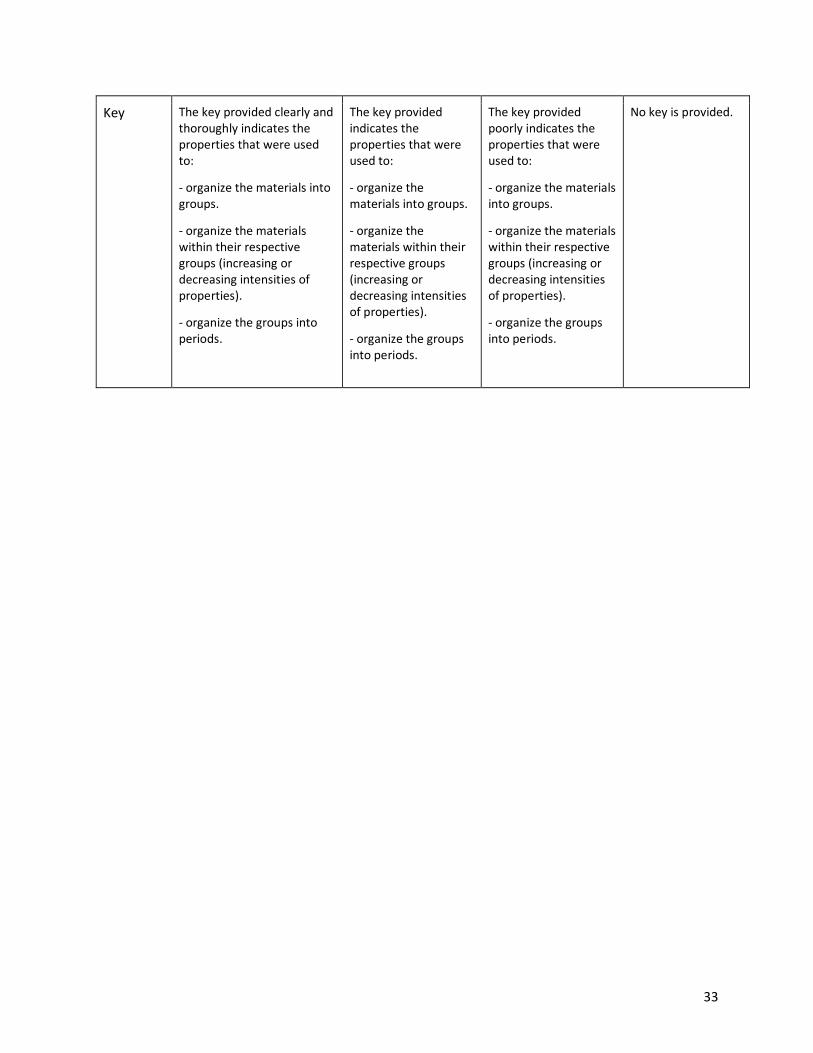
Key The key provided clearly and thoroughly indicates the properties that were used to:
- organize the materials into groups.
- organize the materials within their respective groups (increasing or decreasing intensities of properties).
- organize the groups into periods.
The key provided indicates the properties that were used to:
- organize the materials into groups.
- organize the materials within their respective groups (increasing or decreasing intensities of properties).
- organize the groups into periods.
The key provided poorly indicates the properties that were used to:
- organize the materials into groups.
- organize the materials within their respective groups (increasing or decreasing intensities of properties).
- organize the groups into periods.
No key is provided.