iprocurement user guide - university of technology sydney · iprocurement user guide . ... after...
TRANSCRIPT

neo finance
iProcurement User Guide

Copyright © University of Technology Sydney, 2004. All rights reserved.
Page 2 of 23
Table of Contents About this Workbook ...................................................................................................... 3
Objectives ................................................................................................................... 3
Responsibility ................................................................................................................. 4
Choosing Your Responsibility ..................................................................................... 4
iProcurement Profiles ..................................................................................................... 5
Internet Procurement Introduction ............................................................................... 7
Creating a Requisition .................................................................................................... 9
Checking out ................................................................................................................. 14
Checkout – Review Approver List ............................................................................. 16
Checkout - Review and Submit Requisition .............................................................. 17
Viewing and Ordering using an Old Requisition ....................................................... 18
Procurement Receiving Process ................................................................................... 19
Returning Items ....................................................................................................... 22
Correcting Receipts .................................................................................................. 23

Copyright © University of Technology Sydney, 2004. All rights reserved.
Page 3 of 23
About this Workbook This workbook contains information designed to provide you with an introduction to the NEO finance system and build your iProcurement skill level.
This workbook is an overview and preface to the features and functions within neo finance iProcurement.
Objectives
After reading this user guide, you will be able to:
� Log into Internet procurement
� Understanding Internet Procurement Terminology
� Create Non-Catalogue Requisitions
� Maintain your Shopping Cart
� Go through the Checkout
� View the Status of your Requisitions
� Print your Purchase Orders
� Receive your Purchases in iProcurement
Copyright © University of Technology Sydney, 2004. All rights reserved.
Page 4 of 23
Responsibility
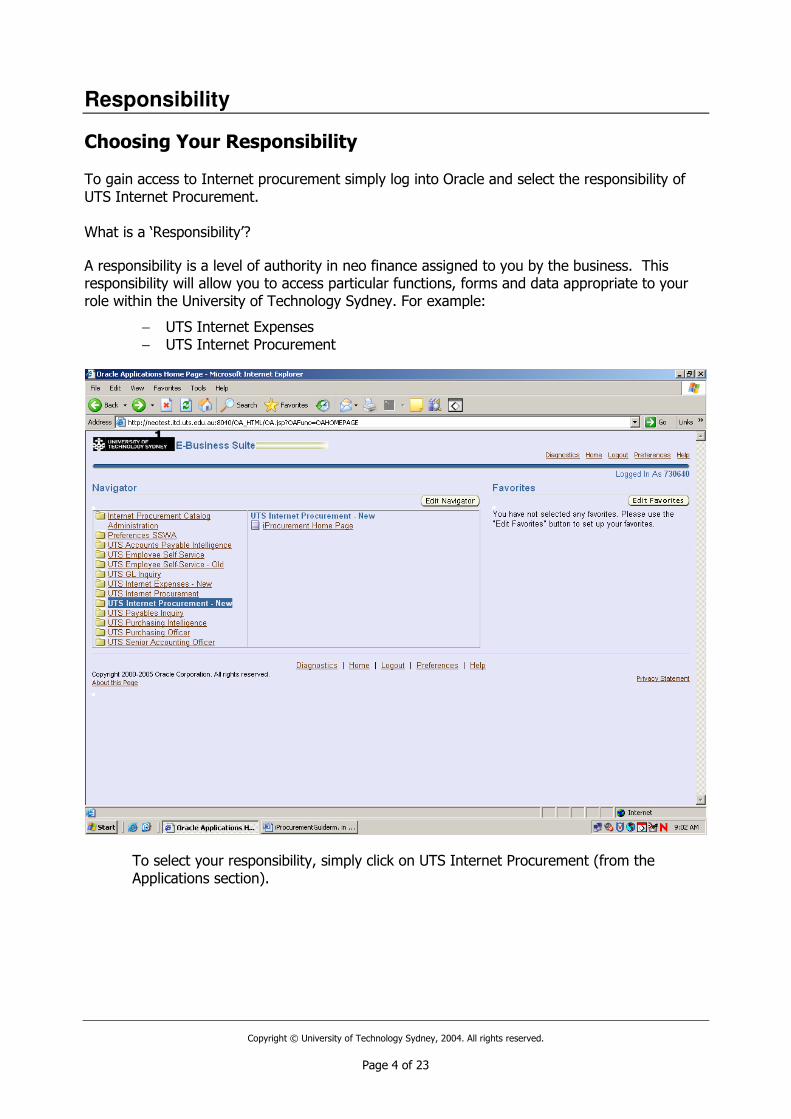
Choosing Your Responsibility To gain access to Internet procurement simply log into Oracle and select the responsibility of UTS Internet Procurement. What is a ‘Responsibility’?
A responsibility is a level of authority in neo finance assigned to you by the business. This responsibility will allow you to access particular functions, forms and data appropriate to your role within the University of Technology Sydney. For example:
− UTS Internet Expenses − UTS Internet Procurement
To select your responsibility, simply click on UTS Internet Procurement (from the Applications section).
1.

Copyright © University of Technology Sydney, 2004. All rights reserved.
Page 5 of 23
iProcurement Profiles Before your requisitions can be created, your procurement profile must be updated to ensure the correct delivery information and other default settings.
• Go to Preferences and select iprocurement preferences.

Copyright © University of Technology Sydney, 2004. All rights reserved.
Page 6 of 23
1. Complete Preferences for the following Delivery Defaults: -
• Need-By Date = Order Date + X Days (select no of days you prefer)
• Requester Name = Select your name (should Default)
• Deliver-To Location = Select your office location from the available list. Please note that the FSU location format is used e.g. CB10.02.290
Note: This is a mandatory change. You must ensure your delivery location is changed from UTS to ensure correct delivery of any purchases.
2. Select the ‘Apply Changes’ button (bottom right hand corner of Window).
3. A Confirmation for changes made to profile information will display.
4. To return to the Main UTS iProcurement Window, select the Shop Tab (top right hand corner of window).
Note: If you will be purchasing items from overseas you will also find an option in your profile to display both the foreign currency price and the Australian dollar conversion.

Copyright © University of Technology Sydney, 2004. All rights reserved.
Page 7 of 23
Internet Procurement Introduction
Screen Layout
1. Standard navigation buttons
Home Home will return you to your E-Business Suite Home Page.
Displays the products that you have placed in your shopping cart
Displays a list of topics on using the iProcurement system in a separate browser window
Takes you to the main shopping page
Takes you to the requisition status screen where you can view your requisition(s) and their status
Takes you to the receiving window where you Receive or Return items, Correct or View Receipts.
1.
2.
3.
4.
5.

Copyright © University of Technology Sydney, 2004. All rights reserved.
Page 8 of 23
2. Purchasing Links – These will allow you to browse through the categories, browse your
favourites or shopping lists and create non-catalogue requests. 3. Requisitions at a Glance – this area displays your most recent requisitions and their
status. By selecting the requisition number the items and cost will display and by selecting the approval status the approval history will display.
4. This area shows all requisitions. Here you can change, cancel or copy a requisition.
5. To Do List – this is the area where your notifications can be reassigned.
Navigation Tip
Use the main navigation links at the top of the iProcurement Window to move around during the ordering process.

Copyright © University of Technology Sydney, 2004. All rights reserved.
Page 9 of 23
Creating a Requisition
Requisitions raised in iProc are called Non Catalogue Requests.
1. Select the Non-Catalogue Request Tab
2. Complete the following required information in the Non-Catalogue Request window (you can search for information by clicking on the torch icon next to the field and use the % symbol as a wildcard):
• Item Description – Description of item to be purchased
• Category – this field selects the most appropriate natural account for your purchase.
• Quantity – the number of the item you require
• Unit Price – price per unit for the item
• Supplier Name – search using the torch icon
NOTE: If you do not locate the supplier details through your search, you will need to add the supplier to neo by contacting Accounts Payable. A ‘New Supplier Request’ form is available on the FSU website. Once the supplier has been created in the Accounts Payable database you can proceed with your requisition.

Copyright © University of Technology Sydney, 2004. All rights reserved.
Page 10 of 23
3. Select the Add to Cart button to add your item to your shopping cart. You can Add to Cart as many times as you require, each time a new line will be created in your requisition.
This will update your Shopping Cart as displayed in the following two images:
Note how adding an item to cart updates the shopping cart contents, without displaying the Shopping Cart screen anymore.

Copyright © University of Technology Sydney, 2004. All rights reserved.
Page 11 of 23
Updating Quantities
Once you have added the items to your shopping cart you need to check that the quantity shown is the quantity required. To update the correct number of items:
1. Select the View Cart and Checkout button (right hand side of window under the Shopping Cart Section)
2. Edit the number in the Quantity column next to each item
3. Click on which ever button you wish to navigate to next, and your edited quantities will be saved automatically.
To remove a line from the requisition, simply click on the ‘Delete’ icon on the right hand side of
the relevant line. Additional items can be added to your shopping cart by navigating back to the
initial creation screen. This can be done by clicking on the ‘Return to Shopping’ link on the
bottom left hand side of the screen.

Copyright © University of Technology Sydney, 2004. All rights reserved.
Page 12 of 23
Saving your Shopping Cart
If you need to put your shopping "on hold" you can save your cart and resume shopping when it is next convenient. To save your cart select the Save button (from your Shopping Cart Window)
The requisition description defaults from first item entered on requisition, you can choose to leave this as is or overwrite with a description of your choice.
To resume adding items to your shopping cart select the View cart and Checkout button and resume as normal.
2. Select the Open Saved Cart link to display all open shopping carts

Copyright © University of Technology Sydney, 2004. All rights reserved.
Page 13 of 23

Copyright © University of Technology Sydney, 2004. All rights reserved.
Page 14 of 23
Checking out
Once you have completed your shopping you need to go through the checkout. The checkout processes the order, sends it for approval and upon approval will create a purchase order. You can also make any necessary amendments to your default details at this stage:
Click on the Checkout button:

Copyright © University of Technology Sydney, 2004. All rights reserved.
Page 15 of 23
In this screen you can update the Requisition Description, Need-By Date, Requester and Deliver-To Location:
For further changes to Delivery Information, Charge Accounts and to add attachments you will
need to click on the Edit Lines button.
- Delivery Information
-
2. Select the Continue button.
Once you have made the necessary updates you can return to the Shopping Cart and click on the Checkout button to proceed to the ‘Review Approver List’ screen.

Copyright © University of Technology Sydney, 2004. All rights reserved.
Page 16 of 23
Checkout – Review Approver List
Your current supervisor should automatically pre-populate the approver field. If this does not happen automatically you can manually enter it. You can also choose to send your requisition to a different approver, either in your area or in another faculty or division. If choosing an approver from a different Organisational Unit please ensure that you have updated the accounting accordingly and that the staff member you select has the appropriate financial delegation.
You can use the ‘Add Attachments’ function to attach quotes for your approver to view. It is mandatory to obtain two quotes for all non-catalogue purchases greater than $2,000.
Click Next once the relevant information has been entered.
Click here to add
Justificaations

Copyright © University of Technology Sydney, 2004. All rights reserved.
Page 17 of 23
Checkout - Review and Submit Requisition
The Review and Submit Requisition Window will display.
• Review all information
• Select the Submit button
The Submit Confirmation Window will display showing your requisition number.

Copyright © University of Technology Sydney, 2004. All rights reserved.
Page 18 of 23
Viewing and Ordering using an Old Requisition You can also create an order by adding the items from a previous requisition to your shopping cart.
1. Locate the requisition that you want to use from the Requisitions tab and click on the option to Copy To Cart:
2. For the items you do not wish to order simply select the delete icon on the left hand side.
3. Select the Update link below the Quantity column to keep your changes and continue with your requisition as normal.

Copyright © University of Technology Sydney, 2004. All rights reserved.
Page 19 of 23
Procurement Receiving Process Select the Receiving tab in iProcurement and the following window will be displayed:
In this window you can receive or return items and also correct and view receipts.
To receive items simply click on the receive icon to the right of the requisition details, click on the requisition number or click on the Receive Items bullet point at the top of the page. Any of these options will allow you to receipt your requisition, the simplest option is to click on the requisition number.

Copyright © University of Technology Sydney, 2004. All rights reserved.
Page 20 of 23
• The Receive Items: Select Items to Receive Window will display.
• Select each line item to be receipted, and it is very important you double-check the Receipt Quantity against the Quantity Ordered.
• Select the Next Button.
NOTE: If you Over Receipt (receive more items than ordered) the following error Message will display.
On the other hand, if you receive fewer items than ordered you can ‘Partially’ receipt your requisition. This means that when you receive the remainder of your order, follow the normal receipting process, but ensure you check the Receipt Quantity, Quantity Ordered and the Already Received section of your requisition line.

Copyright © University of Technology Sydney, 2004. All rights reserved.
Page 21 of 23
The Receipt Date field will automatically default to today’s date. The rest of the fields are optional so do not require your action, simply leave them blank and click on the Next button. At this stage you need only review the information and Submit the receipt. A confirmation window will display your receipt number. It is a good idea to make a note of this on the invoice before sending it to Accounts Payable.

Copyright © University of Technology Sydney, 2004. All rights reserved.
Page 22 of 23
Returning Items To return items you will need to go to the Receiving tab once more. Click on the Return Items
bullet point at the top of the screen. This will enable you to view all your receipted requisitions.
Search for the receipt in question and enter the quantity of goods you wish to ‘return’. Once
you’ve entered these details, click on next and enter a reason before reviewing the details and
submitting the request.
Note: to enable you to return items you will need to have fully receipted the requisition. You cannot return items on a partially or unreceipted requisition.

Copyright © University of Technology Sydney, 2004. All rights reserved.
Page 23 of 23
Correcting Receipts
Again you will need to select the Receiving tab. Choose the Correct Receipts option and you
will see a list of previously receipted requisitions. Select the relevant receipt from this list and
enter the correct quantity. Once you have completed updating the quantity you can click on
Continue and review the details before submitting the request:
A confirmation page will be displayed giving a summary of the changes you have made.