ipsec vpn application guide - static.tp-link.com · before configuration-2- chapter 2. before...
TRANSCRIPT

IPsec VPN Application Guide
REV: 1.0.0
1910010876
CONTENTS
Chapter 1. Overview .................................................................................... 1
Chapter 2. Before Configuration .................................................................. 2
Chapter 3. Configuration .............................................................................. 5
3.1 Configure IPsec VPN on TL-WR842ND (Router A) ................................................................................. 5
3.2 Configure IPsec VPN on TL-ER6120 (Router B) .................................................................................... 10
3.3 Check IPsec Security Alliance .............................................................................................................. 16

Overview
-1-
Chapter 1. Overview IPsec VPN is usually built to connect two or more remote LANs via Internet so that hosts in different remote
LANs are able to communicate with each other as if they are all in the same LAN.
Typical Topology
* Here we use TL-WR842ND (Router A) and TL-ER6120 (Router B) for example.

Before Configuration
-2-
Chapter 2. Before Configuration Before setting up an IPsec VPN, you need to
Ensure that the two routers are connected to the Internet, actively.
Verify the settings needed for IPsec VPN on the two routers.
Verify the settings needed for IPsec VPN on the two routers:
1. Log in TL-WR842ND’s management webpage, then check on the Status page.
2. Log in TL-ER6120’s management webpage, then check on the Network -> Status page.

Before Configuration
-3-
TL-WR842ND’s Status Page:

Before Configuration
-4-
TL-ER6120’s Status Page:

Configuration
-5-
Chapter 3. Configuration 3.1 Configure IPsec VPN on TL-WR842ND (Router A)
Step 1. Log in the management webpage of TL-WR842ND.
Step 2. Go to VPN -> IKE, click Add.

Configuration
-6-
Step 3. Create a Policy Name (here take Test 1 for example); select Main mode as Exchange Mode,
MD5 as Authentication Algorithm, 3DES as Encryption Algorithm, DH2 as DH Group; and create a
Pre-shared Key (here take secret for example). Then click Save.

Configuration
-7-
Step 4. Go to VPN -> IPsec, click Add.
Step 5. Create a Policy Name (here take IPsec 1 for example). Enter 192.168.1.0 / 24 as the Local
Subnet, 192.168.0.0 / 24 as the Peer Subnet (it is Router B’s Local Subnet), 10.10.10.117 as the Peer
Gateway (it is Router B’s WAN IP). Select IKE negotiation as Negotiation Mode, ESP as Security
Protocol, MD5 as Authentication Algorithm, 3DES as Encryption Algorithm, Test 1 as IKE Security Policy,
NONE as PFS Group, Enable as the Status. Then click Save.

Configuration
-8-

Configuration
-9-
Step 6. Check Enable and then click Save to activate the IPsec.

Configuration
-10-
3.2 Configure IPsec VPN on TL-ER6120 (Router B)
Step 1. Log in the management webpage of TL-ER6120.
Step 2. Go to VPN -> IKE -> IKE Proposal.
Step 3. Create a Proposal Name (here take Test 2 for example). Select MD5 as Authentication
Algorithm, 3DES as Encryption Algorithm, DH2 as DH Group, the same as Router A’s. Then click Add.

Configuration
-11-
Step 4. Go to VPN -> IKE -> IKE Policy.
Step 5. Create a Policy Name (here take Test 2 for example). Select Main as Exchange Mode, IP Address as Local ID Type and Remote ID Type, Test 2 as IKE Proposal 1; enter secret as Pre-shared
Key, and 28800 as SA Lifetime, the same as Router A’s. Then click Add.

Configuration
-12-

Configuration
-13-
Step 6. Go to VPN -> IPsec -> IPsec Proposal.
Step 7. Create a Proposal Name (here take IPsec 2 for example). Select ESP as Security Protocol,
MD5 as ESP Authentication, 3DES as ESP Encryption, the same as Router A’s. Then click Add.
Configuration
-14-
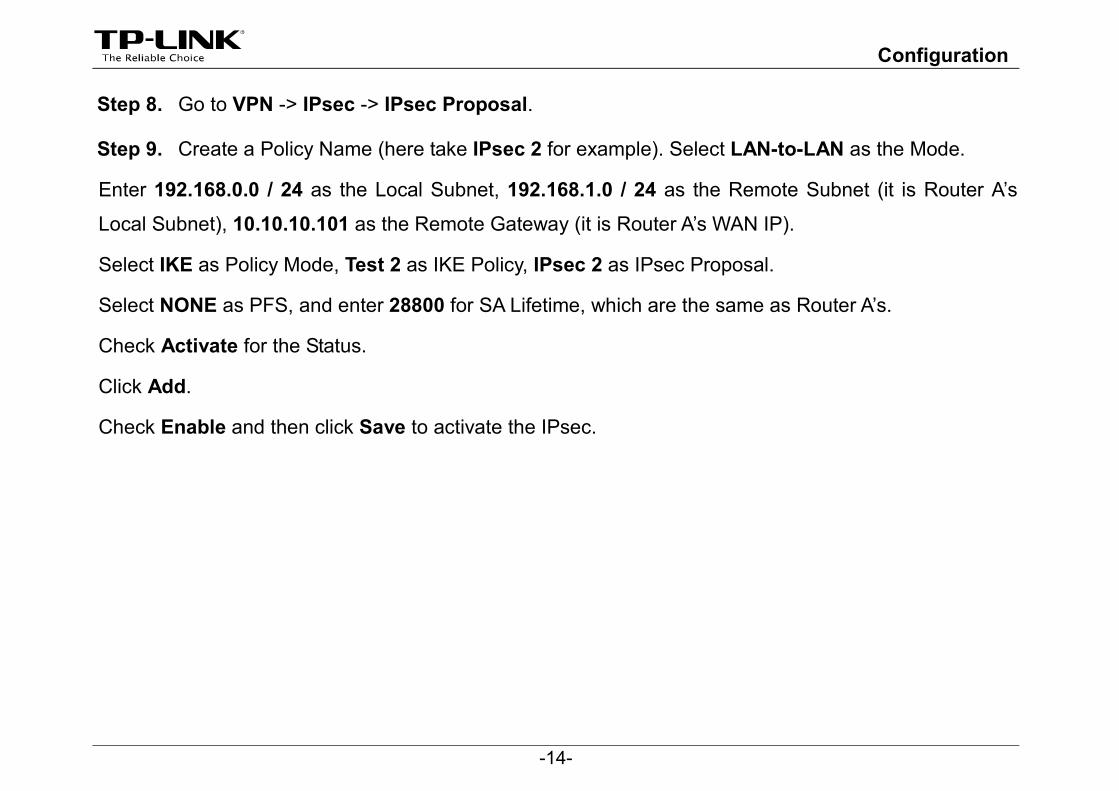
Step 8. Go to VPN -> IPsec -> IPsec Proposal.
Step 9. Create a Policy Name (here take IPsec 2 for example). Select LAN-to-LAN as the Mode.
Enter 192.168.0.0 / 24 as the Local Subnet, 192.168.1.0 / 24 as the Remote Subnet (it is Router A’s
Local Subnet), 10.10.10.101 as the Remote Gateway (it is Router A’s WAN IP).
Select IKE as Policy Mode, Test 2 as IKE Policy, IPsec 2 as IPsec Proposal.
Select NONE as PFS, and enter 28800 for SA Lifetime, which are the same as Router A’s.
Check Activate for the Status.
Click Add.
Check Enable and then click Save to activate the IPsec.

Configuration
-15-

Configuration
-16-
3.3 Check IPsec Security Alliance Step 1. Check the VPN -> Security Alliance List page of TL-WR842ND as well as the VPN -> IPsec ->
IPsec SA page of TL-ER6120.

Configuration
-17-
Step 2. On a host under TL-WR842ND, press [Windows Logo] + [R] to open Run dialog, input cmd and
click OK.
Configuration
-18-
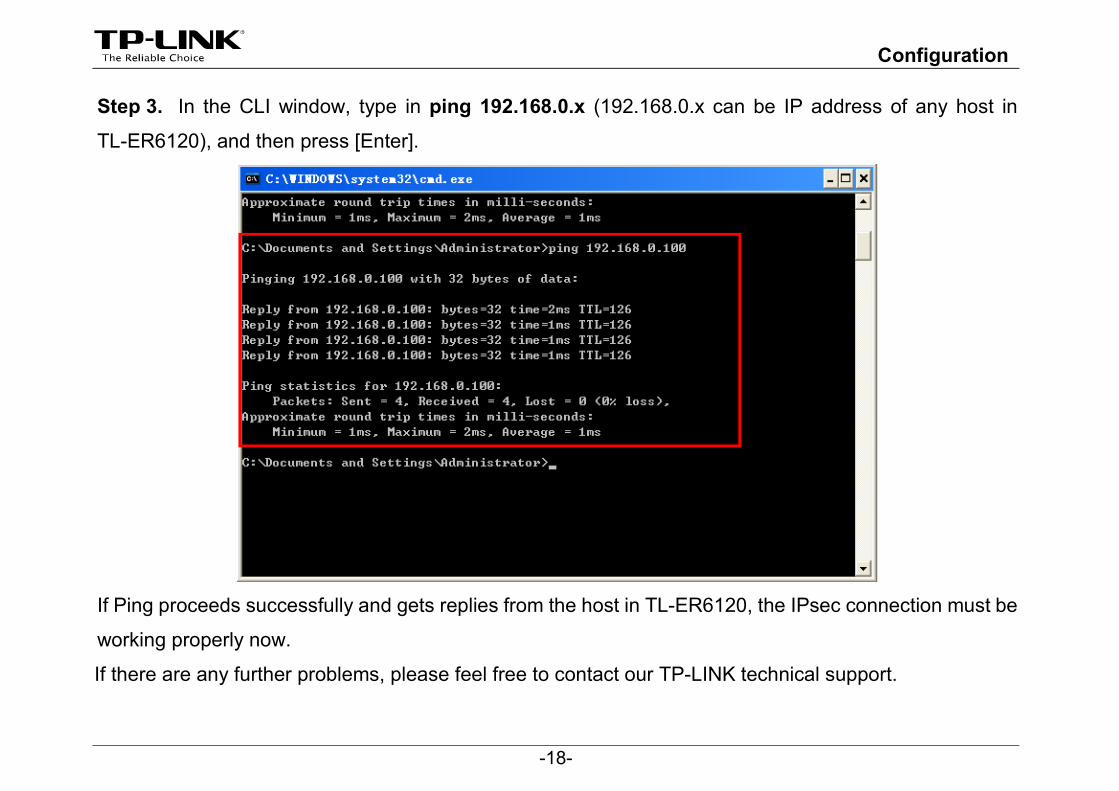
Step 3. In the CLI window, type in ping 192.168.0.x (192.168.0.x can be IP address of any host in
TL-ER6120), and then press [Enter].
If Ping proceeds successfully and gets replies from the host in TL-ER6120, the IPsec connection must be
working properly now.
If there are any further problems, please feel free to contact our TP-LINK technical support.