iptv middleware dvr - daniel im dvr version 2 user guide1125201… · innovative systems, llc |...
TRANSCRIPT

Innovative Systems, LLC | IPTV Middleware Version 2.0 | Rev. November 25, 2010 | Page 1
IPTV Middleware Remote Control & DVR User Guide Version 2.0 The information presented in this document is written for the default settings of the system. Your company may use this information ‘as is’. Or, you are free to reformat the document as best fits your company. All screen captures used in this guide are available as individual png graphics. This guide is a WORKING DOCUMENT. The information and screen captures represented in this document WILL CHANGE frequently. Information in this document may change without notice.
Innovative Systems, LLC | IPTV Middleware Version 2.0 | Rev. November 25, 2010 | Page 2
Table of Contents
Table of Contents ........................................................................................................................... 2
Introduction .................................................................................................................................... 4
The Remote ..................................................................................................................................... 5
Playback Controls ................................................................................................................................... 6
What’s on TV? ............................................................................................................................... 7
Using the OK Button (Now Playing) ..................................................................................................... 7
Using the INFO Button ........................................................................................................................... 8
Using the Browse Button ........................................................................................................................ 9
Using the Channel Guide ............................................................................................................ 10
Using the Guide Button ........................................................................................................................ 10
Search ........................................................................................................................................... 13
Perform a Title Search Within the Guide ........................................................................................... 13
Perform a Partial Text Search Using the Search Button on Remote Control ................................. 14
Record Programs.......................................................................................................................... 15
Record What You Are Currently Watching ...................................................................................... 15
Create a One-Time Recording from the Guide .................................................................................. 17
Record a ‘Live’ Event ........................................................................................................................... 18
Record a Series from the Guide ........................................................................................................... 19
Watch a Recorded Program ......................................................................................................... 21
Reminders ..................................................................................................................................... 23
Folders .......................................................................................................................................... 25
Status Bar ..................................................................................................................................... 26
Delete a Recording ....................................................................................................................... 27
Using Bookmarks ......................................................................................................................... 28
Working with Multiple Streams ................................................................................................... 29
Recording Conflicts ..................................................................................................................... 31
Attempt to Watch a Locked Channel ........................................................................................... 32
Attempt to Watch a Program Beyond the Parental Rating Settings .......................................... 34
Using the List Button ................................................................................................................... 36
Innovative Systems, LLC | IPTV Middleware Version 2.0 | Rev. November 25, 2010 | Page 3
Current Recordings .............................................................................................................................. 36
Future Recordings ................................................................................................................................ 38
Series Recording Rules ......................................................................................................................... 40
Create a Favorites List ................................................................................................................. 42
Access a Favorites List for Surfing ...................................................................................................... 44
My TV Menu ................................................................................................................................ 45
My Recordings Menu ................................................................................................................... 48
My Phone Menu ........................................................................................................................... 50
My Settings Menu ........................................................................................................................ 51
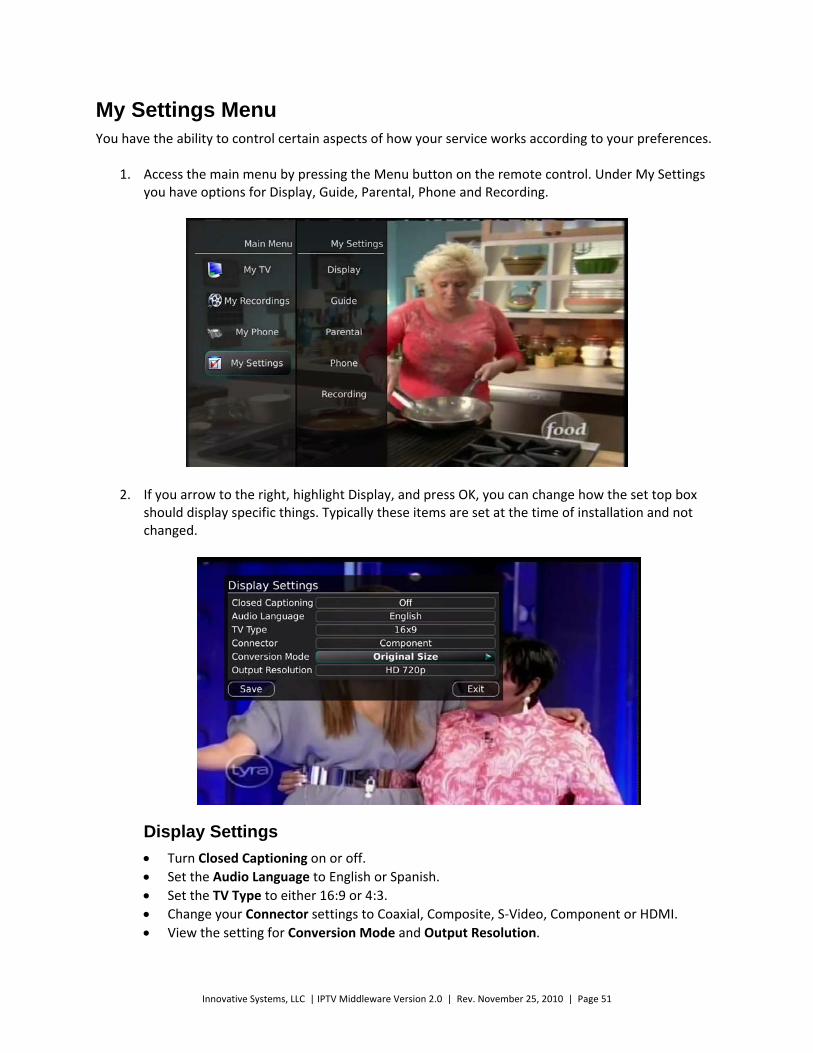
Display Settings ..................................................................................................................................... 51
General Guide Settings ......................................................................................................................... 52
Parental Controls .................................................................................................................................. 53
Change PIN............................................................................................................................................ 53
Edit Locked............................................................................................................................................ 54
Set Ratings ............................................................................................................................................. 54
Phone Options ....................................................................................................................................... 55
Recording Settings ................................................................................................................................ 56
Changing the Number of Rows and Columns in the Guide ....................................................... 57
Caller ID and Message Waiting Indication on the TV ............................................................... 59
Important Note ............................................................................................................................. 61
Innovative Systems, LLC | IPTV Middleware Version 2.0 | Rev. November 25, 2010 | Page 4
Introduction Get ready to free your TV. You’re going to love the new control you have over how and when you watch
television once you’re free from the usual constraints of ordinary TV.
This extraordinary TV service offers a powerful new DVR giving freedom to record your favorite
programs and watch them on YOUR schedule. Using the buttons on the remote control, you can forward
past parts you don’t want to watch and rewind to watch the things you want to see again.
You even have the freedom to control Live TV. Each time you tune to a channel, the DVR begins making
a temporary recording of the program you are watching. This gives you the ability to Pause the current
program if the phone rings and the freedom to rewind or instant replay a scene that you just have to see
again. Your DVR will record up to one hour of Live TV.
It’s important to understand the Live TV recording is not permanent. Unlike recording a program on
your DVR to watch later, the DVR records Live TV in a temporary storage or a buffer. For Live TV
recordings, this temporary recording (buffer) will be erased if any of the following occur:
You turn off your DVR.
You watch the same channel for longer than the temporary recording buffer period. The most recent hour of the program is kept in the temporary recording.
You switch to another program. When you change channels, your DVR begins to store the new program. It removes the previous program you were watching from the temporary storage.
This user guide will walk you through the many features of this extraordinary TV service. But as always, if you have questions or problems, just give us a call.

Innovative Systems, LLC | IPTV Middleware Version 2.0 | Rev. November 25, 2010 | Page 5
The Remote
Innovative Systems, LLC | IPTV Middleware Version 2.0 | Rev. November 25, 2010 | Page 6
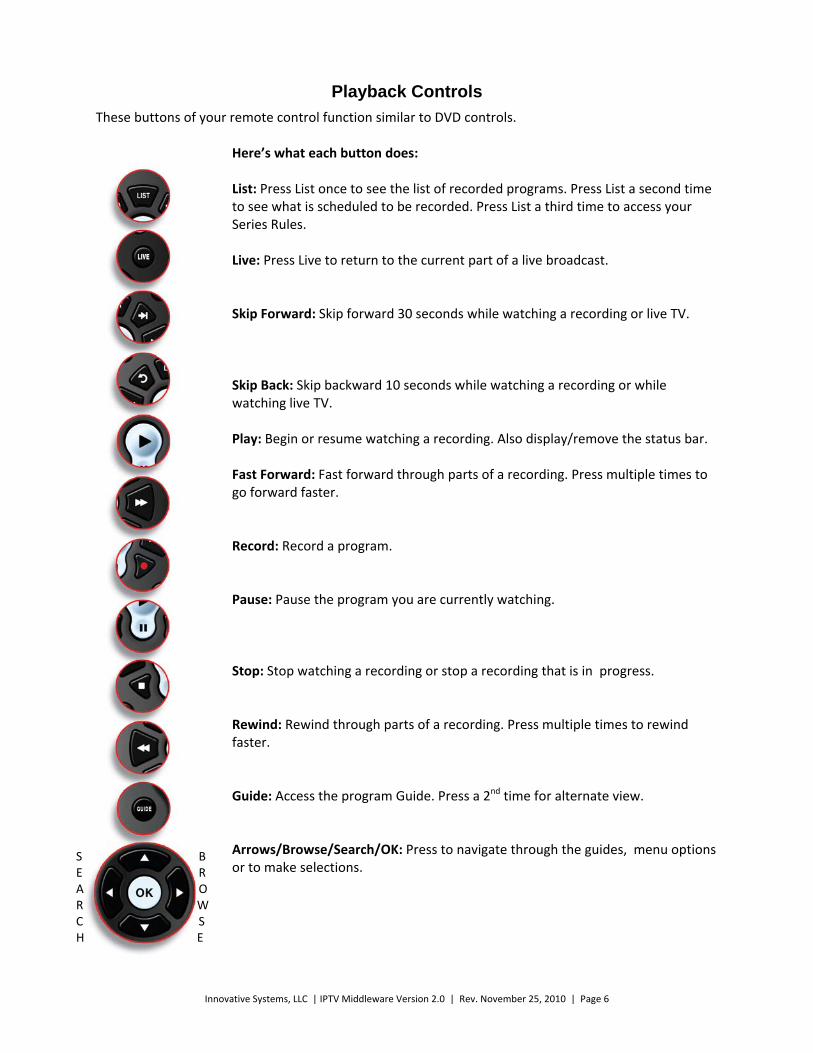
Playback Controls
These buttons of your remote control function similar to DVD controls.
Here’s what each button does: List: Press List once to see the list of recorded programs. Press List a second time to see what is scheduled to be recorded. Press List a third time to access your Series Rules. Live: Press Live to return to the current part of a live broadcast. Skip Forward: Skip forward 30 seconds while watching a recording or live TV. Skip Back: Skip backward 10 seconds while watching a recording or while watching live TV. Play: Begin or resume watching a recording. Also display/remove the status bar. Fast Forward: Fast forward through parts of a recording. Press multiple times to go forward faster. Record: Record a program. Pause: Pause the program you are currently watching. Stop: Stop watching a recording or stop a recording that is in progress. Rewind: Rewind through parts of a recording. Press multiple times to rewind faster. Guide: Access the program Guide. Press a 2nd time for alternate view. Arrows/Browse/Search/OK: Press to navigate through the guides, menu options or to make selections.
S B E R A O R W C S H E
Innovative Systems, LLC | IPTV Middleware Version 2.0 | Rev. November 25, 2010 | Page 7
What’s on TV? When you first turn on the TV, there are three easy ways you can see what is currently showing. You can use the OK button, the Info button or the Browse button.
Using the OK Button (Now Playing)
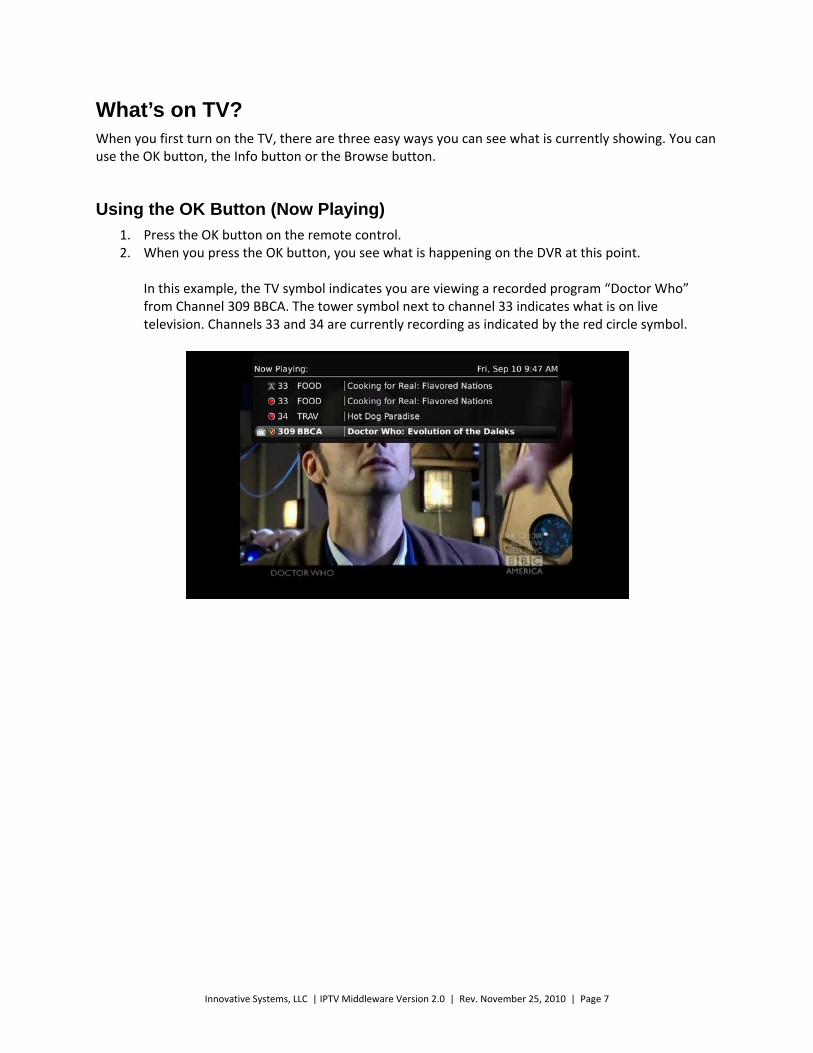
1. Press the OK button on the remote control. 2. When you press the OK button, you see what is happening on the DVR at this point.
In this example, the TV symbol indicates you are viewing a recorded program “Doctor Who” from Channel 309 BBCA. The tower symbol next to channel 33 indicates what is on live television. Channels 33 and 34 are currently recording as indicated by the red circle symbol.
Innovative Systems, LLC | IPTV Middleware Version 2.0 | Rev. November 25, 2010 | Page 8
Using the INFO Button
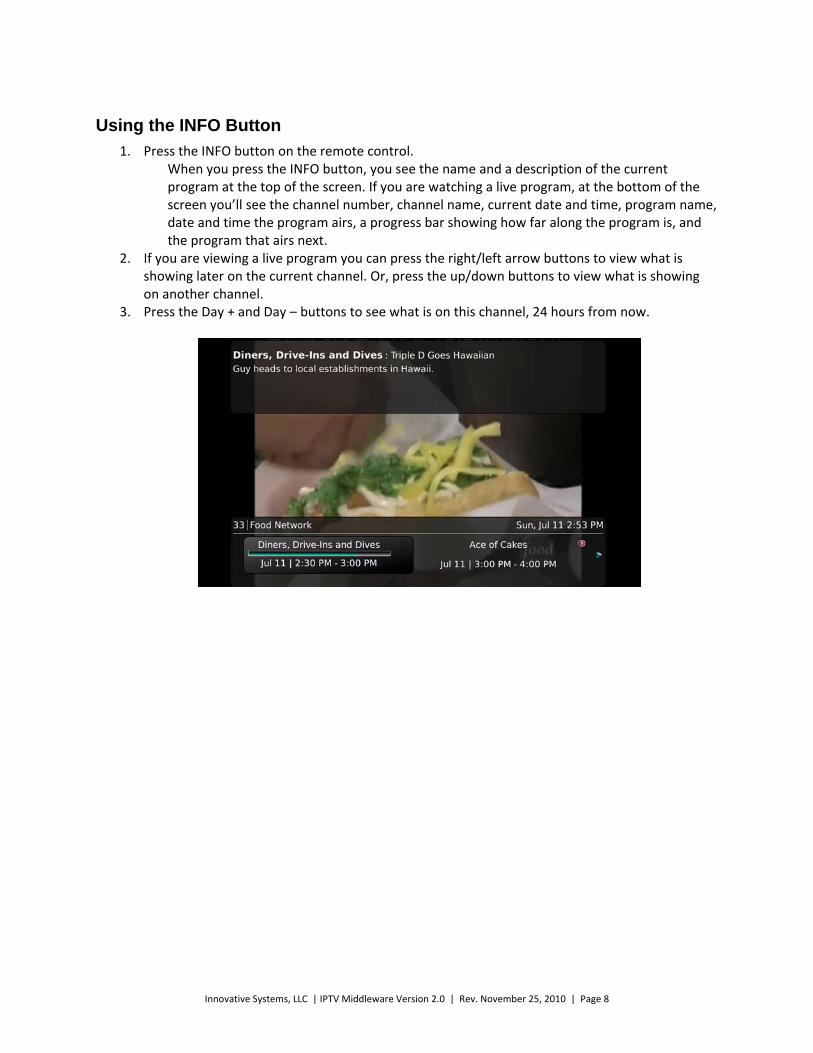
1. Press the INFO button on the remote control. When you press the INFO button, you see the name and a description of the current program at the top of the screen. If you are watching a live program, at the bottom of the screen you’ll see the channel number, channel name, current date and time, program name, date and time the program airs, a progress bar showing how far along the program is, and the program that airs next.
2. If you are viewing a live program you can press the right/left arrow buttons to view what is showing later on the current channel. Or, press the up/down buttons to view what is showing on another channel.
3. Press the Day + and Day – buttons to see what is on this channel, 24 hours from now.
Innovative Systems, LLC | IPTV Middleware Version 2.0 | Rev. November 25, 2010 | Page 9
Using the Browse Button
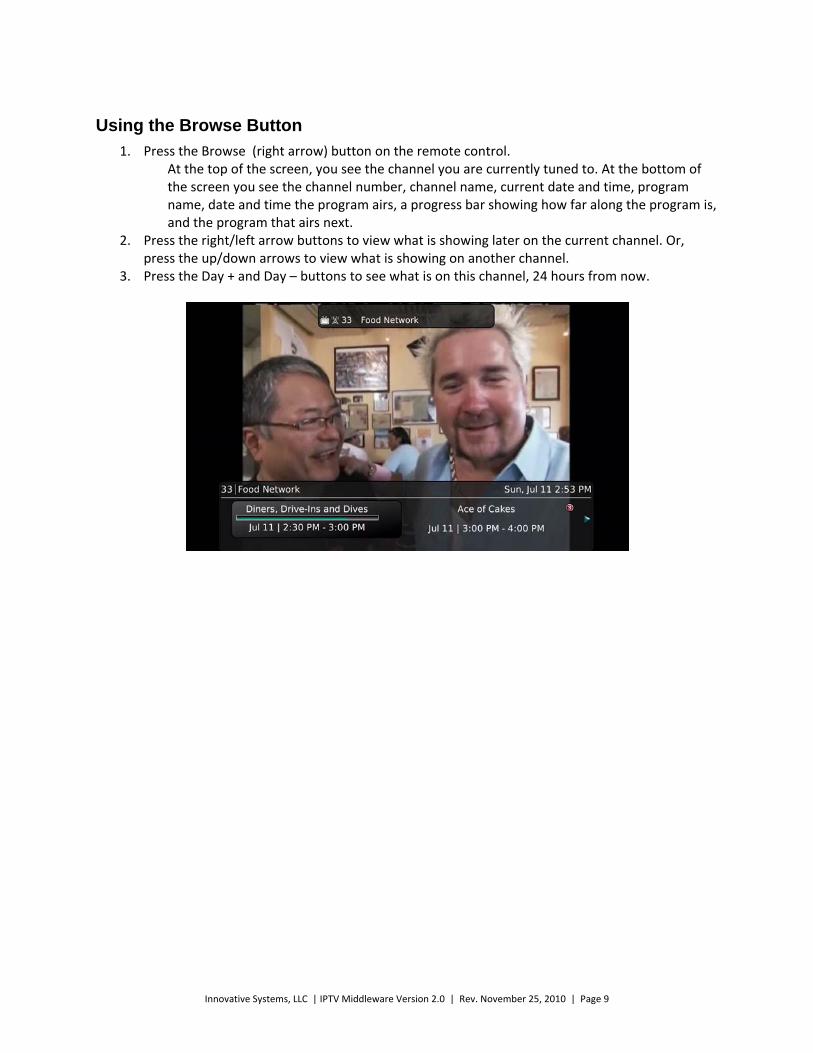
1. Press the Browse (right arrow) button on the remote control. At the top of the screen, you see the channel you are currently tuned to. At the bottom of the screen you see the channel number, channel name, current date and time, program name, date and time the program airs, a progress bar showing how far along the program is, and the program that airs next.
2. Press the right/left arrow buttons to view what is showing later on the current channel. Or, press the up/down arrows to view what is showing on another channel.
3. Press the Day + and Day – buttons to see what is on this channel, 24 hours from now.

Innovative Systems, LLC | IPTV Middleware Version 2.0 | Rev. November 25, 2010 | Page 10
Using the Channel Guide The Channel Guide is your on‐screen tool to see what is on TV and allows you to surf channels while still watching a program.
Using the Guide Button
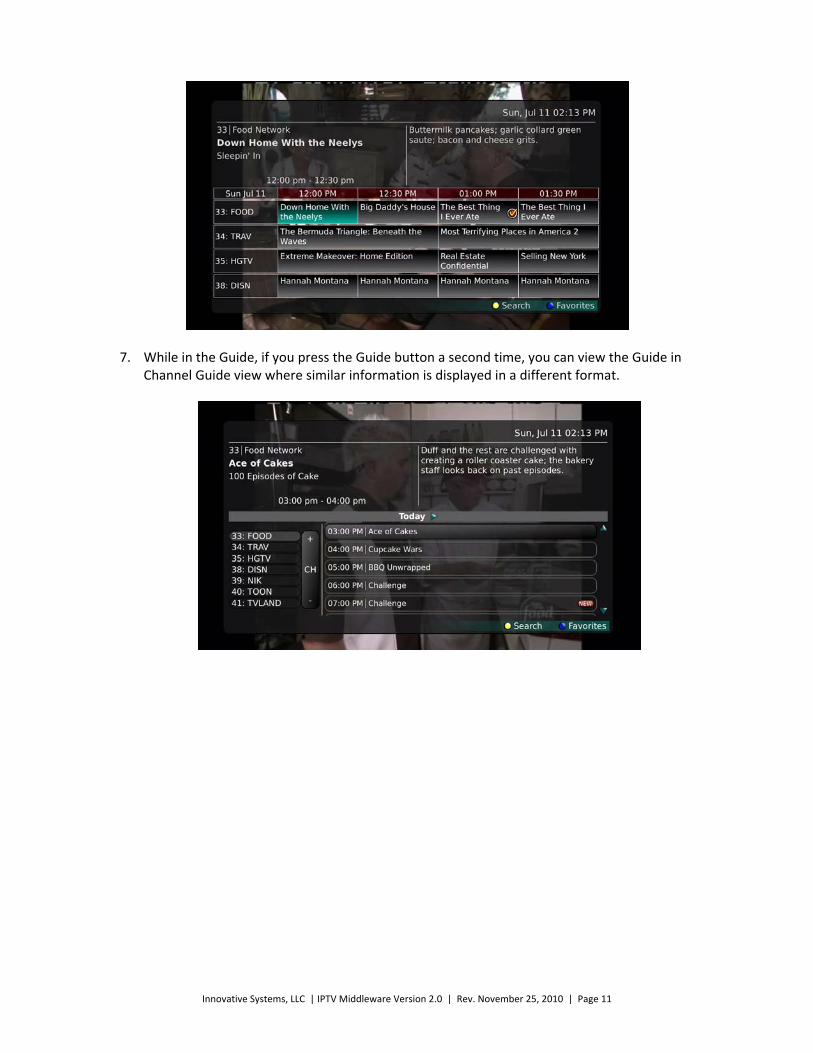
1. Press the Guide button on the remote control. Information about the program you are tuned to displays at the top of the screen along with indicators if the show is in HD, if the program is a new episode, and if the broadcast is in HD. Other channels and their programs will show at the bottom of the screen. Shows that started prior to the current time slot are indicated with a blue arrow prior to the program name. Shows that continue past the last time slot showing on the guide are indicated with a blue arrow after the program name. Programs scheduled for recording will be marked with a red circle.
2. To move through the guide one channel at a time, press the up/down arrow buttons on the remote control. As you do this, a description of the highlighted program will display at the top of the screen. Or, press the Channel + and Channel – buttons to scroll through the channels more quickly.
3. To move through the guide one page at a time, press the Page + (up) and Page – (down) buttons on the remote control.
4. To move through the guide one screen at a time, use the fast forward and rewind buttons. 5. To move through the guide a full 24 hours, press the Day + and Day – buttons on the remote
control. You cannot use the Day – button to go back in time. However, you can use it to page back if you have moved ahead in the guide.
6. To see programs you missed, press the Skip Back button to go back one page in the guide. If there was a program you missed, you could search for other programs of the same name and schedule the DVR to record the program.
Innovative Systems, LLC | IPTV Middleware Version 2.0 | Rev. November 25, 2010 | Page 11
7. While in the Guide, if you press the Guide button a second time, you can view the Guide in Channel Guide view where similar information is displayed in a different format.
Innovative Systems, LLC | IPTV Middleware Version 2.0 | Rev. November 25, 2010 | Page 12
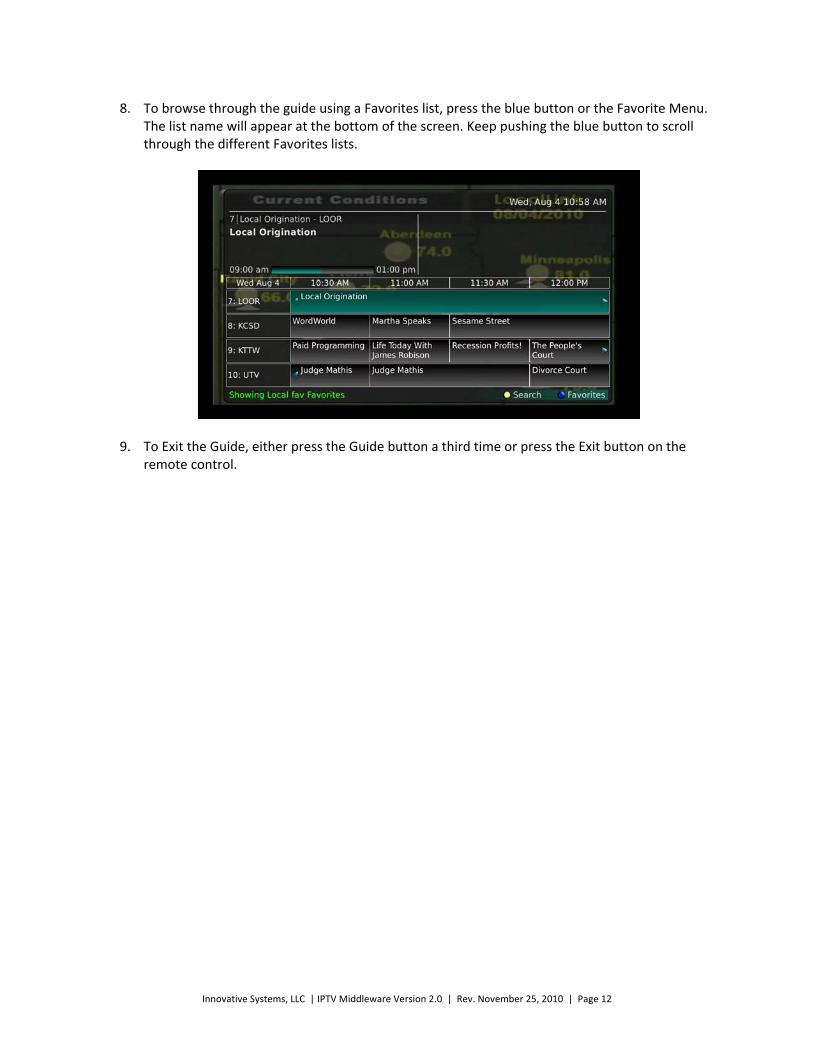
8. To browse through the guide using a Favorites list, press the blue button or the Favorite Menu.
The list name will appear at the bottom of the screen. Keep pushing the blue button to scroll through the different Favorites lists.
9. To Exit the Guide, either press the Guide button a third time or press the Exit button on the remote control.
Innovative Systems, LLC | IPTV Middleware Version 2.0 | Rev. November 25, 2010 | Page 13
Search There are Search capabilities that allow you to either search for a full title of a program or for a word or two within a title. You can use the Search tool in the Guide to find all instances of a program by title. Or, you can use the Search feature to enter a partial name and search for all instances of the word to locate the desired program. This works well if you can’t recall the full name of a program or movie.
Perform a Title Search Within the Guide
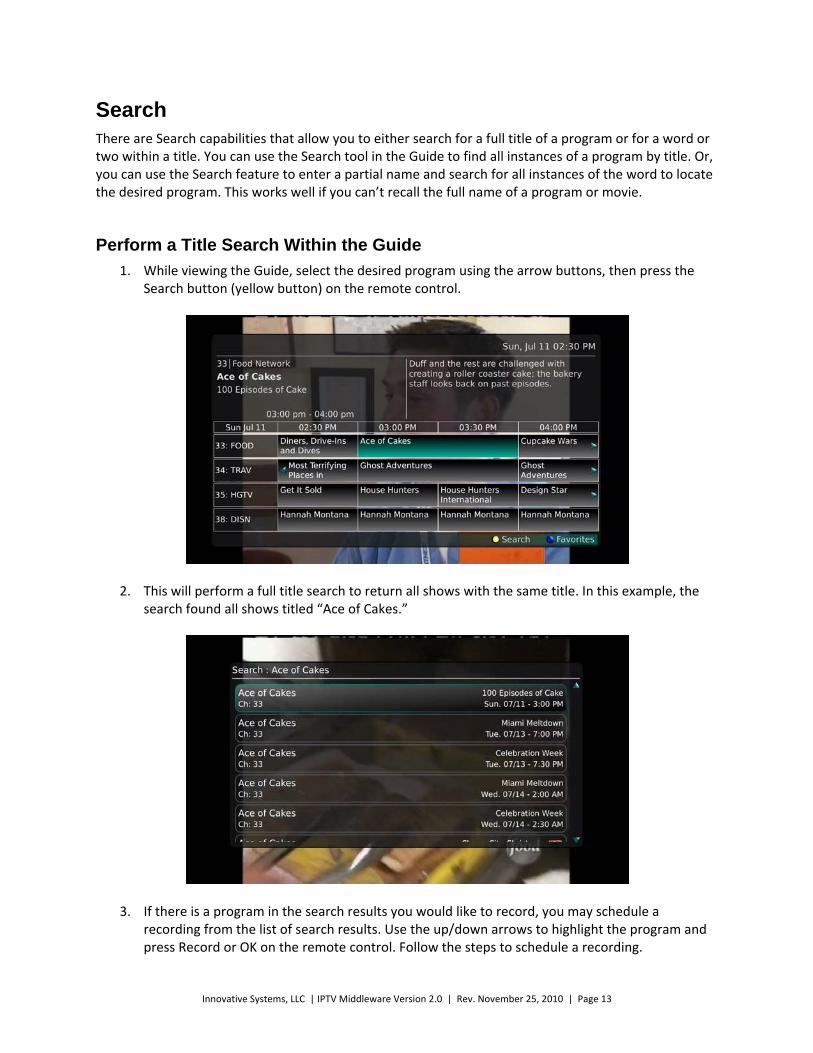
1. While viewing the Guide, select the desired program using the arrow buttons, then press the Search button (yellow button) on the remote control.
2. This will perform a full title search to return all shows with the same title. In this example, the search found all shows titled “Ace of Cakes.”
3. If there is a program in the search results you would like to record, you may schedule a recording from the list of search results. Use the up/down arrows to highlight the program and press Record or OK on the remote control. Follow the steps to schedule a recording.
Innovative Systems, LLC | IPTV Middleware Version 2.0 | Rev. November 25, 2010 | Page 14
Perform a Partial Text Search Using the Search Button on Remote Control
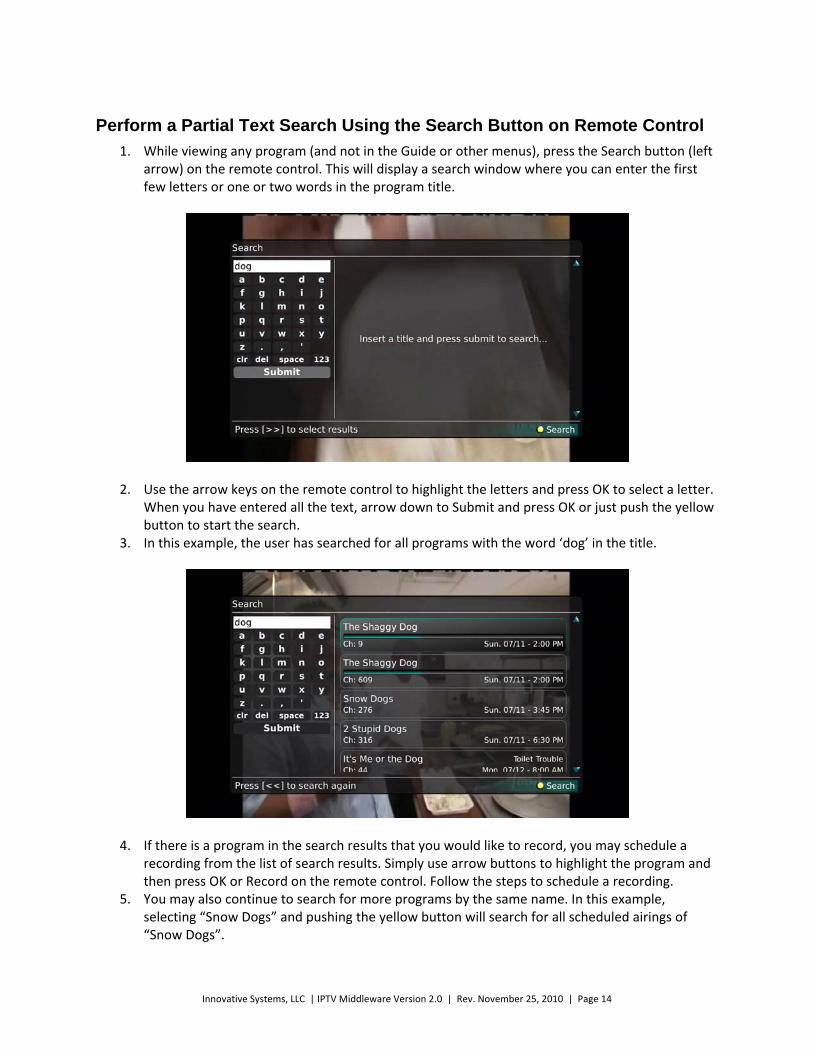
1. While viewing any program (and not in the Guide or other menus), press the Search button (left arrow) on the remote control. This will display a search window where you can enter the first few letters or one or two words in the program title.
2. Use the arrow keys on the remote control to highlight the letters and press OK to select a letter. When you have entered all the text, arrow down to Submit and press OK or just push the yellow button to start the search.
3. In this example, the user has searched for all programs with the word ‘dog’ in the title.
4. If there is a program in the search results that you would like to record, you may schedule a recording from the list of search results. Simply use arrow buttons to highlight the program and then press OK or Record on the remote control. Follow the steps to schedule a recording.
5. You may also continue to search for more programs by the same name. In this example, selecting “Snow Dogs” and pushing the yellow button will search for all scheduled airings of “Snow Dogs”.
Innovative Systems, LLC | IPTV Middleware Version 2.0 | Rev. November 25, 2010 | Page 15
Record Programs Your DVR service gives you the freedom to record the program you are watching as you are watching it, record a program while you watch another, or you can record a program you see in the program guide. You can also schedule a series recording so you always catch all episodes of your favorite programs. Note: If a program you record is either locked by parental rating settings or on a channel that is locked, the DVR will record the program but you will be required to enter a PIN to view it.
Record What You Are Currently Watching
If you are watching a program and decide that you want to record the remainder of the program you can easily start the recording.
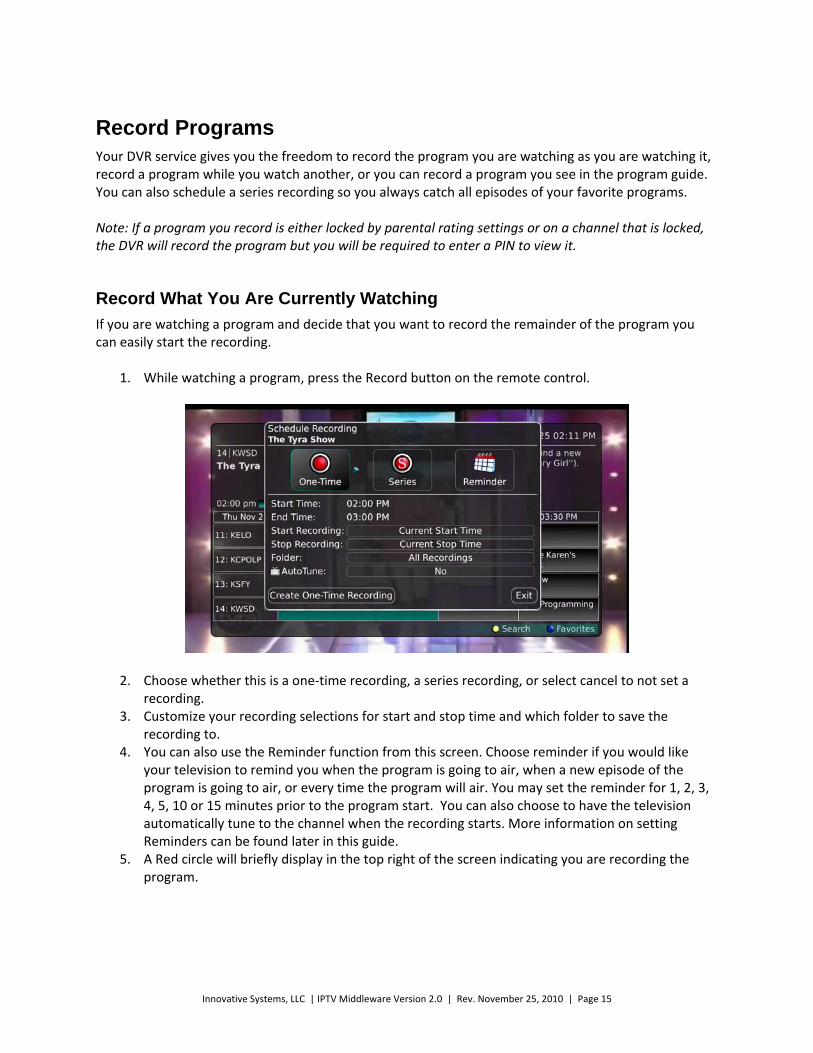
1. While watching a program, press the Record button on the remote control.
2. Choose whether this is a one‐time recording, a series recording, or select cancel to not set a recording.
3. Customize your recording selections for start and stop time and which folder to save the recording to.
4. You can also use the Reminder function from this screen. Choose reminder if you would like your television to remind you when the program is going to air, when a new episode of the program is going to air, or every time the program will air. You may set the reminder for 1, 2, 3, 4, 5, 10 or 15 minutes prior to the program start. You can also choose to have the television automatically tune to the channel when the recording starts. More information on setting Reminders can be found later in this guide.
5. A Red circle will briefly display in the top right of the screen indicating you are recording the program.
Innovative Systems, LLC | IPTV Middleware Version 2.0 | Rev. November 25, 2010 | Page 16
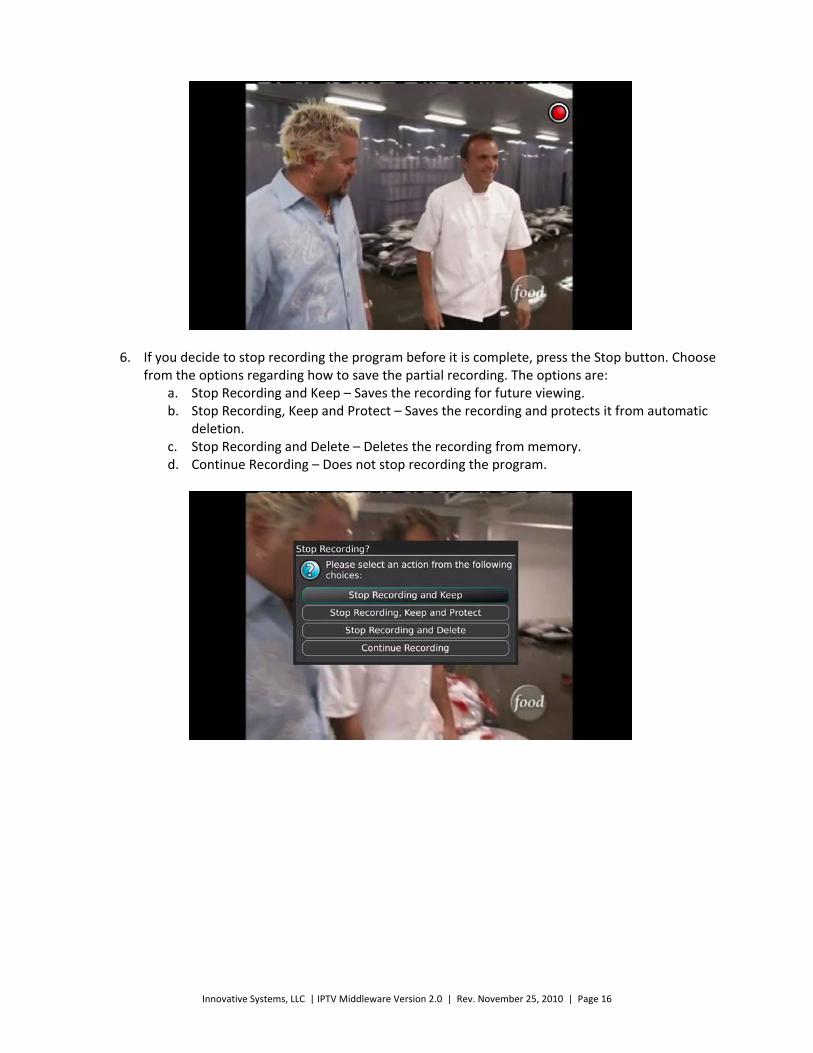
6. If you decide to stop recording the program before it is complete, press the Stop button. Choose from the options regarding how to save the partial recording. The options are:
a. Stop Recording and Keep – Saves the recording for future viewing. b. Stop Recording, Keep and Protect – Saves the recording and protects it from automatic
deletion. c. Stop Recording and Delete – Deletes the recording from memory. d. Continue Recording – Does not stop recording the program.
Innovative Systems, LLC | IPTV Middleware Version 2.0 | Rev. November 25, 2010 | Page 17
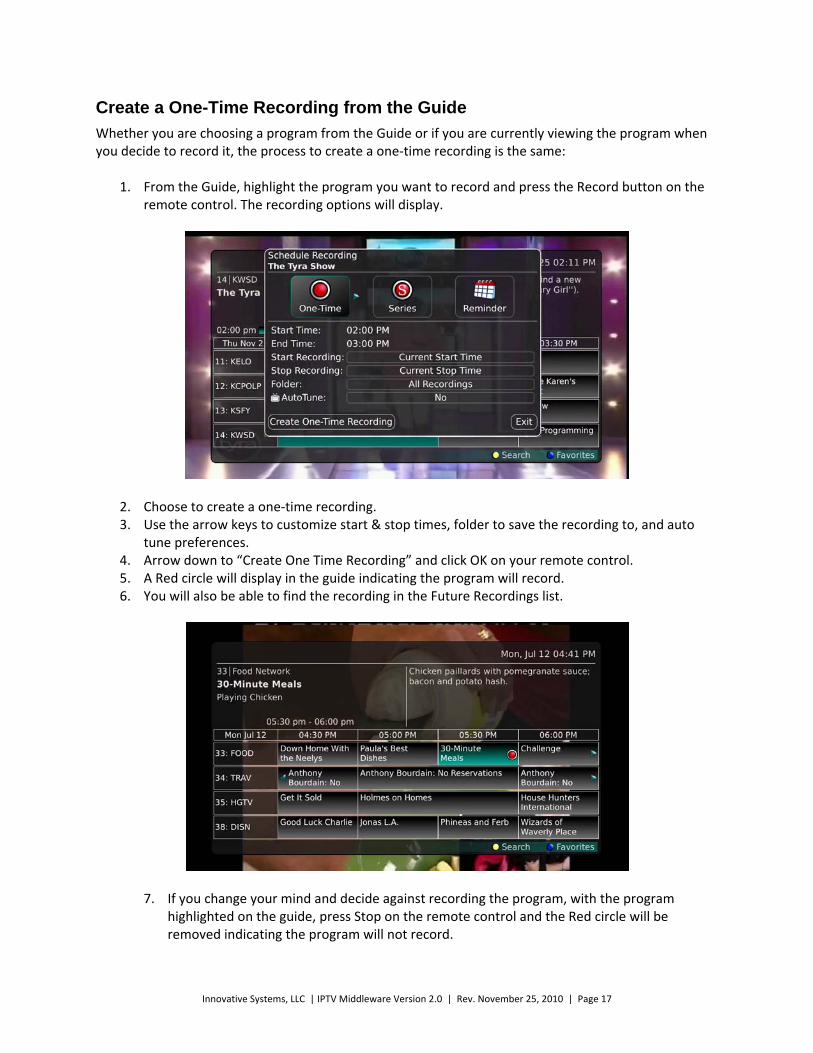
Create a One-Time Recording from the Guide
Whether you are choosing a program from the Guide or if you are currently viewing the program when you decide to record it, the process to create a one‐time recording is the same:
1. From the Guide, highlight the program you want to record and press the Record button on the remote control. The recording options will display.
2. Choose to create a one‐time recording. 3. Use the arrow keys to customize start & stop times, folder to save the recording to, and auto
tune preferences. 4. Arrow down to “Create One Time Recording” and click OK on your remote control. 5. A Red circle will display in the guide indicating the program will record. 6. You will also be able to find the recording in the Future Recordings list.
7. If you change your mind and decide against recording the program, with the program
highlighted on the guide, press Stop on the remote control and the Red circle will be removed indicating the program will not record.
Innovative Systems, LLC | IPTV Middleware Version 2.0 | Rev. November 25, 2010 | Page 18
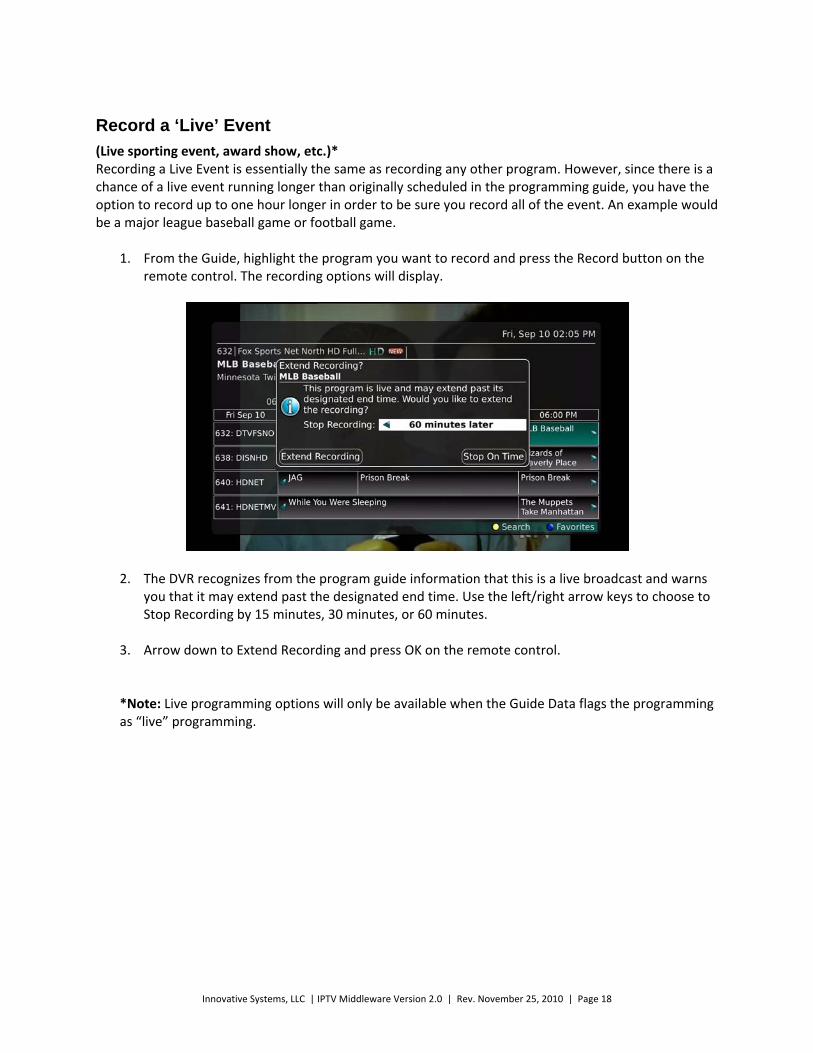
Record a ‘Live’ Event
(Live sporting event, award show, etc.)* Recording a Live Event is essentially the same as recording any other program. However, since there is a chance of a live event running longer than originally scheduled in the programming guide, you have the option to record up to one hour longer in order to be sure you record all of the event. An example would be a major league baseball game or football game.
1. From the Guide, highlight the program you want to record and press the Record button on the remote control. The recording options will display.
2. The DVR recognizes from the program guide information that this is a live broadcast and warns you that it may extend past the designated end time. Use the left/right arrow keys to choose to Stop Recording by 15 minutes, 30 minutes, or 60 minutes.
3. Arrow down to Extend Recording and press OK on the remote control.
*Note: Live programming options will only be available when the Guide Data flags the programming as “live” programming.
Innovative Systems, LLC | IPTV Middleware Version 2.0 | Rev. November 25, 2010 | Page 19
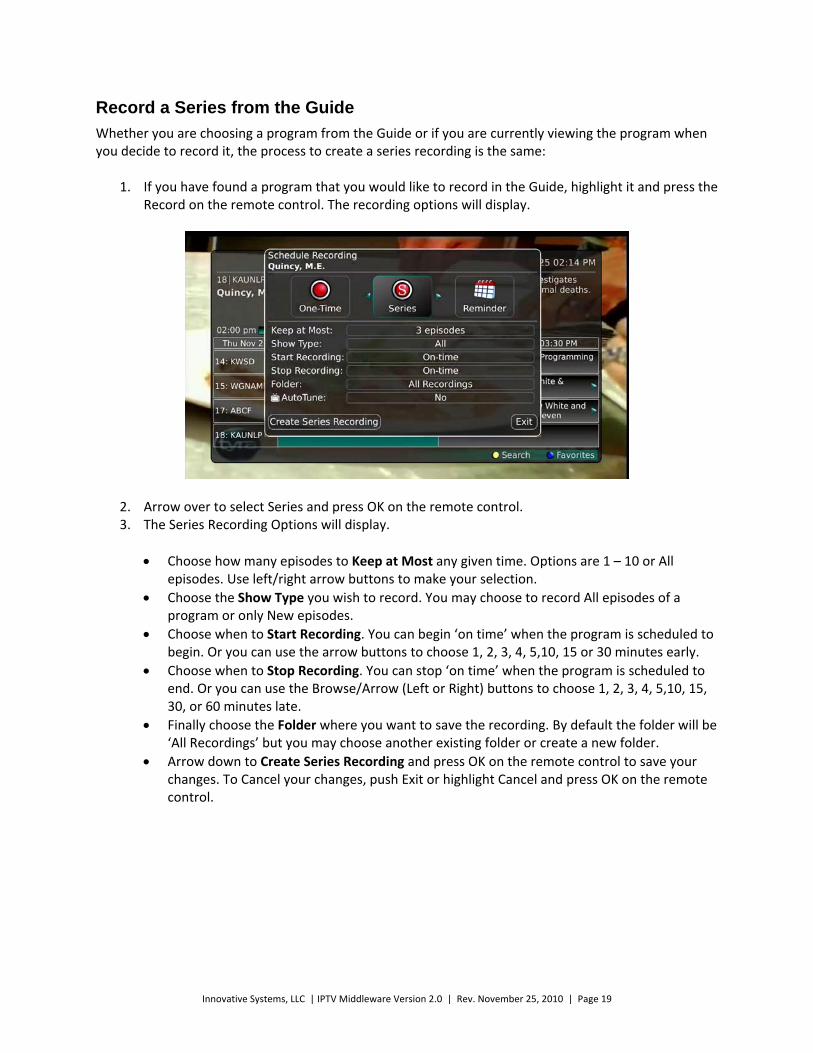
Record a Series from the Guide
Whether you are choosing a program from the Guide or if you are currently viewing the program when you decide to record it, the process to create a series recording is the same:
1. If you have found a program that you would like to record in the Guide, highlight it and press the Record on the remote control. The recording options will display.
2. Arrow over to select Series and press OK on the remote control. 3. The Series Recording Options will display.
Choose how many episodes to Keep at Most any given time. Options are 1 – 10 or All episodes. Use left/right arrow buttons to make your selection.
Choose the Show Type you wish to record. You may choose to record All episodes of a program or only New episodes.
Choose when to Start Recording. You can begin ‘on time’ when the program is scheduled to begin. Or you can use the arrow buttons to choose 1, 2, 3, 4, 5,10, 15 or 30 minutes early.
Choose when to Stop Recording. You can stop ‘on time’ when the program is scheduled to end. Or you can use the Browse/Arrow (Left or Right) buttons to choose 1, 2, 3, 4, 5,10, 15, 30, or 60 minutes late.
Finally choose the Folder where you want to save the recording. By default the folder will be ‘All Recordings’ but you may choose another existing folder or create a new folder.
Arrow down to Create Series Recording and press OK on the remote control to save your changes. To Cancel your changes, push Exit or highlight Cancel and press OK on the remote control.
Innovative Systems, LLC | IPTV Middleware Version 2.0 | Rev. November 25, 2010 | Page 20
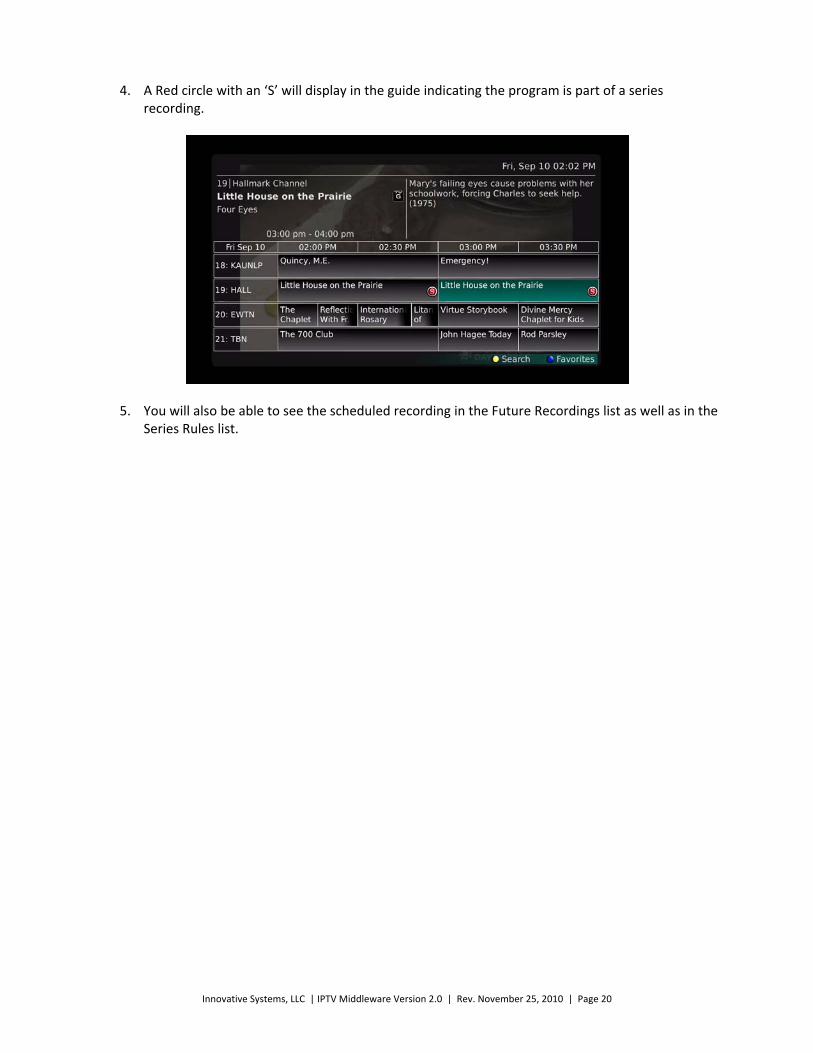
4. A Red circle with an ‘S’ will display in the guide indicating the program is part of a series recording.
5. You will also be able to see the scheduled recording in the Future Recordings list as well as in the Series Rules list.
Innovative Systems, LLC | IPTV Middleware Version 2.0 | Rev. November 25, 2010 | Page 21
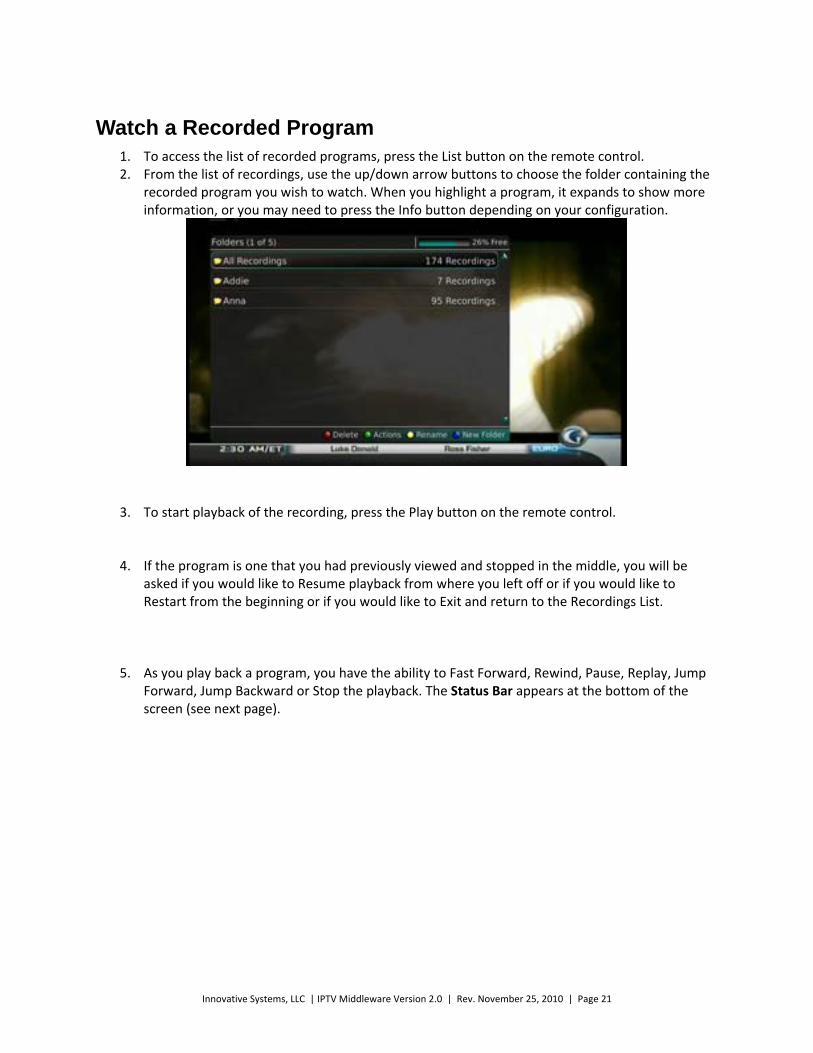
Watch a Recorded Program 1. To access the list of recorded programs, press the List button on the remote control. 2. From the list of recordings, use the up/down arrow buttons to choose the folder containing the
recorded program you wish to watch. When you highlight a program, it expands to show more information, or you may need to press the Info button depending on your configuration.
3. To start playback of the recording, press the Play button on the remote control.
4. If the program is one that you had previously viewed and stopped in the middle, you will be
asked if you would like to Resume playback from where you left off or if you would like to Restart from the beginning or if you would like to Exit and return to the Recordings List.
5. As you play back a program, you have the ability to Fast Forward, Rewind, Pause, Replay, Jump
Forward, Jump Backward or Stop the playback. The Status Bar appears at the bottom of the screen (see next page).
Innovative Systems, LLC | IPTV Middleware Version 2.0 | Rev. November 25, 2010 | Page 22
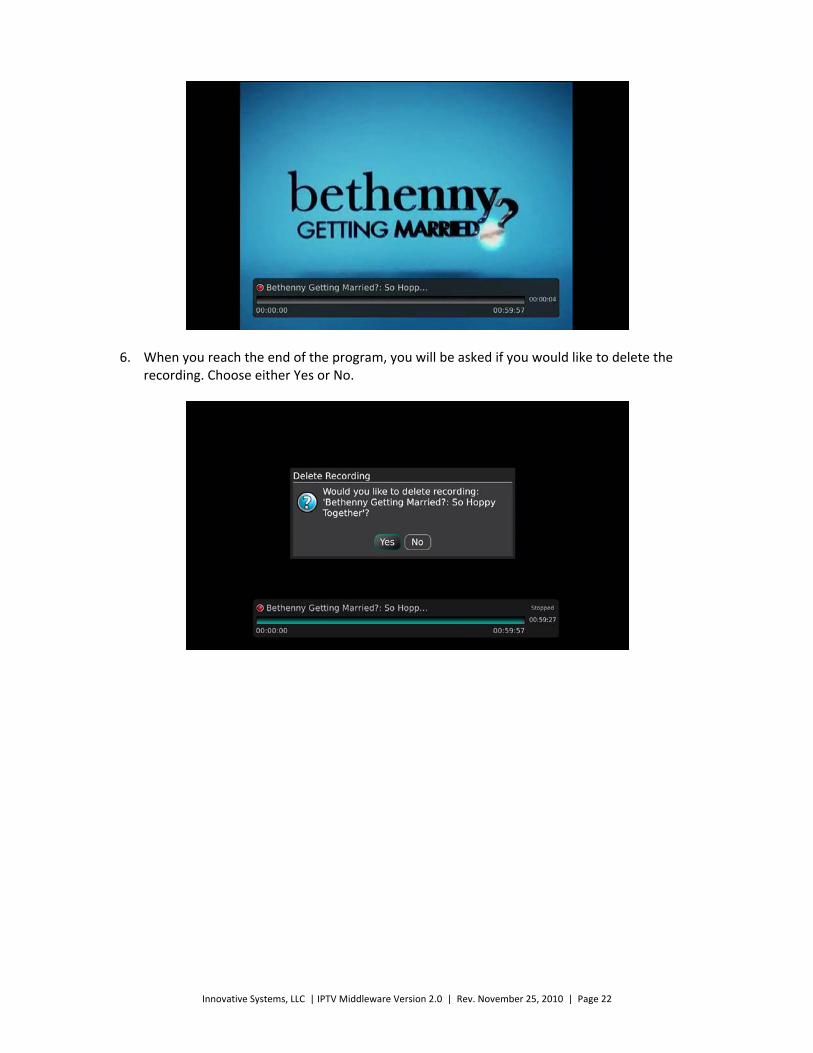
6. When you reach the end of the program, you will be asked if you would like to delete the recording. Choose either Yes or No.
Innovative Systems, LLC | IPTV Middleware Version 2.0 | Rev. November 25, 2010 | Page 23
Reminders Your television can be set to remind you when a program is about to air and to automatically tune to a
program you don’t want to miss.
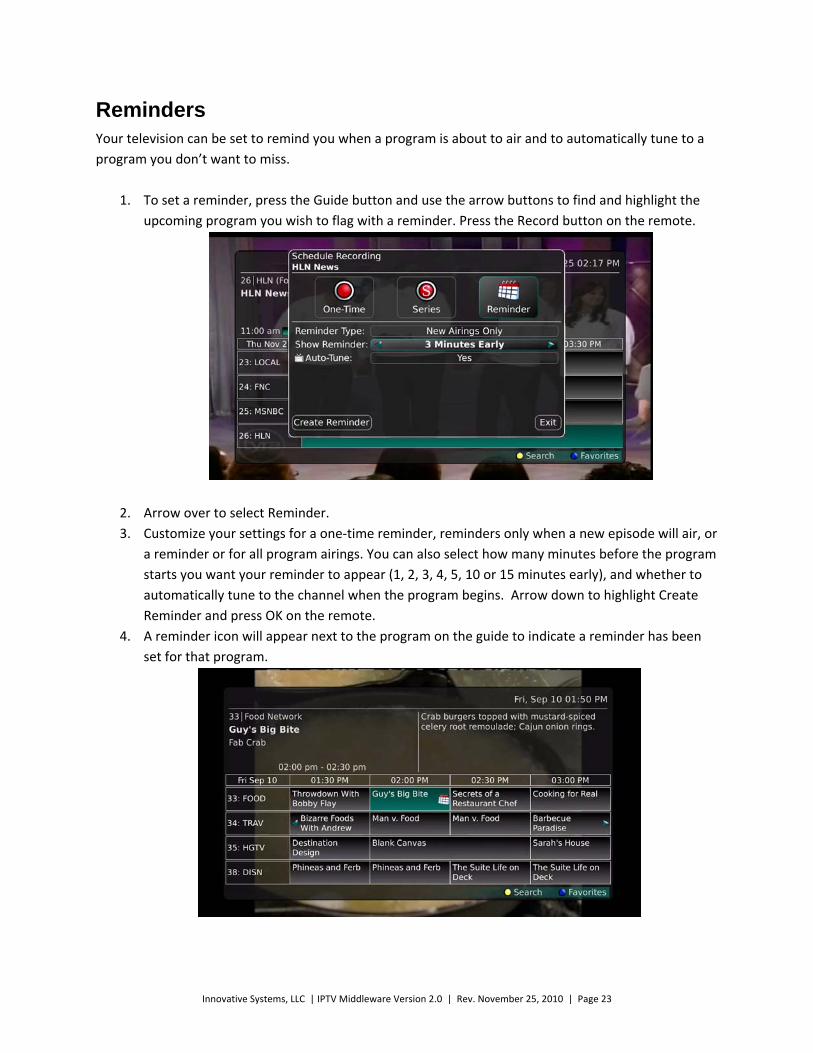
1. To set a reminder, press the Guide button and use the arrow buttons to find and highlight the
upcoming program you wish to flag with a reminder. Press the Record button on the remote.
2. Arrow over to select Reminder.
3. Customize your settings for a one‐time reminder, reminders only when a new episode will air, or
a reminder or for all program airings. You can also select how many minutes before the program
starts you want your reminder to appear (1, 2, 3, 4, 5, 10 or 15 minutes early), and whether to
automatically tune to the channel when the program begins. Arrow down to highlight Create
Reminder and press OK on the remote.
4. A reminder icon will appear next to the program on the guide to indicate a reminder has been
set for that program.

Innovative Systems, LLC | IPTV Middleware Version 2.0 | Rev. November 25, 2010 | Page 24
5. A reminder pop‐up will appear at the top of your TV screen at the time you designated. Press OK
to begin watching the program at any time or wait for it to change channels automatically if you set
the auto tune feature.
Innovative Systems, LLC | IPTV Middleware Version 2.0 | Rev. November 25, 2010 | Page 25
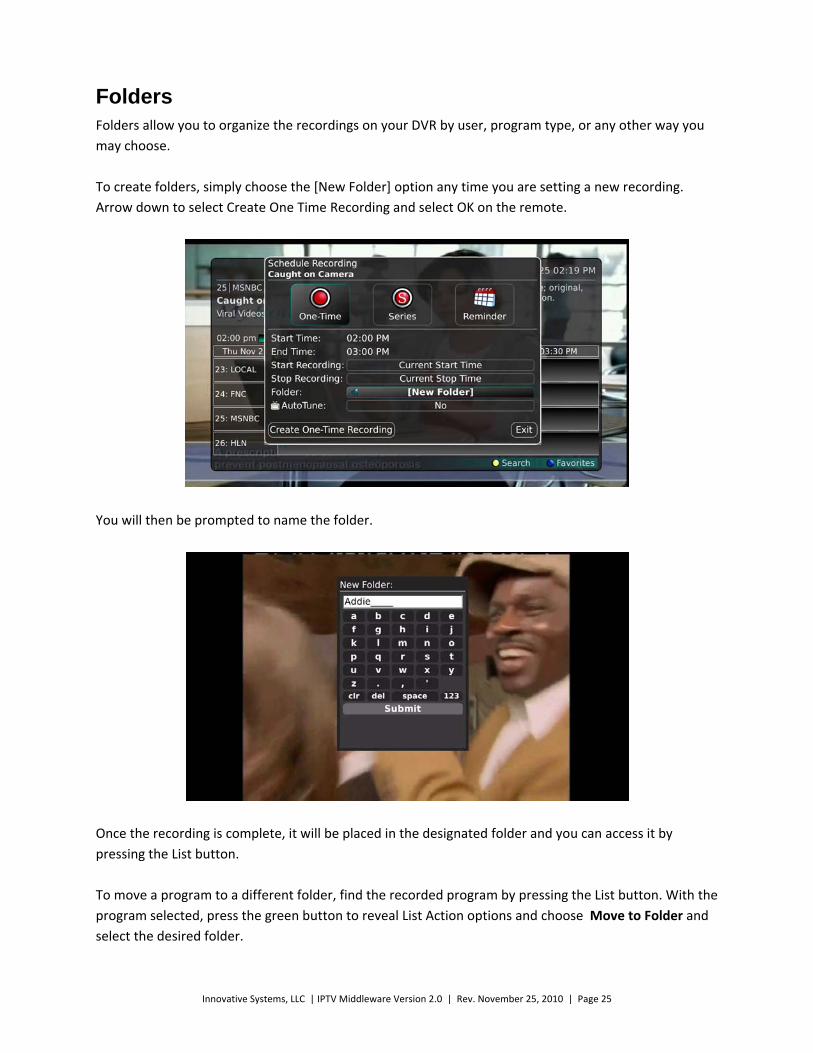
Folders Folders allow you to organize the recordings on your DVR by user, program type, or any other way you
may choose.
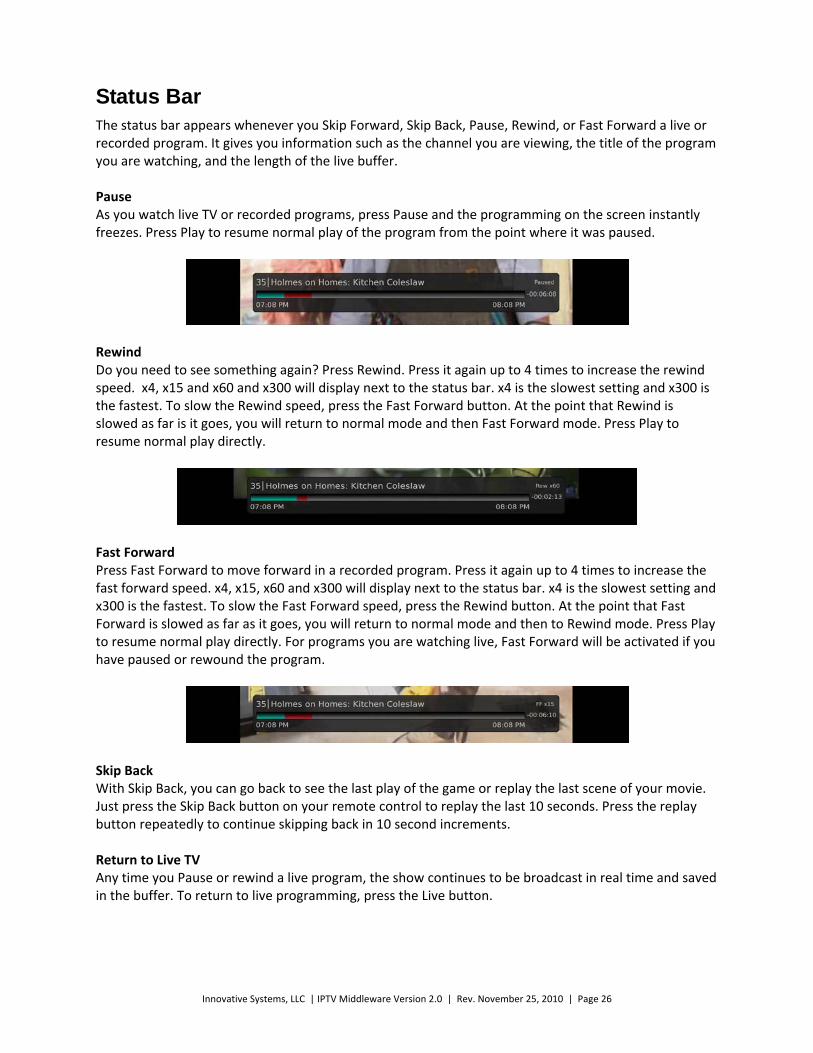
To create folders, simply choose the [New Folder] option any time you are setting a new recording.
Arrow down to select Create One Time Recording and select OK on the remote.
You will then be prompted to name the folder.
Once the recording is complete, it will be placed in the designated folder and you can access it by
pressing the List button.
To move a program to a different folder, find the recorded program by pressing the List button. With the
program selected, press the green button to reveal List Action options and choose Move to Folder and
select the desired folder.
Innovative Systems, LLC | IPTV Middleware Version 2.0 | Rev. November 25, 2010 | Page 26
Status Bar The status bar appears whenever you Skip Forward, Skip Back, Pause, Rewind, or Fast Forward a live or recorded program. It gives you information such as the channel you are viewing, the title of the program you are watching, and the length of the live buffer. Pause As you watch live TV or recorded programs, press Pause and the programming on the screen instantly freezes. Press Play to resume normal play of the program from the point where it was paused.
Rewind Do you need to see something again? Press Rewind. Press it again up to 4 times to increase the rewind speed. x4, x15 and x60 and x300 will display next to the status bar. x4 is the slowest setting and x300 is the fastest. To slow the Rewind speed, press the Fast Forward button. At the point that Rewind is slowed as far is it goes, you will return to normal mode and then Fast Forward mode. Press Play to resume normal play directly.
Fast Forward Press Fast Forward to move forward in a recorded program. Press it again up to 4 times to increase the fast forward speed. x4, x15, x60 and x300 will display next to the status bar. x4 is the slowest setting and x300 is the fastest. To slow the Fast Forward speed, press the Rewind button. At the point that Fast Forward is slowed as far as it goes, you will return to normal mode and then to Rewind mode. Press Play to resume normal play directly. For programs you are watching live, Fast Forward will be activated if you have paused or rewound the program.
Skip Back With Skip Back, you can go back to see the last play of the game or replay the last scene of your movie. Just press the Skip Back button on your remote control to replay the last 10 seconds. Press the replay button repeatedly to continue skipping back in 10 second increments. Return to Live TV Any time you Pause or rewind a live program, the show continues to be broadcast in real time and saved in the buffer. To return to live programming, press the Live button.
Innovative Systems, LLC | IPTV Middleware Version 2.0 | Rev. November 25, 2010 | Page 27
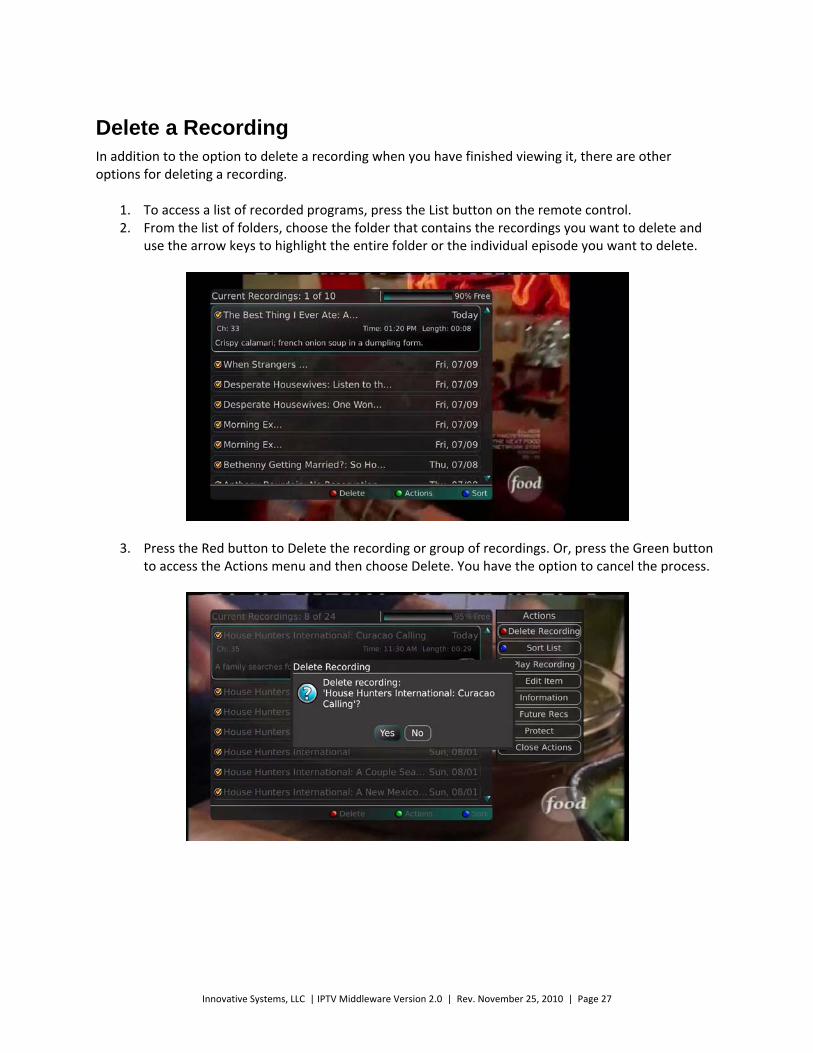
Delete a Recording In addition to the option to delete a recording when you have finished viewing it, there are other options for deleting a recording.
1. To access a list of recorded programs, press the List button on the remote control. 2. From the list of folders, choose the folder that contains the recordings you want to delete and
use the arrow keys to highlight the entire folder or the individual episode you want to delete.
3. Press the Red button to Delete the recording or group of recordings. Or, press the Green button to access the Actions menu and then choose Delete. You have the option to cancel the process.
Innovative Systems, LLC | IPTV Middleware Version 2.0 | Rev. November 25, 2010 | Page 28
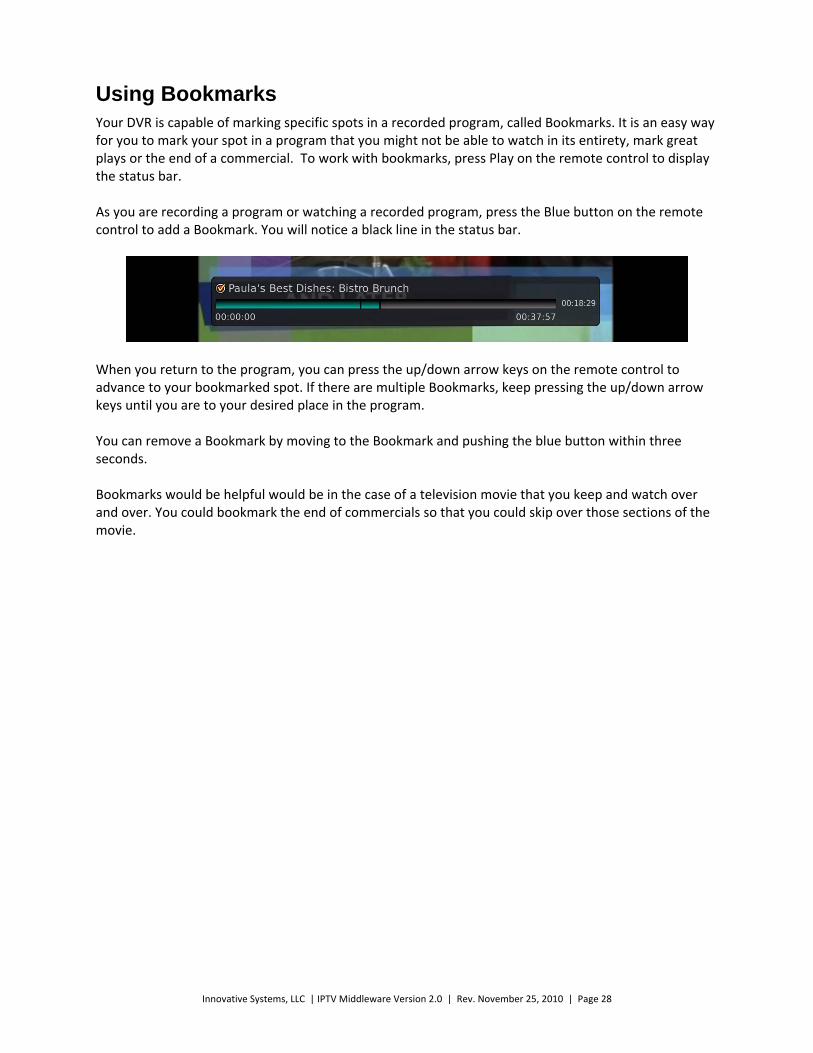
Using Bookmarks Your DVR is capable of marking specific spots in a recorded program, called Bookmarks. It is an easy way for you to mark your spot in a program that you might not be able to watch in its entirety, mark great plays or the end of a commercial. To work with bookmarks, press Play on the remote control to display the status bar. As you are recording a program or watching a recorded program, press the Blue button on the remote control to add a Bookmark. You will notice a black line in the status bar.
When you return to the program, you can press the up/down arrow keys on the remote control to advance to your bookmarked spot. If there are multiple Bookmarks, keep pressing the up/down arrow keys until you are to your desired place in the program. You can remove a Bookmark by moving to the Bookmark and pushing the blue button within three seconds. Bookmarks would be helpful would be in the case of a television movie that you keep and watch over and over. You could bookmark the end of commercials so that you could skip over those sections of the movie.
Innovative Systems, LLC | IPTV Middleware Version 2.0 | Rev. November 25, 2010 | Page 29
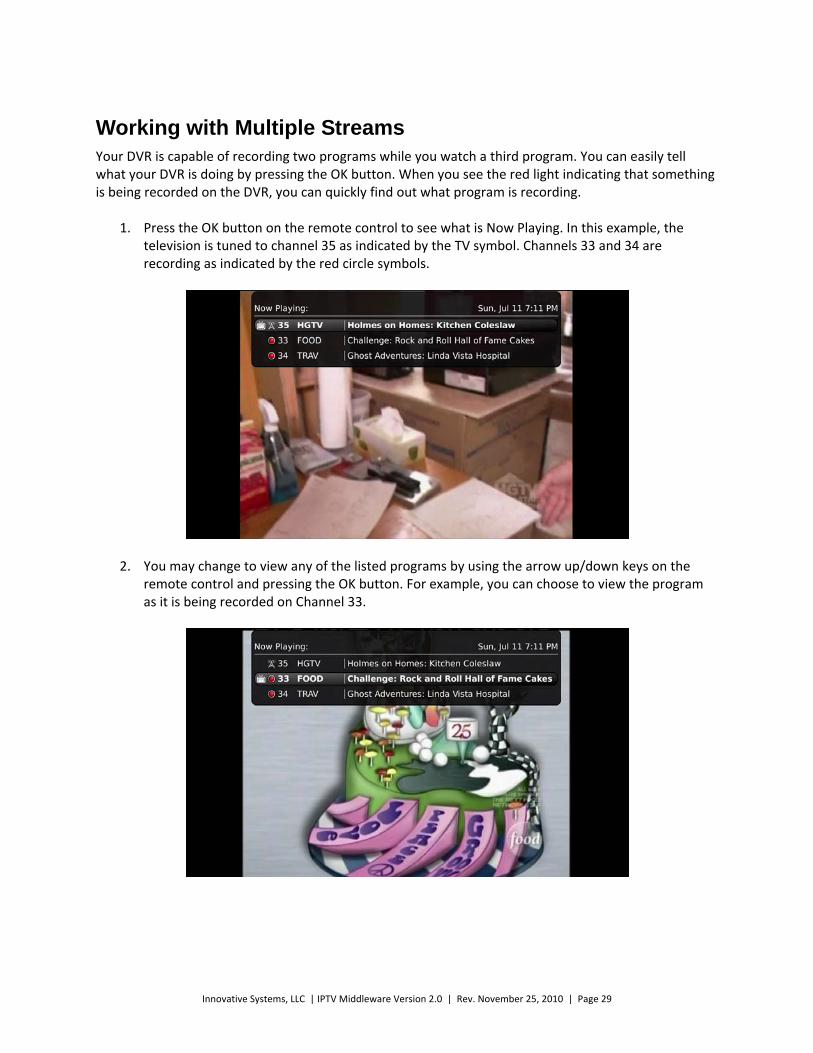
Working with Multiple Streams Your DVR is capable of recording two programs while you watch a third program. You can easily tell what your DVR is doing by pressing the OK button. When you see the red light indicating that something is being recorded on the DVR, you can quickly find out what program is recording.
1. Press the OK button on the remote control to see what is Now Playing. In this example, the television is tuned to channel 35 as indicated by the TV symbol. Channels 33 and 34 are recording as indicated by the red circle symbols.
2. You may change to view any of the listed programs by using the arrow up/down keys on the remote control and pressing the OK button. For example, you can choose to view the program as it is being recorded on Channel 33.
Innovative Systems, LLC | IPTV Middleware Version 2.0 | Rev. November 25, 2010 | Page 30
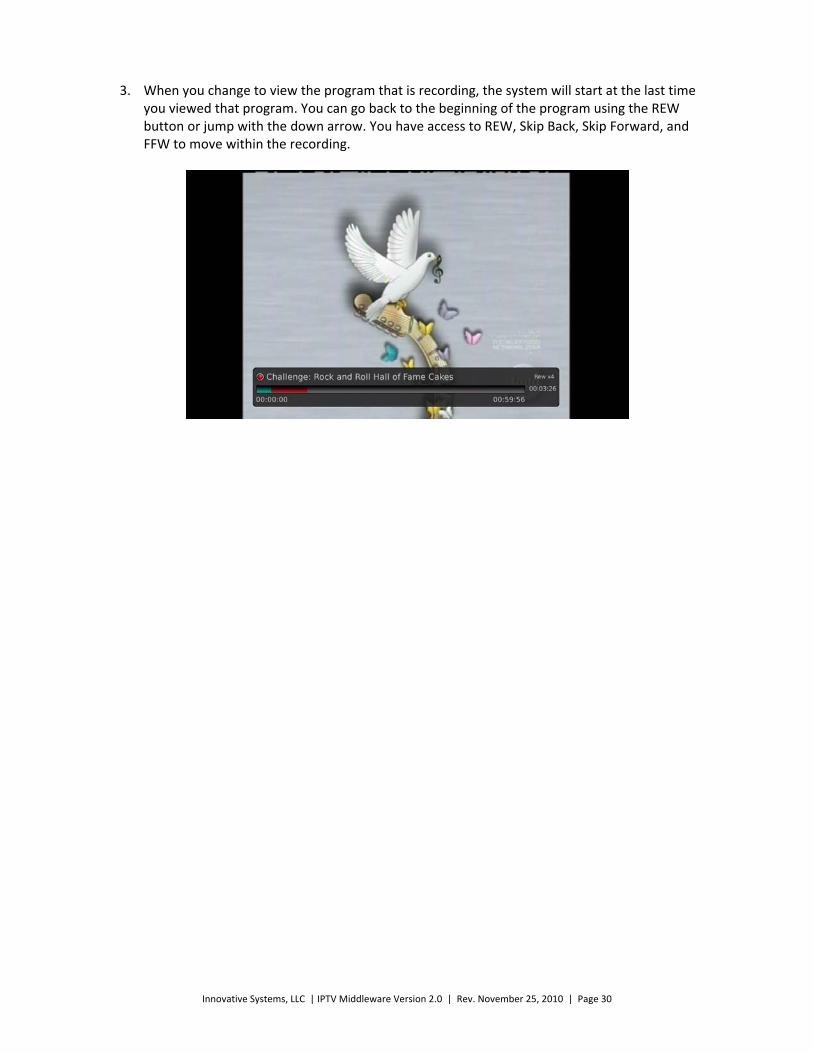
3. When you change to view the program that is recording, the system will start at the last time you viewed that program. You can go back to the beginning of the program using the REW button or jump with the down arrow. You have access to REW, Skip Back, Skip Forward, and FFW to move within the recording.
Innovative Systems, LLC | IPTV Middleware Version 2.0 | Rev. November 25, 2010 | Page 31
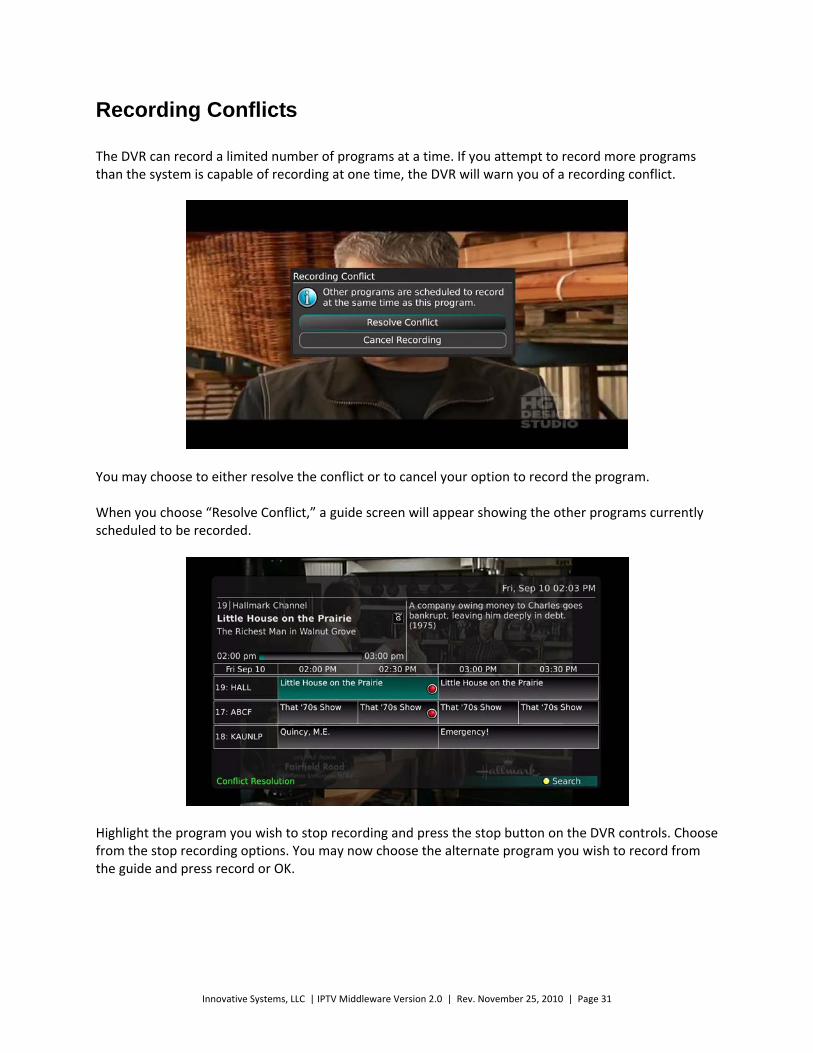
Recording Conflicts The DVR can record a limited number of programs at a time. If you attempt to record more programs than the system is capable of recording at one time, the DVR will warn you of a recording conflict.
You may choose to either resolve the conflict or to cancel your option to record the program. When you choose “Resolve Conflict,” a guide screen will appear showing the other programs currently scheduled to be recorded.
Highlight the program you wish to stop recording and press the stop button on the DVR controls. Choose from the stop recording options. You may now choose the alternate program you wish to record from the guide and press record or OK.
Innovative Systems, LLC | IPTV Middleware Version 2.0 | Rev. November 25, 2010 | Page 32
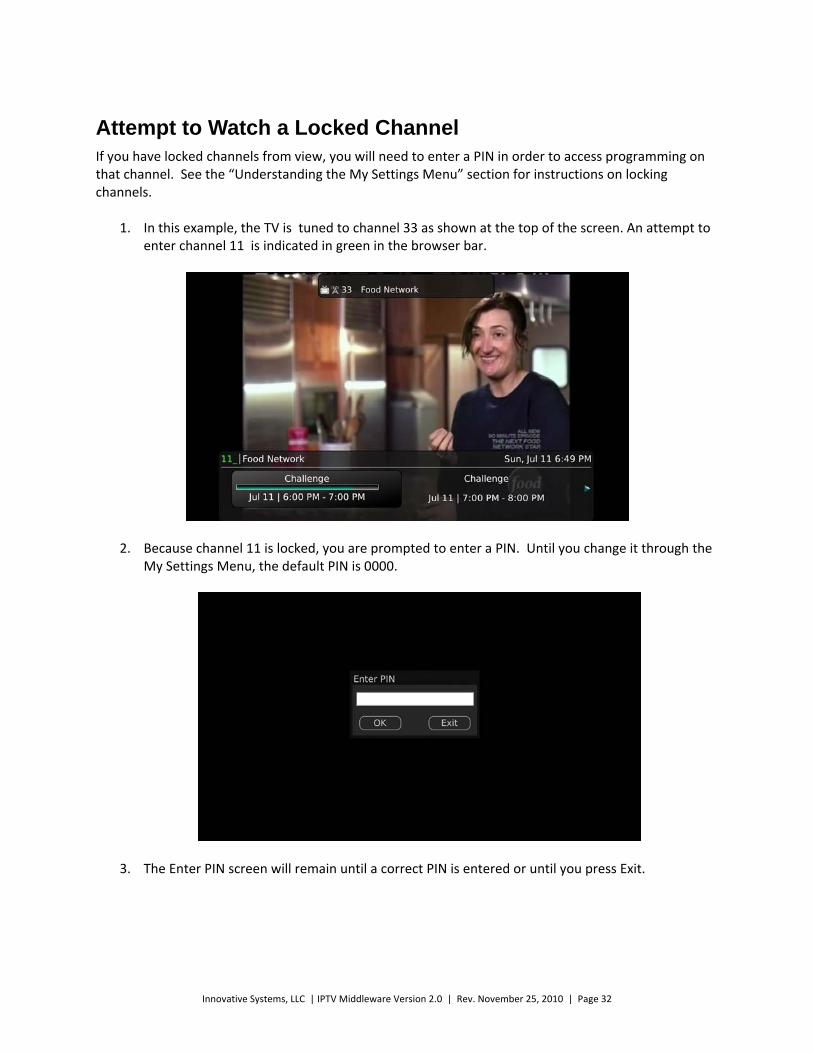
Attempt to Watch a Locked Channel If you have locked channels from view, you will need to enter a PIN in order to access programming on that channel. See the “Understanding the My Settings Menu” section for instructions on locking channels.
1. In this example, the TV is tuned to channel 33 as shown at the top of the screen. An attempt to enter channel 11 is indicated in green in the browser bar.
2. Because channel 11 is locked, you are prompted to enter a PIN. Until you change it through the My Settings Menu, the default PIN is 0000.
3. The Enter PIN screen will remain until a correct PIN is entered or until you press Exit.
Innovative Systems, LLC | IPTV Middleware Version 2.0 | Rev. November 25, 2010 | Page 33
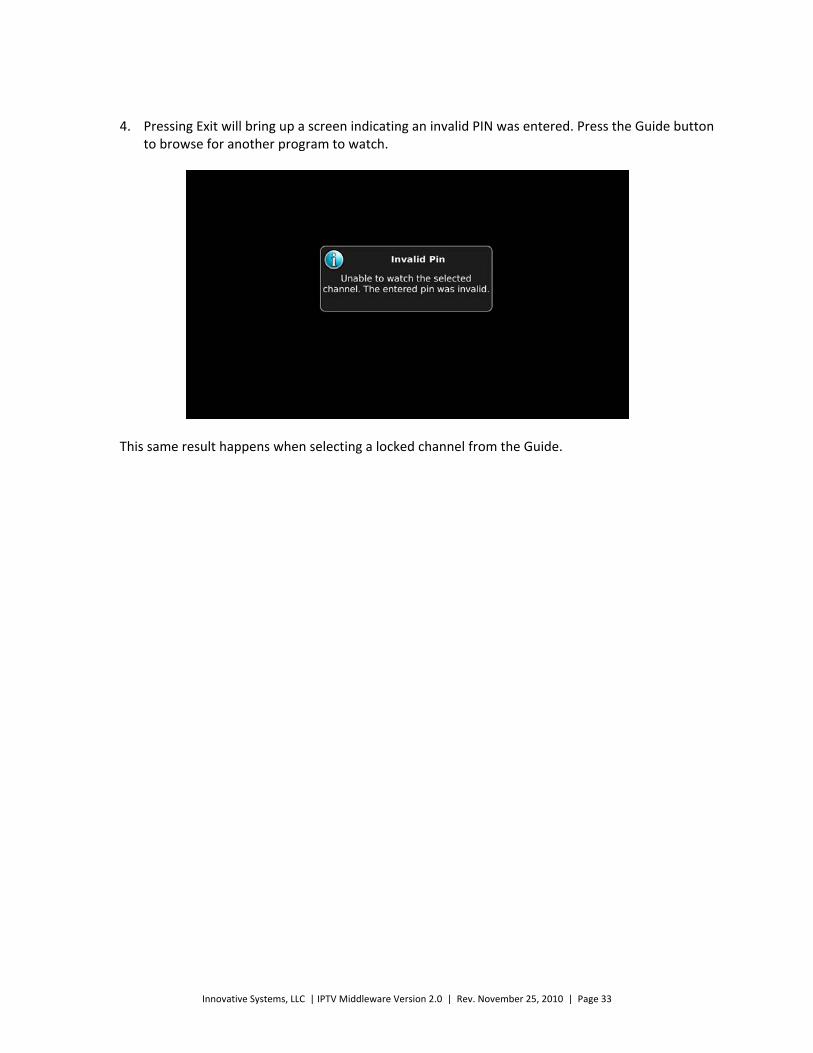
4. Pressing Exit will bring up a screen indicating an invalid PIN was entered. Press the Guide button to browse for another program to watch.
This same result happens when selecting a locked channel from the Guide.

Innovative Systems, LLC | IPTV Middleware Version 2.0 | Rev. November 25, 2010 | Page 34
Attempt to Watch a Program Beyond the Parental Rating Settings If you have set parental ratings in order to prevent viewing shows beyond a rating that you find acceptable, you will need to enter a PIN in order to access programming beyond your specified rating. See the “Understanding the My Settings Menu” section for instructions on setting parental controls.
1. In this example, the desired program is highlighted in the Guide.
2. Because the program is rated beyond the viewing limits set, you are prompted to enter a PIN.
3. The Enter PIN screen will remain until a valid PIN is entered or until you press Exit.
Innovative Systems, LLC | IPTV Middleware Version 2.0 | Rev. November 25, 2010 | Page 35
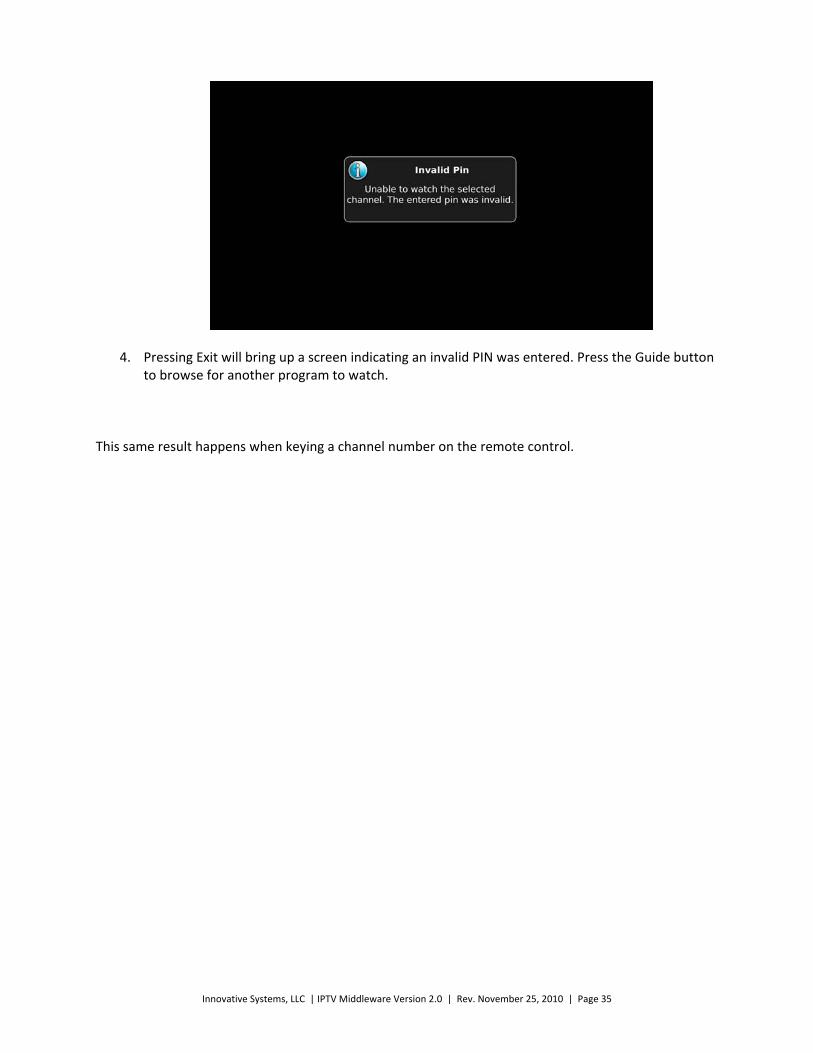
4. Pressing Exit will bring up a screen indicating an invalid PIN was entered. Press the Guide button to browse for another program to watch.
This same result happens when keying a channel number on the remote control.
Innovative Systems, LLC | IPTV Middleware Version 2.0 | Rev. November 25, 2010 | Page 36
Using the List Button You access your recordings, the list of future recordings and series rules by pressing the List button on the remote control multiple times.
Current Recordings
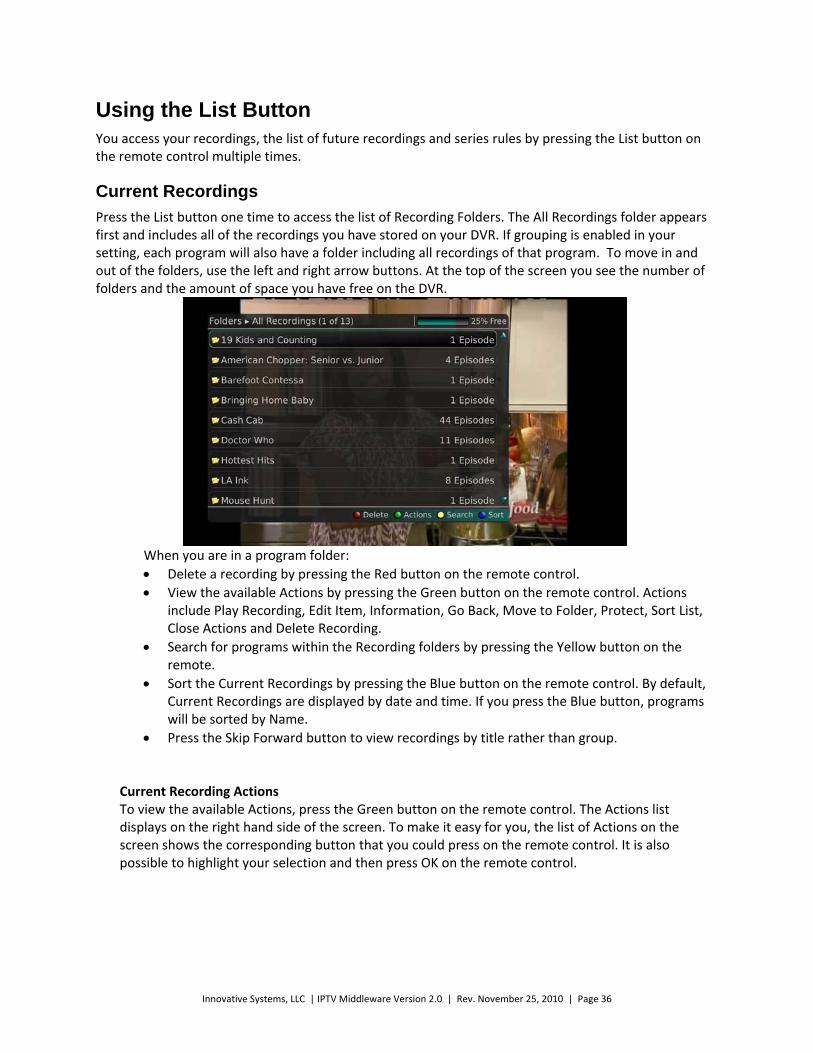
Press the List button one time to access the list of Recording Folders. The All Recordings folder appears first and includes all of the recordings you have stored on your DVR. If grouping is enabled in your setting, each program will also have a folder including all recordings of that program. To move in and out of the folders, use the left and right arrow buttons. At the top of the screen you see the number of folders and the amount of space you have free on the DVR.
When you are in a program folder:
Delete a recording by pressing the Red button on the remote control.
View the available Actions by pressing the Green button on the remote control. Actions include Play Recording, Edit Item, Information, Go Back, Move to Folder, Protect, Sort List, Close Actions and Delete Recording.
Search for programs within the Recording folders by pressing the Yellow button on the remote.
Sort the Current Recordings by pressing the Blue button on the remote control. By default, Current Recordings are displayed by date and time. If you press the Blue button, programs will be sorted by Name.
Press the Skip Forward button to view recordings by title rather than group.
Current Recording Actions To view the available Actions, press the Green button on the remote control. The Actions list displays on the right hand side of the screen. To make it easy for you, the list of Actions on the screen shows the corresponding button that you could press on the remote control. It is also possible to highlight your selection and then press OK on the remote control.
Innovative Systems, LLC | IPTV Middleware Version 2.0 | Rev. November 25, 2010 | Page 37
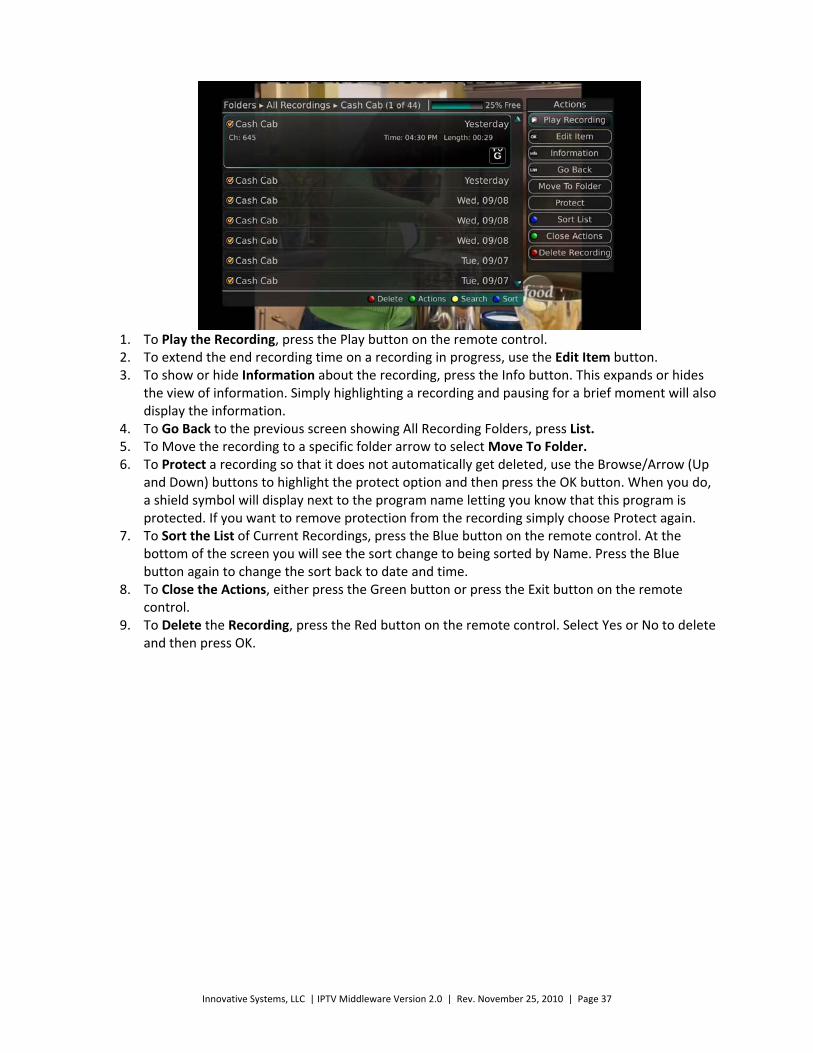
1. To Play the Recording, press the Play button on the remote control. 2. To extend the end recording time on a recording in progress, use the Edit Item button. 3. To show or hide Information about the recording, press the Info button. This expands or hides
the view of information. Simply highlighting a recording and pausing for a brief moment will also display the information.
4. To Go Back to the previous screen showing All Recording Folders, press List. 5. To Move the recording to a specific folder arrow to select Move To Folder. 6. To Protect a recording so that it does not automatically get deleted, use the Browse/Arrow (Up
and Down) buttons to highlight the protect option and then press the OK button. When you do, a shield symbol will display next to the program name letting you know that this program is protected. If you want to remove protection from the recording simply choose Protect again.
7. To Sort the List of Current Recordings, press the Blue button on the remote control. At the bottom of the screen you will see the sort change to being sorted by Name. Press the Blue button again to change the sort back to date and time.
8. To Close the Actions, either press the Green button or press the Exit button on the remote control.
9. To Delete the Recording, press the Red button on the remote control. Select Yes or No to delete and then press OK.
Innovative Systems, LLC | IPTV Middleware Version 2.0 | Rev. November 25, 2010 | Page 38
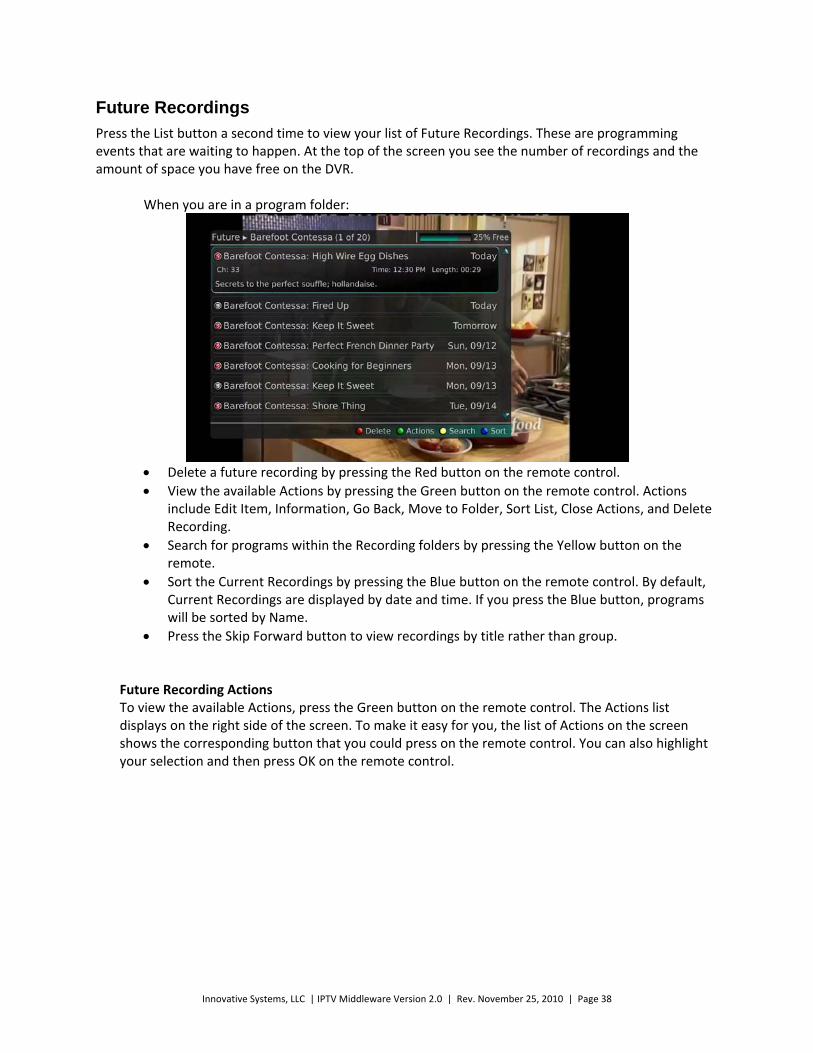
Future Recordings
Press the List button a second time to view your list of Future Recordings. These are programming events that are waiting to happen. At the top of the screen you see the number of recordings and the amount of space you have free on the DVR.
When you are in a program folder:
Delete a future recording by pressing the Red button on the remote control.
View the available Actions by pressing the Green button on the remote control. Actions include Edit Item, Information, Go Back, Move to Folder, Sort List, Close Actions, and Delete Recording.
Search for programs within the Recording folders by pressing the Yellow button on the remote.
Sort the Current Recordings by pressing the Blue button on the remote control. By default, Current Recordings are displayed by date and time. If you press the Blue button, programs will be sorted by Name.
Press the Skip Forward button to view recordings by title rather than group.
Future Recording Actions To view the available Actions, press the Green button on the remote control. The Actions list displays on the right side of the screen. To make it easy for you, the list of Actions on the screen shows the corresponding button that you could press on the remote control. You can also highlight your selection and then press OK on the remote control.
Innovative Systems, LLC | IPTV Middleware Version 2.0 | Rev. November 25, 2010 | Page 39
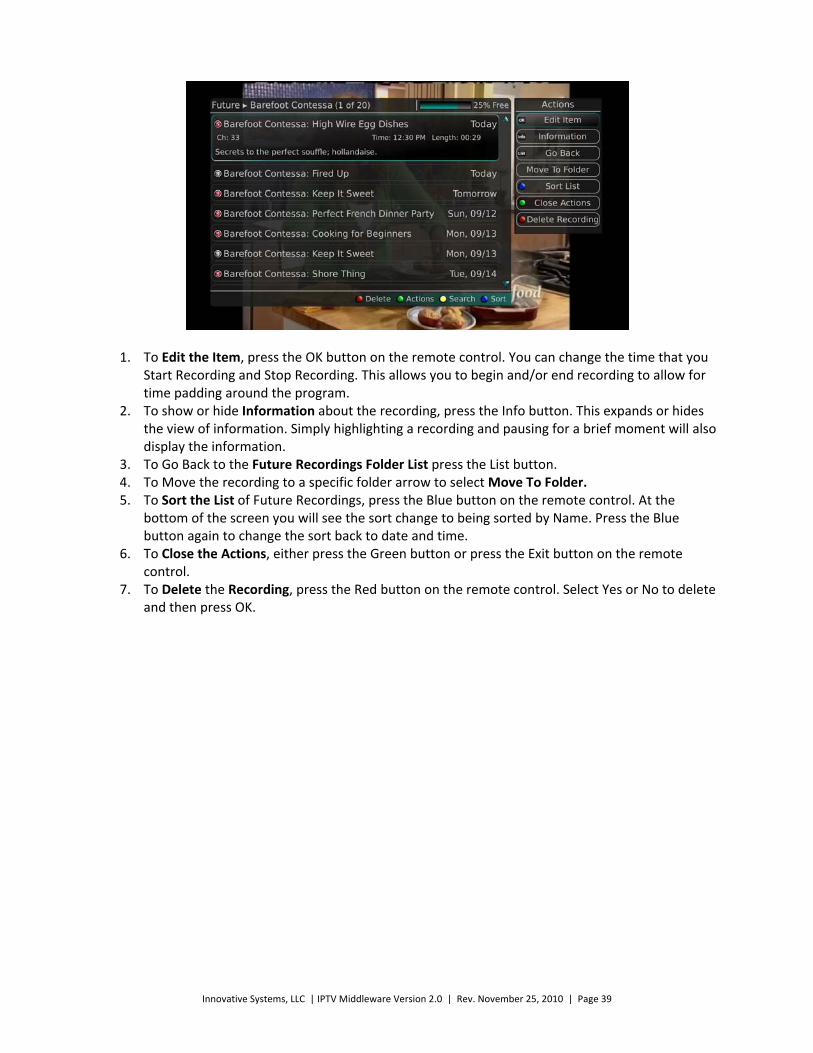
1. To Edit the Item, press the OK button on the remote control. You can change the time that you
Start Recording and Stop Recording. This allows you to begin and/or end recording to allow for time padding around the program.
2. To show or hide Information about the recording, press the Info button. This expands or hides the view of information. Simply highlighting a recording and pausing for a brief moment will also display the information.
3. To Go Back to the Future Recordings Folder List press the List button. 4. To Move the recording to a specific folder arrow to select Move To Folder. 5. To Sort the List of Future Recordings, press the Blue button on the remote control. At the
bottom of the screen you will see the sort change to being sorted by Name. Press the Blue button again to change the sort back to date and time.
6. To Close the Actions, either press the Green button or press the Exit button on the remote control.
7. To Delete the Recording, press the Red button on the remote control. Select Yes or No to delete and then press OK.
Innovative Systems, LLC | IPTV Middleware Version 2.0 | Rev. November 25, 2010 | Page 40
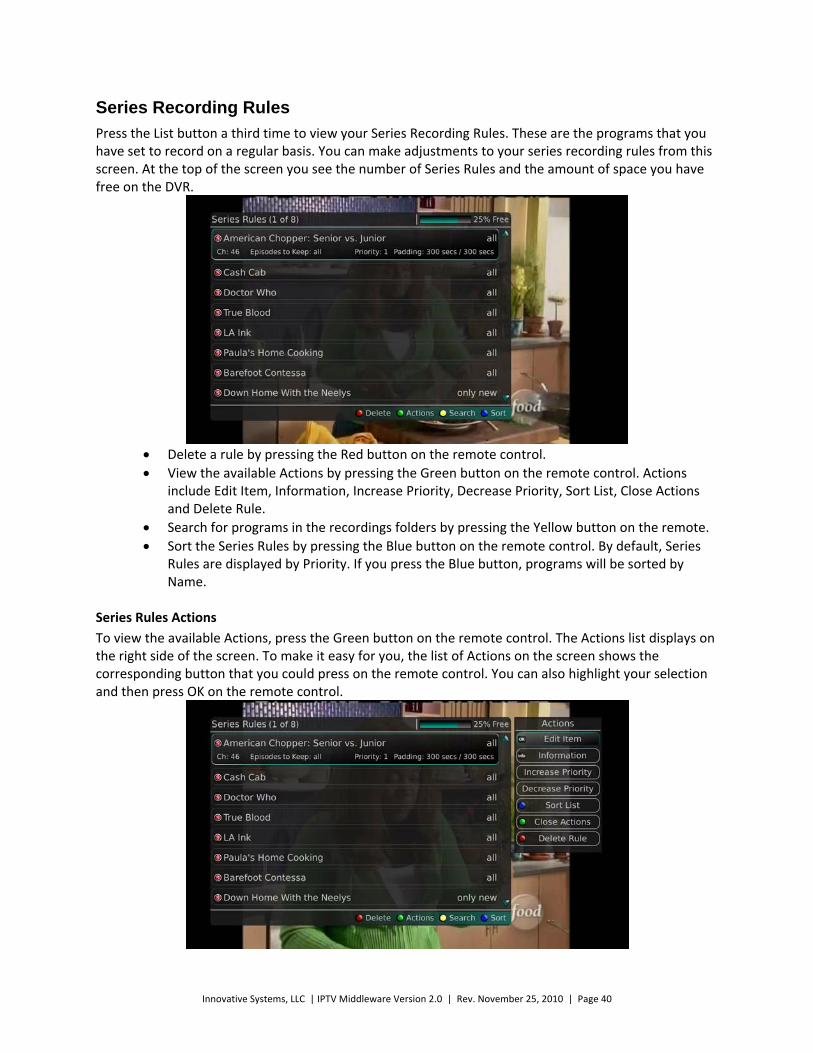
Series Recording Rules
Press the List button a third time to view your Series Recording Rules. These are the programs that you have set to record on a regular basis. You can make adjustments to your series recording rules from this screen. At the top of the screen you see the number of Series Rules and the amount of space you have free on the DVR.
Delete a rule by pressing the Red button on the remote control.
View the available Actions by pressing the Green button on the remote control. Actions include Edit Item, Information, Increase Priority, Decrease Priority, Sort List, Close Actions and Delete Rule.
Search for programs in the recordings folders by pressing the Yellow button on the remote.
Sort the Series Rules by pressing the Blue button on the remote control. By default, Series Rules are displayed by Priority. If you press the Blue button, programs will be sorted by Name.
Series Rules Actions
To view the available Actions, press the Green button on the remote control. The Actions list displays on the right side of the screen. To make it easy for you, the list of Actions on the screen shows the corresponding button that you could press on the remote control. You can also highlight your selection and then press OK on the remote control.
Innovative Systems, LLC | IPTV Middleware Version 2.0 | Rev. November 25, 2010 | Page 41
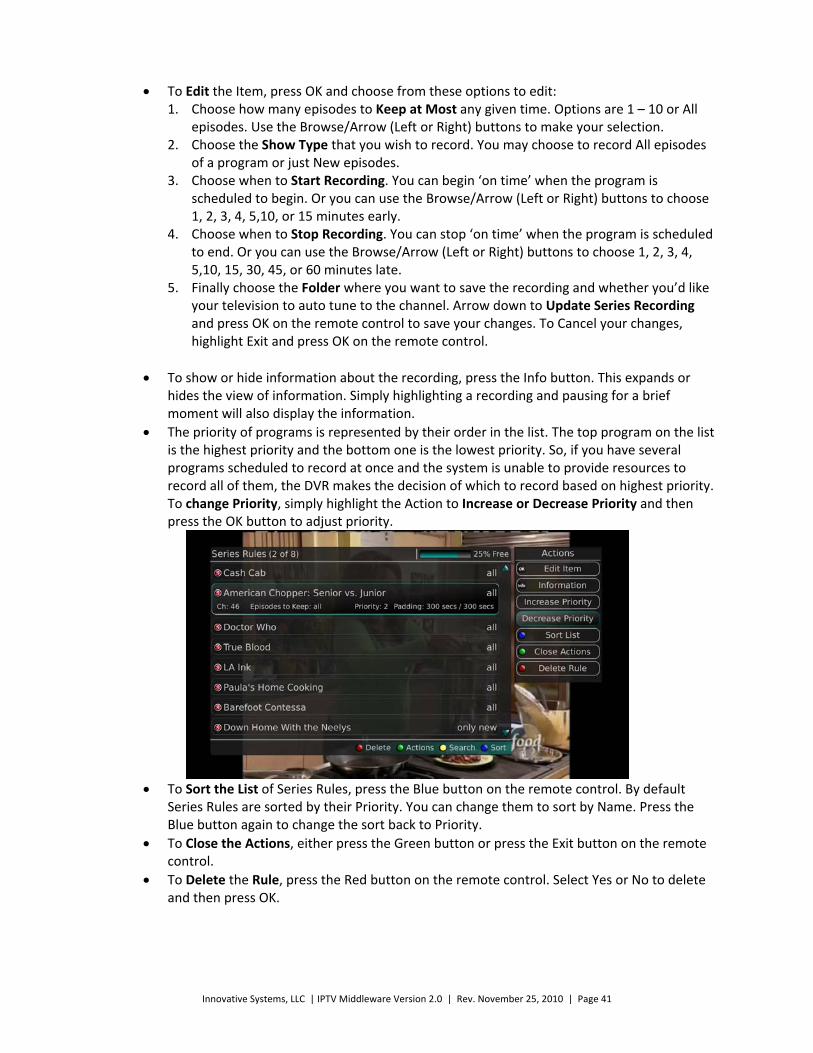
To Edit the Item, press OK and choose from these options to edit: 1. Choose how many episodes to Keep at Most any given time. Options are 1 – 10 or All
episodes. Use the Browse/Arrow (Left or Right) buttons to make your selection. 2. Choose the Show Type that you wish to record. You may choose to record All episodes
of a program or just New episodes. 3. Choose when to Start Recording. You can begin ‘on time’ when the program is
scheduled to begin. Or you can use the Browse/Arrow (Left or Right) buttons to choose 1, 2, 3, 4, 5,10, or 15 minutes early.
4. Choose when to Stop Recording. You can stop ‘on time’ when the program is scheduled to end. Or you can use the Browse/Arrow (Left or Right) buttons to choose 1, 2, 3, 4, 5,10, 15, 30, 45, or 60 minutes late.
5. Finally choose the Folder where you want to save the recording and whether you’d like your television to auto tune to the channel. Arrow down to Update Series Recording and press OK on the remote control to save your changes. To Cancel your changes, highlight Exit and press OK on the remote control.
To show or hide information about the recording, press the Info button. This expands or hides the view of information. Simply highlighting a recording and pausing for a brief moment will also display the information.
The priority of programs is represented by their order in the list. The top program on the list is the highest priority and the bottom one is the lowest priority. So, if you have several programs scheduled to record at once and the system is unable to provide resources to record all of them, the DVR makes the decision of which to record based on highest priority. To change Priority, simply highlight the Action to Increase or Decrease Priority and then press the OK button to adjust priority.
To Sort the List of Series Rules, press the Blue button on the remote control. By default
Series Rules are sorted by their Priority. You can change them to sort by Name. Press the Blue button again to change the sort back to Priority.
To Close the Actions, either press the Green button or press the Exit button on the remote control.
To Delete the Rule, press the Red button on the remote control. Select Yes or No to delete and then press OK.
Innovative Systems, LLC | IPTV Middleware Version 2.0 | Rev. November 25, 2010 | Page 42
Create a Favorites List If you like to be able to surf within only a specific set of channels, you can create Favorites lists. By default, your set‐top has grouped channels into several pre‐set Favorites lists including: All Channels, Subscribed Channels, Movie Channels, Sports Channels, Music Channels, Entertainment Channels, Kids Channels, News Channels, Business News Channels, Infotainment Channels, Religious Channels, Regional Channels and HD Channels. You may create up to five additional Favorites lists.
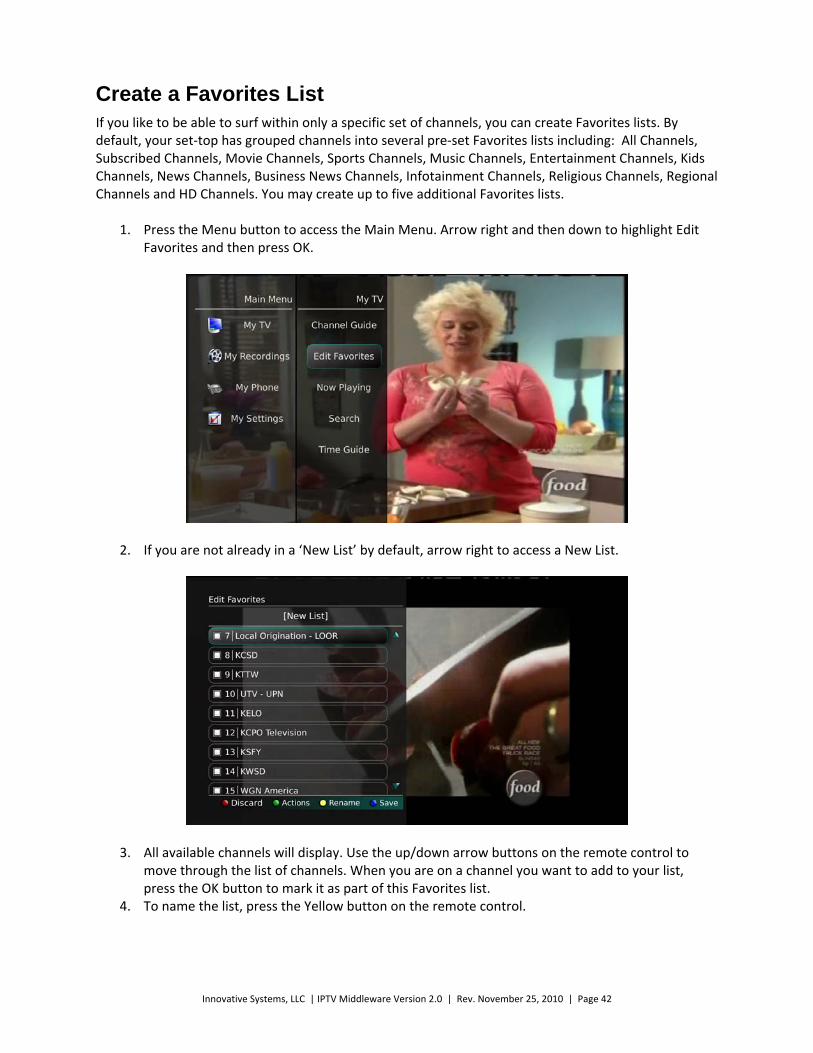
1. Press the Menu button to access the Main Menu. Arrow right and then down to highlight Edit Favorites and then press OK.
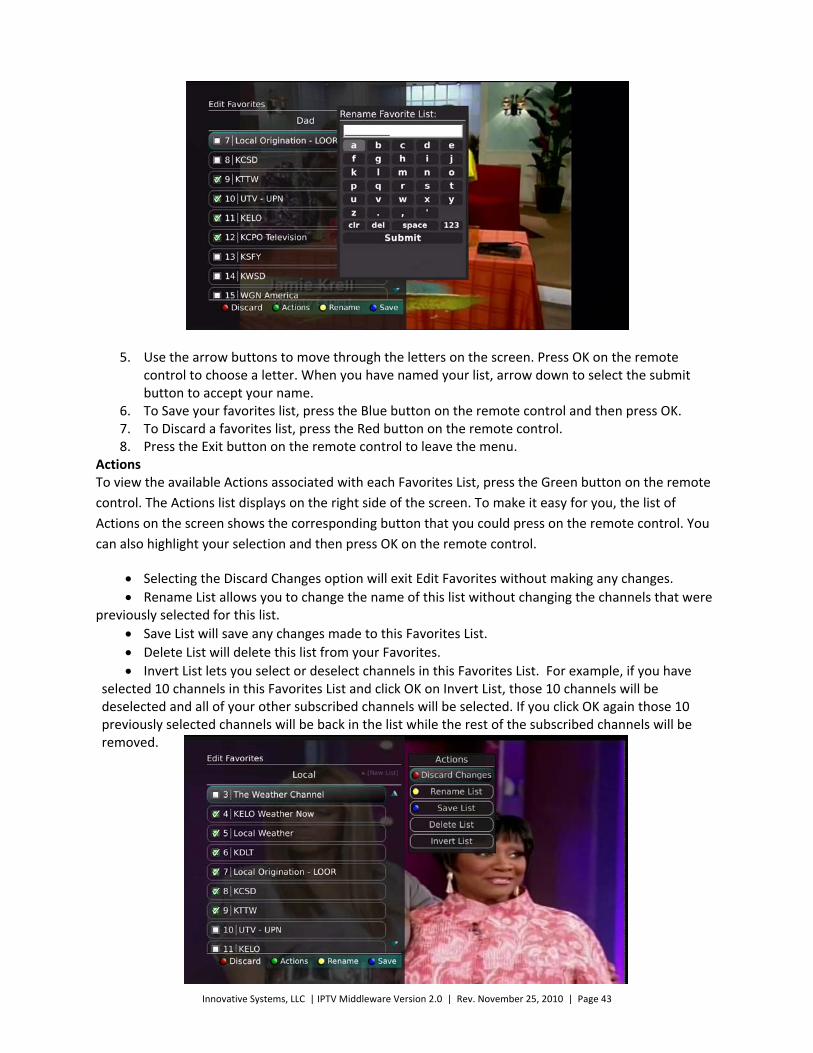
2. If you are not already in a ‘New List’ by default, arrow right to access a New List.
3. All available channels will display. Use the up/down arrow buttons on the remote control to move through the list of channels. When you are on a channel you want to add to your list, press the OK button to mark it as part of this Favorites list.
4. To name the list, press the Yellow button on the remote control.
Innovative Systems, LLC | IPTV Middleware Version 2.0 | Rev. November 25, 2010 | Page 43
5. Use the arrow buttons to move through the letters on the screen. Press OK on the remote control to choose a letter. When you have named your list, arrow down to select the submit button to accept your name.
6. To Save your favorites list, press the Blue button on the remote control and then press OK. 7. To Discard a favorites list, press the Red button on the remote control. 8. Press the Exit button on the remote control to leave the menu.
Actions To view the available Actions associated with each Favorites List, press the Green button on the remote
control. The Actions list displays on the right side of the screen. To make it easy for you, the list of
Actions on the screen shows the corresponding button that you could press on the remote control. You
can also highlight your selection and then press OK on the remote control.
Selecting the Discard Changes option will exit Edit Favorites without making any changes.
Rename List allows you to change the name of this list without changing the channels that were previously selected for this list.
Save List will save any changes made to this Favorites List.
Delete List will delete this list from your Favorites.
Invert List lets you select or deselect channels in this Favorites List. For example, if you have selected 10 channels in this Favorites List and click OK on Invert List, those 10 channels will be deselected and all of your other subscribed channels will be selected. If you click OK again those 10 previously selected channels will be back in the list while the rest of the subscribed channels will be removed.

Innovative Systems, LLC | IPTV Middleware Version 2.0 | Rev. November 25, 2010 | Page 44
Access a Favorites List for Surfing
1. Press the FAV button on the remote control.
2. All Favorites lists will display. Lists that you have created will display with a star. 3. Arrow down to highlight the Favorites list you want to use and then press OK on the remote
control. The list you have selected will show just above the channel number. 4. With the favorites list selected, you will browse channels only within that list.
Innovative Systems, LLC | IPTV Middleware Version 2.0 | Rev. November 25, 2010 | Page 45
My TV Menu Almost everything that can be done with specific buttons on the remote control can also be done in the Menu.
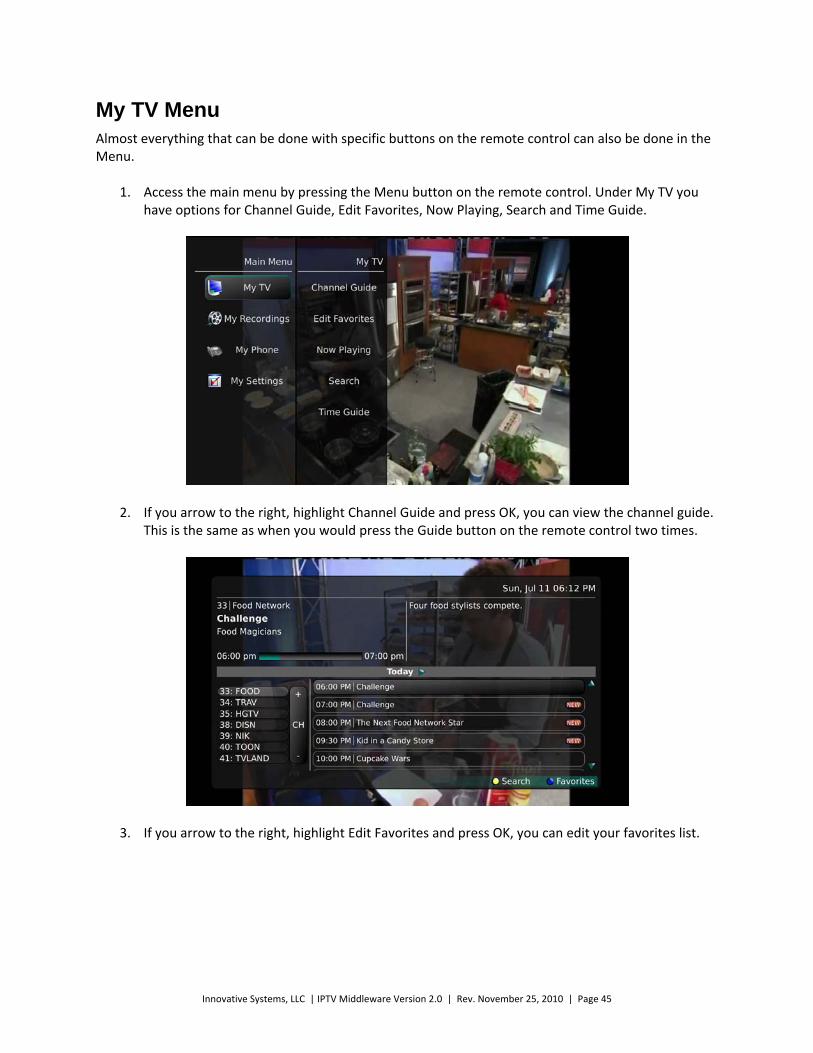
1. Access the main menu by pressing the Menu button on the remote control. Under My TV you have options for Channel Guide, Edit Favorites, Now Playing, Search and Time Guide.
2. If you arrow to the right, highlight Channel Guide and press OK, you can view the channel guide. This is the same as when you would press the Guide button on the remote control two times.
3. If you arrow to the right, highlight Edit Favorites and press OK, you can edit your favorites list.
Innovative Systems, LLC | IPTV Middleware Version 2.0 | Rev. November 25, 2010 | Page 46
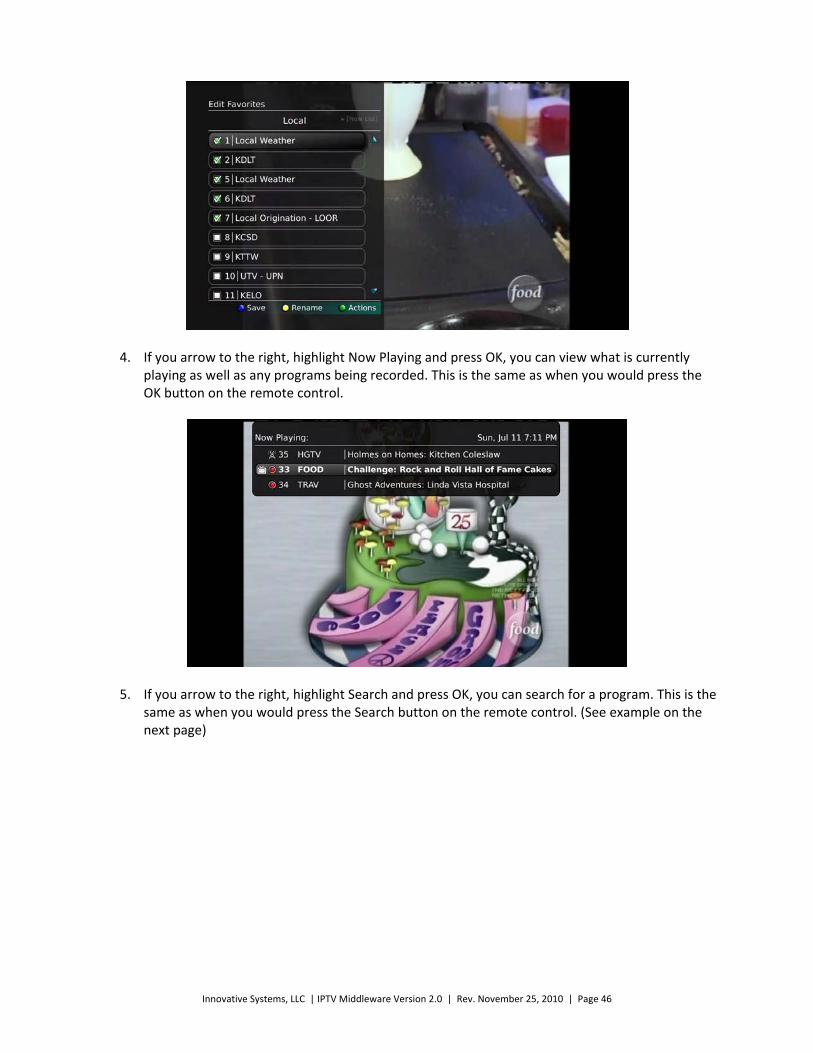
4. If you arrow to the right, highlight Now Playing and press OK, you can view what is currently playing as well as any programs being recorded. This is the same as when you would press the OK button on the remote control.
5. If you arrow to the right, highlight Search and press OK, you can search for a program. This is the same as when you would press the Search button on the remote control. (See example on the next page)

Innovative Systems, LLC | IPTV Middleware Version 2.0 | Rev. November 25, 2010 | Page 47
6. If you arrow to the right, highlight Time Guide and press OK, you can view the time guide. This is the same as when you would press the Guide button on the remote control.
Innovative Systems, LLC | IPTV Middleware Version 2.0 | Rev. November 25, 2010 | Page 48
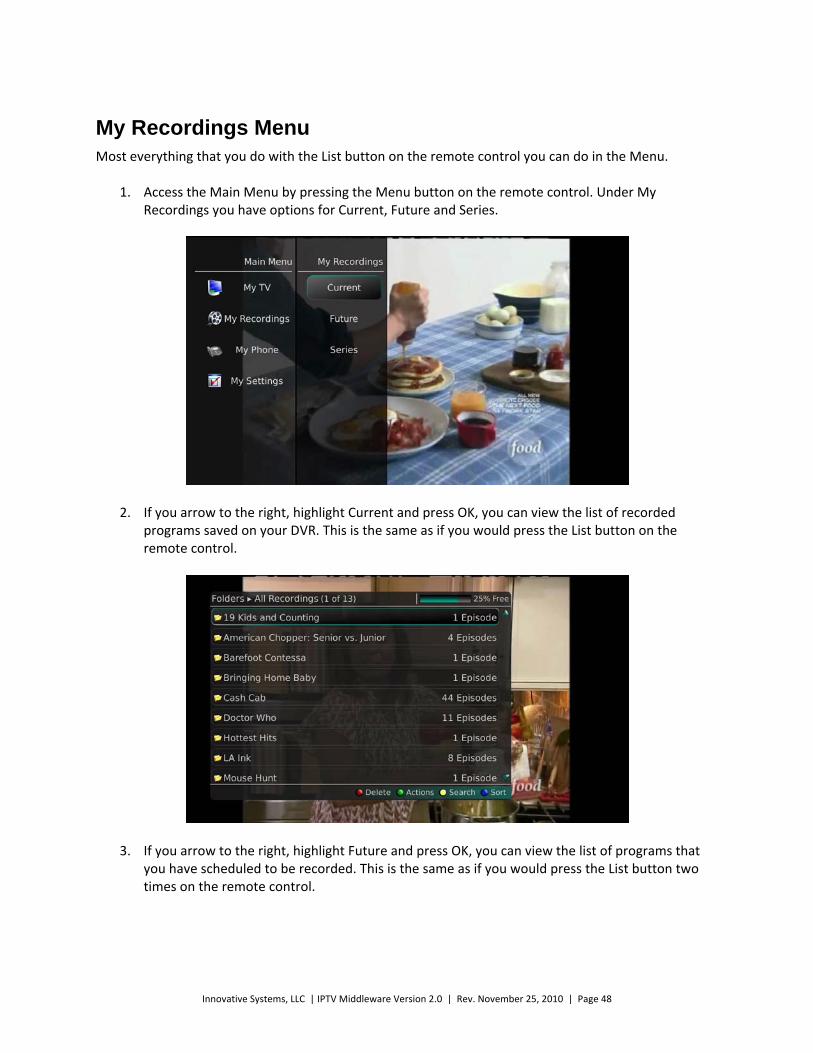
My Recordings Menu Most everything that you do with the List button on the remote control you can do in the Menu.
1. Access the Main Menu by pressing the Menu button on the remote control. Under My Recordings you have options for Current, Future and Series.
2. If you arrow to the right, highlight Current and press OK, you can view the list of recorded programs saved on your DVR. This is the same as if you would press the List button on the remote control.
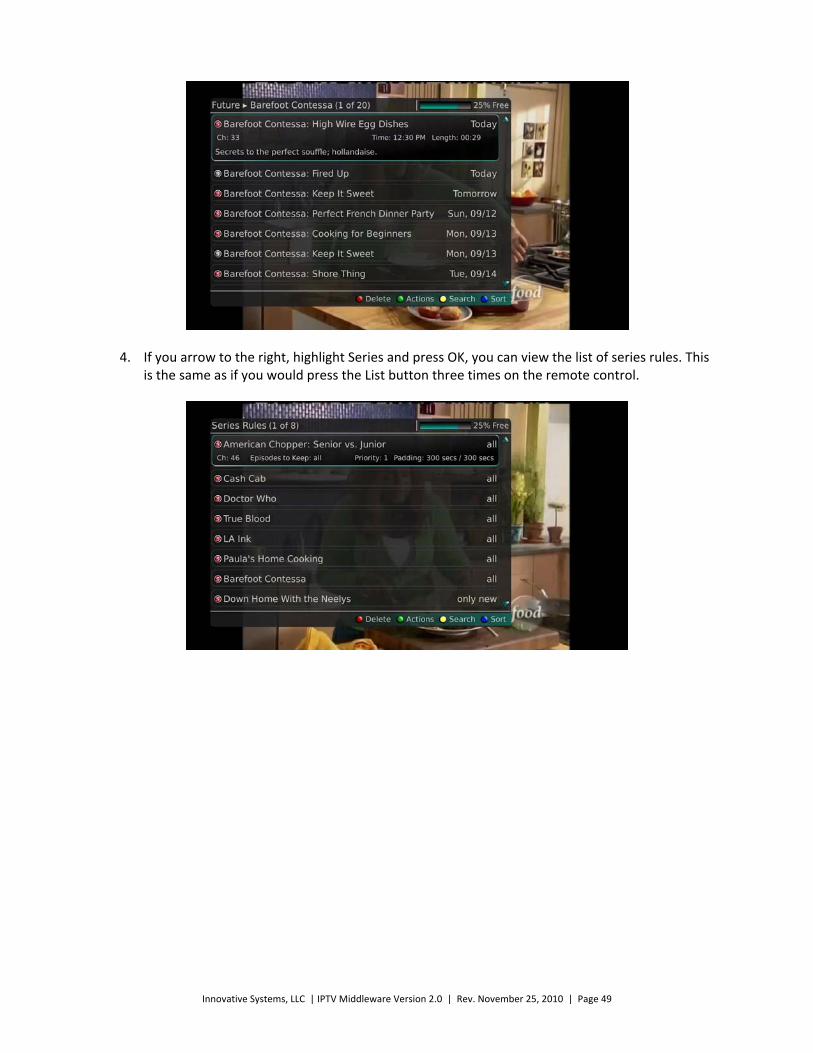
3. If you arrow to the right, highlight Future and press OK, you can view the list of programs that you have scheduled to be recorded. This is the same as if you would press the List button two times on the remote control.
Innovative Systems, LLC | IPTV Middleware Version 2.0 | Rev. November 25, 2010 | Page 49
4. If you arrow to the right, highlight Series and press OK, you can view the list of series rules. This is the same as if you would press the List button three times on the remote control.
Innovative Systems, LLC | IPTV Middleware Version 2.0 | Rev. November 25, 2010 | Page 50
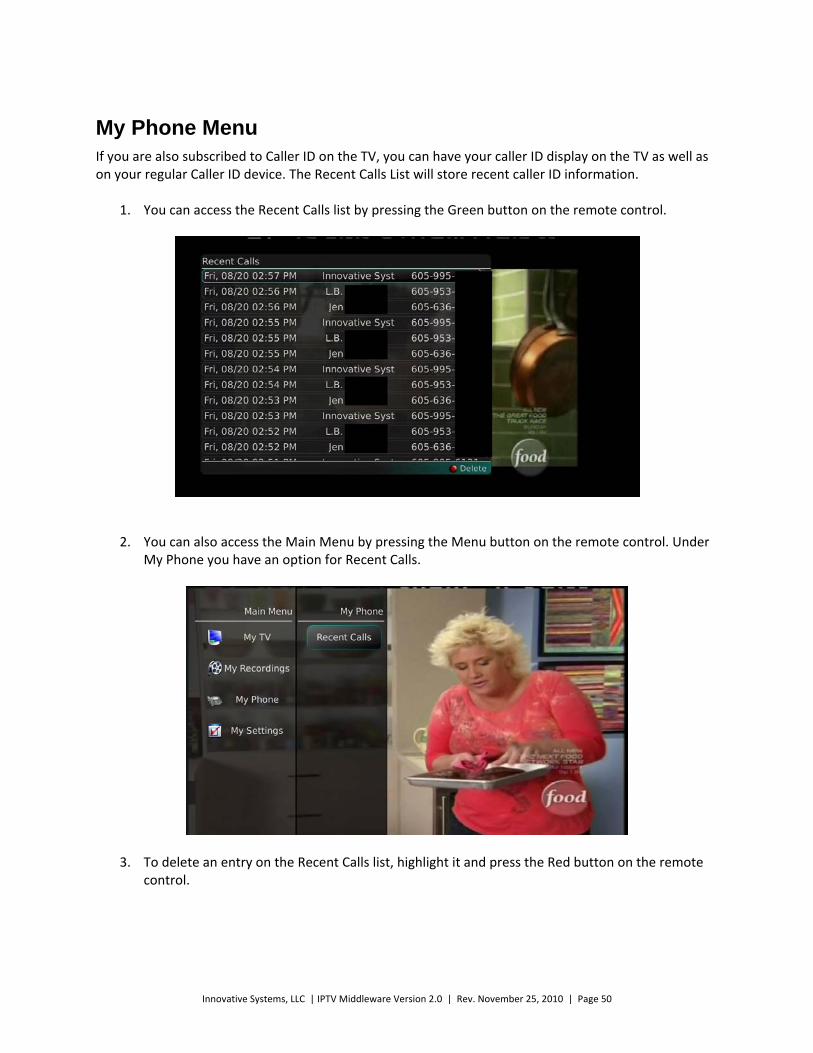
My Phone Menu If you are also subscribed to Caller ID on the TV, you can have your caller ID display on the TV as well as on your regular Caller ID device. The Recent Calls List will store recent caller ID information.
1. You can access the Recent Calls list by pressing the Green button on the remote control.
2. You can also access the Main Menu by pressing the Menu button on the remote control. Under My Phone you have an option for Recent Calls.
3. To delete an entry on the Recent Calls list, highlight it and press the Red button on the remote control.
Innovative Systems, LLC | IPTV Middleware Version 2.0 | Rev. November 25, 2010 | Page 51
My Settings Menu You have the ability to control certain aspects of how your service works according to your preferences.
1. Access the main menu by pressing the Menu button on the remote control. Under My Settings you have options for Display, Guide, Parental, Phone and Recording.
2. If you arrow to the right, highlight Display, and press OK, you can change how the set top box should display specific things. Typically these items are set at the time of installation and not changed.
Display Settings
Turn Closed Captioning on or off.
Set the Audio Language to English or Spanish.
Set the TV Type to either 16:9 or 4:3.
Change your Connector settings to Coaxial, Composite, S‐Video, Component or HDMI.
View the setting for Conversion Mode and Output Resolution.
Innovative Systems, LLC | IPTV Middleware Version 2.0 | Rev. November 25, 2010 | Page 52
If you feel you have changed something by accident, you can always choose to select Exit and press OK or just press Exit on the remote to retain the original settings.
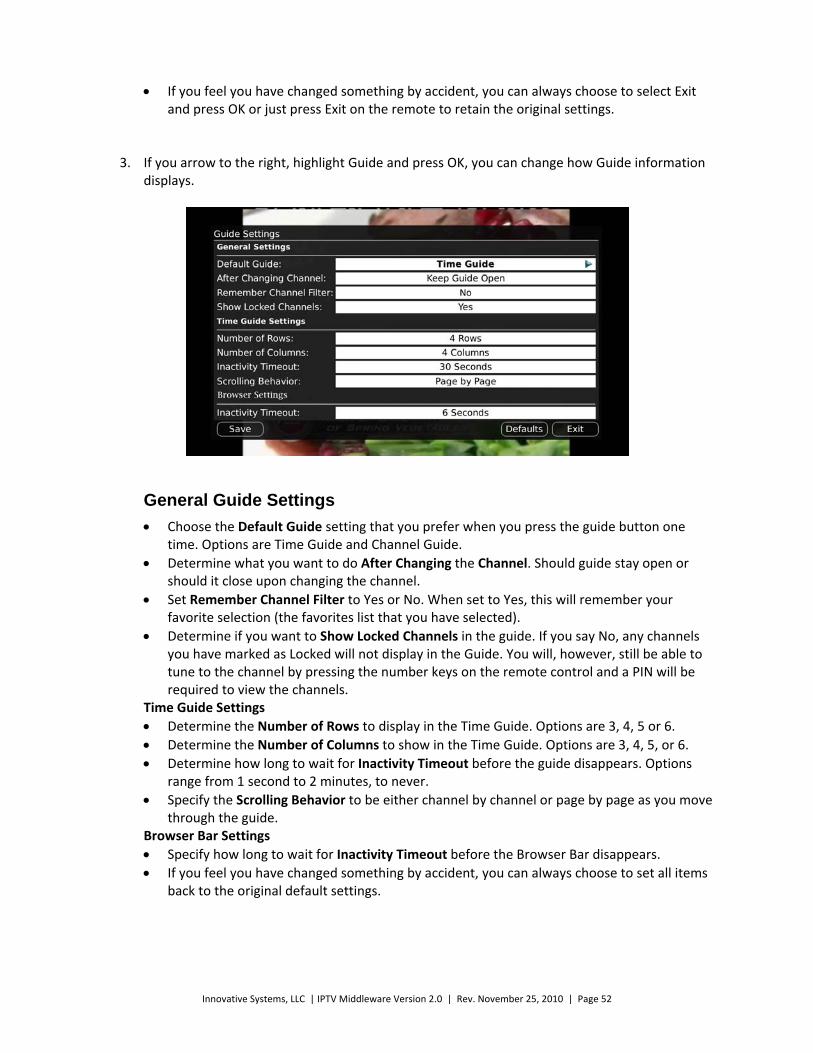
3. If you arrow to the right, highlight Guide and press OK, you can change how Guide information
displays.
General Guide Settings
Choose the Default Guide setting that you prefer when you press the guide button one time. Options are Time Guide and Channel Guide.
Determine what you want to do After Changing the Channel. Should guide stay open or should it close upon changing the channel.
Set Remember Channel Filter to Yes or No. When set to Yes, this will remember your favorite selection (the favorites list that you have selected).
Determine if you want to Show Locked Channels in the guide. If you say No, any channels you have marked as Locked will not display in the Guide. You will, however, still be able to tune to the channel by pressing the number keys on the remote control and a PIN will be required to view the channels.
Time Guide Settings
Determine the Number of Rows to display in the Time Guide. Options are 3, 4, 5 or 6.
Determine the Number of Columns to show in the Time Guide. Options are 3, 4, 5, or 6.
Determine how long to wait for Inactivity Timeout before the guide disappears. Options range from 1 second to 2 minutes, to never.
Specify the Scrolling Behavior to be either channel by channel or page by page as you move through the guide.
Browser Bar Settings
Specify how long to wait for Inactivity Timeout before the Browser Bar disappears.
If you feel you have changed something by accident, you can always choose to set all items back to the original default settings.
Innovative Systems, LLC | IPTV Middleware Version 2.0 | Rev. November 25, 2010 | Page 53
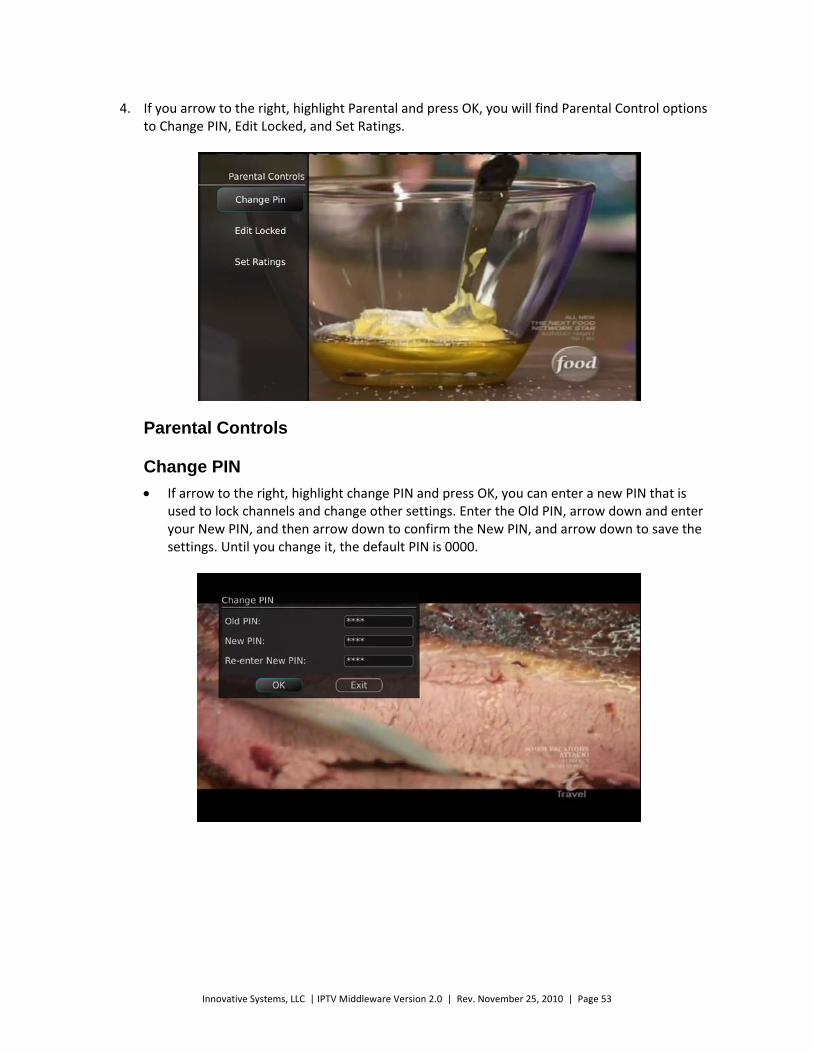
4. If you arrow to the right, highlight Parental and press OK, you will find Parental Control options
to Change PIN, Edit Locked, and Set Ratings.
Parental Controls
Change PIN
If arrow to the right, highlight change PIN and press OK, you can enter a new PIN that is used to lock channels and change other settings. Enter the Old PIN, arrow down and enter your New PIN, and then arrow down to confirm the New PIN, and arrow down to save the settings. Until you change it, the default PIN is 0000.
Innovative Systems, LLC | IPTV Middleware Version 2.0 | Rev. November 25, 2010 | Page 54
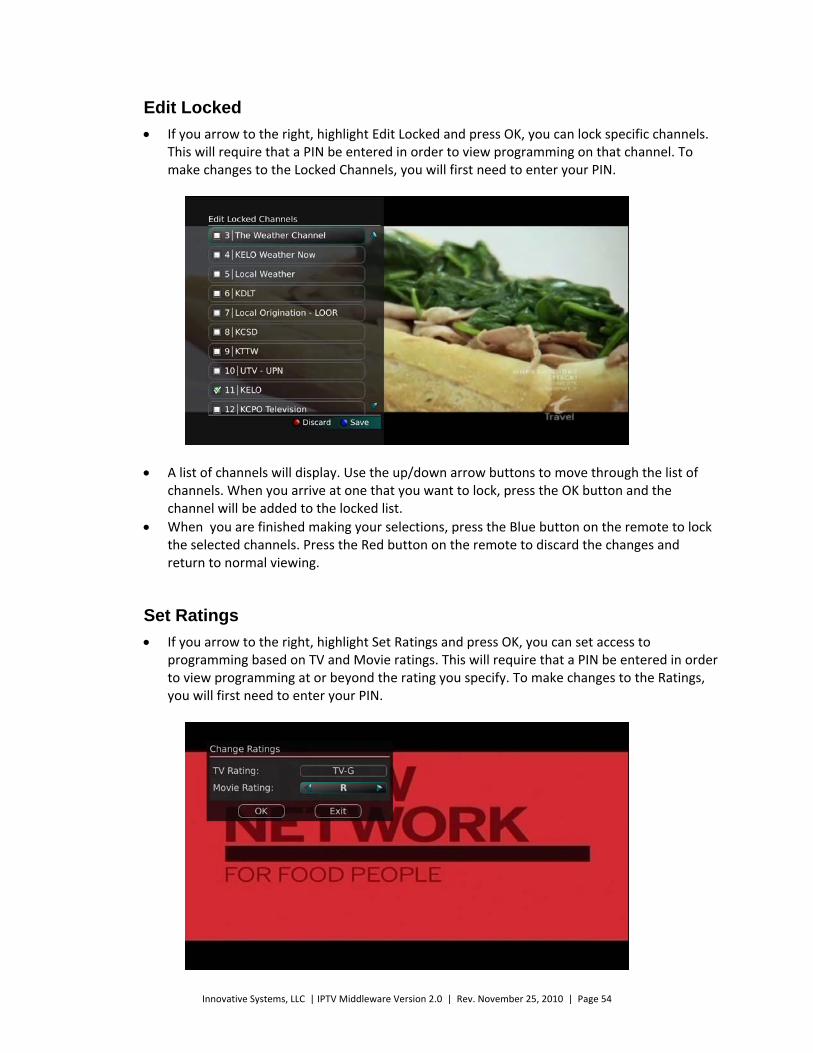
Edit Locked
If you arrow to the right, highlight Edit Locked and press OK, you can lock specific channels. This will require that a PIN be entered in order to view programming on that channel. To make changes to the Locked Channels, you will first need to enter your PIN.
A list of channels will display. Use the up/down arrow buttons to move through the list of channels. When you arrive at one that you want to lock, press the OK button and the channel will be added to the locked list.
When you are finished making your selections, press the Blue button on the remote to lock the selected channels. Press the Red button on the remote to discard the changes and return to normal viewing.
Set Ratings
If you arrow to the right, highlight Set Ratings and press OK, you can set access to programming based on TV and Movie ratings. This will require that a PIN be entered in order to view programming at or beyond the rating you specify. To make changes to the Ratings, you will first need to enter your PIN.
Innovative Systems, LLC | IPTV Middleware Version 2.0 | Rev. November 25, 2010 | Page 55
Use the left/right arrow buttons to choose a TV Rating. Options are: TV‐Y, TV‐Y7, TV‐Y7 FV, TV‐G, TV‐PG, TV‐14, TV‐MA, off.
Use the left/right arrow buttons to choose a Movie Rating. Options are: G, PG, PG‐13, R, NC‐17, Adults Only, off.
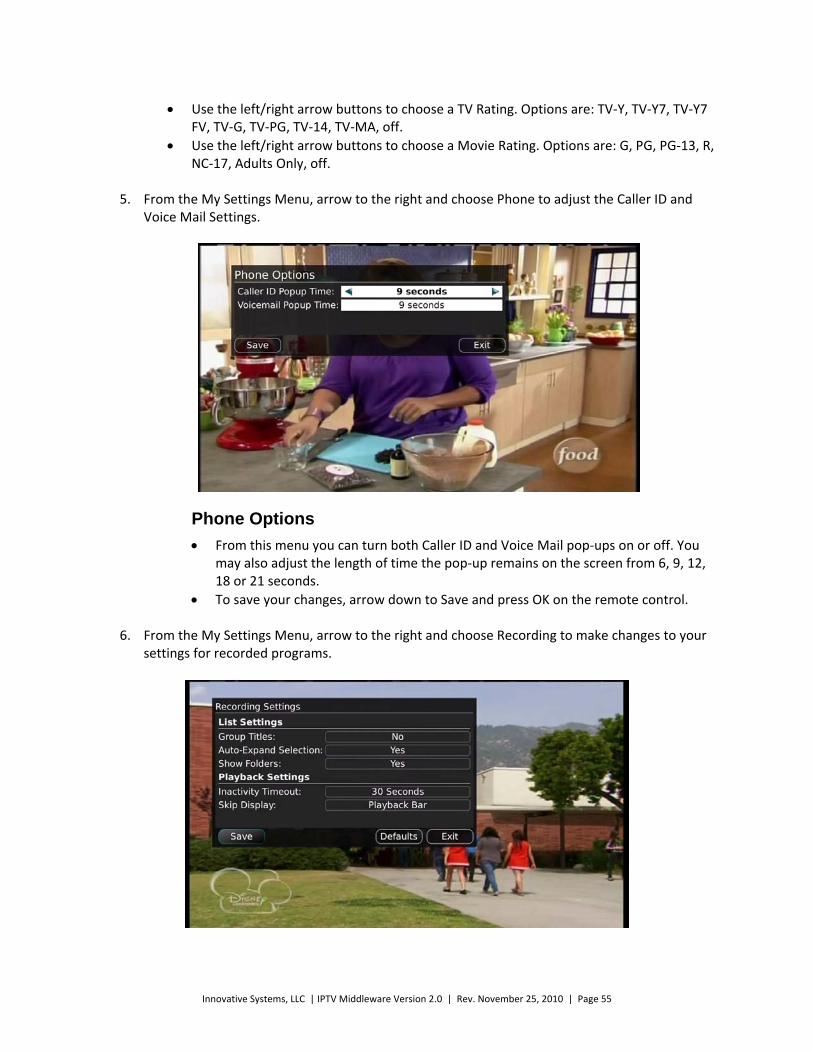
5. From the My Settings Menu, arrow to the right and choose Phone to adjust the Caller ID and
Voice Mail Settings.
Phone Options
From this menu you can turn both Caller ID and Voice Mail pop‐ups on or off. You may also adjust the length of time the pop‐up remains on the screen from 6, 9, 12, 18 or 21 seconds.
To save your changes, arrow down to Save and press OK on the remote control.
6. From the My Settings Menu, arrow to the right and choose Recording to make changes to your settings for recorded programs.
Innovative Systems, LLC | IPTV Middleware Version 2.0 | Rev. November 25, 2010 | Page 56
Recording Settings
Group Recording Titles: This groups all recorded episodes with the same title rather
than listing each episode individually. The Skip Forward button will toggle between
Grouped and Ungrouped listings.
Auto Expand Selection: Choose this option to automatically display information for
the selected recording.
Show Folders: With Show Folders set to Yes, all recordings and future recordings will be grouped into folders when you view your Recordings Lists. With Show Folders set to No, all recordings and future recordings will be displayed individually. Keep in mind that if Group Titles is set to Yes, programs will be grouped together even if Show Folders is set to No. When viewing your Recording Lists the Skip Forward button will toggle between folders and individual recordings.
Change Inactivity Timeout: This setting adjusts the length of time the Status Bar
remains on the screen while you are watching a recorded program after a period of
inactivity. Choose from 1, 2, 3, 4, 5, 6, 7, 8, 9, 10, 12, 15, 30, 45 seconds, one or two
minutes or Never.
Skip Display: Choose between displaying the playback bar or the fast forward/replay
icons during recorded show playback.
Innovative Systems, LLC | IPTV Middleware Version 2.0 | Rev. November 25, 2010 | Page 57
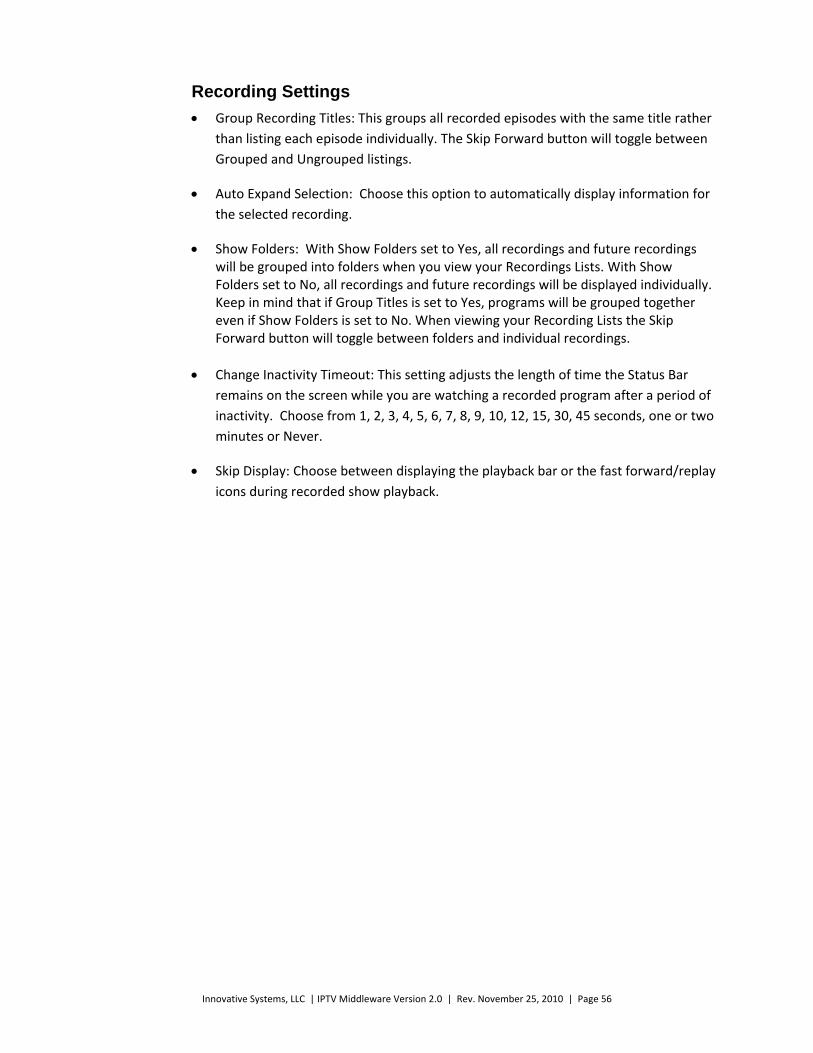
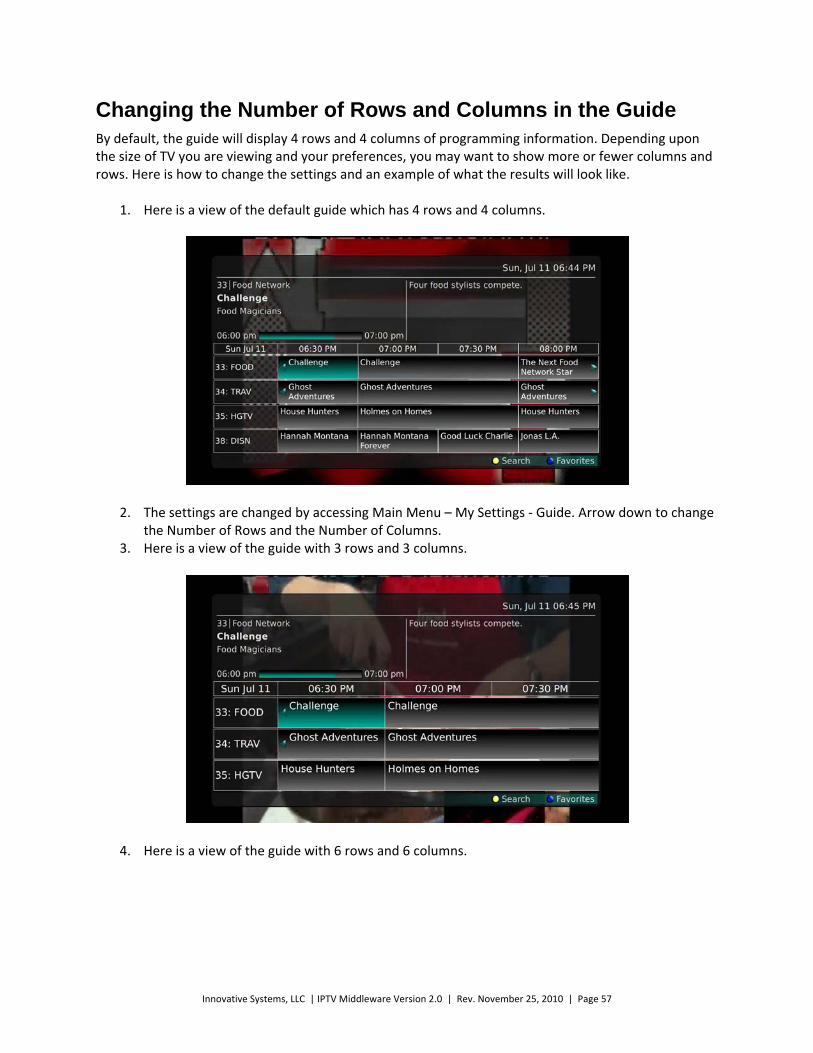
Changing the Number of Rows and Columns in the Guide By default, the guide will display 4 rows and 4 columns of programming information. Depending upon the size of TV you are viewing and your preferences, you may want to show more or fewer columns and rows. Here is how to change the settings and an example of what the results will look like.
1. Here is a view of the default guide which has 4 rows and 4 columns.
2. The settings are changed by accessing Main Menu – My Settings ‐ Guide. Arrow down to change the Number of Rows and the Number of Columns.
3. Here is a view of the guide with 3 rows and 3 columns.
4. Here is a view of the guide with 6 rows and 6 columns.

Innovative Systems, LLC | IPTV Middleware Version 2.0 | Rev. November 25, 2010 | Page 58
Innovative Systems, LLC | IPTV Middleware Version 2.0 | Rev. November 25, 2010 | Page 59
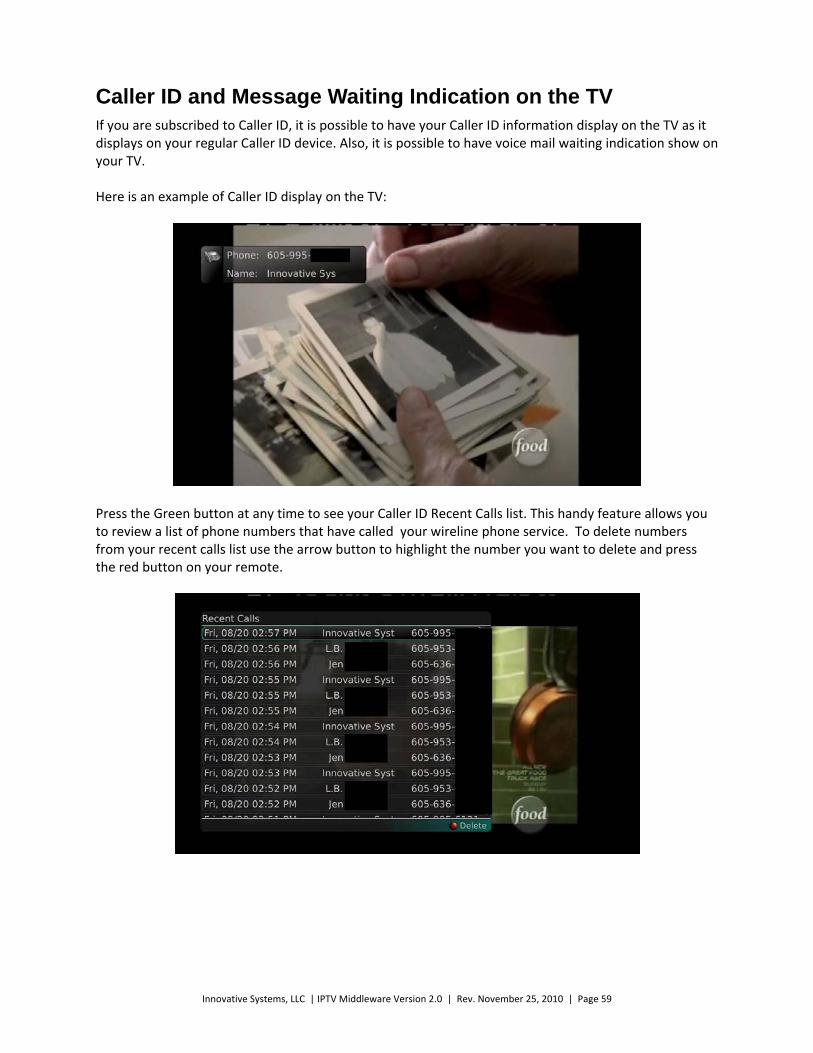
Caller ID and Message Waiting Indication on the TV If you are subscribed to Caller ID, it is possible to have your Caller ID information display on the TV as it displays on your regular Caller ID device. Also, it is possible to have voice mail waiting indication show on your TV. Here is an example of Caller ID display on the TV:
Press the Green button at any time to see your Caller ID Recent Calls list. This handy feature allows you to review a list of phone numbers that have called your wireline phone service. To delete numbers from your recent calls list use the arrow button to highlight the number you want to delete and press the red button on your remote.
Innovative Systems, LLC | IPTV Middleware Version 2.0 | Rev. November 25, 2010 | Page 60
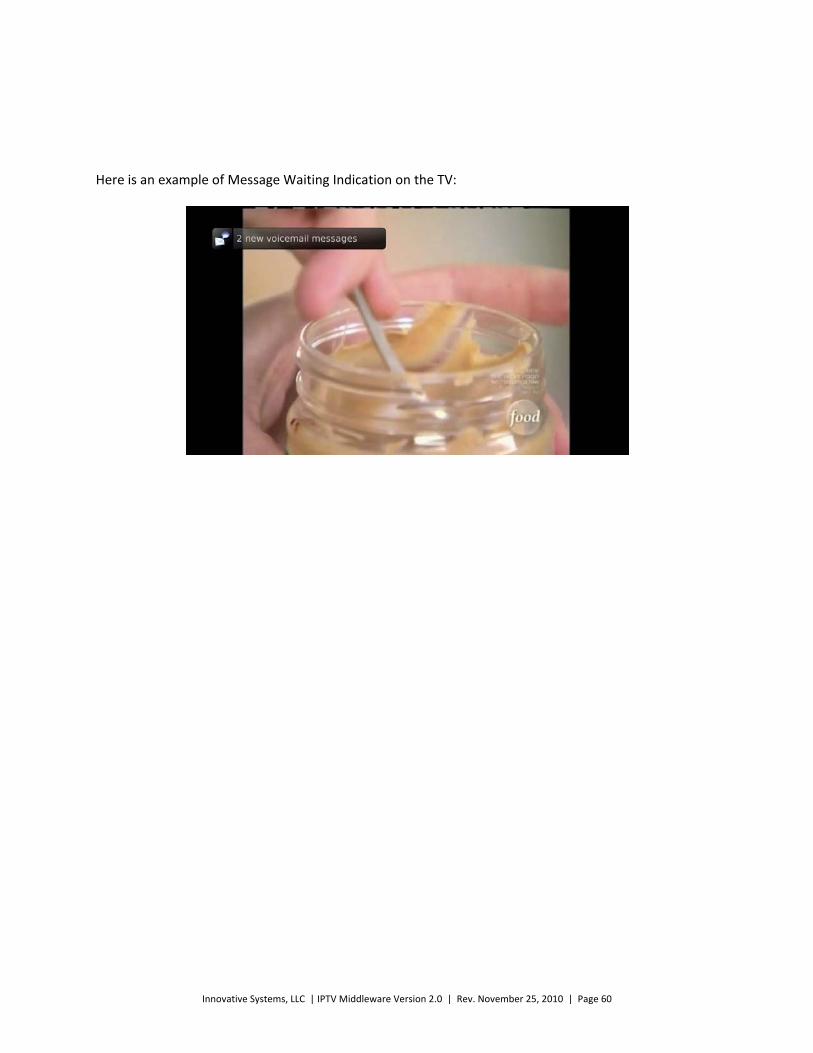
Here is an example of Message Waiting Indication on the TV:
Innovative Systems, LLC | IPTV Middleware Version 2.0 | Rev. November 25, 2010 | Page 61
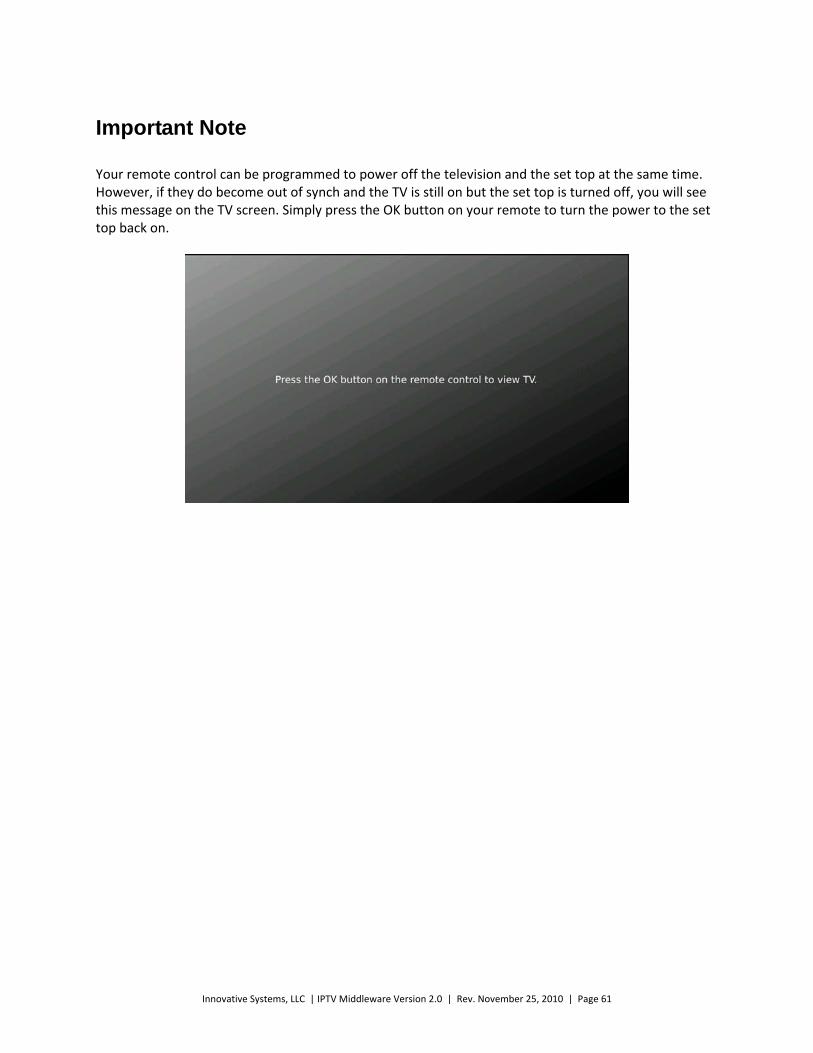
Important Note Your remote control can be programmed to power off the television and the set top at the same time. However, if they do become out of synch and the TV is still on but the set top is turned off, you will see this message on the TV screen. Simply press the OK button on your remote to turn the power to the set top back on.