iptv set-top box embedded diagnostics implementation ... · introduction the iptv set-top...
TRANSCRIPT

IPTV Set-Top Embedded Diagnostics Implementation Design Guide
Overview
Introduction
The IPTV set-top diagnostics application lets you detect problems with the IPTV set-top. A network connection is not required to use this tool. The diagnostics application has the following capabilities:
Test all video and audio outputs
Test the network connection
Test the hard disk drive and DRAM
Test the front panel
Display set-top information stored in the set-top flash memory
Purpose
The purpose of this document is to show you how to launch the embedded diagnostics for IPTV set-tops running Microsoft middleware and gather information from the diagnostic screens.
Supported Set-Tops
The embedded diagnostics application is available for the ISB2000, ISB6000, and ISB7000 series set-tops.
Version
This document supports the embedded diagnostics application version 1.1.
Audience
This document is written for field technicians and system operators.

2 4038541 Rev B
Overview
In This Document
Launching the Diagnostics ........................................................................................ 3
TV and Set-Top Connections .................................................................................... 5
Interacting with the Diagnostics ............................................................................... 7
Automatic Tests ........................................................................................................ 10
Diagnostics Main Menu ........................................................................................... 12
Audio and Video Test .............................................................................................. 13
Network Test ............................................................................................................. 17
Hard Drive Test (DVR Set-Tops Only) .................................................................. 19
Front Panel Test ........................................................................................................ 20
Results ........................................................................................................................ 22
Set-Top Information ................................................................................................. 23

4038541 Rev B 3
Launching the Diagnostics
Launching the Diagnostics To launch the embedded diagnostics, complete the following steps.
1 Hold down the pre-defined keys on the front panel at power up. Because different front panels have a different number of keys, the key sequences are different:
For front panels with only a Power button, hold down the Power button to launch the diagnostics.
For front panels with more than one key, hold down the Menu+Up key combination to launch the diagnostics.
2 While the embedded diagnostics application is starting, the Power LED will blink rapidly. It may take up to 5 minutes for the diagnostics to launch. See Factors Affecting How Long it Takes to Launch the Diagnostics. Depending upon your box type, look for the responses as described here.
When the diagnostics application launches on a non-DVR set-top, the diagnostics main menu appears on the TV screen.
When the diagnostics application launches on a DVR set-top, the progress bar for the hard disk drive test appears on the TV screen.

4 4038541 Rev B
Launching the Diagnostics
Factors Affecting How Long it Takes to Launch the Diagnostics
The following factors affect how long it may take to launch the diagnostics:
The length of time it takes for the set-top to obtain an IP address from a DHCP server can affect how long it takes to launch the diagnostics. The launcher sends requests for an IP address and waits until either a reply is received or the set-top times out after 45 seconds.
Note: If the set-top times out, that means an IP address was not offered. In that case, the diagnostics will still run with a default IP address. You will see loopback on the diagnostics screens in place of the IP address.
Updates to the embedded diagnostics. If an update is available from the server, the launcher downloads the new code and overwrites the old code.

4038541 Rev B 5
TV and Set-Top Connections
TV and Set-Top Connections The diagnostic application displays information on the set-top’s video outputs. Make sure that the set-top is connected to a display, the display is on, and the correct video input is selected before running the diagnostic application.
The following diagrams show the connections to an HDTV and SDTV.
HDTV Connection

6 4038541 Rev B
TV and Set-Top Connections
SDTV Connection

4038541 Rev B 7
Interacting with the Diagnostics
Interacting with the Diagnostics
Input Method
You can use both the front panel and the remote control to interact with the diagnostic application. The only exceptions are launching the diagnostic application and during the front panel button test when only the front panel buttons are active.
Output Method
If these outputs are available on the set-top, the application supports all the set-top video and audio output connectors listed below. To use the diagnostic application, you do not need to alter any existing connection between the set-top and the video and audio sink.
Video
HDMI™
Component
S-Video
Composite
SCART
RF modulator
Audio
HDMI
RCA stereo
SPDIF optical
SPDIF electrical
RF modulator

8 4038541 Rev B
Interacting with the Diagnostics
Navigation
The diagnostic application uses a menu-based user interface. A yellow highlight indicates the currently selected menu item. For example, the Front Panel Test button is highlighted on the Main Menu below.
Scrolling Vertically
Use the Up or Down arrow keys to move in a vertical direction on the screen. For example, use the Up or Down arrow keys to move through the buttons to select Results as shown on the screen below.

4038541 Rev B 9
Interacting with the Diagnostics
Scrolling Horizontally
Use the Left and Right arrow keys to move in a horizontal direction on the screen. For example, use the Left or Right arrow keys to toggle between Yes and No on the Front Panel Test screen shown below.
Committing to a Selection
After you highlight a button on the screen, press OK on the remote control or the front panel of the set-top to commit to the button you have highlighted on the screen.

10 4038541 Rev B
Automatic Tests
Automatic Tests As part of the diagnostic application launch, the set-tops run the following tests automatically. These tests are referred to as "auto test."
DRAM test
Hard disk drive test (DVR models only)
DRAM Test
Before the diagnostic application is first launched, a DRAM test is performed. The DRAM test passed if the diagnostic application launches and displays the Main Menu as shown in this screen.
Note: If the set-top is a non-DVR set-top, this is the screen that appears after the diagnostic application launches.
If the DRAM test fails, the video output will be blank, and the green Power LED and the red Record LED will blink rapidly.
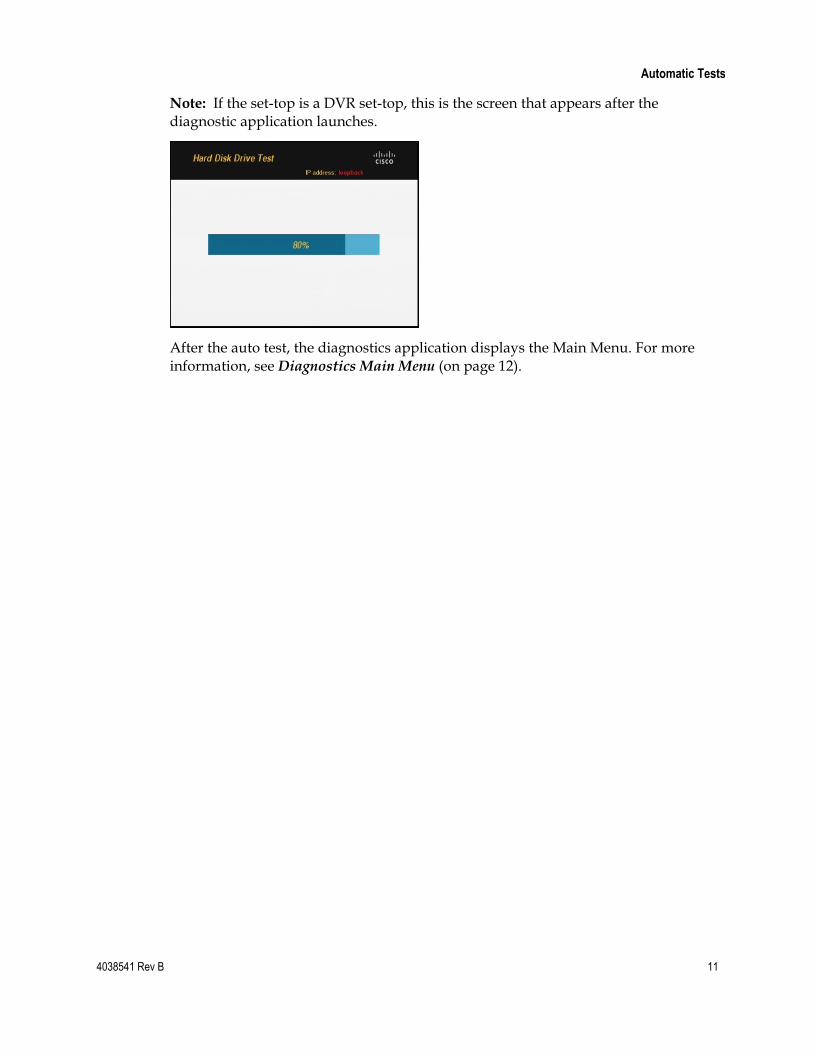
Hard Disk Drive Test
The hard disk drive test is part of the automatic test and is performed only on DVR model set-tops. The hard disk drive test takes several minutes. A progress bar appears to show the progress of the test as shown in the following screen. For more details, refer to Hard Drive Test (DVR Set-Tops Only) (on page 19).
4038541 Rev B 11
Automatic Tests
Note: If the set-top is a DVR set-top, this is the screen that appears after the diagnostic application launches.
After the auto test, the diagnostics application displays the Main Menu. For more information, see Diagnostics Main Menu (on page 12).

12 4038541 Rev B
Diagnostics Main Menu
Diagnostics Main Menu The Diagnostics Main Menu provides access to all diagnostics tests available for your set-top. One Diagnostics Menu is available for DVR set-tops. Another Diagnostics Main Menu is available for non-DVR set-tops. Use the Up and Down arrow keys to find the test you want to run and press the OK button to select the test.
DVR Diagnostics Main Menu
The following screen shows the Main Menu for a DVR set-top:
Non-DVR Diagnostics Main Menu
The following screen shows the Main Menu for a non-DVR set-top:

4038541 Rev B 13
Audio and Video Test
Audio and Video Test The Audio/Video test option on the main menu allows you to test the audio and video functionality of the set-top. When you select the Audio/Video test option on the main menu, the set-top outputs an audio tone and a video display simultaneously. You can stop the test at any time by pressing the OK button.
Audio Test
A monotone audio file is played during the audio/video test. The audio file contains data sampled from the waveform of 440 Hz Sine function.
Video Test
A colorbar image is displayed during the audio/video test.
For the high-definition video output through HDMI and component connection, the colorbar image appears as follows:
For the standard-definition video output through S-video, composite, and SCART connection, the colorbar image appears as follows:

14 4038541 Rev B
Audio and Video Test
After the audio and video tests are complete, the diagnostics application displays a series of screens to ask whether the audio and video is functioning. At each prompt, use the arrow keys to select Yes or No and press OK.
When the application prompts you whether you want to test video with audio, the application responds as follows:
If you answer yes, a series of screens appear. See Optional Video Test with Audio next in this section.

4038541 Rev B 15
Audio and Video Test
If you answer no, the Audio/Video tests page opens. See Audio/Video Tests Results later in this section.
Optional Video Test with Audio
When you select the option to test video with audio, a series of screens appear. At each prompt, use the arrow keys to select Yes or No and press OK.
After you select yes or no, the Audio/Video test page is automatically displayed.

16 4038541 Rev B
Audio and Video Test
Audio/Video Tests Results
After all of the selected audio and video tests are completed, the diagnostics application displays a summary page of the audio and video test. Press OK to exit from the audio/video test summary page and return to the Main Menu.

4038541 Rev B 17
Network Test
Network Test The Network test option on the Main Menu allows you to test the network connection for the set-top. When you select the Network Test option on the Main Menu and press the OK button, the set-top requests an IP address from the DHCP server. The set-top passes the DHCP Test when an IP address is assigned to the set-top. During the DHCP transaction, as an IP address is assigned to the set-top, the set-top becomes aware of the Gateway’s IP address. If the set-top is able to ping the Gateway, the set-top passes the Gateway Test.
If the set-top is not assigned an IP address from the DHCP server, suggestions are displayed on the screen and the option to retest the network is offered. The following screen displays the suggestions:
Follow the suggested instructions, select the option to test again, and press OK.
The DNS Test and WAN Ping Test verify that the Mediaroom Discovery Server URL can be pinged by the set-top. The set-top issues the following command:
# ping -c 10 <name> where <name> is the fully qualified domain name of the Mediaroom Discovery Server URL.
This name is retrieved from the boot flash of the set-top. A commonly used name is discovery.iptv.microsoft.com. During the test, 10 ECHO_REQUEST packets are sent to the discovery server. The network test uses the ping command's default timeout for the test. The default timeout is the amount of time it takes for a signal to be sent plus the amount of time it takes for an acknowledgment of the signal to be received.

18 4038541 Rev B
Network Test
If the DNS Test and WAN Ping Test fail, the following screen is displayed:
Network Test Results
The network test fails if any of the individual tests fail. The following screen is displayed for a network test that fails:
The network test passes if all the individual tests pass. The following screen is displayed for a network test that passes:

4038541 Rev B 19
Hard Drive Test (DVR Set-Tops Only)
Hard Drive Test (DVR Set-Tops Only) The Hard Drive Test option on the Main Menu allows you to test the read and write functionality of the hard disk drive on a DVR set-top. You can use this option to re-run the hard drive test that was performed during auto test.
When you select the Hard Drive Test option on the Main Menu and press OK, the set-top starts a test of the hard disk drive and displays a progress bar as shown below.
If the hard drive test fails, contact your service center.
The following screen is displayed for a test that passes:

20 4038541 Rev B
Front Panel Test
Front Panel Test The front panel test enables you to test the buttons and the LEDs on the front panel of the set-top.
When you select the Front Panel Test from the Main Menu, the button and LED tests are launched simultaneously.
Testing the Front Panel Buttons
When you launch a front panel test, the application tests the buttons on the front panel of the set-top. The application displays a series of screens to test the front panel buttons in a predefined order. At each prompt, press the button on the front panel to test the button. For example, to test the Menu button, press the Menu button on the front panel of the set-top within 10 seconds of when you are prompted. The following screen is an example of the button test screen:
At the end of the test, a summary screen opens to let you know whether the button keys passed or failed. A button passes if the key press is detected. The button test fails if no button press is detected within 10 seconds, or if you press an incorrect key in response to a prompt.

4038541 Rev B 21
Front Panel Test
Testing the LEDs
When you launch a front panel test, the application tests the LEDs on the front panel of the set-top. The front panel LEDs turn on one by one and the application displays a series of screens to ask if the LED is on. At each prompt, press the Left and Right arrows to select Yes or No and press OK. For example, to let the application know whether the Green Power LED is working, use the arrow keys to select Yes or No and press OK. The following screen is an example of an LED test screen:
The result of the button and LED tests is stored in DRAM. Only the result of the last test is stored. If you make a mistake, you can correct it by running the test again.
Front Panel Test Summary Page
After finishing the front panel test, a summary page opens to show the test results of the buttons and LEDs that were tested. Press OK to exit the summary page and return to the Main Menu.

22 4038541 Rev B
Results
Results To get a summary screen of all the diagnostic tests that were performed on the set-top, select Results from the Main Menu.
The Test Result screen indicates the status of each test. For any test that fails, follow the on-screen instructions or contact your service center.

4038541 Rev B 23
Set-Top Information
Set-Top Information To find detailed information about your set-top, select Info from the Main Menu.
The Info button on the Main Menu displays a series of screens that provide details about the set-top. Press the Up or Down buttons to scroll through the screens. The following screen is an example of the set-top information screen:
24 4038541 Rev B
For Information
For Information
If You Have Questions
If you have technical questions, call Cisco Services for assistance. Follow the menu options to speak with a service engineer.


Cisco Systems, Inc. 5030 Sugarloaf Parkway, Box 465447 Lawrenceville, GA 30042
678 277-1120 800 722-2009
www.cisco.com
Cisco and the Cisco logo are trademarks or registered trademarks of Cisco and/or its affiliates in the U.S. and other countries. A listing of Cisco's trademarks can be found at www.cisco.com/go/trademarks. HDMI, the HDMI logo, and High Definition Multimedia Interface are trademarks or registered trademarks of HDMI licensing LLC in the United States and other countries. Other third party trademarks mentioned are the property of their respective owners. The use of the word partner does not imply a partnership relationship between Cisco and any other company. (1009R) Product and service availability are subject to change without notice.
© 2011, 2012 Cisco and/or its affiliates. All rights reserved. June 2012 Printed in USA Part Number 4038541 Rev B