iq interactive education platform v6.0 user manual
TRANSCRIPT

IQ Interactive Education Platform V6.0
User Manual
Rogev computers LTD
2
Part I Foreword
Chapter 1 Product Introduction
IQ Interactive Education Platform is a powerful and new generation software for demonstration and
teaching. It seamlessly connects with all kinds of interactive teaching equipments, such as interactive
whiteboards, touch all-in-ones, interactive projection module, interactive projector, document camera,
lesson preparing machine and so on. With Interactive Education Platform, various powerful functions,
such as freehand writing, annotation, handwriting recognition, charts, screen record, animation, page
show, and subject tools are accessible for teachers and presenters. With IQ Interactive Education
Platform, it becomes so easy to create a vivid and wonderful class and demonstration.
1)Good Interaction Effect: With IQ Interactive Education Platform, students are not passive listeners as
before. Interaction and enthusiasm is increased for both teaching and learning.
2)Easy to Use: Lessons and tests can be prepared by both IQ Interactive Education Platform and
PowerPoint. After lessons, Interactive Education Platform helps teachers free from time-consuming task
with test paper auto checking and marking.
Chapter 2 In/Uninstall, Register and Update
2.1 System Requirements
Windows 7/8/8.1/10
Core 2 2.4G Dual Core Processor or higher
1G RAM(1G above recommended)
Microsoft DirectX8.0 or above
1G free hard disk space (for full installation)
Screen resolution: 1024×768 or above
2.2 Install
2.2.1 Install IQ Interactive Education Platform V6.0
Run the application program of [IQ Interactive Education Platform V6.0.exe ],then follow the on-screen
instruction to install the software. After successful installation, an icon like will appear on the
desktop.
2.2.2 Install Resource Library
Double-click “Resource Library V5.0 (Full)” in the installation CD, then follow the on-screen instruction to
install the Resource Library.
2.3 Uninstall
2.3.1 Uninstall IQ Interactive Education Platform V6.0
Three ways to uninstall IQ Interactive Education Platform:
Rogev computers LTD
3
1) Click Start > Programs >IQ Interactive Education Platform V6.0>Uninstall;
2) Open “Control Panel”, select “Add/Remove Programs”, and in the list of Currently Installed Programs,
select “IQ Interactive Education Platform V6.0”, then click “Remove”;
3) Click IQ Interactive Education Platform V6.0 on the installation CD again.
2.3.2 Uninstall Resource Library
1. Three ways to start uninstallation of Resource Library:
1) When you uninstall the IIQ Interactive Education Platform, the system will prompt you whether to
uninstall the Resource Library at the same time;
2) Open “Control Panel”, select “Add/Remove Programs”, and in the list of Currently Installed Programs,
select “Resource Library V5.0 (Full)”, then click “Remove”;
3) Click “Resource Library V5.0 (Full)” on the installation CD again.
2. Follow the on-screen instruction to uninstall the resource library.
2.4 Register
2.4.1 Trial
IQ Interactive Education Platform has 30 trial times, which are counted by the times you start the
software. After the trial times have run out, please register if you want to continue using the software.
2.4.2 Register
2.4.2.1 Register by Product SN
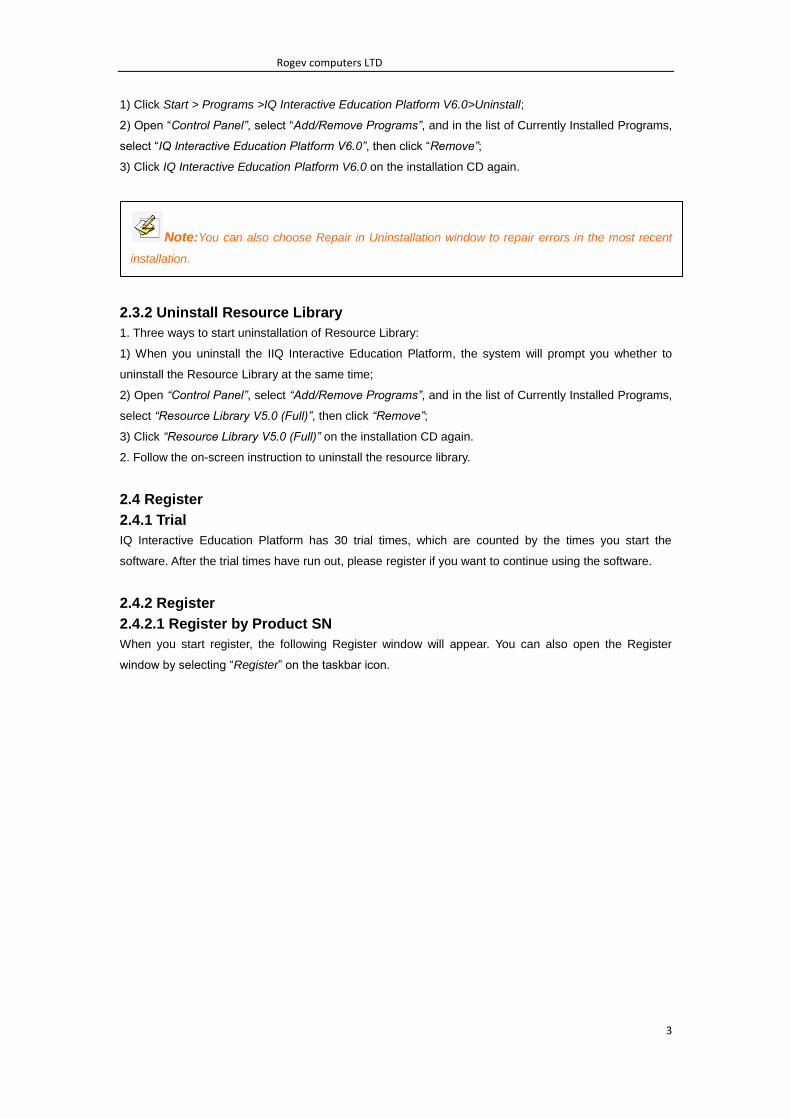
When you start register, the following Register window will appear. You can also open the Register
window by selecting “Register” on the taskbar icon.
Note:You can also choose Repair in Uninstallation window to repair errors in the most recent
installation.
Rogev computers LTD
4
Input Product SN and other information in the Register Window, then click “Register” to finish the
registration.
2.4.2.2 Register by USB Key or Receiver
If you want to register by USB Key or Receiver, please plug the accessory USB Key or Receiver into any
free USB port on your computer. If no Register window appears when you start the IQ Interactive
Education Platform, the registration is successful.
2.5 Update
After starting IQ Interactive Education Platform, the system will automatically check whether the update
package is available. You can also click the taskbar icon, and select “Update” to enter Update window.
Note:If you buy School/Educational Institution/Enterprise Authorized Version, then the name of the
School/Educational Institution/Enterprise will be displayed on Startinterface, Main Window title bar, About
interface,Print Preview window, Printed documents and other output files (except CDFfile)

Rogev computers LTD
5
Part II IQBoard User Guide
Chapter 1 Start IQ Interactive Education
Double-click the “IQ Interactive Education” desktop shortcut, then select subject.
Chapter 2 Mode Interface
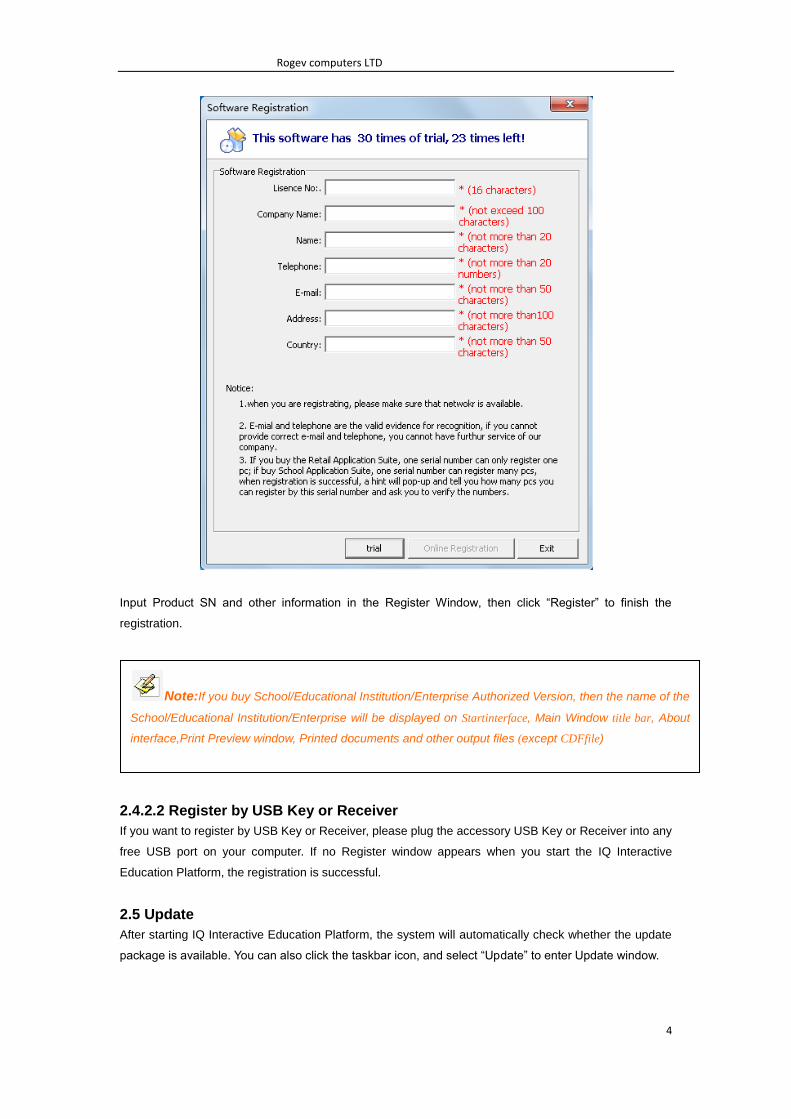
After entering the class, system will display interface as below, select the desired function.
Rogev computers LTD
6
1、 Preparing:Click the Lesson Prepare icon to enter Lesson Prepare Mode, details instruction please
refer to Lesson Prepare Mode section;
2、 Teaching:Click the Teaching icon to enter Teaching Mode, details instruction please refer to
Teaching Mode section;
3、 Desktop:Click the Desktop icon to enter Desktop Mode, details instruction please refer to Desktop
Mode section
4、 Fly screen: Start the IQWalk server, details instruction please refer to Fly screen Mode section
5、 Slide Mode:Click the Slide Mode icon to enter Play Mode, details instruction please refers to Slide
Mode.
6、 Add: Click the Add button; user can add programs or files from the computer disk. You can use the
program directly during class.
7、 Subject:Select the subject from the drop-down list to enter the
desired subject for teaching functions under this subject.
Note: You can go into the Home Button to hide and show the Mode interface.
Chapter 3 Desktop Mode
You can click the Desktop Mode icon on ModeInterface or the Desktop icon on
Rogev computers LTD
7
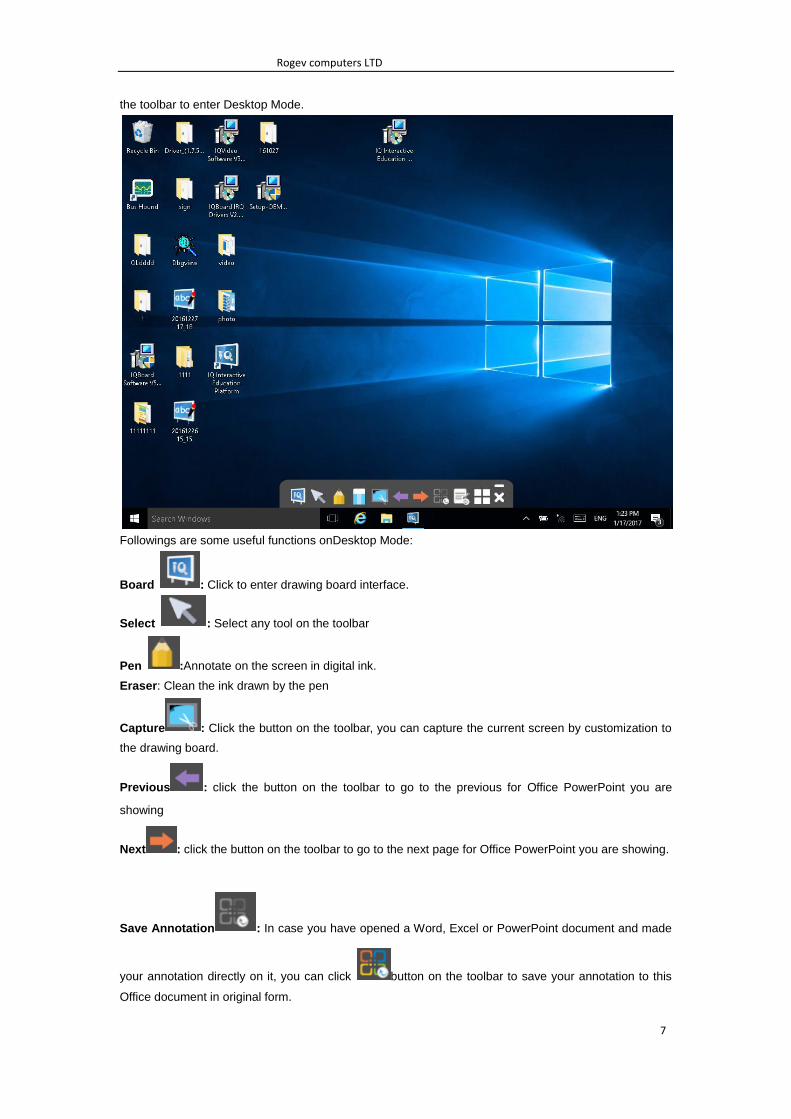
the toolbar to enter Desktop Mode.
Followings are some useful functions onDesktop Mode:
Board : Click to enter drawing board interface.
Select : Select any tool on the toolbar
Pen :Annotate on the screen in digital ink.
Eraser: Clean the ink drawn by the pen
Capture : Click the button on the toolbar, you can capture the current screen by customization to
the drawing board.
Previous : click the button on the toolbar to go to the previous for Office PowerPoint you are
showing
Next : click the button on the toolbar to go to the next page for Office PowerPoint you are showing.
Save Annotation : In case you have opened a Word, Excel or PowerPoint document and made
your annotation directly on it, you can click button on the toolbar to save your annotation to this
Office document in original form.

Rogev computers LTD
8
Clear Annotation : Click the button clear the digital ink created.
Tool : Click the button to display the tools that can be used under the Desktop Mode, the grey tool
cannot be used.
Close : Click the button on the toolbar to switch to Board Mode.
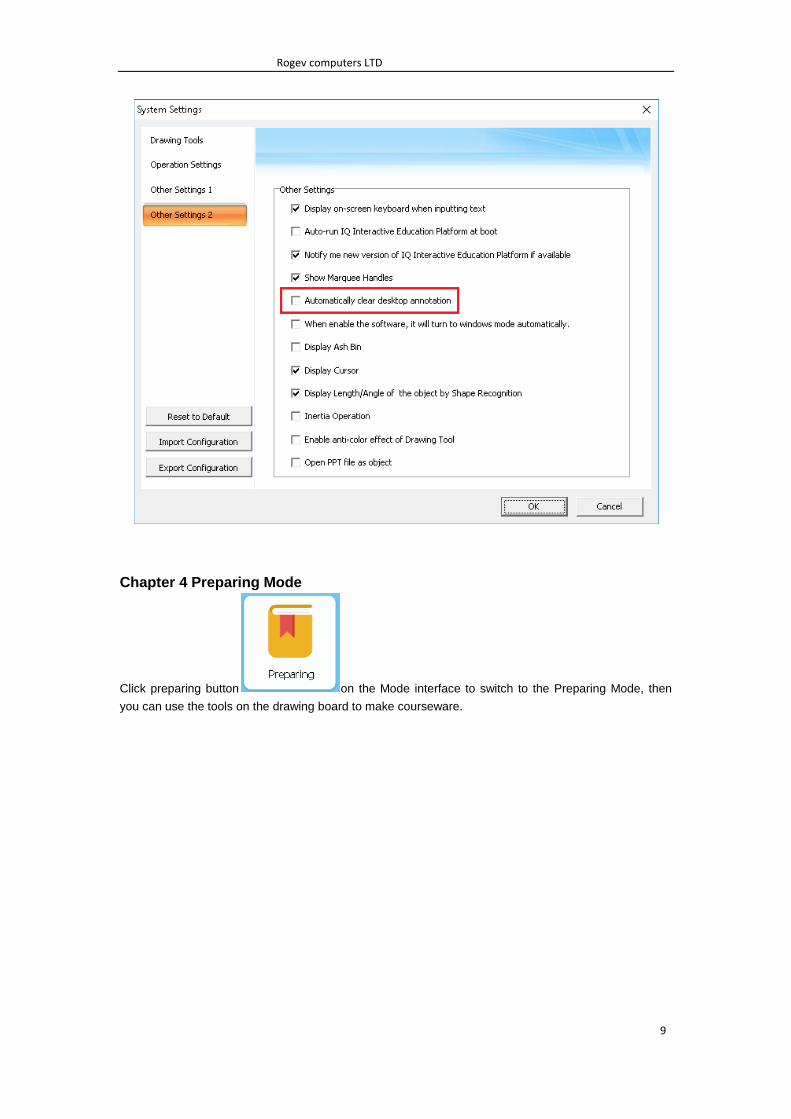
Note: Select the automatically clear desktop annotation item, when the window is closed, the annotation
will be automatically closed.
Rogev computers LTD
9
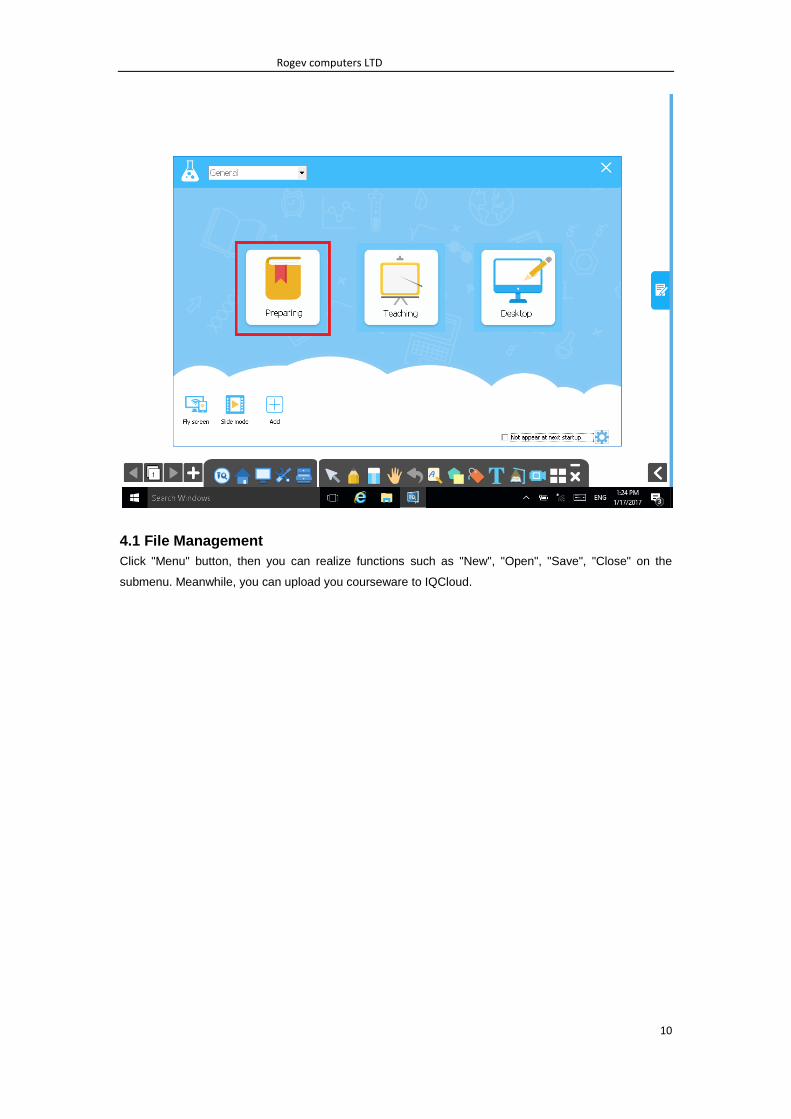
Chapter 4 Preparing Mode
Click preparing button on the Mode interface to switch to the Preparing Mode, then
you can use the tools on the drawing board to make courseware.
Rogev computers LTD
10
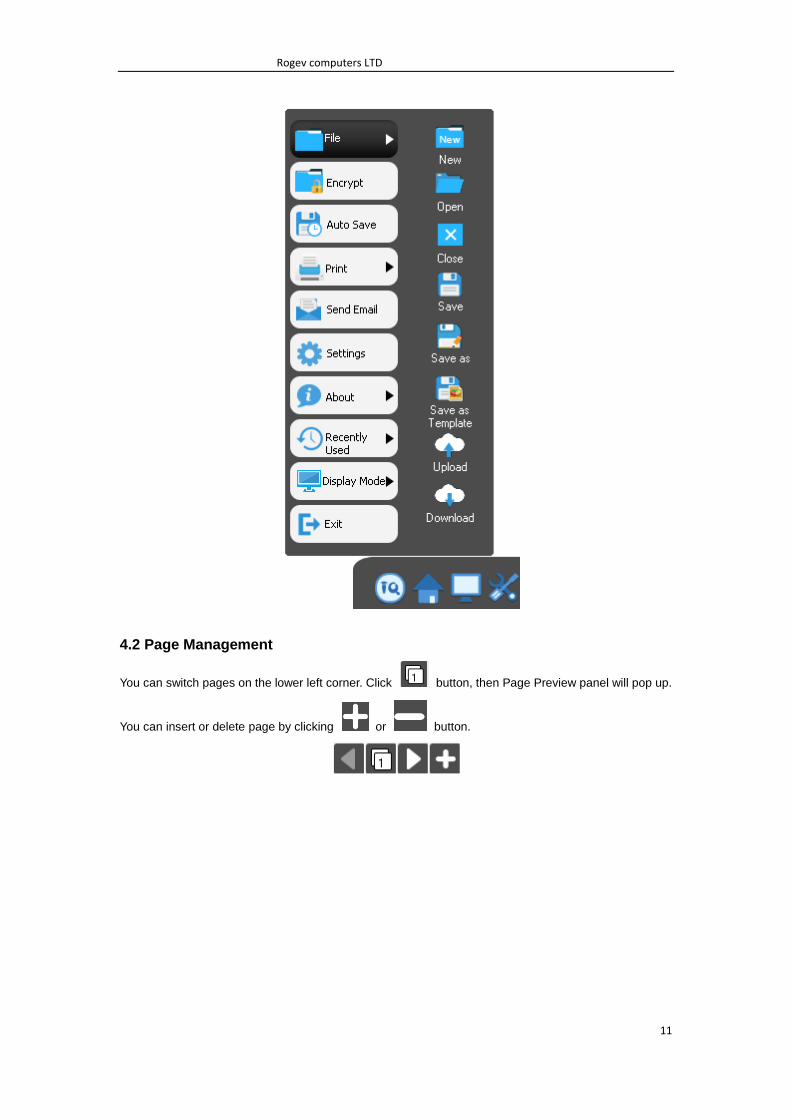
4.1 File Management
Click "Menu" button, then you can realize functions such as "New", "Open", "Save", "Close" on the
submenu. Meanwhile, you can upload you courseware to IQCloud.
Rogev computers LTD
11
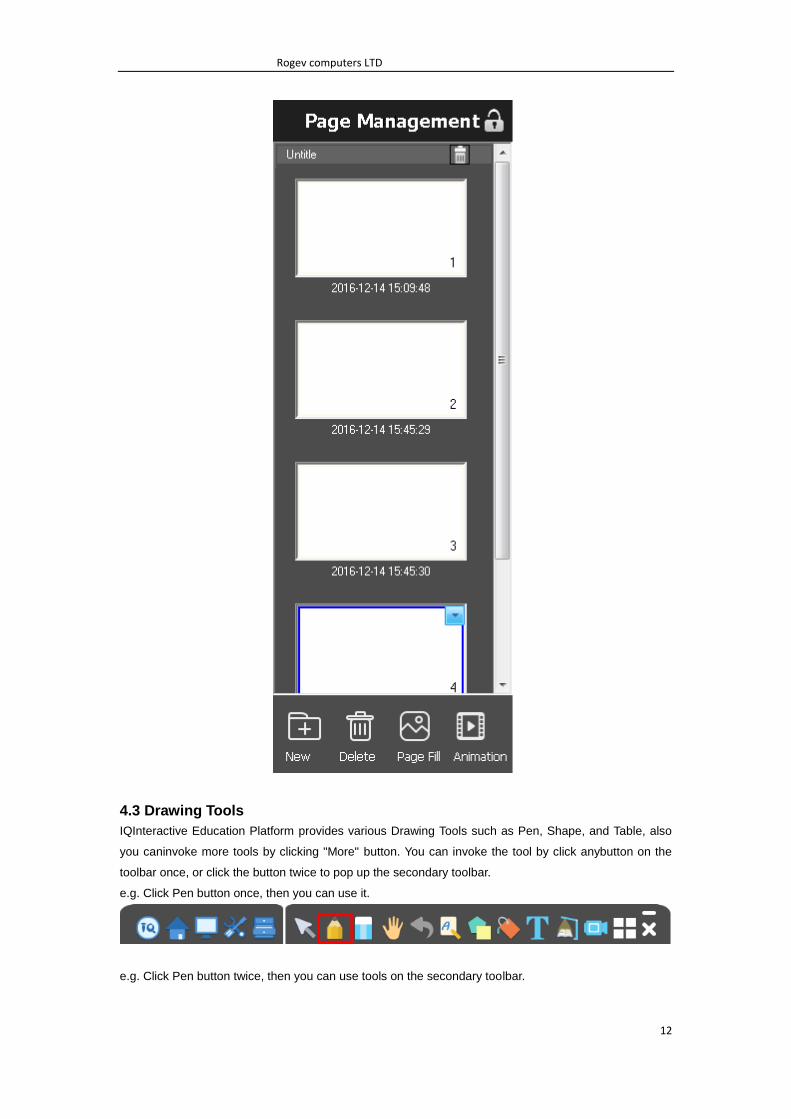
4.2 Page Management
You can switch pages on the lower left corner. Click button, then Page Preview panel will pop up.
You can insert or delete page by clicking or button.
Rogev computers LTD
12
4.3 Drawing Tools
IQInteractive Education Platform provides various Drawing Tools such as Pen, Shape, and Table, also
you caninvoke more tools by clicking "More" button. You can invoke the tool by click anybutton on the
toolbar once, or click the button twice to pop up the secondary toolbar.
e.g. Click Pen button once, then you can use it.
e.g. Click Pen button twice, then you can use tools on the secondary toolbar.

Rogev computers LTD
13
The toolbar icon display may have some difference according to the subject you select. You can click the
button to review the tools:
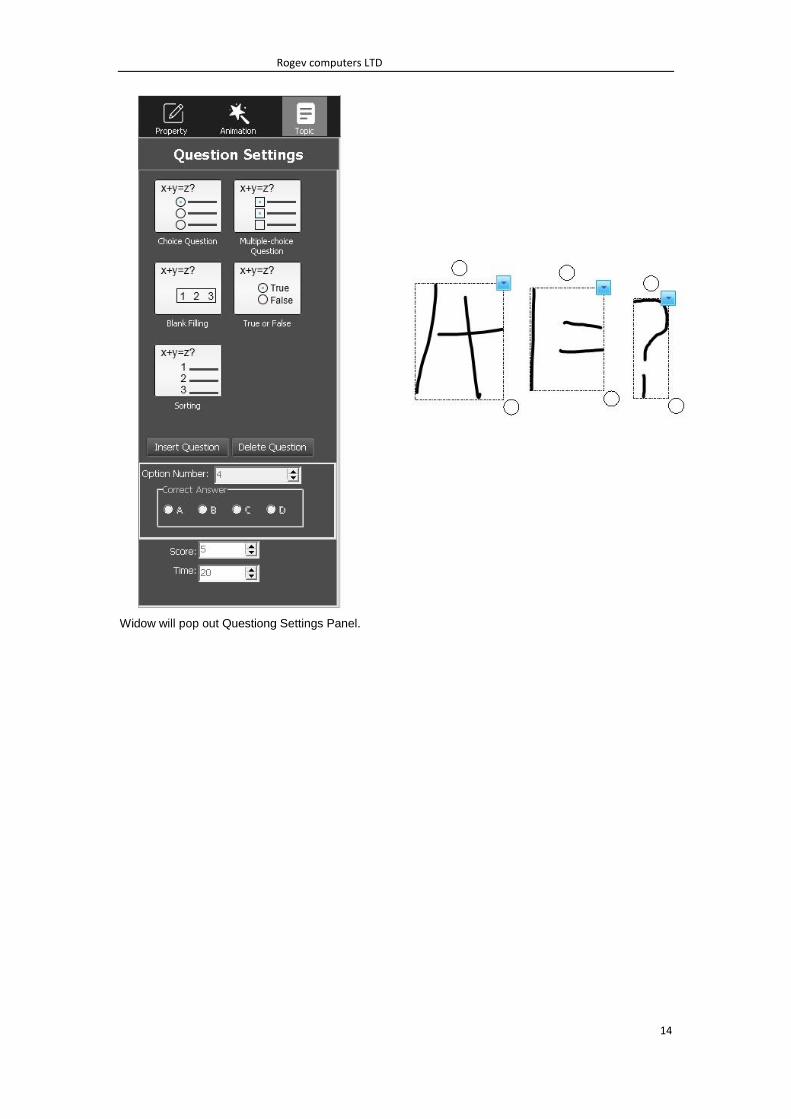
4.3. Question Settings
Under prepare mode, select one or more objects, click the Question Setting button on the Object toolbar,
you can add questions for the object.
Rogev computers LTD
14
Widow will pop out Questiong Settings Panel.
Rogev computers LTD
15
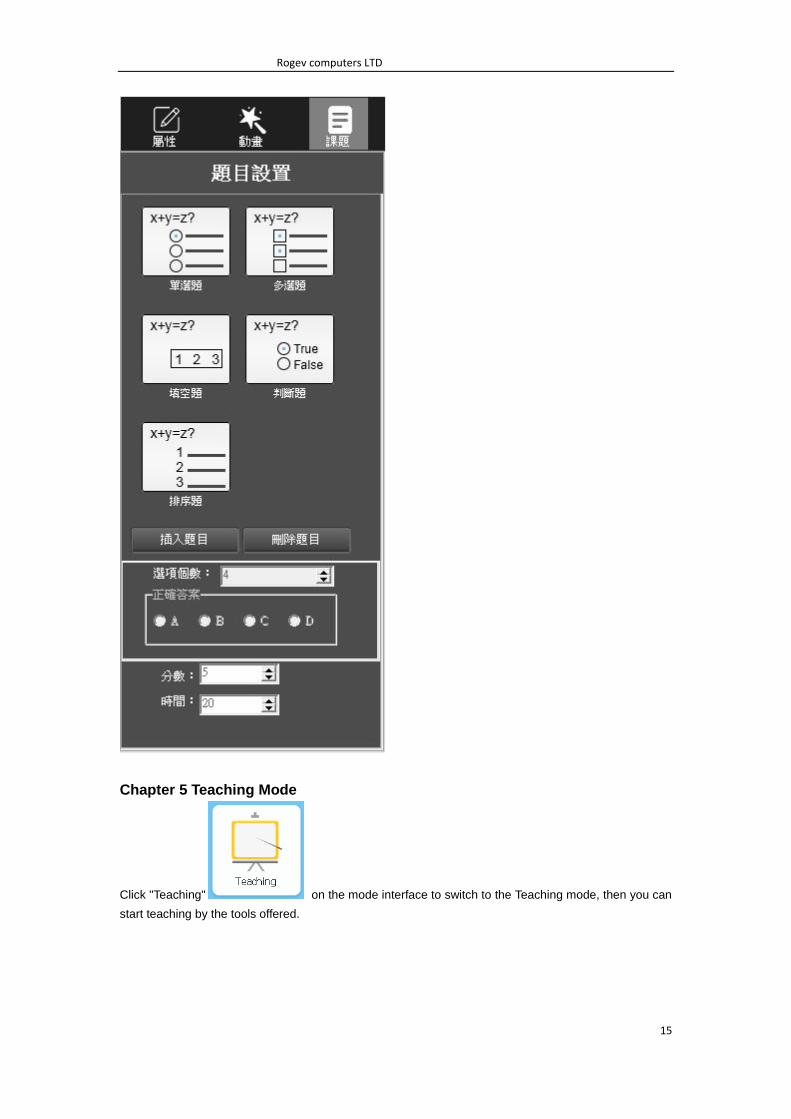
Chapter 5 Teaching Mode
Click "Teaching" on the mode interface to switch to the Teaching mode, then you can
start teaching by the tools offered.
Rogev computers LTD
16
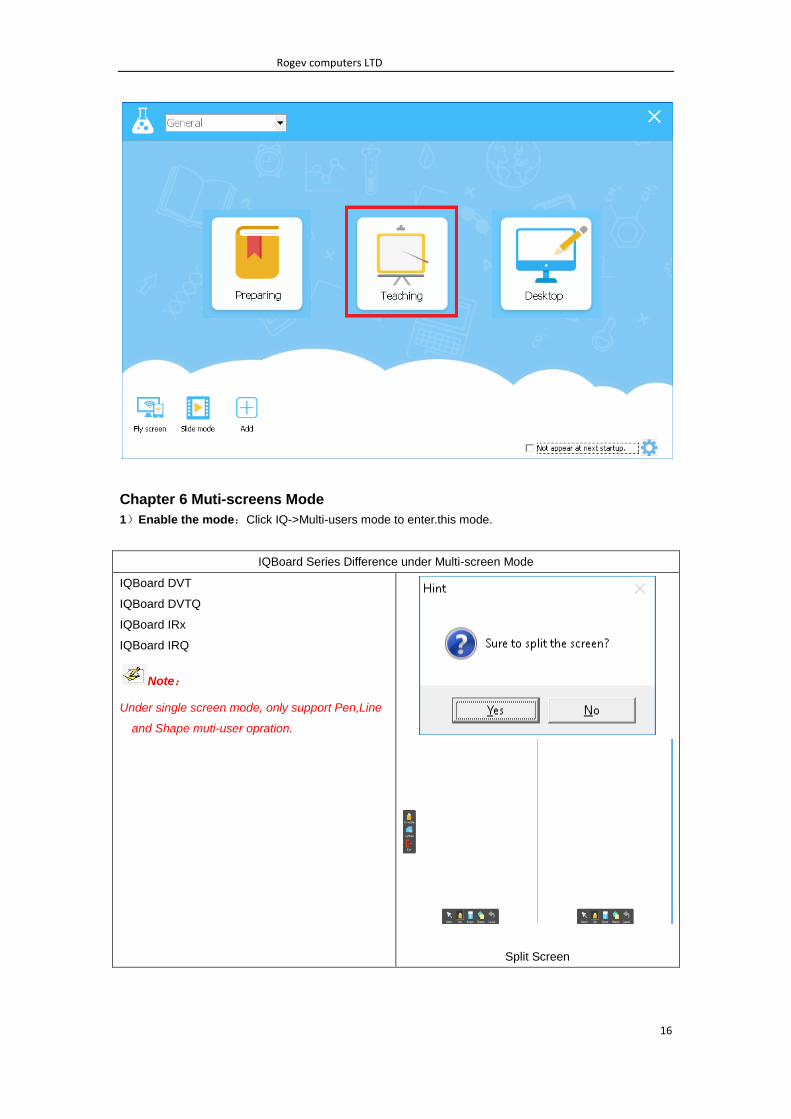
Chapter 6 Muti-screens Mode
1)Enable the mode:Click IQ->Multi-users mode to enter.this mode.
IQBoard Series Difference under Multi-screen Mode
IQBoard DVT
IQBoard DVTQ
IQBoard IRx
IQBoard IRQ
Note:
Under single screen mode, only support Pen,Line
and Shape muti-user opration.
Split Screen
Rogev computers LTD
17
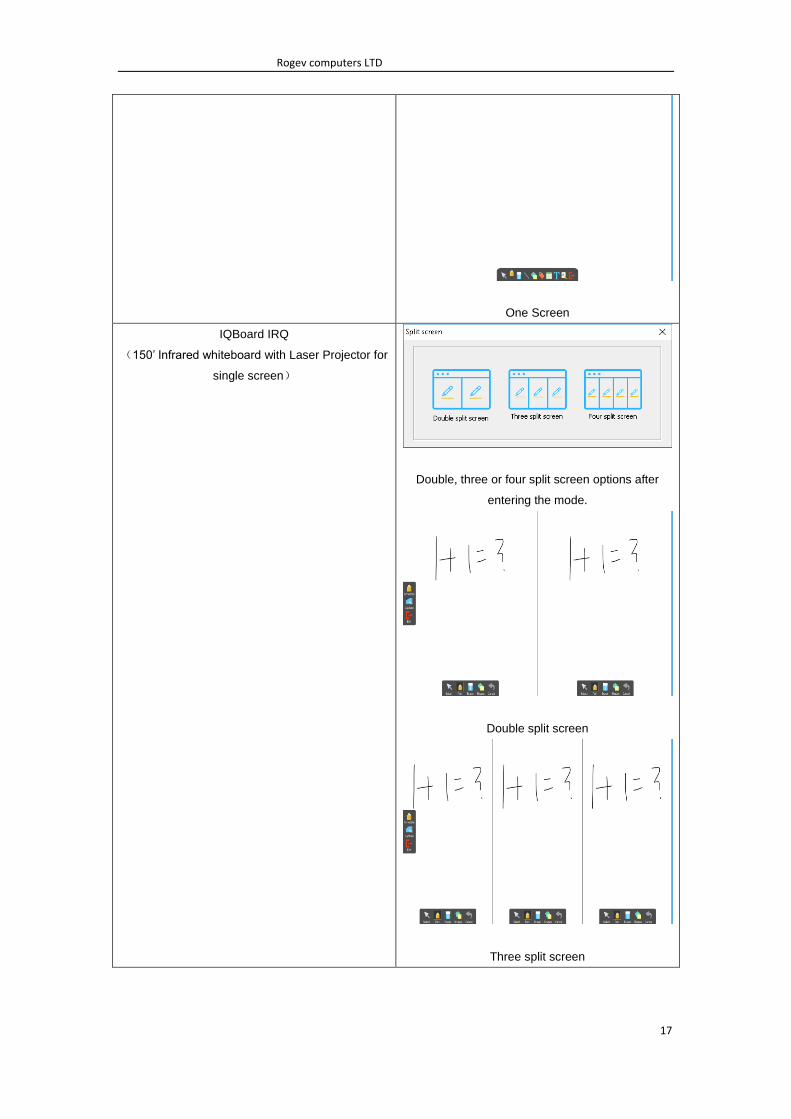
One Screen
IQBoard IRQ
(150‟ Infrared whiteboard with Laser Projector for
single screen)
Double, three or four split screen options after
entering the mode.
Double split screen
Three split screen
Rogev computers LTD
18
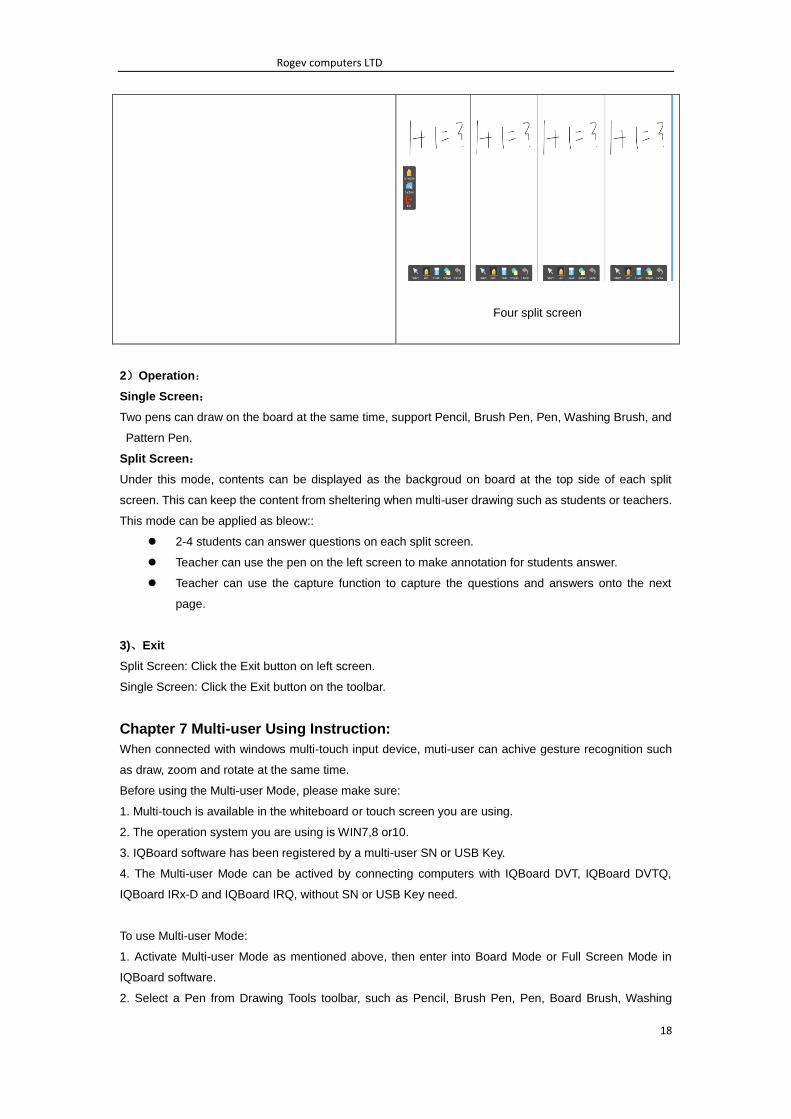
Four split screen
2)Operation:
Single Screen:
Two pens can draw on the board at the same time, support Pencil, Brush Pen, Pen, Washing Brush, and
Pattern Pen.
Split Screen:
Under this mode, contents can be displayed as the backgroud on board at the top side of each split
screen. This can keep the content from sheltering when multi-user drawing such as students or teachers.
This mode can be applied as bleow::
2-4 students can answer questions on each split screen.
Teacher can use the pen on the left screen to make annotation for students answer.
Teacher can use the capture function to capture the questions and answers onto the next
page.
3)、Exit
Split Screen: Click the Exit button on left screen.
Single Screen: Click the Exit button on the toolbar.
Chapter 7 Multi-user Using Instruction:
When connected with windows multi-touch input device, muti-user can achive gesture recognition such
as draw, zoom and rotate at the same time.
Before using the Multi-user Mode, please make sure:
1. Multi-touch is available in the whiteboard or touch screen you are using.
2. The operation system you are using is WIN7,8 or10.
3. IQBoard software has been registered by a multi-user SN or USB Key.
4. The Multi-user Mode can be actived by connecting computers with IQBoard DVT, IQBoard DVTQ,
IQBoard IRx-D and IQBoard IRQ, without SN or USB Key need.
To use Multi-user Mode:
1. Activate Multi-user Mode as mentioned above, then enter into Board Mode or Full Screen Mode in
IQBoard software.
2. Select a Pen from Drawing Tools toolbar, such as Pencil, Brush Pen, Pen, Board Brush, Washing
Rogev computers LTD
19
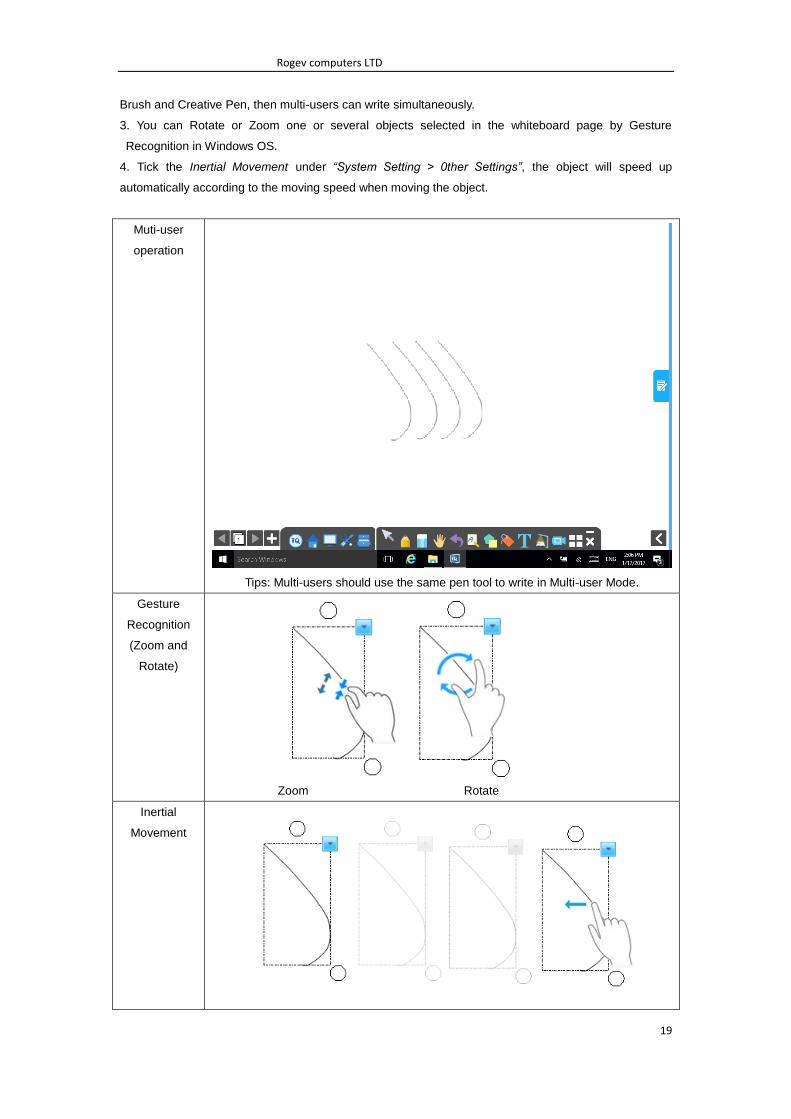
Brush and Creative Pen, then multi-users can write simultaneously.
3. You can Rotate or Zoom one or several objects selected in the whiteboard page by Gesture
Recognition in Windows OS.
4. Tick the Inertial Movement under “System Setting > 0ther Settings”, the object will speed up
automatically according to the moving speed when moving the object.
Muti-user
operation
Tips: Multi-users should use the same pen tool to write in Multi-user Mode.
Gesture
Recognition
(Zoom and
Rotate)
Zoom Rotate
Inertial
Movement
Rogev computers LTD
20
Select and pull the object to move it forward automatically.
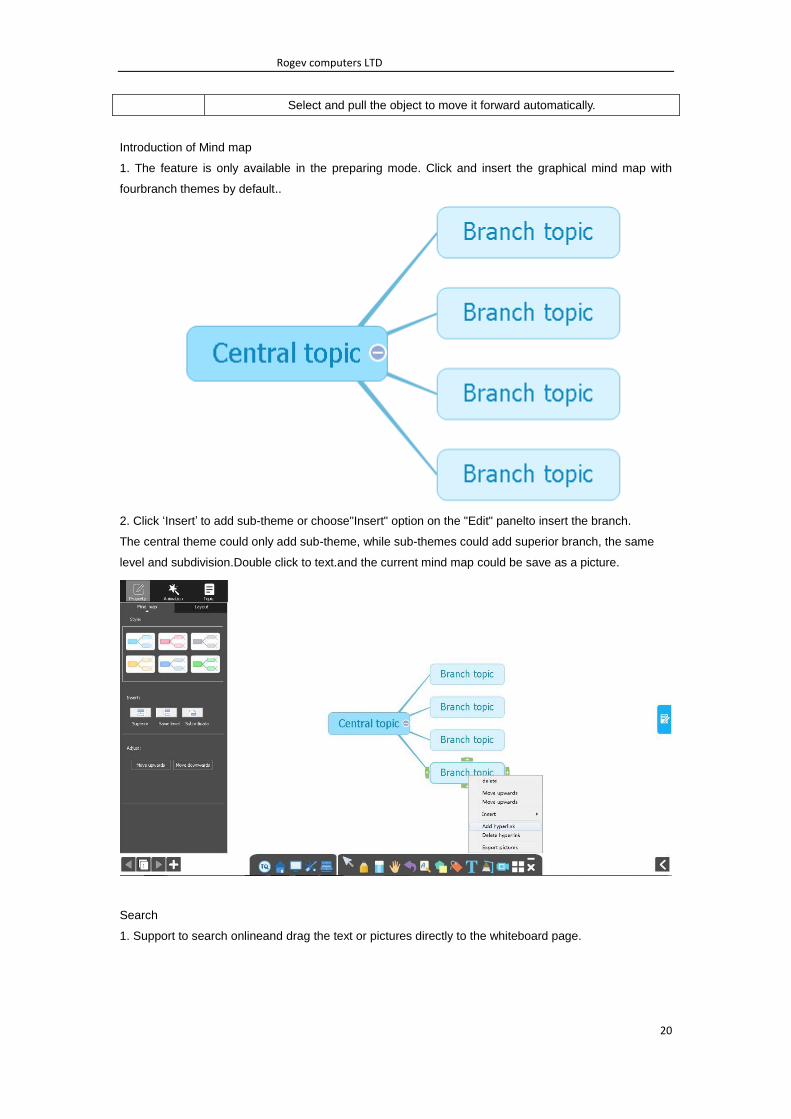
Introduction of Mind map
1. The feature is only available in the preparing mode. Click and insert the graphical mind map with
fourbranch themes by default..
2. Click „Insert‟ to add sub-theme or choose"Insert" option on the "Edit" panelto insert the branch.
The central theme could only add sub-theme, while sub-themes could add superior branch, the same
level and subdivision.Double click to text.and the current mind map could be save as a picture.
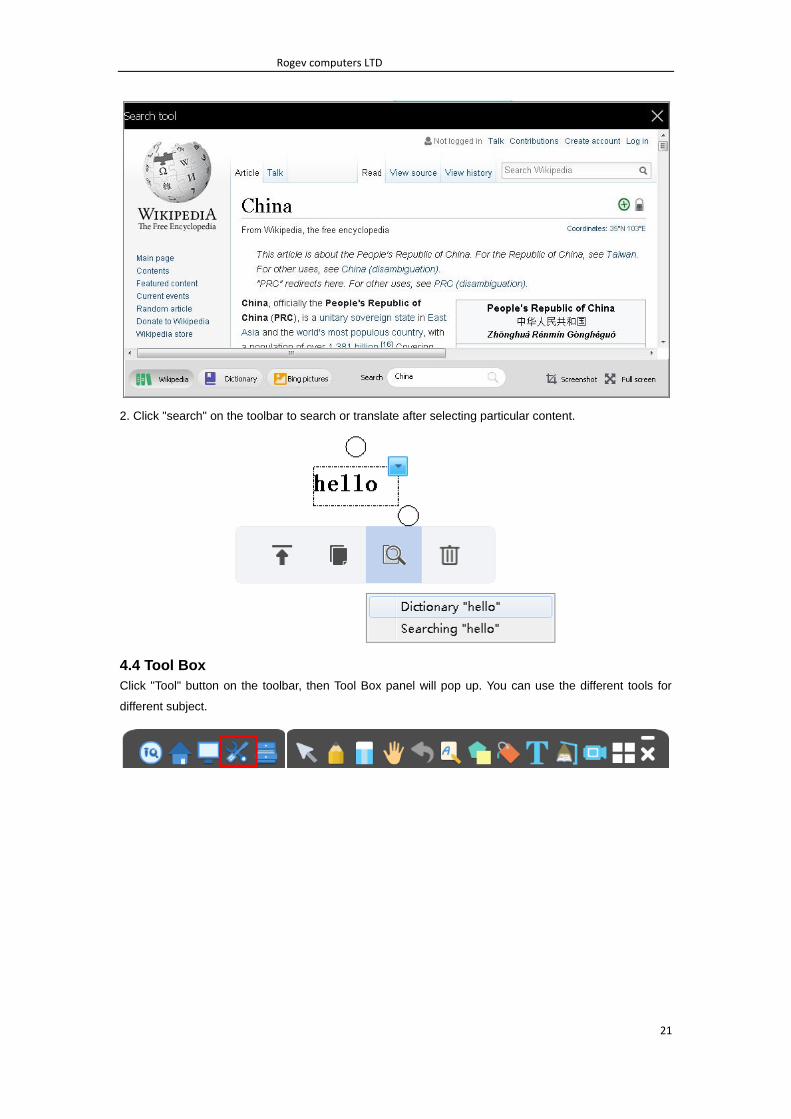
Search
1. Support to search onlineand drag the text or pictures directly to the whiteboard page.
Rogev computers LTD
21
2. Click "search" on the toolbar to search or translate after selecting particular content.
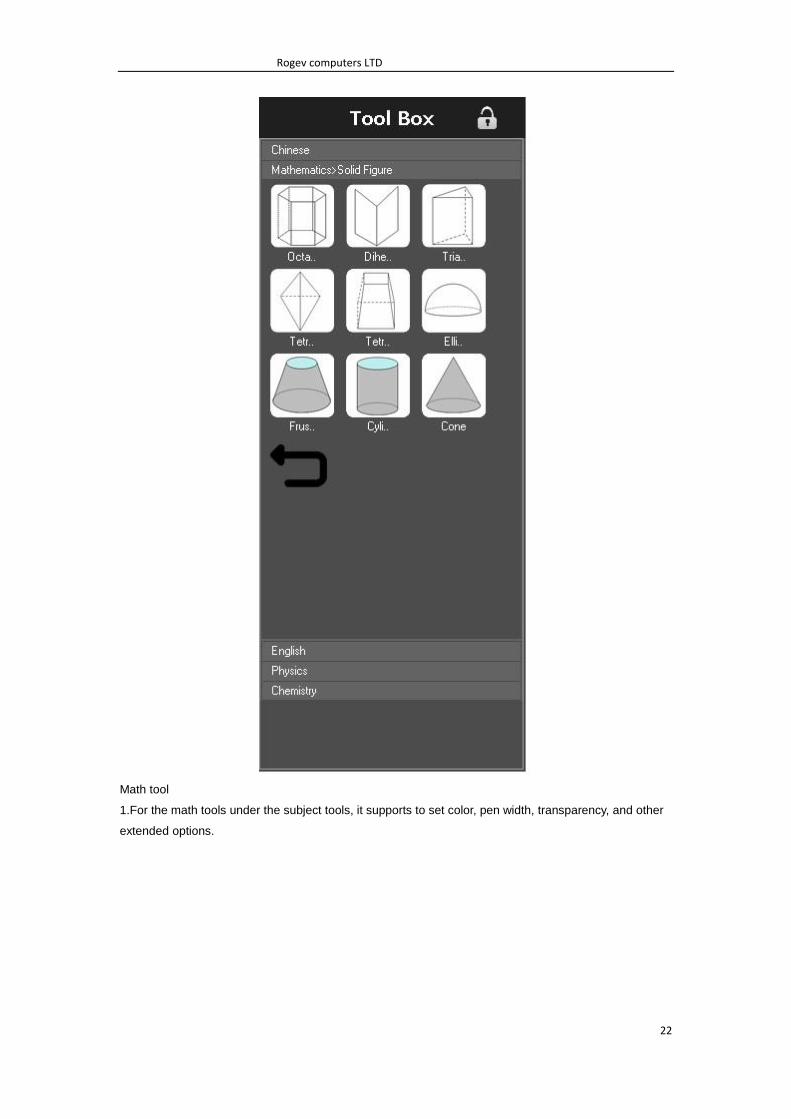
4.4 Tool Box
Click ''Tool" button on the toolbar, then Tool Box panel will pop up. You can use the different tools for
different subject.
Rogev computers LTD
22
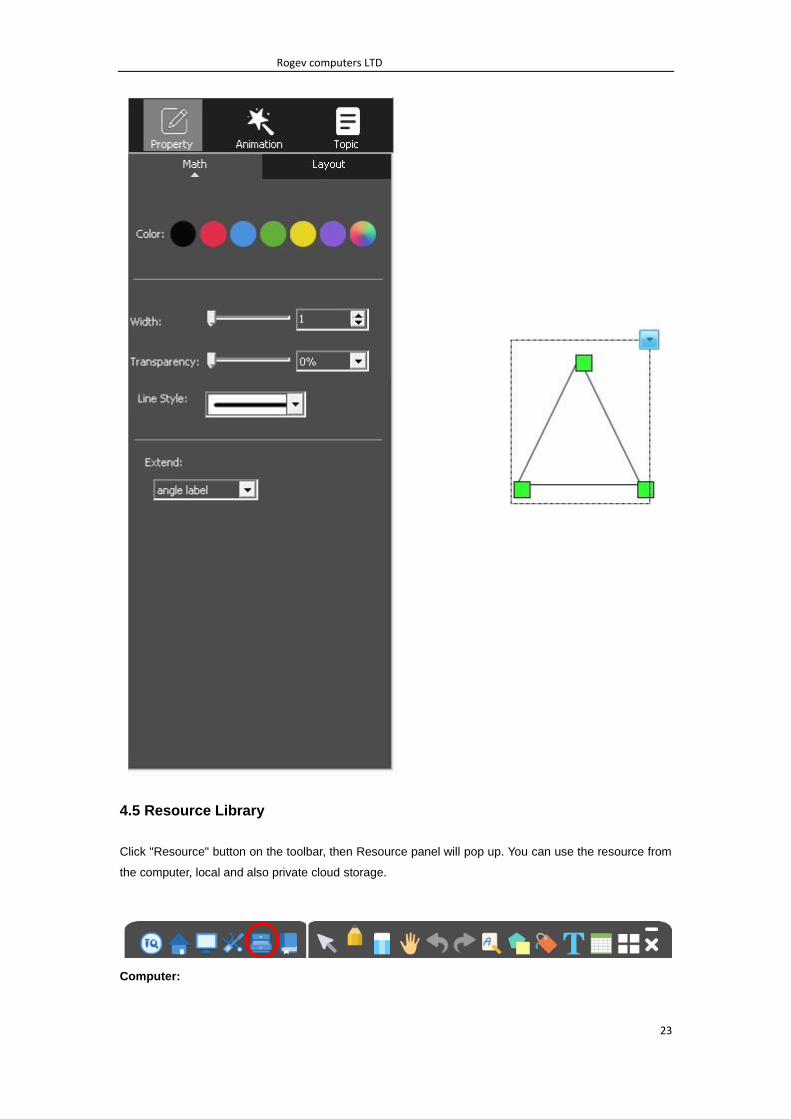
Math tool
1.For the math tools under the subject tools, it supports to set color, pen width, transparency, and other
extended options.
Rogev computers LTD
23
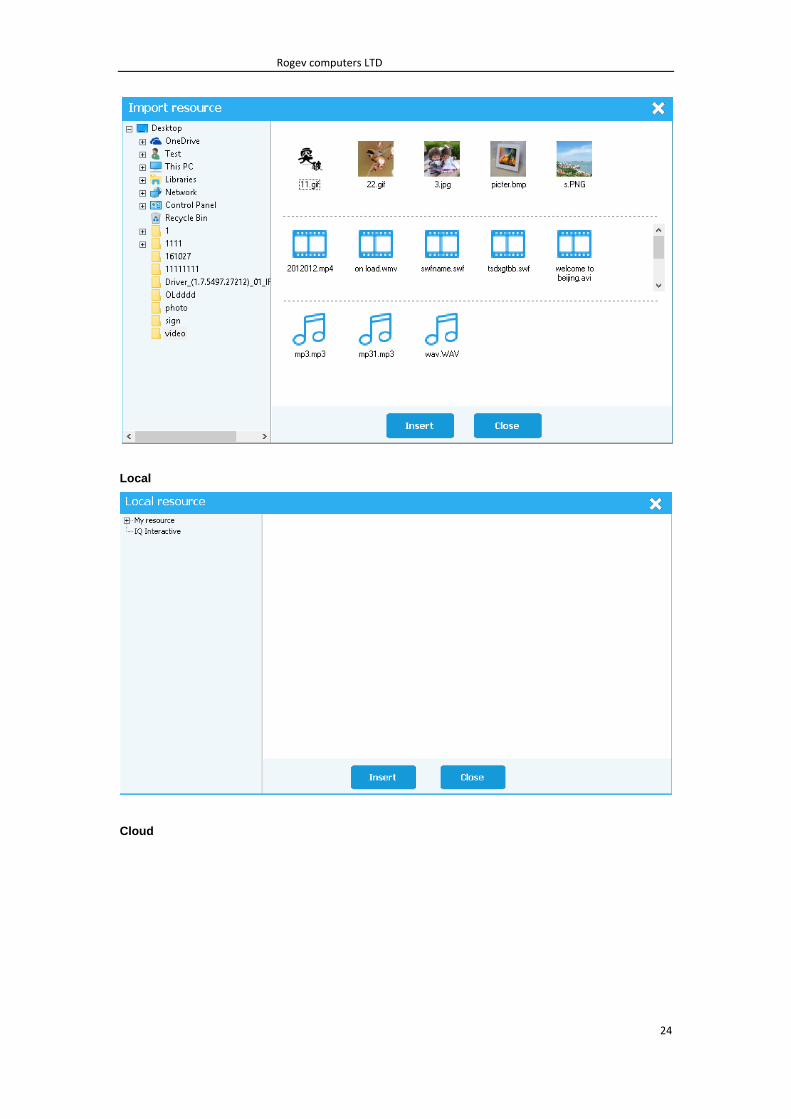
4.5 Resource Library
Click "Resource" button on the toolbar, then Resource panel will pop up. You can use the resource from
the computer, local and also private cloud storage.
Computer:
Rogev computers LTD
24
Local
Cloud

Rogev computers LTD
25
4.6 Note
IQ Interactive Education Platform offer note function, you can make notes on each slide and call out the
notes during teaching.
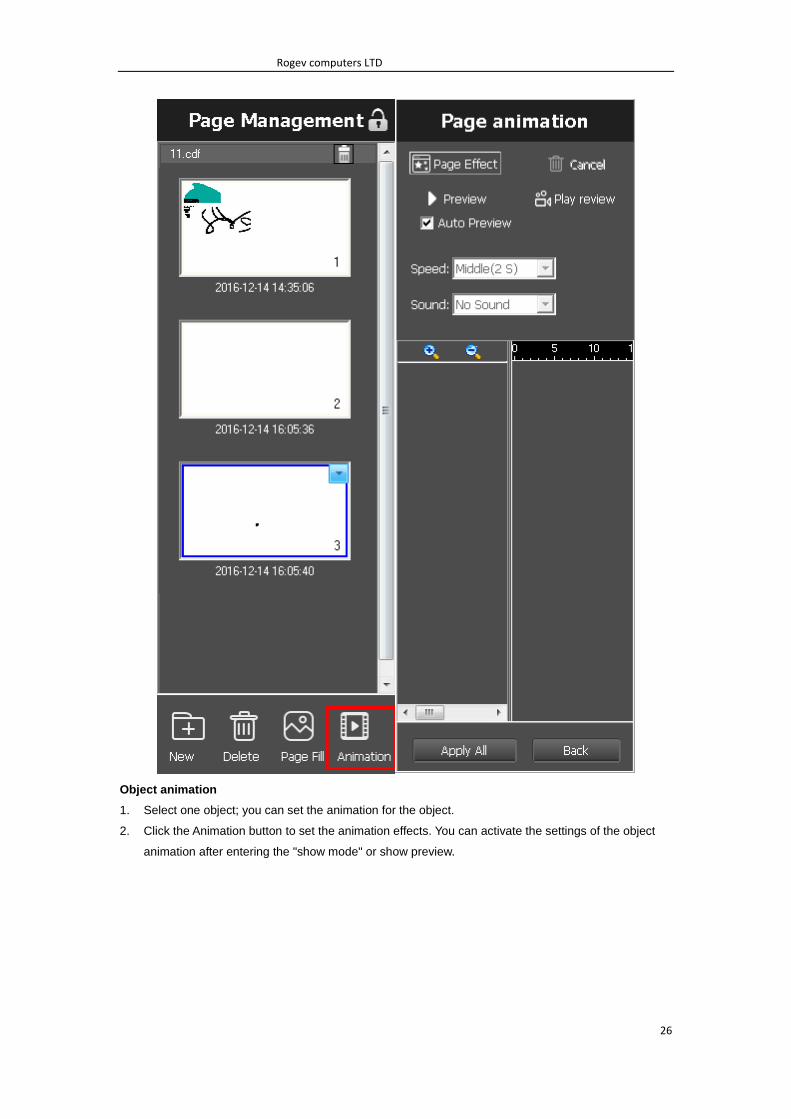
4.7 Animation
Page animation
Click the Animation button under the page can set the Page Animation.
Rogev computers LTD
26
Object animation
1. Select one object; you can set the animation for the object.
2. Click the Animation button to set the animation effects. You can activate the settings of the object
animation after entering the "show mode" or show preview.
Rogev computers LTD
27
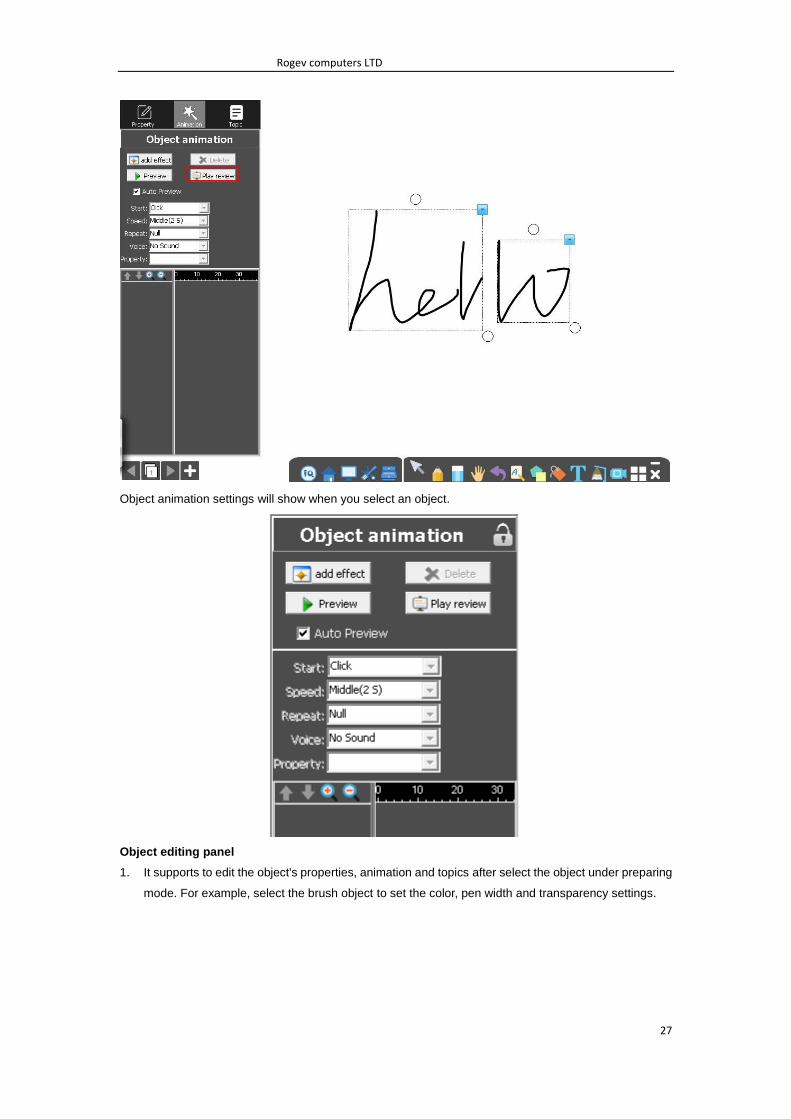
Object animation settings will show when you select an object.
Object editing panel
1. It supports to edit the object's properties, animation and topics after select the object under preparing
mode. For example, select the brush object to set the color, pen width and transparency settings.
Rogev computers LTD
28
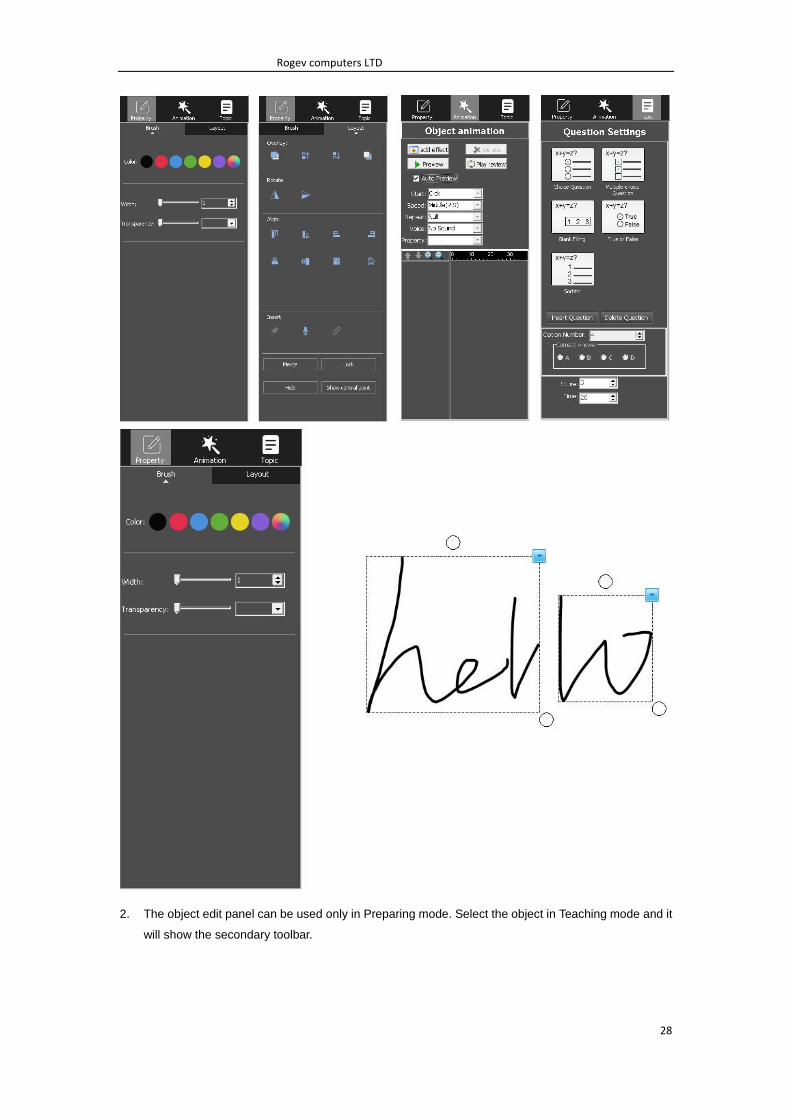
2. The object edit panel can be used only in Preparing mode. Select the object in Teaching mode and it
will show the secondary toolbar.
Rogev computers LTD
29
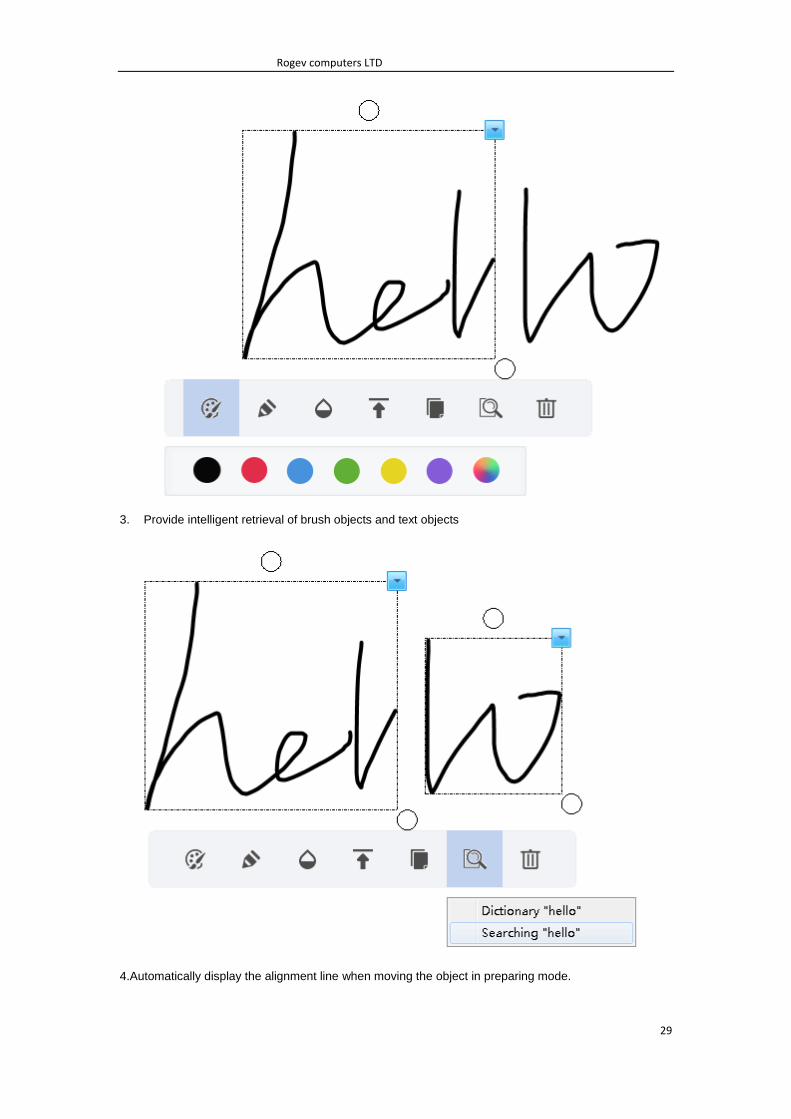
3. Provide intelligent retrieval of brush objects and text objects
4.Automatically display the alignment line when moving the object in preparing mode.

Rogev computers LTD
30
Chapter 9 Slide Mode
Click "Slide Mode" on the mode interface to switch to the play mode, then you can start playing
the current slide including the slide animation and object animation. The tools under the bottom can also
be used. The function is much similar to the Office PowerPoint.
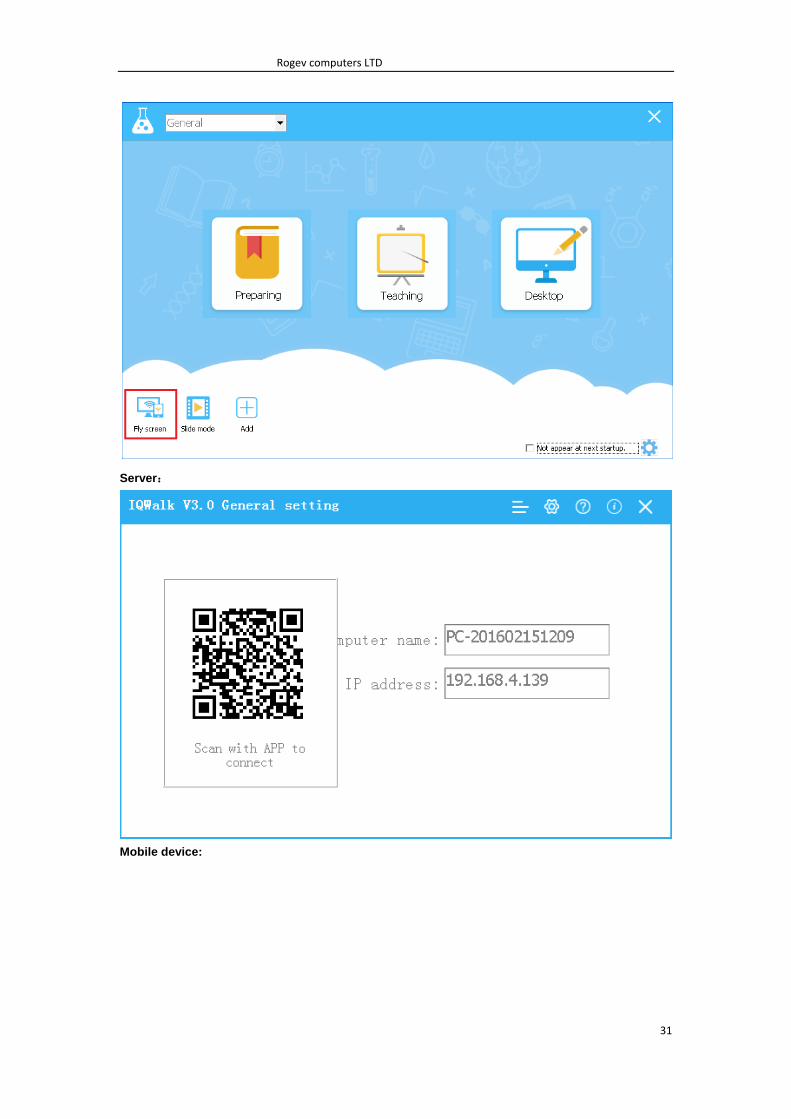
Chapter 10 Fly screen
10.1 Connection
Click "Fly Screen" on the mode interface to switch to the Fly Screen mode, and start the Fly
Screen server
Rogev computers LTD
31
Server:
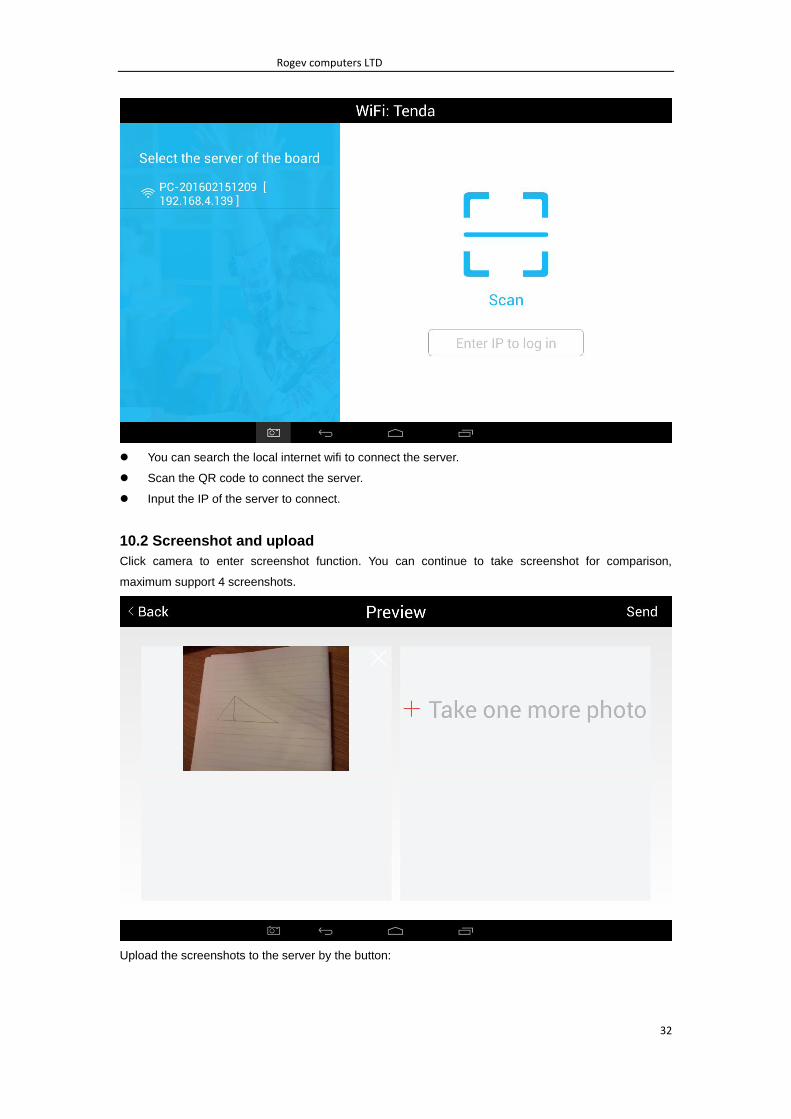
Mobile device:
Rogev computers LTD
32
You can search the local internet wifi to connect the server.
Scan the QR code to connect the server.
Input the IP of the server to connect.
10.2 Screenshot and upload
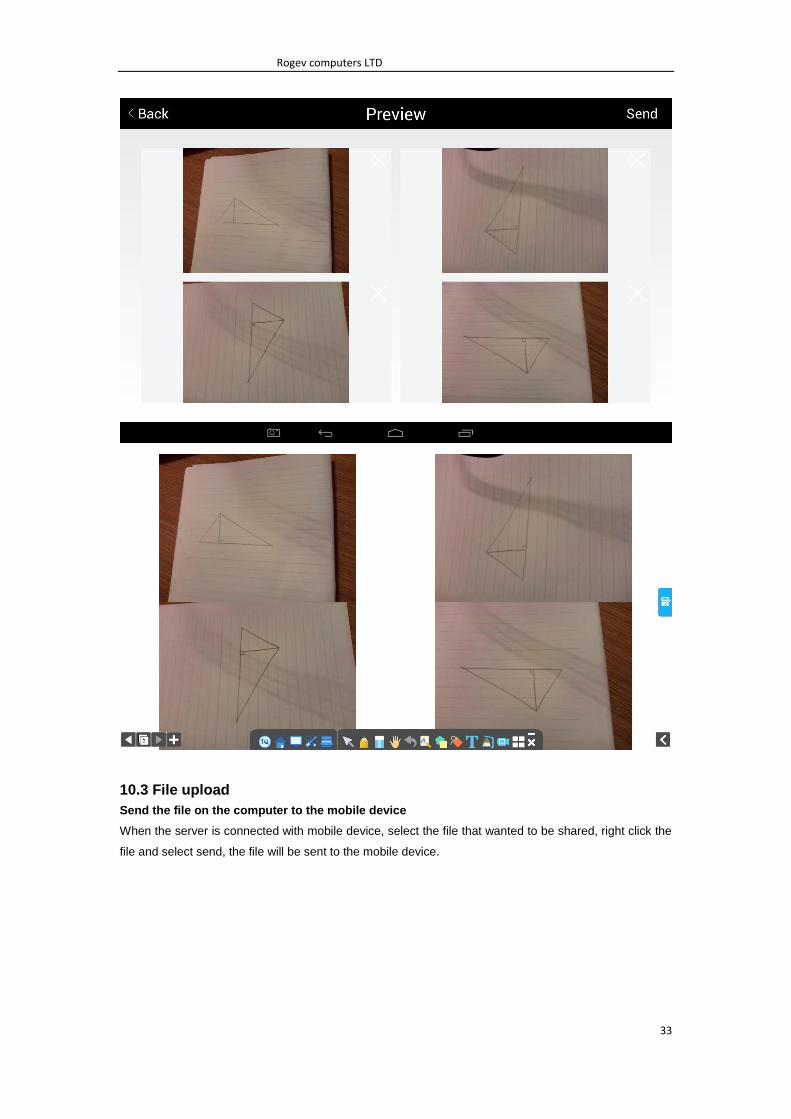
Click camera to enter screenshot function. You can continue to take screenshot for comparison,
maximum support 4 screenshots.
Upload the screenshots to the server by the button:
Rogev computers LTD
33
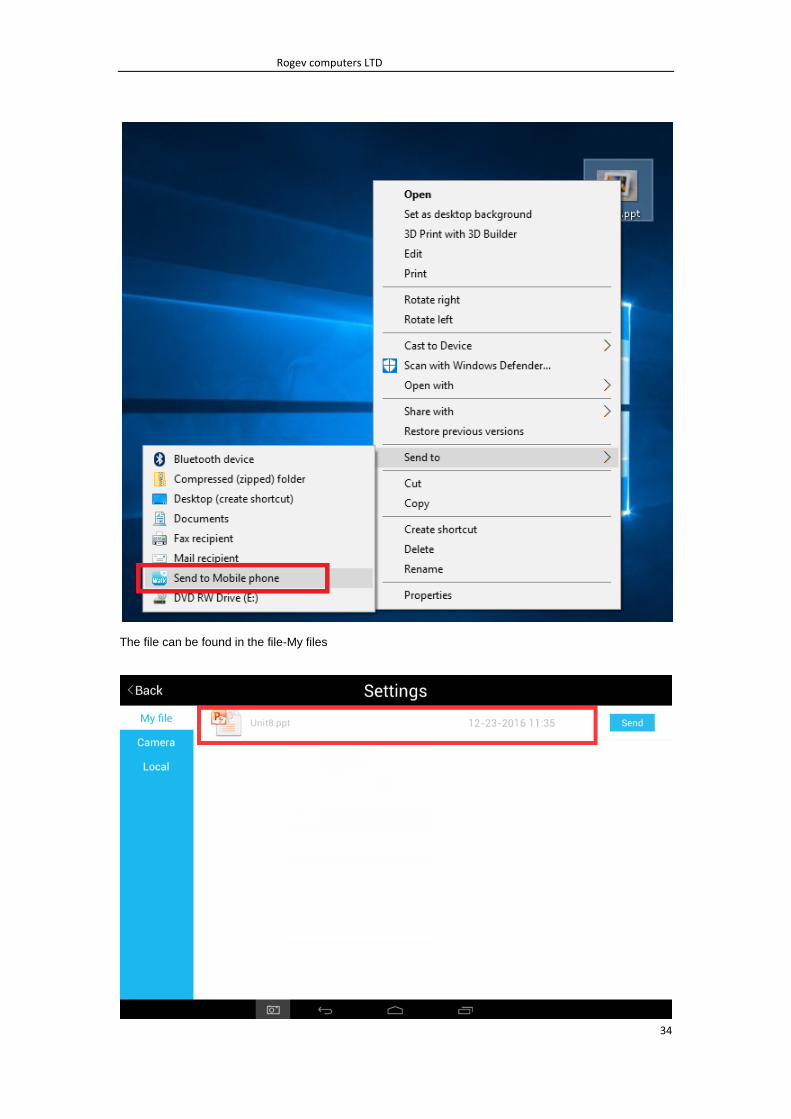
10.3 File upload
Send the file on the computer to the mobile device
When the server is connected with mobile device, select the file that wanted to be shared, right click the
file and select send, the file will be sent to the mobile device.
Rogev computers LTD
34
The file can be found in the file-My files
Rogev computers LTD
35
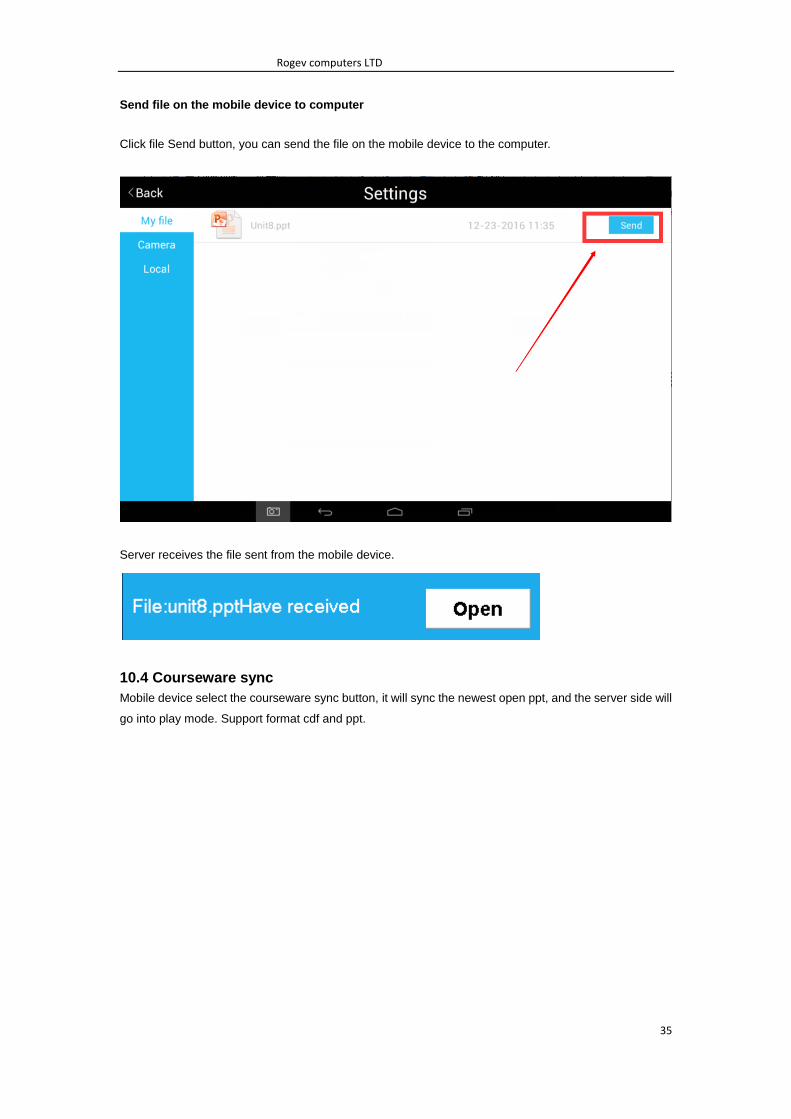
Send file on the mobile device to computer
Click file Send button, you can send the file on the mobile device to the computer.
Server receives the file sent from the mobile device.
10.4 Courseware sync
Mobile device select the courseware sync button, it will sync the newest open ppt, and the server side will
go into play mode. Support format cdf and ppt.
Rogev computers LTD
36
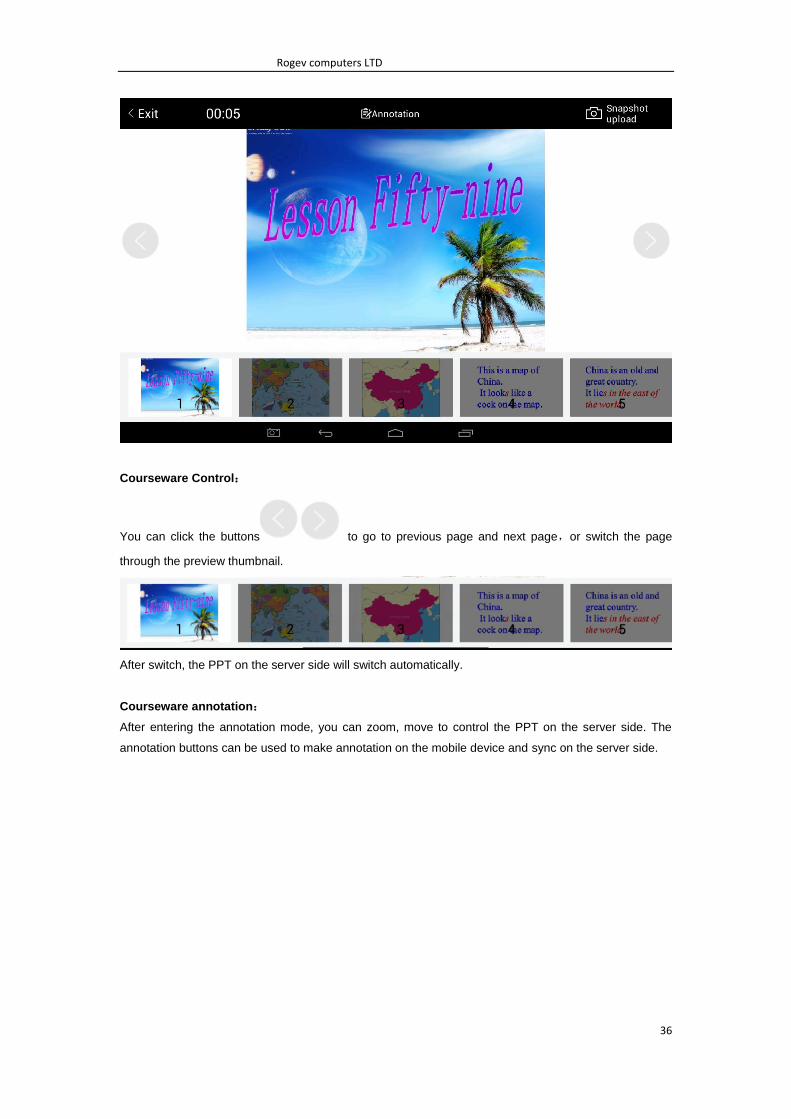
Courseware Control:
You can click the buttons to go to previous page and next page,or switch the page
through the preview thumbnail.
After switch, the PPT on the server side will switch automatically.
Courseware annotation:
After entering the annotation mode, you can zoom, move to control the PPT on the server side. The
annotation buttons can be used to make annotation on the mobile device and sync on the server side.
Rogev computers LTD
37
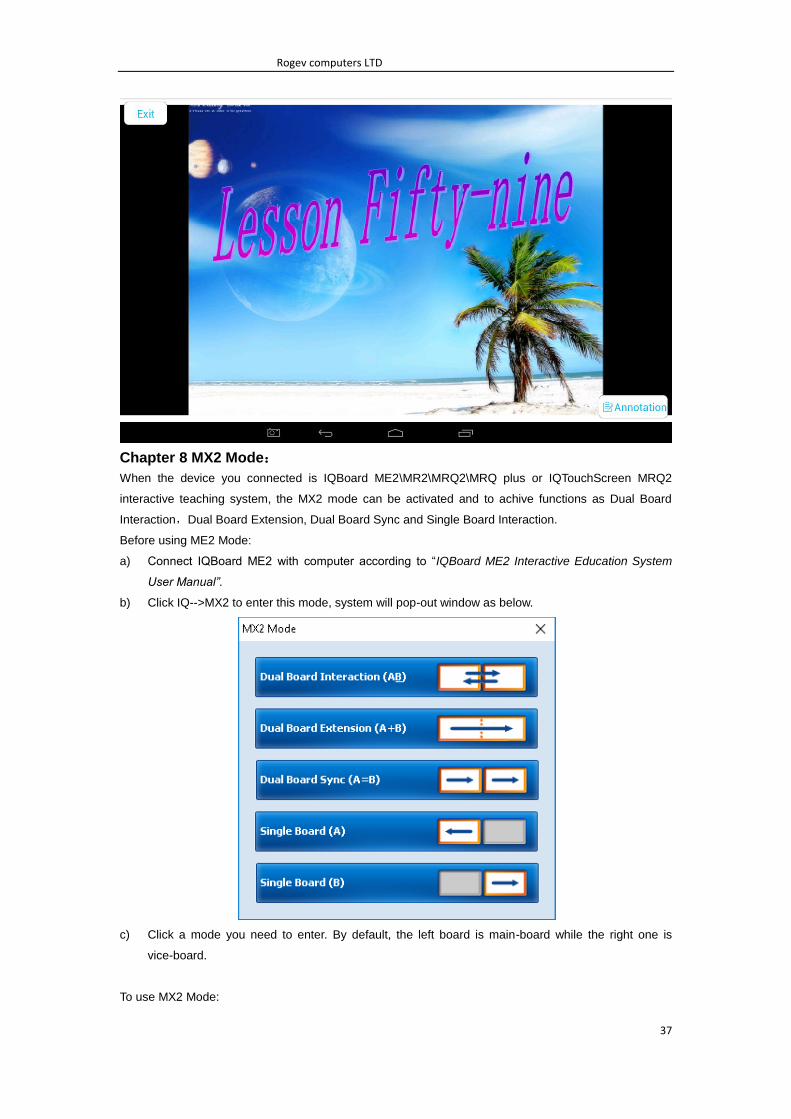
Chapter 8 MX2 Mode:
When the device you connected is IQBoard ME2\MR2\MRQ2\MRQ plus or IQTouchScreen MRQ2
interactive teaching system, the MX2 mode can be activated and to achive functions as Dual Board
Interaction,Dual Board Extension, Dual Board Sync and Single Board Interaction.
Before using ME2 Mode:
a) Connect IQBoard ME2 with computer according to “IQBoard ME2 Interactive Education System
User Manual”.
b) Click IQ-->MX2 to enter this mode, system will pop-out window as below.
c) Click a mode you need to enter. By default, the left board is main-board while the right one is
vice-board.
To use MX2 Mode:
Rogev computers LTD
38
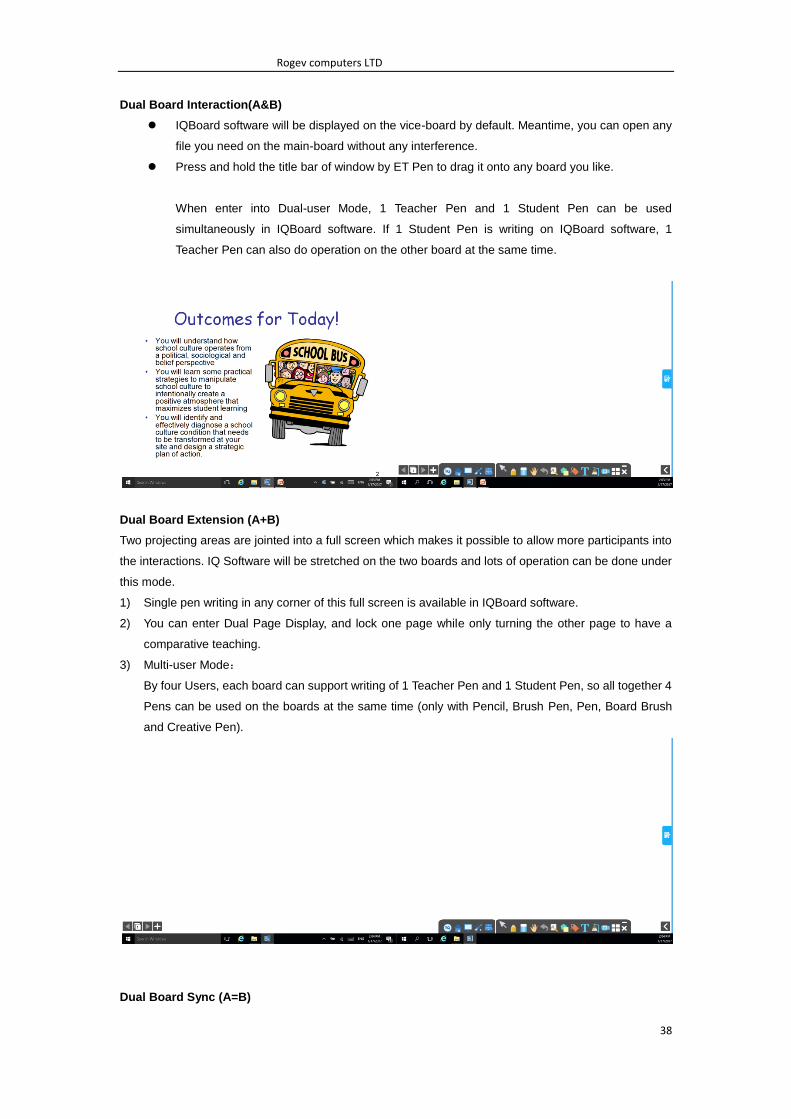
Dual Board Interaction(A&B)
IQBoard software will be displayed on the vice-board by default. Meantime, you can open any
file you need on the main-board without any interference.
Press and hold the title bar of window by ET Pen to drag it onto any board you like.
When enter into Dual-user Mode, 1 Teacher Pen and 1 Student Pen can be used
simultaneously in IQBoard software. If 1 Student Pen is writing on IQBoard software, 1
Teacher Pen can also do operation on the other board at the same time.
Dual Board Extension (A+B)
Two projecting areas are jointed into a full screen which makes it possible to allow more participants into
the interactions. IQ Software will be stretched on the two boards and lots of operation can be done under
this mode.
1) Single pen writing in any corner of this full screen is available in IQBoard software.
2) You can enter Dual Page Display, and lock one page while only turning the other page to have a
comparative teaching.
3) Multi-user Mode:
By four Users, each board can support writing of 1 Teacher Pen and 1 Student Pen, so all together 4
Pens can be used on the boards at the same time (only with Pencil, Brush Pen, Pen, Board Brush
and Creative Pen).
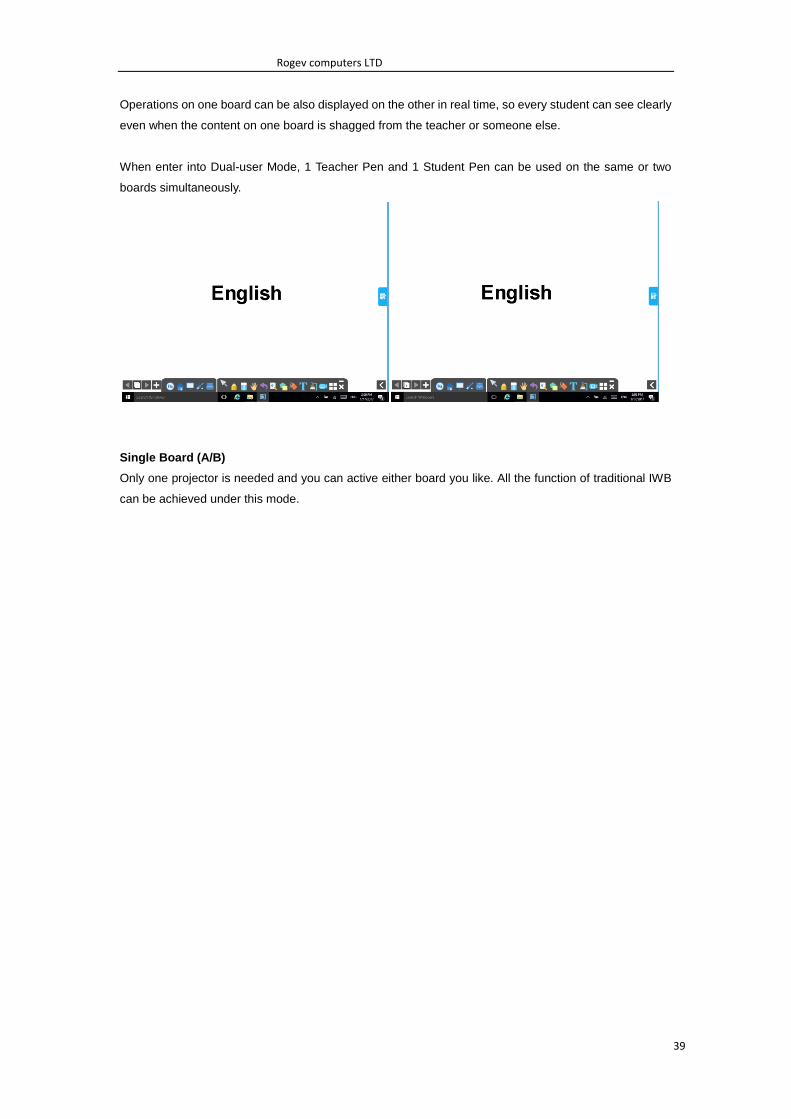
Dual Board Sync (A=B)
Rogev computers LTD
Operations on one board can be also displayed on the other in real time, so every student can see clearly
even when the content on one board is shagged from the teacher or someone else.
When enter into Dual-user Mode, 1 Teacher Pen and 1 Student Pen can be used on the same or two
boards simultaneously.
Single Board (A/B)
Only one projector is needed and you can active either board you like. All the function of traditional IWB
can be achieved under this mode.
39
Rogev computers LTD
40
FAQ
1. While installing the software, the installation interface window is stretched; and meantime,
when I start the software, it prompts unwonted error message. What can I do?
This problem will not occur if your computer is in normal use. If it occurs, the main reason is DPI of
display is too high. Please right click windows desktop blank and get the “Properties” menu, choose
“Settings” and then “Advanced”, change DPI into “Normal size (96dpi)” at DIP Setting. Then restart the
computer.
2. When operating and writing on the whiteboard with the software, the system response is slow,
or the stroke is intermittent. What’s up?
The computer is not under normal running or the memory is occupied too much. Please close some
applications or restart the computer.
Or the operating or writing force is uneven. Sometimes the force is too light to be sensed.
3. When inserting a video file into the whiteboard page and playing it, the video images cannot be
displayed, but a black screen there. How to handle it?
1) The video file doesn‟t exist at all, please select and insert again.
2) The video file has been damaged already, please repair and reinsert it.
3) Hardware acceleration is not enough, please do as follow: right click windows desktop blank,
“properties>Settings>Advanced>Troubleshoot”, and set “Hardware acceleration” from “None” to 3rd
rank.
4. While using the “Spotlight” tool, the concentrated area cannot be highlighted, what’s up?
The reason is the color quality in system is not enough to support this software function, please right click
windows desktop blank, get the “ Properties” menu, select “Settings” and then change “Color quality” to
“Highest (32bit)”.
Other questions, please consult our service center or local dealer.