is3016a passive infrared motion sensor with anti-mask ... · is3016a passive infrared motion sensor...
TRANSCRIPT

IS3016A Passive Infrared Motion Sensor with Anti-Mask - Installation Instructions QUICK LINKS Mounting Location Guidelines Open the Sensor Mount the Sensor Sensor Components and Settings Wire the Sensor
Wiring Examples Walk Test the Sensor Detection Patterns Remote LED Enable Relay Operation
Mask Condition Troubleshooting Sensor Specifications Accessories Approval Listings
1. Turn the arrow to point to the Unlock symbol. 2. Press firmly on housing latch. 3. Gently separate the front and rear housing.
[EN] = approved installation.
Mounting location guidelines: • The maximum range is obtained at a mounting height
of 2.3m (7’ 6”). • Allow a clear line-of-sight to all areas to protect. • Avoid mounting anything within 30cm (12”) in front of the sensor. • Do not directly face windows. • Avoid close proximity to moving machinery, fluorescent lights, and
heating/cooling sources. • Not for use in applications with pets.

- 2 -
• [A] = Wall mounting holes. • [B] = Corner mounting holes. • The rear tamper plate MUST be
mounted to a stud, solid wood, or with a robust wall anchor.
See wiring details and
examples on page 3.

- 3 -
WIRING DETAILS - Observe proper polarity. - If not using the integrated EOL resistors, set all switches to
OFF. - If using the integrated EOL resistors:
1. Connect the sensor to the panel (see wiring diagrams below).
2. Set the appropriate tamper, alarm and Anti-mask/ [RF] DIP switches to ON (see Step 4 on page 2).
Notes: - Consult the Control Panel manual to determine proper
EOL selection. - The Alarm, Tamper and Trouble/anti-mask EOL
settings must each only have one switch ON. - The EOL values should be set at the same time. - If not using the internal EOL resistors, set all switches
to OFF.
Wiring Examples
Alarm, Tamper and Trouble/Anti-Mask configured to one loop.
Alarm, Tamper and Trouble/Anti-Mask configured to two loops.
1. Close the sensor and apply power to the sensor. Initialization is complete when the LED stops flashing slowly (about 30 seconds).
2. Walk through the detection area and observe the LED.
Walk test mode is active for 10 minutes, then automatically exits test mode, disables the LED and enters normal operation mode. For an additional 10 minute walk test, enable Walk Test mode again with the Flashlight feature (see the following page.
RA = Alarm EOL resistor RF = Anti-Mask EOL resistor RT = Tamper EOL resistor W1 = 1 and 2 loop connection resistor.
Note: During power up and walk test modes the LED is active regardless of the LED Enable/Disable DIP switch setting.
LED Power Up
Walk Test [10 min.] Normal Trouble
Fault Anti-Mask
Red Slow Blink
ON Alarm
ON Alarm
Fast Blink OFF
Yellow OFF OFF OFF OFF Fast Blink
- 4 -
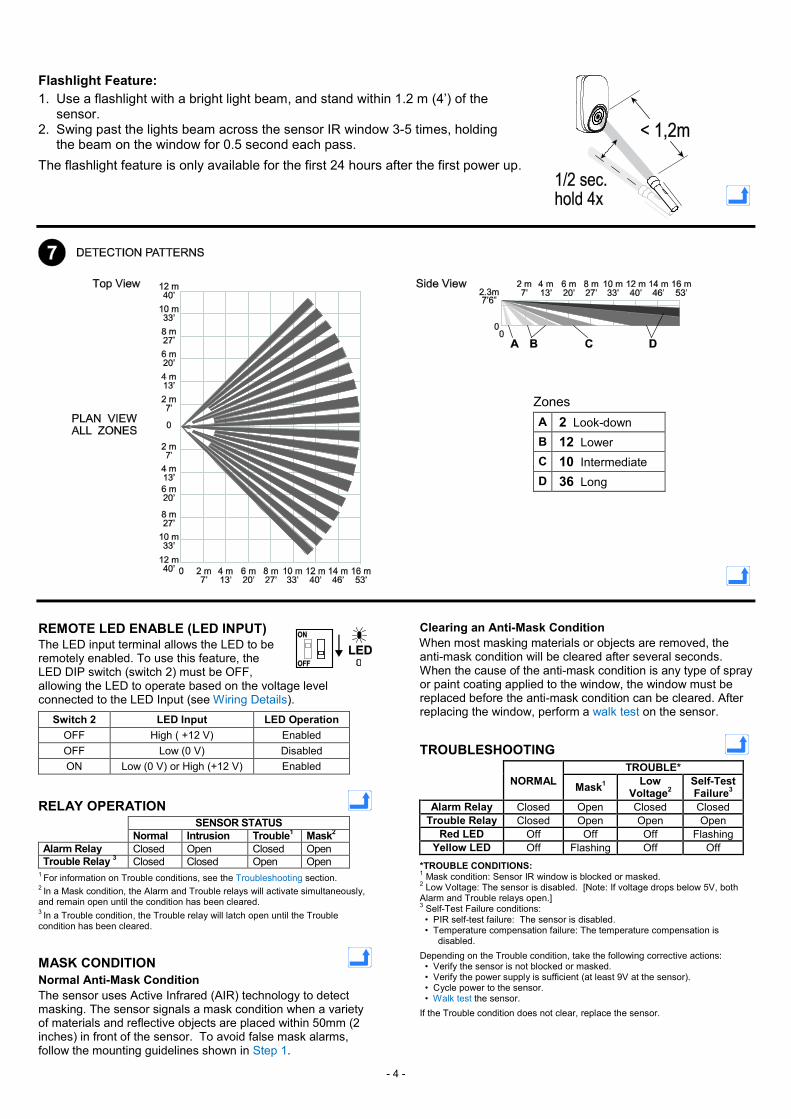
Flashlight Feature: 1. Use a flashlight with a bright light beam, and stand within 1.2 m (4’) of the
sensor. 2. Swing past the lights beam across the sensor IR window 3-5 times, holding
the beam on the window for 0.5 second each pass. The flashlight feature is only available for the first 24 hours after the first power up.
REMOTE LED ENABLE (LED INPUT) The LED input terminal allows the LED to be remotely enabled. To use this feature, the LED DIP switch (switch 2) must be OFF, allowing the LED to operate based on the voltage level connected to the LED Input (see Wiring Details).
Switch 2 LED Input LED Operation OFF High ( +12 V) Enabled OFF Low (0 V) Disabled ON Low (0 V) or High (+12 V) Enabled
RELAY OPERATION SENSOR STATUS Normal Intrusion Trouble1 Mask2 Alarm Relay Closed Open Closed Open Trouble Relay 3 Closed Closed Open Open
1 For information on Trouble conditions, see the Troubleshooting section. 2 In a Mask condition, the Alarm and Trouble relays will activate simultaneously, and remain open until the condition has been cleared. 3 In a Trouble condition, the Trouble relay will latch open until the Trouble condition has been cleared.
MASK CONDITION Normal Anti-Mask Condition The sensor uses Active Infrared (AIR) technology to detect masking. The sensor signals a mask condition when a variety of materials and reflective objects are placed within 50mm (2 inches) in front of the sensor. To avoid false mask alarms, follow the mounting guidelines shown in Step 1.
Clearing an Anti-Mask Condition When most masking materials or objects are removed, the anti-mask condition will be cleared after several seconds. When the cause of the anti-mask condition is any type of spray or paint coating applied to the window, the window must be replaced before the anti-mask condition can be cleared. After replacing the window, perform a walk test on the sensor.
TROUBLESHOOTING TROUBLE*
NORMAL Mask1 Low Voltage2
Self-Test Failure3
Alarm Relay Closed Open Closed Closed Trouble Relay Closed Open Open Open
Red LED Off Off Off Flashing Yellow LED Off Flashing Off Off
*TROUBLE CONDITIONS: 1 Mask condition: Sensor IR window is blocked or masked. 2 Low Voltage: The sensor is disabled. [Note: If voltage drops below 5V, both Alarm and Trouble relays open.] 3 Self-Test Failure conditions: • PIR self-test failure: The sensor is disabled. • Temperature compensation failure: The temperature compensation is
disabled. Depending on the Trouble condition, take the following corrective actions: • Verify the sensor is not blocked or masked. • Verify the power supply is sufficient (at least 9V at the sensor). • Cycle power to the sensor. • Walk test the sensor. If the Trouble condition does not clear, replace the sensor.
Zones A 2 Look-down B 12 Lower C 10 Intermediate D 36 Long

- 5 -
SPECIFICATIONS Range: 16 m x 22 m Power: 9.0 - 15 VDC; 9 mA typical, 11 mA maximum, 12 VDC; AC Ripple: 3 V peak-to-peak at nominal 12 VDC Alarm Relay: Energized Form A; 30 mA, 25 VDC, 22 Ohms resistance maximum. Alarm Relay Duration: 3 seconds Trouble Relay: Energized Form B; (NC) 30 mA, 25 VDC; 22 Ohms resistance maximum Tampers: Cover & Wall; (NC with cover installed) Form A; 30 mA, 25 VDC; Magnetic field RFI Immunity: 15 V/m, 80 MHz – 2.7 GHz PIR White Light Immunity: 10,000 Lux typical Fluorescent light filter: 50 Hz / 60 Hz. Operating Temperature: -10° to 55° C Relative Humidity: 5 to 95%; non-condensing Temperature Compensation: Advanced Dual Slope Dimensions: 11.6 cm H x 7.0 cm W x 4.3 cm D Weight: 118 g (net weight)
ACCESSORIES SMB-10 (P/N 0-000-110-01) Swivel Mount Bracket
SMB-10C (P/N 0-000-111-01) Swivel Mount Ceiling Bracket
SMB-10T (P/N 0-000-155-01) Swivel Mount Bracket w/Tamper
Note : The accessories are not covered by certifications.
APPROVAL LISTINGS
EN50131-2-2:2008, Security Grade 3, Environmental Class II. Suitable for connection to an EN 60950 Class II Limited Power Source. PD6662:2010
Note: In EN 50131-2-2 compliant installations, mount the sensor at 2.3m, do not use only the right side corner mounting holes, enable look down and lock the sensor housing with the cover lock (see “[EN]” where noted in Steps 1-4). Important: The sensor should be tested at least once each year
NF&A2P 3 boucliers (référentiel NF324-H58) et conforme aux normes EN50131-2-2 et RTC50131-2-2 IP30 IK04 – N° de certificat: 2631420016 Organisme de certification: CNPP Cert. : www.cnpp.com et AFNOR Cert.: www.marque-nf.com
Honeywell Security Group - BP1219
1198 avenue du docteur Maurice Donat
Sophia Antipolis 06254 Mougins Cedex. TEL: +33.4.92.94.29.50 FAX: +33.4.92.94.29.60
Corrente norminale: 12 = Corrente massima assorbita: 11 mA
INCERT X-XXX- XXXX LARMKLASS 4

For any additional information, please refer to our Website: http://www.honeywell.com/security/emea/hscdownload Or contact:
Honeywell Security Group Newhouse Industrial Estate Motherwell Lanarkshire ML1 5SB United Kingdom
Please contact your local authorised Honeywell representative for product warranty information.
2013 Honeywell International Inc. Honeywell and DUAL TEC are registered trademarks of Honeywell International Inc. All other trademarks are the properties of their respective owners. All rights reserved. Made in China.
P/N 800-15672 Rev A
Tel: +44(0)1698 738200 Email: [email protected]
www.honeywell.com/security