iscsi boot for primergy servers with intel network...
TRANSCRIPT

June 2015
iSCSI Boot for PRIMERGY Servers with Intel Network Controllers Installation and Configuration with Windows®

This manual is printed on paper treated with chlorine-free bleach.
Comments… Suggestions… Corrections…The User Documentation Department would like toknow your opinion of this manual. Your feedback helpsus optimize our documentation to suit your individual needs.
Feel free to send us your comments by e-mail to [email protected].
Certified documentation according to DIN EN ISO 9001:2008To ensure a consistently high quality standard anduser-friendliness, this documentation was created tomeet the regulations of a quality management system which complies with the requirements of the standardDIN EN ISO 9001:2008.
cognitas. Gesellschaft für Technik-Dokumentation mbHwww.cognitas.de
Copyright and TrademarksCopyright © Fujitsu Technology Solutions GmbH 2015.
All rights reserved.Delivery subject to availability; right of technical modifications reserved.
All hardware and software names used are trademarks of their respective manufacturers.
iSCSI Boot with Intel Controllers (Windows)
Contents
1 Introduction . . . . . . . . . . . . . . . . . . . . . . . . . . . . 5
2 iSCSI Boot with Windows Server 2008 SP2, 2008 R2 SP1, and 2012 R2 . . . . . . . . . . . . . . . . . . . . . . . . . . . . 7
2.1 Installation Overview . . . . . . . . . . . . . . . . . . . . . . . 8
2.2 System Requirements . . . . . . . . . . . . . . . . . . . . . . 8
2.3 iSCSI Boot with Windows Server . . . . . . . . . . . . . . . . 8
2.4 Installing Windows Server 2008 SP2 / R2 / 2012 R2 on an iSCSI Target . . . . . . . . . . . . . . . . . . . . . . . . . . . . 9
3 Configuring an MPIO Connection with Windows . . . . . . 13
3.1 Activating MPIO Support . . . . . . . . . . . . . . . . . . . 14
3.2 Configuring MPIO in the iSCSI Software Initiator . . . . . . 17
4 iSCSI Boot Configurations . . . . . . . . . . . . . . . . . . 25
4.1 iSCSI Boot Configurations in Legacy Mode . . . . . . . . . 254.1.1 Configuring Controller for iSCSI Boot . . . . . . . . . . . . . . 254.1.1.1 Activating the Option ROM Scan . . . . . . . . . . . . . . . 254.1.1.2 Configuring Network Controller for iSCSI Boot . . . . . . . . 264.1.2 Intel iSCSI Boot Configuration Utility . . . . . . . . . . . . . . 274.1.2.1 iSCSI Port Selection Menu . . . . . . . . . . . . . . . . . . 274.1.2.2 iSCSI Port Configuration Menu . . . . . . . . . . . . . . . 284.1.2.3 iSCSI Boot Configuration Menu . . . . . . . . . . . . . . . 294.1.2.4 iSCSI CHAP Configuration Menu . . . . . . . . . . . . . . 314.1.3 Checking the Connection . . . . . . . . . . . . . . . . . . . . 33
4.2 iSCSI Boot Configurations in UEFI Mode . . . . . . . . . . . 344.2.1 Configuring Controller for iSCSI Boot . . . . . . . . . . . . . . 344.2.2 Configuring Network Controller for iSCSI Boot . . . . . . . . . 354.2.2.1 iSCSI Boot Configuration Menu . . . . . . . . . . . . . . . 354.2.2.2 iSCSI CHAP Configuration . . . . . . . . . . . . . . . . . . 394.2.3 Checking the Connection and Preparing for Installation . . . . . 41

iSCSI Boot with Intel Controllers (Windows)
4.2.3.1 Checking the Connection . . . . . . . . . . . . . . . . . . . 414.2.3.2 Preparing the Operating System Installation . . . . . . . . . 41
5 Configuring a DHCP Server . . . . . . . . . . . . . . . . . . . 43
6 Configuring iSCSI Crash Dump . . . . . . . . . . . . . . . . 45
7 Troubleshooting . . . . . . . . . . . . . . . . . . . . . . . . . 47
Glossary . . . . . . . . . . . . . . . . . . . . . . . . . . . . . . . . . . 51

iSCSI Boot with Intel Controllers (Windows) 5
1 Introduction
iSCSI (Internet SCSI) is a protocol for linking servers and data storage facilities, similar to the Fibre Channel Protocol (FCP). iSCSI means “SCSI over Internet Protocol”. iSCSI boot allows a server to be booted remotely from a drive in an iSCSI-based Storage Area Network (SAN).
Figure 1: iSCSI connection
This manual describes how to configure a PRIMERGY server equipped with Intel network controllers for iSCSI boot, focusing on the following issues:
● Configuring the system BIOS and network controllers
● Associating an iSCSI initiator with the iSCSI target
● Recording the iSCSI target name, TCP port number, iSCSI LUN, and authentication details

6 iSCSI Boot with Intel Controllers (Windows)
Configuring the iSCSI Target
Configuration of the iSCSI target varies according to the iSCSI target vendor. In this document the various vendors cannot be covered in detail. The general steps include:
● Creating an iSCSI target
● Associating an iSCSI initiator with the iSCSI target
● Recording the iSCSI target name, TCP port number, iSCSI LUN, and authentication details
Refer to the iSCSI target vendor’s documentation for the specific steps associated with the selected iSCSI target device. After the target has been configured, the following information should be collected from the target:
● The iSCSI target IQN
● The iSCSI target IP address
● The iSCSI target TCP port number
● The iSCSI target CHAP ID & secret
The exact configuration process of a PRIMERGY server for iSCSI depends on the operating system.
References
RFC 3720, “Internet Small Computer Systems Interface (iSCSI)”, http://www.ietf.org/rfc/rfc3720.txt
RFC 4173, “Bootstrapping Clients using the Internet Small Computer System Interface (iSCSI) Protocol”, http://www.ietf.org/rfc/rfc4173.txt
I iSCSI via IPv4 is used in this document. It is also possible to use IPv6.

iSCSI Boot with Intel Controllers (Windows) 7
2 iSCSI Boot with Windows Server 2008 SP2, 2008 R2 SP1, and 2012 R2
This chapter describes how to configure your server with Windows Server 2008 SP2, 2008 R2 SP1, and 2012 R2 to support iSCSI boot with Intel LAN controllers. There are only a few minor differences between these three operating systems.
I ● Windows Server 2008 R2 is released only with SP1.
● Installing the operating system with the ServerView Installation Manager for iSCSI is not supported for onboard LAN cards.
● In addition to onboard LAN cards, different network adapters for iSCSI are also supported for the specified operating systems:
Installation via ServerView is also supported for these adapters.
Model FTS Code No. Part No.
Fujitsu Dual Port 10G Adapter D2755
S26361-F3629-E2/E202
A3C40120708
Intel X540-T Dual Port 10GBase-T Network Adapter
S26361-F3752-E2/E202
A3C40157065

8 iSCSI Boot with Intel Controllers (Windows)
System Requirements
2.1 Installation Overview
Configuring a system to support iSCSI boot under Windows Server 2008 consists of the following steps:
● Configuring the iSCSI Target (for general information, see page 6. For further information, please see the documentation provided by the iSCSI target manufacturer.)
● Configuring the LAN Controller (see "iSCSI Boot Configurations" on page 25).
● Installing Windows Server 2008 SP2 / R2 / 2012 R2 on an iSCSI Target (see page 9).
I With Windows Server 2008 SP2 / 2008 R2 / 2012 R2, you can configure a multipath connection (MPIO connection) using operating system resources. For detailed information, refer to chapter "Configuring an MPIO Connection with Windows" on page 13.
2.2 System Requirements
The iSCSI boot configuration described in this chapter requires Intel LAN controllers and Windows Server 2008 SP2, 2008 R2 or 2012 R2.
Please begin by finding out about the requirements of your PRIMERGY system as well as the requirements of the Intel controllers you use.
2.3 iSCSI Boot with Windows Server
iSCSI boot is possible both in legacy mode and in UEFI mode.
If you want to perform the iSCSI boot in legacy mode, follow the information for configuring the LAN controllers in "iSCSI Boot Configurations in Legacy Mode" on page 25.
If you want to perform the iSCSI boot in UEFI mode, refer to the information for configuring the LAN controllers in "iSCSI Boot Configurations in UEFI Mode" on page 34.

iSCSI Boot with Intel Controllers (Windows) 9
Installing Windows on an iSCSI Target
2.4 Installing Windows Server 2008 SP2 / R2 / 2012 R2 on an iSCSI Target
Ê Switch on the server and insert the operating system DVD. The system connects to the iSCSI target and boots from the DVD.
Once the boot process is completed, the entry menu of the Windows setup is displayed.
Ê Select the user interface language, time zone as well as the country variant of the connected keyboard and click Next.
The Windows Server 2008 SP2 / R2 / 2012 R2 welcome screen is displayed.
Ê Click Install Now. Continue working your way through the wizard until you come to the "Where do you want to install Windows" screen (see figure 2 on page 10).
Ê Click Load Driver (see figure 2 on page 10) to load the network driver currently released for your controller, even if the LUN is already displayed.To do this, you first need to connect a medium with the required drivers (e.g. via CD or USB device).

10 iSCSI Boot with Intel Controllers (Windows)
Installing Windows on an iSCSI Target
Figure 2: Windows Setup – Selecting the installation medium and driver
Ê After clicking Load driver, you can use the Browse button (see figure 3 on page 11) to select the correct driver for your adapters.

iSCSI Boot with Intel Controllers (Windows) 11
Installing Windows on an iSCSI Target
Figure 3: Example of a driver for Controller I210, in this case loaded from a CD
Ê Select the required driver, and confirm by clicking Next.
Ê Then select the required installation target (target LUN), and confirm your selection by clicking Next.
If no iSCSI target LUN is displayed in this menu, there are two possible reasons:
● The iSCSI parameters in the controller’s firmware setup do not match the corresponding parameters in the configuration of the iSCSI target. In this case you will need to check the iSCSI parameters in the controller’s firmware setup (see chapter "iSCSI Boot Configurations" on page 25), and restart the Windows setup.
● No drivers or incorrect drivers were installed. Make sure that the correct drivers are installed.
Ê Follow the instructions of the wizard to the end and then close it.

12 iSCSI Boot with Intel Controllers (Windows)
Installing Windows on an iSCSI Target
iSCSI Boot with Intel Controllers (Windows) 13
3 Configuring an MPIO Connection with Windows
With Windows Server 2008 SP2, 2008 R2 SP1 or 2012 R2, you can configure a multipath connection (MPIO connection) to an iSCSI target using operating system resources. This enhances the availability of the server when booting and in day-to-day operations. If the primary port fails, the secondary port takes over its function.
The following steps are required to configure a multipath connection:
1. Activating multipath support
2. Configuring the multipath connection in the iSCSI Software Initiator
3. Configuring the primary and secondary ports using the iSCSI Boot Configuration Utility.
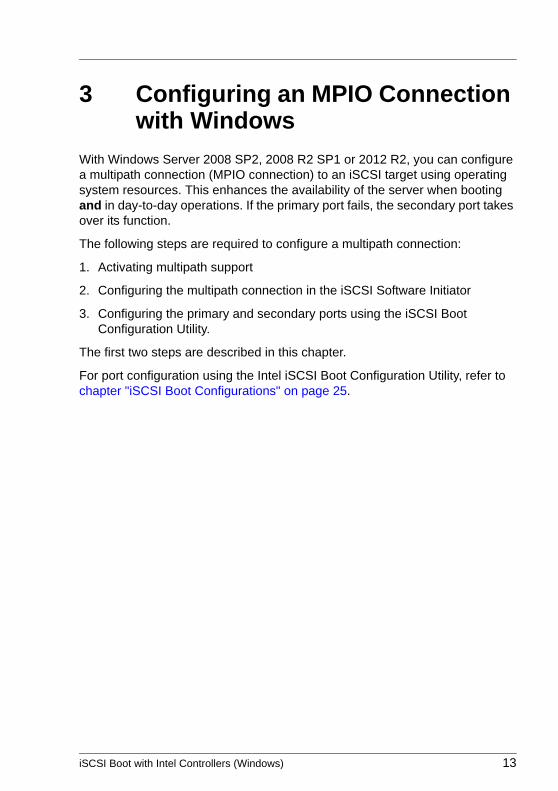
The first two steps are described in this chapter.
For port configuration using the Intel iSCSI Boot Configuration Utility, refer to chapter "iSCSI Boot Configurations" on page 25.

14 iSCSI Boot with Intel Controllers (Windows)
Activating MPIO Support
3.1 Activating MPIO Support
Windows Server 2008 SP2, 2008 R2 SP1, and 2012 R2
Ê Start the Windows Server Manager, open the Manage menu, and click Add Roles and Features (with 2008 SP2 / 2008 R2 under Features, and then click Add Features).
Figure 4: Server Manager -> Manage -> Add Roles and Features

iSCSI Boot with Intel Controllers (Windows) 15
Activating MPIO Support
The Select Features window opens.
Ê Work your way through the wizard and when you reach the "Features" step, select Multipath I/O, and click Next.
Figure 5: Server Manager – Select Features menu
Ê Follow the instructions of the wizard to the end.

16 iSCSI Boot with Intel Controllers (Windows)
Activating MPIO Support
Ê After restarting Windows (if necessary), start the program MPIO (with Windows 2008 SP2 / 2008 R2: Start – Programs –Administrative Tools; with Windows 2012: Server Manager – Tools – MPIO).
Ê Open the Discover Multi-Paths tab and activate the Add support for iSCSI devices option. Click Add.
Ê Click Ok and close the program.
Figure 6: MPIO Properties
Now a restart may be required.

iSCSI Boot with Intel Controllers (Windows) 17
Configuring MPIO in the Software Initiator
3.2 Configuring MPIO in the iSCSI Software Initiator
I The screenshots below show the user interface of the iSCSI Software Initiator with Windows Server 2012 R2. The interface with Windows Server 2008 SP2 / Windows Server 2008 R2 SP1 differs slightly from this, but the functions are the same.
Ê Start the Microsoft iSCSI Initiator and select the Discovery tab (use the Discover Portal tab with 2008 SP2):
Figure 7: Microsoft iSCSI Initiator – Discovery tab
Ê Delete any existing configurations.

18 iSCSI Boot with Intel Controllers (Windows)
Configuring MPIO in the Software Initiator
Ê Click Discover Portal to open the Add Target Portal dialog (use the Add button with Windows Server 2008 SP2).
Figure 8: Microsoft iSCSI Initiator – Discover Target Portal dialog
Ê Enter the IP address and the port number (Port:) for the first target portal and click Advanced to open the Advanced Settings dialog.

iSCSI Boot with Intel Controllers (Windows) 19
Configuring MPIO in the Software Initiator
Ê In the General tab, select Local adapter and Source IP for the primary adapter and click Ok.
Figure 9: Microsoft iSCSI Initiator – Advanced Settings dialog
To add the second adapter, repeat the above steps:
Ê Click Add to open the Add Target Portal dialog again.
Ê Enter the IP address and the port number (Port:) for the second target portal, and click Advanced... to open the Advanced Settings dialog.
Ê In the General tab, select Local adapter and Source IP for the secondary adapter, and click Ok.

20 iSCSI Boot with Intel Controllers (Windows)
Configuring MPIO in the Software Initiator
If everything is configured correctly, the two target portals are displayed on the Discovery tab of the Microsoft iSCSI Initiator.
Figure 10: Microsoft iSCSI Initiator – Discovery tab
iSCSI Boot with Intel Controllers (Windows) 21
Configuring MPIO in the Software Initiator
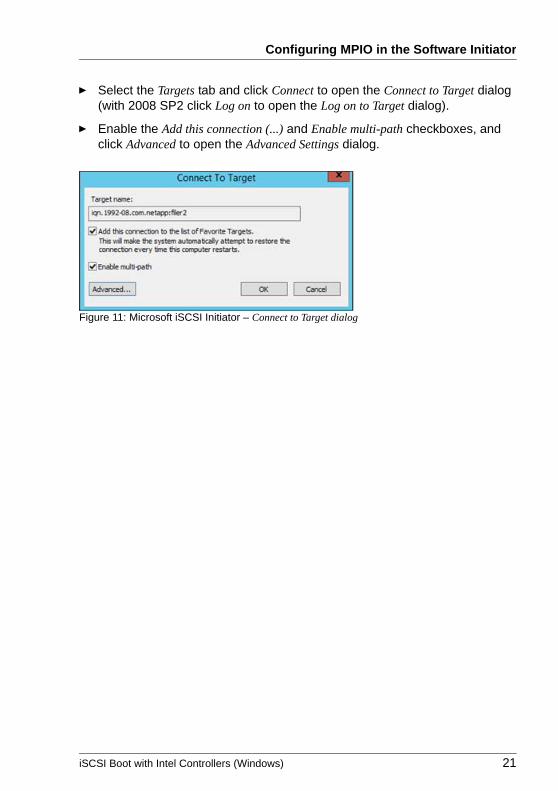
Ê Select the Targets tab and click Connect to open the Connect to Target dialog (with 2008 SP2 click Log on to open the Log on to Target dialog).
Ê Enable the Add this connection (...) and Enable multi-path checkboxes, and click Advanced to open the Advanced Settings dialog.
Figure 11: Microsoft iSCSI Initiator – Connect to Target dialog

22 iSCSI Boot with Intel Controllers (Windows)
Configuring MPIO in the Software Initiator
Ê In the General tab, select the primary adapter as the Target portal (IP) and click Ok.
Figure 12: Microsoft iSCSI Initiator – Advanced Settings dialog

iSCSI Boot with Intel Controllers (Windows) 23
Configuring MPIO in the Software Initiator
To add the second adapter, repeat the above steps:
Ê For the secondary adapter, click Connect again in the Targets tab (with 2008 SP2 click Log on ...). In the next screen, enable the Automatically restore and Enable multi-path checkboxes, and click Advanced to open the Advanced Settings dialog.
Ê In the General tab, select the secondary adapter as the Target portal and click Ok.
Ê Close the software initiator and restart the system.
You configure the second port in the relevant menu depending on whether you are using the legacy mode or UEFI mode (see "iSCSI Boot Configurations in Legacy Mode" on page 25 or "iSCSI Boot Configurations in UEFI Mode" on page 34).
Ê When you have finished the configuration, restart the system and boot to the operating system.
Ê Start the Microsoft iSCSI Initiator, select the Targets tab, and click Properties.With 2008 SP2: Select the Targets tab and click Details.

24 iSCSI Boot with Intel Controllers (Windows)
Configuring MPIO in the Software Initiator
Figure 13: Microsoft iSCSI Initiator – Sessions tab
If the configuration was effective, four sessions for the target are available.

iSCSI Boot with Intel Controllers (Windows) 25
4 iSCSI Boot Configurations
This chapter explains the configuration options for the iSCSI boot. For information on the legacy mode configuration options, see "iSCSI Boot Configurations in Legacy Mode" on page 25. For information on the UEFI mode configuration options, see "iSCSI Boot Configurations in UEFI Mode" on page 34.
4.1 iSCSI Boot Configurations in Legacy Mode
4.1.1 Configuring Controller for iSCSI Boot
4.1.1.1 Activating the Option ROM Scan
In the system BIOS, you must activate the Option ROM Scan for the controller in question to be able to call the Intel iSCSI Boot Configuration Utility for configuring the controller.
V Caution
Activate the Option ROM Scan only for the controller you want to use for iSCSI boot.
The procedure for activating the Option ROM Scan depends on the BIOS setup of your system. An example for a PRIMERGY Server RX1330 M1 server is provided below.
Ê In the Advanced menu of the BIOS setup, select Onboard Devices Configuration, and open the submenu.
Ê Select the entry of the LAN controller that you want to configure for iSCSI boot and set the parameter for this controller to iSCSI.
Ê Save the changes and exit the BIOS Setup.

26 iSCSI Boot with Intel Controllers (Windows)
Configuring the LAN Controller
Figure 14: BIOS Setup menu under Advanced -> Onboard Devices Configuration
4.1.1.2 Configuring Network Controller for iSCSI Boot
Ê To configure the network controller for iSCSI boot, restart the system.
Ê When the message Press <Ctrl-D> to run setup... is displayed, press {Ctrl}[D].
The Intel iSCSI Boot Configuration Utility starts.
Ê Continue as described in section "Intel iSCSI Boot Configuration Utility" on page 27.

iSCSI Boot with Intel Controllers (Windows) 27
Port Selection Menu
4.1.2 Intel iSCSI Boot Configuration Utility
The menus of the Intel iSCSI Boot Configuration Utility allow you to make the settings for the iSCSI boot.
4.1.2.1 iSCSI Port Selection Menu
The first menu of the Intel iSCSI Boot Configuration Utility displays a list of iSCSI boot-capable adapters. For each adapter port the associated PCI device ID, PCI bus/device/function location, and a field indicating iSCSI boot status is displayed. Up to 10 iSCSI boot-capable ports can be displayed within the port selection menu. If there are more iSCSI boot-capable adapters, these are not listed in the menu.
Figure 15: iSCSI Port Selection menu
Ê One network port in the system can be selected as the primary boot port by pressing the [P] key when highlighted. The primary boot port will be the first port used by the Intel iSCSI Boot Configuration Utility to connect to the iSCSI target. Only one port may be selected as a primary boot port.
Ê One network port in the system can be selected as the secondary boot port by pressing the [S] key when highlighted. The secondary boot port will only be used to connect to the iSCSI target disk if the primary boot port fails to establish a connection. Only one port may be selected as a secondary boot port (see also chapter "Configuring an MPIO Connection with Windows" on page 13).

28 iSCSI Boot with Intel Controllers (Windows)
Port Configuration Menu
Ê Pressing the [D] key with a network port highlighted will disable iSCSI boot on that port.
Ê Pressing the [B] key with a network port highlighted will blink an LED on that port.
Ê Use the arrow keys to select the required controller and press the "Enter" key to go to the iSCSI Boot Configuration menu (see section "iSCSI Port Configuration Menu").
Ê Press the [Esc] key to leave the screen.
4.1.2.2 iSCSI Port Configuration Menu
Figure 16: iSCSI Port Configuration menu
iSCSI Boot ConfigurationSelecting this option will take you to the iSCSI Boot Configuration menu. This menu is described in detail in the section below and will allow you to configure the iSCSI parameters for the selected network port.
iSCSI CHAP ConfigurationSelecting this option will take you to the iSCSI CHAP Configuration menu. This menu is described in detail in the section below.
iSCSI Boot with Intel Controllers (Windows) 29
Boot Configuration Menu
Discard changes and ExitSelecting this option will discard all changes made in the iSCSI Boot Configuration and iSCSI CHAP Configuration menus, and return back to the iSCSI Port Configuration menu.
Save changes and ExitSelecting this option will save all changes made in the iSCSI Boot Configuration and iSCSI CHAP Configuration menus. After selecting this option, you will return to the iSCSI Port Configuration menu.
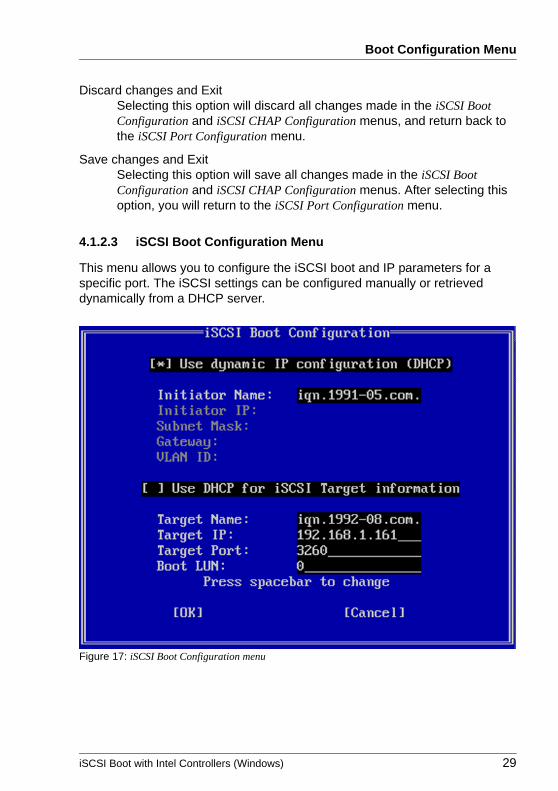
4.1.2.3 iSCSI Boot Configuration Menu
This menu allows you to configure the iSCSI boot and IP parameters for a specific port. The iSCSI settings can be configured manually or retrieved dynamically from a DHCP server.
Figure 17: iSCSI Boot Configuration menu

30 iSCSI Boot with Intel Controllers (Windows)
Boot Configuration Menu
Use Dynamic IP Configuration (DHCP)Selecting this checkbox will cause iSCSI boot to attempt to get the client IP address, subnet mask, and gateway IP address from a DHCP server. If this checkbox is enabled, these fields will not be visible (see also chapter "Configuring a DHCP Server" on page 43).
Initiator NameEnter the iSCSI initiator name to be used by iSCSI boot when connecting to an iSCSI target. The value entered in this field is global and used by all iSCSI boot enabled ports in the system. This field may be left blank if the Use DHCP for iSCSI Target information checkbox is enabled. For information on how to retrieve the iSCSI initiator name dynamically from a DHCP server see chapter "Configuring a DHCP Server" on page 43.
Initiator IPEnter the client IP address to be used for this port as static IP configuration in this field. This IP address will be used by the port during the entire iSCSI session. This option is visible if DHCP is not enabled.
Subnet MaskEnter the IP subnet mask in this field. This should be the IP subnet mask used on the network which the selected port will be connecting to for iSCSI. This option is visible if DHCP is not enabled.
Gateway IPEnter the IP address of the network gateway in this field. This field is necessary if the iSCSI target is located on a different sub-network than the selected iSCSI boot port. This option is visible if DHCP is not enabled.
Use DHCP for iSCSI Target InformationSelecting this checkbox will cause iSCSI boot to attempt to gather the iSCSI target's IP address, IP port number, iSCSI target name, and SCSI LUN ID from a DHCP server on the network. For information on how to configure the iSCSI target parameters using DHCP see chapter "Configuring a DHCP Server" on page 43. When this checkbox is enabled, these fields will not be visible.
Target NameEnter the IQN name of the iSCSI target in this field. This option is visible if DHCP for iSCSI target is not enabled.
Target IPEnter the target IP address of the iSCSI target in this field. This option is visible if DHCP for iSCSI target is not enabled.

iSCSI Boot with Intel Controllers (Windows) 31
CHAP Configuration Menu
Target PortTCP Port Number (default: 3260 for iSCSI).
Boot LUNEnter the LUN ID of the boot disk on the iSCSI target in this field. This option is visible if DHCP for iSCSI target is not enabled.
4.1.2.4 iSCSI CHAP Configuration Menu
iSCSI boot supports Mutual CHAP MD5 authentication with an iSCSI target. iSCSI boot uses the MD5 Message Digest Algorithm developed by RSA Data Security, Inc.
Figure 18: iSCSI CHAP Configuration menu
Use CHAPSelecting this checkbox will enable CHAP authentication for this port. CHAP allows the target to authenticate the initiator. After activating CHAP, you must enter a user name and password for the target.

32 iSCSI Boot with Intel Controllers (Windows)
CHAP Configuration Menu
User NameEnter the CHAP user name in this field. This must be the same as the CHAP user name configured on the iSCSI target.
Target SecretEnter the CHAP password in this field. This must be the same as the CHAP password configured on the iSCSI target and must be between 12 and 16 characters in length. This password must differ from the password in the Initiator Secret field.
Use Mutual CHAPSelecting this checkbox will enable Mutual CHAP authentication for this port. Mutual CHAP allows the initiator to authenticate the target. After enabling Mutual CHAP authentication, an initiator password must be entered. Mutual CHAP can only be selected if Use CHAP is selected.
Initiator SecretEnter the Mutual CHAP password in this field. This must be the same as the CHAP password configured on the iSCSI target and must be between 12 and 16 characters in length. This password must differ from the password in the Target Secret field.
The CHAP Authentication feature of this product requires the following acknowledgments:
This product includes cryptographic software written by Eric Young ([email protected]). This product includes software written by Tim Hudson ([email protected]).
This product includes software developed by the OpenSSL Project for use in the OpenSSL Toolkit http://www.openssl.org. A complete licensing statement can be found here.
VLAN ID
The VLAN ID field was grayed out in the iSCSI boot firmware screen because the Microsoft iSCSI Boot Initiator does not support Vlans.

iSCSI Boot with Intel Controllers (Windows) 33
CHAP Configuration Menu
4.1.3 Checking the Connection
During the boot process you can see whether a connection to the target was established:
The following screen is displayed for a short time in legacy mode if it was possible to establish a connection to the iSCSI target.
Figure 19: Connecting to the iSCSI target

34 iSCSI Boot with Intel Controllers (Windows)
Configuring the LAN Controller
4.2 iSCSI Boot Configurations in UEFI Mode
4.2.1 Configuring Controller for iSCSI Boot
Before starting with the configuration of the iSCSI boot in UEFI mode, you need to configure various settings in the BIOS. Examples of the settings selected on the PRIMERGY Server RX1330 M1 are provided below.
Ê In the Boot menu of the BIOS Setup, first select CSM Configuration, and open the submenu.
Ê Set the parameter for Launch CSM to Disabled.
Figure 20: Setup under Boot -> CSM Configuration
Ê Next, in the Advanced tab of the BIOS Setup, select Network Stack, and open the submenu.
Ê Set all parameters to Enabled.

iSCSI Boot with Intel Controllers (Windows) 35
Configuring the LAN Controller
Figure 21: Setup under Advanced -> Network Stack
Ê Save the changes and exit the BIOS Setup.
4.2.2 Configuring Network Controller for iSCSI Boot
4.2.2.1 iSCSI Boot Configuration Menu
To configure the network controller for iSCSI boot, restart the system. Boot into the BIOS again.
In the Advanced tab, you can first view the adapter properties and configurations.
If several adapters are connected, you can then use this and other information to decide which adapter you want to configure, or whether you wish to configure two adapters (e.g. for MPIO, see chapter "Configuring an MPIO Connection with Windows" on page 13).

36 iSCSI Boot with Intel Controllers (Windows)
Configuring the LAN Controller
Figure 22: Menu under Advanced
You then need to call the iSCSI configurations in the BIOS.
Figure 23: Setup under Advanced -> iSCSI Configuration
Ê Enter the name of the initiator. Note that the iSCSI initiator name as well as the other information below must comply with a specific syntax.
Initiator NameEnter the iSCSI initiator name to be used by iSCSI boot when connecting to an iSCSI target. The value entered in this field is global and used by all iSCSI boot enabled ports in the system.
Now add a new attempt with the required adapter in Add an Attempt.

iSCSI Boot with Intel Controllers (Windows) 37
Configuring the LAN Controller
Figure 24: Setup options under Advanced -> iSCSI Configuration -> Add an Attempt
Ê Enter the parameters to be used in Add an Attempt , and confirm these by clicking Save Changes.
You can configure the following information:
Enable DHCPBy selecting Enabled, iSCSI boot will attempt to retrieve the client IP address, subnet mask, and gateway IP address from a DHCP server. If the parameter is set to Enabled, the input fields for the settings obtained automatically (initiator IP, subnet mask, gateway IP) are not visible (see also chapter "Configuring a DHCP Server" on page 43).
Initiator IPEnter the client IP address to be used for this port as static IP configuration in this field. This IP address will be used by the port during the entire iSCSI session. This option is visible if DHCP is not enabled.
Subnet MaskEnter the IP subnet mask in this field. This should be the IP subnet mask used on the network which the selected port will be connecting to for iSCSI. This option is visible if DHCP is not enabled.

38 iSCSI Boot with Intel Controllers (Windows)
Configuring the LAN Controller
Gateway IPEnter the IP address of the network gateway in this field. This field is necessary if the iSCSI target is located on a different sub-network than the selected iSCSI boot port. This option is visible if DHCP is not enabled.
Use DHCP for iSCSI Target InformationThis option appears if the general DHCP is set to Enabled. If this option is also set to Enabled, iSCSI boot will attempt to retrieve the iSCSI target's IP address, IP port number, iSCSI target name, and SCSI LUN ID from a DHCP server on the network.
For information on how to retrieve the iSCSI target parameters dynamically from a DHCP server, see "Configuring a DHCP Server" on page 37. You can now enter the following information (Target Name, Target IP, Target Port, Boot LUN) if this option is set to disabled.
Target NameEnter the IQN name of the iSCSI target in this field. This option is visible if DHCP for iSCSI target is not enabled.
Target IPEnter the target IP address of the iSCSI target in this field. This option is visible if DHCP for iSCSI target is not enabled.
Target PortTCP Port Number (default: 3260 for iSCSI).
Boot LUNEnter the LUN ID of the boot disk on the iSCSI target in this field. This option is visible if DHCP for iSCSI target is not enabled.
Authentication TypeHere you can configure whether you want to use an authentication method. If you select None, all other parameters are hidden. If you select CHAP, these parameters are shown. For more information, see the next chapter … (iSCSI CHAP Configuration)
4.2.2.2 iSCSI CHAP Configuration
If the authentication type is set to CHAP for the iSCSI configurations, additional options appear.

iSCSI Boot with Intel Controllers (Windows) 39
Configuring the LAN Controller
Figure 25: Setup options for CHAP under Advanced -> iSCSI Configuration -> Add an Attempt
CHAP TypeHere you can configure whether the authentication method is to be one-way CHAP (the target authenticates the initiator, but the initiator does not authenticate the target) or "Mutual CHAP" (both the target and initiator authenticate each other). If one-way CHAP authentication is enabled, only the following two options CHAP Name and CHAP Secret are displayed. If mutual CHAP authentication is enabled, the options Reverse CHAP Name and Reverse CHAP Secret are also displayed.
CHAP NameEnter the CHAP user name in this field. This must be the same as the CHAP user name configured on the iSCSI target.
CHAP SecretEnter the CHAP password in this field. This password must
be identical to the password configured on the iSCSI target. It must contain 12 to 16 characters. This password must differ from the password in the Reverse CHAP Secret field.

40 iSCSI Boot with Intel Controllers (Windows)
Configuring the LAN Controller
Reverse CHAP NameEnter the Mutual CHAP user name in this field. This must be the same as the CHAP user name configured on the iSCSI target.
Reverse CHAP SecretEnter the Mutual CHAP password in this field. This password must be identical to the password configured on the iSCSI target. It must contain 12 to 16 characters. This password must differ from the password in the CHAP Secret field.
I The CHAP Authentication feature of this product requires the following acknowledgments:
This product includes cryptographic software written by Eric Young ([email protected]). This product includes software written by Tim Hudson ([email protected]).
This product includes software developed by the OpenSSL Project for use in the OpenSSL Toolkit http://www.openssl.org. A complete licensing statement can be found here.
VLAN ID
The Microsoft iSCSI Boot Initiator does not support VLANS in UEFI mode.

iSCSI Boot with Intel Controllers (Windows) 41
Configuring the LAN Controller
4.2.3 Checking the Connection and Preparing for Installation
4.2.3.1 Checking the Connection
For iSCSI booting in UEFI mode, the connection to the iSCSI target can be tested by booting to the EFI Shell.
When doing so, the following entry is displayed:
Figure 26: Checking the connection via the EFI Shell
4.2.3.2 Preparing the Operating System Installation
If you then want to install the operating system, it is important that you select the image next to the UEFI in the boot menu if there are several possible entries.
Figure 27: Boot menu for the iSCSI UEFI boot
Confirm this to boot and then follow the steps in section "Installing Windows Server 2008 SP2 / R2 / 2012 R2 on an iSCSI Target" on page 9.
42 iSCSI Boot with Intel Controllers (Windows)
Configuring the LAN Controller

iSCSI Boot with Intel Controllers (Windows) 43
5 Configuring a DHCP Server
If you want to use Dynamic Host Configuration Protocol (DHCP) for the iSCSI boot, the DHCP server needs to be configured to provide the iSCSI boot configurations to the iSCSI initiator. It is necessary to set up the DHCP server to specify Root Path option 17 and Host Name option 12 to respond iSCSI target information back to the iSCSI initiator. DHCP option 3, router list may be necessary, depending on the network configuration.
DHCP Root Path Option 17
The iSCSI root path option configuration string uses the following format:
iscsi:<server name or IP address>:<protocol>:<port>:<LUN>:<target name>
server name or IP addressDHCP server name or valid IPv4 address literal. Example: 192.168.0.20
protocolTransportation protocol used by iSCSI. Default is tcp (6). No other protocols are currently supported.
portPort number of the iSCSI. A default value of 3260 will be used if this field is left blank.
LUNLUN ID configured on iSCSI target system. Default is zero.
target nameiSCSI target name to uniquely identify an iSCSI target in IQN format. Example: iqn.1986-03.com.intel:target1
DHCP Host Name Option 12
Configure option 12 with the host name of the iSCSI initiator.
DHCP Option 3, Router List
Configure option 3 with the gateway or router IP address, if the iSCSI initiator and iSCSI target are on different subnets.

44 iSCSI Boot with Intel Controllers (Windows)
Configuring a DHCP Server

iSCSI Boot with Intel Controllers (Windows) 45
6 Configuring iSCSI Crash Dump
Windows Server 2008 SP2, 2008 R2, and 2012 R2 allow installing crash dump functionality for servers started via iSCSI boot. In case of a system crash, the crash dump is stored to the iSCSI target LUN from which the crashed server was booted.
Windows Server 2008 SP2 / 2008 R2 / 2012 R2
Crash dump file generation is supported for iSCSI-booted Windows Server 2008 SP2 / 2008 R2 / 2012 R2 by the Intel iSCSI Crash Dump Driver.
To set up crash dump support, follow these steps:
1. Set up Windows iSCSI boot as described in earlier documentation.
2. Make sure that the Intel(R) PROSet for Windows Device Manager is installed.
3. Open the properties of your network adapter:
– for 2008 SP2 / R2 under Boot Options,
– for 2012 R2 under Server Manager -> Tools -> Computer Manager ->Device Manager -> Network Adapter -> right-click Properties
46 iSCSI Boot with Intel Controllers (Windows)
Configuring iSCSI Crash Dump
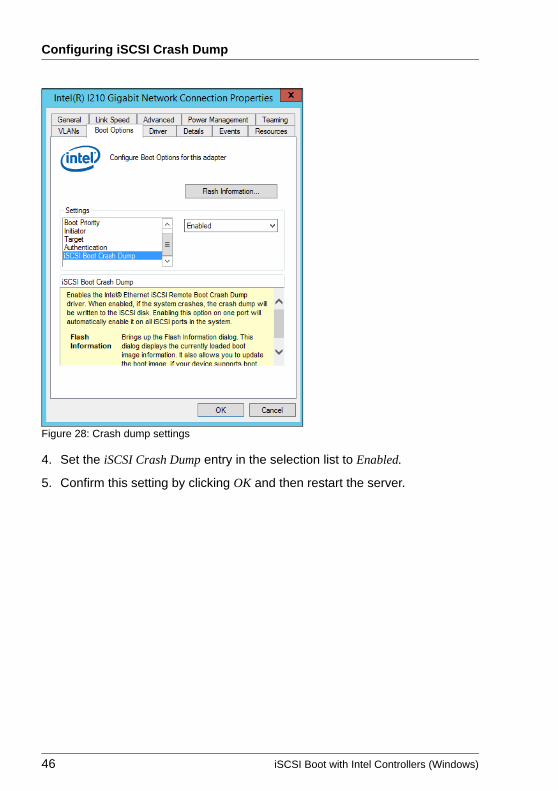
Figure 28: Crash dump settings
4. Set the iSCSI Crash Dump entry in the selection list to Enabled.
5. Confirm this setting by clicking OK and then restart the server.

iSCSI Boot with Intel Controllers (Windows) 47
7 Troubleshooting
This chapter lists problems that can occur when using Intel iSCSI Boot.
● iSCSI Boot does not load on system startup and the sign-on banner is not displayed.
– While the system logon screen may display for a longer time during system startup, iSCSI Boot may not be displayed during POST.It may be necessary to disable a system BIOS feature in order to display messages from iSCSI Boot. From the system BIOS menu, disable any quiet boot or quick boot options. Also disable any BIOS splash screens. These options may be suppressing output from iSCSI Boot.
– Option ROM Scan is disabled in the system BIOS. Enable Option ROM Scan if you want to use the legacy mode.
– The system BIOS may be suppressing output from iSCSI Boot.
– Sufficient system BIOS memory may not be available to load iSCSI Boot. Attempt to disable unused disk controllers and devices in the system BIOS setup menu. SCSI controllers, RAID controller, PXE enabled network connections, and shadowing of system BIOS all reduce the memory area available to iSCSI Boot. Disable these devices and reboot the system to see if iSCSI Boot is able to initialize. If disabling the devices in the system BIOS menu does not resolve the problem then attempt to remove unused disk devices or disk controllers from the system.
● After installing iSCSI Boot, the system will not boot to a local disk or network boot device. The system becomes unresponsive after iSCSI Boot displays the signon banner or after connecting to the iSCSI target.
– A critical system error has occurred during iSCSI Boot initialization. Power on the system and press the [s] key or [ESC] key before iSCSI Boot initializes. This will bypass the iSCSI Boot initialization process and allow the system to boot to a local drive.
– Update the system BIOS.
● Intel(R) iSCSI Remote Boot does not show up as a boot device in the system BIOS boot device menu.
– The system BIOS may not support iSCSI Boot. Update the system BIOS with the most recent version available from the system vendor.

48 iSCSI Boot with Intel Controllers (Windows)
Troubleshooting
– A conflict may exist with another installed device. Attempt to disable unused disk and network controllers. Some SCSI and RAID controllers are known to cause compatibility problems with iSCSI Boot.
● ERROR: Failed to detect link
– iSCSI Boot was unable to detect link on the network port. Check the link detection light on the back of the network connection. The link light should illuminate green when link is established with the link partner.
● ERROR: DHCP Server not found!
iSCSI was configured to retrieve an IP address from DHCP but no DHCP server responded to the DHCP discovery request. This issue can have multiple causes:
– The DHCP server may have used up all available IP address reservations.
– The client iSCSI system may require static IP address assignment on the connected network.
– There may not be a DHCP server present on the network.
– Spanning Tree Protocol (STP) on the network switch may be preventing the iSCSI Boot port from contacting the DHCP server. Refer to your network switch documentation on how to disable Spanning Tree Protocol.
● ERROR: Invalid iSCSI connection information
– The iSCSI configuration information received from DHCP or statically configured in the setup menu is incomplete and an attempt to login to the iSCSI target system could not be made. Verify that the iSCSI initiator name, iSCSI target name, target IP address, and target port number are configured properly in the iSCSI setup menu (for static configuration) or on the DHCP server (for dynamic BOOTP configuration).
● ERROR: Unsupported SCSI disk block size!
– The iSCSI target system is configured to use a disk block size that is not supported by iSCSI Boot. Configure the iSCSI target system to use a disk block size of either 512, 1024, or 2048 in bytes.

iSCSI Boot with Intel Controllers (Windows) 49
Troubleshooting
● ERROR: Could not establish TCP/IP connection with iSCSI target system.
– iSCSI Boot was unable to establish a TCP/IP connection with the iSCSI target system. Verify that the initiator and target IP address, subnet mask, port and gateway settings are configured properly. Verify the settings on the DHCP server if applicable. Check that the iSCSI target system is connected to a network accessible to the iSCSI Boot initiator. Verify that the connection is not being blocked by a firewall.
● ERROR: CHAP authentication with target failed.
– The CHAP user name or secret does not match the CHAP configuration on the iSCSI target system. Verify the CHAP configuration on the iSCSI Boot port matches the iSCSI target system CHAP configuration. Disable CHAP in the iSCSI Boot setup menu if it is not enabled on the target.
● ERROR: Login request rejected by iSCSI target system.
– A login request was sent to the iSCSI target system but the login request was rejected. Verify the iSCSI initiator name, target name, LUN number, and CHAP authentication settings match the settings on the iSCSI target system. Verify that the target is configured to allow the iSCSI Boot initiator access to a LUN.
● When installing Linux to Net App Filer, after a successful target disk discovery, error messages may be seen similar to those listed below.
Iscsi-sfnet:hostx: Connect failed with rc 113: No route to host
Iscsi-sfnet:hostx: establish_session failed. Could not connect to target
– If these error messages are seen, unused iSCSI interfaces on Net App filer should be disabled.
– Continuous=no should be added to the iscsi.conf file.

50 iSCSI Boot with Intel Controllers (Windows)
Troubleshooting
● ERROR: iSCSI target not found.
– Target IP address, however an iSCSI target with the specified iSCSI target name could not be found on the target system. Verify that the configured iSCSI target name and initiator name match the settings on the iSCSI target.
● ERROR: iSCSI target can not accept any more connections.
– The iSCSI target cannot accept any new connections. This error could be caused by a configured limit on the iSCSI target or a limitation of resources (no disks available).
● ERROR: iSCSI target has reported an error.
– An error has occurred on the iSCSI target. Inspect the iSCSI target to determine the source of the error and ensure it is configured properly.
● ERROR: There is an IP address conflict with another system on the network.
– A system on the network was found using the same IP address as the iSCSI Option ROM client.
– If using a static IP address assignment, attempt to change the IP address to something which is not being used by another client on the network.
– If using an IP address assigned by a DHCP server, make sure there are no clients on the network which are using an IP address which conflicts with the IP address range used by the DHCP server.

iSCSI Boot with Intel Controllers (Windows) 51
Glossary
CHAPChallenge Handshake Authentication Protocol. An authentication protocol in which the authentication agent (typically a network server) sends the client program a random value that is used only once.
DHCPDynamic Host Configuration Protocol. A protocol for assigning dynamic IP addresses to devices on a network.
FQDNFully Qualified Domain Name. An Internet address which consists of a hostname and a domain name of the form www.intel.com.
IQNiSCSI Qualified Name. A naming convention supported by iSCSI to uniquely identify an iSCSI initiator or target.
iSCSI InitiatorA client device that connects to the iSCSI service offered by an iSCSI target. Similar in concept to a SCSI controller that plugs into a PC system.
iSCSI TargetA server device that offers the iSCSI service to an iSCSI initiator. Similar in concept to a SCSI drive used in a PC system.
PXEPre-Boot eXecution Environment. An environment to bootstrap computers using a network interface card rather than using local media.
UNDIUniversal Network Device Interface. An application programming interface (or API) for network interface cards. Most commonly associated with PXE.

52 iSCSI Boot with Intel Controllers (Windows)
Glossary