isilon onefs 7.1 backup and recovery guide · ndmp backup and recovery tasks ... create a data...
TRANSCRIPT

IsilonOneFSVersion 7.1
Backup and recovery guide
Copyright © 2013-2014 EMC Corporation. All rights reserved. Published in USA.
Published March, 2014
EMC believes the information in this publication is accurate as of its publication date. The information is subject to changewithout notice.
The information in this publication is provided as is. EMC Corporation makes no representations or warranties of any kind withrespect to the information in this publication, and specifically disclaims implied warranties of merchantability or fitness for aparticular purpose. Use, copying, and distribution of any EMC software described in this publication requires an applicablesoftware license.
EMC², EMC, and the EMC logo are registered trademarks or trademarks of EMC Corporation in the United States and othercountries. All other trademarks used herein are the property of their respective owners.
For the most up-to-date regulatory document for your product line, go to EMC Online Support (https://support.emc.com). Fordocumentation on EMC Data Domain products, go to the EMC Data Domain Support Portal (https://my.datadomain.com).
EMC CorporationHopkinton, Massachusetts 01748-91031-508-435-1000 In North America 1-866-464-7381www.EMC.com
2 OneFS 7.1 Backup and recovery guide

Introduction to this guide 7
About this guide..............................................................................................8Isilon scale-out NAS overview..........................................................................8Where to go for support...................................................................................8
OneFS backup and recovery 9
OneFS backup and recovery overview............................................................10SyncIQ backup and recovery overview...........................................................10NDMP backup and recovery overview............................................................ 10
Data replication with SyncIQ 13
Replication policies and jobs........................................................................ 14Source and target cluster association...............................................15Full and differential replication.........................................................15Controlling replication job resource consumption............................ 15Replication reports...........................................................................16
Replication snapshots...................................................................................16Source cluster snapshots.................................................................16Target cluster snapshots.................................................................. 17
Data failover and failback with SyncIQ...........................................................17Data failover.................................................................................... 18Data failback....................................................................................18
Replication and backup with SmartLock........................................................ 19SmartLock replication and backup limitations..................................19
Recovery times and objectives for SyncIQ......................................................20SyncIQ license functionality.......................................................................... 20
Backing up data with SyncIQ 21
Creating replication policies.......................................................................... 22Excluding directories in replication...................................................22Excluding files in replication............................................................ 23File criteria options.......................................................................... 23Configure default replication policy settings.....................................25Create a replication policy................................................................25Create a SyncIQ domain................................................................... 30Assess a replication policy............................................................... 31
Managing replication to remote clusters........................................................31Start a replication job.......................................................................31Pause a replication job.....................................................................32Resume a replication job..................................................................32Cancel a replication job....................................................................32View active replication jobs..............................................................32View replication performance information........................................ 32Replication job information.............................................................. 33
Managing failed replication jobs................................................................... 33Resolve a replication policy..............................................................33Reset a replication policy................................................................. 34
Chapter 1
Chapter 2
Chapter 3
Chapter 4
CONTENTS
OneFS 7.1 Backup and recovery guide 3
Perform a full or differential replication............................................ 34Managing replication policies....................................................................... 35
Modify a replication policy............................................................... 35Delete a replication policy................................................................35Enable or disable a replication policy............................................... 36View replication policies.................................................................. 36Replication policy information..........................................................36Replication policy settings............................................................... 37
Managing replication to the local cluster....................................................... 39Cancel replication to the local cluster...............................................40Break local target association.......................................................... 40View replication policies targeting the local cluster.......................... 40Remote replication policy information.............................................. 40
Recovering data with SyncIQ 43
Initiating data failover and failback with SyncIQ............................................ 44Fail over data to a secondary cluster.................................................44Revert a failover operation............................................................... 44Fail back data to a primary cluster.................................................... 45
Performing disaster recovery for SmartLock directories..................................46Recover SmartLock directories on a target cluster.............................46Migrate SmartLock directories..........................................................47
NDMP backup 49
NDMP two way backup.................................................................................. 50Snapshot-based incremental backups.......................................................... 50NDMP protocol support................................................................................. 51Supported DMAs........................................................................................... 51NDMP hardware support............................................................................... 52NDMP backup limitations.............................................................................. 52NDMP performance recommendations.......................................................... 52Excluding files and directories from NDMP backups...................................... 54
Backing up and recovering data with NDMP 57
NDMP backup and recovery tasks..................................................................58Configuring basic NDMP backup settings...................................................... 58
NDMP backup settings..................................................................... 58View NDMP backup settings.............................................................58Configure and enable NDMP backup................................................ 58Disable NDMP backup......................................................................59
Managing NDMP user accounts..................................................................... 59Create an NDMP user account.......................................................... 59View NDMP user accounts................................................................59Modify the password of an NDMP user account................................ 59Delete an NDMP user account.......................................................... 60
Managing NDMP backup devices...................................................................60NDMP backup device settings.......................................................... 60Detect NDMP backup devices...........................................................60View NDMP backup devices............................................................. 61Modify the name of an NDMP backup device....................................61Delete an entry for an NDMP backup device..................................... 61
Managing NDMP backup ports...................................................................... 62NDMP backup port settings..............................................................62
Chapter 5
Chapter 6
Chapter 7
CONTENTS
4 OneFS 7.1 Backup and recovery guide
View NDMP backup ports................................................................. 63Modify NDMP backup port settings.................................................. 63Enable or disable an NDMP backup port...........................................63
Managing NDMP backup sessions.................................................................63NDMP session information............................................................... 63View NDMP sessions........................................................................65End an NDMP session...................................................................... 65
Managing restartable backups...................................................................... 65Configure restartable backups......................................................... 65View restartable backup contexts.....................................................66Delete a restartable backup context................................................. 66Configure restartable backup settings.............................................. 67View restartable backup settings..................................................... 67
Sharing tape drives between clusters............................................................ 67Managing default NDMP settings...................................................................67
Set default NDMP settings for a directory......................................... 68Modify default NDMP settings for a directory.................................... 68View default NDMP settings for directories....................................... 68NDMP environment variables........................................................... 69
Managing snapshot based incremental backups...........................................71Enable snapshot-based incremental backups for a directory............ 71View snapshots for snapshot-based incremental backups............... 71Delete snapshots for snapshot-based incremental backups.............71
View NDMP backup logs................................................................................72Configuring NDMP backups with EMC NetWorker...........................................72
Create a group................................................................................. 72Scan for tape devices....................................................................... 72Configure a library............................................................................73Create a data media pool................................................................. 73Label tape devices........................................................................... 74Create a metadata media pool......................................................... 74Create a client.................................................................................. 75
Configuring NDMP backup with Symantec NetBackup................................... 76Add an NDMP host........................................................................... 76Configure storage devices................................................................ 77Create a volume pool....................................................................... 78Inventory a robot..............................................................................78Create a NetBackup policy............................................................... 79
Configuring NDMP backup with CommVault Simpana....................................80Add a NAS client.............................................................................. 80Add an NDMP library........................................................................ 80Create a storage policy.....................................................................81Assign a storage policy and schedule to a client...............................82
CONTENTS
OneFS 7.1 Backup and recovery guide 5

CONTENTS
6 OneFS 7.1 Backup and recovery guide
CHAPTER 1
Introduction to this guide
This section contains the following topics:
u About this guide......................................................................................................8u Isilon scale-out NAS overview..................................................................................8u Where to go for support...........................................................................................8
Introduction to this guide 7
About this guideThis guide describes how to back up and recover data on Isilon clusters through eitherthe SyncIQ software module or the Network Data Management Protocol (NDMP).
Isilon scale-out NAS overviewThe EMC Isilon scale-out NAS storage platform combines modular hardware with unifiedsoftware to harness unstructured data. Powered by the distributed OneFS operatingsystem, an EMC Isilon cluster delivers a scalable pool of storage with a globalnamespace.
The platform's unified software provides centralized web-based and command-lineadministration to manage the following features:
u A symmetrical cluster that runs a distributed file system
u Scale-out nodes that add capacity and performance
u Storage options that manage files, block data, and tiering
u Flexible data protection and high availability
u Software modules that control costs and optimize resources
Where to go for supportYou can contact EMC Isilon Technical Support for any questions about EMC Isilonproducts.
Online Support Live Chat
Create a Service Request
Telephone Support United States: 800-782-4362 (1-800-SVC-4EMC)
Canada: 800-543-4782
Worldwide: +1-508-497-7901
For local phone numbers in your country, see EMC CustomerSupport Centers.
Help with onlinesupport
For questions specific to EMC Online Support registration oraccess, email [email protected].
Introduction to this guide
8 OneFS 7.1 Backup and recovery guide
CHAPTER 2
OneFS backup and recovery
This section contains the following topics:
u OneFS backup and recovery overview....................................................................10u SyncIQ backup and recovery overview................................................................... 10u NDMP backup and recovery overview.................................................................... 10
OneFS backup and recovery 9
OneFS backup and recovery overviewYou can back up data stored on Isilon clusters to another Isilon cluster or a tape device.
You can back up data to an Isilon cluster with the SyncIQ software module. SyncIQenables you to recover backed up data through failover and failback. Failover enablesyou to access data on the cluster it was backed up to. After you fail over, you can fail backto resume accessing your data on the cluster it was backed up from.
You can back up data to a tape device over NDMP. After you back up data to a tapedevice, you can restore the data to any Isilon cluster.
SyncIQ backup and recovery overviewOneFS enables you to replicate data from one Isilon cluster to another through the SyncIQsoftware module. You must activate a SyncIQ license on both Isilon clusters before youcan replicate data between them.
You can replicate data at the directory level while optionally excluding specific files andsub-directories from being replicated. SyncIQ creates and references snapshots toreplicate a consistent point-in-time image of a root directory. Metadata such as accesscontrol lists (ACLs) and alternate data streams (ADS) are replicated along with data.
SyncIQ enables you to maintain a consistent backup copy of your data on another Isiloncluster. SyncIQ offers automated failover and failback capabilities that enable you tocontinue operations on another Isilon cluster if a primary cluster becomes unavailable.
NDMP backup and recovery overviewIn OneFS, you can back up and restore file-system data through the Network DataManagement Protocol (NDMP). From a backup server, you can direct backup and recoveryprocesses between an Isilon cluster and backup devices such as tape devices, mediaservers, and virtual tape libraries (VTLs).
OneFS supports both NDMP three-way backup and NDMP two-way backup. During anNDMP three-way backup operation, a data management application (DMA) on a backupserver instructs the cluster to start backing up data to a tape media server that is eitherattached to the LAN or directly attached to the DMA.
During a two-way NDMP backup, a DMA on a backup server instructs a BackupAccelerator node on the cluster to start backing up data to a tape media server that isattached to the Backup Accelerator node.
NDMP two-way backup is the most efficient method in terms of cluster resourceconsumption. However, NDMP two-way backup requires that you attach one or moreBackup Accelerator nodes to the cluster.
In both the NDMP two-way and three-way backup models, file history data is transferredfrom the cluster to the backup server. Before a backup begins, OneFS creates a snapshotof the targeted directory, then backs up the snapshot, which ensures that the backupimage represents a specific point in time.
You do not need to activate a SnapshotIQ license on the cluster to perform NDMPbackups. If you have activated a SnapshotIQ license on the cluster, you can generate asnapshot through the SnapshotIQ tool, and then back up the same snapshot to multipletape devices. If you back up a SnapshotIQ snapshot, OneFS does not create anothersnapshot for the backup.
OneFS backup and recovery
10 OneFS 7.1 Backup and recovery guide
Note
If you are backing up SmartLock directories for compliance purposes, it is recommendedthat you do not specify autocommit time periods for the SmartLock directories. This isbecause, depending on the autocommit period, files in the SmartLock directories maystill be subject to change.
OneFS backup and recovery
NDMP backup and recovery overview 11

CHAPTER 3
Data replication with SyncIQ
This section contains the following topics:
u Replication policies and jobs.................................................................................14u Replication snapshots...........................................................................................16u Data failover and failback with SyncIQ...................................................................17u Replication and backup with SmartLock................................................................ 19u Recovery times and objectives for SyncIQ..............................................................20u SyncIQ license functionality.................................................................................. 20
Data replication with SyncIQ 13
Replication policies and jobsData replication is coordinated according to replication policies and jobs. Replicationpolicies specify what data is replicated, where the data is replicated to, and how oftenthe data is replicated. Replication jobs are the operations that replicate data from oneIsilon cluster to another. SyncIQ generates replication jobs according to replicationpolicies.
A replication policy specifies two clusters: the source and the target. The cluster on whichthe replication policy exists is the source cluster. The cluster that data is being replicatedto is the target cluster. When a replication policy starts, SyncIQ generates a replicationjob for the policy. When a replication job runs, files from a directory on the source clusterare replicated to a directory on the target cluster; these directories are known as sourceand target directories.
After the first replication job created by a replication policy finishes, the target directoryand all files contained in the target directory are set to a read-only state, and can bemodified only by other replication jobs belonging to the same replication policy. There isno limit to the number of replication policies that can exist on a cluster.
Note
To prevent permissions errors, make sure that ACL policy settings are the same acrosssource and target clusters.
You can create two types of replication policies: synchronization policies and copypolicies. A synchronization policy maintains an exact replica of the source directory onthe target cluster. If a file or sub-directory is deleted from the source directory, the file ordirectory is deleted from the target cluster when the policy is run again.
You can use synchronization policies to fail over and fail back data between source andtarget clusters. When a source cluster becomes unavailable, you can fail over data on atarget cluster and make the data available to clients. When the source cluster becomesavailable again, you can fail back the data to the source cluster.
A copy policy maintains recent versions of the files that are stored on the source cluster.However, files that are deleted on the source cluster are not deleted from the targetcluster. Failback is not supported for copy policies. Copy policies are most commonlyused for archival purposes.
Copy policies enable you to remove files from the source cluster without losing those fileson the target cluster. Deleting files on the source cluster improves performance on thesource cluster while maintaining the deleted files on the target cluster. This can be usefulif, for example, your source cluster is being used for production purposes and your targetcluster is being used only for archiving.
After creating a job for a replication policy, SyncIQ must wait until the job completesbefore it can create another job for the policy. Any number of replication jobs can exist ona cluster at a given time; however, only five replication jobs can run on a source cluster atthe same time. If more than five replication jobs exist on a cluster, the first five jobs runwhile the others are queued to run. The number of replication jobs that a single targetcluster can support concurrently is dependent on the number of workers available on thetarget cluster.
You can replicate any number of files and directories with a single replication job. Youcan prevent a large replication job from overwhelming the system by limiting the amountof cluster resources and network bandwidth that data synchronization is allowed toconsume. Because each node in a cluster is able to send and receive data, the speed atwhich data is replicated increases for larger clusters.
Data replication with SyncIQ
14 OneFS 7.1 Backup and recovery guide
Source and target cluster associationSyncIQ associates a replication policy with a target cluster by marking the target clusterwhen the job runs for the first time. Even if you modify the name or IP address of thetarget cluster, the mark persists on the target cluster. When a replication policy is run,SyncIQ checks the mark to ensure that data is being replicated to the correct location.
On the target cluster, you can manually break an association between a replication policyand target directory. Breaking the association between a source and target cluster causesthe mark on the target cluster to be deleted. You might want to manually break a targetassociation if an association is obsolete. If you break the association of a policy, thepolicy is disabled on the source cluster and you cannot run the policy. If you want to runthe disabled policy again, you must reset the replication policy.
Note
Breaking a policy association causes either a full or differential replication to occur thenext time you run the replication policy. During a full or differential replication, SyncIQcreates a new association between the source and target clusters. Depending on theamount of data being replicated, a full or differential replication can take a very long timeto complete.
Full and differential replicationIf a replication policy encounters an issue that cannot be fixed (for example, if theassociation was broken on the target cluster), you might need to reset the replicationpolicy. If you reset a replication policy, SyncIQ performs either a full or differentialreplication the next time the policy is run. You can specify the type of replication thatSyncIQ performs.
During a full replication, SyncIQ transfers all data from the source cluster regardless ofwhat data exists on the target cluster. A full replication consumes large amounts ofnetwork bandwidth and can take a very long time to complete. However, a full replicationis less strenuous on CPU usage than a differential replication.
During a differential replication, SyncIQ first checks whether a file already exists on thetarget cluster and then transfers only data that does not already exist on the targetcluster. A differential replication consumes less network bandwidth than a fullreplication; however, differential replications consume more CPU. Differential replicationcan be much faster than a full replication if there is an adequate amount of available CPUfor the differential replication job to consume.
Controlling replication job resource consumptionYou can create rules that limit the network traffic created and the rate at which files aresent by replication jobs. You can also specify the number of workers that are spawned bya replication policy to limit the amount of cluster resources that are consumed. Also, youcan restrict a replication policy to connect only to a specific storage pool.
You can create network-traffic rules that control the amount of network traffic generatedby replication jobs during specified time periods. These rules can be useful if, forexample, you want to limit the amount of network traffic created during other resource-intensive operations.
You can create multiple network traffic rules to enforce different limitations at differenttimes. For example, you might allocate a small amount of network bandwidth during peakbusiness hours, but allow unlimited network bandwidth during non-peak hours.
Data replication with SyncIQ
Source and target cluster association 15
When a replication job runs, OneFS generates workers on the source and target cluster.Workers on the source cluster send data while workers on the target cluster write data.OneFS generates no more than 40 workers for a replication job. You can modify themaximum number of workers generated per node to control the amount of resources thata replication job is allowed to consume. For example, you can increase the maximumnumber of workers per node to increase the speed at which data is replicated to thetarget cluster.
You can also reduce resource consumption through file-operation rules that limit the rateat which replication policies are allowed to send files. However, it is recommended thatyou only create file-operation rules if the files you intend to replicate are predictablysimilar in size and not especially large.
Replication reportsAfter a replication job completes, SyncIQ generates a report that contains detailedinformation about the job, including how long the job ran, how much data wastransferred, and what errors occurred.
If a replication report is interrupted, SyncIQ might create a subreport about the progressof the job so far. If the job is then restarted, SyncIQ creates another subreport about theprogress of the job until the job either completes or is interrupted again. SyncIQ creates asubreport each time the job is interrupted until the job completes successfully. If multiplesubreports are created for a job, SyncIQ combines the information from the subreportsinto a single report.
SyncIQ routinely deletes replication reports. You can specify the maximum number ofreplication reports that SyncIQ retains and the length of time that SyncIQ retainsreplication reports. If the maximum number of replication reports is exceeded on acluster, SyncIQ deletes the oldest report each time a new report is created.
You cannot customize the content of a replication report.
Note
If you delete a replication policy, SyncIQ automatically deletes any reports that weregenerated for that policy.
Replication snapshotsSyncIQ generates snapshots to facilitate replication, failover, and failback between Isilonclusters. Snapshots generated by SyncIQ can also be used for archival purposes on thetarget cluster.
Source cluster snapshotsSyncIQ generates snapshots on the source cluster to ensure that a consistent point-in-time image is replicated and that unaltered data is not sent to the target cluster.
Before running a replication job, SyncIQ creates a snapshot of the source directory.SyncIQ then replicates data according to the snapshot rather than the current state of thecluster, allowing users to modify source-directory files while ensuring that an exact point-in-time image of the source directory is replicated.
For example, if a replication job of /ifs/data/dir/ starts at 1:00 PM and finishes at1:20 PM, and /ifs/data/dir/file is modified at 1:10 PM, the modifications are notreflected on the target cluster, even if /ifs/data/dir/file is not replicated until1:15 PM.
Data replication with SyncIQ
16 OneFS 7.1 Backup and recovery guide

You can replicate data according to a snapshot generated with the SnapshotIQ tool. Ifyou replicate data according to a SnapshotIQ snapshot, SyncIQ does not generateanother snapshot of the source directory. This method can be useful if you want toreplicate identical copies of data to multiple Isilon clusters.
SyncIQ generates source snapshots to ensure that replication jobs do not transferunmodified data. When a job is created for a replication policy, SyncIQ checks whether itis the first job created for the policy. If it is not the first job created for the policy, SyncIQcompares the snapshot generated for the earlier job with the snapshot generated for thenew job.
SyncIQ replicates only data that has changed since the last time a snapshot wasgenerated for the replication policy. When a replication job is completed, SyncIQ deletesthe previous source-cluster snapshot and retains the most recent snapshot until the nextjob is run.
Target cluster snapshotsWhen a replication job is run, SyncIQ generates a snapshot on the target cluster tofacilitate failover operations. When the next replication job is created for the replicationpolicy, the job creates a new snapshot and deletes the old one.
If a SnapshotIQ license has been activated on the target cluster, you can configure areplication policy to generate additional snapshots that remain on the target cluster evenas subsequent replication jobs run.
SyncIQ generates target snapshots to facilitate failover on the target cluster regardless ofwhether a SnapshotIQ license has been configured on the target cluster. Failoversnapshots are generated when a replication job completes. SyncIQ retains only onefailover snapshot per replication policy, and deletes the old snapshot after the newsnapshot is created.
If a SnapshotIQ license has been activated on the target cluster, you can configureSyncIQ to generate archival snapshots on the target cluster that are not automaticallydeleted when subsequent replication jobs run. Archival snapshots contain the same dataas the snapshots that are generated for failover purposes. However, you can configurehow long archival snapshots are retained on the target cluster. You can access archivalsnapshots the same way that you access other snapshots generated on a cluster.
Data failover and failback with SyncIQSyncIQ enables you to perform automated data failover and failback operations betweenIsilon clusters. If a cluster is rendered unusable, you can fail over to another Isiloncluster, enabling clients to access to access their data on the other cluster. If theunusable cluster becomes accessible again, you can fail back to the original Isiloncluster.
For the purposes of explaining failover and failback procedures, the cluster originallyaccessed by clients is referred to as the primary cluster, and the cluster that client data isoriginally replicated to is referred to as the secondary cluster. Failover is the process thatallows clients to modify data on a secondary cluster. Failback is the process that allowsclients to access data on the primary cluster again and begins to replicate data back tothe secondary cluster.
Failover and failback can be useful in disaster recovery procedures. For example, if aprimary cluster is damaged by a natural disaster, you can migrate clients to a secondarycluster until the primary cluster is repaired and then migrate the clients back to theprimary cluster.
Data replication with SyncIQ
Target cluster snapshots 17
You can fail over and fail back to facilitate scheduled cluster maintenance. For example, ifyou are upgrading the primary cluster, you might want to migrate clients to a secondarycluster until the upgrade is complete and then migrate clients back to the primary cluster.
Note
Data failover and failback is not supported for SmartLock directories.
Data failoverData failover is the process of preparing data on a secondary cluster to be modified byclients. After you fail over to a secondary cluster, you can redirect clients to modify theirdata on the secondary cluster.
Before failover is performed, you must create and run a replication policy on the primarycluster. You initiate the failover process on the secondary cluster. Failover is performedper replication policy; to migrate data that is spread across multiple replication policies,you must initiate failover for each replication policy.
You can use any replication policy to fail over. However, if the action of the replicationpolicy is set to copy, any file that was deleted on the primary cluster will be present onthe secondary cluster. When the client connects to the secondary cluster, all files thatwere deleted on the primary cluster will be available to the client.
If you initiate failover for a replication policy while an associated replication job isrunning, the failover operation completes but the replication job fails. Because datamight be in an inconsistent state, SyncIQ uses the snapshot generated by the lastsuccessful replication job to revert data on the secondary cluster to the last recoverypoint.
If a disaster occurs on the primary cluster, any modifications to data that were made afterthe last successful replication job started are not reflected on the secondary cluster.When a client connects to the secondary cluster, their data appears as it was when thelast successful replication job was started.
Data failbackData failback is the process of restoring clusters to the roles they occupied before afailover operation. After data failback is complete, the primary cluster hosts clients andreplicates data to the secondary cluster for backup.
The first step in the failback process is updating the primary cluster with all of themodifications that were made to the data on the secondary cluster. The next step in thefailback process is preparing the primary cluster to be accessed by clients. The final stepin the failback process is resuming data replication from the primary to the secondarycluster. At the end of the failback process, you can redirect users to resume accessingtheir data on the primary cluster.
You can fail back data with any replication policy that meets all of the following criteria:
u The source directory is not a SmartLock directory.
u The policy has been failed over.
u The policy is a synchronization policy.
u The policy does not exclude any files or directories from replication.
Data replication with SyncIQ
18 OneFS 7.1 Backup and recovery guide
Replication and backup with SmartLockYou must ensure that SmartLock directories remain protected during replication andbackup operations.
If you are replicating SmartLock directories with SyncIQ, it is recommended that youconfigure all nodes on the source and target clusters into Network Time Protocol (NTP)peer mode to ensure that the node clocks are synchronized. For compliance clusters, it isrecommended that you configure all nodes on the source and target clusters into NTPpeer mode before you set the compliance clock to ensure that the compliance clocks areinitially set to the same time.
Note
Do not configure SmartLock settings for a target SmartLock directory unless you are nolonger replicating data to the directory. Configuring an autocommit time period for atarget SmartLock directory can cause replication jobs to fail. If the target SmartLockdirectory commits a file to a WORM state, and the file is modified on the source cluster,the next replication job will fail because it cannot update the file.
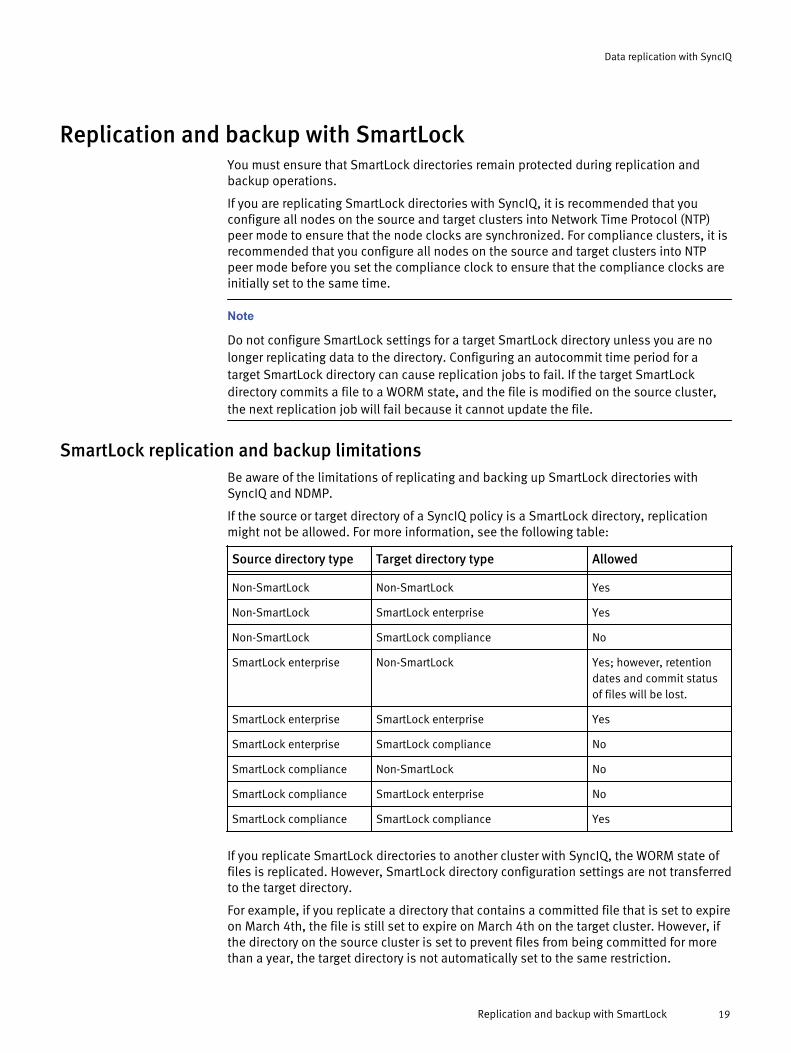
SmartLock replication and backup limitationsBe aware of the limitations of replicating and backing up SmartLock directories withSyncIQ and NDMP.
If the source or target directory of a SyncIQ policy is a SmartLock directory, replicationmight not be allowed. For more information, see the following table:
Source directory type Target directory type Allowed- - -Non-SmartLock Non-SmartLock Yes
Non-SmartLock SmartLock enterprise Yes
Non-SmartLock SmartLock compliance No
SmartLock enterprise Non-SmartLock Yes; however, retentiondates and commit statusof files will be lost.
SmartLock enterprise SmartLock enterprise Yes
SmartLock enterprise SmartLock compliance No
SmartLock compliance Non-SmartLock No
SmartLock compliance SmartLock enterprise No
SmartLock compliance SmartLock compliance Yes
If you replicate SmartLock directories to another cluster with SyncIQ, the WORM state offiles is replicated. However, SmartLock directory configuration settings are not transferredto the target directory.
For example, if you replicate a directory that contains a committed file that is set to expireon March 4th, the file is still set to expire on March 4th on the target cluster. However, ifthe directory on the source cluster is set to prevent files from being committed for morethan a year, the target directory is not automatically set to the same restriction.
Data replication with SyncIQ
Replication and backup with SmartLock 19
If you back up data to an NDMP device, all SmartLock metadata relating to the retentiondate and commit status is transferred to the NDMP device. If you restore data to aSmartLock directory on the cluster, the metadata persists on the cluster. However, if thedirectory that you restore to is not a SmartLock directory, the metadata is lost. You canrestore to a SmartLock directory only if the directory is empty.
Recovery times and objectives for SyncIQThe Recovery Point Objective (RPO) and the Recovery Time Objective (RTO) aremeasurements of the impacts that a disaster can have on business operations. You cancalculate your RPO and RTO for a disaster recovery with replication policies.
RPO is the maximum amount of time for which data is lost if a cluster suddenly becomesunavailable. For an Isilon cluster, the RPO is the amount of time that has passed sincethe last completed replication job started. The RPO is never greater than the time it takesfor two consecutive replication jobs to run and complete.
If a disaster occurs while a replication job is running, the data on the secondary cluster isreverted to the state it was in when the last replication job completed. For example,consider an environment in which a replication policy is scheduled to run every threehours, and replication jobs take two hours to complete. If a disaster occurs an hour aftera replication job begins, the RPO is four hours, because it has been four hours since acompleted job began replicating data.
RTO is the maximum amount of time required to make backup data available to clientsafter a disaster. The RTO is always less than or approximately equal to the RPO,depending on the rate at which replication jobs are created for a given policy.
If replication jobs run continuously, meaning that another replication job is created forthe policy before the previous replication job completes, the RTO is approximately equalto the RPO. When the secondary cluster is failed over, the data on the cluster is reset tothe state it was in when the last job completed; resetting the data takes an amount oftime proportional to the time it took users to modify the data.
If replication jobs run on an interval, meaning that there is a period of time after areplication job completes before the next replication job for the policy starts, therelationship between RTO and RPO depends on whether a replication job is running whenthe disaster occurs. If a job is in progress when a disaster occurs, the RTO is roughlyequal to the RPO. However, if a job is not running when a disaster occurs, the RTO isnegligible because the secondary cluster was not modified since the last replication jobran, and the failover process is almost instantaneous.
SyncIQ license functionalityYou can replicate data to another Isilon cluster only if you activate a SyncIQ license onboth the local cluster and the target cluster.
If a SyncIQ license becomes inactive, you cannot create, run, or manage replicationpolicies. Also, all previously created replication policies are disabled. Replication policiesthat target the local cluster are also disabled. However, data that was previouslyreplicated to the local cluster is still available.
Data replication with SyncIQ
20 OneFS 7.1 Backup and recovery guide

CHAPTER 4
Backing up data with SyncIQ
This section contains the following topics:
u Creating replication policies.................................................................................. 22u Managing replication to remote clusters................................................................31u Managing failed replication jobs........................................................................... 33u Managing replication policies................................................................................35u Managing replication to the local cluster............................................................... 39
Backing up data with SyncIQ 21
Creating replication policiesYou can create replication policies that determine when data is replicated with SyncIQ.
Excluding directories in replicationYou can exclude directories from being replicated by replication policies even if thedirectories exist under the specified source directory.
Note
You cannot fail back replication policies that exclude directories.
By default, all files and directories under the source directory of a replication policy arereplicated to the target cluster. However, you can prevent directories under the sourcedirectory from being replicated.
If you specify a directory to exclude, files and directories under the excluded directory arenot replicated to the target cluster. If you specify a directory to include, only the files anddirectories under the included directory are replicated to the target cluster; anydirectories that are not contained in an included directory are excluded.
If you both include and exclude directories, any excluded directories must be containedin one of the included directories; otherwise, the excluded-directory setting has no effect.For example, consider a policy with the following settings:
u The root directory is /ifs/datau The included directories are /ifs/data/media/music and /ifs/data/
media/moviesu The excluded directories are /ifs/data/archive and /ifs/data/media/
music/workingIn this example, the setting that excludes the /ifs/data/archive directory has noeffect because the /ifs/data/archive directory is not under either of the includeddirectories. The /ifs/data/archive directory is not replicated regardless of whetherthe directory is explicitly excluded. However, the setting that excludes the /ifs/data/media/music/working directory does have an effect, because the directory would bereplicated if the setting was not specified.
In addition, if you exclude a directory that contains the source directory, the exclude-directory setting has no effect. For example, if the root directory of a policy is /ifs/data, explicitly excluding the /ifs directory does not prevent /ifs/data from beingreplicated.
Any directories that you explicitly include or exclude must be contained in or under thespecified root directory. For example, consider a policy in which the specified rootdirectory is /ifs/data. In this example, you could include both the /ifs/data/media and the /ifs/data/users/ directories because they are under /ifs/data.
Excluding directories from a synchronization policy does not cause the directories to bedeleted on the target cluster. For example, consider a replication policy thatsynchronizes /ifs/data on the source cluster to /ifs/data on the target cluster. Ifthe policy excludes /ifs/data/media from replication, and /ifs/data/media/file exists on the target cluster, running the policy does not cause /ifs/data/media/file to be deleted from the target cluster.
Backing up data with SyncIQ
22 OneFS 7.1 Backup and recovery guide
Excluding files in replicationIf you do not want specific files to be replicated by a replication policy, you can excludethem from the replication process through file-matching criteria statements. You canconfigure file-matching criteria statements during the replication-policy creation process.
Note
You cannot fail back replication policies that exclude files.
A file-criteria statement can include one or more elements. Each file-criteria elementcontains a file attribute, a comparison operator, and a comparison value. You cancombine multiple criteria elements in a criteria statement with Boolean "AND" and "OR"operators. You can configure any number of file-criteria definitions.
Configuring file-criteria statements can cause the associated jobs to run slowly. It isrecommended that you specify file-criteria statements in a replication policy only ifnecessary.
Modifying a file-criteria statement will cause a full replication to occur the next time that areplication policy is started. Depending on the amount of data being replicated, a fullreplication can take a very long time to complete.
For synchronization policies, if you modify the comparison operators or comparisonvalues of a file attribute, and a file no longer matches the specified file-matching criteria,the file is deleted from the target the next time the job is run. This rule does not apply tocopy policies.
File criteria optionsYou can configure a replication policy to exclude files that meet or do not meet specificcriteria.
You can specify file criteria based on the following file attributes:
Date createdIncludes or excludes files based on when the file was created. This option isavailable for copy policies only.You can specify a relative date and time, such as "two weeks ago", or specific dateand time, such as "January 1, 2012." Time settings are based on a 24-hour clock.
Date accessedIncludes or excludes files based on when the file was last accessed. This option isavailable for copy policies only, and only if the global access-time-tracking option ofthe cluster is enabled.You can specify a relative date and time, such as "two weeks ago", or specific dateand time, such as "January 1, 2012." Time settings are based on a 24-hour clock.
Date modifiedIncludes or excludes files based on when the file was last modified. This option isavailable for copy policies only.You can specify a relative date and time, such as "two weeks ago", or specific dateand time, such as "January 1, 2012." Time settings are based on a 24-hour clock.
Backing up data with SyncIQ
Excluding files in replication 23
File nameIncludes or excludes files based on the file name. You can specify to include orexclude full or partial names that contain specific text.The following wildcard characters are accepted:
Note
Alternatively, you can filter file names by using POSIX regular-expression (regex) text.Isilon clusters support IEEE Std 1003.2 (POSIX.2) regular expressions. For moreinformation about POSIX regular expressions, see the BSD man pages.
Table 1 Replication file matching wildcards
Wildcard Description- -* Matches any string in place of the asterisk.
For example, m* matches movies and m123.
[ ] Matches any characters contained in the brackets, or a range of charactersseparated by a dash.For example, b[aei]t matches bat, bet, and bit.
For example, 1[4-7]2 matches 142, 152, 162, and 172.
You can exclude characters within brackets by following the first bracket with anexclamation mark.
For example, b[!ie] matches bat but not bit or bet.
You can match a bracket within a bracket if it is either the first or last character.
For example, [[c]at matches cat and [at.
You can match a dash within a bracket if it is either the first or last character.
For example, car[-s] matches cars and car-.
? Matches any character in place of the question mark.For example, t?p matches tap, tip, and top.
PathIncludes or excludes files based on the file path. This option is available for copypolicies only.You can specify to include or exclude full or partial paths that contain specified text.You can also include the wildcard characters *, ?, and [ ].
SizeIncludes or excludes files based on their size.
Note
File sizes are represented in multiples of 1024, not 1000.
Backing up data with SyncIQ
24 OneFS 7.1 Backup and recovery guide
TypeIncludes or excludes files based on one of the following file-system object types:
u Soft link
u Regular file
u Directory
Configure default replication policy settingsYou can configure default settings for replication policies. If you do not modify thesesettings when creating a replication policy, the specified default settings are applied.
Procedure
1. Click Data Protection > SyncIQ > Settings.
2. In the Default Policy Settings section, specify how you want replication policies toconnect to target clusters by selecting one of the following options:
l Click Connect to any nodes in the cluster.
l Click Connect to only the nodes in the subnet and pool if the target cluster namespecifies a SmartConnect zone.
3. Specify which nodes you want replication policies to connect to when a policy is run.
Options Description
Connect policies to all nodes ona source cluster.
Click Run the policy on all nodes in this cluster.
Connect policies only to nodescontained in a specified subnetand pool.
a. Click Run the policy only on nodes in thespecified subnet and pool.
b. From the Subnet and pool list, select thesubnet and pool .
Note
SyncIQ does not support dynamically allocated IP address pools. If a replication jobconnects to a dynamically allocated IP address, SmartConnect might reassign theaddress while a replication job is running, which would disconnect the job and causeit to fail.
4. Click Submit.
Create a replication policyYou can create a replication policy with SyncIQ that defines how and when data isreplicated to another Isilon cluster. Configuring a replication policy is a five-step process.
Configure replication policies carefully. If you modify any of the following policy settingsafter the policy is run, OneFS performs either a full or differential replication the next timethe policy is run:
u Source directory
u Included or excluded directories
u File-criteria statement
Backing up data with SyncIQ
Configure default replication policy settings 25
u Target cluster name or address
This applies only if you target a different cluster. If you modify the IP or domain nameof a target cluster, and then modify the replication policy on the source cluster tomatch the new IP or domain name, a full replication is not performed.
u Target directory
Configure basic policy settingsYou must configure basic settings for a replication policy.
Procedure
1. Click Data Protection > SyncIQ > Policies.
2. Click Create a SyncIQ policy.
3. In the Settings area, in the Policy name field, type a name for the replication policy.
4. Optional: In the Description field, type a description for the replication policy.
5. In the Action area, specify the type of replication policy.
l To copy all files from the source directory to the target directory, click Copy.
Note
Failback is not supported for copy policies.
l To copy all files from the source directory to the target directory and delete anyfiles on the target directory that are not in the source directory, click Synchronize.
6. In the Run job area, specify whether replication jobs will be run.
Options Description
Run jobs only when manuallyinitiated by a user.
Click Only manually.
Run jobs automaticallyaccording to a schedule.
a. Click On a schedule.
b. Specify a schedule.
If you configure a replication policy to run morethan once a day, you cannot configure the intervalto span across two calendar days. For example,you cannot configure a replication policy to runevery hour starting at 7:00 PM and ending at 1:00AM.
Run jobs automatically everytime a change is made to thesource directory.
Click Whenever the source is modified.
After you finish
The next step in the process of creating a replication policy is specifying sourcedirectories and files.
Backing up data with SyncIQ
26 OneFS 7.1 Backup and recovery guide
Specify source directories and filesYou must specify the directories and files you want to replicate.
Procedure
1. In the Source Cluster area, in the Source Root Directory field, type the full path of thesource directory that you want to replicate to the target cluster.
You must specify a directory contained in /ifs. You cannot specify the /ifs/.snapshot directory or subdirectory of it.
2. Optional: Prevent specific subdirectories of the root directory from being replicated.
l To include a directory, in the Included Directories area, click Add a directory path.
l To exclude a directory, in the Excluded Directories area, click Add a directory path.
3. Optional: Prevent specific files from being replicated by specifying file matchingcriteria.
a. In the File Matching Criteria area, select a filter type.
b. Select an operator.
c. Type a value.
Files that do not meet the specified criteria will not be replicated to the target cluster.For example, if you specify File Type doesn't match .txt, SyncIQ will notreplicate any files with the .txt file extension. If you specify Created after08/14/2013, SyncIQ will not replicate any files created before August 14th, 2013.If you want to specify more than one file matching criterion, you can control how thecriteria relate to each other by clicking either Add an "Or" condition or Add an "And"condition.
4. Specify which nodes you want the replication policy to connect to when the policy isrun.
Options Description
Connect the policy to all nodes inthe source cluster.
Click Run the policy on all nodes in this cluster.
Connect the policy only to nodescontained in a specified subnetand pool.
a. Click Run the policy only on nodes in thespecified subnet and pool.
b. From the Subnet and pool list, select thesubnet and pool .
Note
SyncIQ does not support dynamically allocated IP address pools. If a replication jobconnects to a dynamically allocated IP address, SmartConnect might reassign theaddress while a replication job is running, which would disconnect the job and causeit to fail.
After you finish
The next step in the process of creating a replication policy is specifying the targetdirectory.
Backing up data with SyncIQ
Create a replication policy 27

Specify the policy target directoryYou must specify a target cluster and directory to replicate data to.
Procedure
1. In the Target Cluster area, in the Target Host field, type one of the following:
l The fully qualified domain name of any node in the target cluster.
l The host name of any node in the target cluster.
l The name of a SmartConnect zone in the target cluster.
l The IPv4 or IPv6 address of any node in the target cluster.
l localhostThis will replicate data to another directory on the local cluster.
Note
SyncIQ does not support dynamically allocated IP address pools. If a replication jobconnects to a dynamically allocated IP address, SmartConnect might reassign theaddress while a replication job is running, which would disconnect the job and causeit to fail.
2. In the Target Directory field, type the absolute path of the directory on the targetcluster that you want to replicate data to.
CAUTION
If you specify an existing directory on the target cluster, ensure that the directory isnot the target of another replication policy. If this is a synchronization policy, ensurethat the directory is empty. All files are deleted from the target of a synchronizationpolicy the first time the policy is run.
If the specified target directory does not already exist on the target cluster, thedirectory is created the first time the job is run. It is recommended that you do notspecify the /ifs directory. If you specify the /ifs directory, the entire target clusteris set to a read-only state, preventing you from storing any other data on the cluster.
If this is a copy policy, and files in the target directory share the same name as files inthe source directory, the target directory files are overwritten when the job is run.
3. If you want replication jobs to connect only to the nodes included in the SmartConnectzone specified by the target cluster, click Connect only to the nodes within the targetcluster SmartConnect Zone.
After you finish
The next step in the process of creating a replication policy is specifying policy targetsnapshot settings.
Configure policy target snapshot settingsYou can optionally specify how archival snapshots are generated on the target cluster.You can access archival snapshots the same way that you access SnapshotIQ snapshots.
SyncIQ always retains one snapshot on the target cluster to facilitate failover, regardlessof these settings.
Backing up data with SyncIQ
28 OneFS 7.1 Backup and recovery guide
Procedure
1. To create archival snapshots on the target cluster, in the Target Snapshots area, clickCapture snapshots on the target cluster.
2. Optional: To modify the default alias of the last snapshot created according to thereplication policy, in the Snapshot Alias Name field, type a new alias.
You can specify the alias name as a snapshot naming pattern. For example, thefollowing naming pattern is valid:
%{PolicyName}-on-%{SrcCluster}-latest
The previous example produces names similar to the following:
newPolicy-on-Cluster1-latest3. Optional: To modify the snapshot naming pattern for snapshots created according to
the replication policy, in the Snapshot Naming Pattern field, type a naming pattern.Each snapshot generated for this replication policy is assigned a name based on thispattern.
For example, the following naming pattern is valid:
%{PolicyName}-from-%{SrcCluster}-at-%H:%M-on-%m-%d-%Y
The example produces names similar to the following:
newPolicy-from-Cluster1-at-10:30-on-7-12-20124. Select one of the following options:
l Click Snapshots do not expire.
l Click Snapshots expire after... and specify an expiration period.
After you finish
The next step in the process of creating a replication policy is configuring advancedpolicy settings.
Configure advanced policy settingsYou can optionally configure advanced settings for a replication policy.
Procedure
1. Optional: In the Worker Threads Per Node field, specify the maximum number ofconcurrent processes per node that will perform replication operations.
Note
Do not modify the default setting without consulting Isilon Technical Support.
2. Optional: From the Log Level list, select the level of logging you want SyncIQ toperform for replication jobs.
The following log levels are valid, listed from least to most verbose:
l Click Error.
l Click Notice.
l Click Network Activity.
l Click File Activity.
3. Optional: If you want SyncIQ to perform a checksum on each file data packet that isaffected by the replication policy, select the Validate File Integrity check box.
If you enable this option, and the checksum values for a file data packet do notmatch, SyncIQ retransmits the affected packet.
Backing up data with SyncIQ
Create a replication policy 29
4. Optional: To modify the length of time SyncIQ retains replication reports for the policy,in the Keep Reports For area, specify a length of time.
After the specified expiration period has passed for a report, SyncIQ automaticallydeletes the report.
Some units of time are displayed differently when you view a report than how theywere originally entered. Entering a number of days that is equal to a correspondingvalue in weeks, months, or years results in the larger unit of time being displayed. Forexample, if you enter a value of 7 days, 1 week appears for that report after it iscreated. This change occurs because SyncIQ internally records report retention timesin seconds and then converts them into days, weeks, months, or years.
5. Optional: Specify whether to record information about files that are deleted byreplication jobs by selecting one of the following options:
l Click Record when a synchronization deletes files or directories.
l Click Do not record when a synchronization deletes files or directories.
This option is applicable for synchronization policies only.
After you finish
The next step in the process of creating a replication policy is saving the replicationpolicy settings.
Save replication policy settingsSyncIQ does not create replication jobs for a replication policy until you save the policy.
Before you begin
Review the current settings of the replication policy. If necessary, modify the policysettings.
Procedure
1. Click Create Policy.
After you finish
You can increase the speed at which you can failback a replication policy by creating aSyncIQ domain for the source directory of the policy.
Create a SyncIQ domainYou can create a SyncIQ domain to increase the speed at which failback is performed fora replication policy. Because you can fail back only synchronization policies, it is notnecessary to create SyncIQ domains for copy policies.
Failing back a replication policy requires that a SyncIQ domain be created for the sourcedirectory. OneFS automatically creates a SyncIQ domain during the failback process.However, if you intend on failing back a replication policy, it is recommended that youcreate a SyncIQ domain for the source directory of the replication policy while thedirectory is empty. Creating a domain for a directory that contains less data takes lesstime.
Procedure
1. Click Cluster Management > Job Operations > Job Types.
2. In the Job Types area, in the DomainMark row, from the Actions column, select StartJob.
3. In the Domain Root Path field, type the path of a source directory of a replicationpolicy.
Backing up data with SyncIQ
30 OneFS 7.1 Backup and recovery guide
4. From the Type of domain list, select SyncIQ.
5. Ensure that the Delete domain check box is cleared.
6. Click Start Job.
Assess a replication policyBefore running a replication policy for the first time, you can view statistics on the filesthat would be affected by the replication without transferring any files. This can be usefulif you want to preview the size of the data set that will be transferred if you run the policy.
Note
You can assess only replication policies that have never been run before.
Procedure
1. Click Data Protection > SyncIQ > Policies.
2. In the SyncIQ Policies table, in the row of a replication policy, from the Actionscolumn, select Assess Sync.
3. Click Data Protection > SyncIQ > Summary.
4. After the job completes, in the SyncIQ Recent Reports table, in the row of thereplication job, click View Details.
The report displays the total amount of data that would have been transferred in theTotal Data field.
Managing replication to remote clustersYou can manually run, view, assess, pause, resume, cancel, resolve, and reset replicationjobs that target other clusters.
After a policy job starts, you can pause the job to suspend replication activities.Afterwards, you can resume the job, continuing replication from the point where the jobwas interrupted. You can also cancel a running or paused replication job if you want tofree the cluster resources allocated for the job. A paused job reserves cluster resourceswhether or not the resources are in use. A cancelled job releases its cluster resources andallows another replication job to consume those resources. No more than five runningand paused replication jobs can exist on a cluster at a time. However, an unlimitednumber of canceled replication jobs can exist on a cluster. If a replication job remainspaused for more than a week, SyncIQ automatically cancels the job.
Start a replication jobYou can manually start a replication job for a replication policy at any time.
If you want to replicate data according to an existing snapshot, at the OneFS commandprompt, run the isi sync jobs start command with the --source-snapshotoption. You cannot replicate data according to snapshots generated by SyncIQ.
Procedure
1. Click Data Protection > SyncIQ > Policies.
2. In the SyncIQ Policies table, in the Actions column for a job, select Start Job.
Backing up data with SyncIQ
Assess a replication policy 31
Pause a replication jobYou can pause a running replication job and then resume the job later. Pausing areplication job temporarily stops data from being replicated, but does not free the clusterresources replicating the data.
Procedure
1. Click Data Protection > SyncIQ > Summary.
2. In the Active Jobs table, in the Actions column for a job, click Pause Running Job.
Resume a replication jobYou can resume a paused replication job.
Procedure
1. Click Data Protection > SyncIQ > Summary.
2. In the Currently Running table, in the Actions column for a job, click Resume RunningJob.
Cancel a replication jobYou can cancel a running or paused replication job. Cancelling a replication job stopsdata from being replicated and frees the cluster resources that were replicating data. Youcannot resume a cancelled replication job. To restart replication, you must start thereplication policy again.
Procedure
1. Click Data Protection > SyncIQ > Summary.
2. In the Active Jobs table, in the Actions column for a job, click Cancel Running Job.
View active replication jobsYou can view information about replication jobs that are currently running or paused.
Procedure
1. Click Data Protection > SyncIQ > Policies.
2. In the Active Jobs table, review information about active replication jobs.
View replication performance informationYou can view information about how many files are sent and the amount of networkbandwidth consumed by replication policies.
Procedure
1. Click Data Protection > SyncIQ > Performance.
2. In the Network Performance and File Operations tables, view performanceinformation.
Backing up data with SyncIQ
32 OneFS 7.1 Backup and recovery guide
Replication job informationYou can view information about replication jobs through the Active Jobs table.
StatusThe status of the job. The following job statuses are possible:
RunningThe job is currently running without error.
PausedThe job has been temporarily paused.
Policy NameThe name of the associated replication policy.
StartedThe time the job started.
ElapsedHow much time has elapsed since the job started.
TransferredThe number of files that have been transferred, and the total size of all transferredfiles.
Source DirectoryThe path of the source directory on the source cluster.
Target HostThe target directory on the target cluster.
ActionsDisplays any job-related actions that you can perform.
Managing failed replication jobsIf a replication job fails due to an error, SyncIQ might disable the correspondingreplication policy. For example SyncIQ might disable a replication policy if the IP orhostname of the target cluster is modified. If a replication policy is disabled, the policycannot be run.
To resume replication for a disabled policy, you must either fix the error that caused thepolicy to be disabled, or reset the replication policy. It is recommended that you attemptto fix the issue rather than reset the policy. If you believe you have fixed the error, youcan return the replication policy to an enabled state by resolving the policy. You can thenrun the policy again to test whether the issue was fixed. If you are unable to fix the issue,you can reset the replication policy. However, resetting the policy causes a full ordifferential replication to be performed the next time the policy is run.
Note
Depending on the amount of data being synchronized or copied, a full and differentialreplications can take a very long time to complete.
Resolve a replication policyIf SyncIQ disables a replication policy due to a replication error, and you fix the issue thatcaused the error, you can resolve the replication policy. Resolving a replication policy
Backing up data with SyncIQ
Replication job information 33
enables you to run the policy again. If you cannot resolve the issue that caused the error,you can reset the replication policy.
Procedure
1. Click Data Protection > SyncIQ > Policies.
2. In the Policies table, in the row for a policy, select Resolve.
Reset a replication policyIf a replication job encounters an error that you cannot resolve, you can reset thecorresponding replication policy. Resetting a policy causes OneFS to perform a full ordifferential replication the next time the policy is run. Resetting a replication policydeletes the latest snapshot generated for the policy on the source cluster.
CAUTION
Depending on the amount of data being replicated, a full or differential replication cantake a very long time to complete. Reset a replication policy only if you cannot fix theissue that caused the replication error. If you fix the issue that caused the error, resolvethe policy instead of resetting the policy.
Procedure
1. Click Data Protection > SyncIQ > Policies.
2. In the SyncIQ Policies table, in the row for a policy, select Reset Sync State.
Perform a full or differential replicationAfter you reset a replication policy, you must perform either a full or differentialreplication.
Before you begin
Reset a replication policy.
Procedure
1. Open a secure shell (SSH) connection to any node in the cluster and log in through theroot or compliance administrator account.
2. Specify the type of replication you want to perform by running the isi syncpolicies modify command.
l To perform a full replication, disable the --target-compare-initial-syncoption.
For example, the following command disables differential synchronization fornewPolicy:
isi sync policies modify newPolicy \--target-compare-initial-sync false
l To perform a differential replication, enable the --target-compare-initial-sync option.
For example, the following command enables differential synchronization fornewPolicy:
isi sync policies modify newPolicy \--target-compare-initial-sync true
3. Run the policy by running the isi sync jobs start command.
Backing up data with SyncIQ
34 OneFS 7.1 Backup and recovery guide

For example, the following command runs newPolicy:isi sync jobs start newPolicy
Managing replication policiesYou can modify, view, enable and disable replication policies.
Modify a replication policyYou can modify the settings of a replication policy.
If you modify any of the following policy settings after a policy runs, OneFS performseither a full or differential replication the next time the policy runs:
u Source directory
u Included or excluded directories
u File-criteria statement
u Target clusterThis applies only if you target a different cluster. If you modify the IP or domain nameof a target cluster, and then modify the replication policy on the source cluster tomatch the new IP or domain name, a full replication is not performed.
u Target directory
Procedure
1. Click Data Protection > SyncIQ > Policies.
2. In the SyncIQ Policies table, in the row for a policy, click View/Edit.
3. In the View SyncIQ Policy Details dialog box, click Edit Policy.
4. Modify the settings of the replication policy, and then click Save Changes.
Delete a replication policyYou can delete a replication policy. Once a policy is deleted, SyncIQ no longer createsreplication jobs for the policy. Deleting a replication policy breaks the target associationon the target cluster, and allows writes to the target directory.
If you want to temporarily suspend a replication policy from creating replication jobs, youcan disable the policy, and then enable the policy again later.
Procedure
1. Click Data Protection > SyncIQ > Policies.
2. In the SyncIQ Policies table, in the row for a policy, select Delete Policy.
3. In the confirmation dialog box, click Delete.
Backing up data with SyncIQ
Managing replication policies 35
Enable or disable a replication policyYou can temporarily suspend a replication policy from creating replication jobs, and thenenable it again later.
Note
If you disable a replication policy while an associated replication job is running, therunning job is not interrupted. However, the policy will not create another job until thepolicy is enabled.
Procedure
1. Click Data Protection > SyncIQ > Policies.
2. In the SyncIQ Policies table, in the row for a replication policy, select either EnablePolicy or Disable Policy.
If neither Enable Policy nor Disable Policy appears, verify that a replication job is notrunning for the policy. If an associated replication job is not running, ensure that theSyncIQ license is active on the cluster.
View replication policiesYou can view information about replication policies.
Procedure
1. Click Data Protection > SyncIQ > Policies.
2. In the SyncIQ Policies table, review information about replication policies.
Replication policy informationYou can view information about replication policies through the SyncIQ Policies table.
Policy NameThe name of the policy.
StateWhether the policy is enabled or disabled.
Last Known GoodWhen the last successful job ran.
ScheduleWhen the next job is scheduled to run. A value of Manual indicates that the job canbe run only manually. A value of When source is modified indicates that the job willbe run whenever changes are made to the source directory.
Source DirectoryThe path of the source directory on the source cluster.
Target Host : DirectoryThe IP address or fully qualified domain name of the target cluster and the full pathof the target directory.
ActionsAny policy-related actions that you can perform.
Backing up data with SyncIQ
36 OneFS 7.1 Backup and recovery guide
Replication policy settingsYou configure replication policies to run according to replication policy settings.
Policy nameThe name of the policy.
DescriptionDescribes the policy. For example, the description might explain the purpose orfunction of the policy.
EnabledDetermines whether the policy is enabled.
ActionDetermines the how the policy replicates data. All policies copy files from the sourcedirectory to the target directory and update files in the target directory to match fileson the source directory. The action determines how deleting a file on the sourcedirectory affects the target. The following values are valid:
CopyIf a file is deleted in the source directory, the file is not deleted in the targetdirectory.
SynchronizeDeletes files in the target directory if they are no longer present on the source.This ensures that an exact replica of the source directory is maintained on thetarget cluster.
Run jobDetermines whether jobs are run automatically according to a schedule or only whenmanually specified by a user.
Last Successful RunDisplays the last time that a replication job for the policy completed successfully.
Last StartedDisplays the last time that the policy was run.
Source Root DirectoryThe full path of the source directory. Data is replicated from the source directory tothe target directory.
Included DirectoriesDetermines which directories are included in replication. If one or more directoriesare specified by this setting, any directories that are not specified are not replicated.
Excluded DirectoriesDetermines which directories are excluded from replication. Any directories specifiedby this setting are not replicated.
File Matching CriteriaDetermines which files are excluded from replication. Any files that do not meet thespecified criteria are not replicated.
Restrict Source NodesDetermines whether the policy can run on all nodes on the source cluster or run onlyon specific nodes.
Target HostThe IP address or fully qualified domain name of the target cluster.
Backing up data with SyncIQ
Replication policy settings 37
Target DirectoryThe full path of the target directory. Data is replicated to the target directory from thesource directory.
Restrict Target NodesDetermines whether the policy can connect to all nodes on the target cluster or canconnect only to specific nodes.
Capture SnapshotsDetermines whether archival snapshots are generated on the target cluster.
Snapshot Alias NameSpecifies an alias for the latest archival snapshot taken on the target cluster.
Snapshot Naming PatternSpecifies how archival snapshots are named on the target cluster.
Snapshot ExpirationSpecifies how long archival snapshots are retained on the target cluster before theyare automatically deleted by the system.
Workers Threads Per NodeSpecifies the number of workers per node that are generated by OneFS to performeach replication job for the policy.
Log LevelSpecifies the amount of information that is recorded for replication jobs.More verbose options include all information from less verbose options. Thefollowing list describes the log levels from least to most verbose:
NoticeIncludes job and process-level activity, including job starts, stops, and workercoordination information. This is the recommended log level.
ErrorIncludes events related to specific types of failures.
Network ActivityIncludes more job-level activity and work-item information, including specificpaths and snapshot names.
File ActivityIncludes a separate event for each action taken on a file. Do not select thisoption without first consulting Isilon Technical Support.
Replication logs are typically used for debugging purposes. If necessary, you can login to a node through the command-line interface and view the contents ofthe /var/log/isi_migrate.log file on the node.
Validate File IntegrityDetermines whether OneFS performs a checksum on each file data packet that isaffected by a replication job. If a checksum value does not match, OneFS retransmitsthe affected file data packet.
Keep Reports ForSpecifies how long replication reports are kept before they are automatically deletedby OneFS.
Log Deletions on SynchronizationDetermines whether OneFS records when a synchronization job deletes files ordirectories on the target cluster.
The following replication policy fields are available only through the OneFS command-lineinterface.
Backing up data with SyncIQ
38 OneFS 7.1 Backup and recovery guide
Source SubnetSpecifies whether replication jobs connect to any nodes in the cluster or if jobs canconnect only to nodes in a specified subnet.
Source PoolSpecifies whether replication jobs connect to any nodes in the cluster or if jobs canconnect only to nodes in a specified pool.
Password SetSpecifies a password to access the target cluster.
Report Max CountSpecifies the maximum number of replication reports that are retained for thispolicy.
Target Compare Initial SyncDetermines whether full or differential replications are performed for this policy. Fullor differential replications are performed the first time a policy is run and after apolicy is reset.
Source Snapshot ArchiveDetermines whether snapshots generated for the replication policy on the sourcecluster are deleted when the next replication policy is run. Enabling archival sourcesnapshots does not require you to activate the SnapshotIQ license on the cluster.
Source Snapshot PatternIf snapshots generated for the replication policy on the source cluster are retained,renames snapshots according to the specified rename pattern.
Source Snapshot ExpirationIf snapshots generated for the replication policy on the source cluster are retained,specifies an expiration period for the snapshots.
Restrict Target NetworkDetermines whether replication jobs connect only to nodes in a given SmartConnectzone. This setting applies only if the Target Host is specified as a SmartConnectzone.
Target Detect ModificationsDetermines whether SyncIQ checks the target directory for modifications beforereplicating files. By default, SyncIQ always checks for modifications.
Note
Disabling this option could result in data loss. It is recommended that you consultIsilon Technical Support before disabling this option.
ResolveDetermines whether you can manually resolve the policy if a replication jobencounters an error.
Managing replication to the local clusterYou can interrupt replication jobs that target the local cluster.
You can cancel a currently running job that targets the local cluster, or you can break theassociation between a policy and its specified target. Breaking a source and targetcluster association causes SyncIQ to perform a full replication the next time the policy isrun.
Backing up data with SyncIQ
Managing replication to the local cluster 39
Cancel replication to the local clusterYou can cancel a replication job that is targeting the local cluster.
Procedure
1. Click Data Protection > SyncIQ > Local Targets.
2. In the SyncIQ Local Targets table, specify whether to cancel a specific replication jobor all replication jobs targeting the local cluster.
l To cancel a specific job, in the row for a replication job, select Cancel Running Job.
l To cancel all jobs targeting the local cluster, select the check box to the left ofPolicy Name and then select Cancel Selection from the Select a bulk action list.
Break local target associationYou can break the association between a replication policy and the local cluster.Breaking the target association will allow writes to the target directory but will alsorequire you to reset the replication policy before you can run the policy again.
CAUTION
After a replication policy is reset, SyncIQ performs a full or differential replication thenext time the policy is run. Depending on the amount of data being replicated, a full ordifferential replication can take a very long time to complete.
Procedure
1. Click Data Protection > SyncIQ > Local Targets.
2. In the SyncIQ Local Targets table, in the row for a replication policy, select BreakAssociation.
3. In the Confirm dialog box, click Yes.
View replication policies targeting the local clusterYou can view information about replication policies that are currently replicating data tothe local cluster.
Procedure
1. Click Data Protection > SyncIQ > Local Targets.
2. In the SyncIQ Local Targets table, view information about replication policies.
Remote replication policy informationYou can view information about replication policies that are currently targeting the localcluster.
The following information is displayed in the SyncIQ Local Targets table:
IDThe ID of the replication policy.
Policy NameThe name of the replication policy.
Source HostThe name of the source cluster.
Backing up data with SyncIQ
40 OneFS 7.1 Backup and recovery guide
Source Cluster GUIDThe GUID of the source cluster.
Coordinator IPThe IP address of the node on the source cluster that is acting as the job coordinator.
UpdatedThe time when data about the policy or job was last collected from the sourcecluster.
Target PathThe path of the target directory on the target cluster.
StatusThe current status of the replication job.
ActionsDisplays any job-related actions that you can perform.
Backing up data with SyncIQ
Remote replication policy information 41

CHAPTER 5
Recovering data with SyncIQ
This section contains the following topics:
u Initiating data failover and failback with SyncIQ.................................................... 44u Performing disaster recovery for SmartLock directories..........................................46
Recovering data with SyncIQ 43
Initiating data failover and failback with SyncIQYou can fail over from one Isilon cluster to another if, for example, a cluster becomesunavailable. You can then fail back to a primary cluster if the primary cluster becomesavailable again. You can revert failover if you decide that the failover was unnecessary, orif you failed over for testing purposes.
If you fail over a scheduled replication policy on the secondary cluster, and thecorresponding policy on the primary cluster runs a replication job, the job might fail andthe policy might be set to an unrunnable state. To resolve this, modify the replicationpolicy so that it is set to run only manually, resolve the policy, and complete the failbackprocess. After you complete the failback process, you can modify the policy to runaccording to a schedule again.
Note
Although you cannot fail over or fail back SmartLock directories, you can recoverSmartLock directories on a target cluster. After you recover SmartLock directories, you canmigrate them back to the source cluster.
Fail over data to a secondary clusterYou can fail over to a secondary Isilon cluster if, for example, a cluster becomesunavailable.
Before you begin
Create and successfully run a replication policy.
Complete the following procedure for each replication policy that you want to fail over.
Procedure
1. On the secondary Isilon cluster, click Data Protection > SyncIQ > Local Targets.
2. In the SyncIQ Local Targets table, in the row for a replication policy, from the Actionscolumn, select Allow Writes.
After you finish
Direct clients to begin accessing the secondary cluster.
Revert a failover operationFailover reversion undoes a failover operation on a secondary cluster, enabling you toreplicate data from the primary cluster to the secondary cluster again. Failover reversionis useful if the primary cluster becomes available before data is modified on thesecondary cluster or if you failed over to a secondary cluster for testing purposes.
Before you begin
Fail over a replication policy.
Reverting a failover operation does not migrate modified data back to the primary cluster.To migrate data that clients have modified on the secondary cluster, you must fail back tothe primary cluster.
Note
Failover reversion is not supported for SmartLock directories.
Recovering data with SyncIQ
44 OneFS 7.1 Backup and recovery guide
Complete the following procedure for each replication policy that you want to fail over.
Procedure
1. Run the isi sync recovery allow-write command with the --revertoption.
For example, the following command reverts a failover operation for newPolicy:isi sync recovery allow-write newPolicy --revert
Fail back data to a primary clusterAfter you fail over to a secondary cluster, you can fail back to the primary cluster.
Before you begin
Fail over a replication policy.
Procedure
1. On the primary cluster, click Data Protection > SyncIQ > Policies.
2. In the SyncIQ Policies table, in the row for a replication policy, from the Actionscolumn, select Resync-prep.
SyncIQ creates a mirror policy for each replication policy on the secondary cluster.
SyncIQ names mirror policies according to the following pattern:
<replication-policy-name>_mirror3. On the secondary cluster, replicate data to the primary cluster by using the mirror
policies.
You can replicate data either by manually starting the mirror policies or by modifyingthe mirror policies and specifying a schedule.
4. Prevent clients from accessing the secondary cluster and then run each mirror policyagain.
To minimize impact to clients, it is recommended that you wait until client access islow before preventing client access to the cluster.
5. On the primary cluster, click Data Protection > SyncIQ > Local Targets.
6. In the SyncIQ Local Targets table, from the Actions column, select Allow Writes foreach mirror policy.
7. On the secondary cluster, click Data Protection > SyncIQ > Policies.
8. In the SyncIQ Policies table, from the Actions column, select Resync-prep for eachmirror policy.
After you finish
Redirect clients to begin accessing the primary cluster.
Recovering data with SyncIQ
Fail back data to a primary cluster 45
Performing disaster recovery for SmartLock directoriesAlthough you cannot fail over or fail back SmartLock directories, you can recoverSmartLock directories on a target cluster. After you recover SmartLock directories, you canmigrate them back to the source cluster.
Recover SmartLock directories on a target clusterYou can recover SmartLock directories that you have replicated to a target cluster.
Before you begin
Create and successfully run a replication policy.
Complete the following procedure for each SmartLock directory that you want to recover.
Procedure
1. On the target cluster, click Data Protection > SyncIQ > Local Targets.
2. In the SyncIQ Local Targets table, in the row of the replication policy, enable writes tothe target directory of the policy.
l If the last replication job completed successfully and a replication job is notcurrently running, select Allow Writes.
l If a replication job is currently running, wait until the replication job completes,and then select Allow Writes.
l If the primary cluster became unavailable while a replication job was running,select Break Association.
3. If you clicked Break Association, restore any files that are left in an inconsistent state.
a. Delete all files that are not committed to a WORM state from the target directory.
b. Copy all files from the failover snapshot to the target directory.
Failover snapshots are named according to the following naming pattern:
SIQ-Failover-<policy-name>-<year>-<month>-<day>_<hour>-<minute>-<second>
Snapshots are stored in the /ifs/.snapshot directory.
4. If any SmartLock directory configuration settings, such as an autocommit time period,were specified for the source directory of the replication policy, apply those settings tothe target directory.
Because autocommit information is not transferred to the target cluster, files thatwere scheduled to be committed to a WORM state on the source cluster will not bescheduled to be committed at the same time on the target cluster. To ensure that allfiles are retained for the appropriate time period, you can commit all files in targetSmartLock directories to a WORM state. For example, the following commandautomatically commits all files in /ifs/data/smartlock to a WORM state afterone minute.isi smartlock modify --path /ifs/data/smartlock --autocommit 1n
After you finish
Redirect clients to begin accessing the target cluster.
Recovering data with SyncIQ
46 OneFS 7.1 Backup and recovery guide
Migrate SmartLock directoriesYou might want to migrate SmartLock directories if you restored the directories on atarget cluster, and want to transfer those directories either back to the source cluster orto a new cluster.
Procedure
1. On a cluster, create a replication policy for each policy that you want to migrate.
The policies must meet the following requirements:
l The source directory is the SmartLock directory that you are migrating.
l The target directory is an empty SmartLock directory. The source and targetdirectories must be of the same SmartLock type. For example, if the targetdirectory is a compliance directory, the source must also be a compliancedirectory.
2. Replicate data to the target cluster by running the policies you created.
You can replicate data either by manually starting the policies or by specifying a policyschedule.
3. Optional: To ensure that SmartLock protection is enforced for all files, commit all filesin the SmartLock source directory to a WORM state.
Because autocommit information is not transferred to the target cluster, files thatwere scheduled to be committed to a WORM state on the source cluster will not bescheduled to be committed at the same time on the target cluster. To ensure that allfiles are retained for the appropriate time period, you can commit all files in targetSmartLock directories to a WORM state.
For example, the following command automatically commits all files in /ifs/data/smartlock to a WORM state after one minute.isi smartlock modify --path /ifs/data/smartlock --autocommit 1n
This step is unnecessary if you have not configured an autocommit time period for theSmartLock directory being replicated.
4. Prevent clients from accessing the source cluster and run the policy that you created.
To minimize impact to clients, it is recommended that you wait until client access islow before preventing client access to the cluster.
5. On the target cluster, click Data Protection > SyncIQ > Local Targets.
6. In the SyncIQ Local Targets table, in the row of each replication policy, from theActions column, select Allow Writes.
7. Optional: If any SmartLock directory configuration settings, such as an autocommittime period, were specified for the source directories of the replication policies, applythose settings to the target directories.
8. Optional: Delete the copy of your SmartLock data on the source cluster.
If the SmartLock directories are compliance directories or enterprise directories withthe privileged delete functionality permanently disabled, you cannot recover thespace consumed by the source SmartLock directories until all files are released from aWORM state. If you want to free the space before files are released from a WORMstate, contact Isilon Technical Support for information about reformatting your cluster.
Recovering data with SyncIQ
Migrate SmartLock directories 47

CHAPTER 6
NDMP backup
This section contains the following topics:
u NDMP two way backup.......................................................................................... 50u Snapshot-based incremental backups.................................................................. 50u NDMP protocol support......................................................................................... 51u Supported DMAs................................................................................................... 51u NDMP hardware support....................................................................................... 52u NDMP backup limitations...................................................................................... 52u NDMP performance recommendations.................................................................. 52u Excluding files and directories from NDMP backups.............................................. 54
NDMP backup 49
NDMP two way backupTo perform NDMP two-way backups, you must attach a Backup Accelerator node to yourIsilon cluster and attach a tape device to the Backup Accelerator node. You must thenuse OneFS to detect the tape device before you can back up to that device.
You can connect supported tape devices directly to the Fibre Channel ports of a BackupAccelerator node. Alternatively, you can connect Fibre Channel switches to the FibreChannel ports on the Backup Accelerator node, and connect tape and media changerdevices to the Fibre Channel switches. For more information, see your Fibre Channelswitch documentation about zoning the switch to allow communication between theBackup Accelerator node and the connected tape and media changer devices.
If you attach tape devices to a Backup Accelerator node, the cluster detects the deviceswhen you start or restart the node or when you re-scan the Fibre Channel ports todiscover devices. If a cluster detects tape devices, the cluster creates an entry for thepath to each detected device.
If you connect a device through a Fibre Channel switch, multiple paths can exist for asingle device. For example, if you connect a tape device to a Fibre Channel switch, andthen connect the Fibre Channel switch to two Fibre Channel ports, OneFS creates twoentries for the device, one for each path.
Note
If you perform an NDMP two-way backup operation, you must assign static IP addressesto the Backup Accelerator node. If you connect to the cluster through a data managementapplication (DMA), you must connect to the IP address of a Backup Accelerator node. Ifyou perform an NDMP three-way backup, you can connect to any node in the cluster.
Snapshot-based incremental backupsYou can implement snapshot-based incremental backups to increase the speed at whichthese backups are performed.
During a snapshot-based incremental backup, OneFS checks the snapshot taken for theprevious NDMP backup operation and compares it to a new snapshot. OneFS then backsup all data that was modified since the last snapshot was made.
If the incremental backup does not involve snapshots, OneFS must scan the directory todiscover which files were modified. OneFS can perform incremental backups significantlyfaster if snapshots are referenced.
You can perform incremental backups without activating a SnapshotIQ license on thecluster. Although SnapshotIQ offers a number of useful features, it does not enhancesnapshot capabilities in NDMP backup and recovery.
If you implement snapshot-based incremental backups, OneFS retains each snapshottaken for NDMP backups until a new backup of the same or lower level is performed.However, if you do not implement snapshot-based incremental backups, OneFSautomatically deletes each snapshot generated after the corresponding backup iscompleted or canceled.
The following table lists whether supported data management applications (DMAs) canperform snapshot-based incremental backups:
NDMP backup
50 OneFS 7.1 Backup and recovery guide
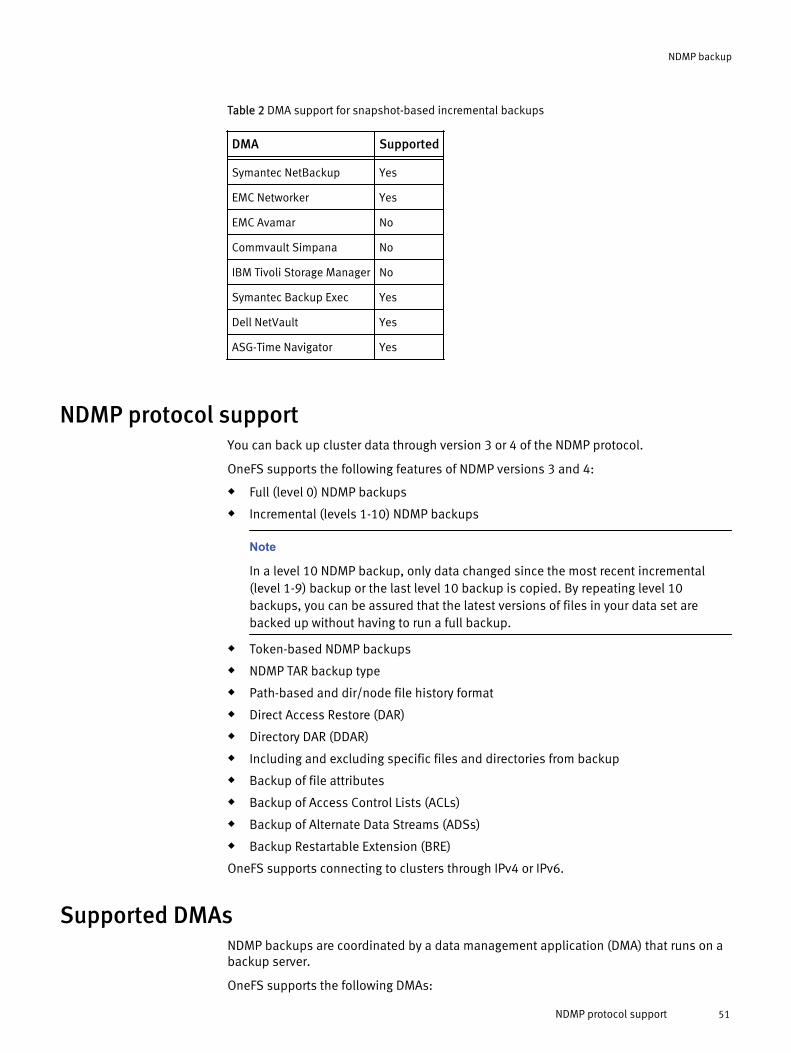
Table 2 DMA support for snapshot-based incremental backups
DMA Supported- -Symantec NetBackup Yes
EMC Networker Yes
EMC Avamar No
Commvault Simpana No
IBM Tivoli Storage Manager No
Symantec Backup Exec Yes
Dell NetVault Yes
ASG-Time Navigator Yes
NDMP protocol supportYou can back up cluster data through version 3 or 4 of the NDMP protocol.
OneFS supports the following features of NDMP versions 3 and 4:
u Full (level 0) NDMP backups
u Incremental (levels 1-10) NDMP backups
Note
In a level 10 NDMP backup, only data changed since the most recent incremental(level 1-9) backup or the last level 10 backup is copied. By repeating level 10backups, you can be assured that the latest versions of files in your data set arebacked up without having to run a full backup.
u Token-based NDMP backups
u NDMP TAR backup type
u Path-based and dir/node file history format
u Direct Access Restore (DAR)
u Directory DAR (DDAR)
u Including and excluding specific files and directories from backup
u Backup of file attributes
u Backup of Access Control Lists (ACLs)
u Backup of Alternate Data Streams (ADSs)
u Backup Restartable Extension (BRE)
OneFS supports connecting to clusters through IPv4 or IPv6.
Supported DMAsNDMP backups are coordinated by a data management application (DMA) that runs on abackup server.
OneFS supports the following DMAs:
NDMP backup
NDMP protocol support 51
u Symantec NetBackup
u EMC NetWorker
u EMC Avamar
u Symantec Backup Exec
u IBM Tivoli Storage Manager
u Dell NetVault
u CommVault Simpana (IPv6 protocol only)
u ASG-Time Navigator
NDMP hardware supportOneFS can backup data to and restore data from tape devices and virtual tape libraries(VTL).
OneFS supports the following types of emulated and physical tape devices:
u LTO-3
u LTO-4
u LTO-5
OneFS supports the following virtual tape libraries (VTLs):
u FalconStor VTL 5.20
u Data Domain VTL 5.1.04 or later
NDMP backup limitationsOneFS NDMP backups have the following limitations:
u OneFS does not back up file system configuration data, such as file protection levelpolicies and quotas.
u OneFS does not support multiple concurrent backups onto the same tape.
u OneFS does not support restoring data from a file system other than OneFS. However,you can migrate data via the NDMP protocol from a NetApp or EMC VNX storagesystem to OneFS.
u Backup Accelerator nodes cannot interact with more than 1024 device paths,including the paths of tape and media changer devices. For example, if each devicehas four paths, you can connect 256 devices to a Backup Accelerator node. If eachdevice has two paths, you can connect 512 devices.
u OneFS does not support more than 64 concurrent NDMP sessions per BackupAccelerator node.
NDMP performance recommendationsConsider the following recommendations to optimize OneFS NDMP backups.
General performance recommendations
u Install the latest patches for OneFS and your data management application (DMA).
u If you are backing up multiple directories that contain small files, set up a separateschedule for each directory.
NDMP backup
52 OneFS 7.1 Backup and recovery guide
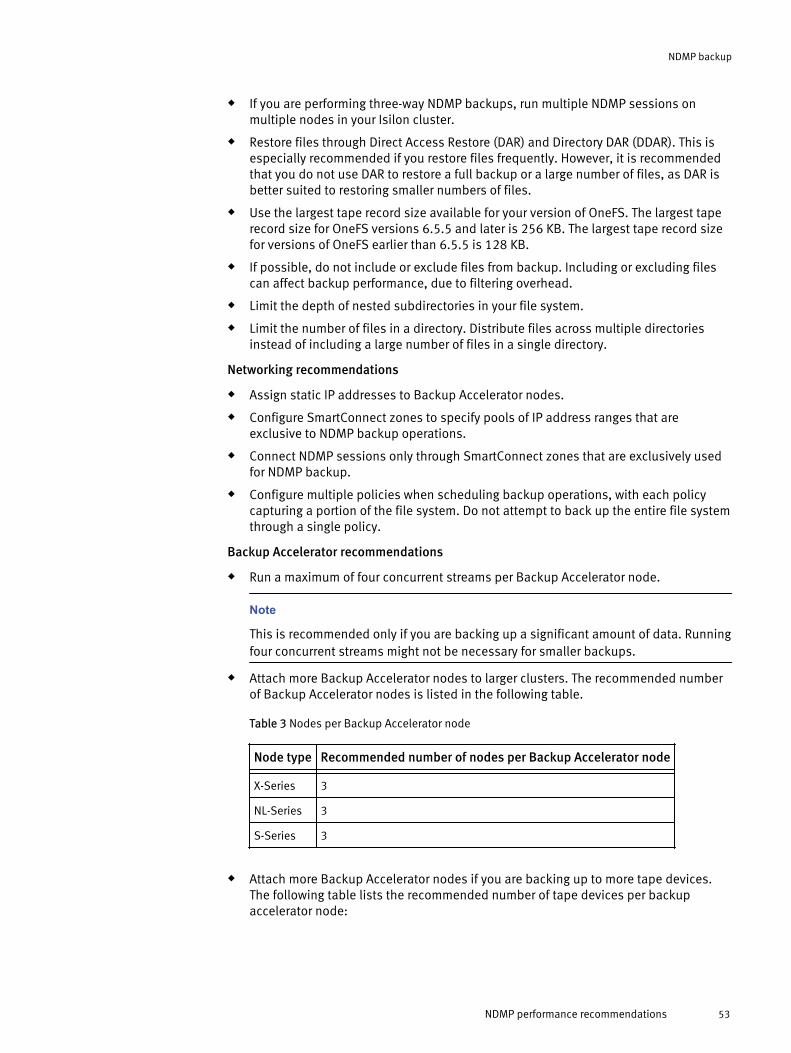
u If you are performing three-way NDMP backups, run multiple NDMP sessions onmultiple nodes in your Isilon cluster.
u Restore files through Direct Access Restore (DAR) and Directory DAR (DDAR). This isespecially recommended if you restore files frequently. However, it is recommendedthat you do not use DAR to restore a full backup or a large number of files, as DAR isbetter suited to restoring smaller numbers of files.
u Use the largest tape record size available for your version of OneFS. The largest taperecord size for OneFS versions 6.5.5 and later is 256 KB. The largest tape record sizefor versions of OneFS earlier than 6.5.5 is 128 KB.
u If possible, do not include or exclude files from backup. Including or excluding filescan affect backup performance, due to filtering overhead.
u Limit the depth of nested subdirectories in your file system.
u Limit the number of files in a directory. Distribute files across multiple directoriesinstead of including a large number of files in a single directory.
Networking recommendations
u Assign static IP addresses to Backup Accelerator nodes.
u Configure SmartConnect zones to specify pools of IP address ranges that areexclusive to NDMP backup operations.
u Connect NDMP sessions only through SmartConnect zones that are exclusively usedfor NDMP backup.
u Configure multiple policies when scheduling backup operations, with each policycapturing a portion of the file system. Do not attempt to back up the entire file systemthrough a single policy.
Backup Accelerator recommendations
u Run a maximum of four concurrent streams per Backup Accelerator node.
Note
This is recommended only if you are backing up a significant amount of data. Runningfour concurrent streams might not be necessary for smaller backups.
u Attach more Backup Accelerator nodes to larger clusters. The recommended numberof Backup Accelerator nodes is listed in the following table.
Table 3 Nodes per Backup Accelerator node
Node type Recommended number of nodes per Backup Accelerator node- -X-Series 3
NL-Series 3
S-Series 3
u Attach more Backup Accelerator nodes if you are backing up to more tape devices.The following table lists the recommended number of tape devices per backupaccelerator node:
NDMP backup
NDMP performance recommendations 53
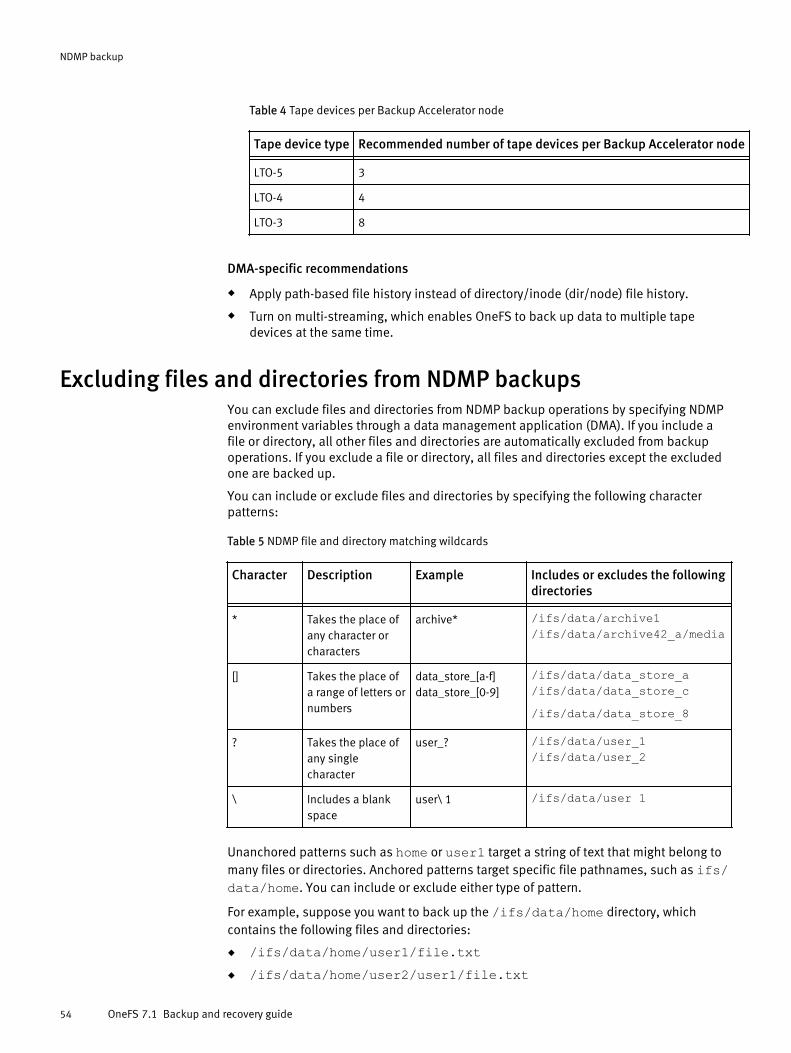
Table 4 Tape devices per Backup Accelerator node
Tape device type Recommended number of tape devices per Backup Accelerator node- -LTO-5 3
LTO-4 4
LTO-3 8
DMA-specific recommendations
u Apply path-based file history instead of directory/inode (dir/node) file history.
u Turn on multi-streaming, which enables OneFS to back up data to multiple tapedevices at the same time.
Excluding files and directories from NDMP backupsYou can exclude files and directories from NDMP backup operations by specifying NDMPenvironment variables through a data management application (DMA). If you include afile or directory, all other files and directories are automatically excluded from backupoperations. If you exclude a file or directory, all files and directories except the excludedone are backed up.
You can include or exclude files and directories by specifying the following characterpatterns:
Table 5 NDMP file and directory matching wildcards
Character Description Example Includes or excludes the followingdirectories
- - - -* Takes the place of
any character orcharacters
archive* /ifs/data/archive1/ifs/data/archive42_a/media
[] Takes the place ofa range of letters ornumbers
data_store_[a-f]data_store_[0-9]
/ifs/data/data_store_a/ifs/data/data_store_c/ifs/data/data_store_8
? Takes the place ofany singlecharacter
user_? /ifs/data/user_1/ifs/data/user_2
\ Includes a blankspace
user\ 1 /ifs/data/user 1
Unanchored patterns such as home or user1 target a string of text that might belong tomany files or directories. Anchored patterns target specific file pathnames, such as ifs/data/home. You can include or exclude either type of pattern.
For example, suppose you want to back up the /ifs/data/home directory, whichcontains the following files and directories:
u /ifs/data/home/user1/file.txtu /ifs/data/home/user2/user1/file.txt
NDMP backup
54 OneFS 7.1 Backup and recovery guide

u /ifs/data/home/user3/other/file.txtu /ifs/data/home/user4/emptydirectoryIf you simply include the /ifs/data/home directory, all files and directories, includingemptydirectory would be backed up.
If you specify both include and exclude patterns, any excluded files or directories underthe included directories would not be backed up. If the excluded directories are not foundin any of the included directories, the exclude specification would have no effect.
Note
Specifying unanchored patterns can degrade the performance of backups. It isrecommended that you avoid unanchored patterns whenever possible.
NDMP backup
Excluding files and directories from NDMP backups 55


CHAPTER 7
Backing up and recovering data with NDMP
This section contains the following topics:
u NDMP backup and recovery tasks..........................................................................58u Configuring basic NDMP backup settings.............................................................. 58u Managing NDMP user accounts............................................................................. 59u Managing NDMP backup devices...........................................................................60u Managing NDMP backup ports.............................................................................. 62u Managing NDMP backup sessions.........................................................................63u Managing restartable backups.............................................................................. 65u Sharing tape drives between clusters.................................................................... 67u Managing default NDMP settings...........................................................................67u Managing snapshot based incremental backups...................................................71u View NDMP backup logs........................................................................................72u Configuring NDMP backups with EMC NetWorker...................................................72u Configuring NDMP backup with Symantec NetBackup........................................... 76u Configuring NDMP backup with CommVault Simpana............................................80
Backing up and recovering data with NDMP 57
NDMP backup and recovery tasksBefore you can back up data with NDMP, you must configure and enable NDMP backupon the cluster. After this, you can configure settings for NDMP backup ports and backupdevices. After you start backing up data with NDMP, you can monitor backup sessions.
Configuring basic NDMP backup settingsYou can configure NDMP backup settings to control how these backups are performed forthe cluster. You can also configure OneFS to interact with a specific data managementapplication (DMA) for NDMP backups.
NDMP backup settingsYou can configure the following settings to control how NDMP backups are performed onthe cluster.
Port numberThe number of the port through which the data management application (DMA) canconnect to the cluster.
DMA vendorThe DMA vendor that the cluster is configured to interact with.
View NDMP backup settingsYou can view current NDMP backup settings. These settings define whether NDMPbackup is enabled, the port through which your data management application (DMA)connects to the cluster, and the DMA vendor that OneFS is configured to interact with.
Procedure
1. Click Data Protection > Backup > NDMP Settings and view NDMP backup settings.
2. In the Settings area, review NDMP backup settings.
Configure and enable NDMP backupOneFS prevents NDMP backups by default. Before you can perform NDMP backups, youmust enable NDMP backups and configure NDMP settings.
Procedure
1. Click Data Protection > Backup > NDMP Settings.
2. In the Service area, click Enable.
3. Optional: To specify a port through which data management applications (DMAs)access the cluster, or the DMA vendor that OneFS is to interact with, in the Settingsarea, click Edit settings.
l In the Port number field, type a port number.
l From the DMA vendor list, select the name of the DMA vendor to manage backupoperations.
If your DMA vendor is not included in the list, select generic. However, note thatany vendors not included on the list are not officially supported and might notfunction as expected.
Backing up and recovering data with NDMP
58 OneFS 7.1 Backup and recovery guide
4. Click Add administrator to add an NDMP user account through which your DMA canaccess the cluster.
a. In the Add Administrator dialog box, in the Name field, type a name for theaccount.
b. In the Password and Confirm password fields, type a password for the account.
c. Click Submit.
Disable NDMP backupYou can disable NDMP backup if you no longer want to use this backup method.
Procedure
1. Click Data Protection > Backup > NDMP Settings.
2. In the Service area, click Disable.
Managing NDMP user accountsYou can create, delete, and modify the passwords of NDMP user accounts.
Create an NDMP user accountBefore you can perform NDMP backups, you must create an NDMP user account throughwhich your data management application (DMA) can access the Isilon cluster.
Procedure
1. Click Data Protection > Backup > NDMP Settings.
2. In the NDMP Administrators area, click Add administrator.
3. In the Add Administrator dialog box, in the Name field, type a name for the account.
4. In the Password and Confirm password fields, type a password for the account.
5. Click Submit.
View NDMP user accountsYou can view information about NDMP user accounts.
Procedure
1. Click Data Protection > Backup > NDMP Settings.
2. In the NDMP administrators area, review information about NDMP user accounts.
Modify the password of an NDMP user accountYou can modify the password for an NDMP user account.
Procedure
1. Click Data Protection > Backup > NDMP Settings.
2. In the NDMP Administrator table, in the row for an NDMP user account, click Changepassword.
3. In the Password and Confirm password fields, type a new password for the account.
4. Click Submit.
Backing up and recovering data with NDMP
Disable NDMP backup 59
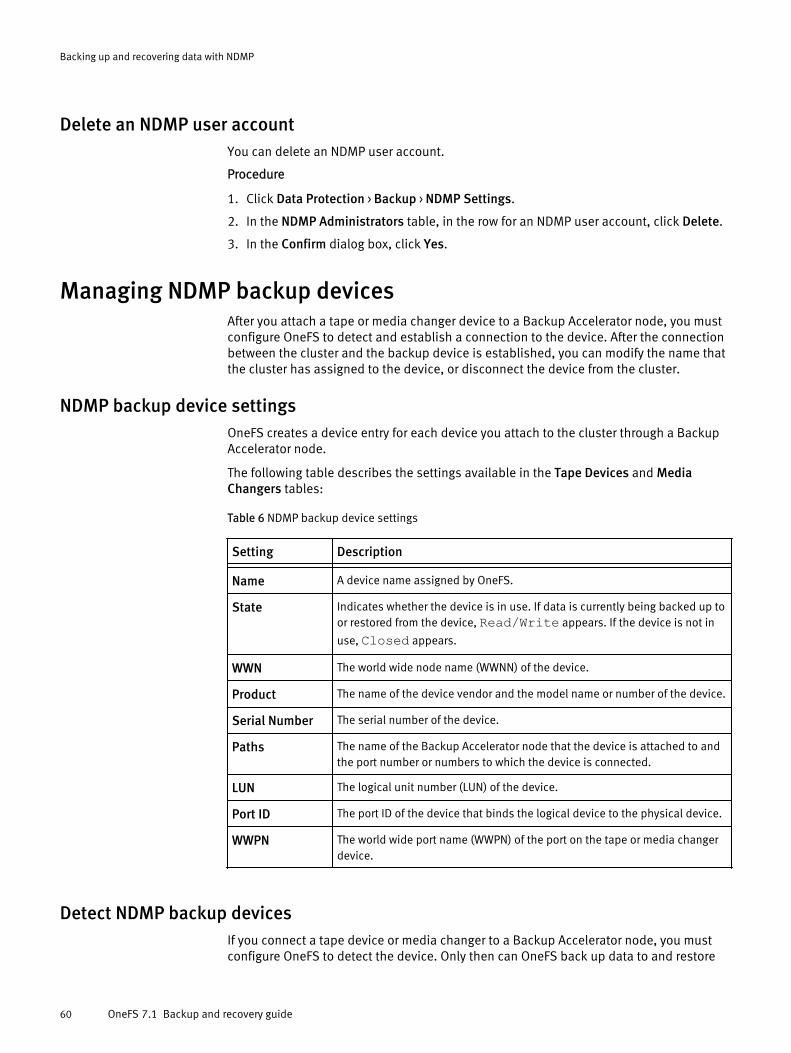
Delete an NDMP user accountYou can delete an NDMP user account.
Procedure
1. Click Data Protection > Backup > NDMP Settings.
2. In the NDMP Administrators table, in the row for an NDMP user account, click Delete.
3. In the Confirm dialog box, click Yes.
Managing NDMP backup devicesAfter you attach a tape or media changer device to a Backup Accelerator node, you mustconfigure OneFS to detect and establish a connection to the device. After the connectionbetween the cluster and the backup device is established, you can modify the name thatthe cluster has assigned to the device, or disconnect the device from the cluster.
NDMP backup device settingsOneFS creates a device entry for each device you attach to the cluster through a BackupAccelerator node.
The following table describes the settings available in the Tape Devices and MediaChangers tables:
Table 6 NDMP backup device settings
Setting Description- -Name A device name assigned by OneFS.
State Indicates whether the device is in use. If data is currently being backed up toor restored from the device, Read/Write appears. If the device is not in
use, Closed appears.
WWN The world wide node name (WWNN) of the device.
Product The name of the device vendor and the model name or number of the device.
Serial Number The serial number of the device.
Paths The name of the Backup Accelerator node that the device is attached to andthe port number or numbers to which the device is connected.
LUN The logical unit number (LUN) of the device.
Port ID The port ID of the device that binds the logical device to the physical device.
WWPN The world wide port name (WWPN) of the port on the tape or media changerdevice.
Detect NDMP backup devicesIf you connect a tape device or media changer to a Backup Accelerator node, you mustconfigure OneFS to detect the device. Only then can OneFS back up data to and restore
Backing up and recovering data with NDMP
60 OneFS 7.1 Backup and recovery guide
data from the device. In OneFS, you can scan a specific node, a specific port, or all portson all nodes.
Procedure
1. Click Data Protection > Backup > Devices.
2. Click Discover devices.
3. Optional: To scan only a specific node for NDMP devices, from the Nodes list, select anode.
4. Optional: To scan only a specific port for NDMP devices, from the Ports list, select aport.
If you specify a port and a node, only the specified port on the node is scanned.However, if you specify only a port, the specified port will be scanned on all nodes.
5. Optional: To remove entries for devices or paths that have become inaccessible,select the Delete inaccessible paths or devices check box.
6. Click Submit.
Results
For each device that is detected, an entry is added to either the Tape Devices or MediaChangers tables.
View NDMP backup devicesYou can view information about tape and media changer devices that are currentlyattached to your Isilon cluster.
Procedure
1. Click Data Protection > Backup > Devices.
2. In the Tape Devices and Media Changers tables, review information about NDMPbackup devices.
Modify the name of an NDMP backup deviceYou can modify the name of an NDMP backup device in OneFS.
Procedure
1. Click Data Protection > Backup > Devices.
2. In the Tape Devices table, click the name of a backup device entry.
3. In the Rename Device dialog box, in the Device Name field, type a new name for thebackup device.
4. Click Submit.
Delete an entry for an NDMP backup deviceIf you physically remove an NDMP device from a cluster, OneFS retains the entry for thedevice. You can delete a device entry for a removed device. You can also remove thedevice entry for a device that is still physically attached to the cluster; this causes OneFSto disconnect from the device.
If you remove a device entry for a device that is connected to the cluster, and you do notphysically disconnect the device, OneFS will detect the device the next time it scans theports. You cannot remove a device entry for a device that is currently in use.
Backing up and recovering data with NDMP
View NDMP backup devices 61
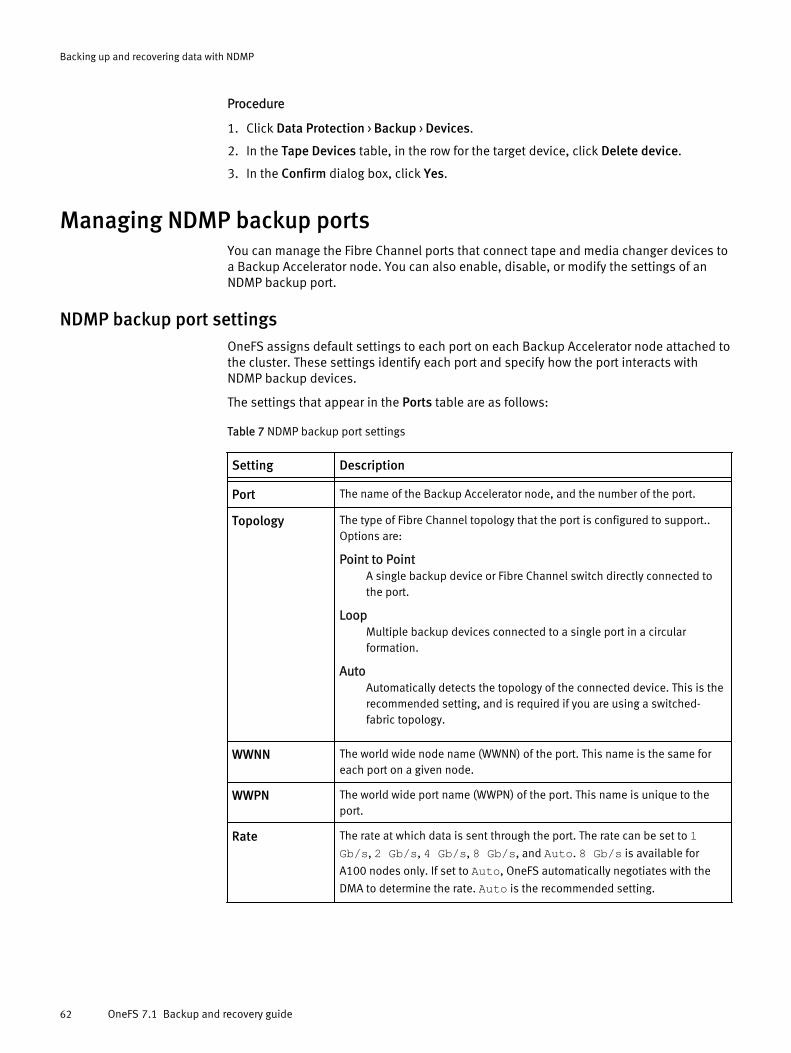
Procedure
1. Click Data Protection > Backup > Devices.
2. In the Tape Devices table, in the row for the target device, click Delete device.
3. In the Confirm dialog box, click Yes.
Managing NDMP backup portsYou can manage the Fibre Channel ports that connect tape and media changer devices toa Backup Accelerator node. You can also enable, disable, or modify the settings of anNDMP backup port.
NDMP backup port settingsOneFS assigns default settings to each port on each Backup Accelerator node attached tothe cluster. These settings identify each port and specify how the port interacts withNDMP backup devices.
The settings that appear in the Ports table are as follows:
Table 7 NDMP backup port settings
Setting Description- -Port The name of the Backup Accelerator node, and the number of the port.
Topology The type of Fibre Channel topology that the port is configured to support..Options are:
Point to PointA single backup device or Fibre Channel switch directly connected tothe port.
LoopMultiple backup devices connected to a single port in a circularformation.
AutoAutomatically detects the topology of the connected device. This is therecommended setting, and is required if you are using a switched-fabric topology.
WWNN The world wide node name (WWNN) of the port. This name is the same foreach port on a given node.
WWPN The world wide port name (WWPN) of the port. This name is unique to theport.
Rate The rate at which data is sent through the port. The rate can be set to 1Gb/s, 2 Gb/s, 4 Gb/s, 8 Gb/s, and Auto. 8 Gb/s is available for
A100 nodes only. If set to Auto, OneFS automatically negotiates with the
DMA to determine the rate. Auto is the recommended setting.
Backing up and recovering data with NDMP
62 OneFS 7.1 Backup and recovery guide
View NDMP backup portsYou can view information about Fibre Channel ports of Backup Accelerator nodesattached to a cluster.
Procedure
1. Click Data Protection > Backup > Ports.
2. In the Ports table, review information about NDMP backup ports.
Modify NDMP backup port settingsYou can modify the settings of an NDMP backup port.
Procedure
1. Click Data Protection > Backup > Ports.
2. In the Sessions table, click the name of a port.
3. In the Edit Port dialog box, modify port settings as needed, and then click Submit.
Enable or disable an NDMP backup portYou can enable or disable an NDMP backup port.
Procedure
1. Click Data Protection > Backup > Ports.
2. In the Ports table, in the row of a port, click Enable or Disable.
Managing NDMP backup sessionsYou can view the status of NDMP backup sessions or terminate a session that is inprogress.
NDMP session informationYou can view information about active NDMP sessions.
The following information is included in the Sessions table, as follows:
Table 8 NDMP session information
Item Description- -Session The unique identification number that OneFS assigned to the
session.
Elapsed How much time has elapsed since the session started.
Transferred The amount of data that was transferred during the session.
Throughput The average throughput of the session over the past five minutes.
Client/Remote The IP address of the backup server that the data managementapplication (DMA) is running on. If a three-way NDMP backup orrestore operation is currently running, the IP address of the remotetape media server also appears.
Backing up and recovering data with NDMP
View NDMP backup ports 63
Table 8 NDMP session information (continued)
Item Description- -Mover/Data The current state of the data mover and the data server. The first
word describes the activity of the data mover. The second worddescribes the activity of the data server.The data mover and data server send data to and receive data fromeach other during backup and restore operations. The data mover isa component of the backup server that receives data duringbackups and sends data during restore operations. The data serveris a component of OneFS that sends data during backups andreceives information during restore operations.
The following states might appear:
ActiveThe data mover or data server is currently sending or receivingdata.
PausedThe data mover is temporarily unable to receive data. While thedata mover is paused, the data server cannot send data to thedata mover. The data server cannot be paused.
IdleThe data mover or data server is not sending or receiving data.
ListenThe data mover or data server is waiting to connect to the dataserver or data mover.
Operation The type of operation (backup or restore) that is currently inprogress. If no operation is in progress, this field is blank.
Backup (0-10)Indicates that data is currently being backed up to a mediaserver. The number indicates the level of NDMP backup.
RestoreIndicates that data is currently being restored from a mediaserver.
Source/Destination If an operation is currently in progress, specifies the /ifsdirectories that are affected by the operation. If a backup is inprogress, displays the path of the source directory that is beingbacked up. If a restore operation is in progress, displays the path ofthe directory that is being restored along with the destinationdirectory to which the tape media server is restoring data. If you arerestoring data to the same location that you backed up your datafrom, the same path appears twice.
Device The name of the tape or media changer device that iscommunicating with the cluster.
Mode How OneFS is interacting with data on the backup media server, asfollows:
Read/WriteOneFS is reading and writing data during a backup operation.
Backing up and recovering data with NDMP
64 OneFS 7.1 Backup and recovery guide
Table 8 NDMP session information (continued)
Item Description- -
ReadOneFS is reading data during a restore operation.
RawThe DMA has access to tape drives, but the drives do notcontain writable tape media.
View NDMP sessionsYou can view information about active NDMP sessions.
Procedure
1. Click Data Protection > Backup > Sessions.
2. In the Sessions table, review information about NDMP sessions.
End an NDMP sessionYou can end an NDMP backup or restore session at any time.
Procedure
1. Click Data Protection > Backup > Sessions.
2. In the Sessions table, in the row of the NDMP session that you want to end, click Kill.
3. In the Confirm dialog box, click Yes.
Managing restartable backupsA restartable backup is a type of NDMP backup that you can enable in your datamanagement application (DMA). If a restartable backup fails, for example, because of apower outage, you can restart the backup from a checkpoint close to the point of failure.In contrast, when a non-restartable backup fails, you must back up all data from thebeginning, regardless of what was transferred during the initial backup process.
After you enable restartable backups from your DMA, you can manage restartable backupcontexts from OneFS. These contexts are the data that OneFS stores to facilitaterestartable backups. Each context represents a checkpoint that the restartable backupprocess can return to if a backup fails.
Restartable backups are supported only for EMC NetWorker 8.1 and later.
Configure restartable backupsYou must configure EMC NetWorker to enable restartable backups and, optionally, definethe checkpoint interval.
If you do not specify a checkpoint interval, NetWorker uses the default interval of 5 GB.
Procedure
1. Configure the client and the directory path that you want to back up as you wouldnormally.
Backing up and recovering data with NDMP
View NDMP sessions 65
2. In the Client Properties dialog box, enable restartable backups.
a. On the General screen, click the Checkpoint enabled checkbox.
b. Specify File in the Checkpoint granularity drop-down list.
3. In the Application information field, type any NDMP variables that you want to specify.
The following specifies a checkpoint interval of 1 GB.CHECKPOINT_INTERVAL_IN_BYTES=1GB
4. Finish configuration and click OK in the Client Properties dialog box.
5. Start the backup.
6. If the backup is interrupted, for example, because of a power failure, restart it.
a. Browse to the Monitoring screen, and locate the backup process in the Groups list.
b. Right-click on the backup process, and in the context menu, click Restart.
NetWorker automatically restarts the backup from the last checkpoint.
View restartable backup contextsYou can view restartable backup contexts that have been configured.
Procedure
1. View all backup contexts by running the following command:
isi ndmp extensions contexts list2. To view detailed information about a specific backup context, run the isi ndmp
extensions contexts view command.
The following command displays detailed information about a backup context with anID of 792eeb8a-8784-11e2-aa70-0025904e91a4:isi ndmp extensions contexts view 792eeb8a-8784-11e2-aa70-0025904e91a4
Delete a restartable backup contextAfter a restartable backup context is no longer needed, your data managementapplication (DMA) automatically requests that OneFS delete the context. You canmanually delete a restartable backup context before the DMA requests it.
Note
It is recommended that you do not manually delete restartable backup contexts.Manually deleting a restartable backup context requires you to restart the correspondingNDMP backup from the beginning.
Procedure
1. Run the isi ndmp extensions contexts delete command.
The following command deletes a restartable backup context with an ID of792eeb8a-8784-11e2-aa70-0025904e91a4:isi ndmp extensions contexts delete 792eeb8a-8784-11e2-aa70-0025904e91a4
Backing up and recovering data with NDMP
66 OneFS 7.1 Backup and recovery guide
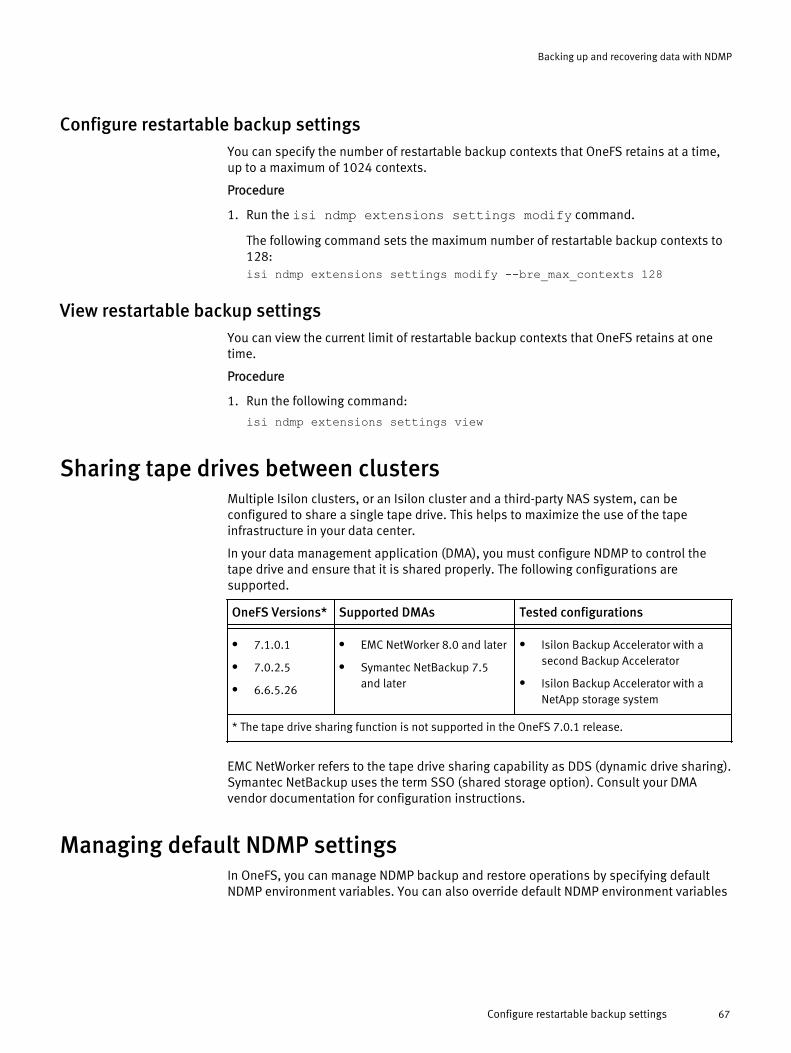
Configure restartable backup settingsYou can specify the number of restartable backup contexts that OneFS retains at a time,up to a maximum of 1024 contexts.
Procedure
1. Run the isi ndmp extensions settings modify command.
The following command sets the maximum number of restartable backup contexts to128:isi ndmp extensions settings modify --bre_max_contexts 128
View restartable backup settingsYou can view the current limit of restartable backup contexts that OneFS retains at onetime.
Procedure
1. Run the following command:
isi ndmp extensions settings view
Sharing tape drives between clustersMultiple Isilon clusters, or an Isilon cluster and a third-party NAS system, can beconfigured to share a single tape drive. This helps to maximize the use of the tapeinfrastructure in your data center.
In your data management application (DMA), you must configure NDMP to control thetape drive and ensure that it is shared properly. The following configurations aresupported.
OneFS Versions* Supported DMAs Tested configurations- - -l 7.1.0.1
l 7.0.2.5
l 6.6.5.26
l EMC NetWorker 8.0 and later
l Symantec NetBackup 7.5and later
l Isilon Backup Accelerator with asecond Backup Accelerator
l Isilon Backup Accelerator with aNetApp storage system
* The tape drive sharing function is not supported in the OneFS 7.0.1 release.
EMC NetWorker refers to the tape drive sharing capability as DDS (dynamic drive sharing).Symantec NetBackup uses the term SSO (shared storage option). Consult your DMAvendor documentation for configuration instructions.
Managing default NDMP settingsIn OneFS, you can manage NDMP backup and restore operations by specifying defaultNDMP environment variables. You can also override default NDMP environment variables
Backing up and recovering data with NDMP
Configure restartable backup settings 67
through your data management application (DMA). For more information about specifyingNDMP environment variables through your DMA, see your DMA documentation.
Set default NDMP settings for a directoryYou can set default NDMP settings for a directory.
Procedure
1. Open a secure shell (SSH) connection to any node in the cluster and log in.
2. Set default NDMP settings by running the isi ndmp settings variablescreate command.
For example, the following command sets the default file history format to path-basedformat for /ifs/data/media:
isi ndmp settings variables create /ifs/data/media HIST F
Modify default NDMP settings for a directoryYou can modify the default NDMP settings for a directory.
Procedure
1. Open a secure shell (SSH) connection to any node in the cluster and log in.
2. Modify default NDMP settings by running the isi ndmp settings variablesmodify command.
For example, the following command sets the default file history format to path-basedformat for /ifs/data/media:
isi ndmp settings variables modify /ifs/data/media HIST F3. Optional: To remove a default NDMP setting for a directory, run the isi ndmp
settings variables delete command:
For example, the following command removes the default file history formatfor /ifs/data/media:
isi ndmp settings variables delete /ifs/data/media --name HIST
View default NDMP settings for directoriesYou can view the default NDMP settings for directories.
Procedure
1. Open a secure shell (SSH) connection to any node in the cluster and log in.
2. View default NDMP settings by running the following command:
isi ndmp settings variables list
Backing up and recovering data with NDMP
68 OneFS 7.1 Backup and recovery guide
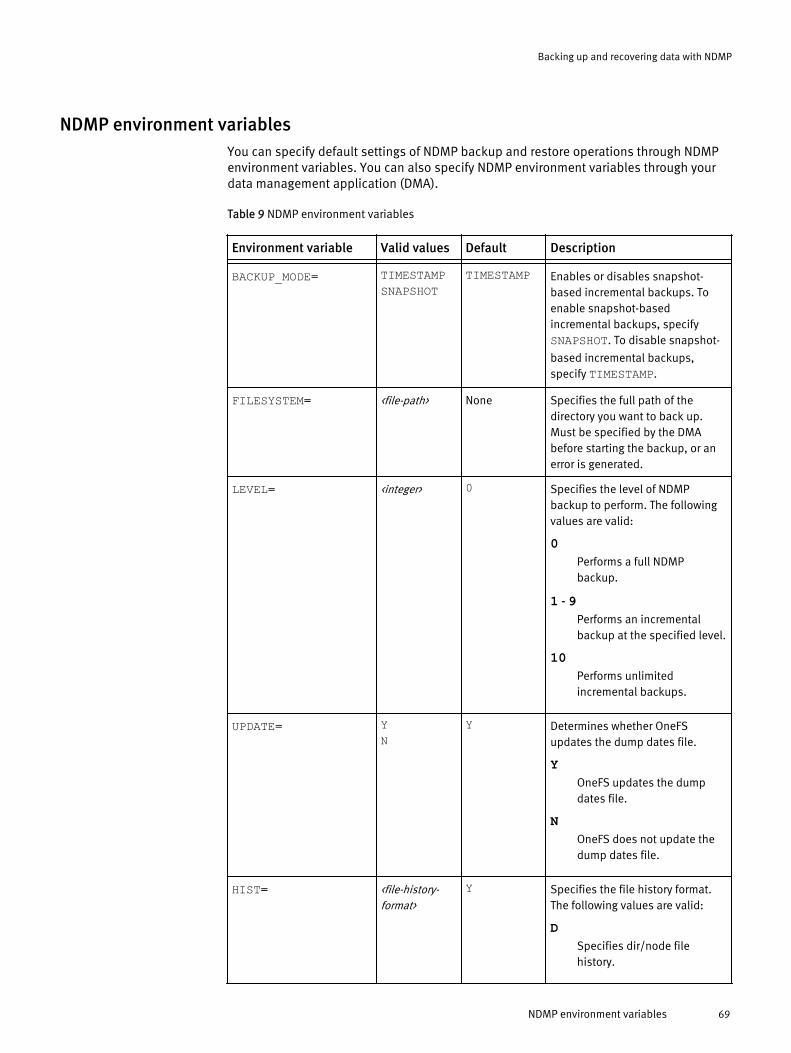
NDMP environment variablesYou can specify default settings of NDMP backup and restore operations through NDMPenvironment variables. You can also specify NDMP environment variables through yourdata management application (DMA).
Table 9 NDMP environment variables
Environment variable Valid values Default Description- - - -BACKUP_MODE= TIMESTAMP
SNAPSHOTTIMESTAMP Enables or disables snapshot-
based incremental backups. Toenable snapshot-basedincremental backups, specifySNAPSHOT. To disable snapshot-
based incremental backups,specify TIMESTAMP.
FILESYSTEM= <file-path> None Specifies the full path of thedirectory you want to back up.Must be specified by the DMAbefore starting the backup, or anerror is generated.
LEVEL= <integer> 0 Specifies the level of NDMPbackup to perform. The followingvalues are valid:
0Performs a full NDMPbackup.
1 - 9Performs an incrementalbackup at the specified level.
10Performs unlimitedincremental backups.
UPDATE= YN
Y Determines whether OneFSupdates the dump dates file.
YOneFS updates the dumpdates file.
NOneFS does not update thedump dates file.
HIST= <file-history-format>
Y Specifies the file history format.The following values are valid:
DSpecifies dir/node filehistory.
Backing up and recovering data with NDMP
NDMP environment variables 69
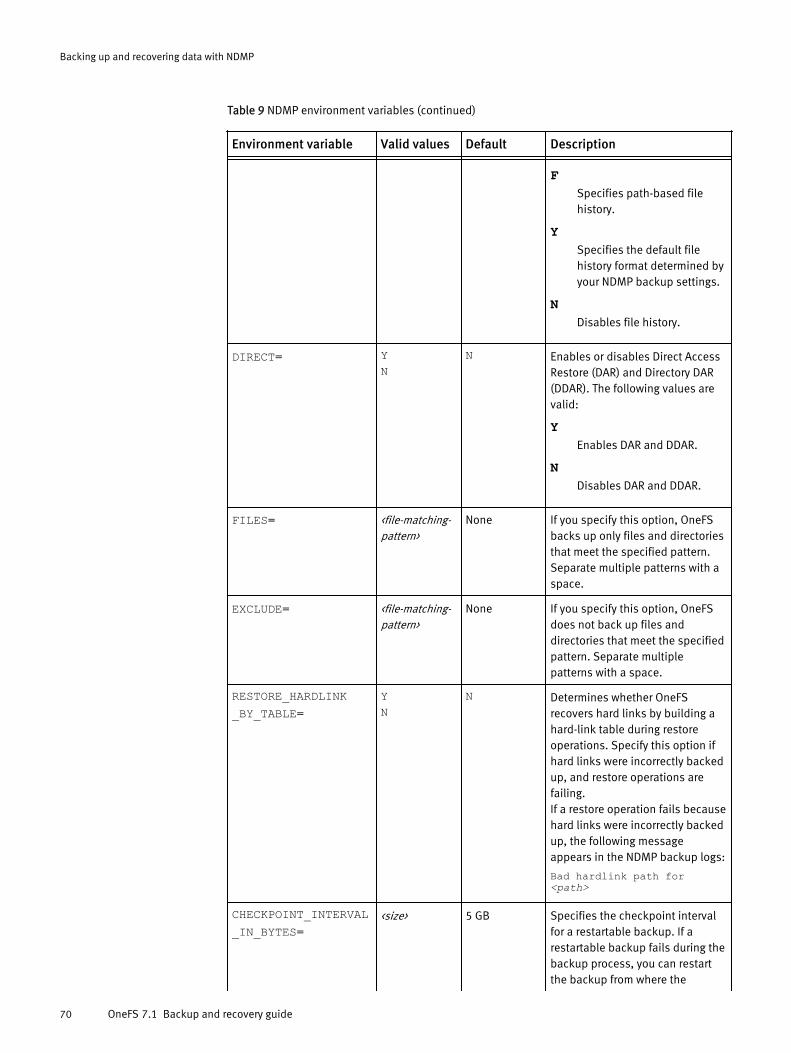
Table 9 NDMP environment variables (continued)
Environment variable Valid values Default Description- - - -
FSpecifies path-based filehistory.
YSpecifies the default filehistory format determined byyour NDMP backup settings.
NDisables file history.
DIRECT= YN
N Enables or disables Direct AccessRestore (DAR) and Directory DAR(DDAR). The following values arevalid:
YEnables DAR and DDAR.
NDisables DAR and DDAR.
FILES= <file-matching-pattern>
None If you specify this option, OneFSbacks up only files and directoriesthat meet the specified pattern.Separate multiple patterns with aspace.
EXCLUDE= <file-matching-pattern>
None If you specify this option, OneFSdoes not back up files anddirectories that meet the specifiedpattern. Separate multiplepatterns with a space.
RESTORE_HARDLINK_BY_TABLE=
YN
N Determines whether OneFSrecovers hard links by building ahard-link table during restoreoperations. Specify this option ifhard links were incorrectly backedup, and restore operations arefailing.If a restore operation fails becausehard links were incorrectly backedup, the following messageappears in the NDMP backup logs:
Bad hardlink path for <path>
CHECKPOINT_INTERVAL_IN_BYTES=
<size> 5 GB Specifies the checkpoint intervalfor a restartable backup. If arestartable backup fails during thebackup process, you can restartthe backup from where the
Backing up and recovering data with NDMP
70 OneFS 7.1 Backup and recovery guide
Table 9 NDMP environment variables (continued)
Environment variable Valid values Default Description- - - -
process failed. The <size>parameter is the space betweeneach checkpoint.Note that this variable can only beset from the DMA. For example, ifyou specify 2 GB, your DMA wouldcreate a checkpoint each time 2GB of data were backed up.
Restartable backups aresupported only for EMC NetWorker8.1 and later.
Managing snapshot based incremental backupsAfter you enable snapshot-based incremental backups, you can view and delete thesnapshots created for these backups.
Enable snapshot-based incremental backups for a directoryYou can configure OneFS to perform snapshot-based incremental backups for a directoryby default. You can also override the default setting in your data management application(DMA).
Procedure
1. Run the isi ndmp settings variable create command.
The following command enables snapshot-based incremental backups for /ifs/data/media:
isi ndmp settings variables create /ifs/data/media BACKUP_MODE SNAPSHOT
View snapshots for snapshot-based incremental backupsYou can view snapshots generated for snapshot-based incremental backups.
Procedure
1. Run the following command:
isi ndmp dumpdates list
Delete snapshots for snapshot-based incremental backupsYou can delete snapshots created for snapshot-based incremental backups.
Note
It is recommended that you do not delete snapshots created for snapshot-basedincremental backups. If all snapshots are deleted for a path, the next backup performedfor the path is a full backup.
Backing up and recovering data with NDMP
Managing snapshot based incremental backups 71
Procedure
1. Run the isi ndmp dumpdates delete command.
The following command deletes all snapshots created for backing up /ifs/data/media:isi ndmp dumpdates delete /ifs/data/media
View NDMP backup logsYou can view information about NDMP backup and restore operations through NDMPbackup logs.
Procedure
1. Click Data Protection > Backup > Logs.
2. In the Log Location area, from the Node list, select a node.
3. In the Log Contents area, review information about NDMP backup and restoreoperations.
Configuring NDMP backups with EMC NetWorkerYou can configure OneFS and EMC NetWorker to backup data stored on an Isilon cluster.The following procedures explain how to configure NDMP backup with EMC NetWorker8.0.
Create a groupWith EMC NetWorker, you must configure a group to manage backups from an Isiloncluster.
Procedure
1. Connect to the NetWorker server from the NetWorker Management Console Server.
2. Click Configuration.
3. Right-click Groups and then click New.
4. In the Name field, type a name for the group.
5. Click OK.
Scan for tape devicesWith EMC NetWorker, you must detect tape devices for backup and restore operations.
Procedure
1. Connect to the NetWorker server from the NetWorker Management Console Server.
2. Click Devices.
3. Right-click Libraries, and then click Scan for Devices.
4. Ensure that no existing storage nodes are selected.
5. Click Create a new Storage Node.
6. Configure the following settings:
Backing up and recovering data with NDMP
72 OneFS 7.1 Backup and recovery guide
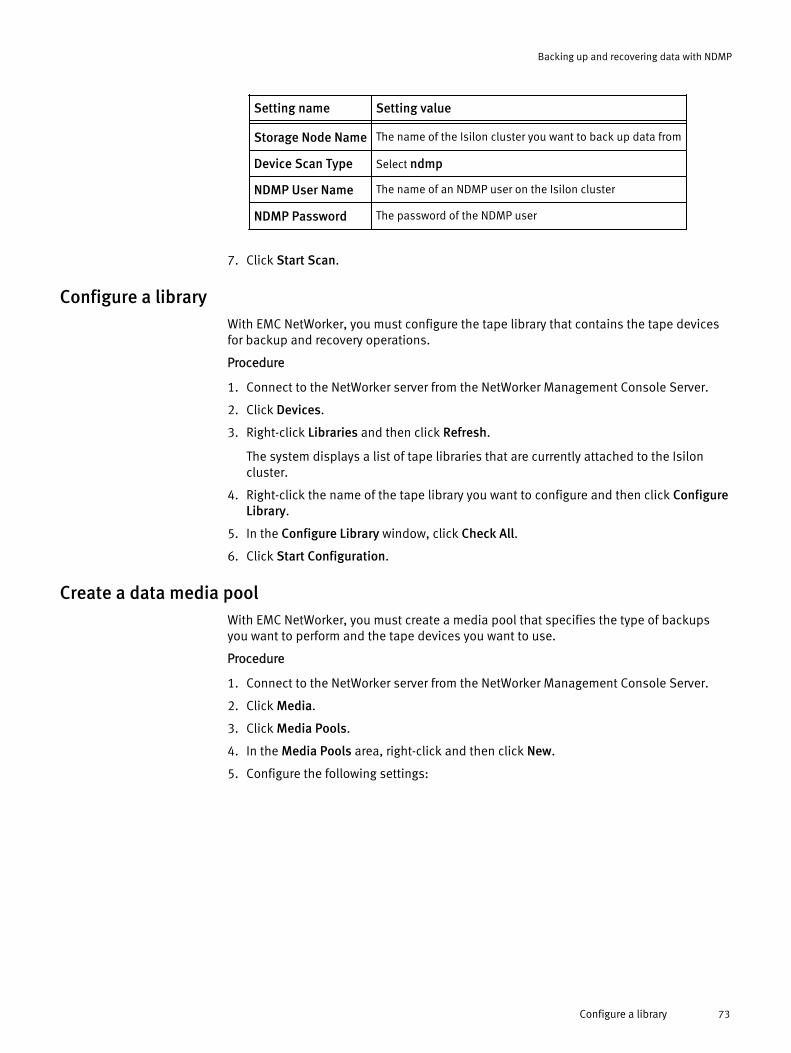
Setting name Setting value- -Storage Node Name The name of the Isilon cluster you want to back up data from
Device Scan Type Select ndmp
NDMP User Name The name of an NDMP user on the Isilon cluster
NDMP Password The password of the NDMP user
7. Click Start Scan.
Configure a libraryWith EMC NetWorker, you must configure the tape library that contains the tape devicesfor backup and recovery operations.
Procedure
1. Connect to the NetWorker server from the NetWorker Management Console Server.
2. Click Devices.
3. Right-click Libraries and then click Refresh.
The system displays a list of tape libraries that are currently attached to the Isiloncluster.
4. Right-click the name of the tape library you want to configure and then click ConfigureLibrary.
5. In the Configure Library window, click Check All.
6. Click Start Configuration.
Create a data media poolWith EMC NetWorker, you must create a media pool that specifies the type of backupsyou want to perform and the tape devices you want to use.
Procedure
1. Connect to the NetWorker server from the NetWorker Management Console Server.
2. Click Media.
3. Click Media Pools.
4. In the Media Pools area, right-click and then click New.
5. Configure the following settings:
Backing up and recovering data with NDMP
Configure a library 73
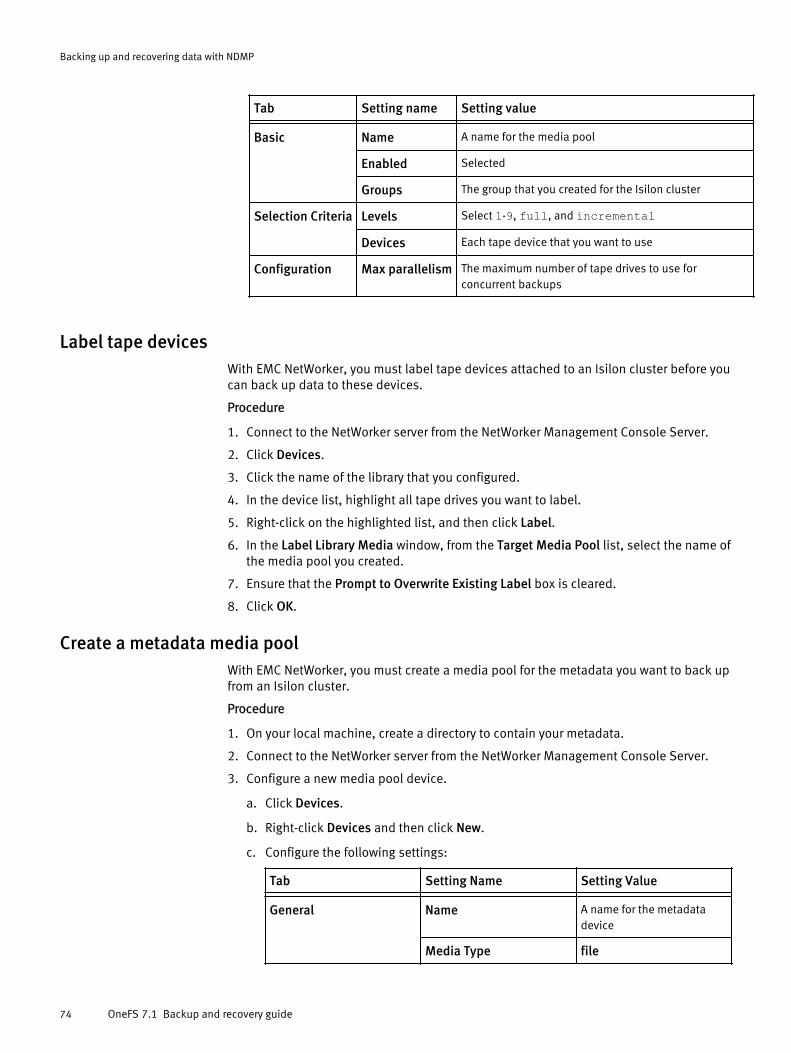
Tab Setting name Setting value- - -Basic Name A name for the media pool
Enabled Selected
Groups The group that you created for the Isilon cluster
Selection Criteria Levels Select 1-9, full, and incremental
Devices Each tape device that you want to use
Configuration Max parallelism The maximum number of tape drives to use forconcurrent backups
Label tape devicesWith EMC NetWorker, you must label tape devices attached to an Isilon cluster before youcan back up data to these devices.
Procedure
1. Connect to the NetWorker server from the NetWorker Management Console Server.
2. Click Devices.
3. Click the name of the library that you configured.
4. In the device list, highlight all tape drives you want to label.
5. Right-click on the highlighted list, and then click Label.
6. In the Label Library Media window, from the Target Media Pool list, select the name ofthe media pool you created.
7. Ensure that the Prompt to Overwrite Existing Label box is cleared.
8. Click OK.
Create a metadata media poolWith EMC NetWorker, you must create a media pool for the metadata you want to back upfrom an Isilon cluster.
Procedure
1. On your local machine, create a directory to contain your metadata.
2. Connect to the NetWorker server from the NetWorker Management Console Server.
3. Configure a new media pool device.
a. Click Devices.
b. Right-click Devices and then click New.
c. Configure the following settings:
Tab Setting Name Setting Value- - -General Name A name for the metadata
device
Media Type file
Backing up and recovering data with NDMP
74 OneFS 7.1 Backup and recovery guide
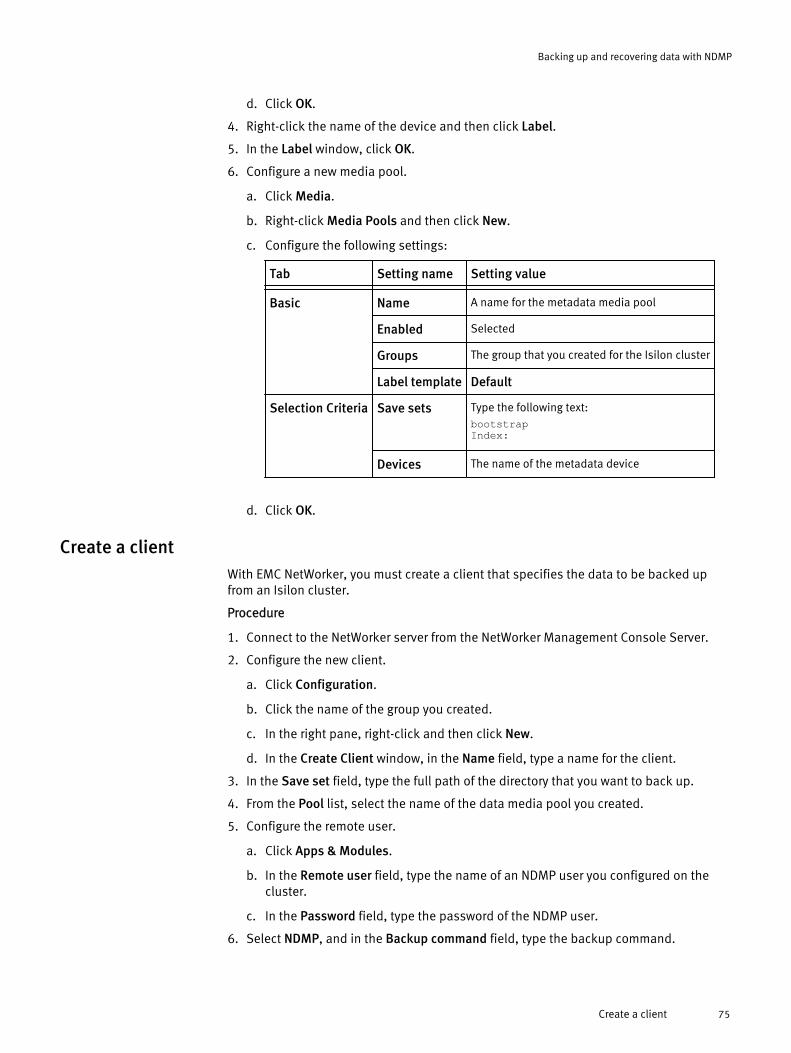
d. Click OK.
4. Right-click the name of the device and then click Label.
5. In the Label window, click OK.
6. Configure a new media pool.
a. Click Media.
b. Right-click Media Pools and then click New.
c. Configure the following settings:
Tab Setting name Setting value- - -Basic Name A name for the metadata media pool
Enabled Selected
Groups The group that you created for the Isilon cluster
Label template Default
Selection Criteria Save sets Type the following text:bootstrapIndex:
Devices The name of the metadata device
d. Click OK.
Create a clientWith EMC NetWorker, you must create a client that specifies the data to be backed upfrom an Isilon cluster.
Procedure
1. Connect to the NetWorker server from the NetWorker Management Console Server.
2. Configure the new client.
a. Click Configuration.
b. Click the name of the group you created.
c. In the right pane, right-click and then click New.
d. In the Create Client window, in the Name field, type a name for the client.
3. In the Save set field, type the full path of the directory that you want to back up.
4. From the Pool list, select the name of the data media pool you created.
5. Configure the remote user.
a. Click Apps & Modules.
b. In the Remote user field, type the name of an NDMP user you configured on thecluster.
c. In the Password field, type the password of the NDMP user.
6. Select NDMP, and in the Backup command field, type the backup command.
Backing up and recovering data with NDMP
Create a client 75
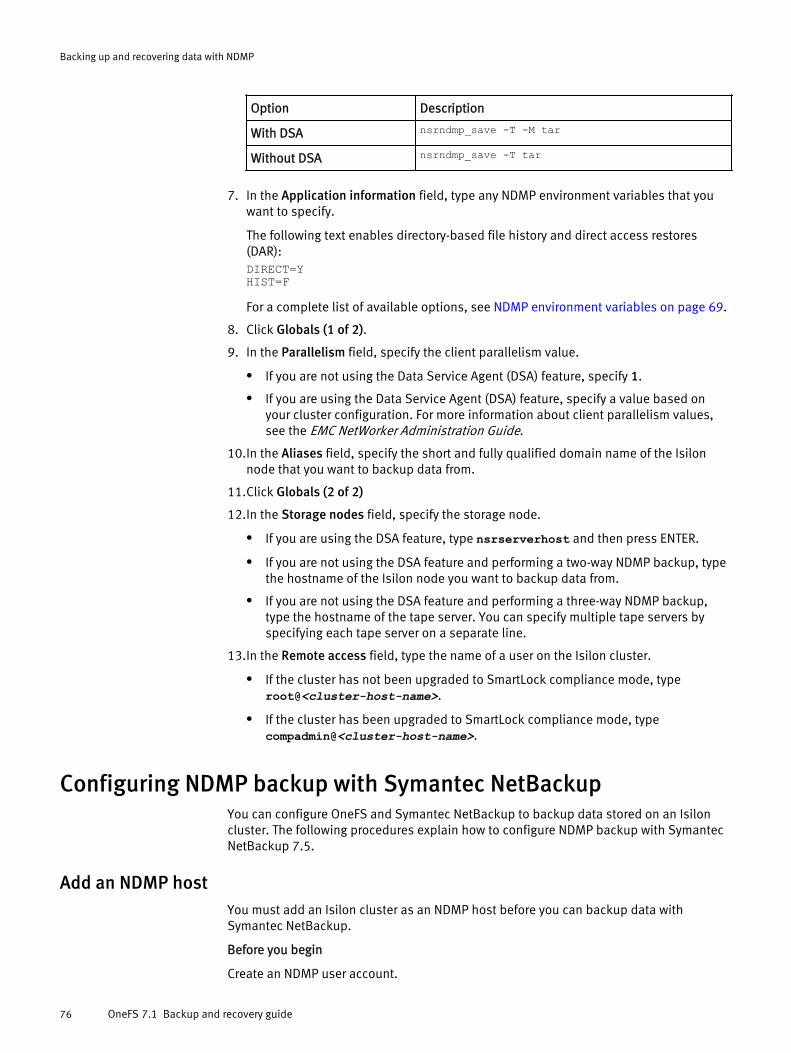
Option Description
With DSA nsrndmp_save -T -M tar
Without DSA nsrndmp_save -T tar
7. In the Application information field, type any NDMP environment variables that youwant to specify.
The following text enables directory-based file history and direct access restores(DAR):DIRECT=YHIST=F
For a complete list of available options, see NDMP environment variables on page 69.
8. Click Globals (1 of 2).
9. In the Parallelism field, specify the client parallelism value.
l If you are not using the Data Service Agent (DSA) feature, specify 1.
l If you are using the Data Service Agent (DSA) feature, specify a value based onyour cluster configuration. For more information about client parallelism values,see the EMC NetWorker Administration Guide.
10.In the Aliases field, specify the short and fully qualified domain name of the Isilonnode that you want to backup data from.
11.Click Globals (2 of 2)
12.In the Storage nodes field, specify the storage node.
l If you are using the DSA feature, type nsrserverhost and then press ENTER.
l If you are not using the DSA feature and performing a two-way NDMP backup, typethe hostname of the Isilon node you want to backup data from.
l If you are not using the DSA feature and performing a three-way NDMP backup,type the hostname of the tape server. You can specify multiple tape servers byspecifying each tape server on a separate line.
13.In the Remote access field, type the name of a user on the Isilon cluster.
l If the cluster has not been upgraded to SmartLock compliance mode, typeroot@<cluster-host-name>.
l If the cluster has been upgraded to SmartLock compliance mode, typecompadmin@<cluster-host-name>.
Configuring NDMP backup with Symantec NetBackupYou can configure OneFS and Symantec NetBackup to backup data stored on an Isiloncluster. The following procedures explain how to configure NDMP backup with SymantecNetBackup 7.5.
Add an NDMP hostYou must add an Isilon cluster as an NDMP host before you can backup data withSymantec NetBackup.
Before you begin
Create an NDMP user account.
Backing up and recovering data with NDMP
76 OneFS 7.1 Backup and recovery guide
Procedure
1. In the NetBackup Administration Console, expand Media and Device Management.
2. Under Media and Device Management, expand Credentials and then click NDMPHosts.
3. Click Actions > New > NDMP Host.
4. In the NDMP Host Name dialog box, specify the cluster you want to backup data from.
l If you have a single Backup Accelerator node in the cluster, type the fully qualifieddomain name, host name, IPv4 address, or IPv6 address of the Backup Acceleratornode.
l If you have multiple Backup Accelerator nodes in the cluster, type the name of aSmartConnect zone that contains only the Backup Accelerator nodes.
l If you are performing a three-way NDMP backup, type the fully qualified domainname, host name, SmartConnect zone, IPv4 address, or IPv6 address of any nodein the cluster.
5. Click OK.
6. In the Add NDMP Host box, click Use the following credentials for this NDMP host onall media servers.
7. In the Username and Password fields, type the username and password of an NDMPuser on the cluster.
8. Click OK.
Configure storage devicesIf you are backing up data to tape devices connected to one or more Backup Acceleratornodes, you must configure Symantec NetBackup to recognize those storage devices.
This procedure is required only if you are performing a two-way NDMP backup.
Procedure
1. In the NetBackup Administration Console, click Media and Device Management.
2. Click Configure Storage Devices.
The Device Configuration Wizard appears.
3. Click Next.
4. Scan the cluster for attached NDMP devices.
a. On the Device Hosts page, click Change.
b. Select NDMP Host, and then click OK.
c. Click Next.
d. Select the NDMP host you created earlier, and then click Next.
e. After the wizard completes the scan for devices on the cluster, click Next.
5. On the SAN Clients page, click Next.
6. Specify backup devices that NetBackup should use.
a. On the Backup Devices page, verify that all attached tape devices are displayed inthe table, and then click Next.
b. On the Drag and Drop Configuration page, Select the tape devices that you wantNetBackup to backup data to and then click Next.
Backing up and recovering data with NDMP
Configure storage devices 77
c. In the confirmation dialog box, click Yes.
d. On the Updating Device Configuration page, click Next.
e. On the Configure Storage Units page, view the name of your storage unit and thenclick Next.
f. Click Finish.
7. Specify the storage unit to associate with the backup devices.
a. Expand NetBackup Management.
b. Expand Storage.
c. Click Storage Units.
d. Double-click the name of the storage unit you created previously.
e. In the Change Storage Unit window, ensure that Maximum concurrent write drivesis equal to the number of tape drives connected to your cluster.
Results
A storage unit is created for your cluster and tape devices. You can view all storage unitsby clicking Storage Units.
Create a volume poolBefore you can inventory a robot in NetBackup, you must create a volume pool.
Procedure
1. In the NetBackup Administration Console, expand Media and Device Management.
2. Expand Media.
3. Expand Volume Pools.
4. Click Actions > New > Volume Pool.
5. In the Pool name field, type a name for the volume pool.
6. Optional: In the Description field, type a description for the volume pool.
7. Click OK.
Inventory a robotBefore you create a NetBackup policy, you must inventory a robot with NetBackup andassociate it with a volume pool.
Procedure
1. In the NetBackup Administration Console, expand Media and Device Management.
2. Inventory a robot.
a. Expand Devices.
b. Click Robots.
c. Right-click the name of the robot that was added when you configured storagedevices, and then click Inventory Robot.
3. Associate a volume pool with the robot.
a. Click Update volume configuration.
b. Click Advanced Options.
Backing up and recovering data with NDMP
78 OneFS 7.1 Backup and recovery guide
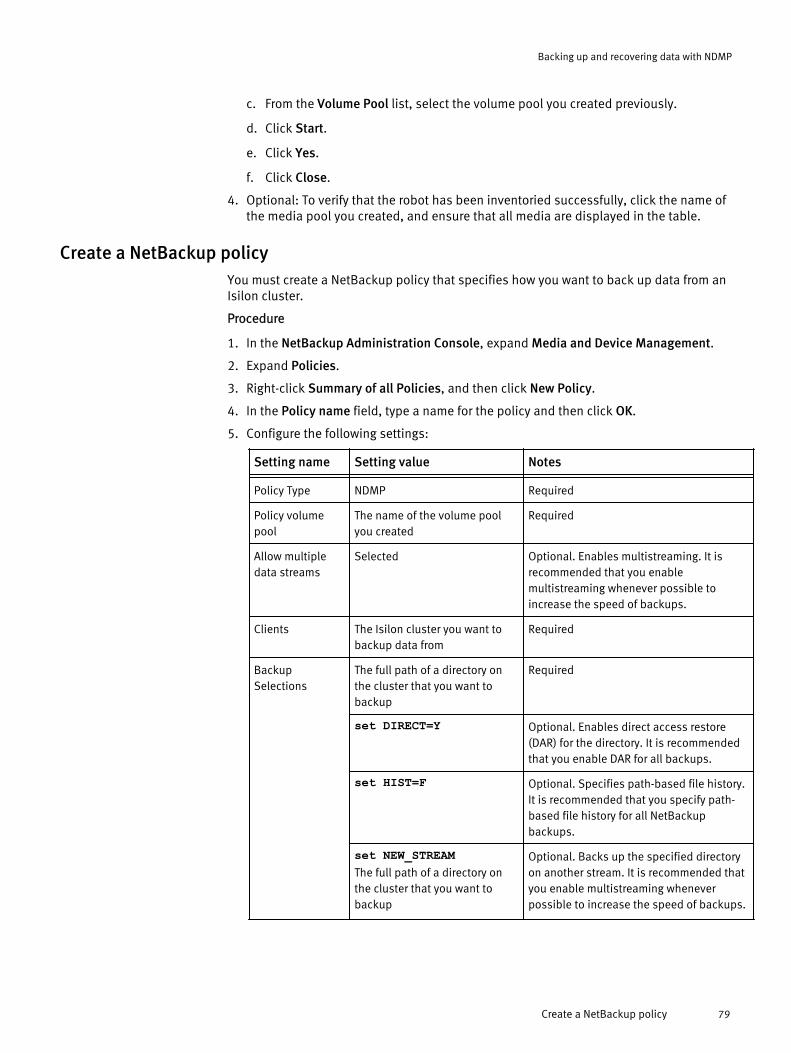
c. From the Volume Pool list, select the volume pool you created previously.
d. Click Start.
e. Click Yes.
f. Click Close.
4. Optional: To verify that the robot has been inventoried successfully, click the name ofthe media pool you created, and ensure that all media are displayed in the table.
Create a NetBackup policyYou must create a NetBackup policy that specifies how you want to back up data from anIsilon cluster.
Procedure
1. In the NetBackup Administration Console, expand Media and Device Management.
2. Expand Policies.
3. Right-click Summary of all Policies, and then click New Policy.
4. In the Policy name field, type a name for the policy and then click OK.
5. Configure the following settings:
Setting name Setting value Notes- - -Policy Type NDMP Required
Policy volumepool
The name of the volume poolyou created
Required
Allow multipledata streams
Selected Optional. Enables multistreaming. It isrecommended that you enablemultistreaming whenever possible toincrease the speed of backups.
Clients The Isilon cluster you want tobackup data from
Required
BackupSelections
The full path of a directory onthe cluster that you want tobackup
Required
set DIRECT=Y Optional. Enables direct access restore(DAR) for the directory. It is recommendedthat you enable DAR for all backups.
set HIST=F Optional. Specifies path-based file history.It is recommended that you specify path-based file history for all NetBackupbackups.
set NEW_STREAMThe full path of a directory onthe cluster that you want tobackup
Optional. Backs up the specified directoryon another stream. It is recommended thatyou enable multistreaming wheneverpossible to increase the speed of backups.
Backing up and recovering data with NDMP
Create a NetBackup policy 79
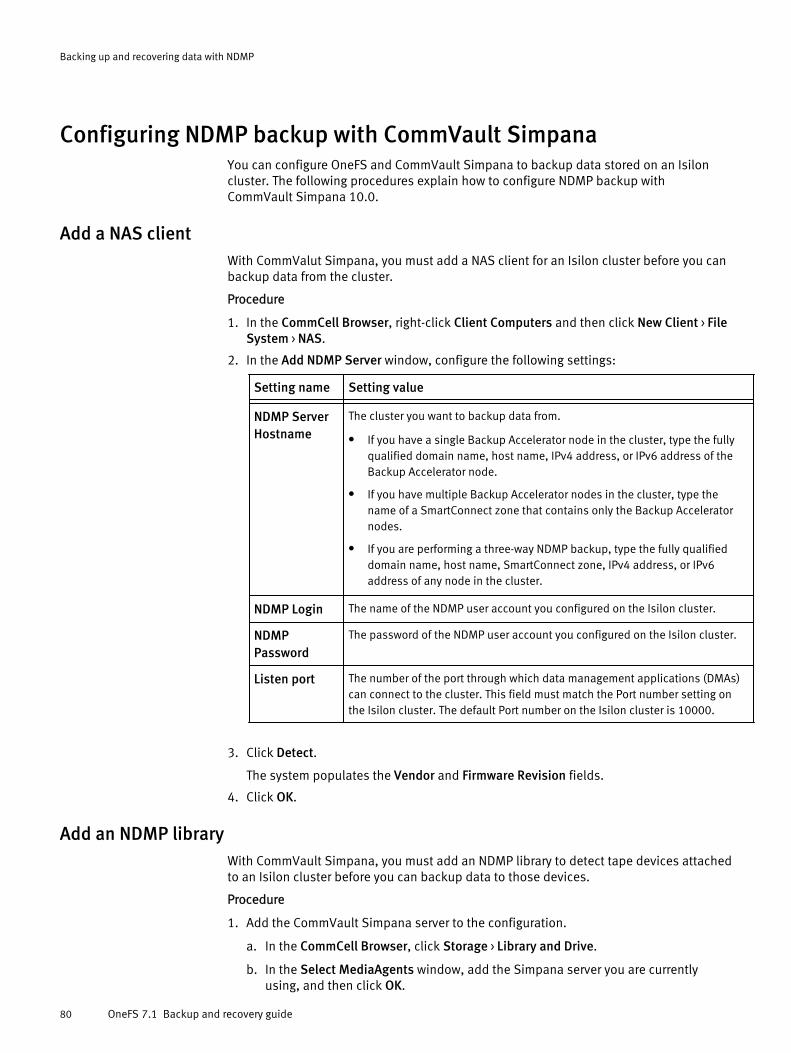
Configuring NDMP backup with CommVault SimpanaYou can configure OneFS and CommVault Simpana to backup data stored on an Isiloncluster. The following procedures explain how to configure NDMP backup withCommVault Simpana 10.0.
Add a NAS clientWith CommValut Simpana, you must add a NAS client for an Isilon cluster before you canbackup data from the cluster.
Procedure
1. In the CommCell Browser, right-click Client Computers and then click New Client > FileSystem > NAS.
2. In the Add NDMP Server window, configure the following settings:
Setting name Setting value- -NDMP ServerHostname
The cluster you want to backup data from.
l If you have a single Backup Accelerator node in the cluster, type the fullyqualified domain name, host name, IPv4 address, or IPv6 address of theBackup Accelerator node.
l If you have multiple Backup Accelerator nodes in the cluster, type thename of a SmartConnect zone that contains only the Backup Acceleratornodes.
l If you are performing a three-way NDMP backup, type the fully qualifieddomain name, host name, SmartConnect zone, IPv4 address, or IPv6address of any node in the cluster.
NDMP Login The name of the NDMP user account you configured on the Isilon cluster.
NDMPPassword
The password of the NDMP user account you configured on the Isilon cluster.
Listen port The number of the port through which data management applications (DMAs)can connect to the cluster. This field must match the Port number setting onthe Isilon cluster. The default Port number on the Isilon cluster is 10000.
3. Click Detect.
The system populates the Vendor and Firmware Revision fields.
4. Click OK.
Add an NDMP libraryWith CommVault Simpana, you must add an NDMP library to detect tape devices attachedto an Isilon cluster before you can backup data to those devices.
Procedure
1. Add the CommVault Simpana server to the configuration.
a. In the CommCell Browser, click Storage > Library and Drive.
b. In the Select MediaAgents window, add the Simpana server you are currentlyusing, and then click OK.
Backing up and recovering data with NDMP
80 OneFS 7.1 Backup and recovery guide
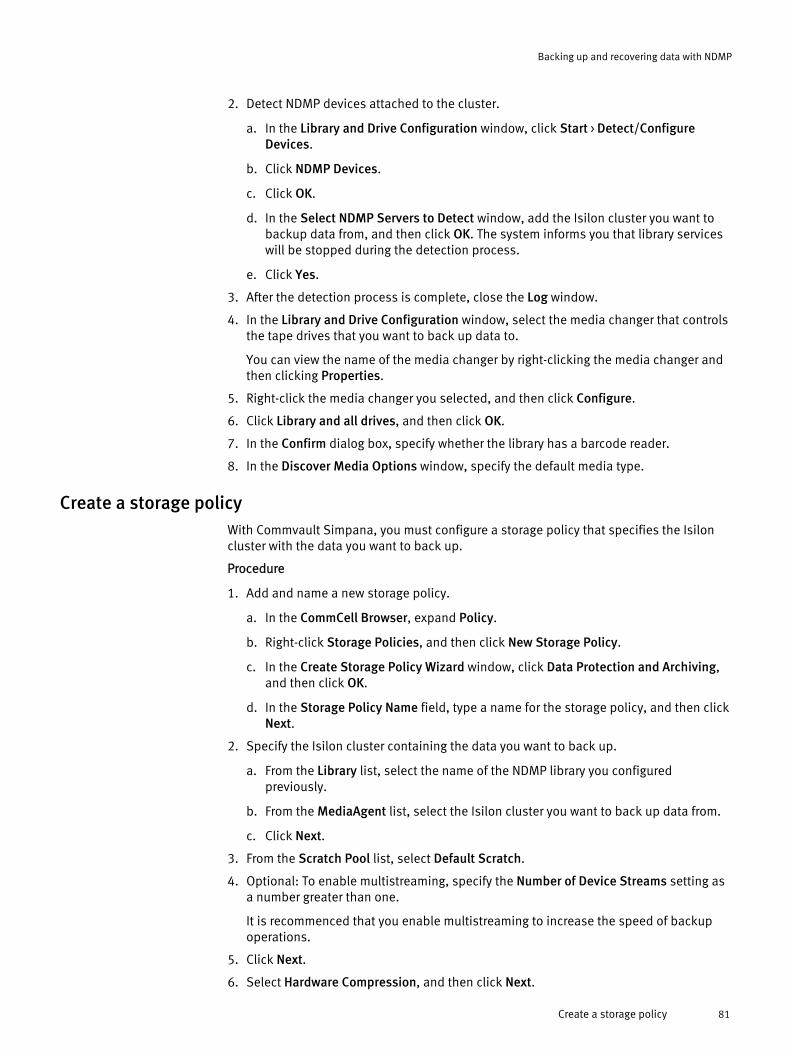
2. Detect NDMP devices attached to the cluster.
a. In the Library and Drive Configuration window, click Start > Detect/ConfigureDevices.
b. Click NDMP Devices.
c. Click OK.
d. In the Select NDMP Servers to Detect window, add the Isilon cluster you want tobackup data from, and then click OK. The system informs you that library serviceswill be stopped during the detection process.
e. Click Yes.
3. After the detection process is complete, close the Log window.
4. In the Library and Drive Configuration window, select the media changer that controlsthe tape drives that you want to back up data to.
You can view the name of the media changer by right-clicking the media changer andthen clicking Properties.
5. Right-click the media changer you selected, and then click Configure.
6. Click Library and all drives, and then click OK.
7. In the Confirm dialog box, specify whether the library has a barcode reader.
8. In the Discover Media Options window, specify the default media type.
Create a storage policyWith Commvault Simpana, you must configure a storage policy that specifies the Isiloncluster with the data you want to back up.
Procedure
1. Add and name a new storage policy.
a. In the CommCell Browser, expand Policy.
b. Right-click Storage Policies, and then click New Storage Policy.
c. In the Create Storage Policy Wizard window, click Data Protection and Archiving,and then click OK.
d. In the Storage Policy Name field, type a name for the storage policy, and then clickNext.
2. Specify the Isilon cluster containing the data you want to back up.
a. From the Library list, select the name of the NDMP library you configuredpreviously.
b. From the MediaAgent list, select the Isilon cluster you want to back up data from.
c. Click Next.
3. From the Scratch Pool list, select Default Scratch.
4. Optional: To enable multistreaming, specify the Number of Device Streams setting asa number greater than one.
It is recommenced that you enable multistreaming to increase the speed of backupoperations.
5. Click Next.
6. Select Hardware Compression, and then click Next.
Backing up and recovering data with NDMP
Create a storage policy 81
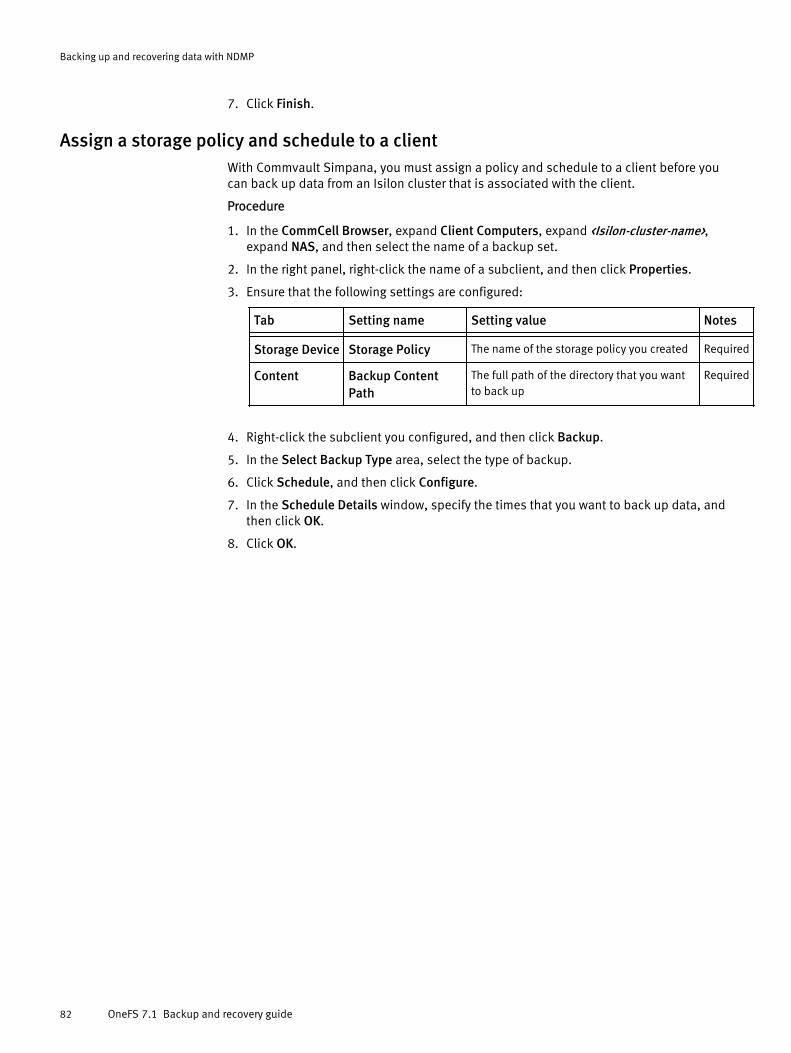
7. Click Finish.
Assign a storage policy and schedule to a clientWith Commvault Simpana, you must assign a policy and schedule to a client before youcan back up data from an Isilon cluster that is associated with the client.
Procedure
1. In the CommCell Browser, expand Client Computers, expand <Isilon-cluster-name>,expand NAS, and then select the name of a backup set.
2. In the right panel, right-click the name of a subclient, and then click Properties.
3. Ensure that the following settings are configured:
Tab Setting name Setting value Notes- - - -Storage Device Storage Policy The name of the storage policy you created Required
Content Backup ContentPath
The full path of the directory that you wantto back up
Required
4. Right-click the subclient you configured, and then click Backup.
5. In the Select Backup Type area, select the type of backup.
6. Click Schedule, and then click Configure.
7. In the Schedule Details window, specify the times that you want to back up data, andthen click OK.
8. Click OK.
Backing up and recovering data with NDMP
82 OneFS 7.1 Backup and recovery guide