isovac cleaning & maintenance
TRANSCRIPT

© 2017 Isolite® Systems. All rights reserved. Last Revised: 03/02/2017
HOW TO CLEAN AND MAINTAIN YOUR
DENTAL ISOLATION ADAPTER

© 2017 Isolite® Systems. All rights reserved. Last Revised: 03/02/2017
2
Step One: Disassembly

© 2017 Isolite® Systems. All rights reserved. Last Revised: 03/02/2017
3After Each Patient, Remove the Mouthpiece from the Control Head and Safely Dispose of It.
Re-use of the mouthpiece can result in the transmission of infectious pathogens
SINGLE-USE MEANS SAFE.Mouthpieces are single-use only to eliminate the risk of patient cross contamination.

© 2017 Isolite® Systems. All rights reserved. Last Revised: 03/02/2017
4 Remove the Control Head from the HVE Coupler
Grasp the HVE Coupler and pull the Control Head straight off.
DO NOT BEND

© 2017 Isolite® Systems. All rights reserved. Last Revised: 03/02/2017
5 Cap the End of the HVE Hose with the Suction Line Plug
Suction Line Plug

© 2017 Isolite® Systems. All rights reserved. Last Revised: 03/02/2017
6 Remove the Vacuum Levers from the Control Head
Remove the Vacuum Levers by
rotating the levers to the off
position.
Keep pushing gently until each lever
pops out.

© 2017 Isolite® Systems. All rights reserved. Last Revised: 03/02/2017
7 Separate the Upper and Lower Halves of the Control Head
Pull the two halves apart
from the Vacuum Lever
retainer rings.

© 2017 Isolite® Systems. All rights reserved. Last Revised: 03/02/2017
8 Your Adapter Is Now Properly Disassembled
Control Head UpperRight Vacuum Lever
Control Head LowerLeft Vacuum Lever

© 2017 Isolite® Systems. All rights reserved. Last Revised: 03/02/2017
9
Step Two: Cleaning

© 2017 Isolite® Systems. All rights reserved. Last Revised: 03/02/2017
10Three Control Heads Are Provided So One Is Always Ready When You Need It
One on the chair, one in the autoclave, and one ready for your next patient.

© 2017 Isolite® Systems. All rights reserved. Last Revised: 03/02/2017
11
Vacuum Channels
Double End Tube Brush
Clean the Suction Channels
Using the provided Double End Tube Brush and a neutral pH (6.5-7.5) enzymatic cleaning solution, remove biomatter and debris from the suction channels. After cleaning, rinse with tap water and dry.

© 2017 Isolite® Systems. All rights reserved. Last Revised: 03/02/2017
12
Step Three: Sterilization

© 2017 Isolite® Systems. All rights reserved. Last Revised: 03/02/2017
13
Follow the sterilization recommendations provided in the Instructions for Use
Before Use on a Patient, Sterilize All Components

© 2017 Isolite® Systems. All rights reserved. Last Revised: 03/02/2017
14 Before Use on a Patient, Sterilize All Components
Place components into an autoclave pouch and sterilize in a steam autoclave using these validated sterilization cycles.
Cycle Temperature Min. Exposure Time Min. Drying Time
Standard 132 °C / 270 °F 15 min 15 min
Prevacuum 132 °C / 270 °F 4 min 20 min
Prevacuum 134 °C / 273 °F 3 min 20 min

© 2017 Isolite® Systems. All rights reserved. Last Revised: 03/02/2017
15
Step Four: Lubrication and Reassembly

© 2017 Isolite® Systems. All rights reserved. Last Revised: 03/02/2017
16 Inspect the Vacuum Lever O-rings for Damage
If the O-rings shows signs of cracking, breakage, or crusty build-up that can not be completely cleaned with a wet cotton swab, the O-ring will need to be removed and replaced.
If properly maintained and lubricated, the O-ring can last for many months or years.

© 2017 Isolite® Systems. All rights reserved. Last Revised: 03/02/2017
17 If Necessary, Remove the O-ring from the Vacuum Levers
Using a probe with a point, pinch and slide the O-ring to one side to create a small loop.
Slide the O-ring off.
Insert the probe point under the O-ring.

© 2017 Isolite® Systems. All rights reserved. Last Revised: 03/02/2017
18 Replace the O-ring on the Vacuum Levers
Roll the O-ring onto the end of the Vacuum Lever valve barrel and into the groove.
O-rings in place.
© 2017 Isolite® Systems. All rights reserved. Last Revised: 03/02/2017
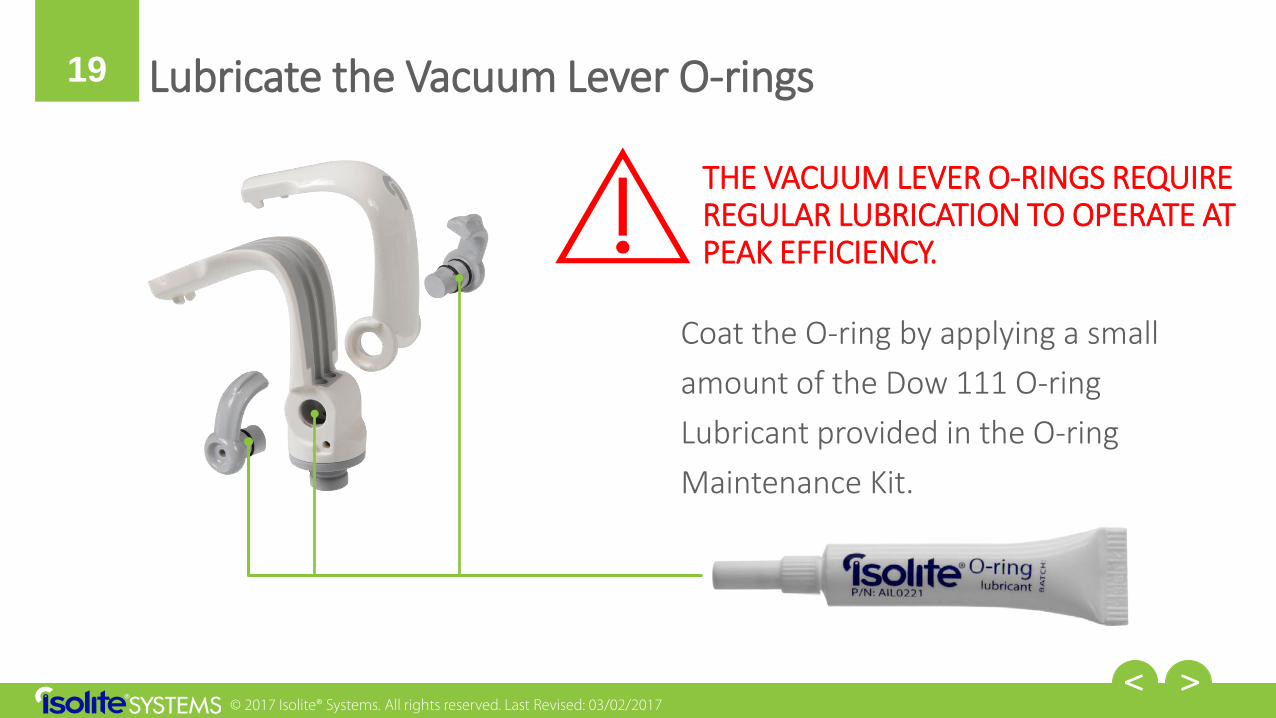
19 Lubricate the Vacuum Lever O-rings
Coat the O-ring by applying a small amount of the Dow 111 O-ring Lubricant provided in the O-ring Maintenance Kit.
THE VACUUM LEVER O-RINGS REQUIRE REGULAR LUBRICATION TO OPERATE AT PEAK EFFICIENCY.

© 2017 Isolite® Systems. All rights reserved. Last Revised: 03/02/2017
20 Reattach the Upper and Lower Halves of the Control Head
Push the two halves
together.

© 2017 Isolite® Systems. All rights reserved. Last Revised: 03/02/2017
21 Reattach the Vacuum Levers
Right Vacuum Lever
Left Vacuum Lever
Check the inside of the Vacuum Lever for L (Left) or R (Right) placement.
Push each Vacuum Lever
into the corresponding
Vacuum Lever retainer ring.

© 2017 Isolite® Systems. All rights reserved. Last Revised: 03/02/2017
22 Reattach the Control Head Directly onto the HVE Coupler
Grasp the HVE Coupler and push the Control Head straight down.
Press firmly in place.

© 2017 Isolite® Systems. All rights reserved. Last Revised: 03/02/2017
23
THANK YOU. PLEASE CONTACT US IF YOU HAVE ANY QUESTIONS
OR NEED ANY ADDITIONAL SUPPORT.