issuer manager user guide - reserveamerica guide - license...harvest report ... issuer manager user...
TRANSCRIPT

Issuer Manager User GuideVersion 3.18 — Published June 2018

Copyright
© 2018 Aspira and/or its affiliates and licensors. All rights reserved. Trademarks and logos are the intellectual property of Aspira.
The content of this document is for information purposes only and is subject to change without notice. The Aspira assumes no liability or responsibility for any error that may appear within this document. The material herein should not be construed as a commitment or warranty.
The Digital Millennium Copyright Act of 1998 (the “DMCA”) provides recourse for copyright owners who believe that material appearing on the Internet infringes their rights under U.S. copyright law. For more information on this subject, see Aspira Corporate Policy.
Licenses and Trademarks
This single-source publication was created using Adobe FrameMaker. PDF was produced using Adobe Distiller and Adobe Acrobat. Adobe FrameMaker, Distiller, and Acrobat are trademarks of Adobe Systems Incorporated. Screen captures are produced using SnagIt, a trademark of TechSmith Corp.
All other copyrights, trademarks, and tradenames are the property of their respective owners.
Document Revision Tracking
Issuer Manager User Guide .......................................................................................... 3.18.01 | 06.15.13.34
Contact
ASPIRA ONE (part of Aspira)
Office Locations
717 N. Harwood StreetSuite 2400Dallas, TX 75201
6925 Century Avenue, 5th FloorMississauga, Ontario L5N 7K2Canada
18 Division StreetSuite 213Saratoga Springs, NY 12866USA
Toll Free: +1-800-695-4636Fax: +1-905-286-0371
If you need any assistance, please click HERE to send emails to Client Support.

Contents
Chapter 1 Introduction 1
About Issuer Manager ........................................................ 1
About This User Guide ........................................................ 2Content Organization . . . . . . . . . . . . . . . . . . . . . . . . . . . . . . . . . . . . 2
Intended Audiences . . . . . . . . . . . . . . . . . . . . . . . . . . . . . . . . . . . . . 2
User Interface and Functionality . . . . . . . . . . . . . . . . . . . . . . . . . . . . 2
Getting Started With Issuer Manager ................................. 3Physical Keyboard and Virtual Keyboard . . . . . . . . . . . . . . . . . . . . . 4
Logging In . . . . . . . . . . . . . . . . . . . . . . . . . . . . . . . . . . . . . . . . . . . . . 4
Main Menu Page . . . . . . . . . . . . . . . . . . . . . . . . . . . . . . . . . . . . . . . . 6
Help Page / Document Center . . . . . . . . . . . . . . . . . . . . . . . . . . . . . . 7
Logging Out and Exiting . . . . . . . . . . . . . . . . . . . . . . . . . . . . . . . . . . 7
Virtual Keyboard ................................................................ 8Common Keyboard Elements . . . . . . . . . . . . . . . . . . . . . . . . . . . . . . . 9
Alphabetic Keyboard Layout . . . . . . . . . . . . . . . . . . . . . . . . . . . . . . 10
Numeric Keyboard Layout . . . . . . . . . . . . . . . . . . . . . . . . . . . . . . . . 11
Navigation ......................................................................... 11
Calibrating Issuer Manager ............................................... 12
Terminal Authorization ...................................................... 14Authorizing Terminals . . . . . . . . . . . . . . . . . . . . . . . . . . . . . . . . . . . 15
Deauthorizing Terminals . . . . . . . . . . . . . . . . . . . . . . . . . . . . . . . . . 16
Customer-facing Display .................................................... 16

Issuer Manager User Guide Contents
iv
Chapter 2: Privileges 17
Purchasing Privileges ........................................................ 17Residency Requirements for Purchasing Privileges . . . . . . . . . . . . 18
Basic Privilege Purchase Workflow . . . . . . . . . . . . . . . . . . . . . . . . . 18
Identifying Customer . . . . . . . . . . . . . . . . . . . . . . . . . . . . . . . . . . . 19
Confirming Customer . . . . . . . . . . . . . . . . . . . . . . . . . . . . . . . . . . . 23
Adding Items to Cart . . . . . . . . . . . . . . . . . . . . . . . . . . . . . . . . . . . . 27
Purchasing awarded privileges . . . . . . . . . . . . . . . . . . . . . . . . . . . . 34
Purchasing Privileges Using Quick Sale ............................. 36
Purchasing Privilege POS .................................................. 40
Purchasing Gift Privileges ................................................. 42
Purchasing Privilege Inventory ......................................... 43
Changing Purchased Privileges .......................................... 45
Chapter 3: Vehicles 49
Vehicle Registration Renewal and Duplication ................... 49
Vehicle Inspection ............................................................. 51
Chapter 4: Other Functions 57
Consumables ..................................................................... 57
Supplies ............................................................................ 61
Transactions ...................................................................... 63Voiding Transactions . . . . . . . . . . . . . . . . . . . . . . . . . . . . . . . . . . . . 63
© 2018 Aspira

Contents Issuer Manager User Guide
Reprinting Transactions . . . . . . . . . . . . . . . . . . . . . . . . . . . . . . . . . 64
Gift Card ............................................................................ 67
User Management .............................................................. 69Working with Existing Users . . . . . . . . . . . . . . . . . . . . . . . . . . . . . . 69
Creating New Users . . . . . . . . . . . . . . . . . . . . . . . . . . . . . . . . . . . . . 71
Application Setup .............................................................. 73
Harvest Report .................................................................. 75
Pickup License ................................................................... 78
Chapter 5: Using the Cart 79
About the Cart ................................................................... 79
Making Changes to Purchases ........................................... 80
Applying Discount ............................................................. 80
Making Donations .............................................................. 81
Selecting Fulfillment Methods ............................................ 81
Making Payment on Purchases .......................................... 82
Processing Sales ................................................................ 87
Chapter 6: Reports 91
Viewing Daily Sales ........................................................... 92
Viewing Account Balance ................................................... 96
v

Issuer Manager User Guide Contents
vi
Viewing Invoices ............................................................... 98
Viewing Outfitter Allocations ........................................... 102
Viewing Supply Orders .................................................... 103
Printing Reports .............................................................. 105
© 2018 Aspira

ISSUER MANAGER
Chapter 1 Introduction
About Issuer Manager
Welcome to Issuer Manager, an application within ASPIRA, which is the comprehensive solution of ASPIRA ONE for park management as well as hunting and fishing licensing. Issuer Manager is designed for use on computers with touchscreens. As an integral part of ASPIRA, it shares its database with the other sales channels: Call Centers and the Web. Updates on customer records and transactions made in one channel are immediately reflected in the other channels.
Issuer Manager includes transaction functions, such as:• purchasing privileges (hunting and fishing licenses)• purchasing consumables• renewing and duplicating vehicle registrations• inspecting vehicles• voiding and reprinting transactions• ordering supplies
Issuer Manager includes management functions, such as:• managing users• generating and printing reports• setting up printers
Issuer Manager incorporates some of the most commonly used functions from License Manager. The former emphasizes simplicity in straightforward cases, while the latter includes many advanced features. Some of the main differences between the two are as follows:
• Issuer Manager is designed for use on dedicated touchscreen computers, with a virtual (touch) keyboard, although it can also be used with a physical keyboard.
• Issuer Manager is used primarily for sales and other transaction workflows.• Registration of a vehicle for the first time is available only in License Manager.• Certain functions, such as search and product administration, are available only in
License Manager.

Issuer Manager User Guide About This User Guide
2
About This User Guide
Content Organization
This guide describes the functionality of Issuer Manager and provides instructions for performing specific tasks. Each topic in the guide includes the following information:
• high-level description of a functional area• sample images of the user interface• process steps to perform tasks
Intended Audiences
This user guide is intended for the following audiences:• Sales staff (customer service representatives) at various field locations • Management staff at various field locations• Staff of ASPIRA ONE
User Interface and Functionality
The user interface of Issuer Manager may vary somewhat, depending on the contract, location, and user role. This user guide is a generic document prepared for all contracts, locations, and user roles. Some of the functionality described may not be available to you and parts of this guide may not apply to you. Screen captures shown should be treated as examples only; what you see on the screen may not be identical.
Some user interface labels, such as page titles and field names, are contract-specific. They are described in this guide for general reference only and do not necessarily reflect the actual labels used in specific contracts.
© 2018 Aspira

Chapter 1 Introduction Issuer Manager User Guide
Getting Started With Issuer Manager
Issuer Manager is a member of the ASPIRA family of web-based applications. The recommended web browser is Microsoft Internet Explorer 10 or 11.
Process Steps: Getting started with Issuer Manager
1. Launch Issuer Manager. The launch screen displays.
Figure 1-1: Launch screen
2. Do one of the following: If Issuer Manager is being used for the first time, you must calibrate it. For
more information, see “Calibrating Issuer Manager” on page 12. If Issuer Manager has already been calibrated, tap License Sales and proceed
to “Process Steps: Logging in to Issuer Manager” on page 4.
3

Issuer Manager User Guide Getting Started With Issuer Manager
4
Physical Keyboard and Virtual Keyboard
Issuer Manager can be used with either a physical keyboard or the virtual keyboard on the screen. When a physical keyboard is available, Issuer Manager can be configured to hide the virtual keyboard. Although the instructions in this user guide is based on the assumption that you use the virtual keyboard, they can be easily converted to instructions for using a physical keyboard. For example, you can replace the word “tap’ with “click”.
Logging In
The initial login step depends on how the system is configured at your location:• If the Issuer Manager Home screen displays, see “Process Steps: Logging in to
Issuer Manager” on page 4.• If the Issuer Manager Home screen does not display, ask your supervisor on how
to get to that screen.
Process Steps: Logging in to Issuer Manager
1. On the Home screen, tap the main logo (or follow the screen instruction)
Figure 1-2: Example 1 of Home screen
2. On the Login screen, tap in the User Name box.
© 2018 Aspira

Chapter 1 Introduction Issuer Manager User Guide
3. When the virtual keyboard pops up, tap the appropriate keys to enter your user name.
Figure 1-3: Keyboard — Entering user name
4. Tap Next.
5. Tap the appropriate keys to enter your password.
Figure 1-4: Keyboard — Entering password
6. Tap Done. The Login screen is populated with your user name and password.
7. Tap OK. The Main Menu page displays.
Note: For instructions on using the virtual keyboard, see “Virtual Keyboard” on page 8.
Note: If the contract is set up for terminal authorization, you may be asked to provide additional information to authorize the terminal. See “Terminal Authorization” on page 14.
Note: If the facility has the Station function configured, then the system will prompt you to select a station before it displays the Main Menu.
5

Issuer Manager User Guide Getting Started With Issuer Manager
6
Main Menu Page
The Main Menu page of Issuer Manager displays buttons for different functional areas within the application:
• Purchase Privilege• Purchase Inventory• Privilege Quick Sale• Purchase Consumables• Vehicle Registration (Renewal and Duplication)• Void Transaction• Reprint Transaction• Vehicle Inspection• Order Supplies• Reports• User Management• Application Setup
Figure 1-5: Example of Main Menu page
Note: Depending on the contract, some of the functional areas described in this guide may not be available.
© 2018 Aspira

Chapter 1 Introduction Issuer Manager User Guide
A workflow in Issuer Manager is a sequence of activities that you perform in order to accomplish a goal, such as purchasing a privilege. To start a workflow in a specific area, tap the appropriate button in the Main Menu. Issuer Manager takes you through a series of screens, depending on your responses on each screen.
If you are in a workflow and want to return to the Main Menu, tap the Main Menu button at the top-right corner of that page.
Help Page / Document Center
The Help page displays buttons for various documentation related to Issuer Manager. The supported document formats are PDF, JPEG, PNG, and GIF.
Figure 1-6: Example of Help page
You can access the Help page by tapping the Help button at the top-right corner of any page.
Logging Out and Exiting
After logging out of Issuer Manager, the Login screen displays. You or another user will have to log in again before using the application. If you exit Issuer Manager, the window closes and the application will no longer be available.
Note: If you return to the Main Menu, you abandon the current workflow and lose all the data in the workflow.
7

Issuer Manager User Guide Virtual Keyboard
8
Process Steps: Logging out of Issuer Manager
1. Go to the Main Menu screen.
2. Tap Log Out (X) at the top-right corner.
Process Steps: Exiting Issuer Manager
1. Go to the Home screen.
2. Tap Exit (X) at the top-right corner.
Virtual Keyboard
Issuer Manager includes a virtual keyboard—also known as a touch keyboard—which pops up on top of the screen when you are required to input data. When the keyboard displays, the screen remains in the background but is dimmed. In this guide, the virtual keyboard is simply referred to as the keyboard.
The keyboard is presented in two layouts: the alphabetic layout and the numeric layout. The former consists primarily of letters of the alphabet, while the latter consists of the numerals and special characters. You can switch from one layout to the other during text input. (For example, if you want to enter the string k25d in the input box, you start with the alphabetic layout, switch to the numeric layout before tapping 2, and switch back to the alphabetic layout before tapping d.)
Note: If you are in a workflow, tap Main Menu at the top-right corner of the page.
© 2018 Aspira

Chapter 1 Introduction Issuer Manager User Guide
Figure 1-7: Keyboard with dimmed screen in background — Alphabetic layout
Figure 1-8: Keyboard — Numeric layout
Common Keyboard Elements
Several elements are common to the alphabetic layout and the numeric layout of the keyboard.
Dimmed screen
Input box labelInput box
Input fields on dimmed screen
Switch layout button
Switch layout button
9

Issuer Manager User Guide Virtual Keyboard
10
Input Box. When you tap a character (letter, numeral, or special character) in the keyboard, that character is displayed in this box. The string of characters in the input box is the value to be entered in the corresponding input field on the dimmed screen.
Input Box Label. Displayed above the input box, this label corresponds to the name of the input field on the dimmed screen.
Previous and Next Buttons. If you tap Previous or Next, the input box displays the content of the previous field or next field on the dimmed screen. (For example, the screen has three input fields: Home Phone, Business Phone, Mobile Phone, in that order. Assuming that the input box currently displays the Business Phone, tapping Previous would display the Home Phone field and tapping Next would display the Mobile Phone field.)
Done Button. Tapping Done moves the content of the input box to the appropriate input field on the screen. At the same time, the keyboard is removed from view.
Clear Button. Tapping Clear removes the content of the input box.
Backspace Key . This key works like the backspace key on a physical keyboard. When you tap the backspace key, you delete the character to the left of the cursor.
Switch Layout Button. This button toggles between .?123 and ABC. • When the alphabetic layout displays, this button is labelled as .?123. Tapping the
button switches the alphabetic layout to the numeric layout. • When the numeric layout displays, the button is labelled as ABC. Tapping the
button swiches the numeric layout to the alphabetic layout.
Hide Button. Tapping Hide removes the keyboard from view. The content in the input box is ignored.
Alphabetic Keyboard Layout
The alphabetic layout of the keyboard is the default layout. Initially, all the keys are in lower case.
To change the keys to upper case, tap the Shift key. (For example, if you want to enter G in the input box, tap Shift, followed by the g key.) After tapping the letter, the keyboard reverts to lower case keys. Consequently, if you want upper case letters, you need to tap Shift every time before you tap a letter key. (For example, if you want to enter Tom Kay in the input box, tap the sequence: Shift + T + o + m + Space + Shift + K + a + y.)
© 2018 Aspira

Chapter 1 Introduction Issuer Manager User Guide
Numeric Keyboard Layout
If the alphabetic layout displays and you want to enter numerals, tap the switch layout button .?123.. After entering numerals, if you want to enter letters, tap the switch layout button ABC. to return to the alphabetic layout. (For example, if you want to enter 25mary8 in the input box, tap the sequence: .?123 +2 +5 + ABC +m + a + r + y + .?123 + 8.)
The space bar and several special characters are available on either layout.
Navigation
When you are in a workflow, several pages include the following navigation buttons:
Table 1-1: Navigation buttons
Button Description
Header
Go to the Help page/ Document Center.
Abandon the workflow and return to the Main Menu. This action deletes all the data that you have entered in the current workflow.
Footer
Go to the previous page in the workflow. The button is dimmed or absent if that page is not available.
Go to the following page in the workflow. The button is dimmed or absent if that page is not available.
Other buttons in the footer
Buttons such as Save, Cancel, Find Customer, Edit Customer, Add Identifier, Start Purchase may be available according to the context.
Content Area
Display the lower portion of the current page. The button is dimmed or absent if that portion is not available.
11

Issuer Manager User Guide Calibrating Issuer Manager
12
Calibrating Issuer Manager
Since Issuer Manager is a touchscreen application, it is necessary to calibrate the touch position to make sure it works properly. Normally, the calibration is a one-time process, which is required prior to using the application.
Process Steps: Calibrating Issuer Manager
1. On the launch screen, tap Touch Screen Calibration. The Calibration screen displays a red circle.
Figure 1-9: Calibration screen with red circle 1
2. Tap the center of the circle (marked by cross hairs). The red circle moves to a different location on the screen.
Display the upper portion of the current page. The button is dimmed or absent if that portion is not available.
Table 1-1: Navigation buttons (Continued)
Button Description
© 2018 Aspira

Chapter 1 Introduction Issuer Manager User Guide
Figure 1-10: Calibration screen with red circle 2
3. Tap the center of the circle again, at its new location. The red circle moves to another location on the screen.
Figure 1-11: Calibration screen with red circle 3
4. Tap the center of the circle one more time, at its new location. The screen displays a cursor.
Note: You have to tap the center of the circle a total of three times.
13

Issuer Manager User Guide Terminal Authorization
14
Figure 1-12: Calibration screen for confirmation
5. To test the calibration, touch the cursor and drag it around the screen.
6. Do one of the following: If the cursor follows the movement of you finger tip (directly under your finger
tip), then it means the calibration is correct. Tap the check icon. When the launch screen displays, the calibration is complete and you can proceed to perform license sales.
If the cursor does not follow the movement of your finger tip, then it means the calibration is incorrect. Tap the return icon and repeat steps 1 to 6.
Terminal Authorization
Issuer Manager runs on dedicated touchscreen computers, which are also called “terminals” in the present context. Depending on the contract, authorization may be required prior to using these terminals. Terminal authorization is a feature that ensures the issuer Manager application runs only on the intended computers.
When the terminal authorization feature is turned on for a contract, after a user logs in, the application goes through a process that detects whether a prior authorization has been made for the terminal. The process starts by generating a machine fingerprint, which is unique for each terminal. The terminal then sends the fingerprint back to ASPIRA ONE for comparison.
Return iconCheck icon
© 2018 Aspira

Chapter 1 Introduction Issuer Manager User Guide
The process continues with the following scenarios:• If ASPIRA ONE has a record of the fingerprint, it lets the application run as
normal.• If ASPIRA ONE does not have a record of the fingerprint, it checks whether the
current logged-in user has the appropriate permission to authorize the terminal. If yes, the system prompts the user to authorize the terminal, by selecting/
confirming a Register ID for the computer and specifying a terminal name. (For details, see “Authorizing Terminals” on page 15.) Once the user confirms, the system creates an authorization (that is, the machine fingerprint) in ASPIRA ONE. The authorization is then considered complete and the application can run on the terminal.
If no, the system displays an error message, indicating the terminal requires authorization. The application is terminated.
The permission to authorize a terminal is not the same as the permission to use Issuer Manager on that terminal. For example, a store manager may have the permission to authorize a terminal, but a customer service representative may not.
Authorizing Terminals
If a terminal has not yet been authorized and you have the permission to authorize it, the following dialog box would display after you log in.
Figure 1-13: Authorizing Terminal dialog box
Select a Register ID from the drop-down list, if more than one ID is available. Type a name to identify the terminal in the Terminal Name field. Then, click OK.
Authorization of a terminal is a one-time process. Once authorized, ASPIRA ONE will recognize the fingerprint from that terminal; anybody who has the permission to use Issuer Manager will be able to use that terminal.
15

Issuer Manager User Guide Customer-facing Display
16
Deauthorizing Terminals
An authorized terminal can be deauthorized in License Manager, but not in Issuer Manager.
Process Steps: Deauthorizing terminals
1. Launch License Manager.
2. On the main menu, click Vendors.
3. Search for the agent (or store) that uses the terminal you want to deauthorize.
4. Click the name of that agent. The Agent Details page displays.
5. In the Actions section, click Device Authorization. The Device Authorization page displays a list of devices.
6. Select the check boxes that correspond to the devices you want to deauthorize.
7. Click Deauthorize.
Customer-facing Display
This user guide describes the touch screen that faces the customer service representative. Some touch screen devices also have a display that faces the customer. The customer-facing display includes information such as the customer’s address, selected products, and the total amount due. The customer can confirm the accuracy of this information.
© 2018 Aspira

ISSUER MANAGER
Chapter 2: Privileges
In the context of hunting and fishing licensing, a product is a type of items that can be hunted or fished. A privilege is a license issued to customers to allow them to hunt or fish a particular item. A customer may need to purchase multiple privileges if they want to hunt or fish multiple items of the same product.
Purchasing Privileges
Purchasing privileges includes making original and replacement purchases, or exchanging privileges. Anyone who wants to purchase a privilege must be a customer (that is, having a customer profile in the ASPIRA customer database). If the customer does not exist, you have to create a customer profile for this person during the purchase workflow.
Purchasing/selling privileges in Issuer Manager includes:
• identifying the customer• creating a new customer profile, if necessary• determining the customer’s residency status• selecting one or more privilege products• optionally, selecting one or more consumable products• accepting customer payment using the Cart
When you sell privileges in Issuer Manager, you can also view and edit customer information during the purchase workflow.
Note: In Issuer Manager, “privilege” and “license” are synonyms.

Issuer Manager User Guide Purchasing Privileges
18
Residency Requirements for Purchasing Privileges
The availability of privilege products to a customer often depends on whether the customer is a resident or non-resident of a specific state/province. Certain customer identification types (such as the drivers license of a specific state/province) enable the system to determine the customer’s residency. Some other customer identification types (such as customer number or passport) are generally deemed insufficient for the system to determine the customer’s residency.
If a customer uses a customer number as identification, then the system may ask the customer to select another identification that can be used to prove the customer’s residency. If this is not possible, the customer will be classified as non-resident and can only purchase privilege products that are available to non-residents. Conversely, a customer who is classified as a resident may only be permitted to purchase privilege products that are available to residents.
If a customer currently does not have an identification that can be used for proof of residency, it is possible to add an acceptable identification during the purchase workflow.
Basic Privilege Purchase Workflow
The following diagrams show an example of the basic workflow for customers who purchase privileges. Depending on the contract and the selected identifier types, there may be minor variations to the basic workflow. For example, if the identifier type is Passport and the customer claims to be a resident, then the customer would be asked to provide additional proof of residency.
Figure 2-1: Basic workflow for purchasing privileges
In Issuer Manager, customer profiles can be created and edited only within privilege purchase workflows.
Note: Each contract is set up somewhat differently. The criteria that are used to determine a customer’s residency may vary from contract to contract.
Select Product
Start
Pay for Products
in Cart
End
Confirm Customer
Select Identifier
Select Residency
Search Customer
Identify Customer Add Items to Cart Review and Print
Exist. customer
?
Create Customer
Profile
Yes
No
Add ID/ certification
?
Add Identifier/
Certification
No
Yes
Answer Product
Questions
Prove residency
?
Select Additional Proof of
Residency
Yes
No
Confirm Customer
Select another
product ?
Review Products
in Cart
No
Yes
© 2018 Aspira

Chapter 2: Privileges Issuer Manager User Guide
Identifying Customer
The first stage of the privilege purchase workflow is Identify Customer, as highlighted in the workflow progress bar.
Figure 2-2: Purchase stage: Identify Customer
At this stage, you:• search for customers by identifiers or by names.• add new customers if they do not already exist in the database.
Process Steps: Identifying a customer
1. From the Main Menu, tap Purchase Privilege. The Identify Customer: Identifier Search page displays.
Figure 2-3: Identify Customer: Identifier Search page
Note: Where applicable, scan a Customer # barcode on the printed document. If the customer is found in the database, then the Confirm Customer page displays. Go to step 4. Otherwise, continue to the next step.
19

Issuer Manager User Guide Purchasing Privileges
20
2. Do one of the following: To search for the customer using an identifier (such as driver’s license), do
one of the following: Tap an identifier type as required (such as Driver’s License #).
Complete the information required for that identifier type, and then tap Next.
Swipe or scan the customer’s Driver’s License or Identification Card to automatically populate the ID# and Date of Birth fields, and then tap Next.
To search for an Individual customer using customer profile (such as name and date of birth):i. Tap Profile Search. The Identify Customer: Profile Search page displays.
Figure 2-4: Identify Customer: Identifier Search page
ii. Complete the required information on the Profile Search page. iii. Tap Next.
To search for a Non-Individual customer:i. Tap Non-Individual Search. The Identify Customer: Non-Individual Search
page displays.
© 2018 Aspira

Chapter 2: Privileges Issuer Manager User Guide
Figure 2-5: Identify Customer: Non-Individual Search page
ii. Complete the information on the Non-Individual Search page.iii. Tap Next.
3. Do one of the following: If the customer is existing, continue to the next step. If the customer is new, the following message displays: “A matching customer
is not found. Would you like to create a new Customer Profile for this customer?” i. Tap OK. A dialog box displays.ii. Select a customer class (such as Individual or Non-Individual). The Create
Customer Profile page displays.
Note: If you search for a customer on the Non-Individual Search page, the customer class will be automatically populated with Non-Individual.
21

Issuer Manager User Guide Purchasing Privileges
22
Figure 2-6: Create Customer Profile page
iii. Complete the information on the Create Customer Profile page.
iv. Tap Save. The Confirm Customer page displays.
4. To continue, go to “Confirming Customer” on page 23.
Process Steps: Identifying a customer by scanning a customer # barcode
1. From the Main Menu, where applicable, scan the Customer # barcode on the printed document.
2. If the customer is found in the database, then the Confirm Customer page displays.
3. To continue, go to “Confirming Customer” on page 23.
Note: Optionally, you may need to add or remove identifiers, do one of the following: To add an identifier, tap Add. To remove an identifier, tap Remove.
© 2018 Aspira

Chapter 2: Privileges Issuer Manager User Guide
Confirming Customer
The second stage of the privilege purchase workflow is Confirm Customer, as highlighted in the workflow progress bar.
Figure 2-7: Purchase stage: Confirm Customer
At this stage, you:• modify customer information, including identifications and certification, if
necessary.• select customer residency.• prove residency, if necessary.
The system checks the selected residency against the address in the customer’s profile to determine whether the customer is a resident of the state or province.
Process Steps: Confirming a customer and selecting residency
1. Follow the instructions in “Identifying Customer” on page 19. The Confirm Customer page displays.
Figure 2-8: Confirm Customer page: Customer tab
23

Issuer Manager User Guide Purchasing Privileges
24
2. Verify the information on this tab, and do one or more of the following, where applicable: To make changes to the customer’s personal information:
i. Tap Edit in this section.ii. Edit the information, as required.iii. Tap Save.
To make changes to the customer’s identifiers:i. Tap Add or Edit in this section.ii. Edit the information or add identifier, as required.iii. Tap Save.
To make changes to the customer’s certification:i. Tap Add or Edit in this section.ii. Edit the information or add certification, as required.iii. Tap Save.
3. To accept the customer information on this page, tap Confirm.
4. Depending on configuration for your contract, the Select An Identifier page may display.
Figure 2-9: Select An Identifier
If the page displays, tap Select in the row that represents the identifier you want to use.
Note: If the system requires more information about the customer, one or more dialog boxes may display. Enter the information as required and confirm again.
© 2018 Aspira

Chapter 2: Privileges Issuer Manager User Guide
5. The Select Residency page displays. Labeling of the buttons depends on the contract. For example, there may be one button for the state or province with the contract and several other buttons for other jurisdictions. Alternatively, there may be a button for Resident (of the state or province with the contract) and another button for Non Resident.
Figure 2-10: Select Residency page
Tap the appropriate residency.
6. Do one of the following: If you tapped Non Resident (or an equivalent state/province name) and the
identification indicates that the customer is a non-resident, then go to “Process Steps: Selecting products and adding items to the Cart” on page 28.
If you tapped Non Resident (or an equivalent state/province name) and the identification indicates that the customer is a resident, a dialog box informs you of that situation.
Figure 2-11: Mismatched Residency dialog box
Note: When certain identifiers were selected (for example, the passport of a foreign country), Non Resident may be the only option available.
25

Issuer Manager User Guide Purchasing Privileges
26
Tap OK and then tap Resident (or the equivalent state/province name). Go to “Process Steps: Selecting products and adding items to the Cart” on page 28.
If you tapped Resident (or the equivalent state/province name) and the identification indicates that the customer is a resident, then go to “Process Steps: Selecting products and adding items to the Cart” on page 28.
If you tapped Resident (or the equivalent state/province name) and the identification does not indicate that the customer is a resident, then do one of the following, depending on how the workflow is set up for your contract: If the Select Additional Proof of Residency page displays, go to step 7. If the Unacceptable Proof of Residency dialog box displays, go to step
8.
7. The Select Additional Proof of Residency page displays the acceptable identifications for proof of residency.
Figure 2-12: Select Additional Proof of Residency page
a) Ask the customer for one of the identifications (for example, student ID) that is displayed on the page and verify the residency.
b) Tap the button that corresponds to that identification (for example, Student ID).c) Go to “Process Steps: Selecting products and adding items to the Cart” on
page 28.
8. The Unacceptable Proof of Residency dialog box displays.
Note: In case of high volume of residency verification, a Wait Message dialog box may display. Wait for the system to respond, or click Retry where applicable.
© 2018 Aspira

Chapter 2: Privileges Issuer Manager User Guide
Figure 2-13: Unacceptable Proof of Residency dialog box
a) Tap OK.b) Do one of the following:
If the customer wants to be classified as a non-resident, then tap Non Resident (or an equivalent state/province name) Go to “Process Steps: Selecting products and adding items to the Cart” on page 28.
If the customer wants to be classified as a resident, then tap Back. Repeat step 7, by selecting an identifier that can prove the customer’s residency.
Adding Items to Cart
The third stage of the privilege purchase workflow is Add Items to Cart, as highlighted in the workflow progress bar.
Figure 2-14: Purchase stage: Adding Items to Cart
At this stage, you:• select products and add items to the cart.• provide additional information related to the selected items.
You can make purchases under the current customer’s name or under a different customer’s name, or both. The original customer is to pay for all the purchases, although the other customers will own the products that have been purchased on their behalf. For example, a father purchases a hunting privilege for himself and another for his son. The father puts both items in his cart and pays the total amount.
27

Issuer Manager User Guide Purchasing Privileges
28
Process Steps: Selecting products and adding items to the Cart
1. Follow the instructions in “Confirming Customer” on page 23. The Select Product page displays product categories. The Selecting Products For section highlights the name of customer under which the purchase is made.
Figure 2-15: Select Product page: Categories
2. Do one of the following: To make a purchase under the highlighted customer’s name, continue to the
next step. To make a purchase under a different customer’s name, tap that customer’s
name in the Select Products For section, and then continue to the next step. To make a purchase under a customer’s name that is not displayed, tap Add
Customer. Repeat the steps in “Process Steps: Identifying a customer” on page 19 and “Process Steps: Confirming a customer and selecting residency” on page 23.
3. Tap on the required product category. The Select Product page displays product categories and the products that belong to the selected category.
© 2018 Aspira

Chapter 2: Privileges Issuer Manager User Guide
Figure 2-16: Select Product page: Categories and products
4. To purchase a product, tap Add in the row that corresponds to the product.
5. Depending on the contract, a dialog box may display a brief description of the selected product or related information.
Figure 2-17: Example of product description dialog box
If the dialog box displays, read the description. Tap OK.
6. Depending on the contract and product, you may be prompted with:
Note: If the product is a Big Game & Turkey product, tap Apply Now or Purchase for the required product. Depending on the contract configuration and the pricing category configuration, the button may have a different label.If the product is an exchange privilege, tap Exchange for the privilege to be exchanged. On the Exchange Product pop-up dialog box, select the privilege to exchange to, and enter the hunt code, if required. Tap OK.
29

Issuer Manager User Guide Purchasing Privileges
30
The Military Status page. Provide the required information for military status, and then click Next.
The Landowner Qualification page. Provide the required information for landowner qualification, and then click Next.
The Military Status and Landowner Qualification page. Provide the required information for military status and landowner qualification, and then click Next.
7. Depending on the contract, you may be prompted with a Voucher Number page, enter the voucher number and tap OK.
8. Depending on the contract, if you are purchasing a lottery product, you may need to select a specific hunt. Select the radio button that corresponds to the required hunt, and then tap Add to Cart.
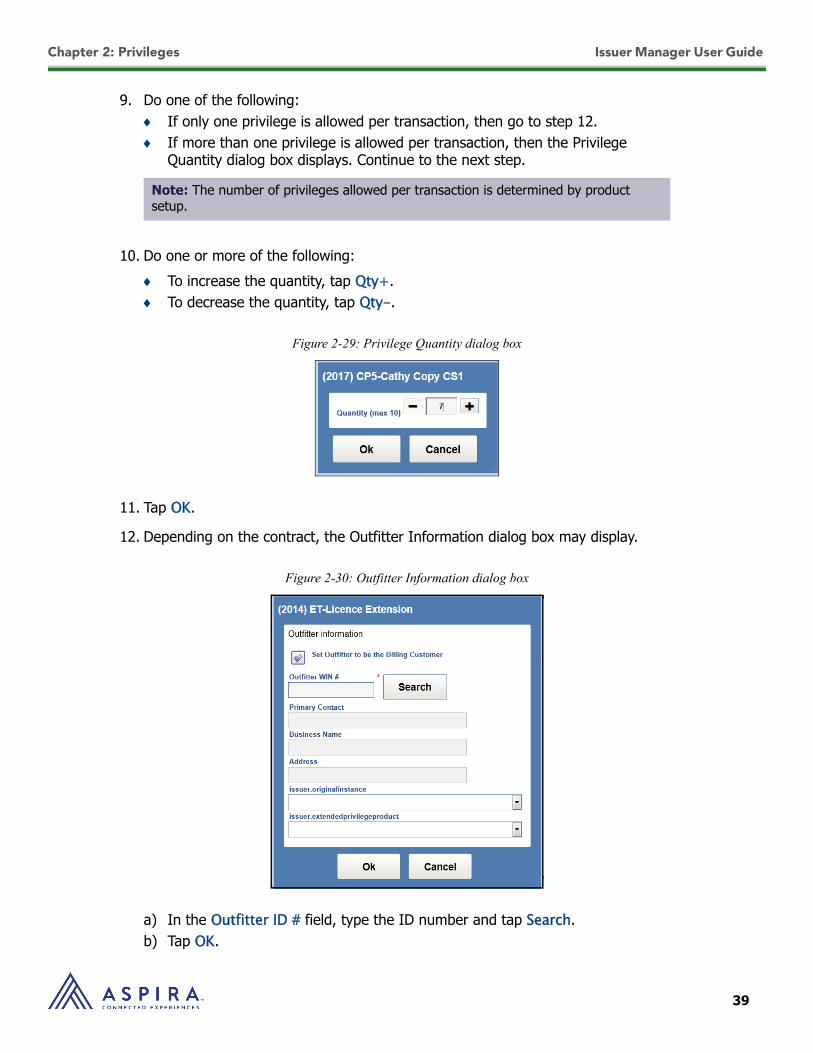
9. If more than one privilege is allowed per transaction, the Privilege Quantity dialog box displays.
Do one or more of the following: To increase the quantity, tap Qty+. To decrease the quantity, tap Qty-.Tap OK.
10. Depending on the product setup, the Privilege Quantity/Valid From Date dialog box may display. If you purchase more than one privilege, then you may select the Apply “# of Days” to All check box to set the same number of valid days to other privileges as the first privilege in the transaction. Tap OK.
11. Depending on the contract, you may need to choose your applicant type. On the Please Choose Applicant Type page, do one of the following: If you are purchasing the product as an individual, tap Individual. If you are purchasing the product as a group leader, tap Group Leader. If you are purchasing the product as a group member, tap Group Member.
The Please enter the Group ID dialog box displays, enter your Group ID.
12. If the product is outfitter-related, the Outfitter Information dialog box displays.
Note: The number of privileges allowed per transaction is determined by the product setup.
Note: If you don't know your Group ID:a) Tap I don't know my Group ID. The Find Group ID dialog box displays.b) Specify search criteria, and then tap Search. c) Select the radio button that corresponds to your group, and click OK.
© 2018 Aspira

Chapter 2: Privileges Issuer Manager User Guide
Figure 2-18: Outfitter Information dialog box
a) In the Outfitter ID # field, type the ID number and tap Search.b) Tap OK.
13. Do one of the following: If the product is a Big Game & Turkey product, continue to the next step. If the product is not a Big Game & Turkey product, continue to step 20.
14. If the purchase limit allows, a Quantity dialog box displays, select or type the quantity for the product being purchased, and tap OK. The Choice Code page displays.
Figure 2-19: Big Game & Turkey Choices Code page
31

Issuer Manager User Guide Purchasing Privileges
32
Complete the information on this page, and tap Confirm Choices.
15. Do one of the following: If the product is for a draw lottery, continue to the next step. If the product is not for a draw lottery, continue to step 20.
16. The Draw Choices dialog box displays.
Figure 2-20: Lottery Draw Choices dialog box
Do one of the following: If you are familiar with the choice codes, select the required codes from the
drop-down lists and tap OK. Continue to the next step. If you want to read details about the available choices before making
selections, tap Pick From List. The Please Make Your Choices page displays.
Figure 2-21: Please Make Your Choices page
Select the appropriate check boxes and tap Confirm Choices.
© 2018 Aspira

Chapter 2: Privileges Issuer Manager User Guide
17. The Confirm Choices page displays.
Figure 2-22: Confirm Choices page
In the Move Up/Down column, tap the up or down arrow to rearrange the order of your choices (for example, from 2nd choice to 1st choice).
18. If the purchase is for a group and you want to modify group members, tap Add/Edit Group Members. The Manage Group Member page displays.
Figure 2-23: Manage Group Members page
33

Issuer Manager User Guide Purchasing Privileges
34
19. Do one or more of the following: To add a group member, enter the customer number and date of birth. To remove a group member, tap Remove in the row that corresponds to the
member.Tap Validate Members.
20. Depending on the privilege selected, one or more prompts may display. These prompts are typically related to hunter education, valid-from-dates, selection of privilege inventories, HIP survey, hunter host, partner license, or various questions. Respond to each prompt until they are all completed. Tap Done.
21. To purchase another privilege product, repeat steps 2 to 20.
22. Optionally, to add a consumable product:a) Tap Back. The Select Category page displays. b) Tap Consumables.c) To continue, see “Consumables” on page 57.
23. Optionally, to purchase a privilege POS product, where applicable:a) On the Select Products page, in the left pane, tap the button for the required
privilege POS product. The right pane displays available privilege POS products.b) In the right pane, tap Add for the required privilege POS product. Depending on
the selected privilege POS product, one or more prompts may display.c) Respond to each prompt until they are all completed.
24. After selecting all the products to be purchased, tap View Cart.
25. To continue, see “Chapter 5: Using the Cart” on page 79.
Purchasing awarded privileges
After purchasing lottery products, customers who win the lottery will be awarded a privilege, and they can then purchase the awarded privilege.
Note: Some contracts may not provide the option to add consumable products.
© 2018 Aspira

Chapter 2: Privileges Issuer Manager User Guide
Process Steps: Purchasing awarded privileges
1. Follow the instructions in “Confirming Customer” on page 23. The Awarded Privileges page displays.
Figure 2-24: Select Awarded Privileges
2. Tap the name of the awarded privilege. The Accept/Decline/Cancel confirmation dialog box displays.
Figure 2-25: Awarded Privileges Options
35

Issuer Manager User Guide Purchasing Privileges Using Quick Sale
36
3. Do one of the following:
To accept the privilege, click Accept. To decline the privilege, click Decline. To confirm the choice later, click Cancel.
4. If there are other awarded privileges, repeat steps 2 and 3 as required.
5. Tap Next. The Select Products page displays.
6. Optionally, purchase other privileges, as required. Tap View Cart.7. To continue, see “Chapter 5: Using the Cart” on page 79.
Purchasing Privileges Using Quick Sale
If a privilege product is designated for quick sale, it displays on the product list in the Privilege Quick Sale section, in addition to the product list in the Purchase Privileges section. A quick sale product requires fewer steps in the sales workflow.
Note: A privilege product can be designated for quick sale on the Product Details page in License Manager.
© 2018 Aspira

Chapter 2: Privileges Issuer Manager User Guide
Process Steps: Purchasing Privileges Using Quick Sale
1. From the Main Menu, tap Privilege Quick Sale. The Enter <Identifier Type> Information page displays.
Figure 2-26: Enter <Identifier Type> Information page
2. Where applicable, tap the required identifier type in the left pane.
3. Do one of the following: Using the keyboard, complete the information on the page. Where applicable, scan the identification using the card reader.
4. Tap Next. The Confirm Customer page displays.
5. Where applicable, edit the customer information.
6. Tap Confirm. The Select Residency page displays.
37

Issuer Manager User Guide Purchasing Privileges Using Quick Sale
38
Figure 2-27: Select Residency page
7. Tap Resident or Non-Resident. The Select Products page displays.
Figure 2-28: Select Products page
8. Tap Add to add the required product to the cart.
Note: Optionally, if you select Resident, you may then need to select Resident Month or provide Additional Proof of Residency.
© 2018 Aspira
Chapter 2: Privileges Issuer Manager User Guide
9. Do one of the following: If only one privilege is allowed per transaction, then go to step 12. If more than one privilege is allowed per transaction, then the Privilege
Quantity dialog box displays. Continue to the next step.
10. Do one or more of the following: To increase the quantity, tap Qty+. To decrease the quantity, tap Qty-.
Figure 2-29: Privilege Quantity dialog box
11. Tap OK.
12. Depending on the contract, the Outfitter Information dialog box may display.
Figure 2-30: Outfitter Information dialog box
a) In the Outfitter ID # field, type the ID number and tap Search.b) Tap OK.
Note: The number of privileges allowed per transaction is determined by product setup.
39

Issuer Manager User Guide Purchasing Privilege POS
40
13. Depending on the privilege selected, one or more prompts may display. The following is a dialog box that you may encounter in the workflow.
Figure 2-31: Privilege Valid-from-date dialog box
Enter the information and tap OK. The Select Products page displays.
14. To purchase another privilege product, repeat steps 8 to 13.
15. After selecting all the products to be purchased, tap View Cart.
16. To Continue, see “Chapter 5: Using the Cart” on page 79.
Purchasing Privilege POS
A privilege POS refers to a product that is introduced to handle Passes for CPW, where License Documents are printed when purchasing a Pass. The privilege POS behaves similar to privileges, but the purchase workflow is different. In the workflow to purchase the privilege POS product, you are allowed to select a product prior to residency check or customer identification.
The general workflow for purchasing Privilege POS is as shown in the following figure:
Figure 2-32: General workflow: Purchase Privilege POS
Process Steps: Purchasing a privilege POS
1. From the Main Menu, tap Purchase Privilege POS. The Select Products page displays.
2. In the left pane, tap the button that corresponds to the product type. The right pane displays the products available in that type.
Note: For a product with consecutive dates, if the quantity selected is greater than 1, then the second privilege valid-from-date is the date immediately after the first privilege valid period ends, the third privilege valid-from-date is the date immediately after the second privilege valid period ends, and so on. For a product with non-consecutive dates, if the quantity is greater than 1, then all privileges have the same valid-from-date.
© 2018 Aspira

Chapter 2: Privileges Issuer Manager User Guide
3. In the right pane, tap Add for the required privilege POS product. Depending on the configuration, one of the following happens:a) If the Product Customer attribute is configured and set to Known Customer, or the
attribute is not configured for the contract, then the Identify Customer page displays. Go to step 4.
b) If the Product Customer attribute is configured and set to General Public Customer, the Privilege POS Sale: Add Item page displays. Go to step 7.
c) If the Product Customer attribute is configured and set to Both, a Customer Identification prompt pops up.i. If you select Yes to process the transaction for a known customer, then the
Identify Customer page displays. Go to step 4.ii. If you select No, the Privilege POS Sale: Add Item page displays. Go to step 7.
4. On the Identify Customer page, specify search criteria and tap Next. The Confirm Customer page displays.
5. On the Confirm Customer page, verify the customer information and tap Confirm. For more information, see “Confirming Customer” on page 23.
6. Optionally, if the Billing Customer pop-up dialog box displays, select whether to set the billing customer to general public, and then tap OK.
7. Depending on the product setup, the Privilege POS Quantity/Valid From Date dialog box may display. If you purchase more than one privilege POS product, you may be able to select the Apply “# of Days” to All check box to set the same number of valid days for other privilege POS products as the first one in the transaction. Tap OK.
8. Depending on the product selected, the system may display one or more prompts, such as the Valid From Date/Time Prompt, Question Prompt, Select Inventory Prompt, or Privilege Attributes Prompt. Complete the information on the prompts, and then tap OK. As a result of business rule evaluation, the system may also need to add or remove certain privilege products.
9. Where applicable, to purchase more privilege POS products, repeat steps 2 to 8.
10. After adding all privilege POS products, tap View Cart.
11. To Continue, see “Chapter 5: Using the Cart” on page 79.
Note: For more information on how to search for a customer, see “Identifying Customer” on page 19.
Note: Based on the contract configuration, General Public customers may not be able to purchase more privilege POS products. The Cart page displays. Go to step 11.
41

Issuer Manager User Guide Purchasing Gift Privileges
42
Purchasing Gift Privileges
A Gift Privilege is a privilege, Big Game & Turkey product, or privilege POS product that a customer may purchase for another existing customer as a gift. When purchasing a gift privilege, the workflow is similar to purchasing privileges, but you first search for the recipient of the gift privilege.
The general workflow for purchasing gift privileges is as shown in the following figure:
Figure 2-33: General workflow: Purchase Gift Privileges
Process Steps: Purchasing gift privileges
1. From the Main Menu, tap Purchase Gift Privilege. The Identify Customer page displays.
2. Search for the customer (recipient) and go to the Confirm Customer page. For more information, see “Process Steps: Identifying a customer” on page 19.
3. Verify the information on this page, and tap Confirm. The Select Residency page displays. For more information, see “Confirming Customer” on page 23.
4. Tap the appropriate residency. The Billing Customer dialog box displays.
5. Do one of the following: To set the billing customer to an unspecified customer, select the General
Public radio button. The Select Gift Privileges page displays. Go to step 8. To set the billing customer to a specific customer, select the Existing
Customer radio button. The Search Billing Customer page displays. Continue to the next step.
6. Complete the information, and tap Next. The Confirm Billing Customer page displays.
7. Tap Confirm. The Select Gift Privileges page displays.
8. In the left pane, tap the button that corresponds to the product type. The right pane displays the products available in that type.
9. In the right pane, tap Add for the required product.
10. Depending on the product selected, the system may display one or more prompts, such as the Privilege Valid Date Prompt, Education Type Information Prompt, or Add Additional Privilege Prompt. As a result of business rule evaluation, the system may also need to add or remove certain privilege products.
Note: For more information on purchasing Big Game & Turkey products, see “Process Steps: Selecting products and adding items to the Cart” on page 28, step 14.
© 2018 Aspira

Chapter 2: Privileges Issuer Manager User Guide
11. To add more gift privilege products, repeat steps 8 to 10.
12. After adding all the required products, tap View Cart.
13. To Continue, see “Chapter 5: Using the Cart” on page 79.
Purchasing Privilege Inventory
In some contracts, customers have the option to purchase inventory numbers before they purchase privileges. Essentially, this option lets customers select and reserve inventory numbers in advance. There is no cost for purchasing inventory numbers. When these customers purchase privileges, they can use the inventory numbers that have been issued to them.
The number of inventory numbers that can be issued to a customer in a sales workflow is governed by the maximum number of privileges he or she is allowed in a transaction and the number of tags allowed per privilege. For example, if the number of privileges is 3 and the number of tags is 2, then the customer can select up to 6 inventory numbers.
Process Steps: Purchasing inventory numbers
1. From the Main Menu, tap Purchase Inventory. The Select Products page displays.
Figure 2-34: Select Product: Purchase Inventory page
2. In the left pane, tap the button that corresponds to the product type. The right pane displays the products available in that type.
Note: Depending on the contract, the main Menu may use a label other than “Purchase Inventory”. An example is “Tags”.
43

Issuer Manager User Guide Purchasing Privilege Inventory
44
3. In the right pane, tap the button that corresponds to the specific product.
4. Do one of the following: If only one privilege is allowed per transaction, then go to step 6. If more than one privilege is allowed per transaction, then continue to the
next step.
5. The Product Inventory Quantity dialog box displays the maximum number of privileges the customer can purchase.
Figure 2-35: Product Inventory Quantity dialog box
Do one or more of the following: To increase the quantity, tap Qty+. To decrease the quantity, tap Qty-.Tap OK.
6. The Select Inventory Numbers dialog box displays. The suggested inventory numbers are pre-selected and the unavailable inventory numbers are dimmed.
Note: The number of privileges allowed per transaction is determined by product setup.
© 2018 Aspira

Chapter 2: Privileges Issuer Manager User Guide
Figure 2-36: Select Inventory Numbers dialog box
Do one of the following: If you accept the pre-selected inventory numbers, tap OK. If you prefer other inventory numbers, tap those numbers to select or deselect
them. After selecting all the numbers you want, tap OK.
The Select Products page displays.
7. To select another set of inventory numbers, repeat steps 2 to 6.
8. After selecting all the inventory numbers you want, tap View Cart.
9. To Continue, see “Chapter 5: Using the Cart” on page 79.
Changing Purchased Privileges
In some contracts, customers have the option to change the privileges they have purchased. Essentially, this option lets customers change the privilege’s valid date and exchange one hunt with another hunt associated with the same privilege instance. For example, after a customer has won a lottery and purchased a hunt specified by the lottery, he or she can exchange the hunt for another hunt associated with the same privilege instance.
Note: Tapping a number successively toggles between selecting it and deselecting it.
45
Issuer Manager User Guide Changing Purchased Privileges
46
Process Steps: Changing privilege’s valid date
1. Follow the instructions in “Identifying Customer” on page 19. The Confirm Customer page displays.
2. Tap Change in this section. The Customer Privileges page displays the privileges that the customer has purchased.
3. Tap the radio button next to privilege product you want to change.
4. Tap Change Dates.
5. On the Change Dates pop-up dialog box, select the Valid From Date & Time.
6. Tap OK.
Process Steps: Exchanging hunts
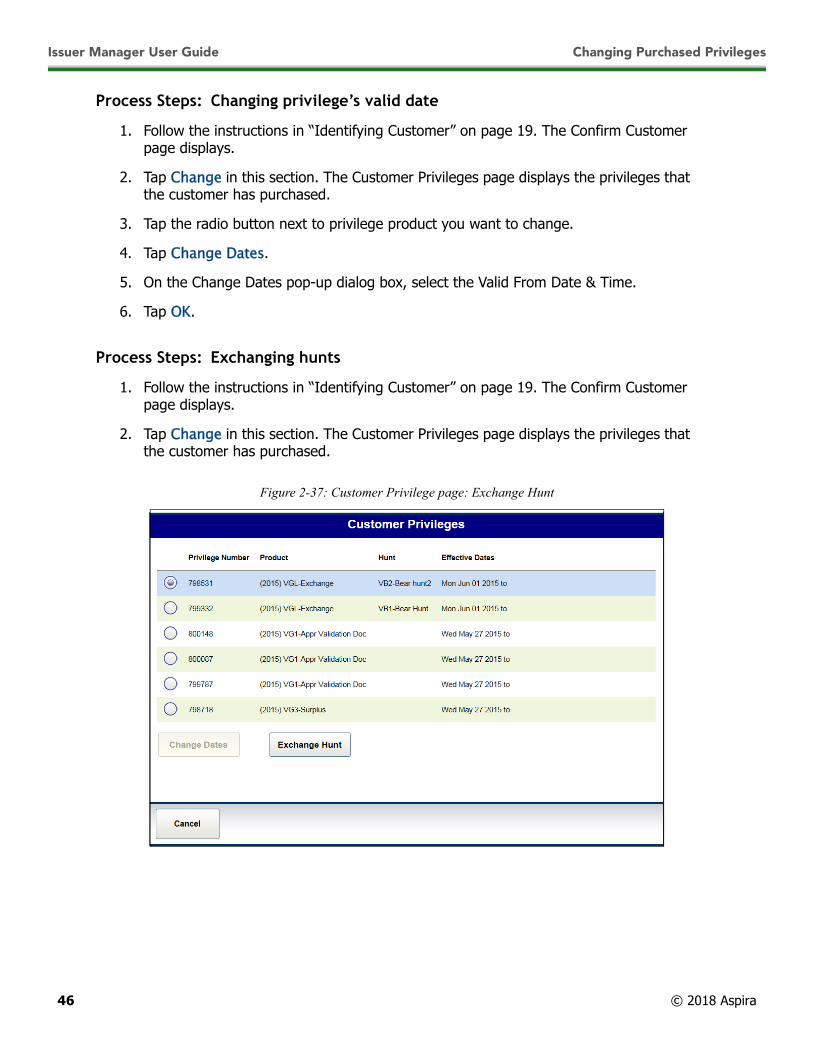
1. Follow the instructions in “Identifying Customer” on page 19. The Confirm Customer page displays.
2. Tap Change in this section. The Customer Privileges page displays the privileges that the customer has purchased.
Figure 2-37: Customer Privilege page: Exchange Hunt
© 2018 Aspira

Chapter 2: Privileges Issuer Manager User Guide
3. Tap the radio button next to privilege product you want to exchange.
4. Tap Exchange Hunt. The Exchange Hunt pop-up dialog box displays.
5. Optionally, tap Filters to specify criteria to search for the required hunt.
6. Tap the radio button that corresponds to privilege product you want to exchange with.
7. Tap OK.
8. To Continue, see “Chapter 5: Using the Cart” on page 79.
47

Issuer Manager User Guide Changing Purchased Privileges
48
© 2018 Aspira
ISSUER MANAGER
Chapter 3: Vehicles
Vehicle Registration Renewal and Duplication
Vehicle registration refers to registering of a vehicle such as a boat or a motor. Issuer Manager lets you renew or duplicate your vehicle registration, provided that it was previously registered. If you are registering a vehicle for the first time, use License Manager.
Renewing a vehicle registration in Issuer Manager includes:
• searching for the vehicle• associating the vehicle renewal or duplication with a customer• selecting a vehicle renewal or duplicate product• accepting customer payment using the Cart
When you renew or duplicate a registration in Issuer Manager, you can view customer (owner) and vehicle information. You can also edit customer information.
Process Steps: Renewing or duplicating a vehicle registration
1. From the Main Menu, tap Vehicle Registration. The Search Vehicle page displays.
2. Tap the name of the vehicle type (for example, Boat or Dealer).
3. Do one of the following: Using the keyboard, enter the MI# of the vehicle in the MI# field. Where applicable, scan the MI# using the card reader.
4. Tap Search. The Confirm Vehicle page displays.
Note: The “MI#” field label is configurable. It is shown here as an example. This field may be labelled differently, depending on the contract.

Issuer Manager User Guide Vehicle Registration Renewal and Duplication
50
Figure 3-1: Confirm Vehicle page
5. View the Vehicle and Customer information, and ensure the information is correct.
6. Optionally, if you want to change the customer information: In the Personal Information section, tap Edit. Make the required changes. Tap Save.
7. Tap Next. The Select Registration Products page displays.
8. In the row that corresponds to the required product, do one of the following: To duplicate the registration, tap Duplicate, and select the County Used from
the drop-down list. To renew the registration, tap Renew, and select the County Used and the
Drive Type from the drop-down lists.
Note: The button dims and changes to In Cart, indicating the selected product has been placed in the Cart.
© 2018 Aspira

Chapter 3: Vehicles Issuer Manager User Guide
Figure 3-2: Example of Select Registration Products page
9. Tap Next. The Confirm Purchase page displays.
10. To continue, see “Chapter 5: Using the Cart” on page 79.
Vehicle Inspection
Customers may request vehicle inspections for various reasons. Anyone who wants to purchase a inspection must be a customer (that is, having a customer profile in the ASPIRA customer database). If the customer does not exist, you have to create a customer profile for this person during the purchase workflow.
Requesting a vehicle inspection in Issuer Manager includes:
• associating the vehicle inspection with a customer• creating a new customer profile, if necessary• specifying the location of the vehicle to be inspected (or location of the dealer)• indicating the reason of the inspection• selecting an inspection product• accepting customer payment using the Cart
When you request a vehicle inspection in Issuer Manager, you can also view and edit customer information.
51

Issuer Manager User Guide Vehicle Inspection
52
Process Steps: Requesting vehicle inspection
1. From the Main Menu, tap Vehicle Inspection. the Select Customer Class page displays.
2. Tap Individual or Business. The Select Identifier Type page displays.
Figure 3-3: Select Identifier Type page
3. Tap an identifier type. The Enter <Identity Type> Information page displays. For example, if you tap Drivers License, the Enter Drivers License Information page displays.
Figure 3-4: Enter <Identity Type> Information page
4. Do one of the following: Using the keyboard, complete the information on the page.
© 2018 Aspira

Chapter 3: Vehicles Issuer Manager User Guide
Where applicable, scan the identification using the card reader.
5. Tap Next.
6. Do one of the following:
7. Do one of the following: If the customer is existing, go to step 9. If the customer is new, continue to the next step.
8. The Create Customer Profile page displays.
Figure 3-5: Create Customer Profile page
Complete the information on this page. Tap Save.
9. The Confirm Customer page displays.
53

Issuer Manager User Guide Vehicle Inspection
54
Figure 3-6: Confirm Customer page
10. Verify the information on this page.
11. Do one of the following: To make changes to the information on this page:
i. Tap Edit Customer.ii. Edit the information, as required.iii. Tap Save.
Continue to the next step.
12. Tap Start Purchase. The Request Vehicle Inspection page displays.
Figure 3-7: Request Vehicle Inspection page
13. In the Boat Location & Contact Information section: Provide the full address of where the boat is located. Provide the customer’s phone number(s)
© 2018 Aspira

Chapter 3: Vehicles Issuer Manager User Guide
14. In the Request Reason section, tap the radio button that corresponds to the reason for requesting the inspection.
15. Optionally, complete the Inspection Details section.
16. Tap Next. The Select Inspection Products page displays.
Figure 3-8: Select Inspection Products page
17. In the row that corresponds to the required product, tap Select. The button dims and changes to In Cart, indicating the selected product has been placed in the Cart.
18. Tap Next. The Confirm Purchase page displays.
19. To continue, see “Chapter 5: Using the Cart” on page 79.
55

Issuer Manager User Guide Vehicle Inspection
56
© 2018 Aspira
ISSUER MANAGER
Chapter 4: Other Functions
Consumables
Consumables refer to items such as POS (point-of-sale) products, donations, and magazine subscriptions. In many cases, when purchasing consumables, the customer is considered “General Public”; that is, the customer is not identified. An alternative for customers is for them to purchase consumables within a purchase privilege workflow. For more information, see “Purchasing Privileges” on page 17.
Process Steps: Making a donation
1. From the Main Menu, tap Purchase Consumable. The Select Products page displays.
Figure 4-1: Select Products page: Donation
2. In the right pane, tap Add in the row for the required donation product. The Donation Amount dialog box displays.

Issuer Manager User Guide Consumables
58
Figure 4-2: Donation Amount dialog box
3. In the Price text box, enter a donation amount and then tap OK.
4. If a dialog box displays, answer the question and then tap Done.
5. To make another donation, repeat steps 2 to 4.
6. Tap View Cart.
7. To continue, see “Chapter 5: Using the Cart” on page 79.
Process Steps: Purchasing a POS product
1. From the Main Menu, tap Purchase Consumable. The Select Products page displays.
Figure 4-3: Select Product page: POS
2. In the right pane, tap Add in the row for the required POS product. The POS Quantity dialog box displays.
Note: If there is more than one question, tap Next Question after answering each question. Tap Done after answering the last question.
© 2018 Aspira

Chapter 4: Other Functions Issuer Manager User Guide
Figure 4-4: POS Quantity dialog box
3. Where applicable, do one or more of the following: To increase the quantity, tap Qty+. To decrease the quantity, tap Qty-.
4. Tap OK.
5. To purchase another POS product, repeat steps 2 to 4.
6. Tap View Cart.
7. To continue, see “Chapter 5: Using the Cart” on page 79.
Process Steps: Purchasing a subscription
1. From the Main Menu, tap Purchase Consumable. The Select Products page displays.
Figure 4-5: Select Product page: Subscription
2. In the right pane, tap Add in the row for the required subscription product. The Enter Subscription Information page displays.
59

Issuer Manager User Guide Consumables
60
Figure 4-6: Enter Subscription Information page
3. Complete the information on the Enter Subscription Information page.
4. Tap Add to Cart.
5. To purchase another subscription, repeat steps 2 to 4.
6. Tap View Cart.
7. To continue, see “Chapter 5: Using the Cart” on page 79.
© 2018 Aspira

Chapter 4: Other Functions Issuer Manager User Guide
Supplies
Supplies refer to products that are used by an agent or a store in order to operate its business. Examples are receipt paper rolls and license paper rolls. These products are not sold to customers.
Process Steps: Ordering supplies
1. From the Main Menu, tap Order Supplies. The Select Products: Supplies page displays.
Figure 4-7: Select Products: Supplies page
2. In the left pane, tap the button that corresponds to the supply category (for example, Supply Kits).
3. In the right pane, tap the button for the specific supply item. The Supply Quantity dialog box displays.
Figure 4-8: Supply Quantity dialog box
4. Where applicable, do one or more of the following: To increase the quantity, tap Qty+. To decrease the quantity, tap Qty-.
61

Issuer Manager User Guide Supplies
62
5. Tap OK.
6. To order another supply item, repeat steps 2 to 5.
7. Tap View Cart.
8. To continue, see “Chapter 5: Using the Cart” on page 79.
© 2018 Aspira

Chapter 4: Other Functions Issuer Manager User Guide
Transactions
Voiding Transactions
Occasionally, a mistake may be made during a transaction. You can invalidate the transaction by voiding it.
By default, Issuer Manager displays all the transactions available for voiding. If you want to view only transactions created by specific registers, use the Filter function.
Process Steps: Voiding a transaction
1. From the Main Menu, tap Void Transaction. The Transactions Available for Voiding page displays.
Figure 4-9: Transactions Available for Voiding page
2. Tap the radio button that corresponds to the transaction you want to void.
3. Tap Void. The Void Reason dialog box displays.
4. Select or enter the void reason.
Note: The current view may not display all the available transactions. Use the up and down arrow buttons to view the other transactions.
Note: To void Gift Card transactions, you may need to manually enter the void reason. However, for other transactions, you can select the radio button for the required void reason.
63

Issuer Manager User Guide Transactions
64
5. If applicable, in the Notes text box, type additional explanations.
6. Based on the contract configuration, if there is at least one additional Order available for Void, you may select the Void Other Orders in the Receipt check box to void other orders in the same receipt.
7. Tap OK. The confirmation page displays.
8. Do one of the following: To print the receipt, tap Print Receipt. To reprint the voided document, tap Reprint Void Document. To finish the process, tap Finish.
Process Steps: Voiding a transaction created by a specific register
1. From the Main Menu, tap Void Transaction. The Transactions Available for Voiding page displays.
2. Tap Filter. The Filter by Register dialog box displays.
Figure 4-10: Filter by Register dialog box
3. Tap the check boxes that correspond to the registers you want.
4. Tap OK. The Transactions Available for Voiding page displays only the transactions created by the selected registers.
5. To continue, see “Process Steps: Voiding a transaction” on page 63, starting from step 2.
Reprinting Transactions
For some purchases, a document is included and provided to the customer. Normally, the required document is printed when processing the sale. If a reprint of this document is necessary, you can use the reprint transaction function to print another copy.
Note: Depending on the contract configuration, the Privilege Inventory page may display. Select whether and how to return the privilege inventory, and then tap OK.
© 2018 Aspira

Chapter 4: Other Functions Issuer Manager User Guide
By default, Issuer Manager displays all the transactions available for reprint. If you want to view only transactions created by specific registers, use the Filter function.
Process Steps: Reprinting transactions
1. From the Main Menu, tap Reprint Transaction. The Transaction Available for Reprint page displays.
Figure 4-11: Transaction Available for Reprint page
2. Tap the radio button that corresponds to the transaction you want to reprint.
3. Tap Reprint. The Select Reason for Reprint dialog box displays.
Figure 4-12: Select Reason for Reprint dialog box
4. Tap the appropriate radio button to select the reason.
5. Optionally, enter a note in the Notes text box.
Note: The current view may not display all the available transactions. Use the up and down arrow buttons to view the other transactions.
65

Issuer Manager User Guide Transactions
66
6. Tap OK. The Reprint Success dialog box displays.
Figure 4-13: Reprint Success dialog box
7. If the printing fails, select Print Failed. The dialog box refreshes and displays a Retry button.
Figure 4-14: Reprint Failed dialog box
8. To retry printing, tap Retry. The Reprint Success dialog box displays.
9. Tap Finish Reprint.
Process Steps: Reprinting transactions created by a specific register
1. From the Main Menu, tap Reprint Transaction. The Transaction Available for Reprint page displays.
2. Tap Filter. The Filter by Register dialog box displays.
Figure 4-15: Filter by Register dialog box
3. Tap the check boxes that correspond to the registers you want.
4. Tap OK. The Transactions Available for Reprint page displays only the transactions created by the selected registers.
5. To continue, follow “Process Steps: Reprinting transactions” on page 65, steps 2 to 9.
© 2018 Aspira

Chapter 4: Other Functions Issuer Manager User Guide
Gift Card
Customers can purchase gift cards or gift certificates of specified dollar amounts and give to others as gifts. Owners (card recipients) can use these cards or certificates to purchase products and services at Facilities where appropriate gift card programs exist. When a purchase is made with a gift card, the purchase amount is deducted from the card balance.
Process Steps: Purchasing a gift card
1. From the Main Menu, tap Gift Card. The Gift Card page displays, with the Purchase tab in focus.
Figure 4-16: Gift Card page
2. Optionally, select the Gift Card Name if there are multiple gift card names.
3. Optionally, depending on the contract, select the Yes or No radio button to determine whether or not to mail the Gift Card to the customer.
4. Select the Gift Card Type: Gift Card or Gift Certificate.
5. Enter the required dollar value in the Amount field.
6. Optionally, to purchase a Gift Card, enter the card number in the Card # field.
67

Issuer Manager User Guide Gift Card
68
7. In the Customer field, do one of the following:
To purchase the gift card or the gift certificate for an unspecified customer, select the General Public radio button, and then tap Process. The Confirm Purchase page displays. Go to step 11.
To purchase the gift card or the gift certificate for a specific customer, select the Select Customer radio button, and then tap Process. The Identify Customer page displays. Continue to the next step.
8. Complete the information on the Identify Customer page, and then tap Next. The system validates the information and one of the following occurs:
If one or more customers matching the information are found, then tap Select in the row for the required customer. The Confirm Customer page displays.
If no customers matching the information are found in the database, then you are prompted to create a new customer profile.i. Tap OK. The Select Customer Class dialog box displays.ii. Select a customer class (such as Individual or Non-individual). The Create
Customer Profile page displays.iii. Complete the information on the Create Customer Profile page, and then tap
Save. The Confirm Customer page displays.
9. Tap Confirm. The Additional Details page displays.
10. Complete the information on the Additional Details page, and then tap Process. The Confirm Purchase page displays.
11. To continue, see “Chapter 5: Using the Cart” on page 79.
Process Steps: Checking the balance on a gift card
1. From the Main Menu, tap Gift Card. The Gift Card page displays.
2. Tap the Check Balance tab. The Check Balance page displays.
3. Enter the Gift Card Number and the Gift Card PIN Number in the respective fields.
4. Tap Check Balance. The balance displays in the Balance field.
Process Steps: Reprinting a gift card
1. From the Main Menu, tap Gift Card. The Gift Card page displays.
2. Tap the Reprint tab. The reprint page displays.
3. Enter the Gift Card Number and the Gift Card PIN Number in the respective fields.
4. Tap Reprint. The system prints the gift card to an available printer.
© 2018 Aspira

Chapter 4: Other Functions Issuer Manager User Guide
User Management
User management refers to the management of staff members who use Issuer Manager. You can view a list of the existing users and create new users. Users with an active status are permitted to log in to Issuer Manager. Depending on the roles assigned to them, these users can perform various tasks in Issuer Manager.
Process Steps: Viewing a list of users
• From the Main Menu, tap User Management. The Users page displays.
Figure 4-17: Users page
Working with Existing Users
The user management pages allow several actions to be performed with existing users. The action buttons are available from the Change Existing User popup menu. Depending on the permissions you have, you may be able to perform some or all of the following actions:
• Edit User — This action opens the Edit User page. You can update user information on this page.
• Activate User — This action activates an inactive user. Only active users can log in to the Issuer Manager application.
69

Issuer Manager User Guide User Management
70
• Deactivate User — This action deactivate an active user. A user who is deactivated becomes an inactive user; he or she can no longer log in to the Issuer Manager application.
• Unlock User — A user may be locked after several unsuccessful attempts at logging in to the Issuer Manager application. The locking feature prevents unauthorized persons from guessing passwords. If you have the required permission, you can unlock users who are currently locked.
• Cancel — This action closes the popup menu without making any changes.
Figure 4-18: Change Existing User menu
Process Steps: Editing a user
1. Go to the Users page.
2. Tap anywhere in the row that corresponds to the user you want to edit. The Change Existing User menu displays.
3. Tap Edit User. The Edit User page displays.
Note: The Activate User button and Deactivate User button share the same location on the menu; the appropriate button is displayed depending on the user status.
Note: Unless the user is currently locked, the Unlock User button is dimmed.
© 2018 Aspira

Chapter 4: Other Functions Issuer Manager User Guide
Figure 4-19: Edit User page
4. Make the required changes.
5. Tap Save.
Process Steps: Activate/deactivate a user
1. Go to the Users page.
2. Tap anywhere in the row that corresponds to the user you want to activate/deactivate. The Change Existing User menu displays.
3. Tap Activate User or Deactivate User. The User page displays the user’s updated status.
Process Steps: Unlocking a user
1. Go to the Users page.
2. Tap anywhere in the row that corresponds to the user you want to unlock. The Change Existing User menu displays.
3. Tap Unlock User. The User page displays the user’s updated status.
Creating New Users
If you have the required permissions, you can create new users and assign roles to them.
71

Issuer Manager User Guide User Management
72
Process Steps: Creating a new user
1. Go to the Users page.
2. Tap New User. The New User page displays.
Figure 4-20: New User page
3. On the New User page, type the First Name, Last Name, Email (optional), and Phone Number (optional) of the new user in the respective text boxes.
4. In the User Name and Password text boxes, type the user name and password that the user will use to log in to Issuer Manager.
5. In the Confirm Password text box, repeat the password that was typed in the Password text box.
6. In the User must change password at next login check box, do one of the following: Select the check box — The password initially assigned is a temporary
password, which the user must change immediately after he or she logs in for the first time.
Clear the check box — There is no need for the user to change the assigned password after he or she logs in.
7. In the User Roles section, select the check box(es) representing the role(s) to be assigned to the new user.
8. Tap Create. The new user is added to the list of users.
© 2018 Aspira

Chapter 4: Other Functions Issuer Manager User Guide
Application Setup
Under Application Setup, you can set up Issuer Manager to print various documents using selected printers.
Process Steps: Setting up a set of printers
1. From the Main Menu, tap Application Setup. The Application Setup page displays.
Figure 4-21: Example of Application Setup page - Initial Configuration
Figure 4-22: Example of Application Setup page - Editing Existing Configuration
73

Issuer Manager User Guide Application Setup
74
2. Tap Add to add printers.
3. Tap the radio buttons to select the Document Type, Printer and Document Template (optional) that you want to use.
Figure 4-23: Printer Configuration dialog box
4. Optionally, for some contracts, when configuring a receipt printer, select the Document Type (Receipt), Printer and Prompt for Receipt (Yes or No).
Note: If you select Yes for Prompt for Receipt, then the system will not automatically print the receipt after a sale. To print a receipt, tap Print Receipt in the Transaction Success dialog box.
© 2018 Aspira

Chapter 4: Other Functions Issuer Manager User Guide
Figure 4-24: Printer Configuration dialog box
5. To set up another printer, repeat steps 2 to 4.
6. After setting up all the printers, tap Save.
Harvest Report
Under Harvest Report, customers can report harvests and reprint harvest reports. It is the customers’ responsibility to initiate harvest reports and to provide harvest information. Customer service representatives enter the information that customers provide into the system.
Note: For some contracts, the system provides an Enable Quick Print check box to enable a quick print function, you can select the check box so the system prints the documents directly once the sale is completed.
75

Issuer Manager User Guide Harvest Report
76
Harvesting refers to killing, or taking an animal, as permitted by a customer’s privilege. For example, a customer has purchased a privilege to hunt deer. If the customer kills a deer, then the animal is considered harvested. For certain species, a harvest must be reported and recorded. When reporting, the system asks a series of questions related to the customer’s harvests. The answers from customers form part of the harvest reports.
Process Steps: Reporting a harvest
1. From the Main Menu, tap Harvest Report. The Search Harvest page displays.
2. Do one of the following: Using the keyboard, enter the Harvest # in the Harvest # field. Where applicable, scan the Harvest # using the card reader.
3. Tap Search. The Confirm Harvest page displays.
4. Verify the information on this page, and tap Start to start reporting.
5. Depending on the contract, a dialog box may display a brief introduction, asking if you are ready to complete the report. Tap OK to continue.
6. The Harvest Question dialog box displays a question. Answer the question and then tap Next Question.
7. Repeat step 6, until the dialog box displays the Done button.
8. Depending on contract configuration, the dialog box may also display the Finish and Print button.
9. Do one of the following: Tap Done to finish the harvest report. Tap Finish and Print to finish and print the harvest report.
10. Depending on contract configuration, a Completion Message dialog box may display. Tap OK.
Process Steps: Reprinting a harvest report
1. From the Main Menu, tap Harvest Report. The Search Harvest page displays.
2. Tap Re-print Report.
Note: Depending on contract configuration, you may also need to provide the WIN #.
Note: If you have not set up a default printer for harvest reports, a printer selection page displays. Select a printer to print the harvest report.
© 2018 Aspira

Chapter 4: Other Functions Issuer Manager User Guide
3. Do one of the following: Using the keyboard, enter the Harvest # or WIN # in the Harvest # or WIN #
fields respectively. Where applicable, scan the Harvest # using the card reader.
4. Tap Search. The Select a Harvest Survey Tag to re-print section displays the most recent harvest reports.
5. Select the required harvest report, and then tap Re-Print.
77

Issuer Manager User Guide Pickup License
78
Pickup License
Under Pickup License, you can print licenses for customers if they have purchased licenses and chosen to pick up their licenses at the sales location, provided that they have not printed these licenses before.
Process Steps: Picking up a license at sales location
1. From the Main Menu, tap Pickup License. The Pickup License page displays.
Figure 4-25: Pickup License page
2. In the Order # field, type the order number.
3. Tap Search. The Pickup License page displays license(s) in the order.
4. Select the license(s) to be printed, tap Print. The system prints the license(s), and the Print Success dialog box displays.
5. Where applicable, reprint and give the document to the customer.
6. Tap Finish.
© 2018 Aspira

ISSUER MANAGER
Chapter 5: Using the Cart
About the Cart
The Cart is the last stage of the purchase workflow. If it is a privilege purchase, then the stage is highlighted in the workflow progress bar.
Figure 5-1: Privilege purchase stage: Review and Print
This stage is where you confirm customer purchases and accept the customer’s payment(s) for these purchases. It consists of two main pages:
• Confirm Purchase page• Payment page (with Select Payment Method and Payment Details sections)
Depending on the particular process, there may be one or more additional dialog boxes in the workflow. If the purchase requires a document is to be printed, it is also printed at this stage.
After selecting the products to purchase, you can view them in the Cart. When you tap View Cart after selecting products, the Confirm Purchase page displays. This page lists all the selected products, along with their required quantities, price for each product, and the total price.

Issuer Manager User Guide Making Changes to Purchases
80
Figure 5-2: Confirm Purchase page
Making Changes to Purchases
You can make changes to purchases by adding products to the Cart or removing products from it. If you want to change the quantity of a selected product, you must remove the product and then add it again, with the revised quantity.
Process Steps: Making changes to purchases
On the Confirm Purchase page, do one or more of the following:• To remove one or more products from the Cart, tap Remove in the appropriate
row(s).• To purchase additional products, tap Continue Shopping.
Applying Discount
If a discount program has been set up, discounts may be applicable to certain orders (or multiple reservations within, or outside of, an Event). Only one discount can be applied to an order at any given time. However, if there are multiple orders in the Cart, each order can have a different discount.
© 2018 Aspira

Chapter 5: Using the Cart Issuer Manager User Guide
Process Steps: Applying discounts
1. On the Confirm Purchase page, in the Enter Promotion Code box, enter the promotion code and tap Apply. The system validates the promotion code, and applies the valid promotion code to all applicable orders within the Cart.
2. Optionally, enter other promotion codes in the Enter Promotion Code box, and then tap Apply.
3. Optionally, to remove a discount for an order, in the specific order row, tap Remove.
Making Donations
When you are purchasing a privilege or privilege POS product, you may be able to make a donation before you pay the order.
Process Steps: Making donations
1. On the Confirm Purchase page, tap Make Payment or Process Sale. The Donation dialog box displays.
2. Do one of the following: Tap Yes to select a donation product, specify a quantity or enter a donation
amount, and then tap OK. Tap No to go to the shopping cart.
Selecting Fulfillment Methods
If you are purchasing privilege or privilege POS products, you may need to select fulfillment methods for different documents. Based on the contract configuration, if multiple products in an order use a same document, then the fulfillment method for this document must be the same. In this case, after you select a fulfillment method for the document in the first product, the system sets the same fulfillment method for the document in other products, and you cannot change it.
81

Issuer Manager User Guide Making Payment on Purchases
82
Process Steps: Selecting fulfillment methods
On the Confirm Purchase page, in the Product column, select the radio button for the required fulfillment method for each document (for example, Printed Immediately or Fulfilled By Mail).
Making Payment on Purchases
Payment can be made using one or more of the available methods (for example, CASH, MC, VISA, TRAV CHK). The available methods may vary according to the facility location.
Payment can be in the form of a single payment or a split payment:
Single Payment. The full amount is paid using a single payment method (for example, cash or one credit card).
Split Payment. A partial amount is paid using one payment method, while the balance is paid using another payment method (for example, the total is $23.00; $20 is paid by travelers check, while the remaining $3.00 is paid in cash).
Process Steps: Making a single payment
1. Verify that the information on the Confirm Purchase page is correct.
2. Tap Make Payment. The Payment page displays.
Note: If an affidavit is associated with the document, after you select the fulfillment method for the document, the system automatically selects the same fulfillment method for the affidavit.
© 2018 Aspira

Chapter 5: Using the Cart Issuer Manager User Guide
Figure 5-3: Payment page
3. In the Select Payment Method section, tap the button for the required method (for example, CASH, MC, VISA, TRAV CHK).
4. Do one of the following: If you selected a method that is not configured to collect information (for
example, cash), enter the amount tendered in the appropriate field. If you selected a method that is configured to collect information (for
example, credit card or check), a dialog box displays. Complete the information and then tap OK.
Figure 5-4: Example of Payment Method dialog box
5. If the location supports EMV PIN Pads, after selecting the Credit Card Payment, the following dialog box displays.
Note: Where applicable, you can swipe the card on the card reader instead of entering the information manually.
83

Issuer Manager User Guide Making Payment on Purchases
84
Figure 5-5: PIN Pad dialog box
Tap PINpad to insert a chip card, or tap Manual to manually enter the credit card information.
Figure 5-6: PIN Pad processing page
6. If the location supports credit card payment for the awarded applications, then the Credit Card for Use if Awarded dialog box displays. Complete the required information, then tap OK.
Figure 5-7: Credit Card for Use if Awarded dialog box
7. Tap Process Sale. If the purchase includes printing of a document, continue to “Process Steps:
Processing a sale that includes a document” on page 87.
© 2018 Aspira
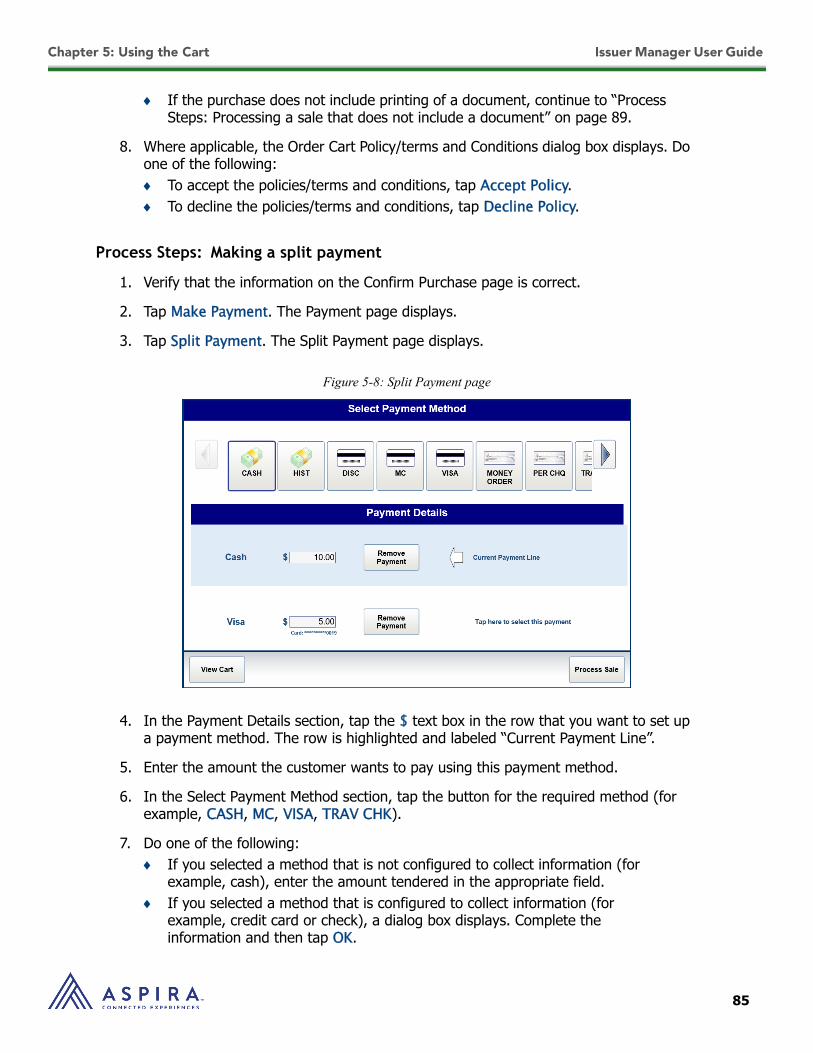
Chapter 5: Using the Cart Issuer Manager User Guide
If the purchase does not include printing of a document, continue to “Process Steps: Processing a sale that does not include a document” on page 89.
8. Where applicable, the Order Cart Policy/terms and Conditions dialog box displays. Do one of the following: To accept the policies/terms and conditions, tap Accept Policy. To decline the policies/terms and conditions, tap Decline Policy.
Process Steps: Making a split payment
1. Verify that the information on the Confirm Purchase page is correct.
2. Tap Make Payment. The Payment page displays.
3. Tap Split Payment. The Split Payment page displays.
Figure 5-8: Split Payment page
4. In the Payment Details section, tap the $ text box in the row that you want to set up a payment method. The row is highlighted and labeled “Current Payment Line”.
5. Enter the amount the customer wants to pay using this payment method.
6. In the Select Payment Method section, tap the button for the required method (for example, CASH, MC, VISA, TRAV CHK).
7. Do one of the following: If you selected a method that is not configured to collect information (for
example, cash), enter the amount tendered in the appropriate field. If you selected a method that is configured to collect information (for
example, credit card or check), a dialog box displays. Complete the information and then tap OK.
85

Issuer Manager User Guide Making Payment on Purchases
86
Figure 5-9: Example of Payment Method dialog box
8. If the location supports EMV PIN Pads, after selecting the Credit Card Payment, the following dialog box displays.
Figure 5-10: PIN Pad dialog box
Tap PINpad to insert a chip card, or tap Manual to manually enter the credit card information.
Figure 5-11: PIN Pad processing page
Note: Where applicable, you can swipe the card on the card reader instead of entering the information manually.
© 2018 Aspira

Chapter 5: Using the Cart Issuer Manager User Guide
9. If the location supports credit card payment for the awarded applications, then the Credit Card for Use if Awarded dialog box displays. Complete the required information, then tap OK.
Figure 5-12: Credit Card for Use if Awarded dialog box
10. For each additional method, repeat steps 4 to 9. Make sure the total payment using all methods equals the amount due.
11. Tap Process Sale. If the purchase includes printing of a document, continue to “Process Steps:
Processing a sale that includes a document” on page 87. If the purchase does not include printing of a document, continue to “Process
Steps: Processing a sale that does not include a document” on page 89.
Processing Sales
After a customer has made a payment, it is necessary to process the sale. For some purchases, a printed document is included and is given to the customer. Other purchases do not include printed documents. A transaction can be reversed immediately, if necessary, at the end of a sale.
Process Steps: Processing a sale that includes a document
1. Accept payment from a customer. For more information, see “Process Steps: Making a single payment” on page 82 or “Process Steps: Making a split payment” on page 85.The Transaction Success dialog box (document) displays.
87

Issuer Manager User Guide Processing Sales
88
Figure 5-13: Transaction Success dialog box (document)
Figure 5-14: Transaction Success dialog box (prompt for printing receipt)
2. Tap Print Document. The Print Success dialog box displays.
3. Depending on the contract configuration, the system may not automatically print the receipt, instead, the system displays the Print Receipt button. To print the receipt, tap Print Receipt. The Print Confirmation dialog box displays.
Figure 5-15: Print Confirmation dialog box
Note: You can reverse the transaction at this point. To do so, tap Reverse Transaction instead of Print Document.
© 2018 Aspira

Chapter 5: Using the Cart Issuer Manager User Guide
4. If all documents available for printing are printed successfully, select the Print Successful radio button. Go to step 9. Otherwise, select Print Failed and go to the next step.
Figure 5-16: Print Failed dialog box
5. Tap Reprint Document. The Print Confirmation dialog box displays.
6. Select Print Successful if all documents available for printing are printed successfully.
7. Where applicable, tap Reprint Receipt to reprint the receipt.
8. Where applicable, provide change and give the receipt and document to the customer.
9. Tap Finish Sale.
Process Steps: Processing a sale that does not include a document
1. Accept payment from a customer. For more information, see “Process Steps: Making a single payment” on page 82 or “Process Steps: Making a split payment” on page 85.The Transaction Success dialog box displays.
Figure 5-17: Transaction Success dialog box
89

Issuer Manager User Guide Processing Sales
90
Figure 5-18: Transaction Success dialog box (prompt for printing receipt)
2. Depending on the contract configuration, the system may not automatically print the receipt, instead, the system displays the Print Receipt button. To print the receipt, tap Print Receipt.
3. Where applicable, provide change and give the receipt to the customer.
4. Optionally, to reverse the transaction as required, tap Reverse Transaction.
5. Tap Finish Sale.
© 2018 Aspira

ISSUER MANAGER
Chapter 6: Reports
The Reports section of Issuer Manager lets you view several report types and print reports:• view daily sales reports• view account balance reports• view invoices• view outfitter allocations• view supply orders• print reports
Process Steps: Selecting a report type
1. From the Main Menu, tap Reports. the Reports page displays.Figure 6-1: Reports page
2. Do one of the following: To generate daily sales reports, tap View Daily Sales. To continue, see
“Process Steps: Viewing daily sales reports” on page 92.
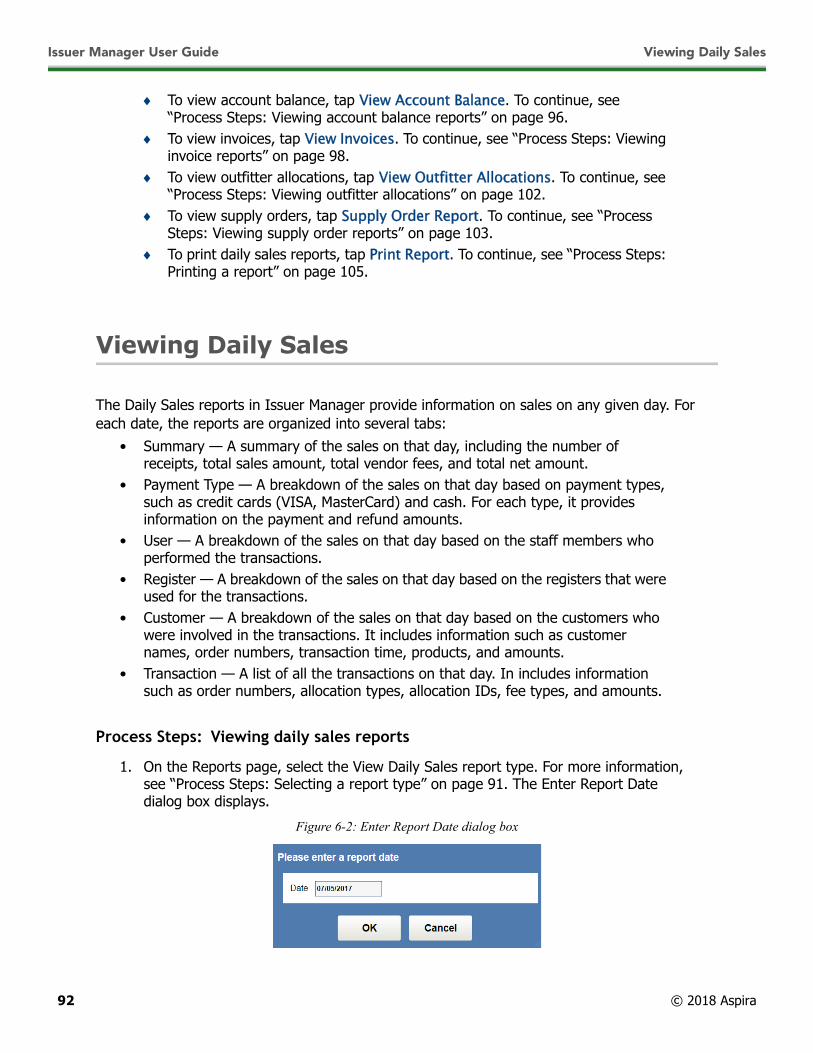
Issuer Manager User Guide Viewing Daily Sales
92
To view account balance, tap View Account Balance. To continue, see “Process Steps: Viewing account balance reports” on page 96.
To view invoices, tap View Invoices. To continue, see “Process Steps: Viewing invoice reports” on page 98.
To view outfitter allocations, tap View Outfitter Allocations. To continue, see “Process Steps: Viewing outfitter allocations” on page 102.
To view supply orders, tap Supply Order Report. To continue, see “Process Steps: Viewing supply order reports” on page 103.
To print daily sales reports, tap Print Report. To continue, see “Process Steps: Printing a report” on page 105.
Viewing Daily Sales
The Daily Sales reports in Issuer Manager provide information on sales on any given day. For each date, the reports are organized into several tabs:
• Summary — A summary of the sales on that day, including the number of receipts, total sales amount, total vendor fees, and total net amount.
• Payment Type — A breakdown of the sales on that day based on payment types, such as credit cards (VISA, MasterCard) and cash. For each type, it provides information on the payment and refund amounts.
• User — A breakdown of the sales on that day based on the staff members who performed the transactions.
• Register — A breakdown of the sales on that day based on the registers that were used for the transactions.
• Customer — A breakdown of the sales on that day based on the customers who were involved in the transactions. It includes information such as customer names, order numbers, transaction time, products, and amounts.
• Transaction — A list of all the transactions on that day. In includes information such as order numbers, allocation types, allocation IDs, fee types, and amounts.
Process Steps: Viewing daily sales reports
1. On the Reports page, select the View Daily Sales report type. For more information, see “Process Steps: Selecting a report type” on page 91. The Enter Report Date dialog box displays.
Figure 6-2: Enter Report Date dialog box
© 2018 Aspira

Chapter 6: Reports Issuer Manager User Guide
2. In the Date text box, type the required date. The default is today’s date.
3. Tap OK. The Daily Sales Report for the selected date displays, focusing on the Summary tab.
Figure 6-3: Daily Sales Report — Summary tab
4. To view the daily sales with breakdown by payment types, tap the Payment Type tab.Figure 6-4: Daily Sales Report — Payment Type tab
93

Issuer Manager User Guide Viewing Daily Sales
94
5. To view the daily sales with breakdown by users who performed the transactions, tap the User tab.
Figure 6-5: Daily Sales Report — User tab
6. To view the daily sales with breakdown by registers that were used to perform the transactions, tap the Register tab.
Figure 6-6: Daily Sales Report — Register tab
© 2018 Aspira

Chapter 6: Reports Issuer Manager User Guide
7. To view the daily sales with breakdown by customers who made purchases, tap the Customer tab.
Figure 6-7: Daily Sales Report — Customer tab
8. To view the daily sales with details on all transactions, tap the Transaction tab.Figure 6-8: Daily Sales Report — Transaction tab
9. To return to the Reports page, tap Back.
95

Issuer Manager User Guide Viewing Account Balance
96
Viewing Account Balance
The Account Balance reports in Issuer Manager provide information on:• the amounts that are awaiting invoicing• the debit, credit, and balance of each account transaction
Process Steps: Viewing account balance reports
1. On the Reports page, select the View Account Balance report type. For more information, see “Process Steps: Selecting a report type” on page 91. The Account Balance page displays, focusing on the Awaiting Invoicing tab.
Figure 6-9: Account Balance Report — Awaiting Invoicing tab
© 2018 Aspira

Chapter 6: Reports Issuer Manager User Guide
2. To view account transactions, tap the Account Transactions tab.Figure 6-10: Account Balance Report — Account Transactions tab
3. To return to the Reports page, tap Back.
97

Issuer Manager User Guide Viewing Invoices
98
Viewing Invoices
The Invoice reports in Issuer Manager provide information on each invoice that is pending or has been sent or cleared. For each invoice, there is a summary report and a detailed report.
Process Steps: Viewing invoice reports
1. On the Reports page, select the View Invoices report type. For more information, see “Process Steps: Selecting a report type” on page 91. The Select Invoice page displays.
Figure 6-11: Invoice Report — Select Invoice
2. Tap View in the row for the required invoice. The Invoice <Invoice #> <Date Range> page displays, focusing on the Summary tab.
© 2018 Aspira
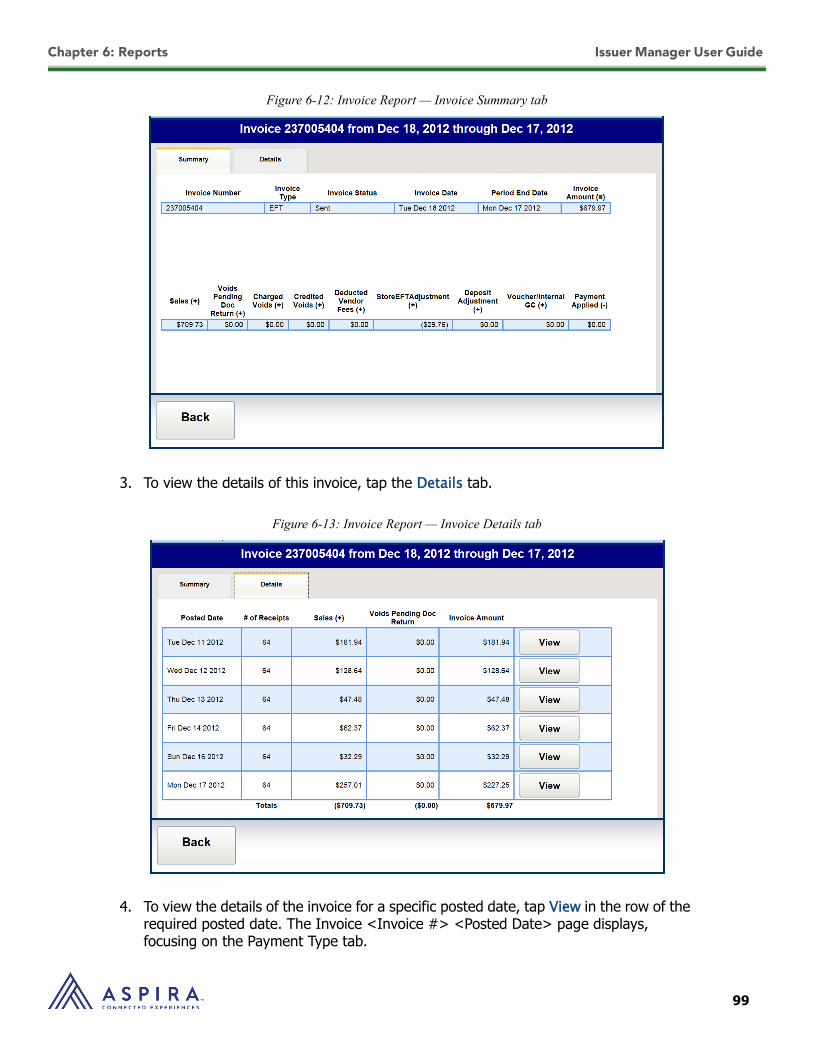
Chapter 6: Reports Issuer Manager User Guide
Figure 6-12: Invoice Report — Invoice Summary tab
3. To view the details of this invoice, tap the Details tab.
Figure 6-13: Invoice Report — Invoice Details tab
4. To view the details of the invoice for a specific posted date, tap View in the row of the required posted date. The Invoice <Invoice #> <Posted Date> page displays, focusing on the Payment Type tab.
99

Issuer Manager User Guide Viewing Invoices
100
Figure 6-14: Invoice Report — Invoice Details — Payment Type tab
5. To view the details of the invoice for a specific posted date, with breakdown by users who performed the transactions, tap the User tab.
Figure 6-15: Invoice Report — Invoice Details — User tab
6. To view the details of the invoice for a specific posted date, with breakdown by registers that were used to performed the transactions, tap the Register tab.
© 2018 Aspira

Chapter 6: Reports Issuer Manager User Guide
Figure 6-16: Invoice Report — Invoice Details — Register tab
7. To view the details of the invoice for a specific posted date, with breakdown by products, tap the Product tab.
Figure 6-17: Invoice Report — Invoice Details — Product tab
8. To return to the Details tab of the invoice, tap Back.
9. To return to the Select Invoice page, tab Back.
101

Issuer Manager User Guide Viewing Outfitter Allocations
102
Viewing Outfitter Allocations
The Outfitter Allocation reports in Issuer Manager provide information on:• a summary of all allocation types, including the number of licenses allocated, the
number sold, and the number available for each license year.• the details for each allocation type, including information on outfitter orders and
customer orders.
Process Steps: Viewing outfitter allocations
1. On the Reports page, select the View Outfitter Allocations report type. For more information, see “Process Steps: Selecting a report type” on page 91. The Outfitter Allocation Summary page displays.
Figure 6-18: Outfitter Allocation Report — Outfitter Allocation Summary
2. Tap Details in the row for the required allocation type. The Outfitter Allocation Orders page displays.
© 2018 Aspira

Chapter 6: Reports Issuer Manager User Guide
Figure 6-19: Outfitter Allocation Report — Outfitter Allocation Orders
Viewing Supply Orders
The Supply Order reports in Issuer Manager provide:• a summary of all supply orders, including the Order #, Order Status, Order Date,
and Fulfillment status.• details for each order, for example, Receipt # and Order Items for the order.
Process Steps: Viewing supply order reports
1. On the Reports page, tap Supply Order Report. For more information, see “Process Steps: Selecting a report type” on page 91. The Please Enter a Report Date Range dialog box displays.
Figure 6-20: Enter Report Date Range dialog box
103

Issuer Manager User Guide Viewing Supply Orders
104
2. Select a report date range as required, and then tap OK. The Select Supply Order page displays a list of available supply orders.
Figure 6-21: Select Supply Order page
3. Tap View in the row for the required order. The Supply Order Details page displays.
Figure 6-22: Supply Order Details page
© 2018 Aspira

Chapter 6: Reports Issuer Manager User Guide
4. To return to the Select Supply Order page, tap Back.
5. To return to the Reports page, tab Back.
Printing Reports
Issuer Manager lets you print reports for a specified date. Currently, the reports available for printing are:
• Daily Sales Activity Breakdown by Customer Report• Daily Sales Activity Report• Daily Sales Activity Summary Report• EFT Invoice Report• Wildlife Void Report
Process Steps: Printing a report
1. On the Reports page, tap Print Report. For more information, see “Process Steps: Selecting a report type” on page 91. The Enter Report Date dialog box displays.
Figure 6-23: Enter Report Date dialog box
2. In the Date text box, type the required date or select the date from the calendar. The default is today’s date.
3. Tap OK. The Print Reports page displays.
105

Issuer Manager User Guide Printing Reports
106
Figure 6-24: Print Reports page
4. Tap the required report type. The Print Reports Filter Criteria page displays.
Figure 6-25: Print Reports Filter Criteria page (Example 1)
Figure 6-26: Print Reports Filter Criteria page (Example 2)
© 2018 Aspira

Chapter 6: Reports Issuer Manager User Guide
Figure 6-27: Print Reports Filter Criteria page (Example 3)
Figure 6-28: Print Reports Filter Criteria page (Example 4)
Figure 6-29: Print Reports Filter Criteria page (Example 5)
107

Issuer Manager User Guide Printing Reports
108
5. Type or select your criteria.
6. Tap OK. An Adobe Acrobat dialog box displays the message: “This document is trying to print. Do you want to allow this?”
7. Tap Yes. The document prints on your default printer.
© 2018 Aspira

Index
AAccount Balance Report
Account Transaction tab . . . . . . . . . . 97Awaiting Invoicing tab . . . . . . . . . . . 96
Application Setup page .......................73application setup, about .....................73ASPIRA
licenses, publication . . . . . . . . . . . . . iiASPIRA ONE
contact . . . . . . . . . . . . . . . . . . . . . iiaudiences of this guide ........................ 2authorization, terminal .............. 5, 14, 15
Ccalibration of touchscreen ...................12Cart
about . . . . . . . . . . . . . . . . . . . . 79making changes in purchases . . . . . . . 80making payments . . . . . . . . . . . . . . 82processing sales . . . . . . . . . . . . . . 87single payment . . . . . . . . . . . . . . . 82split payment . . . . . . . . . . . . . . . . 82
Client Support ....................................iiConfirm Purchase page .......................79consumables ....................................57content organization ........................... 2contract-specific
functionality . . . . . . . . . . . . . . . . 2, 6residency requirements . . . . . . . . . . 18user interface . . . . . . . . . . . . . . . . . 2
copyright ..........................................iiCreate Customer Profile page .... 21, 22, 68customer-facing display ......................16customers
confirming . . . . . . . . . . . . . . . . . . 23creating . . . . . . . . . . . 18, 21, 22, 68editing . . . . . . . . . . . . . . . . . .18, 24identification . . . . . . . . . . . . . .18, 19
residency . . . . . . . . . . . . . . . . . . . 18
DDaily Sales Report
Customer tab . . . . . . . . . . . . . . . . 95Payment Type tab . . . . . . . . . . . . . . 93Register tab . . . . . . . . . . . . . . . . . 94Summary tab . . . . . . . . . . . . . . . . 93Transaction tab . . . . . . . . . . . . . . . 95User tab . . . . . . . . . . . . . . . . . . . 94
deauthorization, terminal .................... 16Document Center ...............................7documents, reprinting ........................ 64donations ....................................... 57
EEdit User page ................................. 70education, hunter ............................. 34
Ffunctionality, contract-specific ............ 2, 6
HHelp page .........................................7HIP survey ...................................... 34Home screen .....................................4hunter education .............................. 34hunter hosts .................................... 34
Iidentifiers
about . . . . . . . . . . . . . . . . . . . . . 18Invoice Report
Details tab . . . . . . . . . . . . . . . . . . 99Payment Type tab . . . . . . . . . . . . . 100Product tab . . . . . . . . . . . . . . . . 101Register tab . . . . . . . . . . . . . . . . 101Select Invoice page . . . . . . . . . . . . . 98Summary tab . . . . . . . . . . . . . . . . 99
109

Issuer Manager User Guide Index
110
User tab . . . . . . . . . . . . . . . . . . 100Issuer Manager
about . . . . . . . . . . . . . . . . . . . . . 1audiences . . . . . . . . . . . . . . . . . . . 2content organization . . . . . . . . . . . . . 2functionality . . . . . . . . . . . . . . . . . . 2user interface . . . . . . . . . . . . . . . . . 2
Kkeyboard, physical ............................. 4keyboard, virtual
about . . . . . . . . . . . . . . . . . . . 4, 8alphabetic layout . . . . . . . . . . . . . . 10common layout elements . . . . . . . . . . 9numeric layout . . . . . . . . . . . . . . . 11
Llaunch screen ................................... 3License Manager
relation to Issuer Manager . . . . . . . . . . 1using . . . . . . . . . . . . . . . . . . . . . 49
licenses, ASPIRA .................................iilicenses, hunting and fishing
See privilegeslogging in ........................................ 4logging out ...................................... 7login screen ...................................... 4
MMain Menu page ................................ 6
Nnavigation of workflow .......................11New User page .................................72
OOutfitter Allocation Report
Outfitter Allocation Orders . . . . . . . . 103Outfitter Allocation Summary . . . . . . 102
Ppartner license .................................34Payment page .............................82, 85
paymentssingle . . . . . . . . . . . . . . . . . . . . . 82split . . . . . . . . . . . . . . . . . . . . . . 82
POS products .................................. 58Print Reports Filter Criteria page .. 106, 107Print Reports page .......................... 106printers
setting up . . . . . . . . . . . . . . . . . . 73privilege inventories
about . . . . . . . . . . . . . . . . . . . . . 43purchasing . . . . . . . . . . . . . . . . . . 43
privilegesabout . . . . . . . . . . . . . . . . . . . . . 17purchasing . . . . . . . . . . . . . . . . . . 17quick sales . . . . . . . . . . . . . . . . . . 36residency . . . . . . . . . . . . . . . . . . . 18selecting . . . . . . . . . . . . . . . . . . . 28
processing sales ............................... 87
Rreports
about . . . . . . . . . . . . . . . . . . . . . 91account balance . . . . . . . . . . . . . . . 96daily sales . . . . . . . . . . . . . . . . . . 92invoices . . . . . . . . . . . . . . . . . . . 98outfitter allocations . . . . . . . . . . . . 102printing . . . . . . . . . . . . . . . . . . . 105
Reports page ................................... 91residency for purchasing privileges ........ 18
Ssales, processing .............................. 87Select Additional Proof of Residency page ...
26Select Inventory Numbers dialog box ..... 44subscriptions ................................... 59supplies ......................................... 61
Tterminal authorization ............... 5, 14, 15terminal deauthorization ..................... 16trademarks ....................................... iitransactions
© 2018 Aspira

Index Issuer Manager User Guide
reprinting . . . . . . . . . . . . . . . . . . 64reversing . . . . . . . . . . . . . . . . . . 87voiding . . . . . . . . . . . . . . . . . . . . 63
Transactions Available for Reprinting page .65
Transactions Available for Voiding page ..63
Uuser interface, contract-specific ............. 2user management
about . . . . . . . . . . . . . . . . . . . . 69users
activating . . . . . . . . . . . . . . . .69, 71creating . . . . . . . . . . . . . . . . . . . 72deactivating . . . . . . . . . . . . . . .70, 71editing . . . . . . . . . . . . . . . . . . . . 70unlocking . . . . . . . . . . . . . . . .70, 71
Users page ......................................69
Vvehicle inspections
about . . . . . . . . . . . . . . . . . . . . 51requesting . . . . . . . . . . . . . . . . . . 52
vehicle registrationabout . . . . . . . . . . . . . . . . . . . . 49duplicating . . . . . . . . . . . . . . . . . 49renewing . . . . . . . . . . . . . . . . . . 49
Wworkflow
about . . . . . . . . . . . . . . . . . . . . . 7navigation . . . . . . . . . . . . . . . . . . 11purchasing privileges . . . . . . . . . . . . 18
111

Issuer Manager User Guide Index
112
© 2018 Aspira