it user guide - benefitsbenefits.vitas.com/media/2293/viewingchanging personal information... ·...
TRANSCRIPT

IT User Guide:
Viewing/Changing Personal Information In PeopleSoft HR
January, 2016

PeopleSoft Employee Self-Service User Guide
©2011-2016 VITAS Healthcare Corporation Page 1 1/27/2016 Information Technology User Documentation Services
TABLE OF CONTENTS
Overview ....................................................................................................................................................... 2
Accessing the System .................................................................................................................................... 2
Viewing/Updating Personal Information ...................................................................................................... 4
Updating Address Information ................................................................................................................. 6
Updating Phone Number(s) ...................................................................................................................... 7
Updating Email Address(es) ...................................................................................................................... 8
Updating Emergency Contact(s) ............................................................................................................... 9
Viewing/Updating Payroll and Compensation Information ....................................................................... 10
Viewing/Printing Paycheck Information ................................................................................................. 11
Viewing/Printing Your Earnings History .................................................................................................. 12
Viewing Your PTO Balances .................................................................................................................... 14
Viewing/Editing Direct Deposit Accounts ............................................................................................... 14
Viewing/Updating W-4 Tax Information ................................................................................................. 17

PeopleSoft Employee Self-Service User Guide
©2011-2016 VITAS Healthcare Corporation Page 2 1/27/2016 Information Technology User Documentation Services
Overview
VITAS employees can change their personal and payroll information in PeopleSoft HR. Functionality exists to perform the following tasks:
Review/change home and mailing address, telephone numbers, email addresses (except for business email), and emergency contacts
View paycheck information for earnings, taxes, deductions, and net pay distribution
View/print your earnings history for a date range
View your PTO balances
View/edit direct deposit information
Change tax withholding information (except when claiming exempt from withholding)
Accessing the System
1. If you are connected to the VITAS network, click the PeopleSoft HR link on the i-net Home page (Quick Links menu):
If you are not connected to the VITAS network, you can type the link www.vitas.com/benefits in your web browser. If you use this method, the VITAS Benefits home page will open:
Then, click the button to proceed to PeopleSoft HR (see step 2 below).
PeopleSoft Employee Self-Service User Guide
©2011-2016 VITAS Healthcare Corporation Page 3 1/27/2016 Information Technology User Documentation Services
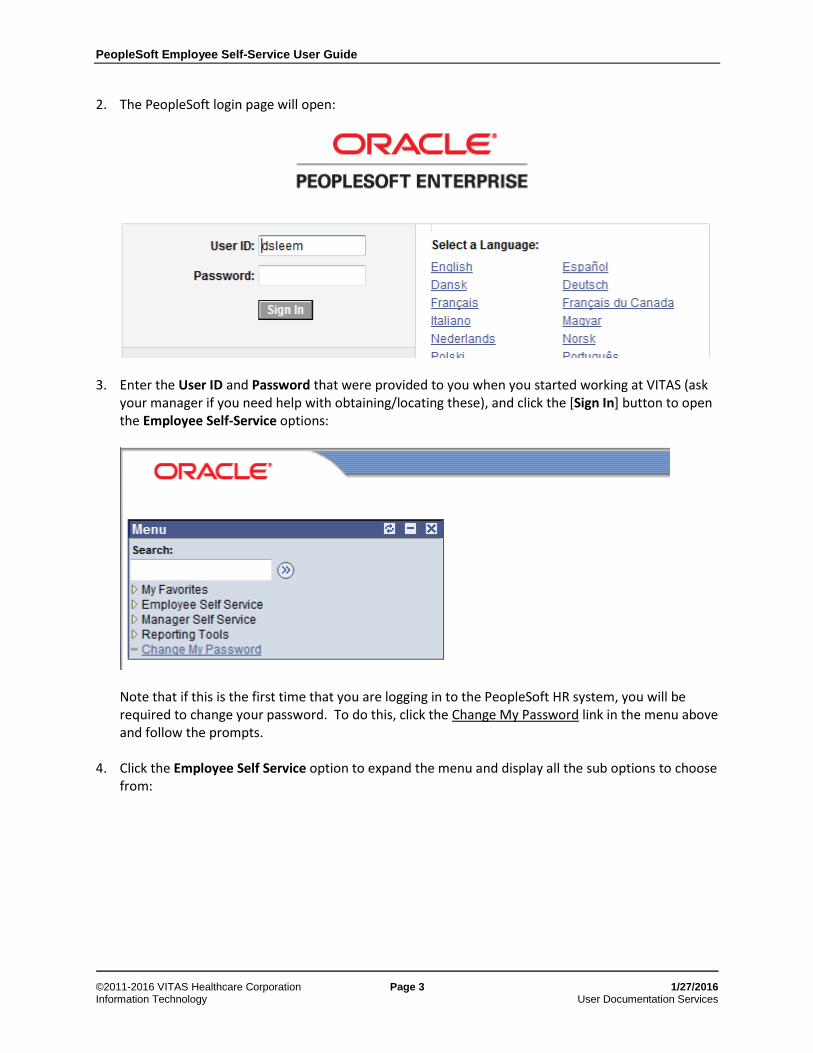
2. The PeopleSoft login page will open:
3. Enter the User ID and Password that were provided to you when you started working at VITAS (ask your manager if you need help with obtaining/locating these), and click the [Sign In] button to open the Employee Self-Service options:
Note that if this is the first time that you are logging in to the PeopleSoft HR system, you will be required to change your password. To do this, click the Change My Password link in the menu above and follow the prompts.
4. Click the Employee Self Service option to expand the menu and display all the sub options to choose
from:

PeopleSoft Employee Self-Service User Guide
©2011-2016 VITAS Healthcare Corporation Page 4 1/27/2016 Information Technology User Documentation Services
Viewing/Updating Personal Information This section describes how to change your personal information, such as addresses, phone numbers, email addresses, and emergency contacts. 1. From the PeopleSoft menu, click on the Personal Information option to display all the related sub
options:
2. The Personal Information Home link displays a description of the sub options. You can access the information to view/edit from that screen, or you can just click on the sub option you want to review/update.
To view a summary page of all of your personal information, click the Personal Information Summary link in the left menu:

PeopleSoft Employee Self-Service User Guide
©2011-2016 VITAS Healthcare Corporation Page 5 1/27/2016 Information Technology User Documentation Services
3. To view or change your home/mailing address, phone numbers, emergency contacts, or email addresses from this screen, click the corresponding button at the bottom of each section. Otherwise, click the corresponding link in the Personal Information menu on the left to go directly to the information you want to view/change:
PeopleSoft Employee Self-Service User Guide
©2011-2016 VITAS Healthcare Corporation Page 6 1/27/2016 Information Technology User Documentation Services
Updating Address Information
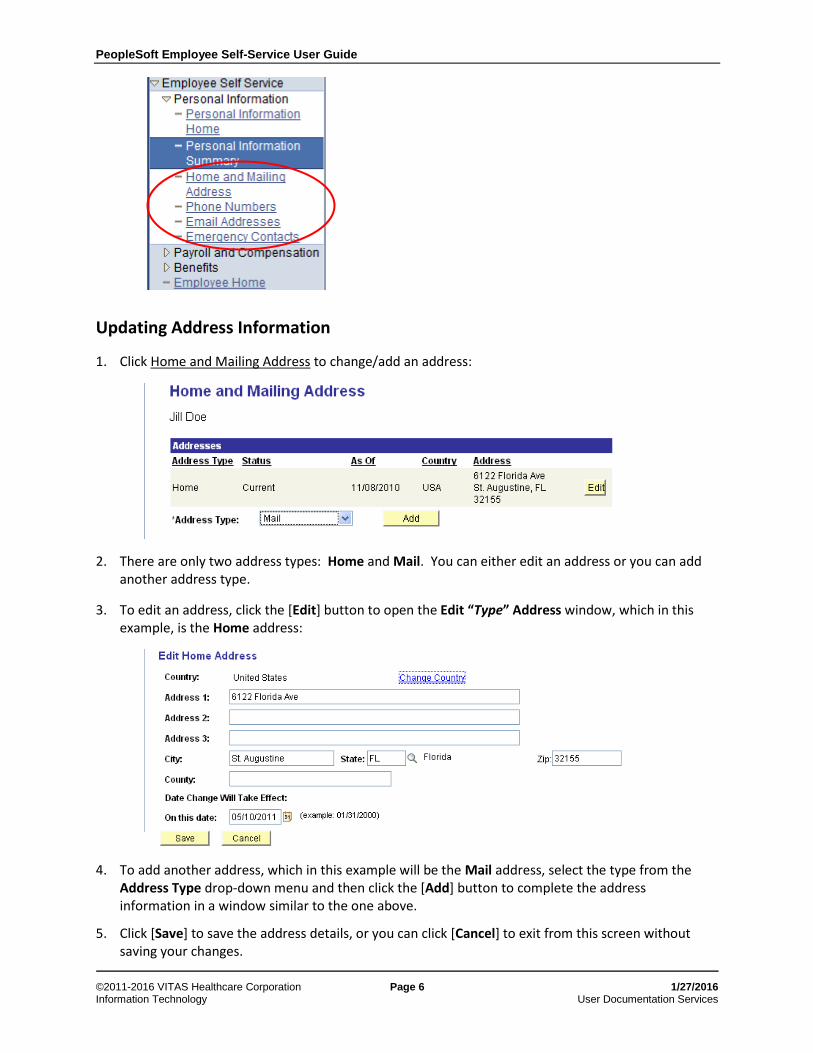
1. Click Home and Mailing Address to change/add an address:
2. There are only two address types: Home and Mail. You can either edit an address or you can add another address type.
3. To edit an address, click the [Edit] button to open the Edit “Type” Address window, which in this example, is the Home address:
4. To add another address, which in this example will be the Mail address, select the type from the Address Type drop-down menu and then click the [Add] button to complete the address information in a window similar to the one above.
5. Click [Save] to save the address details, or you can click [Cancel] to exit from this screen without saving your changes.

PeopleSoft Employee Self-Service User Guide
©2011-2016 VITAS Healthcare Corporation Page 7 1/27/2016 Information Technology User Documentation Services
Updating Phone Number(s)
Note that you can only add a Business phone number if it is not already present, and you cannot change your Business phone number once it is entered. If you need to change it, contact your Business Manager or the Human Resources department.
1. Click Phone Numbers to change/add a phone number:
2. Here, you can edit, delete, or add a phone number.
To edit a number, just type the new number directly in the Telephone field for the appropriate number.
To delete a phone number, click the [Delete] button next to the one you want to delete.
To add a new phone number, click [Add a Phone Number] to insert a new row below the current phone numbers to enter the new phone information.
3. You can check the Display Cellular On I-Net checkbox if you would like your cell phone number to be included in the Employee Lookup results on i-Net.
4. Be sure to click the [Save] button to save your changes before leaving the screen as the system will not prompt you to save your changes.
PeopleSoft Employee Self-Service User Guide
©2011-2016 VITAS Healthcare Corporation Page 8 1/27/2016 Information Technology User Documentation Services
Updating Email Address(es)
Note that you cannot change your Business email address.
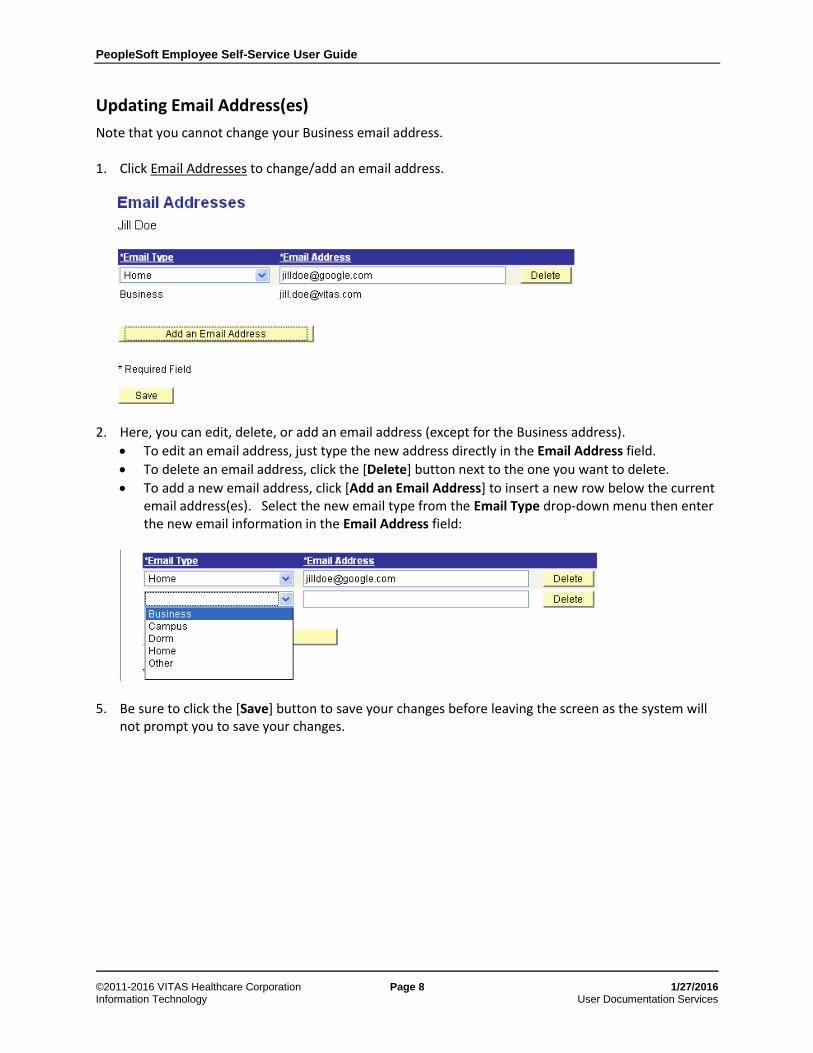
1. Click Email Addresses to change/add an email address.
2. Here, you can edit, delete, or add an email address (except for the Business address).
To edit an email address, just type the new address directly in the Email Address field.
To delete an email address, click the [Delete] button next to the one you want to delete.
To add a new email address, click [Add an Email Address] to insert a new row below the current email address(es). Select the new email type from the Email Type drop-down menu then enter the new email information in the Email Address field:
5. Be sure to click the [Save] button to save your changes before leaving the screen as the system will not prompt you to save your changes.

PeopleSoft Employee Self-Service User Guide
©2011-2016 VITAS Healthcare Corporation Page 9 1/27/2016 Information Technology User Documentation Services
Updating Emergency Contact(s)
1. Click Emergency Contacts to change/add an emergency contact.
Here, you can edit, delete, or add an emergency contact.
2. To edit a contact, click the [Edit] button to open the Emergency Contact Detail window, where you can make changes to any of the displayed information:

PeopleSoft Employee Self-Service User Guide
©2011-2016 VITAS Healthcare Corporation Page 10 1/27/2016 Information Technology User Documentation Services
3. Click the [Save] button to save your changes.
4. To delete an emergency contact, on the main Emergency Contacts page (see step 1), click the [Delete] button next to the one you want to delete.
5. To add a new emergency contact, click [Add an Emergency Contact] on the main Emergency Contacts page to open the Emergency Contact Detail window where you can complete the contact information in a window similar to the one in step 2 above. Then click [Save] to save the new contact information.
Viewing/Updating Payroll and Compensation Information This section describes how to view/change your payroll and compensation information, such as your paycheck, direct deposit accounts, and W-4 tax information. 1. From the PeopleSoft menu, click on the Payroll and Compensation option to display all the sub
options:
2. The Payroll and Compensation Home link displays a description of the related sub options. You can access the information to view/edit from that screen, or you can just click on the sub option you want to review/update.
PeopleSoft Employee Self-Service User Guide
©2011-2016 VITAS Healthcare Corporation Page 11 1/27/2016 Information Technology User Documentation Services
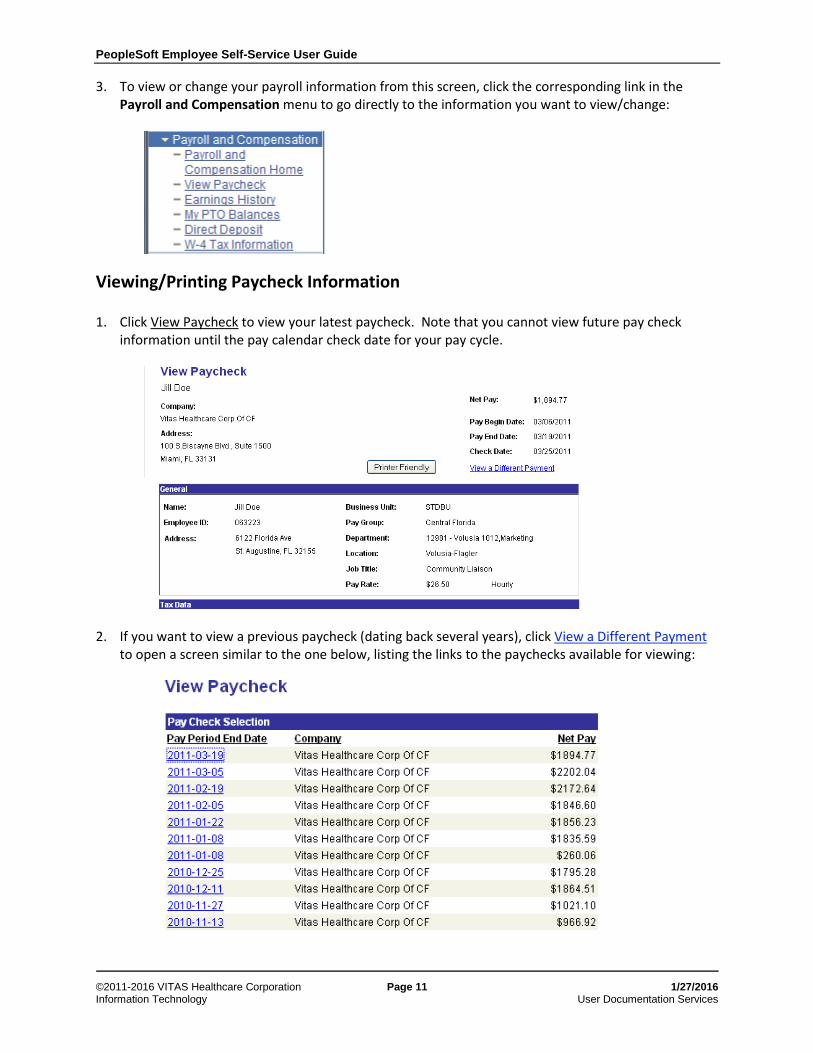
3. To view or change your payroll information from this screen, click the corresponding link in the Payroll and Compensation menu to go directly to the information you want to view/change:
Viewing/Printing Paycheck Information
1. Click View Paycheck to view your latest paycheck. Note that you cannot view future pay check information until the pay calendar check date for your pay cycle.
2. If you want to view a previous paycheck (dating back several years), click View a Different Payment to open a screen similar to the one below, listing the links to the paychecks available for viewing:

PeopleSoft Employee Self-Service User Guide
©2011-2016 VITAS Healthcare Corporation Page 12 1/27/2016 Information Technology User Documentation Services
3. If you want to print a pay statement, select the pay statement you want to print from the View Paycheck screen (if it is not the one already displayed) and click the [Printer Friendly] button. The pay period detail statement will print to your default printer, unless you select another printer in the Print window.
Note that the statement will print on two pages. If you want to fit the statement to print on a single page, you must use the browser’s Print Preview option (on the Print menu of the browser window). First, minimize the left panel menu, then select Print Preview from the Print menu. Then, in the Print Preview window, select 70% in the far right drop-down menu:
Once your pay statement displays in full in this window, click the Printer button to print the statement to your default printer (or select another printer in the Print window).
Viewing/Printing Your Earnings History
Use this option to view your earnings history for a specific year or check date range, and to print a report of this information. 1. Click Earnings History to open the screen below:
2. Enter either a year (in Balances Year) or a date range (Begin/End Check Date) for the information you want to view/print.
3. Click [Create and Review Report] to go to the next page, which will present the status information for the report you requested in a separate window:
PeopleSoft Employee Self-Service User Guide
©2011-2016 VITAS Healthcare Corporation Page 13 1/27/2016 Information Technology User Documentation Services
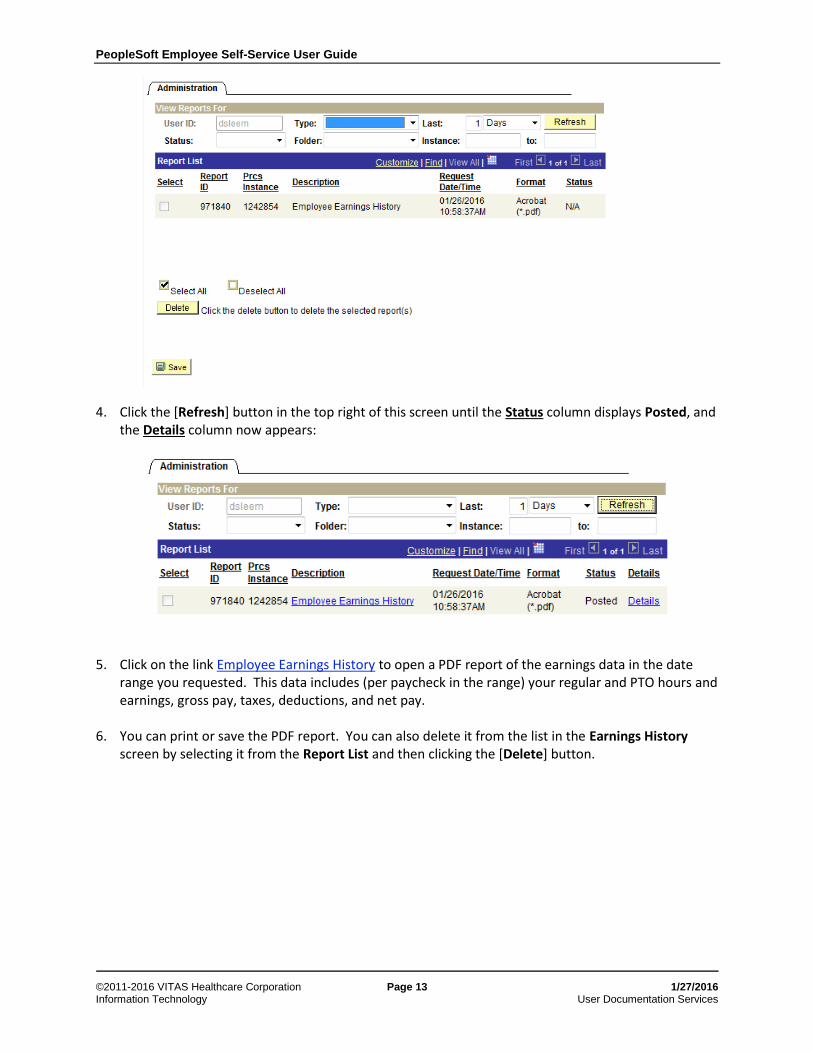
4. Click the [Refresh] button in the top right of this screen until the Status column displays Posted, and the Details column now appears:
5. Click on the link Employee Earnings History to open a PDF report of the earnings data in the date range you requested. This data includes (per paycheck in the range) your regular and PTO hours and earnings, gross pay, taxes, deductions, and net pay.
6. You can print or save the PDF report. You can also delete it from the list in the Earnings History screen by selecting it from the Report List and then clicking the [Delete] button.

PeopleSoft Employee Self-Service User Guide
©2011-2016 VITAS Healthcare Corporation Page 14 1/27/2016 Information Technology User Documentation Services
Viewing Your PTO Balances
You can view your PTO information for the current calendar year (i.e., already used, earned as of “yesterday”, and potentially available for the rest of the year). Click My PTO Balances to display this screen:
You cannot edit this screen. If you have any questions regarding your PTO balances, please contact your Human Resources department or Business Manager.
Viewing/Editing Direct Deposit Accounts
Use the Direct Deposit option to view or make changes to your Direct Deposit accounts.
Note that the Deposit Type column describes the amount/percentage displayed in the Amt/Pct column. In this example, 10% (Percent) is deposited to the Savings account on top; $500 (Amount) is deposited

PeopleSoft Employee Self-Service User Guide
©2011-2016 VITAS Healthcare Corporation Page 15 1/27/2016 Information Technology User Documentation Services
to the Checking account on the second line; and the Balance (whatever that amount is) is deposited to the Checking account on the third line.
The Deposit Order indicates the priority that you have selected for your paycheck to be deposited in multiple accounts. The priority is blank, 1, 2, 3, etc. If you have only one deposit account, the order will be blank. To add a direct deposit account:
1. Click the [Add Account] button to open this screen:
2. Complete the necessary information: a. Select from the Account Type (Checking or Savings; you cannot add a Pay Card – contact the
Payroll department to do this for you) and Deposit Type (Amount, Percent, or Balance) drop-down menu.
b. In the Amount/Percent field, enter the dollar amount or percent to deposit from your pay check (based on the Deposit Type selected above). If you are using percentages only (for all accounts), they must add up to 100%.
c. Enter both the Routing Number and Account Number for this direct deposit account. Note that the routing number must be 9 digits long (including leading zeros, if any).
d. Enter the Deposit Order (i.e., the priority in which to make the deposit in this account). The priority is blank, 1, 2, 3, etc. If you have only one deposit account, leave the order blank.
3. Click [Save] to save this new deposit account and return to the main Direct Deposit screen, where the account details will be displayed.
On this screen, you may also click on the link for the account type (i.e., Savings or Checking) for which you want to view the details:

PeopleSoft Employee Self-Service User Guide
©2011-2016 VITAS Healthcare Corporation Page 16 1/27/2016 Information Technology User Documentation Services
To edit a direct deposit account, click the [Edit] button for the account you want to edit to open the Change Direct Deposit screen, where you can edit any of the information for this account (except the account type):
For a Pay Card, you can change any field except the account number and routing number.
To delete a direct deposit account, click the [Delete] button for the account you want to delete to open the Delete Confirmation screen, where you can select the option to delete the account:

PeopleSoft Employee Self-Service User Guide
©2011-2016 VITAS Healthcare Corporation Page 17 1/27/2016 Information Technology User Documentation Services
Viewing/Updating W-4 Tax Information
Note that you cannot claim Exempt from withholding in the PeopleSoft Employee Self Service system. If you need to claim Exempt, you must complete a paper W-4 Form and send it to your Human Resources department or Business Manager. Also, these changes only affect federal withholding. Any state withholding change still needs to be done by completing a W-4 Form and submitting it to your Business Manager.
1. Click W-4 Tax Information to view your current withholding information and to update your number of allowances, any extra amount to withhold from your paycheck, and your marital status.
2. You may change/enter information in any of the displayed fields.