iway installation and configuration guide - version 8.0oracle e-business suite peoplesoft siebel...
TRANSCRIPT

iWay Installation and ConfigurationGuideVersion 8.0.3
March 22, 2019

Active Technologies, EDA, EDA/SQL, FIDEL, FOCUS, Information Builders, the Information Builders logo, iWay, iWaySoftware, Parlay, PC/FOCUS, RStat, Table Talk, Web390, WebFOCUS, WebFOCUS Active Technologies, and WebFOCUSMagnify are registered trademarks, and DataMigrator and Hyperstage are trademarks of Information Builders, Inc.
Adobe, the Adobe logo, Acrobat, Adobe Reader, Flash, Adobe Flash Builder, Flex, and PostScript are either registeredtrademarks or trademarks of Adobe Systems Incorporated in the United States and/or other countries.
Due to the nature of this material, this document refers to numerous hardware and software products by theirtrademarks. In most, if not all cases, these designations are claimed as trademarks or registered trademarks by theirrespective companies. It is not this publisher's intent to use any of these names generically. The reader is thereforecautioned to investigate all claimed trademark rights before using any of these names other than to refer to the productdescribed.
Copyright © 2019, by Information Builders, Inc. and iWay Software. All rights reserved. Patent Pending. This manual, orparts thereof, may not be reproduced in any form without the written permission of Information Builders, Inc.

Contents
Preface . . . . . . . . . . . . . . . . . . . . . . . . . . . . . . . . . . . . . . . . . . . . . . . . . . . . . . . . . . . . . . . . . . . . . . . . . 7
Documentation Conventions . . . . . . . . . . . . . . . . . . . . . . . . . . . . . . . . . . . . . . . . . . . . . . . . . . . . . . . . . . . .7
Related Publications . . . . . . . . . . . . . . . . . . . . . . . . . . . . . . . . . . . . . . . . . . . . . . . . . . . . . . . . . . . . . . . . . . 8
Customer Support . . . . . . . . . . . . . . . . . . . . . . . . . . . . . . . . . . . . . . . . . . . . . . . . . . . . . . . . . . . . . . . . . . . . 8
Help Us to Serve You Better . . . . . . . . . . . . . . . . . . . . . . . . . . . . . . . . . . . . . . . . . . . . . . . . . . . . . . . . . . . .9
User Feedback . . . . . . . . . . . . . . . . . . . . . . . . . . . . . . . . . . . . . . . . . . . . . . . . . . . . . . . . . . . . . . . . . . . . . . 11
Information Builders Consulting and Training . . . . . . . . . . . . . . . . . . . . . . . . . . . . . . . . . . . . . . . . . . . . 11
1. iWay 8.0 Service Manager Installation Overview . . . . . . . . . . . . . . . . . . . . . . . . . . . . . . . 13
iWay 8.0 Service Manager Products and Components . . . . . . . . . . . . . . . . . . . . . . . . . . . . . . . . . . . . 13
iWay Adapters. . . . . . . . . . . . . . . . . . . . . . . . . . . . . . . . . . . . . . . . . . . . . . . . . . . . . . . . . . . . . . . . . . 13
iWay Service Manager. . . . . . . . . . . . . . . . . . . . . . . . . . . . . . . . . . . . . . . . . . . . . . . . . . . . . . . . . . . 15
iWay Extensions. . . . . . . . . . . . . . . . . . . . . . . . . . . . . . . . . . . . . . . . . . . . . . . . . . . . . . . . . . . . . . . . 15
iWay Business Services Provider. . . . . . . . . . . . . . . . . . . . . . . . . . . . . . . . . . . . . . . . . . . . . . . . . . 16
Installation and Configuration Overview . . . . . . . . . . . . . . . . . . . . . . . . . . . . . . . . . . . . . . . . . . . . . . . . . 17
2. Installing iWay 8.0 Service Manager Components . . . . . . . . . . . . . . . . . . . . . . . . . . . . . . 19
iWay Service Manager Installation Requirements . . . . . . . . . . . . . . . . . . . . . . . . . . . . . . . . . . . . . . . . .19
Hardware Requirements. . . . . . . . . . . . . . . . . . . . . . . . . . . . . . . . . . . . . . . . . . . . . . . . . . . . . . . . . 19
Operating System Requirements. . . . . . . . . . . . . . . . . . . . . . . . . . . . . . . . . . . . . . . . . . . . . . . . . . 19
Java Requirements. . . . . . . . . . . . . . . . . . . . . . . . . . . . . . . . . . . . . . . . . . . . . . . . . . . . . . . . . . . . . .20
Adapter Requirements. . . . . . . . . . . . . . . . . . . . . . . . . . . . . . . . . . . . . . . . . . . . . . . . . . . . . . . . . . . 21
Installing iWay 8.0 Service Manager . . . . . . . . . . . . . . . . . . . . . . . . . . . . . . . . . . . . . . . . . . . . . . . . . . . .21
iWay 8.0 Service Manager Installation. . . . . . . . . . . . . . . . . . . . . . . . . . . . . . . . . . . . . . . . . . . . . 21
Installing iWay 8.0 Service Manager With iWay 5.x, 6.x, or 7.x Service Manager . . . . . . . . . . . . . . 46
Post-Installation Topics and Tasks . . . . . . . . . . . . . . . . . . . . . . . . . . . . . . . . . . . . . . . . . . . . . . . . . . . . . 46
iWay 8.0 Service Manager Directory Structure. . . . . . . . . . . . . . . . . . . . . . . . . . . . . . . . . . . . . . .46
Installing Third-Party Jar Files. . . . . . . . . . . . . . . . . . . . . . . . . . . . . . . . . . . . . . . . . . . . . . . . . . . . . 47
Installing Ebix Archives. . . . . . . . . . . . . . . . . . . . . . . . . . . . . . . . . . . . . . . . . . . . . . . . . . . . . . . . . . 48
iWay TCP Ports. . . . . . . . . . . . . . . . . . . . . . . . . . . . . . . . . . . . . . . . . . . . . . . . . . . . . . . . . . . . . . . . . 48
Environment Variables. . . . . . . . . . . . . . . . . . . . . . . . . . . . . . . . . . . . . . . . . . . . . . . . . . . . . . . . . . . 50
Configuring iWay Service Manager Service as a Separate Process. . . . . . . . . . . . . . . . . . . . . 51
Uninstalling iWay Service Manager. . . . . . . . . . . . . . . . . . . . . . . . . . . . . . . . . . . . . . . . . . . . . . . . 51
iWay Installation and Configuration Guide 3

Registering iWay Software . . . . . . . . . . . . . . . . . . . . . . . . . . . . . . . . . . . . . . . . . . . . . . . . . . . . . . . . . . . . 52
When Should You Register iWay Software. . . . . . . . . . . . . . . . . . . . . . . . . . . . . . . . . . . . . . . . . . 52
How to Register iWay Software. . . . . . . . . . . . . . . . . . . . . . . . . . . . . . . . . . . . . . . . . . . . . . . . . . . .53
Registration Help. . . . . . . . . . . . . . . . . . . . . . . . . . . . . . . . . . . . . . . . . . . . . . . . . . . . . . . . . . . . . . . 54
iWay Service Manager Configuration Steps . . . . . . . . . . . . . . . . . . . . . . . . . . . . . . . . . . . . . . . . . . . . . . 55
3. Preparing Adapters . . . . . . . . . . . . . . . . . . . . . . . . . . . . . . . . . . . . . . . . . . . . . . . . . . . . . . . . . . . 57
Preparing Adapters . . . . . . . . . . . . . . . . . . . . . . . . . . . . . . . . . . . . . . . . . . . . . . . . . . . . . . . . . . . . . . . . . . 57
Legacy Mainframe Adapters With iWay Server Requirement. . . . . . . . . . . . . . . . . . . . . . . . . . . 57
Connect Direct. . . . . . . . . . . . . . . . . . . . . . . . . . . . . . . . . . . . . . . . . . . . . . . . . . . . . . . . . . . . . . . . . 58
ESRI (GEOLoad). . . . . . . . . . . . . . . . . . . . . . . . . . . . . . . . . . . . . . . . . . . . . . . . . . . . . . . . . . . . . . . . 59
FIX. . . . . . . . . . . . . . . . . . . . . . . . . . . . . . . . . . . . . . . . . . . . . . . . . . . . . . . . . . . . . . . . . . . . . . . . . . . .60
J.D. Edwards EnterpriseOne (OneWorld). . . . . . . . . . . . . . . . . . . . . . . . . . . . . . . . . . . . . . . . . . . . 60
J.D. Edwards WorldSoft. . . . . . . . . . . . . . . . . . . . . . . . . . . . . . . . . . . . . . . . . . . . . . . . . . . . . . . . . . 63
LDAP. . . . . . . . . . . . . . . . . . . . . . . . . . . . . . . . . . . . . . . . . . . . . . . . . . . . . . . . . . . . . . . . . . . . . . . . . .63
Required Installation Files. . . . . . . . . . . . . . . . . . . . . . . . . . . . . . . . . . . . . . . . . . . . . . . . . . 63
Microsoft CRM 2011. . . . . . . . . . . . . . . . . . . . . . . . . . . . . . . . . . . . . . . . . . . . . . . . . . . . . . . . . . . . 64
Microsoft .NET. . . . . . . . . . . . . . . . . . . . . . . . . . . . . . . . . . . . . . . . . . . . . . . . . . . . . . . . . . . . . . . . . .64
Required Installation Files. . . . . . . . . . . . . . . . . . . . . . . . . . . . . . . . . . . . . . . . . . . . . . . . . . 65
Sample Files. . . . . . . . . . . . . . . . . . . . . . . . . . . . . . . . . . . . . . . . . . . . . . . . . . . . . . . . . . . . . . 65
MySAP ERP (SAP Java Connector Version 3.x). . . . . . . . . . . . . . . . . . . . . . . . . . . . . . . . . . . . . . .65
Required SAP Library Files. . . . . . . . . . . . . . . . . . . . . . . . . . . . . . . . . . . . . . . . . . . . . . . . . . 66
Installing the Required SAP Library Files. . . . . . . . . . . . . . . . . . . . . . . . . . . . . . . . . . . . . . 67
Oracle Applications (E-Business Suite). . . . . . . . . . . . . . . . . . . . . . . . . . . . . . . . . . . . . . . . . . . . . 69
PeopleSoft. . . . . . . . . . . . . . . . . . . . . . . . . . . . . . . . . . . . . . . . . . . . . . . . . . . . . . . . . . . . . . . . . . . . . 69
RDBMS. . . . . . . . . . . . . . . . . . . . . . . . . . . . . . . . . . . . . . . . . . . . . . . . . . . . . . . . . . . . . . . . . . . . . . . .70
DB2. . . . . . . . . . . . . . . . . . . . . . . . . . . . . . . . . . . . . . . . . . . . . . . . . . . . . . . . . . . . . . . . . . . . . 71
Informix. . . . . . . . . . . . . . . . . . . . . . . . . . . . . . . . . . . . . . . . . . . . . . . . . . . . . . . . . . . . . . . . . . 71
Oracle. . . . . . . . . . . . . . . . . . . . . . . . . . . . . . . . . . . . . . . . . . . . . . . . . . . . . . . . . . . . . . . . . . . .71
Microsoft SQL Server. . . . . . . . . . . . . . . . . . . . . . . . . . . . . . . . . . . . . . . . . . . . . . . . . . . . . . .72
MySQL. . . . . . . . . . . . . . . . . . . . . . . . . . . . . . . . . . . . . . . . . . . . . . . . . . . . . . . . . . . . . . . . . . . 72
PostGres. . . . . . . . . . . . . . . . . . . . . . . . . . . . . . . . . . . . . . . . . . . . . . . . . . . . . . . . . . . . . . . . . 72
Sybase. . . . . . . . . . . . . . . . . . . . . . . . . . . . . . . . . . . . . . . . . . . . . . . . . . . . . . . . . . . . . . . . . . .72
Contents
4 Information Builders

SAP R/3. . . . . . . . . . . . . . . . . . . . . . . . . . . . . . . . . . . . . . . . . . . . . . . . . . . . . . . . . . . . . . . . . . . . . . .72
Siebel. . . . . . . . . . . . . . . . . . . . . . . . . . . . . . . . . . . . . . . . . . . . . . . . . . . . . . . . . . . . . . . . . . . . . . . . . 73
Terminal Emulation Adapter (3270/5250) (Telnet). . . . . . . . . . . . . . . . . . . . . . . . . . . . . . . . . . .74
TIBCO Rendezvous. . . . . . . . . . . . . . . . . . . . . . . . . . . . . . . . . . . . . . . . . . . . . . . . . . . . . . . . . . . . . . 75
4. Configuring iWay Components . . . . . . . . . . . . . . . . . . . . . . . . . . . . . . . . . . . . . . . . . . . . . . . . 77
Configuring and Verifying iWay Service Manager . . . . . . . . . . . . . . . . . . . . . . . . . . . . . . . . . . . . . . . . . .77
Starting and Stopping iWay Service Manager on Windows Platforms. . . . . . . . . . . . . . . . . . . .77
Starting and Stopping iWay Service Manager on Non-Windows Platforms. . . . . . . . . . . . . . . .78
Configuring Service Manager. . . . . . . . . . . . . . . . . . . . . . . . . . . . . . . . . . . . . . . . . . . . . . . . . . . . . 81
Getting Started With iWay. . . . . . . . . . . . . . . . . . . . . . . . . . . . . . . . . . . . . . . . . . . . . . . . . . . . . . . . 84
Additional Configurations. . . . . . . . . . . . . . . . . . . . . . . . . . . . . . . . . . . . . . . . . . . . . . . . . . . . . . . . .84
Configuring a Unique ID for an iWay Service. . . . . . . . . . . . . . . . . . . . . . . . . . . . . . . . . . . . . . . . 87
Configuring the Java Memory Size Settings. . . . . . . . . . . . . . . . . . . . . . . . . . . . . . . . . . . . . . . . . 88
Verifying Service Manager iBSP. . . . . . . . . . . . . . . . . . . . . . . . . . . . . . . . . . . . . . . . . . . . . . . . . . . 90
iWay Integration Tools Transformer. . . . . . . . . . . . . . . . . . . . . . . . . . . . . . . . . . . . . . . . . . . . . . . . 91
iWay Integration Tools Designer. . . . . . . . . . . . . . . . . . . . . . . . . . . . . . . . . . . . . . . . . . . . . . . . . . .91
Configuring iWay Application Server Components . . . . . . . . . . . . . . . . . . . . . . . . . . . . . . . . . . . . . . . . .92
5. Configuring iWay Explorer . . . . . . . . . . . . . . . . . . . . . . . . . . . . . . . . . . . . . . . . . . . . . . . . . . . . 93
Configuring iWay Explorer . . . . . . . . . . . . . . . . . . . . . . . . . . . . . . . . . . . . . . . . . . . . . . . . . . . . . . . . . . . . . 93
Configuring Eclipse iWay Explorer . . . . . . . . . . . . . . . . . . . . . . . . . . . . . . . . . . . . . . . . . . . . . . . . . . . . . . 93
Installing iWay Integration Tools for Eclipse. . . . . . . . . . . . . . . . . . . . . . . . . . . . . . . . . . . . . . . . . 93
Using Eclipse iWay Explorer. . . . . . . . . . . . . . . . . . . . . . . . . . . . . . . . . . . . . . . . . . . . . . . . . . . . . . 95
6. Configuring the iWay Repository . . . . . . . . . . . . . . . . . . . . . . . . . . . . . . . . . . . . . . . . . . . . . . 97
Configuring and Creating the Repository . . . . . . . . . . . . . . . . . . . . . . . . . . . . . . . . . . . . . . . . . . . . . . . . 97
Creating the Repository. . . . . . . . . . . . . . . . . . . . . . . . . . . . . . . . . . . . . . . . . . . . . . . . . . . . . . . . . . 97
Installing the JDBC Driver. . . . . . . . . . . . . . . . . . . . . . . . . . . . . . . . . . . . . . . . . . . . . . . . . . . . . . . 101
Connecting iWay to the Repository. . . . . . . . . . . . . . . . . . . . . . . . . . . . . . . . . . . . . . . . . . . . . . . 102
File System Repositories. . . . . . . . . . . . . . . . . . . . . . . . . . . . . . . . . . . . . . . . . . . . . . . . . . . . . . . 108
Migrating Repositories . . . . . . . . . . . . . . . . . . . . . . . . . . . . . . . . . . . . . . . . . . . . . . . . . . . . . . . . . . . . . . 109
Migration Steps. . . . . . . . . . . . . . . . . . . . . . . . . . . . . . . . . . . . . . . . . . . . . . . . . . . . . . . . . . . . . . . 109
Contents
iWay Installation and Configuration Guide 5

Contents
6 Information Builders

Preface
This documentation describes how to install and configure iWay Adapters, iWay ServiceManager, and iWay Business Service Provider (iBSP). It is intended for those with anadministrator knowledge of the operating systems and target systems involved in theirimplementation.
How This Manual Is Organized
This manual includes the following chapters:
Chapter/Appendix Contents
1 iWay 8.0 Service ManagerInstallation Overview
Provides a brief overview of iWay 8.0 ServiceManager products and components.
2 Installing iWay 8.0 ServiceManager Components
Provides requirements and instructions for runningthe installation program.
3 Preparing Adapters Provides requirements for and information toprepare iWay adapters.
4 Configuring iWayComponents
Describes how to configure components for iWayService Manager.
5 Configuring iWay Explorer Describes how to configure iWay Explorer.
6 Configuring the iWayRepository
Provides information on changing the defaultRDBMS for iWay Service Manager.
Documentation Conventions
The following table describes the documentation conventions that are used in this manual.
Convention Description
THIS TYPEFACE orthis typeface
Denotes syntax that you must enter exactly as shown.
this typeface Represents a placeholder (or variable), a cross-reference, or animportant term. It may also indicate a button, menu item, or dialogbox option that you can click or select.
underscore Indicates a default setting.
iWay Installation and Configuration Guide 7

Convention Description
Key + Key Indicates keys that you must press simultaneously.
{ } Indicates two or three choices. Type one of them, not the braces.
| Separates mutually exclusive choices in syntax. Type one of them,not the symbol.
... Indicates that you can enter a parameter multiple times. Type onlythe parameter, not the ellipsis (...).
.
.
.
Indicates that there are (or could be) intervening or additionalcommands.
Related Publications
Visit our Technical Documentation Library at http://documentation.informationbuilders.com. Youcan also contact the Publications Order Department at (800) 969-4636.
Customer Support
Do you have any questions about this product?
Join the Focal Point community. Focal Point is our online developer center and more than amessage board. It is an interactive network of more than 3,000 developers from almost everyprofession and industry, collaborating on solutions and sharing tips and techniques. AccessFocal Point at http://forums.informationbuilders.com/eve/forums.
You can also access support services electronically, 24 hours a day, with InfoResponseOnline. InfoResponse Online is accessible through our website, http://www.informationbuilders.com. It connects you to the tracking system and known-problemdatabase at the Information Builders support center. Registered users can open, update, andview the status of cases in the tracking system and read descriptions of reported softwareissues. New users can register immediately for this service. The technical support section of http://www.informationbuilders.com also provides usage techniques, diagnostic tips, andanswers to frequently asked questions.
Related Publications
8 Information Builders
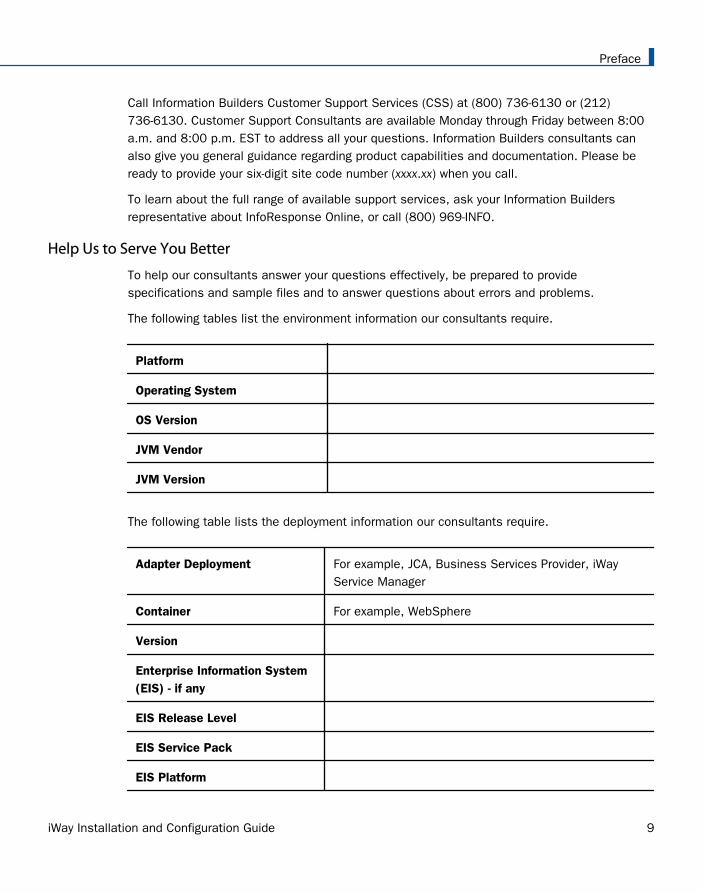
Call Information Builders Customer Support Services (CSS) at (800) 736-6130 or (212)736-6130. Customer Support Consultants are available Monday through Friday between 8:00a.m. and 8:00 p.m. EST to address all your questions. Information Builders consultants canalso give you general guidance regarding product capabilities and documentation. Please beready to provide your six-digit site code number (xxxx.xx) when you call.
To learn about the full range of available support services, ask your Information Buildersrepresentative about InfoResponse Online, or call (800) 969-INFO.
Help Us to Serve You Better
To help our consultants answer your questions effectively, be prepared to providespecifications and sample files and to answer questions about errors and problems.
The following tables list the environment information our consultants require.
Platform
Operating System
OS Version
JVM Vendor
JVM Version
The following table lists the deployment information our consultants require.
Adapter Deployment For example, JCA, Business Services Provider, iWayService Manager
Container For example, WebSphere
Version
Enterprise Information System(EIS) - if any
EIS Release Level
EIS Service Pack
EIS Platform
Preface
iWay Installation and Configuration Guide 9

The following table lists iWay-related information needed by our consultants.
iWay Adapter
iWay Release Level
iWay Patch
The following table lists additional questions to help us serve you better.
Request/Question Error/Problem Details or Information
Did the problem arise througha service or event?
Provide usage scenarios orsummarize the application thatproduces the problem.
When did the problem start?
Can you reproduce thisproblem consistently?
Describe the problem.
Describe the steps toreproduce the problem.
Specify the error message(s).
Any change in the applicationenvironment: softwareconfiguration, EIS/databaseconfiguration, application, andso forth?
Under what circumstance doesthe problem not occur?
Help Us to Serve You Better
10 Information Builders

The following is a list of error/problem files that might be applicable.
Input documents (XML instance, XML schema, non-XML documents)
Transformation files
Error screen shots
Error output files
Trace files
Service Manager package to reproduce problem
Custom functions and agents in use
Diagnostic Zip
Transaction log
For information on tracing, see the iWay Service Manager User's Guide.
User Feedback
In an effort to produce effective documentation, the Technical Content Management staffwelcomes your opinions regarding this document. Please use the Reader Comments form atthe end of this document to communicate your feedback to us or to suggest changes that willsupport improvements to our documentation. You can also contact us through our website, http://documentation.informationbuilders.com/connections.asp.
Thank you, in advance, for your comments.
Information Builders Consulting and Training
Interested in training? Information Builders Education Department offers a wide variety oftraining courses for this and other Information Builders products.
For information on course descriptions, locations, and dates, or to register for classes, visitour website (http://education.informationbuilders.com) or call (800) 969-INFO to speak to anEducation Representative.
Preface
iWay Installation and Configuration Guide 11

Information Builders Consulting and Training
12 Information Builders
Chapter1 iWay 8.0 Service Manager InstallationOverview
This section provides an overview of the installation and configuration of iWay 8.0Service Manager products and components.
In this chapter:
iWay 8.0 Service Manager Products and Components
Installation and Configuration Overview
iWay 8.0 Service Manager Products and Components
This manual explains the installation and initial configuration of iWay 8.0 Service Managercomponents. The topics that follow briefly summarize some of the iWay 8.0 Service Managercomponents.
iWay Adapters
iWay adapter offerings consist of adapters for accessing and integrating information andsystems across many different protocols and data sources. iWay Software provides over 200types of adapters connecting everything from legacy systems and databases to the mostrecent advancements in information technology. Different iWay installation packages includedifferent adapters, so the available adapters depend on which version of iWay you install. Thefollowing are some of the most common adapters installed with iWay:
Technology Adapters
iWay
Java
RDBMS
ESRI
Microsoft .NET
Application Adapters
J.D. Edwards EnterpriseOne
J.D. Edwards World
iWay Installation and Configuration Guide 13
Microsoft Dynamics CRM 2011
Microsoft Exchange
SAP ERP (JCO 3.0)
Oracle E-Business Suite
PeopleSoft
Siebel
Salesforce.com
VistA MUMPS
eBusiness Adapters
EDIFACT
EDI/X12
EDIHL7
Excel
HIPAA
SWIFT
Legacy Adapters
COBOL Data Conversion
CICS
IMS
Terminal Emulation
Log Event Adapters
Informix Dynamic Server 11.50
Oracle 10g and 11g
Protocol Adapters
AQ
iWay 8.0 Service Manager Products and Components
14 Information Builders

Extended AS2
ConnectDirect
LDAP
MSMQ
RabbitMQ
SONIC JMS
Tibco RV
User Datagram Protocol (UDP)
IBM MQ
ActiveMQ
Adapters can be deployed through iWay Service Manager. In addition, adapters can beintegrated directly into your own applications. For information on integrating adapters into yourapplications, contact an iWay Software representative.
iWay Service Manager
iWay Service Manager is a highly scalable enterprise service bus, with fully integrated servicedesign-time environment and web services creation/deployment capabilities. It provides ahosting environment for adapters and includes components for integrating data, applications,systems, and protocols. It also provides a web-based configuration and monitoring toolreferred to as the iWay Service Manager Administration Console.
iWay Service Manager is a stand-alone Java application and requires only a Java VirtualMachine to run.
iWay Extensions
iWay Extensions supplement iWay Service Manager by adding or extending capabilities forservicing messages. The extension services integrate with the native services of ServiceManager during execution and configuration. Extensions can be installed along with iWay or aspackages after iWay Service Manager is installed. The following are some of the most commonextensions:
RVI Gateway. Links two or more iWay Service Managers in a message receiver/messageexecutor relationship for the purpose of tunneling through secure firewalls.
Enterprise Index. Provides indexing services through the Google Search Appliance.
1. iWay 8.0 Service Manager Installation Overview
iWay Installation and Configuration Guide 15
LDAP High Water Mark Listener. Provides the ability to read records from an LDAP if anattribute is defined with increasing values, such as a timestamp of the last change.
RDBMS High Water Mark Listener. Provides the ability to read records from an RDBMS if acolumn or set of columns is defined with increasing values, such as a timestamp of thelast change.
Telnet Control Console. Used to remotely access the iWay Service Manager command lineconsole through a Telnet session. The Telnet session can connect to any iSM instancerunning either in the foreground or the background.
Hot Backup. Hot backup allows a secondary iWay Service Manager system to act as thebackup for a live iWay Service Manager. The backup iWay Service Manager will take over ifthe live iWay Service Manager fails.
PGP Encryption Components. Supports standard OpenPGP, as specified in RFC 2440. Thesupport includes decrypting incoming messages and encrypting outgoing messages usingsimple PGP and key pair (public key) PGP.
Security Developers Tools. Provides a utility program for signing and verifying files.
Data Quality Center. iWay Data Quality Center (DQC) is an essential tool for complex dataquality management. iWay DQC is designed not only to evaluate, monitor, and manage dataquality in different information systems, but also to prevent incorrect data from enteringthese systems in the first place.
Real Time Data Replication. The iWay Real Time Data Replication extension is composedof the SQL Batch Insert Iterator and the Data Integration Object.
XQuery. Evaluates an XQuery 1.0 expression against an input XML document. The result isavailable in the output XML document that is generated. XQuery can be used to select aportion of an XML document or to transform an XML document.
iWay Business Services Provider
iWay Business Services Provider (iBSP) provides transformation and adapter hostingfunctionality, as well as an environment for developing, running, and integrating web services.It provides a transformation and integration engine for processing XML files and SOAPmessages for exchanges with web services applications. Service Manager iBSP runs as acomponent of iWay Service Manager.
Note: iWay Business Services Provider (iBSP) was formerly known as iWay Business ServicesEngine (iBSE). Some references, files, and prompts may still use the previous name.
iWay 8.0 Service Manager Products and Components
16 Information Builders

Installation and Configuration Overview
The following are steps for installing and configuring iWay components. Follow the steps for thecomponents you wish to use:
1. Review the requirements and install any required third party components. (Installing iWay8.0 Service Manager Components on page 19)
2. Run the installation program to install iWay 8.0 Service Manager components. (InstallingiWay 8.0 Service Manager Components on page 19)
3. Copy third party adapter-related files into the iWay 8.0 Service Manager directory structure.(Preparing Adapters on page 57)
4. Start and configure iWay Service Manager. (Configuring iWay Components on page 77)
5. Register iWay 8.0 Service Manager. (Configuring iWay Components on page 77)
6. Refer to the documentation for your installed adapters and/or extensions.
1. iWay 8.0 Service Manager Installation Overview
iWay Installation and Configuration Guide 17

Installation and Configuration Overview
18 Information Builders
Chapter2 Installing iWay 8.0 Service ManagerComponents
The following topics describe the requirements and initial installation procedures for iWaycomponents.
In this chapter:
iWay Service Manager Installation Requirements
Installing iWay 8.0 Service Manager
Installing iWay 8.0 Service Manager With iWay 5.x, 6.x, or 7.x Service Manager
Post-Installation Topics and Tasks
Registering iWay Software
iWay Service Manager Configuration Steps
iWay Service Manager Installation Requirements
Review the following installation requirements to ensure your system supports iWay 8.0Service Manager (iSM).
Hardware Requirements
Minimum requirements for Windows:
1 gigahertz (GHz) or higher Intel® Pentium® compatible CPU.
1 gigabyte (GB) of RAM.
1 gigabyte (GB) of disk space after installation (2 gigabytes during installation).
For other platforms, ensure that your machine has a reasonable supply of resources. For exactrequirements, contact iWay Customer Support.
Operating System Requirements
iWay 8.0 iSM is certified on the following platforms. Additional platforms may be supported, aslong as they meet Java requirements. For more information, contact iWay Customer Support.
AIX 64-bit
OS/400 64-bit
iWay Installation and Configuration Guide 19

Red Hat Enterprise Linux 64-bit
Red Hat Enterprise Linux 64-bit (GUI)
Solsparc 64-bit
Suse Linux Enterprise 64-bit
Windows 7 64-bit
Windows 2008 R2 Standard 64-bit
Windows 2008 Enterprise 64-bit
Windows 2012 64-bit
Windows 10 64-bit
z/OS
For additional operating system support information, contact iWay Customer Support.
The procedures, names, and paths in this manual use Windows conventions and defaultlocations, unless otherwise indicated. For other operating systems and non-default locations,substitute accordingly. Names and case may vary between operating systems.
Java Requirements
Java 2 Standard Edition (J2SE™) JDK 1.8 or higher is required for iWay components.
For Windows, Linux, and Solaris, you can download and install the latest supported JDK from:
http://www.oracle.com/technetwork/java/javase/downloads/index.html
For other platforms, contact the appropriate vendor.
After installing the JDK, the Java command must be in your search PATH to install and runiWay. Ensure the following is in your PATH variable:
/java_home/bin
where:
java_home
Is the absolute path where the JDK is installed.
To determine if Java is properly installed and in your search PATH, execute the following at acommand prompt or shell:
java -version
iWay Service Manager Installation Requirements
20 Information Builders

Information on the Java build appears, for example:
java version "1.8.0_152"Java(TM) SE Runtime Environment, Standard Edition (build 1.8.0_152-b16)Java HotSpot(TM) Client VM (build 152-b16, mixed mode, sharing)
Note: The terms JDK™ and Java SDK™ are synonymous.
Adapter Requirements
Many adapters require third-party libraries, such as JDBC drivers, provided by the vendor of thetarget data source, system, or protocol. You must copy these files into the iWay directorystructure after you install iWay. More information is available in Preparing Adapters on page57.
Installing iWay 8.0 Service Manager
The initial iWay installation procedure installs all iWay components and a set of adapters.These components and adapters are available for a 90-day trial. To receive a permanentlicense after you have installed iWay 8.0 SM, register the software using the instructions foundin Registering iWay Software on page 52.
Additional procedures are found throughout this manual to explain how to activate andconfigure the components of iWay 8.0 SM.
iWay 8.0 Service Manager Installation
Follow the procedure for your platform:
For Windows, see How to Install iWay 8.0 Service Manager on Windows Platforms on page21.
For UNIX, OS/400, and z/OS, see How to Install iWay 8.0 Service Manager on UNIX, OS/400, and z/OS Platforms on page 38.
Procedure: How to Install iWay 8.0 Service Manager on Windows Platforms
You must be an administrator for the local machine to run the installation.
1. Start the installation by executing the iway80.exe installation program.
2. Installing iWay 8.0 Service Manager Components
iWay Installation and Configuration Guide 21

The installation begins by temporarily copying files and analyzing your environment. Thismay take some time. When this process completes, the Welcome window opens, asshown in the following image.
Note: If you receive an error, ensure you are installing as an administrator and there is atleast 2 GB of free space on your operating system drive.
Installing iWay 8.0 Service Manager
22 Information Builders

2. Click Next.
The License Agreement window opens, as shown in the following image.
3. Review the information, and select I accept the terms of the license agreement if you agreeto the terms.
2. Installing iWay 8.0 Service Manager Components
iWay Installation and Configuration Guide 23

The Customer Information window opens, as shown in the following image.
4. Provide your User Name, Company Name, and Site Code.
Important: The site code is a unique company identifier associated with a specificmachine. Be sure to enter a valid and accurate site code in this step because this entry isused when generating your permanent license during the registration process. If you needassistance with the site code, contact your iWay Software sales representative.
5. Click Next.
Installing iWay 8.0 Service Manager
24 Information Builders

The Setup Type window opens, as shown in the following image.
6. Select the setup type (Typical, Runtime, or Custom) according to your requirements.
7. Click Next.
2. Installing iWay 8.0 Service Manager Components
iWay Installation and Configuration Guide 25

The Choose Destination Location window opens, as shown in the following image.
8. Accept the default location, which is C:\Program Files (x86)\iway8\, or click Browse tospecify a new location.
9. Click Next.
Installing iWay 8.0 Service Manager
26 Information Builders
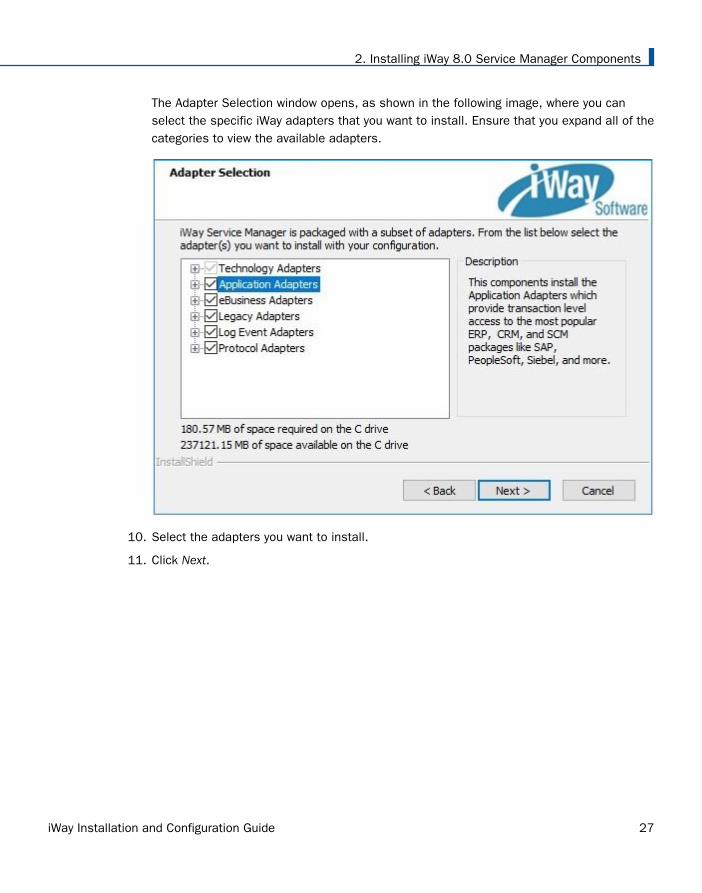
The Adapter Selection window opens, as shown in the following image, where you canselect the specific iWay adapters that you want to install. Ensure that you expand all of thecategories to view the available adapters.
10. Select the adapters you want to install.
11. Click Next.
2. Installing iWay 8.0 Service Manager Components
iWay Installation and Configuration Guide 27

The Feature Selection window opens, as shown in the following image, where you canselect the specific iSM features that you want to install. Ensure that you expand all of thecategories to view the available features.
12. Select the features you want to install.
Installing iWay 8.0 Service Manager
28 Information Builders

13. Click Next.
The iWay Service Manager Configuration options window opens, as shown in the followingimage.
You are prompted to specify the ports that iWay Service Manager uses, as listed anddescribed in the following table.
Name Default Port Purpose
Console 9999 HTTP listener for the iWay Service ManagerAdministration Console.
SOAP 9000 SOAP listener for iBSP and iWay Explorers.
2. Installing iWay 8.0 Service Manager Components
iWay Installation and Configuration Guide 29

Name Default Port Purpose
Envoy
(optional)
9001 Designated port for Envoy to allow Sentinelmonitoring.
Note: The Envoy port option is displayed only ifEnvoy is selected in the Feature Selectionwindow.
14. Accept the default port values or specify new values and then click Next.
Note: Be sure to specify ports that are not being used by other programs or by anotherinstance of iWay. If necessary, contact your system administrator for assistance inidentifying available TCP ports.
If you selected Envoy to be installed from the Feature Selection window in step 11, thenthe Sentinel Registration window opens, as shown in the following image.
15. Accept the default Host and Port values or specify new values along with the correct UserID and Password, and then click Next.
Installing iWay 8.0 Service Manager
30 Information Builders

The Start Copying Files window opens, as shown in the following image.
16. Review the settings and then click Next to start the installation.
2. Installing iWay 8.0 Service Manager Components
iWay Installation and Configuration Guide 31
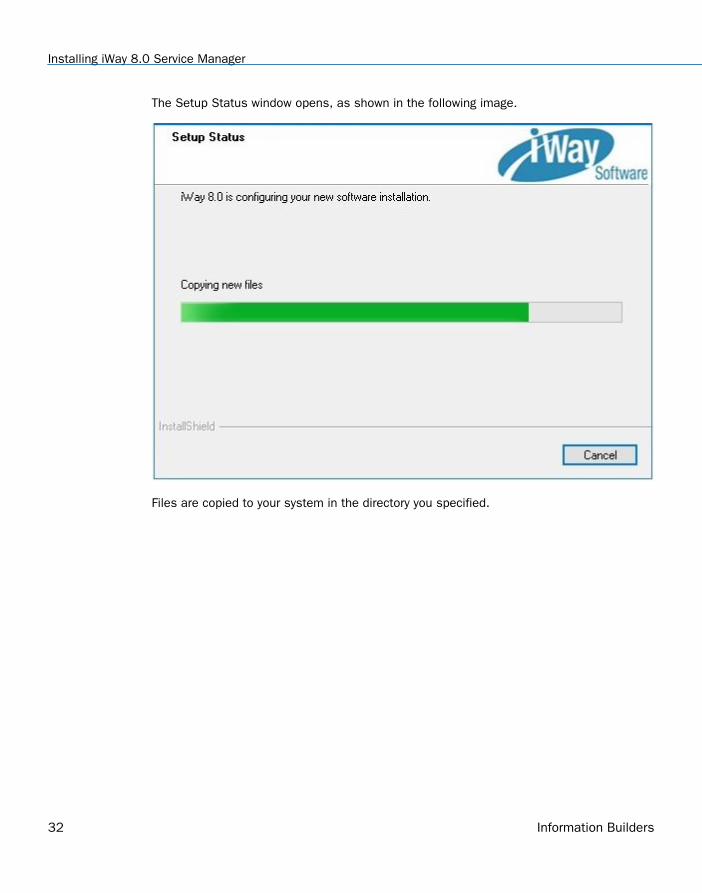
The Setup Status window opens, as shown in the following image.
Files are copied to your system in the directory you specified.
Installing iWay 8.0 Service Manager
32 Information Builders
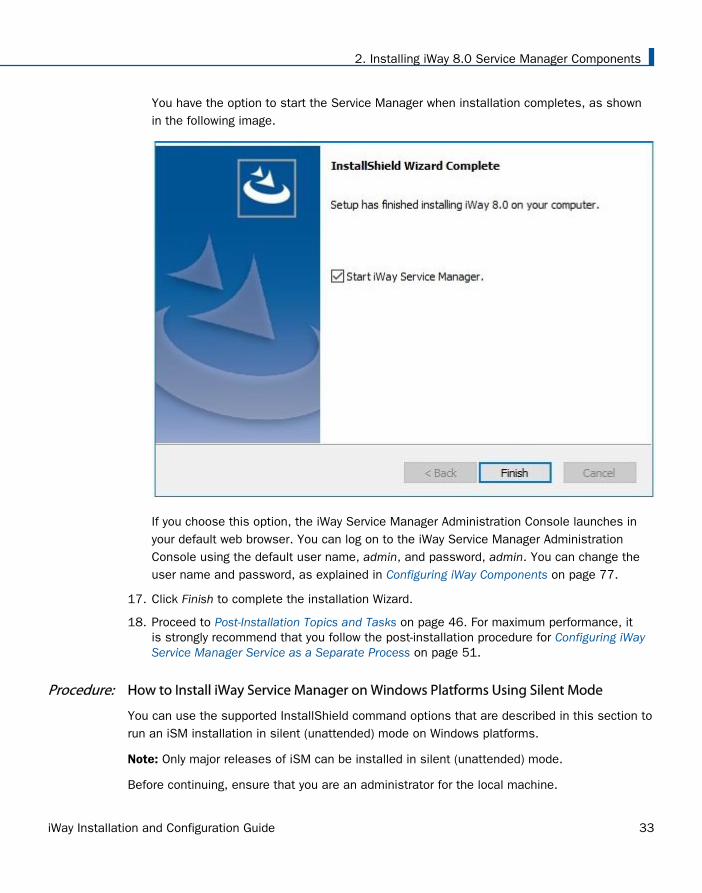
You have the option to start the Service Manager when installation completes, as shownin the following image.
If you choose this option, the iWay Service Manager Administration Console launches inyour default web browser. You can log on to the iWay Service Manager AdministrationConsole using the default user name, admin, and password, admin. You can change theuser name and password, as explained in Configuring iWay Components on page 77.
17. Click Finish to complete the installation Wizard.
18. Proceed to Post-Installation Topics and Tasks on page 46. For maximum performance, itis strongly recommend that you follow the post-installation procedure for Configuring iWayService Manager Service as a Separate Process on page 51.
Procedure: How to Install iWay Service Manager on Windows Platforms Using Silent Mode
You can use the supported InstallShield command options that are described in this section torun an iSM installation in silent (unattended) mode on Windows platforms.
Note: Only major releases of iSM can be installed in silent (unattended) mode.
Before continuing, ensure that you are an administrator for the local machine.
2. Installing iWay 8.0 Service Manager Components
iWay Installation and Configuration Guide 33

The high-level process for configuring a silent (unattended) iSM installation on Windowsplatforms is as follows:
1. Record a response file for an iSM installation using the -r option.
2. Play back a silent (unattended) iSM installation using the -s option.
Procedure: How to Record a Response File to Install iWay Service Manager
1. Open a Windows command prompt.
2. Navigate to the location where the iway80.exe installation program is located, for example:
c:\iWay8_Install_Source>
3. Type the following command:
c:\iWay8_Install_Source>iway80.exe -r -f1my_response_file.iss
where:
-r
Indicates that a response file will be recorded for this iSM installation.
-flmy_response_file.iss
Is the name of the response file that will be created as a result of the iSM installation.Do not include a space between -f1 and my_response_file.
For example, to create a response file for the iSM installation called ism_install_config andsave it in the c:\temp directory, type the following command:
c:\iWay8_Install_Source>iway80.exe -r -f1c:\temp\ism_install_config.iss
This command creates the response file in the specified directory.
Note:
If no directory is specified using the -f1 option, a default response file (setup.iss) iswritten to the c:\windows directory.
There is also an -f2 option that is used to designate the location of the InstallShield logfile. The InstallShield log file is created during the installation process. If no location isspecified, then the InstallShield log file is written to the same location as the responsefile.
4. Complete a normal iSM installation using the Windows-based InstallShield installer.
Installing iWay 8.0 Service Manager
34 Information Builders

The specified response file will record all of the settings that you specified during the iSMinstallation. You can edit and customize the settings in the generated response fileaccording to your requirements.
Procedure: How to Play Back a Response File to Install iWay Service Manager
After you have created your response file, you can run the iSM installation in silent(unattended) mode. Only major releases of iSM can be installed in silent (unattended) mode.
Note: When running the iSM installation in silent (unattended) mode, no messages aredisplayed. All messages are written to a log file. Review this log file to determine the results ofyour iSM installation.
1. Copy the iway80.exe installation program to the location where you want to install iSMusing silent (unattended) mode, for example:
c:\iWay8_Install_Prod>
2. Type the following command:
c:\iWay8_Install_Prod>iway80.exe –s -f1my_response_file.iss -f2log_file
where:
-s
Indicates that the iSM installation will run in silent (unattended) mode.
-flmy_response_file.iss
Specifies the file name and location of the response file. Do not include a spacebetween -f1 and my_response_file.
-f2log_file
Specifies the file name and location where the InstallShield log files will be written. Donot include a space between -f2 and log_file.
For example, to run an iSM installation in silent (unattended) mode from the c:\iWay8_Install_Prod directory, which references the ism_install_config.iss response filefrom the c:\temp directory, and writes an InstallShield log file (ism_install_log_file) to the c:\temp directory, type the following command:
c:\iWay8_Install_Prod>iway80.exe -s -f1c:\temp\ism_install_config.iss-f2c:\temp\ism_install_log_file
2. Installing iWay 8.0 Service Manager Components
iWay Installation and Configuration Guide 35

The iSM installation runs automatically in the background without any user interaction.Review the log file to determine the results of your iSM installation that ran in silent(unattended) mode.
Procedure: How to Uninstall iWay Service Manager on Windows Platforms Using Silent Mode
This section describes how to uninstall iSM in silent (unattended) mode on Windows platforms.Before continuing, ensure that you are an administrator for the local machine.
The high-level process for configuring a silent (unattended) iSM uninstallation on Windowsplatforms is as follows:
Record a response file to uninstall iSM using the -r option.
Play back a silent (unattended) iSM uninstallation using the -s option.
Procedure: How to Record a Response File to Uninstall iWay Service Manager
1. Open a Windows command prompt.
2. Navigate to the location where the iway80.exe installation program is located, for example:
c:\iWay8_Install_Source>
3. Type the following command:
c:\iWay8_Install_Source>iway80.exe -r -f1my_response_file.iss
where:
-r
Indicates that a response file will be recorded for this iSM uninstallation.
-flmy_response_file.iss
Is the name of the response file that will be created as a result of the iSMuninstallation.
For example, to create a response file for the iSM uninstallation called ism_uninstall andsave it in the c:\temp directory, type the following command:
c:\iWay8_Install_Source>iway80.exe -r -f1c:\temp\ism_uninstall.iss
This command creates the response file in the specified directory.
Note:
If no directory is specified using the -f1 option, a default response file (setup.iss) iswritten to the c:\windows directory.
Installing iWay 8.0 Service Manager
36 Information Builders

There is also an -f2 option that is used to designate the location of the InstallShield logfile. The InstallShield log file is created during the uninstallation process. If no locationis specified, then the InstallShield log file is written to the same location as theresponse file.
4. When you run the iway80.exe installation program on a machine where iSM is alreadyinstalled, the Modify, repair, or remove the program dialog box opens, as shown in thefollowing image.
5. Select Remove and then click Next to complete the uninstallation process.
The specified response file (for example, ism_uninstall.iss) will record the Remove option,which instructs the iway80.exe installation program to uninstall iSM. You are now ready toplay back your response file to uninstall iSM.
Procedure: How to Play Back a Response File to Uninstall iWay Service Manager
After you have created your response file, you can run the iSM uninstallation in silent(unattended) mode. Only major releases of iSM can be uninstalled in silent (unattended)mode.
2. Installing iWay 8.0 Service Manager Components
iWay Installation and Configuration Guide 37

Note: When running the iSM uninstallation in silent (unattended) mode, no messages aredisplayed. All messages are written to a log file. Review this log file to determine the results ofyour iSM uninstallation.
1. Copy the iway80.exe installation program to the location where you want to uninstall acopy of iSM using silent (unattended) mode, for example:
c:\iWay8_Install_Prod>
2. Type the following command:
c:\iWay8_Install_Prod>iway80.exe –s -f1my_response_file.iss -f2log_file
where:
-s
Indicates that the iSM uninstallation will run in silent (unattended) mode.
-flmy_response_file.iss
Specifies the file name and location of the response file for the uninstallation. Do notinclude a space between -f1 and my_response_file.
-f2log_file
Specifies the file name and location where the InstallShield log files will be written. Donot include a space between -f2 and log_file.
For example, to run an iSM uninstallation in silent (unattended) mode from the c:\iWay8_Install_Prod directory, which references the ism_uninstall.iss response file from thec:\temp directory, and writes an InstallShield log file (ism_uninstall_log_file) to the c:\tempdirectory, type the following command:
c:\iWay8_Install_Prod>iway80.exe -s -f1c:\temp\ism_uninstall.iss-f2c:\temp\ism_uninstall_log_file
The iSM installation runs automatically in the background without any user interaction.Review the log file to determine the results of your iSM uninstallation that ran in silent(unattended) mode.
Procedure: How to Install iWay 8.0 Service Manager on UNIX, OS/400, and z/OS Platforms
On UNIX/Linux, installing as root is not recommended. Creating a dedicated iWay user ID andgroup with appropriate rights is preferable.
On OS/400, your user ID must have *ALLOBJ, *JOBCTL, and *SAVSYS authority.
On z/OS, the iway80.jar file must be placed in the USS file system.
Installing iWay 8.0 Service Manager
38 Information Builders
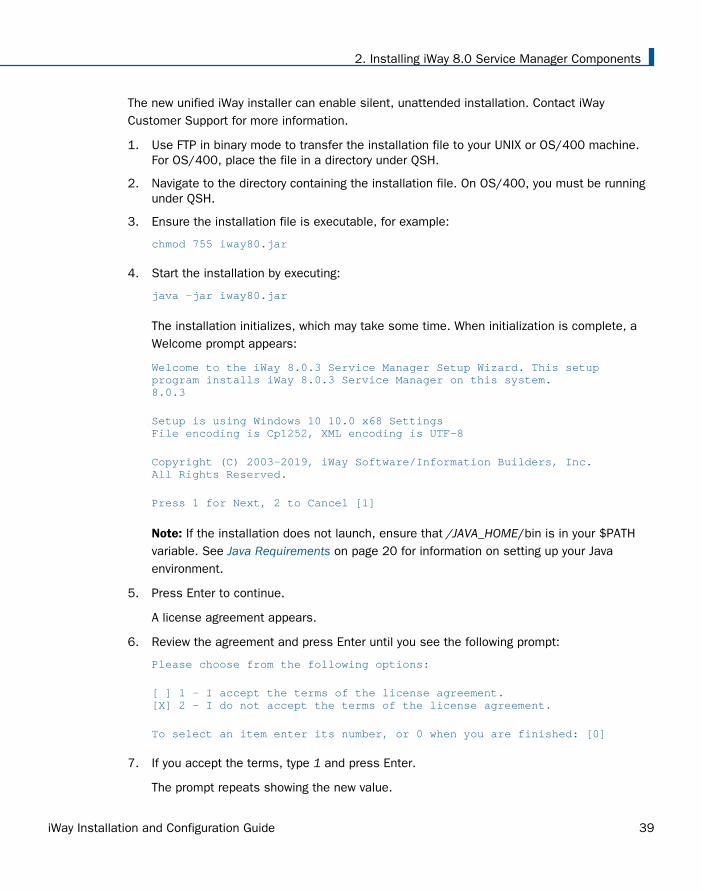
The new unified iWay installer can enable silent, unattended installation. Contact iWayCustomer Support for more information.
1. Use FTP in binary mode to transfer the installation file to your UNIX or OS/400 machine.For OS/400, place the file in a directory under QSH.
2. Navigate to the directory containing the installation file. On OS/400, you must be runningunder QSH.
3. Ensure the installation file is executable, for example:
chmod 755 iway80.jar
4. Start the installation by executing:
java -jar iway80.jar
The installation initializes, which may take some time. When initialization is complete, aWelcome prompt appears:
Welcome to the iWay 8.0.3 Service Manager Setup Wizard. This setup program installs iWay 8.0.3 Service Manager on this system.8.0.3
Setup is using Windows 10 10.0 x68 SettingsFile encoding is Cp1252, XML encoding is UTF-8
Copyright (C) 2003-2019, iWay Software/Information Builders, Inc.All Rights Reserved.
Press 1 for Next, 2 to Cancel [1]
Note: If the installation does not launch, ensure that /JAVA_HOME/bin is in your $PATHvariable. See Java Requirements on page 20 for information on setting up your Javaenvironment.
5. Press Enter to continue.
A license agreement appears.
6. Review the agreement and press Enter until you see the following prompt:
Please choose from the following options:
[ ] 1 - I accept the terms of the license agreement.[X] 2 - I do not accept the terms of the license agreement.
To select an item enter its number, or 0 when you are finished: [0]
7. If you accept the terms, type 1 and press Enter.
The prompt repeats showing the new value.
2. Installing iWay 8.0 Service Manager Components
iWay Installation and Configuration Guide 39
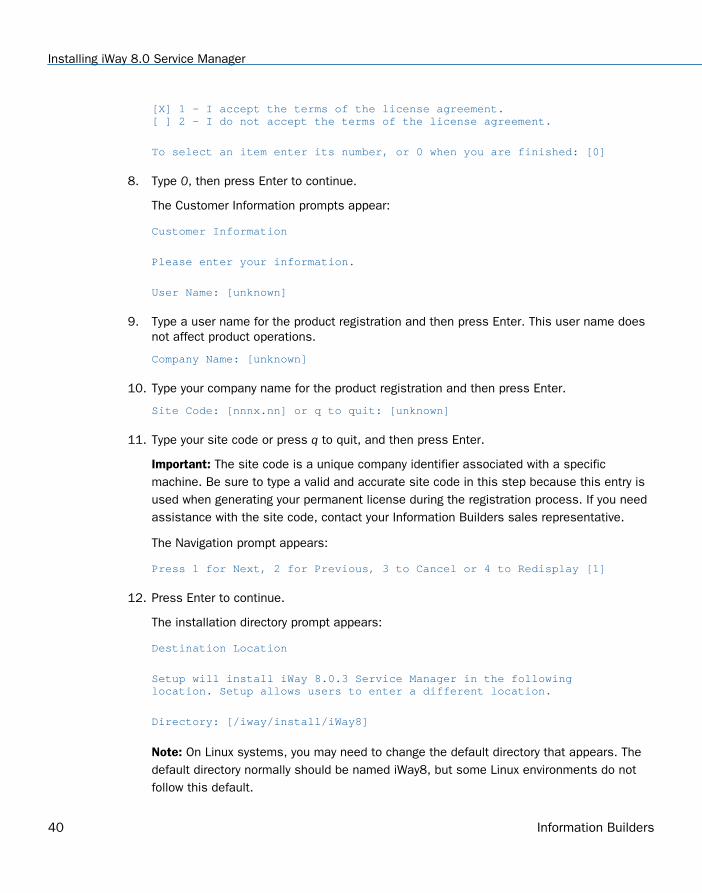
[X] 1 - I accept the terms of the license agreement.[ ] 2 - I do not accept the terms of the license agreement.
To select an item enter its number, or 0 when you are finished: [0]
8. Type 0, then press Enter to continue.
The Customer Information prompts appear:
Customer Information
Please enter your information.
User Name: [unknown]
9. Type a user name for the product registration and then press Enter. This user name doesnot affect product operations.
Company Name: [unknown]
10. Type your company name for the product registration and then press Enter.
Site Code: [nnnx.nn] or q to quit: [unknown]
11. Type your site code or press q to quit, and then press Enter.
Important: The site code is a unique company identifier associated with a specificmachine. Be sure to type a valid and accurate site code in this step because this entry isused when generating your permanent license during the registration process. If you needassistance with the site code, contact your Information Builders sales representative.
The Navigation prompt appears:
Press 1 for Next, 2 for Previous, 3 to Cancel or 4 to Redisplay [1]
12. Press Enter to continue.
The installation directory prompt appears:
Destination Location
Setup will install iWay 8.0.3 Service Manager in the following location. Setup allows users to enter a different location.
Directory: [/iway/install/iWay8]
Note: On Linux systems, you may need to change the default directory that appears. Thedefault directory normally should be named iWay8, but some Linux environments do notfollow this default.
Installing iWay 8.0 Service Manager
40 Information Builders

13. Specify where to install iWay on your system and then press Enter. Ensure this is adirectory to which you have write access.
The navigation prompt appears.
Press 1 for Next, 2 for Previous, 3 to Cancel or 4 to Redisplay [1]
14. Press Enter.
The following prompt for iWay adapter selection appears.
iWay Adapters
iWay 8.0.3 Service Manager is packaged with a subset of iWay adapters. From the list below select the adapter(s) you want to installwith your configuration.
[ ] 1 - Technology Adapters[ ] 2 - Application Adapters[ ] 3 - eBusiness Adapters[ ] 4 - Legacy Adapters[ ] 5 - Queuing Adapters[ ] 6 - Protocol Adapters[ ] 7 - IOT Protocols
Enter a number, (a)ll, (n)one or 0 to finish: [0]
Note: An X next to an adapter category indicates one or more adapters are selected.
15. Type the number of the adapter you want to install and press Enter.
Note: You can only type one adapter number at a time.
16. When you are finished with your selections, type 0 and press Enter.
You are returned to the iWay Adapters selection prompt.
iWay Adapters
iWay 8.0.3 Service Manager is packaged with a subset of iWay adapters. From the list below, select the adapter(s)you want to install with your configuration.
[ ] 1 - Technology Adapters[ ] 2 - Application Adapters[ ] 3 - eBusiness Adapters[ ] 4 - Legacy Adapters[ ] 5 - Queuing Adapters[ ] 6 - Protocol Adapters[ ] 7 - IOT Protocols
Enter a number, (a)ll, (n)one or 0 to finish: [0]
2. Installing iWay 8.0 Service Manager Components
iWay Installation and Configuration Guide 41
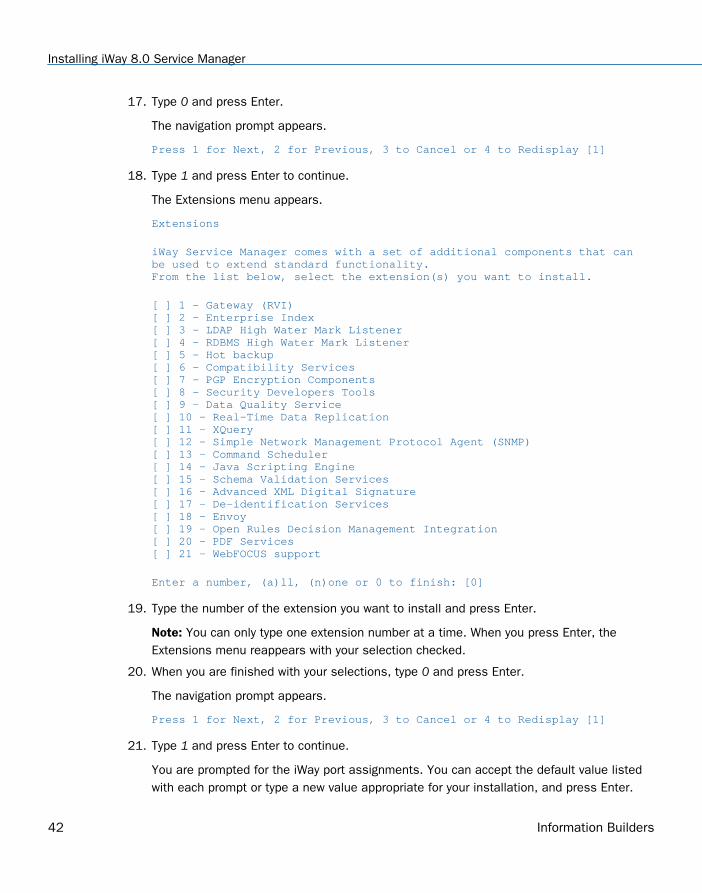
17. Type 0 and press Enter.
The navigation prompt appears.
Press 1 for Next, 2 for Previous, 3 to Cancel or 4 to Redisplay [1]
18. Type 1 and press Enter to continue.
The Extensions menu appears.
Extensions
iWay Service Manager comes with a set of additional components that can be used to extend standard functionality. From the list below, select the extension(s) you want to install.
[ ] 1 - Gateway (RVI)[ ] 2 - Enterprise Index[ ] 3 - LDAP High Water Mark Listener[ ] 4 - RDBMS High Water Mark Listener[ ] 5 - Hot backup[ ] 6 - Compatibility Services[ ] 7 - PGP Encryption Components[ ] 8 - Security Developers Tools[ ] 9 - Data Quality Service[ ] 10 - Real-Time Data Replication[ ] 11 - XQuery[ ] 12 - Simple Network Management Protocol Agent (SNMP)[ ] 13 - Command Scheduler[ ] 14 - Java Scripting Engine[ ] 15 - Schema Validation Services[ ] 16 - Advanced XML Digital Signature[ ] 17 - De-identification Services[ ] 18 - Envoy[ ] 19 - Open Rules Decision Management Integration[ ] 20 - PDF Services[ ] 21 - WebFOCUS support
Enter a number, (a)ll, (n)one or 0 to finish: [0]
19. Type the number of the extension you want to install and press Enter.
Note: You can only type one extension number at a time. When you press Enter, theExtensions menu reappears with your selection checked.
20. When you are finished with your selections, type 0 and press Enter.
The navigation prompt appears.
Press 1 for Next, 2 for Previous, 3 to Cancel or 4 to Redisplay [1]
21. Type 1 and press Enter to continue.
You are prompted for the iWay port assignments. You can accept the default value listedwith each prompt or type a new value appropriate for your installation, and press Enter.
Installing iWay 8.0 Service Manager
42 Information Builders
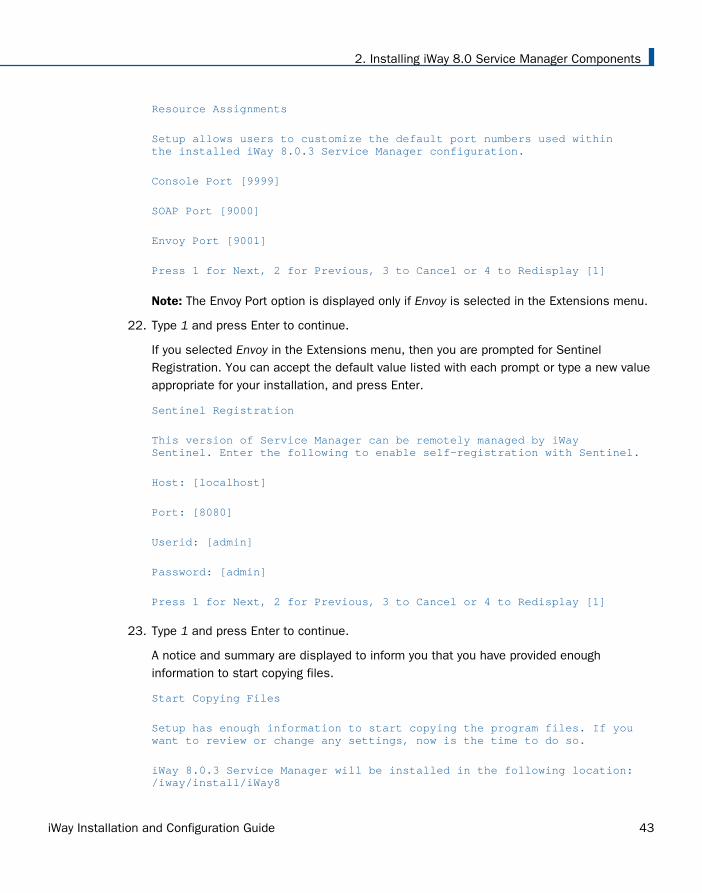
Resource Assignments
Setup allows users to customize the default port numbers used within the installed iWay 8.0.3 Service Manager configuration.
Console Port [9999]
SOAP Port [9000]
Envoy Port [9001]
Press 1 for Next, 2 for Previous, 3 to Cancel or 4 to Redisplay [1]
Note: The Envoy Port option is displayed only if Envoy is selected in the Extensions menu.
22. Type 1 and press Enter to continue.
If you selected Envoy in the Extensions menu, then you are prompted for SentinelRegistration. You can accept the default value listed with each prompt or type a new valueappropriate for your installation, and press Enter.
Sentinel Registration
This version of Service Manager can be remotely managed by iWay Sentinel. Enter the following to enable self-registration with Sentinel.
Host: [localhost]
Port: [8080]
Userid: [admin]
Password: [admin]
Press 1 for Next, 2 for Previous, 3 to Cancel or 4 to Redisplay [1]
23. Type 1 and press Enter to continue.
A notice and summary are displayed to inform you that you have provided enoughinformation to start copying files.
Start Copying Files
Setup has enough information to start copying the program files. If youwant to review or change any settings, now is the time to do so.
iWay 8.0.3 Service Manager will be installed in the following location:/iway/install/iWay8
2. Installing iWay 8.0 Service Manager Components
iWay Installation and Configuration Guide 43
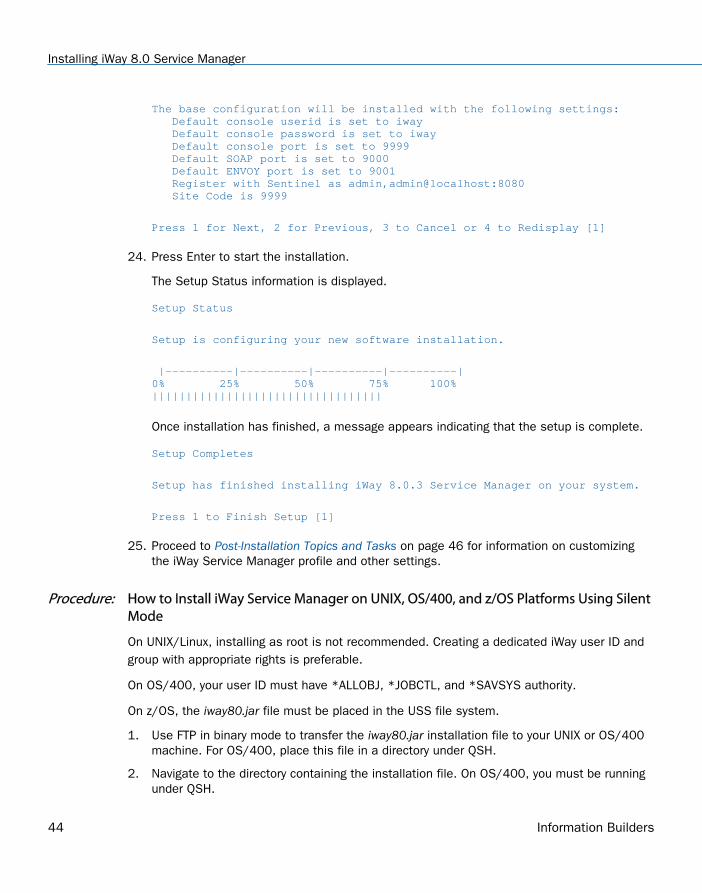
The base configuration will be installed with the following settings: Default console userid is set to iway Default console password is set to iway Default console port is set to 9999 Default SOAP port is set to 9000 Default ENVOY port is set to 9001 Register with Sentinel as admin,admin@localhost:8080 Site Code is 9999
Press 1 for Next, 2 for Previous, 3 to Cancel or 4 to Redisplay [1]
24. Press Enter to start the installation.
The Setup Status information is displayed.
Setup Status
Setup is configuring your new software installation.
|----------|----------|----------|----------|0% 25% 50% 75% 100%||||||||||||||||||||||||||||||||||
Once installation has finished, a message appears indicating that the setup is complete.
Setup Completes
Setup has finished installing iWay 8.0.3 Service Manager on your system.
Press 1 to Finish Setup [1]
25. Proceed to Post-Installation Topics and Tasks on page 46 for information on customizingthe iWay Service Manager profile and other settings.
Procedure: How to Install iWay Service Manager on UNIX, OS/400, and z/OS Platforms Using SilentMode
On UNIX/Linux, installing as root is not recommended. Creating a dedicated iWay user ID andgroup with appropriate rights is preferable.
On OS/400, your user ID must have *ALLOBJ, *JOBCTL, and *SAVSYS authority.
On z/OS, the iway80.jar file must be placed in the USS file system.
1. Use FTP in binary mode to transfer the iway80.jar installation file to your UNIX or OS/400machine. For OS/400, place this file in a directory under QSH.
2. Navigate to the directory containing the installation file. On OS/400, you must be runningunder QSH.
Installing iWay 8.0 Service Manager
44 Information Builders
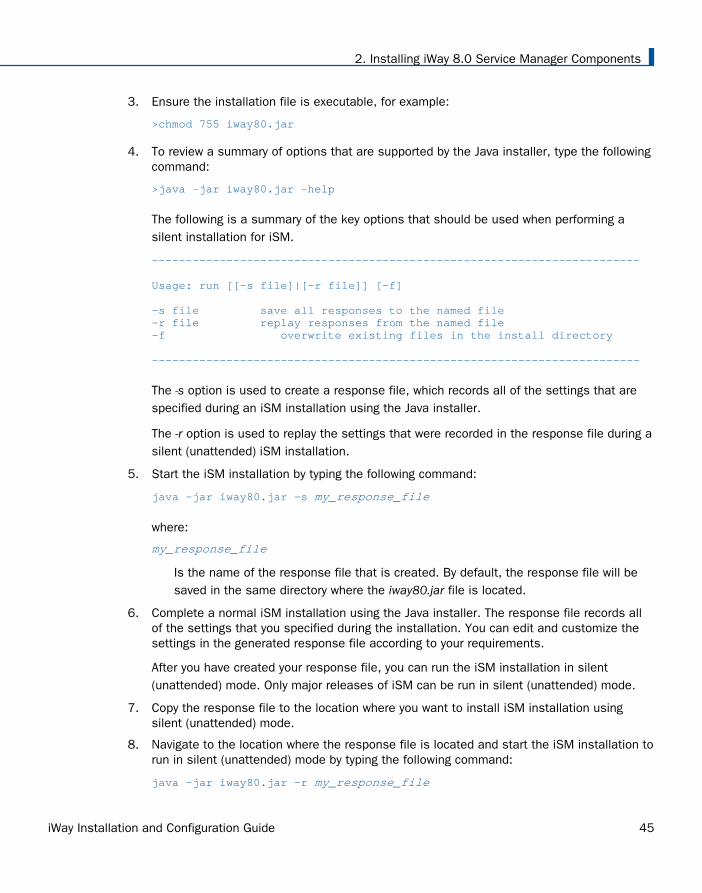
3. Ensure the installation file is executable, for example:
>chmod 755 iway80.jar
4. To review a summary of options that are supported by the Java installer, type the followingcommand:
>java -jar iway80.jar –help
The following is a summary of the key options that should be used when performing asilent installation for iSM.
------------------------------------------------------------------------
Usage: run [[-s file]|[-r file]] [-f]
-s file save all responses to the named file-r file replay responses from the named file-f overwrite existing files in the install directory
------------------------------------------------------------------------
The -s option is used to create a response file, which records all of the settings that arespecified during an iSM installation using the Java installer.
The -r option is used to replay the settings that were recorded in the response file during asilent (unattended) iSM installation.
5. Start the iSM installation by typing the following command:
java -jar iway80.jar -s my_response_file
where:
my_response_file
Is the name of the response file that is created. By default, the response file will besaved in the same directory where the iway80.jar file is located.
6. Complete a normal iSM installation using the Java installer. The response file records allof the settings that you specified during the installation. You can edit and customize thesettings in the generated response file according to your requirements.
After you have created your response file, you can run the iSM installation in silent(unattended) mode. Only major releases of iSM can be run in silent (unattended) mode.
7. Copy the response file to the location where you want to install iSM installation usingsilent (unattended) mode.
8. Navigate to the location where the response file is located and start the iSM installation torun in silent (unattended) mode by typing the following command:
java -jar iway80.jar -r my_response_file
2. Installing iWay 8.0 Service Manager Components
iWay Installation and Configuration Guide 45

where:
my_response_file
Is the name of the response file that you want to reference and use for the iSMinstallation in silent (unattended) mode.
Note: You can also use the -f option to overwrite existing files in the installation directory,for example:
java -jar iway80.jar -r my_response_file -f
The iSM installation runs automatically in the background without any user interaction.
Installing iWay 8.0 Service Manager With iWay 5.x, 6.x, or 7.x Service Manager
iWay 8.0 Service Manager (SM) can be installed onto a system that already has iWay 5.x, 6.x,or 7.x SM installed. However, there is a consideration that should be noted. For all machinesand operating systems, it is important that you choose an iWay 8.0 SM installation directorythat is different from the existing iWay 5.x, 6.x, or 7.x directory.
Post-Installation Topics and Tasks
After installation, review the following topics and perform the steps needed for yourenvironment.
iWay 8.0 Service Manager Directory Structure
After installation, an iway8 directory is created and contains the following subdirectories:
bin
Contains files required to start and access iWay Service Manager.
config
Contains configuration files for the base server and the application folders for eachdeployed application.
User IDs used to run iWay components must have full permissions to the config directory.
Installing iWay 8.0 Service Manager With iWay 5.x, 6.x, or 7.x Service Manager
46 Information Builders

Note: You can run more than one instance of Service Manager by defining multipleconfigurations using the iWay Service Manager Administration Console. The iWay ServiceManager Administration Console is introduced in Configuring iWay Components on page77. By default, two configurations are defined, base and raw. The base configuration setsup everything you require to get started and includes SOAP and HTTP listeners. The rawconfiguration contains no listeners and provides a useful template to define additionalconfigurations.
etc
Contains documentation, miscellaneous tools, and files to configure additionalcomponents. Subdirectories of etc also contain Extensions and additional tools.
lib
Contains adapters, drivers, and other files used by iWay components. All iWay componentsmust access this directory and your library path must be set to this location. For details,see Environment Variables on page 50.
Installing Third-Party Jar Files
Many protocols that iWay Service Manager supports require the presence of third-party jar files.Specific requirements are documented for each protocol in the iWay Service Manager ProtocolGuide.
The j2ee.jar file is required for a number of iWay Service Manager features and functionsacross protocols.
J2EE is not a component that is normally distributed with JRE. If you are compiling an iSM exitthat requires J2EE, Oracle provides a skeleton version that does not contain any method code.This version can be downloaded using the following link:
http://download.java.net/maven/2/javax/javaee-api/6.0/javaee-api-6.0.jar
The actual .jar file that contains the appropriate method code is licensed and supplied by thevendor of an application server (for example, Glassfish, JBOSS, and so on). The ApacheTomcat web server does not provide a J2EE, so you must locate the appropriate executablecode. For example, you may need the mail.jar file from Oracle if you are using iSM mailsystems.
There is a j2ee.jar file that is distributed by Oracle, which can be used. This file can bedownloaded using the following link:
http://www.oracle.com/technetwork/java/javaee/download-141771.html
Download and install the software according to the instructions from the vendor and copy thej2ee.jar to [IWAYHOME]/lib.
2. Installing iWay 8.0 Service Manager Components
iWay Installation and Configuration Guide 47

For more information about your specific platform, contact iWay Customer Support.
Installing Ebix Archives
Ebix archives are not packaged with the iWay 8.0 Service Manager installation. However, Ebixmetadata is available for download from the following website, which is hosted and maintainedby iWay Software and Information Builders:
http://techsupport.ibi.com
iWay TCP Ports
iWay Service Manager uses two TCP ports for system communication. The following table liststhe function and default values of these ports.
Listener DefaultPort
Purpose
Console 9999 HTTP listener for the iWay Service Manager AdministrationConsole.
SOAP 9000 SOAP listener for iBSP.
During iWay SM installation, you can select values other than the default for either or both ofthese ports (for security or in case of a port conflict).
Under certain circumstances, it may be necessary to change the iWay Service Manager systemport assignments after installation is completed. This section describes the procedures tochange the Console and SOAP and iBSP port assignments.
Procedure: How to Change the iWay Service Manager Administration Console Port Assignment
The iWay Service Manager Administration Console port assignment can be modified byaccessing the console and navigating to Console Settings.
Procedure: How to Set Up the SOAP Listener to Follow the ibse-port Special Register
The SOAP listener port is set to the integer value literal entered during iWay Service Managerinstallation, with the default being 9000. This is not ideal for situations where the SOAP portwill be changed after installation, since the ibse-port Special Register and the SOAP port mustalways be changed in tandem.
1. Access the iWay Service Manager Administration Console.
2. Click Registry in the top pane, and then click Listeners in the left pane.
Post-Installation Topics and Tasks
48 Information Builders

The Listeners pane opens.
3. Click Add.
The Select listener type pane opens.
4. Select the SOAP1 listener from the Type drop-down list and click Next.
5. In the Port Property Value field, enter SREG(ibse-port).
The value you are replacing should be an integer port number, its value being 9000 if thedefault was accepted during installation. Do not change any of the other properties of theSOAP1 listener.
6. Click Finish to save the change. The SOAP port will not change until the ibse-port SpecialRegister is updated (see How to Set the ibse-port Special Register on page 49) and iWayService Manager is restarted.
Note: You only need to add the ibse-port Special Register in the SOAP1 Listener Port fieldonce. After this has been set up, future changes to the ibse-port Special Register willautomatically update the iWay Service Manager SOAP port.
Procedure: How to Set the ibse-port Special Register
Once you have successfully completed setting up the SOAP listener value to follow that of theibse-port Special Register, changing the ibse-port register will automatically change the iWayService Manager SOAP listener port, as well.
1. Navigate to the iWay Service Manager home page by clicking the Server menu link in theupper-left corner.
2. Select the server configuration you want to change from the Managed Server drop-downlist. In most cases, this will be the single, master configured server named base.
The console refreshes with the General Properties of the selected server.
3. In the left pane, select Register Settings.
A list of special registers appears in the right pane.
4. Click on the link for ibse-port to display its Special Register Definition information.
5. In the Value field, enter a new value for the ibse-port register.
Note: This value must be an integer, within the range of valid port numbers, and currentlynot used by any other process on the machine. If necessary, contact your systemadministrator for assistance in choosing an available TCP port.
6. Click Update to accept the change.
The Register Settings page is displayed so you can confirm the new ibse-port value.
2. Installing iWay 8.0 Service Manager Components
iWay Installation and Configuration Guide 49

As with all iWay Service Manager Special Register settings, you must restart the server forthe new ibse-port setting to take effect.
7. To restart the server, click Restart in the upper-right of the console.
The following message appears in your browser:
Server's master configuration is restarting...
When restart is complete, the iWay Service Manager Administration Console home pageappears.
Environment Variables
After installation, environment variables are required to use iWay adapters and components.The variables can be set in your profile.
On Windows platforms, environment variables are automatically set by the installationprogram. No steps are necessary, but it is a good idea to be aware of them in case youneed to troubleshoot.
On UNIX, OS/400, and z/OS platforms, you must manually set the appropriate environmentvariables for all user IDs that run iWay components.
Note: If you plan to run multiple installations of iWay components, the environment variablesmust be set up appropriately for each installation.
Procedure: How to Set Environment Variables on UNIX Systems
The following environment variable settings are required to use iWay Service Manager and iWayadapters and components on a UNIX system:
1. The following variable must be defined and set to the location of the iWay8 directory. Thecommands can be issued interactively or added to the iWay user .profile file using a texteditor.
IWAY8
For example:
IWAY8=/home/userID/iWay8/export IWAY8
Note: Be sure to include the trailing slash (/).
2. The PATH variable must contain the iWay8/lib directory, for example:
PATH=$PATH:/home/userID/iWay8/libexport PATH
Post-Installation Topics and Tasks
50 Information Builders
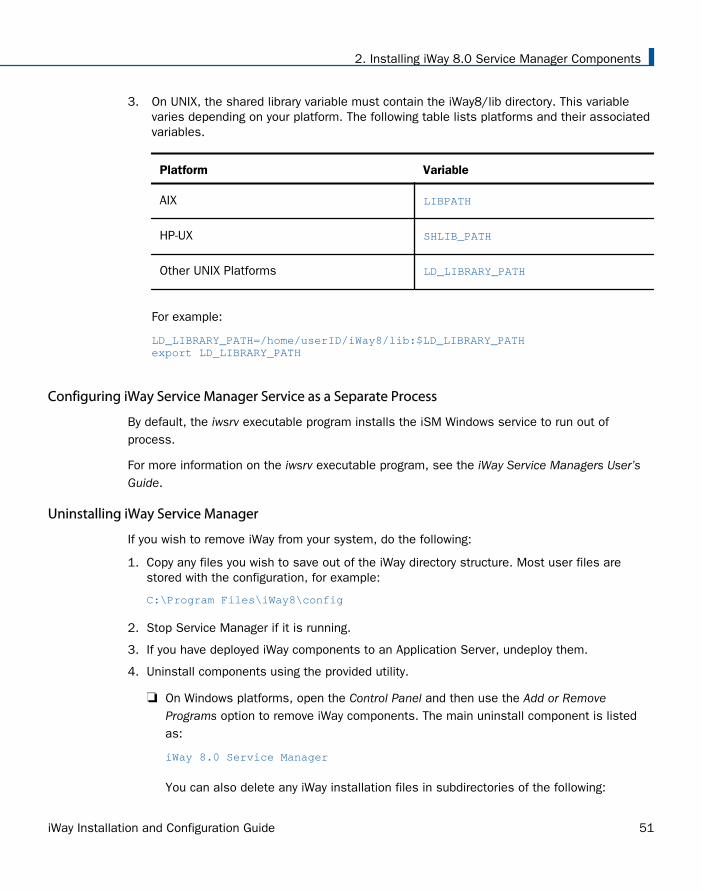
3. On UNIX, the shared library variable must contain the iWay8/lib directory. This variablevaries depending on your platform. The following table lists platforms and their associatedvariables.
Platform Variable
AIX LIBPATH
HP-UX SHLIB_PATH
Other UNIX Platforms LD_LIBRARY_PATH
For example:
LD_LIBRARY_PATH=/home/userID/iWay8/lib:$LD_LIBRARY_PATHexport LD_LIBRARY_PATH
Configuring iWay Service Manager Service as a Separate Process
By default, the iwsrv executable program installs the iSM Windows service to run out ofprocess.
For more information on the iwsrv executable program, see the iWay Service Managers User’sGuide.
Uninstalling iWay Service Manager
If you wish to remove iWay from your system, do the following:
1. Copy any files you wish to save out of the iWay directory structure. Most user files arestored with the configuration, for example:
C:\Program Files\iWay8\config
2. Stop Service Manager if it is running.
3. If you have deployed iWay components to an Application Server, undeploy them.
4. Uninstall components using the provided utility.
On Windows platforms, open the Control Panel and then use the Add or RemovePrograms option to remove iWay components. The main uninstall component is listedas:
iWay 8.0 Service Manager
You can also delete any iWay installation files in subdirectories of the following:
2. Installing iWay 8.0 Service Manager Components
iWay Installation and Configuration Guide 51

C:\WINNT\Downloaded Installations\C:\WINDOWS\Downloaded Installations\
If you ran the deploy tool to configure components for an application server, run itsuninstall utility as well, for example:
C:\Program Files\iWay8\etc\uninstall\deploy\uninstaller.exe
On UNIX, OS/400, and z/OS platforms, delete the iWay directories and remove theenvironment variables.
Registering iWay Software
A default license file, provided when you install iWay 8.0 SM, allows you to use all features ofiWay, including adapters, for 90 days. In order to receive a permanent license file that allowsyou to use the iWay features you purchased beyond this trial period, you must register yoursoftware.
Note: Once you receive your permanent license, you will also receive a 90-day trial extensionfor all non-purchased iWay features.
Tip: To view the features you have purchased, log onto the iWay Service ManagerAdministration Console and click Licenses in the top-right corner. The features that arecurrently in effect are displayed.
An iWay software license is associated with a specific site and a specific machine. When youregister your software, your license file is generated based on information provided during theinstallation (Site Code) and registration (email address). Therefore, the site code you provideduring installation must be accurate. The license files are sent to you through email. Theprocess validates the email address supplied during registration and matches it to the domainname associated with the site code. License files cannot be sent to other domain names.
iWay 8.0 SM uses a software-based license management technology that verifies that the sitecode is valid and that the software has been activated on the eligible machine(s).
The license file (license.xml) contains one or more license keys required to activate specificfeatures of iWay 8.0 SM. Do not attempt to edit this file.
When Should You Register iWay Software
You must register iWay software for each machine on which iWay is installed. The registrationprocess will generate a separate license file for each specific machine.
Registering iWay Software
52 Information Builders

You must re-register iWay software when you:
Install a new major release of iWay.
Install iWay in a new directory on the same machine.
Upgrade or replace the computer where iWay resides.
Replace the operating system of the computer where iWay resides.
How to Register iWay Software
There are three methods available to register iWay 8.0 SM. If you have email or Internetaccess from the machine where the iWay software resides, then you can use the iWay ServiceManager Administration Console to register through either email or the Internet. If you do nothave email or Internet access from the machine where the iWay software resides, we providean alternate method of registration.
This section explains how to register your software using the three methods.
Procedure: How to Register iWay Using the iWay Service Manager Administration Console
To register iWay using the iWay Service Manager Administration Console:
1. Start iWay Service Manager and log on to the iWay Service Manager AdministrationConsole if you have not already done so.
2. At the top-right of the iWay Service Manager Administration Console, click Licenses.
A page appears with information about your current licenses.
3. Click the register the software hyperlink.
A registration form is displayed.
4. Provide the requested information.
5. Click either Web or EMail.
Web sends the form using HTTP.
EMail opens your default email client and creates an email with the form contents inthe message body. Use the email client Send button to submit the registration form.
Once the registration request is processed, you will receive an email with a license file(license.xml) within 72 hours containing the license key(s) for your site and details on howto install the file.
6. Copy the license file onto your computer and place it in the root directory of your iWay 8.0SM installation.
2. Installing iWay 8.0 Service Manager Components
iWay Installation and Configuration Guide 53

Note: iWay Service Manager must be stopped at this stage.
7. Start iWay Service Manager to activate the registration.
Procedure: How to Register iWay Using an Alternate Method
If you do not have email or Internet service on the machine where iWay is installed, use thefollowing steps to register the iWay software.
1. Send the install.xml file, located in the iWay8\bin directory, [email protected] with the following information in the body of the email:
Company Name
Your Full Name
Email Address
City, Province, Postal Code, and Country
Phone Number
Once the registration request is processed, you will receive an email at the address youprovided within 72 hours that contains the license file (license.xml) and details on how toinstall the file.
2. Stop iWay Service Manager.
3. Copy the license file onto your computer and place it in the root directory of your iWay 8.0SM installation.
4. Start iWay Service Manager to activate the registration.
Registration Help
If you do not receive your license file email within five business days, verify that you providedthe correct site code and email address (either by registering from the machine on which iWayresides or sending it in the alternate registration method). If you are sure you providedaccurate information, contact iWay Customer Support and provide the following information:
Site Code
Host name
Email address used to register the software
Registering iWay Software
54 Information Builders

If you have licensing issues after receiving your license file, contact iWay Customer Supportand provide them with the following information:
License file you received
The install.xml file located in the iWay8\bin directory
Any license error messages found in the iWay Service Manager Administration Console
iWay Service Manager Configuration Steps
Now that you have installed and registered iWay 8.0 SM, review the following configurationsteps for iWay components.
1. Prepare your adapter by reviewing the information in Preparing Adapters on page 57.
2. Start iWay Service Manager as explained in Configuring iWay Components on page 77.
3. To use an application server component like Servlet iBSP, prepare and deploy thecomponent as explained in Configuring iWay Components on page 77.
4. Configure a version of iWay Explorer as explained in Configuring iWay Explorer on page93.
5. To change the default iWay Service Manager repository or optionally configure a databaserepository, see Configuring the iWay Repository on page 97.
6. Refer to the documentation for your installed adapters and extensions.
2. Installing iWay 8.0 Service Manager Components
iWay Installation and Configuration Guide 55

iWay Service Manager Configuration Steps
56 Information Builders

Chapter3Preparing Adapters
This section explains steps that are needed after installing iWay, but before usingadapters.
In this chapter:
Preparing Adapters
Preparing Adapters
Some iWay adapters require additional steps or files before they can be used. Your adaptermay not be available and may not appear in iWay Explorer until these steps are performed. Inmany cases, this involves copying third-party libraries or JDBC drivers into the iWay \libdirectory, for example:
C:\Program Files\iway8\lib
After performing the steps for your adapter, you will need to restart Service Manager if it iscurrently running. If you deploy components to an application server, you will need to restartthe application server.
Note: This document sometimes lists the actual names of required files rather than thegeneric name of the driver or library. However, your vendor may change file names, updatefiles, or have different versions of the drivers for different releases. Therefore, confirm whichfiles are required by reviewing information provided by your vendor. Ensure that you use thelatest version of the driver for the correct release of your target system, data source, orprotocol.
Review the topics that follow. If you do not see your adapter listed, check the iWay website orcontact a Customer Service representative.
Legacy Mainframe Adapters With iWay Server Requirement
Access to the following legacy mainframe data sources is provided through an iWay (EDA) Full-Function Server component that must be installed and configured on the mainframe.
Adabas
BULL GCOS
Datacom
iWay Installation and Configuration Guide 57

Flat Files
CA-IDMS/DB
CA-IDMS/SQL
Millennium
MODEL 204
Supra
Teradata
Total
VSAM
Access to and from these data sources are accomplished by first connecting to the iWayServer. Adapters for other legacy data sources do not require an iWay Server.
To configure legacy data adapters for use with iWay 8.0 SM:
1. Install an iWay Server on the mainframe containing the data sources you wish to access.
For information on iWay Server installation and configuration, see the WebFOCUS and iWayServer Installation manual and refer to the Server for z/OS chapter.
2. Configure the iWay Server to access the data source using the iWay Full-Function ServerAdministration Console. The Administration Console help explains the required steps.These steps also appear in the Data Adapter Administrator User's Guide and the ServerAdministration for UNIX, Windows NT OpenVMS, OS/400, & z/OS manual.
3. Install the iWay Data Management Administration Tools (DMAT) Suite on a Windowsmachine as explained in the iWay Data Management Administration Tools Suite InstallationGuide.
4. Use the Catalog Administrator (installed with iWay DMAT) to add stored procedures to theiWay Server catalog so the procedures are accessible from iWay Explorer.
For information on adding stored procedures, see the iWay Catalog Administrator manual.
Connect Direct
The iWay Adapter for Connect Direct requires the following library files:
CDJAI.jar
JMS.jar
Preparing Adapters
58 Information Builders
The CDJAI.jar library file is used to implement Java APIs.
ESRI (GEOLoad)
This section provides the supported versions and required library files for the iWay TechnologyAdapter for ESRI (GEOLoad).
Note: The iWay Technology Adapter for ESRI (GEOLoad) is supported only on Windowsplatforms.
Supported Versions
ArcSDE Version 9.0, 9.2, and 9.3 (For ESRILOAD)
Note: ArcSDE is a part of ArcGIS in Version 9.2 and 9.3. However, ArcSDE is still onlysupported through the ArcSDE API. It is not supported through any other API, includingArcObjects.
GDT Matchmaker Version 6 (For Geocoding)
Required Library Files
ArcSDE Version 9.0 (For ESRILOAD):
jpe90_sdk.jar
jsde90_sdk.jar
Copy these files into the iWay \lib directory, for example:
C:\Program Files\iway8\lib
ArcSDE Version 9.2 (For ESRILOAD):
jsde92_sdk.jar
jpe92_sdk.jar
icu4j_3_2.jar
concurrent.jar
Copy these files into the iWay \lib directory, for example:
C:\Program Files\iway8\lib
ArcSDE Version 9.3 (For ESRILOAD):
jsde_sdk.jar
3. Preparing Adapters
iWay Installation and Configuration Guide 59

jpe_sdk.jar
icu4j_3_2.jar
concurrent.jar
Copy these files into the iWay \lib directory, for example:
C:\Program Files\iway8\lib
GDT Matchmaker Version 6 (For Geocoding):
mmaxwus3.dll
usgeo.dll
usattr.dll
On Windows platforms, these files must be copied into the system32 directory, forexample:
C:\WINNT\system32
or
C:\WINDOWS\system32
FIX
The iWay Integration Solution for FIX requires the B2BITS® FIX Engine.
The B2BITS® FIX Engine is packaged as an archive (B2Bits_jar.zip) and can be downloadedfrom:
http://techsupport.informationbuilders.com/
For more information on installing the B2BITS® FIX Engine and configuring the iWay IntegrationSolution for FIX, see the iWay Integration Solution for FIX User’s Guide.
J.D. Edwards EnterpriseOne (OneWorld)
J.D. Edwards EnterpriseOne (OneWorld) Java-based ThinNet API is required. This is normallydistributed as JAR files with the J.D. Edwards installation media. These files may varydepending on the J.D. Edwards release. They usually consist of the following:
For J.D. Edwards OneWorld B7333 (XE) and B7334 (ERP8):
Kernel.jar
Connector.jar
Preparing Adapters
60 Information Builders

For EnterpriseOne 8.10:
Kernel.jar
Connector.jar
jdeutil.jar
log4j.jar
For EnterpriseOne 8.11:
Base_JAR.jar
JdeNet_JAR.jar
System_JAR.jar
Connector.jar
log4j.jar
For EnterpriseOne 8.12 (Tools Release 8.96.2.0):
Base_JAR.jar
JdeNet_JAR.jar
System_JAR.jar
Connector.jar
EventProcessor_EJB.jar
EventProcessor_JAR.jar
log4j.jar
For EnterpriseOne 8.12 (Tools Release 8.97.1.2 and 8.97.2.0):
Base_JAR.jar
JdeNet_JAR.jar
System_JAR.jar
Connector.jar
EventProcessor_EJB.jar
3. Preparing Adapters
iWay Installation and Configuration Guide 61

EventProcessor_JAR.jar
commons-httpclient-3.0.jar
jmxri.jar
ManagementAgent_JAR.jar
log4j.jar
For EnterpriseOne 9.0 (Tools Release 8.98):
Base_JAR.jar
JdeNet_JAR.jar
System_JAR.jar
Connector.jar
EventProcessor_EJB.jar
EventProcessor_JAR.jar
commons-httpclient-3.0.jar
jmxri.jar
jmxremote_optional.jar
ManagementAgent_JAR.jar
log4j.jar
For EnterpriseOne 9.10 (Tools Release 9.1.0.4):
Base_JAR.jar
JdeNet_JAR.jar
System_JAR.jar
Connector.jar
EventProcessor_EJB.jar
EventProcessor_JAR.jar
Preparing Adapters
62 Information Builders

commons-httpclient-3.0.jar
jmxremote.jar
commons-logging.jar
jmxri.jar
jmxremote_optional.jar
ManagementAgent_JAR.jar
log4j.jar
Note: These files are located in the \\system\classes folder on the JDE Client and theDeployment Server.
You must copy the JAR files into the iWay \lib directory, for example:
C:\Program Files\iway8\lib
J.D. Edwards WorldSoft
The DB2/400 JDBC driver (jt400.jar) is required. Copy the driver into the iWay \lib directory, forexample:
C:\Program Files\iway8\lib
LDAP
Before installing iWay Application Protocol Adapter for LDAP, iWay Service Manager (iSM)Version 7.0 or higher must be installed on a system that is running Java 2 Standard Edition(J2SE™) JDK 1.8 or higher. For more information, see Installing iWay 8.0 Service ManagerComponents on page 19.
Required Installation Files
This section lists and describes the required installation files for iWay Application ProtocolAdapter for LDAP.
iwldap.jar. Exposes design time and runtime interfaces for the iWay Application ProtocolAdapter for LDAP.
ldapbp-1.0.jar.
3. Preparing Adapters
iWay Installation and Configuration Guide 63

The following file is required for the operation of the LDAP adapter, but is considered optionalfor a Java VM installation:
dnsns.jar. Used for the InetAddress wrapper of the JNDI DNS Provider. This file is located inthe following directory:
jdk_home\jre\lib\ext
where:
jdk_home
Is the root installation directory for your JDK. For example:
c:\jdk1.8.0_45\jre\lib\ext\dnsns.jar
The iWay Application Protocol Adapter for LDAP supports only Simple Bind and Transport(SSL) security. For more information about advanced LDAP security implementations, seethe Java Cryptography Architecture Reference Guide on the following Oracle Java web site:
http://docs.oracle.com/javase/6/docs/technotes/guides/security/crypto/CryptoSpec.html
Microsoft CRM 2011
All required .jar library files for the iWay Application Adapter for Microsoft Dynamics 2011 CRMOn-Premises are provided in the iWay \lib folder.
Note: The iWay Application Adapter for Microsoft Dynamics CRM (Compatibility Mode) cannotbe used with Microsoft CRM 2013.
Microsoft .NET
The iWay Technology Adapter for Microsoft .NET allows you to expose Microsoft .NETassemblies without requiring any additional custom attributes or wrapper code.
Microsoft .NET Versions 2.0 - 4.5 are supported by the adapter.
In iWay Service Manager (iSM), the iWay Technology Adapter for Microsoft .NET supports 32-and 64-bit JVM environments. The required components for both environments areautomatically installed. During the iSM installation process, ensure that Microsoft .NET isselected under the Technology Adapters category in the Adapter Selection pane.
Preparing Adapters
64 Information Builders

Required Installation Files
The iSM installation process installs the following adapter components in the <ism_home>\libdirectory:
iwdotnet.jar. Exposes design time and runtime interfaces for the iWay Technology Adapterfor Microsoft .NET
iwdotnet32.dll or iwdotnet64.dll. Export the JNI methods that are required by the Javaclasses, which implement the adapter and act as a common language runtime host.
Note: Both versions of the iwdotnet DLL file are shipped with the adapter. Depending onthe JVM, the adapter will select the appropriate DLL file to load. A 64-bit JVM can load 32 -and 64-bit assemblies. A 32-bit JVM can only load 32-bit assemblies no matter the platformtype (32 - or 64-bit).
iwclr.dll. Contains the functionality to explore assemblies during design time, load andinvoke classes and methods at runtime, and implement the optional custom attributesused for assembly annotation.
Sample Files
The iWay Technology Adapter for Microsoft .NET installs the following sample .NET assembliesin the <ism_home>\etc\samples\dotnet\bin directory:
Complex.dll
Math.dll
Misc.dll
Scriptor.dll
SubComplex.dll
These Microsoft .NET assemblies can be used for adapter testing and verification purposes.
MySAP ERP (SAP Java Connector Version 3.x)
The iWay Application Adapter for mySAP ERP uses the SAP Java Connector (JCo) tocommunicate with SAP ABAP system targets. The following protocols and document styles aresupported:
SAP ALE Intermediate Document (IDOC)
Remote Function Call (RFC)
3. Preparing Adapters
iWay Installation and Configuration Guide 65

Business API (BAPI)
No other connection methods and interface types are supported.
The official supported platform for the iWay Application Adapter for mySAP ERP is SAP JavaConnector (JCo) Version 3.nn for Java Version 1.8nn. In this section, nn refers to releasespecifications. For a list of supported platforms and exact library names, refer to SAP Note1077727. Use the SAP note to ensure the JVM and the JCo are compatible for the selectedhardware and software platform.
Not all SAP supported platforms are supported by iWay Service Manager. For more information,check the list of iWay supported platforms to ensure compatibility.
The SAP JCo library files must be downloaded from the SAP Service Marketplace. A valid SAPsupport ID is required to access the SAP Service Marketplace. For assistance, contact yourSAP administrator. For more information on installing, configuring, and verifying the iWayApplication Adapter for mySAP ERP, see the iWay Application Adapter for mySAP ERP User'sGuide.
To install iWay Application Adapter for mySAP ERP (SAP JCo 3.0), ensure that MySAP JCO 30 isselected under the Application Adapters category in the Adapter Selection pane during the iSMinstallation process.
The iSM installation process automatically adds the iwmysap30.jar file to the <ism_home>\libdirectory.
Required SAP Library Files
This section lists the SAP library files that are required by the iWay Application Adapter formySAP ERP (SAP JCo 3.0).
Platform SAP Library Files
Windows sapjco3.jar
sapjco3.dll
Linux/Solaris/OS400 sapjco3.jar
libsapjco3.so
Preparing Adapters
66 Information Builders

Platform SAP Library Files
HP-UX sapjco3.jar
libsapjco3.sl
AIX sapjco3.jar
libsapjco3.so
Installing the Required SAP Library Files
This section describes the specific directories where the library files must be copied for theiWay Application Adapter for mySAP ERP (SAP JCo 3.0).
Note: When the sapjco3.jar library file is added to the <ism_home>\lib folder, iWay ServiceManager will automatically add this .jar file to the CLASSPATH environment variable at runtime.
The sapjco3.jar library file must always be added to the environment variable locating thesystem load library path, and must be the first entry in the list of library paths.
Windows
Copy the sapjco3.jar and sapjco3.dll library files to the following directory:
<ism_home>\lib
where:
<ism_home>
Is the root installation directory where iSM is installed (for example, C:\Program Files\iway8).
The sapjco3.dll library file will be added to the PATH by iWay Service Manager at runtime if it islocated in the <ism_home>\lib folder. Do not install this file into the Windows\System32folder as this file is not compatible with other versions of the library file and may cause issuesif an instance of SAP GUI or other program is found on the system.
Linux
Copy the sapjco3.jar and libsapjco3.so library files to the following directory:
<ism_home>/lib
3. Preparing Adapters
iWay Installation and Configuration Guide 67

where:
<ism_home>
Is the root installation directory where iSM is installed (for example, /iway/install/iway8).
After installing the libsapjco3.so library file, this file must be added to the path indicated by theLD_LIBARARY_PATH environment variable and be the first library in the list.
HP-UX
Copy the sapjco3.jar and libsapjco3.sl library files to the following directory:
<ism_home>/lib
where:
<ism_home>
Is the root installation directory where iSM is installed (for example, /iway/install/iway8).
After installing the libsapjco3.sl library file, this file must be added to the path indicated by theSHLIB_PATH environment variable and be the first library in the list.
AIX
Copy the sapjco3.jar and libsapjco3.so library files to the following directory:
<ism_home>/lib
where:
<ism_home>
Is the root installation directory where iSM is installed (for example, /iway/install/iway8).
After installing the libsapjco3.so library file, this file must be added to the path indicated by theLIBPATH environment variable and be the first library in the list.
IBM iSeries
Consult SAP Note 1269638 on configuring the SAP JCo 3.0 on IBM iSeries. The default JVMprovided cannot be used with JCo 3.0. SAP Note 1269638 has more information on this topic.
Solaris
There are different packages for different architectures (SPARC, X64, INTEL, or AMD 64 bitprocessor). Locate and install the correct package. Add the library file to the path indicated bythe LD_LIBRARY_PATH environment variable and ensure the file is the first library in the list.
Preparing Adapters
68 Information Builders

Oracle Applications (E-Business Suite)
Oracle JDBC driver (ojdbc6.jar) is required by the iWay Application Adapter for Oracle E-Business Suite. You must copy this .JAR file into the iWay \lib directory, for example:
C:\Program Files\iway8\lib
To use iWay Concurrent Program request functionality, you must install and configure OracleClient on the Oracle database that supports Oracle E-Business Suite.
Installing the iWay Oracle API Wrapper
If you want to use the iWay Application Adapter for Oracle E-Business Suite to interact withOracle APIs (Stored Procedures and Packages), you must install the iWay Oracle API wrapper.For more information, see the iWay Application Adapter for Oracle E-Business Suite User’sGuide.
Installing the GETCLOB Procedure
The GETCLOB procedure must be installed under the schema the adapter uses to run OracleAPIs. For more information, see the iWay Application Adapter for Oracle E-Business Suite User’sGuide.
PeopleSoft
This section indicates which combination of releases and system platforms are supported forthe iWay Application Adapter for PeopleSoft.
PeopleSoft Platform PeopleSoft Release PeopleTools ReleaseLevel
All PeopleSoft supported platforms(Windows, Solaris, AIX, Linux, and HP-UX).
8.1
8.4
8.16.03 - 8.22
8.40.05 - 8.52
Note that the adapter goes by the PeopleTools release and not by the PeopleSoft applicationversion.
Note: You must connect with only one version of an EIS at a given point in time. You cannotconnect to two different versions of PeopleTools using the adapter. Do not use two versions ofan EIS library file simultaneously. You also cannot use the library files for two differentversions in the \lib folder.
Required Library Files
3. Preparing Adapters
iWay Installation and Configuration Guide 69
This section lists the library files that are required by the iWay Application Adapter forPeopleSoft.
PeopleSoft Java Object Adapter file (psjoa.jar)
This file provides a low-level interface between client applications and PeopleSoft. This fileis provided with PeopleSoft in the <PeopleSoft_Home>\web\PSJOA directory. The psjoa.jarfile is different for every version of PeopleSoft. When you upgrade your PeopleTools release,ensure that you copy the psjoa.jar file for the new release into the <iWAY_Home>\libdirectory and restart all components.
pstools.properties
This file is required for PeopleTools 8.1x. This file belongs in the <PeopleSoft_Home>\web\jmac directory.
PeopleSoft Generated Java APIs
For more information on generating the Component Interface Java APIs, see the iWayApplication Adapter for PeopleSoft User's Guide.
All the library files for the PeopleSoft adapter must be copied to the specific directory, such as<iWAY_Home>\lib.
RDBMS
iWay Technology Adapter for RDBMS connects iSM to various database engines that have anavailable JDBC compliant driver from the database or third party vendor. Generally, the JDBCdriver should match the database version as well as the version of the JVM that is hostingiSM. Database versions that have reached the end of their vendor supported lifecycle are nolonger supported by iSM and the iWay Technology Adapter for RDBMS.
All JDBC drivers are installed in the \lib. For example:
On Windows:
iway8\lib
On UNIX (for example, Linux and AIX):
$IWAYHOME/lib
Preparing Adapters
70 Information Builders

DB2
iSM requires a class 4 DB2 JDBC driver to access functionality database and data types.Currently, the following driver versions are required:
Version 9.4.7 and higher on AIX
db2jcc.jar
db2jcc_license_cu.jar
Version 10.0 and higher on z/OS
db2jcc.jar
db2jcc_license_cisuz.jar
Version 5R3 and higher on iSeries (AS 400)
jt400.jar
Informix
Versions 11.5, 12.1, and higher on AIX
ifxjdbc.jar
Note: Additional .jar files may be required depending on the specific environment.
Oracle
Versions 10g, 11g, and higher
ojdbc6.jar
The following .jar file is required when Oracle RAC is implemented:
ucp.jar
The following .jar files are required when XMLType data types are used:
xdb6.jar
xmlparserv2.jar
3. Preparing Adapters
iWay Installation and Configuration Guide 71

Microsoft SQL Server
SQL Versions 2008, 2012, and higher
sqljdbc4.jar
SQL Version 2005 (not supported)
Mainstream support ended April 12, 2011 and extended support will end April 12, 2016.Contact Microsoft for JDBC driver information.
SQL Version 2000 (not supported)
Extended support ended April 9, 2013.
MySQL
Version 5.5.8 and higher
mysql-connector-java-5.1.14-bin.jar
PostGres
Versions 8.4 and 9.3 and later
postgresql-9.0-801.jdbc4.jar
Sybase
Adaptive Server ASE V15.x
jconn4d.jar
SAP R/3
The iWay Application Adapter for SAP R/3 using SAP JCo 2 is no longer supported. SAP hasdiscontinued support for SAP JCo 2 and as a result, iWay cannot offer the adapter onunsupported versions of the JCo. For all SAP adapter installations, use the iWay ApplicationAdapter for mySAP ERP instead. The installation instructions for mySAP ERP should be followedin any scenario that requires the SAP R/3 adapter. The mySAP ERP adapter will support SAPreleases from SAP R/3 4.6C to SAP ERP 7.
For more information, see MySAP ERP (SAP Java Connector Version 3.x) on page 65.
Preparing Adapters
72 Information Builders

Siebel
For Siebel Versions 6.3 - 8.1, Siebel Java Data Bean API is required. This is distributed as JARfiles with the Siebel Thin Client.
Copy the required JAR files into the iWay \lib directory, for example:
C:\Program Files\iway8\lib
The required files vary by Siebel release in both content and name. Therefore, the Siebel ThinClient provided with the target Siebel system must always be used with the adapter, forexample:
Siebel 6.3.x
SiebelTcOM.jarSiebelTcCommon.jarSiebelTC_enu.jarSiebelDataBean.jar
Siebel 7.0.3
SiebelJI_Common.jarSiebelJI_enu.jar
Siebel 7.5.2
SiebelJI_Common.jarSiebelJI_enu.jarSiebelJI.jar
Siebel 7.7 - 7.8.2
SiebelJI_enu.jarSiebel.jar
Siebel 8.0 - 8.1
SiebelJI_enu.jarSiebel.jar
The Siebel COM-based API (Windows only) requires the Siebel Thin Client to be installed andaccessible to the adapter.
The following files are for English language implementations:
SiebelTC_enu.jarSiebelJI_enu.jar
For non-English installations, the last three letters (_enu) vary.
3. Preparing Adapters
iWay Installation and Configuration Guide 73

Siebel Version 6.2 and Lower Connectivity Prerequisites
You must perform additional steps to connect to a Siebel system (version 6.2 and lower) usingCOM connectivity for an iBSP configuration. For more information, see the iWay ApplicationAdapter for Siebel User's Guide.
Configuring Connection Pooling for Siebel
To configure connection pooling for Siebel, you must create a siebel.properties file for use withthe iWay Application Adapter for Siebel. For more information on how to configure thesiebel.properties file, see the iWay Application Adapter for Siebel User's Guide.
Terminal Emulation Adapter (3270/5250) (Telnet)
The iWay Emulation Adapter (3270/5250) links new business applications to mainframe-basedbusiness logic through IBM 3270 and 5250 terminal screens and data streams. It enables youto transform your 3270 or 5250 mainframe screens into HTML pages or to create a remoteprocedure request (RPC) to transform the output of screens into an answer set. The adapterprovides a simple, lightweight, and scalable way to reuse the business logic and data ofterminal applications.
The iWay Emulation Adapter (3270/5250) requires client components that you must configureafter installing iWay. The two client components are:
The run-time component, which is supported on:
Microsoft Windows
UNIX
z/OS (under UNIX System Services)
The Telnet Designer, which is supported on:
Microsoft Windows
The iWay Emulation Adapter (3270/5250) includes the Telnet Designer, which is a tool tocreate screen-based interactions that can run with the adapter. The Telnet Designer issupported on Windows platforms only.
If the adapter is installed on a UNIX platform, then you will need to copy the Telnet Designercomponent, in binary format, from the UNIX system to the Windows system.
For information about using the adapter, including the Telnet Designer, see the iWay EmulationAdapter (3270/5250) User's Guide.
Preparing Adapters
74 Information Builders

TIBCO Rendezvous
The following file is required.
tibrvj.jar
Copy this file into the iWay \lib directory, for example:
C:\Program Files\iway8\lib
In addition to the Java file, tibrvj.jar, the iWay Adapter for TIBCO requires several TIBCO binaryfiles. These files are stored in the following TIBCO directory:
C:\tibco\tibrv\bin
This directory must be added to the search PATH variable of any user ID that runs iWaycomponents.
3. Preparing Adapters
iWay Installation and Configuration Guide 75

Preparing Adapters
76 Information Builders
Chapter4Configuring iWay Components
This section describes how to configure components for iWay Service Manager.
In this chapter:
Configuring and Verifying iWay Service Manager
Configuring iWay Application Server Components
Configuring and Verifying iWay Service Manager
iWay Service Manager is a highly scalable enterprise service bus. It contains fully-integratedservice design-time workbench and web services creation and deployment capabilities, and itprovides a hosting environment for adapters.
This section explains how to start and stop iWay Service Manager, configure and createadditional instances of Service Manager, configure the Java memory size, and verify the iWayBusiness Services Provider (iBSP).
At this time, you are ready to start iWay Service Manager and access the iWay ServiceManager Administration Console.
Starting and Stopping iWay Service Manager on Windows Platforms
If you are not on a Windows system, proceed to Starting and Stopping iWay Service Manager onNon-Windows Platforms on page 78.
The following procedure explains how to start and stop iWay Service Manager on Windowsplatforms. If you copied third-party files for your adapters into the iWay \lib directory, youshould restart it at this time. If it is not started, start it as explained in the following section.
Procedure: How to Start and Stop Service Manager on Windows Platforms
By default, Service Manager runs as a Windows Service and there are two ways to start andstop it.
Use the Windows start menu to select Programs, iWay 8.0 Service Manager, base, and StartService Manager - base or Stop Service Manager - base.
iWay Installation and Configuration Guide 77

or
Open the Services window (Control Panel, Administrative Tools, and then Services), right-click iWay Service Manager -base, and select Start, Restart, or Stop.
Note: By default, Service Manager starts with Windows. To prevent it from starting withWindows, open the Services window, right-click iWay Service Manager -base, choose Properties,and change the Startup type to Manual.
Windows users can proceed to Configuring Service Manager on page 81.
Starting and Stopping iWay Service Manager on Non-Windows Platforms
For non-Windows systems, you can run Service Manager as a service (daemon) or as a usertask.
Windows users can proceed to Configuring Service Manager on page 81.
Procedure: How to Start Service Manager on Non-Windows Platforms as a User Task
To start Service Manager as a user task:
1. Navigate to the directory where iWay 8.0 SM is installed, for example:
/home/userID/iway8
2. Type the following:
./iway8.sh base
When you start Service Manager, you specify which configuration to use. The baseconfiguration is available by default and includes SOAP and HTTP listeners. You can runmore than one instance of Service Manager by defining multiple configurations using theiWay Service Manager Administration Console.
When iWay has started, you receive the following prompt:
Enter command:>
Procedure: How to Stop Service Manager on Non-Windows Platforms as a User Task
To stop Service Manager when it runs as a user task:
1. Go to the Service Manager prompt:
Enter command:>
2. At the Service Manager prompt, enter the following to stop listeners:
stop
Configuring and Verifying iWay Service Manager
78 Information Builders

3. When listeners have stopped, enter the following:
quit
Procedure: How to Start Service Manager on Non-Windows Platforms as a Service
To start Service Manager as a service (daemon):
1. Navigate to the iway8/bin directory, for example:
/home/userID/iway8/bin
2. Edit the following file.
Note: This step is only required the first time you start Service Manager.
a. Open the following file in a text editor:
startservice.sh
b. Edit the IWAY8 line to specify where iWay is installed. Be sure to include the finaltrailing slash, for example:
IWAY8=/home/userID/iway8/
c. Edit the IWAYUSER line so that it specifies the user ID that you want Service Managerto run under, for example:
IWAYUSER=userID
This user ID requires full permissions to the iway8 directory structure. For securityreasons, it is not recommended to run iWay Service Manager as root.
d. Save and exit the file.
3. Execute the startup service file, for example:
./startservice.sh
If you are not logged on as root, you are prompted for the password of the user ID underwhich Service Manager runs.
Password:
4. Enter the password for this user ID.
The base configuration of Service Manager is started in the background and includesSOAP and HTTP listeners. A serviceOut.txt file appears in the iway8 directory and containslog information.
4. Configuring iWay Components
iWay Installation and Configuration Guide 79

Procedure: How to Stop Service Manager on Non-Windows Platforms as a Service
To stop Service Manager running as a service (daemon):
1. Navigate to the iway8/bin directory, for example:
/home/userID/iway8/bin
2. Edit the shutdown file.
Note: This step is only required the first time you stop Service Manager.
a. Open the following file in a text editor:
stopservice.sh
b. Edit the IWAY8 line to specify where iWay is installed. Be sure to include the finaltrailing slash, for example:
IWAY8=/home/userID/iway8/
c. Edit the IWAYUSER line so that it specifies the user ID you are using to run ServiceManager, for example:
IWAYUSER=userID
d. Save and exit the file.
3. Execute the shutdown file, for example:
./stopservice.sh
If you are not logged on as root, you are prompted for the password of the user ID underwhich Service Manager runs.
Password:
4. Enter the password for this user ID.
Note: If you receive an error, ensure the user ID is defined in the shutdown file.
Procedure: How to Start Service Manager as a Batch Process on z/OS
On z/OS systems, you can start Service Manager as a batch process using JCL.
1. Use the following sample JCL as a model to start Service Manager in batch:
Configuring and Verifying iWay Service Manager
80 Information Builders

//EDABGBPX JOB (SMITH),'JAVA BPXBATCH',CLASS=A,MSGLEVEL=(1,1),// MSGCLASS=X,REGION=0M,NOTIFY=EDABG,USER=EDABG1,PASSWORD=XXXXXXX//******************************************************************** //* RUN JAVA UNDER A UNIX SYSTEM SERVICE SHELL//******************************************************************** //STEP2 EXEC PGM=BPXBATSL,// PARM='PGM /bin/sh /u/edabg1/iway8/iway8.sh base -c'//STDOUT DD SYSOUT=*//STDERR DD SYSOUT=*//STDENV DD *JAVA_HOME=/usr/lpp/java/J1.6PATH=/usr/lpp/java/J1.6/bin//
2. Substitute the appropriate job card and HFS locations on your system accordingly.
Procedure: How to Stop Service Manager as a Batch Process on z/OS
On z/OS systems, you can stop Service Manager as a batch process using JCL.
1. Use the following sample JCL as a model to stop Service Manager in batch:
//EDABGBPS JOB (SMITH),'JAVA BPXBATCH',CLASS=A,MSGLEVEL=(1,1),// MSGCLASS=X,REGION=0M,NOTIFY=EDABG,USER=EDABG1,PASSWORD=XXXXXXX//********************************************************************//* RUN JAVA UNDER A UNIX SYSTEM SERVICE SHELL//********************************************************************//STEP2 EXEC PGM=BPXBATSL,// PARM='PGM /bin/sh /u/edabg1/iway8/bin/iway8sd.sh'//STDOUT DD SYSOUT=*//STDERR DD SYSOUT=*//STDENV DD *PATH="/usr/local/diff/bin:.:/usr/lpp/java/J1.6/bin:/bin::/usr/local/bin /usr/local/subin:/usr/sbin"1.6/bin'LIBPATH=/lib:/usr/lib:/usr/lpp/java/J1.6/bin:.JAVA_HOME=/usr/lpp/java/J1.6//
2. Substitute the appropriate job card and HFS locations on your system accordingly.
Configuring Service Manager
The installation program automatically installs and configures Service Manager. The initialbase configuration sets up SOAP and HTTP listeners. You can modify the base configuration,set up additional listeners, or create a new configuration using a web-based configuration toolcalled the iWay Service Manager Administration Console.
4. Configuring iWay Components
iWay Installation and Configuration Guide 81

Procedure: How to Configure and Secure Service Manager
To access the iWay Service Manager Administration Console:
1. Open the following page in your web browser:
http://hostname:9999
where:
hostname
Is the host name where you installed iWay.
If you changed the default port, substitute accordingly.
2. Log on when prompted. When first installed, the user ID and password are the following:
User Name admin
Password admin
Configuring and Verifying iWay Service Manager
82 Information Builders
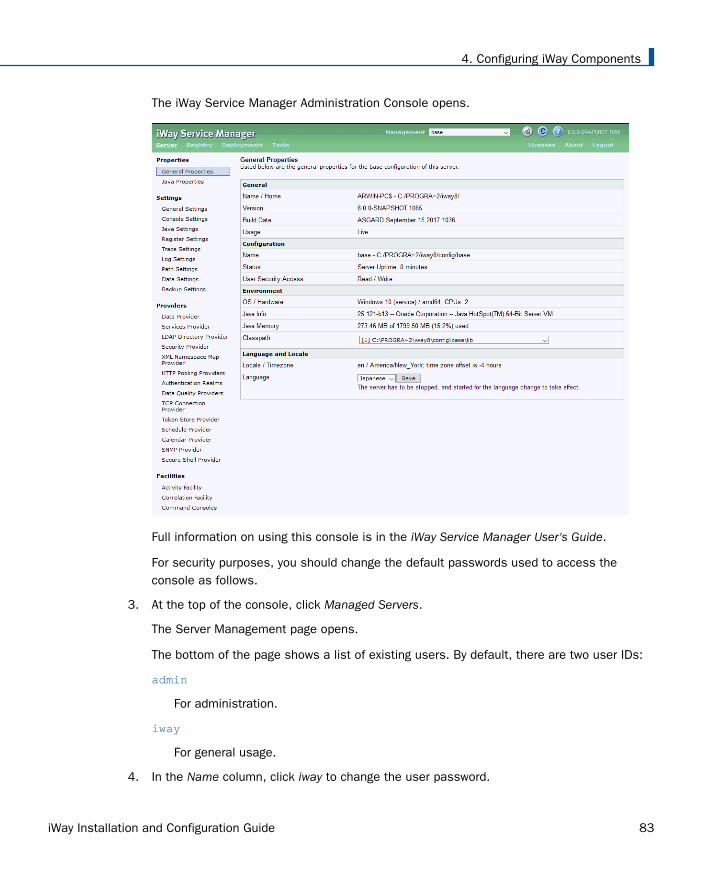
The iWay Service Manager Administration Console opens.
Full information on using this console is in the iWay Service Manager User's Guide.
For security purposes, you should change the default passwords used to access theconsole as follows.
3. At the top of the console, click Managed Servers.
The Server Management page opens.
The bottom of the page shows a list of existing users. By default, there are two user IDs:
admin
For administration.
iway
For general usage.
4. In the Name column, click iway to change the user password.
4. Configuring iWay Components
iWay Installation and Configuration Guide 83

5. Type a new password in the Password field, confirm the password, and click Finish.
6. In the Name column, click admin to change the user password.
7. Type a new password in the Password field, confirm the password, and click Finish.
You are prompted to log on with the new password.
8. Log on with the new password and click OK.
Getting Started With iWay
After iWay starts, review the iWay Welcome pages. These pages are part of the iWay Consoleand accessible at:
http://hostname:9999/ism/welcome
where:
hostname
Is the host name where you installed iWay. If you change the default port, substitute itaccordingly.
These pages provide an excellent way to become familiar with iWay functionality and features.
Additional Configurations
You can create a new configuration if you wish to run more than one instance of iWay ServiceManager. Most iWay documentation assumes you are using the default base configuration. Ifyou create a new configuration, substitute accordingly when reading iWay documentation.
It is recommended that you create at least one application configuration, particularly inproduction and test environments, since the base configuration is used by iWay ServiceManager for console and GUI tool communications.
Procedure: How to Create an Additional Configuration
1. If it is not already open, access the iWay Service Manager Administration Console and logon as an administrator.
2. On top of the console, click Managed Servers.
The Server Management page opens.
3. Under the Configurations area, click Add.
A form appears to define the new configuration.
Configuring and Verifying iWay Service Manager
84 Information Builders
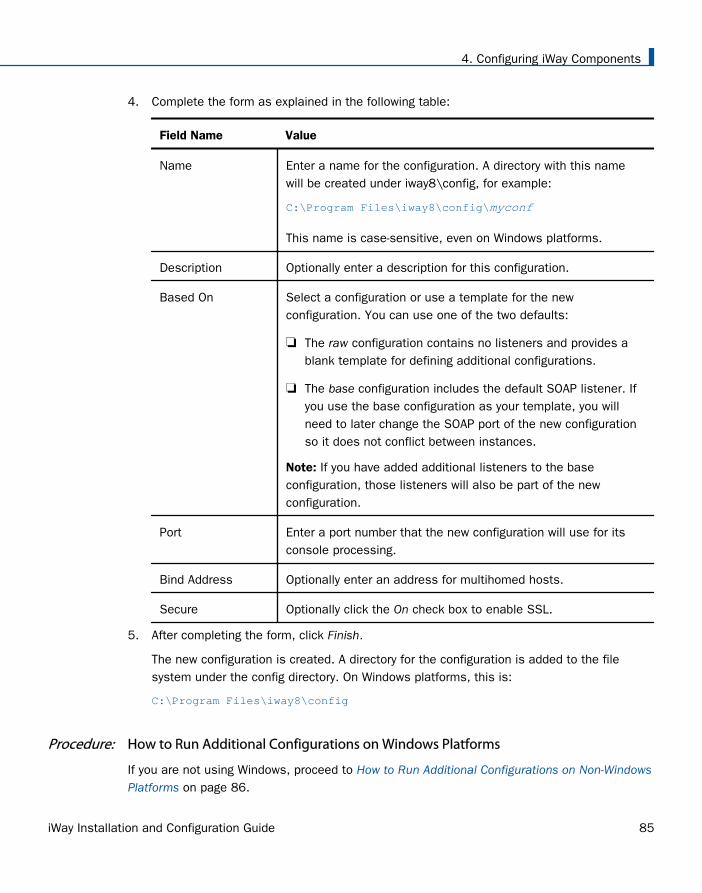
4. Complete the form as explained in the following table:
Field Name Value
Name Enter a name for the configuration. A directory with this namewill be created under iway8\config, for example:
C:\Program Files\iway8\config\myconf
This name is case-sensitive, even on Windows platforms.
Description Optionally enter a description for this configuration.
Based On Select a configuration or use a template for the newconfiguration. You can use one of the two defaults:
The raw configuration contains no listeners and provides ablank template for defining additional configurations.
The base configuration includes the default SOAP listener. Ifyou use the base configuration as your template, you willneed to later change the SOAP port of the new configurationso it does not conflict between instances.
Note: If you have added additional listeners to the baseconfiguration, those listeners will also be part of the newconfiguration.
Port Enter a port number that the new configuration will use for itsconsole processing.
Bind Address Optionally enter an address for multihomed hosts.
Secure Optionally click the On check box to enable SSL.
5. After completing the form, click Finish.
The new configuration is created. A directory for the configuration is added to the filesystem under the config directory. On Windows platforms, this is:
C:\Program Files\iway8\config
Procedure: How to Run Additional Configurations on Windows Platforms
If you are not using Windows, proceed to How to Run Additional Configurations on Non-WindowsPlatforms on page 86.
4. Configuring iWay Components
iWay Installation and Configuration Guide 85

On Windows platforms, to create and run a new Windows service for the configuration:
1. Open a command prompt and navigate to the iway8\bin directory:
C:\Program Files\iway8\bin
2. Enter the following to create the service.
iwsrv config_name -s install
where:
config_name
Is the name of the new configuration. This is case-sensitive, even on Windowsplatforms.
The following is displayed:
iWay Service Manager - config_name ServiceInstalled Successfully.
For details on iWay Service Manager, see the iWay Service Manager User's Guide.
3. Open the Control Panel, double-click Administrative Tools, and select Services.
4. Start and stop the configuration from the Services window. The service appears as:
iWay Service Manager - config_name
If you want to remove the service, ensure the service is stopped and then enter thefollowing in a command prompt at the iway8\bin directory:
iwsrv config_name -s remove
5. Proceed to How to Configure an Additional Configuration on page 87.
Procedure: How to Run Additional Configurations on Non-Windows Platforms
On other platforms, you can run the new configuration as a service (daemon) or as a user task.
To run as a user task, navigate to the directory where you installed iWay and enter thefollowing:
iway8.sh config_name
where:
config_name
Is the name of the new configuration.
Configuring and Verifying iWay Service Manager
86 Information Builders
To run as a service, you must copy, edit, and then execute the default startup and stopfiles in the iway8/bin directory:
startservice.sh
stopservice.sh
Copy and rename these files and then edit them to replace base with the name of yourconfiguration. Also be sure to change the log file names serviceOut.txt and serviceShutdown.txtso they are unique to this configuration. After copying and editing the startup file, execute it.The exact names of these files may vary depending on your platform.
Procedure: How to Configure an Additional Configuration
1. After the configuration has started, return to the iWay Service Manager AdministrationConsole home page for the default configuration:
http://hostname:9999
Note: Although each configuration has a iWay Service Manager Administration Consoleport, the console port for an additional configuration is not normally used. If you do usethe iWay Service Manager Administration Console port for an additional configuration, youstill need to select that configuration from the Managed Servers drop-down list.
2. In the Managed Servers drop-down list, select your configuration.
3. Use the iWay Service Manager Administration Console to configure the new configuration.
4. If you used the base configuration as a template, change the SOAP port so it does notconflict with the default base configuration. Then restart the configuration.
Configuring a Unique ID for an iWay Service
You can configure iWay Service Manager to run as a Windows service (iWay service). Bydefault, the iWay service runs as the Local System ID.
However, the Local System ID does not allow you to set user level environment variables (forexample, _JAVA_OPTIONS).
4. Configuring iWay Components
iWay Installation and Configuration Guide 87
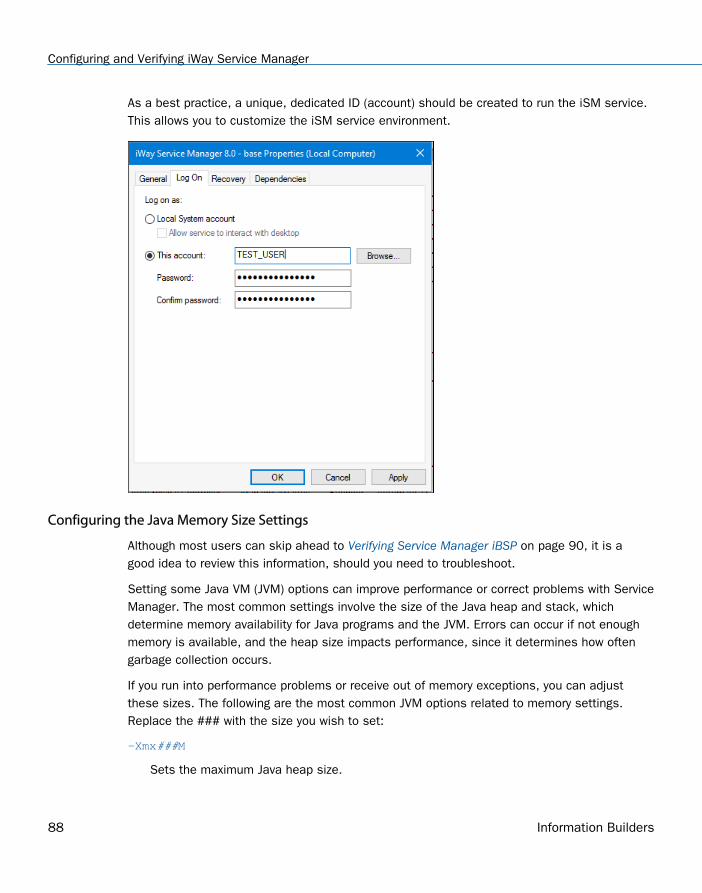
As a best practice, a unique, dedicated ID (account) should be created to run the iSM service.This allows you to customize the iSM service environment.
Configuring the Java Memory Size Settings
Although most users can skip ahead to Verifying Service Manager iBSP on page 90, it is agood idea to review this information, should you need to troubleshoot.
Setting some Java VM (JVM) options can improve performance or correct problems with ServiceManager. The most common settings involve the size of the Java heap and stack, whichdetermine memory availability for Java programs and the JVM. Errors can occur if not enoughmemory is available, and the heap size impacts performance, since it determines how oftengarbage collection occurs.
If you run into performance problems or receive out of memory exceptions, you can adjustthese sizes. The following are the most common JVM options related to memory settings.Replace the ### with the size you wish to set:
-Xmx###M
Sets the maximum Java heap size.
Configuring and Verifying iWay Service Manager
88 Information Builders
-Xms###M
Sets the initial Java heap size.
-Xss###M
Sets the Java thread stack size.
The size is normally set in Megabytes, for example:
-Xms512M
Optimum sizes vary depending on your total memory, the needs of your application, how manyother processes require memory, the type of Java VM, and other considerations.
Where to set these and other JVM options, depends on your operating system:
On Windows platforms, set JVM options using the iWay Service Manager AdministrationConsole. On the home page, under Settings, click Java Settings, specify your JVM options inthe Startup Options box, and click Update. Then stop and start Service Manager. Anexample of these options is:
-Xmx1024M -Xms512M
On non-Windows platforms, you must manually modify the script you use to start ServiceManager:
If you run Service Manager as a service (daemon), edit the script you use to start theservice (for example, startservice.sh) and add JVM options to the line that calls the javacommand, for example:
su $IWAYUSER -c "java -Xmx1024M -Xms512M $REMDBG -cp $CLASSPATH -DIWAY8=$IWAY8 com.ibi.service.edaqmSilentService -config $IWAYCONFIG >> $IWAY8/serviceOut.txt &"
If you run Service Manager as a user task, edit the script you use to start ServiceManager (for example, iway8.sh) and add JVM options to the line that calls the Javacommand, for example:
java –Xmx1024M –Xms512M $REMDBG -cp $CLASSPATH -DIWAY8=$IWAY8 edaqm -config $SCRI PT $2 $3 $4 $5 $6
Alternately, the environment variable _JAVA_OPTIONS can be set accordingly for theiWay user ID.
4. Configuring iWay Components
iWay Installation and Configuration Guide 89

Verifying Service Manager iBSP
iWay Business Services Provider (iBSP) is a transformation and integration engine forprocessing XML files and SOAP messages for exchange with web service applications andother systems. iBSP runs as a component of iWay Service Manager (iSM) and is configuredautomatically. No steps are required for its initial setup.
When first installed, iSM is configured for iBSP and its default SOAP listener is on port 9000.You can verify the installation by accessing a sample web service.
Note: iWay Business Services Provider (iBSP) was formerly known as iWay Business ServicesEngine (iBSE). Some references, files, and prompts may still use the older name.
Procedure: How to Verify Service Manager iBSP
1. Ensure Service Manager is started.
2. Go to the following page in your browser:
http://hostname:9000
where:
hostname
Is the host name where you installed iWay.
If you changed the default port, substitute accordingly.
The iBSP home page opens as shown below. Three hyperlinks are available by default forthe three default licenses, IVP, test, and production.
This page allows you to test the sample web service installed with iWay 8.0 SM. When youcreate web services using iWay Explorer, you can also test them from this page.
Configuring and Verifying iWay Service Manager
90 Information Builders

3. Click IVP.
4. Click iwayivp.
5. Click ivp.
6. Click Invoke.
An XML response that is similar to the following appears in your browser:
<?xml version="1.0" encoding="UTF-8" ?><SOAP-ENV:Envelope xmlns:xsd="http://www.w3.org/2001/XMLSchema"xmlns:SOAPENV="http://schemas.xmlsoap.org/soap/envelope/"xmlns:xsi="http://www.w3.org/2001/XMLSchema-instance"> <SOAP-ENV:Body> <ivpResponse xmlns="urn:iwaysoftware:iBSP:jul2003:ivp:response" cid="A0328ED84ABFA055C4F64B8039C991AA"> <CurrentTime>2017-05-02T19:14:03Z</CurrentTime> <Version>IWAY 8.0 Service Manager</Version> </ivpResponse> </SOAP-ENV:Body></SOAP-ENV:Envelope>
iWay Integration Tools Transformer
iWay Integration Tools (iIT) Transformer (previously known as iWay Transformer) is a GUI toolthat is delivered as a plugin with iIT. iIT Transformer is used to specify how records and fieldsmap to one another. It supports one-to-one, one-to-many, or many-to-one mappingrelationships. Documents created by iIT Transformer are characterized as transformationtemplates and can be used throughout iWay. After being created, the templates are stored asXML documents, so they can be maintained and managed with or without iWay Transformer.
Data domain experts can use iIT Transformer to create sophisticated transformation templateswithout programming assistance. Both transformations for XML and non-XML, input and outputdocument types can be created.
For more information, see the iIT Transformer User Guide.
iWay Integration Tools Designer
iWay Integration Tools (iIT) Designer (previously known as iWay Designer) is a GUI tool that isdelivered as a plugin with iIT. iIT Designer is used to build workflows for use with iWay.Workflows model business processes and control tasks in a correct sequence. A workflowdefinition serves to control the sequence in which external program modules are executed.
For more information, see the iIT Designer User Guide.
4. Configuring iWay Components
iWay Installation and Configuration Guide 91
Configuring iWay Application Server Components
iWay provides several components that can be deployed and run in J2EE Application Servers:
iWay Business Services Provider (iBSP) provides transformation and adapter hostingfunctionality as well as an environment for developing, running, and integrating webservices. It provides a transformation and integration engine for processing XML files andSOAP messages for exchanges with web services applications.
iWay Explorer uses iWay adapters to create schemas and web services for use with iWaycomponents or other XML or web service-based programs. It enables you to quicklygenerate schemas and publish web services from objects and procedures in productionERP systems, without requiring in-depth knowledge of the object or system. iWay Explorer isdelivered as a plugin with iWay Integration Tools (iIT).
For more information on how to configure these components, see Installing iWay 8.0 ServiceManager Components on page 19. The following steps are involved:
Ensure your application server is properly installed and configured.
Perform any prerequisites to configure the application server for iWay components.
Prepare iWay application server components to be deployed. For certain applicationservers, this can be automated by running the iWay deploy tool.
Deploy your application server components.
If needed, create a database repository.
Configuring iWay Application Server Components
92 Information Builders
Chapter5Configuring iWay Explorer
This section explains how to configure iWay Explorer.
If you are planning to use Servlet iBSP, you should first review Configuring iWayComponents on page 77 and then return to this section.
In this chapter:
Configuring iWay Explorer
Configuring Eclipse iWay Explorer
Configuring iWay Explorer
iWay Explorer is a GUI tool that uses iWay Adapters to create schemas and web services foruse with iWay components or other XML or web service-based programs. It allows you toquickly generate and publish a web service from objects and procedures in many differentsystems, without requiring in-depth knowledge of the object or system.
An Eclipse Plugin for iWay Explorer is provided, which can be embedded in the open sourceEclipse development environment using iWay Integration Tools (iIT) for Eclipse. See ConfiguringEclipse iWay Explorer on page 93 for configuration information.
If you are planning to use Servlet iBSP, you should first review Configuring iWay Components onpage 77 and then return to this section.
Configuring Eclipse iWay Explorer
Eclipse Plugin iWay Explorer can be embedded in the open source Eclipse developmentenvironment using iWay Integration Tools for Eclipse. In addition to iWay Explorer, these toolsallow you to start and stop Service Manager and view schemas within Eclipse.
Note: Java Development Kit (JDK) 1.8 or higher is required.
Installing iWay Integration Tools for Eclipse
For the Eclipse rich client (standalone) iWay Explorer, proceed to Using Eclipse iWay Explorer onpage 95.
For the Eclipse plugin iWay Explorer, Eclipse 3.4 or higher must be installed and configured onyour system. Earlier Eclipse releases are not supported. You can download Eclipse from:
iWay Installation and Configuration Guide 93

http://www.eclipse.org/
Note: You can embed iWay Integration Tools into Eclipse, using the Eclipse update manager asexplained in the following procedure. The update manager makes it easy to add additionalfeatures and plug-ins to an Eclipse based product. You can also manually embed the tools byunzipping the iway8\etc\setup\iweclipse.zip file into the Eclipse installation directory.
Procedure: How to Install iWay Integration Tools for Eclipse
1. Open Eclipse.
Note: If Eclipse is already open, ensure that all active projects have been saved.
2. In the Help menu, select Software Updates.
The Software Updates and Add-ons window opens.
3. Go to Available Software and click the Add Site button.
The Add Site window opens.
4. Type the following location:
C:\Program Files\iway8\etc\setup\eclipse
5. Click the Installed button.A progress window opens and displays a message that requirements and dependenciesare being calculated. A window then opens with information about the iWay IntegrationTools version being upgraded.
6. Click Next.
7. Review the license agreement, and if you agree, select the I accept ... radio button, andclick Next.
8. Click Finish.
When the installation completes, you must restart Eclipse.
9. Click Yes to restart Eclipse.
10. When Eclipse restarts, you are asked for the work space location again. Enter the followinglocation and click OK.
C:\Program Files\iway8\etc\setup\eclipse
11. Select the Window menu, choose Show View, and then Other.
The Show View dialog opens.
12. Expand iWay Integration Tools and select iWay Explorer and Complex Properties.
13. Click OK.
Configuring Eclipse iWay Explorer
94 Information Builders
An iWay Explorer tab appears in Eclipse.
Using Eclipse iWay Explorer
Using the Eclipse iWay Explorer is the same whether you run the plugin or rich client version.
Procedure: How to Access Eclipse iWay Explorer
1. Start Eclipse, open a project, and select the iWay Explorer tab.
Initially, no connections are defined. You must define a connection between iWay Explorerand an iWay component, such as Service Manager or Servlet iBSP.
2. Click the new iWay connection (the blue shield) button to define a connection.
3. Select iWay Configuration and click Next.
4. Name the connection.
For Service Manager or Servlet iBSP, this is your choice.
5. Specify the Connection Type.
For Service Manager or Servlet iBSP, choose HTTP Connection.
6. Click Next.
7. Enter the connection information if the default is not correct.
For Service Manager, the URL is the Service Manager hostname and SOAP port, forexample:
http://hostname:9000
where:
hostname
Is the host name where iWay is installed. Use the actual host name and not localhost.
If you changed the default SOAP port, substitute accordingly. You can click the LocalConnection button to see the default.
For Servlet iBSP, the URL depends on your application server port and is normally:
http://hostname:port/ibse/IBSEServlet
5. Configuring iWay Explorer
iWay Installation and Configuration Guide 95

where:
hostname
Is the host name of the application server machine. Use the actual host name and notlocalhost.
port
Is the HTTP port for your application server.
8. Click Next.
9. Check or uncheck the adapters you wish to appear and click Finish.
Your connection appears in the iWay Explorer tab. You can expand it to see adapters andweb services. Double-click Application Explorer to see service adapters and double-clickEvent Explorer to see event adapters. To configure an adapter, right-click and select AddTarget.
The available adapters vary depending on which version of iWay you install and which filesare in the iway8\lib directory. If your adapter requires third-party drivers or libraries, theymust be in the lib directory or your adapter may not appear. See Preparing Adapters onpage 57 for information on required files.
For more information on using Eclipse iWay Explorer, see the Eclipse documentation availablefrom iWay Software.
Configuring Eclipse iWay Explorer
96 Information Builders

Chapter6Configuring the iWay Repository
This section explains how to change the default database repository for iWay ServiceManager. Information on how to migrate repositories is also provided.
In this chapter:
Configuring and Creating the Repository
Migrating Repositories
Configuring and Creating the Repository
iWay Service Manager and Servlet iBSP require repositories to store information about adaptertargets, metadata, transactions, web services, and other data.
For iWay Service Manager, an HSQL database is automatically installed and configuredwhen you install Service Manager.
For Servlet iBSP, a file-based repository is available by default. This is only supported indevelopment environments. For production or test environments, you should set ServletiBSP to use a RDBMS repository, as explained in this section.
Creating the Repository
Scripts to create repository tables are installed with iWay in the ibspsql.zip file, for example:
C:\Program Files\iway8\etc\setup\ibspsql.zip
You should extract the contents of this file to a temporary directory on the machine with yourdatabase server. To extract, you can use Winzip or the jar command (jar xvf ibspsql.zip).
Then follow the steps for your type of repository:
For Microsoft SQL Server, see How to Configure a Microsoft SQL Server Repository on page98.
For Oracle, see How to Configure an Oracle Repository on page 99.
For Sybase, see How to Configure a Sybase Repository on page 100.
For DB2, see How to Configure a DB2 Repository on page 100.
iWay Installation and Configuration Guide 97
For MaxDB, see How to Configure a MaxDB Repository on page 100.
Procedure: How to Configure a Microsoft SQL Server Repository
To configure a Microsoft SQL Server repository:
1. Ensure that SQL Server authentication is supported.
For SQL Server 2000, you can do this in the SQL Server Enterprise Manager by right-clicking your SQL Server, choosing Properties, and clicking the Security tab. IfAuthentication is set to Windows only, change it to SQL Server and Windows, and thenrestart SQL Server.
2. Create a SQL Server user ID.
3. Create a SQL Server database to use as the repository.
To do this, you can use the Enterprise Manager to expand the servers and folders on theleft, right-click the Databases folder, and choosing New Database. You can name thedatabase anything you wish and can keep default settings.
4. Grant your SQL Server user ID db_owner rights to the repository database.
5. If you have not yet done so, extract the contents of the ibspsql.zip file, for example:
C:\Program Files\iway8\etc\setup\ibspsql.zip
Extract the files to a directory on the machine running SQL Server. After extracting files,the SQL Server files are located in an mss directory.
6. Open a command prompt and navigate to the mss directory you extracted from ibspsql.zip.The following file contains SQL to create the repository tables:
iwse.sql
For Japanese users, the script is named Iwse-unicode.sql.
7. Issue the following command to create the repository tables:
osql -S hostname -d databasename -U loginID -P password -i iwse.sql
where:
hostname
Is the host name of the machine where SQL Server is running.
databasename
Is the database name you created.
Configuring and Creating the Repository
98 Information Builders

loginID
Is the SQL Server ID with db_owner rights.
password
Is the password for the SQL Server ID.
The tables should be created in your database.
8. Proceed to Installing the JDBC Driver on page 101.
Procedure: How to Configure an Oracle Repository
To configure an Oracle repository:
1. Contact your database administrator to obtain an Oracle user ID and password to createthe repository.
This user ID should have rights to create and modify tables, as well as the ability to createand execute stored procedures.
2. If you have not yet done so, extract the contents of the ibspsql.zip file, for example:
C:\Program Files\iway8\etc\setup\ibspsql.zip
Extract the files to a directory on the machine running Oracle. After extracting files, theOracle files are in an oracle directory. This directory contains SQL to create the repositorytables.
For Oracle 8i iwse.ora
For Oracle 9i and higher iwse.ora9
Note: For Oracle version 9i and higher, only the ojdbc14.jar driver is supported. Inaddition, you must use the iwse.ora9 script file when configuring repositories for Oracleversion 9i and higher.
3. Issue the following command while logged on as a user ID with the correct environmentsettings:
sqlplus userid/password @ iwse.ora
or
sqlplus userid/password @ iwse.ora9
6. Configuring the iWay Repository
iWay Installation and Configuration Guide 99

4. Proceed to Installing the JDBC Driver on page 101.
Procedure: How to Configure a Sybase Repository
To configure a Sybase repository:
1. Extract the contents of the ibspsql.zip file to the Sybase machine, which is located in thefollowing directory:
C:\Program Files\iway8\etc\setup\ibspsql.zip
The ibspsql.zip file contains the SQL that is required to create the repository. The sybasedirectory you extract contains the following file to create the repository tables:
sybase-iwse.sql
2. Submit this SQL to create the repository tables and structure.
Note: This step should be performed by a Sybase DBA.
3. Proceed to Installing the JDBC Driver on page 101.
Procedure: How to Configure a DB2 Repository
To configure a DB2 repository:
1. Extract the contents of the ibspsql.zip file to the DB2 machine, which is located in thefollowing directory:
C:\Program Files\iway8\etc\setup\ibspsql.zip
The DB2 directory you extract contains the following file to create the repository tables:
db2-iwse.sql
Note: For z/OS systems, contact an iWay Software representative to obtain the correctscripts.
2. Submit this SQL to create the repository tables and structure. However, for OS/400 usedb2-400-iwse.sql.
Note: This step should be performed by a DB2 DBA.
3. Proceed to Installing the JDBC Driver on page 101.
Procedure: How to Configure a MaxDB Repository
1. Contact an iWay Software representative to obtain the SQL needed for a MaxDBrepository. There are several files in maxdb-ibse-install.zip. The .bat files are used forWindows and the .sh files are used for UNIX.
Configuring and Creating the Repository
100 Information Builders

2. Open install.bat (or install.sh) in a text editor and edit it so that it contains a valid MaxDBusername and password. You can optionally change the database name (iwse):
dbmcli db_create iwse username,passworddbmcli -d iwse -u username,password -i install-maxdb-instance.txt
3. Execute install.bat.
The database should be created.
4. Open load-tables-maxdb-iwse.bat (or load-tables-maxdb-iwse.sh) in a text editor and edit itso that it contains a MaxDB administrator username and password, not necessarily thesame logon as in install.bat. In addition, make sure it contains the same database nameas install.bat (iwse by default):
loadercli -d iwse -u dba_username,dba_password -b maxdb-iwse3.sql
5. Execute load-tables-maxdb-iwse.bat.
The tables should be loaded.
Note: If you need to drop the tables and start over, edit and submit maxdb-iwse-droptables.bat (or maxdb-iwse-droptables.sh).
Installing the JDBC Driver
iWay components communicate with the repository using JDBC. Therefore, a JDBC driver mustbe available.
Procedure: How to Install the JDBC Driver
1. Determine the JDBC driver for your repository.
The required driver files depend on your database and driver type, for example:
Database Driver Required Driver Files
SQL Server 2000 msbase.jar
mssqlserver.jar
msutil.jar
SQL Server 2005 sqljdbc.jar
SQL Server 2008 sqljdbc4.jar
6. Configuring the iWay Repository
iWay Installation and Configuration Guide 101

Database Driver Required Driver Files
Oracle 8i classes12.jar
Oracle 9i and higher ojdbc14.jar
MaxDB sapdbc-7_5_0_5.jar
Sybase jconn2.jar
DB2 Type 4 Universal JDBC db2jcc.jar
db2jcc_license_cisuz.jar
DB2 Type 2 Legacy App db2java.zip
See your driver documentation for moreinformation. If both iBSP and DB2 are on z/OSor OS/400, refer to the IBM driverdocumentation.
2. Copy the required JDBC .jar file(s) into the iway8\lib directory, for example:
C:\Program Files\iway8\lib
For information about third-party driver files, see Preparing Adapters on page 57.
3. Restart iWay Service Manager from outside the iWay Service Manager AdministrationConsole. On Windows platforms, you can restart it from the Services window.
4. For Servlet iBSP, add the JDBC driver to your application server CLASSPATH. See Configuring iWay Components on page 77 and refer to your application serverdocumentation for information on setting CLASSPATH.
Tip: Depending on your application server, you may find it easier to add the driver into theibse\WEB-INF\lib directory of the iBSP web application (ibse.war or ibse.ear).
5. Restart iWay Service Manager.
Connecting iWay to the Repository
After you create the repository tables and install the JDBC driver, restart iWay Service Manageror your application server. Then, configure iWay components to access the new repository.
For iWay Service Manager, see How to Enter Connection Information for Service Manager onpage 103.
Configuring and Creating the Repository
102 Information Builders

For Servlet iBSP, see How to Enter Connection Information for Servlet iBSP on page 105.
Procedure: How to Enter Connection Information for Service Manager
1. Open the iWay Service Manager Administration Console and log on:
http://hostname:9999
where:
hostname
Is the host name where you installed iWay.
2. In the left pane, click Services Provider.
3. Next to the Data Provider Name drop-down list, click the Add hyperlink.
A form appears for defining the database.
4. Complete the fields as explained in the following table:
Parameter Description
Name Enter a name that you will use to refer to theconnection.
Driver Class Use the drop-down menu or manually enter the JDBCClass.
Connection URL Use the drop-down menu and edit the default URL.You can also manually enter the URL. Examples areshown after this table. For SQL Server 2000, ensurethe URL ends with the following:
;SelectMethod=cursor
User Provide the user ID to access the repositorydatabase.
Password Provide the password to access the repositorydatabase.
6. Configuring the iWay Repository
iWay Installation and Configuration Guide 103

The repository URLs have the forms listed in the following table.
Database JDBC URL
SQL Server2000
jdbc:microsoft:sqlserver://hostname:port;DatabaseName=dbname;SelectMethod=cursor
SQL Server2005
jdbc:sqlserver://hostname:port;databaseName=dbname
SQL Server2008
jdbc:sqlserver://hostname:port;databaseName=dbname
Oracle jdbc:oracle:thin:@hostname:port:SID
MaxDB jdbc:sapdb://hostname[:port]/DatabaseName[options]
Sybase jdbc:sybase:Tds:hostname:port
DB2 For DB2 Type 4 Universal JDBC driver:
jdbc:db2://hostname:port/dbname
For DB2 Type2 App driver:
jdbc:db2:dbname
See your driver documentation for more information. If both iBSP andDB2 are on z/OS or OS/400, refer to the IBM driver documentation.
where:
hostname
Is the host name of the database server machine.
port
Is the port number for the database server. The SQL Server default is 1433. TheOracle default is 1521.
dbname
Is the database name or DB2 database alias or location name.
Configuring and Creating the Repository
104 Information Builders

SID
Is the ORACLE SID.
5. Click Test.
You should receive a response that says:
The JDBC data provider test completed successfully.
If you receive an error, troubleshoot accordingly. Ensure that the driver is in the iway8\libdirectory as explained in How to Install the JDBC Driver on page 101.
6. Click Add if the test is successful.
Your connection appears on the Data Provider page. If you need to change its parameters,you can click its link.
7. Click Services Provider on the left.
8. Change the Data Store Type to the type of repository you wish to use.
9. Set the connection you just defined as the Data Provider Name.
Note: Connection Pooling is not supported for SQL Server 2005.
10. Click Update.
11. Restart Service Manager from outside of the iWay Service Manager Administration Consoleto ensure it completely restarts. On Windows platforms, use the services Window.
When Service Manager restarts, you should reverify iBSP using the sample web service at:
http://hostname:9000
Note: Use iWay Service Monitor to monitor iWay Service Manager events. Monitoring isimplemented using AmberPoint components and can be enabled through the iWay ServiceManager Administration Console. For details, see the iWay Service Manager User's Guide.
To migrate a repository, see Migrating Repositories on page 109.
Procedure: How to Enter Connection Information for Servlet iBSP
To enter connection information for Servlet iBSP:
1. Ensure you have added your JDBC driver to your application server CLASSPATH asexplained in How to Install the JDBC Driver on page 101.
2. Log on to the Servlet iBSP Configuration page at:
http://hostname:port/ibse
3. At the bottom of the page, provide the repository connection information.
6. Configuring the iWay Repository
iWay Installation and Configuration Guide 105

The following table lists and describes the fields.
Field Description
Repository Type Specify the type of repository you are using.
Note: Data Source is not supported.
Repository URL Edit the provide JDBC URL to connect to the database.Examples follow this table.
Repository Driver Provide the JDBC Class to connect to the database.
For SQL Server 2000:
com.microsoft.jdbc.sqlserver.SQLServerDriver
For SQL Server 2005:
com.microsoft.sqlserver.jdbc.SQLServerDriver
For SQL Server 2008:
com.microsoft.sqlserver.jdbc.SQLServerDriver
For MaxDB:
com.sap.dbtech.jdbc.DriverSapDB
For Oracle:
oracle.jdbc.driver.OracleDriver
For Sybase:
com.sybase.jdbc2.jdbc.SybDriver
For DB2 Type 4 Universal JDBC driver:
com.ibm.db2.jcc.DB2Driver
For DB2 Type2 App driver:
COM.ibm.db2.app.DB2Driver
See your driver documentation for more information. If bothiBSP and DB2 are on z/OS or OS/400, refer to IBM driverdocumentation.
Repository User Provide the user ID to access the repository database.
Configuring and Creating the Repository
106 Information Builders
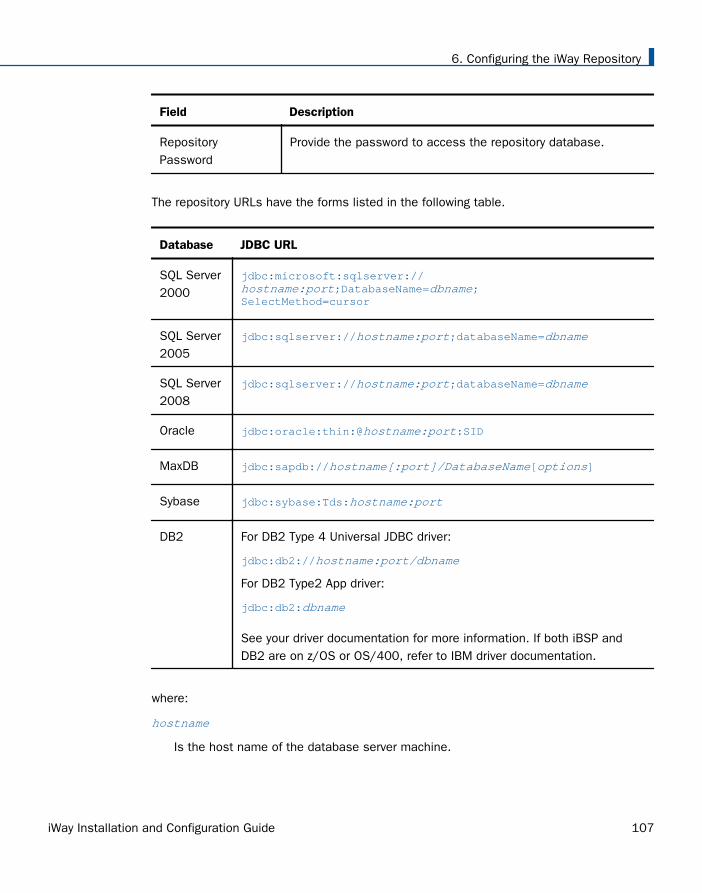
Field Description
RepositoryPassword
Provide the password to access the repository database.
The repository URLs have the forms listed in the following table.
Database JDBC URL
SQL Server2000
jdbc:microsoft:sqlserver://hostname:port;DatabaseName=dbname;SelectMethod=cursor
SQL Server2005
jdbc:sqlserver://hostname:port;databaseName=dbname
SQL Server2008
jdbc:sqlserver://hostname:port;databaseName=dbname
Oracle jdbc:oracle:thin:@hostname:port:SID
MaxDB jdbc:sapdb://hostname[:port]/DatabaseName[options]
Sybase jdbc:sybase:Tds:hostname:port
DB2 For DB2 Type 4 Universal JDBC driver:
jdbc:db2://hostname:port/dbname
For DB2 Type2 App driver:
jdbc:db2:dbname
See your driver documentation for more information. If both iBSP andDB2 are on z/OS or OS/400, refer to IBM driver documentation.
where:
hostname
Is the host name of the database server machine.
6. Configuring the iWay Repository
iWay Installation and Configuration Guide 107

port
Is the port number for the database server. The SQL Server default is 1433. TheOracle default is 1521.
dbname
Is the database name or DB2 database alias or location name.
SID
Is the ORACLE SID.
Note: For SQL Server 2005, do not check Repository Pooling.
4. Click Save.
You should be redirected to the Servlet iBSP home page where you can test the sampleweb service. However, until you redeploy or restart the server, the new repository is notactually used.
5. Restart the application server.
After the server restarts or the application is redeployed, test it by going to the ServletiBSP home page at:
http://hostname:port/ibse/IBSEServlet
If you receive an error, confirm the settings at the configuration page:
http://hostname:port/ibse
If you receive an error, ensure CLASSPATH is properly set and redeploy the iBSP webapplication.
File System Repositories
When Servlet iBSP is installed, it is configured to use a file system repository, so no additionalsteps are required. If you do not have access to a database, you can continue to store theServlet iBSP repository information in XML files on your local machine. However, file systemrepositories are less secure and less efficient than using a database. In addition, file systemrepositories for iBSP are not supported in production environments.
For Servlet iBSP, the default location is either the root directory of the iBSP web applicationunder the application server or a directory under iway8, for example:
C:\Program Files\iway8\config\base\ibserepo.xml
Configuring and Creating the Repository
108 Information Builders

Migrating Repositories
You can migrate repositories using the iWay Service Manager Administration Console. They canbe repositories for iWay Service Manager, the older iWay Adapter Manager, or Servlet iBSP.The structure of the repository has not changed.
Some of the things you can migrate include:
Migrate the data in the default iWay SM HSQL database to another database repository.
Migrate an older iWay Adapter Manager repository into the default iWay SM HSQLdatabase.
Migrate a Servlet iBSP database repository.
In this section:
Source repository refers to the older existing repository you want to migrate.
Target repository refers to the new repository you want to use.
Migration Steps
To migrate a repository, perform the following steps.
Ensure you have created the new repository tables, as explained in Creating the Repositoryon page 97.
Ensure the JDBC driver for both your target and source repositories are in the iway8/libdirectory. See Installing the JDBC Driver on page 101 for more information.
Define the source and target repositories as Data Providers through the iWay ServiceManager Administration Console, as explained in How to Define the Source and TargetRepositories on page 109.
Start the migration, as explained in How to Start the Migration on page 111.
Procedure: How to Define the Source and Target Repositories
You should perform this procedure if you did not yet define the target repository or if you aremigrating from a different source repository than the default HSQL repository.
If you are migrating the default HSQL repository into a new repository, the source repository isalready defined for you. If you performed the steps in How to Enter Connection Information forService Manager on page 103, then you probably already defined the target repository. If youdo not need to define the source or the target, proceed to How to Start the Migration on page111.
6. Configuring the iWay Repository
iWay Installation and Configuration Guide 109

To define the source and target repositories as Data Providers:
1. Open the iWay Service Manager Administration Console and log on:
http://hostname:9999
where:
hostname
Is the host name where you installed iWay.
2. In the left pane, click Data Provider.
3. Click Add under the JDBC Connections box.
A form appears for defining the database. Define the source or target repository.
4. Complete the fields as explained in the following table:
Parameter Description
Name Enter a name that you will use to refer to theconnection.
Driver Class Use the drop-down menu or manually enter the JDBCClass.
Connection URL Use the drop-down menu and edit the default URL. Youcan also manually enter the URL. For examples, see How to Enter Connection Information for ServiceManager on page 103. For SQL Server 2000, ensurethe URL ends with the following:
;SelectMethod=cursor
User Provide the user ID to access the repository database.
Password Provide the password to access the repositorydatabase.
5. Click Test.
You should receive a response that says:
The JDBC data provider test completed successfully.
If you receive an error, troubleshoot accordingly. Ensure the driver is in the iway8\libdirectory, as explained in How to Install the JDBC Driver on page 101.
Migrating Repositories
110 Information Builders

6. Click Add if the test is successful.
You connection appears on the Data Provider page. If you need to change its parameters,you can click its link.
7. If you need to define both the target and source repositories, repeat this procedure todefine another repository.
Procedure: How to Start the Migration
1. If it is not open, open the iWay Service Manager Administration Console and log on.
2. In the left pane, click Services Provider.
The currently selected Data Store Type and Data Provider Name determines the sourcerepository.
3. If it is not already selected, set the source repository by changing the Data Store Type andData Provider Name and clicking Update. The Data Provider Name is the name you usedwhen you defined the source repository.
4. Set the target repository by changing the Data Store Type and Data Provider Name.
5. Then click the Migrate hyperlink.
A page displays information about the migration. If the source and destination (target) arenot correct, click Services Provider on the left to correct them. If your new database hasdata in it that you wish to delete, you can select the Reset/Clean Destination option.
6. Click Migrate if the source and destination (target) are correct.
Information about the migration appears. Ensure that there are no critical errors.
After the migration completes, iBSP is set to use the source repository. You should set itto use the target repository instead.
7. Click Services Provider on the left.
8. Change the Data Store Type to the type of repository you wish to use.
9. Set the connection you just defined as the Data Provider Name.
Note: Connection Pooling is not supported with SQL Server 2005.
10. Restart iWay Service Manager.
6. Configuring the iWay Repository
iWay Installation and Configuration Guide 111

Migrating Repositories
112 Information Builders

FeedbackCustomer success is our top priority. Connect with us today!
Information Builders Technical Content Management team is comprised of many talentedindividuals who work together to design and deliver quality technical documentation products.Your feedback supports our ongoing efforts!
You can also preview new innovations to get an early look at new content products andservices. Your participation helps us create great experiences for every customer.
To send us feedback or make a connection, contact Sarah Buccellato, Technical Editor,Technical Content Management at [email protected].
To request permission to repurpose copyrighted material, please contact Frances Gambino,Vice President, Technical Content Management at [email protected].
Information Builders, Inc.Two Penn PlazaNew York, NY 10121-2898
iWay Installation and Configuration GuideVersion 8.0.3
DN3502253.0319