j2ee best practices -...
TRANSCRIPT

J2EE Best Practices The Middleware Company
01/27/2003
EJB, J2EE, and XML Web Services Expertise
J2EE Best Practices 12/31/2002
TABLE OF CONTENTS
J2EE BEST PRACTICES 3 ORGANIZATION 3 CONVENTIONS AND OTHER DECISIONS 3
DEVELOPMENT LIFE CYCLE 3 BEST PRACTICE #1: ATTACK RISK AS EARLY AS POSSIBLE 4
DESIGN 7 BEST PRACTICE #2: DESIGN FOR CHANGE WITH DYNAMIC DOMAIN MODEL 7 BEST PRACTICE#3: USE A STANDARD MODELING LANGUAGE 7 BEST PRACTICE #4: RECYCLE YOUR RESOURCES 8
DEVELOP 12 BEST PRACTICE #5: USE PROVEN DESIGN PATTERNS 12 BEST PRACTICE #6: AUTOMATE THE BUILD PROCESS 13 BEST PRACTICE #7: INTEGRATE OFTEN 14 BEST PRACTICE #8: OPTIMIZE COMMUNICATION COSTS 15
TEST 17 BEST PRACTICE #9: BUILD TEST CASES FIRST 17 BEST PRACTICE #10: CREATE A TESTING FRAMEWORK 17 BEST PRACTICE #11: AUTOMATE TESTING 19
DEPLOY 21 BEST PRACTICE #12: USE J2EE STANDARD PACKAGING SPECIFICATION 21 BEST PRACTICE #13: USE TOOLS TO HELP IN DEPLOYMENT 22 BEST PRACTICE #14: BACK UP YOUR PRODUCTION DATA AND ENVIRONMENT 23
TUNE 24 BEST PRACTICE #15: BUILD A PERFORMANCE PLAN 24 BEST PRACTICE #16: MANAGE MEMORY AND PLUG LEAKS 26 BEST PRACTICE #17: FOCUS ON PRIORITIES 28
ENVIRONMENTS 30 BEST PRACTICE #18: DO NOT RESTRICT DEPLOYMENT OPTIONS AT DESIGN TIME 33 BEST PRACTICE #19: CREATE A RESPONSIVE DEVELOPMENT ENVIRONMENT 34
J2EE BEST PRACTICES IN ACTION 37 SAMPLE APPLICATION 37 BEST PRACTICE #20: USE A PROVEN MVC FRAMEWORK 38 SESSION FACADE 43 DATA ACCESS OBJECT 45 SERVICE LOCATOR 47 VALUE OBJECT 49
CONCLUSION AND RECAP 52

J2EE Best Practices Page 3 12/31/2002
J2EE BEST PRACTICES The J2EE Platform has emerged over the last couple of years as a standard platform for building enterprise applications. Contributing to J2EE’s exceptional growth has been its ever-increasing breadth of component and infrastructure offerings as well as its ease of use. While it’s maturing, the J2EE platform still offers a number of challenges such as performance, resource management, and flexibility. Developers who may know the Java syntax do not necessarily know how to be effective. Programmers using J2EE technology must learn to go beyond the syntax and understand the best ways to design architect and implement new J2EE solutions. Without extensive real world J2EE experience, the best course is to learn from the experiences of others. Increasingly, the J2EE platform is proving its strengths and weaknesses in a production setting. You can effectively leverage this experience by understanding the published practices that have been the most successful.
Organization In short, this paper is designed to teach you the best practices that will help you get the most reliability and scalability out of your J2EE based application and the most productivity out of your developers. We’ll cover all elements of the software development cycle, from design through deployment. So what exactly is a Best Practice? A Best Practice is a proven technique for achieving a desired result. It is a repeatable technique that has been successful in real life situations, and can be broadly applied across many problems. We will organize the best practices in two major sections: 1. Best practices in theory. The first section describes a number of best practices that
are recommended for J2EE. 2. Best practices in practice. The next section will show an example application that
makes use of a number of the best practices described below.
Conventions and other decisions Like any best practices document, you should know about our decisions: conventions, and standards. You want to know how we chose this set of best practices, and how we present them. • We’ll show in-line code like this: int i=0; and we’ll show code sections like this:
int getBalance() { return balance; }
• Hyperlinks are underlined and hot (if you’re viewing in a format that supports them) like this: www.oracle.com.
• We developed these applications with the Oracle9iAS platform. You can get example code for the Acme Application from:
http://otn.oracle.com/sample_code/tech/java/oc4j/content.html.
DEVELOPMENT LIFE CYCLE The most critical element of any application development philosophy is the methodology that defines the entire application development cycle. Since methodologies used to make

J2EE Best Practices Page 4 12/31/2002
modern J2EE applications are so diverse, we will not endorse any particular methodology. Instead, we will define five relatively generic steps that any significant development method will need to support. The best practices under each can then be integrated into your development cycle.
Figure 1. Best Practices throughout the full lifecycle.
Figure 1 shows the major steps in a development cycle, and the areas in which Best Practices can be applied for each step.
Best practice #1: Attack risk as early as possible The risk associated with application development seems to rise exponentially with complexity. While it may seem hopeless, there are some things that you can do to mitigate your risks. From a process perspective, perhaps the most important risk mitigation involves moving risk to the front of the schedule, reducing your risk in three ways: • Improving knowledge. The biggest risks will always be associated with the
unknown. Earlier knowledge will allow you to make more informed decisions and better schedules through the remainder of development cycle.
• Allowing recovery time. If you’re going to fail, it’s better to fail early, while there’s still time to recover.
• Involving the customer early. Your customer’s response to a user interface or key capability can dramatically impact the direction of a project. Inspiring confidence early improves your relationships.
Prototype versus proof-of-concept Key risk areas usually involve subjective user interfaces and key middleware components. You use different approaches to attack each element.
You use different approaches to solve each problem. User interface prototyping usually involves a breadth-first development cycle; your goal is to get some rough interfaces in front of the user immediately, to solicit early feedback. Your implementation is very broad, but has little or no application code behind it. The advantage is that you get user feedback early in the cycle. The disadvantage is that without any business logic, you don’t get a feel for the technical elements of your system, such as performance.
The technology proof-of-concept usually attacks a single element of risk. Your ultimate goal is to use the riskiest technology in your plan to solve a simple business requirement of the system, attacking the problem in a context that’s as close as possible to the end application. You attack only one (or a few) business requirement, but you attack it very deeply. The benefit is that you learn about the way that the different elements of your

J2EE Best Practices Page 5 12/31/2002
system interact. Conversely, you learn very little about the way that the flow of the whole system, so it’s difficult to communicate with end users.
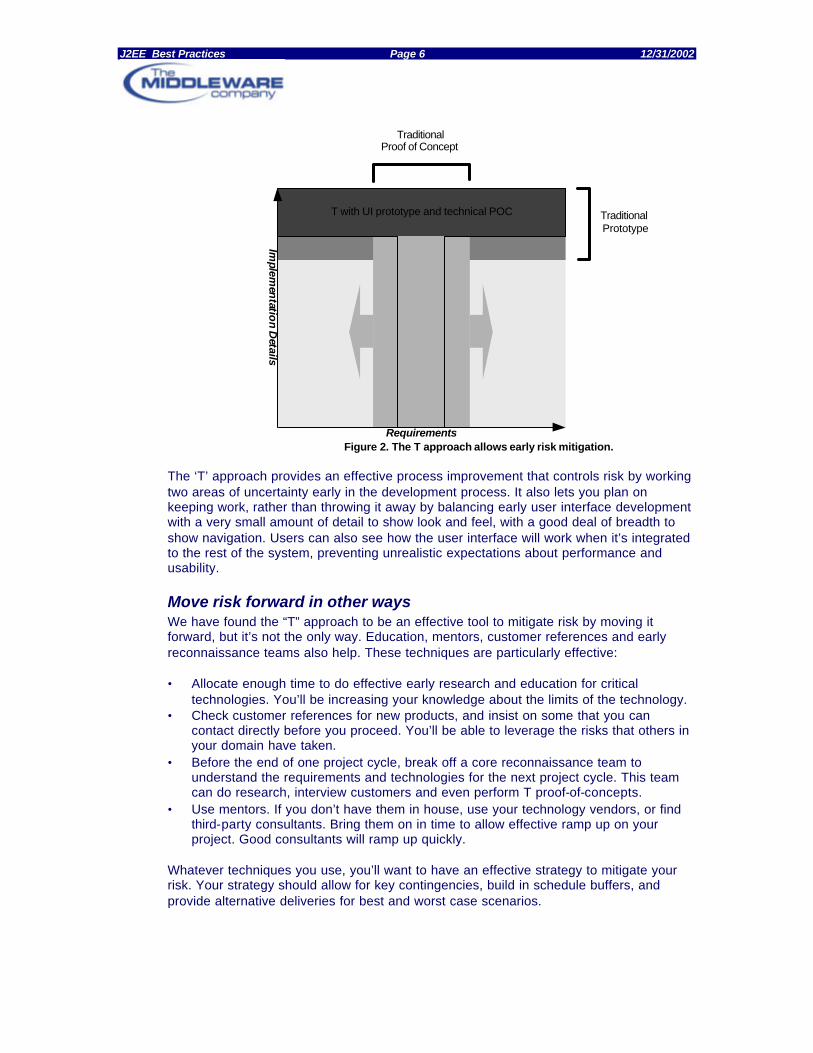
Combine the approaches with the T Proof-of-Concept The most effective risk mitigation uses a hybrid approach, combining the attributes of a prototype and a proof of concept. Figure 2 shows how to effectively combine a prototype with an effective POC. You essentially build a very thin user interface prototype, and integrate that with a single customer requirement with very little scaffolding and an end-to-end implementation. Your interface will be very thin, allowing only for content and flow. Your interface for the single requirement only will be highly polished, and you’ll also provide as much production code as possible as you implement your single requirement. These are the finer points of the approach: • Do a minimal user interface across the system. The interface should be very thin,
and should communicate the overall flow of the system, rather than complete look and feel.
• Implement a technology proof-of-concept consisting of a single requirement. The requirement should require the technology that you’d like to prove.
• Focus on building production-strength code, with only enough scaffolding to implement the system. Clearly comment all short cuts.
• Make early user interfaces on basic technology that’s easy to rev. At a start-up, one of the most famous user interface consultants in the business built our initial UI with papers, connected by string. He drew simple user interfaces by hand and worked through the navigation. Only after it was relatively solid did he use his first HTML editor.
• On the broader user interface, use a minimalist approach to the user interface, once you begin coding. HTML with a single layer is enough. Do not spend excessive time on look and feel. Concentrate instead on content and flow. You will be able to work the UI and the application in parallel once the T POC has been completed.
• Make the single requirement robust. Keep the implementation simple, but use production-level technologies and coding standards.
• Polish the user interface, but only for the single requirement. You’ll find that it’s more efficient to work the user interface once you’ve got live code behind it.
• When you finish a T with a UI model and a technical model that both work, push out from the center bar of the T to implement more requirements. You can attack additional technical areas early to mitigate risk.
• After you’ve got a working T, build the user interface and code your requirements in parallel. Fully integrate each requirement as you go.
J2EE Best Practices Page 6 12/31/2002
TraditionalPrototype
TraditionalProof of Concept
Requirements
T with UI prototype and technical POC
Implem
entatio
n Details
Figure 2. The T approach allows early risk mitigation.
The ‘T’ approach provides an effective process improvement that controls risk by working two areas of uncertainty early in the development process. It also lets you plan on keeping work, rather than throwing it away by balancing early user interface development with a very small amount of detail to show look and feel, with a good deal of breadth to show navigation. Users can also see how the user interface will work when it’s integrated to the rest of the system, preventing unrealistic expectations about performance and usability.
Move risk forward in other ways We have found the “T” approach to be an effective tool to mitigate risk by moving it forward, but it’s not the only way. Education, mentors, customer references and early reconnaissance teams also help. These techniques are particularly effective: • Allocate enough time to do effective early research and education for critical
technologies. You’ll be increasing your knowledge about the limits of the technology. • Check customer references for new products, and insist on some that you can
contact directly before you proceed. You’ll be able to leverage the risks that others in your domain have taken.
• Before the end of one project cycle, break off a core reconnaissance team to understand the requirements and technologies for the next project cycle. This team can do research, interview customers and even perform T proof-of-concepts.
• Use mentors. If you don’t have them in house, use your technology vendors, or find third-party consultants. Bring them on in time to allow effective ramp up on your project. Good consultants will ramp up quickly.
Whatever techniques you use, you’ll want to have an effective strategy to mitigate your risk. Your strategy should allow for key contingencies, build in schedule buffers, and provide alternative deliveries for best and worst case scenarios.
J2EE Best Practices Page 7 12/31/2002
DESIGN Modern methodologies have placed more emphasis on the design phase because it contributes tremendously to the quality, scalability and reliability of an application. In the design phase, change is the least time consuming, and will have the least amount of impact on the rest of the development effort. By designing reusability and scalability into components of an application, future code will be built upon a solid foundation. Change is inevitable. New requirements and changing assumptions will occur, so it is important to maintain an environment that is nimble and adaptive.
After identifying key business requirements during the analysis stage, technical IT personnel must figure out how to implement them. In design, you translate business requirements into software design. Your objective is to evaluate the alternatives that meet the required objectives and best meet the evaluation criteria. You need to address a number of aspects of this phase, such as security, the underlying persistence model, and application resources. Across most applications, common problems have well known solutions. We’ll address some of them in this section.
Best practice #2: Design for change with Dynamic Domain Model Modern developers need to have domain models that are nimbly changed. With the emergence of iterative development and shorter development cycles, there is almost certainty that changes to an application will occur after the initial design. To effectively handle changes, developers shouldn’t have to completely rework tested code. An application needs to be able to nimbly handle changes in a way that ensures a high level of quality.
There are a couple of solutions to creating a dynamic domain model. The most common are the use of CMP EJB or a conventional OR Mapping tool like TopLink. These tools free developers from worrying about maintaining the domain layer and allow them to focus on business rules. These tools work by taking a schema view of the underlying database and applying rules to them to generate all of the necessary code to handle modifications and access to the data, based on the underlying schema and rules. In the event that the database schema changes, which it inevitably will, the programmer will have significantly fewer lines of code to change then if the entire persistence layer was written from scratch.
Modern methodologies have also placed more emphasis on the design phase because it contributes tremendously to the quality, scalability and reliability of an application. At design time, developers can quickly solve problems that might derail a project later in the development cycle. Here, change is the least time consuming, and will have the least amount of impact on the rest of the development effort. As a result of this, it is important for developers and designers to be able to clearly understand one another and to be able to quickly respond to change. Our second best practice ensures this type of information sharing.
Best Practice#3: Use a Standard Modeling Language Designers and Developers, as well as everyone involved in the development process, need to be able to communicate clearly with one another. To improve communication, you need a common language to articulate the design of application components.

J2EE Best Practices Page 8 12/31/2002
UML The unified modeling language (UML) provides a language and a variety of diagrams so that architects and designers can easily and accurately explain complex technical concepts. Many Java IDEs offer tools to generate code from UML models and UML diagrams from code. Through their synchronization and generation features, these tools offer the benefits of well-documented code and increased developer productivity, without saddling the developer with the burden of synchronizing a code base with a documentation artifact.
Best practice #4: Recycle your resources Invariably, applications waste too much time fetching, creating, or destroying some complex objects or resources. Others may be too expensive for a single application to maintain on a one-to-one basis. Therefore, you should create a limited number of the resource, and share them from a common pool. You can pool many types of resources, from complex objects to connections. J2EE will manage some of these for you. For example, J2EE connection pools can improve performance by an order of magnitude for extreme cases. For others, you’ll have to create and manage the pool yourself.
Object Pool You’ll want to use object pools to manage the sharing of objects between multiple clients. By accessing an existing resource through a pool, the client avoids the creation, destruction and initialization costs. When the client is done with the object, it returns the object to the pool for other clients to use. Some of the common characteristics of pools are: • Object pools supply a resource on demand. • Pools deny the resource if none is available. • Pools ensure the validity of the resource.
The following pool (Listing 3) shows some of these features. It is implemented as a singleton, so that only one instance is shared amongst all clients on a given machine. Once a client gets access to the pool by calling the getInstance() method, it can then request a specific instance of the pooled object by calling the checkOut() method, which first checks to see if there are any instances of the resource available by looking in the unlocked Hashtable. If there are, an instance is returned from the pool. If no items exist in the unlocked Hashtable, the capacity of the pool is compared to the total number of pooled objects created. If the capacity has not been met, a new instance of the pooled object is created and returned to the requester. This concept, called lazy initiation, allows for the most appropriate number of pooled object instances to be created and kept. Before the pool returns the object to the client, it places the object in the locked Hashtable, inaccessible to other clients until the object is checked back into the pool. If the pool has already created the maximum number of pooled instances, and none are available, it must handle an error condition. You can add functionality to this example object pool like the expiration of stale objects, validation of the object, and the creation of a minimum size pool.
import java.util.*; public class Pool { private static Pool instance = null;

J2EE Best Practices Page 9 12/31/2002
private int capacity; private Hashtable locked, unlocked; private Pool() { capacity = 10; locked = new Hashtable(); unlocked = new Hashtable(); } public synchronized Pool getInstance () { if ( instance == null ) { instance = new Pool(); } return instance; } public synchronized Object checkOut() { Object o; if( unlocked.size() > 0 ) { Enumeration e = unlocked.keys(); return unlocked.get( e.nextElement() ); } if ( capacity < locked.size() + unlocked.size() ) { o = new Object(); locked.put( o, new Long( System.currentTimeMillis() ) ); return( o ); } else { //Handle error condition } } public synchronized void checkIn( Object o ) { locked.remove( o ); unlocked.put( o, new Long( System.currentTimeMillis() ) ); } } Listing 3. An object pool allows more efficient usage of resources, by creating a reusable type
of object only once, and sharing it among other consumers.
Cache The computer industry has long used hardware and software caching to improve performance from the lowest hardware level to the highest software abstraction layer. When you think about it, a cache is simply another type of pool. Instead of pooling a connection or object, you’re pooling remote data, and placing it closer to the client. Many software and hardware vendors supply their own data caches for their web servers and

J2EE Best Practices Page 10 12/31/2002
database servers. Even so, you might find it useful to create custom caches for such tasks as web services and cross-network requests. A data cache is very similar to a Hashtable. It supports the adding and retrieval of information. A good cache must provide much more, like validation of data, expiration of stale data, and identification and management of infrequently accessed data. Developers often build caches into proxies, which can transparently satisfy requests with a cached value. Listing 4 shows a simple cache implementation. The object class is also implemented as a singleton so that all clients share the same object. A couple of the methods expire some or all of the data contained in the cache. You can also add and remove data from the cache. You can easily add additional functionality to this very simple implementation, like the expiration of stale data. Keep in mind, though, that if you deploy your cache in a cluster, it will change the requirements of the cache dramatically, as you’ll have to synchronize distributed caches, and carefully manage transaction integrity, across the cluster. For this reason, if you could possibly deploy on a clustered environment, you should probably consider buying a cache solution for values that could be distributed across the cluster.
import java.util.*; public class Cache { private static Cache instance = null; private Hashtable cache; private Cache() { cache = new Hashtable(); } public synchronized Cache getInstance () { if ( instance == null ) { instance = new Cache(); } return instance; } public synchronized void addObject( Object key, Object value ) { cache.put( key, value ); } public Object getObject( Object key ) { return cache.get( key ); } public void expire() { cache.clear();
J2EE Best Practices Page 11 12/31/2002
} public synchronized void expire( Object key ) { cache.remove( key ); } }
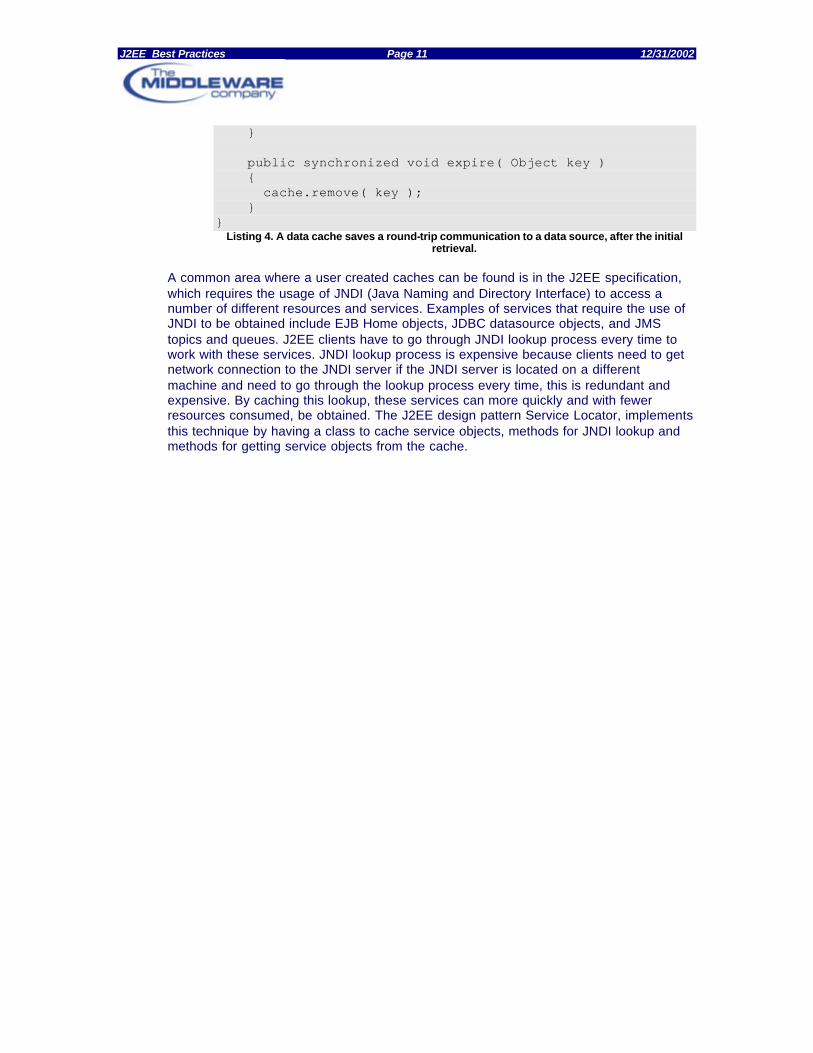
Listing 4. A data cache saves a round-trip communication to a data source, after the initial retrieval.
A common area where a user created caches can be found is in the J2EE specification, which requires the usage of JNDI (Java Naming and Directory Interface) to access a number of different resources and services. Examples of services that require the use of JNDI to be obtained include EJB Home objects, JDBC datasource objects, and JMS topics and queues. J2EE clients have to go through JNDI lookup process every time to work with these services. JNDI lookup process is expensive because clients need to get network connection to the JNDI server if the JNDI server is located on a different machine and need to go through the lookup process every time, this is redundant and expensive. By caching this lookup, these services can more quickly and with fewer resources consumed, be obtained. The J2EE design pattern Service Locator, implements this technique by having a class to cache service objects, methods for JNDI lookup and methods for getting service objects from the cache.

J2EE Best Practices Page 12 12/31/2002
DEVELOP In this step, you explicitly code the solution. Earlier in the life cycle, the infrastructure and business components where identified and designed, here those designs become code. The develop step used to be one long, contiguous phase, but most modern methodologies break this step into many smaller iterations, trying to reduce risk and complexity. Through this iterative development cycle, code is constantly changing and more of an emphasis is placed on refactoring. As a result of the iterative development cycle that most methodologies warrant, developers need to write code that is highly flexible and reusable and to be able to do so in a very rapid manner. There are a number of proven patterns that exist that help developers do just this.
Best practice #5: Use proven design patterns Design patterns are among the most important resources to architects and developers as they can be used as they are intended, or reapplied to new contexts. Patterns are proven and reusable. They provide a common language to express experience. In short, design patterns save you time, money and effort.
You can apply patterns to application behavior, object creation, application structure, and many other functional areas. In light of time and completeness, we present only a high level explanation of some of the core J2EE design patterns that we later apply to the sample ACME application. For a more complete reference, please refer to Sun's J2EE Patterns Catalog which is a functionality based listing and explanation of core J2EE design patterns.
• Session Façade – Fine-grained EJB applications are highly susceptible to
communications overhead. Session facades provide a service access layer that hides the complexity of underlying interactions, and consolidates many logical communications into one larger physical communication. With Entity EJB and other complex objects, the work required to obtain and interact with such objects is confusing. A session façade adds a layer of abstraction that masks complexity.
• MVC - The Model-View-Controller design pattern creates a decoupled data access, data presentation and user interaction layers. The benefits are a higher degree of maintainability because there are fewer interdependencies between components, a higher level of reusability as components have distinct boundaries, and easier configuration as you can implement new views without changing any underlying code.
• Value Objects – Create a single representation of all the data that an EJB call needs. By aggregating all of the needed data for a series of remote calls, you can execute a single remote call instead of many remote ones increasing overall application performance.
• Data Access Objects - Use a Data Access Object to abstract and encapsulate all access to the data source. The Data Access Object manages the connection with the data source to obtain and store data.
• Service Locator - Enterprise applications require the use of distributed components. It is often a difficult and expensive task to obtain handles to components, like an EJB’s Home interface. Instead, you can efficiently manage and obtain them through a Service Locator that centralizes distributed object lookups. You’ll benefit by having a single point of control and an effective attachment point for a cache.

J2EE Best Practices Page 13 12/31/2002
Design patterns are only a part of the puzzle. You will also want to build a robust build framework. With J2EE’s object oriented environment, you’ve got an increased dependency between objects and resources. Since you don’t want to manage all of the dependencies yourself, you’ll need the build process to track it for you. Couple this increased complexity with multiple environments (like development, test and deploy environments), and what seemed like a luxury quickly becomes a necessity.
Best practice #6: Automate the build process In an enterprise development environment, the build process can become quite confusing. Relationships between files, narrowly focused developers, and prepackaged software components all add to the complexity of doing a build. You can easily waste countless hours trying to figure out how to build all of the necessary components in the correct order. javac is adequate for smaller projects, but it is simply unable to handle the complex build relationships. The tool “make” is an alternative, but the Java performance is lacking. These tools cause developers to lose productivity, both to performance, and to processing dependencies by hand. To successfully automate a build, you must consider three major elements. • You must choose build tools appropriate for build automation. • Your development environment and build process must interoperate well. • You should build in notification of success or failure, and set your build success
criteria appropriately.
Building with Ant If you depend on the command line, you’ll want to use an open build tool built for Java. Today, Ant is the tool of choice for Java developers everywhere. Ant is an extensible build tool that is written in java. Ant is an open source apache Jakarta project that runs on multiple platforms and can contribute a great amount of flexibility to the build process. Based on XML, Ant has a number of built in tasks that can be grouped together into targets that contribute to its versatility and power. Take, for example, listing 5 below.
<?xml version="1.0" encoding="UTF-8"?> <!DOCTYPE project [ <!ENTITY ebbuild SYSTEM "file:./ebbuild.xml"> ]> <project name="TestProject" default="compile" basedir="."> <description> Example Ant Build File </description> <!-- set global properties for this build --> <property name="src" location="src"/> <property name="pages" location="pages"/> <property name="build" location="build"/> <property name="dist" location="dist"/> <target name="init"> <tstamp> <format property="DATETIME" pattern="dd-MMM-yyyy"/> </tstamp> <mkdir dir="${build}"/> </target>
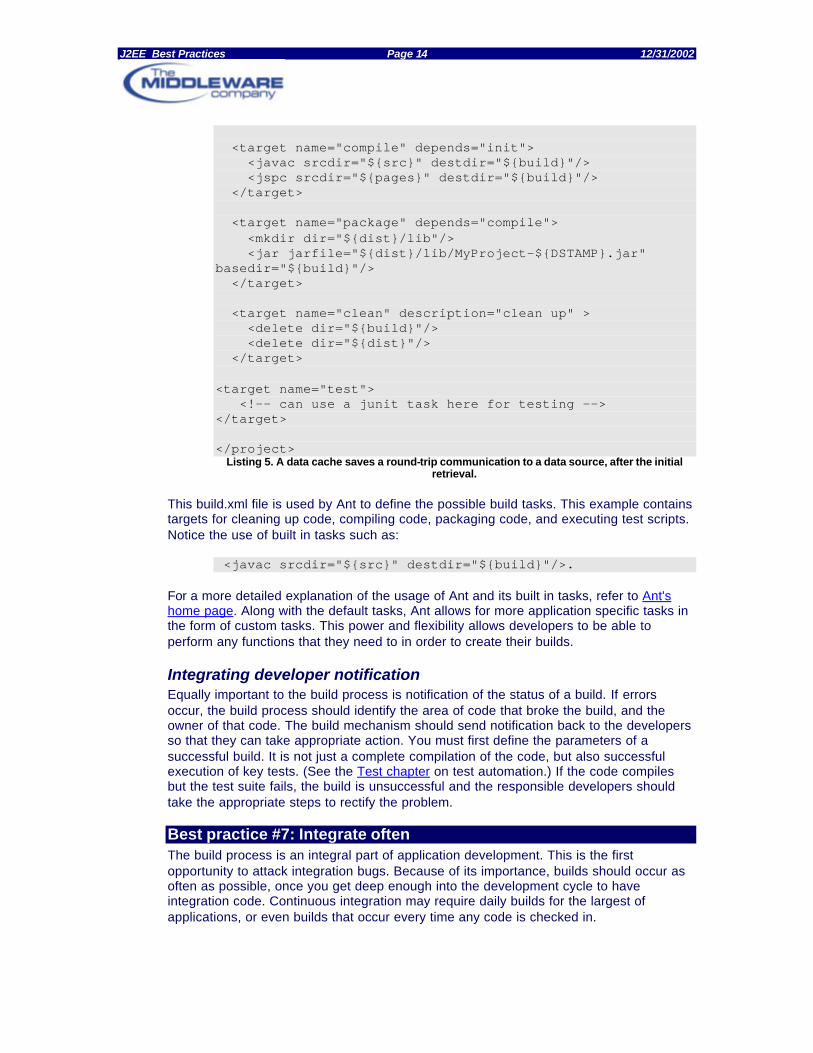
J2EE Best Practices Page 14 12/31/2002
<target name="compile" depends="init"> <javac srcdir="${src}" destdir="${build}"/> <jspc srcdir="${pages}" destdir="${build}"/> </target> <target name="package" depends="compile"> <mkdir dir="${dist}/lib"/> <jar jarfile="${dist}/lib/MyProject-${DSTAMP}.jar" basedir="${build}"/> </target> <target name="clean" description="clean up" > <delete dir="${build}"/> <delete dir="${dist}"/> </target> <target name="test"> <!-- can use a junit task here for testing --> </target> </project>
Listing 5. A data cache saves a round-trip communication to a data source, after the initial retrieval.
This build.xml file is used by Ant to define the possible build tasks. This example contains targets for cleaning up code, compiling code, packaging code, and executing test scripts. Notice the use of built in tasks such as:
<javac srcdir="${src}" destdir="${build}"/>. For a more detailed explanation of the usage of Ant and its built in tasks, refer to Ant's home page. Along with the default tasks, Ant allows for more application specific tasks in the form of custom tasks. This power and flexibility allows developers to be able to perform any functions that they need to in order to create their builds.
Integrating developer notification Equally important to the build process is notification of the status of a build. If errors occur, the build process should identify the area of code that broke the build, and the owner of that code. The build mechanism should send notification back to the developers so that they can take appropriate action. You must first define the parameters of a successful build. It is not just a complete compilation of the code, but also successful execution of key tests. (See the Test chapter on test automation.) If the code compiles but the test suite fails, the build is unsuccessful and the responsible developers should take the appropriate steps to rectify the problem.
Best practice #7: Integrate often The build process is an integral part of application development. This is the first opportunity to attack integration bugs. Because of its importance, builds should occur as often as possible, once you get deep enough into the development cycle to have integration code. Continuous integration may require daily builds for the largest of applications, or even builds that occur every time any code is checked in.

J2EE Best Practices Page 15 12/31/2002
The reason for this best practice is clear. Integration worsens with time. The longer the amount of time between integration, the greater the integration effort. This may seem contradictory to some, but anyone who has experienced the pain of integrating for the first time in days or weeks will quickly verify this assertion. Through constant integration, you can identify bugs and fix them the same day that they were added to the system. This process encourages a culture of mutual respect and accountability. Conversely, delaying integration makes it easy to avoid difficult and important decisions until late in the development cycle. By doing builds more frequently, developers must build upon correct code, eliminating rippling impact of minor errors.
Best practice #8: Optimize communication costs Distributed communication can be quite efficient. Consider that loading the yahoo.com web page can trigger dozens of distributed communications, all in less than four seconds for a high-speed line. However, when distributed communications occur in tight loops over an expensive communication boundary, communication costs can grow out of control. This section includes a number of best practices and suggestions that improve performance.
Use local calls as opposed to remote With the advent of EJB, distributed programming has gotten much easier. You can use client demarcated transaction boundaries in place of hard coded ones. You can build persistence layers in a matter of days and hours, allowing you to focus on core business rules development with reusable components in multiple transactions. With these advantages came wide spread use, and misuse.
To avoid overhead, you should first determine if a distributed call is needed at all. If a local java object can handle the entire request, and no real business requirements mandate a remote call, then the call should be local. If the serving object does not need to make use of container security, instance pooling, container managed transactions, and the object doesn’t need to be distributed, do not use an EJB.
When you definitely need EJB, make use of local interfaces where practical. (Keep in mind that you may limit a clustered deployment, though.) With the first EJB specification, all EJB access was done through marshaled remote calls, regardless of the call’s origin, forcing major performance problems. With EJB 2.0, local interfaces allow non-marshaled object invocations, allowing efficient pass-by-reference parameters and reducing overhead. If the calling client exists in the same container as the recipient, you can make a local call with much better performance.
Aggregate data You must often make multiple calls and return multiple values. In order to do so, most programmers call different methods, each returning a small amount of data. When the methods are distributed, this practice significantly degrades performance. To help combat this tendency, it is good practice to aggregate data. You must consider both input parameters and returned data.
You can logically aggregate this data with objects. Instead of calling a method that takes both an address and telephone number, create a method that takes a person. This improvement requires only a single object. This process improves both local and distributed performance. With respect to returning objects, since only one object can be returned by a method call, by aggregating data, fewer method calls need to occur and a greater amount of data can be returned in a single call.

J2EE Best Practices Page 16 12/31/2002
Batch requests Taking the benefits of data aggregation one step further, you can send a number of similar requests in a single call. This approach allows you to process requests in serial fashion at a given time, or when they are received. By doing multiple requests together, you require only a single connection to the resource. In the case of a database, you need only a single database connection, and the executing SQL needs to be compiled only once saving significant cycles.
JDBC easily allows for batched requests, like Listing 6. This snippet submits a batch of commands to the database for execution and if all commands execute successfully, returns an array of update counts.
Connection con = DriverManager.getConnection(connect); Statement stmt = con.createStatement(); stmt.addBatch("INSERT INTO Names VALUES('Jon')”); stmt.addBatch("INSERT INTO Names VALUES('Joe')”); stmt.addBatch("INSERT INTO Names VALUES('Jim')”); int [] updateCounts = stmt.executeBatch();
Listing 6. Batching requests with JDBC can significantly improve performance.
Since auto commit is enabled by default, each individual script is executed as its own transaction. If the entire batch should participate in a single transaction, be sure to the set auto commit to false using con.setAutoCommit(false) and then call con.commit() when complete.
Cache data Another important factor in implementing an efficient method invocation framework is to identify data that is expensive to obtain, and changes infrequently. A good caching model can often cover up a poorly implemented system. By using a cache, a large number of expensive and time-consuming requests can be replaced by quick-cached value reads. You can read more about caching in the Design chapter, here. Though these suggestions can be relatively fast to implement, they are best applied toward the beginning of a build cycle, before you’ve accumulated too much momentum to change. Contrary to the way most undisciplined teams structure software development, the build cycle should be short and lean. Identifying and optimizing key communications interfaces can keep it that way. In the next section, we will discuss ways to smoothly integrate your testing with the build phase, to further improve your efficiency.

J2EE Best Practices Page 17 12/31/2002
TEST Most developers treat testing as a much younger brother or sister that they must drag along to keep authority figures happy. Testing actually should not just occur after the development of an application, but rather, during the entire development life cycle:
• You should define test cases during the requirements analysis, allowing test cases
addressing all of the requirements. • Many processes require developers to write test scripts before, or at least in
conjunction, with application code. This process ensures that each line of code has a test case, and developers are working to address known issues and functionality.
• Test cases should be executed during integration, to verify that nothing new is broken, and no new bugs have crept into the system.
• Testing should occur on the completed project at deployment time, to prove to all stakeholders that the application meets all prearranged performance and scalability targets.
In this section, we’ll discuss best practices that improve testing efficiency and quality. We’ll talk about building test cases early in the build cycle, with an automated framework, using proven tools and techniques.
Best practice #9: Build test cases first Test cases have traditionally been written and executed in isolation of application code by different sets of people. This process, steeped in inefficiency and contention, is rapidly changing, as more agile development methodologies require developers to write test cases before the application code. By writing test cases first, you can realize a number of tangible benefits: • Developers are more likely to understand the desired functionality and will be more
focused on implementing complete code that satisfies requirements. • From that point, integration testing can occur unimpeded, with no added extra work,
as existing test cases ensure system status. • By writing test cases first, a culture focuses more completely on the value of testing. • Developers are less likely to implement extraneous code that is not required to satisfy
tangible requirements. One of the most common reasons for failing to test is a lack of predefined test cases. Further, schedule pressures defeat efforts to create full testing scripts. It may seem backwards at first, but by writing test scripts first, you actually save time because developers focus on completing relevant tasks and spend less time on integration and system testing later in the development cycle.
Best practice #10: Create a testing framework Testing should be an automated process that can be run at any time by anyone. This rule ensures that testing is not considered a hassle, but is a normal part of the development process. With a single command, a user or application should be able to execute a variety of test suites to determine the overall status of the code base, as well as any individual parts of the code. To do this, you need a very granular test base, and also a rolled up view of test scripts. These test scripts need to be smart of enough to be able to execute automatically and to notify the status of the test execution. In the event of failed tests, the build or test process should take appropriate action, such as notifying the last
J2EE Best Practices Page 18 12/31/2002
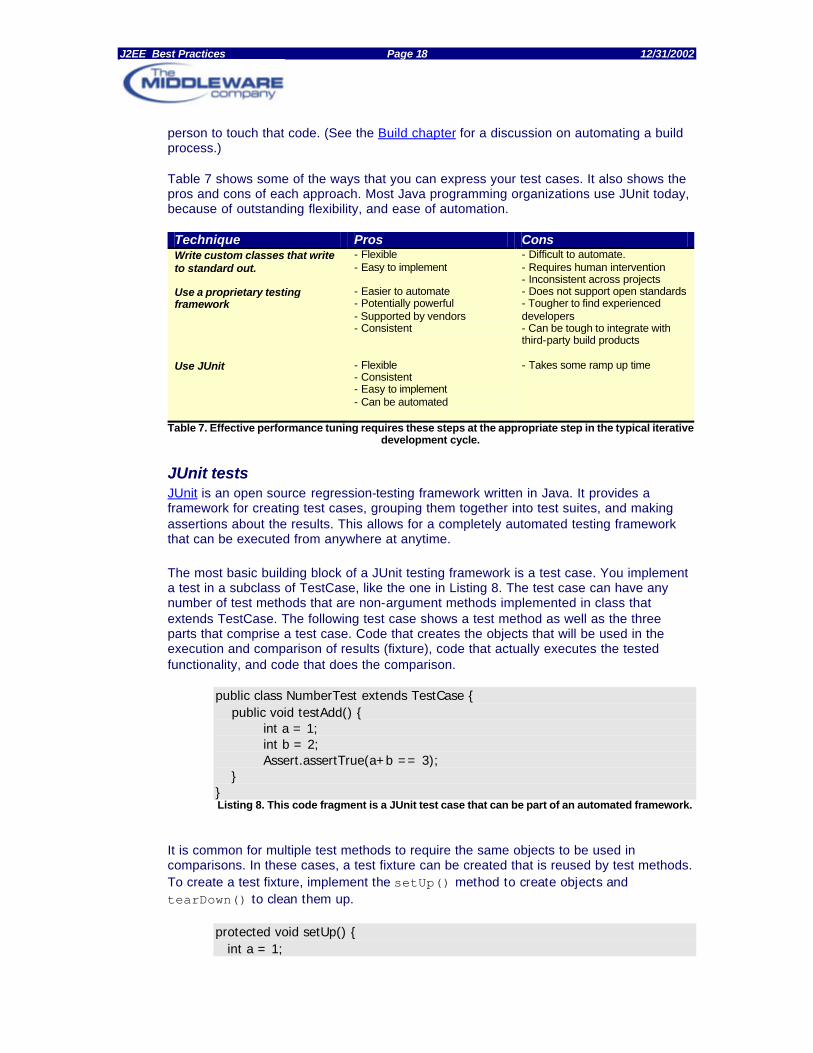
person to touch that code. (See the Build chapter for a discussion on automating a build process.) Table 7 shows some of the ways that you can express your test cases. It also shows the pros and cons of each approach. Most Java programming organizations use JUnit today, because of outstanding flexibility, and ease of automation. Technique Pros Cons Write custom classes that write to standard out.
- Flexible - Easy to implement
- Difficult to automate. - Requires human intervention - Inconsistent across projects
Use a proprietary testing framework
- Easier to automate - Potentially powerful - Supported by vendors - Consistent
- Does not support open standards - Tougher to find experienced developers - Can be tough to integrate with third-party build products
Use JUnit - Flexible - Consistent - Easy to implement - Can be automated
- Takes some ramp up time
Table 7. Effective performance tuning requires these steps at the appropriate step in the typical iterative development cycle.
JUnit tests JUnit is an open source regression-testing framework written in Java. It provides a framework for creating test cases, grouping them together into test suites, and making assertions about the results. This allows for a completely automated testing framework that can be executed from anywhere at anytime.
The most basic building block of a JUnit testing framework is a test case. You implement a test in a subclass of TestCase, like the one in Listing 8. The test case can have any number of test methods that are non-argument methods implemented in class that extends TestCase. The following test case shows a test method as well as the three parts that comprise a test case. Code that creates the objects that will be used in the execution and comparison of results (fixture), code that actually executes the tested functionality, and code that does the comparison.
public class NumberTest extends TestCase { public void testAdd() { int a = 1; int b = 2; Assert.assertTrue(a+b == 3); } } Listing 8. This code fragment is a JUnit test case that can be part of an automated framework.
It is common for multiple test methods to require the same objects to be used in comparisons. In these cases, a test fixture can be created that is reused by test methods. To create a test fixture, implement the setUp() method to create objects and tearDown() to clean them up.
protected void setUp() { int a = 1;
J2EE Best Practices Page 19 12/31/2002
int b = 2; }
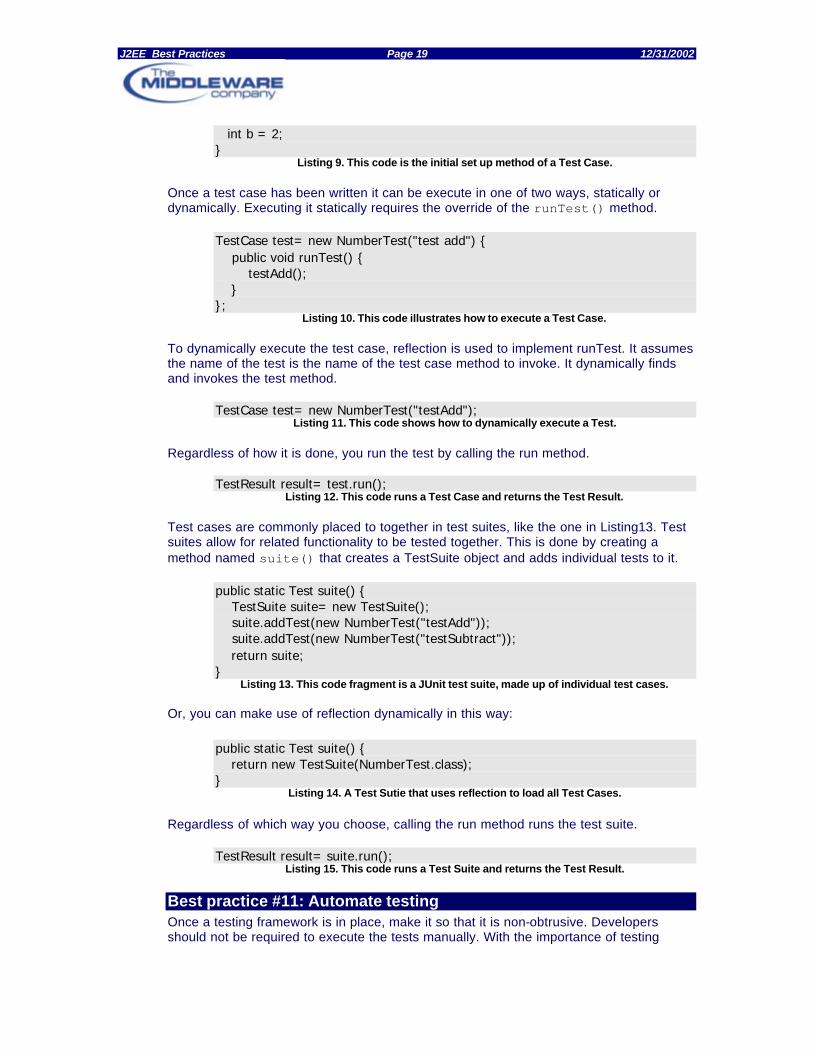
Listing 9. This code is the initial set up method of a Test Case. Once a test case has been written it can be execute in one of two ways, statically or dynamically. Executing it statically requires the override of the runTest() method.
TestCase test= new NumberTest("test add") { public void runTest() { testAdd(); } };
Listing 10. This code illustrates how to execute a Test Case. To dynamically execute the test case, reflection is used to implement runTest. It assumes the name of the test is the name of the test case method to invoke. It dynamically finds and invokes the test method.
TestCase test= new NumberTest("testAdd"); Listing 11. This code shows how to dynamically execute a Test.
Regardless of how it is done, you run the test by calling the run method.
TestResult result= test.run(); Listing 12. This code runs a Test Case and returns the Test Result.
Test cases are commonly placed to together in test suites, like the one in Listing13. Test suites allow for related functionality to be tested together. This is done by creating a method named suite() that creates a TestSuite object and adds individual tests to it.
public static Test suite() { TestSuite suite= new TestSuite(); suite.addTest(new NumberTest("testAdd")); suite.addTest(new NumberTest("testSubtract")); return suite; }
Listing 13. This code fragment is a JUnit test suite, made up of individual test cases.
Or, you can make use of reflection dynamically in this way:
public static Test suite() { return new TestSuite(NumberTest.class); }
Listing 14. A Test Sutie that uses reflection to load all Test Cases.
Regardless of which way you choose, calling the run method runs the test suite.
TestResult result= suite.run();
Listing 15. This code runs a Test Suite and returns the Test Result.
Best practice #11: Automate testing Once a testing framework is in place, make it so that it is non-obtrusive. Developers should not be required to execute the tests manually. With the importance of testing

J2EE Best Practices Page 20 12/31/2002
being so high, it needs to be something that occurs as a natural part of the development process. To achieve this, the test execution should be a part of the build process. This allows for the testing framework to be executed as a normal part of the development process. This will lead to a higher number of executed tests and a lower number of errors that make it into the repository. By making testing a part of the build process, developers will usually execute the test suites before checking in any code, thereby experiencing any problems before they are introduced to the whole development community.
To help add testing to the build process, Ant includes tasks for executing Java classes and JUnit test cases. This shows an ant task that calls a main method of a custom java class. Such a class would implement a main method that would run the individual tests.
<target name="runTests"> <echo>Start test run</echo> <java classname="com.test.TestSuite" fork="true" /> </target>
Listing 16. Ant task that executes a Java Class.
Ant also has a built in Ant task for executing JUnit tests. This simplified execution of a JUnit test results in a standard message.
<junit> <test name="com.test.TestCase" /> </junit>
Listing 17. Ant built in task to execute a JUnit Test Case.
Listing 18 shows a more complex Ant task for executing a JUnit script.
<junit printsummary="yes" haltonfailure="no"> <formatter type="plain" /> <batchtest fork="yes" todir="${test.reports}"> <fileset dir="${tests}"> <include name="*Test*.java" /> </fileset> </batchtest> </junit>
Listing 18. This Ant script executes a test and acts on the results of the test case.
This script executes the TestCase for every JUnit test file that is found in the ${tests} directory that contains the word ‘Test’. Each test is executed within its own JVM instance and the build process continues to run regardless of test status. The results of the tests are written to the ${tests.reports} directory. With these best practices, you can effectively plan and integrate your testing to the rest of your development process. In the next section, we will discuss one specialized type of testing, called performance testing, and application tuning.

J2EE Best Practices Page 21 12/31/2002
DEPLOY One of the final stages of software development is deployment. Here, you move all of the files that are required to run an application from development environments to production environments. The outcome of the deployment stage is an executable application in a production environment. Keep in mind that users tend to request changes more frequently for web-based applications. With the emergence of iterative development, deployments occur at a much greater frequency then in the past, and take on a greater importance.
Best practice #12: Use J2EE standard packaging specification To provide for open, server-based solutions, the J2EE specification details the artifacts that are necessary for the deployment process, and where they need to exist on a server. This specification allows portability of application components and applications themselves. The specification details a number of modules that can be combined together to form an application. Here is a list of the different types of modules, as well as the sub-parts making up each one: • A J2EE application is packaged as an Enterprise Archive (EAR) file. A standard
JAR file with an .ear extension, this component is comprised of one or more J2EE modules and deployment descriptors. You create an EAR file by combining together EJB, Web, and application client modules with the appropriate deployment descriptors. Each of these individual modules is an independently deployable unit that allows pluggable components that can be combined to create applications.
• An EJB module is a collection of enterprise beans, packaged together in a .jar file. This file contains all of the java classes for enterprise beans, including their home and remote interfaces, primary key class if an entity bean, supporting classes that the enterprise beans rely upon, and an EJB deployment descriptor. The EJB deployment descriptor includes the structural and assembly information for the enterprise bean and is in a file named ejb-jar.xml.
• A Web module is packaged together in a jar file that has a .war extension. A WAR file is comprised of Servlets, JSP, applets, supporting classes, all statically served documents (images, HTML, sound files, movie clips, etc…), and a web deployment descriptor. The deployment descriptor manages the relationships of files and properties at both run time and installation time and is named web.xml.
• An Application module is a standard .jar file that contains both java classes and an application client deployment descriptor. The deployment descriptor is named application-client.xml.
Deployment descriptors are XML configuration files that contain all of the declarative data required to deploy the components in the module. The deployment descriptor for a J2EE module also contains assembly instructions that describe how the components are composed into an application. Because of the complexity of this stage, you should use a J2EE verifier tool, such as the one that is provided with the J2EE SDK, on your resulting EAR file before deployment. A verifier tool checks to make sure that the contents of the deployment are well-formed, and are consistent with the EJB, Servlet, and J2EE specifications. This process checks only the syntax, so run time errors still could exist. Whenever possible, your application should only use the files specified in the standard J2EE deployment specification.

J2EE Best Practices Page 22 12/31/2002
Best practice #13: Use tools to help in deployment Despite the excellent documentation detailing the deployment process, packaging your technology can still be one of the more complex steps in application development. Configuring the property files that are needed for deployment and copying the necessary files to the appropriate location is demanding, complex and hard to debug. Luckily though, you can use a variety of tools to assist your deployment for development and production. Most IDEs provide good deployment support, or you can also build scripting languages to assist in the automated deployment of J2EE applications. For large-scale production environments, and even more so for clients, you should not rely on proprietary deployment extensions to assist in the deployment process. Instead, create a platform independent script that allows for deployment to any intended platform. This approach requires significantly more work up front, but allows for non-IDE users to deploy and for deployment to occur to non-IDE supported platforms. Since it’s locked down in a script, deploying applications this way is a much safer, more repeatable process.
Ant Ant is the deployment tool of choice for many of the best professional developers. It offers a number of advantages and shortcuts for deploying J2EE applications. Using Ant, you can build in a number of automated tasks to make deploying applications as simple as executing a command. Ant can make jars, ears, and wars all from a built in tasks. Listing 19 shows an Ant file that builds a variety of targets.
<target name="jar" depends="compile"> <mkdir dir="${root}/lib"/> <jar jarfile="${root}/lib/MyProject-${DSTAMP}.jar" basedir="${build}"/> </target> <target name="war" depends="jar" > <mkdir dir="${dist.dir}"/> <war warfile="${dist.dir}/${dist.war}" webxml="${web.dir}/WEB-INF/web.xml" basedir="${web.dir}" excludes="readme.txt"> <lib dir="${build.dir}"> <include name="core.jar" /> </lib> <classes dir="${build.classes.dir}"> <include name="**/web/**"/> </classes> </war> </target> <ear destfile="${build.dir}/myapp.ear" appxml="${src.dir}/metadata/application.xml"> <fileset dir="${build.dir}" includes="*.jar,*.war"/> </ear>
Listing 19. This file is an Ant file with .war, .ear and .jar targets.
Along with making J2EE modules, Ant also can automate the deployment process by moving the appropriate files to their appropriate location of the J2EE application server.

J2EE Best Practices Page 23 12/31/2002
<target name="deploy" depends="war”> <copy file="${dist.dir}/${dist.war}" todir="${deploy.dir}" overwrite="true"/> <replace file="${deploy.dir}/config.properties" token="@location@" value="${conf.dir}"/> </target>
Listing 20. This Ant file shows how easy it is to build deployment into the build process. Using Ant, your script-driven build process creates a process that is automated, repeatable and extensible. The important difference between the IDE and the script file for major deployment is repeatability. Since the Ant script requires no manual intervention, it’s a much more solid choice for production deployment.
Best practice #14: Back up your production data and environment Whenever dealing with production machines, you should always use extreme caution. Few things can cause more serious damage than making changes to a production environment. Every developer has war stories related to worst-case scenarios of corrupted data and application on production environments, caused by the change of a single line of code. Backups can save you a lot of grief. Plan to back up both your production and development environments. It’s easy to do, and it’s the right thing to do. Make sure that your backups include production data, configuration and application files. Back up on a regular basis, and also before deploying any new code. In case of problems, you can then roll back to the last known ‘good’ state. Of course, good backup architectures are beyond the scope of this paper. This concludes the best practices related to the development process. In the next section, we will discuss different production and development environments. We’ll look at clustered and standalone deployment architectures, and their impact on the development process.
J2EE Best Practices Page 24 12/31/2002
TUNE Perhaps the most often neglected step in most development cycles is application tuning. That’s surprising, because poor performance is one of the more common reasons sited for failure of large software projects. You can mitigate that risk through effective performance planning. While many developers do a little unstructured tuning, very few actually build a working performance plan and execute it. As a result, fewer still focus all resources on the most important performance problems. Part of the problem is the lack of good development tools. That situation is changing. Some vendors are beginning to include good Java profiling services and trouble shooting aids. In this section, we will explore best practices related to planning and executing a performance tuning cycle.
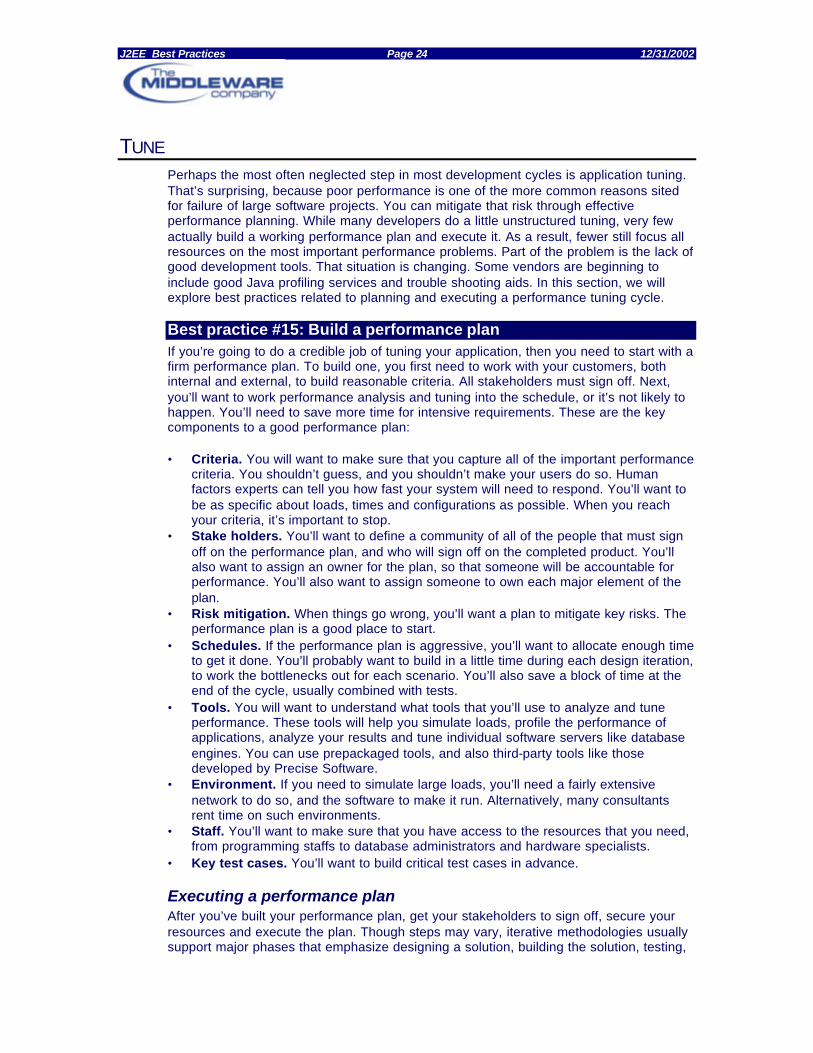
Best practice #15: Build a performance plan If you’re going to do a credible job of tuning your application, then you need to start with a firm performance plan. To build one, you first need to work with your customers, both internal and external, to build reasonable criteria. All stakeholders must sign off. Next, you’ll want to work performance analysis and tuning into the schedule, or it’s not likely to happen. You’ll need to save more time for intensive requirements. These are the key components to a good performance plan: • Criteria. You will want to make sure that you capture all of the important performance
criteria. You shouldn’t guess, and you shouldn’t make your users do so. Human factors experts can tell you how fast your system will need to respond. You’ll want to be as specific about loads, times and configurations as possible. When you reach your criteria, it’s important to stop.
• Stake holders. You’ll want to define a community of all of the people that must sign off on the performance plan, and who will sign off on the completed product. You’ll also want to assign an owner for the plan, so that someone will be accountable for performance. You’ll also want to assign someone to own each major element of the plan.
• Risk mitigation. When things go wrong, you’ll want a plan to mitigate key risks. The performance plan is a good place to start.
• Schedules. If the performance plan is aggressive, you’ll want to allocate enough time to get it done. You’ll probably want to build in a little time during each design iteration, to work the bottlenecks out for each scenario. You’ll also save a block of time at the end of the cycle, usually combined with tests.
• Tools. You will want to understand what tools that you’ll use to analyze and tune performance. These tools will help you simulate loads, profile the performance of applications, analyze your results and tune individual software servers like database engines. You can use prepackaged tools, and also third-party tools like those developed by Precise Software.
• Environment. If you need to simulate large loads, you’ll need a fairly extensive network to do so, and the software to make it run. Alternatively, many consultants rent time on such environments.
• Staff. You’ll want to make sure that you have access to the resources that you need, from programming staffs to database administrators and hardware specialists.
• Key test cases. You’ll want to build critical test cases in advance.
Executing a performance plan After you’ve built your performance plan, get your stakeholders to sign off, secure your resources and execute the plan. Though steps may vary, iterative methodologies usually support major phases that emphasize designing a solution, building the solution, testing,

J2EE Best Practices Page 25 12/31/2002
and deployment. Some add major steps for business justification or post-mortem analysis, but the major phases remain the same. Modern methodologies separate each major phase into iterations. In each, you can usually find elements of design, code, and test. Sound performance analysis spans the entire development cycle. Table 2 shows the major activities, broken down by major phase (represented by the rows), and minor iterations within the phase (represented by columns).
Phase Design Code Verify Design • Build performance
plan • Secure stakeholders • Establish
performance criteria for requirements
• Prototype high-risk technologies
• Tune prototype
• Measure prototype.
Build
• Identify major performance problems
• Code performance tests up front
• Find and solve major bottlenecks only
Tune/Test • Identify hot spots • Design fixes
• Code fixes • Build regression tests
• Set base line • Run perf tests • Note major problems in
test case execution • Find major bottlenecks
Deploy • Document optimal configuration
• Verify production performance
• Monitor production performance
Table 2. Effective performance tuning requires these steps at the appropriate step in the typical iterative development cycle. • Plan. Within the planning phase, your fundamental goal is to create a performance
plan, and prototype technologies and algorithms that are high-risk from a performance perspective, because it’s much easier to recover from problems that you encounter early. You’ll also want to set objective criteria for performance. Don’t guess. Interview users, talk to human factors experts, and set objective criteria for use cases.
• Build. As you get deeper into the development cycle, you begin your full-scale implementation. At this point, you should be implementing new business requirements for each major iteration. Since most of your system is not yet tuned, you should only be concerned with fixing major performance problems. One of the most common mistakes made by stronger programmers is to spend time tuning components that are not bottlenecks. At this point in the cycle, you simply do not have enough information to allocate your tuning resources. However, neither should you let major performance problems fester.
• Test and tune. Through the testing and tuning phases, your performance plan execution should be getting much more active. You should note major performance problems as you execute your test suites. You should actively establish bottlenecks, and prioritize them. You should then continue to work through that list, integrating and regression testing along the way, until your system meets your established criteria. Then, quit. You can always optimize. It takes discipline and constraint to know when to declare victory and move on.
• Deploy. At deployment time, your goal is to deliver and tune the production system. At this point, you should know the performance characteristics of your system, and should be simply working out the kinks.
Late performance problems have derailed many a project, but if you have a firm plan in place, you’ll have a better chance of emerging unscathed. Performance planning is expensive, but remember. The alternatives can be catastrophic.

J2EE Best Practices Page 26 12/31/2002
Best practice #16: Manage memory and plug leaks When many C++ programmers moved over to the Java programming language, they marveled at Java’s garbage collection, which dramatically simplifies memory management. Many of these programmers share a common misconception, that Java programs cannot have memory leaks. To be clear, in this document, a memory leak is memory that is no longer required by the application, but is not garbage collected. In the strictest sense, this is not really a leak: it’s simply a case of the programmer not giving the garbage collector enough information to do its job.
Person:U. R.
Frugal
Root
Person:I. C.
Leaks
Dept:Finance
Invoice:0U812
Dept:Software
Person:Dilbert
Person:Wally
ReachableObjects
UnreachableObjects
Figure 21. Java garbage collectors work by determining reachability. An arrow indicates a reference
from one object to another.
Java garbage collection Java garbage collection works by identifying objects that are reachable by the Java virtual machine, as in Figure 21. Most implementations work this way. Periodically (for example, when memory use hits a certain threshold), the JVM invokes the garbage collector (GC). Some objects reference others, creating a directed graph. The GC then traverses the entire memory tree, and determines if a path to each object exists from the root memory object. Since Java objects reference others, this graph of objects might be very deep. The GC marks objects as reachable or not, and then reclaims all of the unreachable objects. Like Figure 5, the arrows on the graph matter. For example, though the Software department object references the Person object for U. R. Frugal, it is still not reachable, because no reachable object references the Software department object.
Roots of memory leaks Garbage collection simply applies hard and fast rules to determine the objects that an application can no longer reach. The GC cannot determine your intent. Instead, it must follow the reachability rules strictly. If you have left a reference to an object anywhere, then that object cannot be reclaimed, because you can still conceivably reach it in some

J2EE Best Practices Page 27 12/31/2002
way. Typical memory leaks can occur in many different ways, but have very few root causes: • Sloppy clean up. If you don’t’ clean up after connections, you can run out of
connections. In the same way, a memory leak can occur when a primary object allocates a leaked object, and then more than one object references the leaked object. If you don’t clean up all subsequent references when you clean up the primary object (or when the primary object dies), you’ll have a memory leak.
• Short lifecycle meets long lifecycle. Whenever an object having a long lifecycle manages an object with a short lifecycle, you’ve got potential for a memory leak.
• Shaky exception processing. Sometimes, exceptions can short circuit your cleanup code. For this reason, you should put cleanup code in finally blocks.
Most Java memory leaks will fall into one of the previous three categories. Let’s explore some special cases of leaks, and how they might happen. • The leak collection. This type of memory leak happens when you put an object in a
collection, like a cache, and don’t ever remove it. • With caches, this happens when you never flush old or stale data. Other versions of
this type of leak can occur with common design patterns. • The publish-subscribe design pattern allows an object declaring an event to publish
an interface, and subscribers to receive notification when the event occurs. Each time you subscribe to an event, your object is placed in a collection. If you want the GC to handle the subscribing object, you’ll have to unsubscribe when you’re done.
• Singletons. This type of memory leak occurs when you’ve got a singleton with a long lifecycle that references an object with a short lifecycle. If you don’t set the reference to null, then the short-lived object will never be garbage collected.
• The seldom-used, expensive feature. Many applications have features, like Print, that might be extremely expensive, and seldom used. If you anchor these features to objects with a long life cycle, it’s often best to explicitly clean them up between uses.
• Session state. When you are managing session state, you’re subject to memory leaks, because it’s difficult to tell when the session with a particular user ends.
These are the typical leaks. You’ll doubtlessly find others. Since memory leaks are notoriously difficult to find, it pays to understand the patterns associated with various leaks, and to give those areas additional scrutiny. When you do find a leak, you’ll want to use a platform with enough power to help you identify it.
Trouble shooting To solve memory problems, your basic philosophy is to build and narrow a test case, examine the problem in a controlled environment like a debugger or memory profiler, repair the problem and prevent the problem.
Using these tools, you should be well equipped to identify and solve a memory leak. What are the primary steps that you should use to do so? • Reproduce the problem. The first and most important step is to build a test case
that can reproduce the problem. Having a system that can trigger garbage collection simplifies the problem. Simply trigger garbage collection after your test cases and then trigger garbage collection. When you look at the total memory usage at any given time, it will form a graph that forms peaks and valleys. The peaks occur when the system activates garbage collection. The valleys after memory collection represent the true memory usage by your system. If the valley floors grow steadily

J2EE Best Practices Page 28 12/31/2002
over time, as in figure 22, you’ve found your leak. Since you can trigger garbage collection, you can execute a known test case several times, with garbage collection between each. If the total memory space grows directly after garbage collection, you’ve got a potential leak.
True memory usage
GCGC
GC
GC
Figure 22. The vertical axis is memory usage, and the horizontal axis is time. The increasing valleys
between garbage collection indicate a leak.
• Isolate the problem. After you reproduce the problem, attempt to isolate the problem by narrowing your test case. Many times, you’ll find the leak in this way without further investigation.
• Find the offending objects. Your next goal is to use a memory profiler to locate the memory objects that are leaking. Most common memory profilers can show you the number of instances, and the total memory used by each instance, of all of the objects in memory. This way, you can see memory blocks that are abnormally large. By watching the number of instances and then triggering garbage collection, you can see if the system is reclaiming objects as it should.
• Find and repair references to those objects. You’re almost home. Once you’ve identified the object, you can then find references to those objects, and repair them. Repairs involve setting a reference to null, or other clean-up steps, such as closing a file or removing a reference from a collection. The cleanup should go in a finally {} block rather than the main body of a method, to make sure that cleanup can occur when exceptions interrupt processing.
• Prevent future instances of the problem. When possible, you should eliminate the root problems that caused the leaks in the first place. Test cases, education, or framework documentation can frequently effectively remedy the situation and save you further grief.
You can follow these steps to identify and solve known leaks. What separates a good team from a great one is proactive management and action. That means that you’ve got to anticipate memory problems, and act to identify and solve them before your systems reach production stage. The problem here is that many test cases run in a short duration, and do not target memory leaks. For this reason, it helps to design a small set of tests to explicitly look for memory leaks. Some steps can help. You can do some of your tests within the debugger, and train customers to trigger garbage collection and look at memory usage. You can also explicitly design test cases to run over and over, without shutting down, so that you can get a feel for memory use over time. Finally, you can educate your team to avoid and identify effective memory management techniques.
Best practice #17: Focus on priorities One instance of the 80/20 rule is that typically, 80% of a code’s execution will occur in 20% of the code. For this reason, it’s important to focus development resources on the areas likely to make the biggest difference. Priorities can serve you well in two major areas. • Hot spot analysis determines the most active sections of code, so that developers
can focus optimization efforts.
J2EE Best Practices Page 29 12/31/2002
• Performance measurements can show you test cases that are critically slow, and you can profile the execution path to quickly zero in on the performance changes that are likely to make the biggest difference.
• Automation of performance testing can allow you to establish firm performance criteria in your test cases, and fix problems as they fall outside of the specified limits. You can use JUnitPerf from http://www.clarkware.com/software/JUnitPerf.html or any performance test case automation tool.
The key to effective performance tuning is efficient resource allocation. You should spend most of your time tuning the application areas that will give you the biggest benefit. The converse is also true: you should not spend time trying to optimize each element of code that you write, unless you know that it’s in the critical path. This practice is not a license to write sloppy code, but you should use the simplest approach that will work, until you’ve confirmed the need for optimization through manual or automated performance testing.
Critical scenarios performing below specifications Two factors are important for setting priorities after you’ve identified some trouble spots: the importance of scenarios, and the performance against criteria. If a scenario meets criteria, leave it alone for now. You should start your tuning by focus on areas that you’ve measured that are worse than the criteria that you set in the planning phase. Of these, your most critical scenarios take precedence. After you’ve targeted a scenario, profile the scenario with an execution profiler, and focus on the low-lying fruit first: those methods that take the most time to complete. Work through the methods where you can make the biggest difference until you meet criteria. Then, move onto the next scenario.
Don’t be afraid to attack legacy systems outside of the application server, like database configurations. J2EE applications typically depend on many integrated applications, and these external applications might not be optimally tuned for use with J2EE servers. Database servers are frequently a good place to start, since configuration parameters and query structure can have a tremendous impact on overall system performance.
Hot spots After you’ve solved your major bottlenecks and performance problems, you can focus on general tuning, if you’ve still got the time to commit. To do so, your primary tool is your execution profiler. The profiler breaks down the execution of a method into individual method calls, showing the total percentage of execution that can be attributed to each. From there, if necessary, you can drill down to the most time-intensive methods.
Other options for scalability When your skills or your schedule defeat you, improving your deployment configuration can also improve performance. The J2EE architecture is inherently scalable. You can go from a single system to a clustered architecture, upgrade hardware, or upgrade other infrastructure (like your network). When you commit to improving performance through upgrading deployment architecture, make sure that you are setting your priorities correctly. If your database platform is the bottleneck, then it won’t make any difference how your J2EE server is deployed. Therefore, you’ll need to measure all of the major components of your infrastructure to locate the bottlenecks.
J2EE Best Practices Page 30 12/31/2002
ENVIRONMENTS Though this best-practices document focuses on software development and process issues, in this section, we will discuss development and production environments. For production environments, we’ll describe the issues related to your choice of a deployment architecture, and then we’ll discuss some of the relevant details. For development environments, we’ll describe a typical development environment, and then discuss some brief best practices that will allow you to be most efficient.
Production Environments For large deployments, you’ll need to design your production environment as carefully as you design your application. You’ll need to decide how to structure your physical and logical tiers, and decide where you need redundancy for performance, scalability and availability. These issues can impact the way that you build your solution. The primary deployment issues that will impact development are these: • Clustered vs. standalone. If your implementation is clustered, each part of your
J2EE application design will need to support clustering. • Physical tier distribution. Different J2EE architectures advocate different n-tier
architectures. You’ll want to make sure that your design allows for the maximum possible flexibility here, so that you don’t needlessly back yourself into a given option before you begin.
In either case, your first goal should be to support your intended deployment architecture. Your next goal is to maintain flexibility, so that you can change deployment architectures as the requirements or load for your applications change. Both of these goals require an intimate knowledge of the design tradeoffs that support major development. Next, we’ll look at some typical production environments.
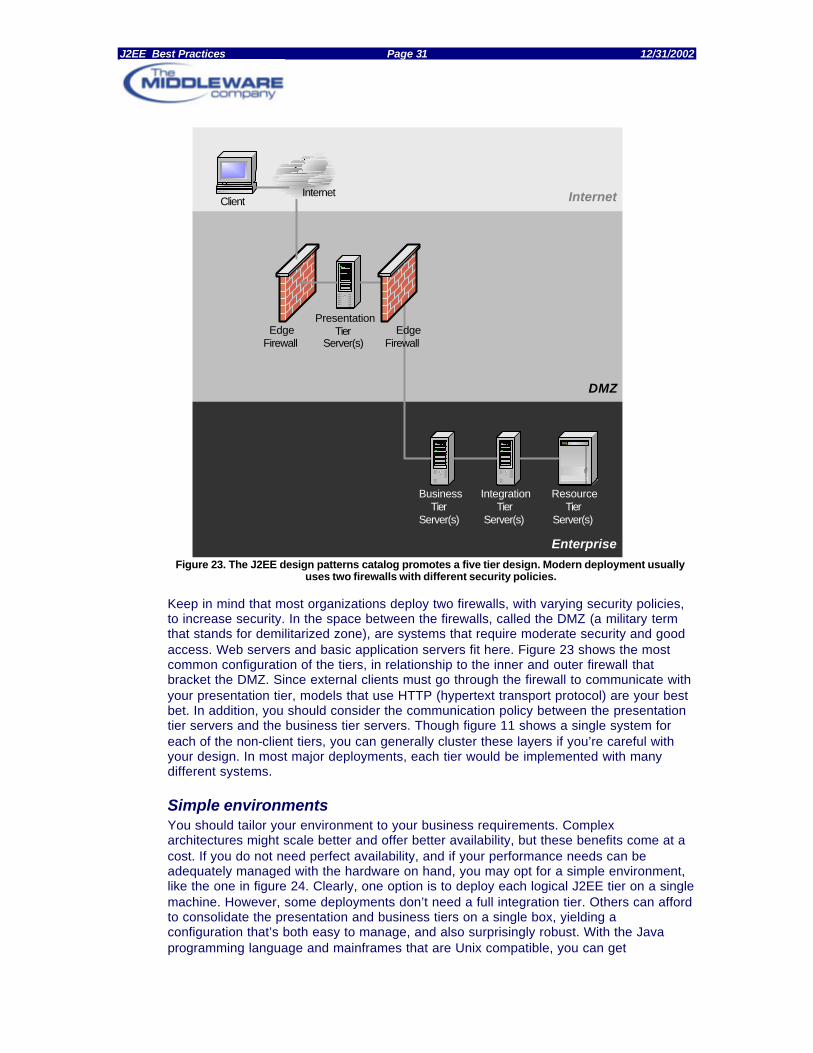
Logical tiers Logical tiers help you to organize your logic. They can ease maintenance, increase flexibility and address deployment concerns. The J2EE Pattern catalog, generally recognizes three to five different tiers, depending on application requirements: • Client tier. This tier supports the user interface, which are generally HTML. These
interfaces may be extended with Java applets or scripting languages. Other application clients may participate.
• Presentation tier. This layer is responsible for building a clear delineation between model, view and controller. We cover design patterns for this tier in detail in the Design chapter, including MVC patterns and J2EE design patterns.
• Business tier. The business tier contains business logic. EJB would be a possible implementation for the business tier.
• Integration tier. This layer provides logic that is used to access complex legacy systems. Web services and queuing architectures belong to this tier.
• Resource tier. Applications like databases or non-j2EE line-of-business applications are resources. A resource may be designed specifically for J2EE, or it may be an independent application requiring an integration tier.
J2EE Best Practices Page 31 12/31/2002
Figure 23. The J2EE design patterns catalog promotes a five tier design. Modern deployment usually uses two firewalls with different security policies.
Keep in mind that most organizations deploy two firewalls, with varying security policies, to increase security. In the space between the firewalls, called the DMZ (a military term that stands for demilitarized zone), are systems that require moderate security and good access. Web servers and basic application servers fit here. Figure 23 shows the most common configuration of the tiers, in relationship to the inner and outer firewall that bracket the DMZ. Since external clients must go through the firewall to communicate with your presentation tier, models that use HTTP (hypertext transport protocol) are your best bet. In addition, you should consider the communication policy between the presentation tier servers and the business tier servers. Though figure 11 shows a single system for each of the non-client tiers, you can generally cluster these layers if you’re careful with your design. In most major deployments, each tier would be implemented with many different systems.
Simple environments You should tailor your environment to your business requirements. Complex architectures might scale better and offer better availability, but these benefits come at a cost. If you do not need perfect availability, and if your performance needs can be adequately managed with the hardware on hand, you may opt for a simple environment, like the one in figure 24. Clearly, one option is to deploy each logical J2EE tier on a single machine. However, some deployments don’t need a full integration tier. Others can afford to consolidate the presentation and business tiers on a single box, yielding a configuration that’s both easy to manage, and also surprisingly robust. With the Java programming language and mainframes that are Unix compatible, you can get
DMZ
EdgeFirewall
Internet
Enterprise
PresentationTier
Server(s)
BusinessTier
Server(s)
IntegrationTier
Server(s)
ResourceTier
Server(s)
InternetClient
Edge Firewall
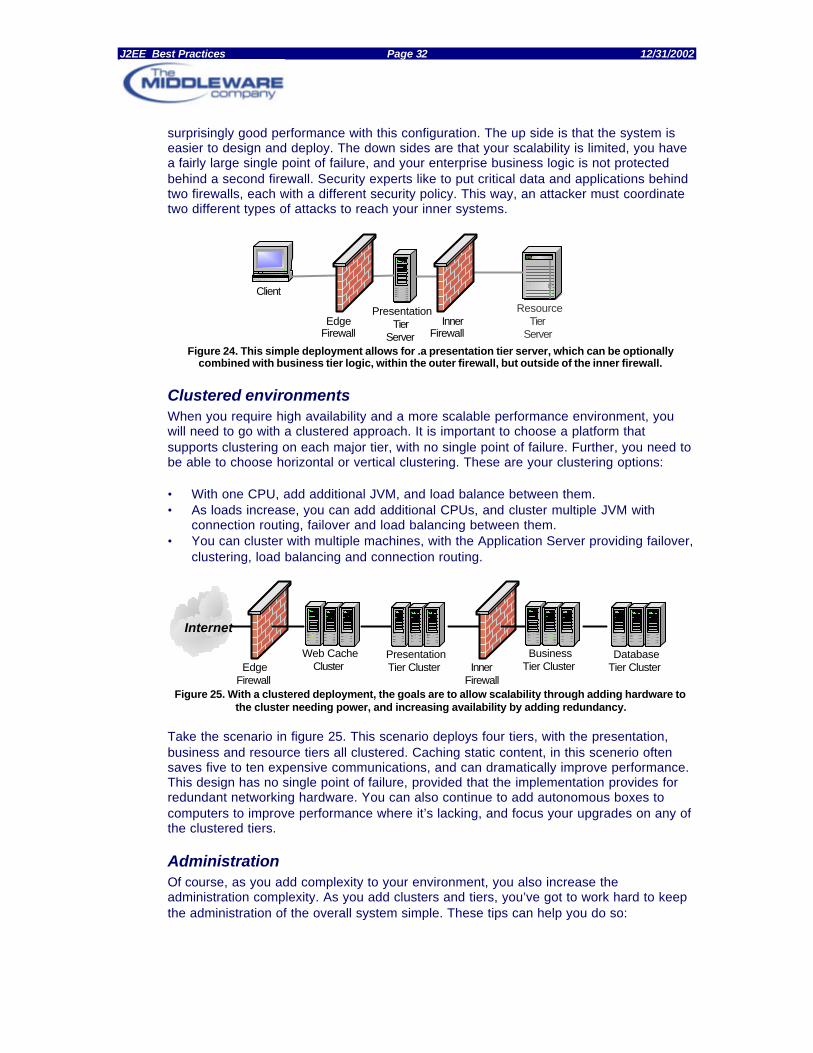
J2EE Best Practices Page 32 12/31/2002
surprisingly good performance with this configuration. The up side is that the system is easier to design and deploy. The down sides are that your scalability is limited, you have a fairly large single point of failure, and your enterprise business logic is not protected behind a second firewall. Security experts like to put critical data and applications behind two firewalls, each with a different security policy. This way, an attacker must coordinate two different types of attacks to reach your inner systems.
PresentationTier
Server
ResourceTier
Server
Client
EdgeFirewall
Inner Firewall
Figure 24. This simple deployment allows for .a presentation tier server, which can be optionally
combined with business tier logic, within the outer firewall, but outside of the inner firewall.
Clustered environments When you require high availability and a more scalable performance environment, you will need to go with a clustered approach. It is important to choose a platform that supports clustering on each major tier, with no single point of failure. Further, you need to be able to choose horizontal or vertical clustering. These are your clustering options: • With one CPU, add additional JVM, and load balance between them. • As loads increase, you can add additional CPUs, and cluster multiple JVM with
connection routing, failover and load balancing between them. • You can cluster with multiple machines, with the Application Server providing failover,
clustering, load balancing and connection routing.
Internet
EdgeFirewall
InnerFirewall
PresentationTier Cluster
Web CacheCluster
BusinessTier Cluster
DatabaseTier Cluster
Figure 25. With a clustered deployment, the goals are to allow scalability through adding hardware to
the cluster needing power, and increasing availability by adding redundancy. Take the scenario in figure 25. This scenario deploys four tiers, with the presentation, business and resource tiers all clustered. Caching static content, in this scenerio often saves five to ten expensive communications, and can dramatically improve performance. This design has no single point of failure, provided that the implementation provides for redundant networking hardware. You can also continue to add autonomous boxes to computers to improve performance where it’s lacking, and focus your upgrades on any of the clustered tiers.
Administration Of course, as you add complexity to your environment, you also increase the administration complexity. As you add clusters and tiers, you’ve got to work hard to keep the administration of the overall system simple. These tips can help you do so:

J2EE Best Practices Page 33 12/31/2002
• Strive for autonomous systems within a cluster. Software configuration becomes very difficult when you are forced to build dramatically different systems within a cluster. You should design your software and configuration such that you deploy a single snap shot across a cluster, with very few changes.
• Make each machine in a cluster do one thing. An old queuing analysis axiom is that queues work best when load sizes are uniform. For this reason, for high-load scenarios, it’s important to divide architectural tiers into physical tiers that do one type of job, and do it well. This might require you to dedicate a small cluster or machine to long or short-running tasks, but the additional effort will pay off with better performance, and by easier scaling when you need to add a system for performance.
• Consider administration when you buy products. Though administration may represent one of the largest independent costs of ownership, many decision makers do not seem to factor it heavily into buying decisions. You should look for products that integrate with your administration consoles, those that provide an integrated administration view beyond a single application, and those that allow you to extend the administration interface.
• Integrate application administration wherever possible. Deployment and administration both represent significant additional cost. Therefore, you should integrate and simplify administration at every possible turn.
• Use a single sign on architecture. Managing users and groups is a major administration cost. Multiple passwords are expensive from an administration perspective, and it’s also inherently insecure. Users who must maintain different passwords for different environments typically do insecure things, like writing passwords down on a post-it note beside the computer or keeping all passwords in a text document called Passwords.
A little extra focus can go a long way toward an application that meets the business needs of an organization. Conversely, if you don’t do your homework in this area, it’s very difficult to have a project that’s as financially successful as it should be, because you can easily eat up your savings administering the system. In the next section, we’ll focus on practices that can improve your deployment flexibility.
Best practice #18: Do not restrict deployment options at design time Whenever possible, you should maintain as much flexibility as possible as you build the system. That way, if your deployment needs change, you’ll be ready to adapt. J2EE application loads are inherently difficult to predict, especially when you’re user population is on the public Internet. Many consultants advocate for planning for much more capacity than you expect. A better approach is to build an architecture that can adapt and scale as required. That requires you to pay careful attention to your software application design. In the next few sections, we’ll talk about architectural decisions that can impact your deployment architectures.
Session state management For early server-side Java Internet applications, developers implemented a wide variety of techniques to manage session state. Today, that’s still true. Whichever you choose, you should make sure that your architecture manages distributed session state. You should also understand whether your solution provides failover. If you intend to cluster your presentation layer, you’ve got several reasonable choices for session state.
• You can use the base J2EE session state management API. This may be your best
bet for light-weight session state. Keep in mind that this implementation does not support massive amounts of data, so you’ll want to keep the amount of data that you store pretty lean.

J2EE Best Practices Page 34 12/31/2002
• You can design your networking architecture to make sure that all communications from a single client always return to the same server. This solution is known as the sticky bit.
• You can use EJB entity beans, or stateless session beans to build your own distributed state management. If you do so, make sure that you have a strategy for deleting old conversations periodically, if required.
Each of these solutions can conceivably be implemented in a way that can adequately maintain distributed session state.
Caching Any caching solutions that you develop for your application will need to support distributed access as well. A simple hash table works fine for a cache if you’re on a standalone system, but it’s not sufficient for distributed processing. For this reason, it’s best to use design patterns and prepackaged software for most of your distributed caching needs. If you must roll your own, make sure that you can invalidate all cached copies to flush old data values before you commit any transactions. Also, keep in mind that clustering can degrade your caching performance for two reasons:
• You’ve got to absorb the communications overhead for distributed invalidation of dirty
data. • With N different caches, you have less of a chance for getting a hit, unless you are
implementing a sticky-bit solution.
In any case, make sure that your caching solution supports distributed deployment, if you decide to build your own. This is true at all clustered layers.
Firewalls and communication planning When you move from a development environment for the first time, you’ll probably have to deal with firewalls for the first time. Make sure that you understand where each tier of your solution is likely to be, in relation to firewalls. Where possible, use solutions that don’t limit your deployment options. For example, your client should talk to the presentation server strictly through HTTP, and HTTPS. Even fat clients or Java applets can use these protocols with a little finesse.
Communication costs Good J2EE solutions optimize communications across distributed boundaries. (See the Build chapter for ways to optimize communications costs.) Great J2EE solutions optimize communication costs for each potential deployment architecture. For example, if you don’t know whether or not your implementation is going to deploy the business tier and presentation tier on the same physical machine or on separate hardware, go ahead and include a session façade to plan for the worst case. If you deploy on a single system, the additional layer will improve performance by reducing the communications cost between the servlet container of the presentation tier and the business tier. If you deploy each on separate hardware, you’ll experience an even greater performance advantage.
Best Practice #19: Create a Responsive Development Environment Of all the components that contribute to developing highly complex software, none contribute more to developer productivity and code quality than the development environment. Many development processes dictate how to set up a development environment, but most developers overlook these recommendations, or sacrifice them to focus more time on other early development priorities. Time invested in creating a
J2EE Best Practices Page 35 12/31/2002
development environment is usually returned many times over the course of the entire development effort. A favorite developer past time is complaining about lost time. Synchronizing code with the code base, merging major changes and fighting with make files have long been considered rites of passage. The phrase “It worked on my machine” is a common management nightmare. All of these issues point to a poorly constructed development environment. As a result, development performance and code quality suffer. You should consider a number of features within a good development environment: • Single Repository - To ensure that everyone is working from the same code base,
the use of a source configuration management (SCM) system is essential. Tools such as PVCS, Source Safe, and Perforce allow developers to version and share all files. You should include source files and all other required application files, including source files, builds, scripts, property files, DDL’s, images, and design documents. At the very minimum, any file that is needed to build on a clean machine needs to exist in the SCM system. Along with the files needed for a clean build, you should keep past completed builds in the SCM, ensuring availability of complete, working builds. You also ensure that you can reproduce any bugs generated on past builds. Finally, be sure to backup the repository frequently.
• Integrate often - Integration worsens exponentially with time. You can identify bugs and fix them the same day, often within hours of their integration, resulting in less down time for you and your peers. Continuous integration saves total integration time, allowing all developers to be more productive. Even the largest projects can integrate daily. For this reason, most agile methods including XP ask for daily builds as a minimum.
• Fully Automate Build Process - Developers shouldn’t have to do anything more complex than executing a single command to create a new build from scratch. Command line tools such as Make and Ant should be used to provide a build structure that can selectively or collectively build an entire application from a single well known command. This non-IDE dependent build mechanism allows developers to use any IDE or operating system that they wish, while still allowing the use of the build tools. This way, all developers can be much more productive by working in their preferred environment. Easy build processes contribute directly to the frequency of builds. The more often that builds occur, the better. The build process should be able to take a completely clean machine, download the code from the source control management system, build all of the necessary files, pack them up, and deploy them in a single step.
• Fully Automated Test Process - One of the components of a build should be the successful completion of all component tests. Tools such as JUnit provide a framework for the creation of test suites that can be automatically run to verify successful build completion. Such an environment should include both component tests (or unit tests), and user acceptance tests (or broader integration tests).
• Mirror production environment - One of the most difficult problems to resolve is when all code is executing properly on one machine, but the same build fails on another. This problem is usually a symptom of different configuration settings in the environment. Such situations are frustrating for developers and costly in terms of time and resources, because many different developers run into the same problem. To help avoid such problems, development environments should be as similar to production as possible. This applies to hardware, software, operating systems, and JVM. At a minimum, a testing environment that closely resembles the production environments should be available.
• Autonomous environment - Developers spend a large amount of time testing their code. In testing, developers make a number of assumptions. Sometimes, these

J2EE Best Practices Page 36 12/31/2002
assumptions prove to be false, creating a vast time drain as they chase down problems that do not really exist. Data corruption is a classic example. To avoid such problems, developers should have their own environment and data space that only they access. This helps to avoid data corruption by fellow developers manipulating data that they are trying to use. Another benefit of a personalized data space is that data access can be faster.
• Base Data Set - In order for code to properly be tested, developers and testers require the use of known data as an input into testing. This base data set quickly becomes changed as code is executed. In order to always allow developers to start from a well-known data set, there needs to exist a base data set that can be easily and quickly installed into the developer’s schema.
As with all best practices, take the ones that work for you, and discard the rest. These suggestions can dramatically improve your development experience. They will help you provide a more structured, complete development environment to support your total development cycle.

Oracle9iAS Best Practices Page 37 12/31/2002
J2EE BEST PRACTICES IN ACTION Now that we have seen a high level description of Best Practices used throughout the life cycle of a J2EE development effort, lets look at an example application to see how a number of the patterns mentioned above are implemented. To do so, we will examine the Acme Industries application, which is a simple B2C web site.
Sample Application The following two diagrams show the use cases that the application addresses and the overall architecture of the Acme web application. The Acme B2C web site supports both new and returning users. New users can create an account and then proceed to order products. Returning customers can create new orders and review the status of their existing orders. Both types of users can perform self-service type functions on their profiles.
Figure 26 – Acme Use Cases
The overall architecture of the Acme web site shows a number of patterns in use. Users interact with the application using a standard MVC framework, services are located using a Service Locator, operation data can be received through both EJB and Data Access Objects, and finally, a Session Façade wraps up access to fine grain Entity EJB.
Figure 27 – Acme Architecture
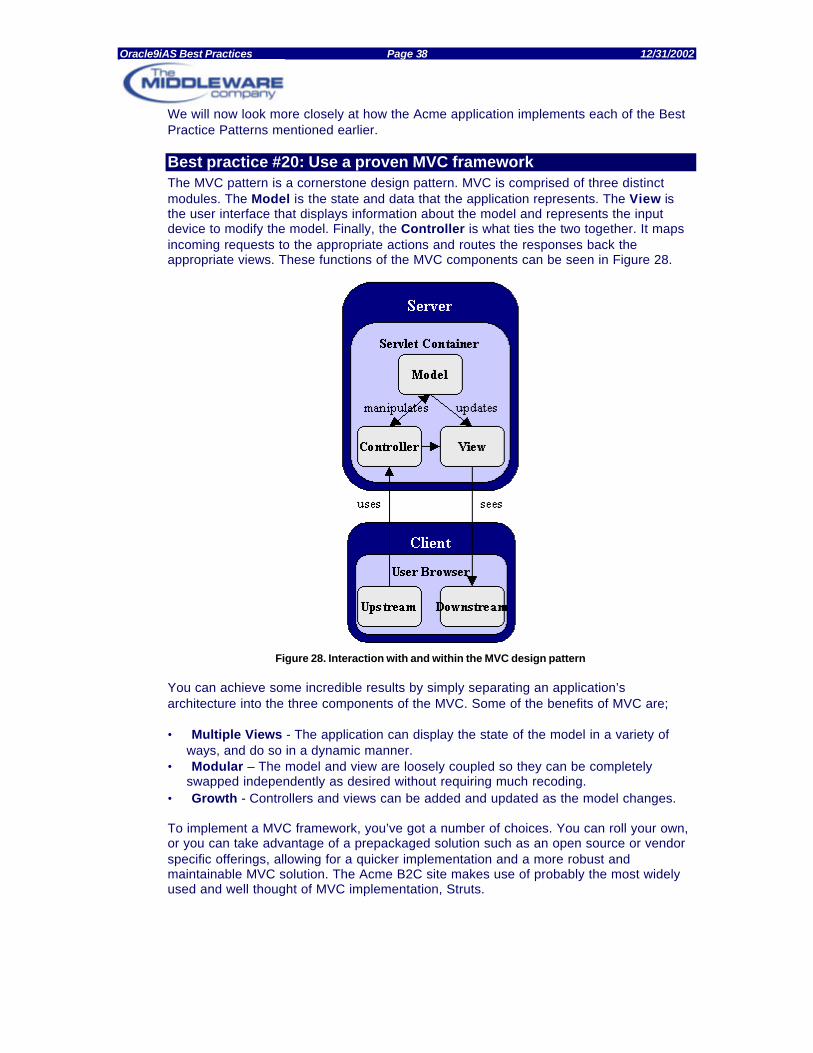
Oracle9iAS Best Practices Page 38 12/31/2002
We will now look more closely at how the Acme application implements each of the Best Practice Patterns mentioned earlier.
Best practice #20: Use a proven MVC framework The MVC pattern is a cornerstone design pattern. MVC is comprised of three distinct modules. The Model is the state and data that the application represents. The View is the user interface that displays information about the model and represents the input device to modify the model. Finally, the Controller is what ties the two together. It maps incoming requests to the appropriate actions and routes the responses back the appropriate views. These functions of the MVC components can be seen in Figure 28.
Figure 28. Interaction with and within the MVC design pattern
You can achieve some incredible results by simply separating an application’s architecture into the three components of the MVC. Some of the benefits of MVC are; • Multiple Views - The application can display the state of the model in a variety of
ways, and do so in a dynamic manner. • Modular – The model and view are loosely coupled so they can be completely
swapped independently as desired without requiring much recoding. • Growth - Controllers and views can be added and updated as the model changes. To implement a MVC framework, you’ve got a number of choices. You can roll your own, or you can take advantage of a prepackaged solution such as an open source or vendor specific offerings, allowing for a quicker implementation and a more robust and maintainable MVC solution. The Acme B2C site makes use of probably the most widely used and well thought of MVC implementation, Struts.

Oracle9iAS Best Practices Page 39 12/31/2002
Struts Struts is an open source MVC implementation from the Jakarta project. It provides a robust set of reusable custom JSP tag libraries, a command framework, and a mechanism for passing data between actions and views. The overall interaction of components is depicted in Figure 29.
Figure 29. Logical Flow of Struts Application.
The controller Servlet, known as the ActionServlet, gives the developer a flow control implementation. This Servlet acts as the central conductor of requests to ensure that requests get properly routed and handled. The process for this is first, the controller Servlet reads in an xml configuration file (struts-config.xml) and populates a set of ActionMapping classes. When the controller receives an incoming request, Struts inspects the corresponding ActionMapping class to determine what ActionClass will handle it. The controller then passes control to the action’s perform() method, with the appropriate mapping from the ActionMapping class. These action classes are part of the action framework, which wraps the model layer. This action framework uses a caching system to instantiate first-time Action classes, and uses a cached instance for subsequent requests. Once an action is completed, it passes back a forwarding address to the controller. To help pass information from the view to the model, Actions make use ActionForms. These objects bind properties of a java class with HTML form elements. An ActionForm can also provide validation of values, and redirect responses if validation fails.
The view represents the retrieved data from the model. The view can be populated in many ways, but perhaps the most extensible and manageable solution is through the use of Java Taglibs. These JSP tags pull data out of the Model and insert it into the JSP page. Struts comes with a number of different tag libraries to provide needed functionality

Oracle9iAS Best Practices Page 40 12/31/2002
for rendering the view. There are HTML libraries that are used for rendering common HTML elements, Logic libraries that support conditional and other logical statements, and template libraries that allow for the creation of templates to be shared across pages. Now that we understand a little more about Struts, lets look at how the Acme application makes use of it.
Acme Struts Implementation The first step in implementing Struts is to tell the web server that the ActionServlet is going to act as a central controller for all incoming requests. To do this, update the web.xml configuration file of the Servlet container, as in Listing 30. From the web.xml file, you can see how the Action Servlet is loaded by the Servlet container and that the Action Servlet itself reads another property file, struts-config.xml to configure itself. The second item in the web.xml file is what maps all incoming requests to the Action Servlet. The <Servlet-mapping> element tells the Servlet container to have all requests that end in “.do” to be forwarded to the Action Servlet for processing. Finally, the <taglib> element allows developers to use custom tag libraries. Many custom tags come with Struts, and we highly recommend that you take advantage of them.
… <servlet> <servlet-name>action</servlet-name> <servlet-class>
org.apache.struts.action.ActionServlet </servlet-class> <init-param> <param-name>application</param-name> <param-value>com.otn.bp.ApplicationResources </param-value> </init-param> <init-param> <param-name>config</param-name> <param-value>/WEB-INF/struts-config.xml</param-value> </init-param> </servlet> <servlet-mapping> <servlet-name>action</servlet-name> <url-pattern>*.do</url-pattern> </servlet-mapping> <taglib> <taglib-uri>/WEB-INF/struts-logic.tld</taglib-uri> <taglib-location>/WEB-INF/struts-logic.tld </taglib-location> </taglib> …
Listing 30. web.xml configuration file.
Now that we have seen how the Acme application forwards all requests to the central controller, you’ve got to tell ActionServlet what to do next through the struts-config.xml file. Shown in Listing 31, this property mapping file maps the ActionServlet for a particular item to the instance of an Action class responsible
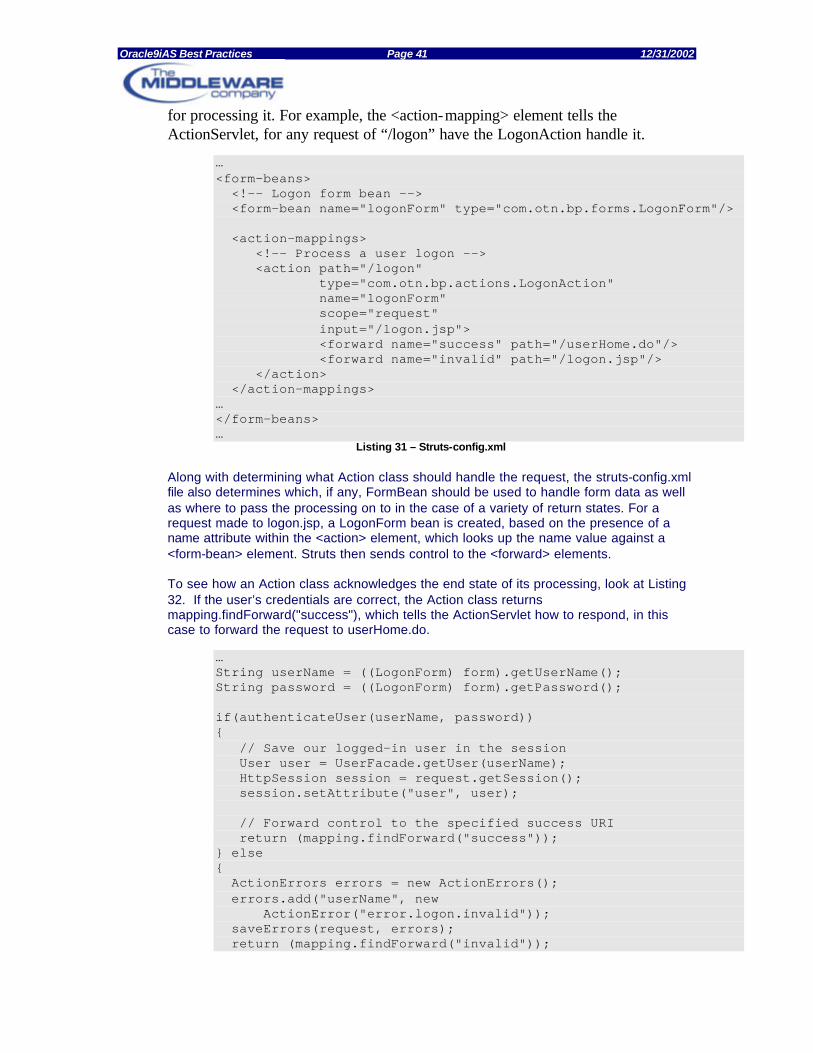
Oracle9iAS Best Practices Page 41 12/31/2002
for processing it. For example, the <action-mapping> element tells the ActionServlet, for any request of “/logon” have the LogonAction handle it.
… <form-beans> <!-- Logon form bean --> <form-bean name="logonForm" type="com.otn.bp.forms.LogonForm"/> <action-mappings> <!-- Process a user logon --> <action path="/logon" type="com.otn.bp.actions.LogonAction" name="logonForm" scope="request" input="/logon.jsp"> <forward name="success" path="/userHome.do"/> <forward name="invalid" path="/logon.jsp"/> </action> </action-mappings> … </form-beans> …
Listing 31 – Struts-config.xml Along with determining what Action class should handle the request, the struts-config.xml file also determines which, if any, FormBean should be used to handle form data as well as where to pass the processing on to in the case of a variety of return states. For a request made to logon.jsp, a LogonForm bean is created, based on the presence of a name attribute within the <action> element, which looks up the name value against a <form-bean> element. Struts then sends control to the <forward> elements. To see how an Action class acknowledges the end state of its processing, look at Listing 32. If the user’s credentials are correct, the Action class returns mapping.findForward("success"), which tells the ActionServlet how to respond, in this case to forward the request to userHome.do.
… String userName = ((LogonForm) form).getUserName(); String password = ((LogonForm) form).getPassword(); if(authenticateUser(userName, password)) { // Save our logged-in user in the session User user = UserFacade.getUser(userName); HttpSession session = request.getSession(); session.setAttribute("user", user); // Forward control to the specified success URI return (mapping.findForward("success")); } else { ActionErrors errors = new ActionErrors(); errors.add("userName", new
ActionError("error.logon.invalid")); saveErrors(request, errors); return (mapping.findForward("invalid"));
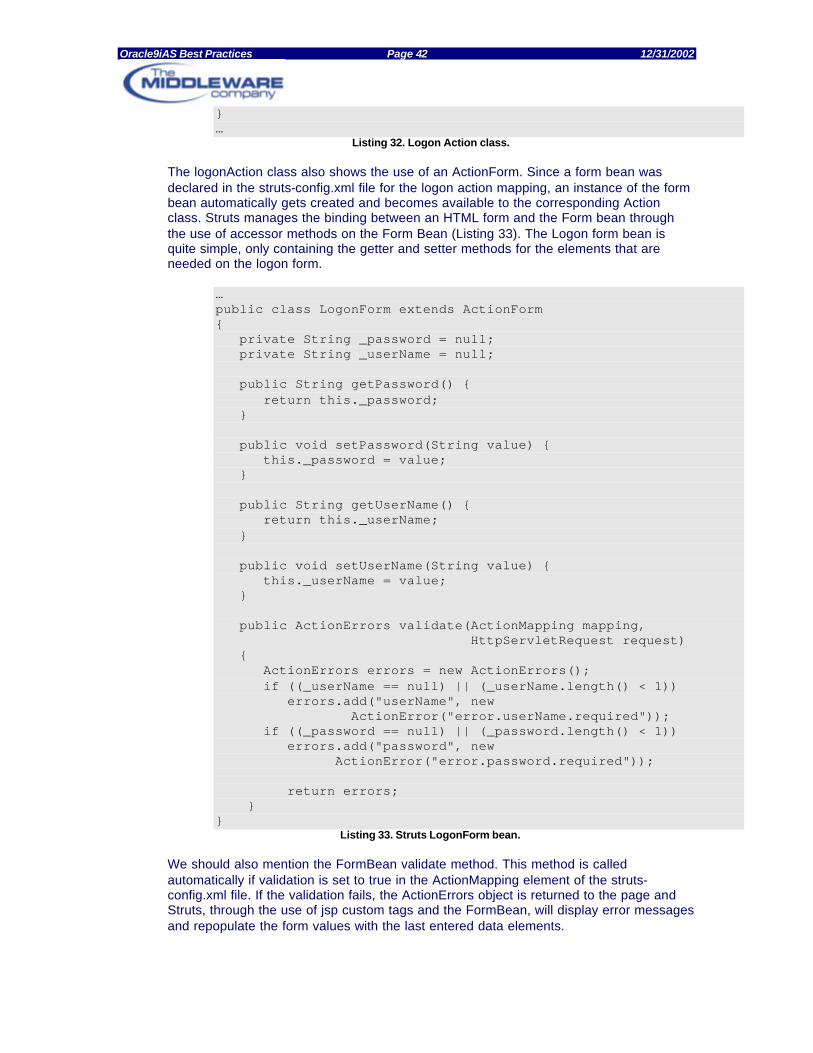
Oracle9iAS Best Practices Page 42 12/31/2002
} …
Listing 32. Logon Action class.
The logonAction class also shows the use of an ActionForm. Since a form bean was declared in the struts-config.xml file for the logon action mapping, an instance of the form bean automatically gets created and becomes available to the corresponding Action class. Struts manages the binding between an HTML form and the Form bean through the use of accessor methods on the Form Bean (Listing 33). The Logon form bean is quite simple, only containing the getter and setter methods for the elements that are needed on the logon form.
… public class LogonForm extends ActionForm { private String _password = null; private String _userName = null; public String getPassword() { return this._password; } public void setPassword(String value) { this._password = value; } public String getUserName() { return this._userName; } public void setUserName(String value) { this._userName = value; } public ActionErrors validate(ActionMapping mapping, HttpServletRequest request) { ActionErrors errors = new ActionErrors(); if ((_userName == null) || (_userName.length() < 1)) errors.add("userName", new ActionError("error.userName.required")); if ((_password == null) || (_password.length() < 1)) errors.add("password", new ActionError("error.password.required")); return errors; } }
Listing 33. Struts LogonForm bean.
We should also mention the FormBean validate method. This method is called automatically if validation is set to true in the ActionMapping element of the struts-config.xml file. If the validation fails, the ActionErrors object is returned to the page and Struts, through the use of jsp custom tags and the FormBean, will display error messages and repopulate the form values with the last entered data elements.

Oracle9iAS Best Practices Page 43 12/31/2002
Look at the Logon.jsp web page (Listing 34) to see how to use custom tags for error processing. The page makes use of a number of Struts custom tags, which need to be added to the web.xml file and declared within the page. After you declare the custom tag libraries, the page can handles the display of exisiting errors. Next, a Struts custom tag declares the form, and is names it according to the action that the form will invoke. Finally, Struts declares each of the form’s elements using another custom tag. These custom tags take care of binding data to, and retrieving data from, a FormBean.
… <%@ taglib uri="/WEB-INF/struts-bean.tld" prefix="bean" %> <%@ taglib uri="/WEB-INF/struts-html.tld" prefix="html" %> <%@ taglib uri="/WEB-INF/struts-logic.tld" prefix="logic" %> <%@ taglib uri="/WEB-INF/bp.tld" prefix="bp" %> <html:errors/> <html:form action="/logon" focus="userName"> <html:text property="userName" size="16" maxlength="16"/> <html:password property="password" size="16"
maxlength="16"/> …
Listing 34. Logon.jsp
Of course, we don’t provide all of the coding details in the paper. If you’d like to see the entire implementation, you can download the code and inspect it. You can find the code at http://otn.oracle.com/sample_code/tech/java/oc4j/content.html.
Session Facade Many development organizations originally turned towards EJB as a means of creating a distributed persistence layer. These companies sought a prepackaged solution to manage application issues like security, transactions, and other persistence topics while making use of an open and extensible framework. Unfortunately, many of these companies went on to experience the performance problems inherent in accessing fine grain access to many objects in a distributed framework, as in Figure 35. Note that each arrow represents an expensive distributed request. Although it was beneficial to have fine grain EJB, performing a unit of work that accessed each of them through a remote RMI-IIOP call was quite expensive with regards to performance.
Figure 35. Fine grain Unit of Work execute by client.
Another problem with directly accessing distributed fine-grained EJB is that it required developers to create a tight coupling between layers, as the middle tier would know all of the steps that were needed to complete a unit of work. Relationships, dependencies, and constraints would have to be executed by the client. Changes to the model would require changes to code in all clients that were accessing the model. An alternative was needed

Oracle9iAS Best Practices Page 44 12/31/2002
that provided the ease of use of fine grain EJB, with fewer network round trips and looser coupling. Enter the Session Façade pattern. A Session Façade looks to simplify an existing interface, in this case the many remote calls for a single unit of work, to be rolled up into a single call on a Session EJB. Figure 36 shows a Session Façade in action.
Figure 36. Session Façade lowering the number of network calls
This method invocation would incur the cost of the network call, but then all subsequent entity bean interactions would stay in the EJB server and execute all of the necessary calls to complete the unit of work. By doing this, a single remote call could accomplish what used to require many network round trips previously. This also makes it easier for clients to use as they no longer need to know the complexities of the underlying data model.
Acme Session Facades To ensure that Acme customers realize the highest performance possible, and that developers have the easiest time adding new functionality, the Acme site makes use of a couple of facades, that segment the work by function. Listing 37 shows the simplified interface of one of the façades as well as the underlying implementation of one of the interfaces. In addition to the Session Façade, the sample code shows a number of the best practice design patterns in action including Value Objects and a Service Locator.
public interface ShoppingFacade extends EJBObject { public Collection getOrdersByUsername(String username) throws java.rmi.RemoteException, Exception; public boolean checkOut(ShoppingCart shoppingCart) throws java.rmi.RemoteException, Exception; } public class ShoppingFacadeBean implements SessionBean { public Collection getOrdersByUsername(String username) throws Exception { Vector orders = new Vector();
CustomerEJBLocalHome userLocalHome = (CustomerEJBLocalHome)
ServiceLocator.getInstance().getLocalHome( "java:comp/env/CustomerEJBLocal");
CustomerEJBLocal customerEJBLocal = userLocalHome.findByUsername(username);
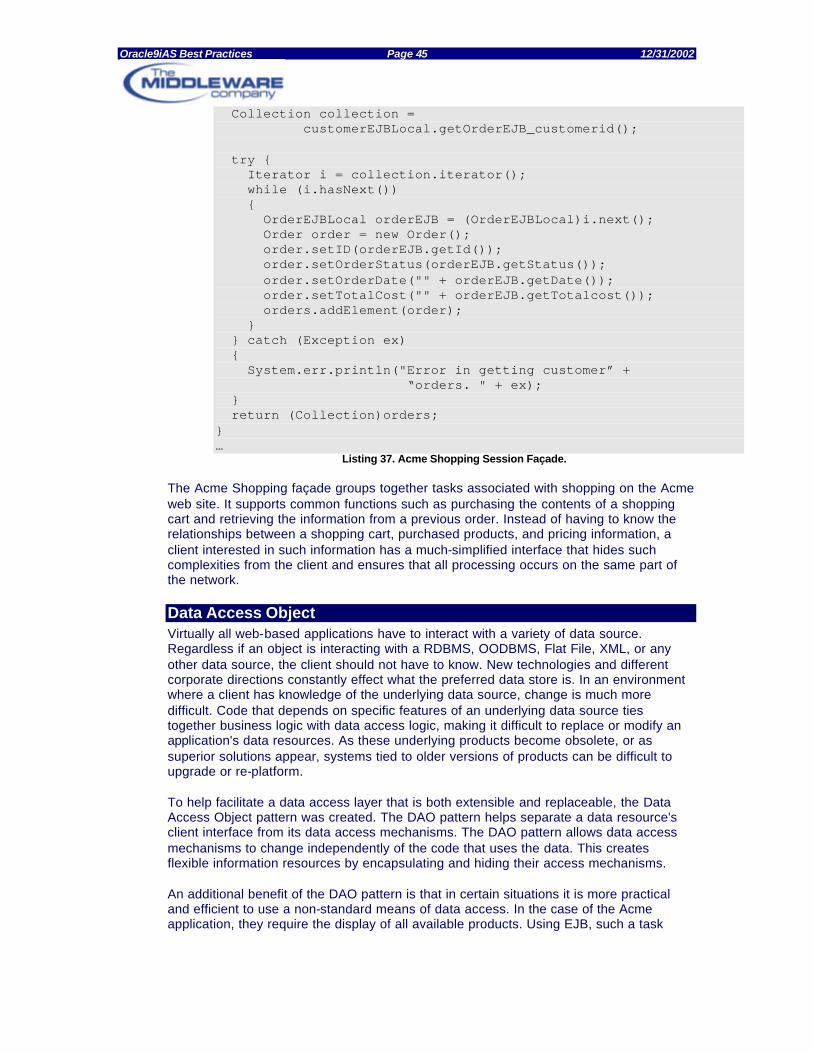
Oracle9iAS Best Practices Page 45 12/31/2002
Collection collection = customerEJBLocal.getOrderEJB_customerid();
try { Iterator i = collection.iterator(); while (i.hasNext()) { OrderEJBLocal orderEJB = (OrderEJBLocal)i.next();
Order order = new Order(); order.setID(orderEJB.getId()); order.setOrderStatus(orderEJB.getStatus()); order.setOrderDate("" + orderEJB.getDate()); order.setTotalCost("" + orderEJB.getTotalcost()); orders.addElement(order);
} } catch (Exception ex) { System.err.println("Error in getting customer” +
“orders. " + ex); } return (Collection)orders; } …
Listing 37. Acme Shopping Session Façade.
The Acme Shopping façade groups together tasks associated with shopping on the Acme web site. It supports common functions such as purchasing the contents of a shopping cart and retrieving the information from a previous order. Instead of having to know the relationships between a shopping cart, purchased products, and pricing information, a client interested in such information has a much-simplified interface that hides such complexities from the client and ensures that all processing occurs on the same part of the network.
Data Access Object Virtually all web-based applications have to interact with a variety of data source. Regardless if an object is interacting with a RDBMS, OODBMS, Flat File, XML, or any other data source, the client should not have to know. New technologies and different corporate directions constantly effect what the preferred data store is. In an environment where a client has knowledge of the underlying data source, change is much more difficult. Code that depends on specific features of an underlying data source ties together business logic with data access logic, making it difficult to replace or modify an application's data resources. As these underlying products become obsolete, or as superior solutions appear, systems tied to older versions of products can be difficult to upgrade or re-platform. To help facilitate a data access layer that is both extensible and replaceable, the Data Access Object pattern was created. The DAO pattern helps separate a data resource's client interface from its data access mechanisms. The DAO pattern allows data access mechanisms to change independently of the code that uses the data. This creates flexible information resources by encapsulating and hiding their access mechanisms. An additional benefit of the DAO pattern is that in certain situations it is more practical and efficient to use a non-standard means of data access. In the case of the Acme application, they require the display of all available products. Using EJB, such a task

Oracle9iAS Best Practices Page 46 12/31/2002
would require countless objects to be created and has the overhead of persistence, security, and other features when all that was wanted was a simple read only solution.
Acme DAO implementation The Acme application requires that the entire product catalog be displayed to the user. This product catalog is currently maintained in a relational database, but might at some point in the future be loaded from a product catalog that is kept and maintained somewhere else. Listing 38 shows the Acme product catalog DAO as well as the Interface that clients would use. Clients would normally obtain an instance of the IProductsDAO by calling to a factory that would generate the appropriate concrete implementation class for IProductsDAO (in our case it is a JDBC based class).
public class ProductsDAODB implements IProductsDAO { private static Properties _properties; public ProductsDAODB() { } public Collection selectAllProducts() throws Exception { Collection collection = (Collection) new Vector(); Connection con = null; Statement stmt = null; try { Class.forName("oracle.jdbc.driver.OracleDriver"); con = DriverManager.getConnection( AcmeProperties.getProperty("database.CONNECTION_NAME"), AcmeProperties.getProperty("database.USER_NAME"), AcmeProperties.getProperty("database.USER_PASSWORD")); stmt = con.createStatement(); ResultSet rs = stmt.executeQuery("Select * from product"); while (rs.next()) { Product product = new Product(); product.setID(rs.getString(1)); product.setName(rs.getString(2)); product.setDescription(rs.getString(3)); product.setCost(rs.getString(4)); collection.add(product); } } catch (Exception ex) { System.err.println("Error getting catalog. " + ex); } finally { try {
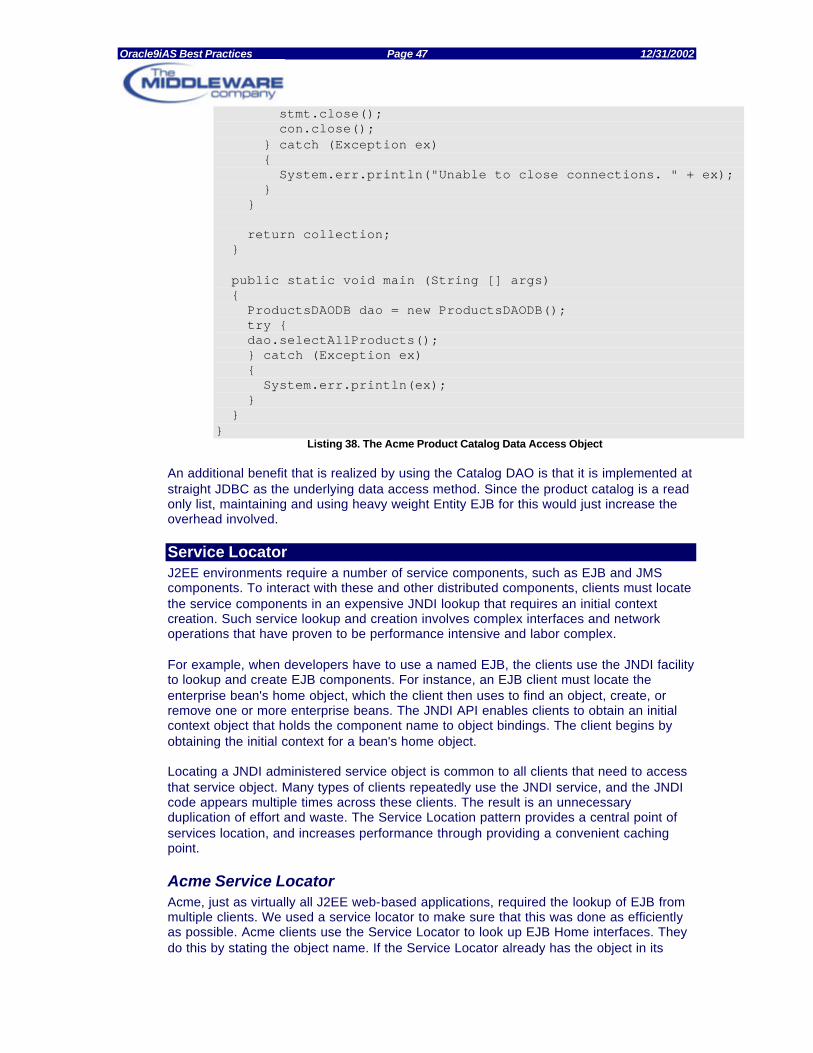
Oracle9iAS Best Practices Page 47 12/31/2002
stmt.close(); con.close(); } catch (Exception ex) { System.err.println("Unable to close connections. " + ex); } } return collection; } public static void main (String [] args) { ProductsDAODB dao = new ProductsDAODB(); try { dao.selectAllProducts(); } catch (Exception ex) { System.err.println(ex); } } }
Listing 38. The Acme Product Catalog Data Access Object
An additional benefit that is realized by using the Catalog DAO is that it is implemented at straight JDBC as the underlying data access method. Since the product catalog is a read only list, maintaining and using heavy weight Entity EJB for this would just increase the overhead involved.
Service Locator J2EE environments require a number of service components, such as EJB and JMS components. To interact with these and other distributed components, clients must locate the service components in an expensive JNDI lookup that requires an initial context creation. Such service lookup and creation involves complex interfaces and network operations that have proven to be performance intensive and labor complex. For example, when developers have to use a named EJB, the clients use the JNDI facility to lookup and create EJB components. For instance, an EJB client must locate the enterprise bean's home object, which the client then uses to find an object, create, or remove one or more enterprise beans. The JNDI API enables clients to obtain an initial context object that holds the component name to object bindings. The client begins by obtaining the initial context for a bean's home object. Locating a JNDI administered service object is common to all clients that need to access that service object. Many types of clients repeatedly use the JNDI service, and the JNDI code appears multiple times across these clients. The result is an unnecessary duplication of effort and waste. The Service Location pattern provides a central point of services location, and increases performance through providing a convenient caching point.
Acme Service Locator Acme, just as virtually all J2EE web-based applications, required the lookup of EJB from multiple clients. We used a service locator to make sure that this was done as efficiently as possible. Acme clients use the Service Locator to look up EJB Home interfaces. They do this by stating the object name. If the Service Locator already has the object in its

Oracle9iAS Best Practices Page 48 12/31/2002
cache, it will return it without having to perform a JNDI lookup. If the object it no in its cache, the Service Locator creates an instance of the Home object, gives it to the client and places it in its cache for future requests. Lisitng 39 shows Acme’s Service Locator.
public class ServiceLocator { private Context _context; private Map _cache; private static ServiceLocator _instance; private ServiceLocator () throws Exception { try { _context = getInitialContext(); _cache = Collections.synchronizedMap(new HashMap()); } catch (Exception ex) { System.out.println(ex); throw ex; } } static public ServiceLocator getInstance() throws Exception{ if (_instance == null) { _instance = new ServiceLocator(); return _instance; } return _instance; } public EJBLocalHome getLocalHome(String jndiHomeName) throws Exception{ EJBLocalHome home = null; try { if (_cache.containsKey(jndiHomeName)) { home = (EJBLocalHome) _cache.get(jndiHomeName); } else { home = (EJBLocalHome) _context.lookup(jndiHomeName); _cache.put(jndiHomeName, home); } } catch (Exception ex) { System.out.println(ex); throw ex; } return home; } public EJBHome getRemoteHome(String jndiHomeName, Class className) throws Exception { EJBHome home = null; try { if (_cache.containsKey(jndiHomeName)) { home = (EJBHome) _cache.get(jndiHomeName); } else {

Oracle9iAS Best Practices Page 49 12/31/2002
Object objref = _context.lookup(jndiHomeName); Object obj = PortableRemoteObject.narrow(objref, className); home = (EJBHome)obj; _cache.put(jndiHomeName, home); } }catch (Exception ex) { System.out.println(ex); throw ex; } return home; } public static Context getInitialContext() throws NamingException { Hashtable env = new Hashtable(); env.put(Context.INITIAL_CONTEXT_FACTORY, AcmeProperties.getProperty("jndi.INITIAL_CONTEXT_FACTORY")); env.put(Context.SECURITY_PRINCIPAL, AcmeProperties.getProperty("jndi.SECURITY_PRINCIPAL")); env.put(Context.SECURITY_CREDENTIALS, AcmeProperties.getProperty("jndi.SECURITY_CREDENTIALS")); env.put(Context.PROVIDER_URL, AcmeProperties.getProperty("jndi.PROVIDER_URL")); return new InitialContext(env); } }
Listing 39. Acme Service Locator
We implemented the Acme Service Locator as a Singleton to ensure that only one instance of the object exists in a single JVM. To save JNDI lookups, our Service Locator maintains a cache of frequently requested services. Requests for existing services can be satisfied purely from the cache.
Value Object Session Façades limit network round trips and establish looser coupling. Value Objects strive to do the same by making a local copy of all of the data that a client will need. To look at this design pattern more closely, lets examine an example involving an EJB. In the case of a Session or Entity Bean, every field that a client requests can potentially be a remote call. This can quickly add up to significant network round tripping and decreased performance, as in Figure 40.
Figure 40. Accessing multiple attributes of an Entity Bean

Oracle9iAS Best Practices Page 50 12/31/2002
The solution also requires the client to have in-depth knowledge of the data layer, creating tight coupling between layers, adding complexity to the developer’s tasks and hindering reuse. If the underlying data model where to change, the client code accessing the data would need to change as well.
Value Objects solve this problem by encapsulating all of the business data. The client calls a single method to send and retrieve the Value Object. When the client requests the enterprise bean for the business data, the enterprise bean can construct the Value Object, populate it with its attribute values, and pass it by value to the client, as in Figure 41.
Figure 41. Accessing multiple attributes of a Value object that was created from an entity bean
When an enterprise bean uses a value object, the client makes a single remote method invocation to the enterprise bean to request the value object instead of numerous remote method calls to get individual attribute values. The enterprise bean then constructs a new value object instance and copies the attribute values from its attributes into the newly created value object. It then returns the value object to the client. The client receives the value object and can then invoke its accessor (or getter) methods to get the individual attribute values from the value object.
Acme Value Object The Acme application makes use of the Value Object pattern in a number of places. All of the beans that are ultimately used for displaying values of pages are used to retrieve data from the data tier (Listing 42). These same objects are also used to create new instances of Entity Beans, as they can be passed into create methods. This allows for a maximum decoupled architecture and increases performance through the use of a single network call.
… public String _name; public String _description; public float _cost; public String _id; public Product(String name, String description, float cost, String id) { this._name = name; this._description = description; this._cost = cost; this._id = id; } public String getName() { return _name;

Oracle9iAS Best Practices Page 51 12/31/2002
} public void setName(String value) { this._name = value; } …
Listing 42. Acme Product Value Object

Oracle9iAS Best Practices Page 52 12/31/2002
CONCLUSION AND RECAP We’ve just taken a look at best practices for J2EE application development. As with most J2EE technologies, most of these suggestions can be used with any J2EE platform. Our tour has taken us through the entire development cycle, from design through deployment. We’ll wrap up by listing the before mentioned best practices, listed by development life cycle stages. We hope that you experience great success with your own J2EE development projects and contribute further to J2EE Best Practices. Overview
#1 Attack risk as early as possible. Using the ‘T’ approach defined in the Overview chapter, you can combine the benefits of prototypes and proofs-of-concept. In any case, you should attack risk as early as your development process will allow.
Design #2 Design for change with DDM. Relational mapping tools can decouple your application code from your database model, insulating each from change. #3 Use a Common Modeling Language. UML allows for designers and developers to speak the same language and understand one another. A secondary benefit in code/model synchronization which increases developer productivity. #4 Recycle your resources. You can use object pools and caches to use important data or resources more than once before you throw it away, often dramatically improving performance.
Build #5 Use proven design patterns. The J2EE pattern catalog makes it easy to learn about critical design patterns and there are a number of books and sites dedicated to understanding and using Patterns. #6 Automate the build process. An automated build should be simple, include testing, and notify key stakeholders, such as developers, of the build status. #7 Integrate often. Continuous integration, a cornerstone of agile methodologies, does not cost time: it saves time. #8 Optimize communication costs. By batching, caching and using the other techniques in this section, you can dramatically reduce communication costs.
Test
#9 Build test cases first. This agile best practice is fast becoming a staple among knowledgeable programmers across the industry. #10 Create a testing framework. Tools like JUnit make it easy to create a framework of both coarse and fine test cases. #11 Automate testing. Test case automation is the key to integrating testing into short development cycles. Automation should fully integrate test cases into the build.

Oracle9iAS Best Practices Page 53 12/31/2002
Deploy #12 Use J2EE standard package specification. For the first time, Java applications have a specification that defines exactly what elements should be deployed, how they should be packaged, and where it should go. You should stay well within the bounds of this specification as you deploy your application. #13 Use tools to help in deployment. You can deploy smaller projects and development systems with IDE tools, but larger, production deployments demand a scripted approach, like Ant. #14 Back up production data and environment. Before deploying any changes, it’s critical to back up the production environment.
Tune #15 Build a performance plan. For modern Internet applications, the complexity demands a full performance plan. In it, you should set criteria for completion, and have all stakeholders sign off. #16 Manage and plug memory leaks. Java can have memory leaks too, but good tools can simplify identifying and fixing them. #17 Focus on priorities. Good developers frequently spend too much time optimizing code fragments that are not on the critical path. If you focus on top priorities first, you’ve got a much greater chance of success.
Environment #18 Do not restrict deployment options at design time. By making intelligent design decisions about how you cache, manage session state, and handle local and remote interfaces, you can maintain flexibility to deploy clustered or standalone, based on changing business needs. #19 Create a Responsive Environment. Make a development environment that maximizes developer’s productivity and independence.
The Middleware Company is a unique group of server-side Java experts. We provide the industry’s most advanced training, mentoring, and advice in EJB, J2EE, and XML-based Web Services technologies. For further information about our services, please visit our Web site at: http://www.middleware-company.com/