jewelry making - · pdf filemetals several inexpensive metals, both in sheet and wire form,...
TRANSCRIPT

JEWELRY MAKING
for the beginning craftsman
GRETA PACK
with illustrations by
MARY L. DAVIS
Preface
JEWELRY MAKING FOR THE BEGINNING CRAFTSMAN
is a work manual for children who wish to make jewelry of silver and other metals. It will introduce them to the skills and processes of an ancient and honorable craft which has unlimited possibilities.
An interesting feature of this type of craft work is that from the beginning, with a few essential tools, materials, and simple working drawings, one can learn to make really wearable jewelry. As in any craft, practice is necessary in order to acquire the work- manship which will give good results. To this end the processes used are repeated many times.
The projects in this book are not given in order of difficulty, but those which combine similar decorative processes have been grouped together.
For best use of space, directions for the processes have not been repeated, but reference pages may be found with each project.
It will be noted that a number of the articles are made of units which can be combined in various ways to make new designs. The transition from these projects to independent planning can be accomplished by experimenting with units of metal which vary in size, shape and texture until a good workable design has been arranged. Then the sequence of the processes will be determined and the working plan made. In this way, the beginner will build up a knowledge of the craft which will inspire him to do more finished work.
Contents
METALS 1
Copper — Brass — Silver — Iron — Tin
TOOLS 3
THE BASIC PROCESSES 8
Sawing, 8 — Piercing, 10 — Filing, 12— Soldering, 14— Cleaning, Polishing, and Finishing, 16
DECORATIVE PROCESSES 17
Wire Work, 17 — Wire Twisting, 18 — Making a Round Wire Coil, 20 — Making a Flat Wire Coil, 22 — Making Disks and Domes, 40 — Cutting Disks, 40 — Punching Domes, 40
J E W E L R Y M A K I N G 24
BARRETTES Barrette with Flat Coils of Wire, 38 Bowknot Barrette of Metal, 51 BRACELETS
Bracelet of Twisted Wire and Flat Coils, 37 Bracelet Band with Dangles of Flat Coils and Beads,
39 Bracelet of Twisted Wire and Domes, 46 Bracelet Chain of Round Rings and Shaped Units
with Stone Charms, 25 BROOCHES
Butterfly Brooch of Copper and Brass with Tapered Coil, 54
Butterfly Brooch of Silver with Crimped Edge and Tapered Coil, 55
BUCKLE AND BUTTONS Buckle and Buttons of Domes, 45
ix
CHAINS Chain of Round Rings, 24 Chain of Shaped Units and Round Rings, 26 Chain of Metal Strips and Round Rings, 31 Chain of Onyx Beads and Coiled Units, 33 Chain of Oval Links with Center Twist, 43 Chain of Tubes, Wire Units and Round Rings, 56 Chain of Onyx Beads Linked with Round Rings, 57 CHARMS Charm with Identification Initial, 27 Charms Mounted with Stones, 28, 29 Charm for Good Luck, 30 NECKLACES
Necklace of Flat Coiled Units Linked with Round Rings, 35
Necklace of Disks and Domes Linked with Oval Ring with Center Twist, 42
PENDANTS Pendant Cross of Tubing, Dome and Units, with
Chain of Metal Strips and Round Rings, 31 Pendant of Onyx with Chain of Shaped Units and
Onyx Beads, 32 Pendant with Metal Cup and Stone held by Cord
and Beads, 50 Pendant Foliated Cross of Tubing, Dome and Wire
Units, with Chain of Tubing, Wire Units and Round Rings, 56
RINGS Ring of Flat Coils, 34 Ring with Flat Coil, Dome and Bead, 47 Ring with Oblong Flat Stone, 52 Ring with Stone Irregular in Shape, 53 SCARF HOLDERS Scarf Holder of Twisted Wire and Flat Coils, 36 Scarf Holder of Raised Metal, Domes and Wire, 44 SLIDE
Slide for Sport Tie of Metal with Stone, and Tapered Coils, 48
DESIGNING 59
S O U R C E S O F S U P P L Y 65
IN DE X 67

Metals
Several inexpensive metals, both in sheet and wire form, can be used to make interesting jewelry. For the beginner, copper and brass are recommended because of their low cost, but even ad- vanced jewelers who work almost exclusively in sterling silver fre- quently use copper and brass for variety and color.
As far as construction is concerned, all the metals named can be used interchangeably for the jewelry included in this book. When the beginning craftsman becomes more skillful he may want to work more often in sterling silver which, although it costs a little more, is a fine adaptable metal.
The different metals vary in hardness. Annealing is a heating process which is given to the metal to make it soft and pliable. Most of the metals used for the following projects may be pur- chased annealed. If the metal has to be annealed, lay it on a screen and hot plate until the heat turns it a glowing red, then set it aside to cool or plunge it into water for quick cooling. Use only an- nealed sheet and wire for the following -projects.
COPPER is used in its pure metallic state. Its reddish-brown color gives it a warm outdoor quality. Cold rolled and an- nealed sheet is smooth and easy to work. It can be polished and lacquered for a permanent finish.
_BRASS is an alloy of copper and zinc, harder than copper. It is gold in color. It takes a high polish and is lacquered to preserve the luster.
STERLING SILVER is an alloy of pure silver and a small percentage of another metal, usually copper, to harden it. It is a more precious metal than copper or brass, it is easy to work and can be finished in several different ways; pol- ished for a soft luster, given a high polish, oxidized for depth of color and then polished for highlights.
IRON is taken from iron ore and, when treated, is both tough and flexible and can be pulled into wire. The black iron bind- ing wire referred to in this book is used not only to hold pieces together for soldering, but also for a chain of iron units held together with silver links. If lacquered, the iron will not rust and its dark color and dull texture contrast well with the other metals used.
TIN has the whiteness of silver and is used in many important alloys, among them being solder. We employ tin only for solder, in pure state or alloyed with lead.


Tools
Essential tools for the beginner include those here and those on the following four pages. A variety of articles can be made with a small set of good tools; in fact, some of the pieces are made with only two or three of the tools listed. All tools should be kept clean and protected from pressure that may bend or dull them and from moisture which will cause corrosion or rust. A good work- man takes care of his tools.
CARE OF TOOLS
Keep the working surface of the steel hammer and steel surface plate free of scratches and dents by using coarse and fine abrasives depending upon the depth of the dent or scratch.
The steel burnisher must be kept well polished and wrapped in chamois skin when not in use.
The file and handle come separately. Only the small files, such as the needle files, have a handle as part of the file. The teeth of the files will become dull if allowed to rub against each other, or against other steel tools. Clean the files with a file brush, and rub the smaller files with a coarse cloth. Files should be put away clean.
Gauges are tools to measure the thickness of the metal sheet and the diameter of the wire. Insert the metal sheet or wire in the slot nearest to the thickness of the metal or diam- eter of the wire and read the gauge number. The gauge numbers referred to in this book are measured by the Brown and Sharpe Gauge.
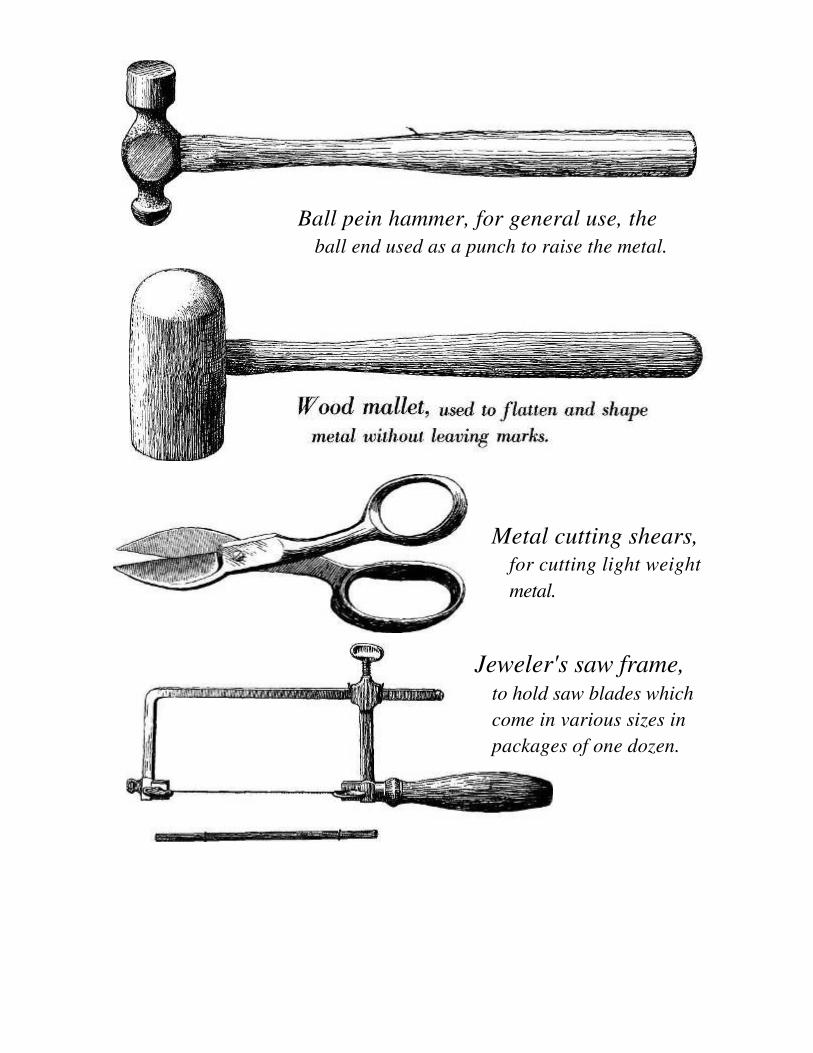
Ball pein hammer, for general use, the ball end used as a punch to raise the metal.
Metal cutting shears,
for cutting light weight metal.
Jeweler's saw frame,
to hold saw blades which come in various sizes in packages of one dozen.
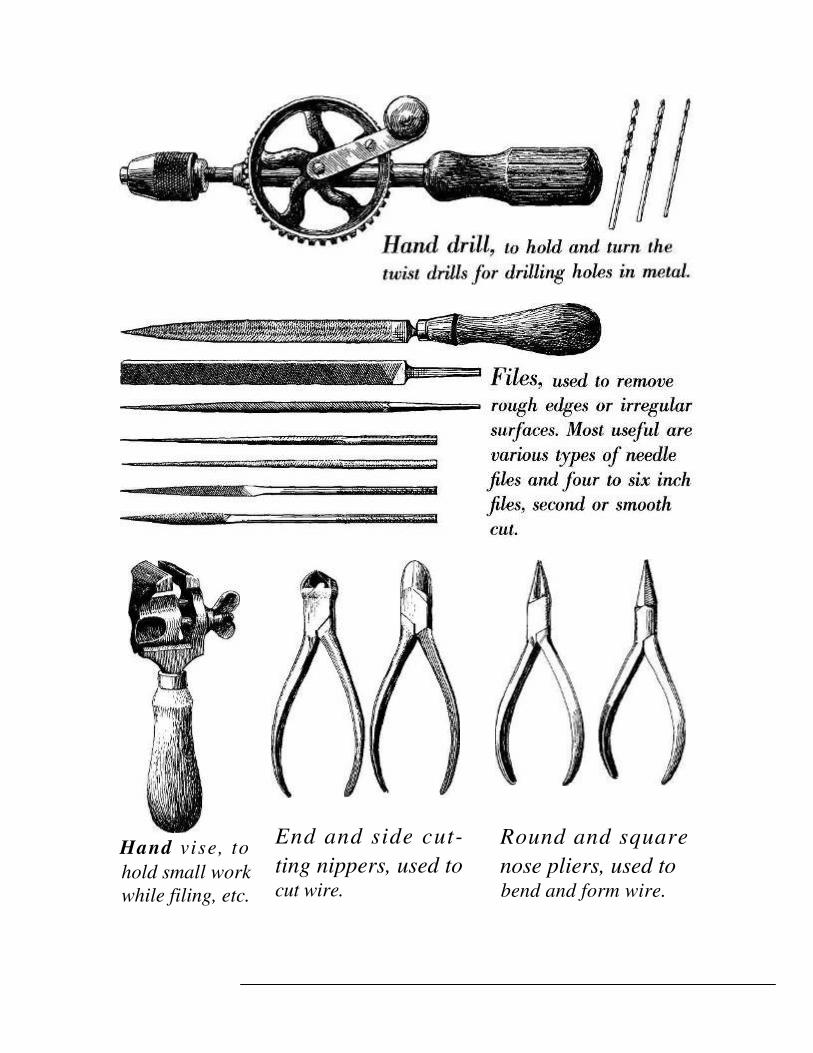
Hand vise, to
hold small work while filing, etc.
End and side cut- ting nippers, used to
cut wire.
Round and square nose pliers, used to
bend and form wire.

Disk cutting and doming tools
Dapping die, a metal block with depressions into which metal can be dapped into rounded forms.
Dapping die cutters, tools with cutting ends, used to cut disks. Dapping die punches, domed steel tools used to raise metal disks in the dapping die.
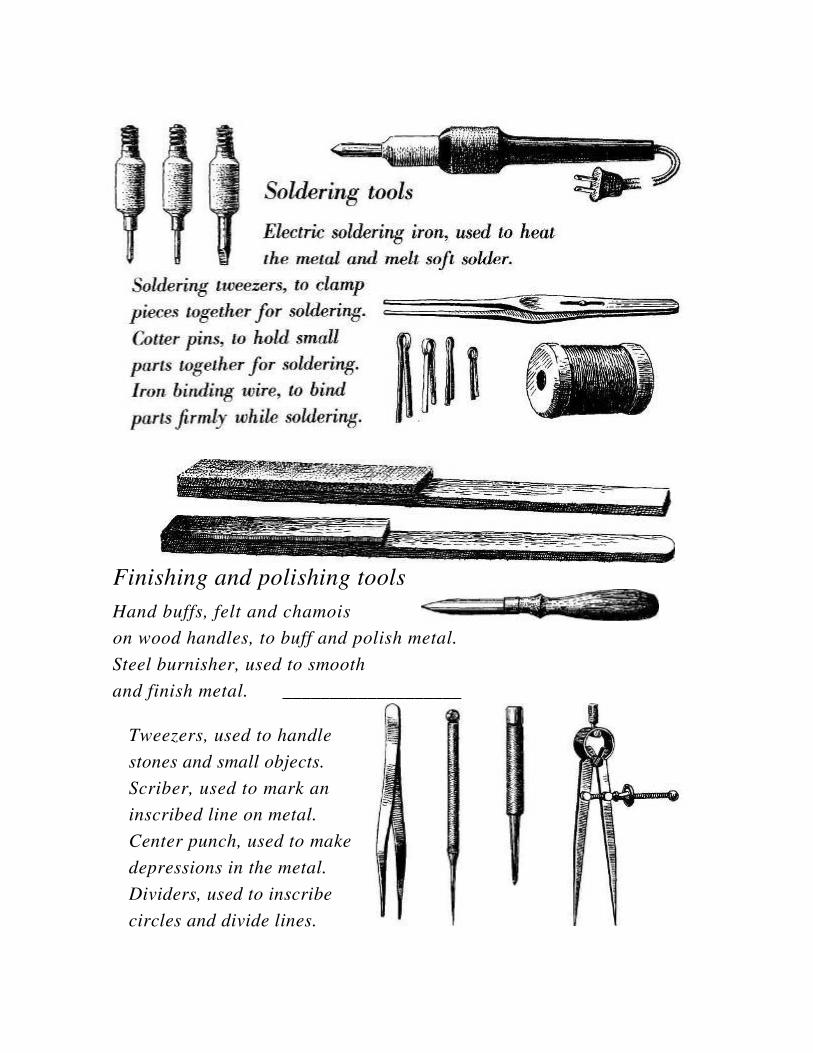
Finishing and polishing tools
Hand buffs, felt and chamois
on wood handles, to buff and polish metal. Steel burnisher, used to smooth
and finish metal. ___________________
Tweezers, used to handle stones and small objects. Scriber, used to mark an inscribed line on metal. Center punch, used to make depressions in the metal. Dividers, used to inscribe circles and divide lines.

The Basic Processes
Following are the basic processes for all jewelry making. Cleaning and filing keep the metal in condition for sawing and soldering which are construction processes, and for wire working which is a decorative process. Polishing and lacquering are finish- ing processes which bring out the technique of construction, and if well done, enhance the beauty of the article.
Sawing
Sawing with a jeweler's saw blade set in a jeweler's saw frame is used for metals which are too heavy in gauge or too intricate in pattern to be cut with shears. This type of saw can be used for straight, curved or angular lines which often form the outline and shape of the design. The saw blade comes in several different sizes. The coarsest used in this book is # I and the finest #0. The thickness of the metal must be greater than the distance between the teeth of the blade to prevent the metal from becom- ing wedged between the teeth, and the saws from bending and breaking. For example, saw 18 gauge metal with a # 1 saw blade.
Transferring the pattern to the metal
Transfer the traced pattern with carbon paper and a hard pencil. Scratch the traced design into the metal. Wipe the metal with a damp cloth to remove the carbon lines.
Setting the blade in the frame
The worker should be directly in front of the V in the bench pin with the shoulder about 3 inches above the bench top. With the frame in a horizontal position, place the upper arm of the frame in the V of the bench pin. Hold and press the handle against the body and clamp one end of the blade in the lower jaw. Press the frame, clamp the loose end in the upper jaw. Release the pressure. The blade must be taut.
Sawing the pattern
The right arm holding the saw frame vertically should be directly in front of the bench pin. Use the full length of the blade when sawing straight or curved lines. For angles use the center of the blade with short strokes in one place to make a space in which to turn the blade.
8
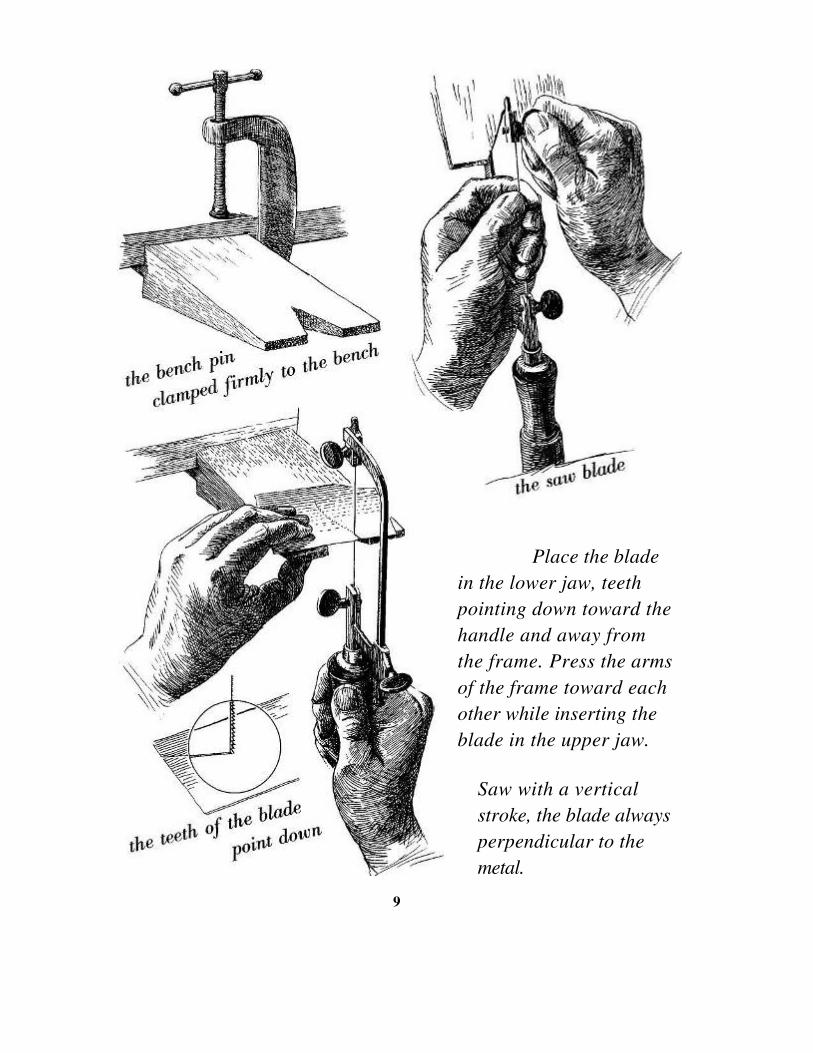
Place the blade in the lower jaw, teeth pointing down toward the handle and away from the frame. Press the arms of the frame toward each other while inserting the blade in the upper jaw.
Saw with a vertical stroke, the blade always perpendicular to the metal.
9
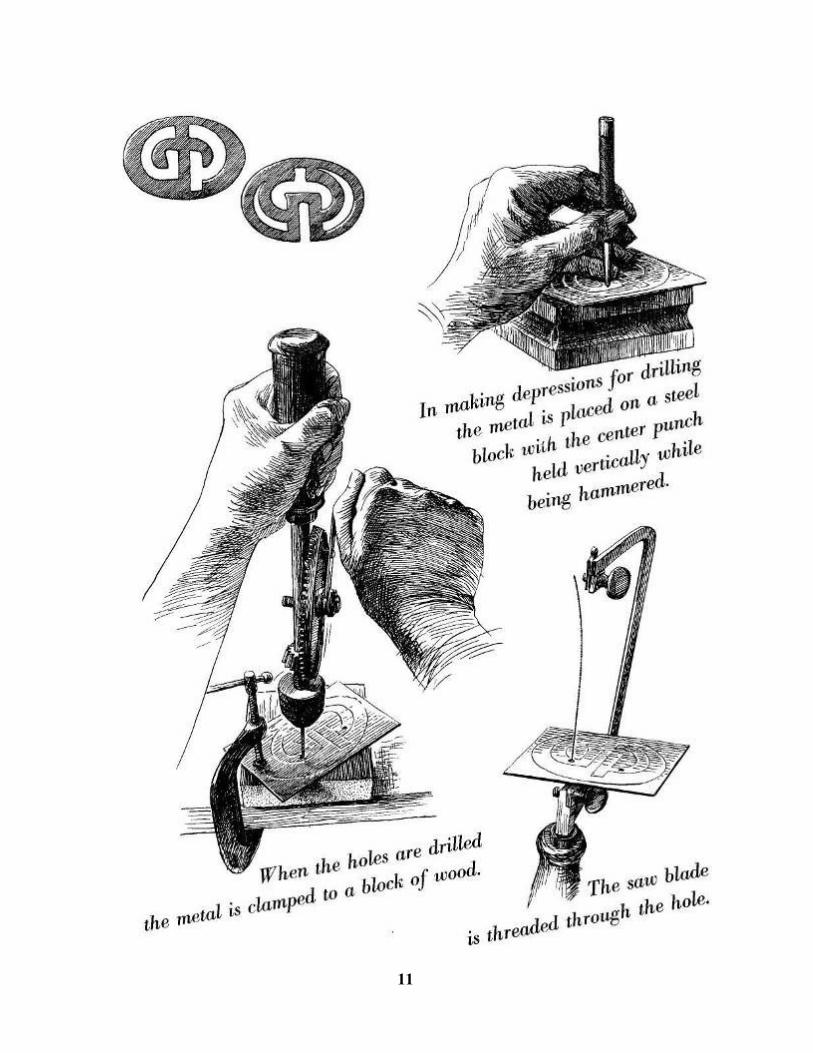
Piercing
Piercing is the term used when the metal is sawed out leaving an openwork design, or when the background is sawed out leaving the design in the metal.
Transfer the pattern to the metal. Make depressions with the center punch in the sections which
are to be pierced. Insert the twist drill in the chuck of the hand drill and drill
holes marked by the punch. Care must be taken in select-ing the drill so the size of the hole will not destroy the traced line of the design.
Set the saw blade in the lower jaw of the saw frame. Thread the blade through the drilled hole nearest the center
of the design. Support the metal against the lower jaw of the frame while
inserting the loose end of the blade in the upper jaw of the frame.
Saw out the section. Follow the directions under sawing. Return the saw frame to the horizontal position. Loosen the blade from the upper jaw, and remove from the
pierced section. Insert the end as before through another drilled hole. Repeat as above until the design or the background has been
pierced.
Transjerring the �pattern, p. 8. Sawing, p. 8.
10
11
Filing
Filing is used to smooth rough edges, to level irregular surfaces and remove excess solder. The files most commonly used for jewelry work are needle files which come in a variety of shapes designed for various contours and angles. Large files from four to six inches in length come with a tang to be fitted into a wooden handle. These files are used for larger areas or when a greater amount of metal has to be filed away. They can also be used for finishing an edge as they come in both coarse and smooth cut. It is good to have an assortment. Only a few are shown on the tool pages.
Clean the metal with pumice powder. Place the metal on a steel surface plate. Tap with a mallet to straighten. Rub the file lightly with chalk; this helps to keep the teeth
from becoming filled with metal filings. Hold the metal firmly. Put the pressure on the forward stroke, remove the pressure
on the back stroke to keep the cutting edge of the teeth from becoming dull. Clean the file at intervals. Remove
the burr on the filed edge with a scraper or coarse emery cloth.
Cleaning the file, p. 3-
12
13
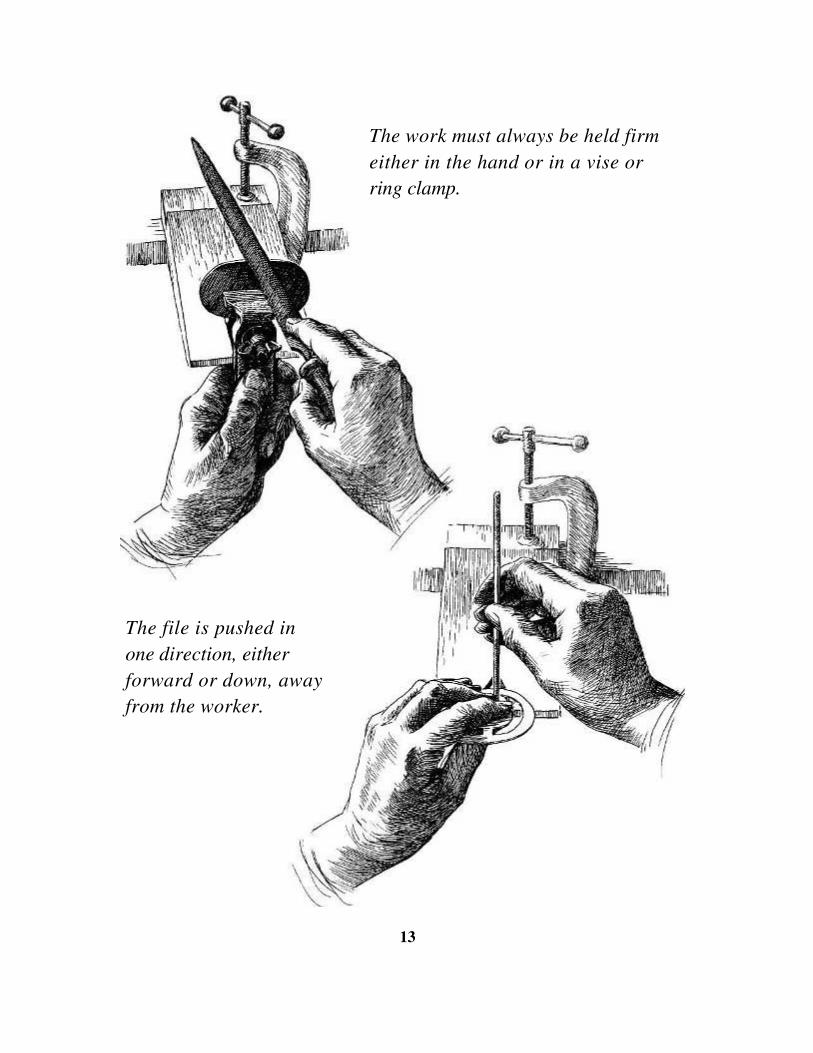
The work must always be held firm either in the hand or in a vise or ring clamp.
The file is pushed in one direction, either forward or down, away from the worker.

Soldering
Soldering is a process used to hold metal pieces together by using another metal or combination of metals which melt and flow at a lower temperature than the metal to be joined.
For the following projects soft solder of tin and lead is used. Pure tin is used as solder only with sterling silver, as it is the color of silver and retains its brilliance. To help the flow of the solder and to keep the metal in condition when heated, a substance called flux is necessary. The flux referred to in this book is in paste form.
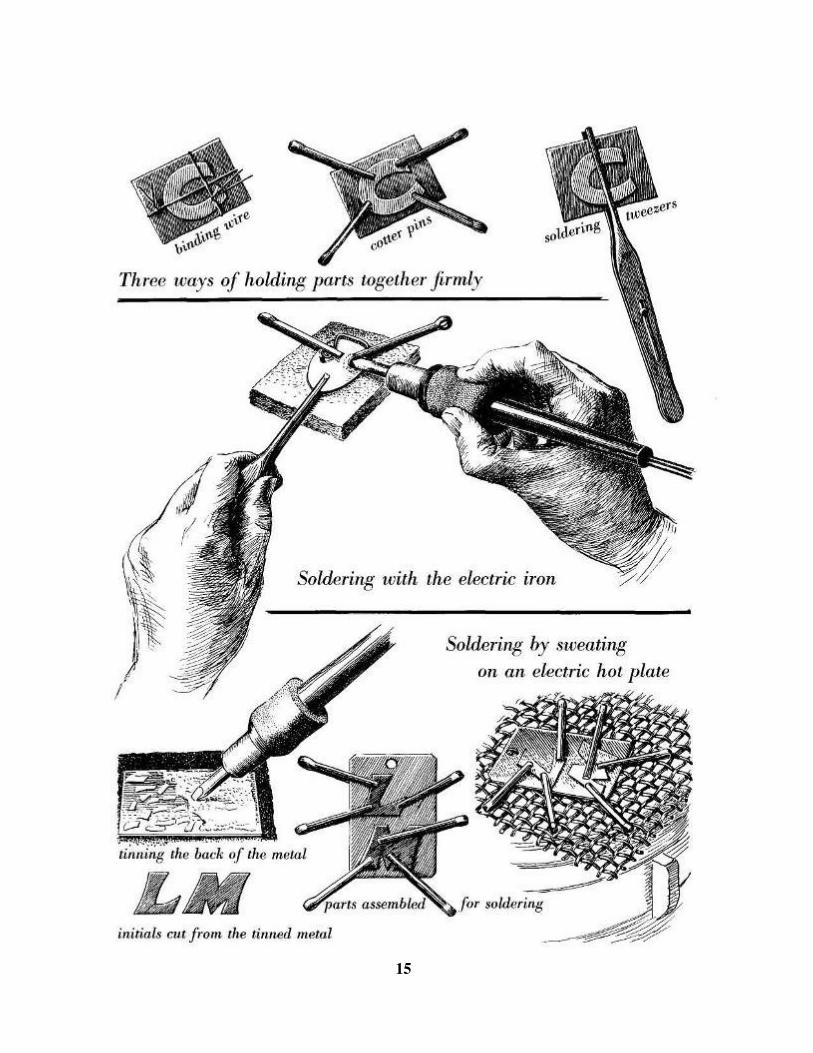
An electric soldering iron, or electric plate, will heat the metal enough so the solder will flow on the parts to be joined. Wire or small pieces of metal may be soldered with the iron. The electric plate is used for large areas of metal, or that of heavy gauge which cannot be heated enough with the iron. The metal to be joined must be held firmly until it cools.
Soldering irons can be obtained in several different types with replacement tips. The copper tip of the iron must have a thin coating of solder before it can be used. This process is called tinning.
Tinning the iron
Heat the iron. Turn off the electric current. File the hot tip until it is a bright copper on all surfaces. Reheat the iron. Rub the hot tip in the flux and solder until a thin coat of solder covers all surfaces of the tip.
Soldering wire joints and small pieces of metal
Hold the metal pieces firmly together. Pick up the solder with the tip of the iron and place on the
joint. Heat the metal until the solder flows.
Sweating a sawed design of metal to a metal background
Clean and flux one side of the metal sheet from which the design is to be sawed. Lay pieces of solder on the fluxed surface. Place on a screen and hot plate until the solder flows. Spread the solder with a hot iron to form a thin coat on the metal. Rinse in water and dry. Saw the design and file all edges smooth.
Clean and flux the background sheet. Clamp the design to the sheet and soldered surface down. Place on a screen and hot plate until the solder melts. This is shown when a thin light line appears between the two metals. Let cool before removing the clamps.
Filing, p. 12. Transferring the design, p. 8. Sawing, p. 8.
14
15
The processes of cleaning polishing and finishing, as presented in this book, are done by hand without the use of acids or motor driven polishing buffs.
The condition of the metal to be cleaned determines which tool or abrasive should be used first to remove scratches or other de-fects. Start with the coarsest tool or abrasive necessary and use in succession others finer than the one just used. When smooth and clean, the metal is ready for polishing. The final steps in fin-ishing a piece of jewelry are very important, for if they are done well they will add much to the beauty of the article.
Use tools and abrasives
in the following sequence
Clean the metal with fine pumice powder and water, using a soft cloth for flat surfaces and a brush for recessed parts. This will remove discoloration and will show which of the tools or abrasives should be used first. File in the
direction of a deep scratch, using a long stroke with a coarse file, and continue with finer files. Remove
excess solder with a file, scraper or emery cloth. Remove marks of the file and minor scratches with emery
cloth, or scotch stone dipped in water, rubbing in a circular motion to avoid wearing a groove in the metal. Rub the
metal with fine pumice powder and water. Rub a piece of felt, charged with tripoli cake, over the metal
surface (the felt may be mounted on wood and used as a hand buff). Wash in hot soap suds to
remove the oil.
Polishing and finishing
Polish with prepared metal polish for luster. Rub the curved side of the burnisher over the metal until a
high polish has been obtained. Finish copper and brass with a thin coat of lacquer.
To oxidize sterling silver
Dip the polished silver in a solution of liver of sulphur (a lump about 1/2 inch in diameter dissolved in a quart of warm water). When the silver becomes dark rinse in cold water. Dry the metal and rub with a soft cloth dipped in whiting or fine pumice powder. Do not lacquer.
Filing, p. 12.
16
Cleaning, Polishing and
Finishing

Wire Work
Wire may form the foundation of a piece of jewelry, or it may be applied as a decoration. It is often twisted to add lightness to a design, and can easily be formed into coils or line units of deco-ration for flat or curved surfaces. Twists and coils of wire can be made of round, half round, or square wire.
Keep the 14 gauge or heavier wire in coils. Wire of a lighter gauge may be wound on spools. If kinks occur in the lighter gauge wire they can be removed by holding the wire ends firmly and the length taut while drawing it over the edge of a wooden bench, or block of wood.
THE JIG
Many of the wire units, coils, and twists shown in this book were made on jigs. The word "jig" is a mechanics' term given to a device which is used to guide a tool or a material. A j ig makes the forming of an article easier during construction and makes the finished pieces mechanically more perfect. When a design re-quires duplication of parts, a jig is often used. The one shown here was made on a block of wood with nails spaced and ham-mered into the wood, the nail heads sawed off, and the ends made smooth so the wire units may be formed and removed easily.
Ends turned under to make slides
for belts
17
Wire unit made on a jig and some of the ways it can be used
Drops for necklaces
Wire twisting
Often a design calls for a twist of given length, sometimes a tight or loose twist. To determine the length to cut the wire is impor-tant. The gauge of the wire as well as the number of twists the wire is given will determine the length of the finished piece. When round wire is used, two or more lengths are necessary for the twist. A rope-like effect may be obtained by twisting a single length of flat or square wire. All wire should be annealed.
Twisting wire 18 gauge or lighter
Measure the amount needed for the twist. Loop the wire length in the center, and insert the two
loose ends through the hole in the spool. Hold the ends in the jaws of a table vise. Insert a small steel rod
through the loop of wire, and pull the wire taut. Hold the spool firmly against the rod. Turn the rod to twist the wire.
Twisting wire 16 gauge or heavier
Hold the looped end of the wire in the jaws of the hand vise. Clamp the loose end in the jaws of the table vise. Turn the hand vise to twist the wire.
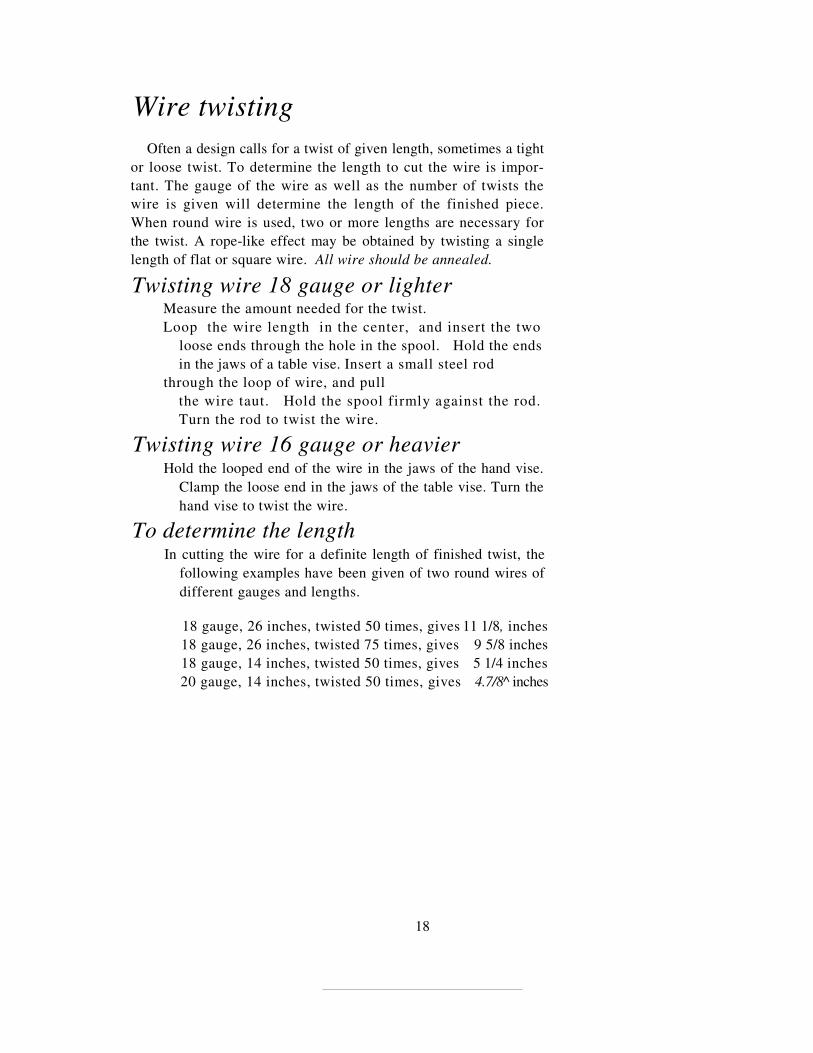
To determine the length
In cutting the wire for a definite length of finished twist, the following examples have been given of two round wires of different gauges and lengths.
18 gauge, 26 inches, twisted 50 times, gives 11 1/8, inches 18 gauge, 26 inches, twisted 75 times, gives 9 5/8 inches 18 gauge, 14 inches, twisted 50 times, gives 5 1/4 inches 20 gauge, 14 inches, twisted 50 times, gives 4.7/8^ inches
18
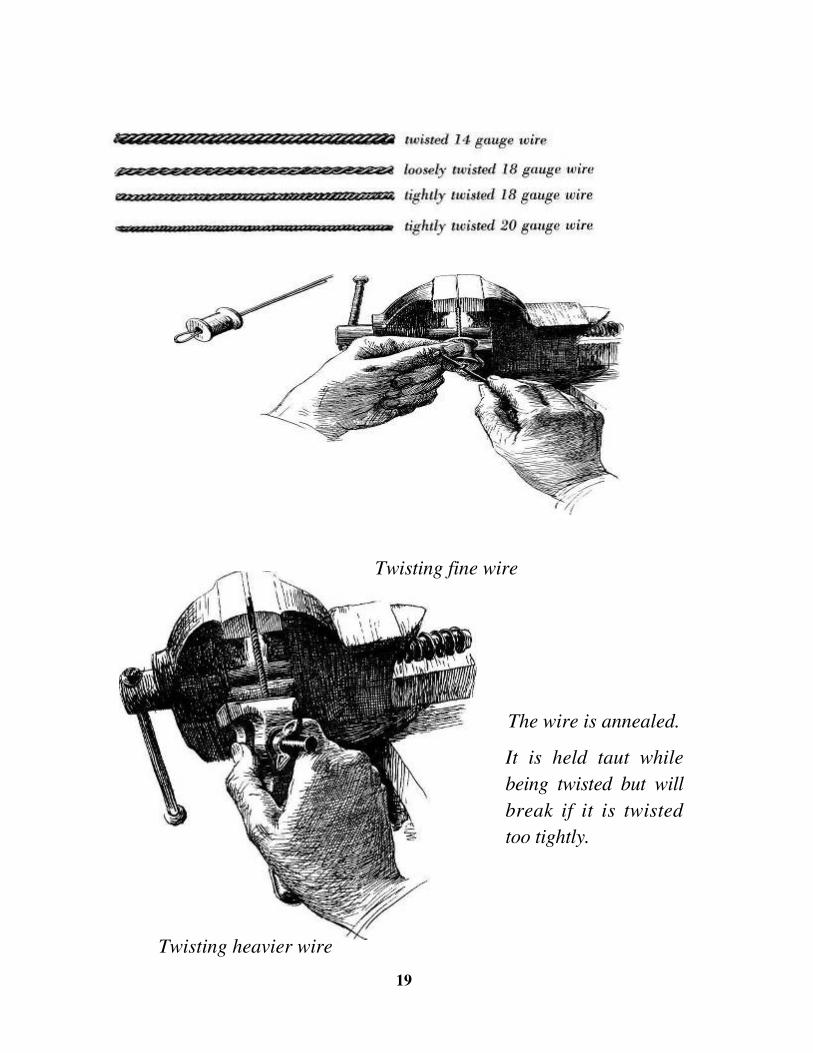
Twisting heavier wire
The wire is annealed.
It is held taut while being twisted but will break if it is twisted too tightly.
19
Twisting fine wire

Making a round wire coil
Coils of wire can be made on mandrels of various sizes and shapes. The simplest is the coil of round rings made of round wire. There are many uses for the coil. When sawed into rings it may be made into a chain. By pulling the wire on both ends to stretch the coil, an open wavy coil results, which may be curved or bent to follow a line for decoration. The open coil may also be flattened into a decorative band of overlapping rings. A cone shaped coil can be made on a round pointed mandrel (knitting needle). These may be used for pendants to give movement and interest to a design and are sometimes used as a fringe for an edge.
The jig
Select a round steel mandrel the diameter of the coil de-sired. Place between two blocks of soft wood parallel with the grain of the wood.
Press the blocks between the jaws of the table vise to form a groove in each block. Remove the mandrel from the blocks, and file a groove at a right angle to the groove made by the mandrel.
Coiling the wire
Place the mandrel between the blocks in the groove letting the end extend beyond the blocks about 1/2 inch. Hold
the blocks in the jaws of the table vise tight enough to hold the blocks but loose enough so the mandrel will turn and move out of the groove as the wire is coiled. Make a
few coils on the end of the mandrel. Clamp the mandrel and coils in the jaws of the hand vise. Hold the
loose end of the wire in the filed groove during the coiling process to guide the wire and to keep the coil even. Use the hand vise as a handle to turn the mandrel
to form the coil.
20
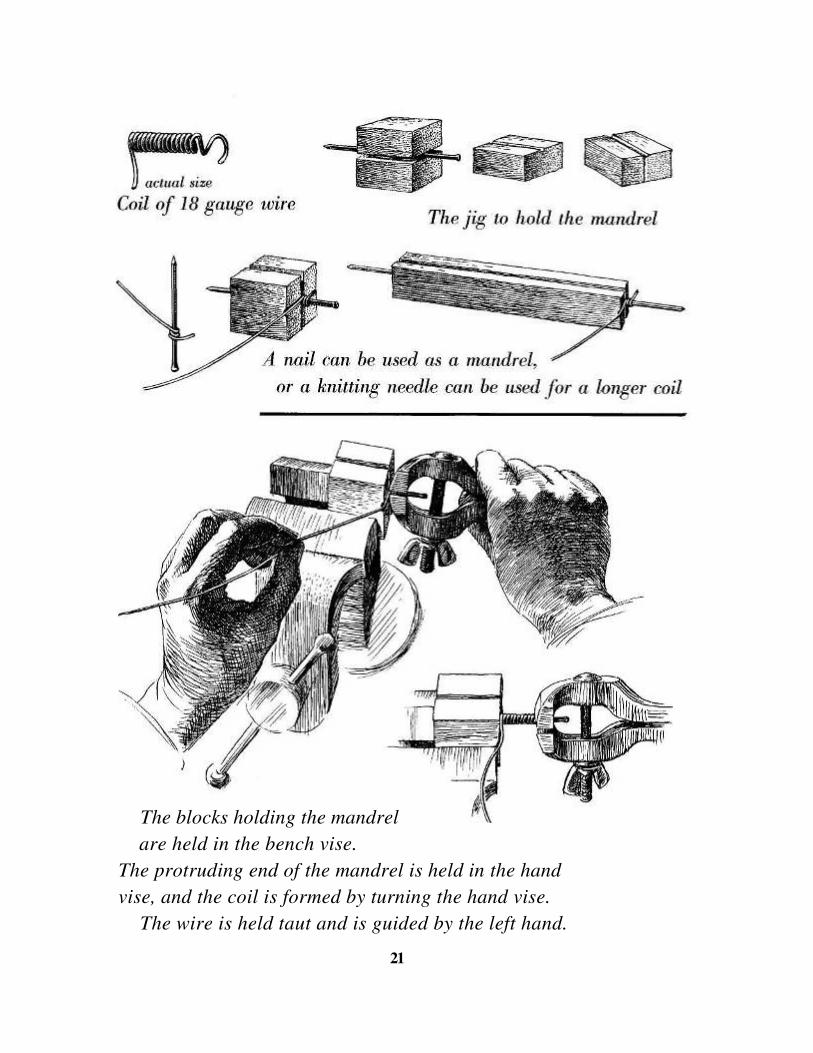
The blocks holding the mandrel
are held in the bench vise. The protruding end of the mandrel is held in the hand vise, and the coil is formed by turning the hand vise.
The wire is held taut and is guided by the left hand.
21
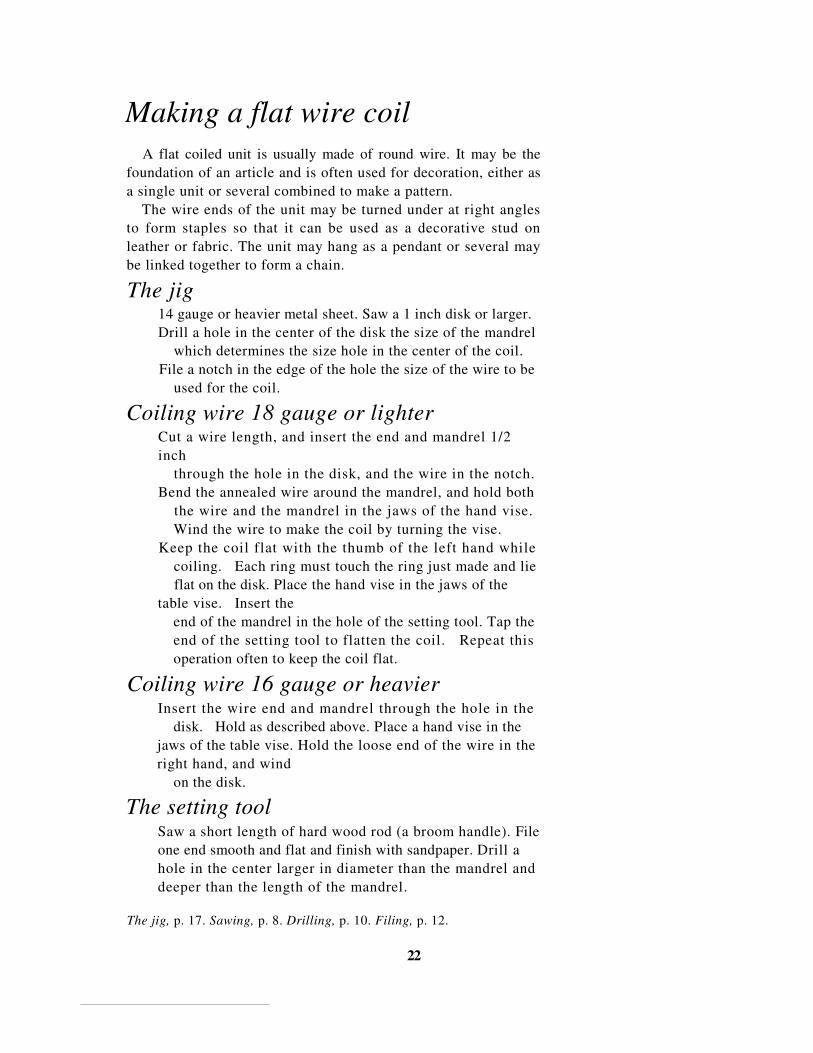
Making a flat wire coil
A flat coiled unit is usually made of round wire. It may be the foundation of an article and is often used for decoration, either as a single unit or several combined to make a pattern.
The wire ends of the unit may be turned under at right angles to form staples so that it can be used as a decorative stud on leather or fabric. The unit may hang as a pendant or several may be linked together to form a chain.
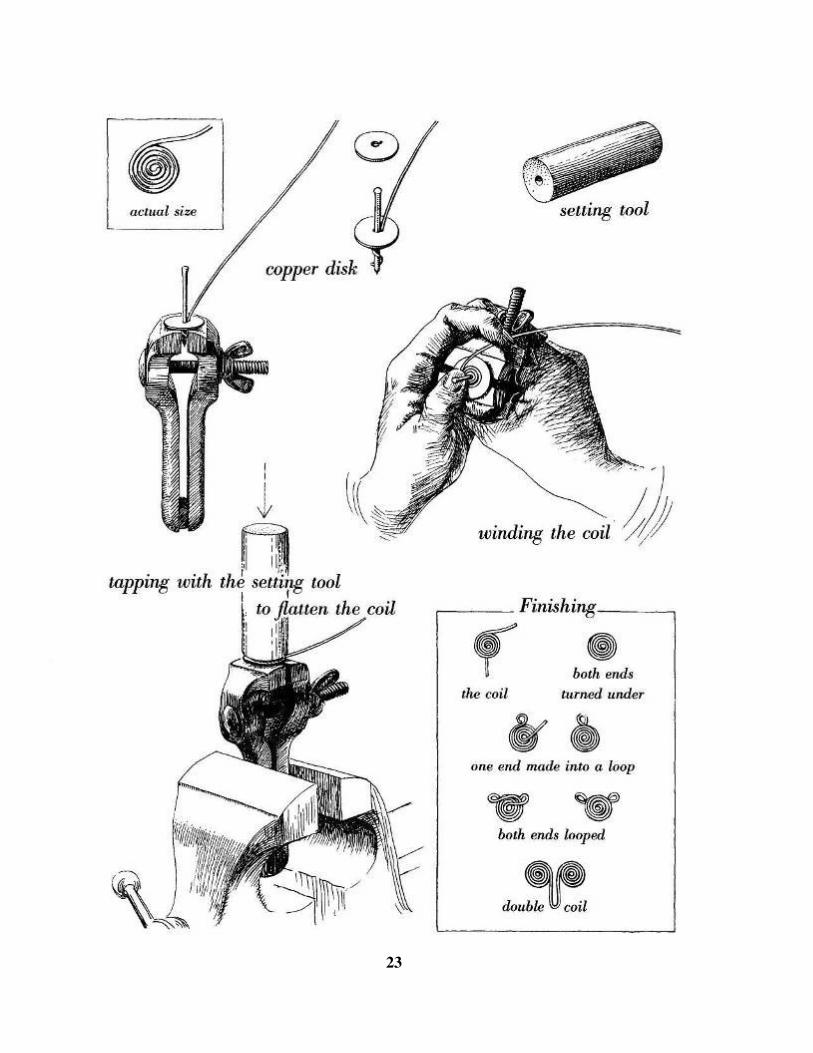
The jig
14 gauge or heavier metal sheet. Saw a 1 inch disk or larger. Drill a hole in the center of the disk the size of the mandrel
which determines the size hole in the center of the coil. File a notch in the edge of the hole the size of the wire to be
used for the coil.
Coiling wire 18 gauge or lighter
Cut a wire length, and insert the end and mandrel 1/2 inch
through the hole in the disk, and the wire in the notch. Bend the annealed wire around the mandrel, and hold both
the wire and the mandrel in the jaws of the hand vise. Wind the wire to make the coil by turning the vise.
Keep the coil flat with the thumb of the left hand while coiling. Each ring must touch the ring just made and lie flat on the disk. Place the hand vise in the jaws of the
table vise. Insert the end of the mandrel in the hole of the setting tool. Tap the end of the setting tool to flatten the coil. Repeat this operation often to keep the coil flat.
Coiling wire 16 gauge or heavier
Insert the wire end and mandrel through the hole in the disk. Hold as described above. Place a hand vise in the
jaws of the table vise. Hold the loose end of the wire in the right hand, and wind
on the disk.
The setting tool
Saw a short length of hard wood rod (a broom handle). File one end smooth and flat and finish with sandpaper. Drill a hole in the center larger in diameter than the mandrel and deeper than the length of the mandrel.
The jig, p. 17. Sawing, p. 8. Drilling, p. 10. Filing, p. 12.
22
23
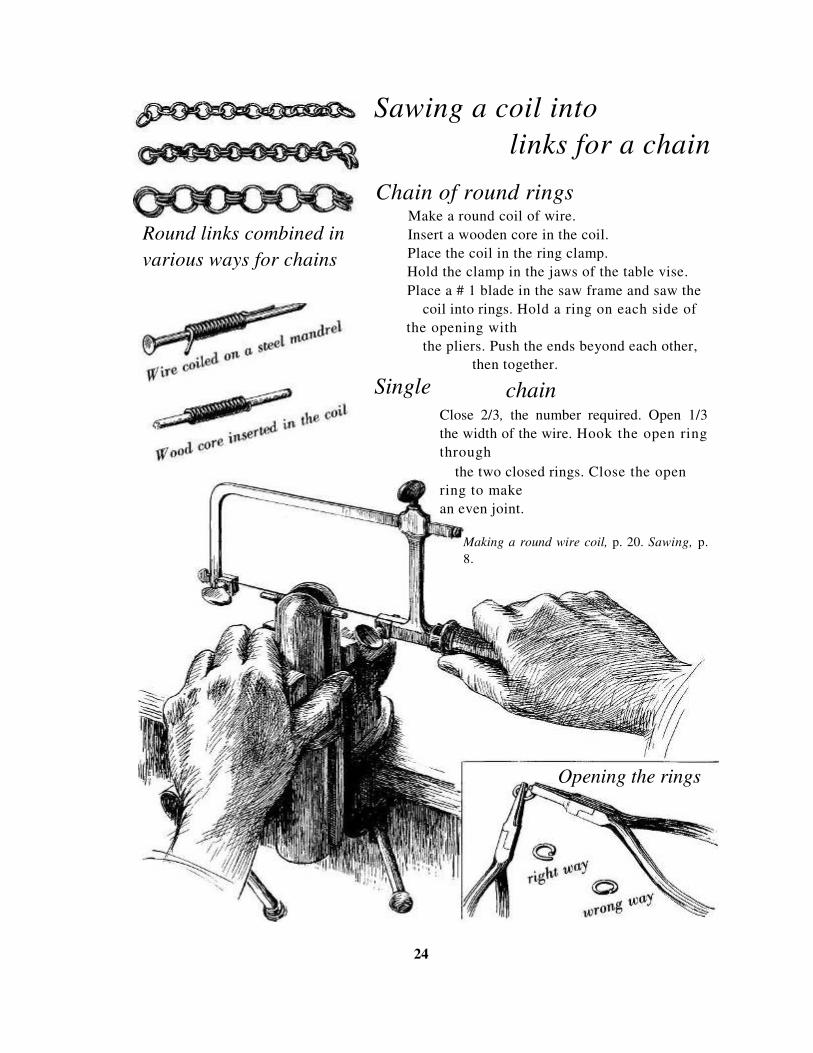
Round links combined in various ways for chains
Sawing a coil into
links for a chain
Chain of round rings
Make a round coil of wire. Insert a wooden core in the coil. Place the coil in the ring clamp. Hold the clamp in the jaws of the table vise. Place a # 1 blade in the saw frame and saw the
coil into rings. Hold a ring on each side of the opening with
the pliers. Push the ends beyond each other, then together.
chain Close 2/3, the number required. Open 1/3 the width of the wire. Hook the open ring through
the two closed rings. Close the open ring to make an even joint.
Making a round wire coil, p. 20. Sawing, p. 8.
24
Single
Opening the rings
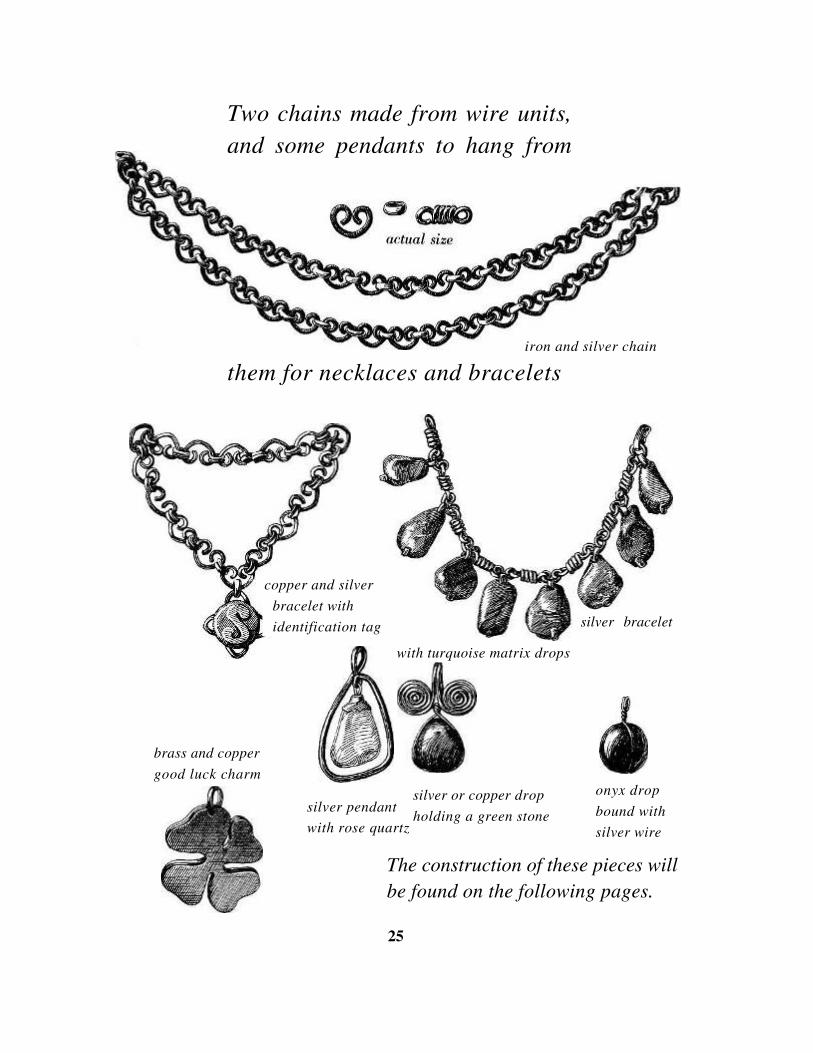
Two chains made from wire units, and some pendants to hang from
them for necklaces and bracelets
brass and copper good luck charm
silver bracelet
with turquoise matrix drops
silver or copper drop holding a green stone
The construction of these pieces will be found on the following pages.
25
iron and silver chain
copper and silver bracelet with identification tag
silver pendant with rose quartz
onyx drop bound with silver wire
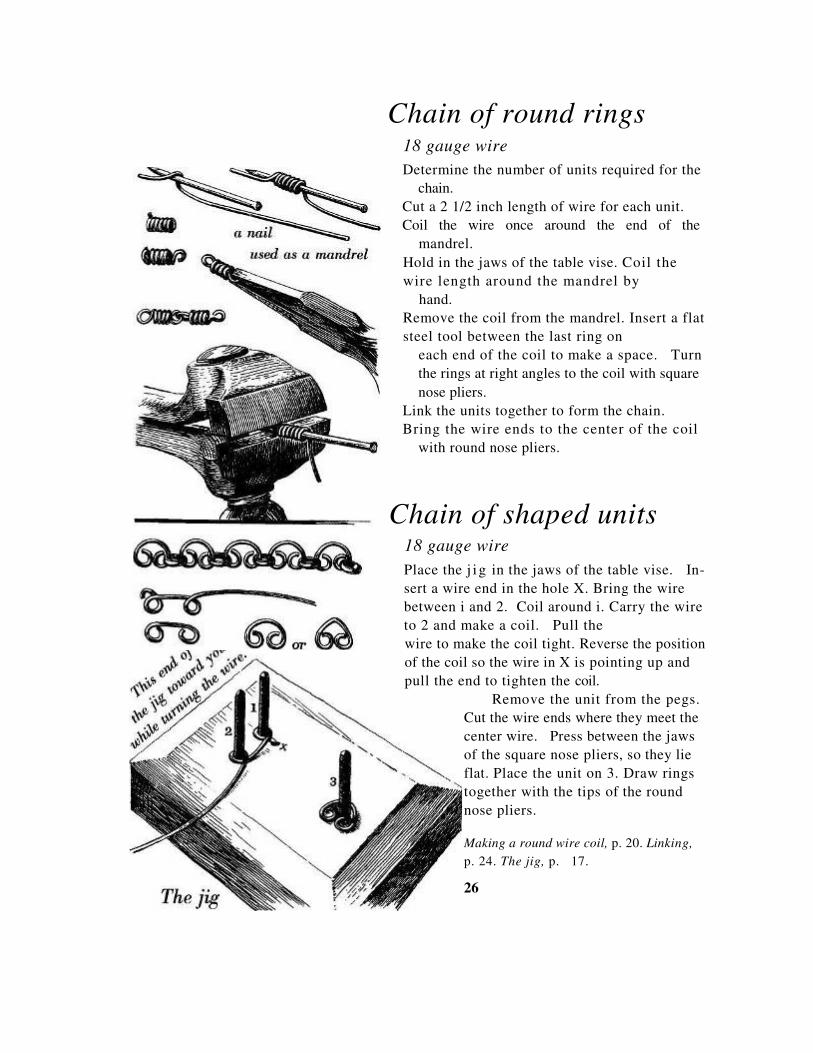
Chain of round rings
18 gauge wire
Determine the number of units required for the chain.
Cut a 2 1/2 inch length of wire for each unit. Coil the wire once around the end of the
mandrel. Hold in the jaws of the table vise. Coil the wire length around the mandrel by
hand. Remove the coil from the mandrel. Insert a flat steel tool between the last ring on
each end of the coil to make a space. Turn the rings at right angles to the coil with square nose pliers.
Link the units together to form the chain. Bring the wire ends to the center of the coil
with round nose pliers.
Chain of shaped units
18 gauge wire
Place the j i g in the jaws of the table vise. In-sert a wire end in the hole X. Bring the wire between i and 2. Coil around i. Carry the wire to 2 and make a coil. Pull the wire to make the coil tight. Reverse the position of the coil so the wire in X is pointing up and pull the end to tighten the coil.
Remove the unit from the pegs. Cut the wire ends where they meet the center wire. Press between the jaws of the square nose pliers, so they lie flat. Place the unit on 3. Draw rings together with the tips of the round nose pliers.
Making a round wire coil, p. 20. Linking, p. 24. The jig, p. 17.
26
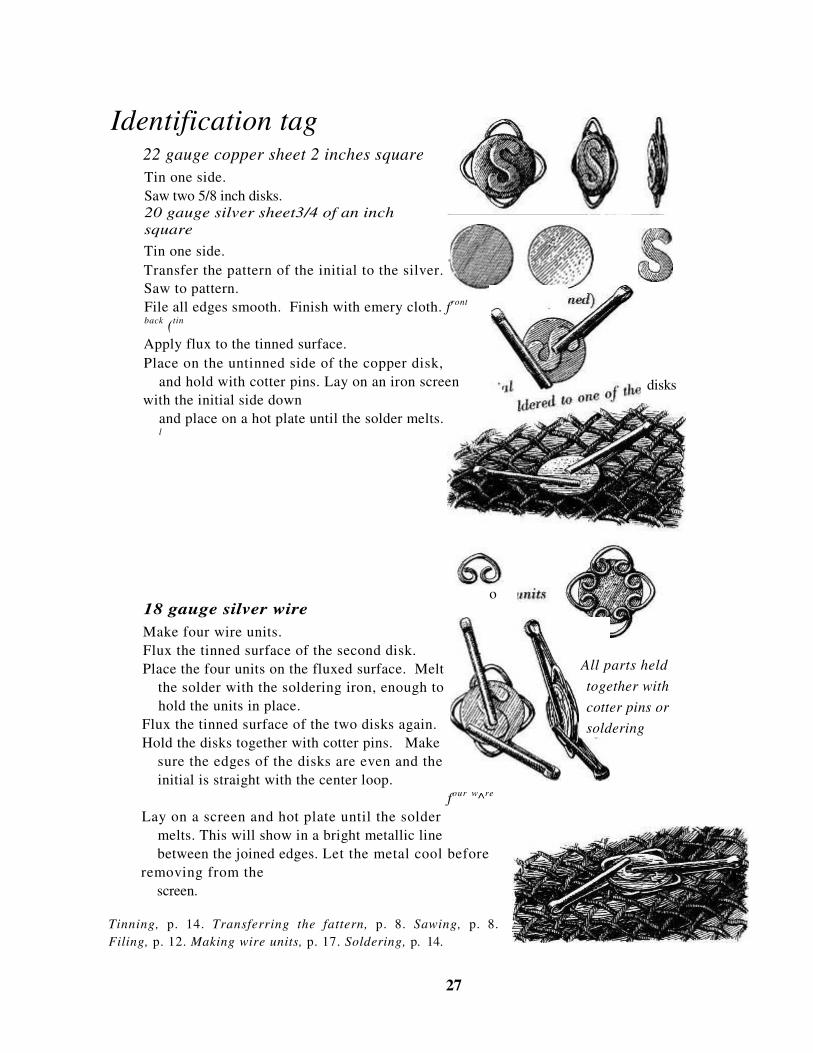
Identification tag
22 gauge copper sheet 2 inches square
Tin one side. Saw two 5/8 inch disks. 20 gauge silver sheet3/4 of an inch square
Tin one side. Transfer the pattern of the initial to the silver. Saw to pattern. File all edges smooth. Finish with emery cloth. front back (tin Apply flux to the tinned surface. Place on the untinned side of the copper disk,
and hold with cotter pins. Lay on an iron screen with the initial side down
and place on a hot plate until the solder melts. l
o 18 gauge silver wire
Make four wire units. Flux the tinned surface of the second disk. Place the four units on the fluxed surface. Melt
the solder with the soldering iron, enough to hold the units in place.
Flux the tinned surface of the two disks again. Hold the disks together with cotter pins. Make
sure the edges of the disks are even and the initial is straight with the center loop. four w^re
Lay on a screen and hot plate until the solder melts. This will show in a bright metallic line between the joined edges. Let the metal cool before
removing from the screen.
Tinning, p. 14. Transferring the fattern, p. 8. Sawing, p. 8. Filing, p. 12. Making wire units, p. 17. Soldering, p. 14.
disks
27
All parts held together with cotter pins or soldering
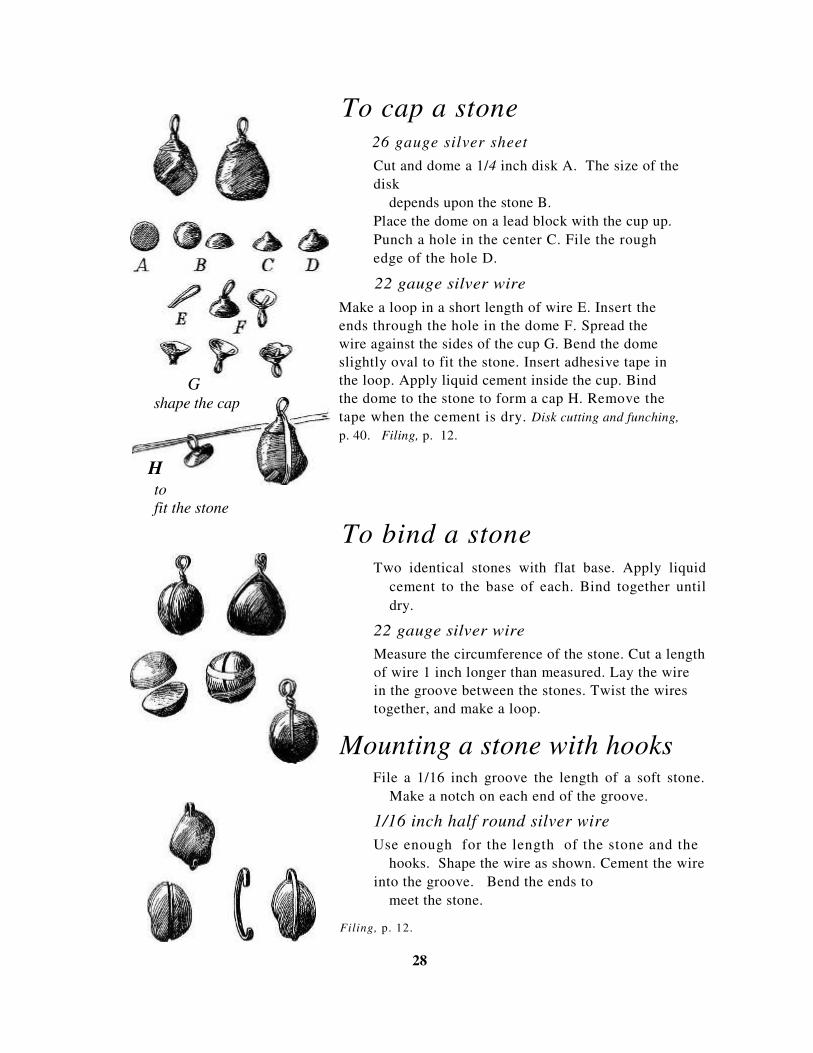
G shape the cap
to fit the stone
To cap a stone
26 gauge silver sheet
Cut and dome a 1/4 inch disk A. The size of the disk
depends upon the stone B. Place the dome on a lead block with the cup up. Punch a hole in the center C. File the rough edge of the hole D.
22 gauge silver wire
Make a loop in a short length of wire E. Insert the ends through the hole in the dome F. Spread the wire against the sides of the cup G. Bend the dome slightly oval to fit the stone. Insert adhesive tape in the loop. Apply liquid cement inside the cup. Bind the dome to the stone to form a cap H. Remove the tape when the cement is dry. Disk cutting and funching, p. 40. Filing, p. 12.
To bind a stone
Two identical stones with flat base. Apply liquid cement to the base of each. Bind together until dry.
22 gauge silver wire
Measure the circumference of the stone. Cut a length of wire 1 inch longer than measured. Lay the wire in the groove between the stones. Twist the wires together, and make a loop.
Mounting a stone with hooks
File a 1/16 inch groove the length of a soft stone. Make a notch on each end of the groove.
1/16 inch half round silver wire
Use enough for the length of the stone and the hooks. Shape the wire as shown. Cement the wire
into the groove. Bend the ends to meet the stone.
Filing, p. 12.
28
H
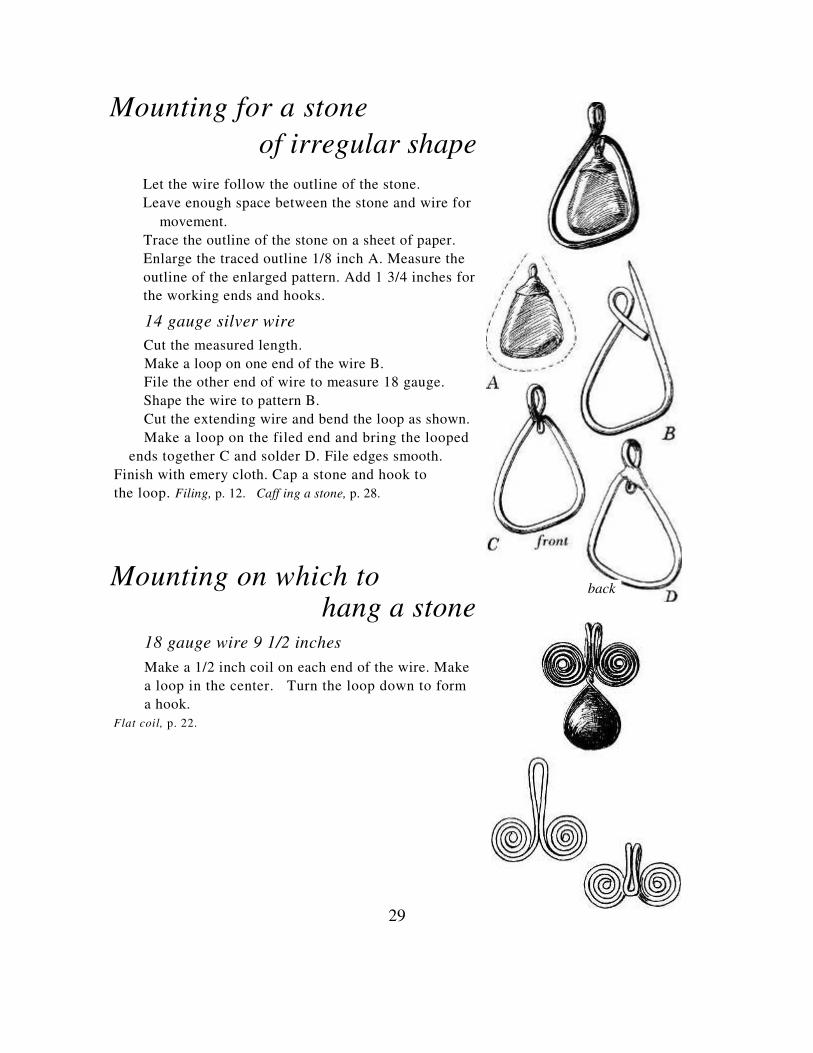
Mounting for a stone
of irregular shape
Let the wire follow the outline of the stone. Leave enough space between the stone and wire for
movement. Trace the outline of the stone on a sheet of paper. Enlarge the traced outline 1/8 inch A. Measure the outline of the enlarged pattern. Add 1 3/4 inches for the working ends and hooks.
14 gauge silver wire
Cut the measured length. Make a loop on one end of the wire B. File the other end of wire to measure 18 gauge. Shape the wire to pattern B. Cut the extending wire and bend the loop as shown. Make a loop on the filed end and bring the looped
ends together C and solder D. File edges smooth. Finish with emery cloth. Cap a stone and hook to the loop. Filing, p. 12. Caff ing a stone, p. 28.
Mounting on which to
hang a stone
18 gauge wire 9 1/2 inches
Make a 1/2 inch coil on each end of the wire. Make a loop in the center. Turn the loop down to form a hook.
Flat coil, p. 22.
29
back
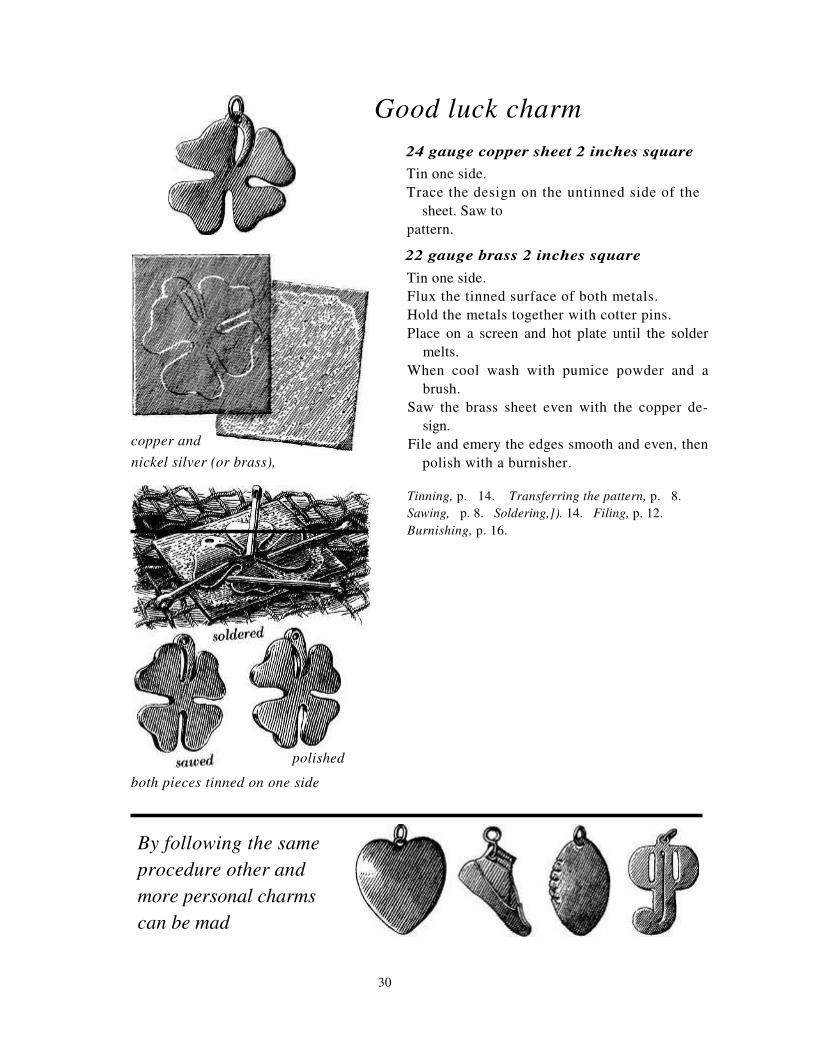
copper and
nickel silver (or brass),
both pieces tinned on one side
Good luck charm
24 gauge copper sheet 2 inches square
Tin one side. Trace the design on the untinned side of the
sheet. Saw to pattern.
22 gauge brass 2 inches square
Tin one side. Flux the tinned surface of both metals. Hold the metals together with cotter pins. Place on a screen and hot plate until the solder
melts. When cool wash with pumice powder and a
brush. Saw the brass sheet even with the copper de-
sign. File and emery the edges smooth and even, then
polish with a burnisher.
Tinning, p. 14. Transferring the pattern, p. 8. Sawing, p. 8. Soldering,]). 14. Filing, p. 12. Burnishing, p. 16.
By following the same procedure other and more personal charms can be mad
polished
30
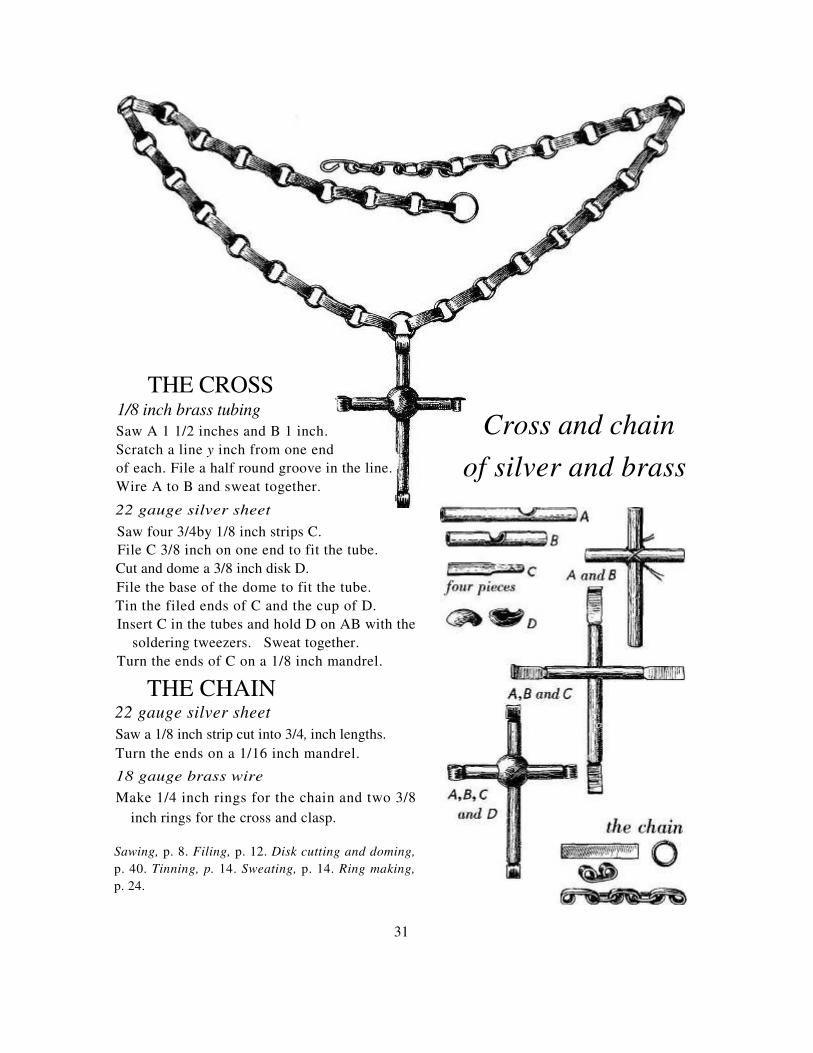
THE CROSS
1/8 inch brass tubing Saw A 1 1/2 inches and B 1 inch. Scratch a line y inch from one end of each. File a half round groove in the line. Wire A to B and sweat together.
22 gauge silver sheet Saw four 3/4by 1/8 inch strips C. File C 3/8 inch on one end to fit the tube. Cut and dome a 3/8 inch disk D. File the base of the dome to fit the tube. Tin the filed ends of C and the cup of D. Insert C in the tubes and hold D on AB with the
soldering tweezers. Sweat together. Turn the ends of C on a 1/8 inch mandrel.
THE CHAIN
22 gauge silver sheet Saw a 1/8 inch strip cut into 3/4, inch lengths. Turn the ends on a 1/16 inch mandrel.
18 gauge brass wire Make 1/4 inch rings for the chain and two 3/8
inch rings for the cross and clasp. Sawing, p. 8. Filing, p. 12. Disk cutting and doming, p. 40. Tinning, p. 14. Sweating, p. 14. Ring making, p. 24.
31
Cross and chain of silver and brass
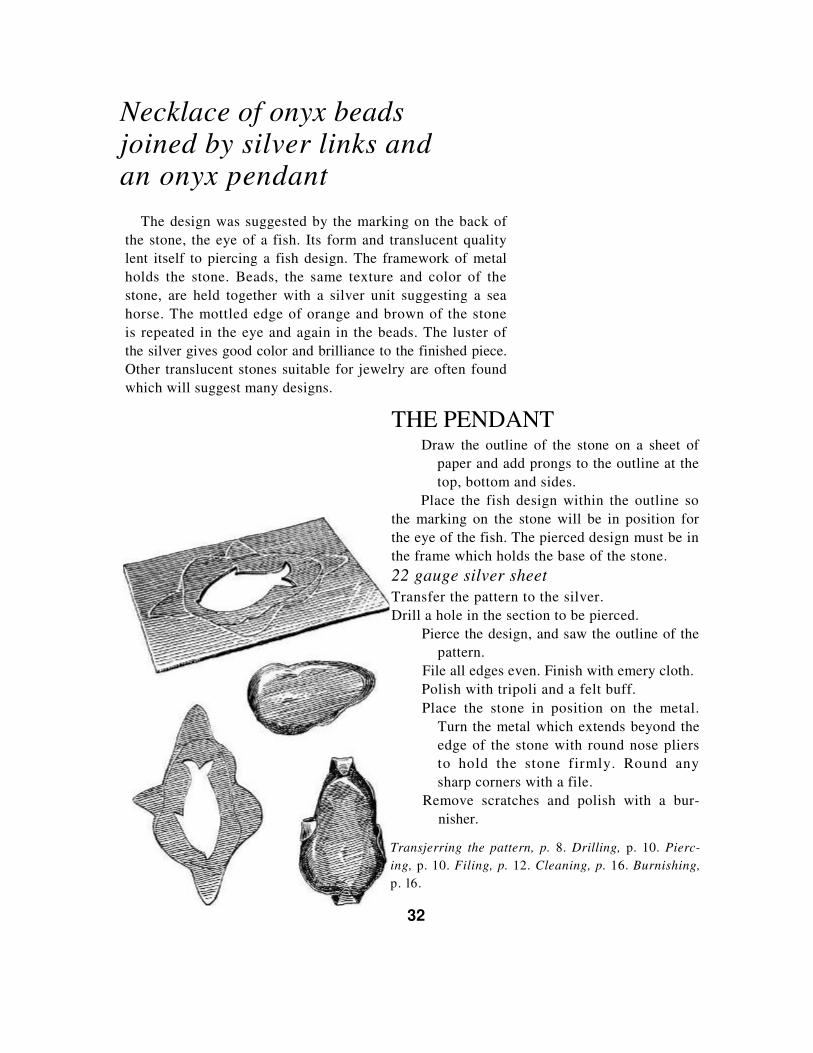
Necklace of onyx beads joined by silver links and an onyx pendant
The design was suggested by the marking on the back of the stone, the eye of a fish. Its form and translucent quality lent itself to piercing a fish design. The framework of metal holds the stone. Beads, the same texture and color of the stone, are held together with a silver unit suggesting a sea horse. The mottled edge of orange and brown of the stone is repeated in the eye and again in the beads. The luster of the silver gives good color and brilliance to the finished piece. Other translucent stones suitable for jewelry are often found which will suggest many designs.
THE PENDANT
Draw the outline of the stone on a sheet of paper and add prongs to the outline at the top, bottom and sides.
Place the fish design within the outline so the marking on the stone will be in position for the eye of the fish. The pierced design must be in the frame which holds the base of the stone. 22 gauge silver sheet
Transfer the pattern to the silver. Drill a hole in the section to be pierced.
Pierce the design, and saw the outline of the pattern.
File all edges even. Finish with emery cloth. Polish with tripoli and a felt buff. Place the stone in position on the metal.
Turn the metal which extends beyond the edge of the stone with round nose pliers to hold the stone firmly. Round any sharp corners with a file.
Remove scratches and polish with a bur-nisher.
Transjerring the pattern, p. 8. Drilling, p. 10. Pierc-ing, p. 10. Filing, p. 12. Cleaning, p. 16. Burnishing, p. l6.
32
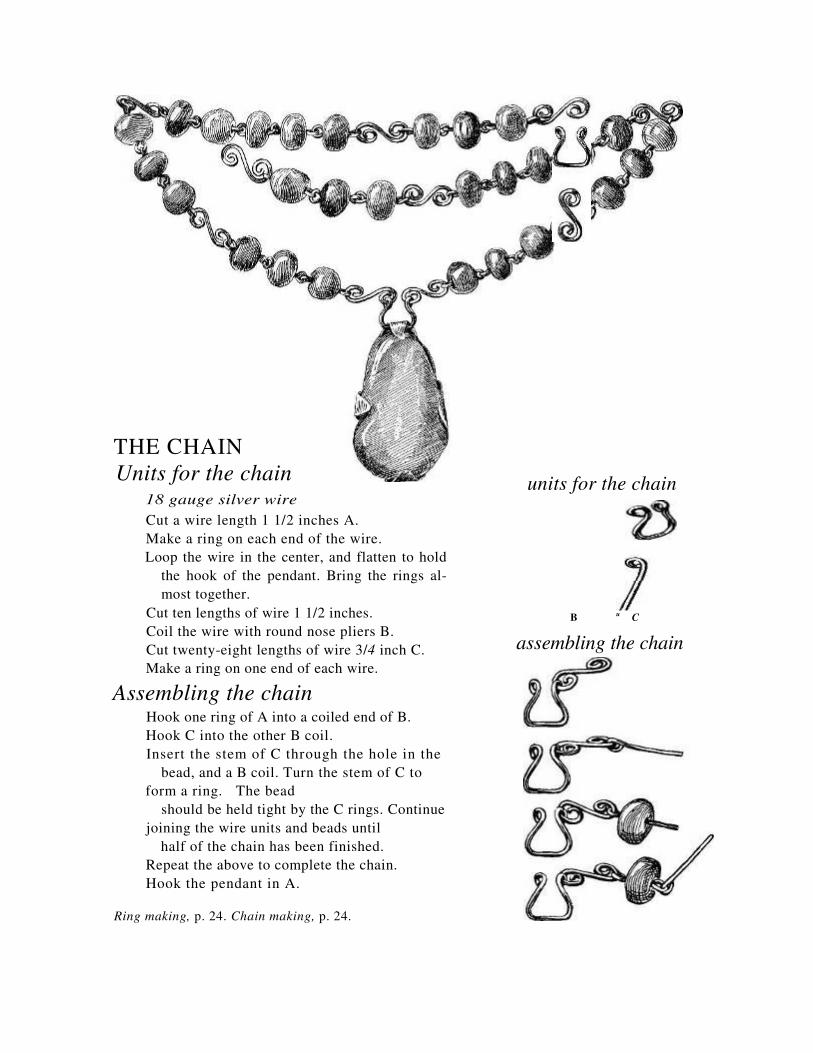
THE CHAIN
Units for the chain
18 gauge silver wire
Cut a wire length 1 1/2 inches A. Make a ring on each end of the wire. Loop the wire in the center, and flatten to hold
the hook of the pendant. Bring the rings al-most together.
Cut ten lengths of wire 1 1/2 inches. Coil the wire with round nose pliers B. Cut twenty-eight lengths of wire 3/4 inch C. Make a ring on one end of each wire.
Assembling the chain
Hook one ring of A into a coiled end of B. Hook C into the other B coil. Insert the stem of C through the hole in the
bead, and a B coil. Turn the stem of C to form a ring. The bead
should be held tight by the C rings. Continue joining the wire units and beads until
half of the chain has been finished. Repeat the above to complete the chain. Hook the pendant in A.
Ring making, p. 24. Chain making, p. 24.
units for the chain
B u C
assembling the chain
assembled and soldered
filed and polished
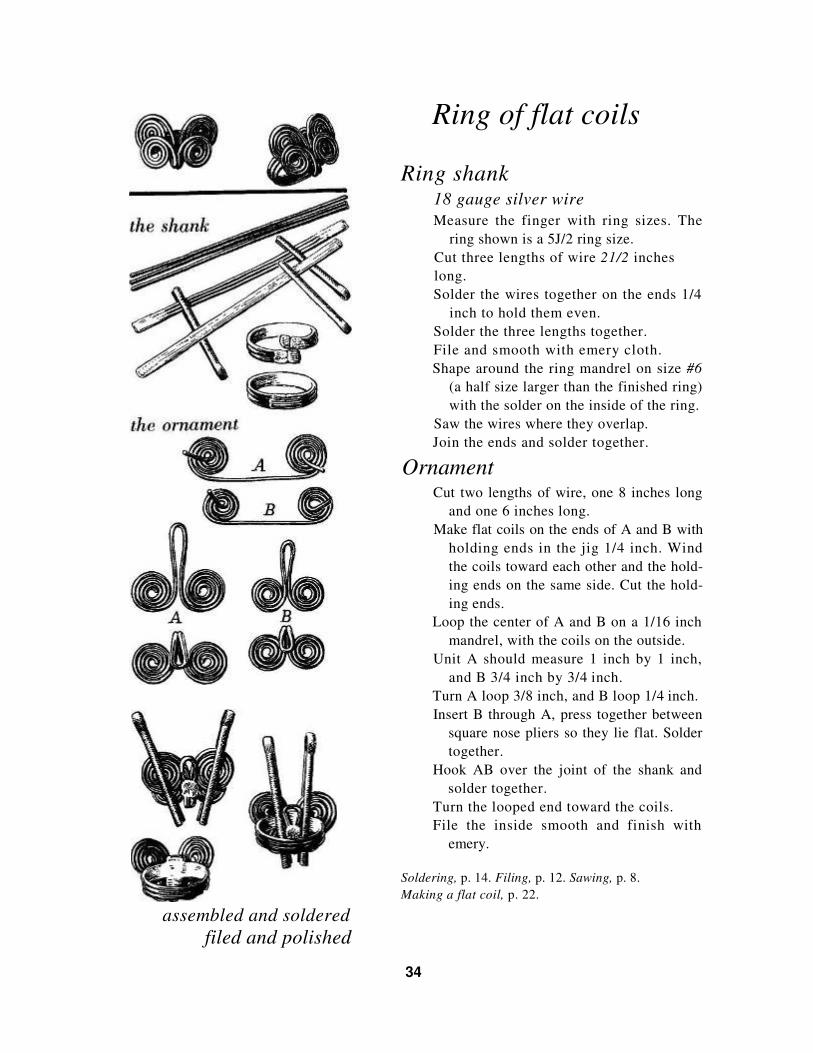
Ring of flat coils
Ring shank
18 gauge silver wire
Measure the finger with ring sizes. The ring shown is a 5J/2 ring size.
Cut three lengths of wire 21/2 inches long. Solder the wires together on the ends 1/4
inch to hold them even. Solder the three lengths together. File and smooth with emery cloth. Shape around the ring mandrel on size #6
(a half size larger than the finished ring) with the solder on the inside of the ring.
Saw the wires where they overlap. Join the ends and solder together.
Ornament
Cut two lengths of wire, one 8 inches long and one 6 inches long.
Make flat coils on the ends of A and B with holding ends in the jig 1/4 inch. Wind the coils toward each other and the hold-ing ends on the same side. Cut the hold-ing ends.
Loop the center of A and B on a 1/16 inch mandrel, with the coils on the outside.
Unit A should measure 1 inch by 1 inch, and B 3/4 inch by 3/4 inch.
Turn A loop 3/8 inch, and B loop 1/4 inch. Insert B through A, press together between
square nose pliers so they lie flat. Solder together.
Hook AB over the joint of the shank and solder together.
Turn the looped end toward the coils. File the inside smooth and finish with
emery.
Soldering, p. 14. Filing, p. 12. Sawing, p. 8. Making a flat coil, p. 22.
34

The coiled units
18 gauge wire
Cut twenty wire lengths 6 inches. Make twenty flat coils, winding the wire five times to
make the unit. Leave 3/8 inch wire end on each unit A. Let 1/2 inch of the outside wire rest on the
back of the coil. Bend flat against the coil B. Cut the wire 3/8
inch from the edge of the coil to the end of the wire.
Make a 1/8 inch ring on the other wire end C. Join the coiled units with 1/4 inch rings to make the
chain D.
The catch
Cut a wire length 3 inches. Bend in the center and bring the ends together. Make a hook on the looped end and a ring on each wire
end. Link to one end of the chain. To fasten, hook the catch
to the last ring on the other end of the chain.
Making a flat coil, p. 22. Ring making, p. 24. Linking, p. 24.
35
Necklace of flat coils
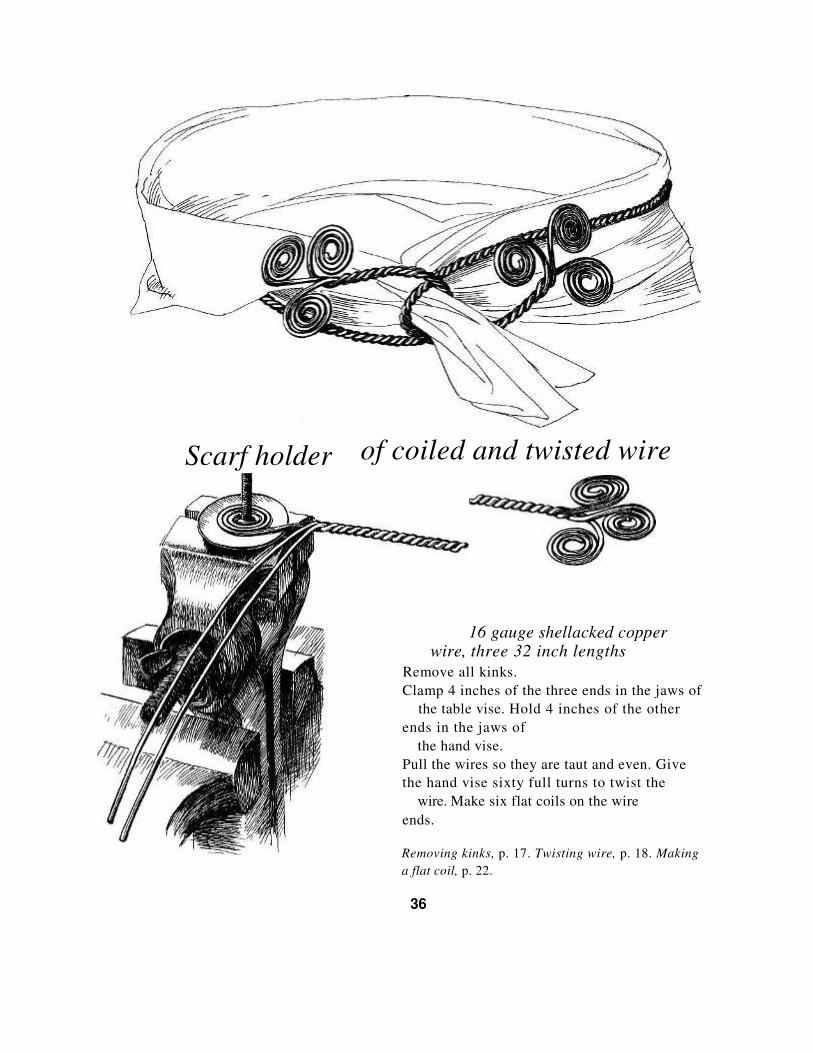
16 gauge shellacked copper
wire, three 32 inch lengths
Remove all kinks. Clamp 4 inches of the three ends in the jaws of
the table vise. Hold 4 inches of the other ends in the jaws of
the hand vise. Pull the wires so they are taut and even. Give the hand vise sixty full turns to twist the
wire. Make six flat coils on the wire ends.
Removing kinks, p. 17. Twisting wire, p. 18. Making a flat coil, p. 22.
36
Scarf holder of coiled and twisted wire
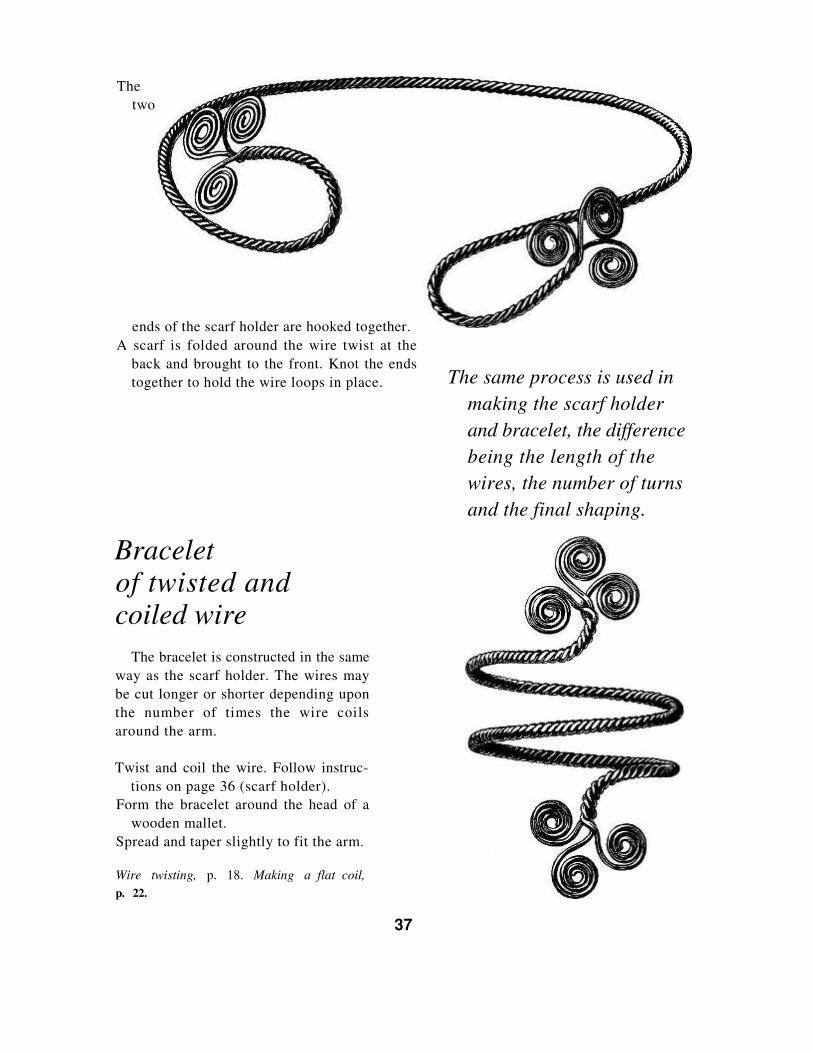
The two
ends of the scarf holder are hooked together. A scarf is folded around the wire twist at the
back and brought to the front. Knot the ends together to hold the wire loops in place.
The same process is used in making the scarf holder and bracelet, the difference being the length of the wires, the number of turns and the final shaping.
Bracelet
of twisted and
coiled wire
The bracelet is constructed in the same way as the scarf holder. The wires may be cut longer or shorter depending upon the number of times the wire coils around the arm.
Twist and coil the wire. Follow instruc-tions on page 36 (scarf holder).
Form the bracelet around the head of a wooden mallet.
Spread and taper slightly to fit the arm.
Wire twisting, p. 18. Making a flat coil, p. 22.
37

with centers
turned under to form hooks six double coils
Terminal ornament
Barrette of flat coils
Coils
18 gauge s i l ver wire Cut six lengths of wire 8 inches. Make a flat coil on the ends. Loop the center and bring the coils to-
gether and hook into each other. Cut one length of wire 4 inches. Coil one end, leave a 1/2 inch length to in-
sert between the last two double coils. Tap the loops flat on the coils. Solder the loops together with the solder-
ing iron. Adjust the coils to overlap with the stems close together. Bend to a slight curve.
The clasp
The clasp is commercial, and should be narrow enough to be covered by the coils and long enough to support the coils.
Tin the top of the clasp. Flux the tinned surface of the clasp and the loops on the back. Hold firmly with cotter pins and sweat together.
Making a flat coil, p. 22. Soldering, p. 14. Tinning, p. 14. Sweating, p. 14.
Terminal ornament
Cut a wire length 1 1/2 inches and make a ring on each end.
Place a small piece of pure tin in each ring. Melt into a ball with the tip of the solder-
ing iron. A 1/8 inch silver bead may be inserted on the wire ends and soldered.
Loop the wire in the center. File a 1/4 inch silver bead to fit on the first
loop of the coils. Insert the looped end of the wire through
the hole in the bead and solder together. Cut the loop and spread the wires. Fit the filed bead over the looped end. Solder the bead and wires to the coils. Filing,
p. 12. Soldering, p. 14. Making a flat coil, p. 2 2.
38
assembled and soldered
soldered to a commercial clasp
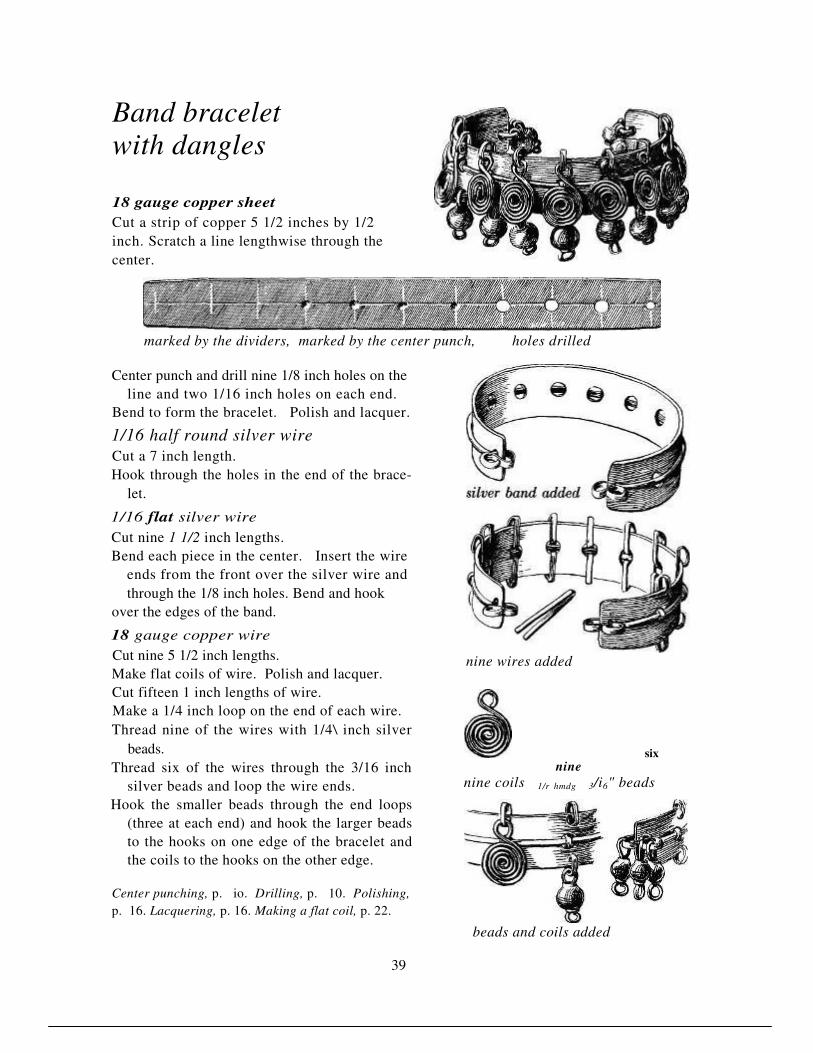
Band bracelet with dangles
18 gauge copper sheet Cut a strip of copper 5 1/2 inches by 1/2 inch. Scratch a line lengthwise through the center.
marked by the dividers, marked by the center punch, holes drilled
Center punch and drill nine 1/8 inch holes on the line and two 1/16 inch holes on each end.
Bend to form the bracelet. Polish and lacquer.
1/16 half round silver wire
Cut a 7 inch length. Hook through the holes in the end of the brace-
let.
1/16 flat silver wire
Cut nine 1 1/2 inch lengths. Bend each piece in the center. Insert the wire
ends from the front over the silver wire and through the 1/8 inch holes. Bend and hook
over the edges of the band.
18 gauge copper wire
Cut nine 5 1/2 inch lengths. Make flat coils of wire. Polish and lacquer. Cut fifteen 1 inch lengths of wire. Make a 1/4 inch loop on the end of each wire. Thread nine of the wires with 1/4\ inch silver
beads. Thread six of the wires through the 3/16 inch
silver beads and loop the wire ends. Hook the smaller beads through the end loops
(three at each end) and hook the larger beads to the hooks on one edge of the bracelet and the coils to the hooks on the other edge.
Center punching, p. io. Drilling, p. 10. Polishing, p. 16. Lacquering, p. 16. Making a flat coil, p. 22.
nine wires added
nine
nine coils 1/r hmdg 3/i6" beads
beads and coils added
39
six
Making Disks and Domes
Disks and domes are used as the foundation of jewelry and also as a means of decoration. They are often given a high polish and take the place of stones in a design. Sometimes wire units are applied to a flat disk or a dome surface for variety and texture.
Cutting disks
20 gauge or lighter sheet metal Lay the metal on a lead block. Cut a disk from the metal sheet with a dapping die cutter.
18 gauge or heavier sheet metal Make a circle with the dividers on the metal. Saw or cut the disk. This applies also to oversize disks.
Punching domes
Select a hollow in the dapping die block slightly larger than the disk.. Raise the disk with the dapping die punch to make the dome. Raise domes larger than the standard punches with the round head of a steel hammer or mallet. Place a disk too large for the dapping die block in a hollow made in a lead or wooden block and dome the disk with the round head of the mallet. To smooth the larger domes, place the mallet head in the jaws of the table vise, the round end up. Hold the cup side of the dome on the mallet. Hammer the domed surface with a mallet to make it smooth.
Sawing, p. 8.
40
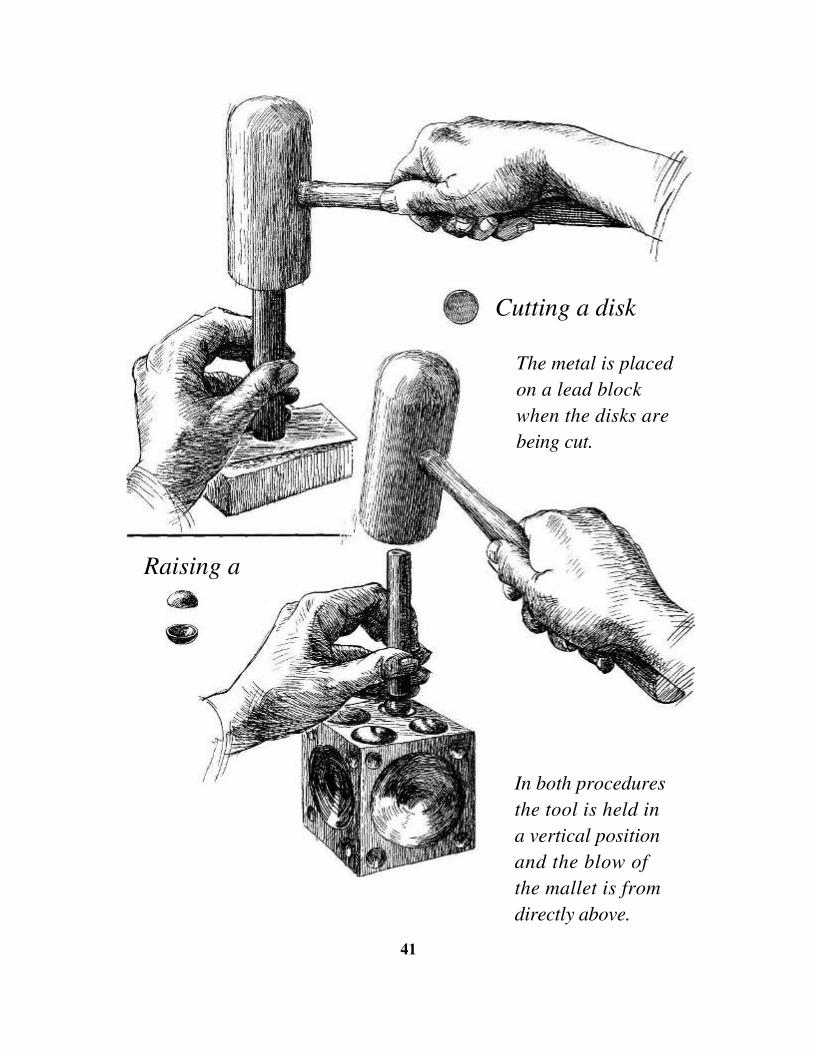
In both procedures the tool is held in a vertical position and the blow of the mallet is from directly above.
41
Cutting a disk
The metal is placed on a lead block when the disks are being cut.
Raising a
Necklace of disks and domes
Disk and dome unit
22 gauge silver sheet
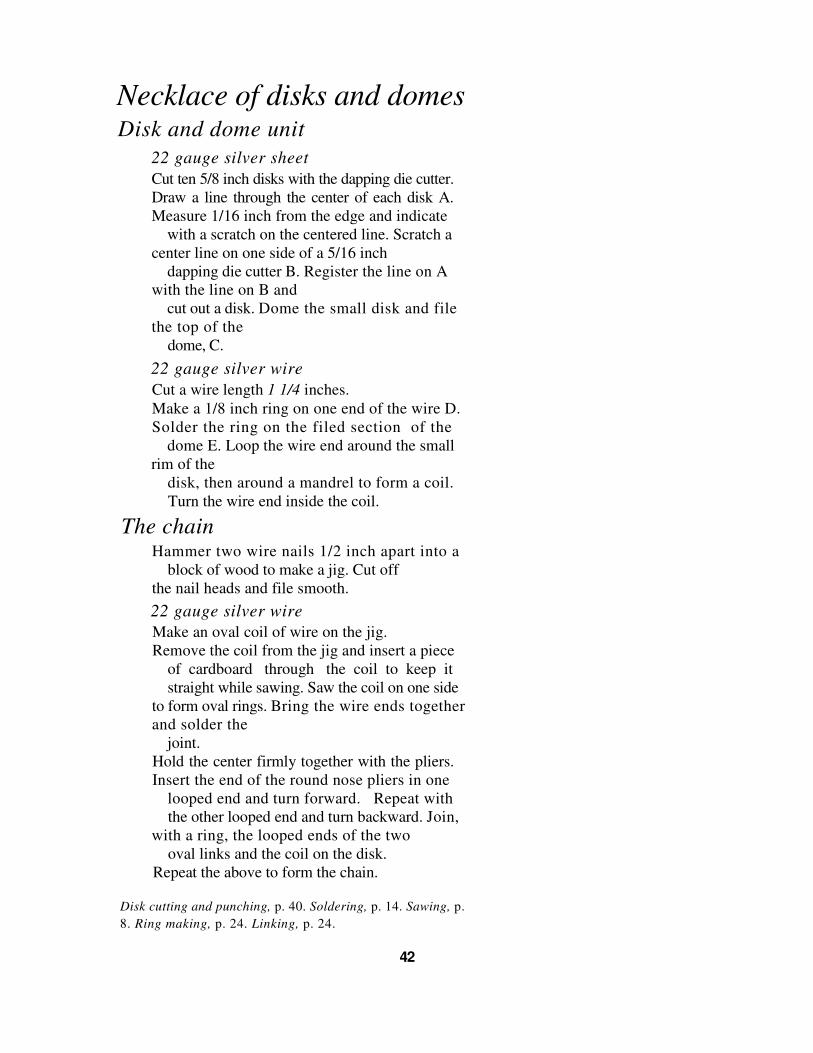
Cut ten 5/8 inch disks with the dapping die cutter. Draw a line through the center of each disk A. Measure 1/16 inch from the edge and indicate
with a scratch on the centered line. Scratch a center line on one side of a 5/16 inch
dapping die cutter B. Register the line on A with the line on B and
cut out a disk. Dome the small disk and file the top of the
dome, C. 22 gauge silver wire
Cut a wire length 1 1/4 inches. Make a 1/8 inch ring on one end of the wire D. Solder the ring on the filed section of the
dome E. Loop the wire end around the small rim of the
disk, then around a mandrel to form a coil. Turn the wire end inside the coil.
The chain
Hammer two wire nails 1/2 inch apart into a block of wood to make a jig. Cut off
the nail heads and file smooth. 22 gauge silver wire
Make an oval coil of wire on the jig. Remove the coil from the jig and insert a piece
of cardboard through the coil to keep it straight while sawing. Saw the coil on one side
to form oval rings. Bring the wire ends together and solder the
joint. Hold the center firmly together with the pliers. Insert the end of the round nose pliers in one
looped end and turn forward. Repeat with the other looped end and turn backward. Join,
with a ring, the looped ends of the two oval links and the coil on the disk.
Repeat the above to form the chain.
Disk cutting and punching, p. 40. Soldering, p. 14. Sawing, p. 8. Ring making, p. 24. Linking, p. 24.
42
A
B
or the drop can be this shape
Two simple chains, either of which can be used
A good way to hold the dome firm while soldering.
Press the rim of the dome on a sheet of asbestos to form a groove. Cut a V from the edge to the groove. Put the dome in the groove and bend the wire to form a clamp.
43

B and C soldered to the back of A
Scarf holder
22 gauge copper sheet Cut the metal to pattern A. Pierce the opening. File all edges and finish with emery
cloth. Dome A slightly. Tin the cupped side.
24 gauge brass sheet Cut and dome a 3/8 inch disk B. File the
base even. Punch a hole in the center.
24 gauge silver sheet
Cut and dome a 3/8, inch disk.
22 gauge silver wire
Cut and double a 1 1/2 inch length. Solder the looped end in the cup of the
small dome C. Insert the wire ends through the hole on
the cup side in B. Make a coil on each wire end. Solder B and the coils to the back of A.
18 gauge silver wire Cut three 4 inch lengths. Solder the ends together D. Cut one 3 inch length E. Shape and tin the coiled end. Hold D and E to A with cotter pins. Solder all together.
Piercing, p. 10. Filing, p. 12. Disk cutting and -punching, p. 40. Making a flat coil, p. 22. Soldering, p. 14.
the wires, D and E, soldered to A
44

Belt buckle and buttons
20 gauge copper sheet
Cut and dome two 1 1/2z inch disks A for the buckle, and as many disks A as desired for buttons.
26 gauge brass sheet
Tin the sheet. Cut to pattern B. Dome B to fit the A domes. 22 gauge copper sheet Cut two strips 3/4 by 1/4 inch C. Turn the ends to fit inside A. Cut a strip 1 inch by 1/4 inch D. Turn one end to form a hook. 18 gauge copper wire Cut the required number of 2 inch wire
lengths for the button shanks and one length for the buckle fastener. Bend
E for the button shanks and F for the buckle fastener. Tin C, D, E and
F where the contact is made with A domes. Flux the cupped
side of B. Hold to A with cotter pins. Place on
screen and hot plate until the solder melts. Flux C, D and F and hold
with cotter pins on the cupped side of the large A domes. Make sure B is held firmly on
the domed side. Sweat together. Solder E on the
back of the small A domes with the soldering iron.
Disk cutting and punching, p. 40. Tinning, p. 14. Sweating, p. 14. Soldering, p. 14.
E-shank for
the button
45
F- hook for the buckle
parts assembled for soldering
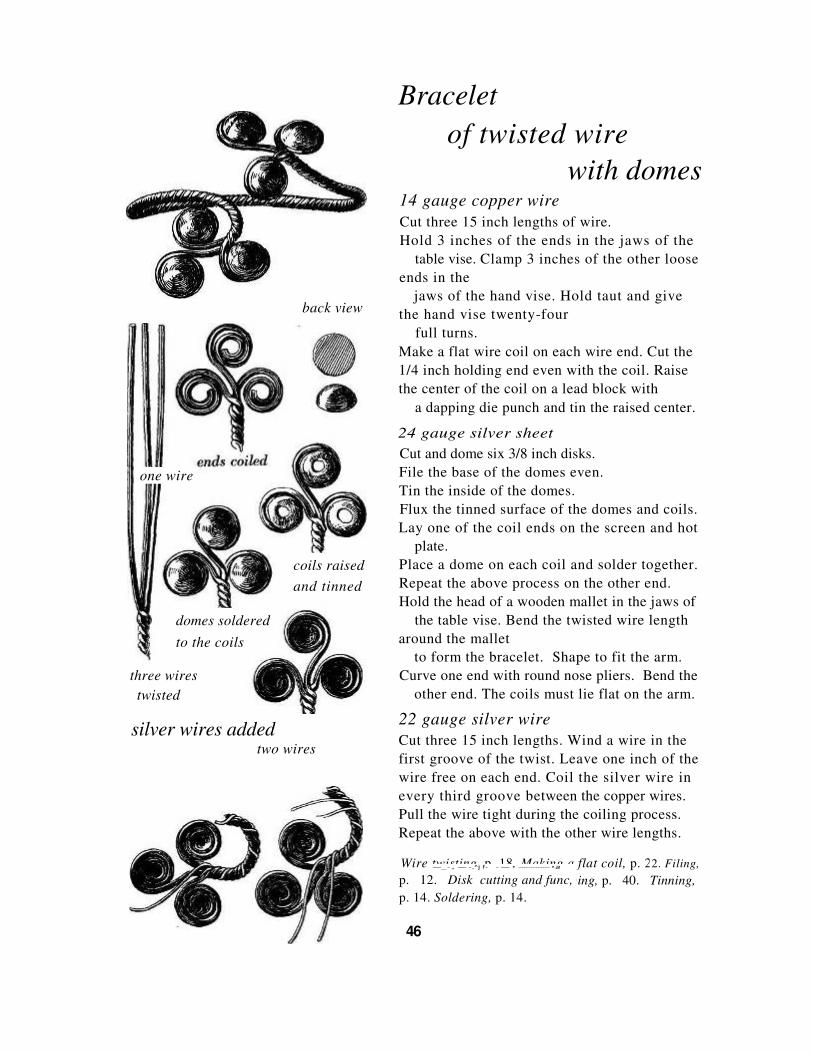
Bracelet
back view
silver wires added two wires
of twisted wire
with domes
14 gauge copper wire
Cut three 15 inch lengths of wire. Hold 3 inches of the ends in the jaws of the
table vise. Clamp 3 inches of the other loose ends in the
jaws of the hand vise. Hold taut and give the hand vise twenty-four
full turns. Make a flat wire coil on each wire end. Cut the 1/4 inch holding end even with the coil. Raise the center of the coil on a lead block with
a dapping die punch and tin the raised center.
24 gauge silver sheet Cut and dome six 3/8 inch disks. File the base of the domes even. Tin the inside of the domes. Flux the tinned surface of the domes and coils. Lay one of the coil ends on the screen and hot
plate. Place a dome on each coil and solder together. Repeat the above process on the other end. Hold the head of a wooden mallet in the jaws of
the table vise. Bend the twisted wire length around the mallet
to form the bracelet. Shape to fit the arm. Curve one end with round nose pliers. Bend the
other end. The coils must lie flat on the arm.
22 gauge silver wire
Cut three 15 inch lengths. Wind a wire in the first groove of the twist. Leave one inch of the wire free on each end. Coil the silver wire in every third groove between the copper wires. Pull the wire tight during the coiling process. Repeat the above with the other wire lengths.
coils raised and tinned
domes soldered to the coils
three wires twisted
one wire
Wire twisting, p. 18. Making a flat coil, p. 22. / p. 12. Disk cutting and punching, p. 40. Tinning,
2. Filing, —_ - „ — -,^j f- - — • ------------------ • a p. 12. Disk cutting and func, p. 14. Soldering, p. 14.
46
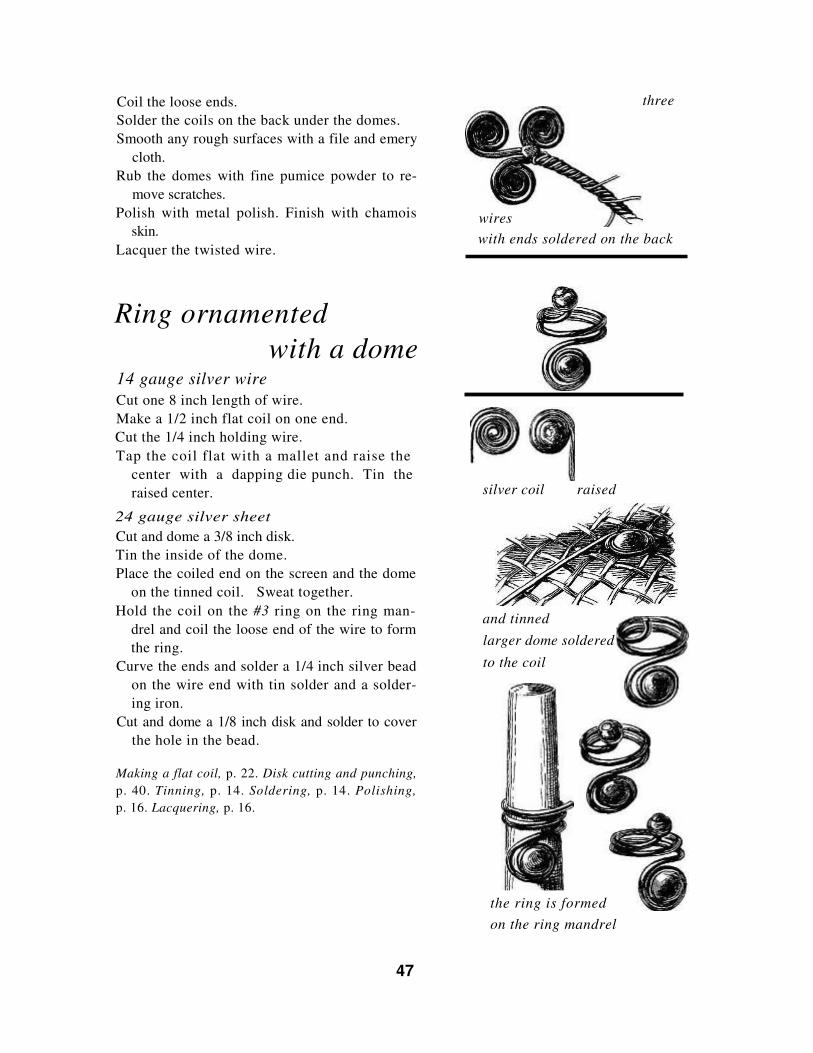
Coil the loose ends. Solder the coils on the back under the domes. Smooth any rough surfaces with a file and emery
cloth. Rub the domes with fine pumice powder to re-
move scratches. Polish with metal polish. Finish with chamois
skin. Lacquer the twisted wire.
three
wires
with ends soldered on the back
Ring ornamented
with a dome
14 gauge silver wire
Cut one 8 inch length of wire. Make a 1/2 inch flat coil on one end. Cut the 1/4 inch holding wire. Tap the coil flat with a mallet and raise the
center with a dapping die punch. Tin the raised center.
24 gauge silver sheet Cut and dome a 3/8 inch disk. Tin the inside of the dome. Place the coiled end on the screen and the dome
on the tinned coil. Sweat together. Hold the coil on the #3 ring on the ring man-
drel and coil the loose end of the wire to form the ring.
Curve the ends and solder a 1/4 inch silver bead on the wire end with tin solder and a solder-ing iron.
Cut and dome a 1/8 inch disk and solder to cover the hole in the bead.
Making a flat coil, p. 22. Disk cutting and punching, p. 40. Tinning, p. 14. Soldering, p. 14. Polishing, p. 16. Lacquering, p. 16.
silver coil raised
and tinned
larger dome soldered
to the coil
47
the ring is formed on the ring mandrel
Slide for a sport tie
20 gauge copper sheet—turquoise matrix stone
Transfer the patterns A and B to the copper sheet. Cut both to pattern.
Place B in the forming block and curve slightly. Place the stone on A and indicate the edge of the stone with
a scratch line on each arm. Remove the stone and turn the ends at right angles on the scratched lines. Tin the back
of A and hold on the curved surface of B with cotter pins. Place on a screen and hot plate until the
solder melts. 20 gauge copper wire — woven silk cord
Make two tapered coils C about seven rings each. The small end of the coil should fit the cord snugly.
Hold the coils together with cotter pins and solder together. Leave a thin coat of solder on the back.
Solder C to the back of B. Make sure the soldering tweezers hold A on the front while holding C on the back.
Place on a screen and hot plate until the solder melts. Make two tapered coils about fifteen rings each D. A knit-
ting needle may be used for the mandrel. Remove all scratches with pumice powder and emery cloth. Set the stone between the arms of A. Turn the ends over the
stone with the burnisher. Polish and lacquer the slide B and the coils C and D. Wind the cord ends with fine binding wire. Cover the ends with liquid cement and insert in the coils D.
To make the forming block
Drill a 3/4 inch hole in a block of wood. Saw the block in half to divide the hole lengthwise. File the curve of the groove to an oval shape. Smooth with
sandpaper. File and smooth a dowel or broom handle to fit the curve in
the block.
Transferring the -pattern, p. 8. Tinning, p. 14. Soldering, p. 14. Making a tafered coil, p. 20. Burnishing, p. 16. Polishing, p. 16. Lacquering, p. 16.
48

49
The end of a knitting needle is used to wind the tapered coils
the forming block
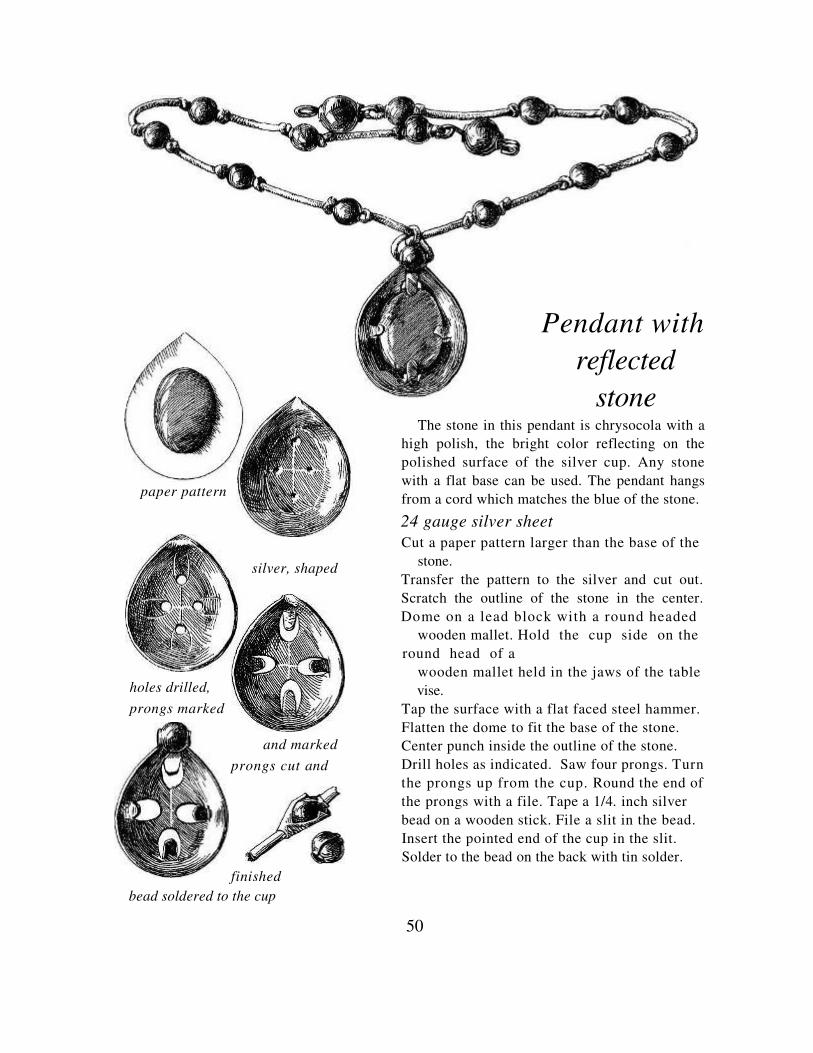
silver, shaped
and marked
prongs cut and
finished bead soldered to the cup
The stone in this pendant is chrysocola with a high polish, the bright color reflecting on the polished surface of the silver cup. Any stone with a flat base can be used. The pendant hangs from a cord which matches the blue of the stone.
24 gauge silver sheet Cut a paper pattern larger than the base of the
stone. Transfer the pattern to the silver and cut out. Scratch the outline of the stone in the center. Dome on a lead block with a round headed
wooden mallet. Hold the cup side on the round head of a
wooden mallet held in the jaws of the table vise.
Tap the surface with a flat faced steel hammer. Flatten the dome to fit the base of the stone. Center punch inside the outline of the stone. Drill holes as indicated. Saw four prongs. Turn the prongs up from the cup. Round the end of the prongs with a file. Tape a 1/4. inch silver bead on a wooden stick. File a slit in the bead. Insert the pointed end of the cup in the slit. Solder to the bead on the back with tin solder.
50
Pendant with
reflected
stone
paper pattern
holes drilled, prongs marked

Bowknot barrette
22 gauge silver sheet Transfer the design to the metal. Cut A and B to pattern. Cut a strip 1/2 inch by 3/16 inch C. Cut a strip 1/4 inch by 3/4 inch D. File all edges smooth. Bend A and B slightly. Bend C at right angles to fit the center of B. Make hooks on both ends of D. File the curve of the hooks flat. Tin the filed surface of the hooks and the flat top of D, also the top of the commercial clasp. Solder D to the tinned surface of the clasp. Place A on B and C in the center. Bend the arms of C around AB as shown. Solder C to B. Place the tinned hooks of D on the back of B. Solder in place with the soldering iron.
Trans]erring the -pattern, p. 8. Filing, p. 12. Tinning, p. 14. Soldering, p. 14.
D soldered to the clasp
Polish with emery cloth, pumice powder and silver polish. Rub the cup with a burnisher for a
high polish. Bend the prongs over the stone with a burnisher. ^*, _ .
, , , , , , . , , L soldered to A and B, back view Insert the cord through the bead on the pendant. String the beads on the cord, holding in place
with a knot. Transferring the pattern, p. 8. Doming, p. 10. Re- moving scratches, p. 16. Filing, P. 12. Burnishing, all parts soldered together, p. 16. Polishing, p. 16. side view
51
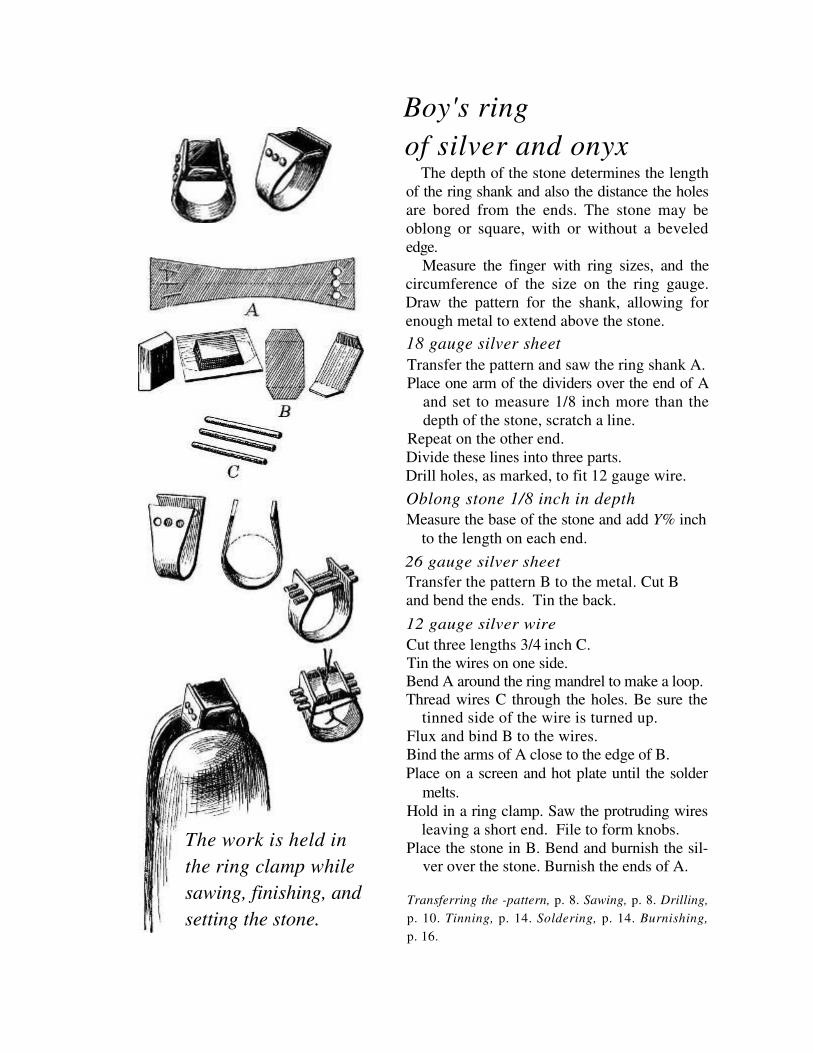
Boy's ring
of silver and onyx
The depth of the stone determines the length of the ring shank and also the distance the holes are bored from the ends. The stone may be oblong or square, with or without a beveled edge.
Measure the finger with ring sizes, and the circumference of the size on the ring gauge. Draw the pattern for the shank, allowing for enough metal to extend above the stone. 18 gauge silver sheet
Transfer the pattern and saw the ring shank A. Place one arm of the dividers over the end of A
and set to measure 1/8 inch more than the depth of the stone, scratch a line.
Repeat on the other end. Divide these lines into three parts. Drill holes, as marked, to fit 12 gauge wire. Oblong stone 1/8 inch in depth
Measure the base of the stone and add Y% inch to the length on each end.
26 gauge silver sheet Transfer the pattern B to the metal. Cut B and bend the ends. Tin the back. 12 gauge silver wire
Cut three lengths 3/4 inch C. Tin the wires on one side. Bend A around the ring mandrel to make a loop. Thread wires C through the holes. Be sure the
tinned side of the wire is turned up. Flux and bind B to the wires. Bind the arms of A close to the edge of B. Place on a screen and hot plate until the solder
melts. Hold in a ring clamp. Saw the protruding wires
leaving a short end. File to form knobs. Place the stone in B. Bend and burnish the sil-
ver over the stone. Burnish the ends of A.
Transferring the -pattern, p. 8. Sawing, p. 8. Drilling, p. 10. Tinning, p. 14. Soldering, p. 14. Burnishing, p. 16.
The work is held in the ring clamp while sawing, finishing, and setting the stone.
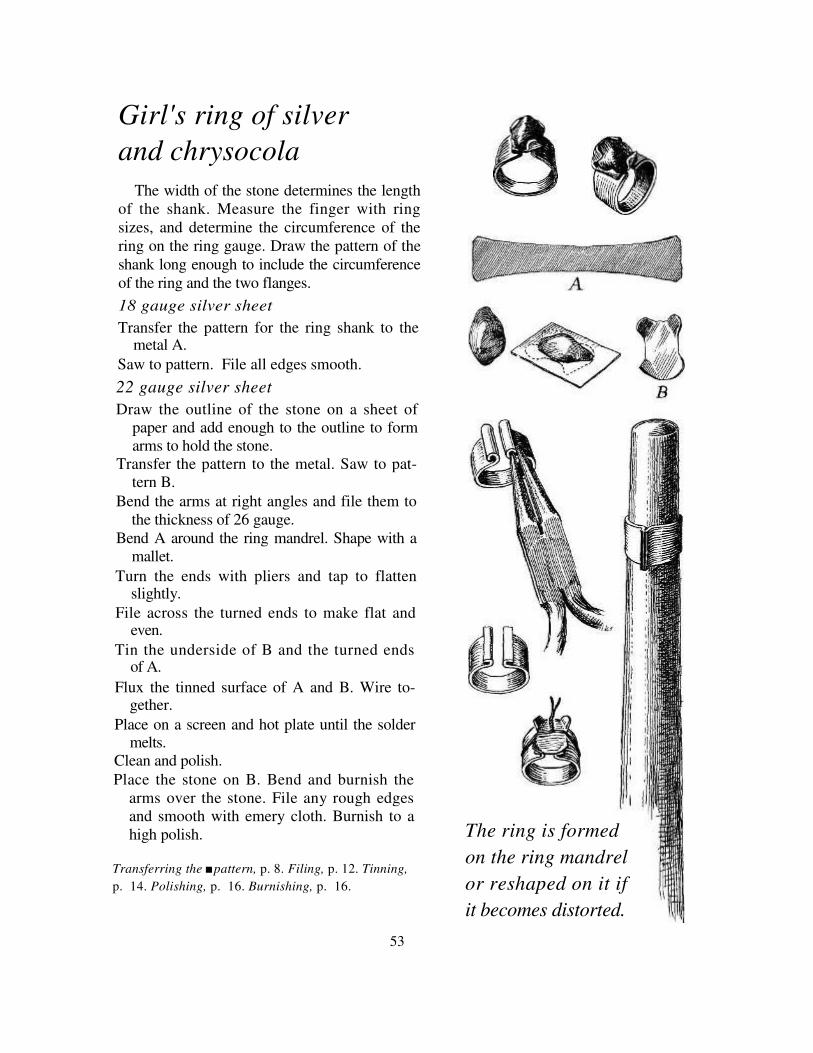
Girl's ring of silver and chrysocola
The width of the stone determines the length of the shank. Measure the finger with ring sizes, and determine the circumference of the ring on the ring gauge. Draw the pattern of the shank long enough to include the circumference of the ring and the two flanges. 18 gauge silver sheet Transfer the pattern for the ring shank to the
metal A. Saw to pattern. File all edges smooth. 22 gauge silver sheet
Draw the outline of the stone on a sheet of paper and add enough to the outline to form arms to hold the stone.
Transfer the pattern to the metal. Saw to pat-tern B.
Bend the arms at right angles and file them to the thickness of 26 gauge.
Bend A around the ring mandrel. Shape with a mallet.
Turn the ends with pliers and tap to flatten slightly.
File across the turned ends to make flat and even.
Tin the underside of B and the turned ends of A.
Flux the tinned surface of A and B. Wire to-gether.
Place on a screen and hot plate until the solder melts.
Clean and polish. Place the stone on B. Bend and burnish the
arms over the stone. File any rough edges and smooth with emery cloth. Burnish to a high polish.
Transferring the �pattern, p. 8. Filing, p. 12. Tinning, p. 14. Polishing, p. 16. Burnishing, p. 16.
53
The ring is formed on the ring mandrel or reshaped on it if it becomes distorted.
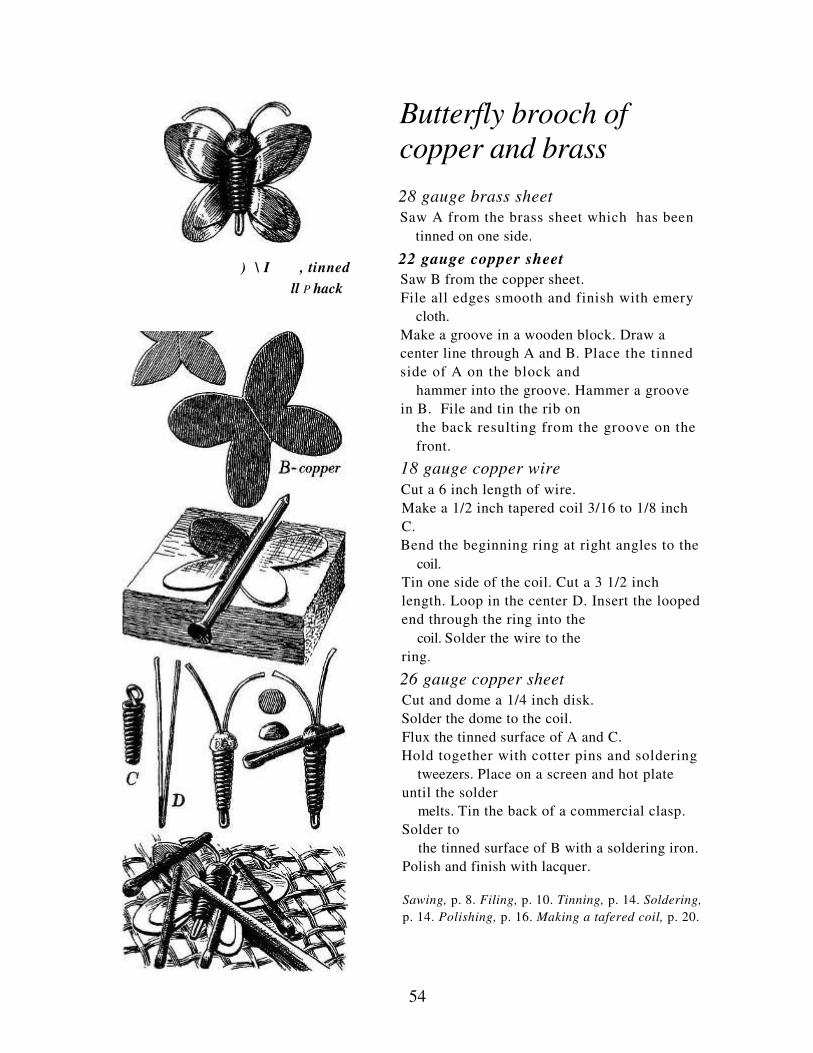
) \ I , tinned ll P hack
Butterfly brooch of copper and brass
28 gauge brass sheet
Saw A from the brass sheet which has been tinned on one side.
22 gauge copper sheet Saw B from the copper sheet. File all edges smooth and finish with emery
cloth. Make a groove in a wooden block. Draw a center line through A and B. Place the tinned side of A on the block and
hammer into the groove. Hammer a groove in B. File and tin the rib on
the back resulting from the groove on the front.
18 gauge copper wire
Cut a 6 inch length of wire. Make a 1/2 inch tapered coil 3/16 to 1/8 inch C. Bend the beginning ring at right angles to the
coil. Tin one side of the coil. Cut a 3 1/2 inch length. Loop in the center D. Insert the looped end through the ring into the
coil. Solder the wire to the ring.
26 gauge copper sheet
Cut and dome a 1/4 inch disk. Solder the dome to the coil. Flux the tinned surface of A and C. Hold together with cotter pins and soldering
tweezers. Place on a screen and hot plate until the solder
melts. Tin the back of a commercial clasp. Solder to
the tinned surface of B with a soldering iron. Polish and finish with lacquer.
Sawing, p. 8. Filing, p. 10. Tinning, p. 14. Soldering, p. 14. Polishing, p. 16. Making a tafered coil, p. 20.
54
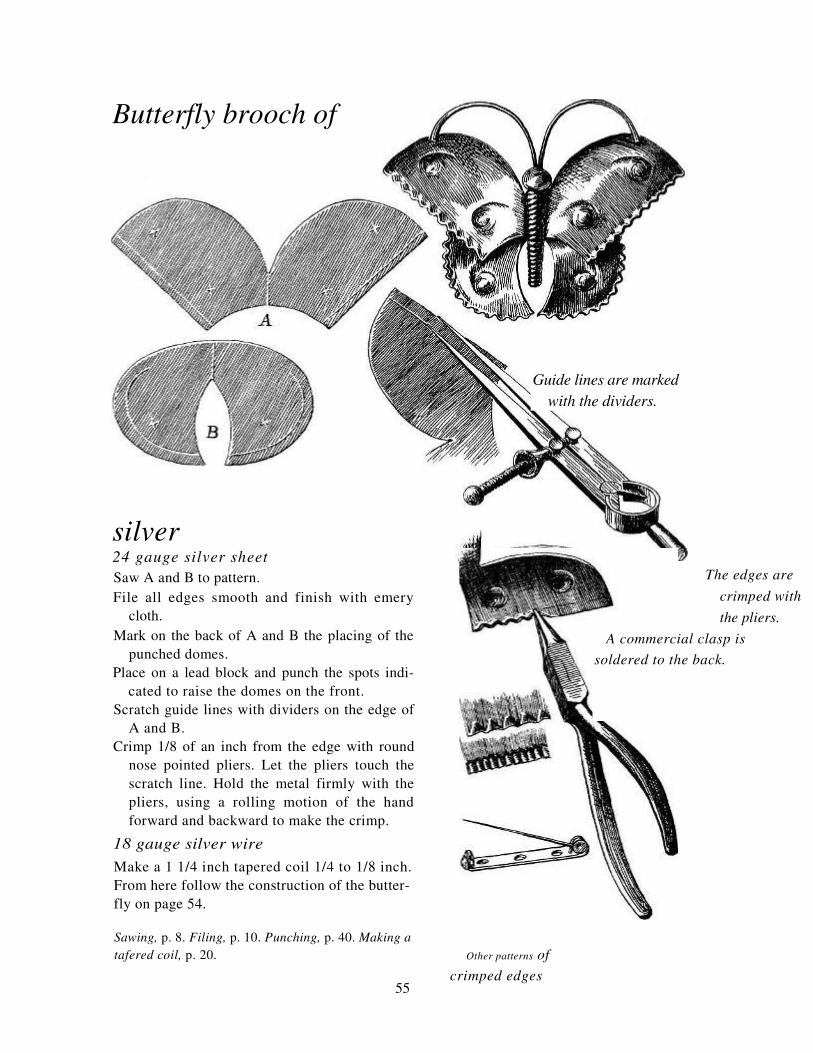
Butterfly brooch of
silver
24 gauge silver sheet
Saw A and B to pattern. File all edges smooth and finish with emery
cloth. Mark on the back of A and B the placing of the
punched domes. Place on a lead block and punch the spots indi-
cated to raise the domes on the front. Scratch guide lines with dividers on the edge of
A and B. Crimp 1/8 of an inch from the edge with round
nose pointed pliers. Let the pliers touch the scratch line. Hold the metal firmly with the pliers, using a rolling motion of the hand forward and backward to make the crimp.
18 gauge silver wire Make a 1 1/4 inch tapered coil 1/4 to 1/8 inch. From here follow the construction of the butter-fly on page 54. Sawing, p. 8. Filing, p. 10. Punching, p. 40. Making a tafered coil, p. 20.
55
Guide lines are marked with the dividers.
The edges are crimped with the pliers.
A commercial clasp is soldered to the back.
Other patterns of crimped edges
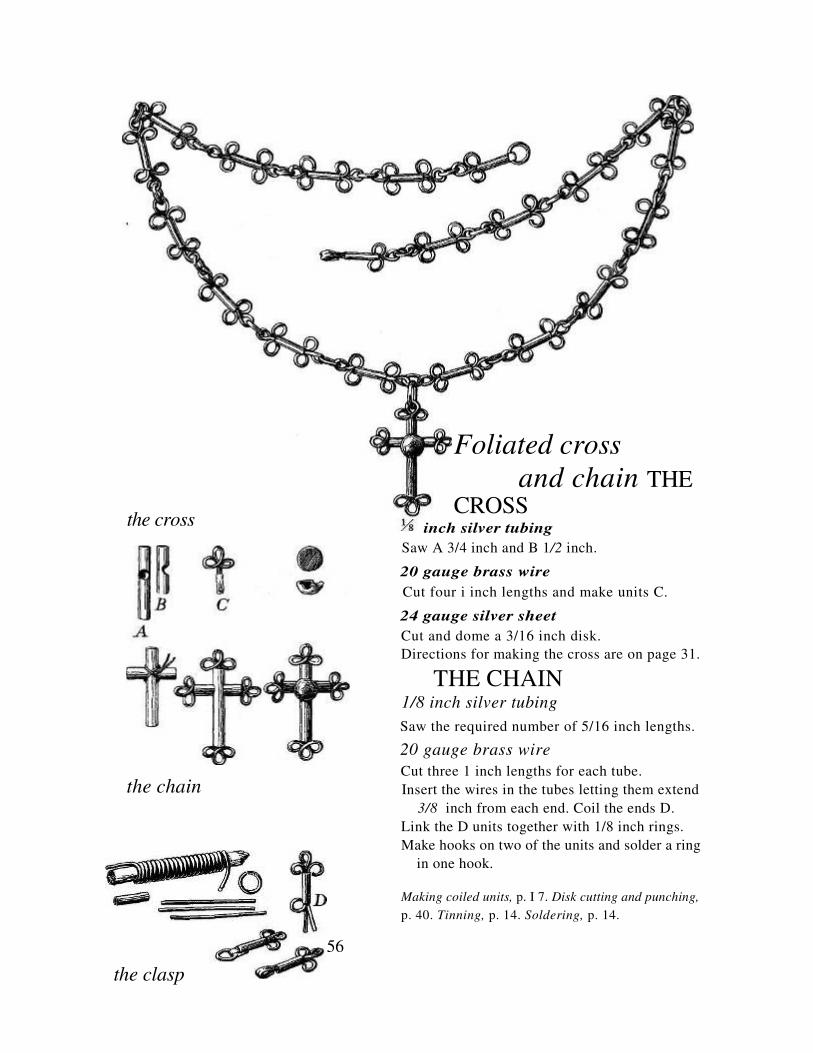
the cross
the chain
Foliated cross
and chain THE CROSS
inch silver tubing Saw A 3/4 inch and B 1/2 inch.
20 gauge brass wire
Cut four i inch lengths and make units C.
24 gauge silver sheet Cut and dome a 3/16 inch disk. Directions for making the cross are on page 31.
THE CHAIN
1/8 inch silver tubing
Saw the required number of 5/16 inch lengths.
20 gauge brass wire
Cut three 1 inch lengths for each tube. Insert the wires in the tubes letting them extend
3/8 inch from each end. Coil the ends D. Link the D units together with 1/8 inch rings. Make hooks on two of the units and solder a ring
in one hook. Making coiled units, p. I 7. Disk cutting and punching, p. 40. Tinning, p. 14. Soldering, p. 14.
56
the clasp
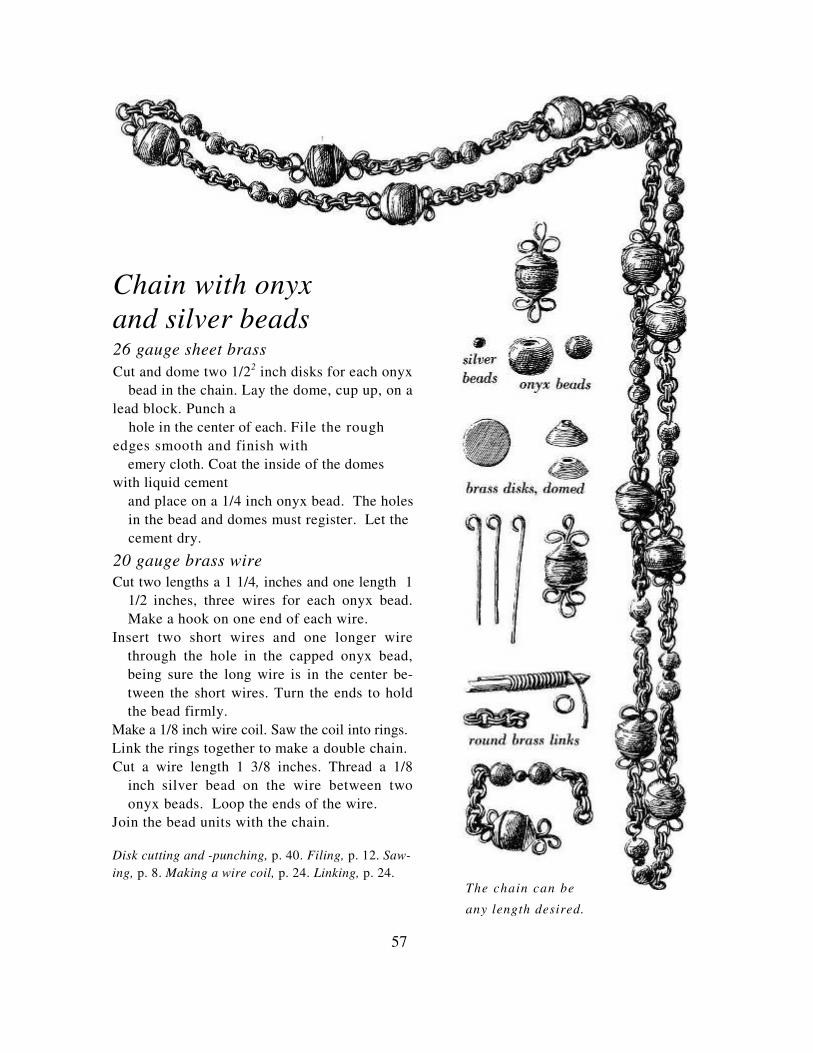
Chain with onyx and silver beads
26 gauge sheet brass
Cut and dome two 1/22 inch disks for each onyx bead in the chain. Lay the dome, cup up, on a
lead block. Punch a hole in the center of each. File the rough
edges smooth and finish with emery cloth. Coat the inside of the domes
with liquid cement and place on a 1/4 inch onyx bead. The holes in the bead and domes must register. Let the cement dry.
20 gauge brass wire Cut two lengths a 1 1/4, inches and one length 1
1/2 inches, three wires for each onyx bead. Make a hook on one end of each wire.
Insert two short wires and one longer wire through the hole in the capped onyx bead, being sure the long wire is in the center be-tween the short wires. Turn the ends to hold the bead firmly.
Make a 1/8 inch wire coil. Saw the coil into rings. Link the rings together to make a double chain. Cut a wire length 1 3/8 inches. Thread a 1/8
inch silver bead on the wire between two onyx beads. Loop the ends of the wire.
Join the bead units with the chain. Disk cutting and -punching, p. 40. Filing, p. 12. Saw-ing, p. 8. Making a wire coil, p. 24. Linking, p. 24.
The chain can be
any length desired.
57
Designing
All good designers, consciously or unconsciously, are in-fluenced by the design of the past and by the art forms and practices of their contemporaries.
The designer not only studies the objects made of the material in which he works, but also designs made in other mediums. Natural forms also give him inspiration.
As the fashion in dress changes through the years, so will the styles in jewelry change, but a beautifully designed and well constructed piece of jewelry is always good. It may be laid aside for a time in favor of a newer piece, but will be treasured and worn again, as we might wear our grand-mother's charms and lockets with pleasure and pride.
The illustrations on the following pages show a number of designs which may interest the beginner and give him ideas for the use of the materials and the skills which he has learned by following the instructions in this book. They will show him how other designers create original designs, using these same materials and skills.
59
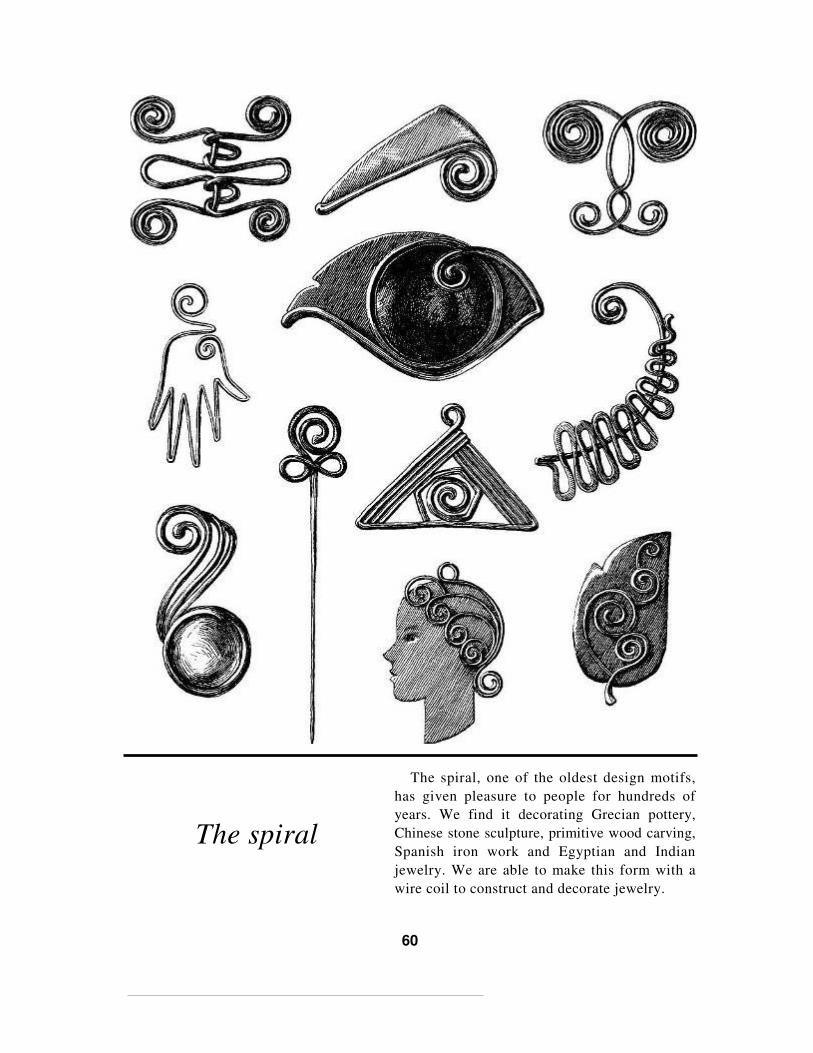
The spiral
The spiral, one of the oldest design motifs, has given pleasure to people for hundreds of years. We find it decorating Grecian pottery, Chinese stone sculpture, primitive wood carving, Spanish iron work and Egyptian and Indian jewelry. We are able to make this form with a wire coil to construct and decorate jewelry.
60
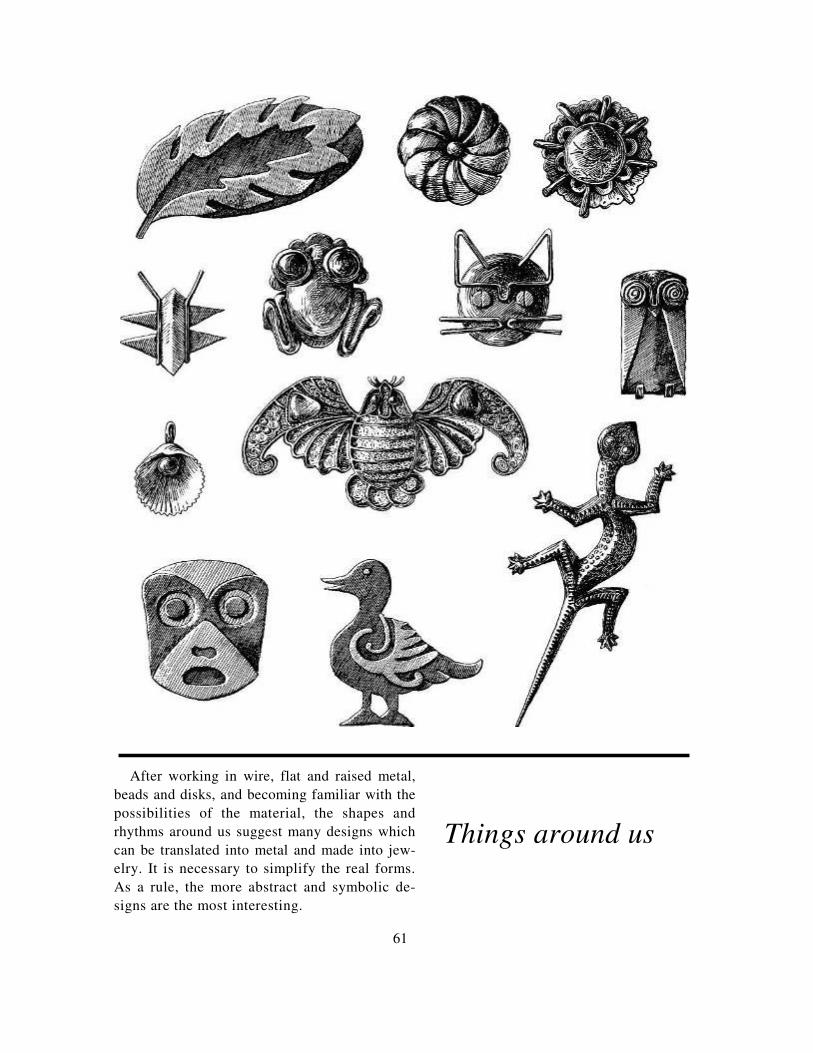
After working in wire, flat and raised metal, beads and disks, and becoming familiar with the possibilities of the material, the shapes and rhythms around us suggest many designs which can be translated into metal and made into jew-elry. It is necessary to simplify the real forms. As a rule, the more abstract and symbolic de-signs are the most interesting.
Things around us
61
Navajo Jewelry
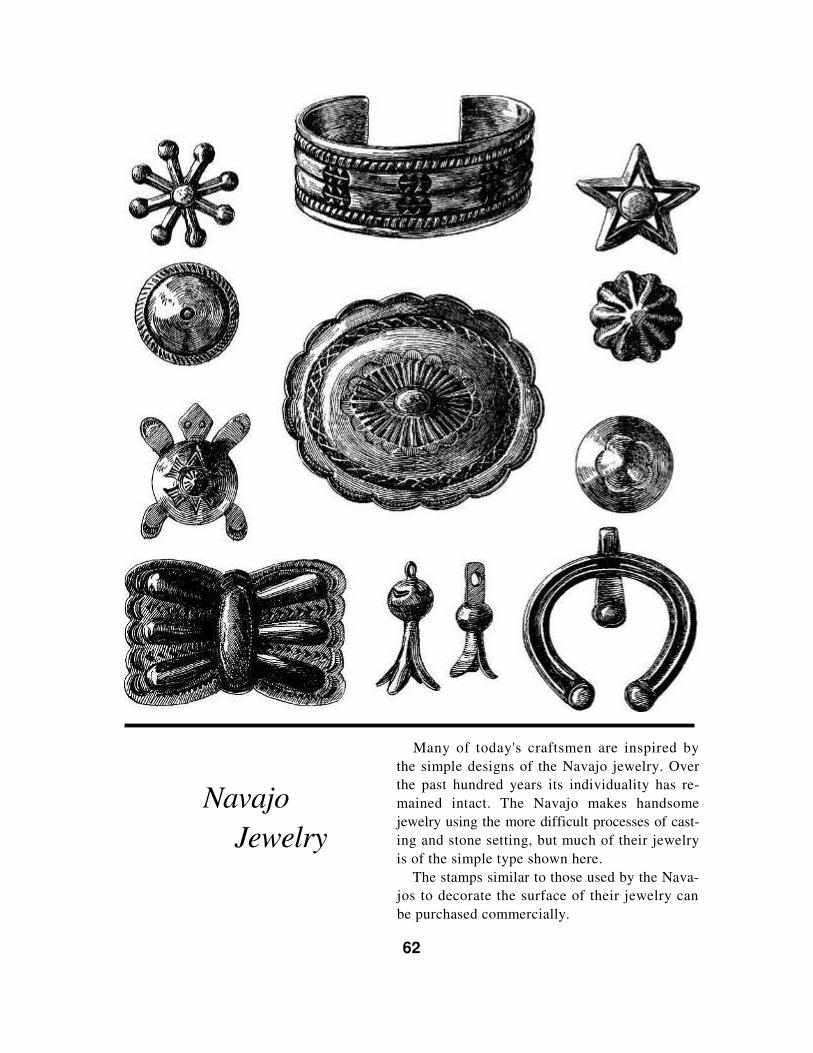
Many of today's craftsmen are inspired by the simple designs of the Navajo jewelry. Over the past hundred years its individuality has re-mained intact. The Navajo makes handsome jewelry using the more difficult processes of cast-ing and stone setting, but much of their jewelry is of the simple type shown here.
The stamps similar to those used by the Nava-jos to decorate the surface of their jewelry can be purchased commercially.
62
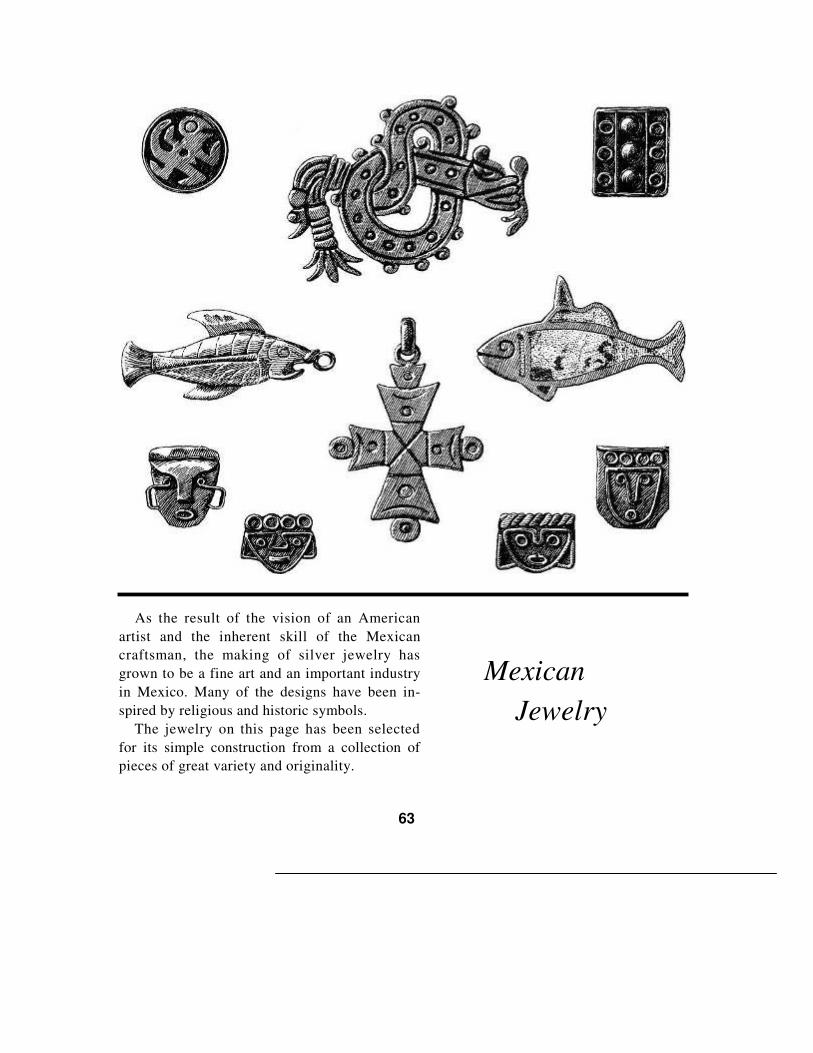
As the result of the vision of an American artist and the inherent skill of the Mexican craftsman, the making of silver jewelry has grown to be a fine art and an important industry in Mexico. Many of the designs have been in-spired by religious and historic symbols.
The jewelry on this page has been selected for its simple construction from a collection of pieces of great variety and originality.
Mexican Jewelry
63
Sources of supply
The following list of supply houses issue catalogues; or-ders may be filled directly or sent by mail. Some of the tools and supplies may be purchased locally from hardware, vari-ety or hobby shops.
JEWELER'S TOOLS, SUPPLIES AND FINDINGS
Jewelry making tools. Silver, copper, and brass sheet, wire, tubes, circles, squares and one hole silver balls, also silver beads, suppliers as indicated by asterisks. Solder and flux. Abrasives, cleaning material and polish. Bar pins, barrettes, ear wires and fine chains.
Allcraft Tool and Supply Company, Inc. 11 East 48th Street, New York 17, N. Y.
Anchor Tool and Supply Company 12 John Street, New York 17, N. Y.
William Dixon Incorporated * 32 East Kinney Street, Newark, New Jersey.
Grieger's, Inc. 1633 East Walnut Street, Pasadena, California.
Gwinn Craft Supply Company 142 North Market Street, Wichita 2, Kansas.
T. B. Hargstoz and Son 709 Sansome Street, Philadelphia 6, Pa. (Metal only)
Southwest Smelting and Refining Company Dallas, Texas.
Wildberg Smelting and Refining Company 633 South Hill Street, Los Angeles 14, California. 742 Market Street, San Francisco 2, California.
Electrical Shop for shellacked wire used for winding motors.
65
STONES
John Barry and Company Dept. C, P. O. Box 15, Detroit 31, Michigan.
Ernest Beissinger 417 Clark Building, Pittsburgh 22, Pa.
Grieger's, Inc. 1633 East Walnut Street, Pasadena, California.
( Tumbled stones and polished slices.)
International Gem Corporation 15 Maiden Lane, New York 7, New York.
Francis J. Sperisen 166 Geary Street, San Francisco, California.
66
Index
Abrasives, 3,16 Adhesive tape, 28, 50 Annealing, I
Barrette, coiled wire, 38; bowknot, 51 Basic processes, 8 Binding wire, I, 48 Bracelet, twisted wire, 36, 37, 46; band,
39 Brass, 1 Brooch, 54, 55 Buckle and buttons, 45 Buff, 16; buffing, 16 Burr, removal of, 12 Burnisher, 3; burnishing, 16, 51, 52, 53
Carbon paper, 8 Catch, 35 Cement, 28, 48, 57 Center punch, 10 Chains, 24, 26, 31, 33, 42, 56, 57 Chalk, 12 Chamois, 3 Charms, 27, 28, 29, 30 Cleaning, files, 3; metal, 16 Coil: cone or tapered, 20, 48; round, 20,
24, 26; oval, 42; flat, 22; open band, 20 Coiling, round coil, 20, ///. 21; flat
coil, 22, ///. 23
Cooling, 1 Copper, 1 Cotter pins, 27, 30, 44, 48, 54 Crimping, 55 Cutting, 8; with dapping die cutter, 40;
saw, 8; shears, 8
Dapping die block, 40; dapping die cutter, 40; dapping die punch, 40, ///. 41
Designing, 59, ///. 60, 61, 62, 63 Disk cutting, 40, ///. 41
Dome punching, 40, ///. 41 Drill, 10 Drilling, 10; preparation for, 10, III. 11
Electric plate, 14 Emery cloth, 16
Files, 3, 12; filing, 12, ///. 13, 16; clean-ing of> 3 Finishing, 16 Flux, 14 Forming block, 48
Gauge, 3
Hammer, 3; hammering, 40, 50 Heating, I, 14
Iron, 1
Jewelry making processes, 8 Jig, 17, 20, 22, 26, 42
Knob, 52
Lacquer, I, 16, 48, 54 Lead block, 40, 55 Linking, 26, 35, 36, 51, 57 Links, round, 24; oval, 42; shaped units, 26, 33
Mandrel, 20, 24, 47 Measuring, 3, 18, 34, 42, 52, 55
Necklace, coiled units, 35; disks and domes, 42
Oxidize, 16
Pendant, 31, 56; with stones, 32, 50 Piercing, 8, ///. 11, 16, 32
67
Polishing, 16, 51 Prongs, 32, 46, 50, 51 Pumice powder, 16
Ring, ringer, 34, 47; with stones, 52, 53
Saw blade, 8 Sawing, 8, preparation for, 8, III. 9; wire
coil into rings, 24, 42 Scarf holder, 35, 36, 44 Scotch stone, 16 Scratches, 3 Screen, 1, 14, 54 Setting tool, 22 Settings, 28, 29, 32, 48, 50, 52, 53 Shears, 8 Shellacked wire, 65 Slide for tie, 48
Soldering, 14, preparation for, 14, ///. 15 Soldering iron, preparation of, 14 Soldering tweezers, 48, 54 Surface plate, 3, 12, 50 Sweating, 14, III. 14
Tin, i Tinning, 14, ///. 14 Tools, care of, 3, ///. 3, 4, 5, 6, 7 Transferring, 8, III. 9 Translucent, 32 Tripoli, 16 Twisting wire, 18, ///. 19
Wire units, flat coil, 22; shaped unit, 26, 33; tapered coil, 20; round ring, 24; oval rings, 42
68