job aid - arizona state university | ranked #1 university … center/job aid_faculty... · web...
TRANSCRIPT
Grade Roster Updates Job Aid
Grade Roster Updates Job Aid
Page 1 of 24
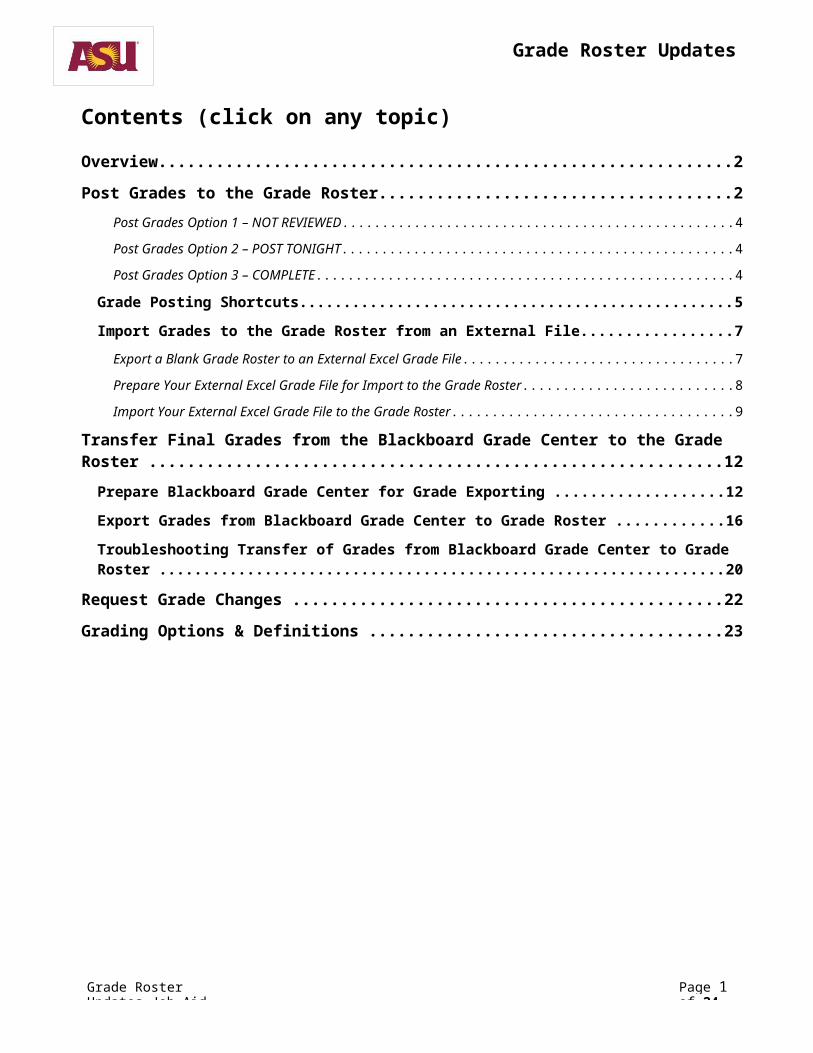
Contents (click on any topic)
Overview..........................................................................................................................................2
Post Grades to the Grade Roster.......................................................................................................2
Post Grades Option 1 – NOT REVIEWED.........................................................................................................................4
Post Grades Option 2 – POST TONIGHT..........................................................................................................................4
Post Grades Option 3 – COMPLETE................................................................................................................................4
Grade Posting Shortcuts.............................................................................................................................5
Import Grades to the Grade Roster from an External File...........................................................................7
Export a Blank Grade Roster to an External Excel Grade File..........................................................................................7
Prepare Your External Excel Grade File for Import to the Grade Roster..........................................................................8
Import Your External Excel Grade File to the Grade Roster............................................................................................9
Transfer Final Grades from the Blackboard Grade Center to the Grade Roster ...............................12
Prepare Blackboard Grade Center for Grade Exporting ............................................................................12
Export Grades from Blackboard Grade Center to Grade Roster ................................................................16
Troubleshooting Transfer of Grades from Blackboard Grade Center to Grade Roster ...............................20
Request Grade Changes ..................................................................................................................22
Grading Options & Definitions ........................................................................................................23
Grade Roster Updates Job Aid
Grade Roster Updates Job Aid
Page 2 of 24
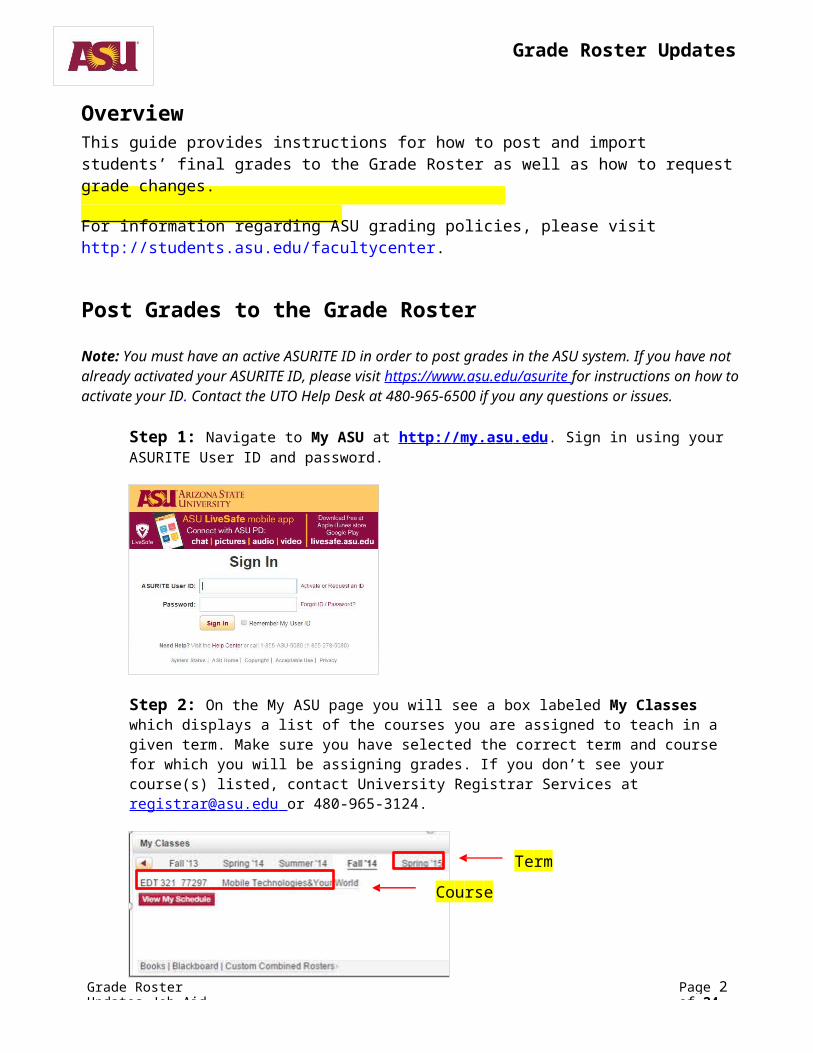
OverviewThis guide provides instructions for how to post and import students’ final grades to the Grade Roster as well as how to request grade changes.
For information regarding ASU grading policies, please visithttp://students.asu.edu/facultycenter.
Post Grades to the Grade Roster
Note: You must have an active ASURITE ID in order to post grades in the ASU system. If you have not already activated your ASURITE ID, please visit h tt p s : / / w ww. a s u .e d u / a surite for instructions on how to activate your ID. Contact the UTO Help Desk at 480-965-6500 if you any questions or issues.
Step 1: Navigate to My ASU at h ttp :/ / m y . a s u . ed u . Sign in using your ASURITE User ID and password.
Step 2: On the My ASU page you will see a box labeled My Classes which displays a list of the courses you are assigned to teach in a given term. Make sure you have selected the correct term and course for which you will be assigning grades. If you don’t see your course(s) listed, contact University Registrar Services at reg i strar @ as u . e d u or 480-965-3124.
Course
Term
Grade Roster Updates Job Aid
Grade Roster Updates Job Aid
Page 3 of 24
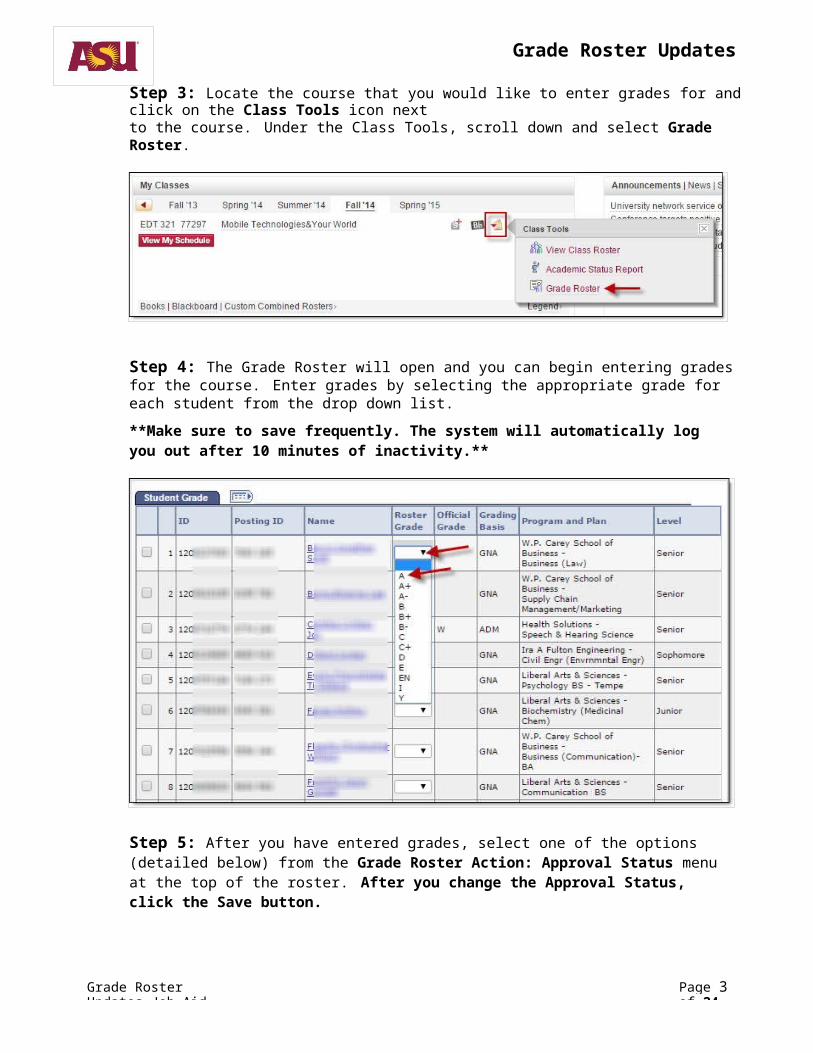
Step 3: Locate the course that you would like to enter grades for and click on the Class Tools icon nextto the course. Under the Class Tools, scroll down and select Grade Roster.
Step 4: The Grade Roster will open and you can begin entering grades for the course. Enter grades by selecting the appropriate grade for each student from the drop down list.
**Make sure to save frequently. The system will automatically log you out after 10 minutes of inactivity.**
Step 5: After you have entered grades, select one of the options (detailed below) from the Grade Roster Action: Approval Status menu at the top of the roster. After you change the Approval Status, click the Save button.

Grade Roster Updates Job Aid
Grade Roster Updates Job Aid
Page 4 of 24
Post G r a des O p t i o n 1 – N O T R E V IE W E D Use this status if you are entering/reviewing grades but you are not ready to post to the student's record. You can change the grades at any time while in this status. Click on the Save button to save your entries.
Post G r a des O p t i o n 2 – P O ST T O N I GHT Use this status if you are ready to post grades to the student's record. The roster may be partially or completely graded. Grades will be posted to the student's record in a nightly batch process. Click on the Save button to save your entries.
Important note: Be sure to leave grades that you do NOT have as blank. Grades that are posted overnight are not editable and can only be changed via the grade change process.
Post G r a des O p t i o n 3 – CO M PLE T E If all the grades for a class are entered, set the status to COMPLETE. A POST button will appear at the bottom of the roster. When you click on POST, grades will immediately post to the student's record. Note that the status is automatically set to COMPLETE in a nightly batch process if grades for all students have been posted. A Grade Roster set to COMPLETE, but not posted immediately, will POST TONIGHT.
Step 6: Remember to click Save after entering grades or changing the approval status. If you attempt to exit the course roster without saving your changes you will receive an error message.
Step 7: After grades for a course have been posted, the Request Grade Change button will appear on the roster. Click on this button if you need to make a change to a student’s posted grade. Please refer to the Re q ue st G r a d e C h a n g e s section of this document for more information on the grade change process.

Grade Roster Updates Job Aid
Grade Roster Updates Job Aid
Page 5 of 24
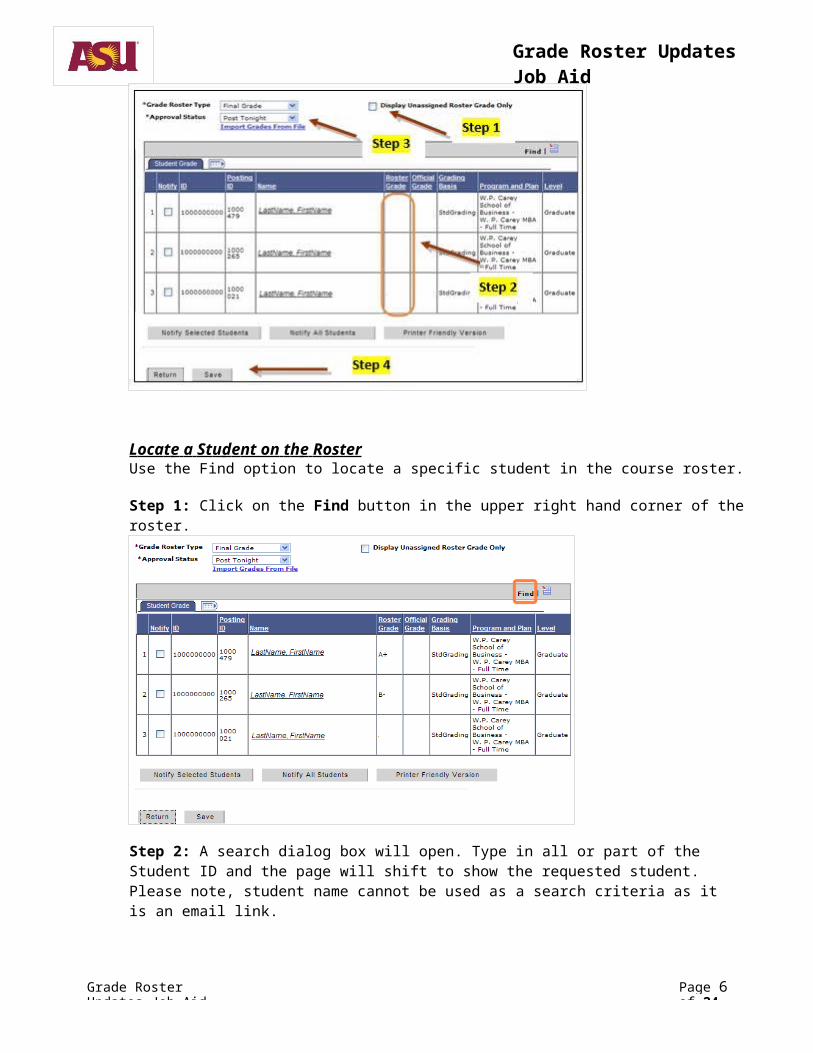
Grade Posting ShortcutsEnter S ame Grade for M u l t i p l e St u dents To help speed up the grade entry process, if the majority of students in the course received the samegrade, you can assign the grade to all students, and then, as necessary, change the grades for those students who earned a different grade.
Step 1: Select a grade from the drop down menu next to the add this grade to all students button. Step 2: Click the add this grade to all students button. The grade selected will be assigned to all students in the course.Step 3: Change grades as necessary for those students who earned a different grade. Step 4: Select the appropriate status from the Approval Status drop down menu. Step 5: Click Save.
Di s p l ay B lank Grades O n ly If you have entered grades for only some students on the roster and need to go back at another timeand continue entering grades, you can filter the course roster to display only those students who do not have a grade assigned.
Step 1: Check the box next to Display Unassigned Roster Grade Only to display only those students without a grade assigned.Step 2: The roster will adjust to list only those students who do not have a grade assigned. Enter grades for students.Step 3: Select the appropriate status from the Approval Status drop down menu (each day the rosterwill be reset to Not Approved status).Step 4: Click Save.

Grade Roster Updates Job Aid
Page 6 of 24
Grade Roster Updates Job Aid
L oca t e a St u d e nt on t h e R oster Use the Find option to locate a specific student in the course roster.
Step 1: Click on the Find button in the upper right hand corner of the roster.
Step 2: A search dialog box will open. Type in all or part of the Student ID and the page will shift to show the requested student. Please note, student name cannot be used as a search criteria as it is an email link.

Grade Roster Updates Job Aid
Page 7 of 24
Grade Roster Updates Job Aid
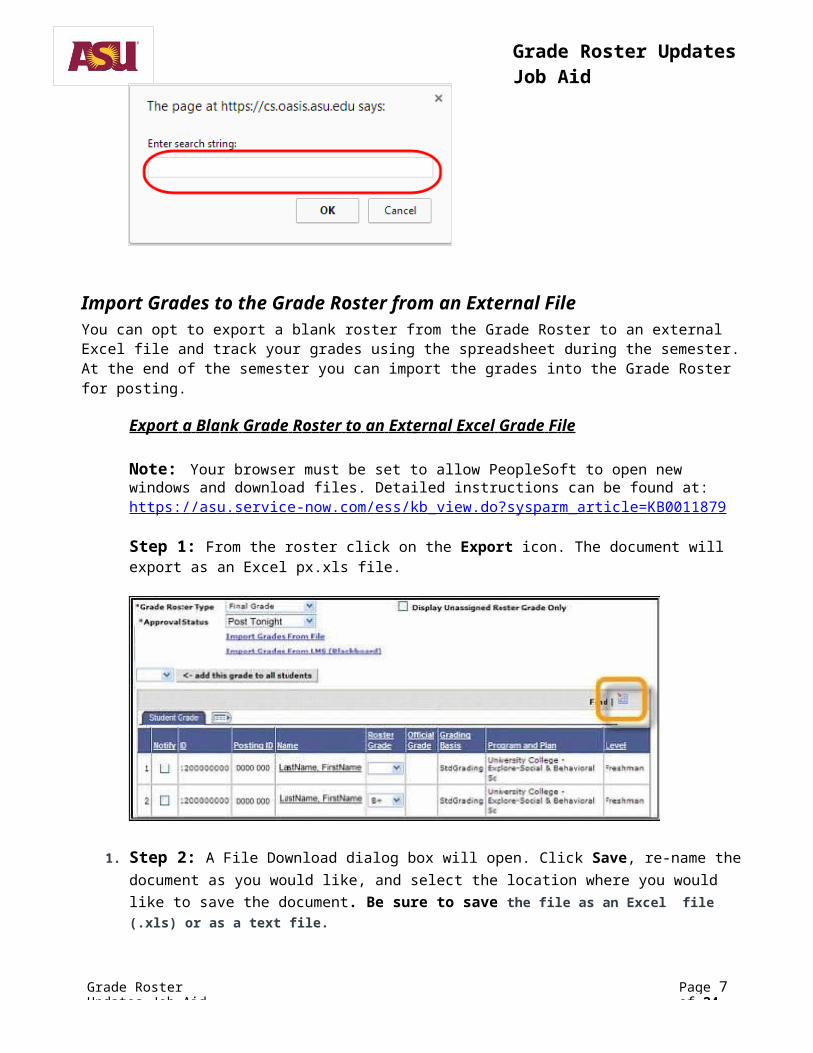
Import Grades to the Grade Roster from an External FileYou can opt to export a blank roster from the Grade Roster to an external Excel file and track your grades using the spreadsheet during the semester. At the end of the semester you can import the grades into the Grade Roster for posting.
Export a Bl a nk Gr a de R o s ter to an Ex t e r n al Excel Grade F i le
Note: Your browser must be set to allow PeopleSoft to open new windows and download files. Detailed instructions can be found at:h tt p s: / /as u . s er v i c e - n o w.c o m / es s /kb _ vi e w.do ? sysp a r m_a r tic l e = KB 00 1 1 8 7 9
Step 1: From the roster click on the Export icon. The document will export as an Excel px.xls file.
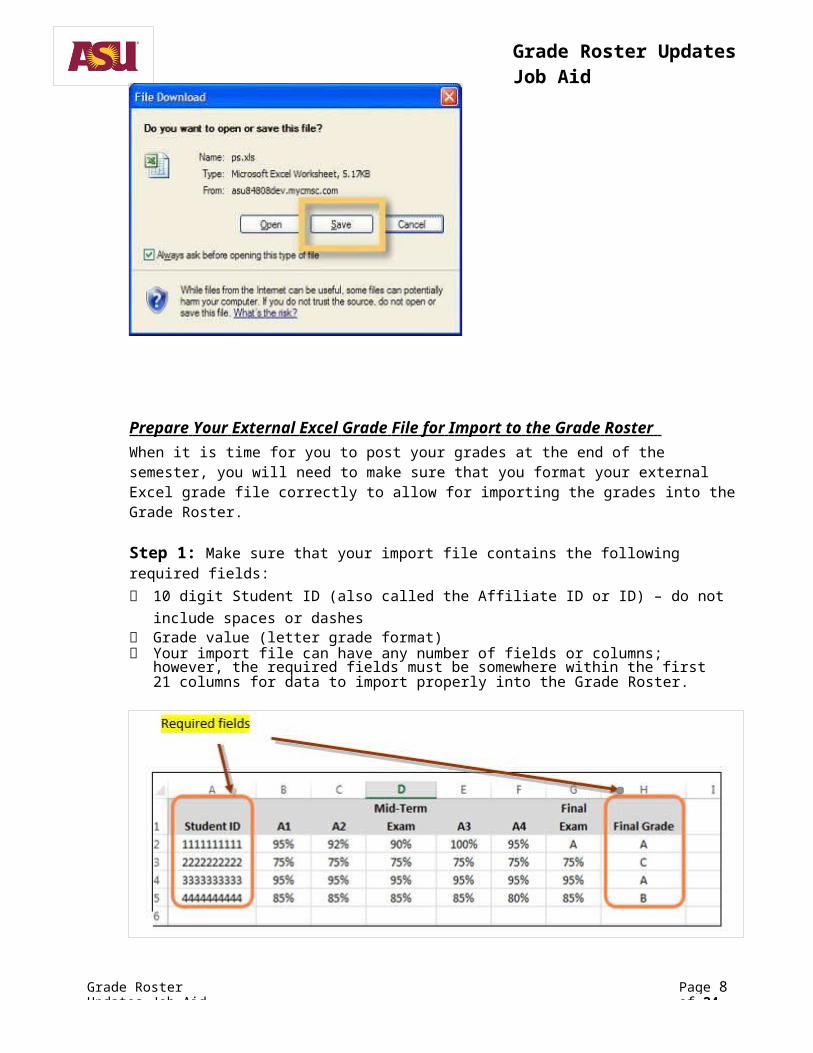
1. Step 2: A File Download dialog box will open. Click Save, re-name the document as you would like, and select the location where you would like to save the document. Be sure to save the file as an Excel file (.xls) or as a text file.

Grade Roster Updates Job Aid
Page 8 of 24
Grade Roster Updates Job Aid
P r epare Your Ex t e r n a l E xcel Grade F ile for I m po r t to t h e Grade R oster When it is time for you to post your grades at the end of the semester, you will need to make sure that you format your external Excel grade file correctly to allow for importing the grades into the Grade Roster.
Step 1: Make sure that your import file contains the following required fields: 10 digit Student ID (also called the Affiliate ID or ID) – do not include spaces or dashes Grade value (letter grade format) Your import file can have any number of fields or columns; however, the required fields must
be somewhere within the first 21 columns for data to import properly into the Grade Roster.
Step 2: Save your prepared file for importing. You can save your file in a tab, space, comma delimited or Excel file format.
2. Note: If you are using the file you downloaded via the Grade Roster Export option, make sure that the file is saved in Excel file (.xls) or text file format before attempt to import.
Grade Roster Updates Job
Grade Roster Updates Job Aid
Page 9 of 24
I m port Y o ur Ex t e r n a l E xcel Grade F i le to t h e Gra d e Ro s ter
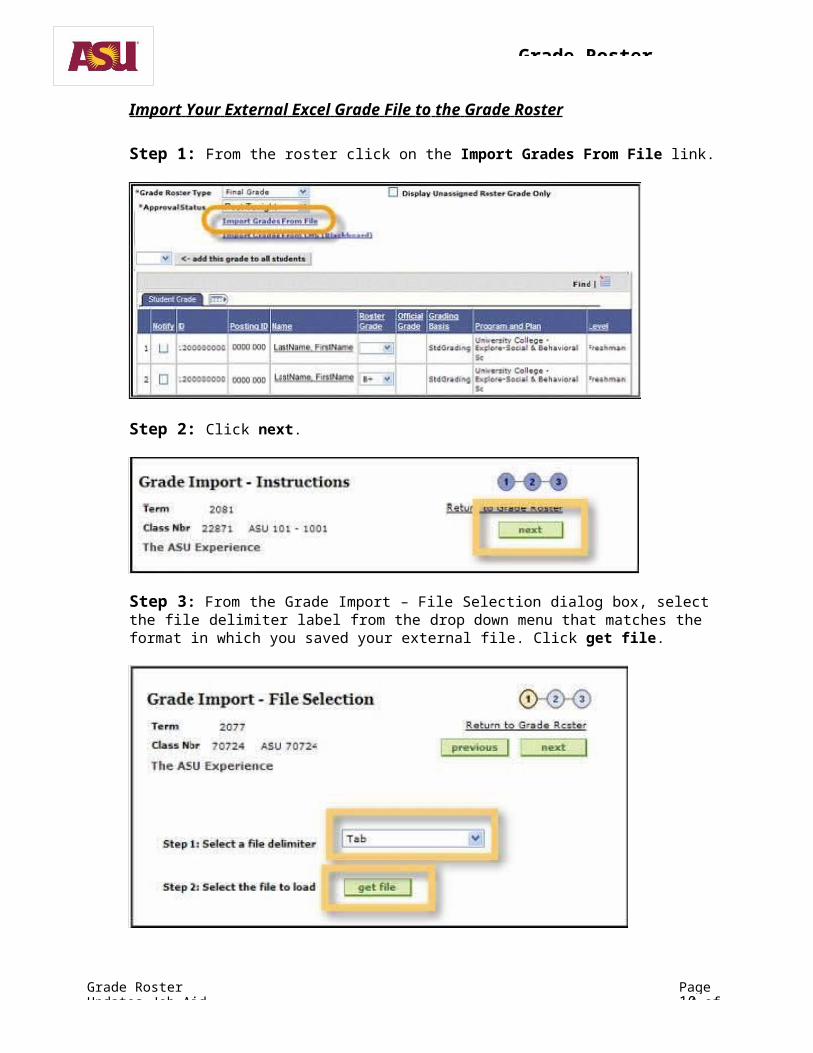
Step 1: From the roster click on the Import Grades From File link.
Step 2: Click next.
Step 3: From the Grade Import – File Selection dialog box, select the file delimiter label from the drop down menu that matches the format in which you saved your external file. Click get file.
Grade Roster Updates Job Aid
Page 10 of 24
Grade Roster Updates Job
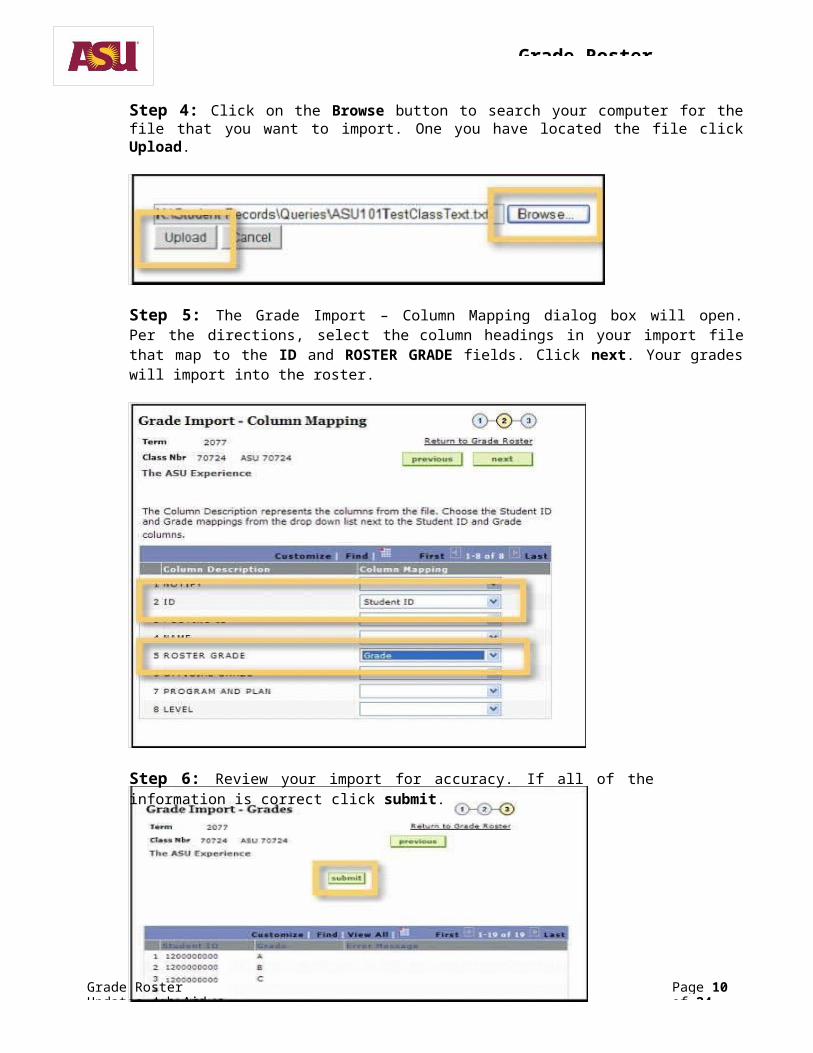
Step 4: Click on the Browse button to search your computer for the file that you want to import. One you have located the file click Upload.
Step 5: The Grade Import – Column Mapping dialog box will open. Per the directions, select the column headings in your import file that map to the ID and ROSTER GRADE fields. Click next. Your grades will import into the roster.
Step 6: Review your import for accuracy. If all of the information is correct click submit.
Grade Roster Updates Job Aid
Page 11 of 24
Grade Roster Updates Job
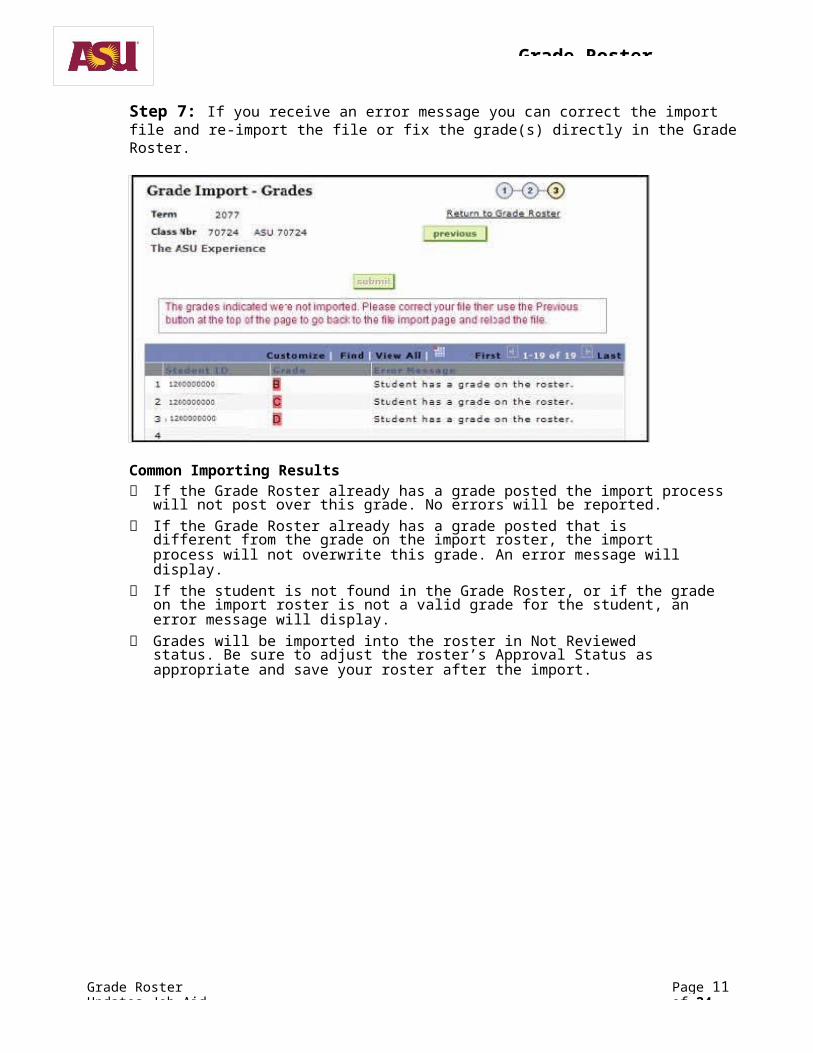
Step 7: If you receive an error message you can correct the import file and re-import the file or fix the grade(s) directly in the Grade Roster.
Common Importing Results If the Grade Roster already has a grade posted the import process will not post over this grade.
No errors will be reported. If the Grade Roster already has a grade posted that is different from the grade on the
import roster, the import process will not overwrite this grade. An error message will display.
If the student is not found in the Grade Roster, or if the grade on the import roster is not a valid grade for the student, an error message will display.
Grades will be imported into the roster in Not Reviewed status. Be sure to adjust the roster’s Approval Status as appropriate and save your roster after the import.

Grade Roster Updates Job
Grade Roster Updates Job Aid
Page 12 of 24
Transfer Final Grades from the Blackboard Grade Center to the Grade Roster
Prepare Blackboard Grade Center for Grade ExportingYou must complete the following steps in order to transfer grades from Blackboard to the Grade Roster.
Step 1: Log in to Blackboard (h tt p : / / m y as u c o u r s es.a s u .e d u ) and navigate to the selected course.
Step 2: Under the course Control Panel (left side of window) select Grade Center and then Full Grade Center.
Grade Roster Updates Job
Grade Roster Updates Job Aid
Page 13 of 24
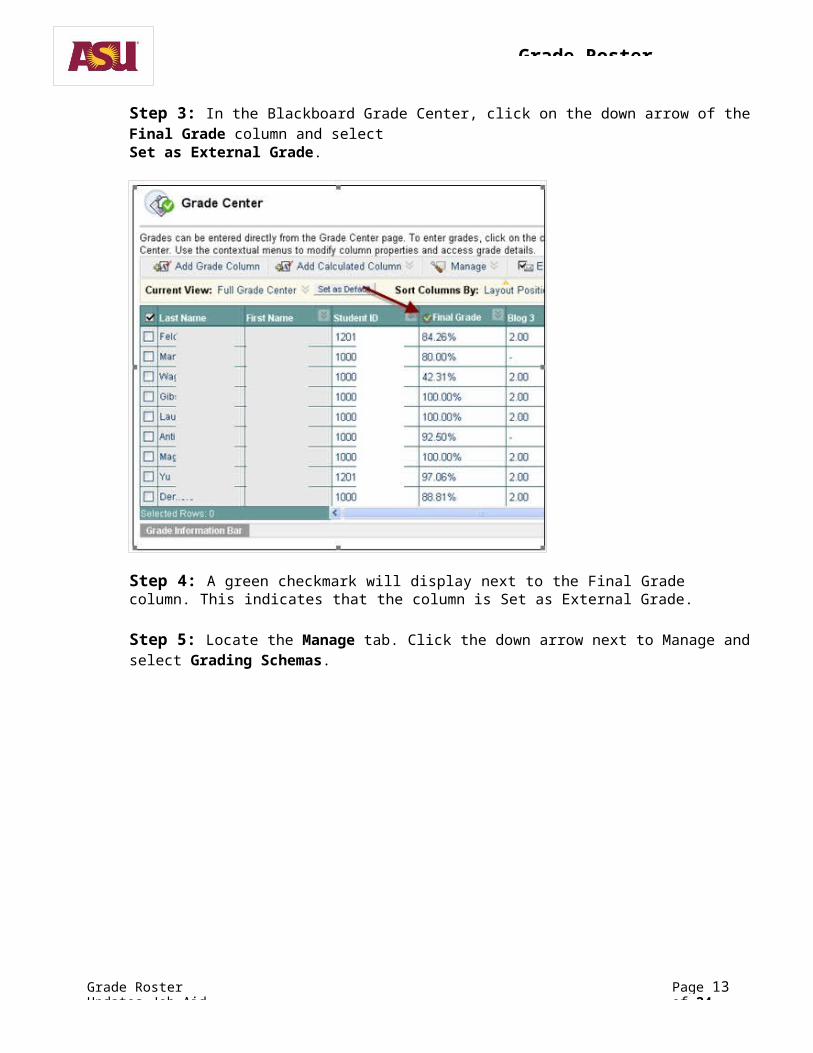
Step 3: In the Blackboard Grade Center, click on the down arrow of the Final Grade column and selectSet as External Grade.
Step 4: A green checkmark will display next to the Final Grade column. This indicates that the column is Set as External Grade.
Step 5: Locate the Manage tab. Click the down arrow next to Manage and select Grading Schemas.
Grade Roster Updates Job
Grade Roster Updates Job Aid
Page 14 of 24
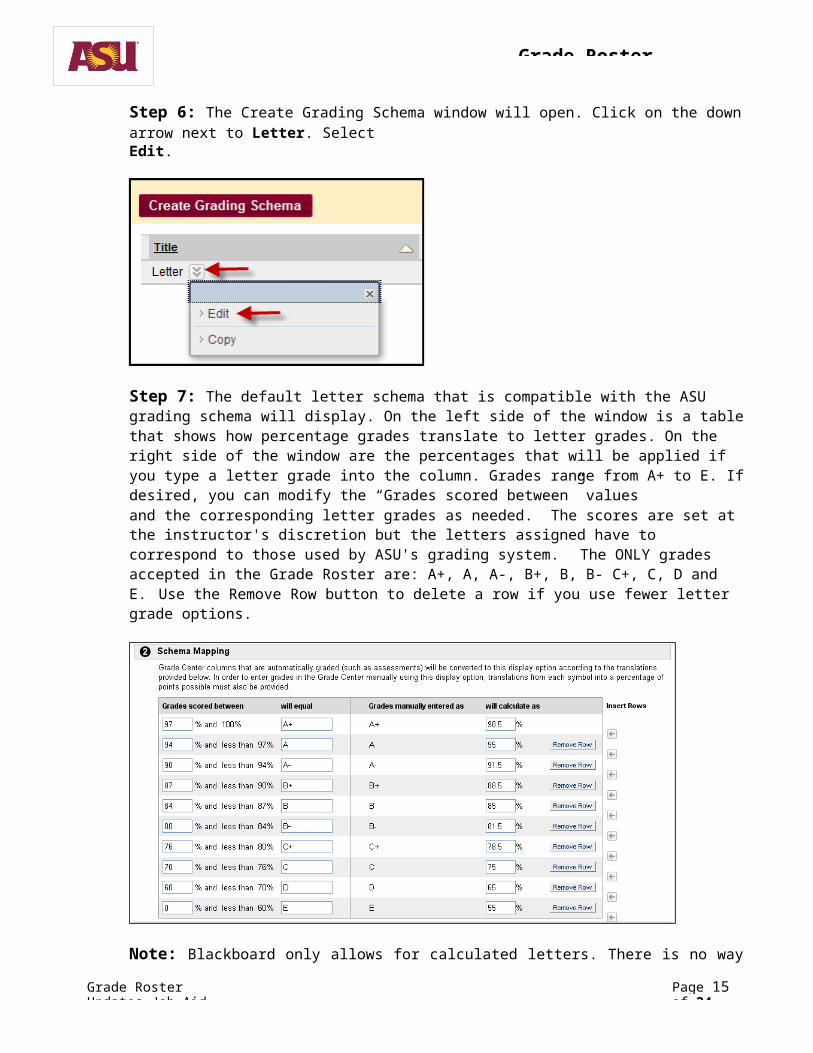
Step 6: The Create Grading Schema window will open. Click on the down arrow next to Letter. SelectEdit.
Step 7: The default letter schema that is compatible with the ASU grading schema will display. On the left side of the window is a table that shows how percentage grades translate to letter grades. On the right side of the window are the percentages that will be applied if you type a letter grade into the column. Grades range from A+ to E. If desired, you can modify the “Grades scored between” valuesand the corresponding letter grades as needed. The scores are set at the instructor's discretion but the letters assigned have to correspond to those used by ASU's grading system. The ONLY grades accepted in the Grade Roster are: A+, A, A-, B+, B, B- C+, C, D and E. Use the Remove Row button to delete a row if you use fewer letter grade options.
Note: Blackboard only allows for calculated letters. There is no way to assign a Pass/Fail or Audit letter in Blackboard. To assign those grades, you will have to manually add them after importing grades into the Grade Roster.
Step 8: Click Submit to save any changes.
Grade Roster Updates Job
Grade Roster Updates Job Aid
Page 15 of 24
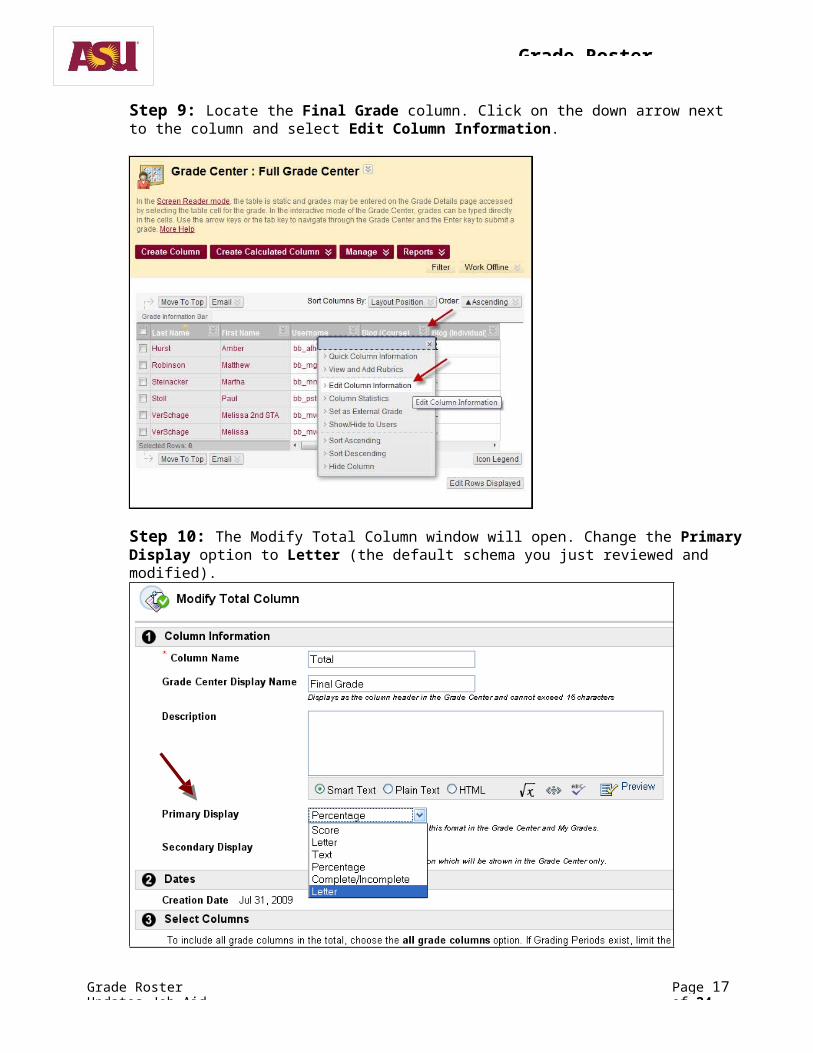
Step 9: Locate the Final Grade column. Click on the down arrow next to the column and select Edit Column Information.
Step 10: The Modify Total Column window will open. Change the Primary Display option to Letter (the default schema you just reviewed and modified).

Grade Roster Updates Job
Grade Roster Updates Job Aid
Page 16 of 24
Step 11: Click Submit to save changes.
Export Grades from Blackboard Grade Center to Grade Roster
Step 1: Log in to Blackboard (h tt p : / / m y as u c o u r s es.a s u .e d u ) and navigate to the selected course.
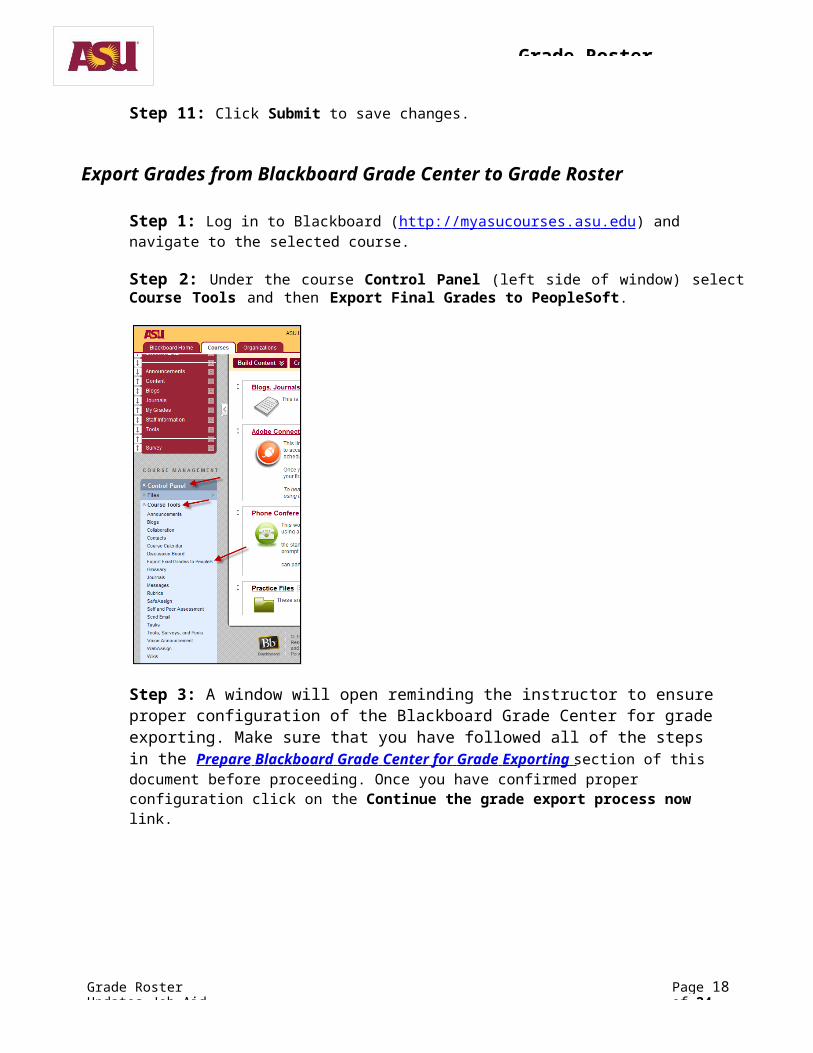
Step 2: Under the course Control Panel (left side of window) select Course Tools and then Export Final Grades to PeopleSoft.
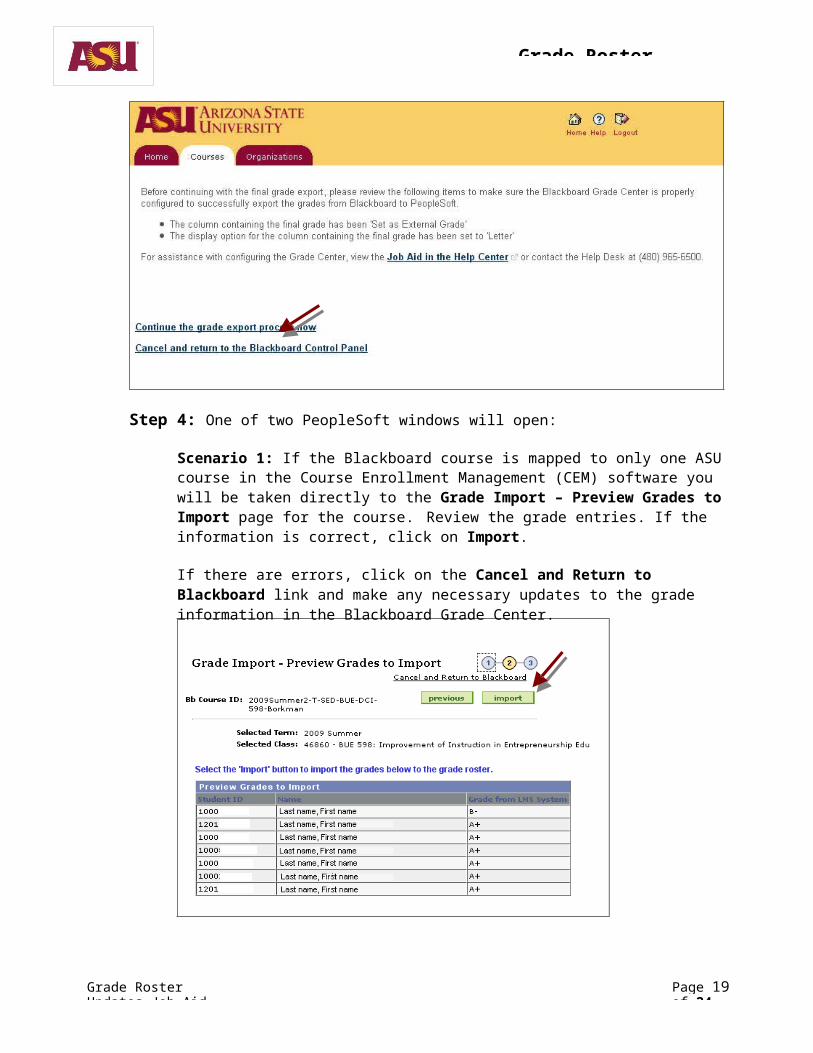
Step 3: A window will open reminding the instructor to ensure proper configuration of the Blackboard Grade Center for grade exporting. Make sure that you have followed all of the steps in the P r e p a r e B l ac k b o a r d G r a de Ce n ter f o r G r ade Ex p o r t in g section of this document before proceeding. Once you have confirmed proper configuration click on the Continue the grade export process now link.
Grade Roster Updates Job
Grade Roster Updates Job Aid
Page 17 of 24
Step 4: One of two PeopleSoft windows will open:
Scenario 1: If the Blackboard course is mapped to only one ASU course in the Course Enrollment Management (CEM) software you will be taken directly to the Grade Import – Preview Grades to Import page for the course. Review the grade entries. If the information is correct, click on Import.
If there are errors, click on the Cancel and Return to Blackboard link and make any necessary updates to the grade information in the Blackboard Grade Center.

Grade Roster Updates Job
Grade Roster Updates Job Aid
Page 18 of 24
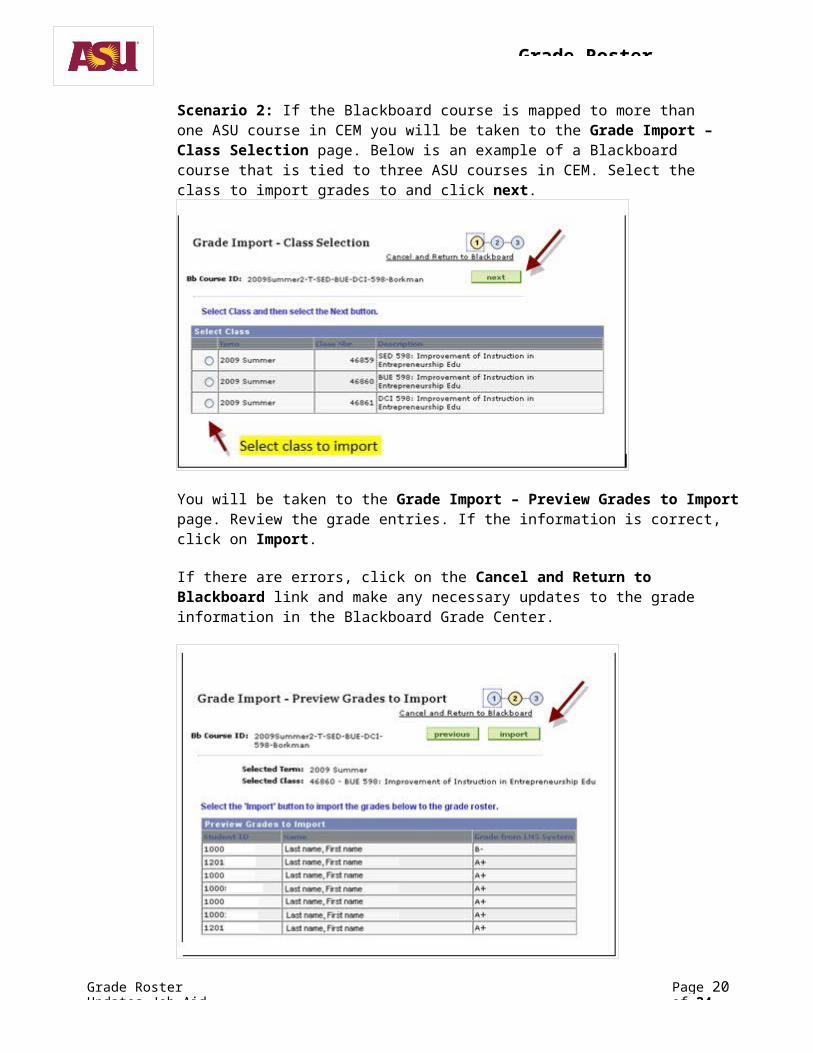
Scenario 2: If the Blackboard course is mapped to more than one ASU course in CEM you will be taken to the Grade Import – Class Selection page. Below is an example of a Blackboard course that is tied to three ASU courses in CEM. Select the class to import grades to and click next.
You will be taken to the Grade Import – Preview Grades to Import page. Review the grade entries. If the information is correct, click on Import.
If there are errors, click on the Cancel and Return to Blackboard link and make any necessary updates to the grade information in the Blackboard Grade Center.
Follow these steps as many times as necessary until each ASU course listed in the Grade Import– Class Selection window has been selected for grade importing.
Grade Roster Updates Job
Grade Roster Updates Job Aid
Page 19 of 24
Step 5: The Grade Import – Import to Grade Roster window will open and display the results of theimport. Grades without an error message were successfully imported to the Grade Roster. Grades thatdid not successfully import will be highlighted in red and will indicate the reason in the Error Message column.
Step 6: Click on the Finish button to return to Blackboard. If you received an error message indicating that a grade did not import into the Grade Roster you can opt to follow the export from Blackboard steps again or you can opt to log in to the Grade Roster and make grade changes as necessary.
Step 7: After you have exported grades from Blackboard into the Grade Roster be sure to log in to the Grade Roster and update the Grade Roster Action: Approval Status to ensure that grades post to students’ records. Steps for updating the Grade Roster Approval Status can be found in this document under P o st Gr a de s to t h e Gr a d e R o st e r .

Grade Roster Updates Job Aid
Page 20 of 24
Grade Roster Updates Job
Troubleshooting Transfer of Grades from Blackboard Grade Center to Grade Roster
Scenario 1: The instructor initiates the export in the Blackboard Control Panel and receives the following error message:
Possible causes for the error message:a. The course exists in Blackboard, but it does not correspond to an actual class in the
Grade Center. Verify that the Blackboard course is linked to a Grade Center course in Course Enrollment Management (CEM) via Blackboard Support. See instructions for contacting Blackboard Support under Scenario 2.
b. The user is not listed as an instructor or teaching assistant with grade or post access on the schedule of classes. The instructor of the class should contact the department's class scheduler to have the instructor/teaching assistant information updated.
c. A Grade Roster has not been generated for the class that is being graded.
If the error is caused by issues b or c, the user may contact their department R o s ter C o n ta c t via email to alert them of the issue.
Grade Roster Updates Job Aid
Page 21 of 24
Grade Roster Updates Job
Scenario 2: The instructor receives an error that indicates a communication problem betweenBlackboard and CEM.
Possible causes for the error message:a. If the text of the error indicates “Failed to invoke method listGrades in…” as shown in the
green highlighted text, the instructor has not set the display option for the column containing the final grade as “Letter” In Blackboard. Please review the P r e p a r e B l a ck b o a r d G r a de C e n ter for G r ade Ex p o r t in g section of this document for instructions for setting this option correctly.
b. If the instructor receives an error message other than the one referenced above, the issue will need to be researched by Blackboard support. Log in to My A S U and click on Service. Under IT Support click Submit a Request. The Service Catalog webpage will open. Scroll down to the Faculty and Classroom Support section and click on Blackboard Support to submit a help ticket.
Grade Roster Updates Job
Grade Roster Updates Job Aid
Page 22 of 24
Request Grade Changes
Note: Classes prior to fall 2006 were not converted with individual sections or instructors and will not be accessible through the Grade Center. Roster Contacts can submit grade changes for these classes by navigating to the Grade Change component via the following navigation in PeopleSoft: ASU Customizations> ASU Student Records> Roster Contacts> Grade Change.
Step 1: Click on the Request Grade Change button.
Step 2: The Grade Change Request window will open. To submit a new grade change, select the new grade from the Change Grade To drop down list and enter a reason for the grade change. All grade changes must have a reason entered.
Grade Roster Updates Job
Grade Roster Updates Job Aid
Page 23 of 24
Step 3: After all grade changes have been entered, click the Submit button at the bottom of the page. After you have clicked Submit, your grade change(s) will be labeled with a Grade Change Status of Requested.
Step 4: Once grade changes are requested, they go to the Level 1 Approver for the Academic Org associated with the class (generally the department office). If approved, the grade change then moves to a Level 2 Approver (generally the college office). If approved by Level 2, the grade changes are posted to students’ records and students receive an email notifying them to check their records.
A grade change may be denied at Level 1 or Level 2 status. At that time email notifications are sent back to the requestor and/or the Level 1 Approver. Denied grade changes may be re-requested.
Multiple grade changes may be submitted for a single student; however, each change request must be processed through to completion before a new request may be submitted.
The Grade Change Request page may be viewed at any time to see the current status of a grade change.
Grading Options & DefinitionsBelow is additional information on grade options that faculty most frequently have questions about. Please visit the Gra d es a n d Gra d i n g Po l i cies we b si t e if you have questions about a grading option not listed here.
I n c o m p lete ( I) A grade of "I" (Incomplete) should be assigned when a student is otherwise doing acceptable work but is unable to complete the course because of illness or other conditions beyond his/her control. Students are required to arrange with the instructor for the completion of the course requirements. The arrangement should be recorded on the R eq u est for Gra d e o f I n c o m p l e te f o r m . The completion date is determined by the instructor, but may not exceed one calendar year from the date the grade of “I” is recorded. When a student completes the course, the instructor must submit an online grade change request to assign the earned grade.
Grade Roster Updates Job
Grade Roster Updates Job Aid
Page 24 of 24
Pass ( P ) A "P" grade should only be assigned when an individual student receives permission from both the class instructor and his/her college to take the course as Pass/Fail. Permission is recorded on the Pas s /F a il E n r o l l m ent f o r m . If the course only awards Pass/Fail grades, the "Y" grade should be utilized to indicate successful completion of the course.
Aud i t ( X) A mark of "X" is recorded for completion of an audited course, unless the instructor determines that the student's participation or attendance has been inadequate, in which case the mark of "W" (Withdrawal) may be recorded. This grading option may not be changed after the close of the drop/add period. The "X" is not included in earned hours and is not computed in the GPA.
S a t is f a c t o r y (Y) A "Y" grade is used for courses in which the instructor assigns only grades of "Y" or "E”. The “Y” grade is generally used for successfully completed internships, projects, readings and conference, research, seminars, theses, dissertations, and workshops. If a course utilizes only the letter grades of A+, A, A-, B+, B, B-, C+, C, D, and E, but a student receives permission to take the course for Pass/Fail credit, the "P" (Pass) or "E" (Fail) grade should be assigned to the student.
Cou r se i n P r o g r e s s ( Z) The "Z" grade is typically used for courses where work will not be completed within one semester's time, such as research, thesis, and dissertation. Once coursework is complete, the instructor must submit a grade change to assign an appropriate grade.
Ac a de m ic D is ho n e s ty ( X E ) The grade of "XE" denotes failure due to academic dishonesty and is treated the same as an "E" for the purposes of GPA, course repeatability, and academic standing determination. A student may not avoid any penalty for academic dishonesty by withdrawing from a course. A student may be reinstated to a course to receive a penalty of a reduced or failing grade of XE.
Fa i l i n g N e v e r P a r t ic ip ated (EN) The grade of "EN" denotes failure due to the student never participating in a course and is treated the same as an "E" for the purposes of GPA, course repeatability, and academic standing determination. The "EN" grade assists ASU in determining a student's financial aid eligibility. For federal aid purposes, we must determine if a student participated in all courses for which they received federal aid. When a student does not participate, the financial aid office must recalculate the student's eligibility. A grade of "EN" will display on the student's transcript beginning fall 2016. Please review the "Grades and Grade Selection" section of the Gra d e P o s ti n g FAQs page for more information about the "EN" grade.