job safety analysis acknowledgement form...jsa book job safety analysis book job safety analysis...
TRANSCRIPT

JSA BOOK
JOB SAFETY ANALYSIS BOOK
JOB SAFETY ANALYSIS ACKNOWLEDGEMENT FORM
By signing this form, I acknowledge that I have reviewed the divisional 2010 JSA book. I agree to follow included JSA’s while performing these operations. I understand and agree that the JSA’s covered can be changed at any time without notice by the Company. ____________________________________ Employee Signature ____________________________________ Print Name ____________________________________ Date
Page 1 of 29 ejpewbjsa110110
JSA BOOK
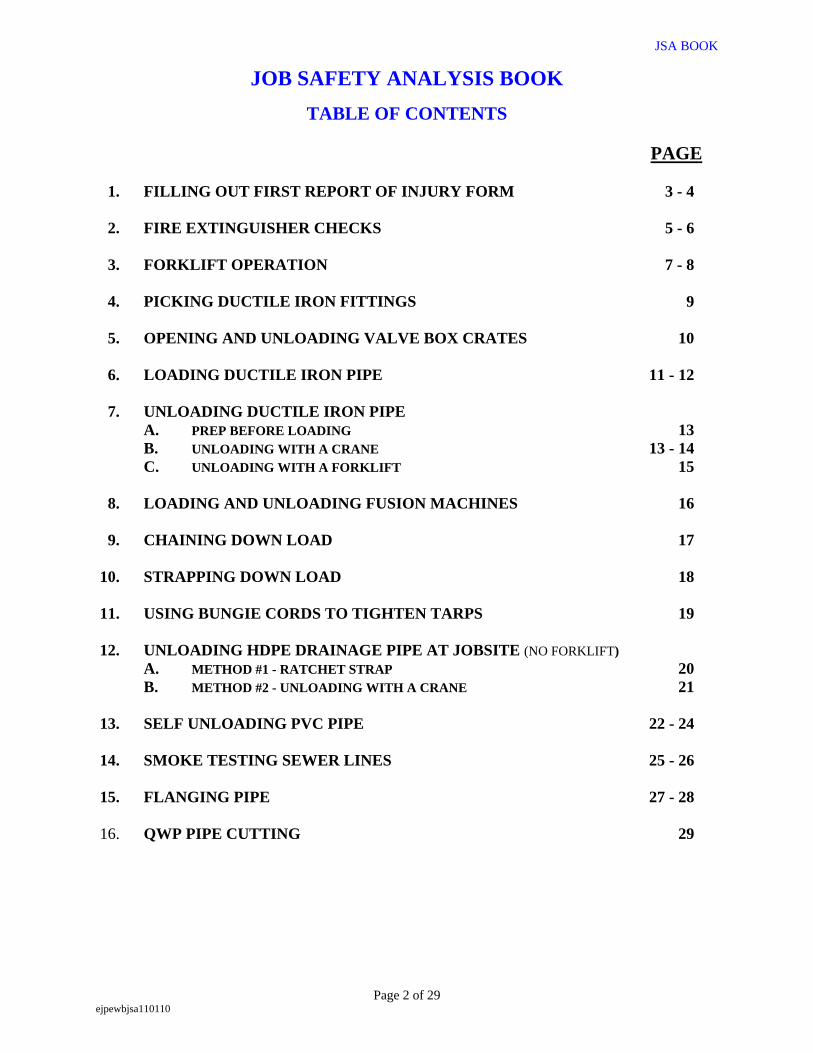
JOB SAFETY ANALYSIS BOOK
TABLE OF CONTENTS
PAGE
1. FILLING OUT FIRST REPORT OF INJURY FORM 3 - 4
2. FIRE EXTINGUISHER CHECKS 5 - 6
3. FORKLIFT OPERATION 7 - 8
4. PICKING DUCTILE IRON FITTINGS 9
5. OPENING AND UNLOADING VALVE BOX CRATES 10
6. LOADING DUCTILE IRON PIPE 11 - 12
7. UNLOADING DUCTILE IRON PIPE A. PREP BEFORE LOADING 13 B. UNLOADING WITH A CRANE 13 - 14 C. UNLOADING WITH A FORKLIFT 15
8. LOADING AND UNLOADING FUSION MACHINES 16
9. CHAINING DOWN LOAD 17 10. STRAPPING DOWN LOAD 18 11. USING BUNGIE CORDS TO TIGHTEN TARPS 19 12. UNLOADING HDPE DRAINAGE PIPE AT JOBSITE (NO FORKLIFT) A. METHOD #1 - RATCHET STRAP 20 B. METHOD #2 - UNLOADING WITH A CRANE 21 13. SELF UNLOADING PVC PIPE 22 - 24 14. SMOKE TESTING SEWER LINES 25 - 26 15. FLANGING PIPE 27 - 28 16. QWP PIPE CUTTING 29
Page 2 of 29 ejpewbjsa110110
JSA BOOK
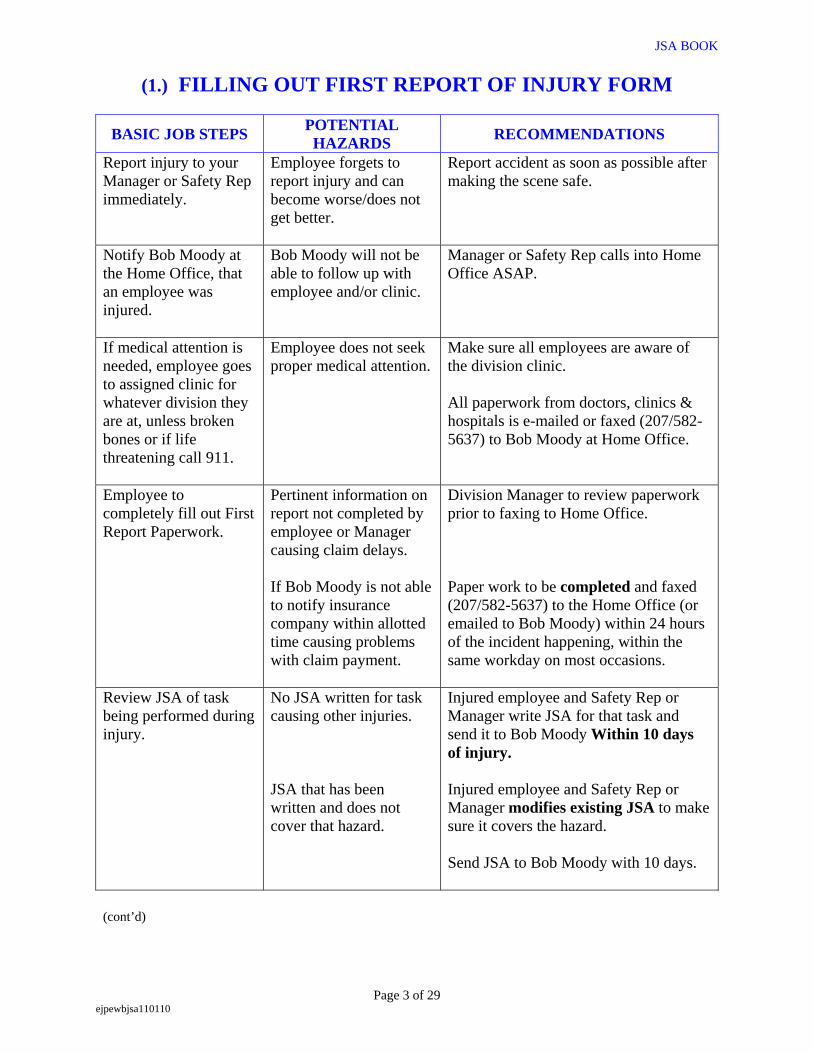
(1.) FILLING OUT FIRST REPORT OF INJURY FORM
BASIC JOB STEPS POTENTIAL HAZARDS RECOMMENDATIONS
Report injury to your Manager or Safety Rep immediately.
Employee forgets to report injury and can become worse/does not get better.
Report accident as soon as possible after making the scene safe.
Notify Bob Moody at the Home Office, that an employee was injured.
Bob Moody will not be able to follow up with employee and/or clinic.
Manager or Safety Rep calls into Home Office ASAP.
If medical attention is needed, employee goes to assigned clinic for whatever division they are at, unless broken bones or if life threatening call 911.
Employee does not seek proper medical attention.
Make sure all employees are aware of the division clinic. All paperwork from doctors, clinics & hospitals is e-mailed or faxed (207/582-5637) to Bob Moody at Home Office.
Employee to completely fill out First Report Paperwork.
Pertinent information on report not completed by employee or Manager causing claim delays. If Bob Moody is not able to notify insurance company within allotted time causing problems with claim payment.
Division Manager to review paperwork prior to faxing to Home Office. Paper work to be completed and faxed (207/582-5637) to the Home Office (or emailed to Bob Moody) within 24 hours of the incident happening, within the same workday on most occasions.
Review JSA of task being performed during injury.
No JSA written for task causing other injuries. JSA that has been written and does not cover that hazard.
Injured employee and Safety Rep or Manager write JSA for that task and send it to Bob Moody Within 10 days of injury. Injured employee and Safety Rep or Manager modifies existing JSA to make sure it covers the hazard. Send JSA to Bob Moody with 10 days.
(cont’d)
Page 3 of 29 ejpewbjsa110110
JSA BOOK
(1.) FILLING OUT FIRST REPORT OF INJURY FORM
BASIC JOB STEPS POTENTIAL HAZARDS RECOMMENDATIONS
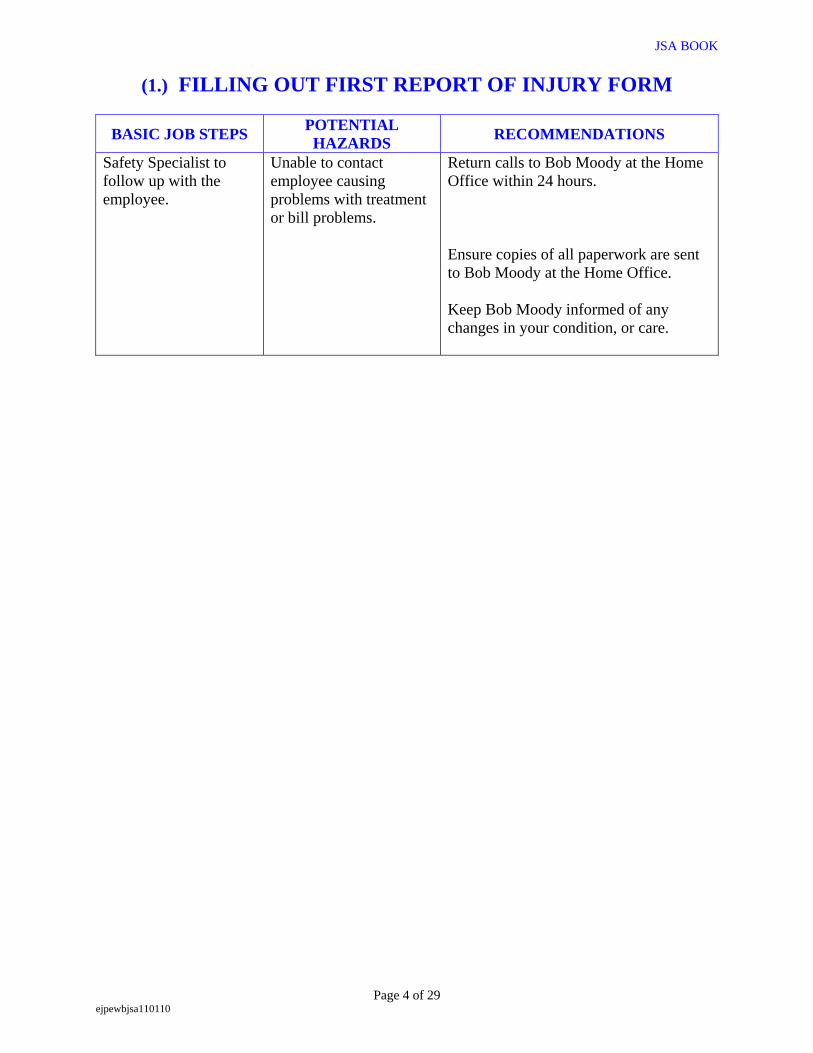
Safety Specialist to follow up with the employee.
Unable to contact employee causing problems with treatment or bill problems.
Return calls to Bob Moody at the Home Office within 24 hours. Ensure copies of all paperwork are sent to Bob Moody at the Home Office. Keep Bob Moody informed of any changes in your condition, or care.
Page 4 of 29 ejpewbjsa110110
JSA BOOK
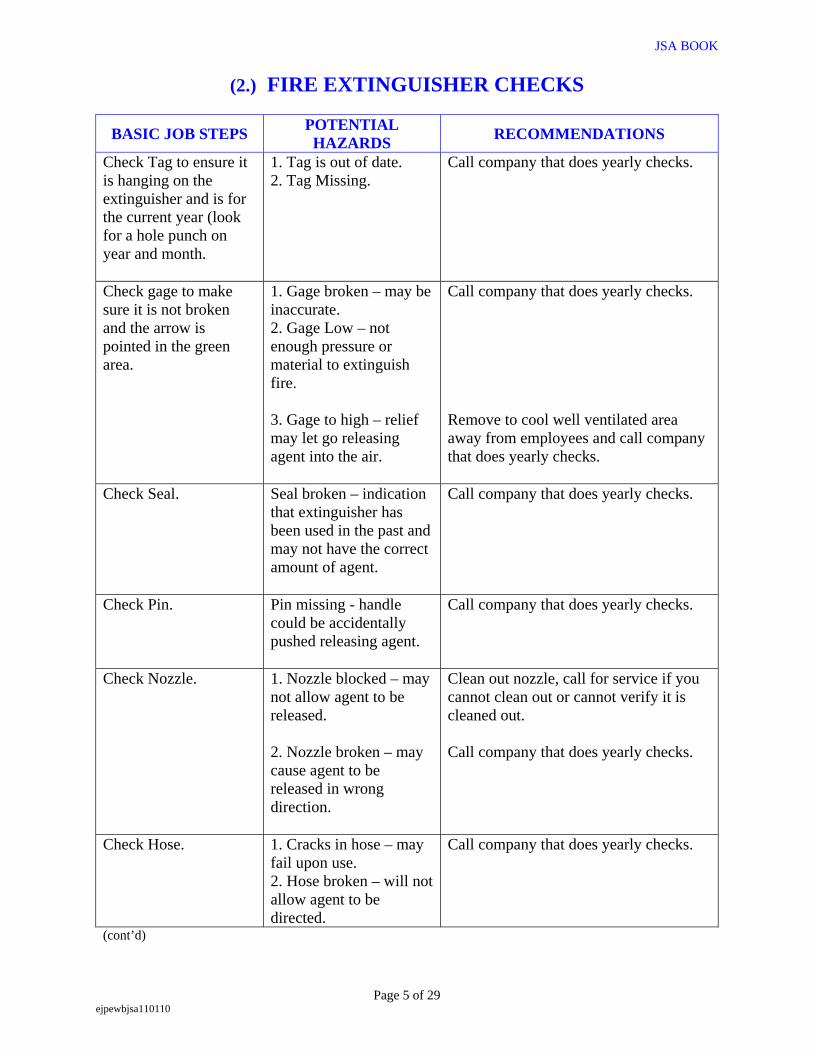
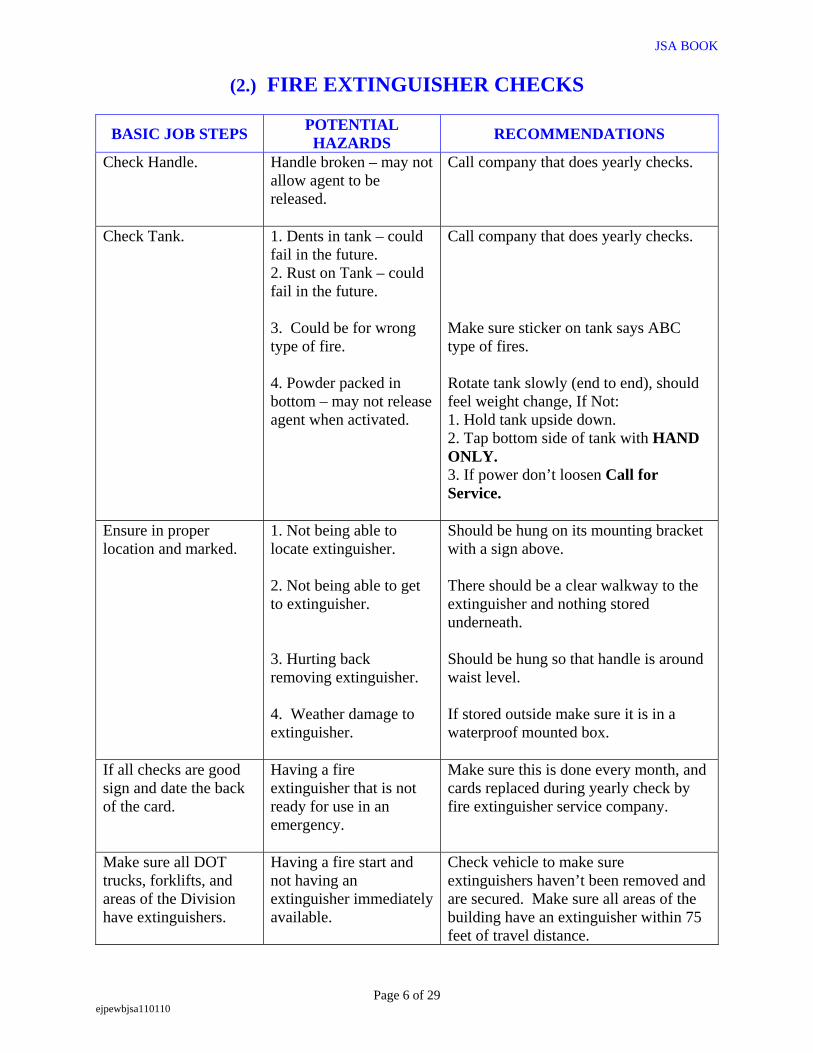
(2.) FIRE EXTINGUISHER CHECKS
POTENTIAL HAZARDS BASIC JOB STEPS RECOMMENDATIONS
Check Tag to ensure it is hanging on the extinguisher and is for the current year (look for a hole punch on year and month.
1. Tag is out of date. 2. Tag Missing.
Call company that does yearly checks.
Check gage to make sure it is not broken and the arrow is pointed in the green area.
1. Gage broken – may be inaccurate. 2. Gage Low – not enough pressure or material to extinguish fire. 3. Gage to high – relief may let go releasing agent into the air.
Call company that does yearly checks. Remove to cool well ventilated area away from employees and call company that does yearly checks.
Check Seal.
Seal broken – indication that extinguisher has been used in the past and may not have the correct amount of agent.
Call company that does yearly checks.
Check Pin. Pin missing - handle could be accidentally pushed releasing agent.
Call company that does yearly checks.
Check Nozzle. 1. Nozzle blocked – may not allow agent to be released. 2. Nozzle broken – may cause agent to be released in wrong direction.
Clean out nozzle, call for service if you cannot clean out or cannot verify it is cleaned out. Call company that does yearly checks.
Check Hose.
1. Cracks in hose – may fail upon use. 2. Hose broken – will not allow agent to be directed.
Call company that does yearly checks.
(cont’d)
Page 5 of 29 ejpewbjsa110110
JSA BOOK
(2.) FIRE EXTINGUISHER CHECKS
BASIC JOB STEPS POTENTIAL HAZARDS RECOMMENDATIONS
Check Handle.
Handle broken – may not allow agent to be released.
Call company that does yearly checks.
Check Tank.
1. Dents in tank – could fail in the future. 2. Rust on Tank – could fail in the future. 3. Could be for wrong type of fire. 4. Powder packed in bottom – may not release agent when activated.
Call company that does yearly checks. Make sure sticker on tank says ABC type of fires. Rotate tank slowly (end to end), should feel weight change, If Not: 1. Hold tank upside down. 2. Tap bottom side of tank with HAND ONLY. 3. If power don’t loosen Call for Service.
Ensure in proper location and marked.
1. Not being able to locate extinguisher. 2. Not being able to get to extinguisher. 3. Hurting back removing extinguisher. 4. Weather damage to extinguisher.
Should be hung on its mounting bracket with a sign above. There should be a clear walkway to the extinguisher and nothing stored underneath. Should be hung so that handle is around waist level. If stored outside make sure it is in a waterproof mounted box.
If all checks are good sign and date the back of the card.
Having a fire extinguisher that is not ready for use in an emergency.
Make sure this is done every month, and cards replaced during yearly check by fire extinguisher service company.
Make sure all DOT trucks, forklifts, and areas of the Division have extinguishers.
Having a fire start and not having an extinguisher immediately available.
Check vehicle to make sure extinguishers haven’t been removed and are secured. Make sure all areas of the building have an extinguisher within 75 feet of travel distance.
Page 6 of 29 ejpewbjsa110110
JSA BOOK
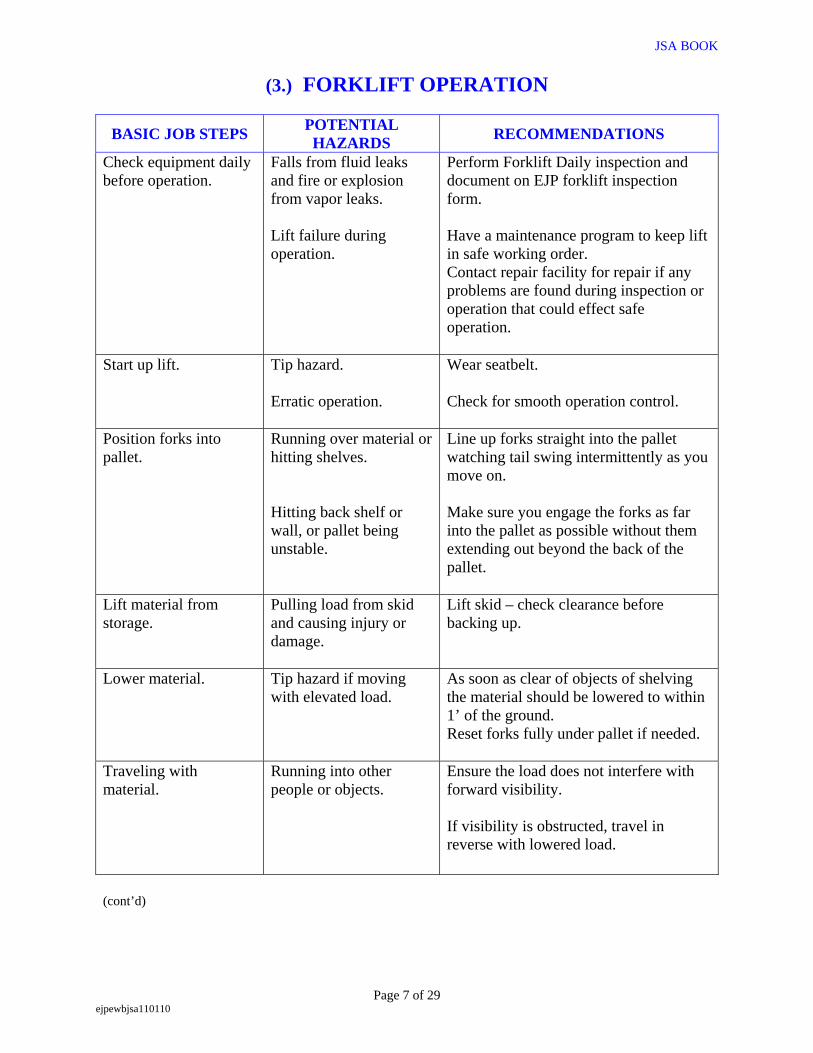
(3.) FORKLIFT OPERATION
BASIC JOB STEPS POTENTIAL HAZARDS RECOMMENDATIONS
Check equipment daily before operation.
Falls from fluid leaks and fire or explosion from vapor leaks. Lift failure during operation.
Perform Forklift Daily inspection and document on EJP forklift inspection form. Have a maintenance program to keep lift in safe working order. Contact repair facility for repair if any problems are found during inspection or operation that could effect safe operation.
Start up lift.
Tip hazard. Erratic operation.
Wear seatbelt. Check for smooth operation control.
Position forks into pallet.
Running over material or hitting shelves. Hitting back shelf or wall, or pallet being unstable.
Line up forks straight into the pallet watching tail swing intermittently as you move on. Make sure you engage the forks as far into the pallet as possible without them extending out beyond the back of the pallet.
Lift material from storage.
Pulling load from skid and causing injury or damage.
Lift skid – check clearance before backing up.
Lower material.
Tip hazard if moving with elevated load.
As soon as clear of objects of shelving the material should be lowered to within 1’ of the ground. Reset forks fully under pallet if needed.
Traveling with material.
Running into other people or objects.
Ensure the load does not interfere with forward visibility. If visibility is obstructed, travel in reverse with lowered load.
(cont’d)
Page 7 of 29 ejpewbjsa110110

JSA BOOK
(3.) FORKLIFT OPERATION
BASIC JOB STEPS POTENTIAL HAZARDS RECOMMENDATIONS
Traveling with material.
Tip hazard. Overhead object. Hitting overhead doors.
Always keep load on uphill direction of slope or counter weight if unloaded. Make sure travel path is clear of overhead objects that could be hit by a forklift, (i.e. overhead doors, power lines, etc.). Lower load and ensure door is completely open.
Park forklift. Unbuckle seatbelt.
Rolling or tripping hazard. No potential hazard.
Put on parking break. Lower forks, making sure forks tips are flat on the ground. Turn off lift. Chock wheels if lift is on a slope.
Dismounting from forklift.
You could trip, fall and become injured.
Watch your step, ensure path is clear, and have three points of contact.
Securing for the night.
Unauthorized operation. Explosive hazard. Electric shock/explosive hazard.
Park inside locked building, if not possible, pull keys and have keys in locked building. Shut off propane tank. Only trained and authorized employees should plug an electric lift in to charge in an approved area away from sparks.
Page 8 of 29 ejpewbjsa110110
JSA BOOK
(4.) PICKING DUCTILE IRON FITTINGS
BASIC JOB STEPS POTENTIAL HAZARDS RECOMMENDATIONS
Drive lift to fittings. Roll over of lift. Collision.
Wear seatbelt. Slow and easy on lift. Make sure line of sight is clear.
Lift fittings. Back injuries. Pinching hands. Insect/Spider bites.
Use lift and straps on heavy fittings (fittings 8”and above, valves 6” and above). Team lift on heavy fittings. Use proper lifting techniques while lifting 6” and under. Make sure fittings are not crated. Wear leather gloves. Watch for insects/spiders while unloading.
Transfer fittings to pallet.
Back injuries. Dropping on foot or leg. Tripping.
Put all heavy fittings where the lift can be driven up to fittings (slide don’t lift). Make sure you have a secure hand hold on the fitting. If fitting is carried make sure path is clear (use hand cart if possible). Watch out for slippery conditions (i.e. water or ice), sand if necessary. No heavy fittings on shelves above waist high.
Transfer fittings to pallet.
Wrist injury. Use two handed carry only. Wear safety boots.
Band or shrink wrap pallets. Cutting banding. Drive pallet to trailer.
Eye injuries from bands. Cut hazards from bands. Back injuries. See first step.
Wear safety glasses whenever banding or cutting bands. Wear leather gloves. Leave pallet at waist level to prevent bending. See first step. Carry load low as possible.
Page 9 of 29 ejpewbjsa110110
JSA BOOK
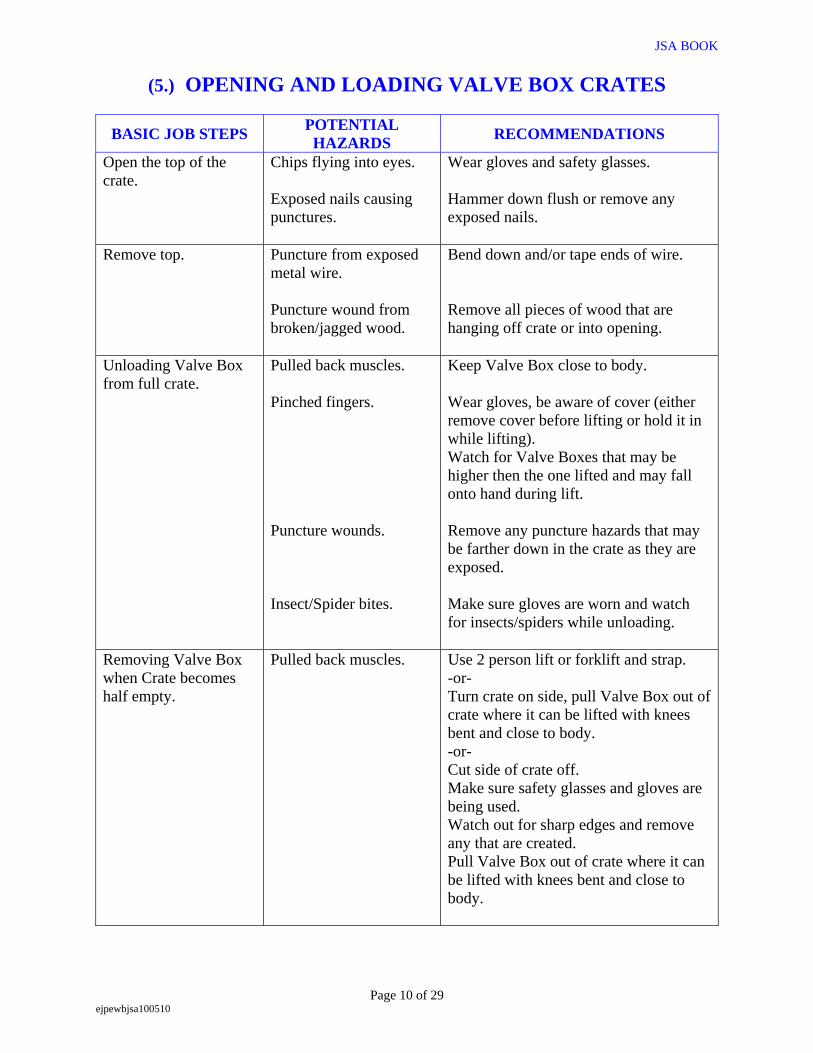
(5.) OPENING AND LOADING VALVE BOX CRATES
BASIC JOB STEPS POTENTIAL HAZARDS RECOMMENDATIONS
Open the top of the crate.
Chips flying into eyes. Exposed nails causing punctures.
Wear gloves and safety glasses. Hammer down flush or remove any exposed nails.
Remove top. Puncture from exposed metal wire. Puncture wound from broken/jagged wood.
Bend down and/or tape ends of wire. Remove all pieces of wood that are hanging off crate or into opening.
Unloading Valve Box from full crate.
Pulled back muscles. Pinched fingers. Puncture wounds. Insect/Spider bites.
Keep Valve Box close to body. Wear gloves, be aware of cover (either remove cover before lifting or hold it in while lifting). Watch for Valve Boxes that may be higher then the one lifted and may fall onto hand during lift. Remove any puncture hazards that may be farther down in the crate as they are exposed. Make sure gloves are worn and watch for insects/spiders while unloading.
Removing Valve Box when Crate becomes half empty.
Pulled back muscles. Use 2 person lift or forklift and strap. -or- Turn crate on side, pull Valve Box out of crate where it can be lifted with knees bent and close to body. -or- Cut side of crate off. Make sure safety glasses and gloves are being used. Watch out for sharp edges and remove any that are created. Pull Valve Box out of crate where it can be lifted with knees bent and close to body.
Page 10 of 29 ejpewbjsa100510
JSA BOOK
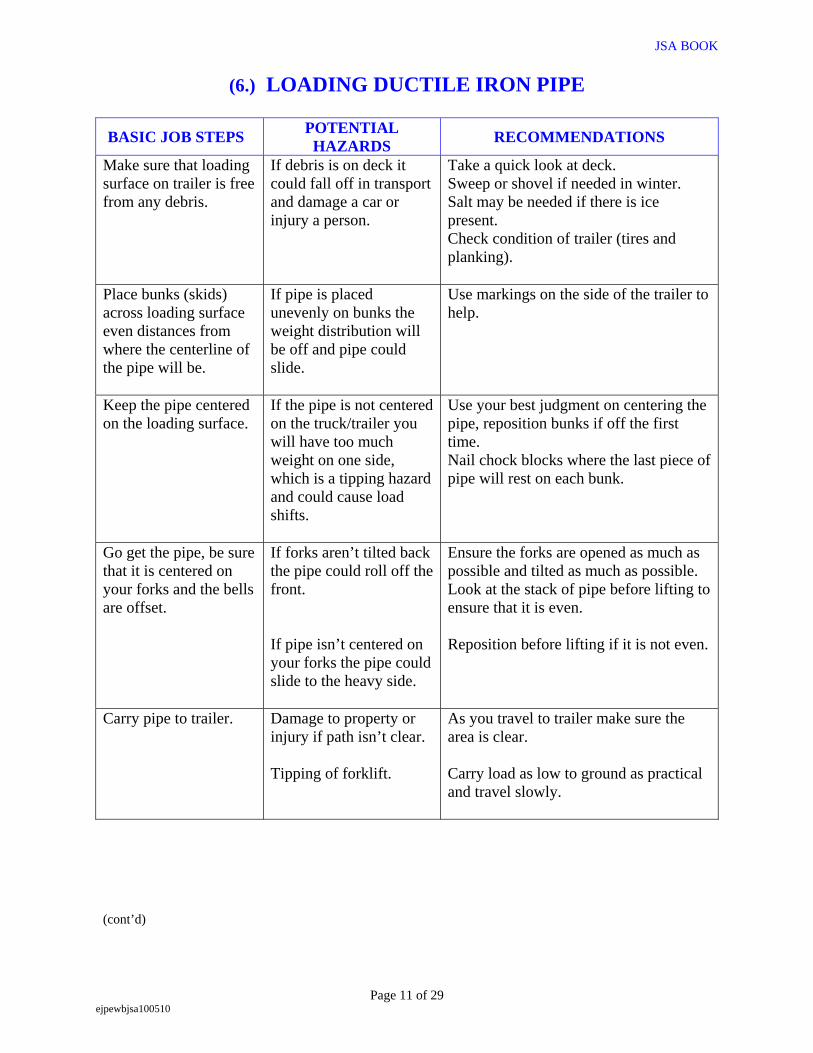
(6.) LOADING DUCTILE IRON PIPE
BASIC JOB STEPS POTENTIAL HAZARDS RECOMMENDATIONS
Make sure that loading surface on trailer is free from any debris.
If debris is on deck it could fall off in transport and damage a car or injury a person.
Take a quick look at deck. Sweep or shovel if needed in winter. Salt may be needed if there is ice present. Check condition of trailer (tires and planking).
Place bunks (skids) across loading surface even distances from where the centerline of the pipe will be.
If pipe is placed unevenly on bunks the weight distribution will be off and pipe could slide.
Use markings on the side of the trailer to help.
Keep the pipe centered on the loading surface.
If the pipe is not centered on the truck/trailer you will have too much weight on one side, which is a tipping hazard and could cause load shifts.
Use your best judgment on centering the pipe, reposition bunks if off the first time. Nail chock blocks where the last piece of pipe will rest on each bunk.
Go get the pipe, be sure that it is centered on your forks and the bells are offset.
If forks aren’t tilted back the pipe could roll off the front. If pipe isn’t centered on your forks the pipe could slide to the heavy side.
Ensure the forks are opened as much as possible and tilted as much as possible. Look at the stack of pipe before lifting to ensure that it is even. Reposition before lifting if it is not even.
Carry pipe to trailer. Damage to property or injury if path isn’t clear. Tipping of forklift.
As you travel to trailer make sure the area is clear. Carry load as low to ground as practical and travel slowly.
(cont’d)
Page 11 of 29 ejpewbjsa100510
JSA BOOK
(6.) LOADING DUCTILE IRON PIPE
BASIC JOB STEPS POTENTIAL HAZARDS RECOMMENDATIONS
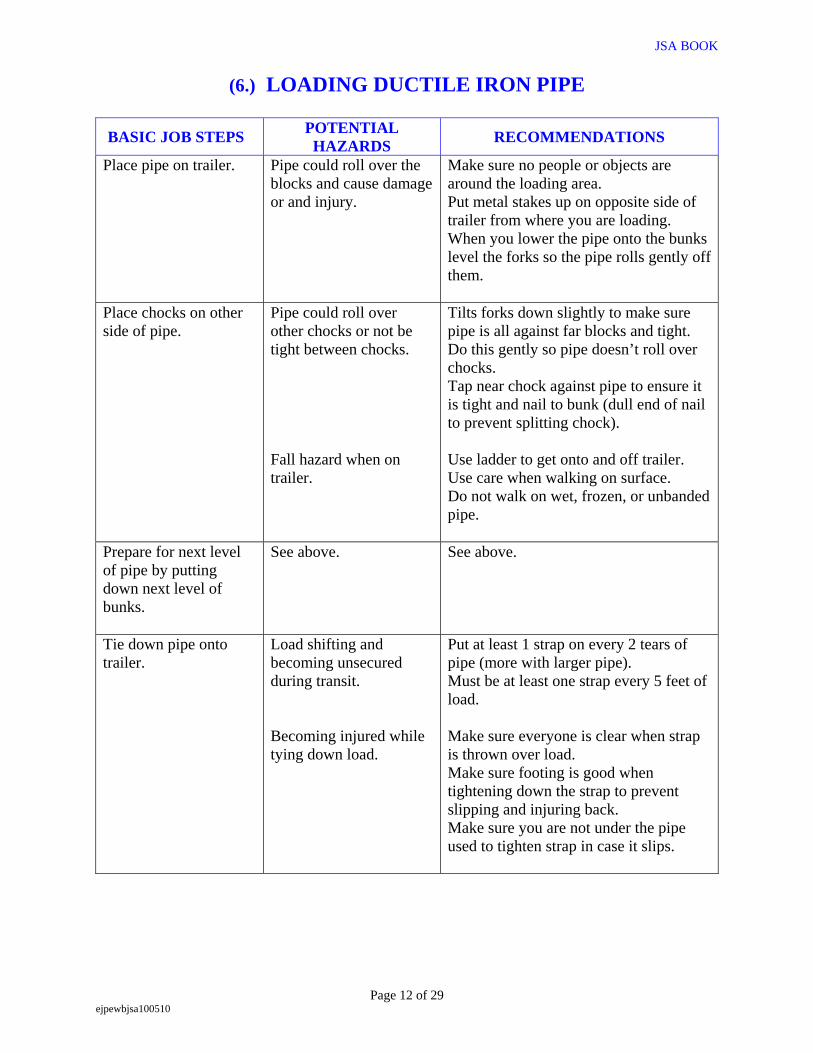
Place pipe on trailer. Pipe could roll over the blocks and cause damage or and injury.
Make sure no people or objects are around the loading area. Put metal stakes up on opposite side of trailer from where you are loading. When you lower the pipe onto the bunks level the forks so the pipe rolls gently off them.
Place chocks on other side of pipe.
Pipe could roll over other chocks or not be tight between chocks. Fall hazard when on trailer.
Tilts forks down slightly to make sure pipe is all against far blocks and tight. Do this gently so pipe doesn’t roll over chocks. Tap near chock against pipe to ensure it is tight and nail to bunk (dull end of nail to prevent splitting chock). Use ladder to get onto and off trailer. Use care when walking on surface. Do not walk on wet, frozen, or unbanded pipe.
Prepare for next level of pipe by putting down next level of bunks.
See above. See above.
Tie down pipe onto trailer.
Load shifting and becoming unsecured during transit. Becoming injured while tying down load.
Put at least 1 strap on every 2 tears of pipe (more with larger pipe). Must be at least one strap every 5 feet of load. Make sure everyone is clear when strap is thrown over load. Make sure footing is good when tightening down the strap to prevent slipping and injuring back. Make sure you are not under the pipe used to tighten strap in case it slips.
Page 12 of 29 ejpewbjsa100510
JSA BOOK
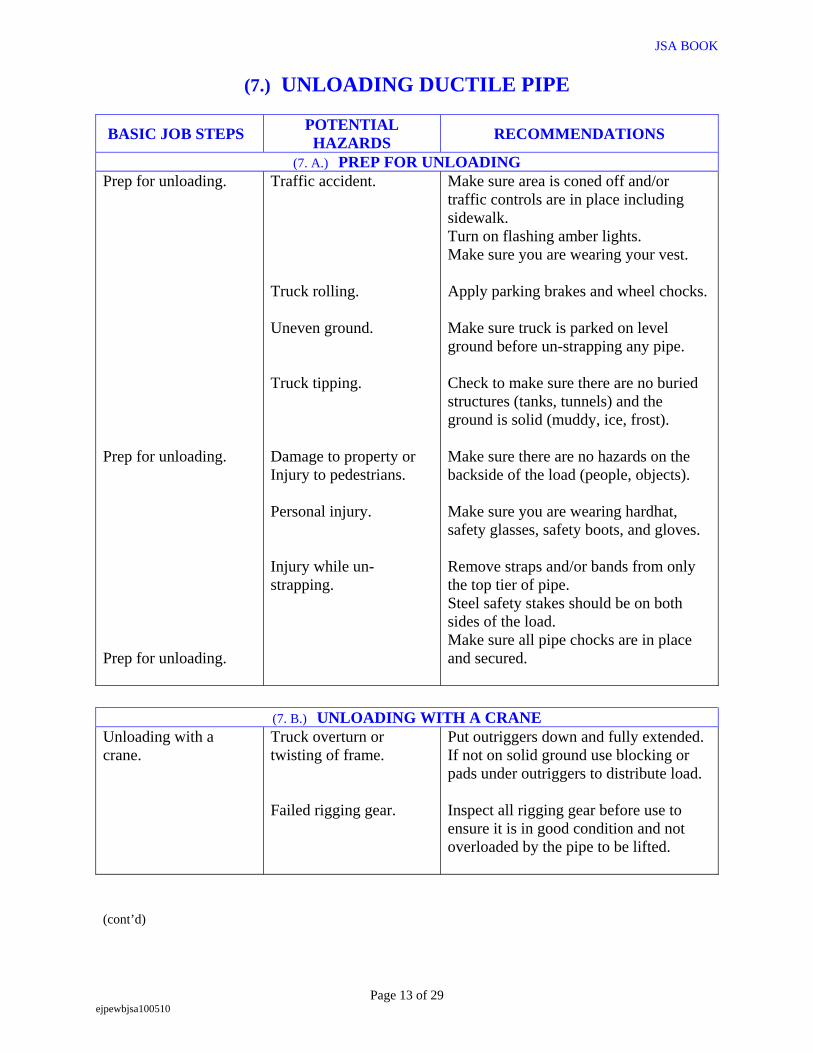
(7.) UNLOADING DUCTILE PIPE
BASIC JOB STEPS POTENTIAL HAZARDS RECOMMENDATIONS
(7. A.) PREP FOR UNLOADING Prep for unloading. Prep for unloading. Prep for unloading.
Traffic accident. Truck rolling. Uneven ground. Truck tipping. Damage to property or Injury to pedestrians. Personal injury. Injury while un-strapping.
Make sure area is coned off and/or traffic controls are in place including sidewalk. Turn on flashing amber lights. Make sure you are wearing your vest. Apply parking brakes and wheel chocks. Make sure truck is parked on level ground before un-strapping any pipe. Check to make sure there are no buried structures (tanks, tunnels) and the ground is solid (muddy, ice, frost). Make sure there are no hazards on the backside of the load (people, objects). Make sure you are wearing hardhat, safety glasses, safety boots, and gloves. Remove straps and/or bands from only the top tier of pipe. Steel safety stakes should be on both sides of the load. Make sure all pipe chocks are in place and secured.
(7. B.) UNLOADING WITH A CRANE
Unloading with a crane.
Truck overturn or twisting of frame. Failed rigging gear.
Put outriggers down and fully extended. If not on solid ground use blocking or pads under outriggers to distribute load. Inspect all rigging gear before use to ensure it is in good condition and not overloaded by the pipe to be lifted.
(cont’d)
Page 13 of 29 ejpewbjsa100510
JSA BOOK
(7.) UNLOADING DUCTILE PIPE
BASIC JOB STEPS POTENTIAL HAZARDS RECOMMENDATIONS
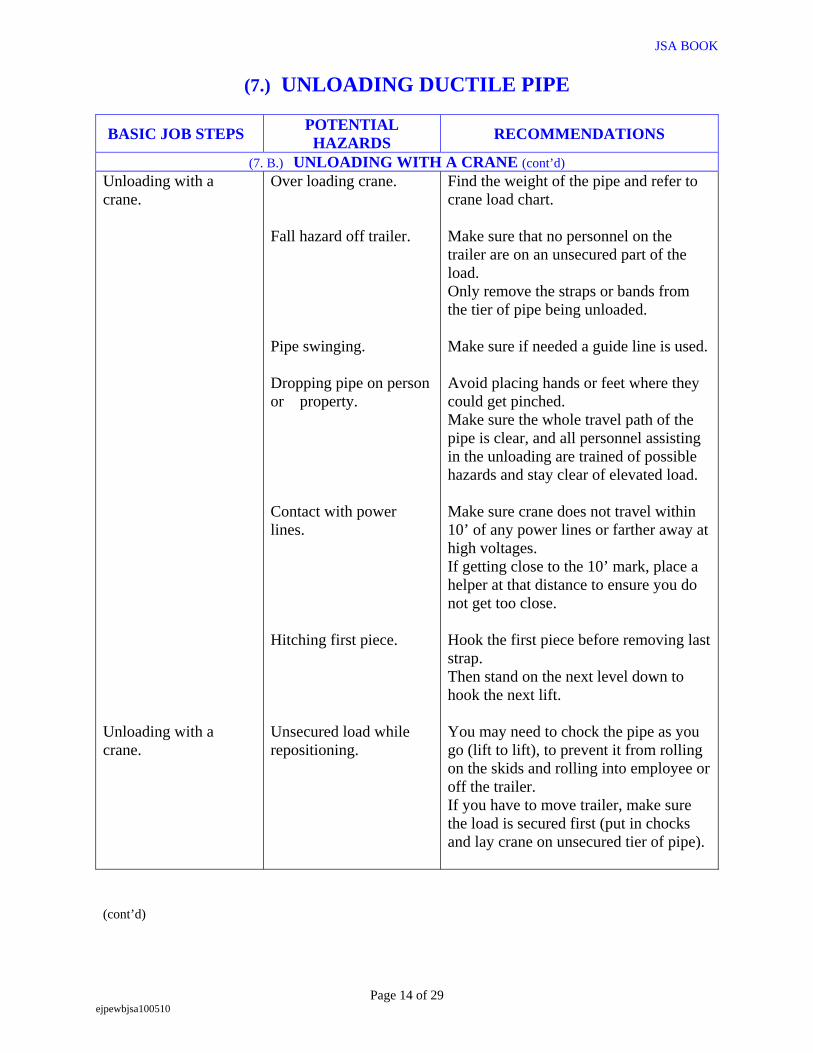
(7. B.) UNLOADING WITH A CRANE (cont’d) Unloading with a crane. Unloading with a crane.
Over loading crane. Fall hazard off trailer. Pipe swinging. Dropping pipe on person or property. Contact with power lines. Hitching first piece. Unsecured load while repositioning.
Find the weight of the pipe and refer to crane load chart. Make sure that no personnel on the trailer are on an unsecured part of the load. Only remove the straps or bands from the tier of pipe being unloaded. Make sure if needed a guide line is used. Avoid placing hands or feet where they could get pinched. Make sure the whole travel path of the pipe is clear, and all personnel assisting in the unloading are trained of possible hazards and stay clear of elevated load. Make sure crane does not travel within 10’ of any power lines or farther away at high voltages. If getting close to the 10’ mark, place a helper at that distance to ensure you do not get too close. Hook the first piece before removing last strap. Then stand on the next level down to hook the next lift. You may need to chock the pipe as you go (lift to lift), to prevent it from rolling on the skids and rolling into employee or off the trailer. If you have to move trailer, make sure the load is secured first (put in chocks and lay crane on unsecured tier of pipe).
(cont’d)
Page 14 of 29 ejpewbjsa100510
JSA BOOK
(7.) UNLOADING DUCTILE PIPE
BASIC JOB STEPS POTENTIAL HAZARDS RECOMMENDATIONS
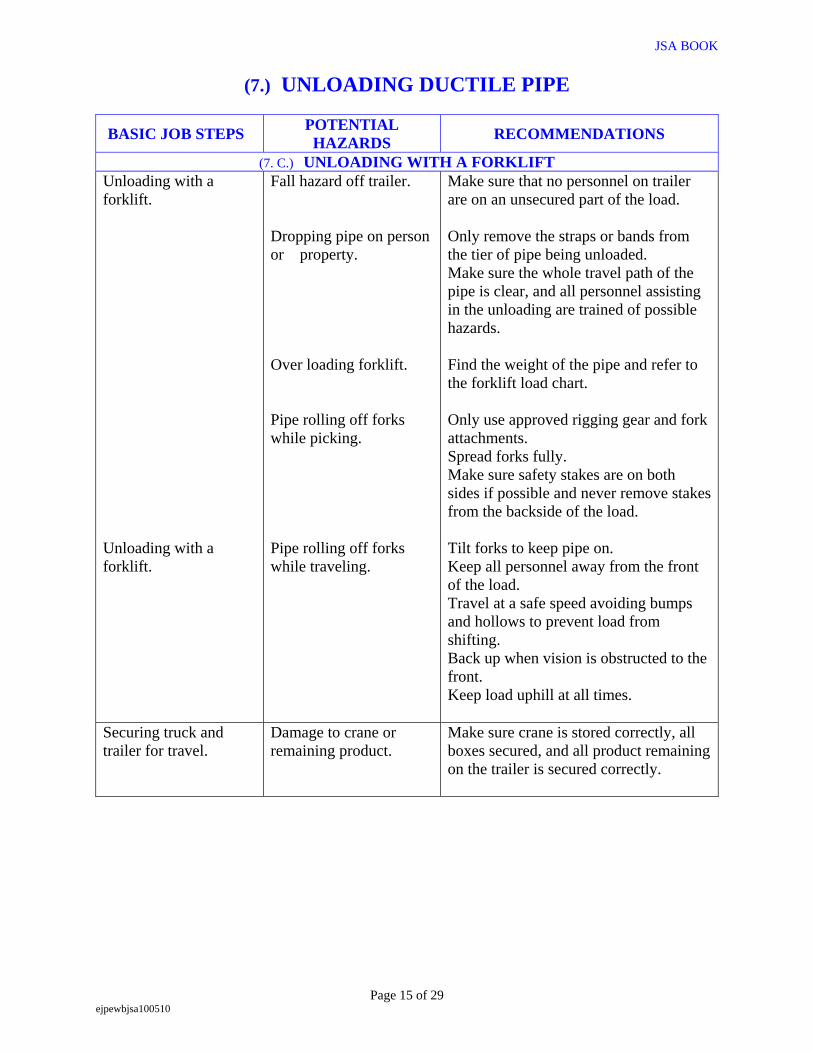
(7. C.) UNLOADING WITH A FORKLIFT Unloading with a forklift. Unloading with a forklift.
Fall hazard off trailer. Dropping pipe on person or property. Over loading forklift. Pipe rolling off forks while picking. Pipe rolling off forks while traveling.
Make sure that no personnel on trailer are on an unsecured part of the load. Only remove the straps or bands from the tier of pipe being unloaded. Make sure the whole travel path of the pipe is clear, and all personnel assisting in the unloading are trained of possible hazards. Find the weight of the pipe and refer to the forklift load chart. Only use approved rigging gear and fork attachments. Spread forks fully. Make sure safety stakes are on both sides if possible and never remove stakes from the backside of the load. Tilt forks to keep pipe on. Keep all personnel away from the front of the load. Travel at a safe speed avoiding bumps and hollows to prevent load from shifting. Back up when vision is obstructed to the front. Keep load uphill at all times.
Securing truck and trailer for travel.
Damage to crane or remaining product.
Make sure crane is stored correctly, all boxes secured, and all product remaining on the trailer is secured correctly.
Page 15 of 29 ejpewbjsa100510
JSA BOOK
(8.) LOADING AND UNLOADING OF FUSION MACHINE
BASIC JOB STEPS POTENTIAL HAZARDS RECOMMENDATIONS
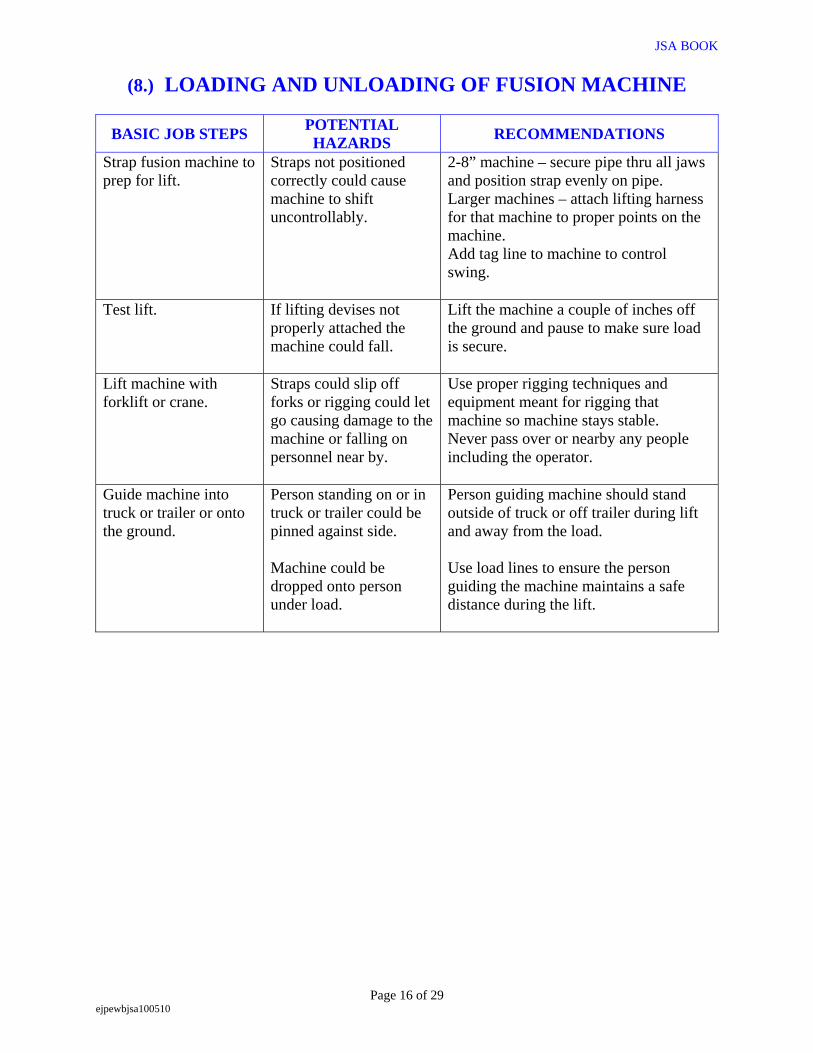
Strap fusion machine to prep for lift.
Straps not positioned correctly could cause machine to shift uncontrollably.
2-8” machine – secure pipe thru all jaws and position strap evenly on pipe. Larger machines – attach lifting harness for that machine to proper points on the machine. Add tag line to machine to control swing.
Test lift. If lifting devises not properly attached the machine could fall.
Lift the machine a couple of inches off the ground and pause to make sure load is secure.
Lift machine with forklift or crane.
Straps could slip off forks or rigging could let go causing damage to the machine or falling on personnel near by.
Use proper rigging techniques and equipment meant for rigging that machine so machine stays stable. Never pass over or nearby any people including the operator.
Guide machine into truck or trailer or onto the ground.
Person standing on or in truck or trailer could be pinned against side.
Person guiding machine should stand outside of truck or off trailer during lift and away from the load.
Machine could be dropped onto person under load.
Use load lines to ensure the person guiding the machine maintains a safe distance during the lift.
Page 16 of 29 ejpewbjsa100510
JSA BOOK
(9.) CHAINING DOWN LOAD
BASIC JOB STEPS POTENTIAL HAZARDS RECOMMENDATIONS
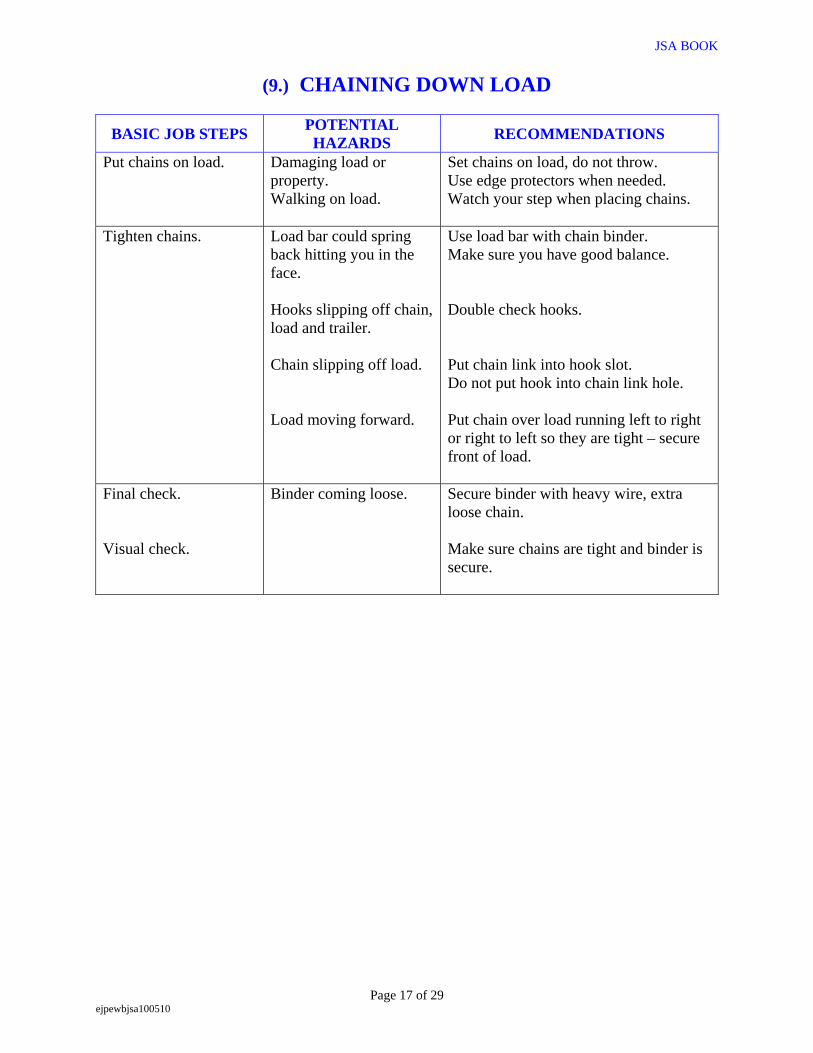
Put chains on load. Damaging load or property. Walking on load.
Set chains on load, do not throw. Use edge protectors when needed. Watch your step when placing chains.
Tighten chains. Load bar could spring back hitting you in the face. Hooks slipping off chain, load and trailer. Chain slipping off load. Load moving forward.
Use load bar with chain binder. Make sure you have good balance. Double check hooks. Put chain link into hook slot. Do not put hook into chain link hole. Put chain over load running left to right or right to left so they are tight – secure front of load.
Final check. Binder coming loose. Secure binder with heavy wire, extra loose chain.
Visual check. Make sure chains are tight and binder is
secure.
Page 17 of 29 ejpewbjsa100510
JSA BOOK
(10.) STRAPPING DOWN LOAD
BASIC JOB STEPS POTENTIAL HAZARDS RECOMMENDATIONS
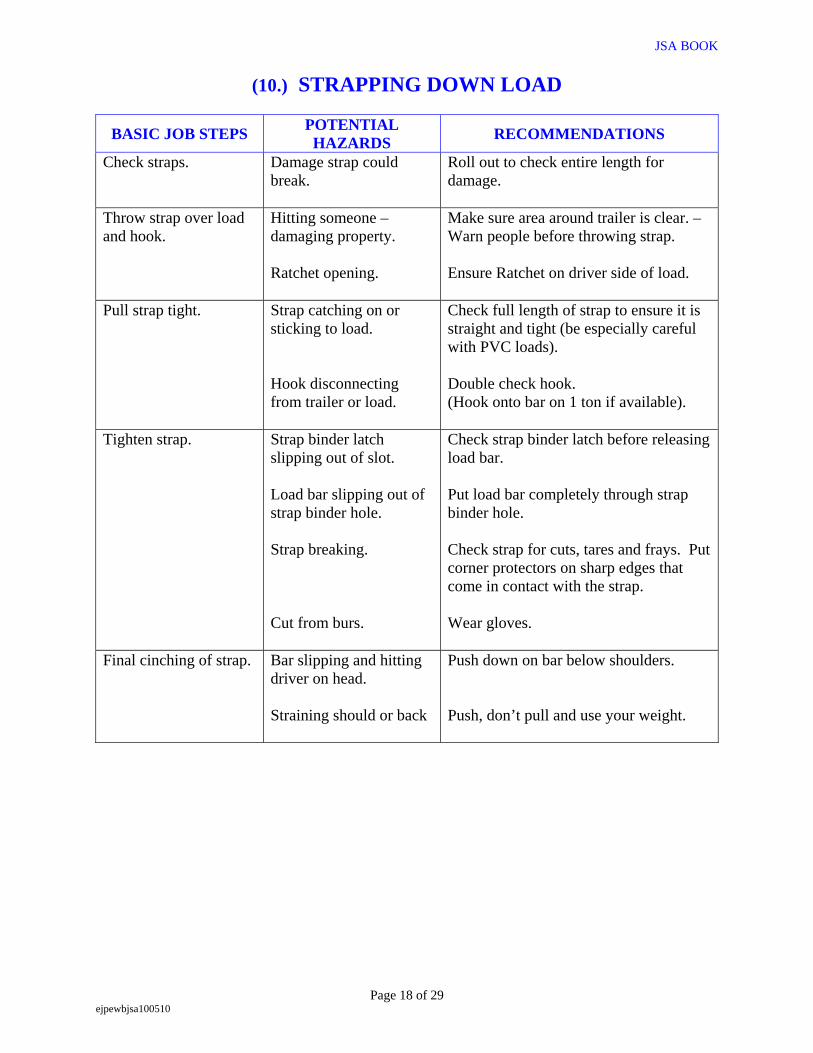
Check straps. Damage strap could break.
Roll out to check entire length for damage.
Throw strap over load and hook.
Hitting someone – damaging property. Ratchet opening.
Make sure area around trailer is clear. – Warn people before throwing strap. Ensure Ratchet on driver side of load.
Pull strap tight. Strap catching on or sticking to load. Hook disconnecting from trailer or load.
Check full length of strap to ensure it is straight and tight (be especially careful with PVC loads). Double check hook. (Hook onto bar on 1 ton if available).
Tighten strap. Strap binder latch slipping out of slot. Load bar slipping out of strap binder hole. Strap breaking. Cut from burs.
Check strap binder latch before releasing load bar. Put load bar completely through strap binder hole. Check strap for cuts, tares and frays. Put corner protectors on sharp edges that come in contact with the strap. Wear gloves.
Final cinching of strap.
Bar slipping and hitting driver on head.
Push down on bar below shoulders.
Straining should or back
Push, don’t pull and use your weight.
Page 18 of 29 ejpewbjsa100510
JSA BOOK
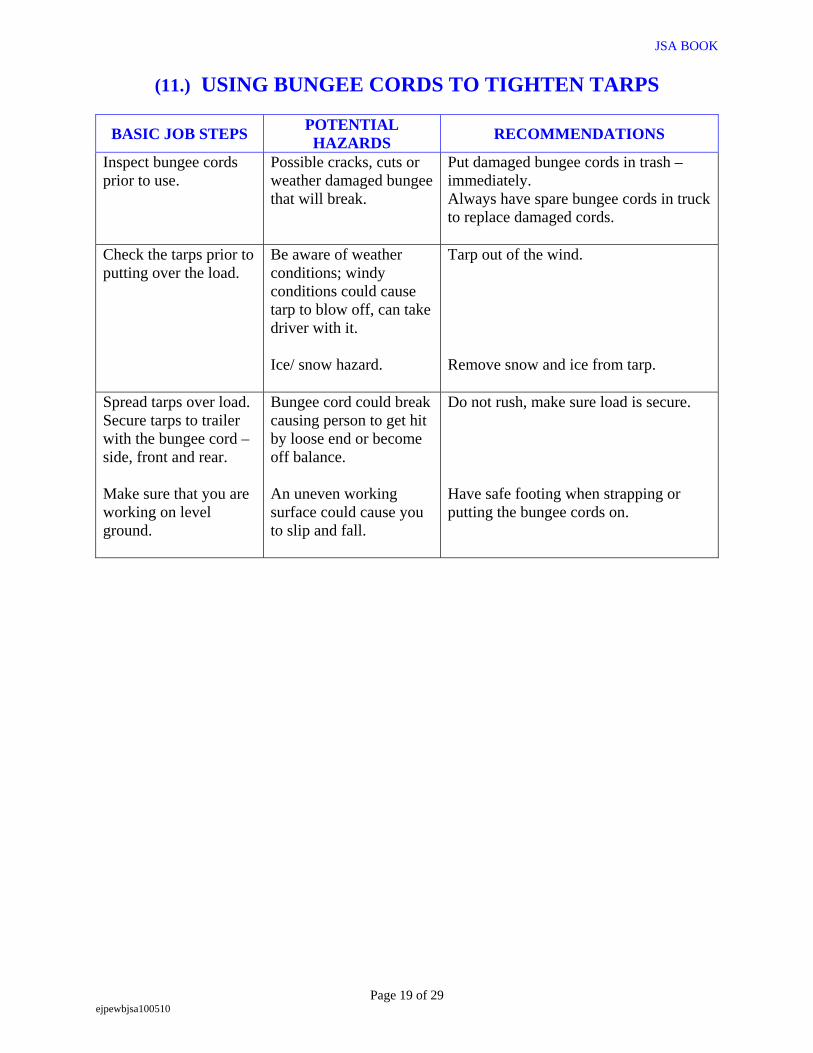
(11.) USING BUNGEE CORDS TO TIGHTEN TARPS
POTENTIAL HAZARDS BASIC JOB STEPS RECOMMENDATIONS
Inspect bungee cords prior to use.
Possible cracks, cuts or weather damaged bungee that will break.
Put damaged bungee cords in trash – immediately. Always have spare bungee cords in truck to replace damaged cords.
Check the tarps prior to putting over the load.
Be aware of weather conditions; windy conditions could cause tarp to blow off, can take driver with it. Ice/ snow hazard.
Tarp out of the wind. Remove snow and ice from tarp.
Spread tarps over load. Secure tarps to trailer with the bungee cord – side, front and rear. Make sure that you are working on level ground.
Bungee cord could break causing person to get hit by loose end or become off balance.
Do not rush, make sure load is secure.
An uneven working surface could cause you to slip and fall.
Have safe footing when strapping or putting the bungee cords on.
Page 19 of 29 ejpewbjsa100510
JSA BOOK
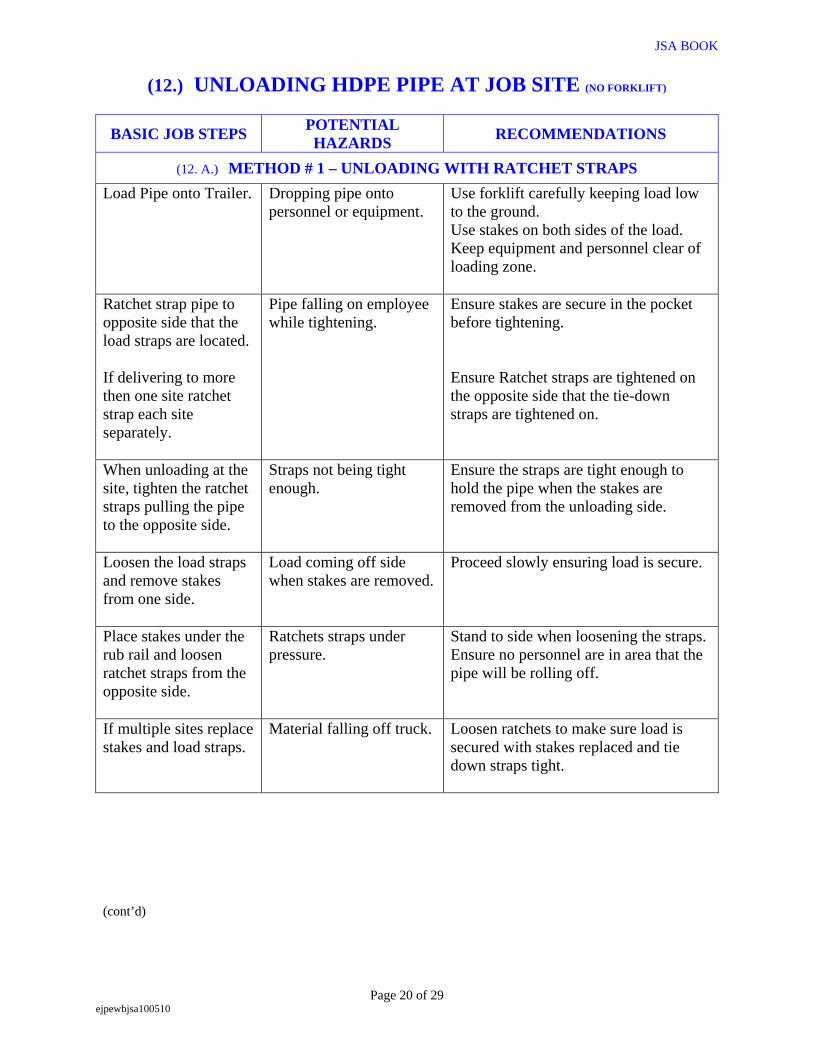
(12.) UNLOADING HDPE PIPE AT JOB SITE (NO FORKLIFT)
BASIC JOB STEPS POTENTIAL HAZARDS RECOMMENDATIONS
(12. A.) METHOD # 1 – UNLOADING WITH RATCHET STRAPS Load Pipe onto Trailer. Dropping pipe onto
personnel or equipment. Use forklift carefully keeping load low to the ground. Use stakes on both sides of the load. Keep equipment and personnel clear of loading zone.
Ratchet strap pipe to opposite side that the load straps are located. If delivering to more then one site ratchet strap each site separately.
Pipe falling on employee while tightening.
Ensure stakes are secure in the pocket before tightening. Ensure Ratchet straps are tightened on the opposite side that the tie-down straps are tightened on.
When unloading at the site, tighten the ratchet straps pulling the pipe to the opposite side.
Straps not being tight enough.
Ensure the straps are tight enough to hold the pipe when the stakes are removed from the unloading side.
Loosen the load straps and remove stakes from one side.
Load coming off side when stakes are removed.
Proceed slowly ensuring load is secure.
Place stakes under the rub rail and loosen ratchet straps from the opposite side.
Ratchets straps under pressure.
Stand to side when loosening the straps. Ensure no personnel are in area that the pipe will be rolling off.
If multiple sites replace stakes and load straps.
Material falling off truck. Loosen ratchets to make sure load is secured with stakes replaced and tie down straps tight.
(cont’d)
Page 20 of 29 ejpewbjsa100510
JSA BOOK
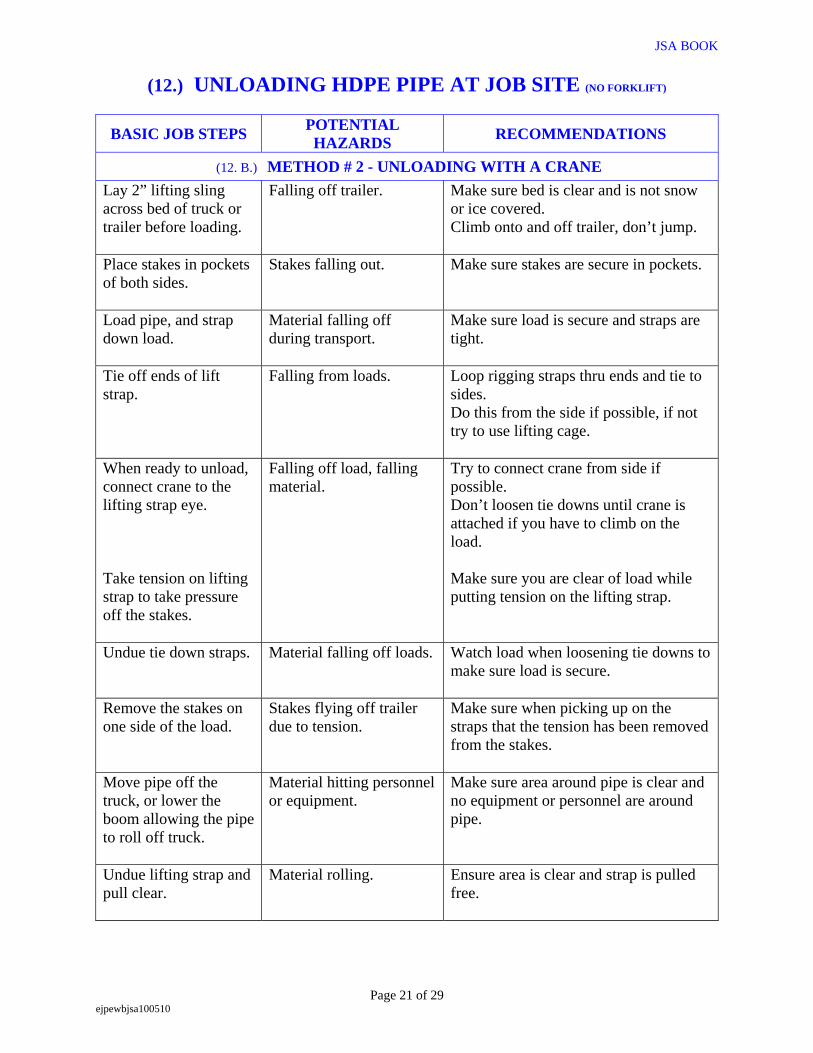
(12.) UNLOADING HDPE PIPE AT JOB SITE (NO FORKLIFT)
POTENTIAL HAZARDS RECOMMENDATIONS BASIC JOB STEPS
(12. B.) METHOD # 2 - UNLOADING WITH A CRANE Lay 2” lifting sling across bed of truck or trailer before loading.
Falling off trailer. Make sure bed is clear and is not snow or ice covered. Climb onto and off trailer, don’t jump.
Place stakes in pockets of both sides.
Stakes falling out. Make sure stakes are secure in pockets.
Load pipe, and strap down load.
Material falling off during transport.
Make sure load is secure and straps are tight.
Tie off ends of lift strap.
Falling from loads. Loop rigging straps thru ends and tie to sides. Do this from the side if possible, if not try to use lifting cage.
When ready to unload, connect crane to the lifting strap eye.
Falling off load, falling material.
Try to connect crane from side if possible. Don’t loosen tie downs until crane is attached if you have to climb on the load.
Take tension on lifting strap to take pressure off the stakes.
Make sure you are clear of load while putting tension on the lifting strap.
Undue tie down straps. Material falling off loads. Watch load when loosening tie downs to make sure load is secure.
Remove the stakes on one side of the load.
Stakes flying off trailer due to tension.
Make sure when picking up on the straps that the tension has been removed from the stakes.
Move pipe off the truck, or lower the boom allowing the pipe to roll off truck.
Material hitting personnel or equipment.
Make sure area around pipe is clear and no equipment or personnel are around pipe.
Undue lifting strap and pull clear.
Material rolling. Ensure area is clear and strap is pulled free.
Page 21 of 29 ejpewbjsa100510
JSA BOOK
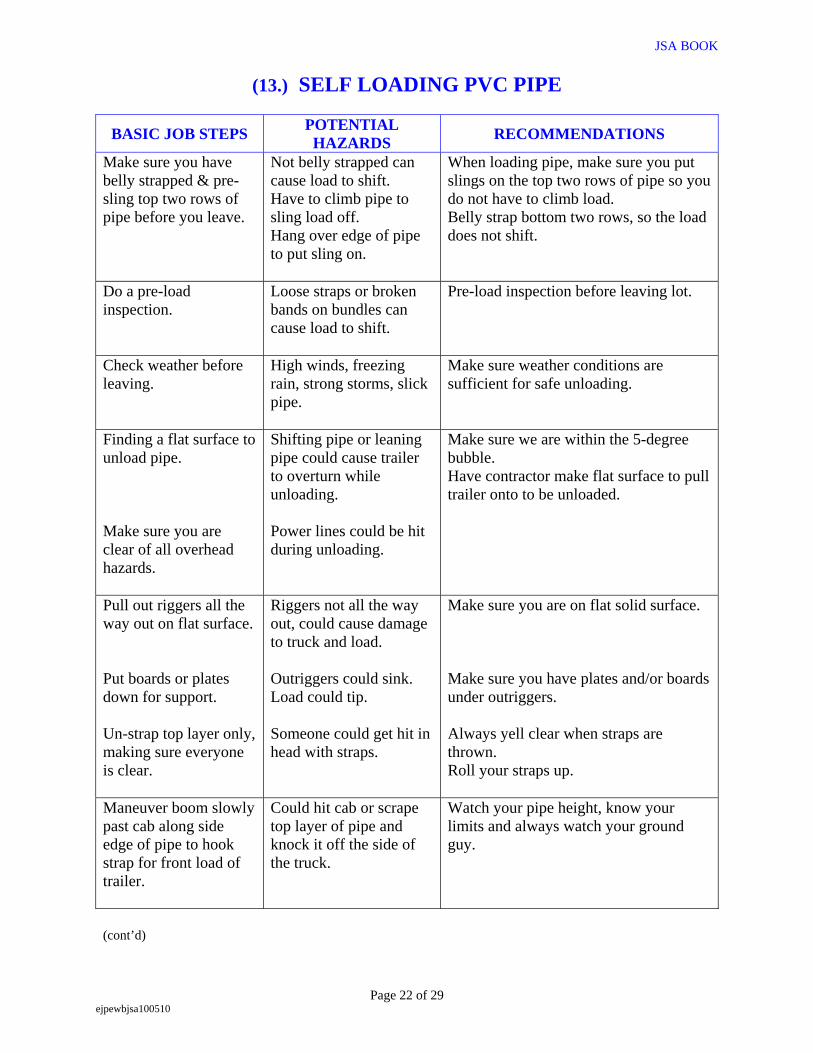
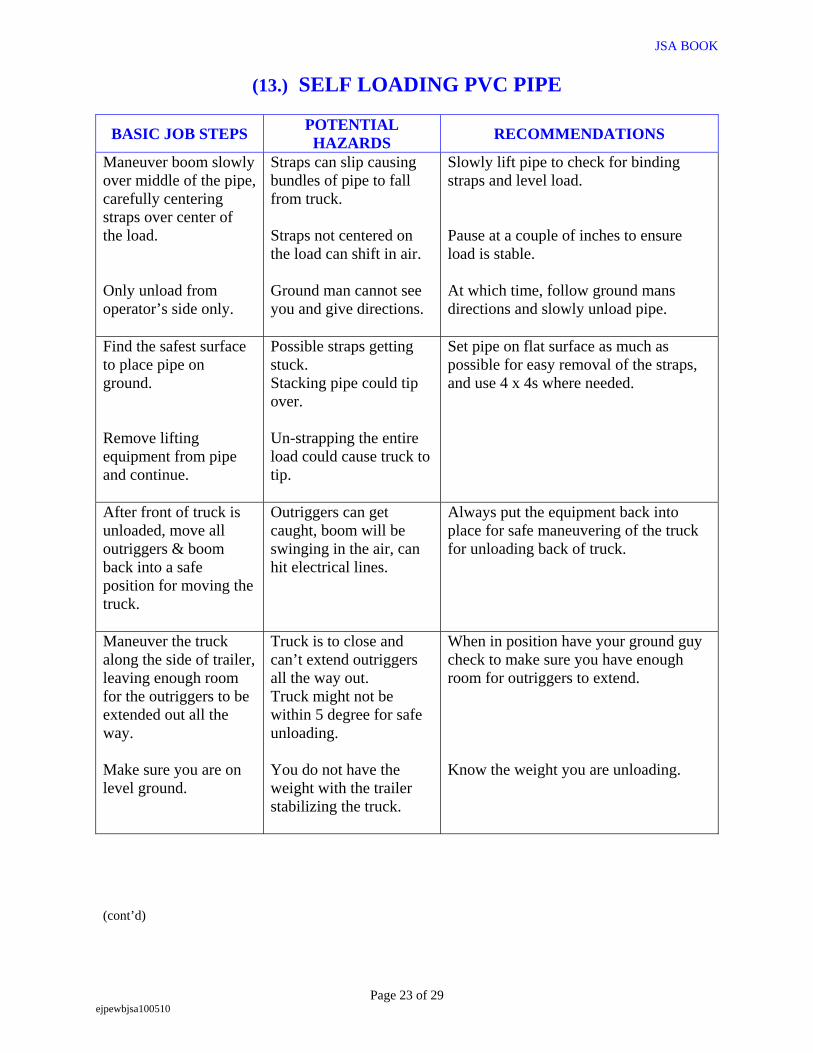
(13.) SELF LOADING PVC PIPE
BASIC JOB STEPS POTENTIAL HAZARDS RECOMMENDATIONS
Make sure you have belly strapped & pre-sling top two rows of pipe before you leave.
Not belly strapped can cause load to shift. Have to climb pipe to sling load off. Hang over edge of pipe to put sling on.
When loading pipe, make sure you put slings on the top two rows of pipe so you do not have to climb load. Belly strap bottom two rows, so the load does not shift.
Do a pre-load inspection.
Loose straps or broken bands on bundles can cause load to shift.
Pre-load inspection before leaving lot.
Check weather before leaving.
High winds, freezing rain, strong storms, slick pipe.
Make sure weather conditions are sufficient for safe unloading.
Finding a flat surface to unload pipe. Make sure you are clear of all overhead hazards.
Shifting pipe or leaning pipe could cause trailer to overturn while unloading. Power lines could be hit during unloading.
Make sure we are within the 5-degree bubble. Have contractor make flat surface to pull trailer onto to be unloaded.
Pull out riggers all the way out on flat surface. Put boards or plates down for support. Un-strap top layer only, making sure everyone is clear.
Riggers not all the way out, could cause damage to truck and load. Outriggers could sink. Load could tip. Someone could get hit in head with straps.
Make sure you are on flat solid surface. Make sure you have plates and/or boards under outriggers. Always yell clear when straps are thrown. Roll your straps up.
Maneuver boom slowly past cab along side edge of pipe to hook strap for front load of trailer.
Could hit cab or scrape top layer of pipe and knock it off the side of the truck.
Watch your pipe height, know your limits and always watch your ground guy.
(cont’d)
Page 22 of 29 ejpewbjsa100510
JSA BOOK
(13.) SELF LOADING PVC PIPE
BASIC JOB STEPS POTENTIAL HAZARDS RECOMMENDATIONS
Maneuver boom slowly over middle of the pipe, carefully centering straps over center of the load.
Straps can slip causing bundles of pipe to fall from truck. Straps not centered on the load can shift in air. Ground man cannot see you and give directions.
Slowly lift pipe to check for binding straps and level load. Pause at a couple of inches to ensure load is stable. At which time, follow ground mans directions and slowly unload pipe.
Only unload from operator’s side only.
Find the safest surface to place pipe on ground. Remove lifting equipment from pipe and continue.
Possible straps getting stuck. Stacking pipe could tip over. Un-strapping the entire load could cause truck to tip.
Set pipe on flat surface as much as possible for easy removal of the straps, and use 4 x 4s where needed.
After front of truck is unloaded, move all outriggers & boom back into a safe position for moving the truck.
Outriggers can get caught, boom will be swinging in the air, can hit electrical lines.
Always put the equipment back into place for safe maneuvering of the truck for unloading back of truck.
Maneuver the truck along the side of trailer, leaving enough room for the outriggers to be extended out all the way. Make sure you are on level ground.
Truck is to close and can’t extend outriggers all the way out. Truck might not be within 5 degree for safe unloading. You do not have the weight with the trailer stabilizing the truck.
When in position have your ground guy check to make sure you have enough room for outriggers to extend. Know the weight you are unloading.
(cont’d)
Page 23 of 29 ejpewbjsa100510
JSA BOOK
(13.) SELF LOADING PVC PIPE
BASIC JOB STEPS POTENTIAL HAZARDS RECOMMENDATIONS
Unload the back the same way you unloaded the front.
Same or more possible hazards could occur. With out the trailer hooked up the truck it will tip easier and possible teeter-totter.
Make sure you follow all of the above precautions.
After unloading all material, hook truck back up to trailer.
Rocks and other items left on bed can fall off and hit car. No lights on trailer.
Do a trip inspection and make sure trailer is clean of all debris.
You should always do a trip inspection before you leave.
Page 24 of 29 ejpewbjsa100510
JSA BOOK
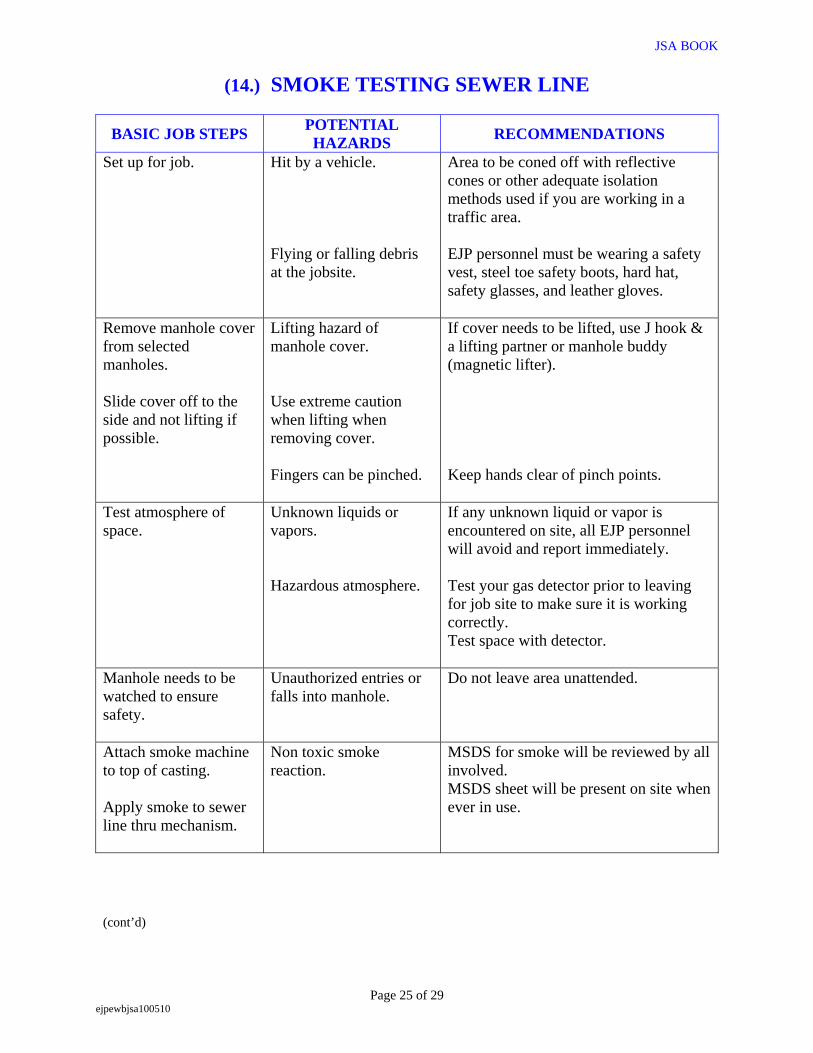
(14.) SMOKE TESTING SEWER LINE
BASIC JOB STEPS POTENTIAL HAZARDS RECOMMENDATIONS
Set up for job.
Hit by a vehicle. Flying or falling debris at the jobsite.
Area to be coned off with reflective cones or other adequate isolation methods used if you are working in a traffic area. EJP personnel must be wearing a safety vest, steel toe safety boots, hard hat, safety glasses, and leather gloves.
Remove manhole cover from selected manholes. Slide cover off to the side and not lifting if possible.
Lifting hazard of manhole cover. Use extreme caution when lifting when removing cover. Fingers can be pinched.
If cover needs to be lifted, use J hook & a lifting partner or manhole buddy (magnetic lifter). Keep hands clear of pinch points.
Test atmosphere of space.
Unknown liquids or vapors. Hazardous atmosphere.
If any unknown liquid or vapor is encountered on site, all EJP personnel will avoid and report immediately. Test your gas detector prior to leaving for job site to make sure it is working correctly. Test space with detector.
Manhole needs to be watched to ensure safety.
Unauthorized entries or falls into manhole.
Do not leave area unattended.
Attach smoke machine to top of casting. Apply smoke to sewer line thru mechanism.
Non toxic smoke reaction.
MSDS for smoke will be reviewed by all involved. MSDS sheet will be present on site when ever in use.
(cont’d)
Page 25 of 29 ejpewbjsa100510
JSA BOOK
(14.) SMOKE TESTING SEWER LINE
BASIC JOB STEPS POTENTIAL HAZARDS RECOMMENDATIONS
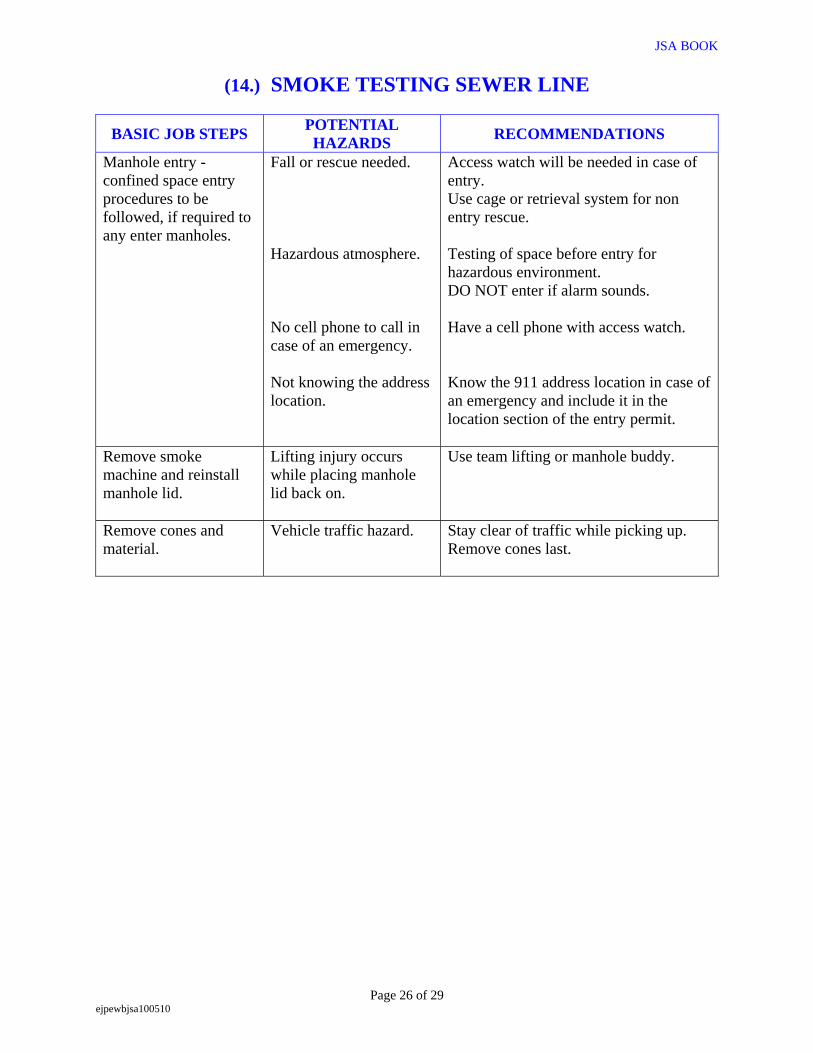
Manhole entry - confined space entry procedures to be followed, if required to any enter manholes.
Fall or rescue needed. Hazardous atmosphere. No cell phone to call in case of an emergency. Not knowing the address location.
Access watch will be needed in case of entry. Use cage or retrieval system for non entry rescue. Testing of space before entry for hazardous environment. DO NOT enter if alarm sounds. Have a cell phone with access watch. Know the 911 address location in case of an emergency and include it in the location section of the entry permit.
Remove smoke machine and reinstall manhole lid.
Lifting injury occurs while placing manhole lid back on.
Use team lifting or manhole buddy.
Remove cones and material.
Vehicle traffic hazard. Stay clear of traffic while picking up. Remove cones last.
Page 26 of 29 ejpewbjsa100510
JSA BOOK
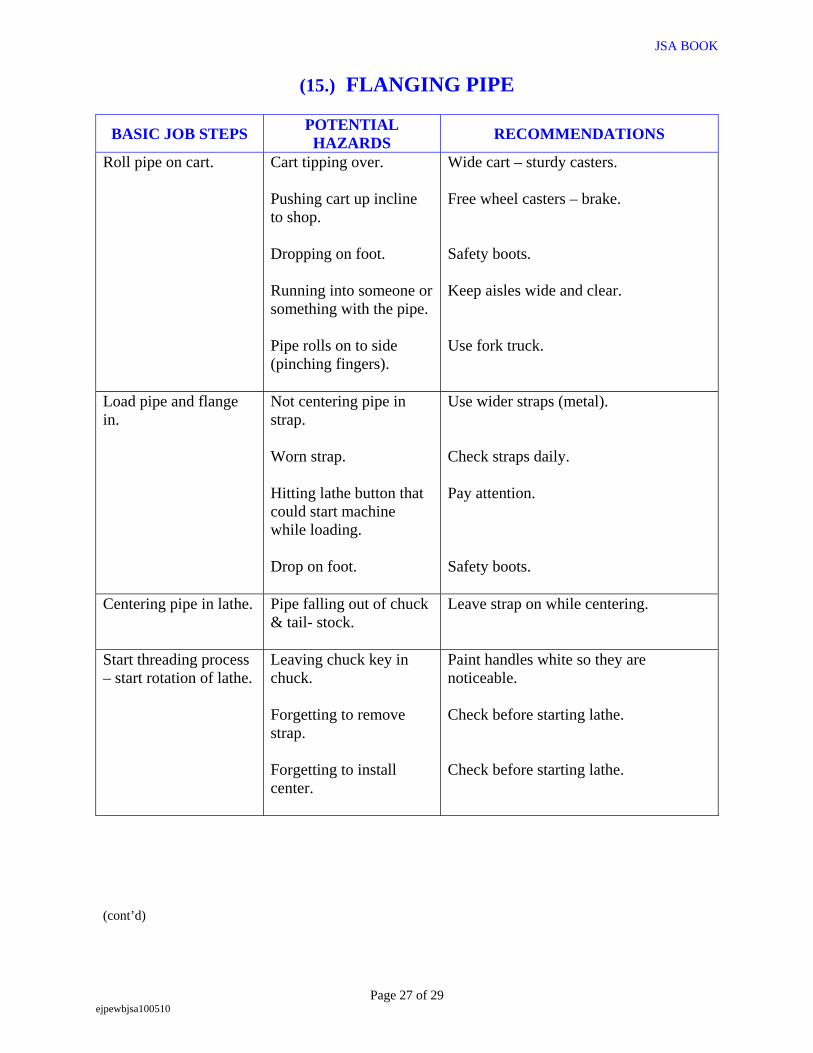
(15.) FLANGING PIPE
BASIC JOB STEPS POTENTIAL HAZARDS RECOMMENDATIONS
Roll pipe on cart. Cart tipping over. Pushing cart up incline to shop. Dropping on foot. Running into someone or something with the pipe. Pipe rolls on to side (pinching fingers).
Wide cart – sturdy casters. Free wheel casters – brake. Safety boots. Keep aisles wide and clear. Use fork truck.
Load pipe and flange in.
Not centering pipe in strap. Worn strap. Hitting lathe button that could start machine while loading. Drop on foot.
Use wider straps (metal). Check straps daily. Pay attention. Safety boots.
Centering pipe in lathe. Pipe falling out of chuck & tail- stock.
Leave strap on while centering.
Start threading process – start rotation of lathe.
Leaving chuck key in chuck. Forgetting to remove strap. Forgetting to install center.
Paint handles white so they are noticeable. Check before starting lathe. Check before starting lathe.
(cont’d)
Page 27 of 29 ejpewbjsa100510
JSA BOOK
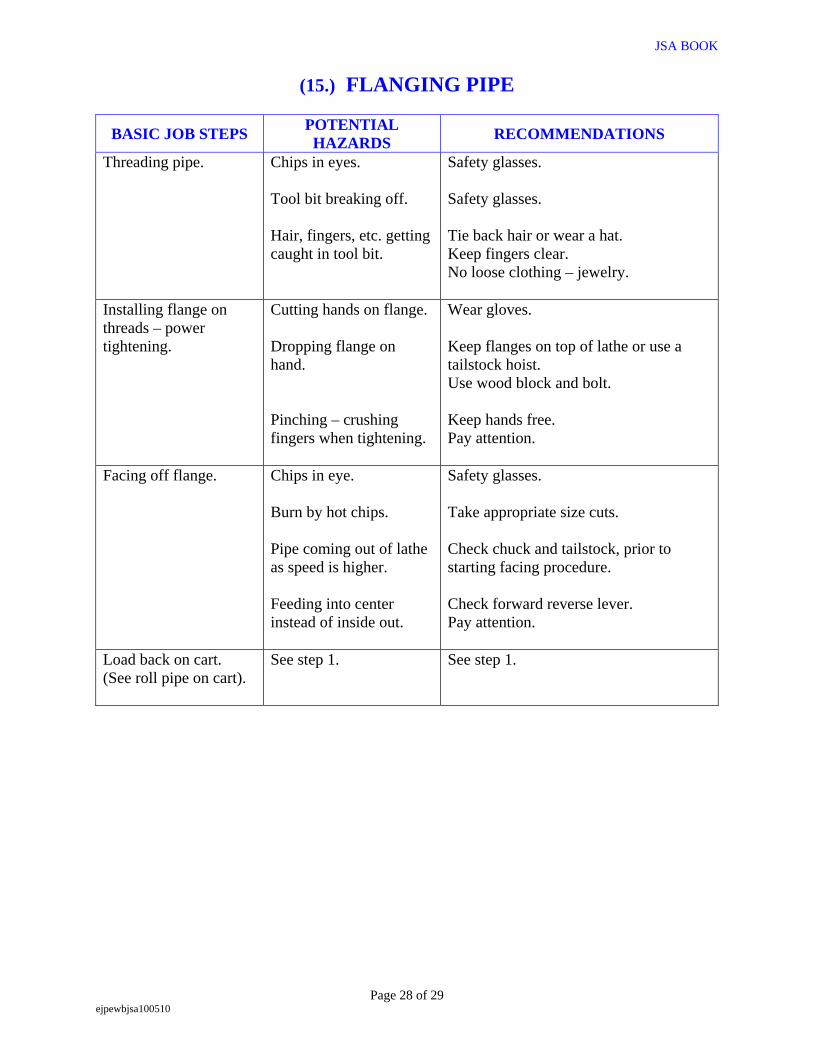
(15.) FLANGING PIPE
BASIC JOB STEPS POTENTIAL HAZARDS RECOMMENDATIONS
Threading pipe. Chips in eyes. Tool bit breaking off. Hair, fingers, etc. getting caught in tool bit.
Safety glasses. Safety glasses. Tie back hair or wear a hat. Keep fingers clear. No loose clothing – jewelry.
Installing flange on threads – power tightening.
Cutting hands on flange. Dropping flange on hand. Pinching – crushing fingers when tightening.
Wear gloves. Keep flanges on top of lathe or use a tailstock hoist. Use wood block and bolt. Keep hands free. Pay attention.
Facing off flange. Chips in eye. Safety glasses. Take appropriate size cuts.
Burn by hot chips. Pipe coming out of lathe as speed is higher. Feeding into center instead of inside out.
Check chuck and tailstock, prior to starting facing procedure. Check forward reverse lever. Pay attention.
Load back on cart. (See roll pipe on cart).
See step 1. See step 1.
Page 28 of 29 ejpewbjsa100510
JSA BOOK
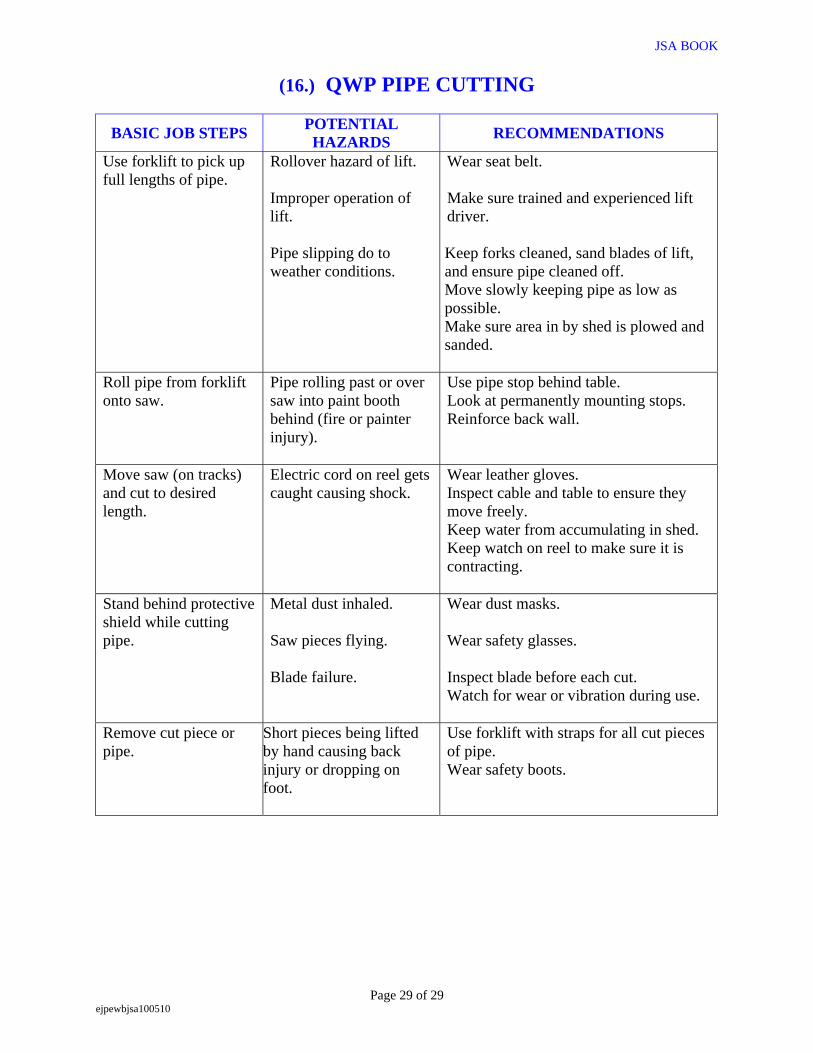
(16.) QWP PIPE CUTTING
BASIC JOB STEPS POTENTIAL HAZARDS RECOMMENDATIONS
Use forklift to pick up full lengths of pipe.
Rollover hazard of lift.
Improper operation of lift. Pipe slipping do to weather conditions.
Wear seat belt. Make sure trained and experienced lift driver. Keep forks cleaned, sand blades of lift, and ensure pipe cleaned off. Move slowly keeping pipe as low as possible. Make sure area in by shed is plowed and sanded.
Roll pipe from forklift onto saw.
Pipe rolling past or over saw into paint booth behind (fire or painter injury).
Use pipe stop behind table. Look at permanently mounting stops. Reinforce back wall.
Move saw (on tracks) and cut to desired length.
Electric cord on reel gets caught causing shock.
Wear leather gloves. Inspect cable and table to ensure they move freely. Keep water from accumulating in shed. Keep watch on reel to make sure it is contracting.
Stand behind protective shield while cutting pipe.
Metal dust inhaled. Wear dust masks. Saw pieces flying. Wear safety glasses. Blade failure. Inspect blade before each cut. Watch for wear or vibration during use.
Remove cut piece or pipe.
Short pieces being lifted by hand causing back injury or dropping on foot.
Use forklift with straps for all cut pieces of pipe. Wear safety boots.
Page 29 of 29 ejpewbjsa100510