joomla 2.5 manual · 1 joomla 2.5 manual websitedesign.co.za contents introduction to the getting...
TRANSCRIPT
All information presented in the document has been acquired from http://docs.joomla.org to assist you with your website
JOOMLA 2.5 MANUAL
WEBSITEDESIGN.CO.ZA
1 JOOMLA 2.5
MANUAL
WEBSITEDESIGN.CO.ZA
CONTENTS
Introduction to the Getting Started series .............................................................................................................................. 3
User Management ................................................................................................................................................................................... 3
Logging in or out of the Administrator back-end ................................................................................................................................... 3
Adding, deleting or editing a user ........................................................................................................................................................ 4
How to create a new user for your website ...................................................................................................................................... 4
How to delete a user for your website ............................................................................................................................................. 4
Content Management .............................................................................................................................................................................. 5
Adding a new article ............................................................................................................................................................................ 5
Adding a menu item which points to an Article ..................................................................................................................................... 6
Tutorial .......................................................................................................................................................................................... 6
Inserting a heading into an Article ...................................................................................................................................................... 11
Inserting a list into an Article .............................................................................................................................................................. 11
Inserting a table into an Article .......................................................................................................................................................... 12
Modifying a table in an Article ............................................................................................................................................................ 12
Inserting a link to another website into an Article ................................................................................................................................ 13
Removing a link from an Article ......................................................................................................................................................... 14
Removing email, print or PDF icons from an Article ............................................................................................................................ 15
Editing the sp accordian (FAQ) .......................................................................................................................................................... 15
How to manage your Top slideshow .................................................................................................................................................. 15
How to Manage your Contact Form ................................................................................................................................................... 16
Menu Management ................................................................................................................................................................................ 16
Adding a new menu .......................................................................................................................................................................... 16
Tutorial ........................................................................................................................................................................................ 16
Changing the order of items in a menu .............................................................................................................................................. 17
Image Management ............................................................................................................................................................................... 18
Adding images .................................................................................................................................................................................. 18
BACK TO
BASICS
This Manual will provide
simple step by step
instructions on how to do
contextual and imagery
changes to your website.
2 Adding an image to an article ............................................................................................................................................................ 18
Uploading images using the Insert Image screen ............................................................................................................................... 20
Gallery Management ............................................................................................................................................................................. 20
How to Manage your Admiror Gallery ................................................................................................................................................ 20
Delete/Remove images: ............................................................................................................................................................... 20
How to Manage your AccordianGallery .............................................................................................................................................. 21
To add images ............................................................................................................................................................................. 21
Delete/Remove images: ............................................................................................................................................................... 21
Create Category ........................................................................................................................................................................... 21
Edit Category ............................................................................................................................................................................... 21
Managing Your Blog .............................................................................................................................................................................. 20
The Basic Options for the Blog Article ........................................................................................................................................... 21
The Basic Options for the Blog Categories .................................................................................................................................... 21
Additional information ............................................................................................................................................................................ 27
Information ....................................................................................................................................................................................... 27
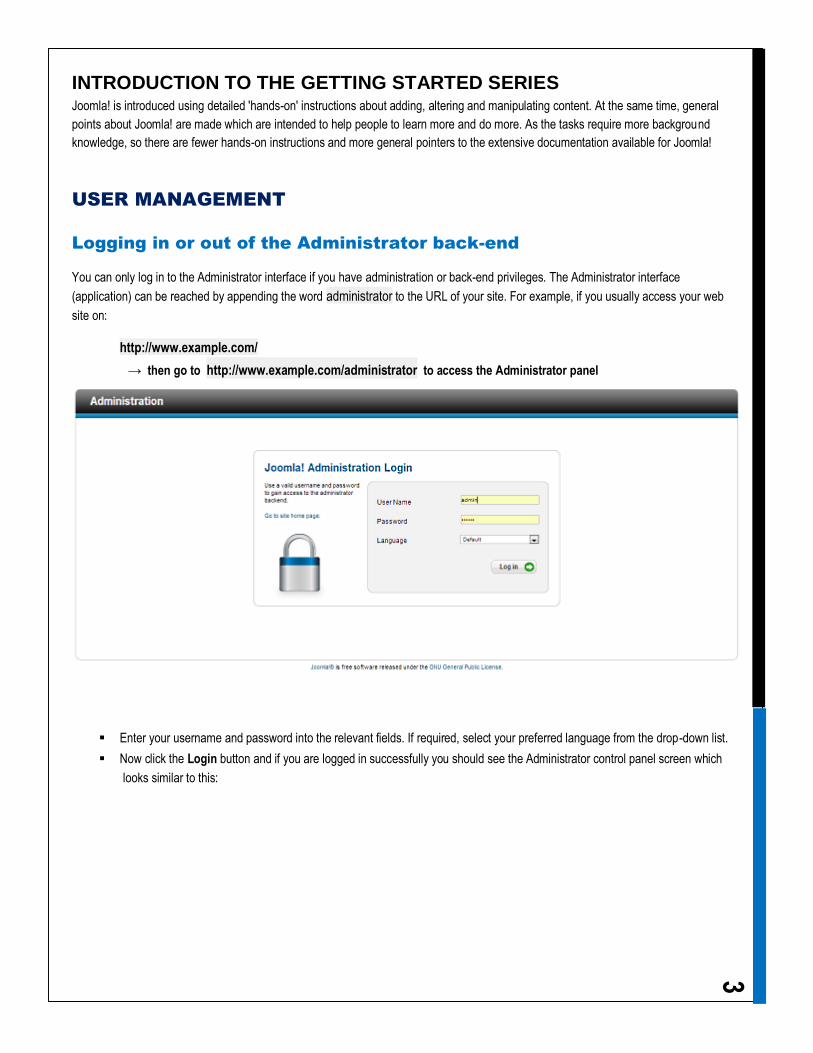
3 INTRODUCTION TO THE GETTING STARTED SERIES
Joomla! is introduced using detailed 'hands-on' instructions about adding, altering and manipulating content. At the same time, general
points about Joomla! are made which are intended to help people to learn more and do more. As the tasks require more background
knowledge, so there are fewer hands-on instructions and more general pointers to the extensive documentation available for Joomla!
USER MANAGEMENT
Logging in or out of the Administrator back-end
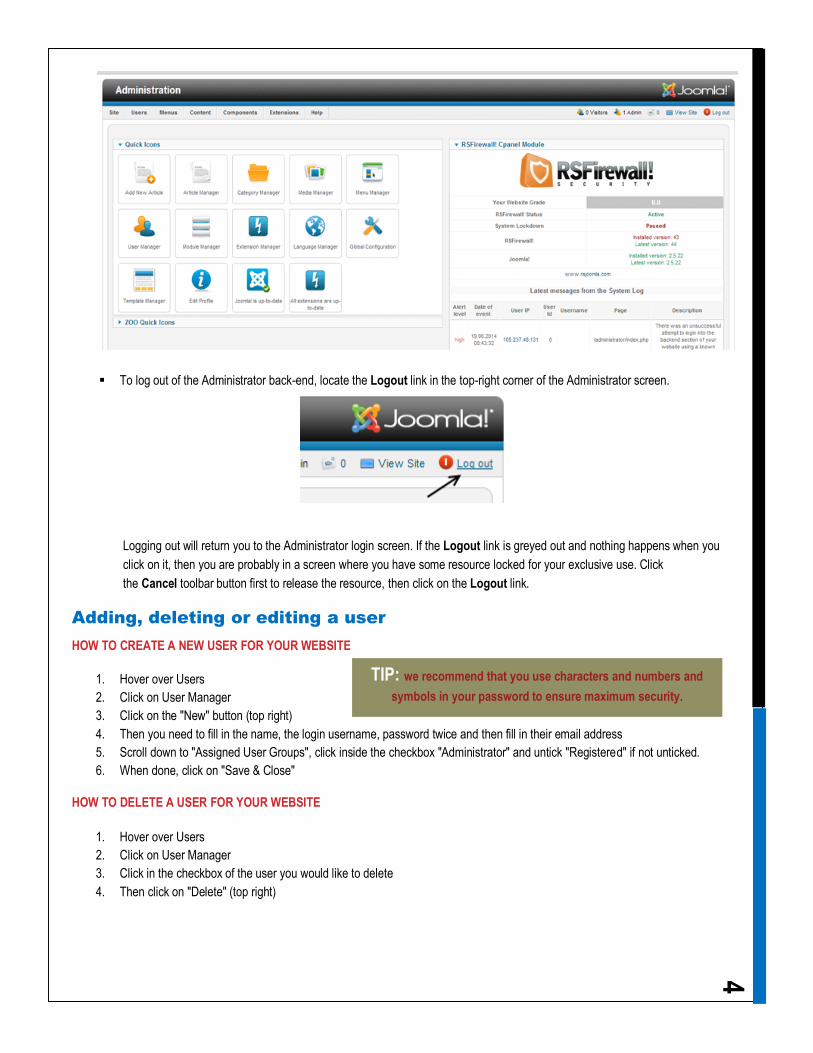
You can only log in to the Administrator interface if you have administration or back-end privileges. The Administrator interface
(application) can be reached by appending the word administrator to the URL of your site. For example, if you usually access your web
site on:
http://www.example.com/
→ then go to http://www.example.com/administrator to access the Administrator panel
Enter your username and password into the relevant fields. If required, select your preferred language from the drop-down list.
Now click the Login button and if you are logged in successfully you should see the Administrator control panel screen which
looks similar to this:
4
TIP: we recommend that you use characters and numbers and
symbols in your password to ensure maximum security.
To log out of the Administrator back-end, locate the Logout link in the top-right corner of the Administrator screen.
Logging out will return you to the Administrator login screen. If the Logout link is greyed out and nothing happens when you
click on it, then you are probably in a screen where you have some resource locked for your exclusive use. Click
the Cancel toolbar button first to release the resource, then click on the Logout link.
Adding, deleting or editing a user
HOW TO CREATE A NEW USER FOR YOUR WEBSITE
1. Hover over Users
2. Click on User Manager
3. Click on the "New" button (top right)
4. Then you need to fill in the name, the login username, password twice and then fill in their email address
5. Scroll down to "Assigned User Groups", click inside the checkbox "Administrator" and untick "Registered" if not unticked.
6. When done, click on "Save & Close"
HOW TO DELETE A USER FOR YOUR WEBSITE
1. Hover over Users
2. Click on User Manager
3. Click in the checkbox of the user you would like to delete
4. Then click on "Delete" (top right)
5 CONTENT MANAGEMENT
Adding a new article
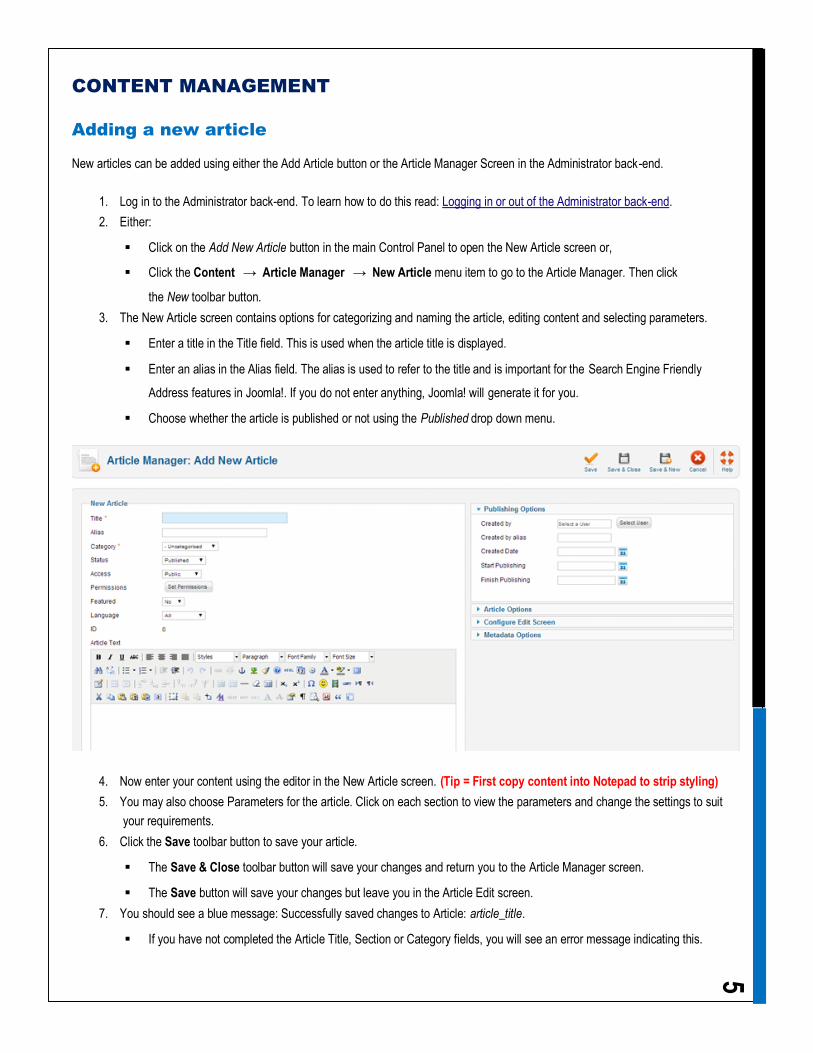
New articles can be added using either the Add Article button or the Article Manager Screen in the Administrator back-end.
1. Log in to the Administrator back-end. To learn how to do this read: Logging in or out of the Administrator back-end.
2. Either:
Click on the Add New Article button in the main Control Panel to open the New Article screen or,
Click the Content → Article Manager → New Article menu item to go to the Article Manager. Then click
the New toolbar button.
3. The New Article screen contains options for categorizing and naming the article, editing content and selecting parameters.
Enter a title in the Title field. This is used when the article title is displayed.
Enter an alias in the Alias field. The alias is used to refer to the title and is important for the Search Engine Friendly
Address features in Joomla!. If you do not enter anything, Joomla! will generate it for you.
Choose whether the article is published or not using the Published drop down menu.
4. Now enter your content using the editor in the New Article screen. (Tip = First copy content into Notepad to strip styling)
5. You may also choose Parameters for the article. Click on each section to view the parameters and change the settings to suit
your requirements.
6. Click the Save toolbar button to save your article.
The Save & Close toolbar button will save your changes and return you to the Article Manager screen.
The Save button will save your changes but leave you in the Article Edit screen.
7. You should see a blue message: Successfully saved changes to Article: article_title.
If you have not completed the Article Title, Section or Category fields, you will see an error message indicating this.
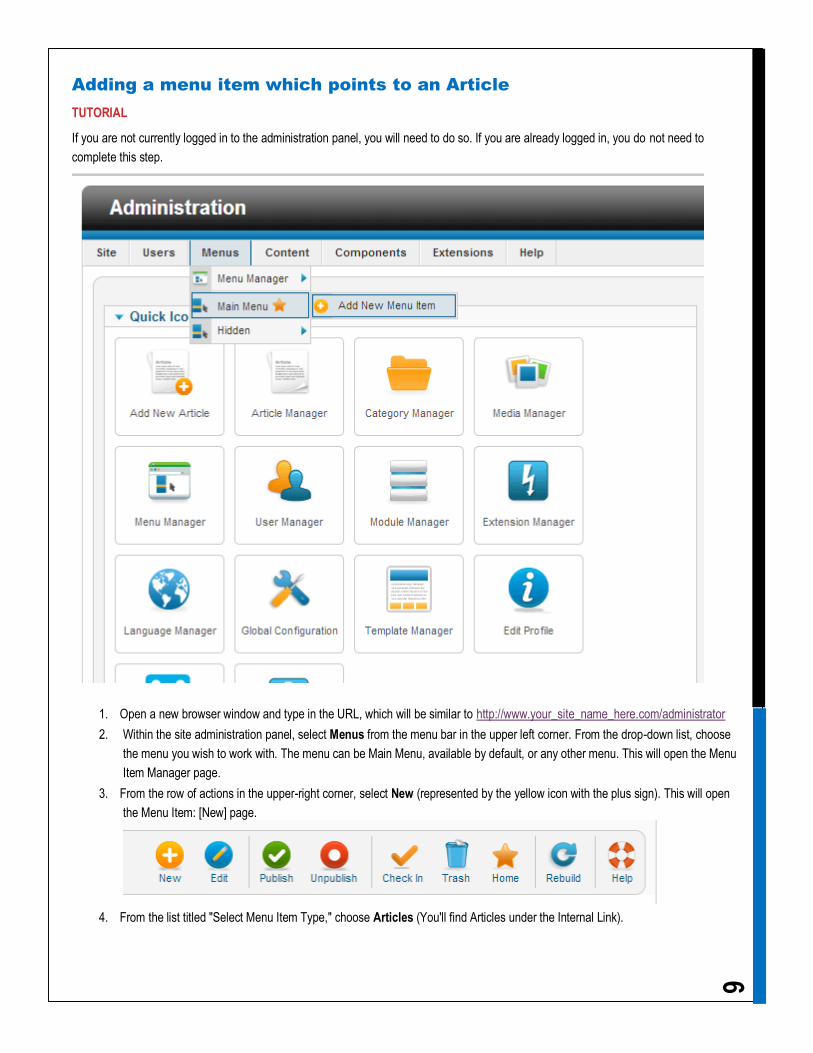
6 Adding a menu item which points to an Article
TUTORIAL
If you are not currently logged in to the administration panel, you will need to do so. If you are already logged in, you do not need to
complete this step.
1. Open a new browser window and type in the URL, which will be similar to http://www.your_site_name_here.com/administrator
2. Within the site administration panel, select Menus from the menu bar in the upper left corner. From the drop-down list, choose
the menu you wish to work with. The menu can be Main Menu, available by default, or any other menu. This will open the Menu
Item Manager page.
3. From the row of actions in the upper-right corner, select New (represented by the yellow icon with the plus sign). This will open
the Menu Item: [New] page.
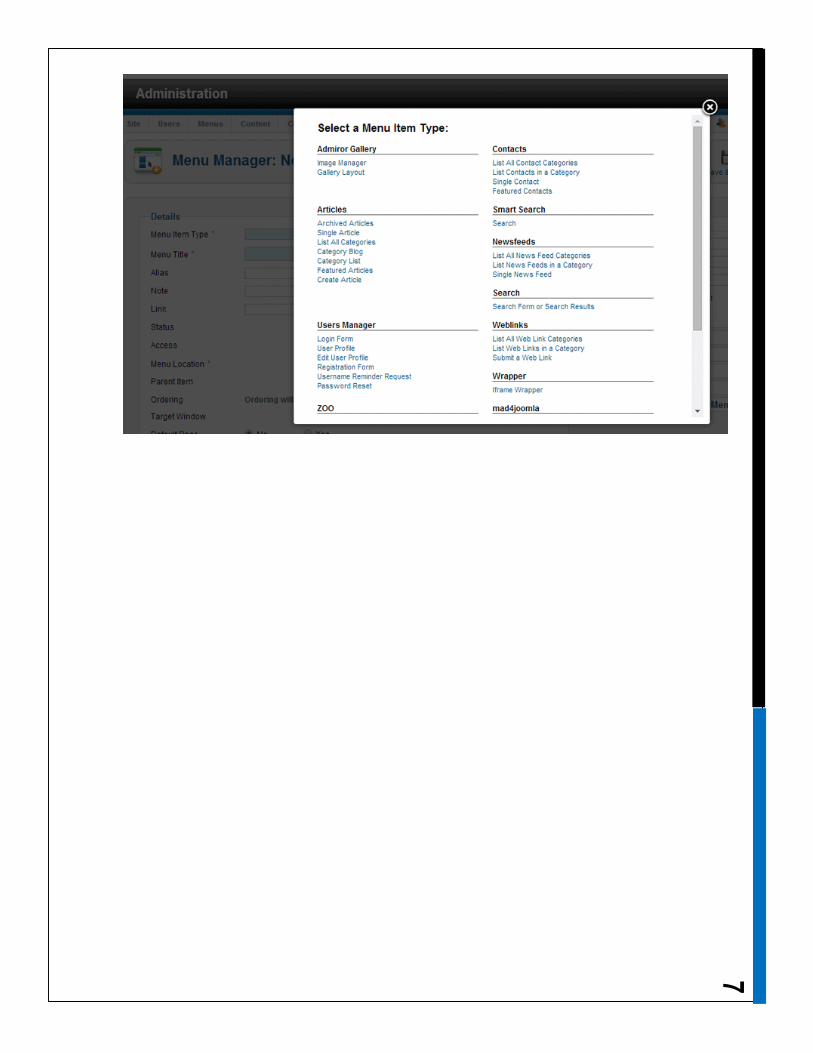
4. From the list titled "Select Menu Item Type," choose Articles (You'll find Articles under the Internal Link).
7
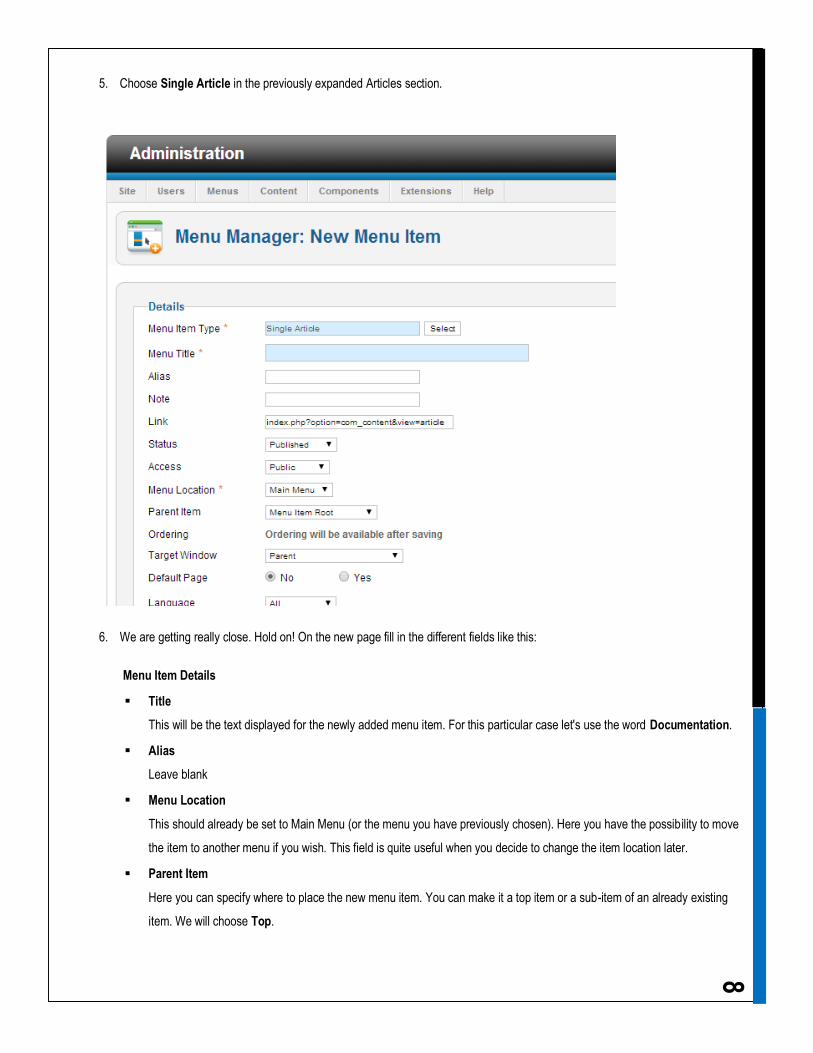
8 5. Choose Single Article in the previously expanded Articles section.
6. We are getting really close. Hold on! On the new page fill in the different fields like this:
Menu Item Details
Title
This will be the text displayed for the newly added menu item. For this particular case let's use the word Documentation.
Alias
Leave blank
Menu Location
This should already be set to Main Menu (or the menu you have previously chosen). Here you have the possibility to move
the item to another menu if you wish. This field is quite useful when you decide to change the item location later.
Parent Item
Here you can specify where to place the new menu item. You can make it a top item or a sub-item of an already existing
item. We will choose Top.
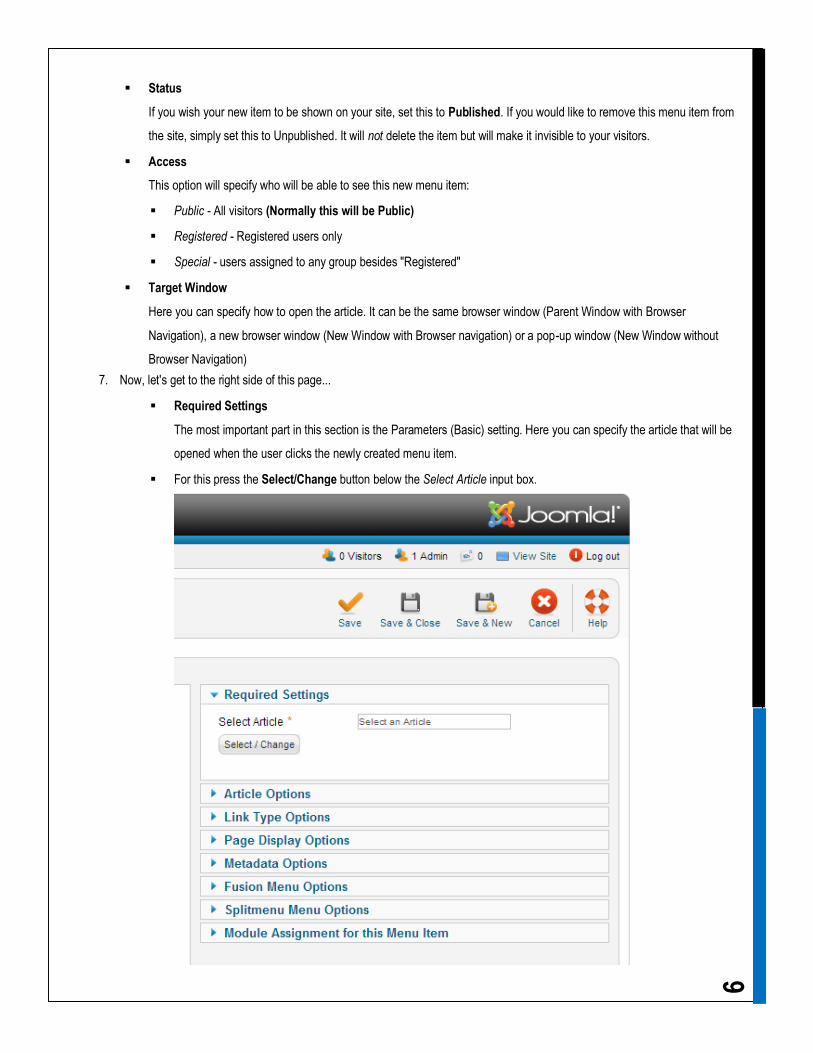
9 Status
If you wish your new item to be shown on your site, set this to Published. If you would like to remove this menu item from
the site, simply set this to Unpublished. It will not delete the item but will make it invisible to your visitors.
Access
This option will specify who will be able to see this new menu item:
Public - All visitors (Normally this will be Public)
Registered - Registered users only
Special - users assigned to any group besides "Registered"
Target Window
Here you can specify how to open the article. It can be the same browser window (Parent Window with Browser
Navigation), a new browser window (New Window with Browser navigation) or a pop-up window (New Window without
Browser Navigation)
7. Now, let's get to the right side of this page...
Required Settings
The most important part in this section is the Parameters (Basic) setting. Here you can specify the article that will be
opened when the user clicks the newly created menu item.
For this press the Select/Change button below the Select Article input box.
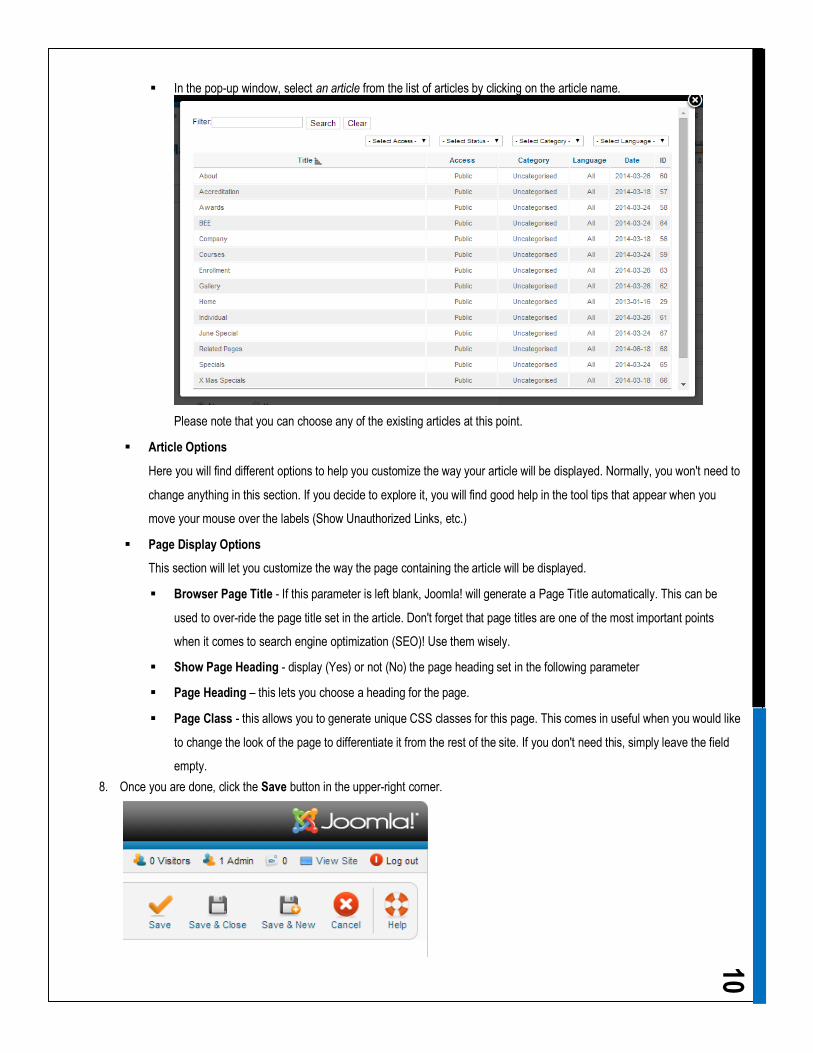
10 In the pop-up window, select an article from the list of articles by clicking on the article name.
Please note that you can choose any of the existing articles at this point.
Article Options
Here you will find different options to help you customize the way your article will be displayed. Normally, you won't need to
change anything in this section. If you decide to explore it, you will find good help in the tool tips that appear when you
move your mouse over the labels (Show Unauthorized Links, etc.)
Page Display Options
This section will let you customize the way the page containing the article will be displayed.
Browser Page Title - If this parameter is left blank, Joomla! will generate a Page Title automatically. This can be
used to over-ride the page title set in the article. Don't forget that page titles are one of the most important points
when it comes to search engine optimization (SEO)! Use them wisely.
Show Page Heading - display (Yes) or not (No) the page heading set in the following parameter
Page Heading – this lets you choose a heading for the page.
Page Class - this allows you to generate unique CSS classes for this page. This comes in useful when you would like
to change the look of the page to differentiate it from the rest of the site. If you don't need this, simply leave the field
empty.
8. Once you are done, click the Save button in the upper-right corner.
11 This will save the new item and place it as the last element (or sub-element, in case of sub-menu items) in the menu. You can
use the green arrows in the Order column to change the item position within the menu.
9. Now, get back to the front-end and refresh the page.
Inserting a heading into an Article
To insert a heading into an Article:
1. Open the Article for editing either by:
Click the Content > Article Manager menu item to go to the Article Manager, select the Article and click the Edit toolbar
button.
Click the Add New Article button in the Control Panel.
If logged in to the Front-end, you have appropriate permissions and are viewing the Article you wish to edit: Click
the Edit toolbar button.
2. Write the heading text in the desired location using the editor.
3. Click (and optionally highlight) the heading text.
4. Select Heading 1 from the --Format-- drop down editor toolbar field.
The primary heading level is 1 but you may choose between 1-6.
To revert to normal paragraph text choose Paragraph.
Note: The style of the heading is determined by styles defined in the site template. In order to create well structured articles it is considered
important to use headings primarly for organising documents rather than for style and presentation.
Inserting a list into an Article
Ordered and unordered lists are common ways of presenting information. To add a list to an article:
1. Open the Article for editing either by:
Click the Content > Article Manager menu item to go to the Article Manager, select the Article and click the Edit toolbar
button.
Clicking the Add New Article button in the Control Panel.
If logged in to the Front-end, you have appropriate permissions and are viewing the Article you wish to edit: Click
the Edit toolbar button.
2. Place the cursor at the position in the article where you want to insert a list.
3. Choose either the Ordered list or Unordered list editor toolbar button.
The default ordered list begins with the numeral 1. and the unordered list starts with a bullet point.
4. Enter the text for each line of the list.
5. Type enter to create a new line and number/bullet.
6. Type enter twice to finish the list or start a new line and click the Ordered List or Unordered List editor toolbar button.
Note the following:
Change the list type part way through by clicking the alternate button.
12 If you create a new ordered list later in your article, the numbering will restart from 1.
Use the Indent and Outdent editor toolbar buttons to create child lists. You may change the type of the child list by clicking the
alternate button.
Inserting a table into an Article
A table may be inserted into an Article as follows:
1. Open the Article for editing either by:
Click the Content > Article Manager menu item to go to the Article Manager, select the Article and click the Edit toolbar
button.
Clicking the Add New Article button in the Control Panel.
If logged in to the Front-end, you have appropriate permissions and are viewing the Article you wish to edit: Click
the Edit toolbar button.
2. Locate the position in the Article editor where you want to insert a table with the cursor.
3. Click the Inserts a new table editor toolbar button. The Insert/Modify table screen opens.
4. Select the number of rows and columns and other parameters according to your requirements.
5. Click the Insert button.
Clicking the Cancel button closes the Insert/Modify table screen.
6. A blank table will be inserted. Type content into individual cells by clicking in a cell and typing.
Modifying a table in an Article
Tables are a very important way of presenting information and data within Articles. The following describes how to modify the basic
elements of tables within an Article. For more information about inserting a table in an article please read: Inserting a table into an Article.
1. Open the Article for editing either by:
Click the Content > Article Manager menu item to go to the Article Manager, select the Article and click the Edit toolbar
button.
Clicking the Add New Article button in the Control Panel.
If logged in to the Front-end, you have appropriate permissions and are viewing the Article you wish to edit: Click
the Edit toolbar button.
2. Locate the table you wish to modify and follow the instructions below as required.
Insert a new row
Select a cell in a row above or below where you wish to insert a new row.
Click the Insert row before or Insert row after editor toolbar button.
Delete a row
Select a cell in the row you wish to delete.
Click the Delete row editor toolbar button.
Insert a new column
13 Select a cell in a column adjacent to where you wish to create a new column.
Click the Insert column before or Insert column after editor toolbar button.
Delete a column
Select a cell in the column you wish to delete.
Click the Remove column editor toolbar button.
Merge a range of cells
Click and highlight a range of cells you wish to merge. This can be done vertically or horizontally.
Click the Merge table cells editor toolbar button.
Split merged cells
You may only split previously merged cells. This is different from most word processing applications and is because of the structure of
HTML tables.
Click the cell you wish to split.
Click the Split merged table cells editor toolbar button.
Note: When a cell is split it will return to the format it was in before being merged. For example: a 3 row, 3 column table contains a merged
cell spanning 3 columns, when this merged cell is split it will return to 3 cells
Inserting a link to another website into an Article
A link to another website (hyperlink) may be inserted in an Article as follows:
1. Open the Article for editing either by:
Click the Content > Article Manager menu item to go to the Article Manager, select the Article and click the Edit toolbar
button.
Click the Add New Article button in the Control Panel.
If logged in to the Front-end, you have appropriate permissions and are viewing the Article you wish to edit: Click
the Edit toolbar button.
14
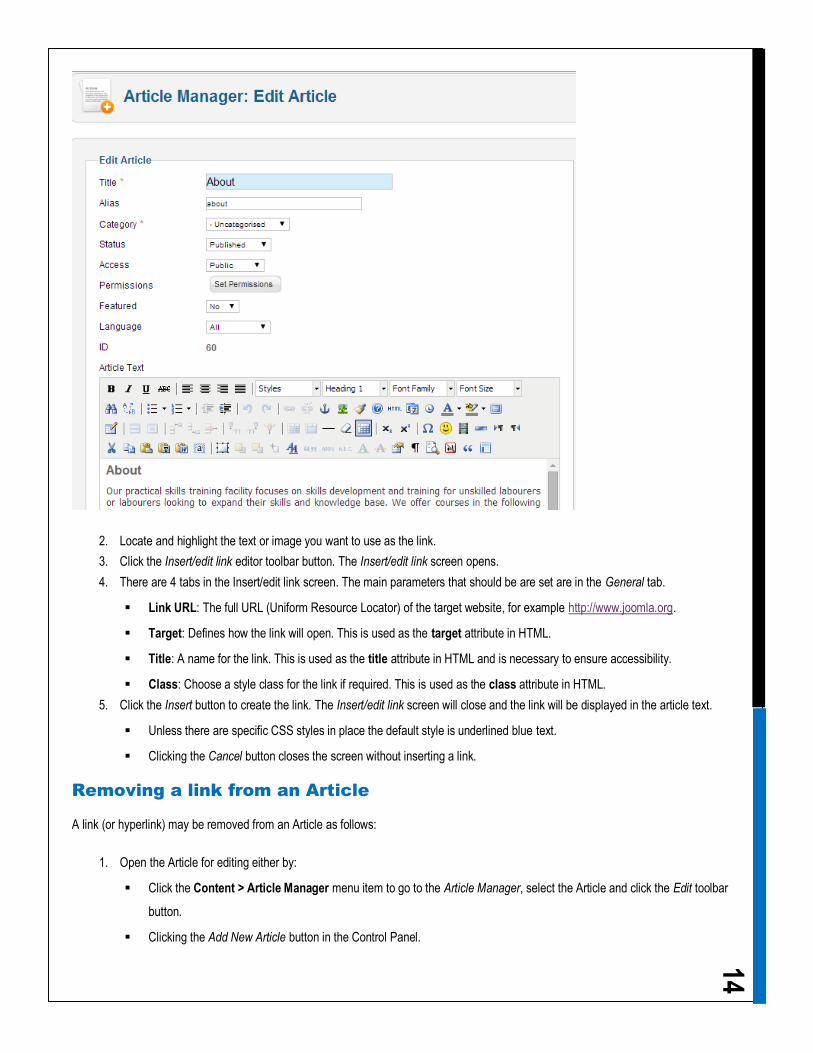
2. Locate and highlight the text or image you want to use as the link.
3. Click the Insert/edit link editor toolbar button. The Insert/edit link screen opens.
4. There are 4 tabs in the Insert/edit link screen. The main parameters that should be are set are in the General tab.
Link URL: The full URL (Uniform Resource Locator) of the target website, for example http://www.joomla.org.
Target: Defines how the link will open. This is used as the target attribute in HTML.
Title: A name for the link. This is used as the title attribute in HTML and is necessary to ensure accessibility.
Class: Choose a style class for the link if required. This is used as the class attribute in HTML.
5. Click the Insert button to create the link. The Insert/edit link screen will close and the link will be displayed in the article text.
Unless there are specific CSS styles in place the default style is underlined blue text.
Clicking the Cancel button closes the screen without inserting a link.
Removing a link from an Article
A link (or hyperlink) may be removed from an Article as follows:
1. Open the Article for editing either by:
Click the Content > Article Manager menu item to go to the Article Manager, select the Article and click the Edit toolbar
button.
Clicking the Add New Article button in the Control Panel.
15 If logged in to the Front-end, you have appropriate permissions and are viewing the Article you wish to edit: Click
the Edit toolbar button.
2. Locate and click on the link you wish to remove using the article editor.
3. Click the Unlink editor toolbar button. The link will be removed.
Removing email, print or PDF icons from an Article
To remove the email, print or PDF icons from an Article:
1. Open the Article for editing either by:
Click the Content > Article Manager menu item. Once in the Article Manager, click on the article name to edit or tick the
box next to the article and click the Edit toolbar button.
Clicking the Add New Article button in the Control Panel.
If logged in to the Front-end, you have appropriate permissions and are viewing the Article you wish to edit: Click
the Edit button.
2. Click on the Parameters - Advanced pane in the Parameters section of the Edit Article screen.
3. Locate the Print Icon, E-mail Icon and PDF Icon drop down fields in the Parameter list and change the values to Hide as
required.
Use Global: Uses the setting in the Article Parameter Global configuration.
Hide: Hides the icon or text and overrides the global configuration for the current Article only.
Show: Displays the icon or text and overrides the global configuration for the current Article only.
4. Click the Save or Apply toolbar button to save the Article.
Editing the sp accordian (FAQ)
Adding new questions:
1. You will be creating a new article for each question. (please ensure that you create the articles in the order you want them to
display)
2. The title of the article is the question that will be displayed and the content of the article is the answer to the question.
3. When creating a new article ensure that you select the correct category for the article. (In this case the category will be FAQs)
When you are finished creating the new articles please check the frontend. The new questions should be displaying now.
If you want to change the ordering of the questions: (Please do not edit anything here if it is not necessary as you can overwrite previous
settings that was done by the developer)
1. Extensions and click on Modules.
2. Click on SP Accordion module.
3. Edit settings here and save.
How to manage your Top slideshow
1. Hover over content then media manager.
2. In the media manager please select the slider folder and upload your image into that folder.
3. Hover over extensions then module manager.
4. Select top slideshow and on the page that follows on your right hand you will see the image paths called e.g:
images/slider/your_image_name.jpg "dimensions 920 x 280", change the image names to your image name.
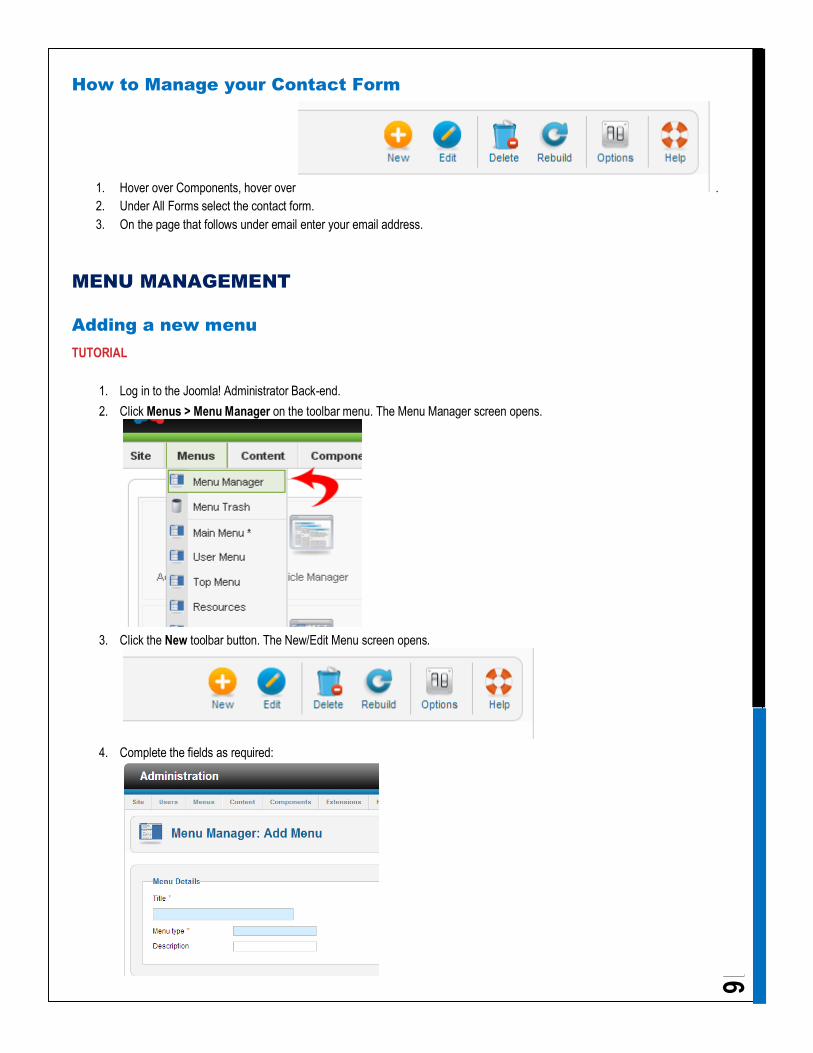
16 How to Manage your Contact Form
1. Hover over Components, hover over .
2. Under All Forms select the contact form.
3. On the page that follows under email enter your email address.
MENU MANAGEMENT
Adding a new menu
TUTORIAL
1. Log in to the Joomla! Administrator Back-end.
2. Click Menus > Menu Manager on the toolbar menu. The Menu Manager screen opens.
3. Click the New toolbar button. The New/Edit Menu screen opens.
4. Complete the fields as required:
17 Title: A proper title for the menu. This is used to identify the menu the Menu Manager in the backend.
Menu Type: This will be the published title or name which displays in the front-end (if you tick yes to "show title" in the
Module Details when editing the module via the Module Manager). This will only be displayed when creating a new menu.
However it can be edited in the Module Manager in the back-end after the module has been created. If left blank, a module
will not be created and you will not be able to show this menu in the Front-end.
Description: A description of the menu, useful for your own reference.
5. Click the Save toolbar button to create the new menu.
To leave without saving click the Cancel toolbar button.
You can now add new items to the newly created menu.
note: All new menus default to disabled when first created.
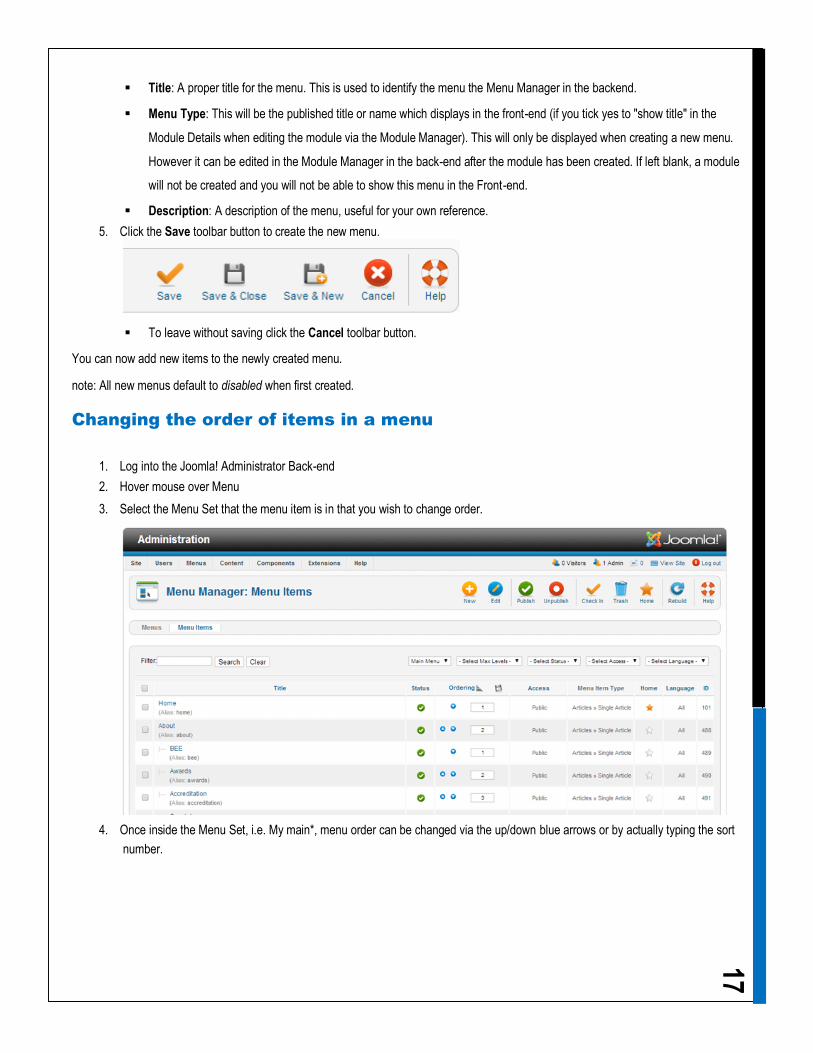
Changing the order of items in a menu
1. Log into the Joomla! Administrator Back-end
2. Hover mouse over Menu
3. Select the Menu Set that the menu item is in that you wish to change order.
4. Once inside the Menu Set, i.e. My main*, menu order can be changed via the up/down blue arrows or by actually typing the sort
number.
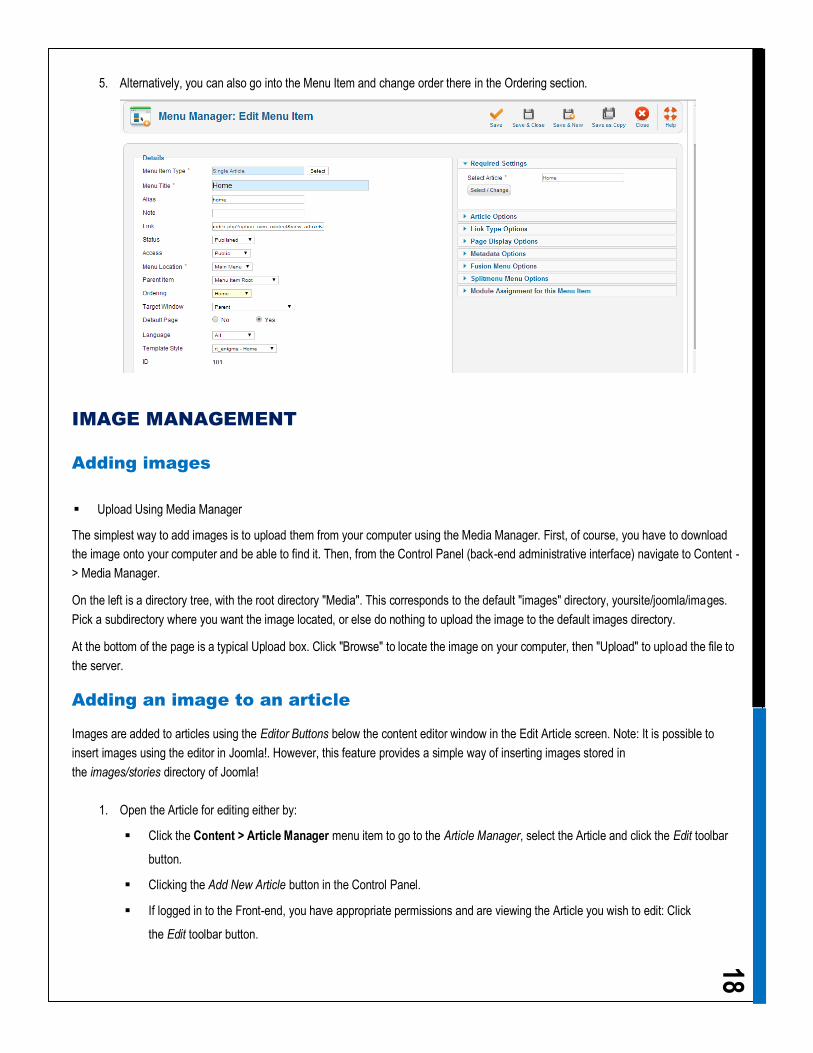
18 5. Alternatively, you can also go into the Menu Item and change order there in the Ordering section.
IMAGE MANAGEMENT
Adding images
Upload Using Media Manager
The simplest way to add images is to upload them from your computer using the Media Manager. First, of course, you have to download
the image onto your computer and be able to find it. Then, from the Control Panel (back-end administrative interface) navigate to Content -
> Media Manager.
On the left is a directory tree, with the root directory "Media". This corresponds to the default "images" directory, yoursite/joomla/images.
Pick a subdirectory where you want the image located, or else do nothing to upload the image to the default images directory.
At the bottom of the page is a typical Upload box. Click "Browse" to locate the image on your computer, then "Upload" to upload the file to
the server.
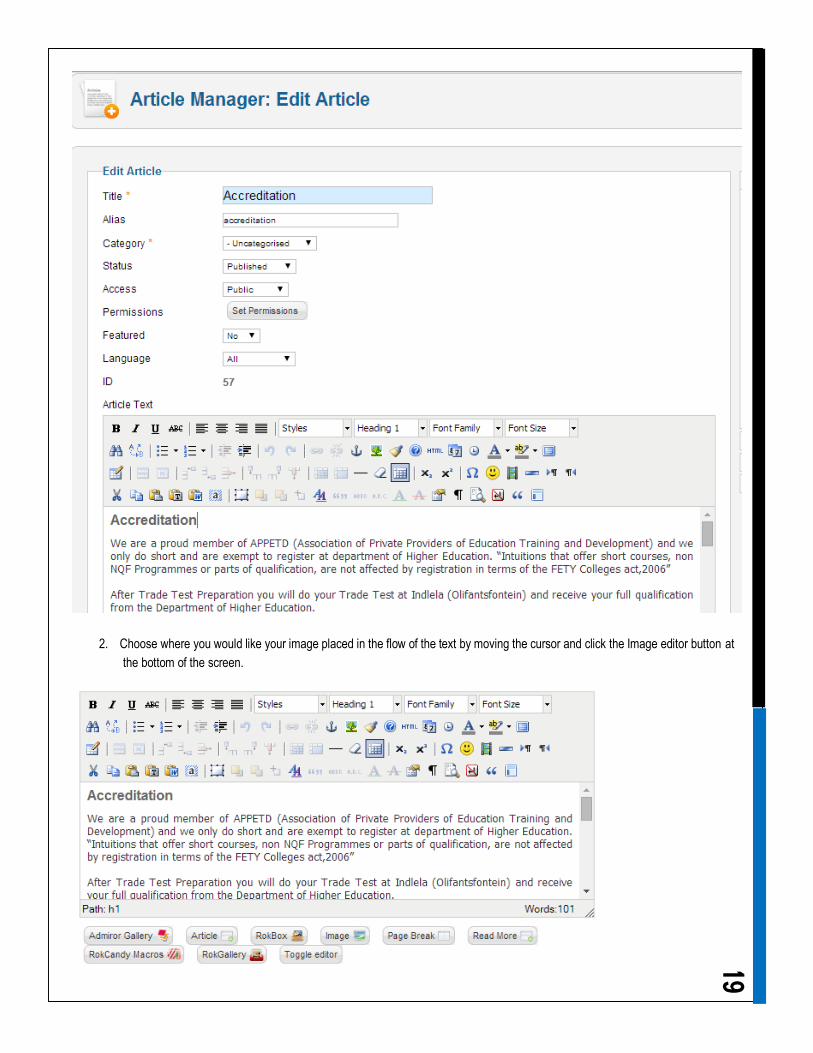
Adding an image to an article
Images are added to articles using the Editor Buttons below the content editor window in the Edit Article screen. Note: It is possible to
insert images using the editor in Joomla!. However, this feature provides a simple way of inserting images stored in
the images/stories directory of Joomla!
1. Open the Article for editing either by:
Click the Content > Article Manager menu item to go to the Article Manager, select the Article and click the Edit toolbar
button.
Clicking the Add New Article button in the Control Panel.
If logged in to the Front-end, you have appropriate permissions and are viewing the Article you wish to edit: Click
the Edit toolbar button.
19
2. Choose where you would like your image placed in the flow of the text by moving the cursor and click the Image editor button at
the bottom of the screen.
20 3. The Insert Image screen will open over the top of the Edit Article screen. Choose an image by clicking on it.
You may also move directory by clicking on the folder icons.
Use the drop down Directory field to quickly select a directory and click the Up button to go up a directory level.
4. Set the image properties as required:
Image Description: This becomes the alt attribute for the image, an important feature for accessibility and compliance
with web standards.
Image Title: Used for the optional caption and also becomes the title attribute in HTML.
Align: Sets the image alignment. If left blank the align attribute is not set.
Caption: Enables the caption which displays the Image Title below the image.
5. Click the Insert button to insert the image. The Insert Image screen will close and the image will be displayed in the editor.
Click the Cancel button to leave the Insert Image screen.
Uploading images using the Insert Image screen
You may also upload new images using the Upload section of the Insert Image screen.
1. Click the Browse button to open a file browser.
2. Select the image files you wish to upload. Click Open in the file browser to confirm the selection. Note: The file browser style and
layout depends on the browser and operating system you are using.
To remove selected files before uploading click the red icon next to the listed files.
If you are uploading multiple files in batches you can clear the list of completed files by clicking the Clear
Completed button.
3. The selected file(s) appear as a list at the bottom of the Insert Image screen. Click Start Upload to begin uploading files.
When the upload is complete a green tick will appear next to the file.
4. You may now select and insert the uploaded image as before.
GALLERY MANAGEMENT
How to Manage your Admiror Gallery
Hover over Components then Admiror Gallery then click on Control Panel.
TO ADD IMAGES:
1. Click on Image Manager.
2. Select the Gallery folder by clicking on the folder.
3. Click on Browse and select the images you want to upload (max 10MB per upload)
4. Click Apply top right corner of the page.
DELETE/REMOVE IMAGES: 1. Click on Image Manager.
2. Select the Gallery folder by clicking on the folder.
3. Tick the tick box of the image/images you want to delete (below the image next to a spanner you will see a tick box)
4. Go to the drop down section just above the images. Next to the spanner icon it will read ‘Operation With Selected Items:’ . Click
on the drop down arrow and select delete.
21 5. Click Apply top right corner of the page.
How to Manage your AccordianGallery
TO ADD IMAGES
1. Hover over Components, hover over accordian-gallery-component and click on multi-upload
2. Select your Category from the dropdown
3. Click on Browse, select the image/(s) from your computer, click open and wait for the green queue upload to finish
4. Click on Close
DELETE/REMOVE IMAGES: 1. Hover over Components, hover over accordian-gallery-component and click on pictures
2. Tick the photo/(s) in the tickbox on the left that you would like to delete, and click on Delete (top right)
CREATE CATEGORY 1. Hover over Components, hover over accordian-gallery-component and click on categories
2. Click on New (top right), Type in the name of the category (or copy the hex code from other category
3. Click on Save & Close (top right)
EDIT CATEGORY 1. Hover over Components, hover over accordian-gallery-component and click on categories
2. Click on the name of the gallery which you would like to edit
3. Change name and color
4. Click on Save & Close
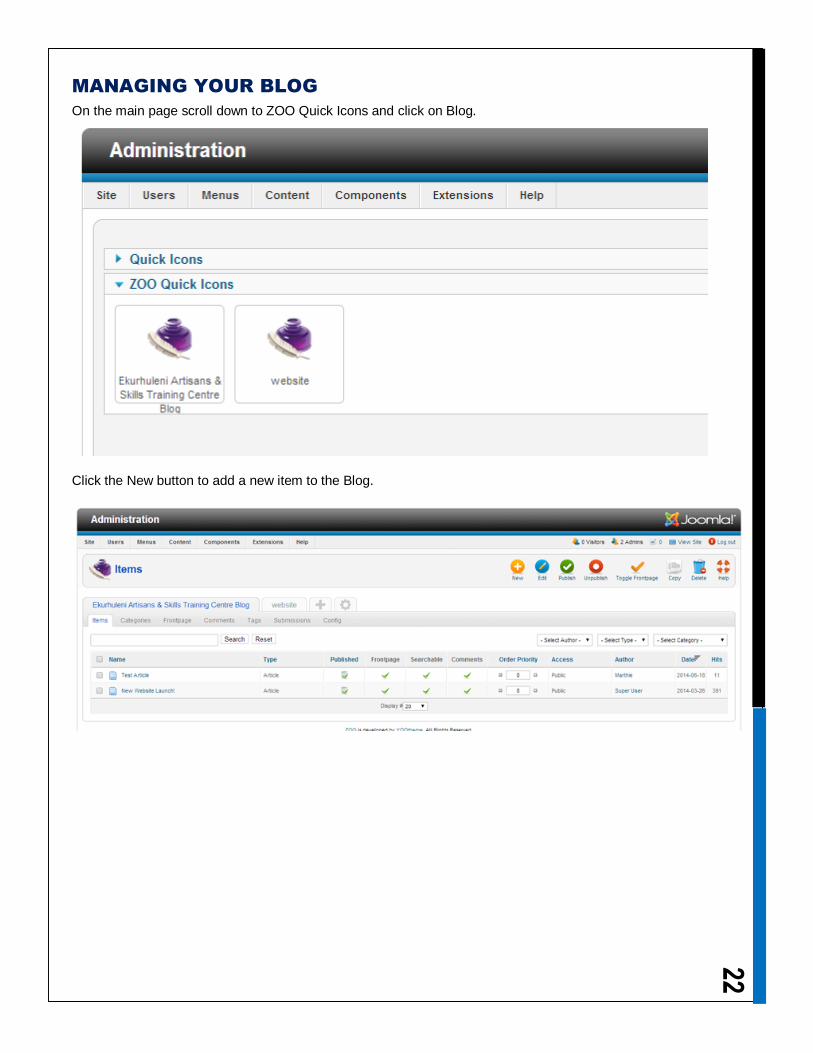
22 MANAGING YOUR BLOG
On the main page scroll down to ZOO Quick Icons and click on Blog.
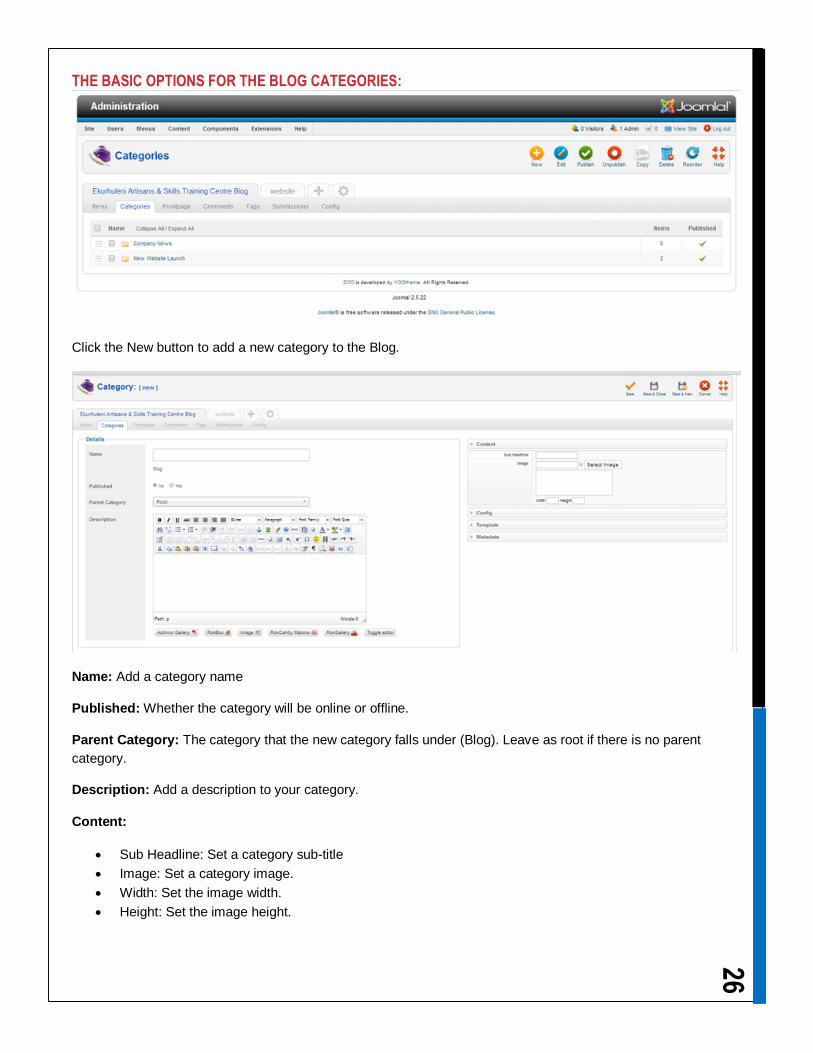
Click the New button to add a new item to the Blog.
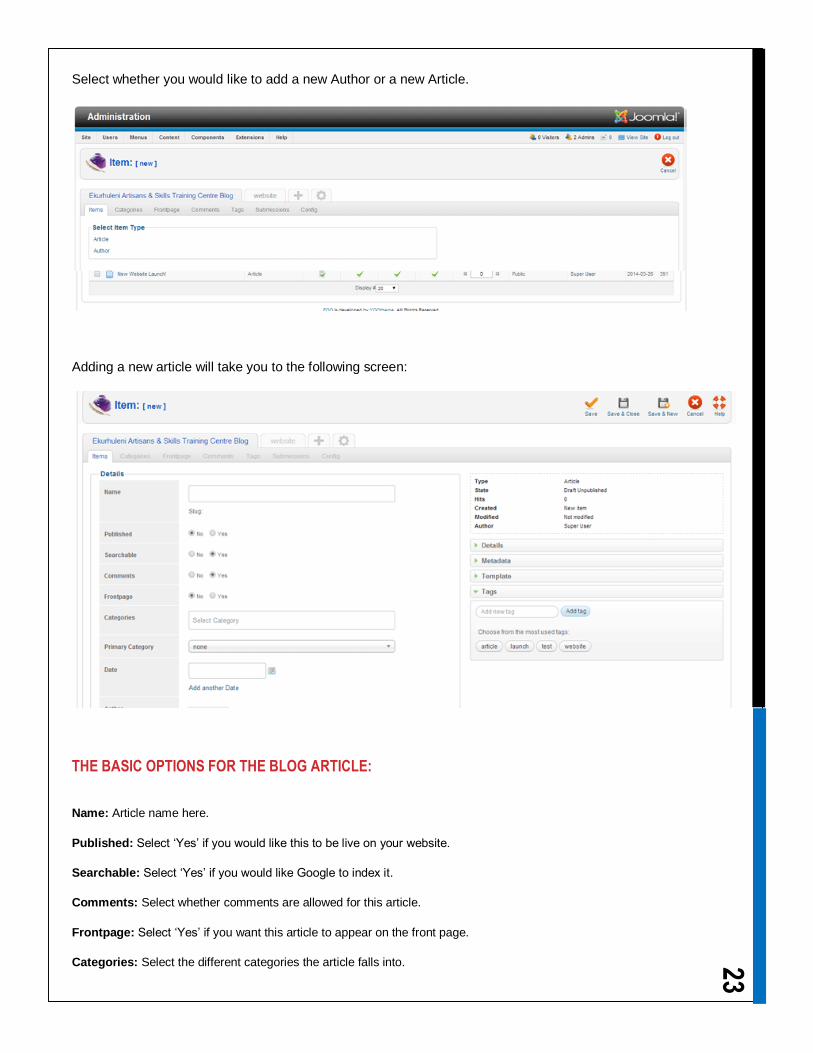
23 Select whether you would like to add a new Author or a new Article.
Adding a new article will take you to the following screen:
THE BASIC OPTIONS FOR THE BLOG ARTICLE:
Name: Article name here.
Published: Select ‘Yes’ if you would like this to be live on your website.
Searchable: Select ‘Yes’ if you would like Google to index it.
Comments: Select whether comments are allowed for this article.
Frontpage: Select ‘Yes’ if you want this article to appear on the front page.
Categories: Select the different categories the article falls into.
24 Primary Category: Select the primary category that your article falls into.
Date: Date of article creation.
Author: The articles’ author.
Subtitle: Secondary title for your article.
Teaser Text: Summary of the article to attract users to view full text.
Text: The articles text.
Teaser Image: Image shown with teaser text.
Image: Image shown with the article.
Media: Upload or link to video or audio content.
Related Articles: Articles that have a similar topic.
External Related Articles: Articles with a related topic from another website.
Social Buttons: Whether you allow this article to be instantly shared on social media with the click of an icon.
ON THE RIGHT HAND SIDE OF THE SCREEN ARE MORE OPTIONS FOR YOUR BLOG ARTICLE:
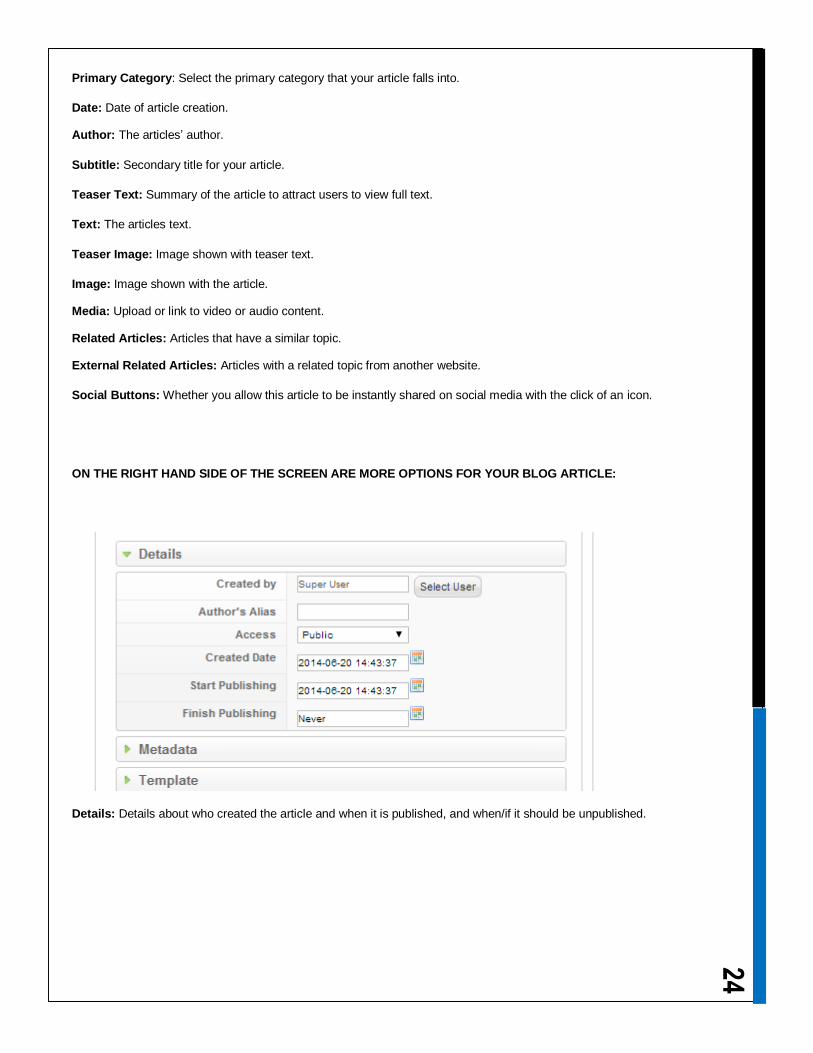
Details: Details about who created the article and when it is published, and when/if it should be unpublished.
25
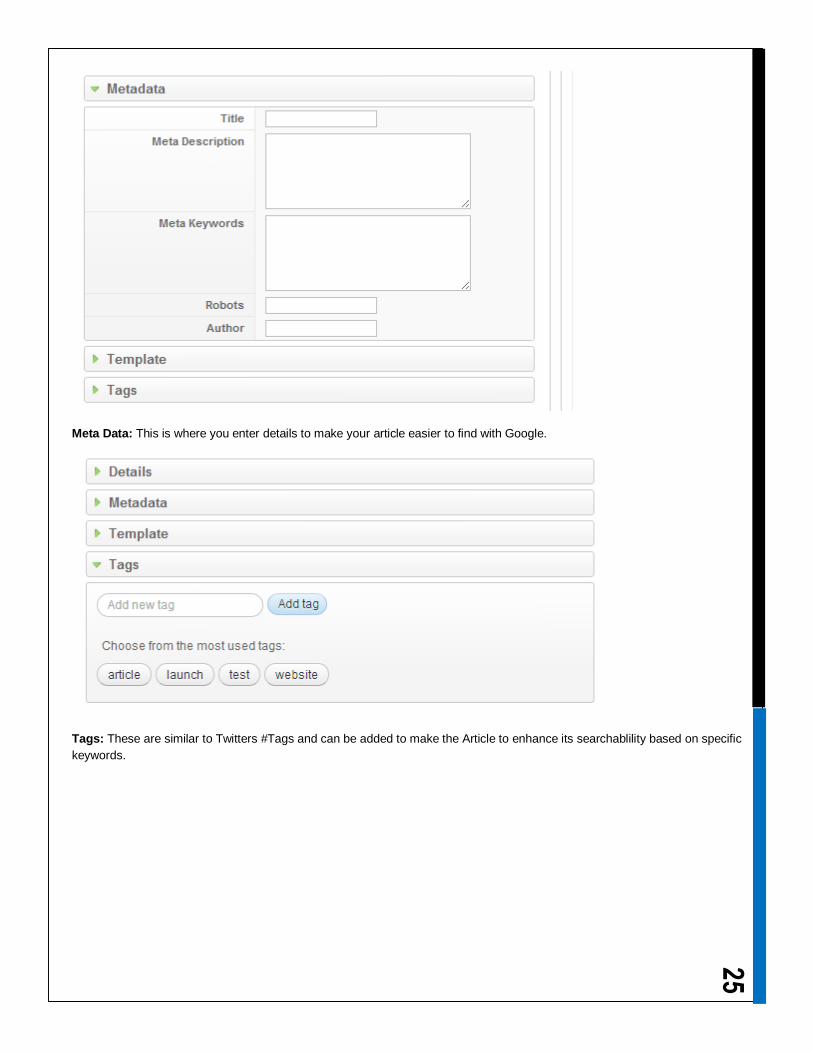
Meta Data: This is where you enter details to make your article easier to find with Google.
Tags: These are similar to Twitters #Tags and can be added to make the Article to enhance its searchablility based on specific
keywords.
26 THE BASIC OPTIONS FOR THE BLOG CATEGORIES:
Click the New button to add a new category to the Blog.
Name: Add a category name
Published: Whether the category will be online or offline.
Parent Category: The category that the new category falls under (Blog). Leave as root if there is no parent
category.
Description: Add a description to your category.
Content:
Sub Headline: Set a category sub-title
Image: Set a category image.
Width: Set the image width.
Height: Set the image height.
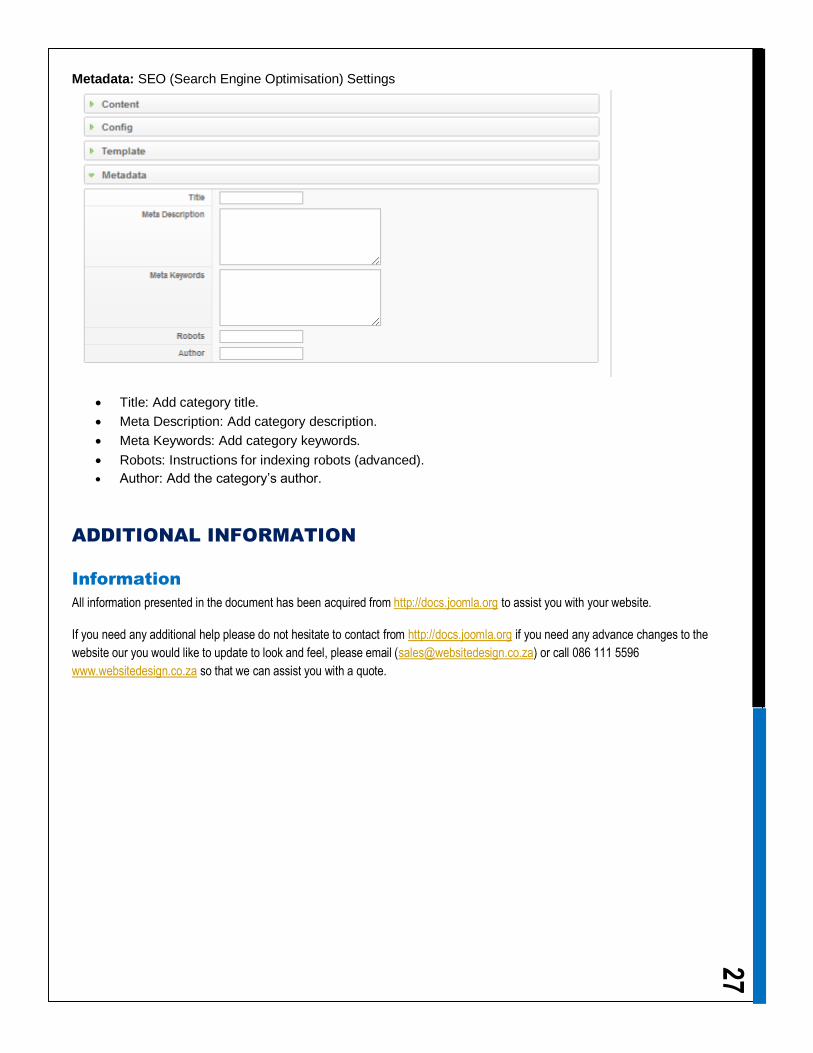
27 Metadata: SEO (Search Engine Optimisation) Settings
Title: Add category title.
Meta Description: Add category description.
Meta Keywords: Add category keywords.
Robots: Instructions for indexing robots (advanced).
Author: Add the category’s author.
ADDITIONAL INFORMATION
Information
All information presented in the document has been acquired from http://docs.joomla.org to assist you with your website.
If you need any additional help please do not hesitate to contact from http://docs.joomla.org if you need any advance changes to the
website our you would like to update to look and feel, please email ([email protected]) or call 086 111 5596
www.websitedesign.co.za so that we can assist you with a quote.