jujama connect - cloudinary · 2018-05-22 · editing your profile to view and make changes to your...
TRANSCRIPT

JUJAMA CONNECTA User Guide to the JUJAMA
Networking & Event App

DOWNLOADING JUJAMA CONNECT & FINDING YOUR EVENT
All events powered by JUJAMA can be easily accessed through a single app — JUJAMA Connect.
From your App Store or Google Play Store, search for “JUJAMA Connect” to download the app.
APP ICON
iOS App Store Android Google Play Store
Finding Your EventTo access your event, search or enter the event name or code that was provided by the conference organizer. When you find your event, tap the “GO” button. If you’re attending multiple events, you can manage them from the “My Events” screen.
Please note: Login details will be sent to the email address which was used to register for the event.
JUJAMA CONNECTOnce downloaded, enter the event name or code into the search bar.
EVENT SEARCHAfter searching, tap the “GO”
button next to the correct event in the list.
MY EVENTSAccess the event by tapping the
correct event block from the My Events screen. Here, you can
manage multiple events.

GETTING STARTED
Welcome to JUJAMA Connect, a members only networking application.
This powerful app brings the event to your mobile device and allows you to:
• Create and maintain a public profile• Request meetings with other attendees• Manage a personalized schedule of event sessions• Send private in-app messages to other members• Receive important updates and announcements from the conference organization team• Access event documentation and content
Please note: Login details will be sent to the email address which was used to register for the event.
There are two ways that you can access the event app:
1. Via your smartphone or tablet, referred to as the app 2. Online, via your laptop or desktop computer, referred to as the web portal
APP LOGIN WEB PORTAL

THE APP MENU & EDITING YOUR PROFILE
The app menu can be found from the “home” screen or any other screen of the app by selecting the three-line icon on the upper left. From this screen, you can see all of the features that are available within the app. When first visiting the app, the best place to start is updating your profile!
Editing Your ProfileTo view and make changes to your profile, select the “My Account” tab from the menu or access your own profile through the Participants screen. Here, you can change how your profile appears in the attendee list by adding a short biography, uploading a profile photo (file size for profile photos must be less than 4MB), or adding your social media links. To streamline the process, you can choose to import your profile from LinkedIn, as shown below.
MENU ICONThe three-line menu icon can be found in the upper left corner of
every app screen.
EDIT PROFILEClick the pencil icons next to each block of information or you can
pull information from your LinkedIn profile.
EDIT PROFILEInformation can be entered into
the fields. Tap the save button after entering information.
Menu Icon
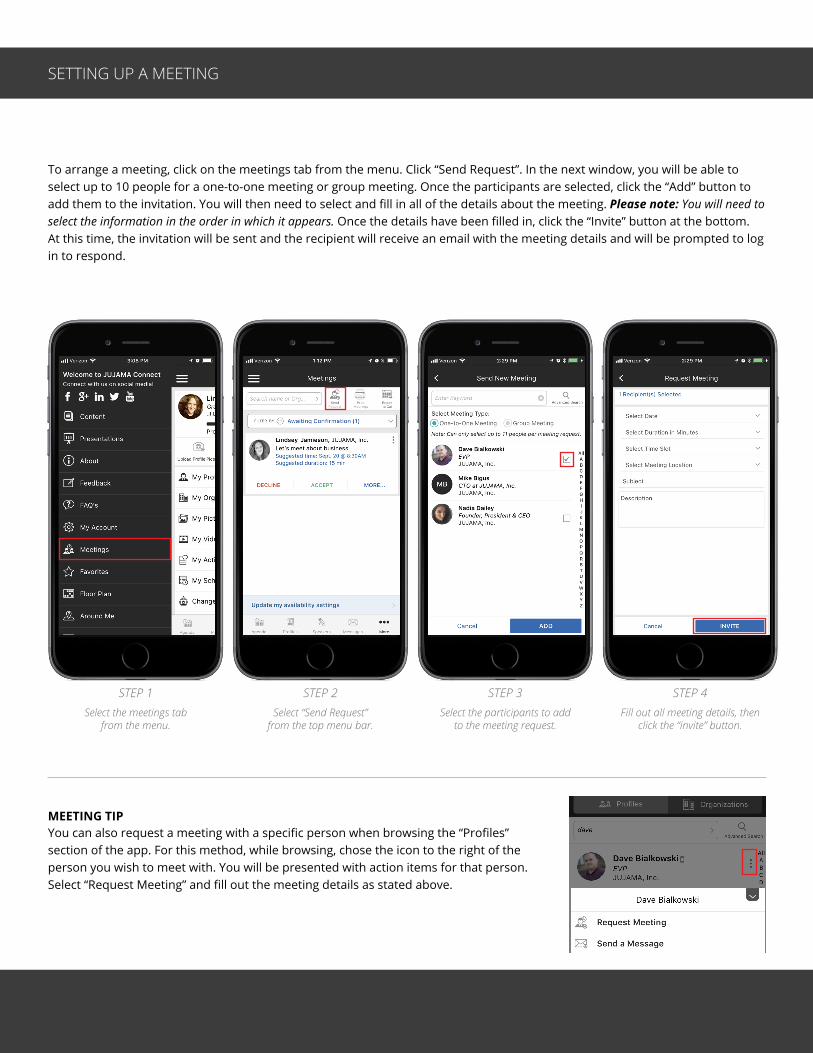
SETTING UP A MEETING
To arrange a meeting, click on the meetings tab from the menu. Click “Send Request”. In the next window, you will be able to select up to 10 people for a one-to-one meeting or group meeting. Once the participants are selected, click the “Add” button to add them to the invitation. You will then need to select and fill in all of the details about the meeting. Please note: You will need to select the information in the order in which it appears. Once the details have been filled in, click the “Invite” button at the bottom. At this time, the invitation will be sent and the recipient will receive an email with the meeting details and will be prompted to log in to respond.
You can also request a meeting with a specific person when browsing the “Profiles” section of the app. For this method, while browsing, chose the icon to the right of the person you wish to meet with. You will be presented with action items for that person. Select “Request Meeting” and fill out the meeting details as stated above.
STEP 1Select the meetings tab
from the menu.
STEP 2Select “Send Request”
from the top menu bar.
STEP 3Select the participants to add
to the meeting request.
STEP 4Fill out all meeting details, then
click the “invite” button.
MEETING TIP

SETTING YOUR MEETING AVAILABILITY
You are able to indicate to other conference attendees what your availability at the event will be. Other attendees will be unable to arrange meetings with you at any times you have indicated yourself to be unavailable. From the meetings tab, choose “Update my availability settings” at the bottom. On the next screen, toggle your meeting availability for each day/time.
From within the meetings tab, select “Update my availability
settings” at the bottom.
Toggle your meeting availabilityfor each day and time. Please note that the days can be scrolled and
selected from the top.

SENDING A MESSAGE
Messages from within the app and web portal act as a typical email inbox would. In addition to being notified of a new message within the app, a recipient will also be notified via email that there is a message waiting for them. To send a message to another attendee, click on the ‘Messages’ tab from the menu. From this window you will be able to view all your messages and send messages to attendees. Select the “Compose Message” button from the top menu bar. Click the add attendee icon to select the attendee you would like to send the message to.
You can adjust your message settings by going to Notification Settings under the My Account tab.
You can also send a message to a person when browsing the “Profiles” section of the app. For this method, while browsing, chose the icon to the right of the person you wish to message. You will be presented with action items for that person. Select “Send a Message” and compose the message.
STEP 1Select the messages tab
from the menu.
STEP 2Select “Compose Message”
from the top menu bar.
STEP 3Tap the add participants icon
to add the attendee you are messaging.
MESSAGING TIP

BROWSING THE AGENDA
The full event agenda can be found within the app or on the web portal. To browse the agenda, you can select the agenda tab from the menu. This will give a complete one page agenda listing that you can browse, print, email, or search. Select from the dropdown to filter the agenda by day. You can select an agenda item for complete item details. Here, you can add it to your personal schedule, set a reminder, and more!
Creating Your Personal ScheduleYou can create a personal schedule by adding both items from the agenda list (see above) and also personal items. From the agenda tab, select “My Schedule” from the top menu bar. Here, you can plan your day, then print, email, or export your personal schedule to your device calendar!
Select the agenda tab from the menu.
Browse the agenda by time, track, and day. You can also choose an action by selecting the action icon
to the right.
See the agenda item detailsand select actions around that
specific item.

THE SOCIAL FEED
The social feed will have posts, photos, videos, and information from event administrators and other attendees. To get the latest updates and stay engaged, it’s recommended that you are active on the social feed. You can choose to post a status update, upload a photo or document, or post a link to a YouTube or Vimeo video. You can also follow, like, and comment on other attendees’ posts, which is another great way to network!
Select the social feed tab from the menu.
Tap the “What’s New” box at the top to update your status, upload a photo, upload a video link, or
search the social feed.
To post a photo or video, tap the appropriate icon on the
bottom right corner.

For more information, please email [email protected] or call (570) 209-7670.