•juki cp-160 - supsew.com cp-160 instruction manual.pdf · •juki manual deinstruggiones ......
TRANSCRIPT

CP-160
INSTRUCTION MANUALBETRIEBSANLEITUNGMANUEL D'UTILISATION
•JUKI
MANUAL DEINSTRUGGIONESMANUALE D'ISTRUZIONI
ACAUTION :
This Instruction Manual is Instruction Manual for the CP-160. Read and fully understand the instructions givenunder "For safe operation" in the Instruction Manual for the control box that is supplied with this instructionManual before putting the machine into service.
AVORSICHT:
Diese Betriebsanleitung ist fur das CP-160 vorgesehen. Lesen sie zum Verstandnis die Anweisungen unter "FurSicheren Betrieb" in der Betriebsanleitung fur die Schaltkasten, die mit dieser Betriebsanleitung geliefert wird,durch, bevor Sie die Maschine in Betrieb nehmen.
AATTENTION:
Ce manuei d'utiiisation est desitne a la CP-160. Avant de mettre la machine en marche lire attentivement, afinde bien les comprendre, les instructions donnees au chapitre "Consignes de Securite Importantes" figurant aumanuei d'utiiisation de la boite de commande accompagnant le present manuei d'utiiisation.
AiPRECAUCION!Este Manual de Instrucciones corresponde a la CP-160. Antes de poner la maquina en funcionamfento, lerecomendamos leer detenidamente las instrucciones incluidas en la seccion "Para una operacion segura" delManual de Instrucciones de la caja de control, ique se suministra con este Manual de Instrucciones.
AATTENZIONE:Questo Manuals d'Istruzioni E destinato al CP-160. Leggere e comprendere pienamente le istruzioni mostrateal par. "Per un utilizzosicuro" nel Manuals d'Istruzioni per il centralina di controilo prima di mettere iamacchina in uso.
No.02
29297900From the library of: Superior Sewing Machine & Supply LLC

CONTENTS
1. INSTALLING THE CONTROL PANEL 1
2. CONNECTING THE CORD 2
3. CONFIGURATION 3
4. CONTROL PANEL 3
5. HOW TO OPERATE THE CONTROL PANEL FOR SEWING STITCHING PATTERNS 9
6. HOW TO USE THE BOBBIN THREAD COUNTER 18
7. NEEDLE UP/DOWN COMPENSATION SWITCH 23
8. KEY LOCK FUNCTION 24
9. ON/OFF SWITCH @ OFTHEMATERIAL EDGE SENSOR 2510. AUTOMATIC THREAD TRIMMING SWITCH 0 26
11. ONE-SHOT AUTOMATIC STITCHING SWITCH (§) 27
12. THREAD TRIMMING PROHIBITION SWITCH 0 27
INHALT
1. INSTALLIEREN DER STEUERTAFEL 1
2. ANSCHLIESSEN DES KABELS 2
3. KONFIGURATION 3
4. STEUERTAFEL 3
5. BEDIENUNG DER STEUERTAFEL ZUM NAHEN VON STICHMUSTERN 9
6. VERWENDUNG DES SPULENFADENZAHLERS 18
7. TASTE FUR NADEL-HOCH/TIEF-KOMPENSATION 23
8. TASTENSPERRFUNKTION 24
9. TASTE FURAUTOMATISCHES FADENABSCHNEIDEN @ 25
ID. STOFFKANTENSENSOR-EIN/AUS-TASTE 0 26
11. TASTEFOR EINSCHUB-NAHAUTOMATIK (§) 27
12. TASTE ZUR VERHUTUNG VON FADENABSCHNEIDEN 0 27
SOMMAIRE
1. INSTALLATION DU PANNEAU DE COMMANDE 1
2. RACCORDEMENT DU CABLE 2
3. CONFIGURATION 3
4. PANNEAU DE COMMANDE 3
5. COMMENT UTILISER LE PANNEAU DE COMMANDE POUR EXECUTER DES CONFIGURATIONS DE COUTURE 9
6. COMMENT UTLISER LE COMPTEUR DE FIL DE CANETTE 18
7. TOUCHE DE COMPENSATION DES POINTS PAR LE RELEVAGE/ABAISSEMENT DE L'AIGUILLE 23
8. FONCTION DE VERROUILLAGE DES TOUCHES 24
9. TOUCHE D'ACTIVATION/DESACTIVATION ® DUCAPTEUR DE BORD DUTISSU 25
ID. TOUCHC DECOURAGE AUTOMALIQUE DU FIL 0 2611. TOUCHE DE COUTUREAUTOMATIQUE NON REPETITIVE (§) 27
12. TOUCHE D'INTERDICTION DE COURAGEDU FIL 0 27
From the library of: Superior Sewing Machine & Supply LLC

INDICE
1. MODE DEINSTALAR EL PANEL DE CONTROL I
2. MODO DE CONECTAR EL CABLE 2
3. CONFIGURACION 3
4. PANEL DE CONTROL 3
5. MODO DE OPERAR EL PANEL DE CONTROL PARA COSER PATRONES DE PESPUNTE 9
6. MODO DE USAR EL CONTADOR DE HILO DE BOBINA 18
7. INTERRUPTOR DE C0MPENSAC|6n DE AGUJA ARRIBA/ABAJO 23
8. FUNCTION DE ENCLAVAMIENTO DE TECLA 24
9. INTCUUPTOR 0 ON/OFF DEL SENSOR DEBORDE ELMATERIAL 25
10. INTERRUPTOR 0 DECORTEAUTOMATICO DE HILO 26
11. INTERRUPTOR 0 DEPESPUNTE AUTOMATICO DEUN GOLPE 27
12. INTERRUPTOR 0 DEPROHIBICION DECORTE DEHILO 27
INDICE
1. INSTALLAZIONE DEL PANNELLO Dl COMANDO 1
2. COLLEGAMENTO DEI CAVI 2
3. CONFIGURAZIONE 3
4. PANNELLO Dl COMANDO 3
5. COME AZIONAREIL PANNELLO Dl COMANDO PER CUCIRE MODELLI Dl CUCITURA 9
6. COME USARE IL CONTATORE Dl FILO DELLA BOBINA 18
7. INTERRUTTORE Dl COMPENSAZIONE SU/GIU DELL'AGO 23
8. FUNZIONE Dl BLOCCAGGIO A CHIAVE 24
9. INTERRUTTORE Dl SENSORE BORDO MATERIALE 0 25
10. INTERRUTTORE Dl TAGLIO DELFILO AUTOMATICO 0 26
11. INTERRUTTORE DlCUCITURA AUTOMATICA "Dl UN COLPO" 0 2712. INTERRUTTORE Dl PROIBIZIONE DEL TAGLIO DEL FILO 0 27
From the library of: Superior Sewing Machine & Supply LLC
1. INSTALLING THE CONTROL PANEL / INSTALLIEREN DER STEUERATAFEL /
INSTALLATION DU PANNEAU DE COMMANDE/
MOOD DE INSTALAR EL PANEL DE CONTROL/
INSTALLAZIONE DEL PANNELLO Dl COMANDO
A
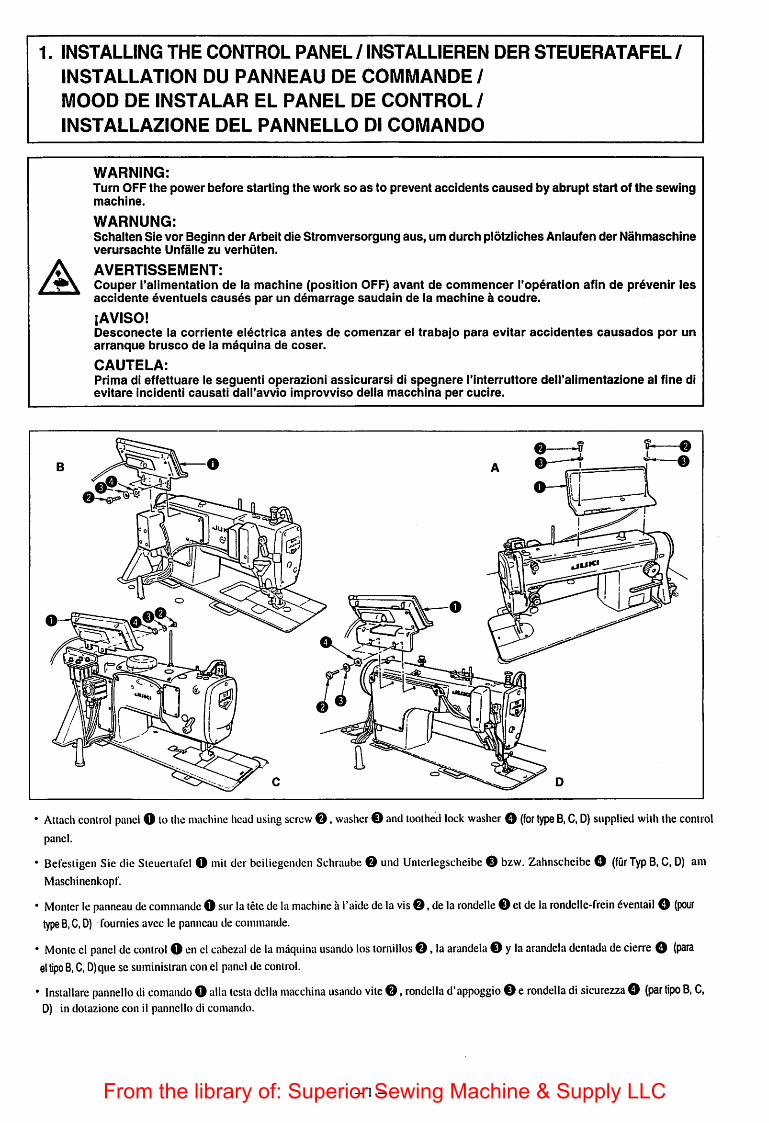
WARNING:Turn OFF the power before starting the work so as to prevent accidents caused by abrupt start of the sewingmachine.
WARNUNG:Schalten Sie vor Beginn der Arbeit die Stromversorgung aus, um durch plotzliches Aniaufen der Nahmaschineverursachte Unfalle zu verhuten.
AVERTISSEMENT:Couper {'alimentation de la machine (position OFF) avant de commencer {'operation afin de prevenir lesaccidente eventuels causes par un demarrage saudain de la machine a coudre.
{AVISO!Desconecte la corriente electrica antes de comenzar el trabajo para evitar accidentes causados por unarranque brusco de la maquina de coser.
CAUTELA:Prima di effettuare le seguenti operazioni assicurarsi di spegnere I'interruttore deH'alimentazione al fine dievitare incidenti causati daH'avvio improvviso della macchina per cucire.
' Attach control panel O tothe machine head using screw 0, washer and toothed lock washer O (for type B, C, D) supplied with thecontrolpanel.
' Befesligen Sie die Steuertafel O mit der beiliegenden Schraube © und Unterlegscheibe © bzw. Zahnscheibe O (fur Typ B, C, D) amMaschinenkopf.
' Monter le panneau de commande O sur la tete de la machine a I'aide de lavis ©, de la rondelle © etde la rondelle-frein dventail O (pourtype B, C, D) foumies avec le panneau decommande.
• Monte el panel de control O en el cabezal de la maquina usando los tornillos ©, la arandela © y la arandela dentada de cierre © (P^i^eltipo B, C, D)que se suministran conel panel de control.
• Installare pannello di comando O alia testa della macchina usando vite ©, rondella d'appoggio © erondella di sicurezza O (par tipo B, C,D) in dotazione con 11 pannello di comando.
- 1 -From the library of: Superior Sewing Machine & Supply LLC

2. CONNECTING THE CORD / ANSCHLIESSEN DES KABELS/
RACCORDEMENT DU CABLE / MODO DE CONECTAR EL CABLE /
COLLEGAMENTO DEI CAVI
( I \
u ^•BODcm •l
1) Pass cord O of the control panel through hole O in themachine table to route it to the underside of the table.
2) As for the connection of the connector, refer to the instructionmanual for control box.
0 Das Kabel O der Steuertafel durch die Offnung O imMa.schinentisch filhren, um es entlang der Unterseite desTisches zu verlegen.
2) Niiheres zum AnschluB des Steckverbinders entnehmen Sie
bilte der Bedienungsanleitung der Schaltkaslen.
1) Introduire lecable O dupanneau decommande parrorificeO delatable de la machine afin de le faire passer au-dessous de la table.2) Pour le branchement du connecteur, se reporter au manuci d'utllisation pour la boTte de commande.
1) Paseel cable O del panel de control porel ngujero O en la mesa de la mdquina enrutarlo a debajo de la mesa.2) Para la conexion del conector, consulte el Manual de Instrucclones para la caja de control.
I) Farpassare cavo O del pannello di comando attraverso foro O perdirigerlo sotto II tavolo.2} Per quanlo riguarda il collegamento del conncltore fare riferimento al Manuale d'Istruzioni per centralina di controllo.
-2-From the library of: Superior Sewing Machine & Supply LLC

3. CONFIGURATION / KONFIGURATION / CONFIGURATION /
CONFIGURACION / CONFIGURAZIONE
o
'^•-1»K' [
I >1 >1 rA»c»eJf
1/14! I/I
N\i|N (fe
©
e
I 1 _[ ocnflcsD cp^ieoj
O
O Powerindicator lamp(LED): Lights up whenthe power switch is turned ON.Max. speed limitation variable resistor: Limits the speed when it is moved to the left ( ).
O Netzlampe (LED); Leuchtet auf,wenn der Netzschalter eingeschaltet wird.o Stellwiderstand zur Begrenzung der Maximalgeschwindigkeit: Durch Verschieben nach links ( ) wirddie Geschwindigkeit begrenzt.
O T^moin d'alimentation (diode 61ectroluminescente); s'allume lorsque I'interrupteur d'alimentation est enclenche.e Resistance variable de limitation de vitesse maximale : Limite la vitesse lorsqu'elle est positionnde ^ gauche ( ).
O Ldmpara indicadora decorriente eiectrica (LED); Se ilumina cuando se posiciona enON el interrupter de lacorriente eiectrica.o Resistor variable limitador de velocidad maxima : iimita la velocldad cuando se mueve a la izquierda ( ).
O Indicatore a LED dell'alimentazione : Si accende quando Tinterruttore deH'alimentazione viene acceso.e Resistore variabile perla limitazione di velocita massima : Limita la velocity quando esso viene spostato verso sinistra ( ).
4. CONTROL PANEL / STEUERTAFEL / PANNEAU DE COMMANDE /PANEL DE CONTROL / PANNELLO DI COMANDO
0 o
Vl/Iil/IaLbI
naM ^
a
aM'I AA E
— ABC8C J'ji\I\l [/b' IIS |5u|u5)>6(S)
d DflTlEa) cp-ieo J AI— ?ll
m
(All theindications on the control panel are illustrated in the lip-up state forthe sake ofexplanation.)(Zur besseren Veranschaulichung sind alle Anzeigen der Steuertafel inihrem erleuchteten Zustand abgebildet.)(Pour faciliter les explications, toutes les indications du panneau decommande sont illustr^s hI'etat eclaire.)(Todas lasindicaciones enel panel decontrol seilustran iluminadas para facilitar laexplicacion.)(Tutte leindicazioni sul pannello dicomando sono illustrate nella fase di accensione allo scopo didescriverle.)
-3 -From the library of: Superior Sewing Machine & Supply LLC

O Pattern selector switch• Used for selecting a pattern from among the four different
patterns.
O Touche de selection de configuration» Permet de choisironeconfiguration parnii quatre.
O Interruttore di selezione del modello• Usato per selezionare un modello ira i quattro modelli
dilTerenli.
O Musterwahitasten• Diencn zur Wahl cincs von vicr vcrschicdcncn Mustcm.
O Interruptor del selector de patrbn• Seusa paraseleccionarunpatrondeentreloscuatrodifercntes
patroncs.
0 Double reverse stitching (for start) switch• Used for tuming ON/OFF the double reversestitchingfor
start.
0 Taste fur Doppelrtickwartsstlche (am Ntihbeginn)• Dient zum Bin- bzw. Au.sschaltcn der Doppelruckwiirtsstichc
am Nahbeginn.
O Touche d'execution de points arriere doubles(pour le debut de la couture)
Permetd'activer/ddsactiverI'executionde pointsarrieredoubles au ddbut de la couture.
O Interruttore di affrancatura doppia (per rinizio)• Usalo peraccendere/spegnere I'affrancatura doppia perI'inizio.
0 Double reverse stitching (for end) switch• Usedfor turning ON/OFFthe doublereverse stitching for
end.
© Touche d'execution de points arriere doubles(pour la fin de la couture)
• Permetd'activer/ddsactiver Texdcution de pointsarridredoubles d la fin de la couture.
O Interruttore di affrancatura doppia (per la fine)• Usaloperaccendcre/spegncre raffrancaluradoppiaperla fine.
O Automatic reverse stitching (for start)switch
• Usedfor turning ON/OFF the automatic reverse stitchingfor start.
O Touche d'execution automatique de pointsarriere (pour la debut de la couture)
• Permet d'activer/ddsactiver I'exdcution automatique depoints arridre au ddbut de la couture.
O Interruttore di affrancatura automatica (perI'inizio)• Usato peraccendere/spegnere I'affrancatura automatica per
I'inizio.
O Interruptor de doble puntada invertida (paraIniclo)• Sc usa para activar/dcsactivar el cosido de doble puntada
invertida para inicio.
0 Taste ftir Doppelrtickwartsstlche (am Nahende)• Dient zum Bin- bzw. Au.sschaltcn dor E)oppclruckwarts.sticlic
am Nahende.
0 Interruptor de doble puntada invertida (parafin)• Se usa para activar/desaetivar el cosido de doble pimtada
invertida para fin.
O Taste fiir automatische Ruckwdrtsstiche (am Nahbeginn)• Dient zum Bin- bzw. Ausschalten der automatischen
Riickwailsstiche am Nahbeginn.
O Interruptor de puntada automatica invertida(para inicio)• Scusaparaactivar/dcsactivarelcosidoautomatico dcpuntada
invertida para inicio.
-4 -From the library of: Superior Sewing Machine & Supply LLC

0 Automatic reverse stitching (for end)switch
• Used for turning ON/OFF the automatic reverse stitchingfor end.
0 Touche d'execution automatique do pointsarriere (pour la fin de la couture)
• Permet d'activer/ddsactiver I'ex^cution automatique depoints arrifere ^ la Fin de la couture.
0 Interruttore di affrancatura automatica (per la fine)• Usato per acccndcre/spegnere 1'affrancatura automatica per
la fine.
0 Switches for setting the number ofstitches
• Used for setting the number of stitches to be sewn inprocesses A through D.
0 Touches pour le reglage du nombre de points• Permettent de specifier le nombre de points h ex6cuter
pour lesoperations A &D.
0 Interruttori per impostare il numero di punti• Usati per impostare il numero di punii da cucire in process! da
AaD.
0 Material edge sensor ON/OFF switch• Renderedeffectivewhen thematerialedgesensoris installed
on the machine.
• Used for setting whether or not the material edge sensor isused during sewing.
O Touche d'activatlon/desactivation du capteurde bord du tissu
• Cette touche n'est active que si le capteur de borddu tissua ete install^ sur la machine.
• Gette touche permet d'activer et de d^sactiver lefonctionnement du capteur de bord du tissu pendant lacouture.
O Interruttore di sensore bordo materiale• Reso valido quando il sensore bordo materiale e installato sulla
macchina.
• Usato per Impostare se il sensore bordo materiale e usalo omeno durante la cucitura.
0 Tastefur automatische Ruckwdrtsstiche (am Ndhende)• Diciil zum Ein- bzw. Ausschaltcn dor automalischcn
RUckwartsstiche am Niihcndc.
0 Interruptor de puntada automatica invertida(para fin)• Seusaparaactivar/desactivarelcosidoautomaticodepuntada
invertida para fm.
0 Stichzahl-Elnstelltasten• Dlcncn zum Einstcllcn dor in den Prozesscn A bis D zu
niihendcn Anzahl von Stichcn.
0 Interruptores para fijar el numero depuntadas• Se usan para fijar el numero de puntadas a coser en los
procesos A al D.
o Stoffkantensensor-Ein/Aus-Taste• Nur wirksam, wcnn dcr Stoffkantctiscnsor an dcr Maschinc
angcbracin ist.• Dient zur Akiivicrung bzw. Deaktivicrung dcs
Stoflkantcnscnsors wiihrcnd dcs Nahcns.
O Interruptor ON/OFF de sensor de horde dematerial• Dcvicne inefeciivo cuandocsta instalado en la m^uina dc
coser el sensor de borde de material.
• Se usa para fijar si el sensor de borde de material se usa o noduranle el cosido.
5 -From the library of: Superior Sewing Machine & Supply LLC

O One-shot automatic stitching switch• Rendered effective when the material edge sensor is instal
led on the machine or when the sewing machine is operatedunder the constant-dimension stitching mode.
• Start the sewing machine with this switch, and the sewingmachine will run automatically until the material edge isdetected or the end of a constant-dimension stitching isreached.
© Touche de couture automatique non repetitive
• Cette touche n'est active que lorsque le capteurde bord dutissu est install^ sur la machine ou que la machine estutilis6e dans le mode de couture k dimensions constantes.
• Lorsqu'on fait fonctionner la machine avec cette toucheenclench^e, elle execute une couture automatiquejusqu'kce que le bord du tissu soit d^tectd ou que la fin de lacouture k dimensions constantes soit atteint.
Interruttore di cucitura automatica "di un colpo"• Reso vatido quando 11 scnsore bordo matcriale &installato sulla
macchina o quando la inacchina per cucire viene azionata nelmodo di cucitura programmata.
• Avviare la macchina per cucire con queslo interruttore, e lamacchina per cucire funzionerii automaticamente finche ilbordo materiale sia rilevalo o finch6 il numero di puntiimposlato sia raggiunto.
€> Automatic thread trimming switch• Rendered effective when the material edge sensor is instal
ledon the machine or when the sewing machine is operatedunder the constant-dimension stitching mode.
• Even keep depressing the front part of the pedal, the sensorcan detect the material edge, or after the completion of theconstant-dimension stitching mode, the machine will automatically perform thread trimming.
© Touche de coupage automatique du fil• Cettetouchen'est activequelorsquelecapteurdeborddu
tissu est install^ sur la machine ou que la machine estutilisee dans le mode de couture k dimensions constantes.
• MemelorsqueI'avant de la p^daleest maintenuenfonc€,le capteurpeutdetecterle borddu tissu. Aprfes la findela couture k dimensions constantes, la machine effectueautomatiquement le coupage du fil.
Interruttore di taglio del filo automatico• Reso valido quando il sensore bordo materiale h installato
sulla macchina o quandola macchinapercucirevieneazionatanel modo di cucitura programmata.
• Pur tenendo premuta la parte anteriore del pedale, quandoviene rilevato il bordo materiale o al termine del modo dicucitura a dimensloni costanti, la macchina eseguir^automaticamente il taglio del filo.
O Taste fiir EinschuO-NMhautomatIk• Nur wirksam, wenn dcr Stoffkantcnscnsor an dcr Ma.schine
angebracht ist odcr die Ma.schine unter dcr KonstantmaB-Nahbetriebsart betriebcn wird.
• Wird die Nahmaschine mit dicscr Taste gestartct, liiuft sicautomatisch solange, bis die Stoflkante crfaBt odcr das Endcdcs KonstantmaB-Niilivorgangs crrcicht wird.
O Interrupter de pespunte automatico de un goipe• Dcviene efectivo cuando el selector de borde de material esta
instalado en la maquina de coser o cuando la m^uina decoser es operada bajo la modalidad de puntada de dimensionconstante.
• Ponga en marcha la maquina de coser con este interruptor, yla maquina de coser funcionard automdticamente hasta quese detecte el borde del material o hasta que se llegue el ftn deun cosido de puntada de dimensidn constante.
O Taste fur automatlsches Fadenabschneiden• Nur wirksam. wenn der Stoffkantcnscnsor an dcr Maschiiie
angebracht Ist odcr die Maschine unter der KonstantmaB-
Nahbctrieb.sart betriebcn wild,
• Bei Beiiitigung dicscr Taste fUhrt die Nahma.schine nach derErkcnnung dcr Stoffkantc odcr nach dcr Bcendigung dcrKonstanimaB-Nahbciricb.sart aulomati.scli Fadenabschneiden aus,selbst wenn dcr vordcre Toil dcs Pedals gcdriickt gchallcn wird.
© Interruptor de corte automatico de hllo• Devicne efectivo cuamlo el selector de borde de material esta
instalado en la maquina de cosero cuando la m^uina decoser es operada bajo la modalidad de puntada de dimensionconstante.
• Aunque mantcnga presionada la parte frontal del pedal, elsensor puede dctectar el borde del material o despues decomplctadala modalidad decosidode puntadade dimensionconstante, o despues de completer la modalidad de cosido depuntadadedimensidnconstante, lamdquinadecoserejecutaraautomaticamente el corte de hilo.
-6 -From the library of: Superior Sewing Machine & Supply LLC

(E) Thread trimming prohibition switch• Used for prohibiting thread trimming at any occasion.
(D Touche d'interdiction de coupage du fil
• Permet d'interdire le coupage du fil dans tous les cas.
Interruttore di proibizione del taglio del filo• Usato per proibire il taglio del file ad ogni caso.
0 Bobbin thread counter
• Indicates the amount of bobbin thread while counting it by subtracting from the set value.
•When the bobbin thread remaining amount detectingdevice is installed on the machine, the counter indicates the number of times of detecting.
0 Compteur de fil de canette
• Indique la quantite restante de fil de canette en diminuantla valeur spdcifide en fonction du nombre de pointsddtectds.
• Lorsque le detecteur de quantite restante de fil de canetteest installs sur la machine, le compteur indique le nombrede detections.
0 Contatore di filo della bobina
• Indica la quantit<^ di filo della bobina conteggiandola persottrazione da! valore di imposiazione.
• Quando il dispositivo per rilevare la quantila rimanente dinio della bobina e installato sulla macchina, il contatore indicail numero di volte della rilevazione.
0 Bobbin counter reset switch
• Used for returning the value shown on the bobbin threadcounter to the initial value.
0 Touche de reinitialisation du compteur de fil decanette
• Permet de ramener le compteurde fil de canette &la valeurinitiale.
0 Interruttore di ripristino del contatore di filodella bobina• Usato perripoiiareil valoremostrato sulcontatore di filodella
bobina a! valore iniziale.
Taste zur Verhiitung des Fadenabschneidens• Diem zur Verhiitung des Fadenabschneidens unter alien
Umsiiinden.
<E) Interrupter de prohibicibn de corte de hilo• Sc usa para prohibir cl corte de hilo en cualquier ocasidn.
0 Spulenfadenzdhler• Zcigl die rcsllichc Spulenfadenmcnge durch Subtraktion von
dcni vorgcgcbcncn Wen an.
• Wcnn dcr Spulcnfaden-Rcstbctragdctcktor an dcr Maschincangcbracht ist, zcigt dcr Ziihlcr die Anzahl dcrErkennungnsvorglingc an.
0 Contador de hilo de bobina• Indica la cantidad de hilo de bobina mientas la cucnta
rcstandola del valor fijado.• Cuando cl dispositivo detector de cantidad remanenle de hilo
de bobina esta instalado en la maquina de coser, el contadorindica el numero de veccs de deteccidn.
0 SpulenfadenzShler-Ruckstelitaste* Dicnt zur RUckstcllung des auf dem Spulenfadcnzahler
angezciglcnWeilesauf den Ausgangswcrt.
0 Interruptor de reposicidn de contador debobina
• Se usaparavolverel valorquese inuestraen el contador dehilo de bobina al valor inicial.
0 Bobbin thread amount setting switch• Used for setting the amount of bobbin thread.
0 Spulenfadenmengen-Einstelltaste• Dicnt zum Einstcllen dcr Spulenfadenmcnge.
0 Touche de reglage de la quantite de fil decanette
• Permet de specifier la quantite de fil de canette.
0 Interruptor de fijacibn de cantidad de hilo debobina
• Se usa para fijar la cantidad de hilo de bobina.
0 Interruttore di impostazione della quantita difilo della bobina• Usato per imposlarela quantitadi filo della bobina.
-7-From the library of: Superior Sewing Machine & Supply LLC

<D No. of pcs. counter•The indication shown on the counter increase whilecoupling up the numberof finished piecesof garmentevery time the machine performs thread trimming.
(D Compteur de nombre do pieces
• L'indication du compteur augmente en comptant lenombre de pieces termindes ^ chaque fois que la machineeffectue un coupage du fil.
<E) Interruttore di compensazione su/giu deii'ago• Usato quando si esegue la cucitura di compensazione su/giu
deii'ago.
<1^ Werkstuckzdhter• Dor auf dcm Ziiiilcf angc/.ciglc Wcrt wird mil jcdcm
fcrtiggcslclltcn Wcrksluck crhblu, jcdcsmal, wcnn dieMaschinc Fadcnabschnciden ausfUhrt.
(D Contador de No. de plezas• La indicacion se mueslra en el contador aumenta micntras se
acoplaclnumcrodcplezasacabadas cadavezquelam^uinaejecuiael corlcdc hilo.
-8-From the library of: Superior Sewing Machine & Supply LLC

5. HOW TO OPERATE THE CONTROL PANEL FOR SEWING STITCHINGPATTERNS/
BEDIENUNG DER STEUENAFEL ZUM NAHEN VON STICHMUSTERN /
COMMENT UTILISER LE PANNEAU DE COMMANDE POUR EXECUTERDES CONFIGURATIONS DE COUTURE /
MODO DE OPERAR EL PANEL DE CONTROL PARA COSCR PATRONESDE PESPUNTE/
COME AZIONARE IL PANNELLO Dl COMANDO PER CUCIRE MODELLI
Dl CUCITURA
(1) Reverse stitching pattern(1) Riickwartsstichmuster(1) Configuration de conture arriere(1) Patrdn de pespunte invertido(1) Modello di affrancatura
O & @
aUI
aM ^cc
i A AABCDCV y I«—D—'
A.
Ic^cf
e W
l/l/lil/l
^ p.-: LI
IWiN
0 O
Sewing pallern
Nahmuster
0 N
• ^ i
•I '1
k%%%
OFF ON
AUS EIN
OFF OFF
AUS AUS
OFF
AUS
ON
EIN
"G
ON
EIN
ON
EIN
1) Press reverse stitching pattern switch O to specify the reverse stitching pattern.
2) The reverse stitching pattern is selected, and the number ofstitches and data on reverse stitching which have already beenspecified are shown on the panel.
3) If you want to change the number of stitches, operate the "+"or "-"switch of switches O for setting the number of stitchesA through D.(The range of the number of stitches that can be changed : 0to 19 stitches)
4) Fourdifferent stitching patterns can be performed by matching the ON and OFFsettings of automatic reverse stitching(for start) switch 0 and automatic reverse stitching (forend) switch 0.
5) Furthermore, the double reverse stitching can be selectedby operating double reverse stitching (for start) switch ©and double reverse stitching (for end) switch © .
1) Die Taste fiir RUckwiirissiichmuster © ciriickcn, urn dasRiickwailssl ichmusler anzugcbcn.
2) Das Riickwart.sslichmu.sier wird gcvvahli, und die bcrcilsangegcbencn Wcric fur die Slich/ahl und die Dalcn fur dieRuckwiirtsstichc wcrdcn auf dcr Sicueiiafcl angc/.cigl.
3) Zum Andcm dcr Stich/uhi die Scilc " + " odor " - " dcr Ta.sicn
o driickcn, urn die Siichzahl fiir die Prozc.ssc A bis Dcinzustclicn.
(Einsicilbcrcich dcr Slich/ahl: 0 bis 19 Stichc)
4) Durch Kombinicrcn dcr BIN- und AUS-Zusiande dcr Tastcn 0und © fiirauiomali.schc Ruckwiiilsstichc (am Nahbcginn bzw.am Niihende) slchcn vicr verschiedenc Stichmusicr zurVcifiigung.
5) Dailibcrhinaus konncn Doppclriickwiiilsslichc durch Bctiitigungdcr Tasic © fiir Doppclriickwansstichc (am Nahbcginn) unddcr Taste © fiir Doppclriickwari.s.stichc (.nm Niihende) gcwiihliwcrdcn.
-9-From the library of: Superior Sewing Machine & Supply LLC

0 0
aIb",
Dpcj ~]*1^1
a
*r»4
J?I A AABCBCV V I^D—'
ic%r
:• 1/1 . 3—c-o.
: N 1 'I 'I 'I 'I
i\NlN
o e
lA
Configuration decouture
Patrones de pespunle
Modelli di cucltura
e N
DESEN-
CLENCHEE
OFF
DESEN-
CLENCHEE
OFF
EN-
CLENCHEE
ON
DESEN-
CLENCHEE
OFF
DESEN-
CLENCHEE
OFF
EN-
CLENCHEE
ON
T]
EN-
CLENCHEE
ON
EN-
CLENCHEE
ON
1) Appuyer sur la touche de configurationde couture arrifereO pourspecifier une configuration de couturearri^re.
2) La configuration de couture arri&re est sdlectionnde. Lenombrede points et les donndesde points arrifere ayant ddjkdte specifies sont indiques sur le panneau.
3) Pour changer le nombre de points, utiliser les touches"+"ou"-" O quipermettentde specifierle nombredespointsdes operations A a D.(Le nombre de points peut etre rdgl6 entre 0 et 19.)
4) On peut obtenir quatre configurations de couture dif-ferentes en combinant les positions ENCLENCHEE etDESENCLENCHEE de la touche d'exdcution auto-matique depoints arrifere (pour led€but dolacouture) Oet de la touche d'execution automatique de points arri^re(pour la fin de la couture) 0 .
5) De plus, I'execution de points arri&re doubles peut etrechoisie en utilisant la touche d'execution de points arri^redoubles (pour le debut de la couture) 0 et touched'execution de points arri^re doubles (pour la fin de lacouture) 0 .
1) Pulse el interruptor O de patrdn de pespunte invertido paraespccificar el patron de pespunte invertido.
2) Se haseleccionado el patrdndc pespunte invertido, y sc muestranen el panel el numero de puntadas y datos sobre el pespunteinvertido que ya ha sido ya especificado.
3) Siustedquierecambiarelnumero depuntadas,opereel interruptor"+"oel"-"de losinterruptores O parafijar elnumero depuntadasA a D. (Gama del numero de puntadas que se puede cambiar: 0a 19 puntadas)
4) Sc pueden cjecutar cualro diferentes patrones dc pespunleacoplando lasfijaciones ONyOFFdelinterruptor 0 depespunteautomatico invertido (parainicio)y el interruptor 0 depespunteautomatico invertido (para fin).
5) Ademas, elpespuntedoble invertido sepuedescleccionaroperandoel interruptor © depespunte doble invertido (para inicio) y elinterruptor © dcpespunte doble invertido (para fin).
1) Premere interruttore dimodello diaffrancatura O per sclezioiiareil modello di affrancatura.
2) 11 modello di affrancatura viene selezionalo, e il numero di puntie dati su affrancaturache sono statigih impostativengonomostratisul pannello.
3) Qualora si desideri cambiare il numero di punti, agiresull'interruttore "+" o di interruttori O per impostare ilnumerodi puntiper process! da A a D. (11 campo di impostazionedel numero di punti: da 0 a 19 punti)
4) Quattro different! modelli di cucitura possono essere eseguitiaccoppiando le iinpostazioni di ON e OFF di interruttore diaffrancatura automatica (per I'inizio) 0 ed interruttore diaffrancatura automatica (perla fine) 0.
5) Inoltre, Taffrancatura doppia puo essere selezionata agendo suinterruttore diaffrancatura doppia (perI'inizio) © edinterruttoredi affrancatura doppia(per la line)©.
-10-From the library of: Superior Sewing Machine & Supply LLC
(2) Constant-dimension stitching pattern(2) KonstantmaB-Stichmuster
o o
0 in
Sewing paiiern
Nahmuster
0 N
OFF
AUS
CD
OFF
AUS
lU >g
ON OFF
EIN AUS
CD CD
OFF ON
AUS EIN
ON
EIN
CD
ON
EIN
1) Die Taste o fiir KonslaniinaB-Slichmustcr an dcr Sieucrtafcldriicken, urn das KonslaniinaB-Stichinusicr zii wahlcn.
2) Das KonsianimaB-Siiciiinustcr wird gcwiihlt. Nun wcrden dievorbesiimmte Anzahl von Stichcn und dcr Zusiand dcrRUckwartsslichfunklion auf dcr Slcucrtafcl angezcigl.2um Andern der Slichzahl der Prozesse C und D im
3) KonslantmaB-Sliclimuslcr die Slichzahl-Einsielliastcn 0 fiirdie Prozesse C und D driicken. Die Riickwiirlsstichecntsprechend wahlcn. Zuin Andern dcr Anzahl dcrRiickwiirtsstiche die Slichzahl-Einslclltaslcn =4= fiir dieProzesse A und B driicken.
(Einslcllbercich: A, B = 0 bis 19SiicheC, D = 5 bis500Sliche)4) Durcli Kombinicrcn der EIN- und AUS-Zusliindc der Tasien 0
und 0 fiir aulomalische Rtickwiiiissliciie (am Niihbcginn bzw.am Nahcndc) stchen vicr vcrschicdcnc Slichmustcr zurVerfiigung.
5) Dariibcr hinaus konncn Doppclriickwart.ssliche durch BeialigungdcrTaste O fiir Doppclriickwailsstichc (am Niihbcginn) unddcrTaste 0 fiir Doppclruckwart.sstiche (am Nahcndc) gewiihltwcrden.
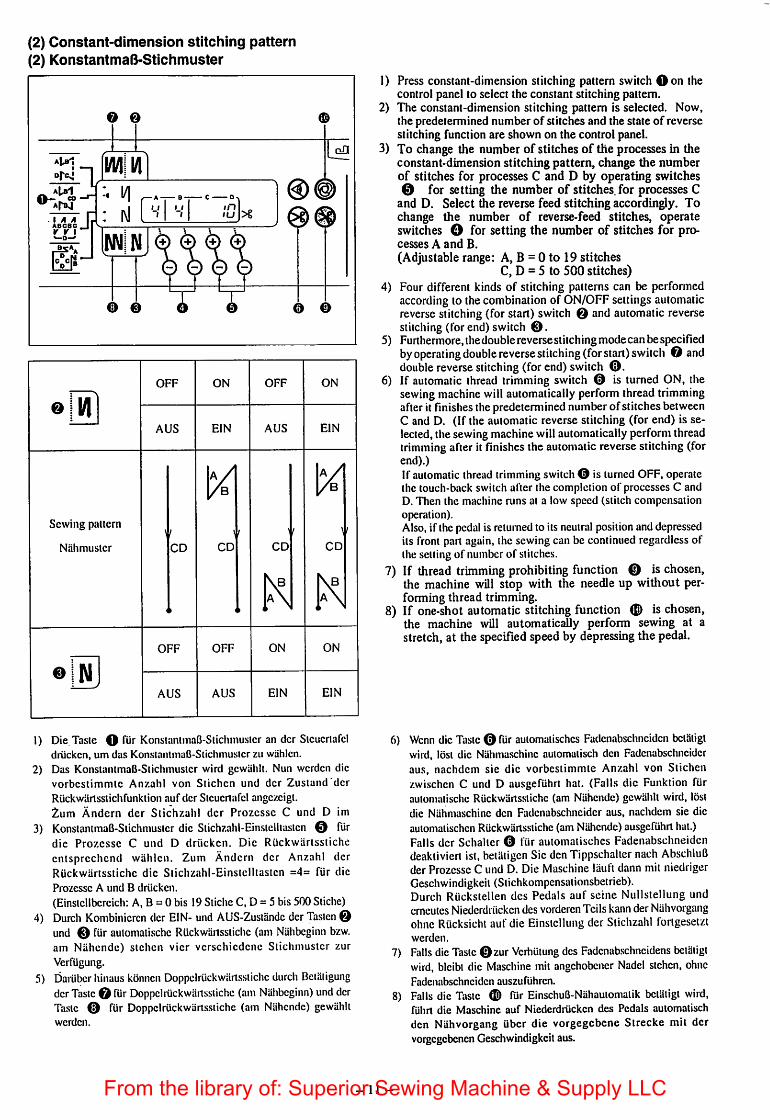
1) Press constant-dimension stitching pattern switch Oon thecontrol panel to select the constant stitching pattern.
2) The constant-dimension stitching pattern is selected. Now,the predetermined number of stitches and the state of reversestitching function are shown on the control panel.
3) To change the number of stitches of the processesin theconstant-dimension stitching pattern, change the numberof stitches for processes C and D by operating switches0 for setting the number of stitches,for processes C
and D. Select the reverse feed stitching accordingly. Tochange the number of reverse-feed stitches, operateswitches O for setting the number of stitches for processes A and B.(Adjustable range: A, B = 0 to 19 stitches
C, D = 5 to 500 stitches)4) Four different kinds of stitching patterns can be performed
according to the combination of ON/OFFsettings automaticreverse stitching (for start) switch 0 and automatic reversestitching (for end) switch 0.
5) Furthermore, thedouble reverse stitching mode can bespecifiedby operating double reverse stitching (for start) switch O anddouble reverse stitching (forend)switch ©.
6) If automatic thread trimming switch 0 is turned ON, thesewingmachinewill automatically perform thread trimmingafter it finishes the predetermined number of stitches betweenC and D. (If the automatic reverse stitching (for end) is selected, thesewingmachinewill automatically performthreadtrimming after it finishes the automatic reverse stitching (forend).)If automatic thread trimming switch© is turnedOFF, operatethe touch-back switch after the completion of processes C andD. Then the machine runs at a low speed (stitch compensationoperation).Also,if the pedalis returned to its neutral positionand depressedits front part again, the sewing can be continued regardless ofthe selling of number of stitches.
7) If thread trimming prohibiting function 0 is chosen,the machine will stop with the needle up without performing thread trimming.
8) If one-shot automatic stitching function © is chosen,the machine wUl automatically perform sewing at astretch, at the specified speedby depressing the pedal.
6) Wcnn die Taste0 fiir aulomatisches Fadenabschneiden belSligtwird, lost die NUhmaschine auiomalisch den Fadcnabschneideraus, nachdem sie die vorbesiimmte Anzahl von Stichcnzwi.schen C und D ausgefuhrt hat. (Falls die Funktion fiirautomatischc Riickwartsslichc (am Nahcndc) gewahlt wird, lostdie NUhmaschine den Fadcnabschneider aus, nachdem sie dieaulomatischen Ruckwartssiiche (am Nahcndc) ausgefiihrt hat.)Falls der Schaller © fiir aulomatisches Fadenabschneidendeaktivieri ist, beiUtigen SiedenTippschaller nach AbschluBder Prozesse C und D. Die Maschine lauft dann mil niedrigerGesehwindigkeii (Slichkompensaiionsbelrieb).Durch RUckstellen des Pedals auf seine Nullslellung undemeules Niederdriickendes vorderenTeils kann der Nahvorgangohne Rucksichl auf die Einsiellung der Slichzahl fortgesetztwerden.
7) Falls dieTaste ©zur Verhiilung des Fadenab-schneidens beialiglwird, bleibl die Maschine mil angehobener Nadel slehen, ohneFadenabschneiden auszufiihren.
8) Falls die Trisie 0 fiir EinschuB-Nahauiomalik beialigl wird,fiihrl die Maschine auf Niederdriicken des Pedals auiomalischden Nahvorgang iiber die vorgegebene Sirecke mil dervorgegebenen Gesehwindigkeii aus.
- 11 -From the library of: Superior Sewing Machine & Supply LLC

(2) Configration de couture a dimensions constantes(2) Patron de puntada de dimension constants
aLb1
aM ^0-:
aMt A AABCBC,K K 1«—D—'
O O
i/i/iii/i-« I/] _ A_— B C DN: i\l I I I 'u|>gmn
O 0 0 0
o I/I
Configuration decouture
Patrones de pespunte
Modeili di cucitura
e N
DESEN-
CLENCHEE
OFF
CD
DESEN-
CLENCHEE
OFF
EN-
CLENCHEE
ON
CD
DESEN-
CLENCHEE
OFF
DESEN-
CLENCHEE
OFF
EN-
CLENCHEE
ON
EN-
CLENCHEE
ON
EN-
CLENCHEE
ON
1) Appuyer sur la louche de configuration de couture hdimensionsde constante O surlepanneaudecommandepour choisir la configuration de couture a dimensionsconstantes.
2) La configuration de couture ^ dimensions constantes ests61ectionn6e. Le nombre predetermin6 de points et Tetatde la fonction d'execution de points arrifere sont alorsindiqu^s sur le panneau de commande.
3) Pour changer le nombre de points des operations de laconfiguration de couture hdimensions constantes, changerle nombre de points des operations C et D avec les touches0 qui permettent de specifier le nombre de points des
operations C et D. Choisir lacouture arrifereen consequence.Pour changer le nombre de points arri^re, utiliser lestouches O. qui permettent de specifier le nombre depoints pourles operations A et B.(Plage de reglage: A, B = 0 k 19 points
C, D = 5 a 5(X) points)
4) On peut obtenir quatre configurations de couture dif-ferentes en combinant les positions ENCLENCHEE etDESENCLENCHEE de la touche d'execution auto-matique de points arrifere (pour Ic debut de la couture) 0et de la touche d'execution automatique de points arriere(pour la fin de la couture) 0 .
5) De plus, I'execution de points arriere doubles peut etrechoisie en utilisant la touche d'execution de points arrieredoubles (pour le debut de la couture) O et la touched'execution de points arriere doubles (pour la fin de lacouture) 0 .
6) Si la touche de coupage automatique du fil © est en-clenchee, lamachine coupe automatiquement le fll apresavoir execute le nombre depoints predetermine entre Cet D. (Si I'execution automatique de points arriere (pourla fin de la couture) est choisie, la machine coupeautomatiquement le fil apres avoir termine I'executionautomatique de points arriere (pour la fin de la couture).)Si I'interrupteur de coupe-fil automatique 0 est sur arr6t,agir sur I'interrupteur "touch-back" aprfes avoir termine lesoperations C et D. La machine se met alors h fonctionner hpetite Vitesse (operation de compensation des points).Si Ton ram^ne la pedale au neutre, puis qu'on I'enfonce hnouveau en avant, on peut continuer ^ coudre quel que soit lenombre de points predetermine.
7) Si la fonction d'interdiction de coupage du fil 0 estchoisie, la machine s'arrete avec I'aiguille compl^tementrelevee sans couper le fil.
8) Si la fonction de couture automatique non repetitive. 0:est choisie, la machine effectue automatiquement la couture d'un trait h la vitesse specifiee par I'enfoncement dela pedale.
1) PulseelinterruptorOdepatrondcpuntadadedimensionconstante 6)cn el panel de control para seleccionar el patron de puntadaconstante.
2) Se ha seleccionadoel patrdnde puntadade dimensionconstante.Ahora, el numero predeterminado de puntadas y el estado de lafuncidnde puntadainvertidase muestranen el panel de control.
3) Paracambiarel numerode puntadasdelprocesoen el patrdndepuntada de dimensidri constante, cambie el numero de puntadasparalosprocesos C y Doperando los interruptores 0 parafljarel mlmcro de puntadas para los procesos C y D.. Seleccionc elnumero de puntadas para los procesos C y D. Selecciones enconformidad la pespunte de transporte invertido, opere losinterruptoresO fijarelnumero depuntadasparalosprocesosAyB.(Gama ajustable: A, B = 0 a 19 puntadas
C, D = 5 a 500 puntadas.)4) Sepucdenejecutarcuatrodiferentesclasesdepatronesdepuntada
de acuerdo a la combinacion de las fijaciones ON/OFF del gjinterruptor0 depuntada automdtica invertida (para inicio) ydelinterrupter 0 de puntada automatica invertida (parafin).
5) Adcmas, la modalidad de puntada invertida doble se puedecspccificar operando el interruptor 0 depuntadadobleinvertida(para inicio)y cl interruptor0 de puntadadoble invertida(paraf"")- - 12-
Si se posiciona en ON el interruptor 0 de corte automdtico dehilo, la maquina de coser ejecutara automaticamente el corte dehilo dcspudsque termina el numero predeterminado de puntadasentre C y D. (Si se selecciona la modalidad de puntada automdticainvertida(para fin),lamdquinadecoserejccutar^automdticamenteel corte de hilo despuds que termina la puntada automdticainvertida (para fm).)Si el Interruptor © delcortahilo autom^tico estden OFF,vuelvaa accionar el Interruptor a simple tacto para completar losprocesos C y D. Enlonces la maquina funclonarda baja velocldad(operacldn de compensaclon de puntada).Atlemds,si el pedal se vuelve a su poslcion neutral y si se vuelvea preslonar la pane frontal del pedal, el cosldo puede contlnuarsea cual fuere la fijacidn de numero de puntadas.Si se seleccionala funcion0 de prohibicidnde cortede hilo, lamaquina de coser se detendracon la aguja arribasin ejecutarelcorte de hilo.
Siseselecciona la funcion 0 depuntada automatica deungolpe,la maquina de coser ejecutara automaticamente el cosido cn untramo,a la velocidadespecificadapresionandoel pedal.
From the library of: Superior Sewing Machine & Supply LLC

(2) Modelio di cucitura a dimensioni costanti
O 0
ABCac
1) Premere interrullore di modelio di cucilura a dimensioni cosiantiO perselezionare il modelio di cucitura a dimensioni costanti.
2) li modeilo di cucitura a dimensioni costanti viene seiezionato, eil numero di punti e dati su affrancatura ecc. ciie sono stati giaimpostati vengono mostrati sui panneilo.
3) Qualora si desideri cambiare ii numero di punti dei processi neimodelio di cucitura a dimensioni costanti, cambiare ii numero dipunti per processi Ce Dagendo sugii intemittori © per impostureil numero di punti per processi C e D. Se viene seiezionata ancheraffrancatura, per cambiare ii numero di punti dcii'affrancatura,agire sugli interruttori O perimposture il numero di punti perprocessi A e B.(II campo di impostazione: A, B = da 0 a 19punti C, D = da 0 a500 punti)
4) Quattro differenti modelli di cucitura possono essere eseguitiaccoppiando ie impostazioni di ON e OFF di interruttore diaffrancatura automatica (per i'inizio) 0 ed interruttore diaffrancatura automatica (peria fine) ©.
5) Inoltre, 1'affrancatura doppia puo essere seiezionata agendo suinterruttore diaffrancatura doppia (perI'inizio) O ed interruttoredi affrancatura doppia (perla flne) O.
(3) Overlapped stitching pattern
e 14
Modelli di
cudlura
N
OFF
CD
OFF
ON OFF ON
CD CD CD
OFF ON ON
6) Se I'interruttore di taglio del filo automatico © b acceso, lamacchina per cucire eseguira automaticamente il taglio del filodopo die la stessa fmisce il predeterminato numero di punti traC e D. (Se I'affrancatura automatica (per la fine) e seiezionata,la macchina per cucire eseguir^i automaticamente il taglio del filodopo die la stessa finisce i'affrancatura automatica (per la fine).Se i'interruttore di tagiio del filo automatico © bspento, azionareI'interruttore "ouch-back" al termine dei processi C e D. Lamacchina quindi ruota a bassa velocita (compensazione di punto).Inoltre, se il pedale viene riportato in folle e la parte anterioredei pedale viene premuta nuovamente, la cucitura pu6 esserecontinuata indifferentemente all'impostazionedel numero di punti.SeI'interruttore ditaglio del filo automatico ©e spento, azionarerinierrutiore "touch-back" al termine dei processi C e D. Lamacchina quindi ruota a bassa velocita (compensazione di punto).Inoltre, se ii pedaie viene riportato in folle e la pane anterioredel pedal eviene premuta nuovamente, la cucitura pub esserecontinuata indifferentementeall'impostazione del numero di punti.
7) Sefunzione di proibizione dei taglio del filo © bseiezionata, lamacchinasi fermcrb con I'ago in alto senza eseguireil taglio dei filo.
8) Se funzione dicucitura automatica "diuncoipo" ® bseiezionata,ia macchina eseguir^ automaticamente la cucitura di Ilia, aliavelocitit impostata premendo il pedale.
dH
B-C- On
L'1 si s >g
o
1) Press overlapped stitching pattern switch O to specify theoverlapped stitching pattern. 4)
2) The overlapped stitching pattern is selected, and the number ofstitches and data on overlapped stitching which have alreadybeen specified are shown on the panel.
3) If you want to change the number of stitches, operate the"+"orswitch of switches © for setting the number of stitchesfor processes A through C. If you want to change the numberof wholeprocesses,operate the "+" orswitch of switch 5)© for setting the number of processes D.(The range of the number of stitches A, B and C that can bechanged : 0 to 19 stitches) (The range of the number of
- 13 -
processes Dthat canbechanged : 0 to 9 times)Depress the front part of the pedal once, and the sewingmachine will repeat the normal stitching and reversestitching by the predetermined time. Then, the sewingmachine wOl automatically make the thread trimmeractuate and will stop to complete the overlappedstitchingprocedure. (The one-shot automaticstitchingcannotbe turned OFF.)If thread trimming prohibiting function O is chosen,the machine will stop with tire needle up upon completion of tire overlapped stitching procedure witlroutperforming thread trimming.
From the library of: Superior Sewing Machine & Supply LLC

(3) Uberlappendes Stichmuster(3) Configuration de couture superposee(3) Patron de pespunte superpuesto(3) Modeiio di cucitura sovrapposta
Ata'i
aUb1CO
l/l/l{l/l_ B C
On
;• 1 LM ' '1 1 1 5 >g
1) Die Tasle. O fur Obcrlappungsstichmuslcr driicken, um dasOberlappungsstichniusler anzugebcn.
2) Das Oberlappungsslichmustcr wird gcwahit, und die bercilsangcgcbcnen Wertc fiir die Stichzahl und die Dalcn fUrUberlappendes Nahen werden auf der Steueitafel angezeigt.
3) Zum Andem der Stichzahl die Seile " + " oder " - " der Tasicn
e drUcken, um die Stichzahl fur die Prozesse A bis Ceinzustellen. Zum Andem der Anzahl der ganzen Prozesse dieSeite " + " Oder" - " der Taste drucken, um die Anzahl der
Prozesse unter D einzustellen.
(Einstellbereich der Stichzahl fur die Prozes.se A, B und C: 0 bis19 Sliche) (Ein.stellbereich der Anzahl von Proze.ssen D: 0 bis 9)
1) Appuyer sur la louche de configuration de couturesuperposee O pour specifier une configuration de couture superposee.
2) La configuration de couture superposee est seiectionnee.Le nombre de points et les donnees de couture superposeeayant dej^ ete specifies sent indiques sur le panneau.
3) Pour changer le nombre de points, utiliser les touches "+"ou 0 qui permettentde spedfier le nombre des pointsdesoperations A &C. Pour changer le nombre d'operationscompletes,utiliserles touches"+"ou"-" © quipermettentde specifier le nombre des operations D.(Le nombre de points pour les operations A, B et C peutetre
1) Pulse el intcmiptor O de patrdn de pespunte invertido paraespecificar el patrdn de pespunte invertido.
2) Se ha seleccionado el patrdn de pespunte invertido, y el numerode puntadas y los datos sobre el pespunte invertido ya se banespecificado como se muestran en el panel.
3) Si quiere cambiar el numero de puntadas, opere el interruptor "+"o de los interruplores © para fijar el numerode puntadasdesde A a C. Si quiere cambiar el numero de todos los proccsos,opereel interruptor"+"o"-"delinterruptor© parafijar elnumerode procesos D.(Gama del numero de puntadas A, B y C que se puedcn cambiar;0 a 19 puntadas) (Gama del numero de proccsos D que se pucde
1) Premere interrullorc di modello di cucitura sovrapposta O perselezionare il modello di cucitura sovrapposta.
2) II modello di cucitura sovrapposta viene selezionato, e il numerodi punti e dati su cucitura sovrapposta chc sono stati gia impostativengono mostrati sul pannello.
3) Qualora si desideri cambiare il numero di punti, agiresuirinterruttore o di interrullori © per imposture ilnumero di punti per processi da A a C. Per cambiare il numero diinteri processi, agire suH'intenuttore o di interruttore ©per impostare il numero di processi D.(11 campo di impostazione del numero di punti A, B e C: da 0 a19 punti) (II campo di impostazione del numero di processi D: da0 a 9 volte)
qDC
4) Den vordcren Teil des Pedals einmal niederdriicken, woraufliindie Nahmaschine die Vorwiirts- und Ruckwiirlsslichc um dievorgcgebene Anzahl wicdcrholt. Dann lost die Nahma.schineaulomati.sch den Fadcnabschncidcr aus und becndcl denObeiiappungsvorgang. (Die Ein.schuB-Nahauiomalik kann nichlau.sgc.schallel werden.)
5) Falls die Ta.sle O zur Verhiilung des Fadcnabschncidensbcliiligt wird, bleibi die Maschine nach Beendigung desUberlappungsvorgangs mit angehobener Nadcl slehen, ohneFadenabschnciden au.szuriihrcn.
r^gl^ entre 0 et 19. Le nombre d'operations D peut etrechange entre 0 et 9.)
4) Appuyer une fois sur I'avant de la pedale. La machiner^pfete la couture normale et la couture arriere le nombredefois indiqu^. Le coupe-fil est ensuite actionne et la machines'arrete, terminant la procedure de couture superposee.(La couture automatique non repetitive ne peut pas etredesactivee.)
5) Si la fonction d'interdiction de coupage du fil O estchoisie, la machine s'arrete avec I'aiguille compietementrelevee k la fin de la procedure de couture superposee sanscouper le fil.
cambiar: 0 a 9 veces)4) Presione la parte frontal del pedal una vez, y la maquina de coser
repelira el pespunte normal y el pespunte invertido por el tiempopredeterminado. Luego, la maquina de coser actuaraautomaticamente el corta-hilo y se detendra para completar elprocedimiento de pespunte. (No se puede cancelar el pespunteautomatico de un golpe.)
5) Si se selecciona la funcion © de prohibicion de cortedehilo,lamaquina se detendra con la aguja aniba al completar elprocedimiento de pespunte superpuesto sin ejecutar el corte dehilo.
4) Premere la parte anteriore del pedale una volta, e la macchina percucire ripeter«^ la cucitura normale e cucitura ad inversione per ilpredeterminato numero di volte. La macchina per cucire quindiautomaticamente fara funzionare il rasafilo e si arrestera percomplctare la procedura di cucitura sovrapposta. (La cucituraautomatica "di un colpo" non puo essere spenta.)
5) Se la funzione di proibizione del taglio del filo O t scelta, lamacchina si arresterh con I'ago in alto al termine della proceduradi cucitura sovrapposta senza eseguire il taglio del filo.
-14-From the library of: Superior Sewing Machine & Supply LLC

(4) Rectangular stitching pattern(4) Rechteck-Stichmuster(4) Configuration de points rectanguiaire(4) Patron de pespunte rectangular(4) Modello di cucitura rettangolare
5)
e N
Sewing pattern
Niihmuster
Coufiguration de couture
Patrones de pespunte
Modelli di cucitura
0 l/i
0 0
ABCBC
OFF
AUS
DESENCLENCHEE
OFF
AUS
DESENCLENCHEE
'U >€
ON OFF ON
EIN AUS EfN
ENCLENCHEE DESENCLENCHEE ENCLENCHEE
U
OFF
AUS
H
"Z
ON
EIN
"Z
ON
EIN
DESENCLENCHEE ENCLENCHEE ENCLENCHEE
0 0
1) Press rectangular stitching pattern switch O onthecontrolpanel to select the rectangular stitching pattern.
2) The rectangular stitching pattern is selected. Now, thepredetermined number of stitches and other sewing dataare shown on the control panel.
3) To change the number of stitches of the processes in therectangle stitching pattern, operate switches 0 (forprocesses C and D) to change the number of stitches forprocesses C and D.Select the reverse feed stitching accordingly. To changethe number of reverse-feed stitches, operate switches Ofor setting the number of stitches for processes A and B.(Adjustable range : A, B = 0 to 19 stitches,
C, D = 0 to 99 stitches)
4) Four different kinds of stitching patterns can be performedaccording to the combination of ON/OFF settingsautomatic reverse stitching (for start) switch 0 andautomatic reverse slitiching (forend) switch ©.
6)
Furthermore, the double reverse stitching mode can bespecified by operating double reverse stitching (for start) switch 0 and doublereverse stitching (forend) switch O.At each step the sewing machine automaticallystops after sewing the predetermined number of stitches.At this time, if the touch-back switch is operated, the sewing machine runs at a low speed (stitch compensation operation).Also, if the pedal is returned to its neutral position anddepressed its front part again, thesewing canbecontinued regradless of thesettingof number of stitches.
Ifautomatic thread trimming switch O is turned ON,thesewing machine willautomatically perform thread trimming afterthecompletionof the last process. (If the automatic reversestitching(for end) is selected, the sewing machinewill automaticallyperformthread trimmingafter it finishes the automatic reverse stitching (for end).)If thread trimming prohibiting function 0 is chosen, the machine will stop with the needle up without perfontiing thread trimming.If one-shot automatic stitching function ® is chosen, the machine will automatically perform sewing at a stretchuntil the number ofstitchesspecifiedis reached, at the predetermined sewingspeedbydepressing the pedalwhilethe sewingmachineis engagedin the sewingof process C or D. The machine performs thread trimmingin the last processof one-shotautomatic stitching pattern.For the sewing machineequipped with an auto-lifter, the presser foot will automatically go up after the completionof each sewing process.
7)8)
9)
15-From the library of: Superior Sewing Machine & Supply LLC

1) Die Taste O fur Rechteck-Stichmustcr an cler Sleuertafel drUcken, urn das Rechteck-Sticlimuster zu wahlen.2) Das Rechteck-Stichmusler wird gewiihit. Nun wcrden die voibestinimle Anzahl von Stichen und andere Nahdaten auf der Steuertafei angezeigt.3) Zum Andern der Slichzahl der Prozesse Cund Dim Rechteck-Stichmusler die Stichzahl-Einstelltasten 0 fur die Prozesse Cund DdrUcken.
Die Ruckwtirtsstiche entsprechend wahlen. Zum Andern der Anzahl der Ruckwartssriche die Stichzahl-Einstelltasten O fOr die Prozesse Aund B driicken.
(Einstellbereich: A, B = 0 bis 19Sliche C, D = 0 bis 99 Stiche)4) Durch Kombinieren der EIN- und AUS-Zuslande der Tasleu O und © fur automatische Ruckwartsstiche (am Nahbeginn bzw. am Ntihende)
stehen vier verschiedene Stichmuster zur Verfugung.5) Dariiber hinaus konnen Doppelruckwartssliche durch Betatigung der Taste © fur Doppelriickwartsstiche (am Nahbeginn) und der Taste ©
fiir Doppelruckwartssliche (am Nahende)gewUhlt werden.Naeh jedem Schritt bleibt die Nahmaschine automatisch stehen, nachdem siedievorbestimmte Anzahl von Stichen ausgefUhrt hat.Wird dann derTippschalter bctUtigt, lliuft die Nahmaschine mil niedriger Geschwindigkeit (Stichkompensationsbetrieb).Durch RUckstellen des Pedals aufseine Nullstellung und erneutes Niederdrucken des vorderen Teils kann derNahvorgang ohne RUcksicht aufdie Einstellung der Stichzahl fortgesetzt werden.
6) Wenn dieTaste © Tiir automatisches Fadcnab.schneidcn betatigl wird, lost die Nahmaschine nach Bcendigung des letzten Prozesses automati.schden Fadenabschneider aus. (Falls die Funktion fUr automatische Ruckwartsstiche (am Nahende) gewahit wird, lost die Nahmaschine denFadenabschneider aus, naehdcm sie die automatischen Ruckwartsstiche (am Nahende) ausgePuhnhat.)
7) Falls die Taste © zur VerhUtung des Fadenabschneidens betatigt wird, bleibt die Maschine mil angehobener Nadel stehen, ohneFadenabschneiden auszufiihren.
8) Falls dieTaste © fur EinschuB-Nahautomatik betatigt wird, fiihrt die Maschine aufNiedcrdrUcken des Pedals wahrcnd der Verarbeitung desProzesses C oder D automatisch den Nahvorgang Uber die vorgegebene Strecke milder vorgegebenen Geschwindigkeit aus, bis die angegebeneStichzahl erreicht ist. Im letzten ProzcB der EinschuB-Nahautomatik fuhrt die Maschine Fadenabschneiden aus.
9) BeiNahmaschinen milautomatischer NiihfuBluftung wird der NiihfuB nach Beendigung jedesNahprozesses automatisch angehoben.
1) Pulse el interruptor O de patron de pespunte rectangular enel panel de control para seleccionar el patrdn de pesprnte rectangular.2) Sehaseleccionado el patrdn de pespunte rectangular. Ahora, el ndmero predeterminado de puntadas y otros datos decosido se muestran enel
panel de control.3) Para cambiar elnuinero de puntadas del proceso en elpaton de pespunte rectangular, opere los interruptores © (para los procesos Cy D) para
cambiar el numero de puntadas para los procesos C y D.Seleecione el numerode puntadaspara los procesos C y D. Selecciones en conformidad la pespuntede transporte invertido, operelos interruptoresO para fijar el numero de puntadas para losprocesos A y B.(Gama ajustable: A, B = 0 a 19 puntadas
C, D = 0 a 99 puntadas.)4) Sepueden ejecutar cuatro diferentes clases de patrones depuntada deacuerdo a lacombinacidn delas fijaciones ON/OFF del interruptor © de
puntada automdtica invertida (para inicio) y del interruptor © de puntada automatica invertida (para fin).5) Ademds, lamodalidad depuntada invertida doble .se puede especificar operando el interruptor © depuntada doble invertida (para inicio) y el
interruptor © de puntada doble invertida (para fin).A chaque etape, la machine s'arrete automatiquement apr^s avoir effectue le nombre de points predetermine.Si Ton agit alors sur I'interrupteur "touch-back", la machine fonctionne it petite vitesse (operationde compensationdes points).Si Ton ramene la p6dale au neutre, puis qu'on I'enfonce h nouveau en avant, on peut continuer a coudre quel que soit le nombr de pointspredetermine.
6) Si la louchede coupageautomatique du fil 0 est enclench^e, la machine execute automatiquement le coupagedu fil apr^s lademifere operation. (Si Tex^cution automatique de points arri&re (pour la fin de la couture) est choisie, la machine coupeautomatiquement le fil apr^s avoir termini I'ex^cution automatique de points arriere (pour la fin de la couture).)
7) Si la function d'interdiction de coupage du fil © estchoisie,lamachines'arrete avecI'aiguille compl^tement relev^e sans couperle fil.
8) Si la function de couture automatique nun r^p^titive © est choisie,la machineeffectueautomatiquement la couture d'un trait^ la Vitessesp^cifi^e par I'enfoncement de la p^dale pendant I'ex^cution de la couture de reparation C ou D. La machine coupele fil dans la demi^re operation de la configuration de couture automatique non repetitive.
9) Si la machine est ^quip€e d'un releveur automatique, le pied presseur remonte automatiquement ^ la fin de chaque operation decouture.
-16-From the library of: Superior Sewing Machine & Supply LLC

1) Appuyer surla touche deconfiguration decouture rectangulalre O pour spdcifier une configuration decouture rectangulaire.2) Laconfiguration decouture rectangulaire estselectionnde. Lenombre de points et lesautres doun^s de couture rectangulaire pr6d6termin6s
sont indiques sur le panneau.3) Pourchanger le nombre de points desoperations d'une confrguration decouture rectangulaire, utiliser les touches 0 (pourlesoperations
C et D) qui permettentde speciller les points pour les operationsC et D.Choisir rexdcution de points arriSre enconsequence. Pour changer le nombre de points arriere, utiliser lestouches O qui permettent despecifier le nombre de points pour les operations A et B.(Plage de reglage ; A, B = 0 &19 points
C, D = 0 h 99 points)4) On pent obtenir quatre types difiercnls de configurationsde points selon la position ENCLENCHEE/DESENCLENCHEE de la touche
d'execution automatiqiie de points anierc (pour ledebut de lacouture) 0 et de la touche d'execution automatique de points arriere (pourla finde la couture) 0.
5) De plus, I'execution de points arriere doubles peuletre choisieen utilisant la touched'execution de points arriere doubles (pour le debut delacouture) 0 et la touche d'execution depoints arriere doubles (pour la fin de lacouture) 0.En cada paso la maquina de coser se para automaticamcnte despues de coser el numero de puntadas predeterminado. Ahora, si se vuelvea accionar el interruptor a simple tacto, la maquina de coser funciona a baja velocidad (operacidn de compensacidn de puntada).Ademds, si el pedal se vuelve a su posicidn neutral y si se vuelve a presionar la pane frontal del pedal, el cosido puede continuar sea cualfuere la fijacidn de numero de puntada.
6) Sisc posiciona en ONel interruptor 0 de cone automatico dehilo, lamaquina decoserejecuiara autom^ticamente elcone dehilodespues decompletar el ultimo proceso. (Si se selecciona la modalidad de puntada aulom^tica invcrtida (para fm), la mdquina de coser ejecutardautomdticamente el corte de hilo despues que termina la puntada auiomdlica invcrtida (para fin).)
7) Siseselecciona la funcidn 0 deprohibicidn decorte dehilo, lamdquina decoser se dctcndrS conla aguja arriba sinejccutar elconedehilo.8) Sise selecciona la funcidn 0 de pespunte automatico deungolpe, la mdquina decoserejccutara automaticamcnte el cosidoen un tramo hasta
que sc llegue al numero especificado de puntadas, a la velocidadprcdctcrminada de cosido prcsionando elpedal mientras que la m^uinade coserestdejecutandoelcosido de losprocesosCo D. Lamaquinadecoserejccutaelcortede hiloenel liltimoprocesodepatrdndepespunteautomaticode un golpe.
9) Para la mdquina de coser equipada con un clcvador automatico, el prcnsatclas subira automaticamcnte despues de completar cada proceso decosido.
1) Premere interruttore di modello dicucilura reltangolare O per selezionarc il modello dicucitura retiangolare.2) II modellodi cucitura rettangolareviene selezionato, e il numerodi puntie altri daii che sono stati gid impostati vengonomostratisul pannello.3) Qualora si desideri cambiare 11 numero di punti dei process! nel modello di cucitura reltangolare, cambiare il numero di punti per processi C e
Dagendo sugli interruttori 0 perimpostare il numero di punti per processi Ce D. Se viene selezionata anche I'affrancatura, percambiare ilnumero di punti dell'affrancatura, agire sugli interruttori O per impostare il numero di punti perprocessi Ae B.(II campo di impostazione: A, B = da 0 a 19 punti C, D = da 0 a 99 punti)
4) Quattro different! modelli di cucitura possono essere eseguiti accoppiando le impostazionidi ON e OFF di iniermttore di affrancatura automatica(per I'inizio) 0 ed interruttore di affrancatura automatica (per la fine) 0.
5) Inoltre, I'affrancatura doppia pub essere selezionata agendo suinterruttore diaffrancatura doppia (per I'inizio) 0 edintemittore diaffrancaturadoppia (perla fine) 0.A ciascuna fase la macchina per cucire si ferma automaticamente dopo aver cucito il predeterminato numero di punti.A questo punto, se 1'interruttore "touch-back" viene azionato, la macchina per cucire ruota a bassa velocity (compcnsazione di punto).Inoltre, se il pedale viene riportato in folle e la parte anteriore del pedale viene premuta nuovamente, la cucitura pub essere continuataindifferentemente all'impostazione del numero di punti.A ciascuna fase la macchina per cucire si ferma automaticamente dopo aver cucito il predeterminato numero di punti.A questo punto, se 1'interruttore "touch-back" viene azionato, la macchina per cucire ruota a bassa velocilh (compensazione di punto).Inoltre, se il pedale viene riportato in folle e la parte anteriore del pedale viene premuta nuovamente, la cucitura pub essere continuataindifferentemente all'impostazione del numero di punti.
6) SeI'interruttore di taglio del filo automatico © bacceso, lamacchina percucire eseguirb automaticamente il taglio delfilo altermine dell'ultimoprocesso. (Se I'affrancatura automatica (per la fine) h selezionata, la macchina percucire eseguira automaticamente il tagliodel filodopochela stessa finisce I'affrancatura automatica (per la fine).
7) Se funzione di proibizione del taglio del filo 0 e selezionata, la macchina si fermera con I'ago inalto senza eseguire il taglio del filo.8) Se funzione dicucitura automatica "diuncolpo" 0 e selezionata, lamacchina eseguira automaticamente lacucitura di fila finchb ilnumero di
punti impostato siaraggiunto premendo la parte anteriore delpedale mentre la macchina percucire e impegnata nella cucitura di processo C oD. La macchinaesegue il taglio del filo nell'ultimo processodel modellodi cucitura automatica"di un colpo".
9) Per la macchina per cucire dotata di alzapiedinoautomatico, il piedino premistoffasi sollevera automaticamenteal termine di ciascun processodi cucitura.
-17-From the library of: Superior Sewing Machine & Supply LLC

6. HOW TO USE THE BOBBIN THREAD COUNTER /VERWENDUNG DES SPULENFADENZAHLERS /
COMMENT UTILISER LE COMPTEUR DE FIL DE CANETTE /MODO DE USAR EL CONTADOR DE HILO DE BOBINA /
COME USARE IL CONTATORE Dl FILO DELLA BOBINA
The machine detects the number of stitches. Thepreset value on the bobbin thread counter issubtracted in accordance with thenumber of stitches detected. (Every time the detector detects 10 stitches, 1 is subtracted from the preset value on the bobbinthread counter.) When the value on the counter becomes aminus value as"1 ^ 0 ^ the buzzer peeps three times to warnthe operator that the time to change the bobbin thread has come.
Die Maschine rcgislricrt die Anzahl dcr Sliche. Dor voicingcslelllc Wcrt des Spulenfadenzahlers verringcrl sicli in Ubcrcinsliinmung mil dcr Anzahldcrregislrierlen Stichc. (Nacli jedcr Registricrung von 10 Stichcn wird I von dein voreingesielllen Wcrt des Spulenfadenzahlers sublrahiert.) SobaldderWert desZahlers negaliv wird (1 0 •• -1), eildntder Summer dreimal, urn dieBedienungspersondaraufaufmerksamzumachen.daBes anderZeit i.st, die Spulc auszuwechseln.
La machineddtecte le nombre de points. La valeurspdcifide sur le compteurde fil de canetteest diminudeen fonctiondu nombredepoints ddtectds. (A chaque fois que le capteurddtecte 10points,la valeurspdcifide sur le compteurdiminue d'une unite.) Lorsquele compteuratteint une valeur negative telle que "1 0 -1", le vibreursonoreproduit trois bips pour avertlr I'operateur qu'il esttemps de changer le fil de canette.
Lam^uinadecoser detecta elnumero depuntadas. El valor prefijado enelcontador dehilo debobina seresta enconformidad con elnumero depuntadas detectadas. (Cada vezqueeldetector detecta 10puntadas, resta 1del valor prefijado enelcontador dehilo debobina.) Cuando elvalorenelcontador desciende hasta"1 0 ^l," el zumbador emite unpitido tres veces paraavisar a la operadora quehallegado la horadecambiarel hilo de bobina.
La macchina rileva il numero di punti. 11 valore preslabilito sul contatoredi filo deila bobina viene sottratto a seconda del numero di punti rilevato.(Ogni volta che il rilevatore rileva 10 punti, I e sottratto dal valore prestabilito sul contatore di filo della bobina.) Quando il valore sul contatorediventa un valore negativo come "I ^ 0 "f -I", ilcicalino squiltiscetre volte per avvertire I'operatore che barrivata ora dicambiare il filo dellabobina.
aUICO
I A AABCBCV V I»—D—»
U N •—IVb
mv[»J ArJTumgn cp-160
-
\
n\
uV J
/
0
1) Press bobbin thread counter reset switch O toreturn the value indicated onbobbin thread counter to the intial value (ithas been factory-setto " 0 " at the time of delivery).
(Caution) The bobbin thread counter cannot be reset during sewing. In this case, make the thread trimmer actuate once.2) Specify an intial value using bobbin thread amount setting switch O.
(Keep pressing the switch until the spesified value exceeds 100 digit. Now, the number on the counter increases/decreases in the incrementsof 100. If you want to specify a number around 100, operate the switch on all such occasions.)
1) Die Spulenfadenzahle-Ruckstelltaste O drucken, um den auf dem Spulenfadenzahler 0 angezeiglen Wert auf den Ausgangswertzuriickzustellen. (Der Wert wurde werkseitig vor dem Versand auf " 0 " eingestellt.)
(Achtung) Der Spulenfadenzahler kann nicht wahrend des Nahvorgangs zuruckgestellt werden. In diesem Fall mul3 derFadenabschnelder einmal betatlgt werden.
2) DenAusgangswert mil Hilfeder Spulenfadenmengen-Einstelltaste © angeben.(Die Taste gedrUckt halten, bis der angezeigte Wert die Ziffer 100iibersteigt. Nun wird der auf dem Zahler angezeigte Wert in SprUngen von100erhoht/erniedrigt. Um einen Wert von etwa 100anzugeben, ist die Taste bei alien solchen Gelegenheitenzu bet^tigen.)
-18-From the library of: Superior Sewing Machine & Supply LLC

aU1
»r<4_naLb1
CO
I A AABOBCV V I*—0—'
^*A» N '
J?
i/i/iii/1
mn
[_^QODSD CP-160
0
%%%%1) Appuyer surlalouche de reinitialisation du compteur de fil decanette O pour ramener lecompteur de fil decanette O ^ la valeur initiale, (la
valeur inidale a ete r6glee "0" en usine).(Attention) iin'est pas possible de relnltlallser le compteur de fil de canette pendant la couture. Dans cecas, actlonner une fols le coupe-fll.
2) Specifierune valeurinitialeh I'aide de la louche de reglage de la quantity de 111 de canetteO.(Continuerhappuyer sur la louchejusqu'^ ce que la valeurspecifide diSpasse 100.Le nombresur le compteuraugmente/diminuealors par pasde 100. Pour specifier un nombre voisin de 100 utiliser la louche.)
1) Pulse el interruptor O de reposicidn de contador de hilodebobina paravolver el valor indicado en el contador O de hilode bobina al valorinicial (ha sido fijado en la fabrica a "0" al tiempo de la entrega).
(Precauclon) El contador de hilo de bobina no se puede reposlclonar durante el cosldo. En este caso haga que actue unavez el corta-hilo.
2) Especftlque el valor inicial usando el interruptor O de fijacion decantidad de hilo debobina.(Mantenga pulsado el interruptor hasta que el valor especiilcado exceda 100dfgitos. Ahora, el numero en el contador aumenta/disminuye enincrementos de 100. Si usted quiere esprificar un numero alrededor de 100, opere el interruptor en todas eslas ocasiones.)
1) Premere interruttore di riprislino del contatore di filo della bobina O per riportare il valore indicate sucontatore di filedellabobina O alvalore iniziale ( stato impostalo a "0" in I'abbricaal memento della consegna).
(Attenzlone) II contatore dl filo della bobina non puo essere ripristlnato durante la cucltura. In questo caso, mettere infunzlone 11 rasafilo una volta.
2) Imposiare unvalore iniziale usando interruttore di impostazione della quantiih di filo della bobina ©.(Tenere premuto IMnterruttore finche il valore impostalo superi cifra 100. Ora, il numero sul contatore aumenta/diminuisce in incrementi di100. Qualora si desideri impostarc un numero intorno a 100, premere I'interruttore volta per volta.)
-19-From the library of: Superior Sewing Machine & Supply LLC

< Initial value on the bobbin thread counter for reference >
The table below gives the initial setting values for referencewhen the bobbin is wound with thread to the extent that thepinhole in the outside of the bobbin case is reached as shownin tlie figure given above.
Thread usedLength of threadwound round thebobbin
Value on bobbin
thread counter
Polyester spunthread #50
36 m 1200
(stitch length : 3 mm)
Cotton thread #50 31 m1000
(stitch length : 3 mm)
Thread tension rate 100%
* Actually, the bobbin thread counter is affected by the materialthickness and the sewing speed. So, adjust the initial value ofthe bobbin thread counter in accordance with the operatingconditions.
3) Once the initial value is specified properly,start the sewing machine.4) Whena minusvalueis shown on the counterand the buzzerpeeps threetimes,replace the bobbin thread.5) After the bobbin thread has been properly replaced, press bobbin thread counter resetswitch O to return the value on the bobbin thread
counter to the initial value. Now, re-start the sewing machine.6) If the remaining amount of bobbin thread is excessive or the bobbin thread runs out before the bobbin thread counter indicates a minus
value, and theinitial value appropriately using the"+"orswitch of bobbin thread amount setting switch O.If the remaining amount of bobbin thread is excessive
..Increase the initial value using the "+" switch.If the remaining amount of bobbin thread is insufficient
..Decrease the initial value using the switch.
< Ausgangswert auf dem Spulenfadenzahler als Anhaltspunkt
Die in der untenstehende Tabcllc angcgcbencn Ausgangswcrtc geltcnfurdie Situation, bei der die Spulcso bewlckclt i.st, daB das Stiftloch inderAuBenscite derSpulenkapscI gemaB derobigen Abbildung crreichtwind.
Verwendetes
Garn
Lange des auf dieSpule gewickeltenFadens
Spulenfadenzahler-Anzeige
Polyester-Spinnfasergam #50 36 m
1200
(Stichlange: 3 mm)
Baumwollgam #50 31 m1000
(Stichlange: 3 mm)
Fadenspannungskonstante 100%
* Da der Spulenfadenzahler von der Stoffdicke und derNahgeschwindigkeit beeinfluBt wird. sollte der Ausgang.swert dcsSpulenfadenzahlers gemaB den Betriebsbcdingungen eingestelltwerdcn.
3) Nachdem derAusgangswert korrekt eingestellt worden ist, kann die Niihmaschine gestanet werden.4) Sobald ein negativer Wert auf dem Zahler angezeigt wird und der Summer dreimal ertont, muB der Spulenfadenvorrat emeuert werden.5) Nachdem die Spule korrekt ausgewechselt worden ist, die Spulenfadenzahler-Riickstelltaste O drucken, urn den aufdem Spulenfadenzahler
angezeigten Wert aufden Ausgangswert zuriickzustellen. Nun kann dieNdhmaschine wieder gestartet werden.6) Falls der Restbetrag des Spulenfadens ubermaBig groB ist oder der Spulenfadenvorrat zur Neige geht, bevor der Spulenfadenzahler einen
negativen Wert anzeigt, muB der Ausgangswert durch Drucken der Seite "+" oderder Spulenfadenmengen-EinsLelltaste O entsprechendkorrigiert werden.Fallsder Restbetrag des Spulenfadens UbermaBig groB ist
... Den Ausgangswert durch Drucken von "+" erhohen.Falls der Restbetragdes Spulenfadensunzureichendist
... Den Ausgangswert durchDrucken von verringem.
-20-From the library of: Superior Sewing Machine & Supply LLC

<Valeur initiate sur ie compteur de fil de canette pour reference>
3)4)5)
6)
« 4> ooo<^ o o « o• 09 a 0 d
/ OoOooOOtt
o y
Le tableau ci-dessous indique, pour rdf^rence, les valeurs der^glage initiates lorsquela canetteestbobin€e jusqu'k rorificeext6rieurde la boite hcanette comme le reprdsente la figureci-dessus.
Fil utiliseLongueur de fil
bobine sur la canetteValeur du compteur de
fil de canette
File de polyester
n" 5036 m
1200
(longueur des points: 3mm)
Fil de coton n° 5031 m
1000
(longueur des points:3mm)
Taux de tension du HI 100 %
* Dans la r^alitd, le compteur de fil de canette est affect^ parrdpaisseur du tissu et par la vitessede couture. Specifier lavaleur initiate du compteur de fit de canette selon les conditions d'utilisation.
Apres avoir speifie la valeur initiale, metlre la machine en marche.Lorsqu'une valeur ndgative est indiquee sur le compteur ct qucle vibreur sonore produit trois bips, remplacer le fil de canette.Apr^s avoir remplace ie fil decanette, appuycr sur lalouche dereinitialisation du compteur defil decanette O pour ramener lecompteura la valeur initiale. Remettre alors la machine en marche.
Si laquautite restante defil decanette estexcessive ousi lefil decanette s'epuise avant que lecompteur n'ait indiqu6 une valeur ndgative,specifiercorrectement la valeurinitialeen ulilisant la touche "+" ou de reglage de la quantity de filde canetteO.Si la quantity restante de fil de canette est excessive
... augmenter la valeur initiale ^ Taide.de la touche "+".Si la quantitd restante de fil de canette est insulTisante
... diminuer la valeur initiale h I'aide de la touche
<Valor Infclal del contador de hllo de bobina para referencia>
En la siguientc tabia sc dan los valores iniciales de fijacion pararefercncia cuandolabobinaes bobinadaconhilohastaelpuntodequccl liilo hayallegadohasta el agujerito en el exteriorde la capsuladccanilla como se muestra en la figura anterior.
Hiloque se usaLongituddel hilobobinadoenia
bobina
Valor del contador de
hilo de bobina
Hilo hilado de
poli^ster #50 36 m1200
(longitudde puntada:3mm)
Hilodealgod6n#50 31 m1000
(longitudde puntada:3mm)
Proporcidn de tension del hilo 100%
* Actualmentc,el contador dc hilo dc bobina cs afcctadopor cl grosordel material yporlavclocidaddecosido. Porlotanto.ajustccl valorinicial del contador dc hilo dc bobina cn conformidad con lascondiciones de opcracion.
3) Una vez que se ha especificado debidanlente cl valor inicial. ponga en marcha la maquina de coser.4) Cuando se muestre un valor negativo en el contador y el zumbador suene ires veces, reemplace el hilo de bobina.5) Despuds quese hacambiado debidamente el hilo de bobina, pulse el interruptor O de reposicidn delcontodor de hilo debobina paravolver
para retornar el valor en el contador de hilo de bobina al valor inicial. Ahora, vuelva a poner en marcha la mdquina de coser.6) Si la cantidad remanente de hilo de bobina es excesiva o se gasta el hilo de bobina antes de que el contador de hilo de bobina indique un
valornegativo, ajusteel valorinicial apropiadamente usando el interruptor "+" o del interruptor © de fijacidn de cantidadde hilo debobina.
Si la cantidad remanente de hilo de bobina es excesiva
... Aumente el valor inicial usando el interruptor"+".Si la cantidad remanente de hilo de bobina es insuficiente
... Disminuya el valor inicial usando el interruptor
-21 -From the library of: Superior Sewing Machine & Supply LLC

<Valore iniziale sul contatore di filo della bobina come riferimento
ssr.v
La labella qui sotto fornisce il valore di impostazione iniziale comeriferimento quando la bobina h avvolta con il filo finch6 il foro dispillo nella parte esterna della capsula sia raggiunto come mostratonella figura data qui sopra.
File utillzzatoLunghezza del filo
awcltointomo alia bobinaValore sul contatore delfilo della bobina
Filo di spun dipoliestere #50 36 m
1200
(lunghezza del punto: 3 mm)
Filo di cotone
#5031 m
1000
(lunghezza del punto: 3 mm)
Rapporto di tensione del filo il 100%
In pratica, il contatore di filo della bobina h condizionato dallospessore del materiale e dalla velocity di cucitura. Regolare percioil valore iniziale del contittore di filo della bobina secondo le
condizioni operative.
3) Una volta die il valore inizialeb imposlalocorrettamente, avviare la macchinaper cucire.4) Quando un valore negative b mo.strato sul contatore e il cicalino squittisce tre volte, sostituire il filo della bobina.5) Dopodie il filodella bobinab slato soslituito correttamente, premere inlerruttore di ripristino del contatoredi filo della bobinaO per
riportare il valore sul contatore di filo della bobina al valore iniziale. Avviare quindi la macchina per cucire nuovamente.6) Se la quantitb rimanente di filo della bobina b ecces.siva o il filo della bobina si esaurisce prima che il contatore di filo della bobina indichi
un valore negative, regolare il valore iniziale usando interruttore "+" o di interruttore di impostazione della quantitb di filodella bobina ©Se la quantitb rimanente di filo della bobina b eccessiva
...Aumentare il valore iniziale usando ('interruttoreSe la quantitb rimanente di filo della bobina c insufficiente
...Diminuire il valore iniziale usando I'interruttore
(Caution) If the bobbin thread counter is used in combination with the bobbin thread remaining amount detecting device, thebobbin thread counter indicates the number of detections of the bobbin thread remaining amount detecting device.So, be sure to use the device after carefully reading the Instruction Manual for the bobbin thread remaining amountdetecting device.
(Achtung) Wenn der SpulenfadenzShler In Verbindung mit dem Spulenfaden-Restbetragdetektor verwendet wird, zeigt derSpulenfadenzahler die Anzahl der Registrierungen des Spulenfaden-Restbetragdetektors an. Daher sollte vorBenutzung dieser Vorrlchtung die Bedienungsanleitung des Spulenfaden-Restbetragdetektors sorgfSltig studiertwerden.
(Attention) SI Ton utilise le compteur de fil de canette avec le detecteur de quantite restante de fil de canette,le compteur indique le nombre de detections effectuees par le detecteur. Avant d'utiliser ledetecteur de quantite restante de fil de canette, lire attentivement son manual d'utilisation.
(Precauclbn) SIel contador de hllode bobina se usa en combinacion con el disposltlvo detector de cantldad remanente dehllo de bobina, el contador de hllo de bobina indlca del nCimero de detecclones del disposltlvo detector decantldadremanente de hllo de bobina. Porlotanto,use sin falta eldisposltlvo despu6s de leerdetenldamenteel Manual de Instrucclones para el disposltlvo detector de cantldad remanente de hllo de bobina.
(Attenzlone) Se II contatoredl filo della bobina e usato in comblnazlone con II disposltlvo dl rllevazlone dellaquantltarimanente dl filo dellabobina, II contatoredi filo dellabobinaIndlca II numerodellerllevazloni del disposltlvodl rllevazlone della quantlta rimanente dl filo della bobina. AsslcurarsI percio dl leggere attentamente IIManuale d'istruzloni per II disposltlvo dl rllevazlone della quantity rimanente dl filo della bobina primadiusarlo.
-22From the library of: Superior Sewing Machine & Supply LLC

7. NEEDLE UP/DOWN COMPENSATION SWITCH /
TASTE FUR NADEL-HOCH/TIEF-KOMPENSATION /
TOUCHE DECOMPENSATION DES POINTS PAR LE RELEVAGE /ABAISSEMENT DE L'AIGUILLE /
INTERRUPTOR DE COMPENSACION DE AGUJA ARRIBA/ABAJO /
INTERRUTTORE Dl COMPENSAZIONE SU/GIU DELL'AGO
ABCBC
Every time needle up/down compensation switch O ispressed, theneedlegoes up when it is in its lowestpositionor comesdown whenit is in its highest position. Thiscompensates the stitch by a halfofthe predetermined stitch length.However, note that the machinedoes not runcontinuouslyat a lowspeed even if you keep the switch pressing.Also, note that the needle up/down compensation switch isinoperative after turning the handwheel by hand.Thread trimmingis operativeonlyat the timeof stitchcompensationafter depressing the front part of the pedal once.
Mit jedem Driicken derTaste O fur Nadel-hoch/tief Kompensationhebt Odersenkt sich die Nadel je nachdem, ob sie sich in Tief-oderHochstcllung bellndet. Dadurch wird der Stich um die Halfte dervobestimmten Stichlange kompensiert.Die Maschine lauft jedoch nich fortwahrend mil niedrigerGeschwindigkeit, wenn diese Taste gedriitckt gehalten wird.Der Nadel-hoch/tief-Kompensationsschalter ist funktionsunfahig,
nachdem das Handrad von Hand gedreht worden ist.Der Fadenabschneiderist nur zum Zeitpunkt der Stichkompensationfunktionsfiihig, nachdem der vordere Teil des Pedals einmalniedergedriickt worden ist.
A chaque fois queTon appuie sur la touche decompensation des points parlerelevage/abaissement de I'aiguille O, I'aiguille remonte si ellese trouve sur sa position la plus basse ou s'abaissc si elle se trouve sur la position la plus haute. Ceci compense le point par la moitidde lalongueur des points predeterminee.Noter, toutefois, que la machine ne tourne pas continuellement a petite vitesse meme si I'on maintient cette touche enfonc6e.Noter6galementque Tinternipteurde compensationdes points par relevage/abaissement de I'aiguille est inop6rant lorsqu'on a tourne le volanta la main.
Le coupagedu fil n'est possibleque lors de la compensation des pointsapres que I'on a appuyd une fois sur I'avant de la p6dale.
Cada vezquepulse el interrupter O decompcnsacidn deaguja arriba/abajo, laaguja sube cuando estd ensu posicion m^s baja o baja cuandoestd en su posicidn mds alta. Esto compcnsa la puntada en una mitad de la longitud de punlada preterminada.Sin embargo, tenga en cuenta que la mdquina de coser no cose continuamente a baja velocidad aun cuando usted mantenga presionado elinterrutor.
Ademds, tenga presente que el interruptor de compensacidn de aguja arriba/abajo queda inopcraiivo despuds de girar el volante con la mano.El corta-hilo opera solamente al ticmpo de compensacidn de puntada despuds de presionar la parte frontal del pedal una vez.
Ogni volta cheinterruttore di coinpensazione su/giu dell'ago O ^ premuto, I'ago vasu quando si trova nella sua posizione pibassa o viene giuquando si trova nella sua posizione pi alta.Questo compensa il punto per una metii della predeterminata lunghezza del punto.Comunque, si tenga presente che la macchina non funziona continuamente a bassa velocita anche se I'interruttore viene tenuto premuto.Inoltre, I'interruttore di compensazione su/giu dell'ago e inoperante dopo aver girato il volantino manualmente.II rasafilo h operante solo al momento della compensazione del punto dopo averpremuto la parte anteriore del pedale una volta.
-23 -From the library of: Superior Sewing Machine & Supply LLC

8. KEY LOCK FUNCTION / TASTENSPERRFUNKTION /FONCTION DE VERROUILLAGE DES TOUCHES /
FUNCION DE ENCLAVAMIENTO DE TECLA /
FUNZIONE Di BLOCCAGGIO A CHIAVE
In ordertoprevent thespecified dataon thenumber ofstitches ortheprocesses (A,B,CandD)tobechanged bymistake, thesettingswitchcanbe locked. (Even withthesetting keys locked, thepattern to besewn and thevalue onthebobbin thread counter canbe changed.)
Um versehenlliches Verslcllcn dor liirdie Sticlizahl odcrdie Niihprozesse (A,B.C und D)eingeslellten Dalen 7,u veihiilen. konnen die Einslelltastengesperrt werden. (Da.s zuniiliende Musier undderWert desSpuienfadenzahlcrs konnen aberirolz gespcrrter Einslelltasten geandert werden.)
Pourempecherque les donndes spdcifides de nombre de points oudesopdrations (A,B, C at D) puissant dtrachangdas pararraur, 11ast possibla da varrcuillar las touchas da saisia. (Toutafois, mamalorsqualas touchasda saisia sont varrouilldas,11 ast posslbladechanger la configuration h axdcutar at la valaur du comptaur da fil da canatta.)
Paraevitarque se cambienpor equlvocacidn los dates especiflcados sobreel niimero de puntadas o los procesos(A, B, C y D), se puedeenclavar(bloquear) el interruptorde fljacidn. (Adncon las teclasde fljacidn enclavadas, esposiblequesecambienel patrona cosery el valoren el contadorde hilo de bobina.)
A1 fine di evitare che i dati impostatisul numerodi puntio sui processi (A, B, C e D) venganomodificati pererrore, Tinterruttoredi impostazionepub essere bloccato. (Anchecon gli interruttori di impostazione bloccati,il modelloda cuciree il valoresul contatoredi filo delta bobina possonoessere modificati.)
aIb",I/I/IIW
aUICO
I A AAOCBCV V I
D—'
aLbI
a^bICD
I A AABCBCV V I
B^AA
N —JB
DC C
D
J?
N\IIN
oe
l/l/lil/ll/l/| ^
: M\l
h%%%
o
- B —
ut
miN It
1) After the completion of the setting of data on the number ofstitches, etc., turn OFF the power to the machine once.
2) Tum ON the power switch while simultaneously pressingautomatic reverse stitching (for end) switch O and the "+"switch of number of stitches setting switch O for process Awith fingers.
3) Key mark 0 is shown on the control panel. This completesthe locking of keys.(If the key mark is not shown on the control panel, carry outthe aforementioned steps 1) through 3) again.)
* To release thekeys from the locked state, perform the aforementioned steps 1) and 2).(Once the key mark goes out, the keys are released from thelocked state.)
1) Nachdcm die Einstcllung dcr Daten lUr die Stichzahl usw.bccndct wordcn i.st, die Stromvcrsorgung dcr Maschinc einmalau.sschalten.
2) Den Netz.sclialler ein.schalten. wiihrcnd glcichzcitig die Ta.stc furautomaiischc Riickwaiis.stichc (am Niiliende) O und die Seitc" + " dcr Stichzahl-Einstelltaste 0 fiir ProzcB A gcdriicktgchaltcn werden.
3) Das Schliis-scl-Symbol @ crschcint auf dcr Stcucrtafel. Damitistdie Spcrrcdcr Tasicn abgc.schlosscn.(Falls das Schlu.s.scl-Symbol nicht auf dcr Stcucrtafel crschcint,dieoben be.schricbcncnScliritlc I)bis 3)cmcut ausfiihrcn.)
* Um den Spcrrzusland dcr Tasicn vvlcdcr aufziihelicn, die obenbcschricbencn Schritle I) und 2) ausfiihrcn. (Sobald dasSchliis.scl-Symbol crlischi, ist dcr Spcrrzustand dcr Tasicnaufgehoben.)
1) Apr^savoir termlne I'entrde des donnees sur le nombredespoints, etc., mettre la machine hors tension.
2) R^enclencherrintermpteurd'allmentatlontoutenappuyantslmultandment sur la louche d'exdcutlon automatique depointsarrlfere (pour la finde lacouture) O et sur lalouche"+" de r^glage du nombre depoints 0 pour I'op^ratloniA.
3) Le pictographe de cle © apparait sur le panneau decommande. Cecl termlne le verroulllage des touches.(SI le pictographe de cle n'apparait pas sur le panneau decommande, recommencer les operations 1 h 3.)
* Four deverroulller lestouches, effectuer lesoperations 1)et2) cl-dessus.(One fols que le pictographe de cleadlsparu, les touches sontdeverroulliees.)
-24-From the library of: Superior Sewing Machine & Supply LLC

aUI
dCo^""!aUI
CO
I A AABCDCK V I*—D—'
B^A.
|c°c|
J?N\liN X\%
oo
o
aLbI
•t^naLb1
CD
aMI A AABCBCV V IA—D—'
N\i hB —
uf
DG C
D
J?A
N
N\liN %%
1) Despu^s de completada la fijacion de datos sobre el ndmero depuntadas. etc., desconecte una vez de la m^quina de coser lacorriente el6ctrica.
2) Posicione en ON el intemiptor de allmentacidn de corrienteel^ctrica a la vez que pulsacon los dedos simult^eamente elinterrupter O de pespunteautomdtico invertido (para fin) y elinterrupior"+"del interrupter Q defljacidndenumeredepuntadaspara el procese A.
3) La marca 0 de tecla apareceen el panel de control. Con esto secomplcta el bloqueo de teclas.(Si la marca de tecla no aparece en el panel de control, ejecute otravez los mencionados pasos 1) al 3).)
* Para desbloquear las teclas, ejecute los mencionados pasos 1) y 2).(Una vez que dcsaparezca la marca de tecla, es que las teclas banqucdado dcsbloqueadas.)
1) Al termine di impostazione di dati sul numero di punti, ecc.,spegnere la macchina una volta.
2) Accendere rinterrultore deiralimcntazione premendosimuitaneamente interruitore di affrancatura automatica (per lafine) O e i'lnterruttore "+"di interruttore di impostazione delnumero di punti O per processo A con ledita.
3) Segno dichiave O viene moslralo sul pannello di comando.Queslo coinpleta il bloccaggio a chiave.(Se il segnodi chiavenon viene moslralosul pannellodi comando,eseguire nuovainenle i passi sopraccilali da I) a 3).)
* Per rilasciare il bloccaggio a chiave, eseguire i passi sopraccilali 1)e2).(Una volta che il segno di chiave si spegne, il bloccaggio a chiave hrilasciato.)
9. ON/OFF SWITCH @ OF THE MATERIAL EDGE SENSOR /STOFFKANTENSENSOR-EIN/AUS-TASTE ® /TOUCHE D'ACTIVATION/DESACTIVATION ® DU CAPTEUR DE BORD DUTISSU /
INTERRUPTOR ® ON/OFF DEL SENSOR DE BORDE EL MATERIAL/INTERRUTTORE DI SENSORE BORDO MATERIALE ®
• When the material edge sensor, which is optionaUy available, is connected to the control panel, the ON/OFF switch of thematerial edge sensor becomes effective.
• If the material edge sensor is specified, the sewing machine will automatically stop running or perform thread trimming whenthe sensor detects the material edge.
(Caution) If the material edge sensor is used in combination with the control panel, carefully read the Instruction Manual for thematerial edge sensor beforehand.
• Durchden AnschluB dcs gc.sondcn crhalilichcn Slofllcanicnscnsors an die Steuertafel wirddie Slofficanlensensor-Eln/Aus-Taslc fuiikiionsrahig.• Wenn der Sloffkanlcnscnsor akiivicn isi, blcibl die NUhmaschine auloinati.sch sichcn oder fiiliri Fadcnabschnciden aus, wenn dcr Sensor die
Sloffkantc crkenni.
(Achtung) Wenn der Stoffkantensensor in Verbindung mit der Steuertafel verwendet wird, sollte vor der Inbetriebnahme dieBedienungsanleitung des Stoffkantensensors sorgfSltig durchgelesen warden.
-25From the library of: Superior Sewing Machine & Supply LLC

• Lorsque lecapteurdebord dutissu enoption estraccordd aupanneau decommande, lalouche d'activation/desactivationducapteurde bord du tissu devient active.
• Si le capteurde bordde tissuest spdcifid, la machinekcoudre s'arrete automatiquement ou coupele fil lorsquele capteurddtectele bord du tissu.
(Attention) Si le capteur de bord du tissu est utilise avec le panneau de commande, lire attentivement sonmanual d'utilisation.
• Cuando elsensordebordc de material, disponible opcionalmenle, esteconeciado alpaneldecontrol, devendra efectivo el inlerruptor ON/OFF delsensor de borde de material.
• Si sc especificael sensorde bordcde material, la mdquinade coser se parara automdlicamenle o cjecutara el corte de hilo cuandoel sensordeteclael horde del material.
(Precaucldn) Si se use el sensor de horde de material en combinacidn con el panel de control, lea de antemano detenldamenteel Manual de Instrucclones del sensor de borde de material.
• Quando il sensore bordomateriale, che h disponibilea richiesta, e collegatoal pannellodi comando, rinterruttore di sensorebordo materialeviene reso valido.
• Se it sensore bordo materiale b selezionalo, la macchina per cucire si fermer o eseguird il taglio del filo automaticamentequando 11 sensorerileva il bordo del materiale.
(Attenzlone) Se II sensore bordo materiale e usato In comblnazlone con II pannello dl comando, leggere attentamenteManuale d'istruzloni per II sensore bordo materiale In antlclpo.
10. AUTOMATIC THREAD TRIMMING SWITCH ® /TASTE FUR AUTOMATICHES FADENABSCHNEIDEN (§) /TOUCHE DE COURAGE AUTOMATIQUE DE FIL ® /INTERRUPTOR ® DE CORTE AUTOMATICO DE HILO /INTERRUTTORE DI TAGLIO DEL FILO AUTOMATICO ®
• Thisswitch is usedto automatically actuate the thread trimmerin a process where the sewingmachineautomatically stops or when thematerial edge sensor is used.(If theautomaticreverse stitching (for end) is specified, the threadtrimmer will actuate after the sewing machine completes the automaticreverse stitching (for end).)
• DieseTaste wird bei Prozessen, wo die Niihmaschine automalisch slehenbleibt, odcr wo der Slofllcanicnscnsor vcrwcndct wird, bcnutzt, um denFadenabschncidcr automalisch zu bctiitigen.
• (Falls die Funktion fur automati.schc Riickwaiis-silchc (am Niihcnde) gewahit wird, I5.st die Niaimaschinc den Fadenabschncidcr aus, nachdcm sicdieautomatischcn RUckwansstichc (am Nahcncfe) ausgefOhrt hat.)
• Cette louche permet de commander Tactionnement automatique du coupe-fil lorsque la machine s'arrete automatiquement oulorsqu'on utilise le capteur de bord du tissu.(SiI'exdcution automatique de points arrifere (pour la fin de la couture) est choisie, le coupe-fil est actionnd aprfes Texecutionautomatique de points arrifere(pour la fin de la couture).)
• Este inlerruptor seusa para actuar automaticamente elcorta>hilo enunproceso donde lamaquina decoser separa automaticamente o cuando seusa el sensor de borde de material.(Si seespecifica elpespunte automatico invertido (para fin), elcorta-hilo actuara despues que lamaquinadecoser completaelpespunte automaticoinvertido (para fin).)
• Questo interrultore b usato per mettere in funzione il rasafilo automaticamente in un processo nel quale la macchina per cucire si dermaautomaticamente o quando II sensore bordo materiale e usato.(Se faffrancatura automatica (per lafine) e selezionata, il rasafilo simetterS infunzione dopo che lamacchina per cucire completa I'affrancaturaautomatica (per la fine)).
-26-From the library of: Superior Sewing Machine & Supply LLC

11. ONE-SHOT AUTOMATIC STITCHING SWITCH # /TASTE FUR EINSCHUSS-NAHAUTOMATIK (§) /TOUCHE DE COUTURE AUTOMATIQUE NON REPETITIVE (§) /INTERRUPTOR (f) DE PESPUNTE AUTOMATICO DE UN GOLPE /INTERRUTTORE Dl CUCITURA AUTOMATICA "Dl UN COLPO" (S)
• This switch is used, in tlie constant-dimension stitching mode, rectangular stitching mode, or in the process where thematerialedge sensor is specified, to make the sewing machine automatically perform sewing at the specified speed until theend of theprocess is reached only by driving the sewingmachine mode.
• Diese Taslc wire! in den Bclricbsarlcn fUr KonslanlmaB-Slichmusicr und Rcchtcck-Sticlimiislcr odcr bci Prozcs.scn init Angabc dcsSlorrkantenscnsoi's benut/l, uni die Niibinaschinc (lurch cinmaligcs Slatlcn zu vcranlasscn, den Nahvorgang mil der angcgcbcncn Gcschwindigkeilaulomalisch ausziiruhrcn, bis das Ende dcs Piozcsscs circichi i.si.
' Cette touche s'utilisedans lemode decouture kdimensions constantes^dans lemode decouturerectangulaireoudans une operationoh Tutilisationducapteurdeborddutissuestsp^cifi^e. Elle commandeI'ex^cutiond'unecouture automatique klavitesse sp6cifi6ejusqu'h la fin deI'opdration parune seule operation.
Este interrupter seusa en lamodalidad depuntada dedimensidn constante, modalidad depespunte rectangular, oenelpr(x;eso en que sehayaespecificado elsensor debordc del material, para que lamaquina decoser pueda ejecutar automaticamente elcosido a lavelocidad especificadahastallegaral findelproceso solamente activando la modalidad de la maquina de coser.
• Questo intermttore husalo, nel modo dicucitura a dimcnsioni coslanti, nel modo dicucitura reitangoiare o nel processo incui il sensore bordomateriaie e seiezionato, perfare eseguire automaticamente lacucitura alia velocita impostata alia macchina percucire finch6 la fine delprocessosia raggiunta solo mettendo in funzione la macchina per cucire una volta.
12. THREAD TRIMMING PROHIBITION SWITCH <§>/TASTE ZUR VERHUTUNG VON FADENABSCHNEIDEN (§) /TOUCHE D'INTERDICTION DE COUPAGE DU FIL (§) /INTERRUPTOR (g) DE PROHIBICION DE CORTE DE HILO/INTERRUTTORE Dl PROIBIZIONE DEL TAGLIO DEL FILO
This switch is usedto temporarily make the thread trimming function inoperative.The other performance of sewing machine is not affected by this switch.(If the automatic reverse stitching (for end) is specified, the sewing machine will perform the automatic reverse stitching at the end ofsewing.)If the automatic thread trimming switch ((0)) and the thread trimming prohibition switch (^)) are both specified, the machine will notperfonn thread trimming but stop with its needle up.
DieseTastedient dazu, die Fadenahschneide-Funktion voriibergehend unwirk.sam zu machen.Die iibrigen Funktionen der Nahma.schine werden durch diese Taste nicht beeinlluBt.(Wenn automatische Riickwiiiisstiche (am Nahende) angegebcn worclen sind, fiihrt die Niilimaschine die automatischen Ruckwarisstiche amNiihcnde aus.)
Falls sowohl die Taste fur automati.sches Fadenab.schnciden ( (^ )als auch die Taste zur Verhutung von Fadenab.schneiden ( )nktivieilwird, fUhil die Ma.schinc kein Fadenab.schneiden aus. sondcm bleibtmil iKKligc.siellier Naclcl stchen.
Cette touche s'utilise pour d6sactiver temporairement la fonction de coupage du fil.Les autres fonctions de la machine ne sont pas affect^es par cette touche.(Si Ton a spdcifid une execution automatique de points arri^re (pour la fin de la couture), la machine execute automatiquement lespoints arrifere k la fin de la couture.)Si Ton a activd k la fois la touche de coupage automatique du fil ( ) et la touche d'interdiction de coupage du fil ( ), lamachine ne coupe pas le fil, mais s'arrete avec son aiguille relev6e.
Este interruptor se usa para anular temporalmente la funcidn dc corte de hilo.Las otras funcionesde a mdquinade coser no son afectadas por este interruptor.(Sise cspecifica el pespunteautomatico invertido (para fin), la maquina de coserejccutara el pespunteautomatico invertidoal fin del cosido.)Si se espccifican el interruptor ((0) )dc corte automatico de hilo yel interruptor (^)) de prohibicidn de corte de hilo, la mdquina de coser noejccutara el corte de hilo sino que se parara con su aguja arriba.
' Questo intermttore b usato per rendere temporaneamente inoperantc la funzione di taglio del filo.Le altrc esecuzioni dclla macchina per cucire non sono condizionatc da questo intermttore.(Se I'affrancatura automatica (per la fine) e selczionata, la macchina per cucire cscguira I'affrancatura automatica alia fine di cucitura.)
• Se I'interruttore di taglio del filo automatico ( (^ )erinicrruttore di proibizione del taglio del filo (^) )sono selezionati tutti edue, lamacchina non escguira il taglio del filo ma si fermera con il suo ago in alto.
-27-From the library of: Superior Sewing Machine & Supply LLC

•JUKI
JUKI CORPORATIONINTERNATIONAL SALES H.Q.
8-2-1, KOKURYO-CHO,CHOFU-SHI, TOKYO 182-8655, JAPANPHONE : (81)3-3430-4001 to 4005FAX : (81)3-3430-4309 • 4914 • 4984TELEX: J22967
Copyright © 2004 JUKI CORPORATION.•All righls reserved throughout the world.• Alle Rechte weltwelt vorbehaiten.
• Tous drolts reserves partout dans le monde.• Reservados todos derechos en el mundo
entero.
• Tutti i diritti sono riservati in tutto 11 mondo.
Please do not hesitate to contact our distributors or agents in your area for further information when necessary.Bitte wenden Sie sich an unsere Handler oder Vertreter in Ihrer Nahe, wenn Sie weitere Informatiorien benotigen.Pour plus d'information, n'hdsitez pas k consuiter nos distributeurs ou agents dans votre region.Sirvase ponerse en contacto con nuestros distribuidores o agentes en su area siempre que necesite algunainformacion mas detallada.
Per uiteriore tnformazione, si prega di non esitare a mettersi in contatto con nostri distributori o agenti vostra areaquando necessario.
* The description covered in this instruction manual is subject to change for improvement of thecommodity without notice.
* Anderungen der in dieser Betriebsanleitung enthaltenen Beschreibungen, die der Verbesserung desProduktes dienen, bleiben vorbehaiten.
* Les specifications donnees dans le present lUlanuel d'utilisation sont sujettes a modification sans prdavis.La descripcion que se de en este manual de instrucciones esta sujeta a cambio sin previo aviso porrazones de mejora de la mercancia.
* Le descrizioni contenute in questo manuale d' istruzioni sono soggette a modifiche senza alcun preavviso.04 • 07 Printed in Japan (E)
From the library of: Superior Sewing Machine & Supply LLC