jvc - appliance parts | replacement water filters | lawn ... · jvc mini dv/s-vhs video cassette...
TRANSCRIPT

JVC
Mini DV/S-VHSVIDEO CASSETTE RECORDER
HR-DVS3U
SunerVHSET
INSTRUCTIONS
For Customer Use:
Enter below the Model No. and
Serial No. which are located on the
rear of cabinet. Retain this
information for future referen(e.
Model No.
Serial No.
LPT0641-001A

2 EN
Failure to heed the following precautions may result in damageDear Customer, to the VCR, Remote or video cassette.
Thank you for purchasing the JVC Mini DV/S-VHS video 1. DO NOT place the VCR...cassette recorder. Before use, please read the safety
information and precautions to ensure safe use of your newVCR.
...in an environment prone to extreme temperatures orhumidity.
...in direct sunlight.
...in a dusty environmenL
...in an environment where strong magnetic fields are
generated.
...on a surface that is unstable or subject to vibration.
2. DO NOT block the VCR's ventilation openings.
3. DO NOT place heavy objects on the VCR or on the Remote.
4. DO NOT place anything which might spill on the top of theVCR or on the Remote.
5. AVOID violent shocks to the VCR during transport.
CAUTIONS
CAUTION: TO REDUCE THE RISK OF ELECTRIC SHOCK.
DO NOT REMOVE COVER (OR BACK).NO USER-SERVICEABLE PARTS INSIDE.
REFER SERVICING TO QUALIFIED SERVICE PERSONNEL.
The lightning flash with arrowhead symbol, within
an equilateral triangle, is intended to alert the user
to the presence of uninsulated "dangerous voltage"
within the product's enclosure that may be of
sufficient magnitude to constitute a risk of electric
shock to persons.
The exclamation point within an equilateral
triangle is intended to alert the user to the presence
of important operating and maintenance
(servicing) instructions in the literature
accompanying the appliance.
WARNING:TO PREVENT FIRE OR SHOCK HAZARD, DONOT EXPOSE THIS UNIT TO RAIN ORMOISTURE.
CAUTION:
This video cassette recorder should be used with AC 120V'%,,
60Hz only.
]b prevent electric shocks and fire hazards, DO NOT use any
other power source.
CAUTION:
TO PREVENT ELECTRIC SHOCK, MAI CH WIDE BLADE OF
PLUG TO WILDE SLOT, FUHY INSERE
ATTENTION:
POUR EVITER LES CHOCS _[ ECTRIQUES, IN] RODUIRE LALAME LA PlUS lARGE DE IA FICHE DANS IA BORNE
CORRESPONDANTE DE LA PRISE ET POUSSER JUSQU'AUFOND.
Note to CATV system installer:
]his reminder is provided to call the CATV system installer'sattention to Article 820-40 of the NEC that provides guidelines
for proper grounding and, in particular, specifies that the cable
ground shall be connected to the grounding system of the
building, as close to the point of cable entry as practical.
CAUTION:
Changes or modifications not approved by JVC could void
user's authority to operate the equipment.
MOISTU RE CONDENSATION
Moisture in the air will condense on the VCR when you move it
from a cold place to a warm place, or under extremely humid
conditions just as water droplets form on the surface of a glass
filled with cold liquid. Moisture condensation on the head drum
will cause damage to the tape. In conditions where
condensation may occur, keep the VCR's power turned on for a
few hours to let the moisture dry before inserting a tape.
VCR Plus+, C s and PlusCode are registered trademarks of
Gemstar Development Corporation.
The VCR Plus+ system is manufactured under license from
Gemstar Development Corporation.
DSS TM is an official trademark of DIRECTV, Inc., a unit of GM
Hughes Electronics. PRIMESTAR is a registered service mark of
Primestar Fbrtners, I.P. DISH Network TM is a trademark of
Echostar Communications Corporation.
• Cassettes marked "S-VHS" and "VHS" can be used with this
video cassette recorder. However, S-VHS recordings are
possible only with cassettes marked "S-VHS'.
By using the S-VHS ET function, it is possible to record and
play back with S-VHS picture quality on VHS cassettes withthis VCR.
• Cassettes marked "Mini DV" can be used with the DV deck of
this VCR. [he DV deck can play back and record only NTSC
signals.
This product incorporates copyright protection technology that is
protected by method chimes of certain U.S. patents and other
intellectual property rights owned by Macrovision Corporation
and other rights owners. Use of this copyright protection
technology must be authorized by Macrovision Corporation, and
is intended for home and other limited viewing users only unless
otherwise authorized by Macrovision Corporation. Reverse
engineering or disassembly is prohibited.

E-3IMPORTANTPRODUCTSAFETYINSTRUCTIONSElectrical energy can perform many useful functions. But
improper use can result in potential electrical shock or fire
hazards. This product has been engineered and manufactured to
assure your personal safety. In order not to defeat the built-in
safeguards, observe the following basic rules for its installation,
use and servicing.
ATTENTION:Follow and obey all warnings and instructions marked on your
product and its operating instructions. For your safety, please
read all the safety and operating instructions before you operate
this product and keep this booklet for future reference.
INSTALLATION
1. Grounding or Polarization
CA)Your product may be equipped with a polarized alternating-
current line plug (a plug having one blade wider than the
other). [his plug will fit into the power outlet only one way.
This is a safety feature.
[f you are unable to insert the plug fully into the outlet, try
reversing the plug. If the plug should still fail to fit, contact
your electrician to replace your obsolete oudet. Do not
defeat the safety purpose of the polarized plug.
(B) Your product may be equipped with a 3-wire grounding-type
plug, a plug having a third (grounding) pin. This plug will
only fit into a grounding-type power oudet. [his is a safetyfeature.
If you are unable to insert the plug into the outlet, contact
your electrician to replace your obsolete oudet. Do not
defeat the safety purpose of the grounding-type plug.
2. Power Sources
Operate your product only from the type of power source
indicated on the marking label. If you are not sure of the type of
power supply to your home, consult your product dealer or local
power company. [f your product is intended to operate from
battery power, or other sources, refer to the operatinginstructions.
3. OverloadingDo not overload wall outlets, extension cords, or integralconvenience receptacles as this can result in a risk of fire orelectric shock,
4. Power Cord Protection
Power supply cords should be routed so that they are not likely
to be walked on or pinched by items placed upon or against
them, paying particular attention to cords at plugs, convenience
receptacles, an(] the point where they exit from the product.
5. Ventilation
Slots and openings in the cabinet are provided for ventilation. ]b
ensure reliable operation of the product and to protect it from
overheating, these openings must not be blocked or covered.
• Do not block the openings by placing the product on a bed,
sofa, rug or other similar surface.
• Do not place the product in a built-in installation such as a
bookcase or rack unless proper ventilation is provided or themanufacturer's instructions have been adhered to.
6. Wall or Ceiling Mounting
The product should be mounted to a wall or ceiling only as
recommended by the manufacturer.
ANTENNA INSTALLATION INSTRUCTIONS
1. Outdoor Antenna Grounding
If an outside antenna or cable system is connected to the
product, be sure the antenna or cable system is grounded so as
to provide some protection against voltage surges an(] built-up
static charges. Article 81 0 of the National Electrical Code, ANSI/
NFPA 70, provides information with regard to proper grounding
of the mast and supporting structure, grounding of the lead-in
wire to an antenna discharge unit, size of grounding connectors,
location of antenna discharge unit, connection to grounding
electrodes, an(] requirements for the grounding electrode.
2. Lightning
For added protection for this product during a lightning storm, or
when it is left unattended and unused for long periods of time,
unplug it from the wall outlet an(] disconnect the antenna or
cable system. This will prevent damage to the product due to
lightning an(] power-line surges.
3. Power Lines
An outside antenna system should not be located in the vicinity
of overhead power lines or other electric light or power circuits,
or where it can fall into such power lines or circuits. When
installing an outside antenna system, extreme care should be
taken to keep from touching such power lines or circuits as
contact with them might be fatal.
EXAMPLE OF ANTENNA GROUNDING AS PER
NATIONAL ELECTRICAL CODE, ANSI/NFPA 70
LEAD IN WIRE
GROUNDCLAMP
ANTENNADISCHARGEUNIT(NECSECTION
ELECTRICSERVICE _onn 810-20)GROUNDINGCONDUCTORS(NECSECTION810-21)
GROUNDCLAMPS
POWERSERVICEGROUNDINGELECTRODESYSTEM(NECART250. PARTH)
NEC - NATIONAL ELECTRICAL CODE

LiEN
USE1. Accessories
lb avoid personal injury:
• Do not place this product on an unstable cart, stand, tripod,
bracket, or table. [t may fall, causing serious injury to a child
or adult, and serious damage to the product.
• Use only with a cart, stand, tripod, bracket, or table
recommended by the manufacturer or sold with the product.
• Use a mounting accessory recommended by the manufacturer
and follow the manufacturer's instructions for any mounting of
the product.
• Do not try to roll a cart with small casters across thresholds or
deep-pile carpets.
2. Product and Cart Combination PORTASLECARTWARNING
A product and cart combination should (Symbol providedby RETAC)
be moved with care. Quick stops,
excessive force, and uneven surfaces
may cause the product and cartcombination to overturn.
3. Water and Moisture
Do not use this product near water--for example, near a bath
tub, wash bowl, kitchen sink or laundry tub, in a wet basement,
or near a swimming pool and the like.
4. Object and Liquid Entry
Never push objects of any kind into this product through
openings as they may touch dangerous voltage points or short-
out parts that could result in a fire or electric shock. Never spill
liquid of any kind on the product.
5. Attachments
Do not use attachments not recommended by the manufacturer
of this product as they may cause hazards.
6. Cleaning
Unplug this product from the wall outlet before cleaning. Do not
use liquid cleaners or aerosol cleaners. Use a damp cloth for
cleaning.
7. Heat
The product should be situate(] away from heat sources such as
radiators, heat registers, stoves, or other products (including
amplifiers) that produce heat.
SERVICING
1. Servicing
If your product is not operating correctly or exhibits a marked
change in performance and you are unable to restore normal
operation by following the detailed procedure in its operating
instructions, do not attempt to service it yourself as opening or
removing covers may expose you to dangerous voltage or other
hazards. Refer all servicing to qualified service personnel.
2. Damage Requiring Service
Unplug this product from the wall outlet and refer servicing to
qualified service personnel under the following conditions:
a. When the power supply cord or plug is damaged.
b. If liquid has been spilled, or objects have fallen into the
product.
(. If the product has been exposed to rain or water.
d. If the produ(t does not operate normally by following the
operating instructions. Adjust only those controls that are
(overed by the operating instructions as an improper
adjustment of other controls may result in damage an(] will
often require extensive work by a qualified te(hnkian to
restore the product to its normal operation.
e. If the product has been dropped or damaged in any way.
f. When the product exhibits a distinct change in
performance--this indicates a need for service.
3. Replacement Parts
When replacement [)arts are required, be sure the service
technician has use(] replacement [)arts specified by themanufacturer or which have the same characteristics as the
original part. Unauthorized substitutions may result in fire,electric shock or other hazards.
4. Safety Check
Upon completion of any service or repairs to this product, ask
the service technician to perform safety checks to determine that
the product is in safe operating condition.
HOW TO USE THIS INSTRUCTION MANUAL
• All major sections and subsections are listed in the l:able Of
Contents on page 5. Use this when searching for information
on a specific procedure or feature.
• The Index on pages 6 11 lists frequently-used terms, and the
number of the page on which they are use(] or explained in themanual. This section also illustrates the controls and
connections on the front and rear panel, the front display
panel an(] the remote control.
• The L_ _mark signals a reference to another page forinstructions or related infornlation.
• Operation buttons necessary for the various procedures are
clearly indicated through the use of illustrations at the
beginning of each major section.
BEFORE YOU INSTALL YOUR NEW VCR...
•.. please read the sections/literature listed below•
• "CAUTIONS" on page 2• "[MPORTAN] PRODUCT SAFETY INSTRUCTIONS" on
pages 3 - 4

CONTENTS EN 5
INDEX 6FRONT VIEW .......................................................................... 6REAR VIEW ............................................................................. 7FRONT DISPLAY PANEL ......................................................... 8REMOTE .................................................................................. 9How To Use ............................................................................ 9
ON-SCREEN DISPLAY (for VHS de(k) ................................... 10ON-SCREEN DISPLAY (for DV deck) ..................................... 11
INSTALLINGYOURNEWVCR 12Basic Connections ..................................................... 12
S-VIDEO Connection ................................................. 13
INITIALSETTINGS 14Plug & Play Set .......................................................... 14Language ................................................................... 15Clock Set ................................................................... 16
Preparations ........................................................................... 16Semiauto Clock Set ................................................................ 17Manual Clock Set .................................................................. 17Tuner Set ................................................................... 18
Auto Channel Set ................................................................... 18Manual Channel Set .............................................................. 19
Cable Box Control Setting ......................................... 20
Installing Controller ............................................................... 20Setting cable box's brand and channel ................................... 21
DBS Receiver Control Setting .................................... 23
Installing Controller ............................................................... 23Setting DBS receiver's brand an(] channel .............................. 24
PLAYBACK/RECORDINGONVHSDECK 26BasicPlayback ........................................................... 26Basic Recording ......................................................... 27
Playback Features ...................................................... 28
Still Picture/Frame-By-Frame Playback (On the VCR) ............. 28Slow Motion (On the VCR) .................................................... 28High-Speed (Turbo) Search (On the VCR) .............................. 28Variable Speed Search (On the VCR) ..................................... 28Still Picture/Frame-By-Frame Playback (On the Remote) ........ 29Slow Motion (On the Remote) ............................................... 29High-Speed (Turbo) Search (On the Remote) ......................... 29Variable Speed Search (On the Remote) ................................ 29
Repeat Playback .................................................................... 30Index Search .......................................................................... 30
Next Function Memory .......................................................... 30Manual Tracking .................................................................... 31Soundtrack Selection ............................................................. 31
Recording Features .................................................... 32
Record ()ne Program While Watching Another ..................... 32Instant Timer Re(ording (ITR) ................................................. 32Elapsed Recording Time Indication ........................................ 33Tape Remaining Time ............................................................ 33Retake ................................................................................... 34
Second Audio Recording ....................................................... 34Active Video Calibration ........................................... 35
Playback ................................................................................ 3,5Recording .............................................................................. 35
PLAYBACK/RECORDINGONDVDECK 36Basic"Playback ............................................................ 36Basic" Recording .......................................................... 37
Playback Features ....................................................... 38
Still Picture/Frame-By-Frame Playback (On the VCR) ............. 38Slow Motion (On the VCR) .................................................... 38
High-Speed(Turbo)Search (On the VCR) .............................. 38Variable Speed Search (On the VCR) ..................................... 38Still Picture/Frame-By-Frame Playback (On the Remote) ........ 39Slow Motion (On the Remote) ............. .................................. 39High-Speed (Turbo) Search (On the Remote) ......................... 39Variable Speed Search (On ihe Remote) ................................ 39
Next Function Memory .......................................................... 40Soundtrac k Selection ............................................................. 40
Recording Features ..................................................... 41
Second Audio Recording ....................................................... 41Record One Program While Watching Another ..................... 41Instant Timer Recording (ITR) ................................................ 41Time Code ............................................................................. 41
TIMERRECORDING 42VCR Plus+ Timer Programing .................................... 42
Changing VCR Plus+ Setting ...................................... 44Guide Channel Number Set ................................................... 44Guide Channel Number ........................................................ 45
Express Timer Programlng .......................................... 46
24H R Quick Programing ............................................ 48
Check, cancel and change programs ..................................... 50To cancel or change a program ............................................. 50When programs overlap each other ....................................... 51
EDITING 52Tape Dubbing (from DV to VHS) ............................... 52
Dubbing An Entire Cassette ................................................... 52
Tape Dubbing (from VHS to DV) ................................ 53
Dubbing An Entire Cassette ................................................... 53
Normal Dubbing (from DV to VHS) ........................... 54
Normal Dubbing (from VHS to DV) ........................... 55[dlt From A Camcorder .............................................. 56
[dlt To Or From Another VCR/PC .............................. 58
Audio Dubbing ........................................................... 60
VHS Audio Dubbing .............................................................. 60DV Audio Dubbing ............................................................... 60
Insert Editing .............................................................. 62
VHS Insert Editing .................................................................. 62DV Insert Editing (SP mode only) ........................................... 62AV Insert Editing (VHS deck only) .......................................... 63
Random Assemble Editing .......................................... 64
64-program Editing Memory (8 programs x 8 scenes) ............ 64
REMOTECONTROLFUNCTIONS 66Remote A/B Code Switching .................................................. 66TV Multi-Brand Remote Control ............................................ 67(:able Box Multi-Brand Remote Control ................................. 68DBS Receiver Multi-Brand Remote Control ........................... 69
SUBSIDIARYSETTINGS 70Mode Set .................................................................... 70
TROUBLESHOOTING 77
QUESTIONSANDANSWERS 81PLAYBACK ............................................................................ 81RECORDING ......................................................................... 81TIMER RECORDING ............................................................. 81
SPECIFICATIONS 82
INDEX 83
FORSERVICING(OnlyinU.S.A.) 84
WARRANTY(OnlyinU.S.A.) 85

dEN
FRONTVIEW
INDEX
0 POWER Button ___pg. 15O DV Eject (EJECTA) Button _ pg. 36, 37OSTOP • Button _ pg. 26, 27, 36, 37O Mini DV Cassette I.oading SlotO PI.AY I_ Button _ pg. 26, 36O PAUSEII Button _ pg. 27, 28, 37, 38O DV Button _._pg. 36, 370 S-VHS Button _, pg. 26, 27O VHS Cassette loading Slotl_ Random Assemble Edit (R.A.EDII) Button
_._pg. 64lIDRandom Assemble Edit START Button _ pg. 65
VIDEO Input Connector z__pg. 56, 62!_VHS Eject (EJECT.A) Button _ pg. 26, 27
DV IN/OUT connector (i.l.ink*) z__pg. 56* LLink/etL'/s to the IEEE1394-1995 industly specitic_4ion and
extensic_ns thel_,oL The [, Ii_o is used k;i ploducts compliant withthe i.Link standald.
_]) Dubbing Direction (DV =>/<_ S-VHS) Indicatorsz__pg. 52, 53Dubbing (DUB) Button _ pg. 52, 53Dubbing Direction (,,_/_-) Buttons _ pg. 52, 53REC• Button _ pg. 27, 37
tD DV mode Indicators _ pg. 36, 371_ Remote Sensor
Front Display Panel_. pg. 8@VHS mode Indicators _ pg. 26, 27I_ 24HR QUICK PROGRAM Button _ pg. 48I_t ADVANCED JOG Dial _ pg. 26, 36, 48I_ INSERT Button _ pg. 63I_ Random Assemble Edit IN/OUT Button z__pg. 64I_ Audio Dubbing (A.DUB) Button _ pg. 61!_l Remote PAUSEConnector z__pg. 56
AUDIO Input Connectors _ pg. 56, 60, 621_ S-VIDEO Input Connector _- pg. 56, 62
]b access covered buttons/connectors, pull and ()pen thecover.
REARVIEW
EN7
'Ts v_o_( AUDIO
© ®e!e eSi
rL
I I
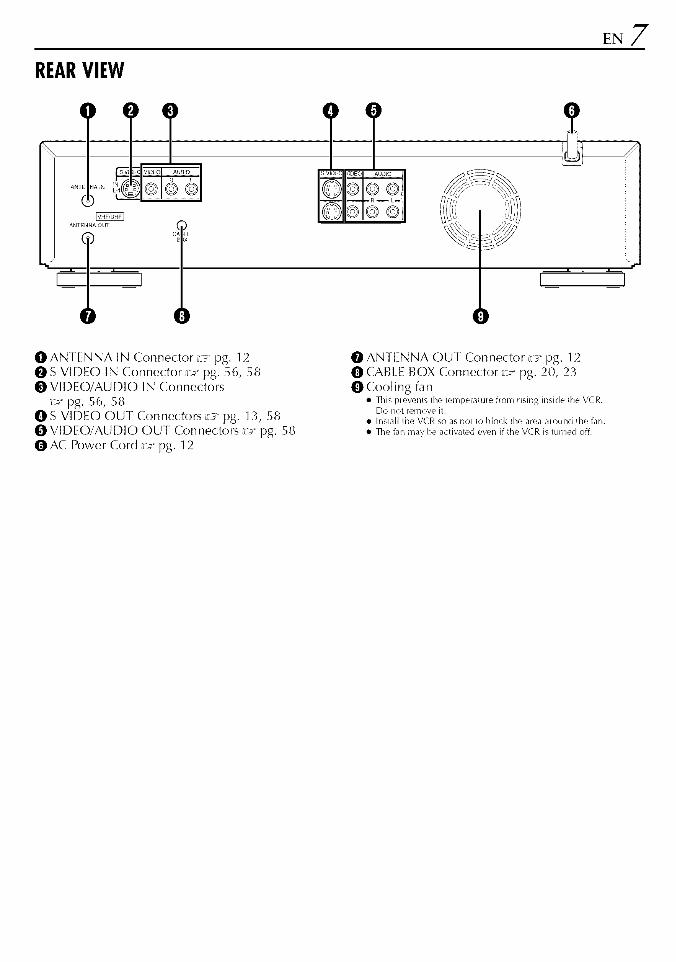
O ANTENNA IN Connector ___pg. 12OS VIDEO IN Connector r__pg, 56, 58O VIDEO/AUDIO IN Connectors
_ pg. 56, 58O SVIDEO OUT Connectors _ pg. 13, 58O VIDEO/AUDIO OUT Connectors r__pg. 58O AC Power Cord _ pg. 12
0 ANTENNA OUT Connector z_:_pg. 12O CABLE BOX Connector r_° pg. 20, 23O Cooling fan
• This ixevents the t_,mpelaturr, flora rising inside the VCR.Do not remove it.
• Install the VCR so as not to blod< time area alound the fan.
• Time fan may be activated even if time VCR is turned off.

8 EN
FRONTDISPLAYPANEL
INDEX (cont.)
""s!¢ U" U IZI"
0 Symbolic Mode Indicators
STill.: iiiiSHOW: _.....
PLAY:
FE/REW VARIABI.E RECORD:SEARCH: ........
RECORD PAUSE:
AUDIO DUBBING: ]} .: :.-
AUDIO DUBBING PAUSE: .....
INSERT: ii.]{)
INSERT PAUSE: _;'::# _>:: iiii
AV INSERT: -_':::_-
AV INSERTPAUSE: ::,::!!r!
O I_pe Speed Indicators _ pg. 27, 37O Start Time Indicator ( _ ) _ pg. 48
Stop Time Indicator ( -_ ) ;_._pg. 48O "limer" Indicator _ _pg. 43, 47, 48O I]tpe Remaining Time Indicator (VHS deck only)
_ pg. 33O S-VHS Indicator (VHS deck only) _ pg. 720 "Cassette I.oaded" MarkO Counter/Remain Display (VHS deck only)
_ pg. 33Time Code l)isplay (DV deck only) _ pg. 41Channel/Mode Display (I.-1 or F-l) _ pg. 14Clock l)isplay _ pg. 14

E.9REMOTE
Buttons with a small dot on the left side of the name can also
be used to operate your TV with the VCR/TV/CABLE/DBS
switch set to TV. (z_ ° pg. 67)
HowToUseBefore use, insert two AA size batteries into the Remote with
the polarity (O and (_)) matched correctly as indicated on
the battery c()mpartment or on the lid.
The Remote can operate most of your VCRg functions, as
well as basic functions of TV sets, cable boxes an(] DBSreceivers.
• Point the Remote toward the remote sensor on the target
corn ponent.• The maximum operating distance of the remote control is
about 8 m.
NOTE:If the Remote does not work properly, remove it5 batteries,
wait for a few seconds, replace the batteries and then b7
again.
I]t VCR/TV/CABI.E/DBS Button _ pg. 67, 68, 69O TV/VCR Button _ pg. 67O A/B Code Button _ pg. 66O Number Keys _ pg. 27, 37O I)BS Button _ pg. 470 CANCEl Button _ pg. 50
Counter Reset (C.RESET)Button z_ pg. 33O StOP +/- Button _ pg. 460 START+/- Button _ pg. 46OPROG Button _J pg. 46
Auto lracki ng 1/11 Button z__pg. 31SP/LP,SP/EPButton _ pg. 27, 37
lIDRewind (REW 41_1)Button _ pg. 26, 361[_REC• Button _ pg. 27, 37!_ STOP • Button _ pg. 26, 36Ill) A v Button u pg. 15
TV CH +/- Button _ pg. 67@MENU Button _ pg. 15
OK Button _ pg. 15Random Assemble Edit START Button _ pg. 65
t[DJOG dial _ pg. 26, 36IDA. MONllOR Button _-pg. 31,40
<1/_ (TV Muting) Button _ pg. 67POWER Button _ pg. 15DISPLAY Button _ pg. 33ENTER Button _ pg. 67On-Screen Display (OSD) Button _ pg. 10, 11PROG CHECK Button _ pg. 50
I_ DAII:Y (M-F) Button a__pg. 43, 47I_tWEEKIY Button _ pg. 43, 47I_ TIMER Button z_ pg. 43, 47
AUX Button _ pg. 56I_ DArE +/- Button _ pg. 47!_ICH +/- Button _ pg. 27, 37I_ S-VHS Button _ pg. 26, 271_ DV Button _ pg. 36, 37!_ Fast Forward (FFI_1_) Button _ pg. 26, 36_l} PLAYI_ Button a__pg. 26, 36!_ PAUSE II Button _ pg. 27, 37_) <Ib_Button z__pg. 29, 39
TV Volume (VOL) +/- Button _ pg. 67!_) Random Assemble Edit (R.A.EDll) Button
u pg. 64Random Assemble Edit IN/OUT Button _ pg. 64
_JOG/SHUTTLE Button _ pg. 29, 39@ISHUTllE Ring _ pg. 29, 39

10 EN INDEX (cont.)
ON-SCREENDISPLAY(forVHSdeck)If you press DISPLAY/OSD on the Remote when "SUPERIMPOSE" is set to "ON" (_7 _pg. 71 ), various operational
indicators appear on the TV screen.
tON125SUN 12:00 AMSTEREOSAP
REIVIA[NCOUNT : 23 " 45
O Operation Mode IndicatorsO I_pe Speed SP/EPO Timer Warning Display
A warning appears on the TV screen to tell you that the timer-
recording is to start in 5 minutes if you're not in the Timer
mode at that time. The warning blinks for the entire 5
minutes leading up to the start of timer recording, 1o clear
the display, press CANCEL on the Remote.
O Iilpe Position IndicatorThe tape position indicator
appears on the TV screen
when you press REW (41-_1)
or FF (1_1_) from the Stop
mode or perform an Index
Search (z_ _pg. 30). The
position ot"ll" in relation to
"B" (beginning)or "E" (end)
shows you where you are
on the tape.
NOTE:
•B ..... + .... -=.... +..... E
COUNT I] :33:27
Beginning End
Depending on the type of tape being used, the tape position
indk ator may not appear ( orre( tly.
Index number _._ pg. 30Ol_pe Remaining Time Indicator0 Counter Display _._ pg. 33O Audio Mode Display _ pg. 31O VHS Indicator
_) SAP Indicator _ pg. 34• Stereo program Indicator _ pg. 34
Day/Clock Display@) Channel Position Number/
Auxiliary Input Indicator (L-1 or F-l)Dubbing Direction Indicators(DV --, VHS) _,_ pg. 52"Cassette I.oaded" Mark
To recall an indication
[] Press DISPEAY/OSD.
gall indications corresponding to the current status are
displayed for 5 seconds. After that, the counterinformation and RECORD/PAUSE if in the Record Pause
nlode, remain on the screen.
[] Press DISPEA¥/OSD again to clear the display.oThe RECORD/PAUSE indication remains on the screen.

EN11
ON-SCREENDISPLAY(forDVdeck)If you press DISPLAY/OSD on the Remote when "SUPERIMPOSE" is set to "ON" (_ pg. 71 ), various operational
indicators appear on the TV screen.
_'-cH 125-SUN 12 : O0AM
0
tBECORD "PAOs ]ili--e-STEREO-WARN,NG- O-SAP TIMER RECORDING12BIT
TO START SOON
-DV [CANCEL]
L+R COUNT 0 • O0 OG 0
O Operation Mode IndicatorsO I_pe Speed SP/LPO Sound Mode Display _ pg. 76O Timer Warning Display
A warning appears on the TV screen to tell you that the timer-
recording is to start in 5 minutes if you're not in the Timer
mode at that time. The warning blinks for the entire 5
minutes leading up to the start of timer recording. To clear
the display, press CANCEl_ on the Remote.
ERR()R Indicator** ERROR indi_:_tol appeals when you stair duhbin_ a tape with a
copy plc;tection signals ot when Audio Du_bin_ ol Insert Editin,_ isnot possible depending on the condition.
OTime Code Display _ pg, 410 Audio Mode Display _ pg, 400 DV Indicator
OSAP Indicator _ pg. 41O Stereo program Indicator _ pg. 41
Day/Clock Display0 Channel Position Number/
Auxiliary Input Indicator (L-1 or F-l)Dubbing Direction Indicators(VHS -, DV) _ pg, 53
t[_ "Cassette I.oaded" Mark
To recall an indication
[] Press DISPI-AY/OSD.
eAII indications corresponding to the current status are
displayed for 5 seconds. After that, the counterinformation and RECORD/PAUSE if in the Record Pause
mode, remain on the screen.
[] Press DISPI-AY/OSD again to clear the display.e[he RECORD/PAUSE indication remains on the screen.

12 EN INSTALLING YOUR NEW VCR
BasicConnectionsIt's essential that your VCR be properly connected.
THESE STEPS MUST BE COMP[.ETED BEFORE ANY
VIDEO OPERAIION CAN BE PERFORMED.
I1 Checkthe contents.
Make sure the package contains all of the accessorieslisted in "SPECIFICATIONS" on page 82.
F_ SituatetheVCR.
Place the VCR on a stable, horizontal surface.
I_1 ConnecttheVCRto TV.
Antenna or Cable
iI
I
II........D /,at Eeedero_1
Matching Transformer(not supplied)
ANTENNA
IN//
o
\
ANTENNA
OUT
VIDEO
OUT OUT
Audio/Video Cable ]
(su ppliec___
To Audio/VMeo _ _Input Conne(tors _ V
AC Outlet
AUDIO _AC
PowerCord
Back of VCR
RFCable
(supplied)
[] Disconnect the TV antenna from the TV.[] Connect the TV antenna cable to the ANTENNA IN
connector on the rear panel of the VCR.[] Connect the supplied RF cable between the
ANTENNA OUT connector on the rear panel of theVCR and the TV's antenna terminal.
[] Connect the supplied Audio/Video cable between theAUDIO/VIDEO OUT connectors on the rear of the
VCR and the Audio/Video input connectors on the TV.• Set your TV to AV mode.• For switching the TV's mode, refer to the instruction manual of
your television.• To obtain high-quality S-VHS pictures, you can also use the
S-VIDEO connection described on page 13.
D ConnecttheVCRto powersource.
Plug the end of the AC power cord into an AC outlet.
• The clock and tuner channels will automatically be set when
the antenna is connected and when the AC power cord is first
connected to an AC outlet (Z_" pg. 14). (If "Auto" or "CH" is
displayed on the front display panel before the VCR is
powered on, the clock and tuner channels are being set
automatically. Wait for the time to be displayed on the front
display panel before turning on the VCRd
]b 75 ohm Terminal
TV

S-VIDEOConnectionEN13
iI
I
II
S VIDEO
OUT
Antenna or Cable
Coaxial Cable ]
Flat Feeder
Matching Transformer
{not supplied)
AC OutletAUDIO
OUTAC Power Cord
ANTENNA IN
ANTENNA OUT
RFCable
(supplied)
o
S-Video
Cable
(supplied)
__ Back of VCRAudio/Video Cable
Isupplied)
Yellow: _-]Not connected ._.\ r_ _ . ,. • ,
_ _ _ fo Audlo/Vloeo
_ _:_ Input Connectors
To S-VIDEO InputConnector
To 75 ohm Terminal
TV
IITo connect to a TV with S-VIDEO/AUDIO inputconnectors...
I1 ConnecttheVCRto TV.
[] Connect the antenna, VCR and TV as per "BasicConnections" (:_€_pg. 12).
[] Connect the VCR's S VIDEO OUT connector to the
TV's S-VI[}EO input connector.[] Connect the VCR's AUDIO OUT connectors to the
TV's AUDIO input connectors.
F_ ConnecttheVCRto powersource.
Plug the end of the AC power cord into an AC outlet.
• The clock and tuner channels will automatically be set when
the antenna is connected and when the AC power cord is first
connected to an AC outlet if_<" pg. 14). (if "Auto" or "CH" is
displayed on the front display panel before the VCR is
powered on, the clock and tuner channels are being set
automatically. Wait for the time to be displayed on the front
display panel before powering on the VCRj
NOTES:• You _an obtain high-quality S-VHS pRtures.
• To operate the VCR with your TV using the S-VIDEO
connection, set your TV to it5 AV mode. Km can also use tile
TV/VCR button on the VCR's Remote to set your TV to the AV
mode. CZ__ log. 672
• Fbr switching the TV's mode, refer to tile instruction manual of
your television.

14 EN INITIAL SETTINGS
Plug& PlaySetAutoClockSet/AutoTunerSet
ATTENTION:• If you use a cable box, Plug&Play will not function; set the
clock and tuner channels separately. (L_ _pg. 16 - 19)
• Depending on areas or reception conditions, the VCR maynot receive the Auto clock setting data from the PBS
channel. If this function is taking a considerable amount of
time, it may be necessary to perform the Semiauto or
Manual Clock Set procedure.
This VCR sets the clock and tuner channels automaticallywhen AC power cord is first connected to an AC outlet.The antenna cable must be connected for the Plug & Playsetting.The time and date can be set automatically by the clocksetting data transmitted from one of the regular TVbroadcast channels. We call this TV channel the "host
channel" and it is a PBS channel in your area.
I1 PerformPlug& Play setup.
Connect the antenna cable to the VCR (_ pg. 12). Thenconnect the AC power cord to an AC outlet. Do not turnon the VCR.
The clock and tuner channels will be set automatically.
NOTES:• Auto Clo_k Set is performed first.
"Auto" blinks on the front display panel during Auto Clock SeL
• Auto Channel Set is performed next. Auto Channel Set scans
all the _hannels that are receivable by your VCR. During Auto
Channel Set, the _hannel numbers are disp&yed as they arescann_/and seL
• When Plug & Pby setting has been complete successfully, the
correct clod< time is displayed. If you perform Plug & Play
setting successfully, there is no need to perform "Clo_ k Set"
C_-_ pg. 76) and "Tuner Set" C_-_ pg. 78). If, howeve# you want
to add or delete _hannels, refer to "Manual Channel Set"
During Initial Auto Clock Sel"Auto" blinks.
During Auto Channel Set
The channel numbers are displayed
as they are scanned and set.
Plug&Play CompletedThe current time is displayed.
If an incorrect clock time or "- -:- -" appears on the display panel, see "What to do if Plug & Play selling failed" below.
INFORMATION• If "AUTO CI (-)CK" is set to "ON" (L_ _ pg. 17), the clock will be adjusted automatically by the host channel every hour (except
11:00 PM, midnight, 1:00 AM and 2:00 AM) using the incoming PBS channel clock setting data. ([his automatic clock
adjustment can only be performed when the VCR is turned off. The clock will be adjusted just on these hours -- on the time
displayed on the front display panel, not on the actual real time.) The default setting of "AUTO CLOCK" is "ON". (_" pg. 17)
• If the memory backup fails, because a power outage occurs or because the AC power cord is unplugged, Plug & Play will be
performed when power is restored to the VCR.
What to do if Plug & Play setting failed
• If an incorrect time is displayed on the front display panel, you may be receiving the dock setting data of a PBS channel from an
adjacent time zone, or an incorrect PBS channel from a cable TV system. In this case, perform "Semiauto Clock Set" (_-_" pg. 17)
or "Manual Clock Set" (_-_" pg. 1 7).
• If "--:--" appears on the front display panel, your antenna cable may not be connected to the VCR or there may not be a Host
PBS signal available in your area. Ensure that the antenna cable is connected correctly. [hen turn on and off the VCR; the Plug &
Play setting will be automatically reactivated. If Plug & Play setting is not performed though the antenna cable is connected
correctly, perform "Manual Clock Set" (_-_ pg. 17) and "Auto Channel Set" (_-_ pg. 18) or "Manual Channel Set" (_-_ pg. 19).

LanguageTurn on the IV and select the AV mode.
el
_,_ JVC 1
/J,/
This VCR offers you the language choice to view menusand some messages -- in English, Spanish or French. Thedefault setting is "ENGLISH".
_ TurnontheVCR.
Press POWER.
F_ Accessthe MainMenuscreen.
Press MENU.
_1 Accessthe Initial Setscreen.
Press _V to move the MAiNMENDhighlight bar/arrow/to
MODE SET"INITIAl SET", then press OK VNSMODESETor _, DV MODE SET
TUNER SET
D Selectthelanguage.
Press _V to move the
highlight bar/arrow) to"EANGUAGE', then pressOK or b_ repeatedly until thedesired language is selected.
INITIAL SET
CLOCK SET
GUIDE CHANNELSETCABLE BOX SET08S RECEIVER SET
D Returnto the normalscreen.
Press MENU.

.l 6EN INITIAL SETTINGS (cont.)
ClockSet Perform clock setting only if the clock has not been setcorrectly by the Plug&Play setting or if you use a cablebox.
l'urn on the TV and select the AV mode. ] Preparations
JVCi1 Turnonthe VCR.
Press POWER.
F_ Accessthe MainMenuscreen.
Press MENU.
I_1 Accessthe Initial Setscreen.
Press _V to move tile highlight bar (arrow) to "INIIIA[
SET", then press OK or _.
D Accessthe ClockSet screen.
Press AV to move the highlight bar (arrow/to "CI.OCKSET", then press OK or _.• "CABLE BOX USERSSETCLOCK MANUALLY" appears on the
screen for about 5 seconds, then the Clock Set screen appears.
Lq

EN17
SemiautoClockSetYou can change the host channel/D.S.l] (Daylight Saving lime)/
time zone setting manually. First follow steps 1 to 4 in
"Preparations" (z_" pg. 16), then go to the following steps•
NOTE:The time set previously will be erased when "AUTO (LOCK';"HOST CH'; "D.S.E " or "TIME ZONE" setting is changed.
Jeset "AutoClock"to "ON".
Press OK or _ repeatedly to CLOCKSETmove the highlight bar to
TIME DATE
"AUTO CLOCK", then press _,_V so that "ON" is selected. HOSTCR fAUT'_
D.S.T. :AUTOTIMEZONE :AUTO
YEAR
02
(CATV)
D Completethe SemiautoClockSet.
Press MENU to return to normal screen.
IMPORTANTTurn off the VCR after performing Ser'niauto Clo_ k, "Auto"will appear on the display panel while the clo(k is being set,The current ckxk time will appear automatically when theclo_ k setting is complete,
AUTO DAYLIGHT SAVING TIME
This function enables automatic adjustment of the VCR's
clock at the start and end of Daylight Saving Time.
With Auto DST activated,...
• . . on the first Sunday of April at 2:00 AM, the clock is
adjusted to 3:00 AM.
• . . on the last Sunday of October at 2:00 AM, the clock is
adjusted to 1:00 AM.
F_ Selectthe hostchannel.
You can either select "AUTO" or enter a PBS channelnumber.
Press OK or _ to move the highlight bar to "HOST CH',then press AV repeatedly until "AUTO" or the desiredPBS channel number is selected.
NOTE:Some PBS _hannels do not transmit _lo_ k setting data.
[_1 Selectthe D.S.T.mode.
Press OK or b> to move the highlight ba" to "D.S.E ', then
press _V repeatedly until the desired setting is selected.
AUTO: Select if you want to adjust your VCR's clockautomatically by the incoming signal from thehost channel. Be sure to select the correct time
zone manually in step 4.ON: Adjustment will be made by the built-in clock
itself.
OFF: Select when Daylight Saving Time does not applyto you.
D Selectthe time zone.
Press OK or b- to move the highlight bar to "TIMEZONE", then press AV repeatedly until "AUTO" or thedesired time zone is selected. Each time you press thebutton, the time zone changes as follows:
AUTO _ ATLANFIC _ EASTERN _ CENFRALMOUNTAIN _ PACIFIC _ ALASKA _ HAWAII
(back to the beginning)
NOTE:If an incorrect time is displayed by the Plug & Play function, youmay be receiving the ckx k setting data of a PBS _hannel fr()rn anadja( ent time zone or from an in( orrect PBS ( hannel from acable TV system. If you selected "AUTO" for the host ( hannel instep 2, be sure to select the correct tir'ne zone manually.
ManualClockSetFirst follow steps 1 to 4 in "Preparations" (_:" pg. 16), then go to
the following steps.
Jeset time, date andyear.
Press _V until the desired
time appears, then press OK
or _. Set the date and year inthe same way.• Holding _V changes the time
in 30-minute intervals, orchanges the date in 15-dayintervals.
CLOCK SET ]
_TIME o DATE YEAR |I
_AUTO CLOCK : ON IHOST CH : AUTO (CATV) [D.S.T. : AUTO |!MEZ0NE _AU!°..... IPRESS(_,,'v);_H_N|PK)P_E_8{_ ENU)iTO:ERD
F_ SelectD.S.T.mode.
Press OK or D to move the
highlight bar to "D.S.I.", thenpress _V to select thedesired setting.
ON: Adjustment will bemade by the built-inclock itself.
OFF: Select when DaylightSaving Time does notapply to you.
CLOCKSET ]
TIME DATE YEAR I1:00AM 12124 02TUE |
AUTO CLOCK _,OFF I
_1 Startclock.
Press MENU and normal screen appears.
To make corrections any time during the processPress OK or _- repeatedly until the item you want tochange blinks, then press _.

18 EN INITIAL SETTINGS (cont.)
tunerSetTurn on the IV and select the AV mode.
_,_ JVC 1
AutoChannelSet
#J##
Perform Auto Channel Set only if channels have not been set
correctly by the Plug&Play setting.
] _ TurnontheVCR.
Press POWER.
_ Accessthe MainMenuscreen.
Press MENU.
I_1 Accessthe TunerSet screen.
Press AV to move tile MAiNMENU
highlight bar/arrow) toMODESET
"TUNER SET", then press OK VHSMODESET
or _. _TINITIALSET
D PerformAutoChannelSet.
Press AV to move the
highlight bar/arrow/to
"AUTO CH SET", then press
OK or b>. You can
automatically set the
receivable channels in your
area in the order of their
frequencies.• When Auto Channel Set is
complete, "SCAN
COMPLETED" appears on theTV screen.
• [f the scan was unsuccessful,"SCAN COMPLETED NO
SIGNAl " appears on screen.Check the connections and start
again.
TUNER SET
BAND CATV
MANUAL CHANNEL SET
AUTOCHANNELSET
SCANNING...
: )@ESt@@ilI@@ii ;i
INFORMATIONThe VCR selects the _orrect band (TV or CATV) automatically
(luring Auto Channel Set. The selected band will bedisplayed on the right side of "BAND" on the Rmer Set
screen.
D Returnto the normalscreen.
Press MENU.

EN19
JVC
ManualChannelSetYou can add the channels you want or delete the channels youdo not want manually.
I1 Turnonthe VCR.
Press POWER.
_ Accessthe MainMenuscreen.
Press MENU.
I_1 Accessthe TunerSet screen.
Press AV to move the MAINMENUhighlight bar/arrow) to
MDDE SET"TUNER SET", then press OK vDsMODESET
or _. _TINITIALSET
D Accessthe ManualChannelSet screen.
Press _V to move the TUNEBSEThighlight bar larrow/to
BAND CATV"MANUAl. CHANNEl SET", AUTOCNANNELSET
then press OK or b>.
D Addor skipthedesiredchannels.
To add channels
[] Press the number keys toinput a channel number youwant to add.
[] Press OK or _ to set to"ADD".
[] Repeat [] to [] to add otherchannels.
1o skip channels[] Press AV or the number keys to select a channel
number you want to skip.[] Press OK or _ to set to "SKIP".
[] Repeat [] and [] to skip other channels.
D Returnto the normalscreen.
Press MENU.

20 EN INITIAL SETTINGS (cont.)
CableBoxControlSettingPlace the cable box on top of the VCR. Attach the VCR'sController to the top of the VCR with the Controller'stransmitter pointed towards the cable box's remotesensor.
ATTENTION:The (bntroller can also control a DBS receiver. If both a cable
box and a DBS receiver are used, position the Controller so its
si2_nal reach_ the remote sensors of both the _able box and DBSteceivel:
Cable box
The following procedure is required if you receive yourTV channels through a cable box (descrambler). [heController allows the VCR to automatically switch thecable box channel during timer recording. The Controlleris effective for recording broadcasts that have beenprogramed using "VCR Plus+ _'Timer Programing"1_-_"pg. 42) or "Express Timer Programing" (___"pg. 46).
InstallingController
i1_ Situate the Controller.
Place the Controller so that the path between itstransmitter and the cable box's remote sensor isunobstructed.
F_ Attachthe Controller.
Fix securely using the adhesive strip attached on the backof the Controller.
Your VCRController
(suggested locations)
Cable box
ITo RFoutput
Controller
'ransmltter or
\ / r,)_._ // ANTENNA
[ ' ,
Your VCR
ITo Audio/vide()
output
AUDIO/
VIDEO IN
I_1 Make connections.
If your cable box does not have audlo/video outputconnectors
Connect the RF output connector on the cable box to theANTENNA IN connector on the rear of your VCR.
If your cable box has audio/video output connectorsConnect an audio/video cable between the AUDIO/VIDEO IN connectors on the rear of the VCR and the
audio/video output connectors on the cable box.
NOTE:When _onne_ ting your _able box, refer to it5 instruction manual,
D ConnecttheControllerto VCR.
Connect the Controller to the CABLE BOX connector on
the rear paneh
How to control the cable box
This VCR has two separate methods to (ontrol your (ablebox.
• The VCRg wireless Remote can control your cable box.This eliminates the need for a separate cable boxg Remote.
• The VCRg Controller can also control your cable box. Thisallows the VCR to change your cable boxg channelnumber during timer re_ording.
Each method must be set up separately. ]o set up the VCR'sRemote, refer to page 68. [b set up the Controller, go topage 21.

m
JVC
C ) CD CD CZD
C7_ CsD CO
N/
EN21
D Accessthe Initial Setscreen.
Press AV to move the MAIHMEHUhighlight bar/arrow) to
MODE SET"]NEIIA[ SET", then press OK VHS MODE SET
or_.
D
DV MODE SETTUNED SET
Accessthe CableBoxSet screen.
Press AVtomove the
highlightbar/arrow) to"CABI.E BOX SET", then
press OK or _.
INITIAL SET
CLOCK SETLANGUAGE ENGLISHGUIDE CHANNEL SET
DBS RECEIVER SET
-IT!
D Selectthecablebox's channel.
Your selection depends on howCABLE SOX SET
the cable box is connected to
your VCR. "l_l"If the cable box is connected " "
to your VCR's ANTENNA INconnector on the rear panel,press AV until the channelnumber representing the cablebox's output (CH2 - CH9) appears on the screen.
If the cable box is connected to your VCR's AUDIO/VIDEO IN connectors on the rear panel, press _v until"ON 1=1 (REAR)" appears oil tile screen.
If you do not use a cable box, press AV until "OFF"appears on the screen.
Settingcablebox'sbrandandchannelAfter installation, set the cable bo×_ brand and channel
correctly; otherwise, the Controller cannot workcorrectly.
[Turn the TV and select the AV mode.on
il Turnonthe VCR.
Press POWER.
1_1 Turnonthe cablebox.
Turn on the cable box's power.
_1 Accessthe MainMenuscreenonthe VCR.
Press MENU.
]

22 EN INITIAL SETTINGS (cont.)
_ Accessthe CableBoxBrandSet screen.
Press OK or b*.
lrl Enterthecablebox's brand.
CABLE BOX BRAND SETPress the appropriate number
keys to enter the brand code "11"from the following list, then ,, ,,press OK or P> and "CABI.EBOX CONTROl. [S ON"
appears on the screen for about5 seconds, then it returns to thenormal screen.
If the cable boys channel CABLEBOXBRANDSETchanges to 9, setting is
1complete. Press OK.
DID YOUR CABLE BOXIf the cable boxPs channel does CHANGE TO CHANNEL09?
not change to 9; NO[] Press AV to move the
highlight bar (arrow) to"NO", then press OK or b*.
[] Repeat step 8 until the cable box's channel changes to9 by entering another code.
[] If the channel does not change after going through allthe code numbers listed for your model of cable box,then try all the other numbers.
BRAND NAME
ARCHER
CABI ETENNA
CABLEVIEW
CITIZEN
CURTIS
DIAMOND
GC BRAND
GEMINI
GENERAL INSTRUMENTS
CODE
1,5,171,1715,16,17,21,2515,16,17,21,252,81,1715,16,17,21,25151,4,6,11,12,15,28
HAMHN
JASCO
JERROLDNOVAVISION
OA K
PANASONIC
PULSER
RCA
REGAL
REMBRANDT
SAMSUNG
SCIENTIFIC ATLANTA
SIGMA
SI MARX
SPRUCER
STAR(3ATE
TEl EVIEW
TOCOM
UNIKA
UNIVERSAL
VIDEOWAY
ZENITH
10, 18,23151,4,6,11,12,15,282,87, 2013, 1415,16,17,21,2513, 1410, 18,231,16,175, 16,242,87,205, 16, 17,24,2513, 145, 15, 16, 17,21,24,255, 16,241,4,161,1716, 17,253,9,223,9,22
NOTES:• lhe (ontroller may not work with all types of(able box.• If your cable box does not respond to any (ode between 1 and
25, you cannot use the Controller to change cable boxchannels. In this case, make sure to leave the cable box turnedon and tuned to the proper channel before the scheduled starttime of timer recording.(ontact your (able company about the possibility ofexchanging your current cable box with the one (ompatiblewith your VCR.
• 7he VCR can only (hange the cable box channel through theController during timer re( ording.
• If your cable box (annot be operated with a Remote (becauseit has no remote sensor), you cannot use the (bntroller tochange its (hannels. Make sure to leave the cable box turnedon and tuned to the proper channel before the scheduled starttime of timer recotding.
• If the VCR's memory backup expires because of a powerfailure, set the cable box output (hannel and brand again.
• For customers in U.S.A.: If you are unable to set the(ontrolle_; contact JVC toll free at 1-800-537-5722.

DBSReceiver
ControlSettingPlace the DBS (Direct Broadcast Satellite) receiver on topof the VCR. Attach the VCR's Controller to tile top of theVCR with the Controller's transmitter pointed towards theDBS receiver's remote sensor.
ATTENTION:71_e (ontroller can also control a cable box, If both a DBS
receiver and a cable box are used, position the Controller so it5
signal rea(hes the remote sensors of both the DBS receiver andcable box,
DBS receiver
The following procedure is required if you receivesatellite channels through a DBS (Direct BroadcastSatellite) receiver. The Controller allows the VCR to
automatically switch the DBS receiver's channel duringtimer recording.
NOTES:• The VCR can automatically _hange the DBS receiver (hannels
using the Controller when the VCR has been prograrned using
"Express lirner Progmrning" Ct__pg. 462.Because satellite progmming does not use PlusCbde, the
Controller cannot change the DBS receiver _ hannels during
"VCR PILls+' Timer Programing" Ct-_ pg. 42).
• Ira cable box is also used, it is recommended that you
connect the DBS receiver to your VCR'5 audio/video input
connectors and the cable box to your VCR'5 antenna inputterminal.
InstallingController
I_1 Situatethe Controller.
Place the Controller so that the path between itstransmitter and the DBS receiver's remote sensor is
unobstructed,
Your
Controller
(suggested locations)
DBS receiver
ITo RF ]o Audio/
output video
Controller Transmitter output
or
ANTENNA AUDIO/
',/ IN VIDEO IN"4
I I
Your VCR
_ Attachthe Controller.
Fi× securely using the adhesive strip attached on the backof the Controller
l_lMake connections.
If your DBS receiver does not have audio/video outputconnectors
Connect the RF output terminal on the DBS receiver to
the ANTENNA IN connector on the rear of your VCR.
If your DBS receiver has audlo/vldeo output connectorsConnect an audio/video cable between the AUDIO/
VIDEO IN connectors on the rear of the VCR and the
audio/video output connectors on the DBS receiver.
NOTE:When connecting your DBS recteivet, refer to its instructionrTlanual,
D ConnecttheControllerto VCR.
Connect the Controller to the CABLE BO× connector on
the rear panel.
How to control the DBS receiver
This VCR has two separate methods to _ontrol your DBSreceiver.
• The VCR's wireless Remote can control your DBS receiver.
This eliminates the need for a separate DBS receiver'sRemote,
• The VCR's Controller can also control your DBS receiven
This allows the VCR to change your DBS receiver's channel
number during timer recording.
Each method must be set up separately. 1_ set up the VCR's
Remote, refer to page 69. [b set up the Controller, go to
page 24.

24 EN INITIAL SETTINGS (cont.)
m
JVC
C7) C_DC_
C ) CD CZ) CZ)
/IH
D Accessthe Initial Setscreen.
Press AV to move the MAINMEHUhighlight bar/arrow) to
MODE SET"]NEIIA[ SET", then press OK VHS MODE SET
or _. OV MODE SETTUNED SET
D Accessthe DBSReceiverSet screen.
Press AV to move theINITIAL SET
highlight bar (arrow) to "DBSRECEIVER SET", then press CLOCNSETLANGUAGE ENGLISHOK or _>. GUIDE CHANNEL SET
CABLE BOX SET
D Selectthe DBSreceiver'schannel.
Your selection depends on howDBS RECEIVER SET
the DBS receiver is connected
to your VCR. "1"i1_"If the DBS receiver is " "
connected to your VCR'sANTENNA IN connector on
the rear panel, press AV untilthe channel number
representing the DBS receiver's output (CH3 or CH4)appears on the screen.
If the DBS receiver is connected to your VCR's AUDIO/VIDEO IN connectors on the rear panel, press AV until"ON L-1 (REAR)" appears on the screen.
If you do not use a DBS receiver, press AV until "OFF"appears on the screen.
SettingDBSreceiver'sbrandandchannelAfter installation, set the DBS receiver's brand and
channel correctly; otherwise, the Controller cannot workcorrectly.
Turn on the TV and select the AV mode. ]
i1 Turnonthe VCR.
Press POWER.
1_1 Turnonthe DBSreceiver.
Turn on the DBS receiver's power.
[_1 Accessthe MainMenuscreenonthe VCR.
Press MENU.

_ Accessthe DBSReceiverBrandSet screen.
Press OK or b*.
D Enterthe DBSreceiver'sbrand.
Pressthe appropriate numberkeys to enter the brand codefrom the following list, thenpress OK or P>.The program currentlyreceived through the DBSreceiver appears for about 10seconds.
DBSRECEIVER8RANDSET
BRAND NAME CODE
JVC (DISH Network) 51ECHOSTAR (DISH Network) 51
SONY (DSS) 41
RCA (DSS) 40
NOTES:• The Controller may not work with all types ofDBS re_eive_:
• If your DBS receiver does not respond to the code, you cannot
use the O)ntroller to _hange satellite ( hannels. In this case,make sure to leave the DBS receiver turned on and tuned to
the proper ( hannel before the s( heduled start time of timer
recording.
• 7he VCR can only (hange the satellite (hannel through the
(onboller during timer re( o_ding.
• If your DBS receiver cannot be operated with a Remote
(because it has no remote sensor), you cannot use the
(onboller to ( hange it___hanneb. Make sure to leave the DBS
receiver turned on and tuned to the proper ( hannel before the
s( heduled start time of timer recording.
• If the VCRt_ memory backup expires because of a power
failure, set the cable box output ( hannel and brand again.
• For customers in U.S.A.: If you are unable to set the (ontrolle_,contact ]VC toll free at 1-800- _3 7- _722.
If the DBS receiver's channel
changes to the channel listedbelow for your brand, settingis complete.JVC "-" 1 O0ECHOSTAR "-" 100SONY --,- 20,BRCA "-" 205
Press OK or P> and "DBS RECEIVER CONTROl. IS ON"
appears on the screen for about 5 seconds, then it returnsto the normal screen.
DBS RECEIVER 8RAND SET
51
DID YOUR O8S RECEIVER
CHANGE TC_,_NEL 1007
NO
If the DBS receiver's channel does not change as shownabove;[] Press AV to move the highlight bar !arrow) to "NO",
then press OK or b>.[] Repeat step 8.

26"EN PLAYBACK/RECORDING ON VHS DECK
BasicPlayback(VHSdeck)
lurn on the TV and select the AV mode.
/JVI_
_i_ dEZ_ i nlA
I,
JVC
C© C©
]
IieLoad a cassette.
Make sure the window side is up, the rear label side isfacing you and the arrow on the front of the cassette ispointed toward the VCR.• Do not apply too much pressure when inserting.• The VCR's power comes on automatically.• If the record safety tab has been removed, playback begins
automatically.
_ SelecttheVHS deck.
Press S-VHS.
• The S-VHS button lights on the VCR.
I_1 Findthe programstartpoint.
If the tape is advanced past the start point, pressREW (4-_1) or turn the ADVANCED JOG dial on the VCR
to the left. [b go forward, press FF (1_1_) or turn theADVANCED JOG dial on the VCR to the right.
D Start playback.
Press PLAY (1_-). "VIDEO CAI.IBRATION" appearsblinking on the TV screen during automatic tracking./_ _pg. _¢5)• The VHS playback indicator lights on the VCR.
D Stopplayback.
Press STOP (IlL Then press EJECT (A) to remove thecassette.
• The VHS playback indicator turns off.
NOTE:It is impossible to play ba( k a tape on the VHS de_ k while the
recording is in progress on the DV de( k. When you start
recording on the DV clerk during playback on the VHS tied<,
playback stops on the VHS de( k and re( ording continues on theDV de( k.
UsablecassettesFull-Size VHS
T-30 (ST-30**)
T-60 (ST-60**)T90
T-120 (ST-120"*)
T-160 (ST-160**)ST-210'*
Compact VHS*
TC-20 (S1-C20'*)
TC-30 (ST-C30**)
TC-40 (ST-C40**)
* Compact VHS camcorder recordings can be played on this
VCR. Simply place the recorded cassette into a VHS
Cassette Adapter and it can be used just like any full-sizedVHS cassette.
**H_is VCR can tecotd on regular VHS and Super VHS
cassettes. While only VHS signal5 can be recorded on
regular VHS _assettes l;, both VHS and Super VHS signals
can be recorded and played back using Super VHScassettes.
12By using the S- VHS ET function, it is possible to re_ ord and
play ba_k with S-VHS picture quality on VHS cassetteswith this VCR.

EN27
BasicRecording i]1Loada cassette.Insert a VHS (or S-VHS) cassette with the record safety
(VHSdeck)
Turn on the IV and select the AV mode.
JVC
tab intact.
• The VCR's power comes on automatically.
] _ SelecttheVHS deck.Press S-VHS
• The S-VHS button lights on the VCR.
[_1 Choosea program.
On the Remote
Press CH +/- or the number keys.
On the VCR
Push the ADVANCED JOG dial and turn it to the left or
right to select the channel you wish to record.
D Set the tape speed.
Press SP/EP (//11). Check the SP/EP indicator on the
VCR's front display panel to confirm the selected tapespeed.
D Start recording.
Press and hold REC {e) and press PLAY (1_) on tileRemote, or press REC (Q) on the VCR.• The VHS recording indicator lights on the VCR.
Video Calibration takes place at the beginning of both thefirst SP and the first EP recording after inserting the cassette.(_-_ pg. 35)
D Pause/Resumerecording.
Press PAUSE (11). Press PLAY (1_) to resume recording.• You can select channel during the Record Pause mode.
_Stop recording.
Press STOP (IlL lhen press EJECT (A) to remove tilecassette.
• The VHS recording indicator turns off.
NOTE:It is not possible to re_ ord a TV program on both the VHS de_ t<and the DV deck simult, meously. In adclition, it is not possible torecord simultaneously from the same external input.
28 EN PLAYBACK/RECORDING ON VHS DECK (cont.)
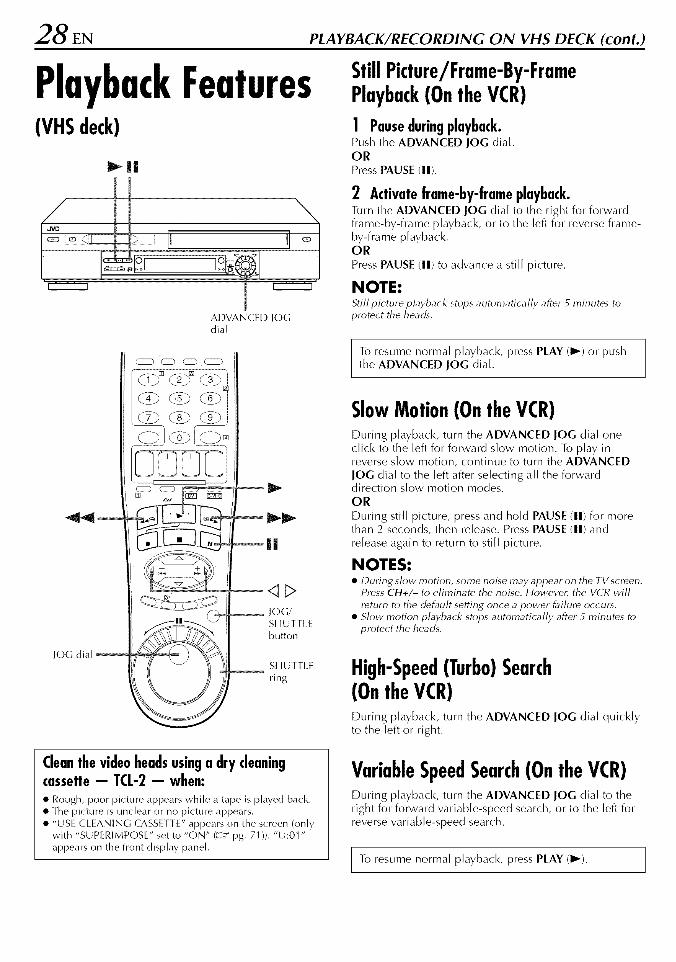
PlaybackFeatures(VHSdeck)
ADVANCED JOGdial
StillPicture/Frame-By-FramePlayback(OntheVCR)! Pauseduringplayback.Push the ADVANCED JOG diahORPress PAUSE Ill).
2 Activateframe-by-frameplayback.Turn tile ADVANCED JOG dial to the right for forwardframe-by-frame playback, or to the left for reverse frame-by-frame playback.OR
Press PAUSE (11) to advance a still picture.
NOTE:Still pk ture playback stops automatR ally after _ minutes toprote_ t the heads.
4141_
JOG dial
[]
OG/SHUTTLEbutton
SHUTTI E
ring
lb resume normal playback, press PLAY (1_) or pushthe ADVANCED JOG dial.
SlowMotion(OntheVCR)During playback, turn the ADVANCED JOG dial oneclick to the left for forward slow motion. ]o play inreverse slow motion, continue to turn the ADVANCED
JOG dial to the left after selecting all the forwarddirection slow motion modes.
ORDuring still picture, press and hold PAUSE (11) for morethan 2 seconds, then release. Press PAUSE (11) and
release again to return to still picture.
NOTES:• During slow motion, some noise may appear on the TV screen.
Press CH+/- to eliminate the noise. However, the VCR willreturn to the default setting once a power failure occurs.
• Slow motion playback stops automatRally after 5 minutes toprotect the heacg.
High-Speed(Turbo)Search(OntheVCR)During playback, turn the ADVANCED JOG dial quicklyto the left or right.
Cleanthe videoheadsusinga dry cleaningcassette- TCL-2- when:
• Rough, poor picture appears while a tape is played back.• The picture is unclear or no pi(ture appears.• "USE CLEANING CASSETTE" appears on the s(-reen (only
with "SUPERIMPOSE" set to "ON" (_-_"pg. 71 )). "U:01"appears on the front display paneh
VariableSpeedSearch(OntheVCR)During playback, turn the ADVANCED JOG dial to theright for forward variable-speed search, or to the left forreverse variable-speed search.
]b resume normal playback, press PLAY (1_). ]

EN29
StillPicture/Frame-By-FramePlayback(OntheRemote)! Pauseduringplayback.Press PAUSE (IlL
2 Activateframe-by-frameplayback.Press JOG/SHUTTLE so that the button lights up. Turn theJOG dial to the right for forward frame-by-frameplayback, or to the left for reverse frame-by-frameplayback.orPress PAUSE (11) to advance a still picture.ORPress <1 for reverse frame-by-frame playback or b_ forforward frame-by-frame playback.
NOTE:Still picture playback stops automatR ally after 5 minutes toprotect the heatS.
SlowMotion(OntheRemote)Press JOG/SHUTTLE so that the button lights up. Duringplayback or still, turn the SHUTTLE ring to the right forforward slow motion, or to the left for reverse slow
motion. Release to return to still picture.OR
During still picture, press and hold PAUSE (11) for morethan 2 seconds, then release. Press PAUSE (11) and
release again to return to still picture.OR
During still picture, press and hold <I or _. Release toreturn to still picture.
NOTES:• During slow motion, some noise may appear on the TV s_reen.
Press CH+/- to eliminate the noise. However, &e VCR willreturn to the default setting once a power failure occurs.
• Slow motion playback stops automatically after _ minutes toprotect the heads.
ib resume normal playback, press PLAY (1_). ]
You can also use the Remote's JOG dial/SHUTTLE ring forthe operations. First press the JOG/SHUTTLE button on theRemote so that the button lights up before use. Refer to theSHUTTLE ring illustration below as you read the procedures.
Still
'_v0H+
Reverse ._vc_- Forward9 I1
D,w,rseReverse Reverse sl _r Slow N3rmal Foi_aidseaic _ " Ill() O_ • seaic _
I 4 steps I play I motion I 2 steps I play I 4 steps I
High-Speed(Turbo)Search(OntheRemote)Press JOG/SHUTTLE so that the button lights up. Duringplayback or still, turn the SHUTTLE ring all the way to theright for forward high-speed search, or to the left forreverse high-speed search. Releasing SHUTTLE ringresumes still picture playback.OR
During playback or still, press FF (1_1_) for forward high-speed search, or REW (41_1) for reverse high-speedsearch.
NOTE:fbr short searches, press and hold FF (l_lJ"-; or REW (41",,9) forover 2 second5 during playback or still picture. When released,normal playback resumes.
VariableSpeedSearch(OntheRemote)Press JOG/SHUTTLE so that the button lights up. Duringplayback or still, turn the SHUTTLE ring to the right forforward variable-speed search, or to the left for reversevariable-speed search.ORDuring playback, press <1 or D.• The more times you press, the faster the playback picture
moves.• To decrease speed, press the button for the opposite direction.
lb resume normal playback, press PLAY (1_). ]

0 EN PLAYBACK/RECORDING ON VHS DECK (cont.)
POWER
i ,
, _II ||
A
JVC
POWER
RepeatPlaybackYour VCR carl automatically play back the whole tape 1O0 times
repeatedly.
] Start playback.Press PLAY (1_).
2 ActivateRepeatPlayback.Press PLAY (1_) and hold for over 5 seconds, then release.
• The Play indicator (') on the front display panel blinks
slowly.• After playing back a tape 1O0 times, the VCR stops
automatically.
3 StopRepeatPlayback.Press STOP (11) at any time.
• Pressing PLAY (1_), REW (41_1), FF (1_1_) or PAUSE (11) alsostops Repeat Playback.
IndexSearchYour VCR automatically marks
index codes at the beginning of
each recording. [his function gives
you quick access to any one of 9index codes in either direction.
NOTE:Before starting, make sure the V(R
is in the Stop mode.
iNDEX 1
ActivateIndexSearch.Press _d or E> (141_1 or I_1_1). "INDEX -1" or "INDEX 1" is
displayed on the TV screen and search begins in thecorresponding direction.• To access index codes 2 through 9, press _d or _ repeatedly
until the correct index number is displayed.
Example:
To locate the beginning of B from the current position, press _dtwice.
To locate the beginning of D from the current position, press b>
once.
Current position
!
c o-2 -1 1 2 3_'--I
/Index number
• When the specified index code is located, playback beginsautomatically.
NextFunctionMemory]he Next Function Memory "tells" the VCR what to do after
rewinding. Before continuing, make sure the VCR is in the Stopmode.
a- For Automatic Start Of PlaybackPress REW (41_1), then press PLAY (1_) within2 seconds.
b- For Automatic Power Off
Press REW (41_1), then press POWER within2 seconds.
c- For Automatic Cassette Ejection After Tape RewindPress REW (4_), then press EJECT (A) within2 seconds.
NOTE:7he Automatic Power Off does not work if "AUTO TIMER" is set
to "ON" (__" pg. 71) and if any timer programing has been
made. If "AUTO TIMER" is set to "ON'; the VCR dire( tly goes
into the 77men,Standby mode at the same time when the POWER
is pressed for the Automatic Power Off.

EN31
//11
JVC
_D C3 C D
A. MONITOR
--CH
ManualTrackingYour VCR is equipped with automatk tracking control. During
playbac k, you can override this and adjust the tracking manually
by pressing the CH buttons.
! Overrideautomatictracking.Press////on the Remote
2 Adjustthetrackingmanually.Press CH + or-.
• Press/111 again to return to automatic tracking.
NOTE:When a new tape is inserted, the VCR enters the automatk
tracking mode automatically.
S0undtrackSelectionYour VCR is capable of recording three soundtracks (HI-FI I,
HI-FI R and NORM) and will play back the one you select.
During Playback
Pressing A. MONITOR changes the soundtrack as follows:• You can also select the soundtrack on the VHS MODE SET
screen. (z_ _ pg. 75, "AUDIO MONFFOR')
TRACK
On-screen Display
HI-FI
HI-FIL
USE
Hi-Fi sound is played back
Sound on the left Hi-Fi channel is
played back
H I-F [ R Sound on the right Hi-Fi channel isplayed back
NORM Sound on the normal track is playedback
Both sounds on the Hi-Fi track andNORM
normal track are mixed and playedHI-FI back
NOTES:• "H!-FI" should normally he selected. In this mode, Hi-Fi stereo
tapes are played ba_ k in stereo, and the nom_al audio track is
played back automatically for tapes with only norrnal audio.• "SUPERIMPOSE" must be set to "ON" or the on-screen
displays will not appear Cz__pg. 71).

2 EN PLAYBACK/RECORDING ON VHS DECK (cont.)
RecordingFeatures(VHSdeck)
/
• dVC
, /
RecordingResumeFunctionIf there is a power outage during recording, Instant Timer
Recording (in the right column) or timer recording
(_ pg. 42, 46, 48), the recording will resume automatically
when power is restored to the VCR unless the VCR's memory
backup has expire(].
Accidentalerasureprevention]b prevent accidental recording on a re_orded cassette,
remove its safety tab. ]b record on it lateb cover the hole
with adhesive tape.
Record safety tab
RecordOneProgramWhileWatchingAnotherOnce recording is in progress, all you need to do is to setthe channel controls on the TV for the station you wish toview.
• The program selected with the TV's channel controls appearson the TV screen, while the one selected with the VCR's CHbuttons is recorded on the tape.
InstantTimerRecording(ITR)]his easy method lets you record for from 30 minutes to 6 hours
(selectable in 30-min. increments), and shuts the VCR off after
recording is finished.
! Start recording.Press REC (0) on the VCR.
2 Engagethe ITRmode.Press REC (0) again. " " blinks and "0:'_0" appears on
the front display panel.
3 Set the recordingduration.If you want to record for more than 30 minutes, press
REC (0) to extend the time. Each press extends recording
time by 30 minutes.
NOTES:• You _an only perform ITR using the REC (0) button on the
VCR'.s front panel.
• You can play back a tape on DV de(k while using the VHS
de( k for Instant [imer Re_ ording. However, remember that the
VCR will turn it.self off when the Inst, mt 77met Re_ o_ding end.s.

C.RESET_
JVC
DISPLAY/OSD
ElapsedRecordingTimeIndication
! Set the counterdisplay.Press DISPLAY/OSD until a counter reading appears on
the front display panel.
2 Resetthecounter.Press c.RESET before starting recording or playback.
• The counter is reset to "0:00:00" an({ shows the exact elapsed
time as the tape runs. You can check the exact time of a
recording or playback.
TapeRemainingTimePress DISPLAY/OSD until the time remaining on the tape
appears on the front display panel.
• The front display panel shows the tape remaining time with
"_:_" displayed.
• By pressing the DISPLAY/OSD button, you can change the
display to show the counter reading, tape remaining time,
channel position* or clock time.
* CTlannel position is not displayed duling playbadc
NOTES:• When you press DISPLAY/OSD, the on-screen display appears
(_-_ pp_, 10) on the TV screen for _ se_ ond,_, then the displays
other than tile counter disappears. To clear the counter display,
press DISPLAY/OSD• Depending on the type of tape being used, tile tape remaining
time reading may not appear right away, or is not _orrect.
: ";'flay sometimes appear, or the display may blink ono( ( asion.
34 EN PLAYBACK/RECORDING ON VHS DECK (cont.)
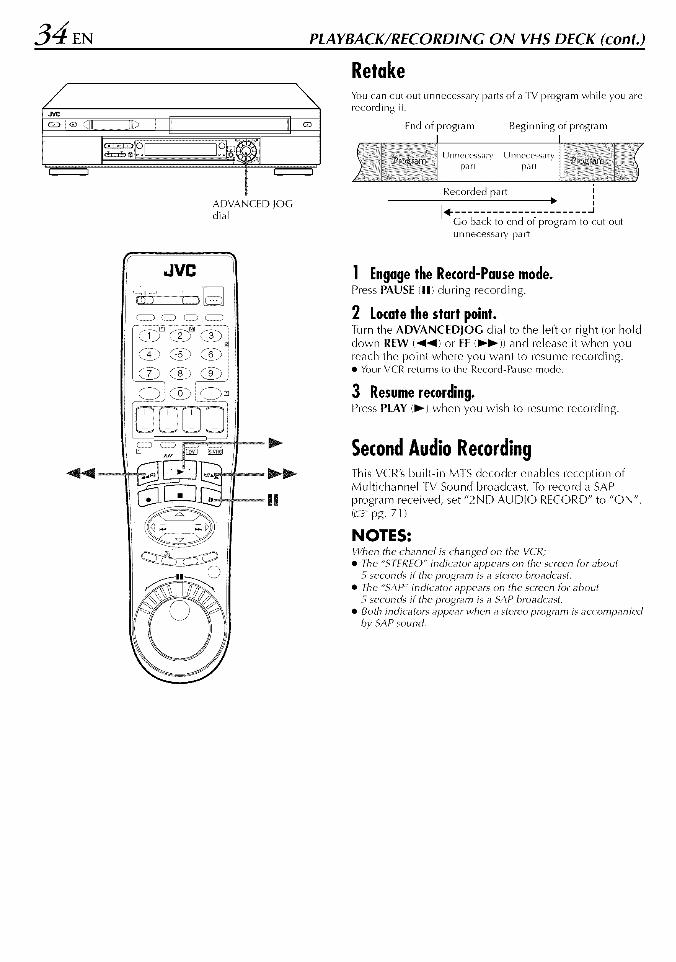
/
ADVANCED JOGdial
RetakeYou can cut out unnecessary [)arts of a TV program while you are
recording it.
End of program Beginning of program
Go back to end of program to cut out
unne(essary [)art
JVC
CO <0 CG_,
! Engagethe Record-Pausemode.Press PAUSE (11) during recording
2 Locatethestart point.Turn the ADVANCEDJOG dial to the left or right (or hold
clown REW (41_1) or FF (1_1_)) and release it when you
reach the point where you want to resume recording.• Your VCR returns to the Record-Pause mode.
3 Resumerecording.Press PLAY (1_) when you wish to resume recording.
SecondAudioRecordingThis VCR's built-in MTS decoder enables reception ofMultichannel TV Sound broadcast. lb record a SAP
program received, set "2ND AUDIO RECORD" to "ON".
(z_ pg. 71 )
NOTES:When the _hannel is _hanged on the VCR;
• 7he "STEREO" indicator appears on the screen for about
second5 if the program is a stereo broadcast.
• 7he "SAP" indicator appears on the screen for about
second5 if the program is a SAP broadcast.
• Both indicators appear when a stereo program is accompanied
by SAP sound,

ActiveVideoCalibration(VHSdeck)Active Video Calibration checks the condition of the tapein use during playback and recording, and compensatesto provide the highest-possible playback and recording
pictures. You can set "VIDEO CALIBRATION" to "ON" or"OFF" to your preference !_-_ pg. 73).
PlaybackThe VCR assesses the quality
of the tape once you initiate
playback.• The VCR adjusts the playback
picture quality based on the
quality of the tape in use.• Video Calibration is active
during automatic tracking. TheVideo Calibration screen
appears blinking on the TV screen.
NOTES:
\\l//--VIBEOBALIBRATION--
//IX\
• When watching a tape recorded with "VIDEO CALIBRATION"
set to "ON'; it is recommended that you leave VIDEO
CALIBRATION on during playback as well.
• When wat_ hing a rent, fl tape or one recorded on another VCR,or when using this VCR as the player for editin_g, set VIDEO
( _,LIBRA TION to your preference (_ <_pg. 73).
• The Video C, flibration screen only appears at the beginning of
automatic tracking. Even though it doesn't appear after that,the Video calibration functkm is operative.
RecordingThe VCR assesses the quality
of the tape once you initiate
recording.
• The VCR spends approximately
7 seconds assessing the
condition of the tape, then
begins recording.
NOTES:• 71_eVideo (,flibration work__ for
both SP and EP modes only
after a tape has been insertedand the Record mode is first
initiated. It does not wort<
during recording.
• In the case of timer recordings,the Video (iflibration works
before re_ o_ding is initiated.
• Once the cassette is ejected,the Video (iflibration data is
cancelled. 77_enext time the
cassette is used for recording,Video (alibration is re-
performed,
DURING VIDEOCALIBRATION
STABT END
EHEEEEEEE+ ........ + ........ +
ACTIVE VIDEO CALIBBATION
VIDEO CALIBRATION
COMPLETE
SIART ENDBEEEEBEBEEEE§EEEEBEBEEEE§+ ........ + ........ +
ACTIVE VIDEO CALIBRATION
ATTENTIONSince the Video Calibration works before recording a<tually
starts, there is a delay of approximately 7 seconds after
RIEC (O) and PLAY (1_) on the Remote are pressed, or
RIEC (O) on the VCR is pressed. [b make sure you record the
desired scene or program in its entirety, first perform the
following steps:
[] Press and hold PAUSE (11) an(] press RIEC (O) to engagethe Record Pause mode.
• The VCR then automatically checks the condition of the
tape and, after approximately 7 seconds, re-enters RecordPause mode.
[] Press PLAY (1_) to start recording.
[f you want to bypass the Video Calibration and begin
recording immediately, set "V[DIEO CAIEIBRATION" to "OFF"
(_-_ pg. 73).

6"EN PLAYBACK/RECORDING ON DV DECK
BasicPlayback(DVdeck)
lurn on the TV and select the AV mode.
/JVI_
\
JVC
]
_eLoad a cassette.
Make sure the window side is up, the rear label side is
facing you and the arrow on the front of the cassette is
pointed toward the VCR.
• Do not apply too much pressure when inserting.
• The VCR's power comes on automatically.
• If the erase protection switch is set to "SAVE", playback begins
automatically. It takes about 15 seconds until the playback
picture appears.
_ Selectthe DVdeck.
Press DV.
• The DV button lights on the VCR.
_1 Findthe programstartpoint.
If the tape is advanced past the start point, pressREW (4_1) or turn the ADVANCED JOG dial to the left.
lb go forward, press ElF(1_1_) or turn the ADVANCEDJOG dial to the right.
D Start playback.
Press PLAY (1_).• The DV playback indicator lights on the VCR.
D Stopplayback.
Press STOP (m). Then press EJECT (A) to remove thecassette.
• The DV playba(k indicator turns off.
Usablecassettes
Only cassettes marked MUller _ _an be used with the DVdeck.
NOTE:When you re_ord a t,lpe on the DV de_ k with the re_ordingspeed set to "LP'; it is recommended to play ba_k the tape onthis DV de_k. Digital video re_order from other manufacturersmay not be able to play ba_ k the tape properly.

BasicRecording il Loada cassette.Insert a Mini DV cassette with the erase protection switch
(DVdeck) setto'REC"The VCR s power comes on automatically.
lurn on the TV and select the AV mode. _ Selectthe DVdeck.Press DV.
• The DV button lights on the VCR.
/J_
\(2D
1_1 Choosea program.
On the Remote
Press CH +/- or the number keys.
On the VCR
Push the ADVANCED JOG dial and turn it to the left or
right to select the channel you wish to record.
D Set the tape speed.
JVC
CZZD 'C:D C::::::),
@Y3
Press SP/LP (1111). Check the SP/I.P indicator on the
VCR's front display panel to confirm the selected tapespeed.
D Start recording.
Press and hold REC Ill) and press PLAY (1_) on theRemote, or press REC (ll) on the VCR.• The DV recording indicator lights on the VCR.
D Pause/Resumerecording.
Press PAUSE (11). Press PLAY (1_) to resume recording.• You can select channel (luring the Record Pause mode.
_Stop recording.
Press STOP (11). Then press EJECT (_.._) to remove the
cassette.
• The DV recording indicator turns off.
NOTES:• It is not possible to re_ ord a TV program on both the VHS dell<
and the DV de(k simultaneously. In addition, it is not possible
to record simultaneously from the same external input,
• When you re(oral a tape on the DV deck with the re(ording
speed set to "LP'; it is recommended to play back the tape on
this DV deck. Digital video re_ order from other manufacturers
may not be able to play ba_ k the tape properly.

38 EN PLAYBACK/RECORDING ON DV DECK (cont.)
PlaybackFeatures(DVdeck)
JOG dial
ADVANCED JOGdial
JOG/
button
SHUTTLE
ring
StillPicture/Frame-By-FramePlayback(OntheVCR)! Pauseduringplayback.Push the ADVANCED JOG dial.ORPress PAUSE (11).
2 Activateframe-by-frameplayback.Turn tile ADVANCED JOG dial to the right for forwardframe-by-frame playback, or to the left for reverse frame-by-frame playback.ORPress PAUSE (11) to advance a still picture.
NOTE:Still pk ture playback stops automatR ally after _ minutes toprote_ t the heads,
lb resume normal playback, press PLAY (1_) or pushthe ADVANCED JOG dial.
SlowMotion(OntheVCR)During playback, turn the ADVANCED lOG dial oneclick to the left for forward slow motion. ]o play inreverse slow motion, continue to turn the ADVANCEDlOG dial to the left.ORDuring still picture, press and hold PAUSE (11) for morethan 2 seconds, then release. Press PAUSE (11) and
release again to return to still picture.
NOTE:Forward slow motion playl)ad< stops automatk ally after 1minute, reverse slow motion playback after 30 second5 toprotect the heads,
High-Speed(Turbo)Search(OntheVCR)During playback, turn the ADVANCED JOG dial quicklyto the left or right.
ATTENTIONPRture may appear distorted during w_riable speed search,
Cleanthe videoheadsusinga dry cleaningcassette- M-DV12CL - when:
• No picture during playback.• Blocks of noise appear during playback.• "USE CLEANING CASSETTE" appears on the screen (only
with "SUPERIMPOSE" set to "ON" (L__pg. 71 )).
VariableSpeedSearch(OntheVCR)During playback, turn the ADVANCED JOG dial to theright for forward variable-speed search, or to the left forreverse variable-speed search.
[b resume normal playback, press PLAY (I,,-). ]

StillPicture/Frame-By-FramePlayback(OntheRemote)! Pauseduringplayback.Press PAUSE (11).
2 Activateframe-by-frameplayback.Press JOG/SHUTTLE so that the button lights up. Turn theJOG dial to the right for forward frame-by-frameplayback, or to the left for reverse frame-by-frameplayback.orPress PAUSE (11) to advance a still picture.ORPress <1 for reverse frame-by-frame playback or b_ forforward frame-by-frame playback.
NOTE:Still picture playback stops automatR ally after _ minutes toprotect the heacLs.
SlowMotion(OntheRemote)Press JOG/SHUTTLE so that the button lights up. Duringplayback or still, turn the SHUTTLE ring to the right forforward slow motion, or to the left for reverse slow
motion. Release to return to still picture.OR
During still picture, press and hold PAUSE (11) for morethan 2 seconds, then release. Press PAUSE (11) and
release again to return to still picture.OR
During still picture, press and hold <I or _. Release toreturn to still picture.
NOTE:Tbtward slow motion pl, lyba( k stops automati( ally after 1minute, reverse slow motion playback after 30 seconcg toprote_ t the heacLs.
lb resume playback, pressnormal PLAY (I,_). ]
You can also use the Remote's JOG dial/SHUTTLE ring forthe operations. First press the lOG/SHUTTLE button on theRemote so that the button lights up before use. Refer to theSHUTTLE ring illustration below as you read the procedures.
Still
'w0H+
Reverse ._vc_- Forwardq Ii
Reverse Reverse S]_r FoP,vaidI _ I Reve[se I SlO\\ I I NO[[llZII I _ I
' 1 St_l_ i siep , , s s_eps
High-Speed(Turbo)Search(OntheRemote)Press JOG/SHUTTLE so that the button lights up. Duringplayback or still, turn the SHUTTLE ring all the way to theright for forward high-speed search, or to the left forreverse high-speed search. Releasing SHUTTLE ringresumes still picture playback.OR
During playback or still, press FF (1_1_) for forward high-speed search, or REW (41_1) for reverse high-speedsearch.
NOTE:Tbr short searches, press and hold FF (1_11_2 or REW (41_1) forover 2 second5 during playback or still picture. When released,normal playback resumes.
VariableSpeedSearch(OntheRemote)Press JOGISHUTTLE so that the button lights up. Duringplayback or still, turn the SHUTTLE ring to the right forforward variable-speed search, or to the left for reversevariable-speed search.ORDuring playback, press <1 or _.• The more times you press, the faster the playback picture
moves,
• To decrease speed, press the button for the opposite direction.
[b resume normal playback, press PLAY (1_). ]

0 EN PLAYBACK/RECORDING ON DV DECK (cont.)
J f_
C2S)
POWER
i÷÷ i lli ..... I
A
JVC
CZID 'CZD CD CZD
C7_ C8_ C9_
A. MONITOR
POWER
NextFunctionMemoryThe Next Function Memory "tells" the VCR what to do after
rewinding. Before continuing, make sure the VCR is in the Stopnlode.
a- For Automatic Start Of PlaybackPress REW (41-_1), then press PLAY (1_) within2 seconds.
b- For Automatic Power Off
Press REW (41-_1), then press POWER within2 seconds.
c- For Automatic Cassette Ejection After Tape RewindPress REW (41-_1), then press EJECT (A) within2 seconds.
NOTE:The Aut¢)mati_ Power Off does not work if "AUTO TIMER" is set
to "ON" C__" pg. 71) and if any timer programing has been
made. If "AUTO TIMER" is set to "ON'; the VCR dire( tly goes
into the Timer-St, lndl)y mode at the same time when the POWER
is pressed for the Automatic Power Off.
SoundtrackSelectionYour VCR is capable of recording two soundtracks (L and R) andwill play back the one you select.During PlaybackPressing A. MONITOR changes the soundtra(k as follows:
TRACK
On-Screen DisplayUSE
Both sounds on the left channel and
L+R the right channel are mixed and
played back
Sound on the left channel is playedL back
Sound on the right channel isR played back
NOTE:"SUPERIMPOSE" must be set to "ON" or the on-s_ reen displays
will not appear C_ ° pg. 71).

RecordingFeatures(DVdeck)
/i6 d_
,0 0 _....
JVC
dlbmd2_b° ¢_bld_> d_b d_b_d_b C_bC_bJ
DISPLAY/OSD
RecordingResumeFunctionIf there is a power outage during recording, Instant Timer
Recording (in the right column) or timer recording
(_ pg. 42, 46, 48), the recording will resume automatically
when power is restored to the VCR unless the VCR's memory
backup has expired.
Accidentalerasureprevention]b prevent accidental recording on a re(or(led cassette, set
its erase protection switch to "SAVE". ]b record on it later, set
the switch to "REC'.
i-I. oI-FF-- EraseprotectionswitchiiJD]]]
SecondAudioRecording]his VCR's built-in MTS decoder enables reception ofMultichannel [V Sound broadcast. ]b record a SAP
program received, set "2ND AUDIO RECORD" to "ON".
/;-_ _pg. 71 )
NOTES:When the _hannel is _hanged on the VCR;
• The "STEREO" indicator appears on the screen for about
5 second5 if the program is a stereo broadcast.
• ]he "SAP" indicator appears on the screen for about
second5 if the prograr'n is a SAP broadcast.
• Both indicators appear when a stereo program is accompanied
by SAP sound.
RecordOneProgramWhileWatchingAnotherOnce recording is in progress, all you need to do is to setthe channel controls on the TV for the station you wish toview.
• The program selected with the TV's channel controls appearson the TV screen, while the one selected with the VCR's CHbuttons is recorded on the tape.
InstantTimerRecording(ITR)This easy method lets you record for from 30 minutes to 2 hours
(selectable in 30-min. increments), and shuts the VCR off after
recording is finished.
1 Start recording.Press REC (O) on the VCR.
2 Engagethe ITRmode.Press REC (0) again. " " blinks and "0:_;0 " appears on
the front display paneh
3 Set the recordingduration.If you want to record for more than 30 minutes, press
REC (Q) to extend the time. Each press extends recording
time by 30 minutes.
NOTE:X_u _ an only perform I]R using the REC (0) button on the
VCR_ front panel
TimeCodeDuring recording, a time code is recorded on the tape. This time
code is used to confirm the position on the tape when [)laying
back or editing a tape. ]b perform Random Assemble Editing
(_-_ pg. 64), time code is necessary.
Press DISPLAY/OSD until the time code on the tape
appears on the front display panel.
• By pressing the DISPLAY/OSD button, you can change the
display to show the time code, channel position*, clock time.
* Channel position is not displayed dulin_ playbadc
NOTES:The presence of a blank (unrecorded) portion in the middle of a
tape can result in misoperation.
A "blank portion" of a tape is a section where nothing is
recorded on the tape. if you start recording in a blank portion of
a tape, the time codes will start from "0:00:00" again. If identical
time codes are recorded in two different places on a tape,
Random Assemble Editing and other similar functions might not
operate properly.
In the following cases, you should play back the tape and
confirm where a scene ends, and then begin recording fromthere:
• When starting recording in the middle of a tape on whkh a
recording has already been made.
• When you finish recording on a tape, then played ba_k that
recording in order to _he_ k it, and now wish to continue
recording.
• When you lostpower or the batteries died while you were
recording with a car'ncordet:

2 EN TIMER RECORDING
VCRPlus+Timer
ProgramingWith the VCR Plus+ system, timer programing is greatlysimplified because each TV program has a correspondingcode number which your VCR is able to recognize.
Before performing the VCR Plus+ Timer Programlng:• Make sure that the VCR's built-in clock is set properly.• Turn on the TV and select the AV mode.
CANCEL
STOP+/-
JVC
_i1 Turnonthe VCR.
Press POWER.
I_1 Loada cassette.
Insert a VHS (or S-VHS) cassette with the record safetytab intact.
ORInsert a Mini DV cassette with the erase protection switchset to "REC'.
_1 Selectthedeck.
Press S-VHS or DV.
D Accessthe PlusCodeNo. screen.
Press PROG.
• The clock must be set to accessthe PlusCode No. screen. If
you have not set the clock, theMain Menu screen appearsafter an error message isdisplayed. Refer to "Plug &Play Set" (_ pg. 14) or "ClockSet" (zu" pg. 16).
Press the number keys toenter the PlusCode number
of a program you wish torecord. Then press OK.• If you make a mistake, press
CANCEL and input the correctnumber,
Enterthe PlusCodenumber.
PLUSCODE NO.
D Accessthe VCRPlus+Programscreen.
The VCR Plus+ Prograrnscreen appears (if you're juststarting out and you haveselected the VHS deck, "VHS
PROGRAM 1" appears).
IMPORTANT
Make sure the dlannel position number you wish to record is
displayed; if not, see "Changing VCR Plus+ _Setting" on
page 44 and set the Guide Channel number correctly.
• If the number you entered is invalid, "ERROR" appears on the
TV screen. Press CANCEl. and input a valid PlusCode number.
• [f the "GUIDI, CHANNEL SET" screen appears, see
"ATTI,NTION" on page 43.

_Set the tape speed.
For the VHS deck
Press SP/EP (1111).
For the DV deck
Press SP/LP (I/11).
D Returnto the normalscreen.
Press PrOG or OK. "PROGRAM COMPLETED" appears
on the TV screen for about 5 seconds, then the normal
screen appears. [f "PROGRAM NO[ COMPLETED
PROGRAM OVER[ AP" appears on the TV screen, see
page 51.
• Repeat steps 3 8 for each additional program.
D EngagetheVCR'stimermode.
Press TIMER. The VCR turns off automatically and "®"
appears on the front display paneh
• To disengage the timer mode, press TIMER again.
NOTES:• To Change The Stop Time • . .
• . . press STOP +/- in step 6. You can compensate for
anticipated program schedule delays.
• To Time_Record Weekly Or Daily Serials...
• . . in step 6, press WEEKLY (number key "90 for weekly
serials or DALLY (M-F) Inumber key "8") for daily seriab
(Monday FTiday}. Either "WEFKLY" or "DAILY" appears on
the TV s( reen. Pressing the button again makes the
corresponding indR ation disappear:
• In case of a power failure after programing, the VCR_ memo_ 7
backup keeps your selectkms for approxima rely t 0 rain utes.
• You can program each de_k to timeme_ord as many as 6
programs. If you t_7 to program the VCR to record a seventh,
"PROGRAM FULL" appears on the TV screen. 7b record the
extra program, you must first cancel any unnecessary
programs (S__ pg. 50)•• It is not possible to timer=record the same program on both the
VHS de( k and the DV de_ k simultaneously.
• During timer re¢ording, it is not possible to _hange the
recording de_ k (VHS or DV).
• If the tim_s that are programed for re(ording on the DV de(k
and on the VHS de_ k overlap, the earlier start time takes
precedence. If the start times are the same, the VHS de(i< takes
precedence.
Cable Box or DBS receiver UsersTo tinier-record a _able or satellite broadcast using the VCR
plus+ system:
[] Perform "Cable Box Control Setting" (Z_ _pg. 20) or "DBS
Receiver Control Setting" (_-_ pg. 23).
[] Perform steps 1 - 9.
[] Leave the power of cable box or DBS receiver on•
IMPORTANTIf you have moved to a di_rent area or if a broadcasting
station's channel number has been changed, the wrong VCR
CH or CABLE CH number will be displayed on the VCR
Plus+ program screen in step 6. When this happens, set the
correct Guide Channel number for that station. (_-_ pg. 44,
"Changing VCR Plus+ _Setting")
ATTENTIONGuide Channel Number Set
"GUIDE CHANNEL SET" appears after performing step 6 if
the Guide Channel number for the PlusCode number youentered has not been set•
If you want to set the Guide Channel number for the TV or
cable station, press number keys or _V to input the channel
position number on which your VCR or cable box receives
that station, then press OK or _ to set the Guide Channel
number• VCR Plus+ Program screen appears.
GUIDECHANNELSET If you receive your channelswith a cable box an(] if you
have properly set your
Controller, "CABLE CH"
appears in place of "VCR
CH'. If not, refer to pages 20.

4EN TIMER RECORDING (cont.)
ChangingVCRPlus+®Setting
lurn on the IV and select the AV mode. ]
JVC
The VCR Plus+ programing system assigns a VCR Plus+guide channel to the TV channels and the cablechannels. These guide channel numbers are also calledthe VCR Plus+ channel codes. Most TV listings have asection, usually a chart, indicating the guide channelnumbers assigned to each station.[b ensure that VCR Plus+ timer recording operatescorrectly, it is necessary to set the VCR Plus+ "GuideChannel Set" for each station.
[f you have moved to a different area or if a broadcastingstation's channel number has been changed, perform thefollowing steps to set the correct guide channel number.
NOTES:• In many instances, the VCR Plus+ guide _hannel numbers for
cable and broa@ ast TV stations DO NOT match the channelnumber on whkh it is received by your VCR or cable box.Check your TV listing, or _ontact your cable supplier fordetaiLs.
• Many TV stations can be viewed on cable. Ched< your TVlisting, or contact your cable supplier for details.
GuideChannelNumberSet
_11 Turnonthe VCR.
Press POWER.
I_ Accessthe MainMenuscreen.
Press MENU
I_1 Accessthe Initial Setscreen.
Press_V to move the highlight bar (arrow) to "INITIAlSET", then press OK or _.
D Accessthe GuideChannelSet screen.
Press _V to move the highlight bar (arrow) to "GUIDECHANNEl SET", then press OK or b,.
D EntertheGuideChannelnumber.
Press AV or the number keys _UJDECHAHHELSET
to select the VCR Plus+ guide _ ",channel number as shown in
the TV listing, then press OK orb>.
• [f you receive your channels witha cable box and if you haveproperly set your Controller,"CABLE CH" appears in place of /Example)
\'Vheninputting the Guide"VCR CH'. If not, perform Channelnumbel 6 for WNJU"Cable Box Control Setting" (ind.}.?-€_ pg. 20).

JVn
DPress _V or the number keysto select the number of the
channel on which the guidechannel's broadcasts are
received, then press OK or _.• Repeat steps 5 and 6 as
necessary.
Enterthereceivingchannelpositionnumber.
GUIDECHANNELgET
{Example) If WNJU dnd.} isleceived on channel
position 47.
_ Returnto the normalscreen.
Press MENU.
GuideChannelNumber"Guide Channel (GUIDE CH) number" refers to the assigned
TV station numbers, according to broadcast area, for the VCR
Plus+ timer recording. The Guide Channel numbers can be
found in most TV listings.

6EN TIMER RECORDING (cont.)
ExpressTimerProgramingIf you do not know the PlusCode number for the programyou wish to record, use the following procedure to setyour VCR to timet_record the program.
Before performing Express Timer Programlng:
• Make sure that the VCR's built-in clock is set properly.• Turn on the TV and select the AV mode.
JVC
DAILY(M-F)WEEKLY
_i1 Turnonthe VCR.
Press POWER.
I_1 Loada cassette.
Insert a VHS (or S-VHS) cassette with the record safetytab intact.
ORInsert a Mini DV cassette with the erase protection switchset to "REC'.
I_1 Selectthedeck.
Press S-VHS or DV.
D Accessthe PlusCodescreen.
Press PROG.
D Accessthe Programscreen.
Press START+/-. (if you're VHSPROGRAMtjust starting out and you have
START STOPselected the VHS deck, "VHS _ []PROGRAM 1" appears.) DATE CH
!':'!Entertheprogramstart time.
Press START+/- to enter the
time you want recording to
start.
• Press and hold START+l- to
move in 30-minute
increments, or press and
release repeatedly to move 1minute at a time.
VHSPROGRAM1
START STOP
DATE CR
Entertheprogramstoptime.
Press STOP+/-to enter the time you want recording to
stop.• Press and hold STOP+/-to move in 30-minute increments, or
press and release repeatedly to move 1 minute at a time.

D Entertheprogramdate.
Press DATE+/-•
• The current date appears on the TV screen. The date you enter
appears in its place.
D Enterthechannelposition.
PressCH+/-• If you are using a DBS receiver, see "ATTENIION FOR DBS
RECEIVER USERS" in the right column.
• Holding down CH +/- rapidly scans through the channels.
Setthe tape speed.
For the VHS deck
PressSP/EP (////).
For the DV deck
Press SP/LP (1111).
Returnto the normalscreen.
Press PROG or OK. "PROGRAM COMPI.EIED" appears
on the TV screen for about 5 seconds, then the normal
screen appears. If "PROGRAM NOT COMPLETED
PROGRAM OVER[ AP" appears on the TV screen, see
page 51.
• Repeat steps 3 11 for each additional program.
B EngagetheVCR'stimermode.
Press TIMER. The VCR turns off automatically and "®"
appears on the front display paneh
• To disengage the tinter mode, press TIMER again.
NOTES:• To lTmet_Record Weekly Or Daily Serials...
• . . anytime during steps 5 through 10, press WEEKLY
(number key "9") for weekly serials or DALLY (M-F) (number
key "80 for daily serials (Monday F?iday). Either "WEEKLY"
or "DAILY" appears on the TV screen. Pressing the button
again makes the ( onesponding indication disappeac
• You can program each de(k to time_we_ord as many as 6
programs. If you tt7 to program the VCR to record a seventh,
"PROGRAM FULL" appears on the TV screen. 7b record the
extra program, you must first cancel arty unnecessary
programs (_-_ pg. 502.• In case of a power failure after programing, the VCR9 memot 7
backup keeps your selections for approxima rely 10 rain utes.
• Programs that start after midnight must have the next day9date•
• You cart program the timer while a regular recording is in
progress; the on-screen menu will not be re_ orded•
• It is not possible to timet_record the same program on both the
VHS deck and the DV de_ k simultaneously.
• During timer re_ording, it is not possible to _hange the
recording cM k (VHS or DV).
• If the times that are programed for re_ otding on the DV de_k
and on the VHS de_k overlap, the earlier start time takes
precedence. If the start times are the same, the VHS de_ k takes
precedence.
Cable Box or DBS Receiver Users
To timer-record a cable or satellite broadcast using Express
Tinter Programing:[] Perform "Cable Box Control Setting" on page 20 or "DBS
Receiver Control Setting" on page 23.
[] Perform steps 1 12.
[] Leave the power of cable box or DBS receiver on.
ATTENTIONFOR DBSRECEIVERUSERSIf you are using a DBS receiver {unless "DBS RECEIVER SET"
is set to "OFF" z_ ° pg. 24), the band indication {TV, CATV or
DBS) appears under the channel number indication.
TV: [o timer-record a regular VHSPRO6RAMtTV broadcast received
START STOPon the VCR• _ []
CATV: To timer-record a cable DATE CHTV broadcast received _ m
SUN 0[18on theVCR, or through a
cable box (unless"CABLE BOX SET" is set
to "OFF" _u_ pg. 21/.DBS: To timer-record a satellite broadcast received through
a DBS receiver.
NOTE:If "BAND" is set to "TV" on the Tuner Set s( reen (__ pg. 18)and "(ABLE BOX SET" is set to "OFF" on the (_ble Box Set
screen C__" pg. 212, "CA7V" will not be displayed on the
Program screen; If "BAND" is set to "C_,7V" or "CABLE BOX
SET" is set to "ON'; "TV" will not be displayed.
If the channel number entered requires that the band be set,
"7=DBS" is displayed on the screen.
If this happens, press the number key "7 (DBS)" to select"DBS".

_S EN TIMER RECORDING (cont.)
24HRQuickPrograming
Before performing the 24HR Quick Programlng:
• Make sure that the VCR's built-in _lo_k is set properly.• Select the deck.
• Set the tape speed,• For the VHS deck:
Insert a VHS (or S-VHS) cassette with the record safety tabintact.
For the DV deck:
Insert a Mini DV cassette with the erase protection switchset to "REC'.
/!
You can program a timer recording that starts within 24hours using the ADVANCED JOG dial oil the VCR.
i1 Entertheprogrammode.
Press 24HR QUICK PROGRAM on the VCR. ]he starttime indicator ( I-_ ) starts blinking on the front displaypaneh
IE!
_- .) I, j"
r, --IO_
Set the programstart/stop time andchannel.
Press 24HR QUICK PROGRAM. ]he VCR turns offautomatically and "Q" appears on the front displaypanel.• To disengage the timer mode, press TIMER or 24HR QUICK
PROGRAM again.
I_1 EngagetheVCR'stimer mode.
Turn the ADVANCED JOG dial to the left or right to setthe time you want recording to start.• One click stop of the ADVANCED JOG dial changes the time
in 5-minute intervals.
I ,-,,7I;K:, rl_: U U,.
Push the ADVANCED JOG dial. The stop time indicator( ,,_ ) starts blinking on the front display paneh Turn theADVANCED JOG dial to the left or right to set the timeyou want recording to stop.
_. t,
I-IN
Push the ADVANCED JOG dial. Turn the ADVANCED
JOG dial to the left or right to select the channel you wishto record.
_ t,
I ' II
• You can cancel the setting at any time by pressing and holdingthe ADVANCED lOG dial for more than 3 seconds or pressingCANCEL on the Remote. Repeat the step 2.
NOTES:• You (an pt_)gmm ea_ cJe_ k) timet=t_cot_J as many as 6
programs. If you try to program the VCR to record a seventh,
"FULl" appears on the front display panel. lb re( ord the extra
program, you must first cancel any unnecessary programs
CS__ pg. _0).• If "l=7r" appears on the front display panel, repeat the StVl)S on
page 48 again.
• When a menu screen is shown, you (annot use 24HR Quick
Programing function. Press MENU to return to normal screen,
and try again.
• You (an use 24HR Qukk Programing ftmction al._o when theVCR is turned off.
• [or 24HR Qui(k Programing function, the program owrlap
warning display does not appear even if some programs
owrlap each other. The program with the lower programnumber will be re(ordeal and the other one will not be
re_ ord_d correctlj_
• It is not possible to timer-record rite same program on both the
VHS d_ck and the DV (I_( k simultaneously.
• During timer recording, it is notpossibl_ to (hange the
re( ording cl_( k (VHS or DVj.
• If the times that are programed for te( ording on the DV cl_ck
and on the VHS (Dck overlap, the earlier start time takes
prececi_nce. If the start times are the same, the VHS cI_ck takes
prececlen( e.
• If you perfomt 24HR Quick Programing during recording or
Instant 7Truer Recorcling (ITRB press TIMER to engage the timer
mocl_ after the recording (or ITRj is finished.

50 EN TIMER RECORDING (cont.)
_
Check,cancelandchangeprogramsJVC
C_mCO° ©7
_i1 Disengagethe timer mode.
PressTIMER,then press POWER.
ElPress PROG CHECK.
• The Program Check screen
appears for the deck (VHS or
DV) being selected.
Accessthe ProgramCheckscreen.
pV_SsTARTSTOPCH DATE
1 8:00P 10:00 12 12/242 IO:OOA10:45 40 12/25
i 11:30P 1:00 125 12/25
_1 Accessthe Programscreen.
Press PROG CHECK agai n to VHSPROGRAM1check more information.
START STOPEach time you press Pro(; _ []CHECK, tile next program's _DATE i"F'l['4_jCHinformation appears. DAILY CAW
Tocancelorchangea program...
D Cancelor change a program.
Press CANCEL to cancel a program. |o change programsettings, press the appropriate button: START+/-,STOP+/-, DATE+/-, CH+/-, and/or SP/EP (/I//).
D Returnto the normalscreen.
Press PROG CHECK as many times as necessary. If thereare still some programs remaining, go to step 6.
D Returnto the timer mode.
Press TIMER.

ATTENTIONIf there is a conflict in the timer schedule and one
program overlaps with anothel; only the parts shownbelow in gray will be recorded.
Pattern 1: The program with the lower program numberwill be recorded.
10:00 11:00 12:00
Program 1 I _::_ I
Program 2 [ CH40 _'_ Not recorded
Pattern 2: The program starting earlier will be recorded.
10:00 11:00 12:00
Program 1 I _e I
Program 2 _ Not recorded
Pattern 3: The program starting earlier will be recorded,
followe(J by the remaining portion of the other
program.
1000 11:00 12:00
Program 1
Program 2 [ . [
NoJrecorded
ATTENTIONIf the program you havejust made and "DV" areblinking, there is aconflicting program on theDV deck.
[] Press AV to move the
highlight bar to "DV',then press OK or [>.DV Program Check
screen appears.[] Cancel or change
program setting asdescribed in step 2 and3 in the right column.
VDS
PR SfART STOP OH DATE0:00 10:00 12 1224
10:00 10:45 40 1212511:30 1:00 125 12/25
9:00 10:00 10 12/24
DVPD START STOP CH DATE
II I I
WhenprogramsoverlapeachotherIf "PROGRAM NOT COMPI ETEr) PROGRAM OVER[ AP"appears, you have another program overlapping the programyou have just made.The Program Check screen appears and conflicting programswill start blinking.
[VHS 1
PROGRAM NOT COMPLETEO _. "_2 IO:OOA 10:45 40 12/25<'1
PROGRAMOVERLAP JJL ,[3 11:30P 1:00 125 12/25_1
ti ,:ooplO:OOlO 1,/24..I!
Example: Program 1 (you have just made) and Program 4overlap each other on the VHS deck.
i1 Confirmtheoverlappingprograms.
Overlapping programs blink on the TV screen.
F_ Selecttheprogramto modify.
Press _V, then press OK or b_.• You can only select one of the overlapping programs.
NOTE:If you do not mind this overlap, press PROG to finish the timerprogram setting. See "ATTFNTION" in the left column. Theprogram with the lower program number will be tecomlecl andthe other one will not be recorded correctly, If no changes aremade for approximately 3 minut% the VCR will return to thenorrT?a l s( r_en.
1_1 Cancelor changeprogramsetting.
To cancel a program, press CANCEL when the Programscreen you do not want is shown. "PROGRAMCOMP[.ETED" appears on the TV screen for about 5
seconds, then the normal screen appears.To change a program, press the appropriate button:START+/-, STOP+/-, DATE+/-, CH+/-, and/or SP/EP(I/11) when the Program screen on which you want to
make changes is shown, then press OK. "PROGRAMCOMPI.ETED" appears on the TV screen for about 5seconds, then the normal screen appears.
NOTE:If the overlap is not yet solved, or another overlap o_curs withthe timer program setting after making the last correction on aprogram, the conflicting programs will be shown on the ProgramChe_k screen again. Repeat the above steps again until theoverlap is solved.

2EN EDITING
rapeDubbing(fromDVto VHS)
/JVC
i_ DUB
Az
S-VHS
JVC
\
_ OH+/-
DubbingAnEntireCassetteBecause this VCR includes both VHS deck and DV deck, you
can easily use it for dubbing without connecting any other
equipment.
_eLoad cassettes.
For the VHS deck
Insert a VHS (or S-VHS) cassette with the record safetytab intact, or cover the hole using adhesive tape.
For the DV deck
Insert a Mini DV cassette with tile erase protection switchset to "SAVE".
_ Selectthedubbingdirection.
Press "_.
• The dubbing direction indicator (DV =:>) lights.
I_lset the tape speed.
Press S-VHS, then press SP/EP (1111).SUPERIMPOSE L• "DV -* VHS" appears on the TV screen if " _" "s
set to "ON". ?z_°pg. 71)
D Start dubbing.
Press DUB for more than 2 seconds.
• DV playback indicator and VHS recording indicator light.
• If the tapes have not been rewound, both decks rewind
automatically. The VHS deck goes into Record Pause mode,
and the DV deck goes into Pause mode.
When both decks have finished rewinding, dubbing begins
automatically.
After dubbing is completed, the decks rewind both tapes
automatically and eject them. The VCR then shuts off.
NOTES:• If you set the duhhing direction in_orre_ fly, you _ould erase an
import, mr recording that you wanted to copy. It is
recommended to conduct a test with unimportant _assettesfirst.
• If you start dubbing a copy-prote_ted tape, "ERROR" message
is displayed on screen and the dubbing is aborted.
• To cancel the dubbing mode, press CH +/- so that the dubbing
dire_ tion indicator (DV =_> ) goes off.

rapeDubbing(fromVHSto DV)
DUB-,gm DV
//Hw
JVC
• . [] []
/IH
DV
DubbingAnEntireCassetteBecause this VCR includes both VHS deck and DV deck, you
can easily use it for dubbing without connecting any other
equipment.
i1 Loadcassettes.
For the VHS deck
Insert a VHS (or S-VHS) cassette with the record safetytab removed.
For the DV deck
Insert a Mini DV cassette with tile erase protection switchset to "REC".
_ Selectthedubbingdirection.
Press _'.
• The dubbing direction indicator (<= S-VHS) lights.
I_lset the tape speed.
Press DV, then press SP/LP (////).SUPERIMPOSE L• "VHS _ DV" appears on the TV screen if " _" "s
set to "ON". (z_° pg. 71)
D Start dubbing.
Press DUB for more than 2 seconds.
• VHS playback indicator and DV recording indicator light.
• If the tapes have not been rewound, both decks rewind
automatically. [he DV deck goes into Record Pause mode, and
the VHS deck goes into Pause mode.
When both decks have finished rewinding, dubbing begins
automatically.
After dubbing is completed, the decks rewind both tapes
automatically and eject them. The VCR then shuts off.
NOTES:• If you set the dubbing direction incorre( fly, you could erase an
import, rot recording that you wanted to copy. It is
recommended to conduct a test with unimportant _assettesfirst.
• If you start dubbing a tape from a tape with a copy protection
signal, the tapes will he automatically ejected, and the VCRwill turn off.
• To cancel the dubbing mode, press CH +/- so that the dubbing
direction indicator (<_ S-VHS) goes off.

4EN EDITING (cont.)
NormalDubbing(fromDVto VHS)
START
!\
m _ • DV S-VHS
1/11_
JVC
S-VHS
DV
_m
NOTES:• If you set the dubbing direction incorrectly, you _oukl erase an
important recording that you wanted to copy. It is
recommended to conduct a test with unimportant cassettesfirst.
• 7here may be a discrepancy of several second.s between where
you intend editing to start, and where it actually start.s.
• 7he superimposed indication during the operation or dubbingis not recorded.
• To cancel the dubbing mode, press CH +/- so that the
dubbing dire_ tion indicator (DV=:>; goes off.
• When dubbing a Mini DV tape that was produced by audio
dubbing, you need to set "12BIT MODE" to the appropriate
mode before playing back the tape. (_-_" pg. 76)
You can dub selected scenes on a tape, starting and
stopping wherever you wish.
i1 Loadcassettes.
For the VHS deck
Insert a VHS (or S-VHS) cassette with the record safety
tab intact, or cover the hole using adhesive tape.
For the DV deck
Insert a Mini DV cassette with the erase protection switchset to "SAVE".
F_ Selectthedubbingdirection.
Press "_.
• The dubbing direction indicator (DV =:>) lights.
I_1 Set the tape speed.
Press S-VHS, then press SP/EP (llll).
• "DV -'_ VHS" appears on the TV screen if "SUPERIMPOSE" is
set to "ON". (_-_" pg. 71)
D L0cale the slarl p0inl on the DV deck.
[] Press DV
[] Press PLAY (1_) to start playback.
[] Press PAUSE (11) to pause playback a little before the
start point.
D PreparetheVHS deckfor dubbing.
[] Press S-VHS.
[] Press and hold PAUSE (11) and press REC (0) so thatthe VHS deck enters the Record Pause mode.
• DV playback indicator and VHS recording indicator light.
D Start dubbing.
Press START.
_ Pausedubbing.
Press START.
• The VHS deck enters the Recording Pause mode, then the DV
deck enters the Dubbing Pause mode.
D Enddubbing.
Press STOP (11) to stop recording on the VHS deck. Then
press DV and press STOP (11) to stop playback on the DV
deck.

NormalDubbing(fromVHSto DV)
START
\
You can dub selected scenes on a tape, starting and
stopping wherever you wish.
i1 Loadcassettes.
For the VHS deck
Insert a VHS (or S-VHS) cassette with the record safetytab removed.
For the DV deck
Insert a Mini DV cassette with the erase protection switchset to "REC".
1
II _ • DV S-VHS
////_
JVC
S-VHSDV
NOTES:• If you set the dubbing direction imorre_tly, you _ould erase an
import, rot recording that you wanted to copy. It is
recommended to conduct a test with unimport, mt cassettesfirst.
• 7here may be a dis_repamy of several second.s between where
you intend editing to start, and where it actually start.s.
• 7he superimposed indication during the operation or dubbingis not recorded.
• To cancel the dubbing mode, press CH +/- so that the
dubbing direction indicator (<_S-VHS; goes off.
• Before you start dubbing, set "SOUND MODE" to the
appropriate mode. fz_ _pg. 76)
F_ Selectthedubbingdirection.
Press_-• The dubbing direction indicator (<_ S-VHS) lights.
I_1 Set the tape speed.
Press DV, then press SP/LP (1111).
• "VHS -_ DV" appears on the TV screen if "SUPERIMPOSE" is
set to "ON". (_-_" pg. 71)
D L0cale lhe slarl p0inl on lhe VHS deck.
[] Press S-VHS.
[] Press PLAY (1_) to start playback.
[] Press PAUSE (11) to pause playback a little before the
start point.
D Preparethe DV deckfor dubbing.
[] Press DV.
[] Press and hold PAUSE (11) and press REC (0) so thatthe DV deck enters the Record Pause mode.
• VHS playback indicator and DV recording indicator light.
D Start dubbing.
Press START.
_ Pausedubbing.
Press START.
• The DV deck enters the Recording Pause mode, then the VHS
deck enters the Dubbing Pause mode.
D Enddubbing.
Press STOP (I) to stop recording on the DV deck. Then
press S-VHS and press STOP (M) to stop playback on the
VHS deck.

6EN EDITING (cont.)
EditFromACamcorder
JVC
/JVC
\
[S-VHS
You can use a camcorder as the source player and yourVCR as the recording deck.You can perform digital dubbing if you connect a devicesuch as a camcorder which has a DV IN/OUT connector.
Because the signals are digital, there is no loss of video oraudio quality as a result of editing.
i1 Make connections.
[] If the camcorder has no S-VIDEO output connector ,..... connect the camcorder's AUDIO OUT and VIDEO
OUT connectors to the VCR's front panel AUDIO andVIDEO input connectors.
[] If the camcorder has an S-VIDEO output connector ...... connect the camcorder's AUDIO OUT and
S-VIDEO OUT connectors to the VCR's front panelAUDIO and S-VIDEO input connectors.
[] If the camcorder has a DV IN/OUT connector ....,, connect the camcorder's DV IN/OUT connector tothe VCR's DV IN/OUT connector.
• When using a monaural camcorder, connect its AUDIO OUTconnector to the AUDIO L input connector on your VCR.
• When a Master Edit Control-equipped JVC camcorder is used,the camcorder is capable of controlling the VCR. Refer to thecamcorder's instruction manual for operating procedure.
F_Set the VCR'sinputmode.
Press AUX (number key "0") and/or CH +/- to select"F-1 ",
F-1 :when connecting the camcorder to the audio/videoinput connectors or DV IN/OUT connector on the frontpanel.
• When using S VIDEO connector, set "FRONT AUX INPUT" to"S-VIDEO'. (:-€_pg. 73)
• When using VIDEO connector, set "FRONT AUX INPUT" to"VIIZ)EO". (:_u"pg. 73)
I_1 Selecttherecordingdeck.
Press S-VHS or DV.
• To edit from a camcorder to the VHS deck through the DV IN/
OUT connector, press ,-_-.
• To edit from a camcorder to the DV deck through the S-VIDEO
(V[DEO)/AUDIO input connectors, press 41,,.
D Set the editmode.(VHS deckonly)
See "PICTURE CONTROl/' on page 73.
D Start the camcorder.
Engage the Play mode of the camcorder.
D Start the VCR.
Engage the Record mode of the VCR,
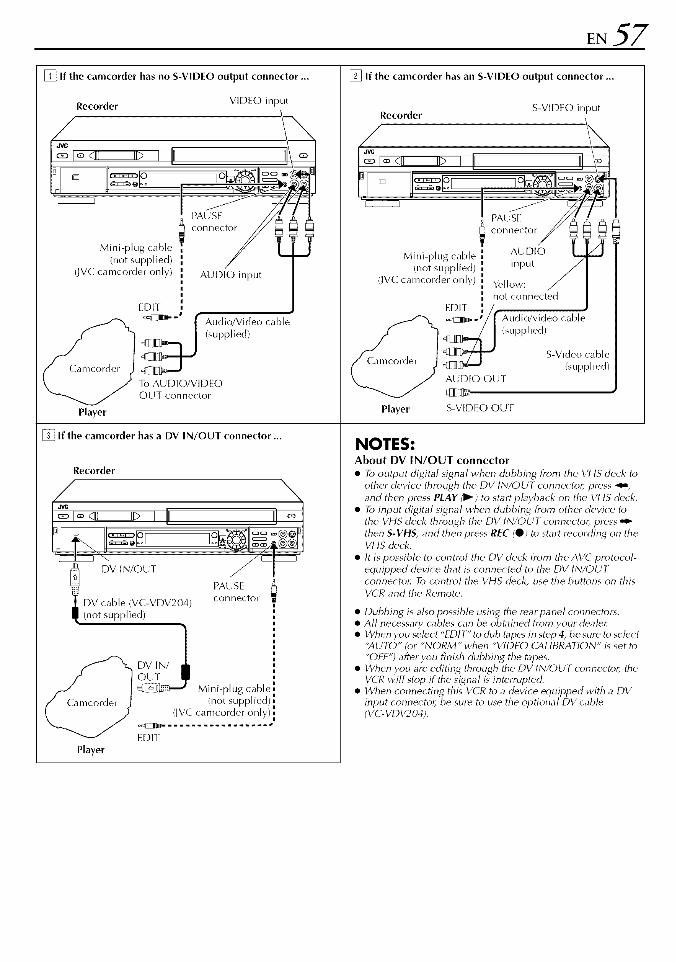
[] If the camcorder has no S-VIDEO output connector ...
Recorder VIDEO input
8
Mini-plug cable _
(onne(toF
[] If the camcorder has an S-VIDEO output connector ...
Recorder S-VIDEO input
Mini-plug cable
(not supplied)
dVC camcorder only)
EDIT
AUDIO OUT
Player S-VIDEO OUT
(not supplied)
(JVC camcorder only) AUDIO input
EDIT
_ _z:l_--' f Audio/Video cable
_ (supplied)
To AUDIO/VIDEO
OUT connector
Player
[] If the camcorder has a DV IN/OUT connector ...NOTES:
PAUSE
connector
AUDIO
input
Yellow:not connected
Audio/video cable
(supplied)
Recorder
/_ I_ _EZZZ:_
DV IN/OUT
_DV cable (VC-VDV204)
I_ (not supplied)
PAUSE
connector
Player
Mini-plug cable;
(not supplied)
(JVC camcorder only)
EDIT
S-Video cable(supplied)
• Dubbing is also possible using the rearpanel connectors.• All necessary cables call be obtained from your deale_
• When you select "tTDIT" to dub tapes in step 4, be sure to select"AUTO" (or "NORM" when "VIDEO (ALIBRAIION" is set to
"OFF") after you finish dubbing the tapes.• When you are editing through the DV IN/OUT connector, the
VCR will stop if the signal is interrupted.• When connecting this VCR to a device equipped with a DV
input connector, be sure to use the optional DV cable(VC-VDV204).
About DV IN/OUT connector
• It) output digital signal when dubbing hom the VHS deck to
other device through the DV IN/OUI conne( _6 press .ql,-,
and then press PLAY (11,-) to startplayba(k on the VHS de(k.
• To input digit, fl signal when dubbing from other devi(e to
the VHS de_ k through the DV IN/OUT connecto6 press ,_
then S-VHS, and then press REC (0) to start recording on theVHS dell<.
• It is possible to control the DV de_k from the AVC protocol-
equipped device that is connected to the DV IN/OUTconnectoc To _ontrol the VHS de_k, use the buttons on thisVCR and the Remote.

58 EN
EditToOrFromAnotherVCR/PC
JVC
C D CD CZD,
CO_ CO° C_b,
EDITING (cont.)
You can use your VCR as tile source player or as therecording deck.
i1 Make connections.
Connect an audio/video cable between file player'sVIDEO OUT and AUDIO OUT connectors and therecorder's VIDEO IN and AUDIO IN connectors.
• If connecting a VCR with an S-VIDEO input/output (-onne(tor,it is re(-ommended to use the S-VIDEO connection tominimize picture degradation while editing.
_Set the inputmodeof recordingdeck.
If using your VCR as a recording deck, press AUX/number key "0") and/or CH +/-to select "L-1 ".
[-I : when connecting the VCR to the audio/video inputconnectors on the rear panel.
• When using S VIDEO connector, set "REAR AUX INPUT" to"S-VIDEO'. (k_ _pg. 71 )
• When using VIDEO connector, set "REAR AUX INPUT" to"VIDEO". ?-_ pg. 71)
I_1 Selecttherecordingdeck.
Press S-VHS or DV.
D Set the editmode.(VHS deckonly)
See "PICTURE CONTROl/' on page 73.
D Start the sourceplayer.
Engage the Play mode of the source player.
D Start the recordingdeck.
Engage the Record mode of the recording deck.

Connectionto anotherVCR
(Example: When using this VCR as the source player)
VIDEO AUDIO
OUT OUT
Player \
S VIDEO OUT r_
S-Video _able
(supplied)
Your VCR
Audio/Video cable
(supplied)
S VIDEO IN _ _ _ AUDIO IN
11
Recorder
i i
Another VCR
VIDEO IN
Advantagesof S-VHSvideorecordersYou _an edit from VHS to S-VHS, S-VHS to VHS, or fromS-VHS to S-VHS.
• From VHS to S-VHS: Record VHS playback signals in the
S-VHS mode. Although the picture quality is inherently
limited by that of the original, the edited tape has better
picture quality than those made by VHS-to-VHS editing.
• From S-VHS to VHS: Because the picture quality of the
source material is very high, the edited tape has better
picture quality than those made by VHS-to-VHS editing.
• From S-VHS to S-VHS: All signals will be transferred with
nlinimum degradation.
NOTES:• Dubbing is also possible using the front panel connec tots.
• All necessary cables can be obtained from yoLtr dealec
• When you select "EDIT" to dub tapes in step 4, be sure toselect "AUTO" (or "NORM" when "VIDEO C_LIBRArION" is
set to "OFF") after you finish dubbing the tapes.
• When you use this VCR as the source player for editing, be
sure to set "SUPERIMPOSE" to "OFF" before starting
C_ _pg. 77).
• If you are using ano&er VCR wi& S-Video andAudio input/
output connectors, you carl connect those connectors to this
VCR'_ S-VIDEO and AUDIO input/output connectors.
Connectionto a PCwith DV connector
Recorder
/d_
DV IN/OUT
NOTES:• It is possible to control the DV de_k from tile PC with DV
connector by using some of the commer_ ially soM or pre-installed DV editing software. Refer to the instructionmanuals of PC and software.
• The system may not work properly depending on the PC or
DV editing software.• When connecting this VCR to a PC with a DV connector,
be sure to use the optional DV _able (VC- VDV204 or VC-Vf)V206).
DV cable [
(VC-VDV204 or VC-VDV206)
{not supplied)
i
PC with DV conneclor

60 EN EDITING (cont.)
AudioDubbingVHSAudioDubbingAudio Dubbing replaces the normal audio sound of apreviously recorded tape with a new soundtrack.
Normal audio track _0_ Pre-recorded tape
Video/Hi-Fi audio
track
Audio-dubbedtape
DVAudioDubbingThis function lets you record new audio, withouterasing the original audio, on a DV tape that wasrecorded with "SOUND MODE" set to "12BIT"
(_:_ pg. 76).
ATTENTION:You cannot perform Auto Dubbing on a _pe _at wasrecorded with "SOUND MODE" set to "16BIT" (S__ pg. 76),on a tape that was re<orcled at the "LP" speed, or on a blanktape.
Your VCR
/
,Iq H
A.DUB
i
c-/_
\
/ \CD player, etc.
AUX
JVC
[]
MONITOR
+/-
!|
_1 Makeconnections.
Connect an audio component to the AUDIO [ + R inputconnectors on the VCR's front paneL• When connecting a monaural audio component, use only the
VCR's AUDIO L input connector.
F_ Loada cassette.
For the VHS deck
Insert a VHS (or S-VHS) cassette with the record safetytab intact, or covet- the hole using adhesive tape.
For the DV deck
Insert a Mini DV cassette with the erase protection switchset to "REC'.
I_1 Setthe VCR'sinputmode.
Press AUX (number key "0") and/or CH +/- to select"F-1 ".
D Selectthe recordingdeck.
Press S-VHS or DV.
• When using the DV deck as the recording deck, press _ so
that the audio signals from the AUDIO L + R input connectors
can be recorded. [he dubbing direction indicator (<= S-VHS)
lights.
D Locatethestart point.
Press PLAY (ll,-) to start playback of the tape in your VCR,and press PAUSE (11) when you reach the point whereyou want to start dubbing.
D EngagetheAudioDubbingmode.
Press A.DUB.
• Your VCR enters the Audio Dubbing Pause mode. {":" blinks," " and "i:. " light up on the front display paneh)
_ Start dubbing.
Engage the audio component's Play mode, then pressPLAY (1_) to start the tape in your VCR; Audio Dubbing
beg!ns at this point.• " " blinks and " : " is displayed on the front display panel.• 1-ostop dubbing temporarily, press PAUSE (11). Press PLAY (ll_)
to resume dubbing.
D EndAudioDubbing.
Press STOP (11) to stop the tape in your VCR, and engagethe audio component's Stop mode.
NOTES:• Once the Audio Dubbing start.s, you can not use the other
deHc
• When monitoring the audio-dubbed sound on the DV de_k,
set "12BIT MODE" to "SOUND2" C___pg. 76).• When monitoring the sound during Audio Dubbing, tile
normal soundtra_ k is automatR ally sele(ted. If you wish to
hear tile mixed sound (Hi-Fi + Normal soundtra_ ks), press
A. MONITOR to select "NORM HI El" C_-_" pg. 31). (VHS
tie<t< only)
• Audio Dubbing stops automatically when the counter reaches
"0:00:00'; and the VCR enters the Play mode. Che_ k the
counter reading before dubbing. (VHS deck only)
• Audio Dubbing is also possible using the rear panel AUDIO INconnector:
• When playin_ back an audio-dubbed tape on the VHS clerk,
press A. MONITOR on the Remote to select tile soundtra_ k
you wish t() hear C_-_ pg. 3 t). When playing ba( k an audio-
dubbed Mini DV tape on the DV de(k, set "12BIT MODE" to
"SOUNE)2" C_" pg. 76).• Picture may be distorted during Audio Dubbing Pause.
• It may be unlawful to record or play ba(k (opyrighted material
without the consent of the _opyright ownec
• Audio dubbing is not possible using the DV IN/OUTconnectot_
• Audio dubbing is not possible on a blink portion of the tape,

62 EN EDITING (cont.)
InsertEditingVHSInsertEditingInsert Editing replaces part of the recorded scene withnew material. Both the picture and Hi-Fi audiosoundtrack are replaced with new ones, while thenormal audio soundtrack remains unchanged. If youwish to change the normal audio track as well, use theAudio Dubbing function simultaneously.For Insert Editing, use your VCR as the recording deck.
Source tape
Recordingtape
, , , , , , [ '
After Insert Editing Video/Hi-Fiaudio track
DVInsertEditing(SPmodeonly)lhe picture is t-eplaced with new one, while the audiosoundtrack remains unchanged.
For Insert Editing, use your VCR as the recording deck.
ATTENTION:Insert Editing is not possible with a Mini DV ( assett_re( orcLedin I P r'node or on a blank tape,
Recorder
L
Your VCR
Audio/Video signal
(i i
Player
Audio/Video Cable _ i(supplied)
I[ -Video Cable (supplied)S-Video signal
Another VCR
C.RESET_
JVC
||
+/=

lie Makeconnections.
Connect tile player's VIDEO OUT or SIVIDEO OUT andAUDIO OUl connectors to your VCR's VIDEO orS-VIDEO and AUDIO input connectors.
_Set the VCR'sinputmode.
Press AUX (number key "0") and/or CH +/- to select
"F-1" Ior "1.-1" if you use the connectors on the rear).
• When using S VIDEO connector, set "FRONT AUX INPUT" (or
"REAR AUX INPUT" if you use the connectors on the rear) to
"S-VIDEO". (_ pg. 71, 73)
• When using VIDEO connector, set "FRONT AUX INPUT" (or
"REAR AUX INPUT") to "VIDEO". (:-_ pg. 71, 73)
I_1 Selectthe recordingdeck.
Press S-VHS or DV.
• When using the DV deck as the recording deck, press _ so
that the video and audio signals from the VIDEO/S-VIDEO and
AUDIO L + R input connectors can be recorded. The dubbing
direction indicator (<= S-VHS) lights.
D Preparethe recordingcassette.
For the VHS deck
load the recording cassette into the VHS deck, and playit back to determine the edit-out point (the end of thesegment to be replaced) using the ADVANCED JOG dial,or pressing <1 b_ and PAUSE (11).Then press C.RESET to reset the counter.
For the DV deck
load the recording cassette into the DV deck.
D Locatethestart point.
Determine the edit-in point (the beginning of the segmentto be replaced) using the ADVANCED JOG dial, orpressing _ _ and PAUSE ill).• Be sure to engage the Still mode at the edit-in point.
D Engagethe InsertEditingmode.
Press INSERT.
• Your VCR enters the Insert Pause mode. (":", "::" and ":.i"
light up on the front display panel.)
• The TV screen changes from the still picture to the input
source you are going to record.
_ Start Editing.
Load the source cassette and play back the segment thatis to be inserted. When you reach the start of the sectionof the source tape that you wish to insert, press IP[A¥ (1_)to start the tape in your VCR; Insert Editing begins at thispoint.• "" and ": " are displayed on the front display panel.
D EndInsertEditing.
For the VHS deck
At counter "0:00:00", Insert Editing will stopautomatically while the tape continues running in thePlay mode. if you wish to stop Insert Editing before thespecified edit-out point, press C.RESET.
For the DV deck
Press STOP (11) to stop recording on the DV deck.
AVInsertEditing(VHSdeckonly)If you want to replace the picture, Hi-Fi audio soundtrackand normal audio soundtrack all at the same time ...
... In step 6, after you press INSERT, press A.DUB also.
(" " and":" blink and ":.i" lights up on the front display
panel.)
NOTES:• Once the Insert Editing statts, you _an not use the other de_k.
• All necessary cables can be obtained frorn your dealer:
• Insert Editing cannot be perforrned on a VHS (or S-VHS)
cassette that has had its record safety tab removed, or on a
Mini DV cassette that has had it5 erase protection swit_ l_ set to"SAVE".
• When Insert Editing is performed on a tape that has been
recorded on another VCR, the inserted portion may appeardistorted.
• In Insert Editing, the re_ording speed (SP/I:P) is determined by
the previous recording to be tepla_ ed. If the previous
recording's speed changes within a single edit, the inserted
picture will be distorted at the switching point. (VHS de_ k
only)
• A small portion of the recording whRh precedes an insert edit
may become erased.
• Insert Fditing is also possible using the rear panel connectors.
When using these connectors, be sure to set "RFAR AUX
INPUT" to the appropriate mode. Co___pg. 71)
• Insert Editing is not possible using the DV IN/OUT connector.
• Insert Editing is not possible on a blank portion of the tape.

aldEN EDITING (cont.)
RandomAssemble
Editing
64-programEditingMemory(8 programsx 8scenes)By using the Random Assemble Editing function, you can selectup to 8 scenes from a previously recorded Mini DV cassette andautomatically dub them onto a VHS (or S-VHS) cassette.Random Assemble Editing is possible only when dubbing fromthe DV deck to the VHS deck.
/
R.A.EDff _
DV
rSTART
IN/OUT
Je Loadcassettes.
For the VHS deck
Insert a VHS (or S-VHS) cassette with the record safetytab intact, or cover the hole using adhesive tape.
For the DV deck
Insert a Mini DV cassette with the erase protection switchset to "SAVE".
_ Selectthe DVdeck.
Press DV.
CANCEL
m_
OK/START
dVC
/,ss
S-VHS
_DV
R.A.EDITIN/OUT
_1 Accessthe R.A.Editscreen.
Press R.A.EDIT. The R.A.Edit screen appears.
D Selecttheprogram.
Press _V to move the arrow
to select one program youwant to edit, then press OKorb.
• To remove a program from theR.A.EDIT screen, select theprogram number, then pressCANCEL for more than 2seconds.
I(_ DV _ VHSP1 3:46PM 1/24/2888l P2--:--AM --/--/ ..../ P3==:==AM ==/==/ ....| P4--:--AM --/--/ ....[ Pg==:==AM ==/==/ ....| PG==:==AM ==/==/ ..../ P7--:--AM --/--/ ....| P(]--:--AM --/--/ ....
L PRESS (.&,V), THEN START
Locatethestart point.
Press PlAY (1_) to start I[_I IN OUT ]
playback. Find the edit-in -:--:-- Z
p°int °n the s°urce tal)e fr°m [i iwhere you want the edited 4scene to begin by pressingPAUSE(n), then I)ress IN/ 8
OUT. [TC0:08:80 TOTAL 0:88:88
• The edit-in point is registeredin memory and appears on thescreen.

D Locatetheendpoint.
Press PLAY (1_) to start
playback. Find the edit-out
point where you want the
edited scene to end by
pressing PAUSE (11), then
press IN/OUT.
• The edit-out point is registered
in memory and appears on thescreen.
• The total time of the edited
scenes is displayed to the rightof "TOTAl/'.
• Repeat steps 5 an(] 6 for eachadditional scene.
To Make Corrections ...
... in step 5 or 6, you can cancel registered in and out points by
pressing CANCEL. Each time you press, the preceding point is
0:02:23 • . • If, for example, you have registered 5 sets of in and out points
i [ and want to reset the first set, you have to press CANCEL until
l i all points after the first set have been erased. Reenter themI after you have repaired the first set of points.
Ltco:o2:23_OTAL5:00:00 NOTES:
1 JH OUT
0:02:23 _ 0:02:51
io/TC 0:02:51 TAL 0:00:28
Preparethe sourcetape.
Rewind the tape in the DV deck to the beginning of thescene you want to edit.
D PreparetheVHS deckfor dubbing.
[] Press S-VHS.[] Search for the point where you want to start dubbing
by pressing PLAY (1_), FF (1_1_) or REW (41_1) thenpress STOP (11).
[] Press REC (Q), then the VHS deck enters the RecordPause mode.
• When Random Assemble l:_liting does not work, press _,-,
then perform Random Assemble E_Jiting again.
• To camel the registered scene, press CANCEL. Ea(h time
CANCEL is pressed, the latest registered scene is erased.
• When the sour(e tape has more than 2 identical time cocl_
(_-_ pg. 4 1;, tile VCR may not find tile edit-in point you set
and a malfunction may occur:
• When choosing a scene, set edit-in and edit-out point5 so that
there's a relatively large difference between them.
• If the sear(h time for an in-point exceed5 _ minutes, the VHS
de( k's Record-Rinse mode will be cancelled and editing will
not take place.
• If there are blank portions before or after tile edit-in and edit-
out point_s, a blue-backed screen may be included in theedited version.
• Since tirne codes register tirne only as accurately as second_s,
the time code total time may not mat( h the tot, fl program time
exactly.
• 7b use Random Assemble Editing consecutively for two or
more programs, press START for ea( h program.
When dubbing from another Mini DV ( assette, ( hange the
Mini DV cassette first, and then press STARE.
D StartRandomAssembleEditing.
Press START (or OK).
• Automatic editing begins; all the specified scenes are copied
to the VHS deck in the order they were registered.
• The on-screen display remains while your VCR searches for
each scene (blinking cursor indicates scene currently being
searched for), but disappears during actual editing.
• During scene search, the VHS deck automatically enters its
Record-Standby mode.
• When all registered scenes have been edited, the DV deckenters the Pause mode, the VHS deck enters its Record Pause
mode, and "- : : " blinks at the next available number.
EndRandomAssembleEditing.
Press R.A.EDIT twice to return to the normal screen.
Press sTOP (11) to stop the VHS deck's Record Pausemode.
Press Dr, then press STOP (11) to stop the DV deck's Pausemode.

6EN REMOTE CONTROL FUNCTIONS
RemoteA/B CodeSwitchingThis Remote is capable of transmitting two _ontrol codes; one set
to respond to A code control signals and another set to respond
to B code control signals. This Remote control is preset to send A
code signals because your VCR is initially set to respond to A
code signals. You can easily modify your VCR and the Remote to
respond to B code signals. When using two IVC VCRs, set two
VCRs and their Remotes to different codes, so that you can
operate these VCRs separately.
II _ HI0 0 j" _"
A/B
JVC
_D C) (D .( b
• [] []
_1 Set the remotecontrolcodefor Remote.
[] Press and hold A/B.
[] Press the number key "2".[] Press STOP (11), and release A/B.• The Remote now can transmit B code control signals.
F_ Checkthe remotecontrolcodefor VCR.
Press and hold PLAY (ID,-)on the VCR for more than
5 seconds while the VCR is turned off. The code currentlyset appears on the display panel.
_1 Changethe codefor VCR.
Press any key on the Remote. The VCR now responds to
B code control signals.
• To set the Remote and the VCR back to A code control signals,
repeat the same procedure as shown above except pressing
the number key "1" in step [] of 1.
To control two VCRs with the same Remote
You can _ontrol two IVC VCRs by switching the remote control
code for the Remote between A and B (_" step 1), keeping twoVCRs to different control codes.
• To change only the remote control code for the Remote, DO
NOT perform steps 2 and 3.

TV Multi-BrandRemoteControlYour Remote can operate the basic functions of your TV set. In
addition to ]VC TVs, other manufacturer's TVs can also becontrol led.
Before performing the following steps:]urn ON the TV using its Remote.
VCR/W/CABLE/DBS m
tv/vcr--
Om. 9_
POWER
ENTER
TV VOL
Jeset the TV brandcode.
[] Set the VCR/TV/CABLE/DBS switch on tile VCR's
Remote to TV.
[] Press and hold POWER.
[] Press the number keys to enter your TV's brand code.
[] Press STOP (i), and release POWER. The TV should
turn off. If it does, try other operation (z_ _ step 2).
• Once you have set the Remote to operate the TV, you do not
have to repeat this step until you replace your Remote'sbatteries.
• Some brands of TV have more than one code. if the TV does
not function with one code, try entering another.
_ Operatethe TV.
Press the corresponding button: POWER,TV/VCR,TV CH +/-, TV VOL+/-, .d/.X (TV Muting), number keys.
• For some brands of TV, you must press ENTER after having
pressed the number keys.
• To return the Remote to VCR control, Set the VCR/TV/CABLE/DBS switch to VCR.
BRAND NAME CODE
IVC
HFfACHI
MAGNAVOX
MITSUBISHI
PANASONIC
RCA
SHARP
SONY
SAMSUNG
SANYO
SEARS
TOSHIBA
ZENITH
01,0310O2O304, 11O5O6O7121313O8O9
IMPORTANTAlthough the supplied Remote unit is ( ompatil)le with JVC
televisions, as well as many other models, it may not work with
your TV, or in some instances, may have limited function

68 EN REMOTE CONTROL FUNCTIONS (cont.)
CableBoxMulti-BrandRemoteControlYour Remote can operate the basic functions of your cable box
set. In addition to JVC cable boxes, other manufacturer's cableboxes can also be controlled.
Before performing the following steps:l_Jrrl ON the cable box using its Remote.
vcR/w/CABLE/DBS,_
== 9_
JVC
CD CD C D CID
N#
IMPORTANTIt may not work with your _able box, or in some inst, m_ es, may
have limited function _apabilitw
NOTES:• K_u must set _e cab_ box b_nd for _mr Remote and _e
cable box brand for ,your Controller CS__ pg. 2 l) sepa_°_tely.
The list of cable box bmnd.s that can be controlled by yourRemote is different from the list of brand.s that can be
controlled by your _ontroller.
• It's not possible to set the Remote for both your cable box and
a DBS receiver at the same time. You can only set the Remote
to operate one of these units at a time.
_1 Set the CableBoxbrandcode.
[] Set the VCR/TWCABLE/DBS switch on the VCR'sRemote to CABLE/DBS.
[] Press and hold POWER.
[] Press the number keys to enter your cable box's brandcode.
[] Press STOP (11), and release POWER. The cable box
should turn off, If it does, try other operations
(_" step 2).
• Once you have set the Remote to operate the cable box, you
do not have to repeat this step until you replace your Remote'sbatteries.
• Some brands of cable box have more than one code. If the
cable box does not function with one code, try enteringanother.
_ Operatethe CableBox.
Press the corresponding button: POWER,
TV CH +/-, number keys.
• For some brands of cable box, you must press ENTER after
having pressed the number keys.
• 1-o return the Remote to VCR control, Set the VCR/TV/CABLE/DBS switch to VCR.
BRAND NAME CODE
ARCHER
CABLEIENNA
CABLEVIEW
CITIZEN
CURTIS
DIAMOND
GC BRAND
GEMINI
GENERAL INSTRUMENTS
HAMLIN
JASCO
JERROIDNOVAVISION
OAK
PANASONIC
PULSER
RCA
REGAL
REMBRANDT
SAMSUNG
SCIENTIFIC ATLANTA
SIGMA
SL MARX
SPRUCER
STARGATE
TEI.EVIEW
TOCOM
UNIKA
UNIVERSAL
VIDEOWAY
ZENITH
01,05,1701, 1715, 16, 17, 21,2515, 16, 17, 21,250201, 1715, 16, 17, 21,251501,04,06, 11, 12, 15,2810,18,231501,04,06, 11, 12, 15,28O2O713, 1415, 16, 17, 21,2513, 1410,18,2301, 16, 1705, 16, 24O2O705,16,17,24,2513, 1405, 15, 16, 17, 21,24, 2505, 16, 2401,04, 1601, 1716,17,2503, 09, 2203, 09, 22

DBSReceiverMulti-BrandRemoteControlYour Remote can operate the basic functions of your DBS (Direct
Broadcast Satellite) receiver set. In addition to JVC DBS
receivers, other manufacturer's DBS receivers can also becontrol led.
Before performing the following steps:Turn ON the DBS receiver using its Remote.
VeRIlY/CABLE/DBS
Ommg_
TVCH+/-
POWER
ENTER
--m
_1 Set the DBSreceiverbrandcode.
[] Set the VCR/TV/CABLE/DBS switch on the VCR'sRemote to CABI.E/DBS.
[] Press and hold POWER.
[] Press the number keys to enter your DBS receiver'sbrand code.
[] Press STOP (11), and release POWER. The E)BS
receiver should turn off. [f it does, try other operations
(z_" step 2).
• Once you have set the Remote to operate the DBS receiver,
you do not have to repeat this step until you replace yourRemote's batteries.
• Some brands of DBS receiver have more than one code. If the
DBS receiver does not function with one code, try enteringanother.
_ Operatethe DBSreceiver.
Press the corresponding button: POWER,
TV CH +/-, number keys.
• For some brands of DBS receiver, you must press ENTER after
having pressed the number keys.
• l-o return the Remote to VCR control, Set the VCR/TV/CABLE/DBS switch to VCR.
BRAND NAME CODE
JVC (DISH Network) 51ECHOSTAR (DISH Network) 51
SONY (DSS) 41
RCA (DSS) 40
NOTES:• You must set the DBS te_eivet t)tand for yot, Remot_ and the
DBS te_ eiver btand for yot. (bnttoller (_-<"pg, 24) sepmately,
• It's not possible k) opet_-Ite a DBS receiver that is not equippedwith a temote conttol sensoc
• It's notpossible to set the Remote for both yot, DBS receiver
and a cable box at the same time. You <an only set the Remote
to operate one of these units at a time.
IMPORTANTAlthough the supplied Remote unit is _ompatible with JVU DBS
receivers, as well as many other models, it may not work with
your DBS re< eivec or in some instances, may have limited
function capability.

70 EN SUBSIDIARY SETTINGS
ModeSetTurn on the IV and select the AV mode. ]
You can change various mode settings on TV screen byfollowing the procedure described below.For each mode setting, see pages 7I to 76.
JVC
MODE SET _-_"pg 71
VHS MODE SET _-_;pg 72
DV MODE SET _ pg 76
• The procedure shows how to set "SUPERIMPOSE" to"ON" on the "MODE SE]-" screen as an example.
il Turnonthe VCR.
Press POWER.
_ Accessthe MainMenuscreen.
Press MENU.
I_1 Accessthe ModeSet screen.
PressAV to move the
highlight bar (arrow) to"MODE SE]", then press OKorD.
[ MAINMENU
VHS MODE SETDV MODE SETTUNER SETINITIAL SET
D Selectthemode.
Press AV to move the
highlight bar/arrow) to. j : - uSL PERIMPOSE .
NODE SETREAR AUX INPUT VIDEO2NO AUDIO RECORD OFFAUTO TIMER OFF
I1,11I',t1;D ,'Jli161
D Selectthemodesetting.
Press OKor_.
D Returnto the normalscreen.
Press MENU.

MODESET* The default setting is bold in the table below.
REARAUXINPUTVIDEOS-VIDE0
2ND AUDIORECORDONOFF
AUTOTIMERONOFF
SUPERIMPOSEONOFF
Select the appropriate mode depending on the connector being used on the rearpanel.
VIDEO: Tb use the VIDEO input connector on the rear panel.S-VIDE0: Tb use the S-VIDEO input connector on the rear panel.
• When this function is set to "ON";If a SAP program is received, the SAP audio is recorded oil both the normal and Hi-Fi tracks. The main audio is not recorded.
If a non-SAP program is received, the main audio is recorded on both the Hi-Fi andnormal tracks.
• When this function is set to "OFF", the SAP audio cannot be recorded.
NOTES:When the d_annel is (hanged on the VCR;• The "STEREO" indicator appears on the screen for about _ second5 if the program is a
stere() broadcast.• The "SAP" indRator appears on the screen for about 5 second5 if the program is a SAP
broadcast.• Both indicators appear when a stereo program is accompanied by SAP sound.
When this function is set to "ON", the timer is automatically engaged when theVCR power is turned off, and automatically disengaged when the VCR is poweredback on.
NOTE:Fbr safety, when "AUTO 7?MER" is set to "OFF'; all other VCR functions are disabled while
the lTmer mode is engaged, To disengage the timer, press TIMER,
When this function is set to "ON", various operational indicators appear on the TVscreen. Messages appear in the selected language (_ pg. 15).
NOTES:• When you use this VCR as the source player for editing, be sure to set "SUPFRIMPOSE" to
"OFF" before starting,• During playback, the operation mode indicators may be disturbed depending on the type
of tape being used.

72 EN SUBSIDMRY SETTINGS (cont.)
VHSMODESET <Je au,tsett, g,s,old taN I ,ow.
S-VHS ETONOFF
S-VHS MODEONOFF
You can record on VHS cassettes with S-VHS picture quality. ]_pes recorded using
this function can be played back on a VCR equipped with the S-VHS ET function.
When this function is set to "ON", the S-VHS indicator lights up on the front
display paneh
NOTES:• K)u _an activate the S-VHS ET function only before you start recording on a VHS cassette.
• Before recording, make sure that "VIDEO (_,LIBRATION" is set to "ON". CL<"pg. 77)• You _annotactivate the S-VHS ET functk)n _.
._ while re_ ording is in progress.
... while timer=re( ording or Instant 7imer Recording (L _ pg. 32) is in progress.
._ while Video C,flibration C_-¢_pg. 3_) is in progress.• 7he S-VHS ET function does not work with S-VHS _assettes.
• To keep the highest quality recorc/ing and playback pictures over a long period of tiff}e,
S-VHS recording on S-VHS cassettes is recommended.
• Use of high grade tapes is recommended for S-VHS ET recordings. On some tapes, picture
quality will not improve even if the S-VHS ET function is used. Che_ k the recording quality
before you start important recordings.
• K)u can play bad< a tape recorded using the S-VHS ET function on most of S-VHS VCRs and
of VHS VCRs equipped with SQPI_ (S-VHS QUASI PLAYBACK) function. (Notice some
VCRs are not ( ompatible with tire S-VHS ET functionj
• While playing ba(k a tape recorded using the S-VHS ET function on some VCRs, noise may
appean (If playback picture becomes blurred or interrupted, use a cleaning cassette.)
• In the high-speed search, still, slow-motion or frame-by-frame playback modes C_-<" pg. 28;,
noise may appean If these r'node__ are performed frequently on a tape recorded using the
S-VHS ET function, the tape may be damaged and the picture may be deteriorated.
Your VCR can record in S-VHS (Super VHS), S-VHS ET or VHS.
eTo record in S-VHS:Set "S-VHS MODE" to "ON". Then, insert a cassette marked "S-VHS'. The S-VHS
indicator lights up on the front display panel.
The S-VHS recording mode is selected.
eTo record in S-VHS ET on a VHS cassette:
Set "S-VHS ET" to "ON". (_ See above.) Then, insert a cassette marked "VHS".
[he S-VHS indicator lights up on the front display paneh
eTo record in VHS:Insert a cassette marked "VHS".
Set "S-VHS ET" to "OFF". (_ See above.)
eTo record in VHS on an S-VHS cassette:
Insert a cassette marked "S-VHS". The S-VHS indicator lights up on the front
display paneh Then, set "S-VHS MODE" to "OFF". The S-VHS indicator goes off.
The VHS recording mode is selected.
NOTE:When playing I)a_ k a tape that has been re_ orded in S- VHS or S- VHS EI, the S- VHS indR ator
light,_ up on the front display panel regardless of the "S-VHS MODE" setting.

VHSMODESET(cont.)* The default setting is bold in the table below.
VIDEOCALIBRATIONONOFF
PICTURECONTROLAUTOEDITSOFSHARP
FRONTAUXINPUTVIDEOS-VIDEO
When this function is set to "ON", this VCR checks the condition of the tape in useduring playback and recording, and compensates to provide the highest-possiblepictures. This takes place whenever you play back a tape or start recording afterinserting a tape. (_-_ pg. 35)
[his feature helps you to adjust the playback picture quality according to yourpreference. Normally select "AUTO".
AUTO: Provides the optimized picture benefits of the VIDEOCAI.IBRATION Picture System.
EDIT: Minimizes picture degradation during editing (recording andplayback).
SOFT: Reduces image coarseness when viewing overplayed tapescontaining a lot of noise,
SHARP: Clearec sharper-edged picture when viewing images with lots offlat, same-coloured surfaces such as cartoons.
NOTES:• When you select "I:DIT'; "SOET" or "SHARP'; the selected mode will not change until you
select another mode,• When you select "EDIT" to dub tapes, be sure to select "AUTO" after you finish dubbing
the tapes,• When "VIDEO CALIBRATION" is "OFF'; "PICTURE CONTROL" switches automatically
from "AUIO" to "NORM",
Select the appropriate mode depending on the connector being used on the frontpanel.
VIDEO: lb use the VIDEO input connector on the front panel.S-VIDE0: Tb use the S-VIDEO input connector on the front panel.

7_ EN SUBSIDMRY SETTINGS (cont.)
VHSMODESET(cont.) •The Je au'tsett, g,s"o'dthetaNe' e'ow
AUTOSP-*EP TIMERONOFF
BLUEBACKONOFF
DIGITALTBC/NRONOFF
When this function is set to "ON', the VCR automatically switches to EP mode to
allow complete recording if there is not enough tape to record the entire program
while timer-recording in SP mode.
For Example...
Recording a program of 140 minutes in length onto a 120-minute tape
Approximately 110 minutes Approximately 30 minutes
I sPmode I EPmode I]bta1140 minutes
Make sure you set this function to "ON", before the timer-recording starts.
NOTES:• If you have programed the VCR to timet_re(ord 2 or more programs, the se(ond program
and those thereafter may not fit on the tape if,you set "AUTO SP--_EP TIMER" to "ON", In
this case, make sure the mode is not engaged, then set the tape speed manually during
timer programing,• In order to ensure that the re(ording fits on the tape, this feature may leave a slight non-
recorded section at the end of the tape,
• There may be some noise and sound disturl)ance at the point on the tape where the VCRswit( hes from SP to EP mode,
• The Auto SP-+EP Timer feature is not available during ITR (Inst, mt Timer Recording), and
the feature will not work properly on the following tapes: TIST)-30, T(ST)-60, TIST)-90, and
T(SO-120.
When this function is set to "ON", the TV screen becomes all blue when receivinga channel not in use.
NOTE:When you want to re( eive an unstable ( hannel with poor signals, set this fun( tion to "OFF",
Your VCR is equipped with the Digital TBC (Time Base Corrector) that removesjitter from fluctuating video signals to deliver a stable picture even with old tapesand rental cassettes.
[he on/off of Digital 3-DNR (Noise Reduction) which cuts noise and enables clearpicture reproduction is also linked to this function.We recommend that you set "DIGI]AI. TBC/NR" to "ON" when ...... playing back a tape recorded on a camcorder.... playing back a tape repeatedly used.... using this VCR as the source player for editing.
NOTES:• If you play I)a(k a tape re(orded under poor TV re(eption (ondition, the pi(ture may
become more stable with Digital TBC/NR set to off.
• When "DIGITAL TB(-,VNR" is set to "ON'; if you play ba(k a tape where certain types of
signals are recorded (using a PC or some character generators), the pla,vback picture maybe distorted, If this is the case, set "DIGIT_,L TBCTNR" to "OFF",

EN75VHSMODESET(cont.) •F,o ,o au,tsort,rig,sbo'd,nt"etaNe
• When this function is set to "ON', you call automatically correct vertical vibrationin the picture when playing back unstable recordings made on another VCR.
VIDEOSTABILIZERONOFF
DIGITALR3ONOFF
• AUDIOMONITOR
NOTES:• When you finish viewing a tape, be sure to set this function to "OFF".• Regardlessofthesetting, thisfunctionhasnoeffectduringrecotdingandduringspecialeffect,s
playback.• The on-screen display ma,vjitter vertically when this function is set to "ON".• To watch recordings with close-caption, set this function to "OFF".• Video Stabilizer and Digital TBCTNRcannot be used at the same time. If,you activate Digital
TBCTNR when "WDFO STABILIZER" is set to "ON'; Video Stabilizer will be automatR all,vturned "OFF".
HI-FIHI-FILHI-FIRNORMMIX
When this function is set to "ON", the Digital R3 picture system applies edgecorrection to the luminance signal to enhance details.
NOTES:• Normally it is re(ommended to keep "DIGITAL R3 " set to "ON'.• Depending on the type of tape being used, picture quality may be better with "DIGITAL
R3 " set to "OFF".• If,you use the VCR as the sour(e player for editing, be sure to set "DIGITAL R3" to "OFF"
before starting.
This VCR can record two sound tracks simultaneously (normal and Hi-Fi) on a Hi-Fistereo tape. '_u can select the sound track(s) to listen to while playing back a Hi-Fistereo tape. [n addition, when playing back a prerecorded tape containing twoseparate audio programs on the Hi-Fi tracks, you can choose either one byselecting either "HI-F[ L" or "HI-F[ R'.
HI-FI:HI-FIL:HI-FIR:NORM:MIX:
Normally select this. Hi-Fi sound is played back.Sound on the left Hi-Fi channel is played back.Sound on the right Hi-Fi channel is played back.Sound on the normal track is played back.Both sounds on the Hi-Fi track and normal track are mixed and
played back.
NOTES:• While playing ba_k a monaural t,lpe, souncl5 on the normal track will be heard regardless of
this setting.• You (an also use the A. MONITOR button on the Remote to sele( t the clesir_! monitor
sound. 00-_ pg. _ 12

6EN SUBSIDMRY SETTINGS (cont.)
DVMODESET* The default setting is bold in the table below.
SOUNDMODE12BIT16BIT
12BIT MODESOUND1SOUND2FULL
Select the appropriate mode before recording on a Mini DV tape.
12BIT: Enables Audio Dubbing later.16BIT: Audio Dubbing is impossible but the recorded sound quality is
higher than "12 BIT".
Select the appropriate mode when playing back an audio-dubbed Mini DV tape.
SOUND1: Original recorded soundSOUND2: Audio-dubbed sound
FULL: Original recorded sound and Audio-dubbed sound
NOTES:• When "12BIT MODE" is set to "FULL'; both the main and sub audio will be audible.
• To select only the main audio or only the sub audio of bilingual tapes, set "12BIT MODE"to "SOUND 1 ".

rROUBL S,-,OOr,NC EN77Before requesting service for a problem, use this chart and see if you can repair the trouble yourself. Small problems are
often easily corrected, and this call save you the trouble of sending your VCR off for repair.
POWER
1. No power is supplied to the VCR. • The AC power cord is disconnected. Connect the AC power cord.
2. The clock is functioning properly, but • "Q" is displayed on the front display Press the TIMER button to turn the "(D"
the VCR cannot be powered, panel with "AUTO TIMER" set to "OFF". indicator off.
3. The Remote won't function. • The batteries are discharged. Replace the dead batteries with new ones.
TAPE TRANSPORTSYMPTOM . POSSIBLECAUSE . CORRECTIVEACTION
1. The tape does not run during • "i" is displayed on the front display Press PLAY/l_) to turn the "i:. " indicator
recording, paneh off.
2. The tape will not rewind or fast- • The tape is already fully rewound or Che(k the cassette.forward, fast-forwarded.
PLAYBACK
ACTION
1. The playback picture does not appear • The TV receiver is not set to the AV Set the TV to its AV mode.
while the tape is running, mode.
2. Noise appears during visual search. • This is normal.
3. Noise appears during normal • The automatic tracking mode is Try manual tracking. (z7 _pg. 31 )
playback. (VHS deck only) engaged.
4. The playback picture is blurred or • The video heads may be dirty. For the VHS deck
interrupted while TV broadcasts are Use a dry cleaning cassette TCL-2, or
clear or "USE CI.EANING CASSETTE" consult your IVC dealer.
message appears on the screen. For the DV deck
Use a dry cleaning cassette M-DV12CL, or
consult your/VC dealer.
5. Breaks are noticeable in Hi-Fi • The automatic tracking mode is Try manual tracking. (L_ ° pg. 31)
soundtrack. {VHS deck only) engaged.

_7 0/0 EN TROUBLESHOOTING (cont.)
RECORDING
ACTION
1. Recording cannot be started. • For the VHS deck
There is no cassette loaded, or the
cassette loaded has had its record safetytab removed.
Insert a VHS (or S-VHS) cassette, or usingadhesive tape, cover the hole where thetab was removed.
Insert a Mini DV cassette, or set the erase
protection switch set to "REC'.
• For the DV deck
]here is no cassette loaded, or thecassette loaded has had its erase
protection switch set to "SAVE".
• "L-1 " or "F-1 " has been selected as the
input mode.
• The components have been incorrectly
connected, or correct video connector
(S-VIDEO or VIDEO) is not selected.
2. TV broadcasts cannot be recorded. Set to the desired channel.
3. l?lpe-to-tape editing using another
component is not possible.
• All necessary power switches have notbeen turned on.
Connect the components correctly(_-_"pg. 56 62) or check "REAR AUXINPUT" or "FRON] AUX INPUT" setting.(_T__pg. 71, 73)
Confirm that all units' power switches areturned on.
• The input mode is not correct. Set the input mode to "L-1" or "F-1 ".
4. Camcorder recording is not possible. • The camcorder has not been properly Confirm that the camcorder is properly
connected, connected. (zu" pg. 56)
• The input mode is not correct. Set the input mode to "L-1" or "F-1 ".
5. "_]" on the front display panel won't • The end of the tape was reached during The program may not have been recorded
stop blinking, recording, in its entirety. Next time make sure you
have enough time on the tape to record
the entire program.
6. Audio dubbing is not possible. For the DV deck• "SOUND MODE" had been set to Set "SOUND MODE" to "12BIT" at the
"16BET" at the original recording, original recording. (_-_ pg. 76)
• The tape speed had been set to LP at the Set the tape speed to SP at the original
original recording, recording.
7. Monitoring the audio-dubbed sound is • This is normal. Set "12BIT MODE" to "SOUND 2" or
not possible during audio dubbing monitor the sound using the connected
using the DV deck. devices.
8. The programed memory of Random • The memory backup time has expired. Perform Random Assemble Editing again.
Assemble Editing is disappeared. {_-_ pg. 64)
9. When performing Tape Dubbing, the • This is normal. Locate the start point a little before the
beginning of the dubbing start point is point where you want to start dubbing.
not dubbed. (_-_ pg. 54, 55)

TIMER RECORDING
1. [inlet- re(ording won't work. • The clock and/or the timer have been set
incorrectly.
• The timer is not engaged.
• Timer recording may not work when the
VCR's input mode is set to "F-1" for
recording on the DV deck.
ACTION
Re-perform the clock and/or timer
settings.
Press TIMER and confirm that "(D" is
displayed on the front display panel.
Set the channel position other than "F-1"
before engaging to llmer-Standby mode.
2. Timer programing is not possible. • limer recording is in progress. Timer programing can't be performed
while a timer recording is in progress.Wait until it finishes.
3. "Q" and "[_]" on the front display • The timer is engaged but there's no
panel won't stop blinking, cassette loaded.
• The end of the tape was reached during
timer recording.
• VHS deck
The loaded cassette has had its record
safety tab removed,
• DV deck
The loaded cassette has had its erase
protection switch set to "SAVE".
For the VHS deck
Insert a VHS (or S-VHS) cassette with the
record safety tab intact, or cover the hole
using adhesive tape.For the DV deck
Insert a Mini DV cassette with the erase
protection switch set to "REC',
The program may not have been recorded
in its entirety. Next time make sure you
have enough time on the tape to record
the entire program.
Remove the cassette and cover the hole
with adhesive tape, or insert a cassette
with the record safety tab intact,
Remove the cassette and set the erase
protection switch to "REC'.
4. "Q" blinks for 10 seconds and the • TIMER has been pressed when there are Check the programed data and re-
Timer mode is disengaged, no programs in memory, or the timer program as necessary, then press TIMER
record information has been programed again,
incorrectly.
5. The VCR Plus+ system does not timer- • The VCR's channel positions have been Refer to "Guide Channel Number Set"
record properly, set incorrectly. {_-_ pg, 44) and re-perform the procedure.
6. lhe power shuts off an(] "[_" won't • The end of the tape was reached during The program may not have been recorded
stop blinking, Instant Timer Recording. in its entirety. Next time make sure you
have enough time on the tape to record
the entire program.

80 EN TROUBLESHOOTING (cont.)
TIMER RECORDING (cont.)ACTION
7. Cable channels are not automatically
switched during timer recording.
8. Satellite channels are not
automatically switched during timer
recording.
• The Controller is not properlyconnected to the VCR.
• The output channel selected in theCable Box Set screen is incorrect.
• The cable box is turned off.
• The Controller is not properlyconnected to the VCR.
• The output channel selected in the DBSReceiver Set screen is incorrect.
• The VCR is not set correctly to controlthe DBS receivec
Connect the Controller correctly{:-_ pg. 20).
After confirming your cable box's output
channel numbet_ re-access the Cable BoxSet screen and select the correct number
Make sure the power is on before timer
recording starts.
Connect the Controller correctly(:-_ pg. 23).
After confirming your DBS receiver's
output channel number, re-access theDBS Receiver Set screen and select the
correct number (z_" pg. 24).
Set the correct DBS receiver brand code
{:-_ pg. 24).
• The DBS receiver is turned off. Make sure the power is on before timer
recording starts.
9. []mer recording begins as scheduled, • Even though you do not use an external Set "CABLE BOX SET" to "OFF"
but the channel is always incorrect, cable box or DBS receiver, "CABLE BOX (_ €_ pg. 21 ) or "DBS RECEIVER SET" is set
SET" is set to "ON" or "DBS RECEIVER to "OFF" f:-u" pg. 24).SET" is set to "ON".
OTHER PROBLEMSSYMPTOM POSSIBLECAUSE CORRECTIVEACTION
1. Whistling or howling is heard from the • ]he camcorder's microphone is too Position the camcorder so its microphone
TV during camcorder recording, close to the TV. is away from the TV.
• The TV's volume is too high. RJrn the TV's volume down.
2. When scanning channels, some of • Those channels have been designated to If you need the skipped channels, restore
them are skipped over. be skipped, them (_-_ pg. 19).
3. ]he channel cannot be changed. • Recording is in progress. Press PAUSE (11) to pause the recording,
change channels, then press PLAY (1_) to
resume recording.
4. Channel settings that were made • After the manual settings were made, Perform manual setting again.
manually seem to have changed or Auto Channel Set was performed.
disappeared.
5. ]he Remote will not operate your TV • The brand codes are set incorrectly. Reset the correct brand codes (_-_ pg. 67,
or cable box or DBS receivec 68, or 69).
6. Even though Auto or Semiauto Clock • The clock setting data received from the Select a different host channel during
Set has been performed, the clock is host channel is incorrect. "Semiauto Clock Set" (:-_ pg. 17), or
incorrect, perform "Manual Clock Set" (_-_ pg. 17).
7. No picture appears when you connect Turn off the VCR or the connected
a device to DV IN/OUT connector, appliance once, then turn it on again.
ATTENTIONThis VCR contains microcomputers. External electronic noise or interference can cause microcomputer to malfunction. If the VCR
does not operate correctly switch its power off and unplug the AC power cord from the AC supply. Wait for a while and then plug
the power cord back in. Eject and check the condition of the cassette. If everything appears normal, you can operate the VCR asusual.

QUESTIONS AND ANSWERS
PLAYBACK TIMERRECORDING
EN81
Q. What happens if the end of the tape is reachedduring playback or search?
A. The tape is automatically rewound to thebeginning.
Q. Can the VCR indefinitely remain in the Stillmode?
A. No. It stops automatically after 5 minutes on theVHS deck, 3 minutes on the DV deck to protectthe heads.
Q. When returning from variable-speed search tonormal playback, the picture is disturbed.Should I be concerned about this?
A. No, it is normah
Q. Noise bar appear during variable-speed search.What's the problem?
A. This is normah
Q. ":" and "®" remain lit on the front displaypanel. Is there a problem?
A. No. rhis is a normal c()ndition f()r a timer
rec()rding in pr()gress.
Q. Can I program the timer while I'm watching atape or a TV broadcast?
A. You won't see the picture as it is replace(] by theon-screen menu, but the audio from the
program or tape you're viewing can be heard.
Q. Sometimes, during Index Search, the VCR can'tfind the program I want to see. Why not?
A. lhere may be index codes too close together.
RECORDING
Q. When I pause and then resume a recording, theend of the recording before the pause isoverlapped by the beginning of thecontinuation of recording. Why does thishappen?
A. This is n()rmah It reduces distortion at the pauseand resume points.
Q. Can the VCR indefinitely remain in the Record-Pause mode?
A. No. The VCR goes to its Stop modeautomatically alter 5 minutes to protect theheads.
Q. What happens if the tape runs out duringrecording?
A. lhe VCR stops recording, and "[_]" on the frontdisplay panel won't stop blinking.

82 EN SPECIFICATIONS
GENERAL
Power requirement : AC 120 V_, 60 HzPower consumption
Power on 35 WPower off 4.4 W
JemperatureOperating 5°C to 40°C (41 °F to 104°F)Storage _0°C to 60°C (4°F to140°F)
Operating position Horizontal onlyDimensions (WxHxD)
: 435 mm x 106 mm x 380 mm
(17-3/16" x 4-;/16" x 15")
Weight : 5.1 kg(11.2 Ibs)
input/Output : RCA connectors:IN x2, OUTx2S-Video connectors:
INx2, OUTx2DV connector:
IN/OUT x 1 (4-pin, IEEE1394conformity, digital input/output)
VHS DECK VIDEO/AUDIO
Signal system : NTSC-type color signal and EIAmonochrome signal, 525 lines/60 fields
Recording system : DA4 (Double Azimuth) head helical
scan systemFormat : S-VHS/VHS NTSC standard
Signal-to-noise ratio: 45 dBHorizontal resolution
: 230 lines (VHS)400 lines (S-VHS)
Frequency range : 70 Hz to 10,000 Hz (Normal audio)20 Hz to 20,000 Hz (Hi-Fi audio)
Maximum recording time(SP) : 210 min. with ST-210 video cassette(EP) : 6_0 min. with ST-210 video cassette
DV DECK VIDEO/AUDIO
Signal system NI SC-type colour signal, 525 lines60 fields
Recording system Digital Component RecordingFormat DV format (SD mode)Cassette Mini DV Cassette
Maximum recording time(SP) : 80 min. with M-DV80ME cassette(LP) : 120 min. with M-DV80ME cassette
Audio recording system: PCM 48 kHz, 16 bit (2 ch)/
32 kHz, 12 bit (4 ch)
TUNERTuning system : Frequency synthesized tunerChannel coverage
VHF : Channels 2-I _¢UHF : Channels 14-69CATV : 11 _ Channels
TIMER
Clock reference : QuartzProgram capacity : 1-year programmable timer/
6 programs each on the VHS andDV deck
Memory backup time: Approx. 10 min.
ACCESSORIES
Provided accessories
: RF cable (F-type),Audio/Video cable,
S-Video cable (4-pin),Controller,Infrared remote control unit,
"AA" battery x 2
Specifications shown are for SP mode unless otherwise specified.
F_& O.E. Design and specifications subject to ( hange withoutnotice.
This equipment has been tested and found to comply with
the limits for a Class B digital device, pursuant to Part 15 of
the FCC Rules. These limits are designed to provide
reasonable protection against harmful interference in a
residential installation. [his equipment generates, uses, and
can radiate radio frequency energy and, if not installed and
used in accordance with the instructions, may cause harmful
interference to radio communications. However, there is no
guarantee that interference will not occur in a particular
installation. If this equipment does cause harmful
interference to radio or television reception, which can be
determined by turning the equipment off and on, the user is
encouraged to try to correct the interference by one or more
of the following measures:
Reorient or relocate the receiving antenna.
increase the separation between the equipment andreceiver.
Connect the equipment into an outlet on a circuitdifferent from that to which the receiver is connected.
Consult the dealer or an experienced radioflV
technician for help.

INDEX EN (s_3
AActive Video Calibration ........................................... 35
Advantages of S-VHS video recorders ............................ 59
Audio Dubbing ...................................................... 60
AUDIO MONITOR ................................................. 75
Auto Channel Set .................................................... 18
AUTO SP-+EP TIMER .............................................. 74AUTO TIMER ........................................................ 71AV Insert Editing ..................................................... 63
BBlUE BACK .......................................................... 74
CCable box ............................................................. 20
Cable Box Control Setting ......................................... 20
Cable Box Multi-Brand Remote Control ......................... 68
Changing VCR Plus+ _Setting ...................................... 44Check, cancel and change programs ............................ 50
Clock Set .............................................................. ] 6
Controller ....................................................... 20, 23
DDBS receiver ......................................................... 23DBS Receiver Control Setting ..................................... 23
DBS Receiver Multi-Brand Remote Control .................... 69DI(iEEAI R3 .......................................................... 75DIGITAl. TBC/NR ................................................... 74
EEDITING .............................................................. 52
Elapsed Recording Time Mdication .............................. 33Express Timer Programming ....................................... 46
FFRONT AUX INPUT ................................................ 73
GGuide Channel Number Set ................................. 43, 44
HHigh-Speed (Turbo) Search (On the Remote) ............. 29, 39High-Speed (Turbo) Search (On the VCR) ................ 28, 38
IIndex Search ......................................................... 30
Insert Editing ......................................................... 62Instant Timer Recording (ITR) ............................... 32, 4]
Lkanguage ............................................................. 15
MManual Channel Set ................................................ ] 9
Manual Clock Set ................................................... ] 7
Manual Tracking .................................................... 3 ]Mode Set .............................................................. 70
NNext Function Memory ....................................... 30, 40
Normal Dubbing (from DV to VHS) .............................. 54
Normal Dubbing (from VHS to DV) .............................. 55
OON-SCREEN DISPLAY (for DV deck) ............................ ] ]
ON-SCREEN DISPI.AY ifor VHS deck) ........................... ] 0
PPICTURE CONTROl ................................................. 73PlAYBACK/RECORDING ON DV DECK ....................... 36PLAYBACK/RECORDING ON VHS DECK ...................... 26Plug & Play Set ....................................................... ] 4
RRandom Assemble Editing ......................................... 64REAR AUX INPUT ................................................... 7]
Record One Program While Watching Another .......... 32, 4]
Recording Resume Function ................................. 32, 4]
Remote A/B Code Switching ....................................... 66Repeat Playback ..................................................... 30
Retake ................................................................. 34
SSecond Audio Recording ..................................... 34, 41Semiauto Clock Set .................................................. ] 7Slow Motion (On the Remote) .............................. 29, 39Slow Motion (On the VCR) .................................. 28, 38
SOUND MODE ...................................................... 76Soundtrack Selection .......................................... 3 ], 40
Still Picture/Frame-By-Frame Playback (On the Remote) 29, 39Still Picture/Frame-By-Frame Playback (On the VCR) ... 28, 38
SUPERIMPOSE ....................................................... 71S-VHS ET .............................................................. 72S-VHSMODE ........................................................ 72
TTape Dubbing (from DV to VHS) ................................. 52
Tape Dubbing (from VHS to DV) ................................. 53
Tape Position Indicator ............................................. ] 0
Tape Remaining Time .............................................. 33Time Code ............................................................ 4 ]
TIMER RECORDING ................................................ 42Timer Warning Display ....................................... ] O, ] ]
Tuner Set .............................................................. ] 8
TV Multi-Brand Remote Control .................................. 67
VVariable Speed Search (On the Remote) ................... 29, 39Variable Speed Search (On the VCR) ...................... 28, 38
VCR Plus+ ' Timer Programing ..................................... 42VIDEO CALIBI.ATION .............................................. 73VIDEO STABIIAZER ................................................. 75
WWhen programs overlap each other .............................. 51
12BIT MODE ......................................................... 7624HR Quick Programing ........................................... 482ND AUDIO RECORD ............................................. 71

84 EN FOR SERVICING (Only in U.S.A.)
HOW TO LOCATE YOUR JVC SERVICE CENTER
TOLL FREE: 1-800-537-5722
http://www.jvc.com
Dear Customer,
In order to receive the most satisfaction from your purchase, please read the instruction booklet before operatingthe unit. In the event that repair is necessary, or for the address nearest your location within the Continental UnitedStates, please call 1-800-537-5722 for your nearest authorized servicer or visit our website at ww_zJVC.com.Remember to retain your Bill of Sale for Warranty Service.
--dVC
JVC SERVICE & ENGINEERINGCOMPANY OF AMERICA
DIVISION OF JVC AMERICAS CORR
Sophisticated electronic products may require occasional service. Just as quality is a keyword in the engineeringand production of the wide array of JVC products, service is the key to maintaining the high level performance forwhich JVC is world famous. The JVC service and engineering organization stands behind our products.
NATIONAL HEADQUARTERS
JVC SERVICE & ENGINEERING COMPANY OF AMERICADIVISION OF JVC AMERICAS CORR
10 New Maple AvenuePine Brook, NJ 07058-9641
ACCESSORIES
To purchase accessories for your JVC product, youmay contact your local JVC Deale_From the 48 Continental United States call toll free:1-800-882-2345 or on the web at wwwJVC.com
Don't service the product yourself.
CAUTION
To prevent electrical shock, do not open the cabinet.There are no user serviceable parts inside.Please refer to qualified service personnel for repairs.

WARRANTY (Only in U.S.A.) EN 8.5
LIMITED WARRANTYcoNsuMERVIDEO1-90JVC COMPANY OF AMERICA warrants this product and all parts thereof, except as set forth below ONLY TO THE ORIGINALPURCHASER AT RETAIL to be FREE FROM DEFECTIVE MATERIALS AND WORKMANSHIP from the date of original retailpurchase for the period as shown below. ("The Warranty Period")
PARTS LABOR
1YR 90DAYS
THIS LIMITED WARRANTY IS VALID ONLY IN THE FIFTY (50) UNITED STATES, THE DISTRICT OF COLUMBIA AND INCOMMONWEALTH OF PUERTO RICO.
WHAT WE WILL DO:If this product is found to be defective, JVC will repair or replace defective parts at no charge to the original owner. Such repairand replacement services shall be rendered by JVC during normal business hours at JVC authorized service centers. Partsused for replacement are warranted only for the remainder of the Warranty Period. All products and parts thereof may bebrought to a JVC authorized service center on a carry-in basis except for Television sets having a screen size 25 inches andabove which are covered on an in-home basis.
WHAT YOU MUST DO FOR WARRANTY SERVICE:
Return your product to a JVC authorized service center with a copy of your bill of sale. For your nearest JVC authorized servicecenter, please call toll free: (800) 537-5722.
If service is not available locally, box the product carefully, preferably in the original carton, and ship, insured, with a copy of yourbill of sale plus a letter of explanation of the problem to the nearest JVC Factory Service Center, the name and location of whichwill be given to you by the toll-free number.
If you have any questions concerning your JVC Product, please contact our Customer Relations Department.
WHAT IS NOT COVERED:
This limited warranty provided by JVC does not cover:1. Products which have been subject to abuse, accident, alteration, modification, tampering, negligence, misuse, faulty
installation, lack of reasonable care, or if repaired or serviced by anyone other than a service facility authorized by JVC torender such service, or if affixed to any attachment not provided with the products, or if the model or serial number has beenaltered, tampered with, defaced or removed;
2. Initial installation and installation and removal for repair;3. Operational adjustments covered in the Owner's Manual, normal maintenance, video and audio head cleaning;4. Damage that occurs in shipment, due to act of God, and cosmetic damage;5. Signal reception problems and failures due to line power surge;6. Video Pick-up Tubes/CCD Image Sensor, Cartridge, Stylus (Needle) are covered for 90 days from the date of purchase;7. Accessories;8. Batteries (except that Rechargeable Batteries are covered for 90 days from the date of purchase);
There are no other express warranties except as listed above.
THE DURATION OF ANY IMPLIED WARRANTIES INCLUDING THE IMPLIED WARRANTY OF MERCHANTABILITY, ISLIMITED TO THE DURATION OF THE EXPRESS WARRANTY HEREIN.
JVC SHALL NOT BE LIABLE FOR THE LOSS OF USE OF THE PRODUCT, INCONVENIENCE, LOSS OR ANY OTHERDAMAGES, WHETHER DIRECT, INCIDENTAL OR CONSEQUENTIAL (INCLUDING, WITHOUT LIMITATION, DAMAGE TOTAPES, RECORDS OR DISCS) RESULTING FROM THE USE OF THIS PRODUCT, OR ARISING OUT OF ANY BREACH OFTHIS WARRANTY. ALL EXPRESS AND IMPLIED WARRANTIES, INCLUDING THE WARRANTIES OF MERCHANTABILITYAND FITNESS FOR PARTICULAR PURPOSE, ARE LIMITED TO THE WARRANTY PERIOD SET FORTH ABOVE.
Some states do not allow the exclusion of incidental or consequential damages or limitations on how long an implied warrantylasts, so these limitations or exclusions may not apply to you. This warranty gives you specific legal rights and you may alsohave other rights which vary from state to state.
JVC COMPANY OF AMERICADIVISION OF JVC AMERICAS CORR
1700 Valley RoadWayne, New Jersey 07470
REFURBISHED PRODUCTS CARRY A SEPARATE WARRANTY, THIS WARRANTY DOES NOT APPLY. FOR DETAILS OFREFURBISHED PRODUCT WARRANTY, PLEASE REFER TO THE REFURBISHED PRODUCT WARRANTY INFORMATIONPACKAGED WITH EACH REFURBISHED PRODUCT.
For customer use:Enter below the Model No. and Serial No. which is located either on the rear, bottom or side of the cabinet. Retain thisinformation for future reference.
Model No.: Serial No.:
Purchase date: Name of dealer:

m
JVCVICTOR COMPANY OF JAPAN, LIMITED
COPYRIGHT © 2002 VICTOR COMPANY OF JAPAN, LTD. [] _) Printed in Japan0102MNV-'I-'ID=I-'VP