kentico cms 7 hands on labs (november 2013)
DESCRIPTION
Thanks to everyone that provided feedback and ideas. I am happy to announce the November release of the Kentico CMS 7 Hands on labs. Now with over 20 labs and 100 pages it’s packed with a lot of Kentico CMS 7 information!TRANSCRIPT
Kentico CMS Hands on Lab
Kentico CMS Version 7 Hands on Labs
November, 2013
Twitter: @trobbins
Email: [email protected]
Blog: http://devnet.kentico.com/Blogs/Thomas-
Robbins.aspx
For more information http://www.kentico.com
Kentico CMS Hands on Lab
2
Table of Contents Kentico CMS Version 7 Hands on Labs 1
Hands on Lab 1: Kentico Enterprise Marketing Solution: Campaigns 1
Lab Overview 1
Lab Introduction 1
Lab 1-1: Creating the online form 2
Lab 1-1: Creating an online form 2 Lab 1-2: Inserting the online form 7
Lab 1-2: Creating the Services campaign 14
Lab 2-1: Create a document campaign 14 Lab 2-2: Creating Campaign Data 17
Lab 1-3: Optimizing Campaigns with A/B testing 20
Lab 3-1: Creating the A/B test 20 Lab 3-2: creating the variant page 22
Lab 1-4: Scoring contacts 26
Lab 4-1: Creating the contact 26 Lab 4-2: Creating the scoring rules 29
Summary 33
Hands on Lab 2: Custom Table: Create and Display 34
Lab overview 34
Lab introduction 34
Lab 2-1: Creating a custom table 35
Lab 2-2: Adding custom table data 42
Lab 2-3: Creating the display page 45
Lab 2-4: Displaying custom table data 47
Lab 2-5: Editing the default Transformation 53
Lab 2-6: Adding custom table data with the API 56
Lab 2-7: Editing custom table data using the API 62
Summary 65
Hands on Lab 3: Integrating Twitter with Kentico CMS 66
Lab Overview 66
Lab Introduction 66
Lab 3-1: Twitter feed web part 67
Lab 3-2: Twitter follow button web part 70
Kentico CMS Hands on Lab
3
Lab3-3: Twitter tweet button web part 73
Lab 3-4: Update the Home page template 76
Summary 79
Hands on lab 4: UI Personalization 80
Lab Overview 80
Lab Introduction 80
Lab 4-1: Adding a new tab to CMS Desk 81
Summary 84
Hands on Lab 5: Integrating Facebook with Kentico CMS 85
Lab Overview 85
Lab Introduction 85
Lab 5-1: Adding a Facebook Recommendations web part 86
Summary 88
Hands on Lab 6: Auto-posting to Social Media with Advanced Workflow 89
Lab Overview 89
Lab Introduction 89
Lab 6-1: Create the Twitter application 90
Lab 6-2: Collect your bit.ly information 93
Lab 6-3: Setup social media integration with Kentico CMS 94
Lab 6-4: Testing social media integration 96
Lab 6-5: Setting up the advanced workflow 99
Lab 6-6: Executed the advanced workflow 109
Summary 113

Kentico CMS Hands on Lab
1
Hands on Lab 1:
Kentico Enterprise Marketing Solution: Campaigns
Lab Overview
System Requirements:
Kentico CMS 7 Enterprise Marketing Solution installed with the Sample
Corporate Site
Intended Lab Audience:
Online Marketers
CMS Designers
Lab Introduction
Executing successful campaigns is an essential part of any marketing organization.
Campaigns are a way to engage and interact with your customers. They provide an ideal
mechanism to generate sales leads and collect customer information. This set of
exercises is intended to show the process of creating a document based campaign for
the Services page that collects customer information using an online form. Then using
the collected customer information we will then score the leads for later use by the
sales department. In completing this set of labs you will perform the following tasks:
Create an Online form for collecting customer information
Create a squeeze page for collecting customer information
Create a Services campaign
Create conversions
Create a lead score
Optimize a campaign using A/B tests

Kentico CMS Hands on Lab
2
Lab 1-1: Creating the online form
Online forms are the easiest way to create a contact information form for the live site
without having to write application code. Forms are built using a data driven interface
and then inserted into the page using the Online form web part. In this lab we will
create the contact information form and then insert it into the Services page, which is
then used as the main campaign landing page.
Lab 1-1: Creating an online form
1. Log into CMS Desk and select the Tools tab and then click the Add a new form
link as shown in the following screenshot.
Kentico CMS Hands on Lab
3
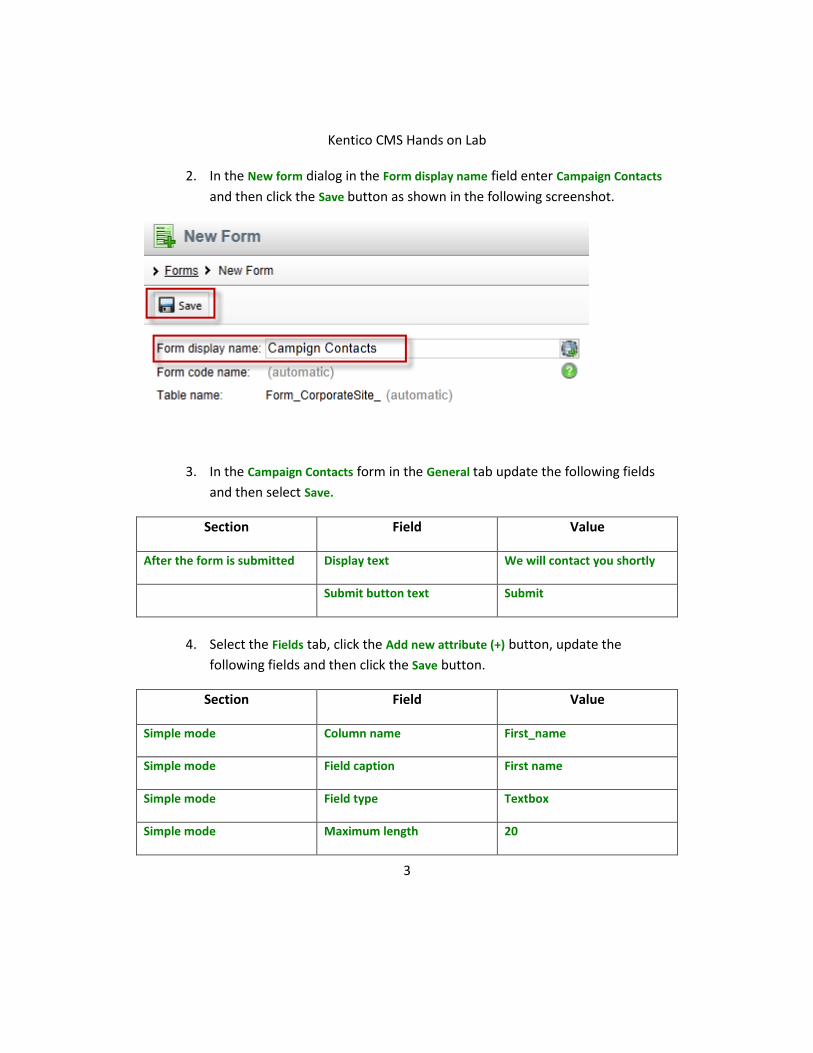
2. In the New form dialog in the Form display name field enter Campaign Contacts
and then click the Save button as shown in the following screenshot.
3. In the Campaign Contacts form in the General tab update the following fields
and then select Save.
Section Field Value
After the form is submitted Display text We will contact you shortly
Submit button text Submit
4. Select the Fields tab, click the Add new attribute (+) button, update the
following fields and then click the Save button.
Section Field Value
Simple mode Column name First_name
Simple mode Field caption First name
Simple mode Field type Textbox
Simple mode Maximum length 20
Kentico CMS Hands on Lab
4
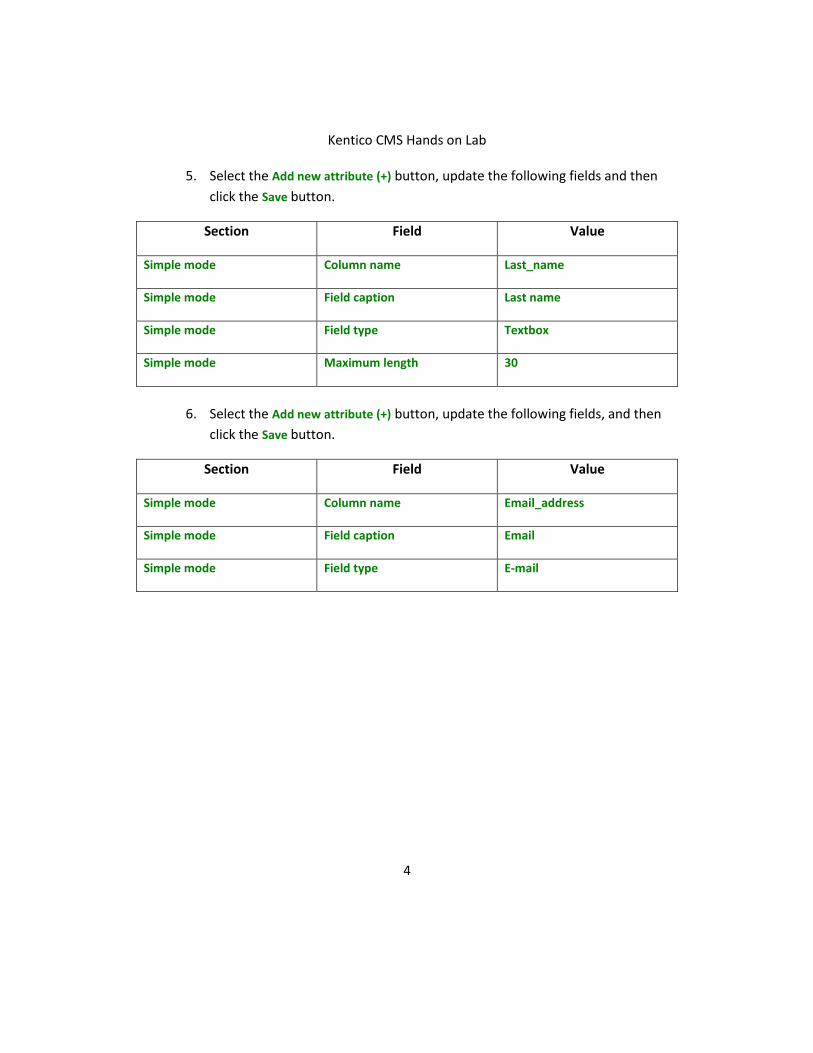
5. Select the Add new attribute (+) button, update the following fields and then
click the Save button.
Section Field Value
Simple mode Column name Last_name
Simple mode Field caption Last name
Simple mode Field type Textbox
Simple mode Maximum length 30
6. Select the Add new attribute (+) button, update the following fields, and then
click the Save button.
Section Field Value
Simple mode Column name Email_address
Simple mode Field caption Email
Simple mode Field type E-mail
Kentico CMS Hands on Lab
5
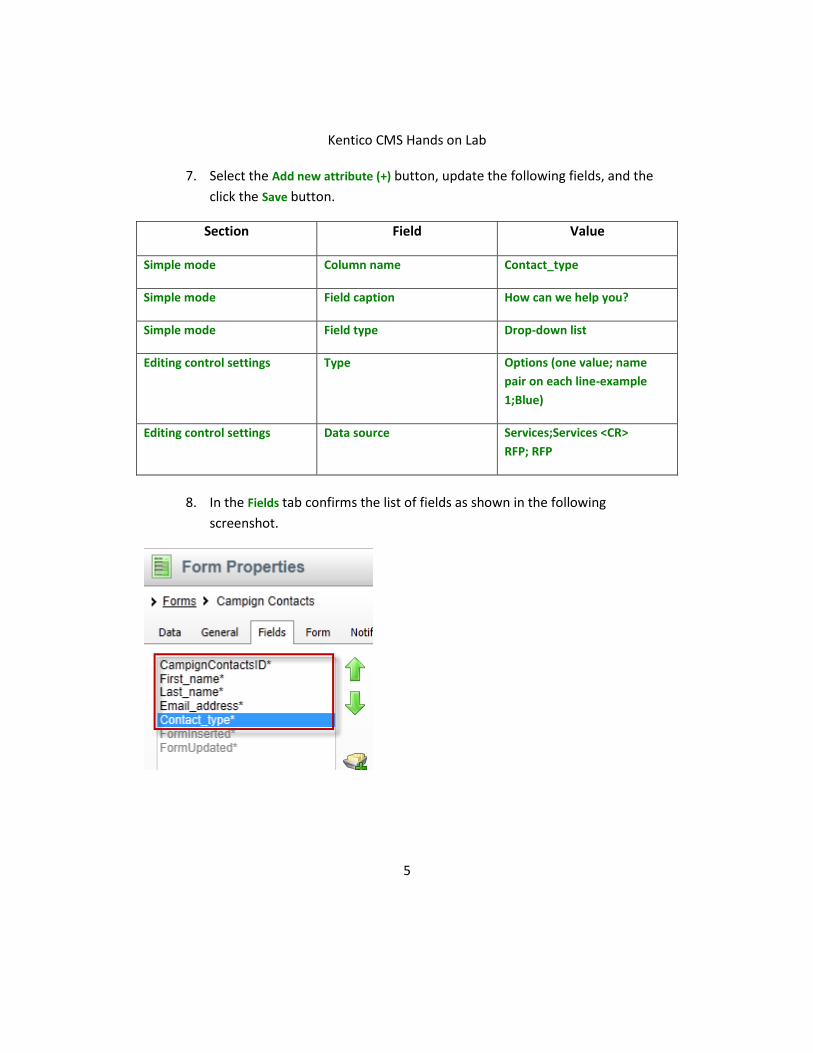
7. Select the Add new attribute (+) button, update the following fields, and the
click the Save button.
Section Field Value
Simple mode Column name Contact_type
Simple mode Field caption How can we help you?
Simple mode Field type Drop-down list
Editing control settings Type Options (one value; name
pair on each line-example
1;Blue)
Editing control settings Data source Services;Services <CR>
RFP; RFP
8. In the Fields tab confirms the list of fields as shown in the following
screenshot.
Kentico CMS Hands on Lab
6
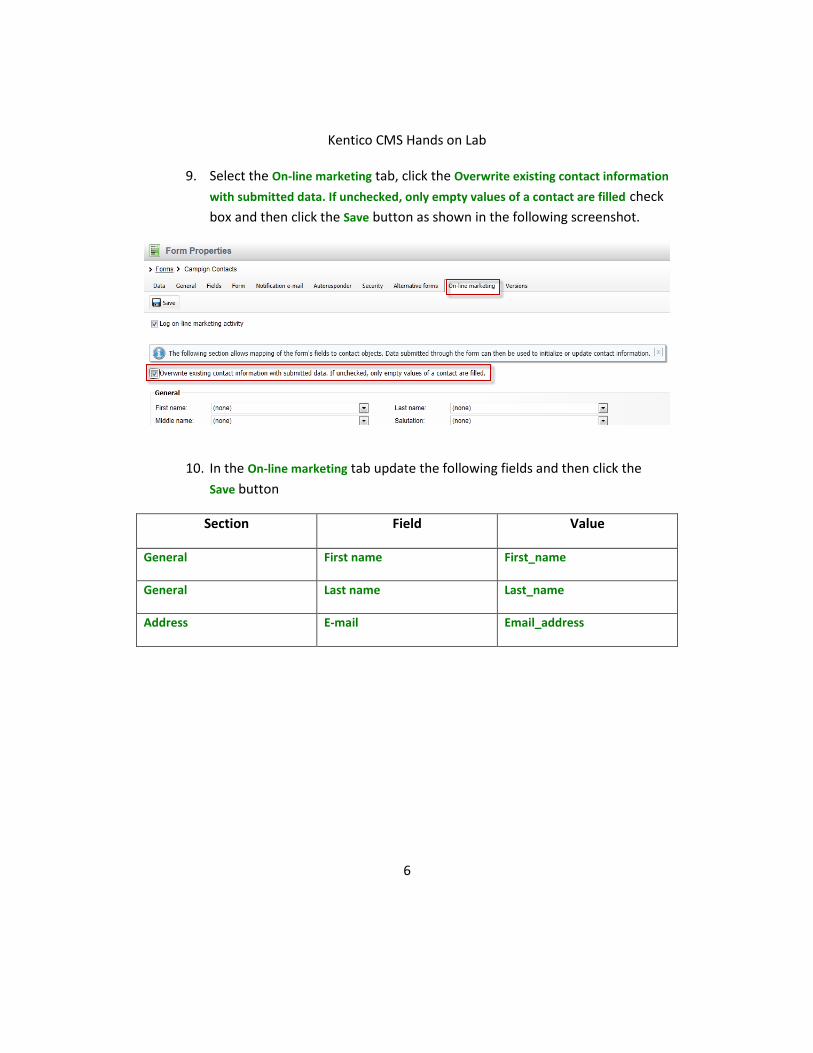
9. Select the On-line marketing tab, click the Overwrite existing contact information
with submitted data. If unchecked, only empty values of a contact are filled check
box and then click the Save button as shown in the following screenshot.
10. In the On-line marketing tab update the following fields and then click the
Save button
Section Field Value
General First name First_name
General Last name Last_name
Address E-mail Email_address
Kentico CMS Hands on Lab
7
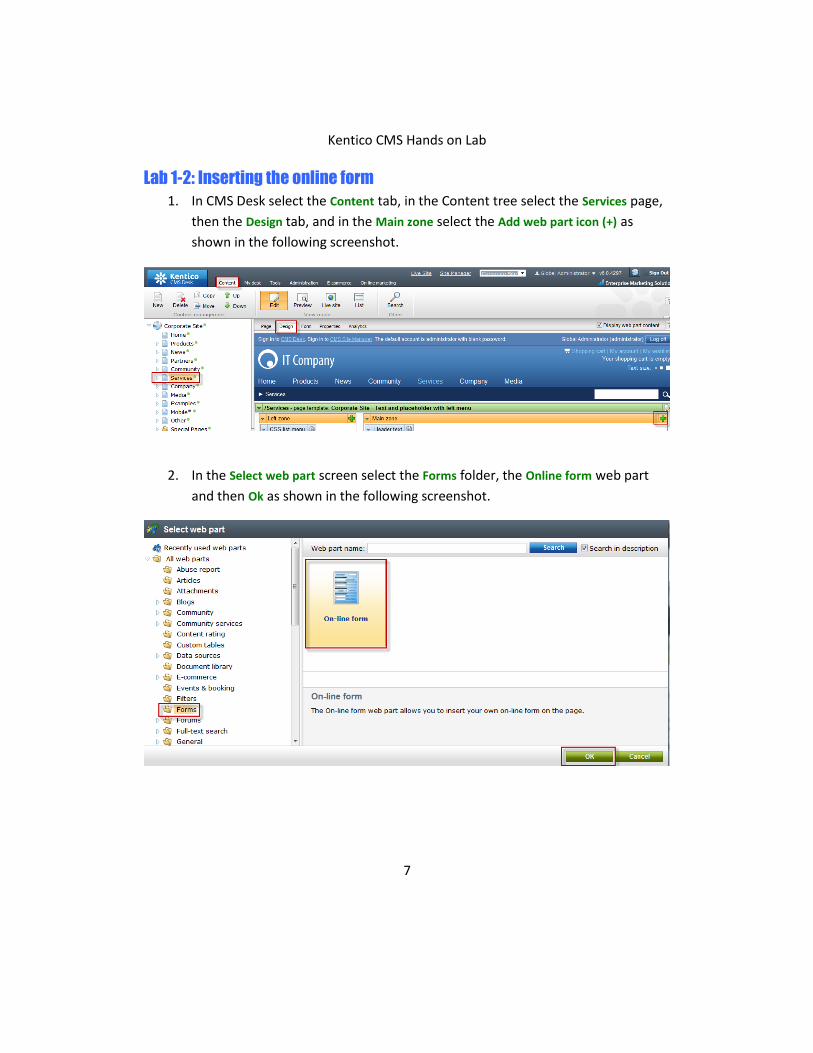
Lab 1-2: Inserting the online form
1. In CMS Desk select the Content tab, in the Content tree select the Services page,
then the Design tab, and in the Main zone select the Add web part icon (+) as
shown in the following screenshot.
2. In the Select web part screen select the Forms folder, the Online form web part
and then Ok as shown in the following screenshot.
Kentico CMS Hands on Lab
8
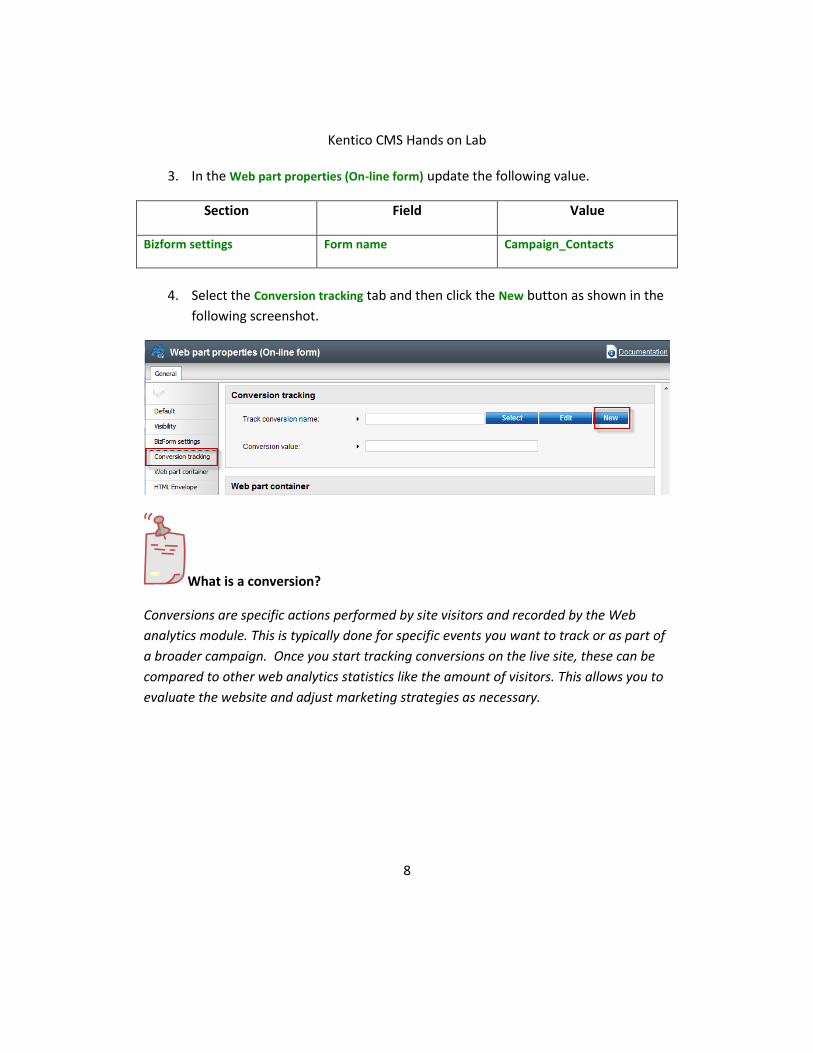
3. In the Web part properties (On-line form) update the following value.
Section Field Value
Bizform settings Form name Campaign_Contacts
4. Select the Conversion tracking tab and then click the New button as shown in the
following screenshot.
What is a conversion?
Conversions are specific actions performed by site visitors and recorded by the Web
analytics module. This is typically done for specific events you want to track or as part of
a broader campaign. Once you start tracking conversions on the live site, these can be
compared to other web analytics statistics like the amount of visitors. This allows you to
evaluate the website and adjust marketing strategies as necessary.
Kentico CMS Hands on Lab
9
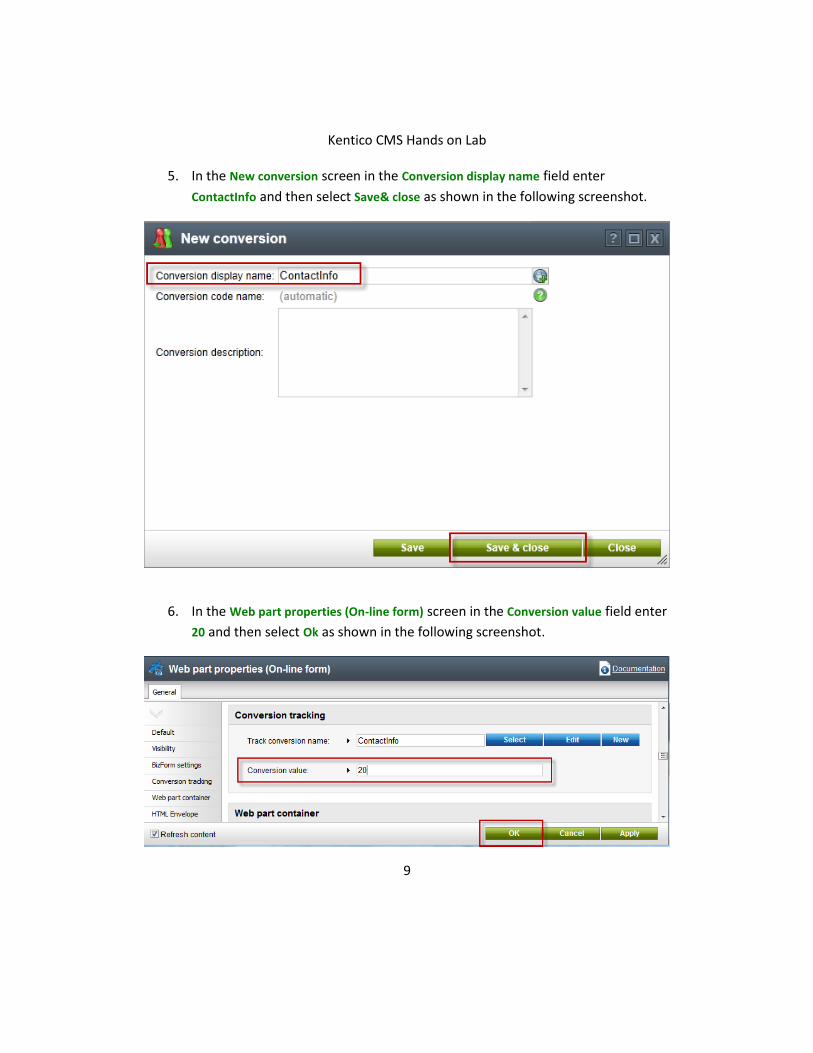
5. In the New conversion screen in the Conversion display name field enter
ContactInfo and then select Save& close as shown in the following screenshot.
6. In the Web part properties (On-line form) screen in the Conversion value field enter
20 and then select Ok as shown in the following screenshot.
Kentico CMS Hands on Lab
10
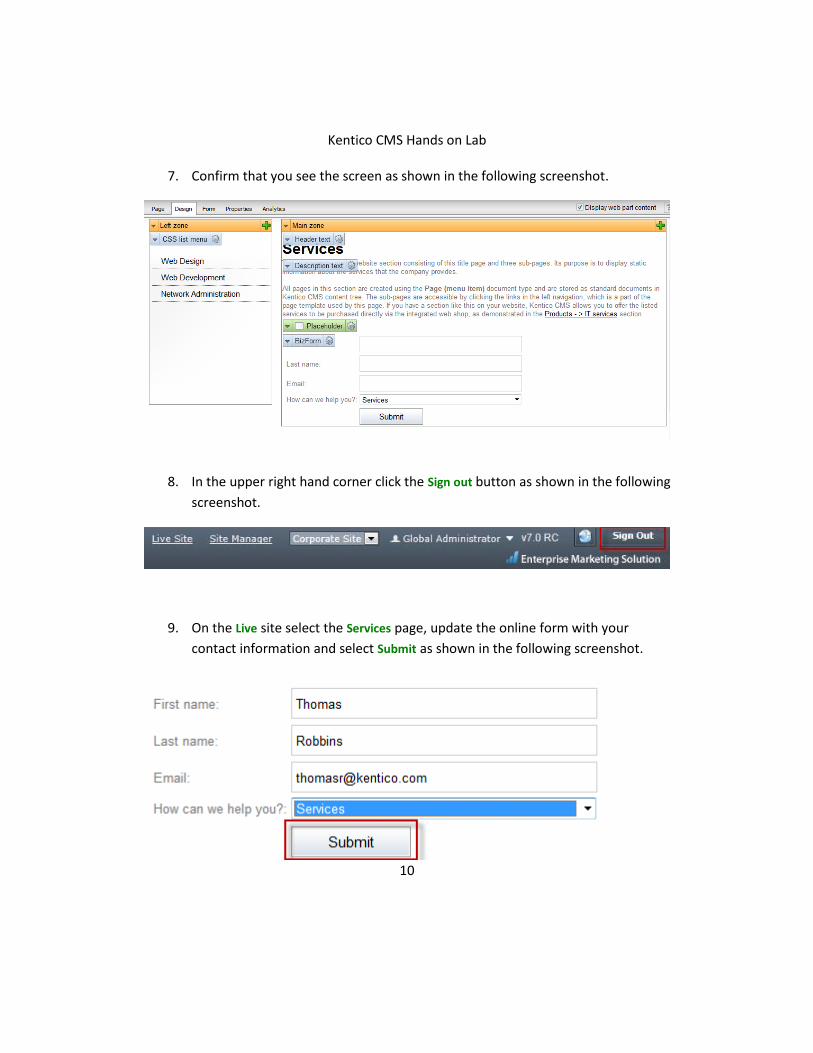
7. Confirm that you see the screen as shown in the following screenshot.
8. In the upper right hand corner click the Sign out button as shown in the following
screenshot.
9. On the Live site select the Services page, update the online form with your
contact information and select Submit as shown in the following screenshot.
Kentico CMS Hands on Lab
11
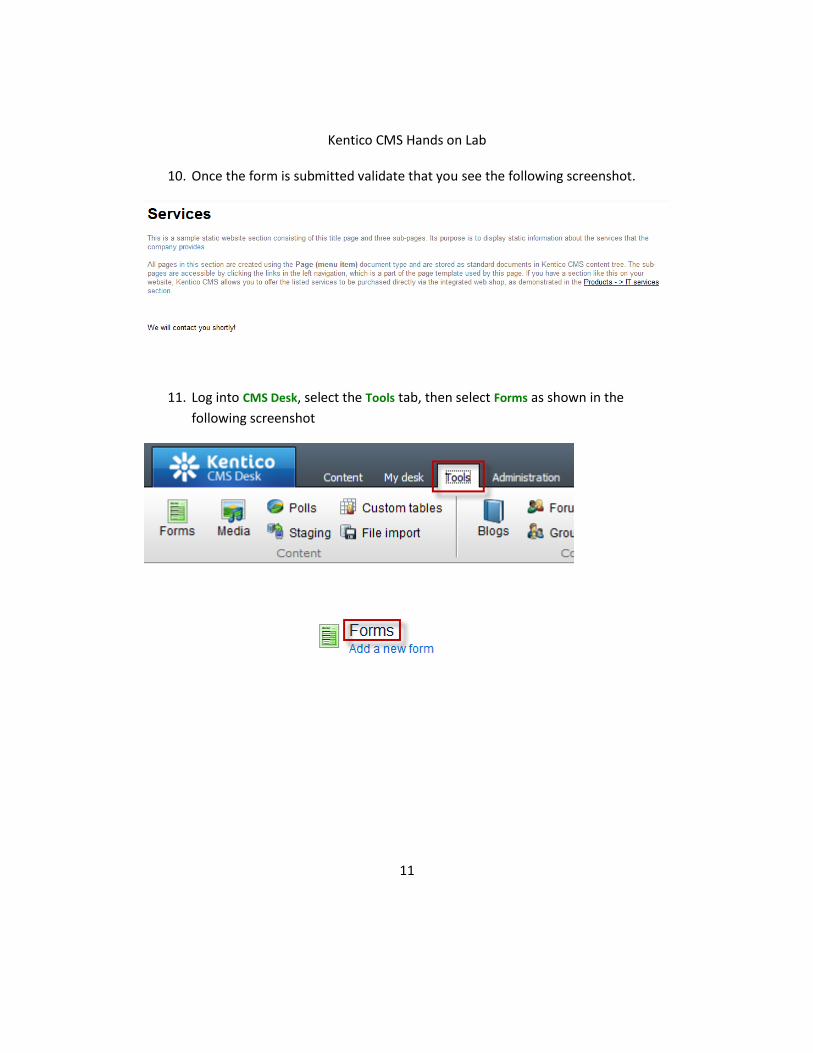
10. Once the form is submitted validate that you see the following screenshot.
11. Log into CMS Desk, select the Tools tab, then select Forms as shown in the
following screenshot
Kentico CMS Hands on Lab
12
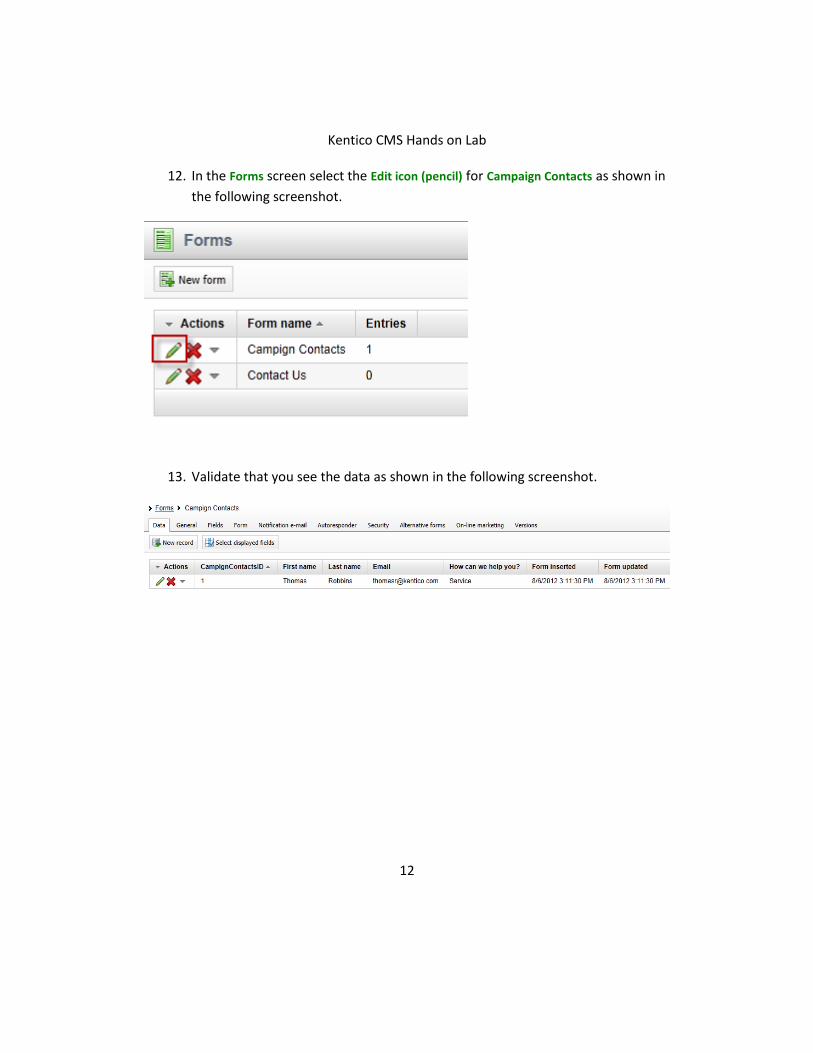
12. In the Forms screen select the Edit icon (pencil) for Campaign Contacts as shown in
the following screenshot.
13. Validate that you see the data as shown in the following screenshot.
Kentico CMS Hands on Lab
13
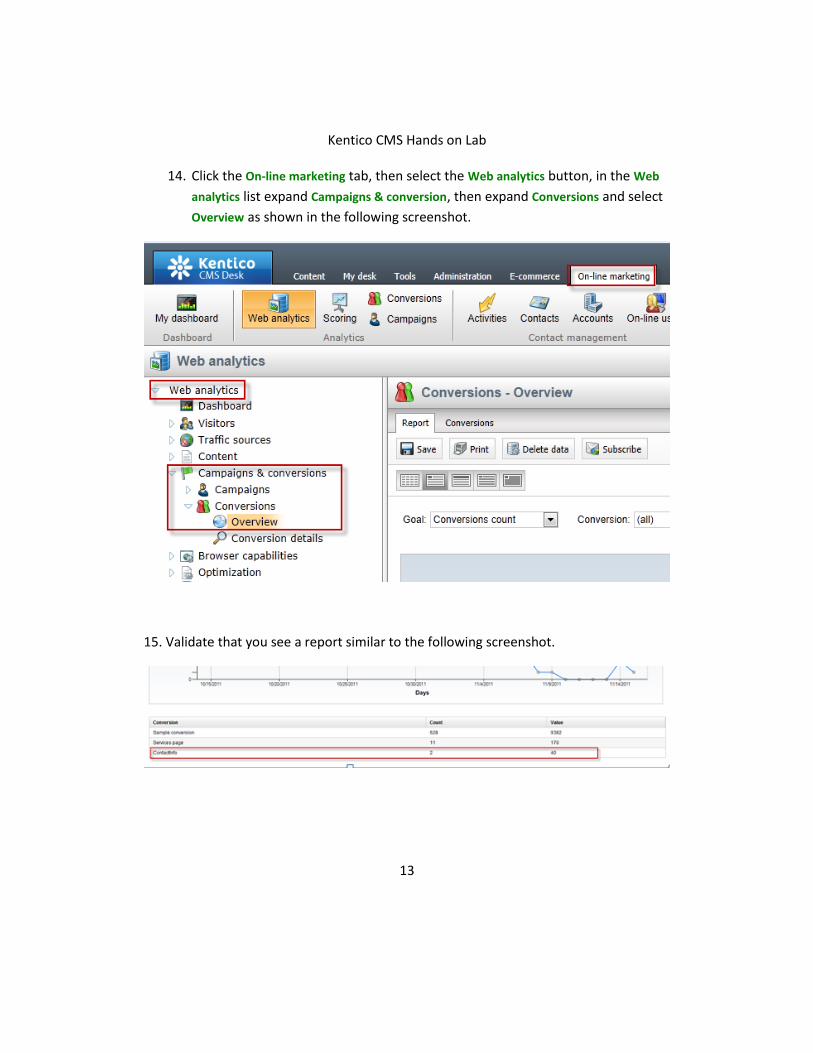
14. Click the On-line marketing tab, then select the Web analytics button, in the Web
analytics list expand Campaigns & conversion, then expand Conversions and select
Overview as shown in the following screenshot.
15. Validate that you see a report similar to the following screenshot.
Kentico CMS Hands on Lab
14
Lab 1-2: Creating the Services campaign
Kentico EMS offers a variety of ways to create campaigns. Each is dependent on the type
and purpose of your marketing strategy. With the completion of the online form we are
now ready to create the document based campaign for the Services page. This campaign
includes page visits to the Services page and completion of the online form.
Lab 2-1: Create a document campaign
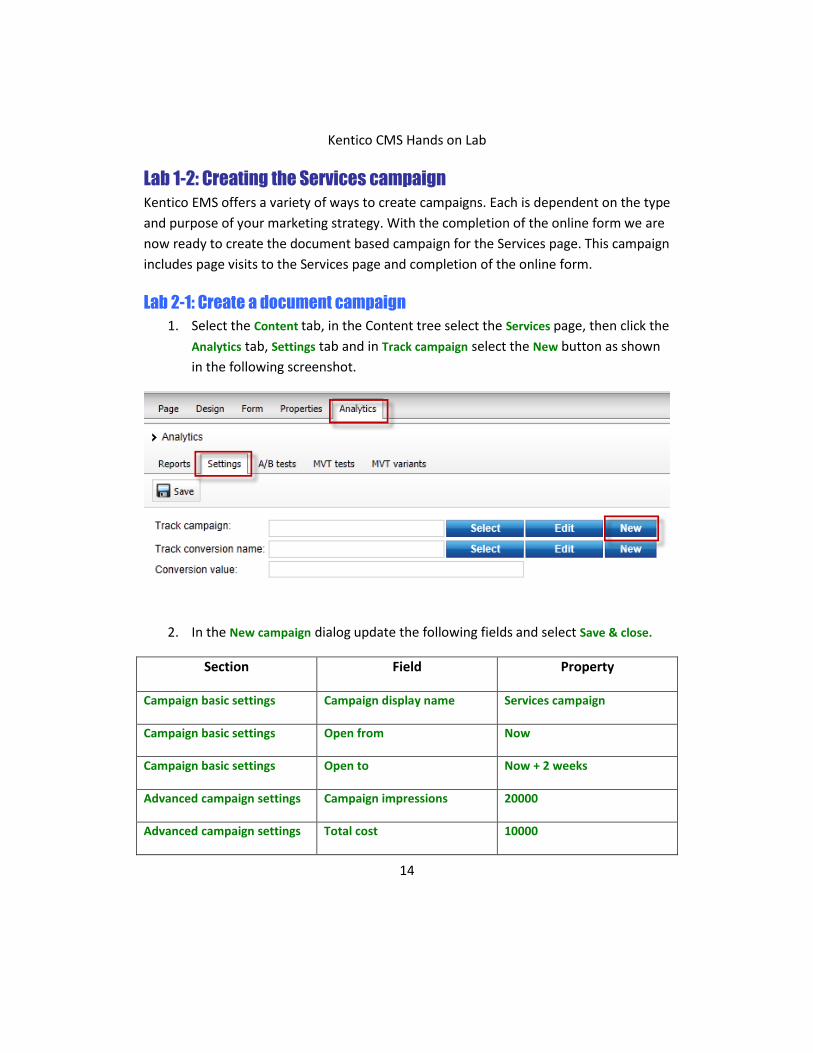
1. Select the Content tab, in the Content tree select the Services page, then click the
Analytics tab, Settings tab and in Track campaign select the New button as shown
in the following screenshot.
2. In the New campaign dialog update the following fields and select Save & close.
Section Field Property
Campaign basic settings Campaign display name Services campaign
Campaign basic settings Open from Now
Campaign basic settings Open to Now + 2 weeks
Advanced campaign settings Campaign impressions 20000
Advanced campaign settings Total cost 10000
Kentico CMS Hands on Lab
15
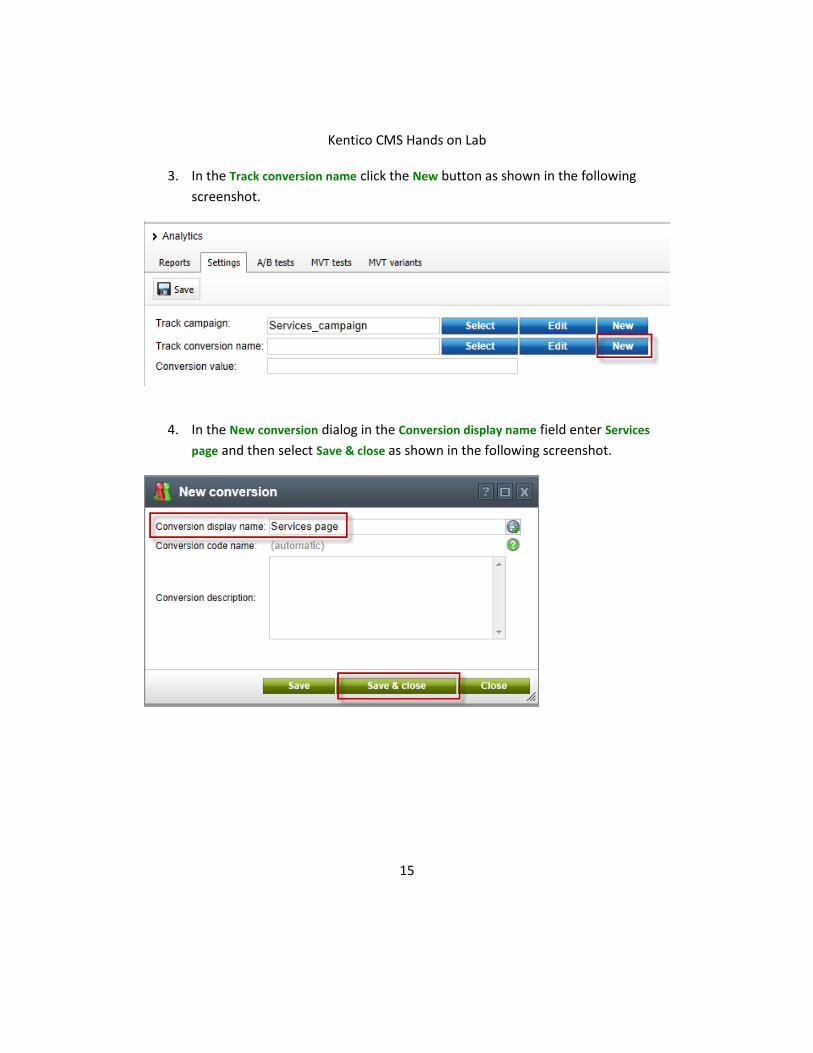
3. In the Track conversion name click the New button as shown in the following
screenshot.
4. In the New conversion dialog in the Conversion display name field enter Services
page and then select Save & close as shown in the following screenshot.
Kentico CMS Hands on Lab
16
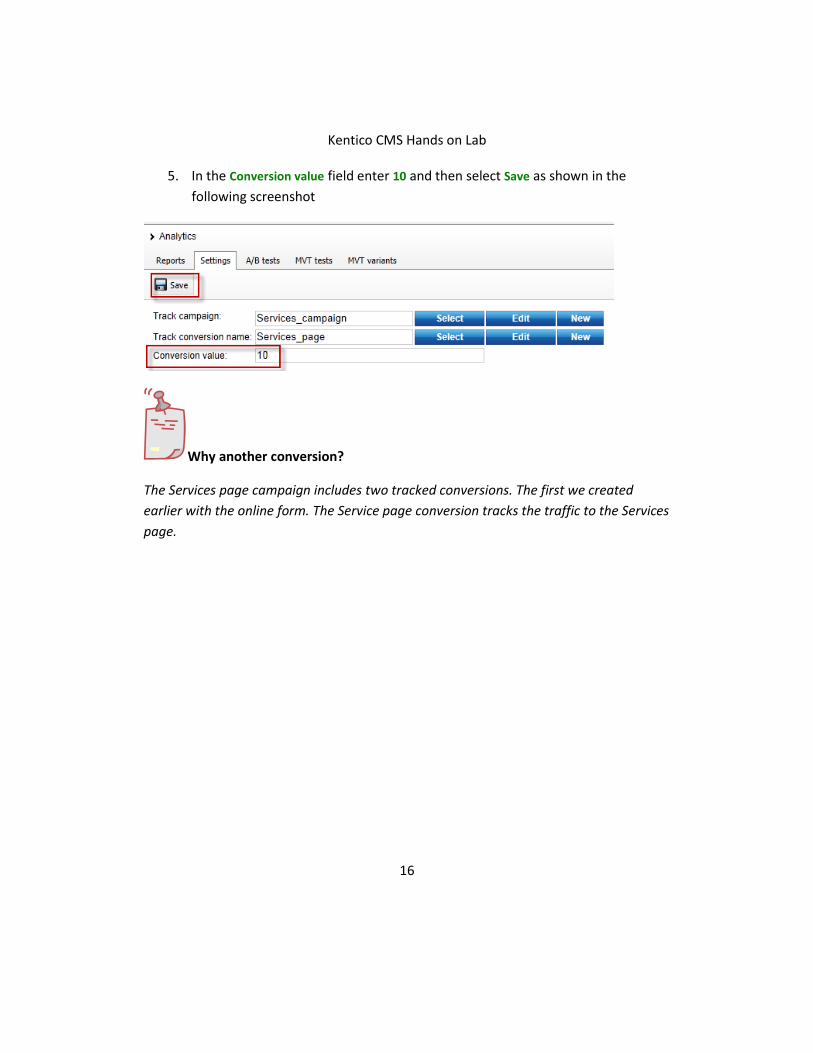
5. In the Conversion value field enter 10 and then select Save as shown in the
following screenshot
Why another conversion?
The Services page campaign includes two tracked conversions. The first we created
earlier with the online form. The Service page conversion tracks the traffic to the Services
page.
Kentico CMS Hands on Lab
17
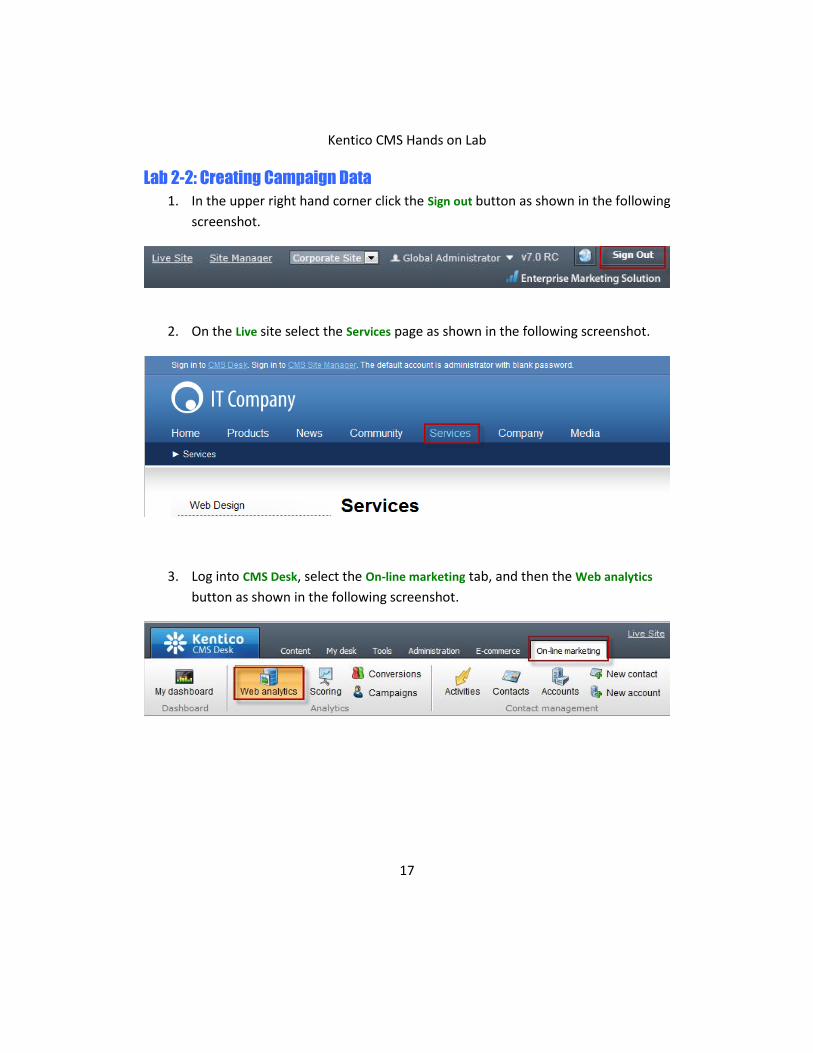
Lab 2-2: Creating Campaign Data
1. In the upper right hand corner click the Sign out button as shown in the following
screenshot.
2. On the Live site select the Services page as shown in the following screenshot.
3. Log into CMS Desk, select the On-line marketing tab, and then the Web analytics
button as shown in the following screenshot.
Kentico CMS Hands on Lab
18
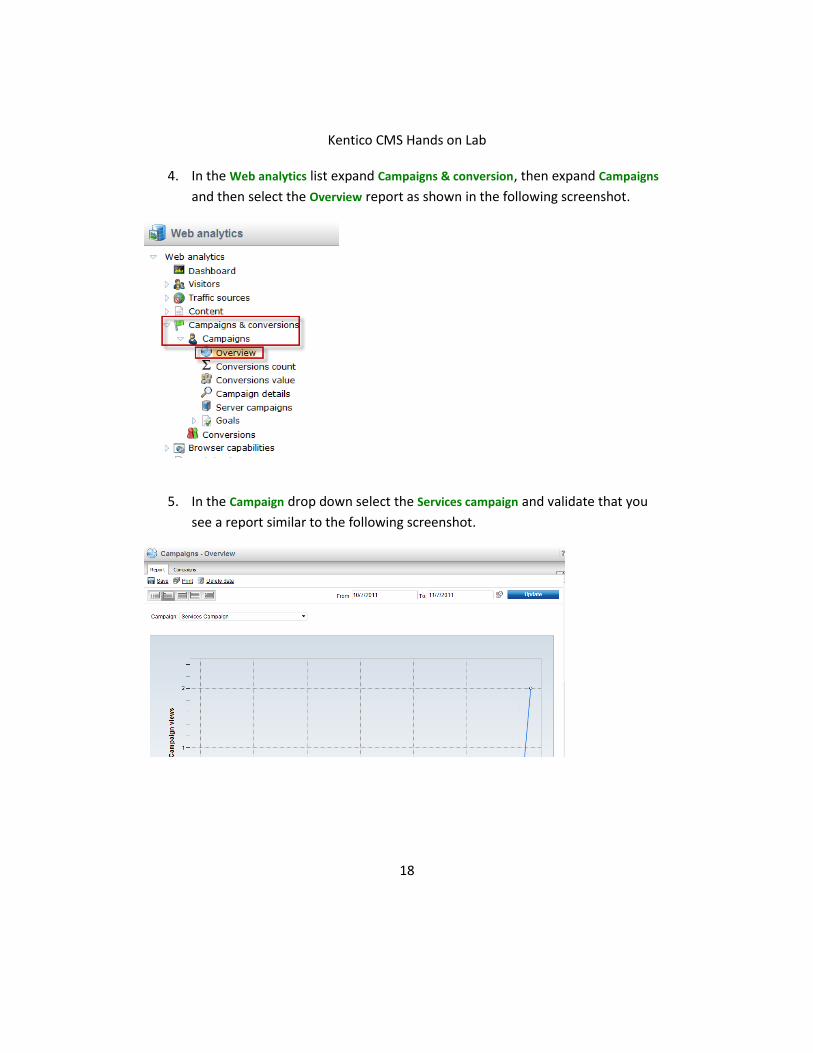
4. In the Web analytics list expand Campaigns & conversion, then expand Campaigns
and then select the Overview report as shown in the following screenshot.
5. In the Campaign drop down select the Services campaign and validate that you
see a report similar to the following screenshot.
Kentico CMS Hands on Lab
19
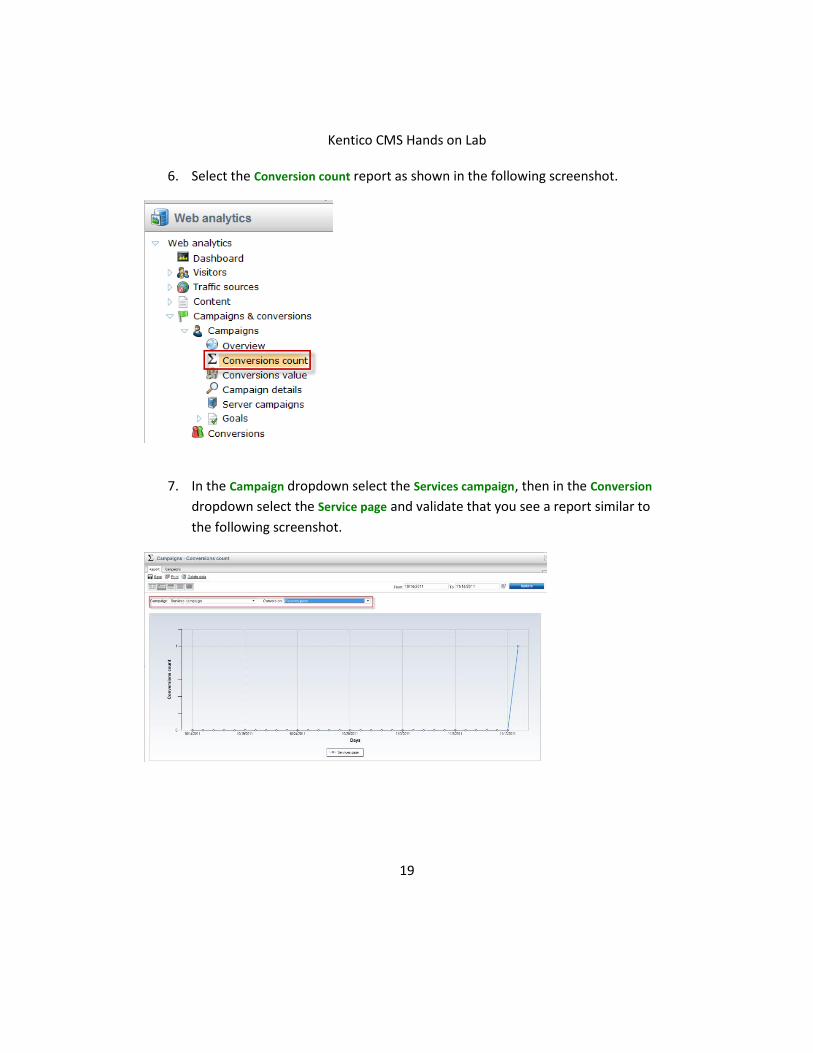
6. Select the Conversion count report as shown in the following screenshot.
7. In the Campaign dropdown select the Services campaign, then in the Conversion
dropdown select the Service page and validate that you see a report similar to
the following screenshot.
Kentico CMS Hands on Lab
20
Lab 1-3: Optimizing Campaigns with A/B testing
As a campaign progresses it’s important to continually evaluate and refine. This can
often include page elements like messaging and typography to find better ways to
engage site visitors. In this lab we will create an A/B test of our services page as a way to
increase our campaign conversions. Within Kentico EMS the first step is to create the
A/B test and then create the variant page that will be used for the testing process.
What’s the difference between A/B and MVT Testing?
A/B testing is different than MVT Testing. An A/B test uses a combination of pages and
tests elements like copy text, layouts, images and colors. MVT Testing is focused on web
part zones, web parts, and widgets.
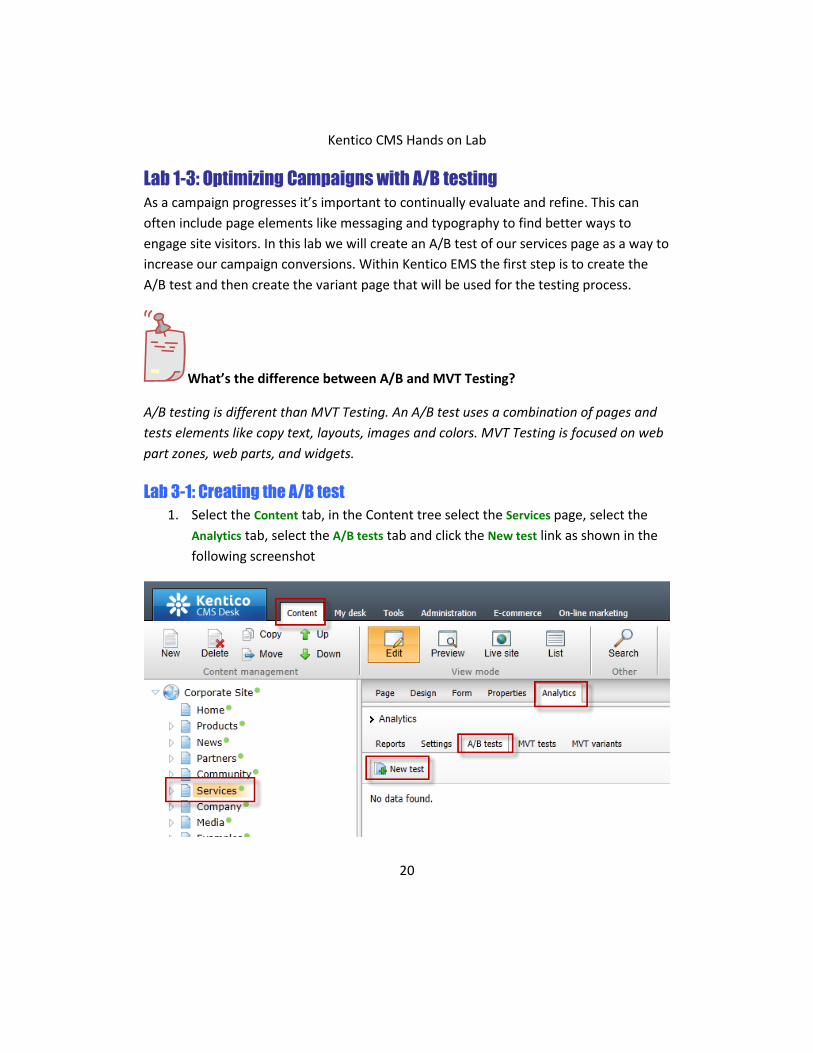
Lab 3-1: Creating the A/B test
1. Select the Content tab, in the Content tree select the Services page, select the
Analytics tab, select the A/B tests tab and click the New test link as shown in the
following screenshot
Kentico CMS Hands on Lab
21
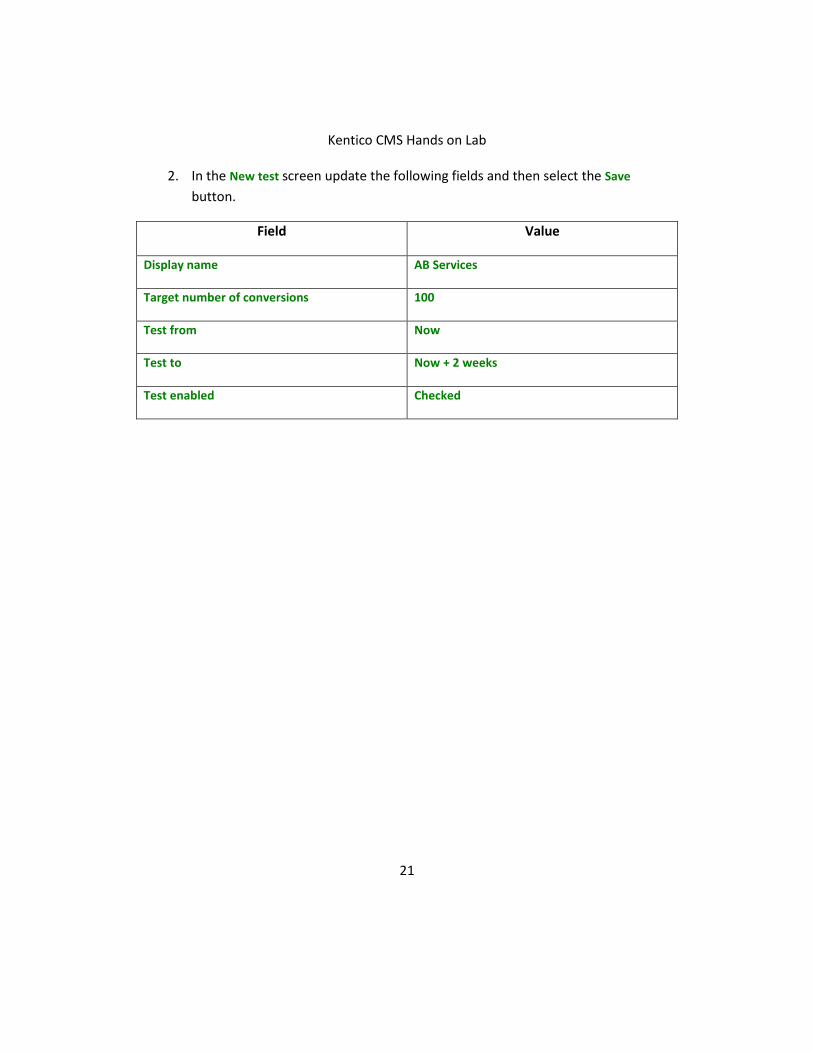
2. In the New test screen update the following fields and then select the Save
button.
Field Value
Display name AB Services
Target number of conversions 100
Test from Now
Test to Now + 2 weeks
Test enabled Checked
Kentico CMS Hands on Lab
22
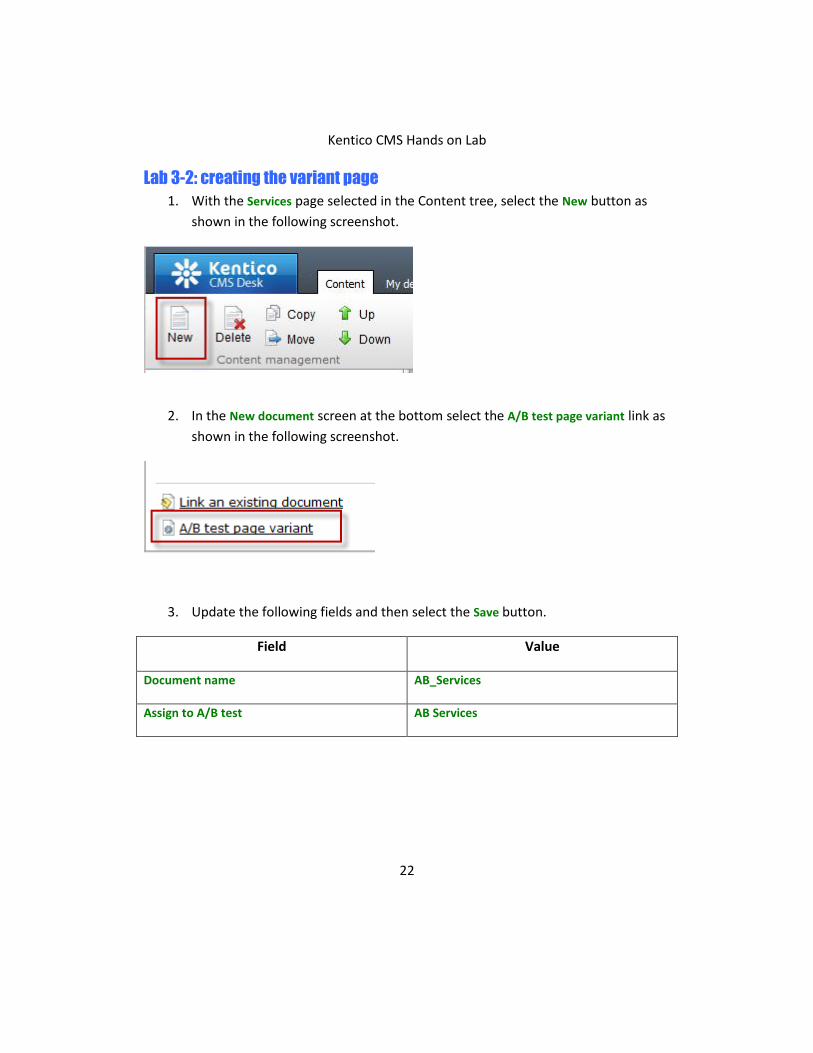
Lab 3-2: creating the variant page
1. With the Services page selected in the Content tree, select the New button as
shown in the following screenshot.
2. In the New document screen at the bottom select the A/B test page variant link as
shown in the following screenshot.
3. Update the following fields and then select the Save button.
Field Value
Document name AB_Services
Assign to A/B test AB Services
Kentico CMS Hands on Lab
23
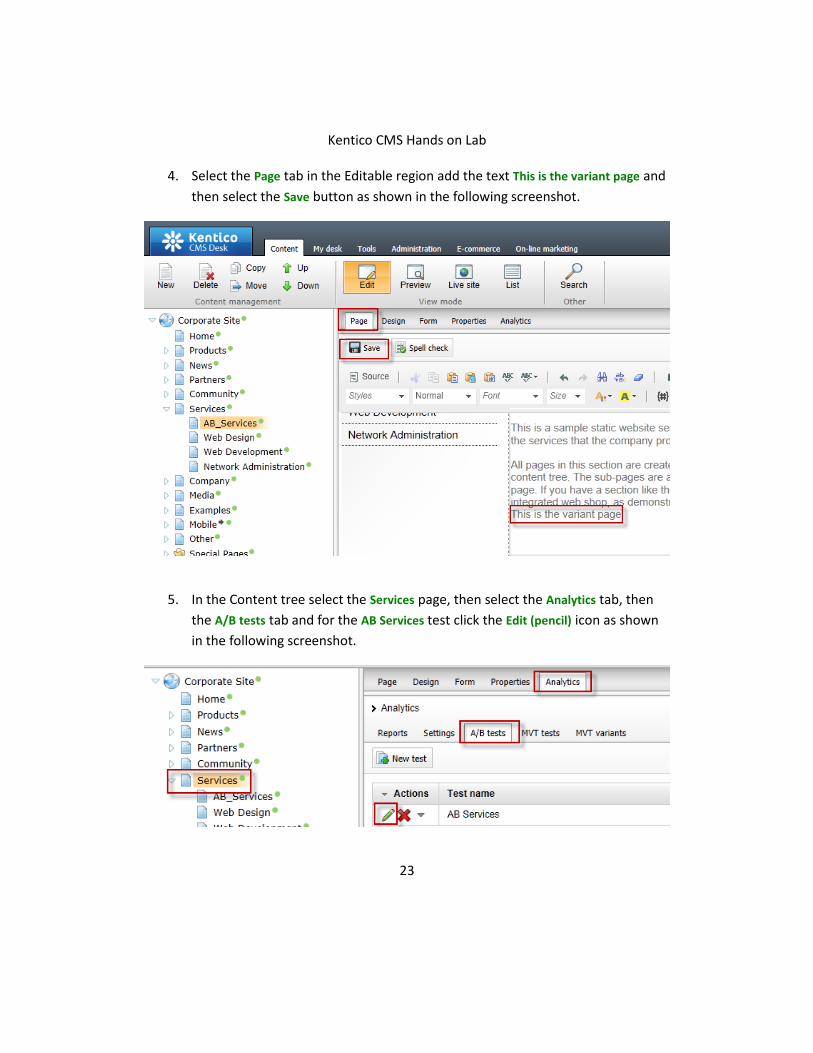
4. Select the Page tab in the Editable region add the text This is the variant page and
then select the Save button as shown in the following screenshot.
5. In the Content tree select the Services page, then select the Analytics tab, then
the A/B tests tab and for the AB Services test click the Edit (pencil) icon as shown
in the following screenshot.
Kentico CMS Hands on Lab
24
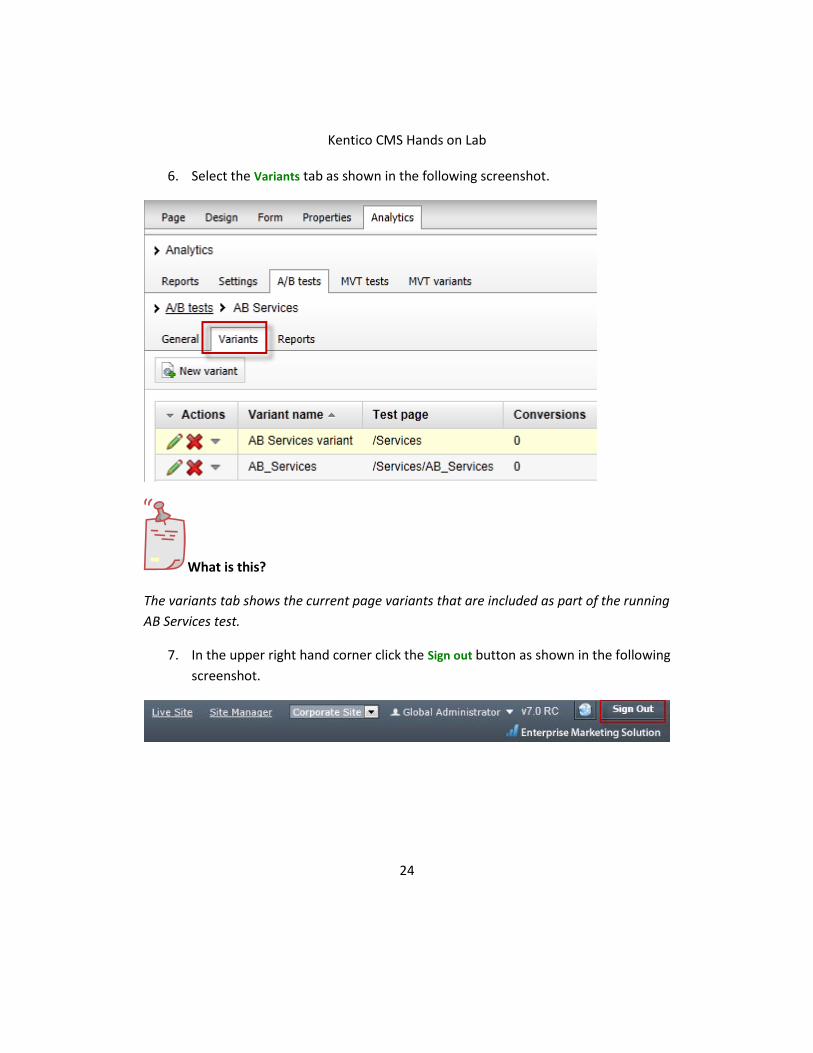
6. Select the Variants tab as shown in the following screenshot.
What is this?
The variants tab shows the current page variants that are included as part of the running
AB Services test.
7. In the upper right hand corner click the Sign out button as shown in the following
screenshot.
Kentico CMS Hands on Lab
25
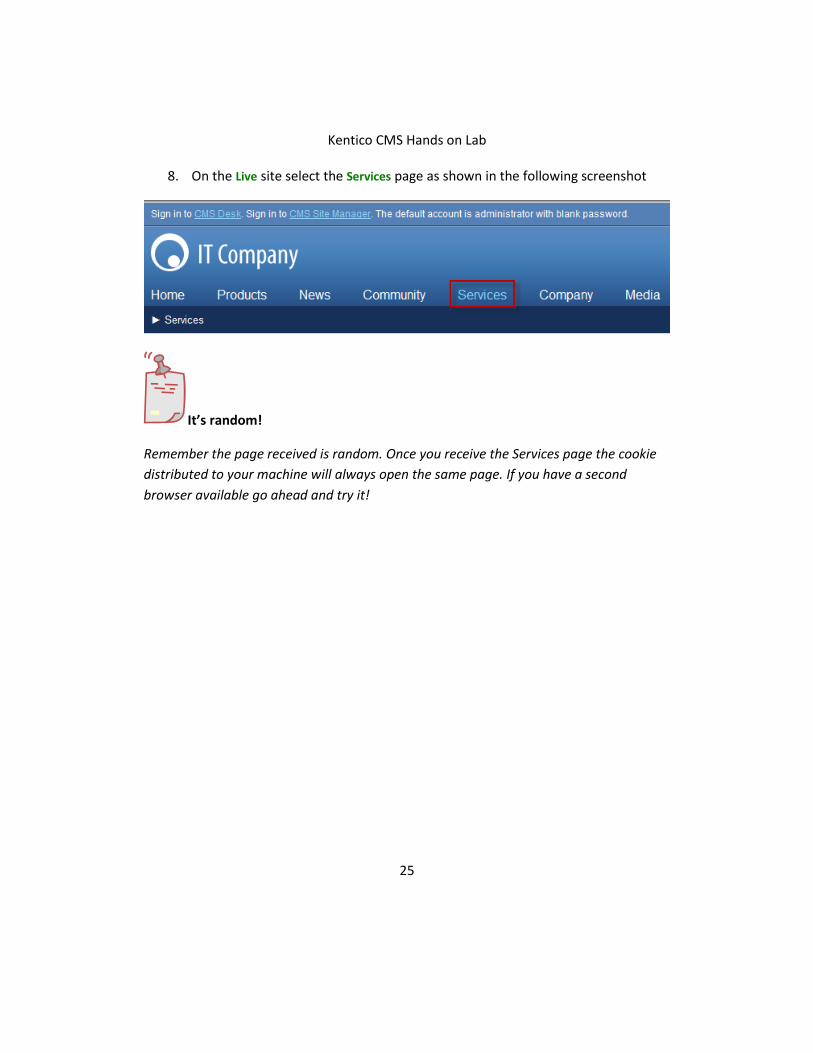
8. On the Live site select the Services page as shown in the following screenshot
It’s random!
Remember the page received is random. Once you receive the Services page the cookie
distributed to your machine will always open the same page. If you have a second
browser available go ahead and try it!
Kentico CMS Hands on Lab
26
Lab 1-4: Scoring contacts
With the campaign running and proper demand generation our page will begin to
receive site visits and contact form submissions. Once leads are collected they can be
scored to show the weighting of their potential opportunities for our sales staff. In this
lab we will enter our contact information and then create an Activity based scoring rule.
Lab 4-1: Creating the contact
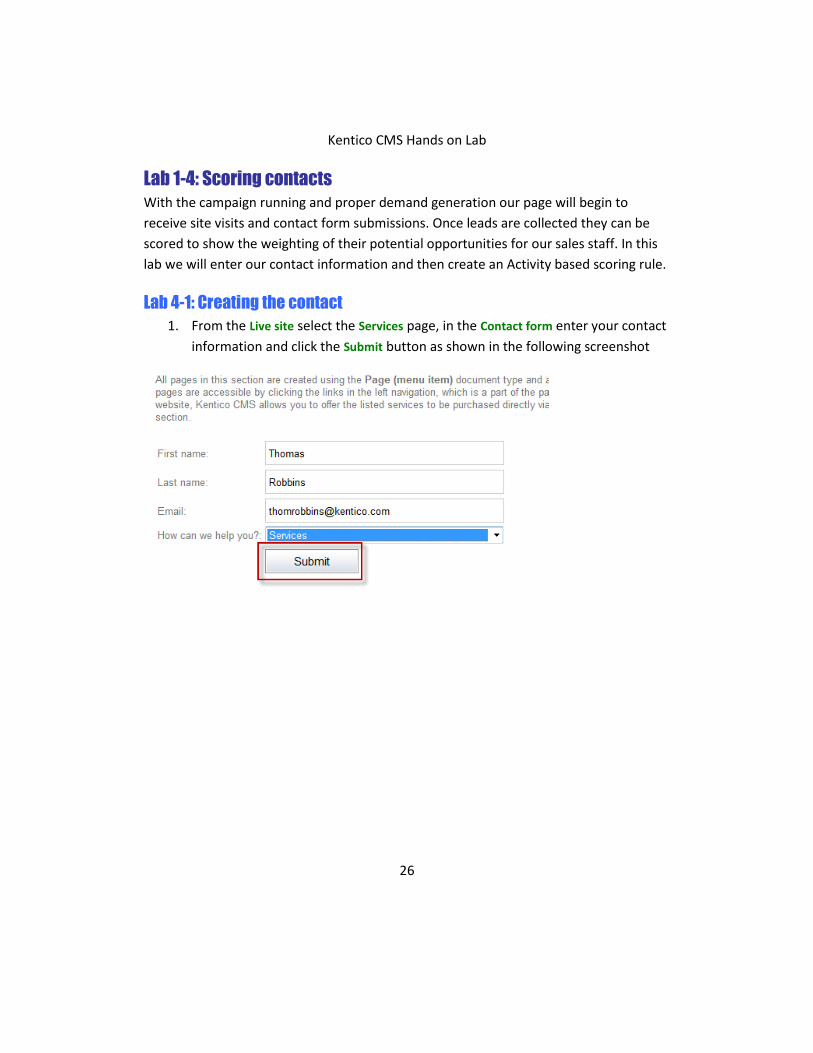
1. From the Live site select the Services page, in the Contact form enter your contact
information and click the Submit button as shown in the following screenshot
Kentico CMS Hands on Lab
27
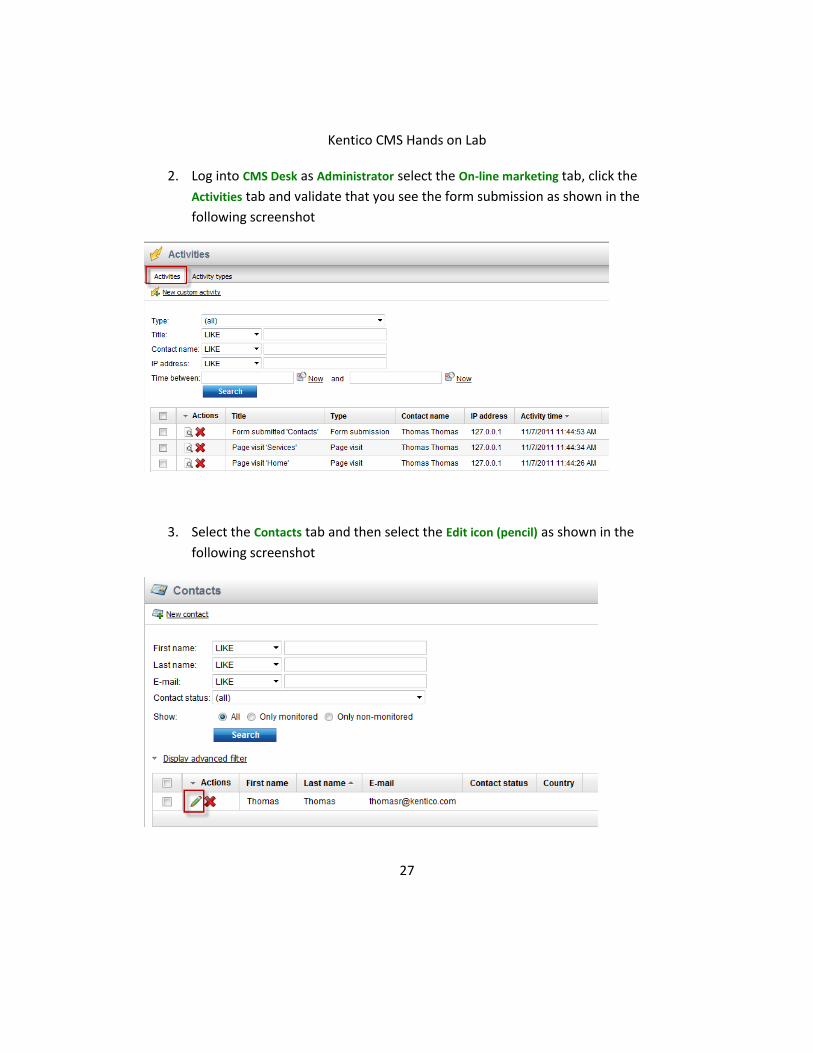
2. Log into CMS Desk as Administrator select the On-line marketing tab, click the
Activities tab and validate that you see the form submission as shown in the
following screenshot
3. Select the Contacts tab and then select the Edit icon (pencil) as shown in the
following screenshot
Kentico CMS Hands on Lab
28
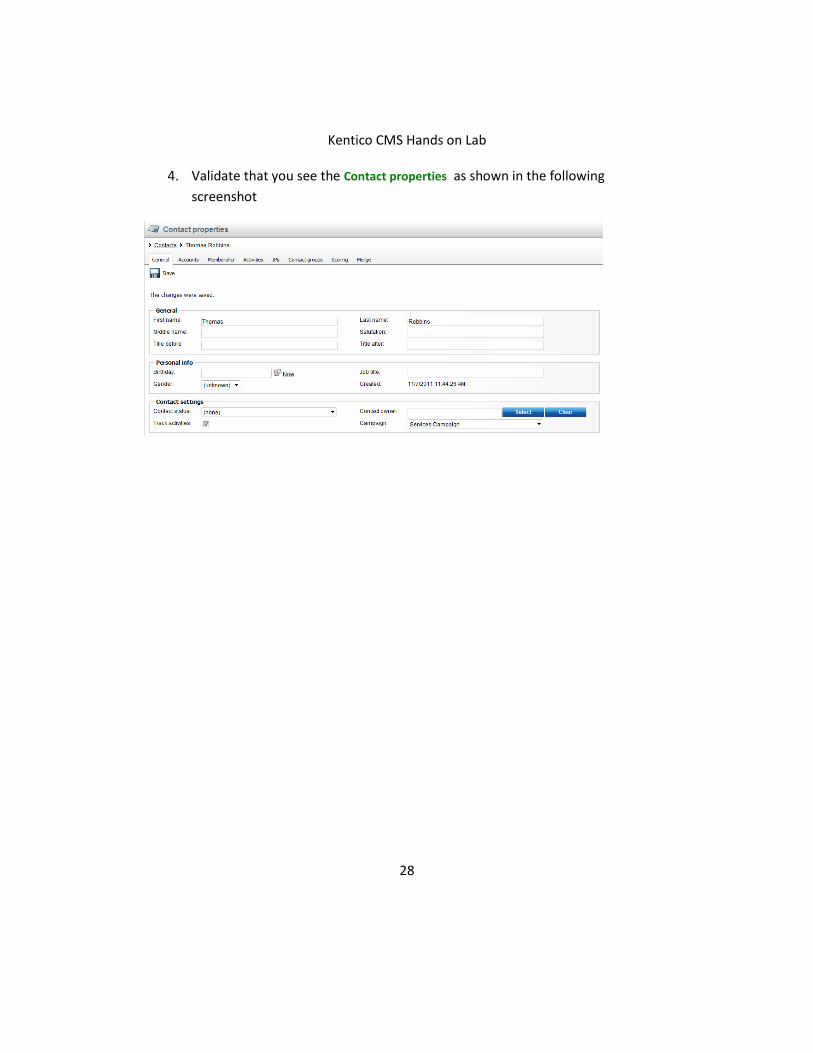
4. Validate that you see the Contact properties as shown in the following
screenshot
Kentico CMS Hands on Lab
29
Lab 4-2: Creating the scoring rules
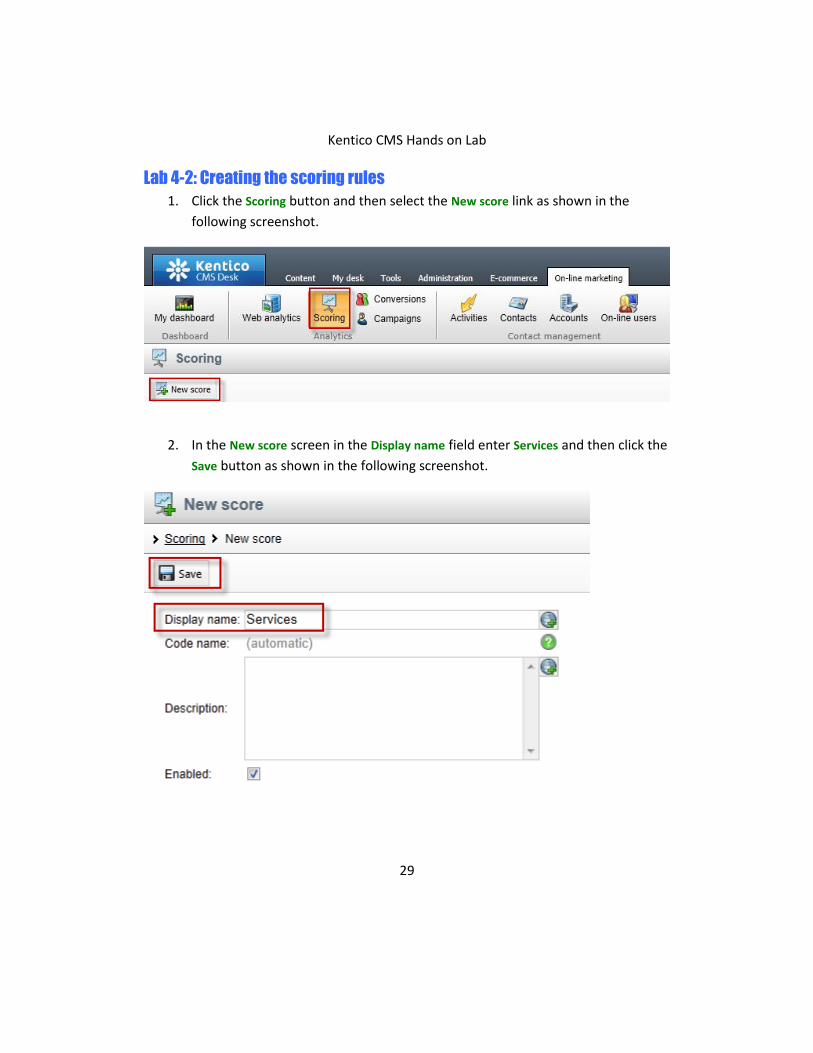
1. Click the Scoring button and then select the New score link as shown in the
following screenshot.
2. In the New score screen in the Display name field enter Services and then click the
Save button as shown in the following screenshot.
Kentico CMS Hands on Lab
30
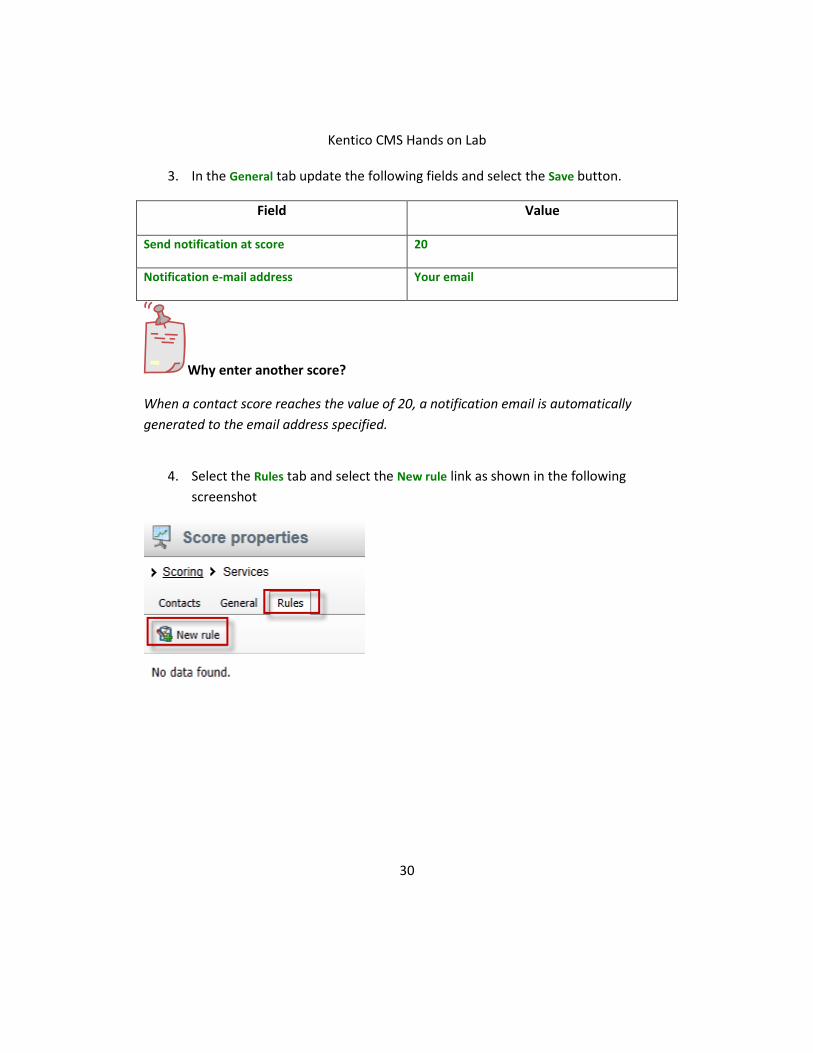
3. In the General tab update the following fields and select the Save button.
Field Value
Send notification at score 20
Notification e-mail address Your email
Why enter another score?
When a contact score reaches the value of 20, a notification email is automatically
generated to the email address specified.
4. Select the Rules tab and select the New rule link as shown in the following
screenshot
Kentico CMS Hands on Lab
31
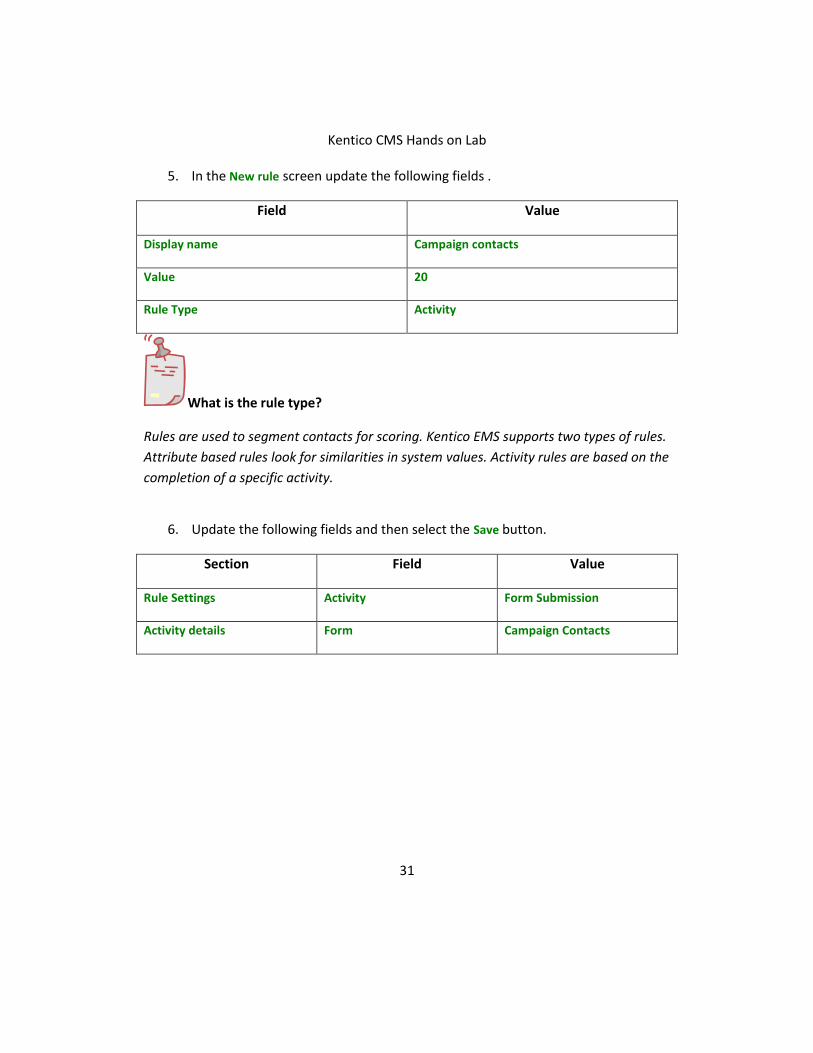
5. In the New rule screen update the following fields .
Field Value
Display name Campaign contacts
Value 20
Rule Type Activity
What is the rule type?
Rules are used to segment contacts for scoring. Kentico EMS supports two types of rules.
Attribute based rules look for similarities in system values. Activity rules are based on the
completion of a specific activity.
6. Update the following fields and then select the Save button.
Section Field Value
Rule Settings Activity Form Submission
Activity details Form Campaign Contacts
Kentico CMS Hands on Lab
32
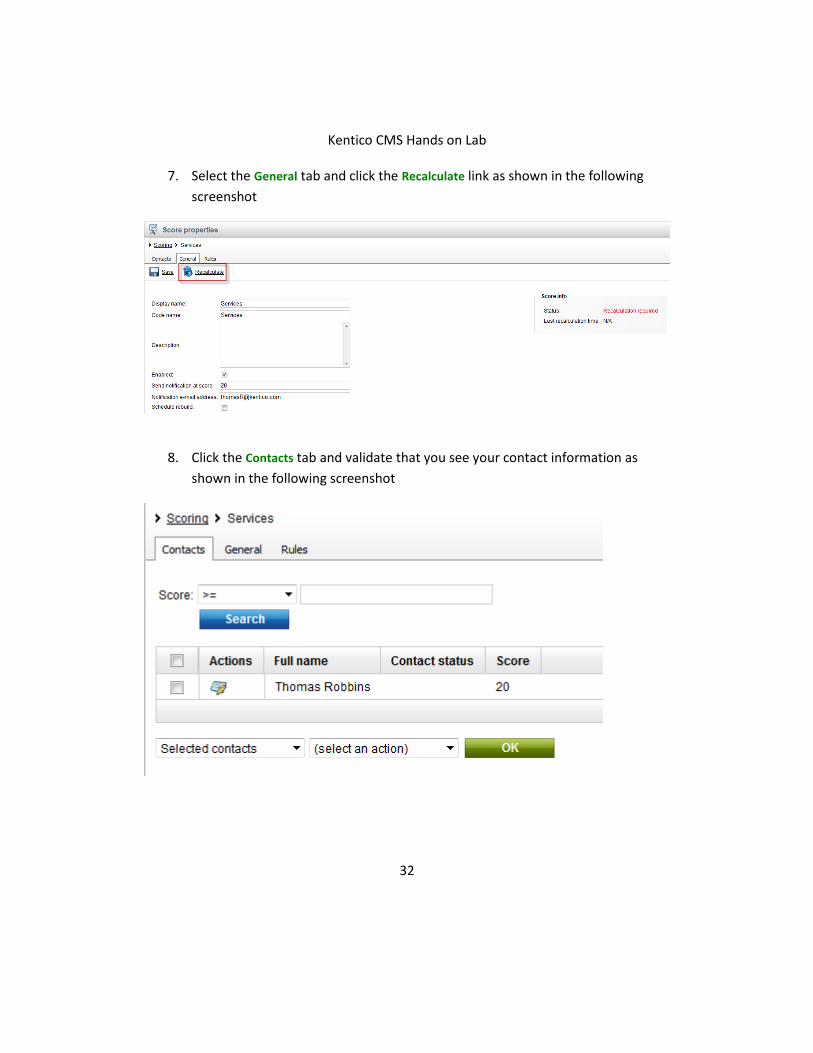
7. Select the General tab and click the Recalculate link as shown in the following
screenshot
8. Click the Contacts tab and validate that you see your contact information as
shown in the following screenshot
Kentico CMS Hands on Lab
33
Summary
In this set of Hands on Labs we looked at how to create a campaign and collect
customer information. We then looked at how we can optimize this campaign further
with an A/B test. Specifically, we covered the following.
Creating an online form
Linking an online form to contacts with EMS
Creating a document campaign
Creating an A/B test
Collecting contact information
Scoring contacts
Key Resources:
http://devnet.kentico.com/Documentation.aspx
http://devnet.kentico.com/Videos/ABTest.aspx
Kentico CMS Hands on Lab
34
Hands on Lab 2:
Custom Table: Create and Display
Lab overview
System Requirements:
Kentico CMS 7 with the Sample Corporate Site
Intended Lab Audience:
CMS Designers
CMS Developers
Lab introduction
Kentico CMS provides custom tables as a way to store and manage custom data.
Technically, they are SQL tables and coupled stored procedures. Once a custom table is
created and contains data, the next step is to provide a display for site visitors. In this
lab we will add a custom table and then use the Basic Repeater web part to display it on
a page. We will also look at how to use the Kentico CMS API to add and edit an existing
item. In completing this set of labs you will perform the following tasks:
Create a custom table
Explore the Data Source web part
Explore the Basic Repeater web part
Edit a transformation for better visual display
Add a new item to the custom table using the Kentico CMS API
Edit an existing item using the Kentico CMS API
Kentico CMS Hands on Lab
35
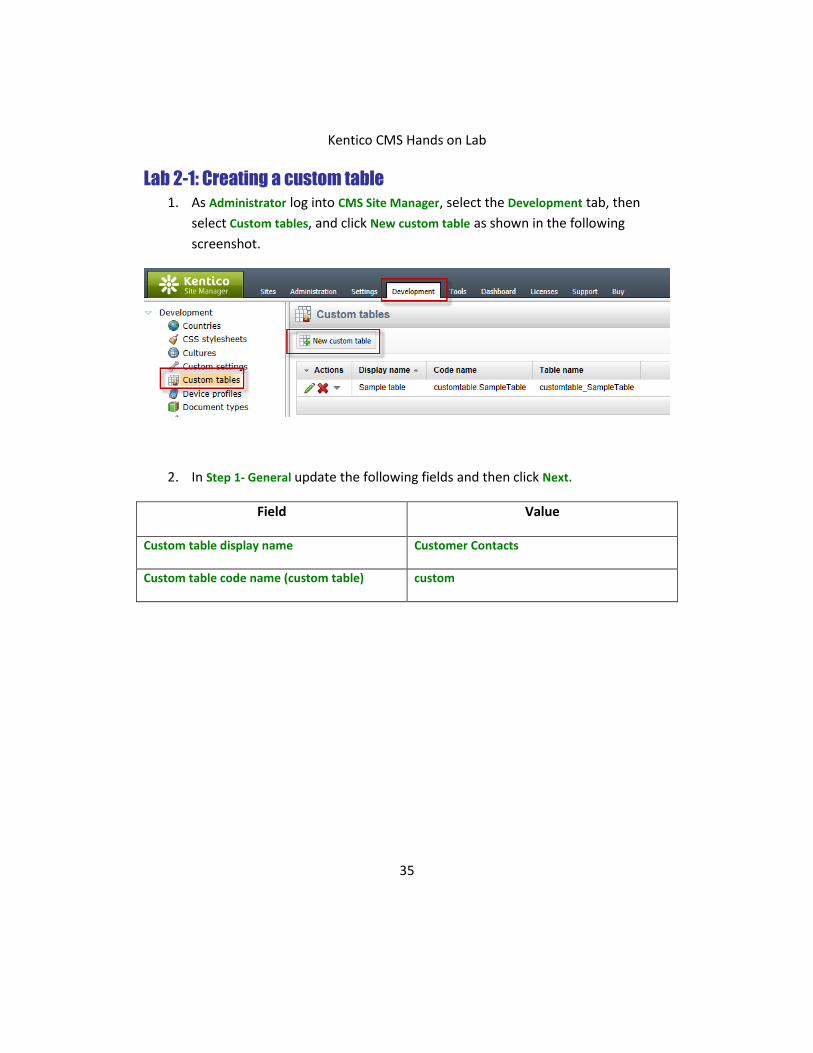
Lab 2-1: Creating a custom table
1. As Administrator log into CMS Site Manager, select the Development tab, then
select Custom tables, and click New custom table as shown in the following
screenshot.
2. In Step 1- General update the following fields and then click Next.
Field Value
Custom table display name Customer Contacts
Custom table code name (custom table) custom
Kentico CMS Hands on Lab
36
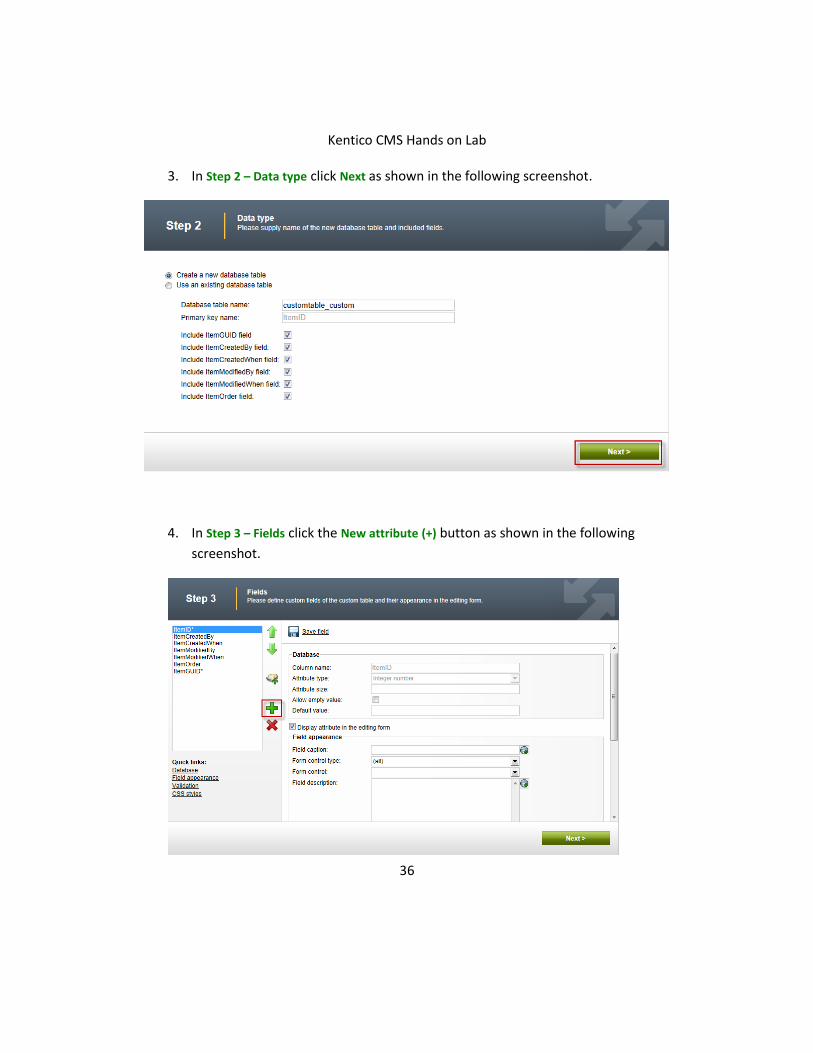
3. In Step 2 – Data type click Next as shown in the following screenshot.
4. In Step 3 – Fields click the New attribute (+) button as shown in the following
screenshot.

Kentico CMS Hands on Lab
37
5. In the New attribute (+) dialog update the following fields and then click Save.
Section Field Value
Database Column name Name
Database Attribute size 100
Field appearance Field caption Name
Field appearance Form control Textbox
6. Select the New attribute (+) button, update the following fields and then click
Save.
Section Field Value
Database Column name Title
Database Attribute size 100
Field appearance Field caption Title
Field appearance Form control Textbox
7. Select the New attribute (+) button, update the following fields, and then click
Save.
Section Field Value
Database Column name Email
Database Attribute size 100
Field appearance Field caption Email
Field appearance Form control E-mail
Kentico CMS Hands on Lab
38
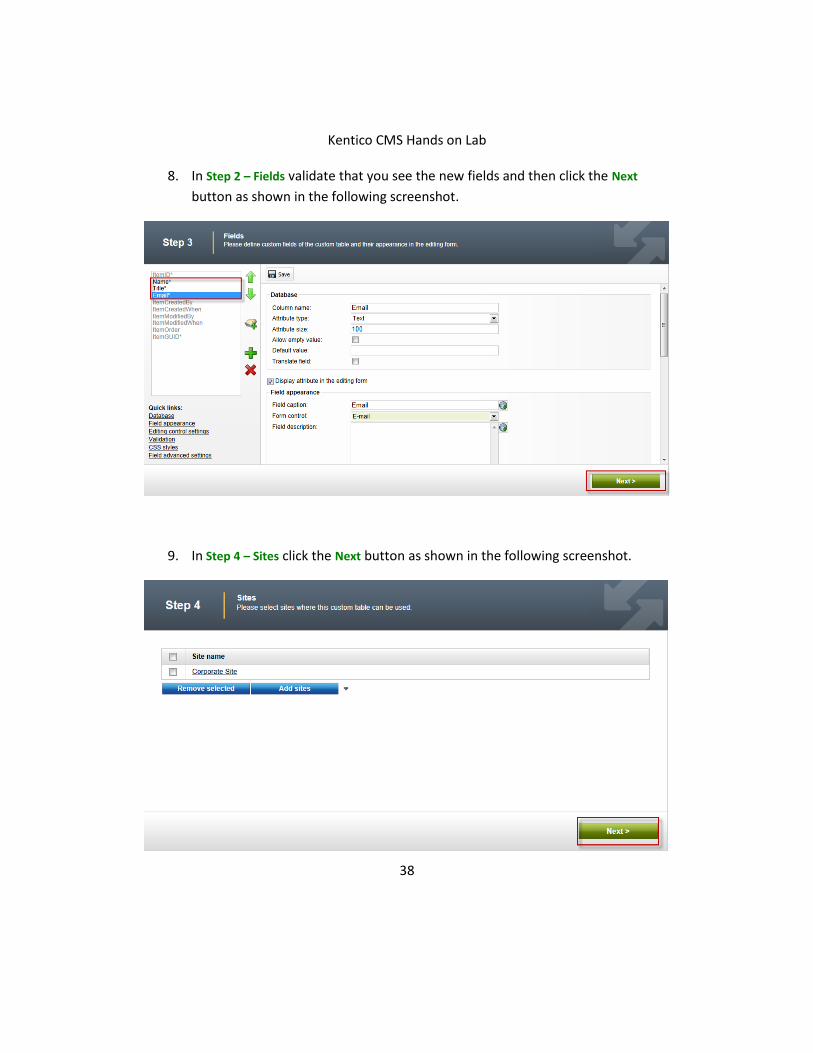
8. In Step 2 – Fields validate that you see the new fields and then click the Next
button as shown in the following screenshot.
9. In Step 4 – Sites click the Next button as shown in the following screenshot.
Kentico CMS Hands on Lab
39
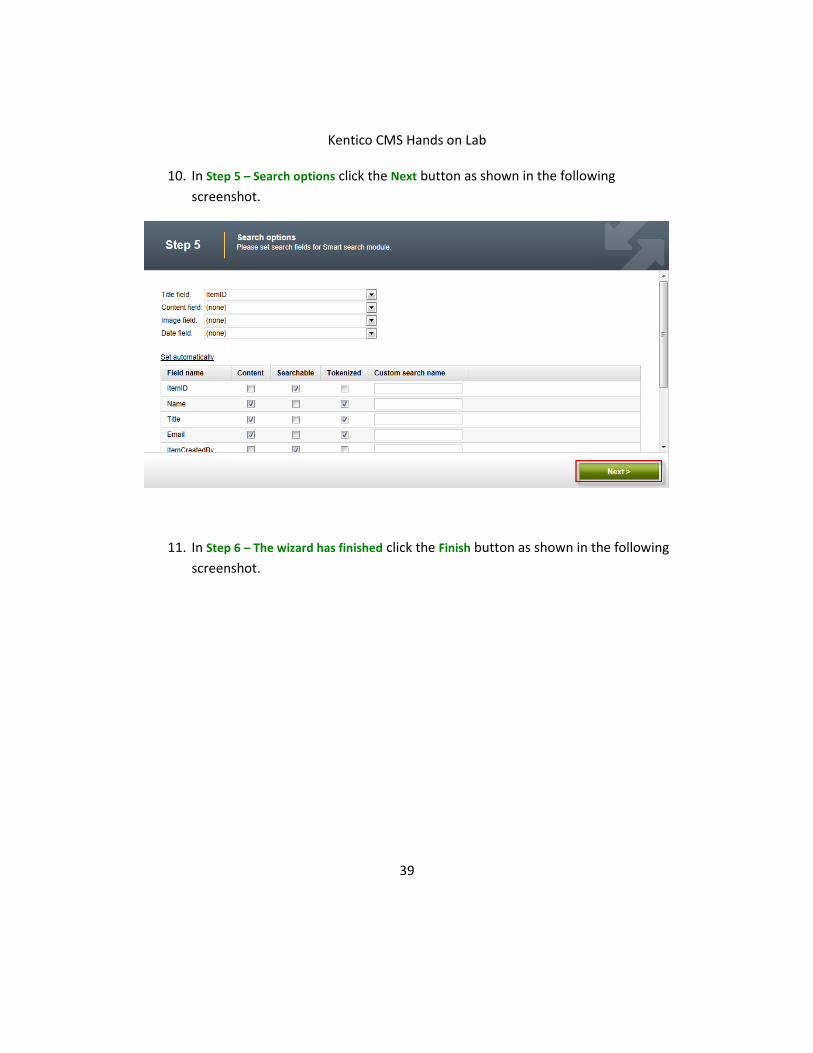
10. In Step 5 – Search options click the Next button as shown in the following
screenshot.
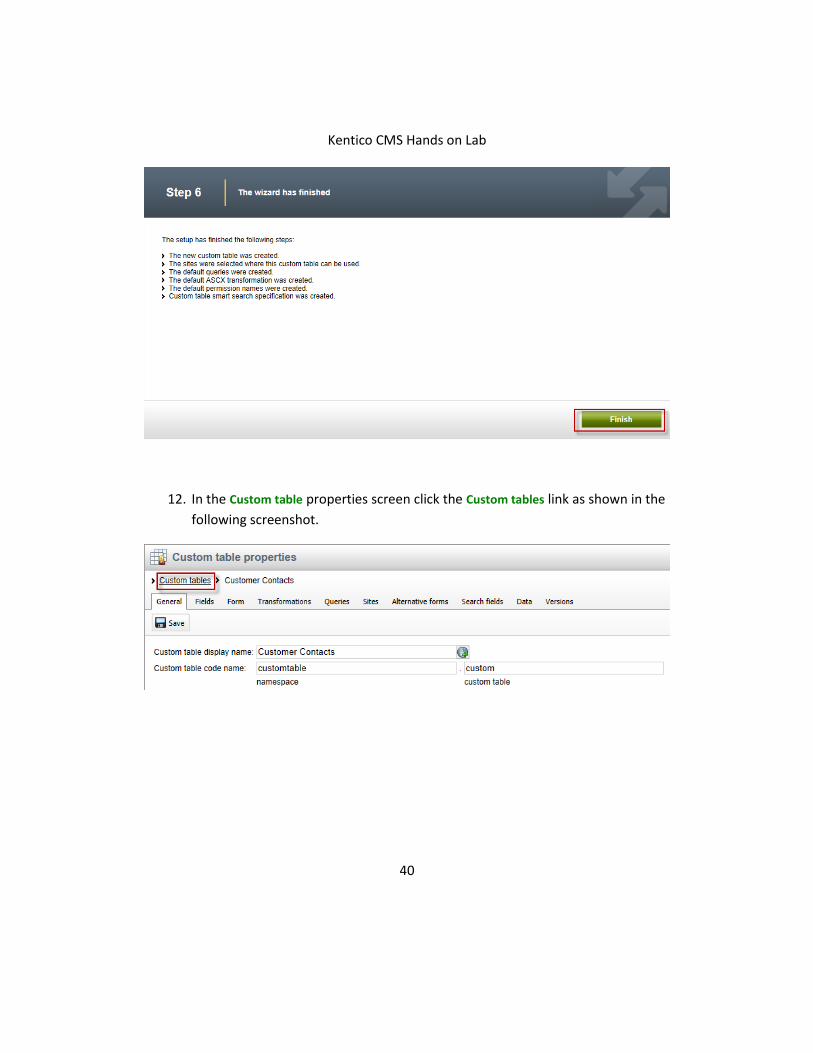
11. In Step 6 – The wizard has finished click the Finish button as shown in the following
screenshot.
Kentico CMS Hands on Lab
40
12. In the Custom table properties screen click the Custom tables link as shown in the
following screenshot.

Kentico CMS Hands on Lab
41
13. In the Custom tables screen validate that the Customer Contacts custom table is
displayed as shown in the following screenshot.
Kentico CMS Hands on Lab
42
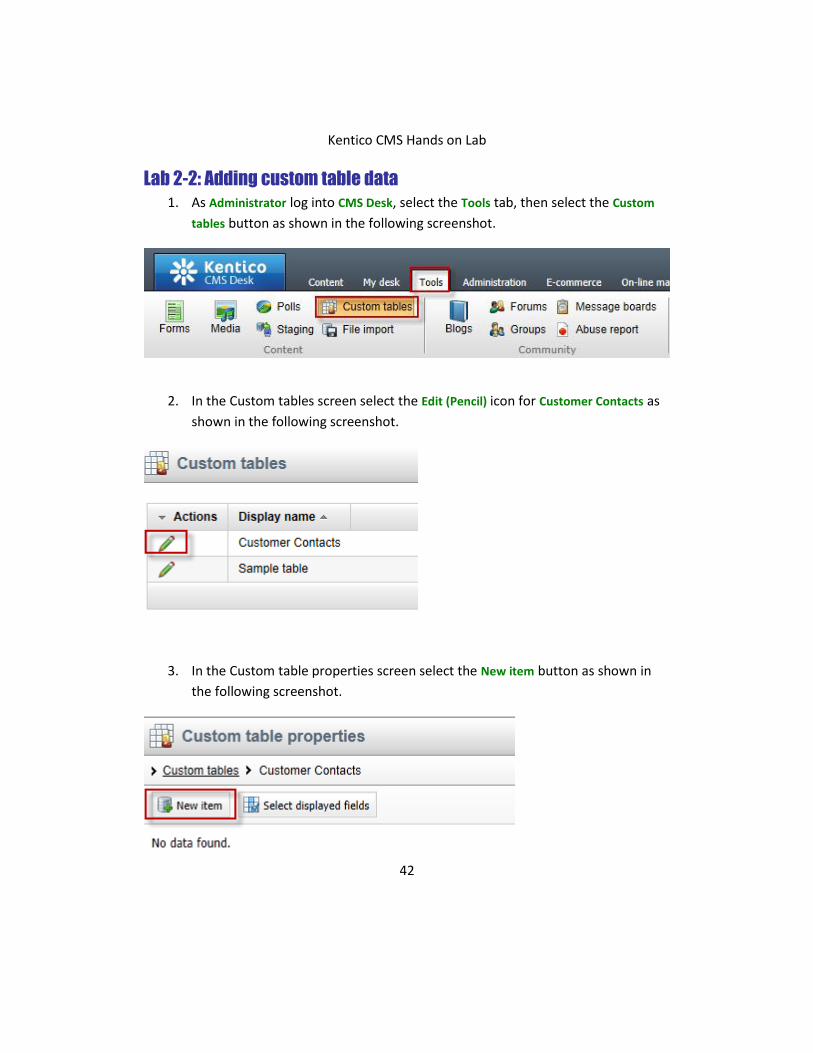
Lab 2-2: Adding custom table data
1. As Administrator log into CMS Desk, select the Tools tab, then select the Custom
tables button as shown in the following screenshot.
2. In the Custom tables screen select the Edit (Pencil) icon for Customer Contacts as
shown in the following screenshot.
3. In the Custom table properties screen select the New item button as shown in
the following screenshot.
Kentico CMS Hands on Lab
43
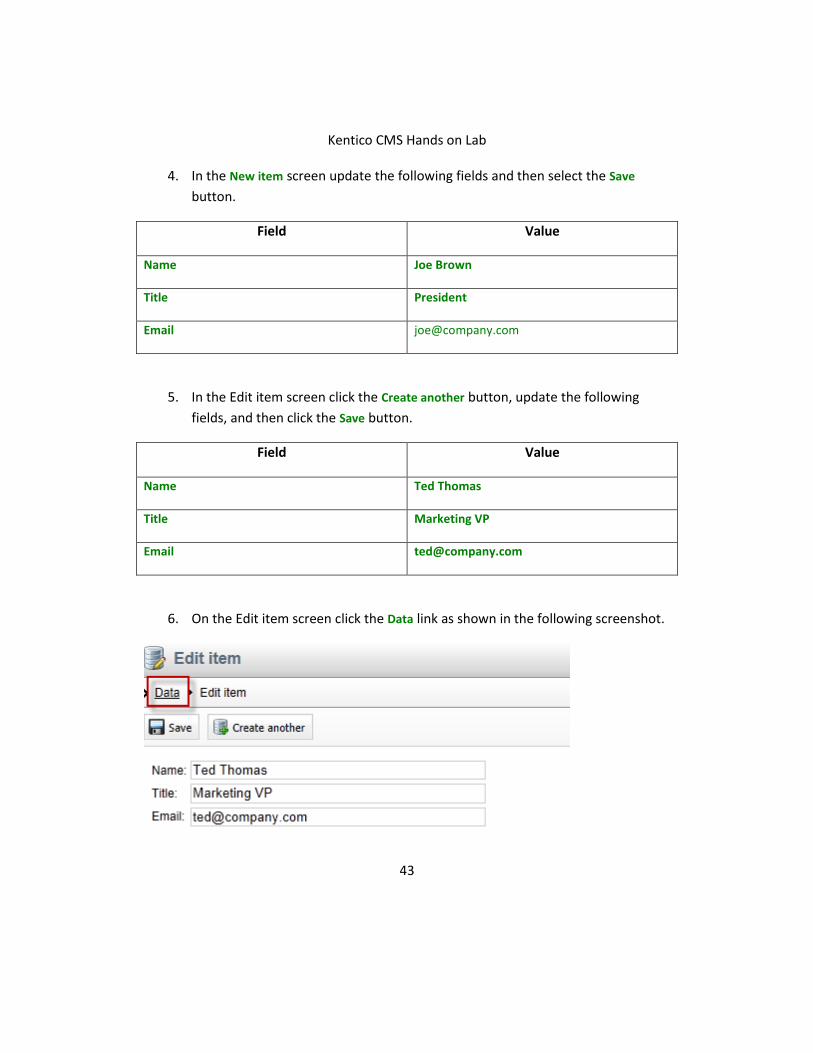
4. In the New item screen update the following fields and then select the Save
button.
Field Value
Name Joe Brown
Title President
Email [email protected]
5. In the Edit item screen click the Create another button, update the following
fields, and then click the Save button.
Field Value
Name Ted Thomas
Title Marketing VP
Email [email protected]
6. On the Edit item screen click the Data link as shown in the following screenshot.
Kentico CMS Hands on Lab
44
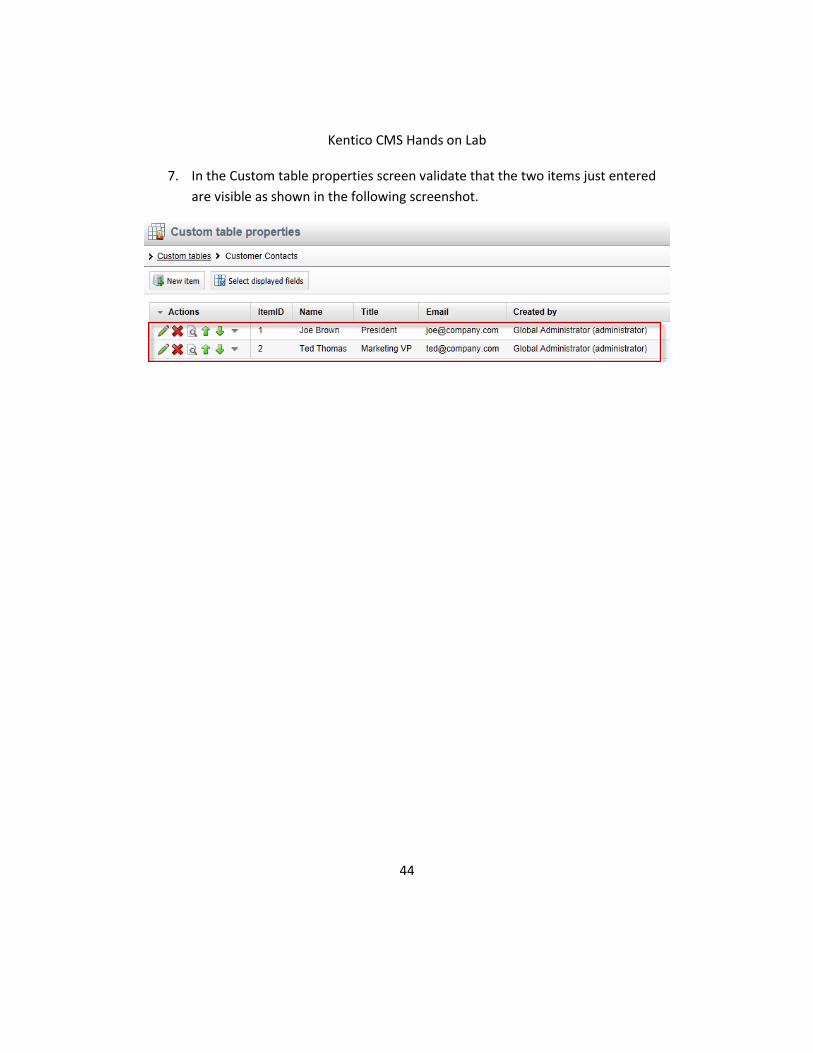
7. In the Custom table properties screen validate that the two items just entered
are visible as shown in the following screenshot.
Kentico CMS Hands on Lab
45
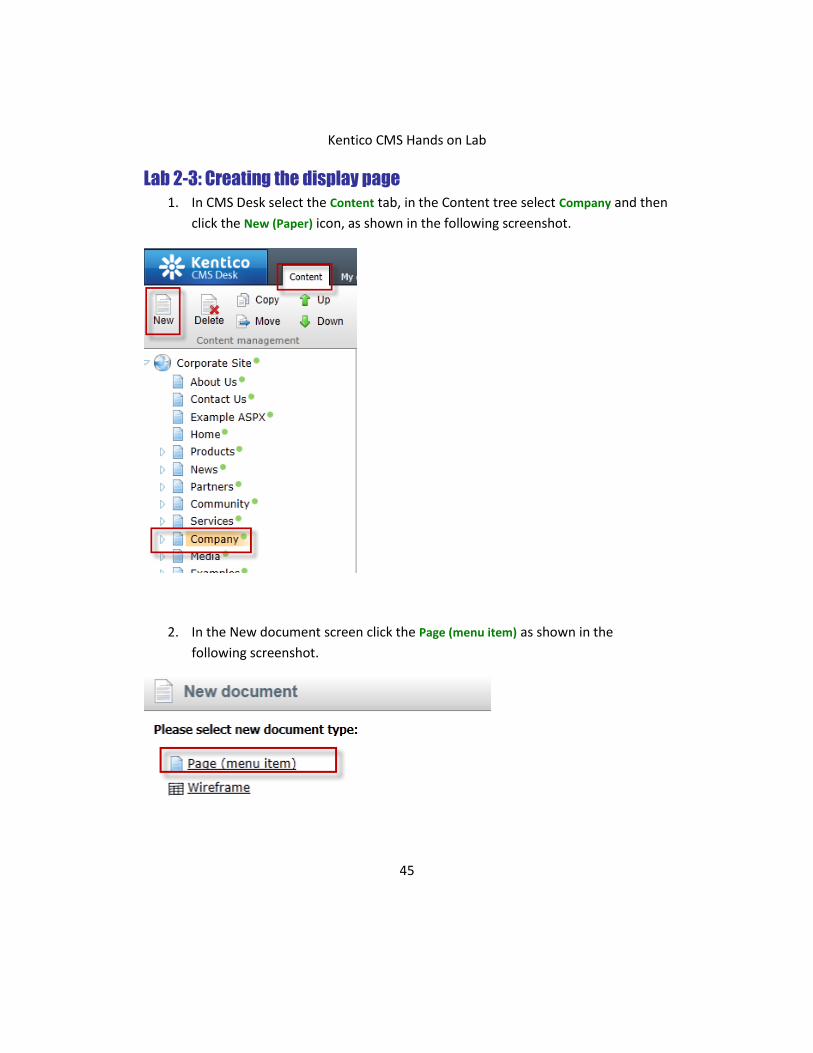
Lab 2-3: Creating the display page
1. In CMS Desk select the Content tab, in the Content tree select Company and then
click the New (Paper) icon, as shown in the following screenshot.
2. In the New document screen click the Page (menu item) as shown in the
following screenshot.
Kentico CMS Hands on Lab
46
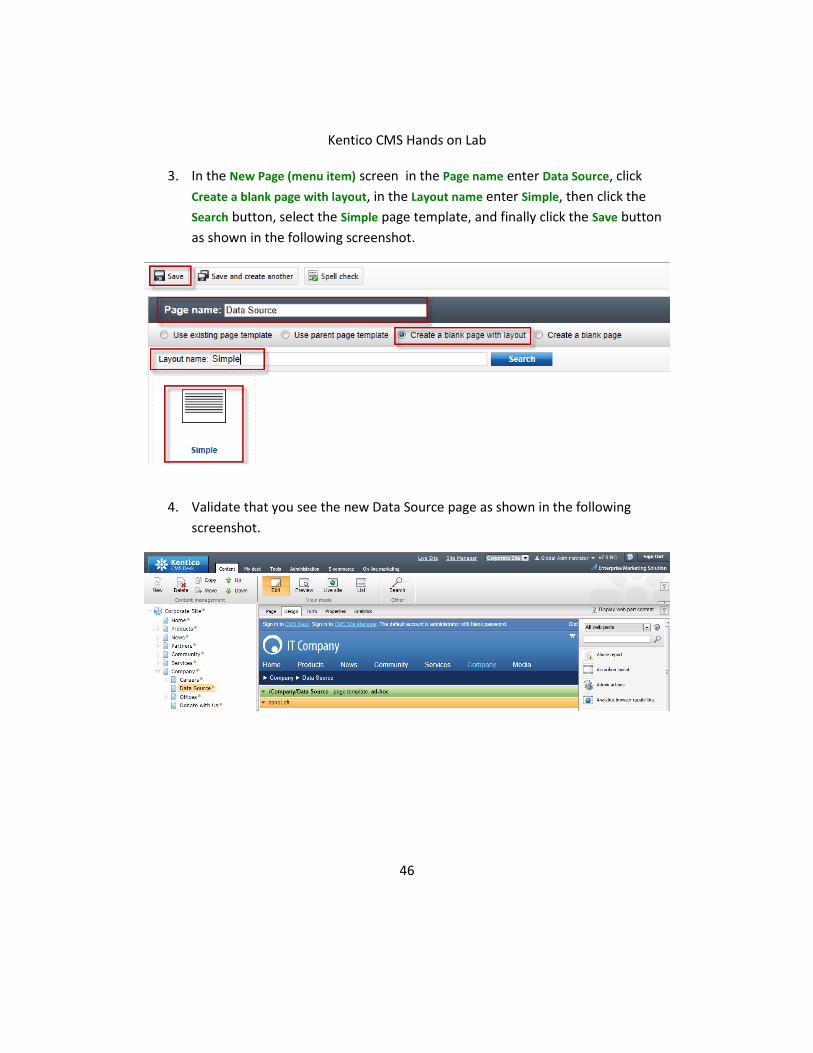
3. In the New Page (menu item) screen in the Page name enter Data Source, click
Create a blank page with layout, in the Layout name enter Simple, then click the
Search button, select the Simple page template, and finally click the Save button
as shown in the following screenshot.
4. Validate that you see the new Data Source page as shown in the following
screenshot.
Kentico CMS Hands on Lab
47
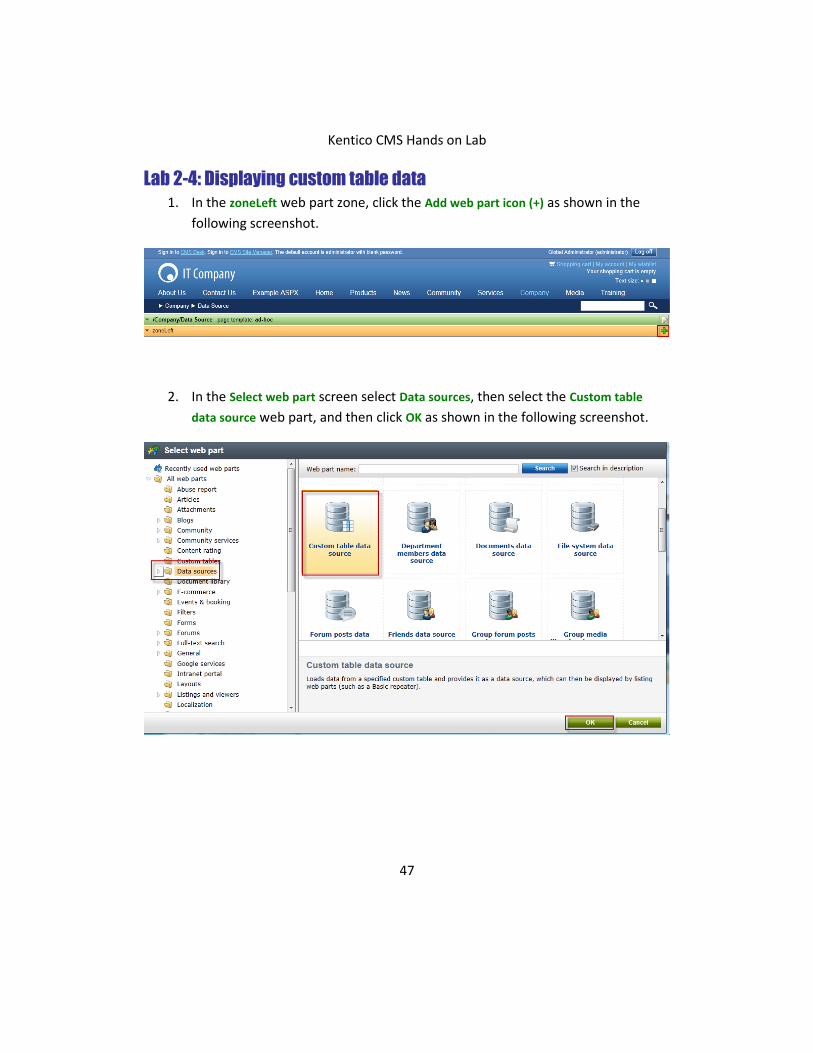
Lab 2-4: Displaying custom table data
1. In the zoneLeft web part zone, click the Add web part icon (+) as shown in the
following screenshot.
2. In the Select web part screen select Data sources, then select the Custom table
data source web part, and then click OK as shown in the following screenshot.
Kentico CMS Hands on Lab
48
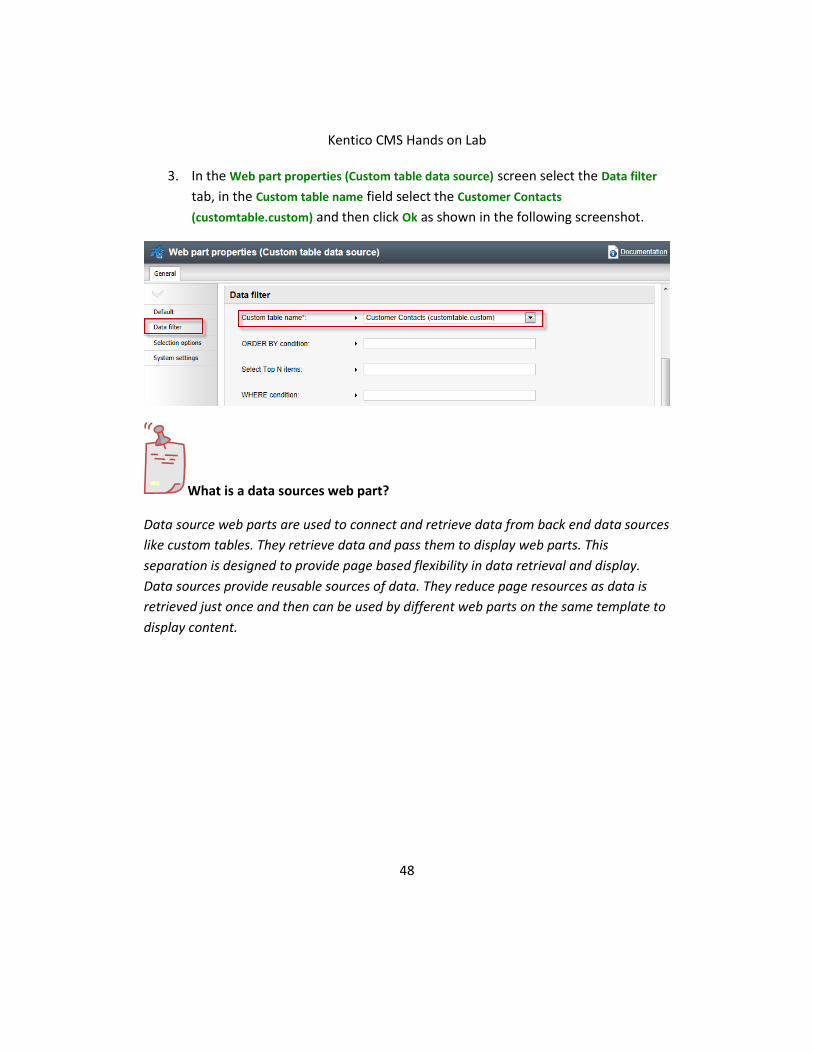
3. In the Web part properties (Custom table data source) screen select the Data filter
tab, in the Custom table name field select the Customer Contacts
(customtable.custom) and then click Ok as shown in the following screenshot.
What is a data sources web part?
Data source web parts are used to connect and retrieve data from back end data sources
like custom tables. They retrieve data and pass them to display web parts. This
separation is designed to provide page based flexibility in data retrieval and display.
Data sources provide reusable sources of data. They reduce page resources as data is
retrieved just once and then can be used by different web parts on the same template to
display content.
Kentico CMS Hands on Lab
49
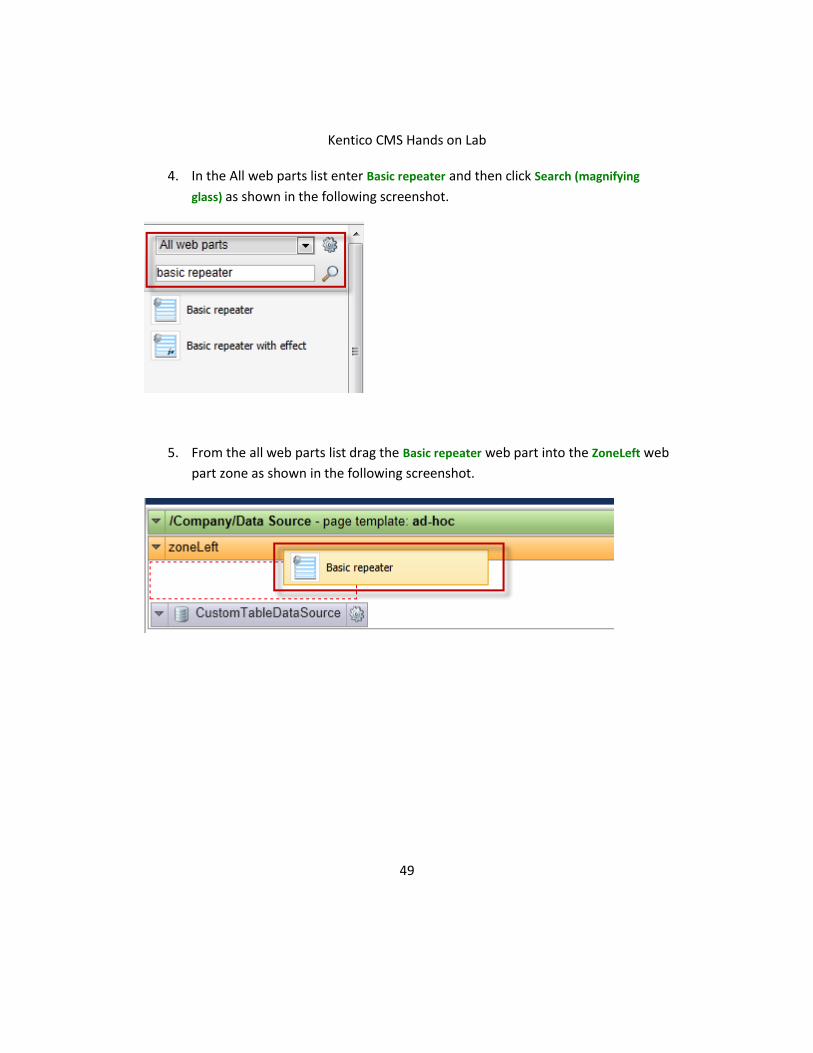
4. In the All web parts list enter Basic repeater and then click Search (magnifying
glass) as shown in the following screenshot.
5. From the all web parts list drag the Basic repeater web part into the ZoneLeft web
part zone as shown in the following screenshot.
Kentico CMS Hands on Lab
50
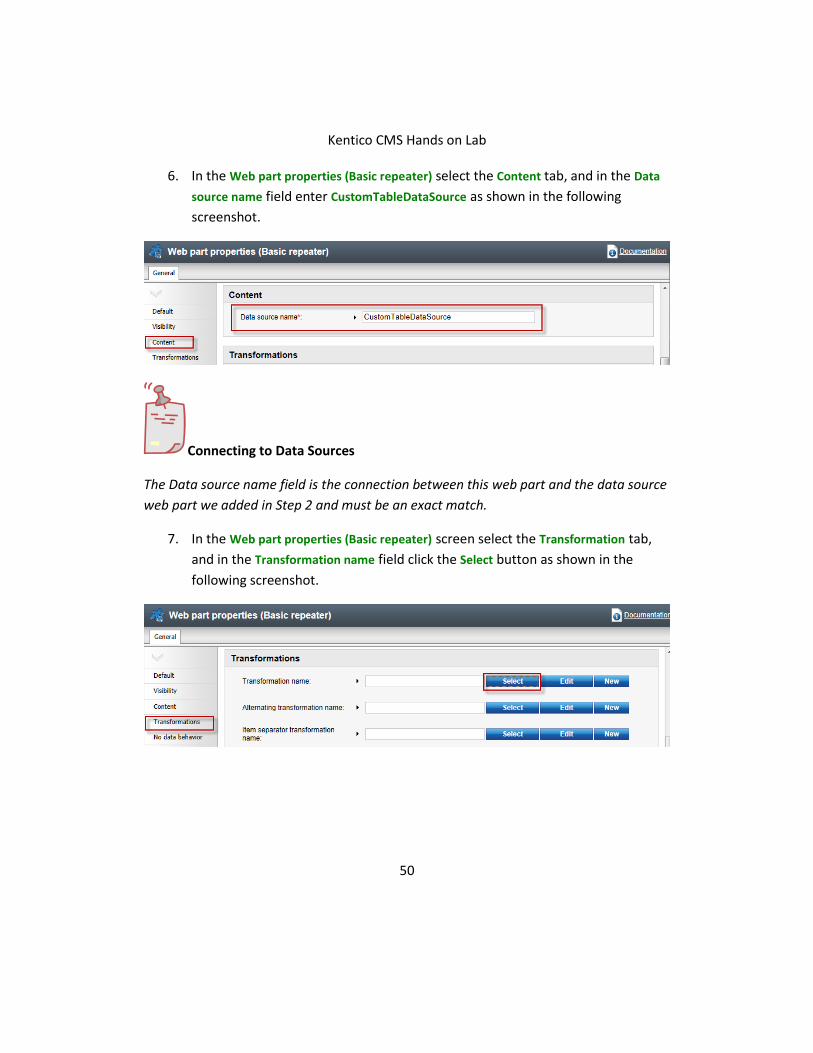
6. In the Web part properties (Basic repeater) select the Content tab, and in the Data
source name field enter CustomTableDataSource as shown in the following
screenshot.
Connecting to Data Sources
The Data source name field is the connection between this web part and the data source
web part we added in Step 2 and must be an exact match.
7. In the Web part properties (Basic repeater) screen select the Transformation tab,
and in the Transformation name field click the Select button as shown in the
following screenshot.
Kentico CMS Hands on Lab
51
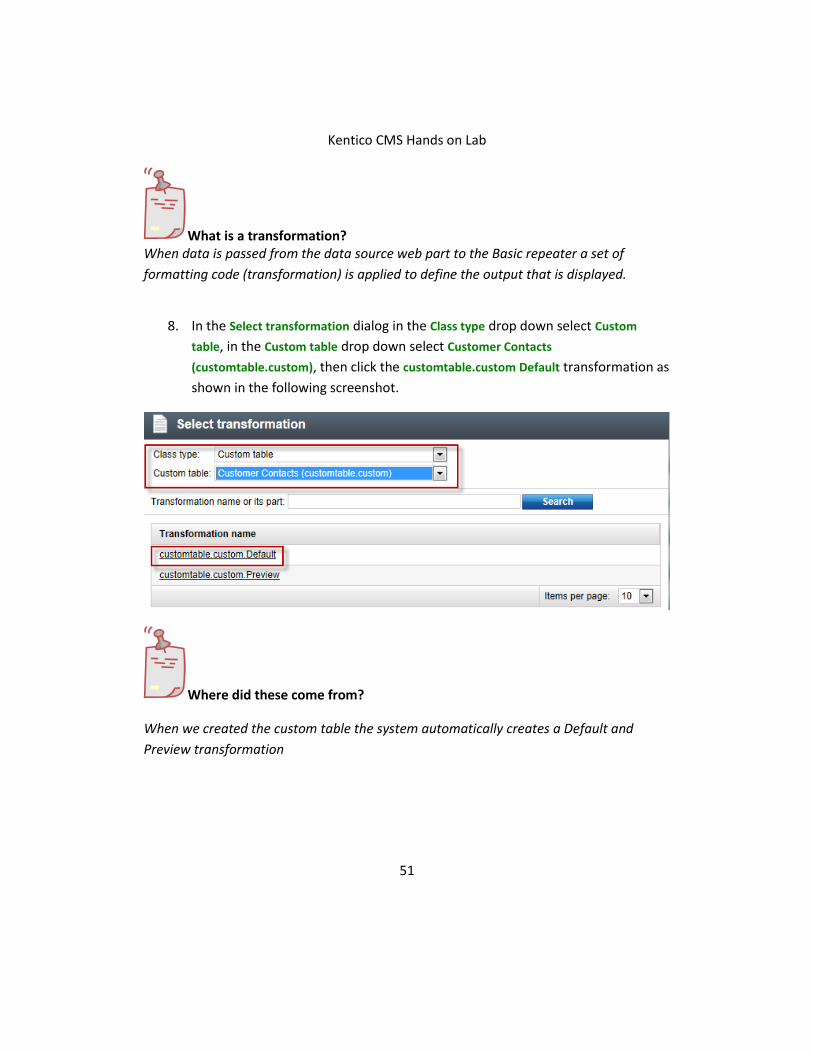
What is a transformation? When data is passed from the data source web part to the Basic repeater a set of
formatting code (transformation) is applied to define the output that is displayed.
8. In the Select transformation dialog in the Class type drop down select Custom
table, in the Custom table drop down select Customer Contacts
(customtable.custom), then click the customtable.custom Default transformation as
shown in the following screenshot.
Where did these come from?
When we created the custom table the system automatically creates a Default and
Preview transformation
Kentico CMS Hands on Lab
52
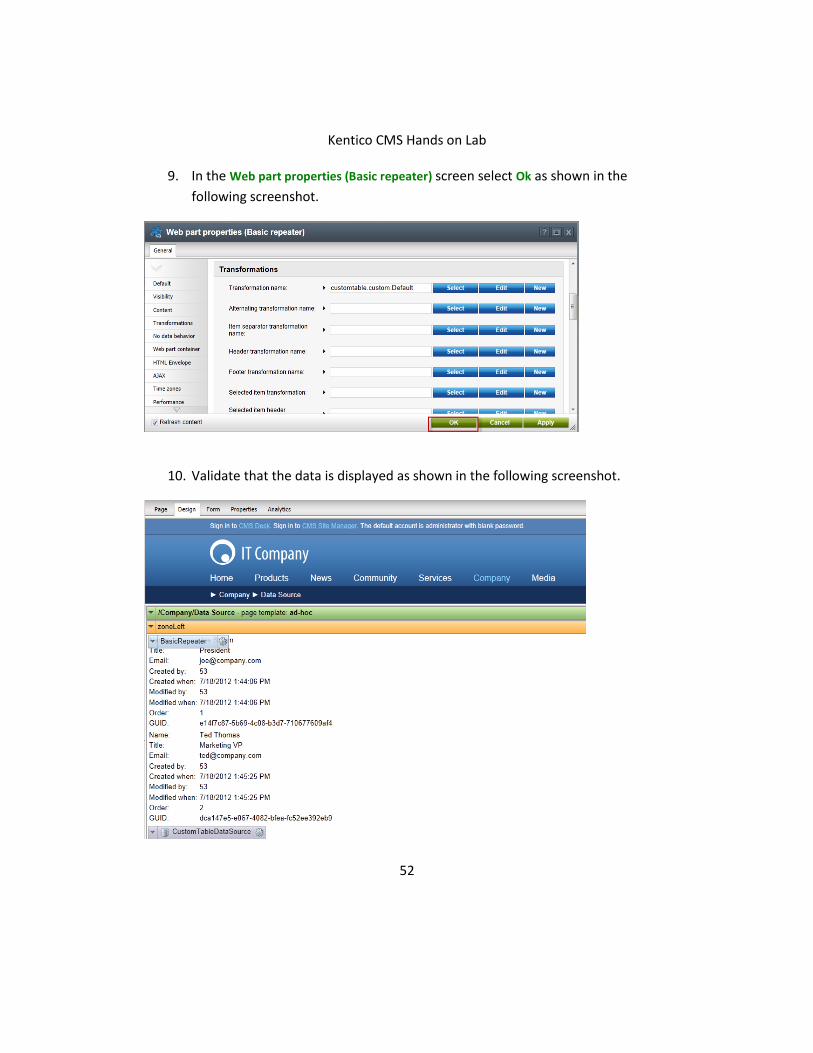
9. In the Web part properties (Basic repeater) screen select Ok as shown in the
following screenshot.
10. Validate that the data is displayed as shown in the following screenshot.
Kentico CMS Hands on Lab
53
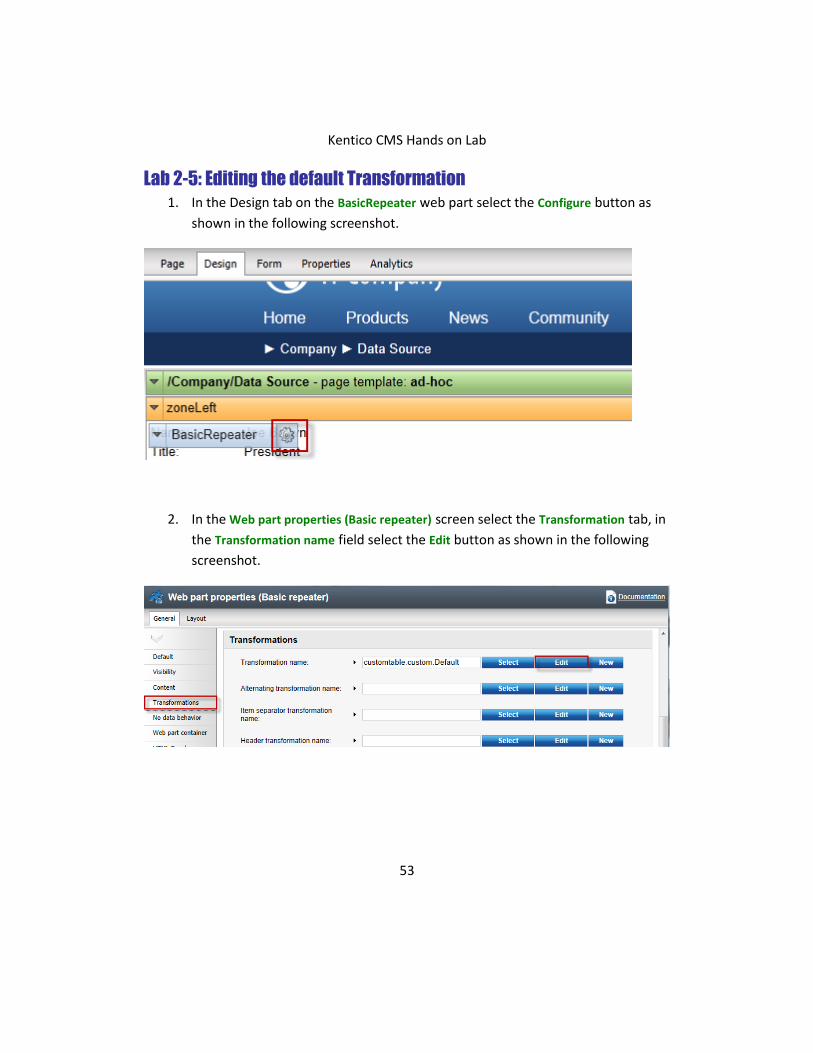
Lab 2-5: Editing the default Transformation
1. In the Design tab on the BasicRepeater web part select the Configure button as
shown in the following screenshot.
2. In the Web part properties (Basic repeater) screen select the Transformation tab, in
the Transformation name field select the Edit button as shown in the following
screenshot.
Kentico CMS Hands on Lab
54
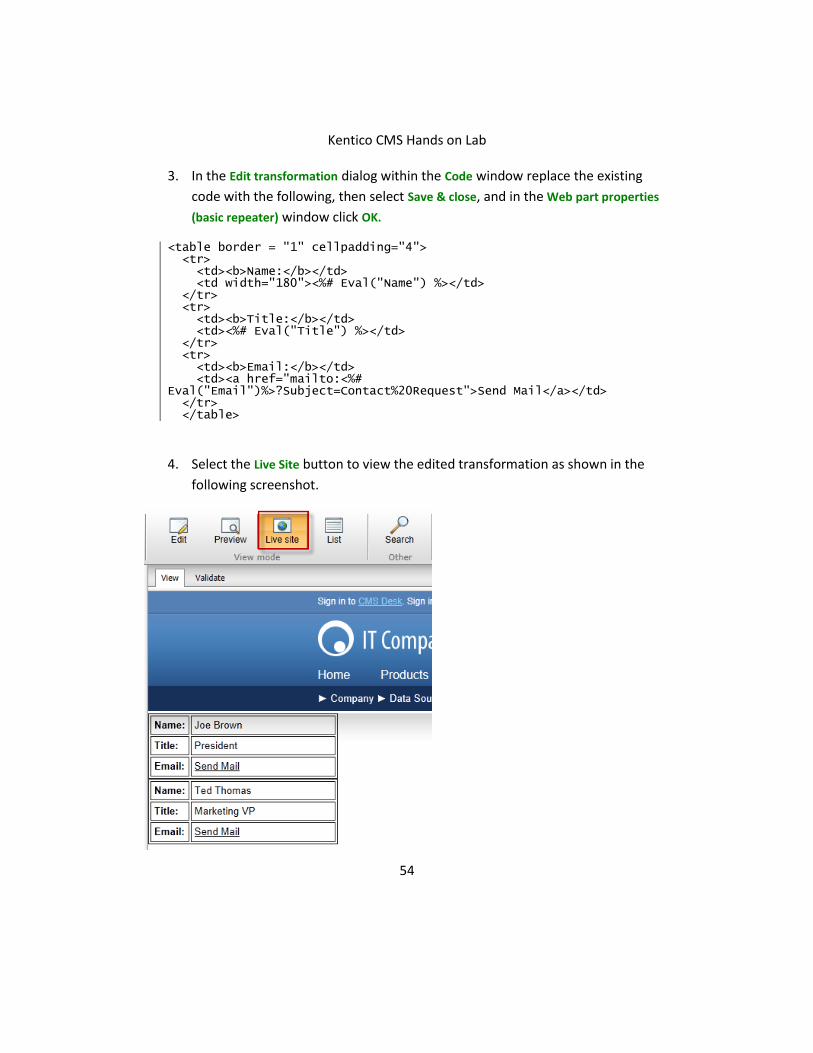
3. In the Edit transformation dialog within the Code window replace the existing
code with the following, then select Save & close, and in the Web part properties
(basic repeater) window click OK.
<table border = "1" cellpadding="4"> <tr> <td><b>Name:</b></td> <td width="180"><%# Eval("Name") %></td> </tr> <tr> <td><b>Title:</b></td> <td><%# Eval("Title") %></td> </tr> <tr> <td><b>Email:</b></td> <td><a href="mailto:<%# Eval("Email")%>?Subject=Contact%20Request">Send Mail</a></td> </tr> </table>
4. Select the Live Site button to view the edited transformation as shown in the
following screenshot.
Kentico CMS Hands on Lab
55
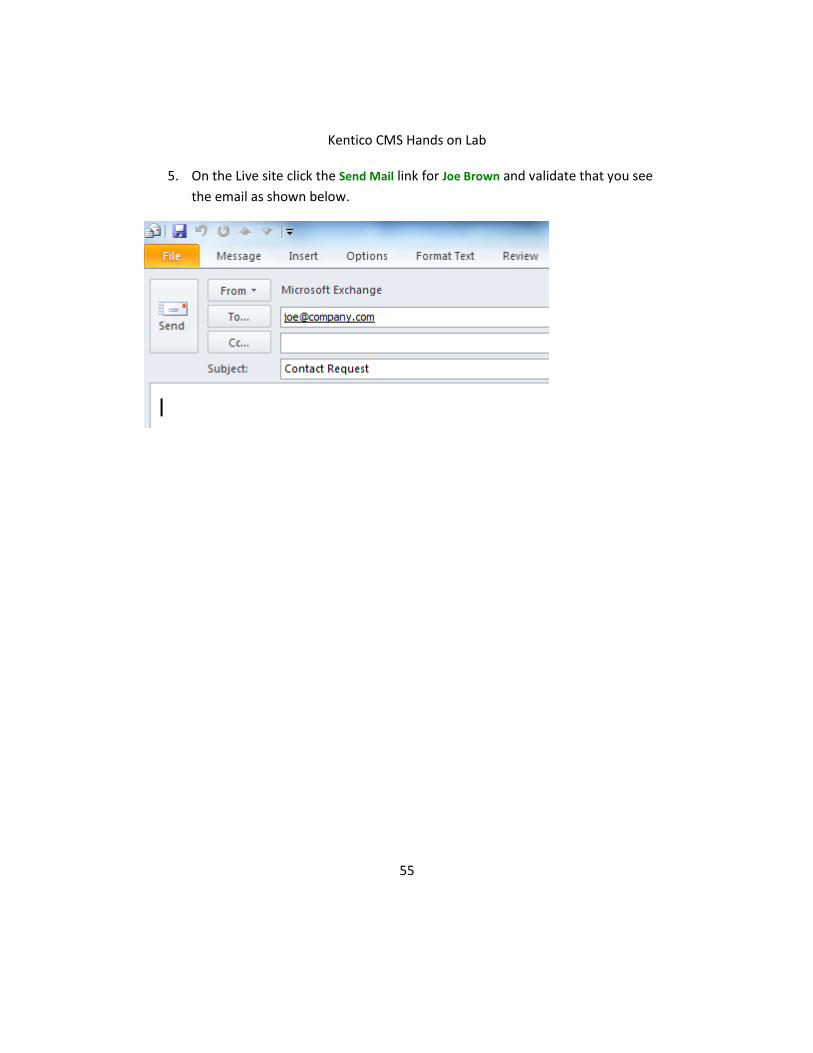
5. On the Live site click the Send Mail link for Joe Brown and validate that you see
the email as shown below.

Kentico CMS Hands on Lab
56
Lab 2-6: Adding custom table data with the API
1. In Visual Studio open the Kentico CMS Web project in the Solution Explorer right
click on the project root and select Add new item as shown in the following
screenshot.
2. In the Add new item dialog select Web form, in the Name field enter Tables.aspx,
and then click the Add button as shown in the following screenshot.
Kentico CMS Hands on Lab
57
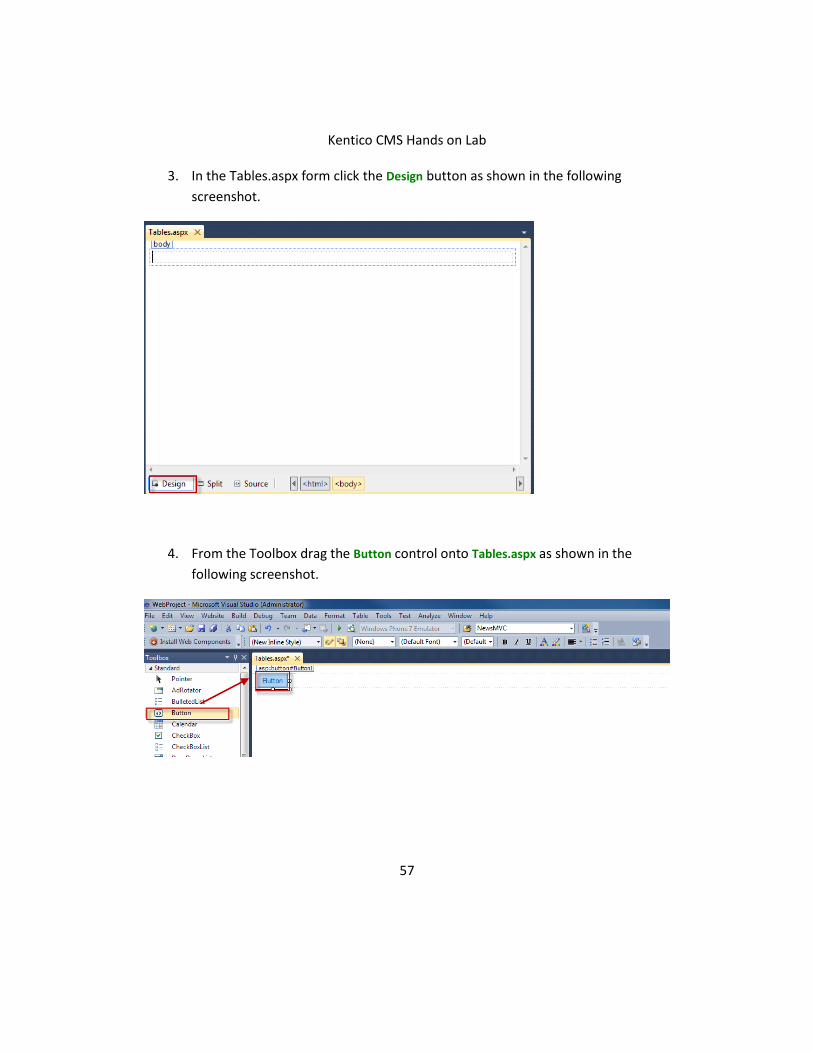
3. In the Tables.aspx form click the Design button as shown in the following
screenshot.
4. From the Toolbox drag the Button control onto Tables.aspx as shown in the
following screenshot.
Kentico CMS Hands on Lab
58
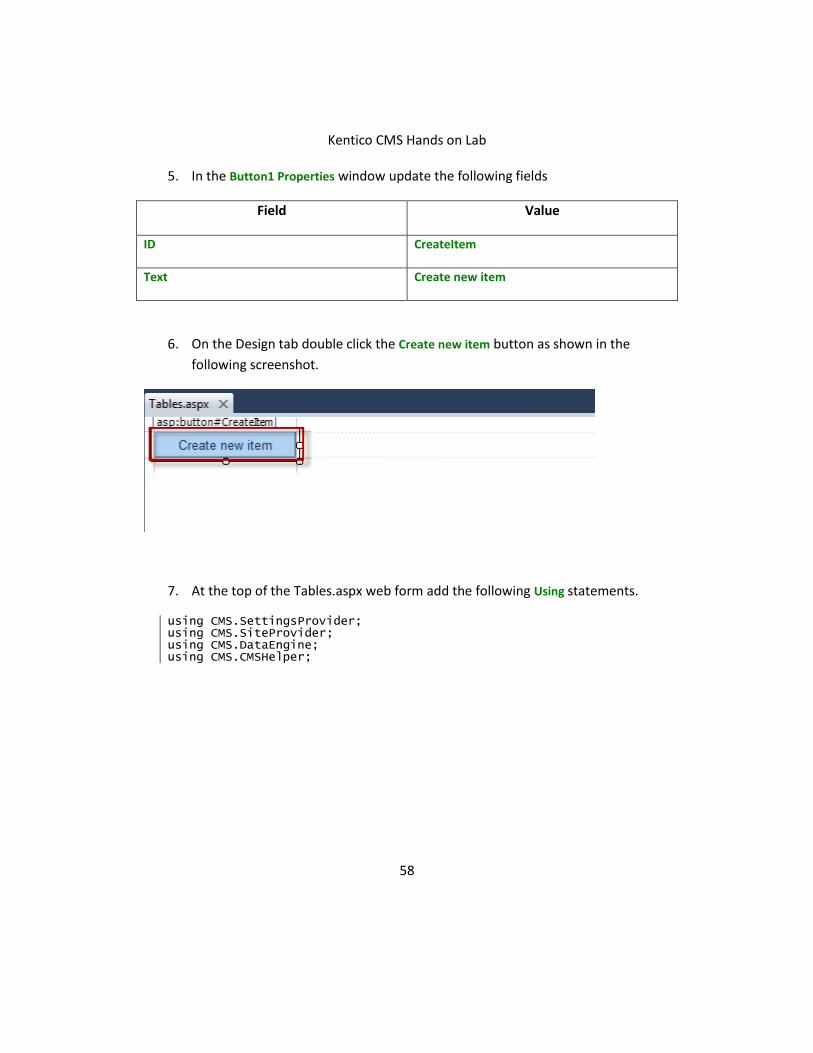
5. In the Button1 Properties window update the following fields
Field Value
ID CreateItem
Text Create new item
6. On the Design tab double click the Create new item button as shown in the
following screenshot.
7. At the top of the Tables.aspx web form add the following Using statements.
using CMS.SettingsProvider; using CMS.SiteProvider; using CMS.DataEngine; using CMS.CMSHelper;
Kentico CMS Hands on Lab
59
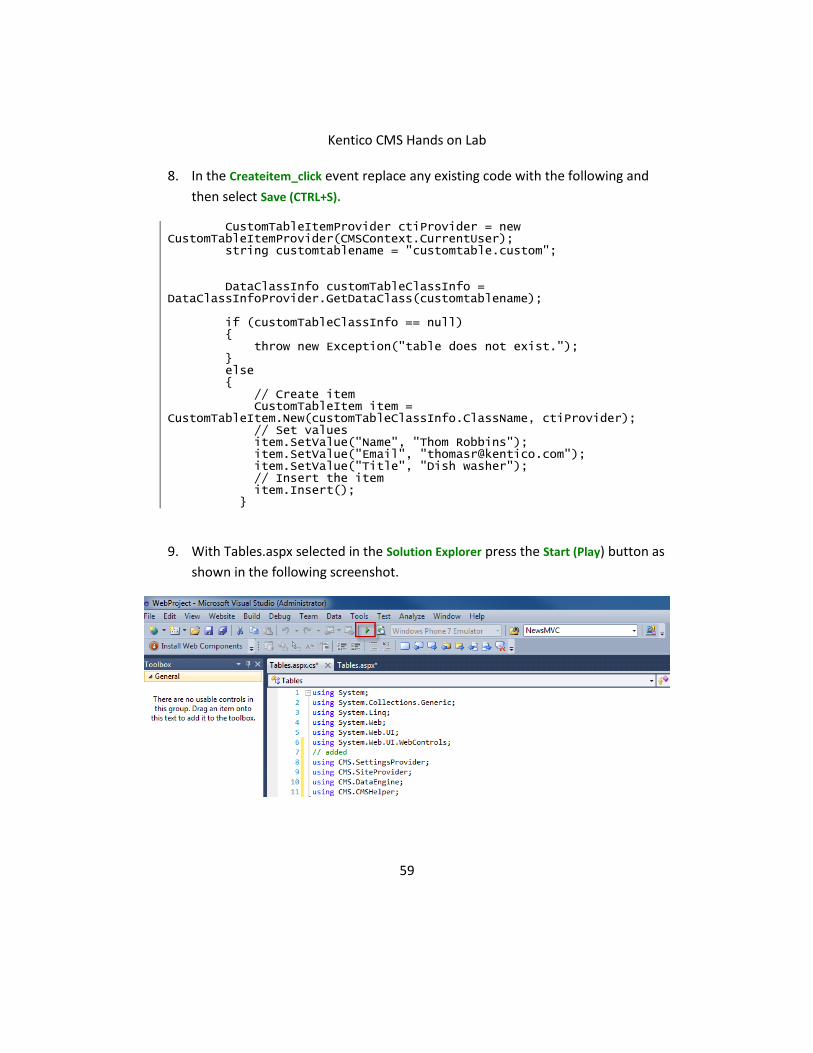
8. In the Createitem_click event replace any existing code with the following and
then select Save (CTRL+S).
CustomTableItemProvider ctiProvider = new CustomTableItemProvider(CMSContext.CurrentUser); string customtablename = "customtable.custom"; DataClassInfo customTableClassInfo = DataClassInfoProvider.GetDataClass(customtablename); if (customTableClassInfo == null) { throw new Exception("table does not exist."); } else { // Create item CustomTableItem item = CustomTableItem.New(customTableClassInfo.ClassName, ctiProvider); // Set values item.SetValue("Name", "Thom Robbins"); item.SetValue("Email", "[email protected]"); item.SetValue("Title", "Dish washer"); // Insert the item item.Insert(); }
9. With Tables.aspx selected in the Solution Explorer press the Start (Play) button as
shown in the following screenshot.
Kentico CMS Hands on Lab
60
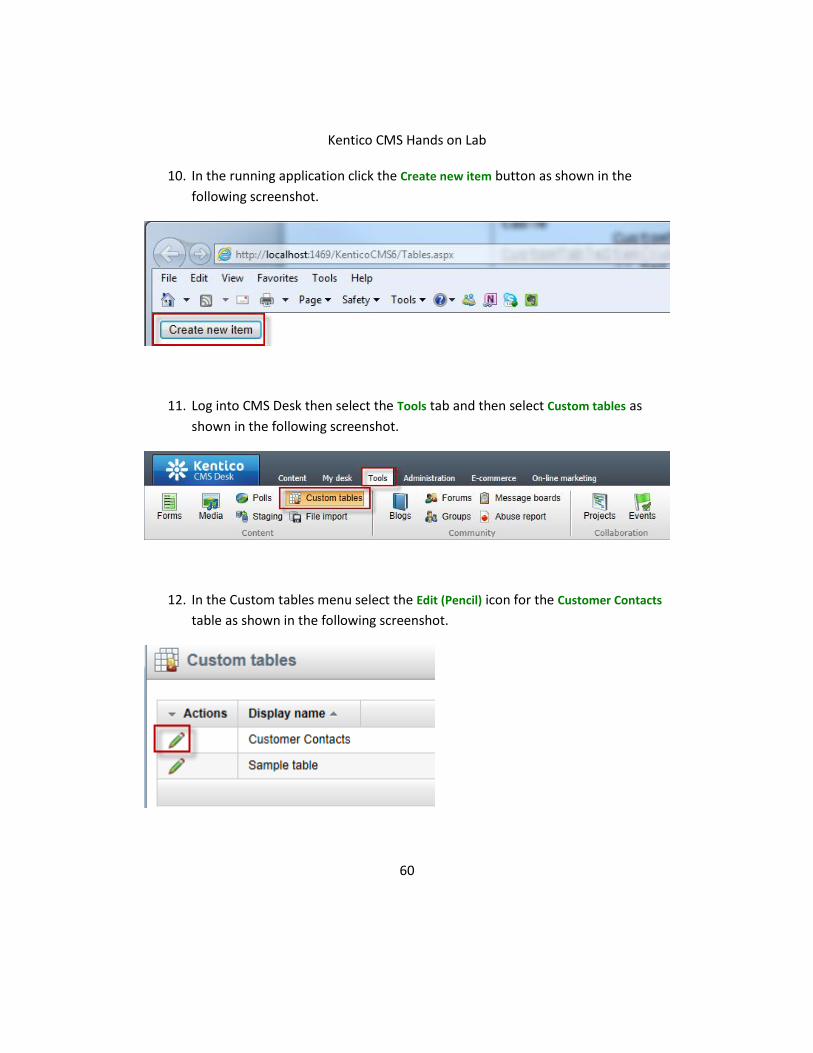
10. In the running application click the Create new item button as shown in the
following screenshot.
11. Log into CMS Desk then select the Tools tab and then select Custom tables as
shown in the following screenshot.
12. In the Custom tables menu select the Edit (Pencil) icon for the Customer Contacts
table as shown in the following screenshot.
Kentico CMS Hands on Lab
61
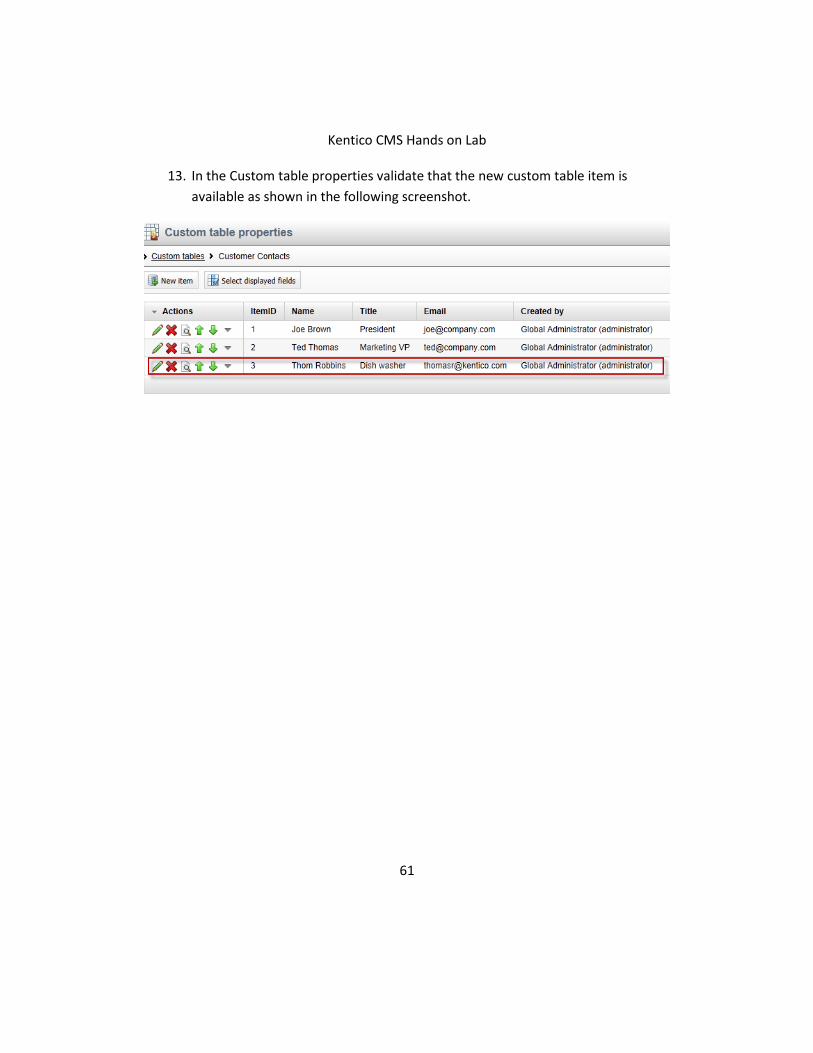
13. In the Custom table properties validate that the new custom table item is
available as shown in the following screenshot.
Kentico CMS Hands on Lab
62
Lab 2-7: Editing custom table data using the API
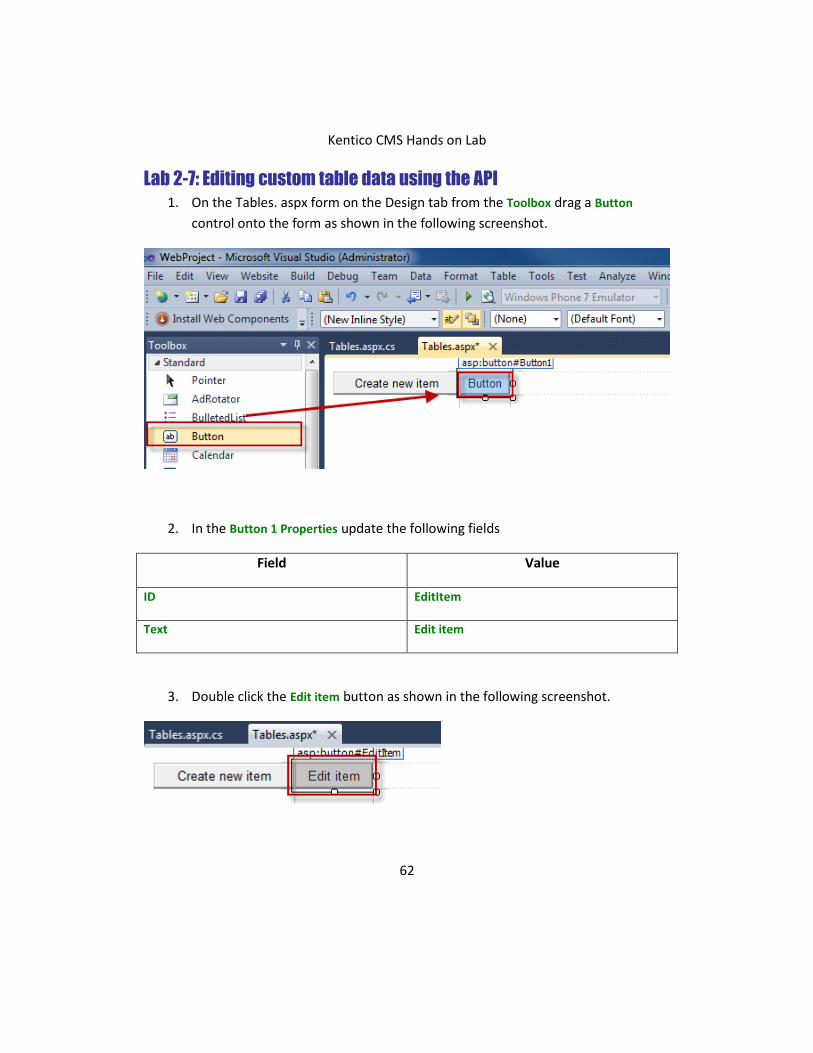
1. On the Tables. aspx form on the Design tab from the Toolbox drag a Button
control onto the form as shown in the following screenshot.
2. In the Button 1 Properties update the following fields
Field Value
ID EditItem
Text Edit item
3. Double click the Edit item button as shown in the following screenshot.
Kentico CMS Hands on Lab
63
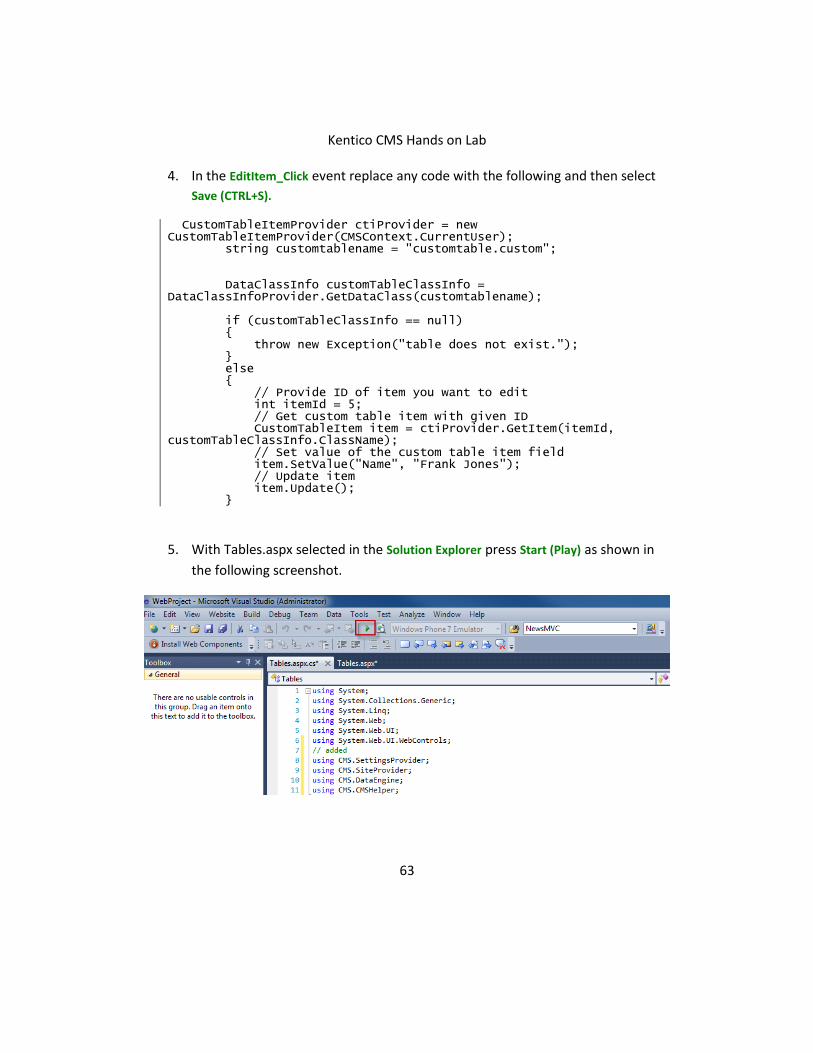
4. In the EditItem_Click event replace any code with the following and then select
Save (CTRL+S).
CustomTableItemProvider ctiProvider = new CustomTableItemProvider(CMSContext.CurrentUser); string customtablename = "customtable.custom"; DataClassInfo customTableClassInfo = DataClassInfoProvider.GetDataClass(customtablename); if (customTableClassInfo == null) { throw new Exception("table does not exist."); } else { // Provide ID of item you want to edit int itemId = 5; // Get custom table item with given ID CustomTableItem item = ctiProvider.GetItem(itemId, customTableClassInfo.ClassName); // Set value of the custom table item field item.SetValue("Name", "Frank Jones"); // Update item item.Update(); }
5. With Tables.aspx selected in the Solution Explorer press Start (Play) as shown in
the following screenshot.
Kentico CMS Hands on Lab
64
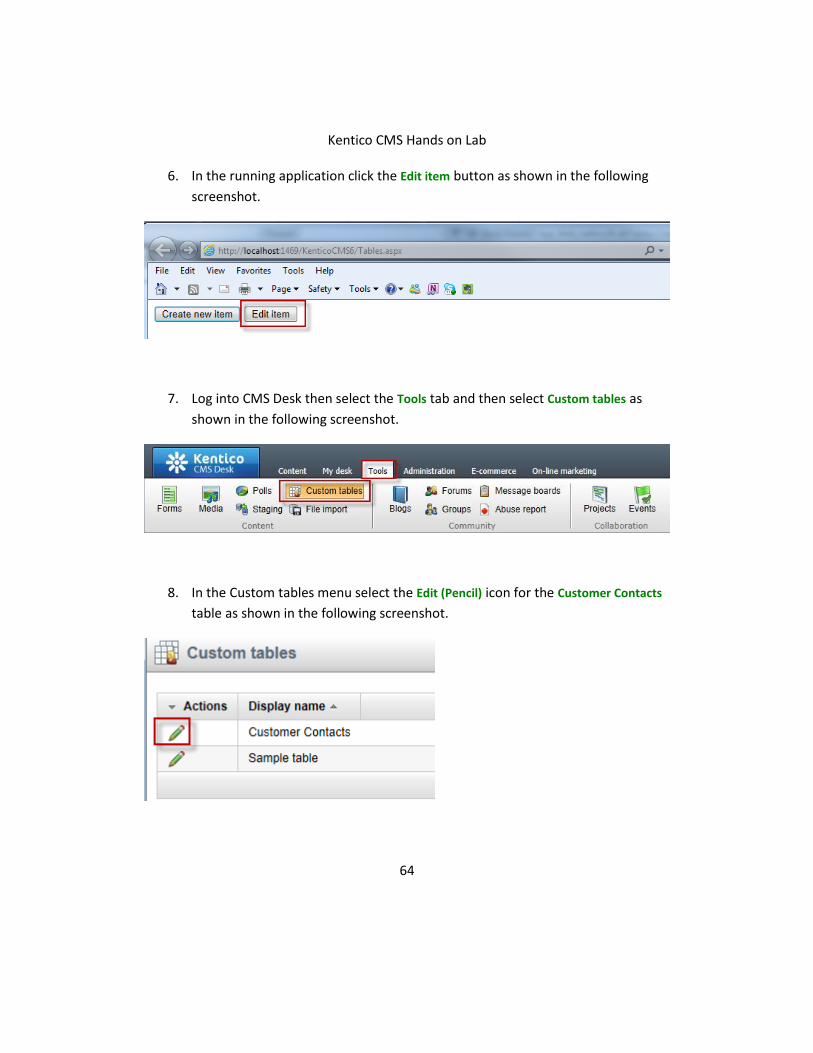
6. In the running application click the Edit item button as shown in the following
screenshot.
7. Log into CMS Desk then select the Tools tab and then select Custom tables as
shown in the following screenshot.
8. In the Custom tables menu select the Edit (Pencil) icon for the Customer Contacts
table as shown in the following screenshot.

Kentico CMS Hands on Lab
65
9. In the Custom table properties validate that the Name field contains Frank Jones
as shown in the following screenshot.
Summary
In this set of Hands on Labs we looked at how to create a custom table and then display
the data using the Basic Repeater web part. We also looked at how we can edit the
default transformation and use the Kentico CMS API. Specifically, we covered the
following.
Creating a custom table
Adding data to a custom data using CMS Site manager
Creating a new CMS page
Using Data source web parts
Displaying data with the Basic repeater web part
Editing the default transformation
Adding items using the API
Editing items using the API
Key Resources:
http://devnet.kentico.com/Documentation.aspx
http://devnet.kentico.com/Videos/Content-Management/How-To--Using-Data-
Source-Web-Parts.aspx
Kentico CMS Hands on Lab
66
Hands on Lab 3:
Integrating Twitter with Kentico CMS
Lab Overview
System Requirements:
Kentico CMS 7 installed with the Sample Corporate Site
Active Twitter account
Intended Lab Audience:
Content Administrators
CMS Designers
Lab Introduction
Technically, Twitter is a micro blogging platform that limits real time comments (tweets)
to 140 characters. What may seem like a simple technology has become a worldwide
phenomenon with a projected 200 million active users. Leveraging this platform many
companies are looking to Twitter as a key part of their integrated marketing campaigns
and a key source of real time customer connections. With an extensive and well
documented API, Twitter looks to make site integration as easy as possible. In this lab,
we will add Twitter functionality to the Kentico Corporate sample site. This will enable
site users to tweet and engage about the things they find on your site and enable site
owners and administrators to extend their reach. In completing this set of labs you will
perform the following tasks:
Add the Twitter feed web part
Add the Twitter follow button web part
Add the Twitter tweet button web part
Update the Home page template

Kentico CMS Hands on Lab
67
Lab 3-1: Twitter feed web part
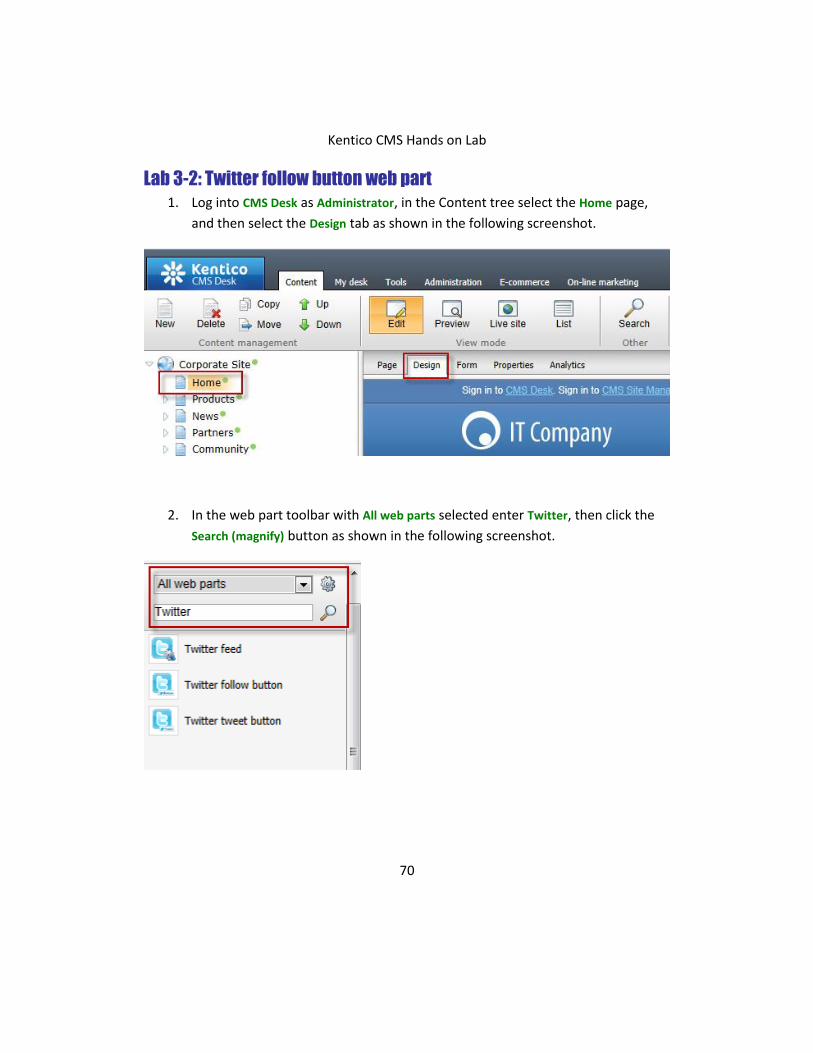
1. Log into CMS Desk as Administrator, in the Content tree select the Home page,
and then select the Design tab as shown in the following screenshot.
2. In the web part toolbar with All web parts selected enter Twitter, then click the
Search (magnify) button as shown in the following screenshot.
Kentico CMS Hands on Lab
68
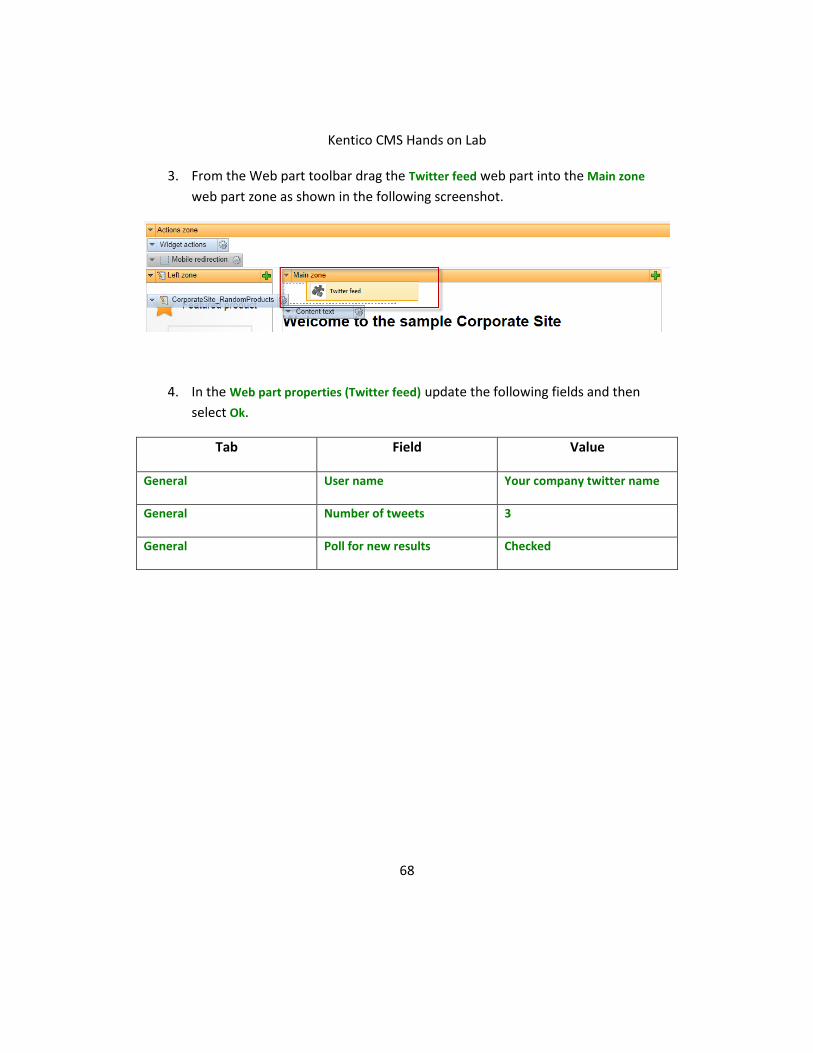
3. From the Web part toolbar drag the Twitter feed web part into the Main zone
web part zone as shown in the following screenshot.
4. In the Web part properties (Twitter feed) update the following fields and then
select Ok.
Tab Field Value
General User name Your company twitter name
General Number of tweets 3
General Poll for new results Checked
Kentico CMS Hands on Lab
69
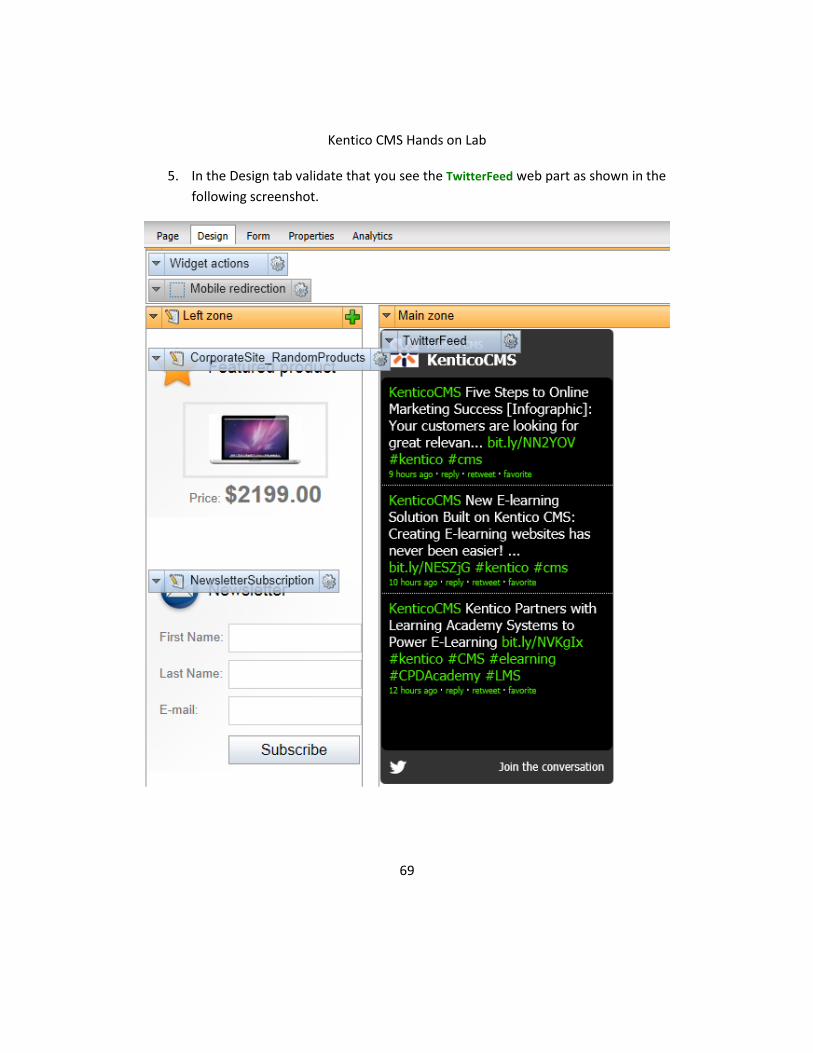
5. In the Design tab validate that you see the TwitterFeed web part as shown in the
following screenshot.
Kentico CMS Hands on Lab
70
Lab 3-2: Twitter follow button web part
1. Log into CMS Desk as Administrator, in the Content tree select the Home page,
and then select the Design tab as shown in the following screenshot.
2. In the web part toolbar with All web parts selected enter Twitter, then click the
Search (magnify) button as shown in the following screenshot.

Kentico CMS Hands on Lab
71
3. From the Web part toolbar drag the Twitter follow button web part into the Main
zone web part zone as shown in the following screenshot.
4. In the Web part properties (Twitter follow button) update the following fields and
then select Ok.
Tab Field Value
General User to follow Your company twitter name
Design Display followers count Checked
Design Show screen name Checked
5. In the Design tab validate that you see the TwitterFollowButton as shown in the
following screenshot.
Kentico CMS Hands on Lab
72
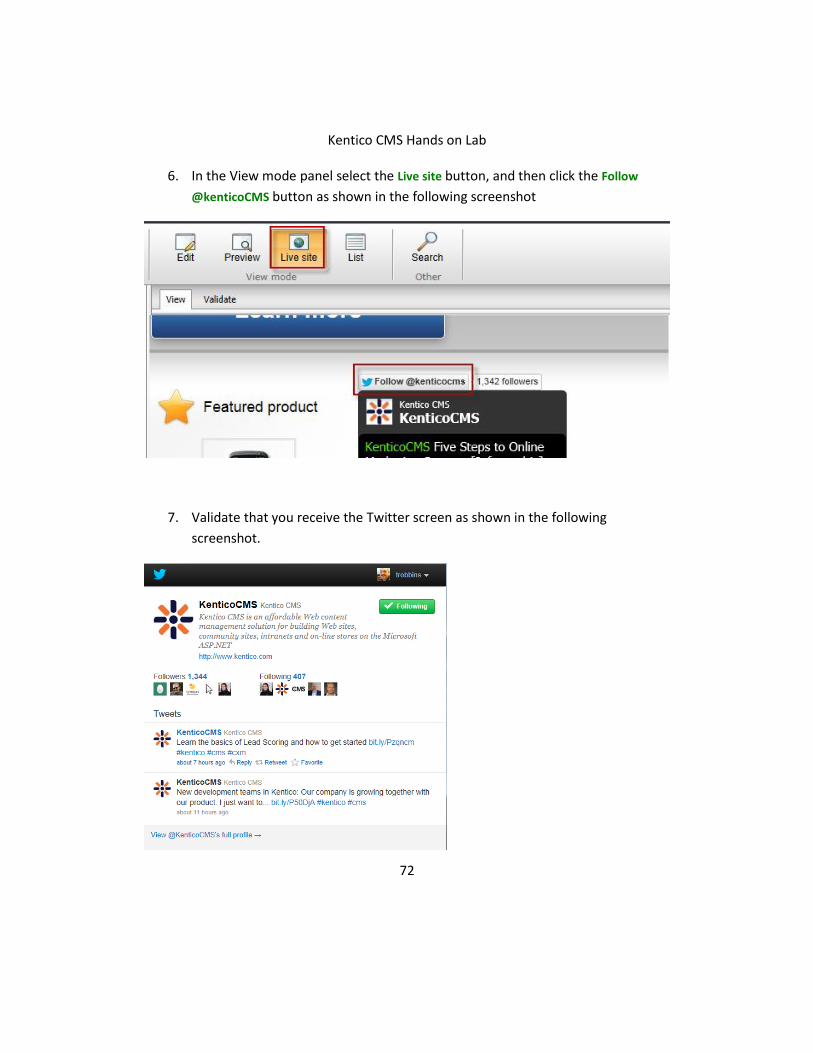
6. In the View mode panel select the Live site button, and then click the Follow
@kenticoCMS button as shown in the following screenshot
7. Validate that you receive the Twitter screen as shown in the following
screenshot.

Kentico CMS Hands on Lab
73
Lab3-3: Twitter tweet button web part
1. Log into CMS Desk as Administrator, in the Content tree select the Home page,
and then select the Design tab as shown in the following screenshot.
2. In the web part toolbar with All web parts selected enter Twitter, then click the
Search (magnify) button as shown in the following screenshot.
Kentico CMS Hands on Lab
74
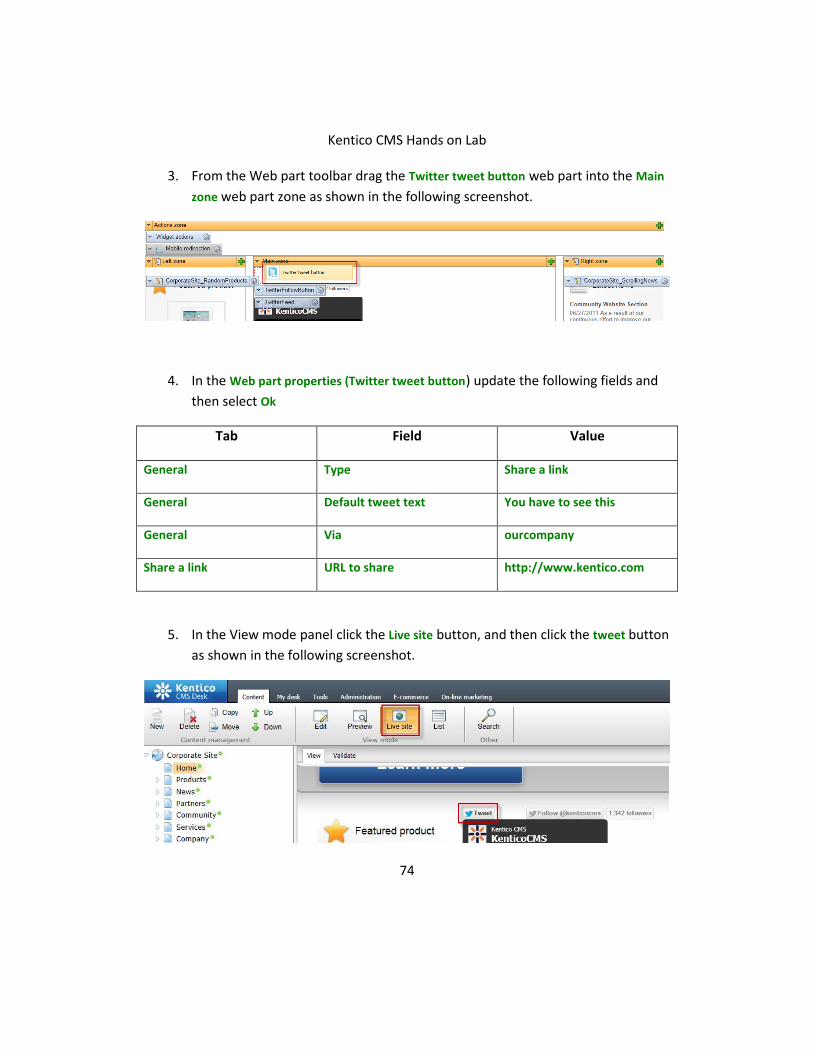
3. From the Web part toolbar drag the Twitter tweet button web part into the Main
zone web part zone as shown in the following screenshot.
4. In the Web part properties (Twitter tweet button) update the following fields and
then select Ok
Tab Field Value
General Type Share a link
General Default tweet text You have to see this
General Via ourcompany
Share a link URL to share http://www.kentico.com
5. In the View mode panel click the Live site button, and then click the tweet button
as shown in the following screenshot.
Kentico CMS Hands on Lab
75
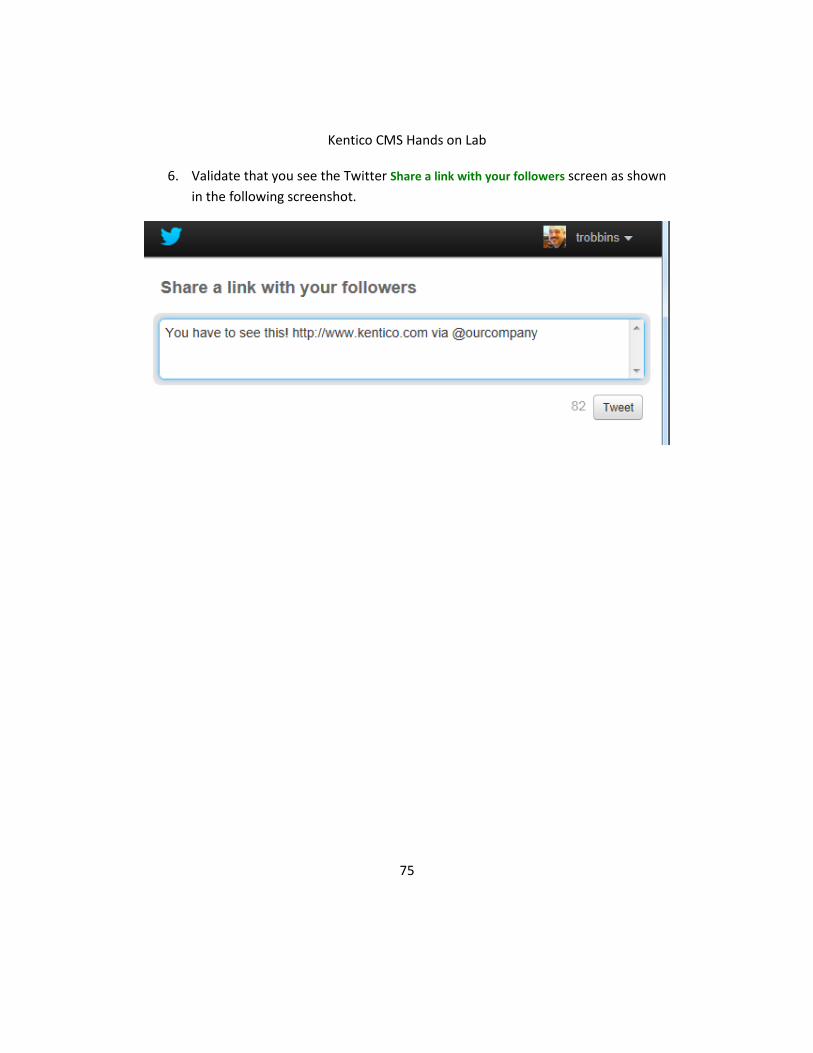
6. Validate that you see the Twitter Share a link with your followers screen as shown
in the following screenshot.
Kentico CMS Hands on Lab
76
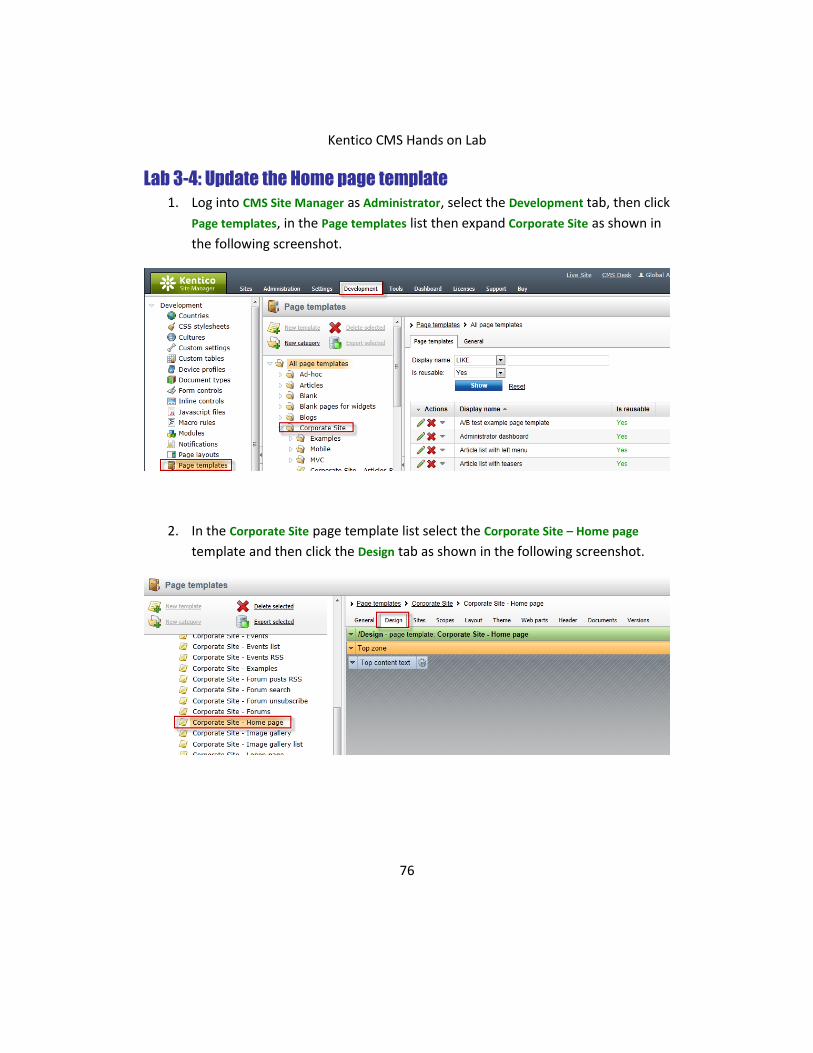
Lab 3-4: Update the Home page template
1. Log into CMS Site Manager as Administrator, select the Development tab, then click
Page templates, in the Page templates list then expand Corporate Site as shown in
the following screenshot.
2. In the Corporate Site page template list select the Corporate Site – Home page
template and then click the Design tab as shown in the following screenshot.
Kentico CMS Hands on Lab
77
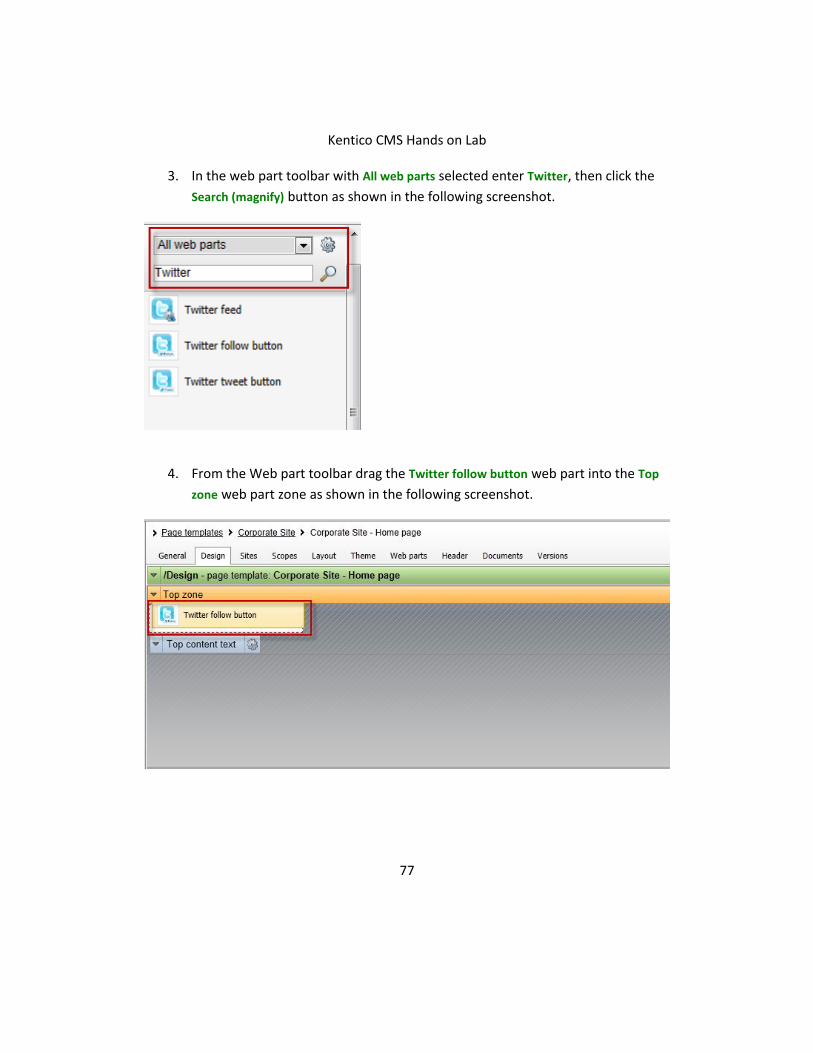
3. In the web part toolbar with All web parts selected enter Twitter, then click the
Search (magnify) button as shown in the following screenshot.
4. From the Web part toolbar drag the Twitter follow button web part into the Top
zone web part zone as shown in the following screenshot.
Kentico CMS Hands on Lab
78
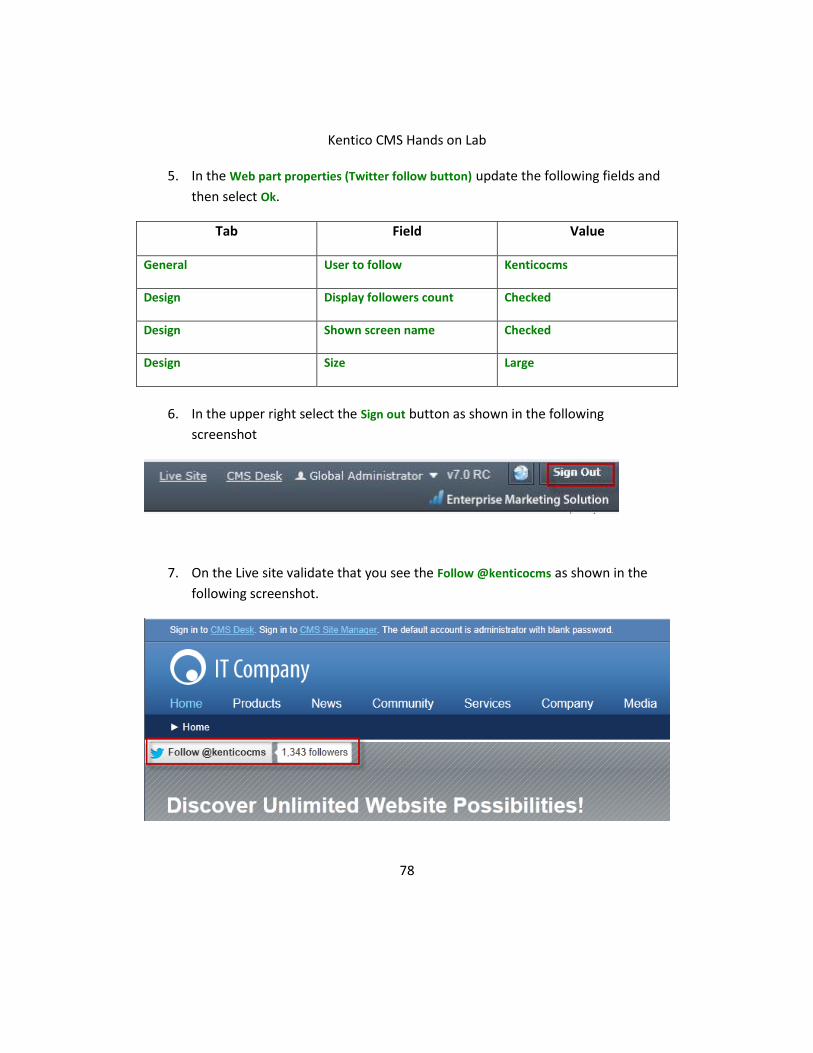
5. In the Web part properties (Twitter follow button) update the following fields and
then select Ok.
Tab Field Value
General User to follow Kenticocms
Design Display followers count Checked
Design Shown screen name Checked
Design Size Large
6. In the upper right select the Sign out button as shown in the following
screenshot
7. On the Live site validate that you see the Follow @kenticocms as shown in the
following screenshot.

Kentico CMS Hands on Lab
79
Summary
In this set of Hands on Labs we have looked at how we can add Twitter support using
both a Static text web part and page template. Specifically we covered the following.
Add the Twitter feed web part
Add the Twitter follow button web part
Add the Twitter tweet button web part
Update the Home page template
Key Resources:
Feature Series: Twitter web parts
http://twitter.com/about/resources

Kentico CMS Hands on Lab
80
Hands on lab 4:
UI Personalization
Lab Overview
System Requirements:
Kentico CMS 7 installed with the Sample Corporate Site
Intended Lab Audience:
CMS Designers
CMS Developers
Content Administrators
Lab Introduction
UI personalization enables the creation of simplified interfaces with CMS Desk. This will
decrease the learning curve, remove unnecessary features and enable users to focus on
areas of the system they really need. In completing this set of labs you will perform the
following tasks:
Explore CMS Desk
Add a new tab to CMS Desk
Kentico CMS Hands on Lab
81
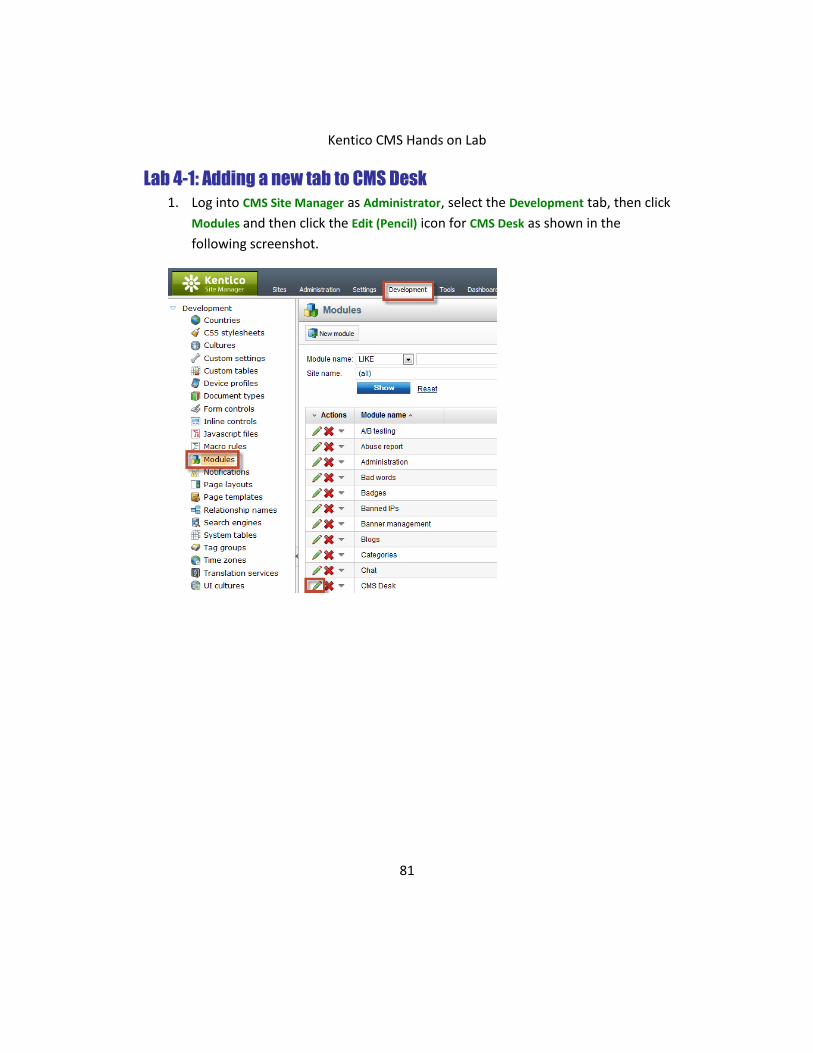
Lab 4-1: Adding a new tab to CMS Desk
1. Log into CMS Site Manager as Administrator, select the Development tab, then click
Modules and then click the Edit (Pencil) icon for CMS Desk as shown in the
following screenshot.
Kentico CMS Hands on Lab
82
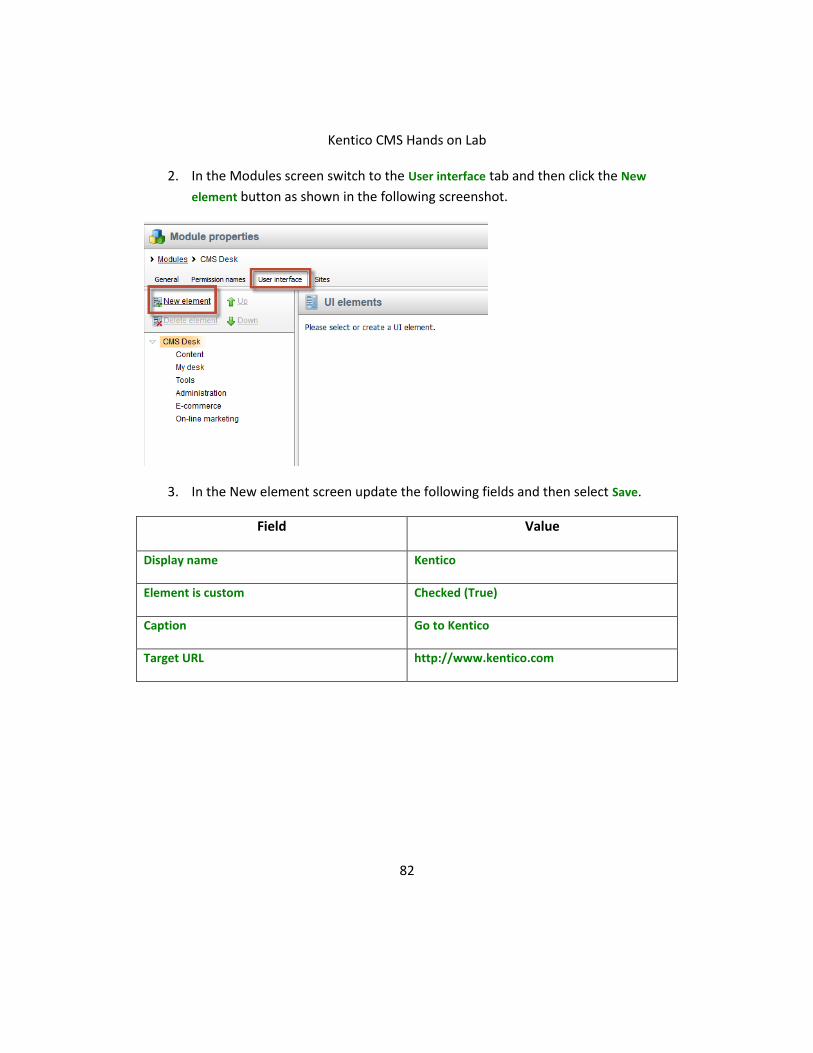
2. In the Modules screen switch to the User interface tab and then click the New
element button as shown in the following screenshot.
3. In the New element screen update the following fields and then select Save.
Field Value
Display name Kentico
Element is custom Checked (True)
Caption Go to Kentico
Target URL http://www.kentico.com
Kentico CMS Hands on Lab
83
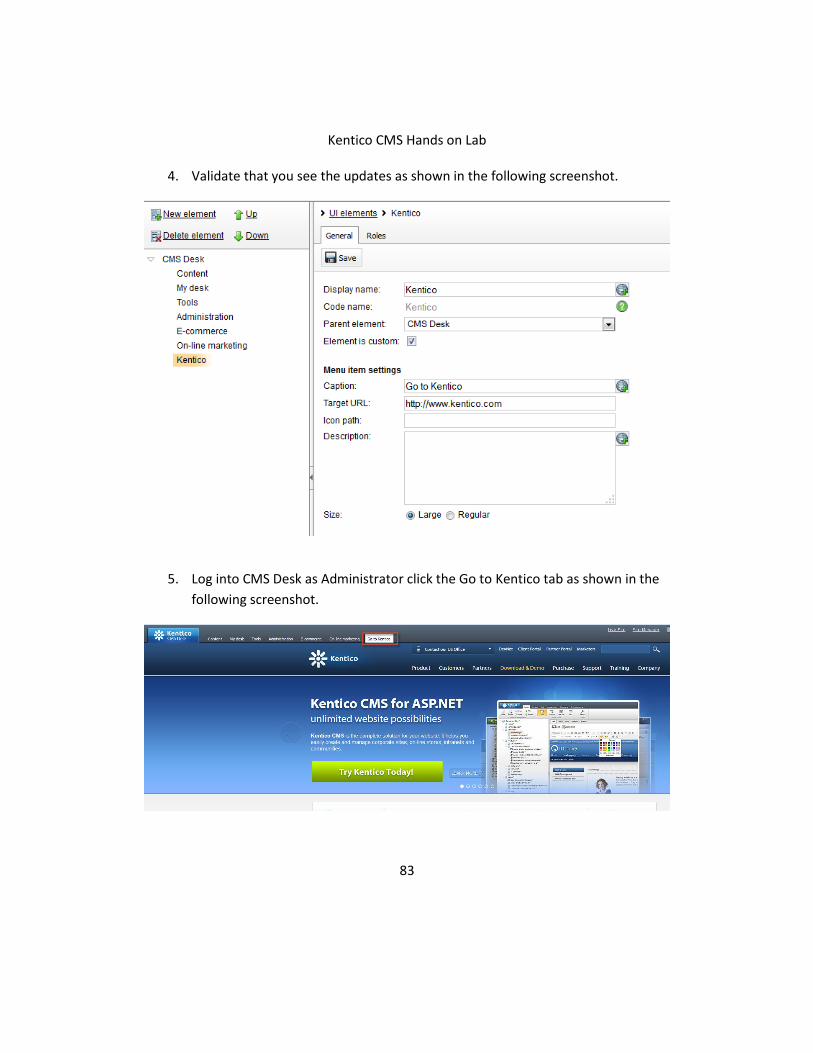
4. Validate that you see the updates as shown in the following screenshot.
5. Log into CMS Desk as Administrator click the Go to Kentico tab as shown in the
following screenshot.
Kentico CMS Hands on Lab
84
Summary
In this set of Hands on Labs we have looked at how to create UI personalization.
Specifically we covered the following.
Looked at UI personalization
Added a new tab to CMS Desk
Key Resources:
UI Personalization overview

Kentico CMS Hands on Lab
85
Hands on Lab 5:
Integrating Facebook with Kentico CMS
Lab Overview
System Requirements:
Kentico CMS 7 installed with the Sample Corporate Site
Active Facebook account
Intended Lab Audience:
CMS Designers
CMS Developers
Content Administrators
Lab Introduction
Facebook has become an internet marketing sensation, with third party estimates of
almost 200 million users and reports that almost two thirds of these log in daily. For
many marketers, Facebook has become an essential ingredient for online and integrated
marketing campaigns. Facebook provides marketers and web site owner’s paid
advertising models that include user profiling, targeted advertisements, community
collaboration and networking opportunities. Non paid opportunities enable marketers
and web site owner’s the opportunity for their customers to discuss, share and
recommend content and products with their social network. Both provide an
opportunity for companies to build their brand, extend reach and collaborate with
customers. Facebook provides an extensive API that any website owner can leverage. In
this lab, we will add Facebook functionality to the Kentico Corporate sample site. In
completing this set of labs you will perform the following tasks:
Add a Facebook recommendations web part
Kentico CMS Hands on Lab
86
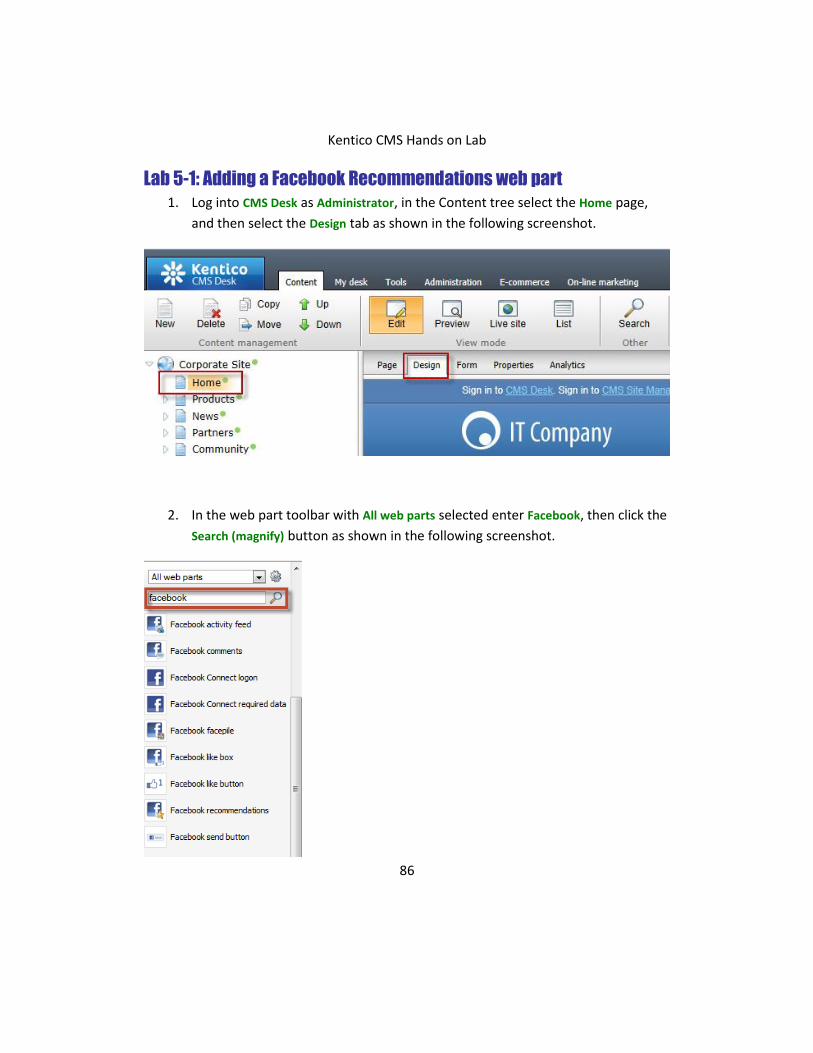
Lab 5-1: Adding a Facebook Recommendations web part
1. Log into CMS Desk as Administrator, in the Content tree select the Home page,
and then select the Design tab as shown in the following screenshot.
2. In the web part toolbar with All web parts selected enter Facebook, then click the
Search (magnify) button as shown in the following screenshot.
Kentico CMS Hands on Lab
87
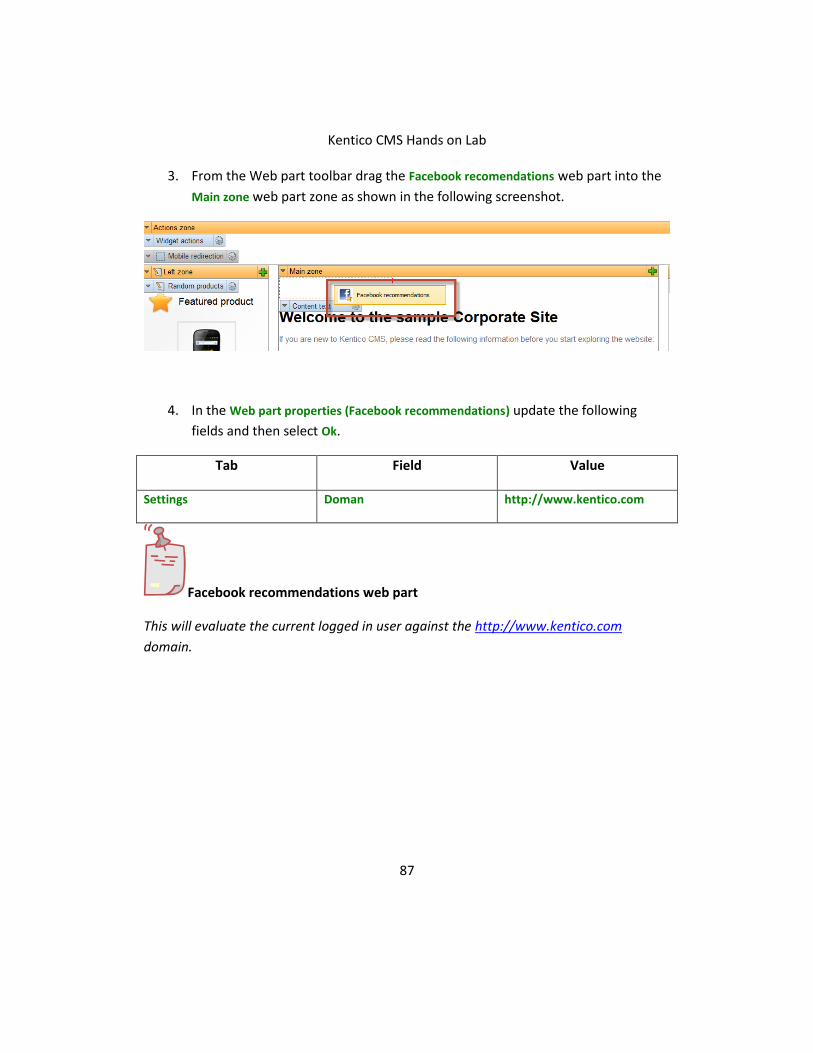
3. From the Web part toolbar drag the Facebook recomendations web part into the
Main zone web part zone as shown in the following screenshot.
4. In the Web part properties (Facebook recommendations) update the following
fields and then select Ok.
Tab Field Value
Settings Doman http://www.kentico.com
Facebook recommendations web part
This will evaluate the current logged in user against the http://www.kentico.com
domain.
Kentico CMS Hands on Lab
88
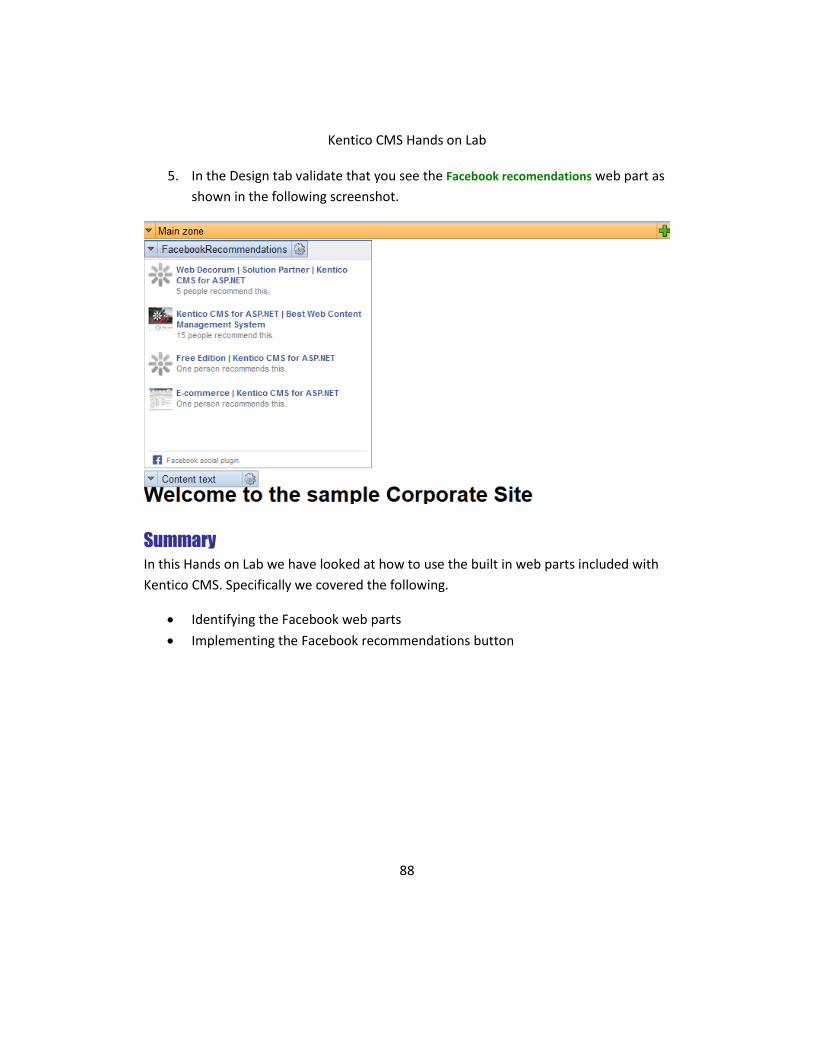
5. In the Design tab validate that you see the Facebook recomendations web part as
shown in the following screenshot.
Summary
In this Hands on Lab we have looked at how to use the built in web parts included with
Kentico CMS. Specifically we covered the following.
Identifying the Facebook web parts
Implementing the Facebook recommendations button
Kentico CMS Hands on Lab
89
Hands on Lab 6:
Auto-posting to Social Media with Advanced Workflow
Lab Overview
System Requirements:
Kentico CMS 7 installed with the Sample Corporate Site
Active Twitter Account
Active bit.ly account
Intended Lab Audience:
CMS Designers
CMS Developers
Content Administrators
Lab Introduction
Social media has become an incredibly important part of any marketing campaign. The
problem is that using social media can take a lot of time. For marketers this is often a
luxury that is not available. Using a combination of social media integration and
Advanced workflow with Kentico you are able to auto post to your social media
accounts when a new document is published. In this lab we will create a new Advanced
workflow using the Kentico corporate site that auto posts to Twitter when a new blog
post is published. In completing this set of labs you will perform the following tasks.
Understand what is needed to integrate Twitter and bit.ly with Kentico
Setup social media integration with Kentico
Create a new Advanced workflow
Create a new workflow step that publishes to Twitter
Set a workflow scope for blogs
Kentico CMS Hands on Lab
90
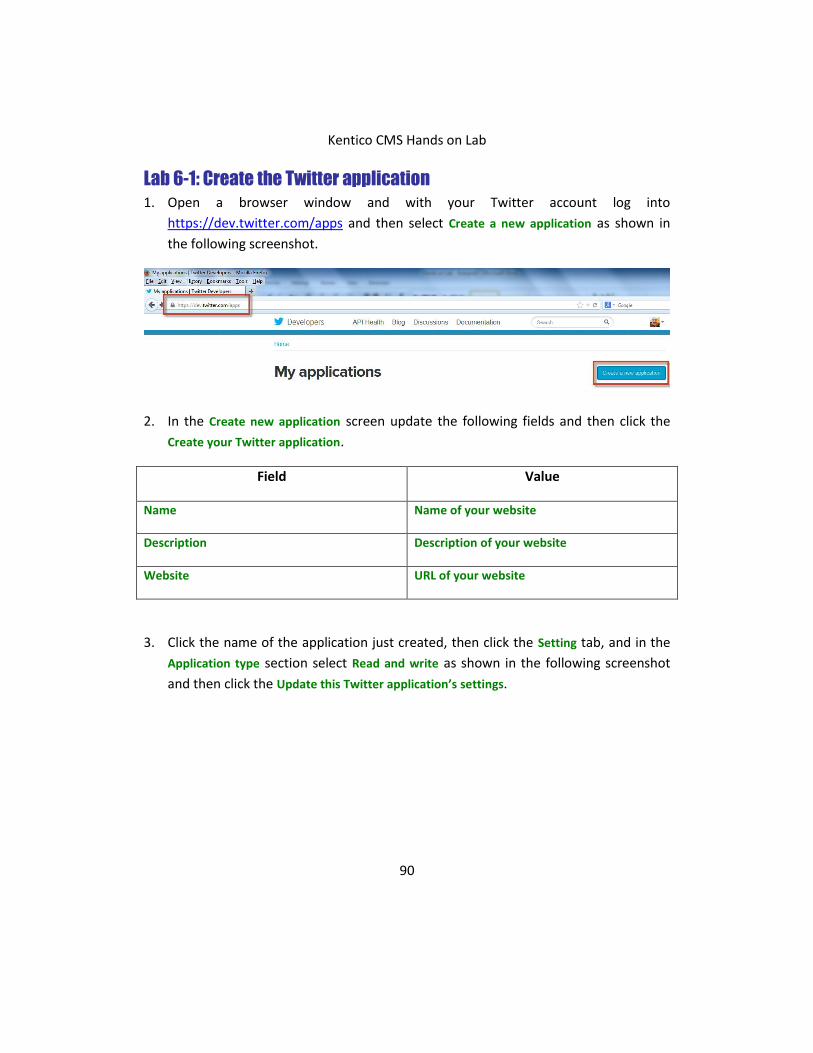
Lab 6-1: Create the Twitter application
1. Open a browser window and with your Twitter account log into
https://dev.twitter.com/apps and then select Create a new application as shown in
the following screenshot.
2. In the Create new application screen update the following fields and then click the
Create your Twitter application.
Field Value
Name Name of your website
Description Description of your website
Website URL of your website
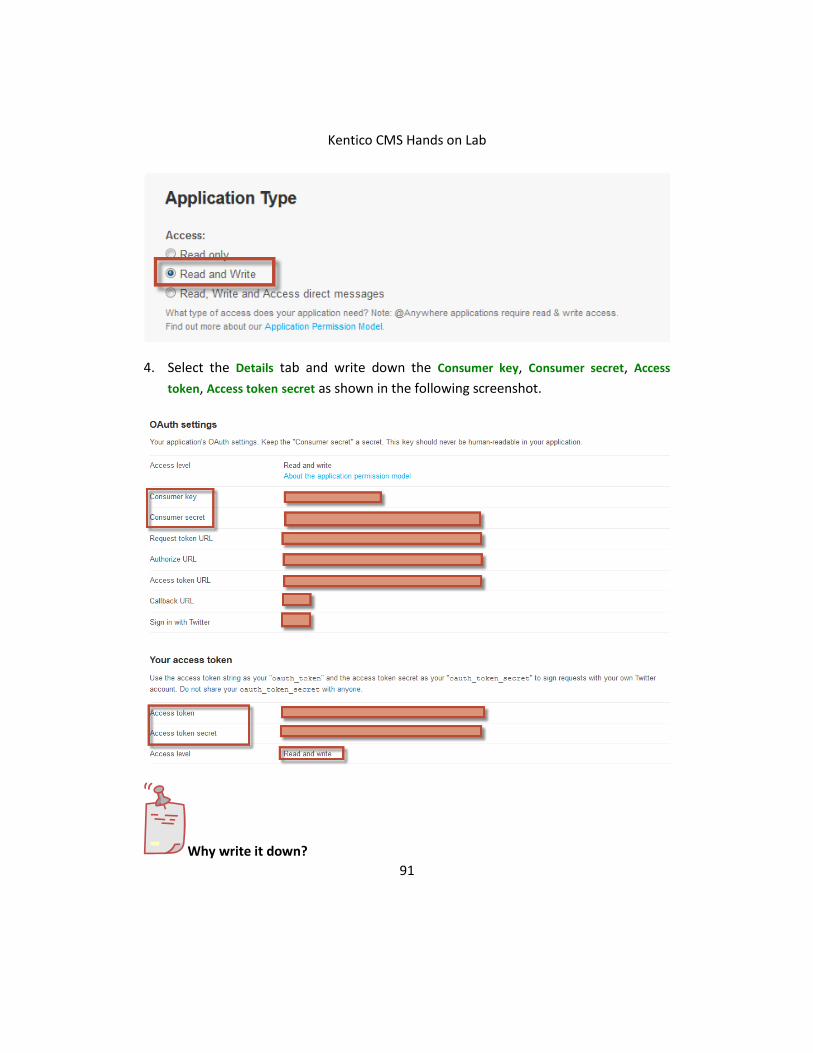
3. Click the name of the application just created, then click the Setting tab, and in the
Application type section select Read and write as shown in the following screenshot
and then click the Update this Twitter application’s settings.
Kentico CMS Hands on Lab
91
4. Select the Details tab and write down the Consumer key, Consumer secret, Access
token, Access token secret as shown in the following screenshot.
Why write it down?

Kentico CMS Hands on Lab
92
This information will be used later in the lab as the basis for integration for Kentico.
Kentico CMS Hands on Lab
93
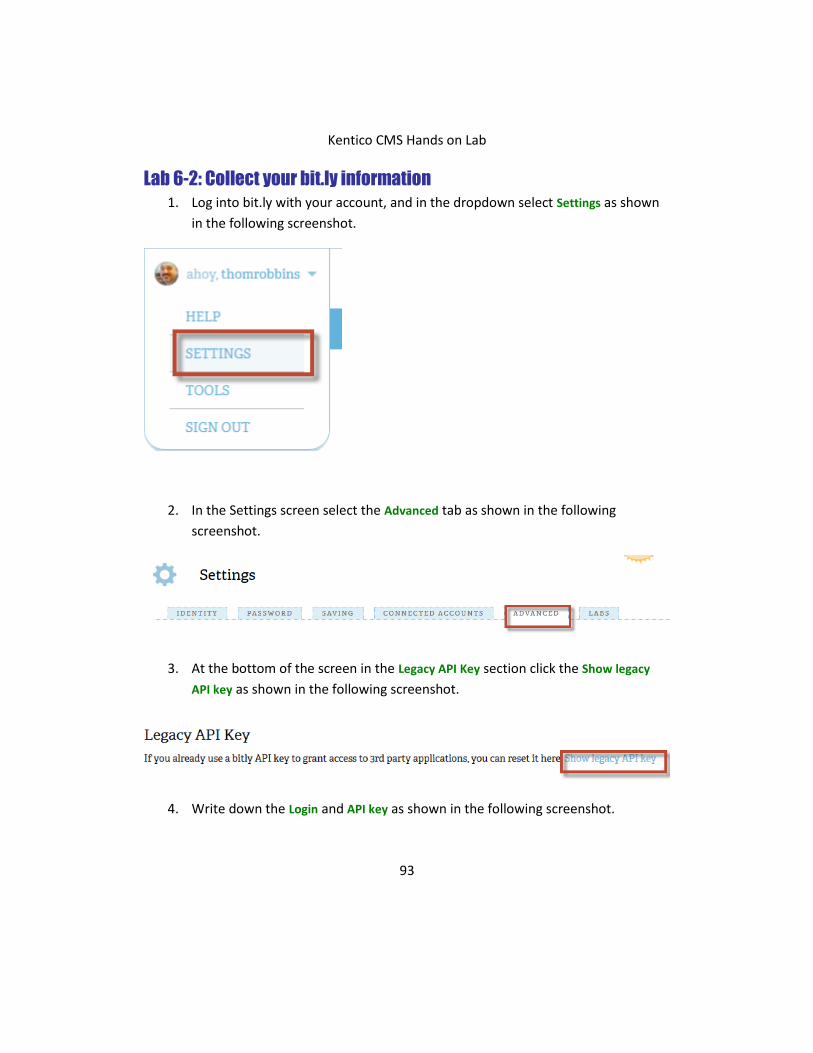
Lab 6-2: Collect your bit.ly information
1. Log into bit.ly with your account, and in the dropdown select Settings as shown
in the following screenshot.
2. In the Settings screen select the Advanced tab as shown in the following
screenshot.
3. At the bottom of the screen in the Legacy API Key section click the Show legacy
API key as shown in the following screenshot.
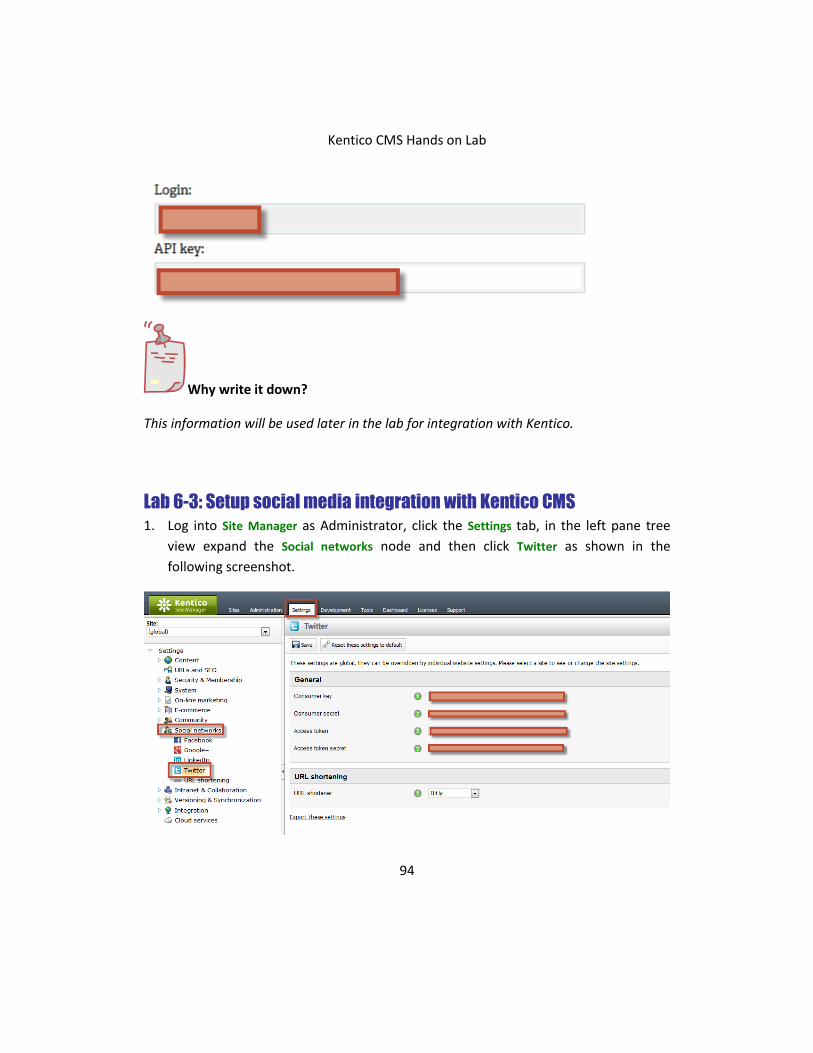
4. Write down the Login and API key as shown in the following screenshot.
Kentico CMS Hands on Lab
94
Why write it down?
This information will be used later in the lab for integration with Kentico.
Lab 6-3: Setup social media integration with Kentico CMS
1. Log into Site Manager as Administrator, click the Settings tab, in the left pane tree
view expand the Social networks node and then click Twitter as shown in the
following screenshot.
Kentico CMS Hands on Lab
95
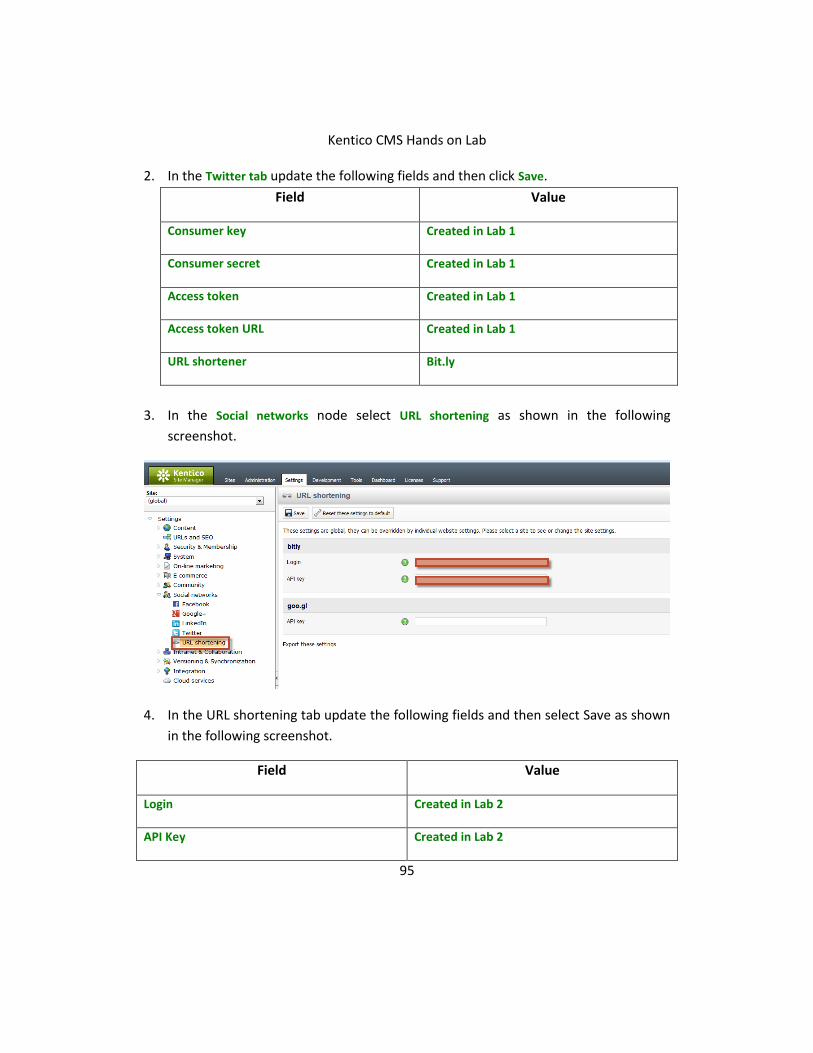
2. In the Twitter tab update the following fields and then click Save.
Field Value
Consumer key Created in Lab 1
Consumer secret Created in Lab 1
Access token Created in Lab 1
Access token URL Created in Lab 1
URL shortener Bit.ly
3. In the Social networks node select URL shortening as shown in the following
screenshot.
4. In the URL shortening tab update the following fields and then select Save as shown
in the following screenshot.
Field Value
Login Created in Lab 2
API Key Created in Lab 2
Kentico CMS Hands on Lab
96
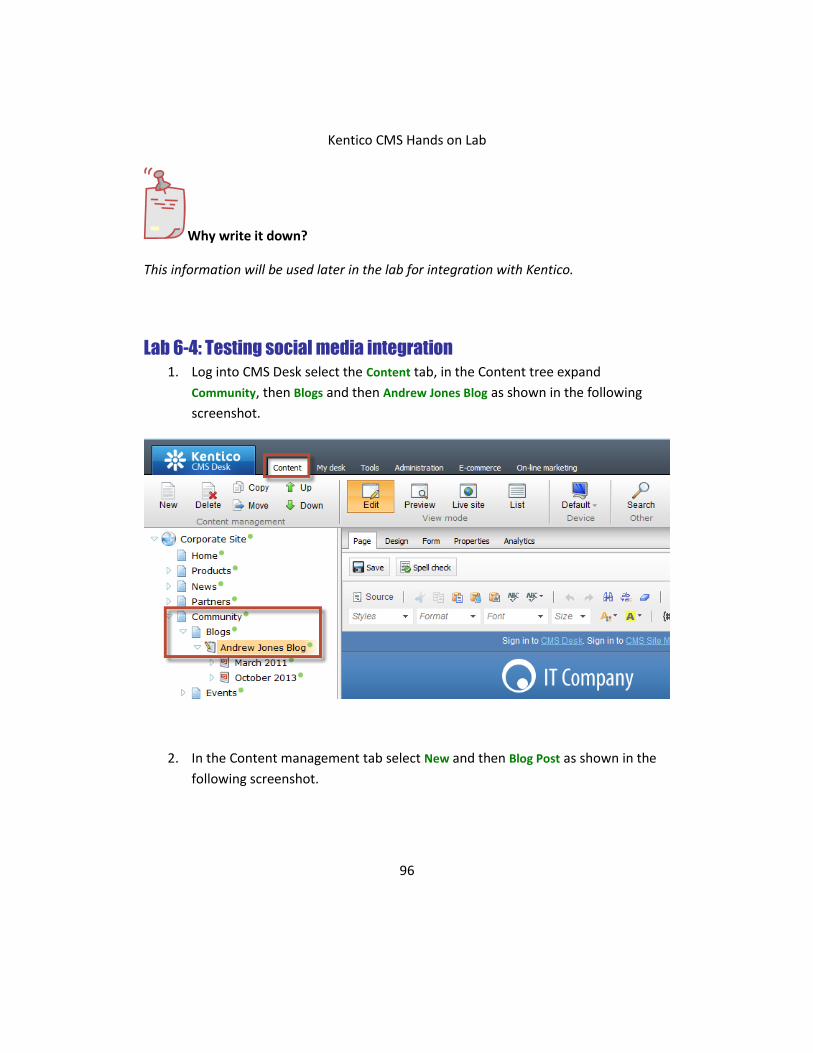
Why write it down?
This information will be used later in the lab for integration with Kentico.
Lab 6-4: Testing social media integration
1. Log into CMS Desk select the Content tab, in the Content tree expand
Community, then Blogs and then Andrew Jones Blog as shown in the following
screenshot.
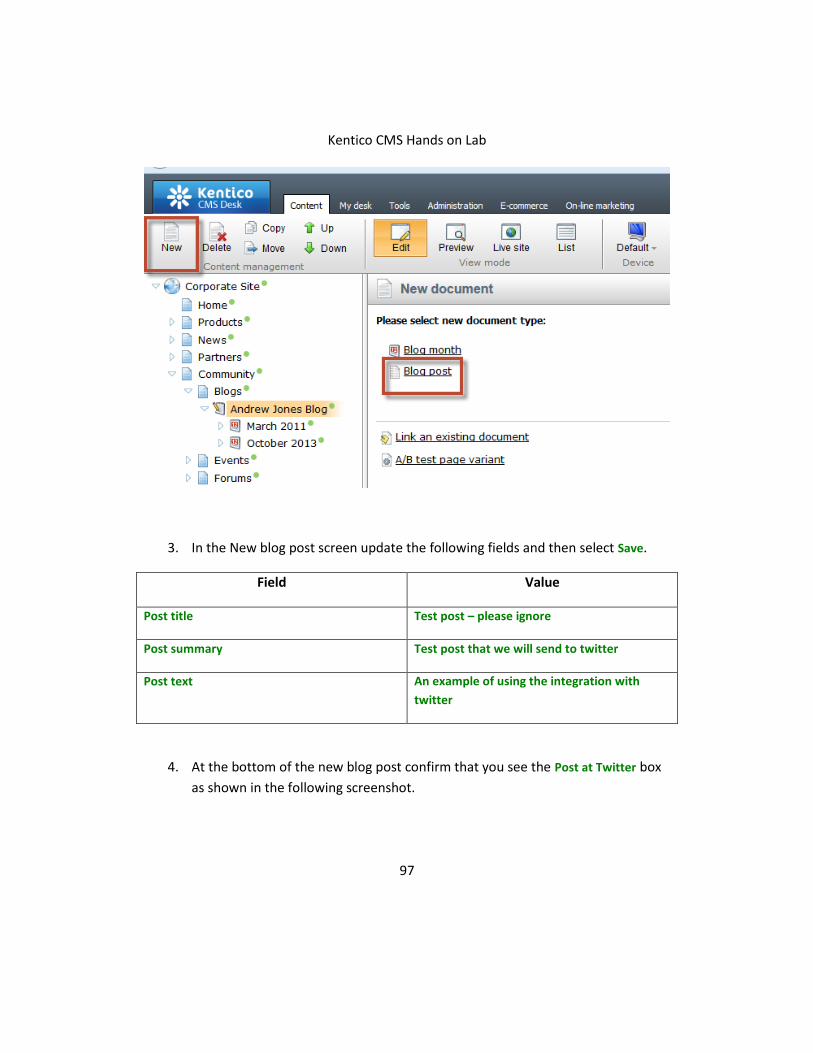
2. In the Content management tab select New and then Blog Post as shown in the
following screenshot.
Kentico CMS Hands on Lab
97
3. In the New blog post screen update the following fields and then select Save.
Field Value
Post title Test post – please ignore
Post summary Test post that we will send to twitter
Post text An example of using the integration with
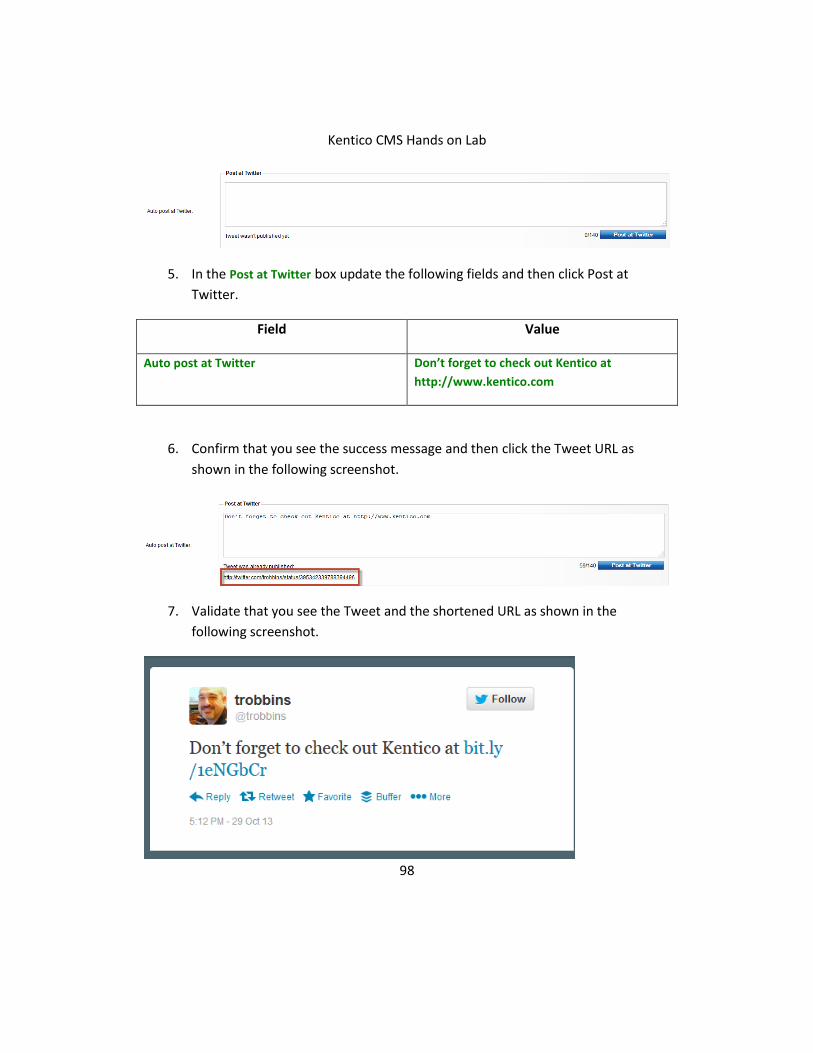
4. At the bottom of the new blog post confirm that you see the Post at Twitter box
as shown in the following screenshot.
Kentico CMS Hands on Lab
98
5. In the Post at Twitter box update the following fields and then click Post at
Twitter.
Field Value
Auto post at Twitter Don’t forget to check out Kentico at
http://www.kentico.com
6. Confirm that you see the success message and then click the Tweet URL as
shown in the following screenshot.
7. Validate that you see the Tweet and the shortened URL as shown in the
following screenshot.
Kentico CMS Hands on Lab
99
What am I looking at?
You have successfully tested the Twitter and URL shortening integration with Kentico.
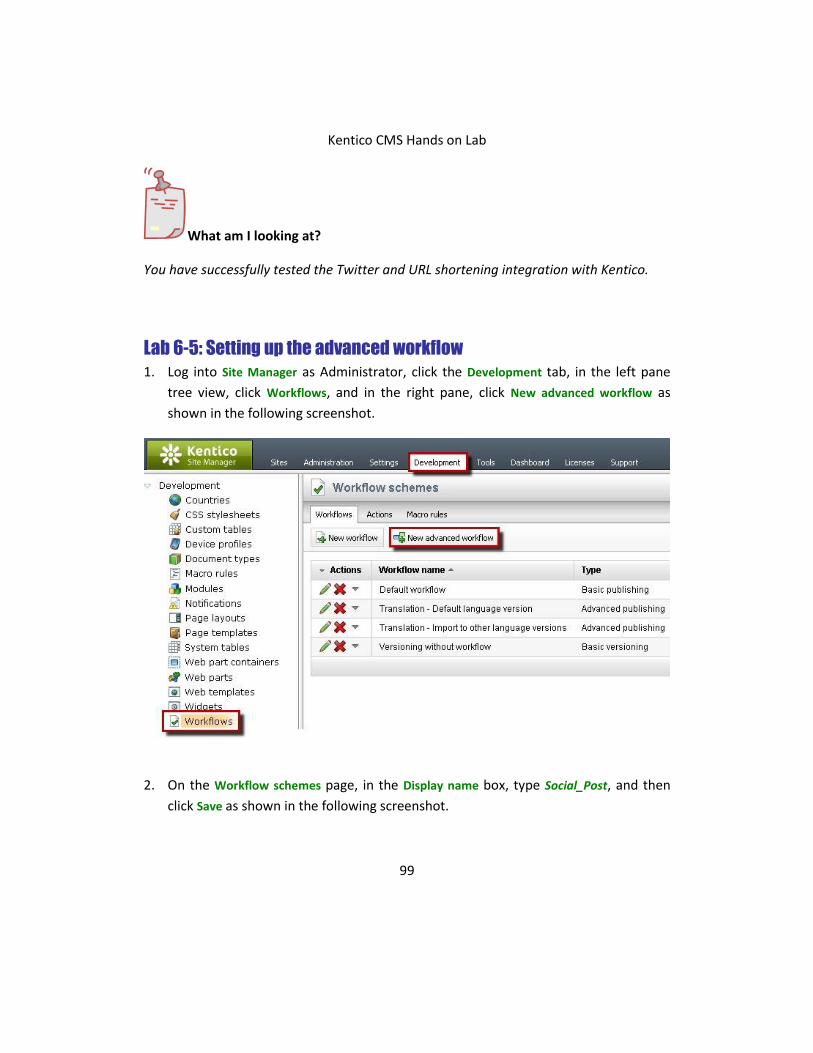
Lab 6-5: Setting up the advanced workflow
1. Log into Site Manager as Administrator, click the Development tab, in the left pane
tree view, click Workflows, and in the right pane, click New advanced workflow as
shown in the following screenshot.
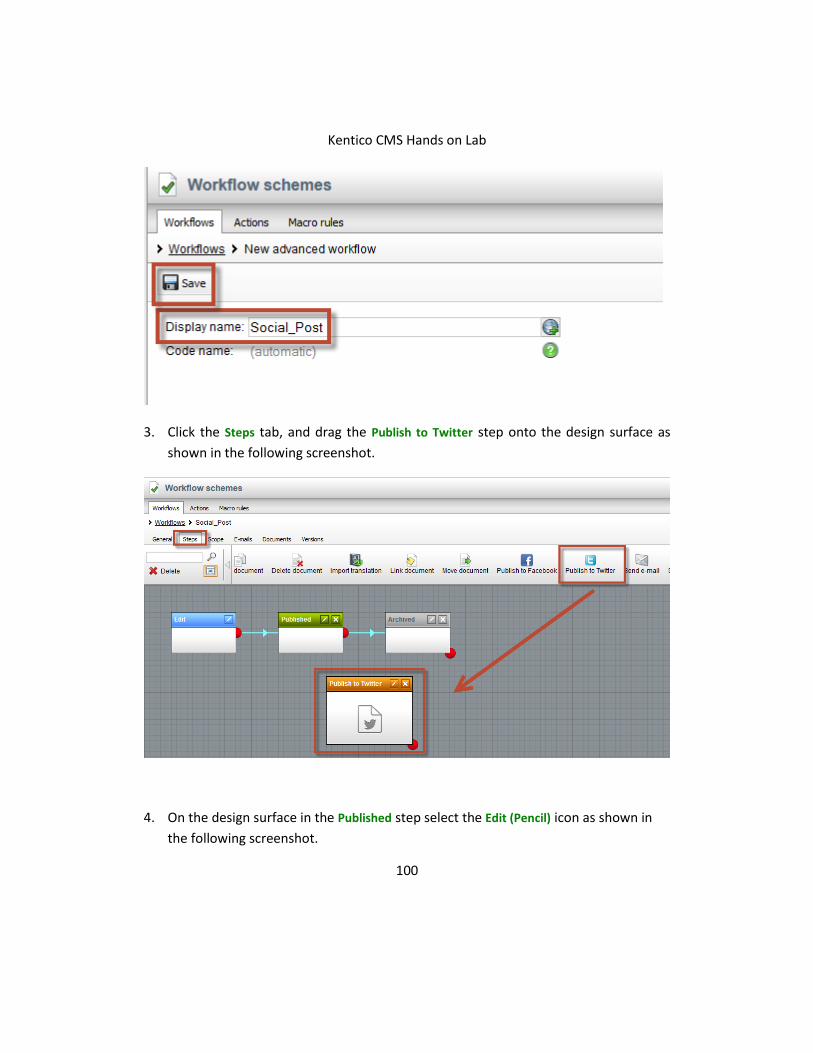
2. On the Workflow schemes page, in the Display name box, type Social_Post, and then
click Save as shown in the following screenshot.
Kentico CMS Hands on Lab
100
3. Click the Steps tab, and drag the Publish to Twitter step onto the design surface as
shown in the following screenshot.
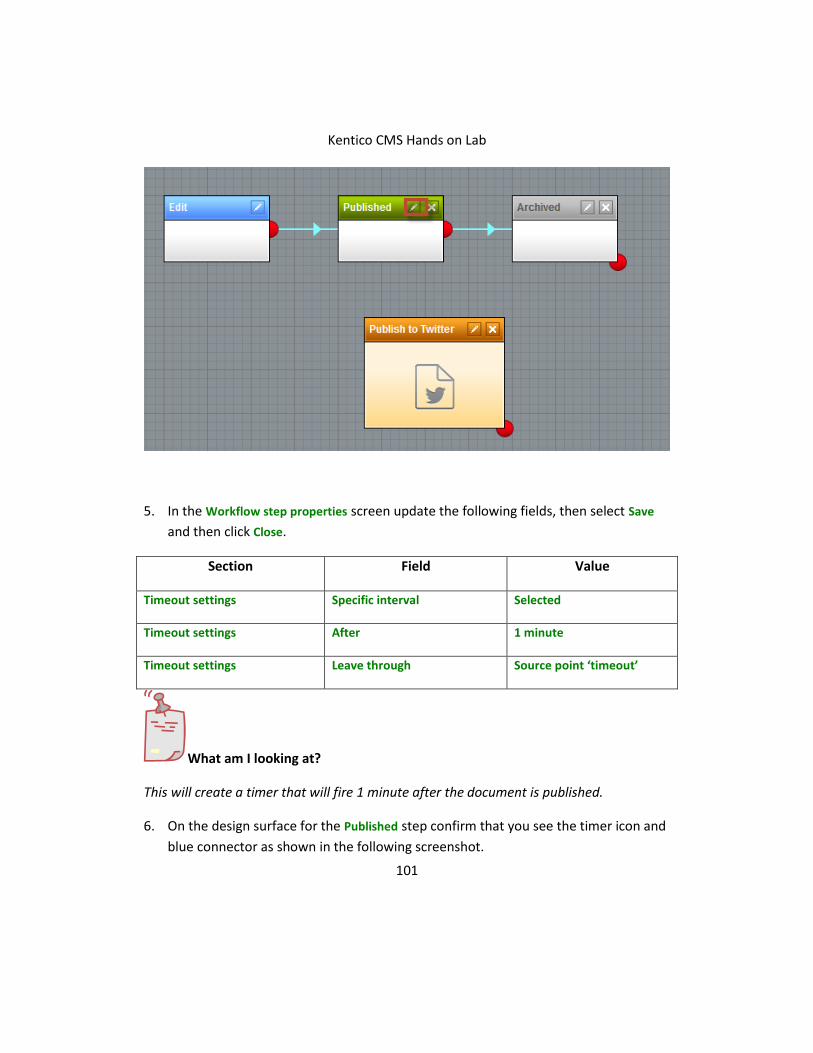
4. On the design surface in the Published step select the Edit (Pencil) icon as shown in
the following screenshot.
Kentico CMS Hands on Lab
101
5. In the Workflow step properties screen update the following fields, then select Save
and then click Close.
Section Field Value
Timeout settings Specific interval Selected
Timeout settings After 1 minute
Timeout settings Leave through Source point ‘timeout’
What am I looking at?
This will create a timer that will fire 1 minute after the document is published.
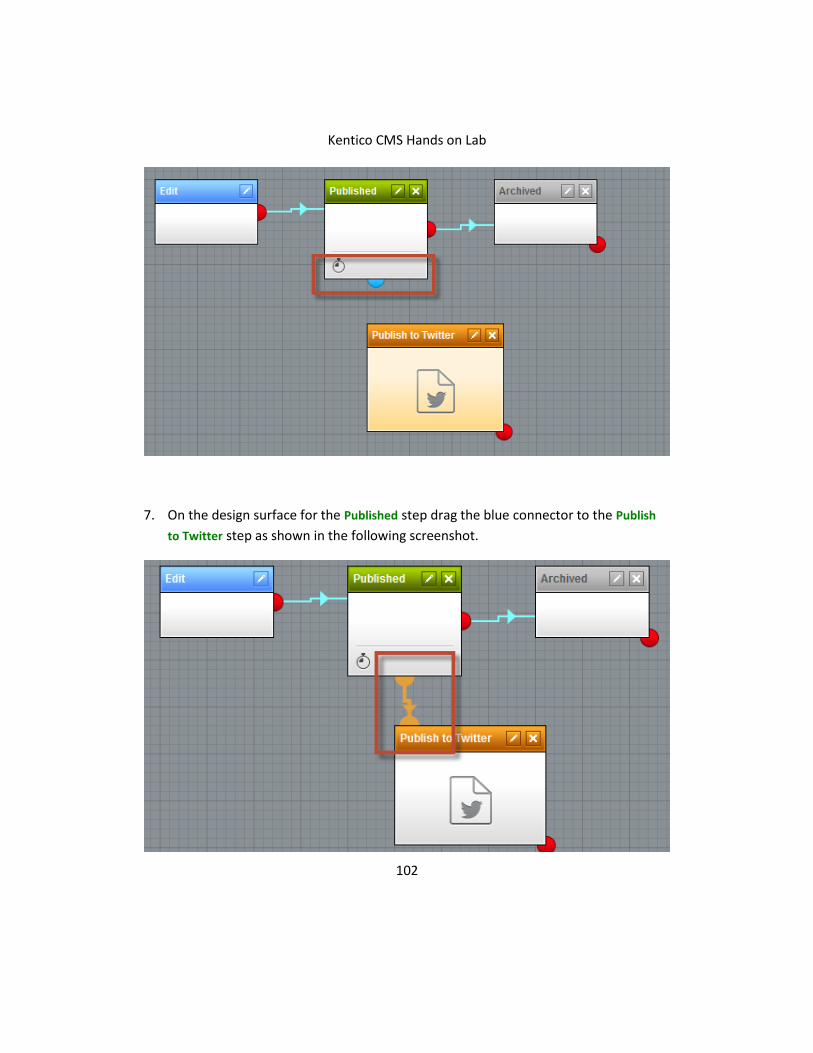
6. On the design surface for the Published step confirm that you see the timer icon and
blue connector as shown in the following screenshot.
Kentico CMS Hands on Lab
102
7. On the design surface for the Published step drag the blue connector to the Publish
to Twitter step as shown in the following screenshot.
Kentico CMS Hands on Lab
103
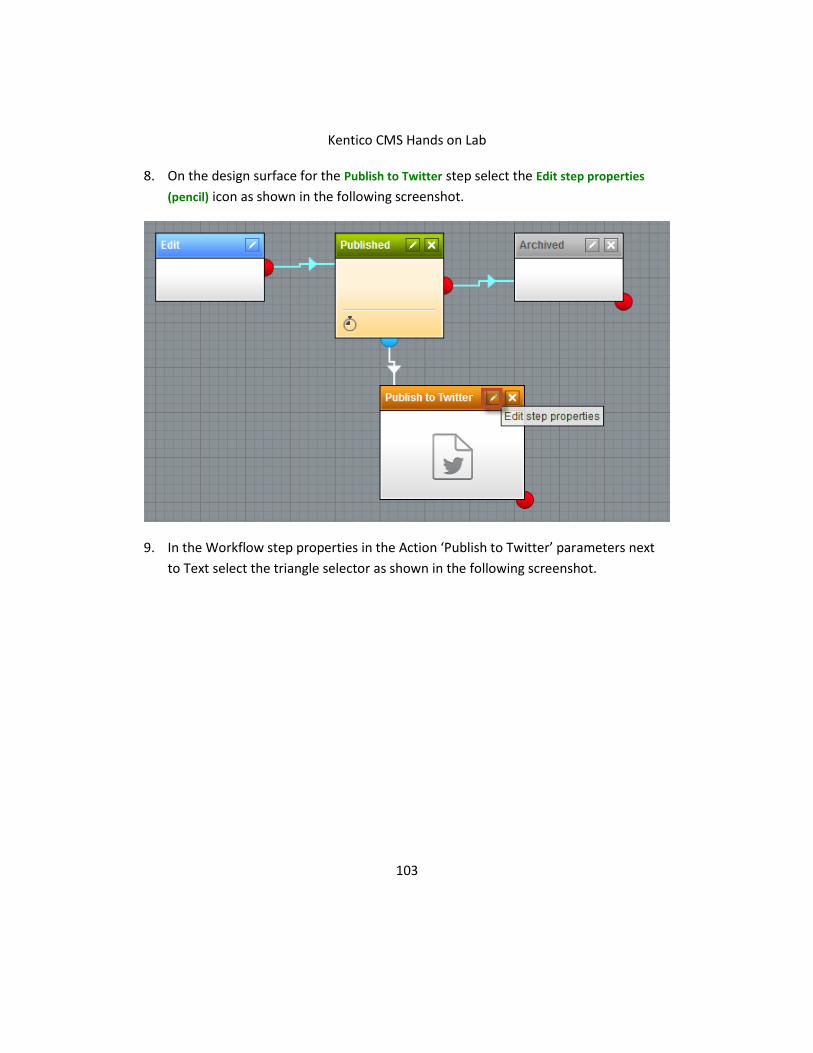
8. On the design surface for the Publish to Twitter step select the Edit step properties
(pencil) icon as shown in the following screenshot.
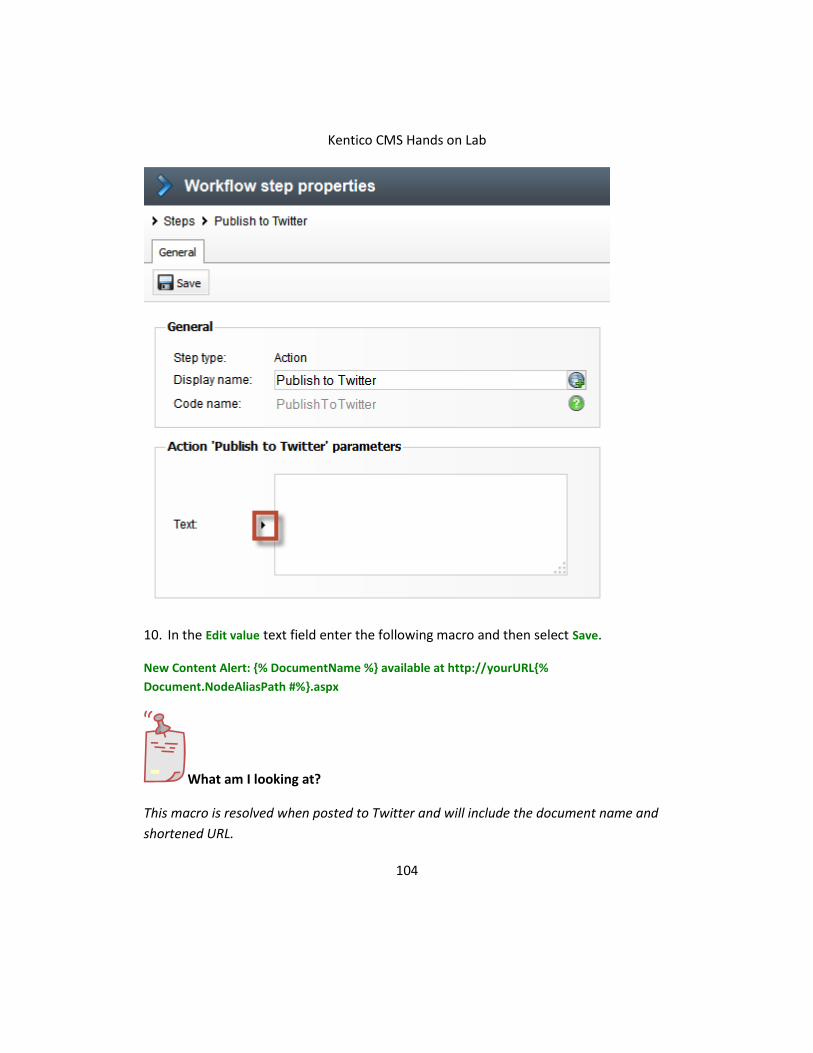
9. In the Workflow step properties in the Action ‘Publish to Twitter’ parameters next
to Text select the triangle selector as shown in the following screenshot.
Kentico CMS Hands on Lab
104
10. In the Edit value text field enter the following macro and then select Save.
New Content Alert: {% DocumentName %} available at http://yourURL{%
Document.NodeAliasPath #%}.aspx
What am I looking at?
This macro is resolved when posted to Twitter and will include the document name and
shortened URL.
Kentico CMS Hands on Lab
105
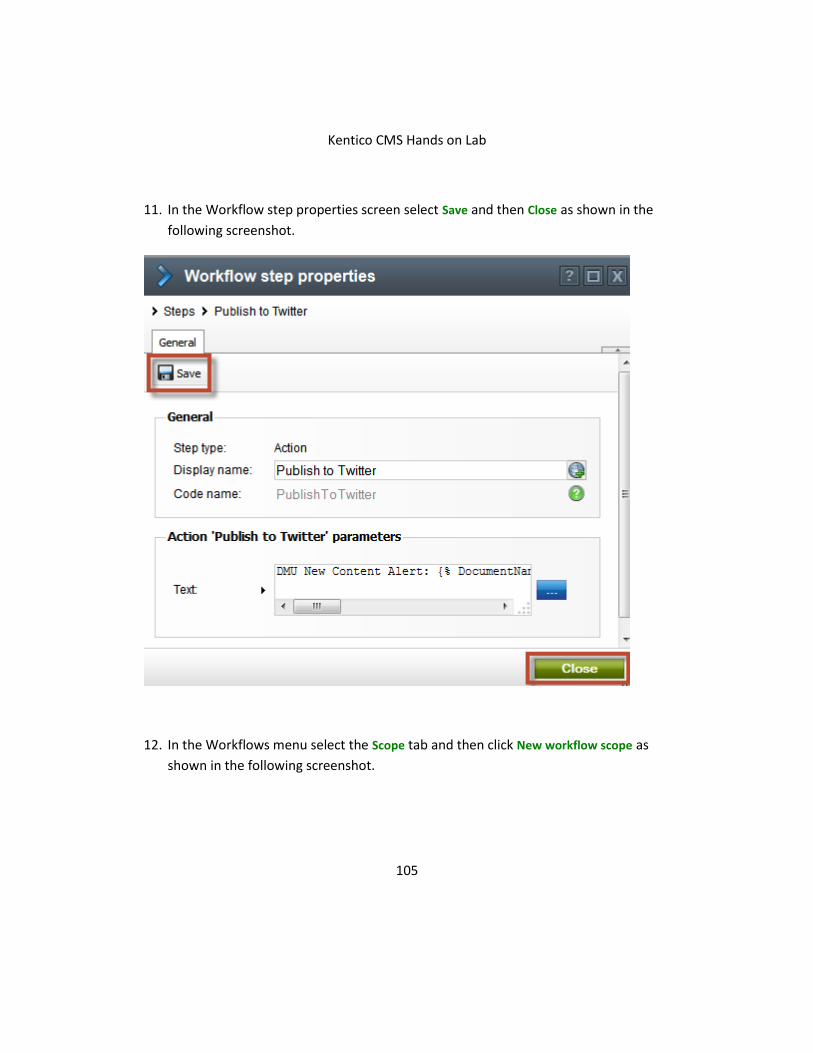
11. In the Workflow step properties screen select Save and then Close as shown in the
following screenshot.
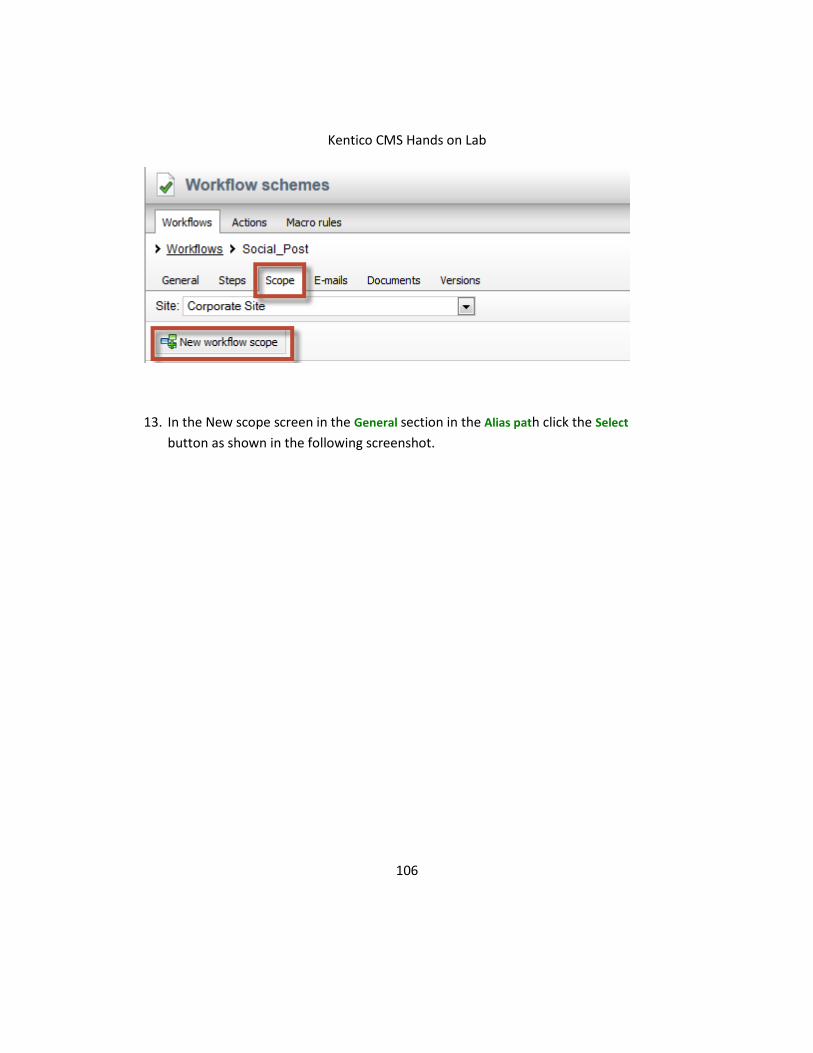
12. In the Workflows menu select the Scope tab and then click New workflow scope as
shown in the following screenshot.
Kentico CMS Hands on Lab
106
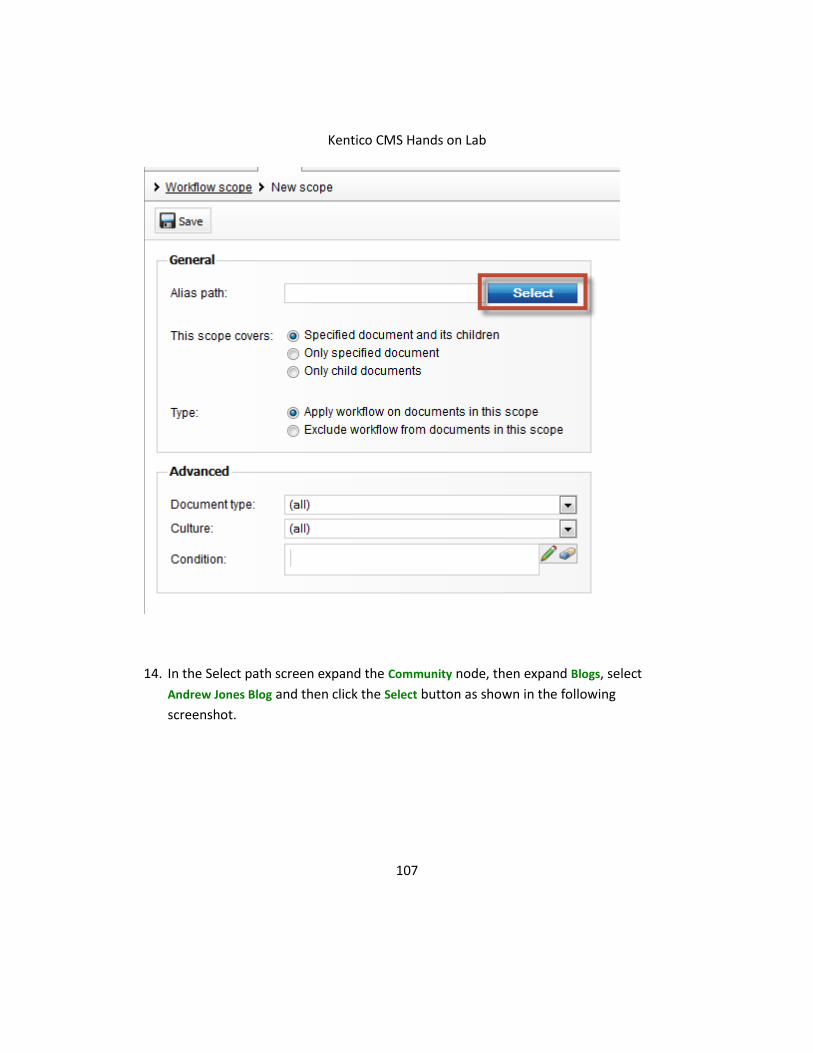
13. In the New scope screen in the General section in the Alias path click the Select
button as shown in the following screenshot.
Kentico CMS Hands on Lab
107
14. In the Select path screen expand the Community node, then expand Blogs, select
Andrew Jones Blog and then click the Select button as shown in the following
screenshot.

Kentico CMS Hands on Lab
108
15. In the Scope ID:1 screen update the following fields and then select Save.
Section Fields Value
General This scope covers Specified documents and its
children
General Type Apply workflow on
documents in this scope
Advanced Document type Blog Post (CMS.BlogPost)
What am I looking at?
In this example we created a workflow for blog posts only. You can have multiple scopes
that cover multiple different document types.
Kentico CMS Hands on Lab
109
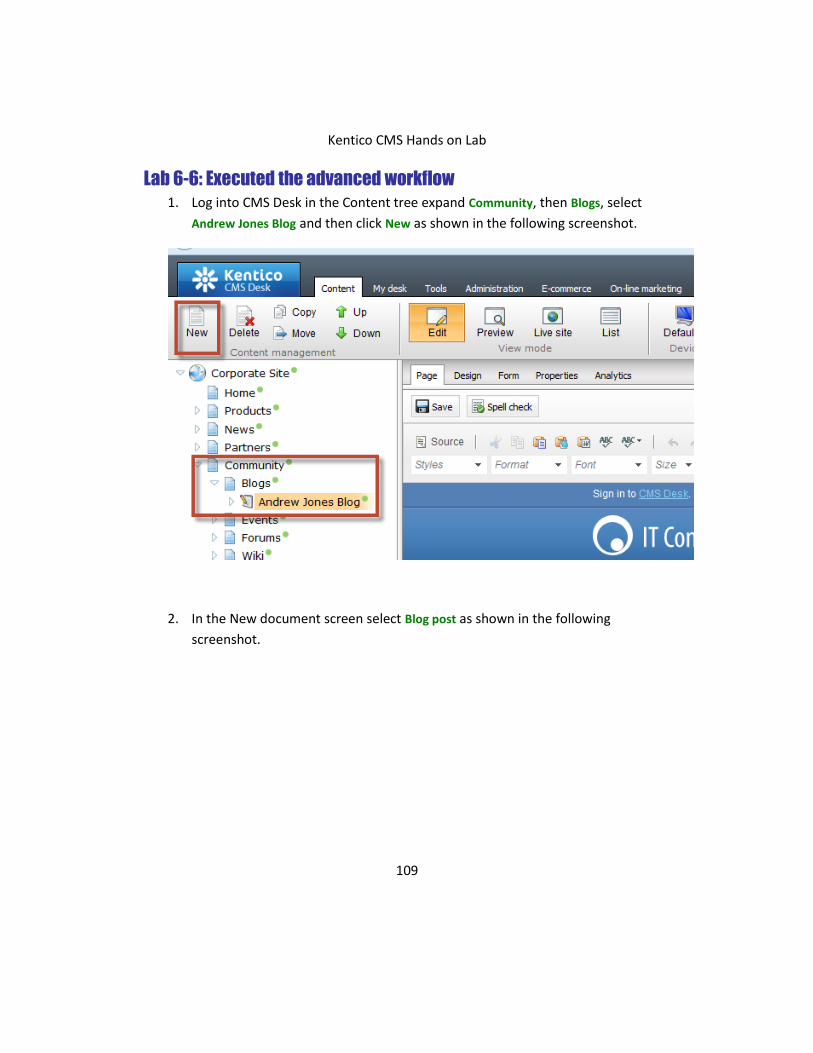
Lab 6-6: Executed the advanced workflow
1. Log into CMS Desk in the Content tree expand Community, then Blogs, select
Andrew Jones Blog and then click New as shown in the following screenshot.
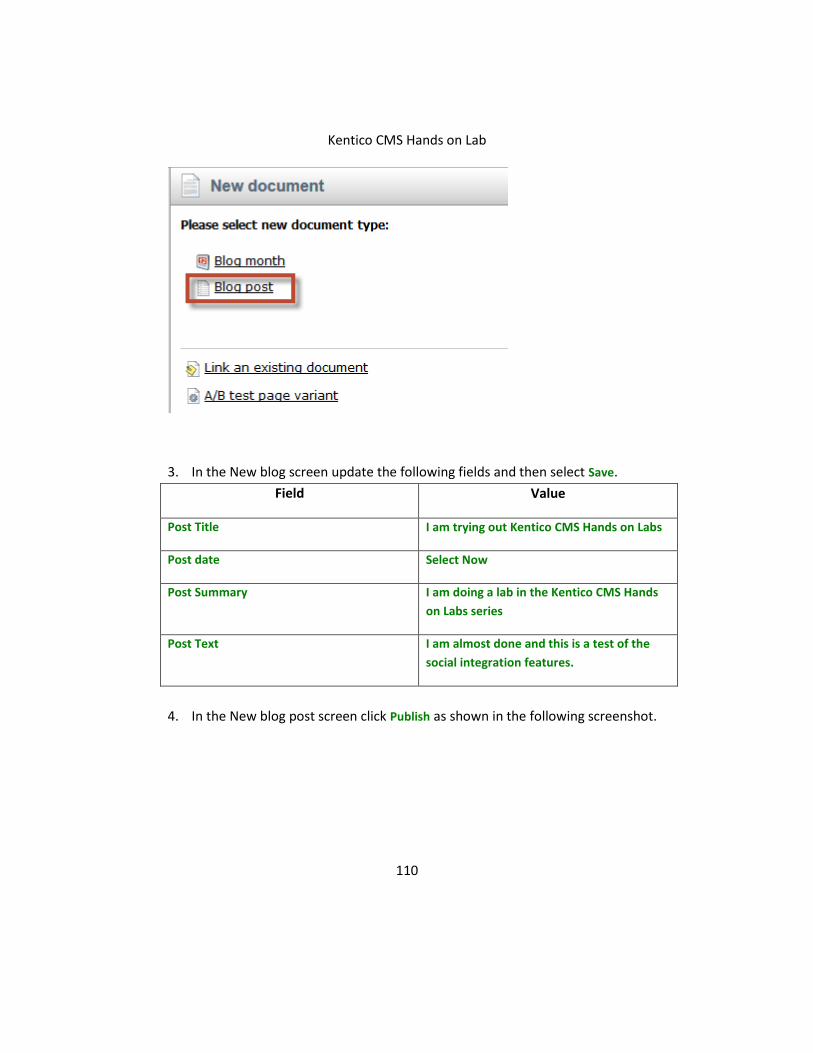
2. In the New document screen select Blog post as shown in the following
screenshot.
Kentico CMS Hands on Lab
110
3. In the New blog screen update the following fields and then select Save.
Field Value
Post Title I am trying out Kentico CMS Hands on Labs
Post date Select Now
Post Summary I am doing a lab in the Kentico CMS Hands
on Labs series
Post Text I am almost done and this is a test of the
social integration features.
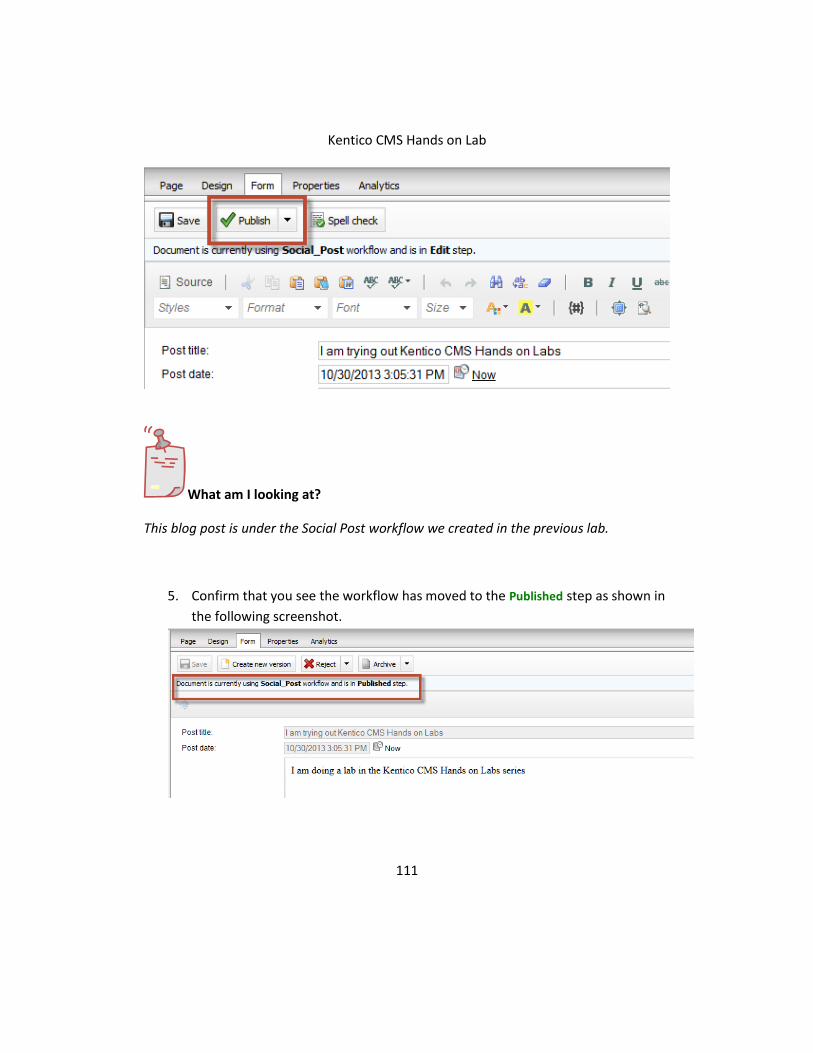
4. In the New blog post screen click Publish as shown in the following screenshot.
Kentico CMS Hands on Lab
111
What am I looking at?
This blog post is under the Social Post workflow we created in the previous lab.
5. Confirm that you see the workflow has moved to the Published step as shown in
the following screenshot.
Kentico CMS Hands on Lab
112
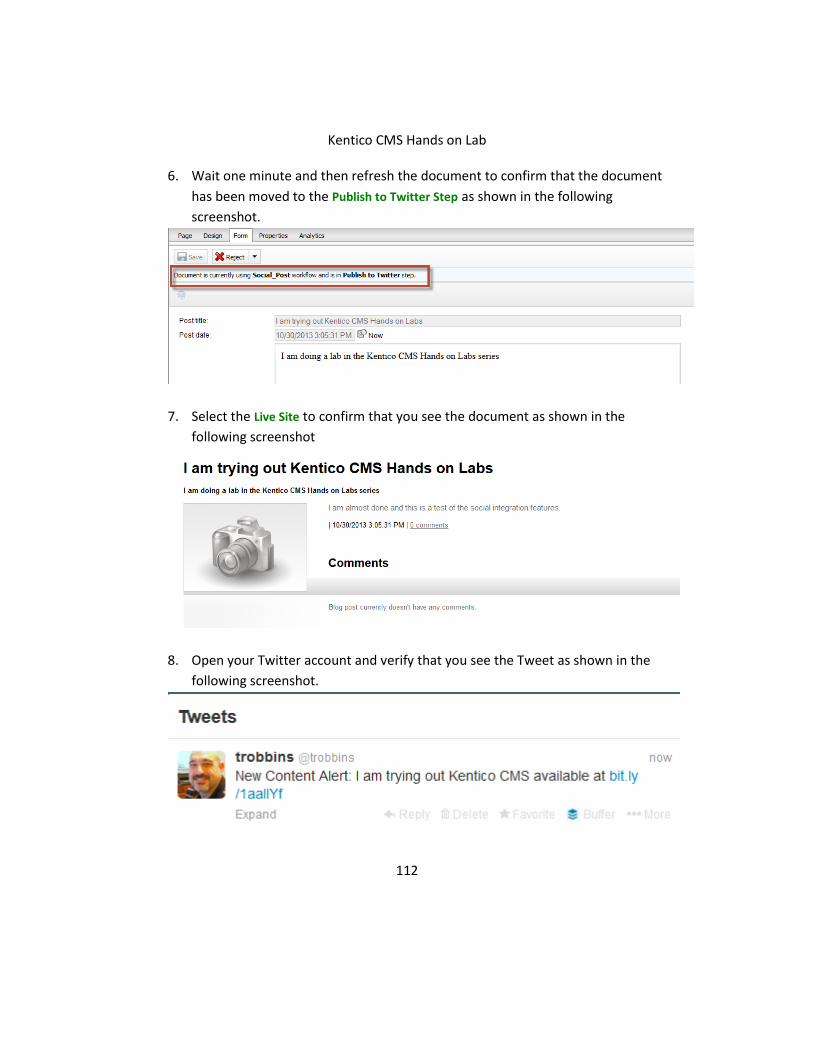
6. Wait one minute and then refresh the document to confirm that the document
has been moved to the Publish to Twitter Step as shown in the following
screenshot.
7. Select the Live Site to confirm that you see the document as shown in the
following screenshot
8. Open your Twitter account and verify that you see the Tweet as shown in the
following screenshot.
Kentico CMS Hands on Lab
113
Summary
In this Hands on Lab we have looked at how to use Advanced workflow to automatically
post to Twitter. Specifically we covered the following.
What information is needed from Twitter to use social medial integration with
Kentico CMS
What information is needed to from bit.ly to use URL shortening with Kentico
CMS
How to create a new Advanced workflow
How to create a scope that will select documents for an Advanced workflow
Key Resources:
http://devnet.kentico.com/docs/devguide/index.html?workflow_designing_adv
anced.htm
http://devnet.kentico.com/Videos/Feature-series/Kentico-Feature-Series-
Advanced-workflow.aspx