kentucky beekeeping a guide for...
TRANSCRIPT

KENTUCKY BEEKEEPING
A guide for beginners
Thomas C. Webster Coope ram
rative Extension ProgKentucky State University
Frankfort, Kentucky


CONTENTS
Introduction Part 1: Understanding the Bees 1
A year in the life of a honey bee colony 2 The life of a queen bee 4 The life of a worker bee 7 The life of a drone bee 9 Communication in the Hive 10 The waggle dance 10 The sense of smell 11 Pheromones 11 Trophallaxis 13 Varieties and Breeds of Honey bees 13 The African bees 14 Breeds of bees 16 What is the best type of bee for a beginner? 16
Part 2: The Hive 17 Hive parts 17 Considerations about hive materials 18 Special Equipment 20 Screened bottom boards 20 Pollen traps 20
Part 3: Establ ishing and Examining the Hives 21
Choosing a location for the bee hives 21 Basic equipment 22 Getting Your Bees 23
Acquiring an established hive 23 Making a divide from an existing hive 24 Buying a package of bees 24 Catching and installing a swarm of bees 26
How many hives? 28 Getting Ready to Work the Bees 29
How the bees sense the world around them 29 Other factors which influence bee behavior 30 Stings 31
Examining the Hive 32 Opening the hive 32 What to observe 33 Closing the hive 34
How thoroughly should a hive be examined? 34 Part 4: Hive Management 37
Feeding Bees 37 Feeding sugar syrup 37 Feeding pollen supplements or substitutes 39
Water for Bees 40 Mites, Diseases, Pests and Predators 40
Varroa mites 41 Tracheal mites 41 American foulbrood (AFB) 42 Chalkbrood 43 Nosema 43 Viruses 44 European foulbrood (EFB) 44 Wax moths 44 Small hive beetles 46 Skunks 46 Bears 47 Mice 47 Ants and other minor pests 48
Other Problems 48 Swarming 48 Supersedure 48 Starvation 49 Pesticide poisoning 49 Queenlessness 50 Drone-laying queens and queens
that produce bad brood patterns 50 Laying worker bees 50 Robber bees 51 Absconding 52 Drifting 52 Extreme weather 53 Theft and vandalism 54
Important Activities 54 Interpreting the brood pattern 54 Finding the queen 56 Buying queen bees 58 Requeening a hive 59 Introducing a queen to a newly divided 60 or queenless hive Marking and clipping a queen 61
Dividing hives 62 Uniting hives 63
Moving hives 63 Culling old frames 64
Preparations for Winter 65 Increasing the number of bees by uniting colonies 66 Evaluating the hive for honey stores 66 Mite and disease control 66 Reducing the hive entrance 67 Removing queen excluders 67
Part 5: Benefits from Healthy Hives 68
Products of the Hive 68 Honey 68 Pollen 69 Beeswax 70

Propolis 71
Health and Nutritional Benefits of Hive Products 71 Honey 72 Pollen 73 Propolis 74 Royal jelly 74 Bee venom 74
The Honey Harvest 74 Honey harvesting tools 75 Extracting and bottling the honey 76
Honey plants in Kentucky 77 Fruit and Vegetable Pollination 78 Other Bee Species for Pollination 79
Part 6: Learning More 81
Beekeeping Associations and Field Days 81 Further reading 81 Magazines 82 Books 82 The internet 83 Beekeeping sights in Kentucky 84 What’s next? 84
Glossary of Beekeeping Terms 86 I thank Etta Thacker for assistance in proofreading and compiling this booklet. The Cooperative Extension Program of Kentucky State University is an Equal Opportunity Organization authorized to provide research, educational information and other services only to individuals and institutions that function without regard to race, color, sex, age, disability or national origin. Issued in furtherance of Cooperative Extension Work Act of September 29, 1977, in cooperation with the U.S. Department of Agriculture. Harold R. Benson, Administrator, Cooperative Extension Program, Kentucky State University, Frankfort, Kentucky.

1
INTRODUCTION
Beekeeping appeals to those who are curious about plants and animals, who enjoy
working outdoors and who appreciate the interplay among weather, the seasons and nature.
In this way it is related to gardening, fishing, hunting and care for animals.
Beekeeping is also a type of agriculture. Hives are managed for marketable products.
The crop pollinating activity of the bee is worth billions of dollars each year in this country
alone.
The honey bee, however, has an additional element which is not evident in plants or
most animals. That is the complex social structure of the bee colony. Much of what is
fascinating about honey bees is in the way the bees interact and cooperate.
Kentucky is a good place to get started. A large portion of the state is rural or wooded.
Some of the best honey plants in the country, such as sourwood and basswood, grow here.
Bees rarely have trouble finding pollen. We have relatively little trouble with pesticides
poisoning bees, a major problem in other states. Last but not least, the state beekeeping
association and many local associations hold regular, informative meetings and field days.
Beginners are welcome!
The beginner needs little to get started as a beekeeper. A suitable location for the bees,
the basic equipment, and of course the bees themselves are needed. From there on, it's a
matter of learning from other beekeepers, magazines, books and (most important) personal
experience.
PART 1: UNDERSTANDING THE BEES An understanding of the life of the honey bee colony is essential to good beekeeping.
The bee is remarkable for many reasons, including its ability to live in a cooperative society,
which we call the colony. The colony consists of the live bees, including the brood but not
including the structure they live in. The hive is the bee colony plus the structure around them:
the wooden boxes owned by beekeepers, a hollow tree, or any other structure they might
find. Sometimes a colony will not have a hive, for example a swarm of bees that is searching
2
for a place to live. In practice, many beekeepers use the terms colony and hive
interchangeably.
The queen is the heart of the colony. She is usually the mother of all the other bees in the
colony. The workers are sterile females, numbering up to 60,000 per hive. They are true to
their name --tending the larvae, feeding the queen, cleaning the hive, grooming each other,
constructing beeswax comb, guarding the hive, foraging for nectar and pollen, making honey,
and keeping the hive warm or cool as needed. Drones are the hopelessly lazy male bees.
They do nothing but eat and wait for nice afternoons when they will fly off in hopes of
meeting a young queen. A drone can be recognized by his enormous black eyes which cover
most of the head. His thorax and abdomen are stockier than those of a worker bee. Both his
eyes and his powerful flight muscles are key to his success on a mating flight.
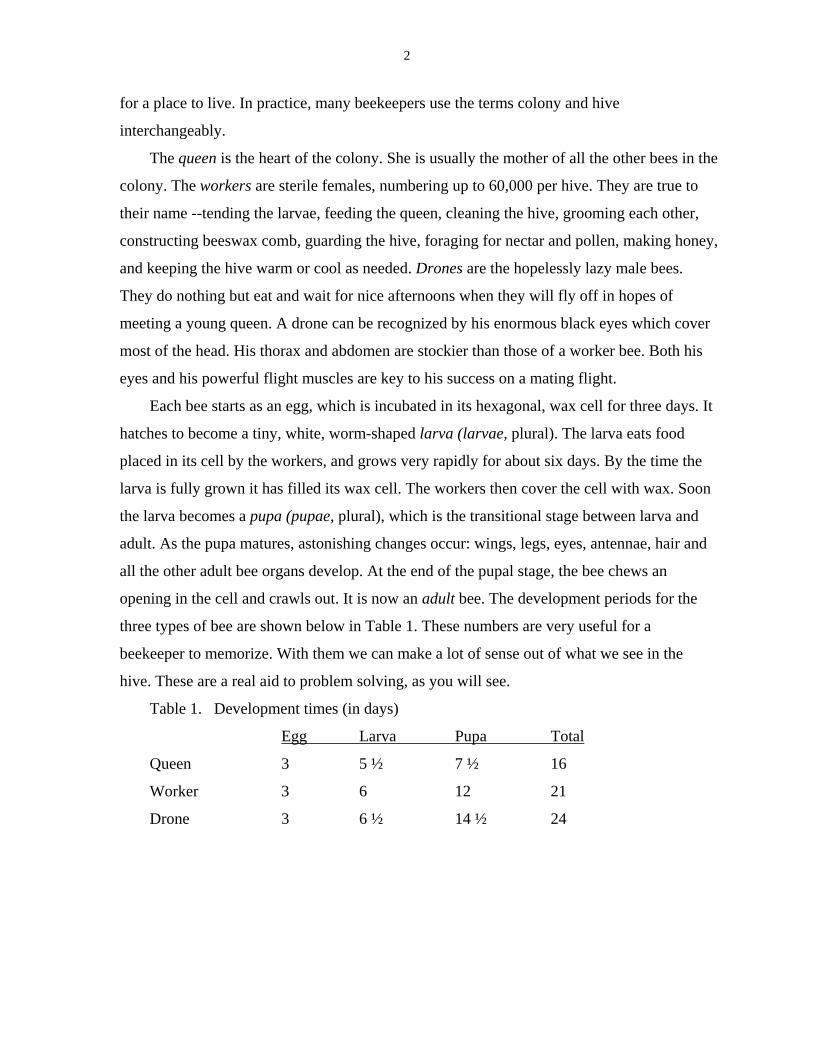
Each bee starts as an egg, which is incubated in its hexagonal, wax cell for three days. It
hatches to become a tiny, white, worm-shaped larva (larvae, plural). The larva eats food
placed in its cell by the workers, and grows very rapidly for about six days. By the time the
larva is fully grown it has filled its wax cell. The workers then cover the cell with wax. Soon
the larva becomes a pupa (pupae, plural), which is the transitional stage between larva and
adult. As the pupa matures, astonishing changes occur: wings, legs, eyes, antennae, hair and
all the other adult bee organs develop. At the end of the pupal stage, the bee chews an
opening in the cell and crawls out. It is now an adult bee. The development periods for the
three types of bee are shown below in Table 1. These numbers are very useful for a
beekeeper to memorize. With them we can make a lot of sense out of what we see in the
hive. These are a real aid to problem solving, as you will see.
Table 1. Development times (in days)
Egg Larva Pupa Total
Queen 3 5 ½ 7 ½ 16
Worker 3 6 12 21
Drone 3 6 ½ 14 ½ 24
3
A year in the life of a honey bee colony
We will consider a natural (feral) colony, not managed by a beekeeper. From this we
will understand the colony's seasonal story, and why beekeepers manage bees in certain
ways.
Let's begin with February and March, when the colony experiences the first few warm
days. On sunny days above 55o the bees pour out in search of early flowers, and return with
the first nectar and pollen of the new year. The arrival of food in the hive stimulates the
queen to begin laying eggs, which soon hatch into hungry worker bee larvae. With some
luck, the spring weather is not too bad and the bees are able to satisfy these hungry mouths.
The queen lays more worker eggs daily. The first young adult worker bees of the year begin
to emerge from their cells three weeks after the queen began her egg laying. They join the
other workers, the winter bees that were reared last year, to strengthen the colony population.
As March passes into April and May, the colony develops enough worker bees to feed
and incubate a larger brood nest. Also, the nights are not as cold, and this helps the bees
incubate their brood. With more brood rearing the number of workers soon grows quickly. In
May and June, the weather is almost perfect and everything seems to be blooming at once.
The days are longer, so workers can be out foraging for 14 to 16 hours daily. The sheets of
comb, many hexagonal cells of beeswax, are filled with honey, pollen and brood. This is
when the colony really grows and makes most of its honey. When bees are foraging for
nectar and making it into honey, we call it a honey flow. When they are bringing in pollen,
it's a pollen flow.
April through June is mating time. Drones are reared in great numbers and a few queens
develop in the strongest colonies. When a new queen emerges from her cell, the colony is
ready to divide. About half of the adult bees leave the hive in a big cloud, along with a queen
--usually the original, older queen. This colony of bees which is temporarily without a home
is called a swarm. They soon settle near the hive in a cluster. In a day or so the swarm moves
on to a permanent home. A hollow tree or other cavity is typical.
Meanwhile, a young queen remains in the original hive. As soon as weather permits, she
takes a mating flight. Several days later she begins to lay eggs and takes on her new role as
colony queen.
4
The most important honey plants do not bloom abundantly in July and August. During
these months the hive often experiences a summer dearth. It consumes stored honey if it isn't
finding enough nectar and pollen to satisfy the larvae and adult bees. The number of brood
cells diminishes. Often, a second honey flow occurs in early fall but the bees usually make
less honey at this time than in the spring. In September and October, winter preparations
begin, and brood rearing tapers off. When cold weather hits, the bees cluster tightly to keep
warm. From November to February the worker bees are eating honey, clustering, and
generating heat by shivering their flight muscles. If the bees are healthy, numerous enough to
make a large, warm cluster, and have sufficient honey stored, they should survive the winter.
We can understand more about the honey bee colony by learning details of the lives of
the individual bees. An outline of the lives of a queen, worker and drone follow.
The life of a queen bee
The queen begins her adult life when she emerges from her peanut-shaped queen cell. If
you see the cell just after her emergence, you may see the circular hole she cut for herself at
the bottom. The worker bees destroy the empty queen cell soon after the queen has emerged.
For this reason, queen cells are seen only in a hive when queens are reared, or just afterward.
As a young virgin, the queen will appear relatively small. She is able to walk quickly
across the comb because her ovaries have not yet enlarged. She is difficult for the beekeeper
to find because she is not much larger than the worker bees.
A few days into her adult life, she takes flight in search of a drone congregation area.
Her mating flight will be during the afternoon, usually on a warm sunny day. The drone
congregation area is a location about 50 feet above the ground where hundreds of drones are
circling. We don't know exactly how or why the drones and queens choose certain locations
to congregate. But it's clear that every year new drones and queens choose these same
locations again. When the queen approaches the congregation area, the drones speed toward
her and attempt to mate. The queen mates with ten to twenty drones in rapid succession, and
then returns to her hive. If the queen was unsuccessful in finding enough drones for mating
she may try another mating flight within the following days.

5
After a successful mating flight, the sperm obtained by the queen moves to a tiny
spherical sac inside of her, called the spermatheca. The sperm will be stored there, and
gradually depleted, for the rest of her life. It will be sufficient to fertilize her eggs for the next
two or three years.
When the queen is ready to lay an egg, she first inspects the inside of a beeswax cell. If
the cell is empty and clean, she then turns around and inserts her abdomen. Then comes a
clever trick: the queen is able to control the sex of the egg she lays. If the egg is to be female,
she releases a bit of sperm from her spermatheca as the egg passes through her reproductive
tract. Fertilized eggs are female and will develop into workers or queens. If, however, the egg
is to be male (drone) the queen withholds sperm as the egg passes. Unfertilized eggs develop
into drones.
The queen's ability to control the sex of her offspring is one of her most valuable traits.
In this way drones may be produced only for the mating season. This ability is shared by kin
of the honey bee. Ants, wasps and other bee species have the same mechanism to control the
sex of their offspring.
As spring progresses, the young, mated queen in a healthy hive devotes herself entirely
to the task of laying eggs. If the workers bring an abundance of nectar and pollen home, the
queen is fed accordingly. In May and June she will lay 1000 to 2000 eggs daily if she's aided
by a strong colony. That's by almost continuous activity day and night. Most of her eggs
develop into the workers that run the whole hive. So we can see why beekeepers are so
concerned with the vigor and genetic traits of their queens.
When foraging slows in midsummer, the queen is fed less and her egg production tapers
off. Her ovaries shrink and she is noticeably smaller. The last eggs will be laid in October in
a typical Kentucky autumn. For the queen, winter is a time only for waiting in the middle of
the cluster. The ball of worker bees surrounds and warms her. In February she is fed more
and stimulated to lay a few eggs. The cues are the appearance of the first spring flora and a
slight lengthening of the days. Honey bees, like many plants and animals, have their own
internal clocks which allow them to tell whether the days are becoming shorter or longer.
With springtime's abundant forage and increasing worker bee population, the queen bee
is fed more and more by the workers. Most of this food is royal jelly, the glandular secretion

6
which is generated by the worker bees. It is also fed to larvae as they develop into queens.
The queen returns to her role as an "egg-laying machine". This second year, however, she
will do more than lay eggs in worker and drone cells. In April, May or June she will find a
few wax queen cups which have been constructed by the worker bees. These are thimble-
shaped cups open downward. They are often seen attached to the brood comb. The queen
lays a female (fertilized) egg in each of several cups. They are now queen cells. The eggs
hang securely from the inner base of the cells because the queen uses a sticky material to
glue them to the wax surface.
When the eggs in queen cells hatch, the workers feed the new young larvae royal jelly.
This liquid is thick enough to be suspended inside the cells. The workers add wax to the
cells, extending them downward. Since they are created in anticipation of the swarming
process, they are often called swarm cells. The young larvae hang from the inverted surface
of the royal jelly. For the first two days, each larva is surrounded by an abundance of this
very rich food. The worker bees visit the cells frequently, adding jelly and extending the cell
walls downward with wax. The larvae grow very quickly and by the fifth or sixth day after
hatching they have eaten nearly all of the food. By that time they are large enough to fill their
cells and the cells have been capped at the bottom by the worker bees. The larvae then enter
the pupal stage inside their cells. The rudiments of wings, eyes, antennae and legs appear.
Twelve to fourteen days after hatching from an egg, each developing queen has finished her
pupal period and has become an adult.
While these larvae and pupae develop in their queen cells, the adult queen is eating less.
Her ovaries shrink, she lays fewer eggs and soon she is light enough to fly.
When the developing queens are nearly ready to emerge from their cells, our story
becomes more complicated. The colony typically rears more queens than it will actually need
for the swarming process, so there is a rivalry among these new queens. If left to their own
devices they would hunt each other down and try to sting each other to death. So the worker
bees must mediate this conflict to prevent a destructive battle, which could leave the
swarming process with no queens at all.
The colony is now on the verge of swarming, a dramatic process in which one honey bee
colony becomes two or more colonies. Just as her queen daughters are ready to emerge from

7
their cells, the original queen leaves the hive with a cloud of worker and drone bees. They
quickly settle in a cluster somewhere near the hive, often on a branch.
The most mature new queens in the hive chew open the bottoms of their cells. The
worker bees may prevent their exit by holding them inside until their mother has left, and
then release one from her cell. The first queen out then hunts for the other queen cells and
kills the queens in them by stinging through the cell wall. As the survivor, she has become
the new queen. She inherits the original nest from her mother and reigns over the bees which
have remained in the hive. After feeding for a few days she becomes strong enough to take
her mating flight, and begin a life much like her mother's at the head of the colony.
During the time just after the departure of the original queen, the remaining queens
make curious honking and tooting noises. Some honk from inside of their cells, so that the
sound is muffled. If you open a hive just after a swarm departs, you may hear these queen
noises. The function of the noises is not completely clear. They appear to be signals
indicating the viability and number of young queens in the hive, allowing the queens and
workers to regulate the final number of queens and swarms from the original hive.
A populous colony may generate a second and even a third swarm shortly after the first
prime swarm departs. These are called afterswarms. In this case, the workers have protected
several new queens for the process. Each afterswarm leaves with one of the new virgin
queens, which must mate after her colony finds a permanent nest site.
The best queens are productive and vital into their second year and rarely into a third
year. But all queens age, and this is perceived by the workers. Older queens lay fewer eggs
and relatively more drone eggs. Eventually the worker bees begin to feed royal jelly to some
of the young female larvae, initiating queen cells. These are supersedure cells. One of these
daughter queens is allowed to emerge, mate and begin laying eggs. Often the original, mother
queen remains in the hive during this process, but she is fed less and less by the workers.
Gradually she is starved and dies. This process is called supersedure. If you see two queens
in a hive, you might be witnessing supersedure in progress.
8
The life of a worker bee
The worker bee has a life far more complex and flexible than that of a queen or drone.
We are still far from understanding all of the intricacies and interactions of the workers. Only
a brief overview follows here.
A young adult worker chews her way out of her brood cell and joins her many
nestmates. You can often observe emerging workers when examining a frame of nearly
mature capped worker brood. Within a few hours of her emergence, the young worker can be
identified by her slightly whitish hair and awkward movements. She is unable to fly or sting
for the first day of her adult life. She feeds herself on honey and pollen to strengthen her self.
By the second day she has started to help the colony with the first of a series of tasks:
cleaning cells. Several days later her brood food glands have developed and she is able to
secrete food for young larvae. She also accepts liquid food from the other worker bees and
passes it on to larvae and adult bees. A few days later she is old enough to secrete wax from a
set of eight glands under her abdomen. If the colony needs new comb, she may participate by
pulling newly secreted wax scales from her abdomen and molding them into hexagonal cells.
Other workers that are one to several weeks old will fill colony needs by guarding the hive
entrance, ripening honey, circulating air through the hive by fanning their wings, and
attending the queen. A few even specialize as "undertaker bees", removing dead nestmates
and dropping them outside of the hive. Individual bees generally stick with one or a few tasks
at any given time. They will switch as they age and as the needs of the colony change.
At an age of two or three weeks, a worker first ventures outdoors for a play flight. In
doing so she makes a transition from house bee to field bee. In play flight a worker circles in
the area around the hive. She is memorizing landmarks and the appearance of her hive.
Within a day or so afterward, she is off to the flora collecting nectar, pollen, or both. Once
she has discovered a patch of blooming flowers, she is likely to specialize in that type of
flower. It makes sense for her to specialize because it takes a little time to learn just how to
collect nectar and pollen from that type of flower, and where it grows. Specialization is part
of the efficient nature of the colony. Some worker bees will specialize on water or propolis
collection. (See Water for bees, p. 40 and Propolis, p. 71)
9
The spring and summer life of a worker bee is concerned much with brood rearing and
foraging. A worker bee will fly many miles daily and her wing margins eventually become
badly tattered. Workers rarely live longer than two months during this time. The bees that are
reared in early fall are destined to become the winter bees. Their job in winter will be to
cluster and generate heat. In early spring, the surviving winter bees must forage and rear the
first brood until they are finally replaced by a new generation of young workers. The winter
bees must live from four to six months for this wintering process to be successful. For this
reason a beekeeper should nurture as many well-fed bees into fall as possible.
A good beekeeper is aware of the worker bee tasks, their relationship to the ages of the
bees and their function in the colony. Here are three examples: (a) If the beekeeper wants to
divide one hive into two or more, it's helpful to divide the worker population so that young
house bees and older field bees are in each of the new hives. (See Dividing Hives, p.62)
(b) A hive can be requeened most successfully if the new queen is put in contact mainly with
younger house bees. (See Requeening a hive, p. 59) (c) If a hive is moved during the day
when bees are flying, it will lose many of the older bees with foraging experience and keep
the younger house bees which rear the brood (see Moving Hives, p. 63).
The life of a drone bee
The drone bee leads a simple and melancholy life. It usually begins in late spring time or
early summer, when the queen is most inclined to lay male eggs in drone cells. When the
drone emerges from his cell as a young adult he feeds himself on honey and pollen. Within a
few days he is ready to fly. His first flights may be primarily play flights. Eventually he
begins to fly to a drone congregation area. He fills up on honey before each flight in order to
be airborne for as long as possible. These flights continue on sunny afternoons for as long as
he is able. A small number of the drones in a colony, about 1%, actually succeed in mating
with a queen. Those that do so die immediately afterward.
Those drones that survive until fall are evicted from the hive as they would be nothing
but honey consumers in winter. Since the drones are unable to rear brood, clean the hive,
secrete wax, sting, forage or perform other useful tasks, they would be only a liability during
winter and early spring. Drones have no stingers, so they are useless for colony defense.

10
Watch the hive entrance after the first cold October nights. Drones are dragged
struggling from the hive by the workers. If one breaks free the workers capture him again and
force him out, perhaps stinging him in the process. Finally, the exhausted drones are left to
die outside.
COMMUNICATION IN THE HIVE
For the colony to thrive, individual bees in the complex society of the hive must
communicate with each other. Their methods of communication are quite different from
those used by humans. The inside of the hive is dim in daytime and completely dark at night,
so vision is useless there. Bees do use noises, but to a limited extent. Piping and honking
noises from queens (See The life of the queen bee, p. 4) and buzzing noises by dancing
forager bees (See The waggle dance, p. 10) have special purposes. The real story of colony
communication is by touching, odor, and food sharing.
The waggle dance
No description of honey bees would be complete without a mention of the famous
dances which bees use to communicate the location of nectar and pollen-bearing flowers.
This behavior was deciphered by the Austrian biologist Karl von Frisch. He went on to win
the Nobel Prize, awarded in part for his work on honey bees.
A curious behavior called the waggle dance is performed by scout bees to announce the
appearance of new bloom. Scout bees are foragers which specialize in the discovery of new
nectar and pollen sources. Successful scouts return to the hive and perform a dance which
describes the distance, direction and quality of the food source. The scout walks in a figure-8
pattern on the comb, waggling in the middle part of the "8". The direction the bee faces while
waggling communicates the direction of the bloom from the hive relative to the direction of
the sun. The number of seconds spent waggling indicates the distance from the hive to the
blooming flowers.
The dancing bee also communicates distance with buzzing noises, which humans can't
hear. The vigor of the waggle tells the other bees how rich and available the food is. Other
forager bees -the recruits -follow the dancing bee closely. The dancing bee may stop
11
occasionally and offer a taste of the nectar she has collected to the surrounding recruits, as
further information about the quality of the food. The recruits smell the body of the dancer to
learn the scent of the flowers she visited. If the vigor of the dance and a taste of nectar are
convincing, the recruits then use the distance and direction information to find the bloom.
They also remember the scent of the flora to find the bloom.
The coordinated search efforts of the honey bee are one key to their success as honey
makers. Large hives that are full of bees have more scouts than weaker hives. This is one
reason why larger colonies are so much better at making honey. One colony with 40,000
worker bees will make more honey than two hives each containing 20,000 bees.
The waggle dances and many other types of behavior can be seen best with an
observation hive. This is a specially constructed hive with transparent sides. Scout bees will
waggle also on the surface of a clustered swarm to communicate possible nest sites. This is
easily observed when watching bees on the surface of a swarm that has been clustered a day
or more after leaving its hive.
Sense of smell
We humans are woefully inadequate at smelling the world around us, compared to many
other animals. This is obvious every time we take our dogs for a walk. Most insects are
acutely sensitive to odors, especially the smell of their foods and of mating attractants. Honey
bees are no exception.
In addition to detecting flowers and intruding animals, bees are very good at smelling
each other. Each hive has a characteristic odor. Bees from another hive are intercepted at the
hive entrance when guard bees smell the foreign hive odor. Bees are also very sensitive to
pheromones (below).
Pheromones
Bees are especially sensitive to the smell of signaling chemicals called pheromones
(FER-o-mones). Pheromones are chemicals used by animals to communicate with others of
their own species. Insects which form colonies (honey bees and some other bees, ants, some
wasps, termites) rely heavily on pheromones.
12
Worker bees communicate with several types of pheromones. One is released from a
gland at the tip of the abdomen, the Nasanoff gland. This Nasanoff pheromone is used when
the bee colony needs to congregate. It says to the other bees "Come this way, the rest of the
colony is over here." This behavior is called scent fanning.
For example, when the bees in a captured swarm or a purchased package are installed in
a hive, several dozen workers will perch at the hive entrance where they open their Nasanoff
glands and fan their wings. Straggler bees which might be left on the package box or other
equipment near the hive will be drawn to their colony by this odor. If you lean close to the
bees as they fan, you might catch the scent they emit. It smells like lemon grass tea, and has
some of the same chemicals as this tea.
Worker bees use their Nasanoff glands also when traveling as a swarm to a new nest.
The scout bees -those workers which have picked out the best place to call home -lead the
rest of the colony by releasing this pheromone. If you happen to see a swarm on the move
you might notice the pleasant scent. It's enjoyable and safe to walk along with the cloud of
bees as it moves slowly through the air.
Workers release another pheromone when they sting. When the stinger breaks off of the
bee, and remains embedded in its victim, it releases a banana-like smell. This is the sting
pheromone. It encourages other bees to sting in the same place. Hobby beekeepers rarely
experience stinging that results in much pheromone release. However, the African bees
attack in numbers great enough to make good use of this pheromone. (See African bees p.
14)
The queen bee also communicates with pheromones. A variety of chemicals are released
from her mandibles, abdomen and feet. When a queen flies to mate, drones find her partly
through her pheromones. In the hive, workers cluster around her in a retinue as they lick
these chemicals from her body. The workers then pass the queen pheromones to worker bees
not near the queen. Eventually some of the pheromone reaches all of the worker bees in the
colony. In this way, all of the workers perceive her existence, even those which have never
been close to the queen. The human nose cannot detect this pheromone.
If the queen dies or is removed by a beekeeper, the entire colony begins to sense the
disappearance of queen pheromone within a few hours. The behavior of the worker bees

13
changes dramatically as the colony enters the queenless condition. Nurse bees select several
to a dozen young female larvae in worker brood cells to become potential queens. These
larvae are fed copious amounts of royal jelly, just as if they began their lives in queen cells.
The workers add wax to the hexagonal, horizontal cells, extending them downward as they
become the peanut- shaped queen cells. In this case they are emergency queen cells. The
worker bees change their behavior in other ways also. The workers are more likely to sting,
they forage less for food, and are less meticulous in cleaning their nest. When a new mated
queen becomes established in the colony, workers detect her pheromones and their behavior
returns to normal.
Trophallaxis
Colonies of social insects share food extensively. This is a behavior called trophallaxis
(tro-fa-LAX-is). In trophallaxis, one honey bee will extend her proboscis, or tongue, to
another bee. This is how one bee will ask for food from her nestmate. If the other bee has a
crop full of honey or nectar, she may produce a droplet, which the requesting bee then
consumes with her proboscis. This is not often observed in routine beekeeping, but can be
seen with specially constructed observation hives.
When a colony is on a honey flow, the house bees receive plenty of nectar by
trophallaxis from the foragers, and share it among themselves. The house bees, including
nurses, are then more generous in offering food to larvae and the queen. Some pheromones
may be spread among the bees by trophallaxis.
VARIETIES AND BREEDS OF HONEY BEES
The honey bee, which goes by the scientific name Apis mellifera, is a species native to
Europe, Africa and Asia as far east as Saudi Arabia, Iran and the Ural Mountains of Russia.
Within this enormous range at least 24 varieties, technically called "subspecies" developed.
One subspecies, Apis mellifera lamarkii, inhabited the Nile River Valley. For thousands of
years the Egyptians moved hives of this bee up and down the river in barges. Another, A. m.
sahariensis, is native to isolated oases in the Sahara Desert. Others thrived on individual
islands such as Cyprus and Madagascar. Each of these types of honey bees has its own set of
14
characteristics. As they are all the same species, they can potentially interbreed to produce
hybrids.
When the first European settlers came to North America they brought their bee hives,
along with crops and livestock. Since those people were mainly northern Europeans, the bees
too (A. m. mellifera) were from that region. These bees are often called "German bees",
although their range was quite extensive: from the British Isles and France, across northern
Europe and into western Russia. The first German bees were established in North America in
the early 1600's. In the 1800's, bees from Italy were brought to the U.S. These Italian bees (A.
m. ligustica) soon became the preferred type because they were much better tempered than
the German bees. Camiolan bees (A. m. carnica) from southeastern Europe and Caucasian
bees (A. m. caucasica) from the Black Sea area are also popular with American beekeepers.
The German bee is dark and often mean-tempered. Its main virtue is that it overwinters
very well in cold regions. These bees end brood rearing relatively early in fall, and are slow
to build up a population in the spring. For perhaps two hundred years, eastern Kentucky
forests were populated by feral German bees. In the 1990's, the twin epidemics of tracheal
mites and varroa mites eliminated nearly all of these feral bees.
Italian bees are relatively gentle, have good disease resistance and are often yellowish.
They rear brood early in the spring and continue it late into the fall, so they tend to consume
more honey through the winter than other types of bees.
Carniolan bees are gentle and overwinter with a relatively small population, so they need
relatively less honey through the winter. They rear brood rapidly in springtime, building up
their population quickly.
Caucasian bees are usually gray and tend to be quite gentle. They swarm less often than
other bees. However, they build up slowly in the spring, use propolis heavily and are more
susceptible to nosema disease.
The African bees
In 1990 the African bees entered Texas from Mexico. Since then they have become
established in much of California, Arizona, New Mexico, Nevada, Oklahoma and Texas.
Years after the entry of the bees into the U.S., they continue to expand their range. In the late

15
1990's they reached the outskirts of San Diego and Los Angeles. Recently, they have been
found in parts of Florida and other Gulf Coast states. These bees are very prone to sting and
swarm. They can be managed but with greater difficulty than our familiar strains of honey
bees.
We can understand these bees by considering their origin and history. They are derived
from bees (A. m. scutellata) brought from South Africa to Brazil in 1956, for a research
project. The bees escaped in 1957 and rapidly populated the region. Since they are a tropical
bee, they thrived in Brazil and other tropical countries. With time they moved through
Central America and Mexico, displacing nearly all of the European stock bees that had been
kept previously. Some call them"Africanized bees" because they have interbred somewhat
with the European bees kept by beekeepers. We are familiar with another name, the
unfortunate term "killer bees" which has come from those who watch too many low-budget
movies.
As they entered the southern United States their reproduction and dispersal slowed. This
was probably due to several factors. Most important, our country is not the tropical
environment ideal for African bees. Also, large scale beekeeping operations in Texas and
other states have interbred with and probably "diluted" the population so that they are
significantly more European. Possibly, fire ants and varroa mites have killed many of the
colonies. We in Kentucky are unlikely to have permanently established African bees. Our
winters are too cold for this tropical bee. It is possible that some swarms might survive for a
summer after they "hitch-hike" a ride north on a barge or large vehicle. African bees traveled
to the San Joaquin Valley of California in 1985 and to Virginia in 2000 this way. In both of
those cases the bees were quickly eradicated.
The bees are very dangerous because they are easily disturbed and will attack in great
numbers. They also swarm and abscond frequently, so they are quite difficult for the
beekeeper to manage. The greatest danger is to people and animals that cannot run away or
get indoors quickly. Animals that are tied or kept in pens are most vulnerable.
However the Brazilians have done quite well with these bees. With the right protective
equipment, and by locating hives away from houses and farm animals, the Brazilians have

16
learned to manage the bees effectively. Their African and Africanized bees produce three to
four times the honey that the European-stock bees produced previously.
In the U.S., only a small number of people have died due to African bee attacks. This is
a credit to the thorough educational campaign mounted by Texas and the other affected
states.
Breeds of bees
Bee breeders have developed particular varieties or breeds of bees, based on desirable
traits in various subspecies. Perhaps the best known is the Buckfast bee. Also, several
research labs and beekeepers have developed bees with tracheal mite and varroa mite
resistance. These breeding programs are often described in beekeeping magazines.
Buckfast bees were bred over many decades by Brother Adam, a dedicated monk at
Buckfast Abbey in England. The Buckfast strain has some resistance to tracheal mites, and is
good for honey production and other traits desired by beekeepers. It does well in Kentucky.
Bees from the former Yugoslavia were bred for both tracheal mite and varroa mite
resistance, by U.S. Department of Agriculture researchers. They were often called "Yugo
bees". More recently the same researchers developed a stock of "Russian bees" which began
with bees taken from eastern Russia, where they seemed to have developed varroa mite
resistance.
Which is the best type of bee for a beginner?
The best information usually comes from other beekeepers. Talk to those in your local
and state beekeeping associations. Gentle behavior is very important for beginners. It is also
essential if your hives are near your neighbors.
As you gain experience, you may become more interested in honey production, mite
resistance, or overwintering ability. All of these traits have some genetic basis, so they are
determined partly by the breed of queen you have.
When you chose your bees it is good to know that stock sold in this country is rarely
"pure". The only way to maintain a pure line of bees is to instrumentally inseminate all of the
queens with semen from drones of a known source. Bee breeders cannot do this on a large
scale. Instead, the common practice is to let the queens fly to mate naturally in an area where

17
the breeder keeps an overwhelming majority of bees with the desired genes. In this way the
breeder "floods" the drone congregation areas with drones from the desired colonies. This is
a very acceptable practice. It nearly always results in high quality, mated queens for sale to
beekeepers. The main factor in choosing a source of bees should be whether it has the traits
important to you.
PART 2: THE HIVE The bees need a place to live. Beekeepers need to be able to open and examine it without
destroying the carefully constructed comb. Consequently, we use hives with removable
frames. The equipment is made to standard dimensions so that hive parts are interchangeable,
even if they are bought from different companies.
Hive parts
One or two deep boxes, or brood boxes, sit on a bottom board. This is usually where the
queen is active. Smaller boxes, supers, rest on top of the deep boxes. All of these boxes are
called hive bodies. Some beekeepers use deep boxes as honey supers. However, a deep super
with 9 or 10 frames of honey can weigh over 50 pounds. At harvest time, most beekeepers
don't want to carry this much at once. On top, an inner cover and outer cover shelter and
insulate the whole hive. A brick or small cement block should be placed on the outer cover in
windy locations.
Deep or shallow frames hang inside the hive bodies. I prefer nine frames to a hive body
because they are then much easier to remove without squashing bees. But you will meet
dedicated ten- framers and may become one yourself.
The hive parts are shipped from beekeeping supply companies in pieces. They are easily
assembled with nails and glue. The outer surfaces of the hive should be painted with exterior
house paint. Inner surfaces, the inner cover and the frames should never be painted. Some
beekeepers treat the hive bodies, bottom board and outer cover with wood preservatives
instead of paint. Be careful not to use a wood preservative containing toxic substances.
Traditionally, beekeepers paint their hives white. Practically, any light color will do.
Some beekeepers buy odd lots and leftover house paint at reduced prices. If you do this, add

18
white paint to lighten dark colors so that the hive does not overheat on sunny summer days.
A multicolored apiary is striking in appearance, and the different colors help the bees to
identify their own hives. Consequently, drift among hives will be reduced. (See Drifting, p.
52)
The hive should be elevated a few inches above the ground. This helps with hive
ventilation, reduces problems with weeds and grass growing in front of the hive entrances,
and prevents wooden bottom boards from rotting. Use a very stable and level hive stand. I
make hive stands from lengths of 4 "x4" treated lumber. Cinder blocks and wooden pallets
are also used. Tilt the hive just slightly toward the entrance so that rainwater does not
accumulate inside the hive.
Each newly constructed frame will need a sheet of beeswax foundation before it goes
into the hive. Foundation is embossed with the bees' comb pattern, and often wires are
embedded into it. The wires will strengthen the comb which the bees will build on the
foundation, inside the wooden frame. The sheet of foundation guides the bees as they
construct their wax cells on it. This activity is called drawing out the foundation into comb.
Without foundation in the frames, bees not will make their comb neatly inside the frames.
Instead you would have comb constructed every which-way and be unable to remove the
frames without destroying the comb.
Many beekeepers use a queen excluder, which is a wire or plastic grid that retains the
queen in the lower part of the hive. It has spaces between the wires that are just wide enough
to allow the workers through, but not the queen. The queen excluder is handy because it
prevents the queen from laying eggs and starting a brood nest in the honey supers. When the
time for honey harvest comes, it's convenient to have only honey in the supers. The excluder
also prevents the whole colony from moving up and abandoning the lower hive bodies. This
is a common occurrence, and part of natural bee behavior.
But excluders have their down side. A hive may make less honey with an excluder than
without. This is because the effort needed to wiggle through the excluder can discourage the
worker bees from storing honey in the supers. And any drones trapped above the excluder
will be caught and die in the excluder because they are too fat to pass through. I suggest
excluders for those beekeepers who are too busy for frequent hive inspections during the
19
honey flow. Otherwise, occasional adjustments can counter the problem of the queen moving
up.
Considerations about hive materials
Bee space. A critical dimension in the hive is the space between the adjacent wax combs
in the hive. This distance, about 3/8 of an inch, is called bee space. It is the amount of space
the bees leave between their naturally constructed sheets of comb. If frames in the hive are
separated by more than this dimension, the bees will create another layer of comb in that
area. If the separation is less than 3/8", the bees will add wax comb to join the adjacent
combs. With this in mind, beekeeping supply companies construct frames so that when they
are pushed together the combs inside them will be separated by this critical dimension. By
keeping the combs at the bee space distance, the frames will be easy to pull out of the hive
one by one, without interference from extra comb between them.
The concept and usefulness of bee space was developed a century and a half ago by
Lorenzo Langstroth. This simple idea created a revolution in beekeeping. With carefully
constructed frames, beekeepers were able to remove or add frames without serious disruption
of the hive. Hive inspections, divisions, honey harvesting and all other manipulations became
easy. Today, frames and hive bodies from all American beekeeping supply companies are
called Langstroth equipment because they conform to the bee space dimensions.
Wood or plastic? All of the hive parts described above can be made from plastic. Is this
better than wood? I feel that a plastic bottom board is very nice. It is the hive part most
vulnerable to rot, since it is close to the ground, and plastic is easy to clean. But plastic hive
bodies, frames and inner covers are not such a good idea. This large amount of plastic around
and in the hive creates problems. Two problems are that the plastic does not absorb the bee
odor which is important to the colony, and that the plastic is a poor insulator compared to
wood. In winter, condensation will develop on the inner plastic walls. All in all, the bees do
better with wooden hive bodies, frames and inner covers. The outer cover can be plastic, or
wood covered with metal sheeting. Both are good.
Some types of plastic will warp over time. This does not usually happen with the bottom
board because of the continuous weight from the hive.

20
Plastic foundation is also sold. This can be good if the bees build on it during a strong
honey flow and when the colony is vigorous. Then the frame is very strong with this internal
plastic sheet. But if conditions are not really terrific, the bees will be reluctant to build comb
on it. Beeswax foundation is almost always more useful than plastic.
SPECIAL EQUIPMENT
Screened bottom boards
Many beekeepers prefer bottom boards which have a large opening to the ground, which
is covered with screen. These are used for control of varroa mites (see p.41). Research has
shown that many mites fall from the bees inside the hive. The open bottom allows the mites
to fall to the grass below where it is almost impossible for them to return to the hive. This is
an effective way for beekeepers to reduce mite infestations without chemical treatments or
special procedures.
Some beekeepers prefer to construct their own screened bottom boards, or modify
conventional bottom boards. This is fairly easy to do as long as the bottom board is sturdy
and keeps to standard hive dimensions. The screen is purchased as “8-mesh hardware cloth”,
with 8 holes to the inch. This prevents bees from entering through the bottom but allows the
mites to pass through. This large opening at the bottom of the hive may be beneficial to the
hive for ventilation also, especially in summer.
Pollen trap
A pollen trap is a device that fits across the entrance of the hive and removes the pollen
loads from returning pollen foragers. It has small holes that the bees can just barely wiggle
through. As they do, clumps of pollen fall from the bees' legs into a drawer below.
Pollen traps are used when the beekeeper wants to collect pollen for human or animal
consumption, or to mix with sugar and water for bee feed at a later time. They also increase
the number of bees which forage for pollen, making a hive a better pollinator of crops.
However, a pollen trap deprives the bees of essential nutrients so it should not be left on
a hive for more than a few weeks, it should never be used on a weak hive. The trap will
weaken even a strong hive if on the hive for many weeks. And the bees will become irritable
21
because of their efforts to wiggle through the trap. Pollen should be removed from the trap
every week or so. Some types of pollen traps do not protect the pollen from rain. Wet pollen
is spoiled. Pollen trapping is a special activity that requires some extra attention from the
beekeeper.
PART 3: ESTABLISHING AND EXAMINING THE
HIVE Choosing a location for the bee hives
The best site for bee hives is accessible to the beekeeper, where the bees will thrive, and
where they will not bother people or animals. The site for the hives is called an apiary,
although some will simply call it a bee yard. Choose a spot which gets considerable sun,
especially in the morning. It's good to place the hive so that the entrance faces south or east.
The sunlight stimulates bee activity, especially early in the morning.
The location should be sheltered from the wind by trees, bushes or buildings. In
Kentucky, wind comes most often from the west so a windbreak to the west is most
important. In winter, the chilling effect of the wind can be very significant.
Bees need blooming flowers to make honey, so the beekeeper should think about what
plants grow in the area. Think about what is growing within a mile or two from your hive
site. Bees will fly up to 3 miles from the hive in search for flowering plants if they need to.
The best plants include many that grow nearly everywhere including black locust, tulip
poplar, and roadside weeds. Orchards and some ornamental plants are good too. The ideal
rural location is one that is near a mixture of wooded and open weedy areas or orchards.
Areas that include mostly grass land or tobacco are not helpful for the bees, although they
will often fly beyond these crops to find good forage. The small scale of Kentucky farms
means that the bees can find something in bloom near I almost every location.
Towns and cities can be surprisingly good for honey production. The diversity of trees
and gardens make for excellent honey production. One beekeeper with hives in Lexington
produced over 300 pounds of honey from several hives, in one year when the weather and

22
other factors were favorable. The trees and buildings in a town provide good windbreaks. On
winter nights, urban areas are slightly warmer than rural areas.
If the hives are located in a backyard or any spot near your neighbors, it's a good idea to
have a tall fence or row of bushes around your yard. The bees will fly above this barrier
when they leave the hive, and continue to fly at that height. If your barrier keeps their flight
path at least eight feet above the ground you will have fewer problems with the bees
bothering your neighbors.
If many hives are near parked cars or laundry drying outdoors, bee defecation will be a
problem. This will be very evident on the first nice day after the bees have been confined by
several days of rainy weather.
Basic equipment
The basic items needed for routine beekeeping are the bee veil, beekeeping gloves,
smoker and hive tool. When the beekeeper is ready to harvest the honey from the hive, some
additional equipment is required.
Bee veil. No one should open a bee hive without a bee veil to protect the head. Most
veils fit over a hat or helmet so that they surround the entire head and neck. The best veils are
made of strong material, reinforced so that it is held away from the head. Several types of
veils attach to a jacket by a zipper. These are nice because they are completely secure around
the neck.
Gloves. Beginners will usually want to wear gloves. However, some experienced
beekeepers prefer to work bees barehanded because it allows them to be more agile. With
time and experience, a few stings on the hands may not seem as bad as the discomfort of
wearing heavy gloves in hot weather. Some beekeepers wear gloves only when weather or
other conditions will cause the bees to sting a lot.
Smoker. The smoker consists of a metal container that holds smoldering material and a
bellows to pump the smoke out. Smoke is very helpful in calming the bees. When used
correctly, it greatly reduces the tendency of bees to sting. Smoker fuel is usually dry wood
shavings, bark or pine needles. Wood shavings can be obtained from livestock supply stores,
23
pet stores, and lumber mills. Burlap can be used, but only if it has not been treated with any
chemicals.
Hive tool. The hive tool is simply a heavy-duty paint scraper. It is indispensable for
separating hive bodies, removing frames from the hive, scraping debris, and many other
chores.
GETTING YOUR BEES
There are four ways to get your first bee hives. You can (1) get established hives from a
beekeeper nearby, (2) get small hives made by dividing a beekeeper's stronger hive (divides
or splits), (3) purchase packages of bees from a commercial package bee producer, or (4)
catch swarms. Each method has its advantages and disadvantages.
What time of year should you get your hive? Most people prefer to get their bees in the
spring. In March and April the colony populations are relatively low. An established hive is
easy to move because it will consist of only one or two brood boxes. It's possible to buy and
move an established hive in summer or fall, but it’s not a good idea to move a hive in winter.
The move disrupts the bees when they are trying to maintain their winter cluster. Divides
should be made only in the spring when they have will time to grow in preparation for
winter. Packages are shipped in April and May. Swarms are most frequent in spring and early
summer. They too need the whole summer to get ready for the coming winter.
1. Acquiring an established bee hive
Often an experienced beekeeper with many hives is willing to sell one of them. This
means you will have a complete hive with worker bees, brood, a laying queen and some
stored honey and pollen. Since the hive is already up and running, you will probably have
some honey to harvest after the first May-June honey flow. It may not be necessary to
construct extra frames and hive bodies right away.
The disadvantages are that it will be more expensive than a divide or swarm, that it is
possible to get a hive with brood diseases, that the move to your location may be a difficult
chore (see Moving hives, p. 63), and that a hive with many bees can be intimidating to a
novice. The cost of an established hive depends on many things: the strength (number of bees
in the hive), condition of the wooden parts (hive bodies, frames, bottom board, inner and

24
outer covers), the amount of honey in the hive, the time of year, whether diseases are present,
and whether the hive has been recently and correctly treated for parasitic mites. A strong hive
in excellent condition purchased in spring just before the honey flow might sell for $75 to
$100. A hive purchased in summer or fall, with deteriorated wooden parts could sell for $50
or less. Do not buy a weak hive in late summer or fall, or one with conspicuous disease or
mite problems. The hive will need to be strong and relatively healthy to make it through the
winter. Hive parts can be painted, repaired or replaced if you are willing to do so.
To be sure that diseases and mites are not a problem in the hive you are planning to get,
have an experienced beekeeper examine the brood for you. You may want to have a sample
of bees examined for tracheal mites, by the state apiarist or extension specialist. Generally, a
strong hive in late spring or summer has very few problems with tracheal mites.
Try to get a hive that is not extremely full of bees, or that is especially defensive. A
gentle hive is one of the keys to starting out right. For this reason, it's nice to get a hive in
March or April when the colony population has not grown much.
2. Making a divide, or “nuc”, from an existing hive
Possibly, a beekeeper will be willing to sell you a hive made by dividing an existing
hive. (See Dividing hives p.62) This will cost you less than a full size hive, so it is a fairly
economical way to get started. It gives you an opportunity to watch a less intimidating hive
grow through the year into a productive hive. However, a divide is usually only made in
April, May or June, and it will probably not make any surplus honey in the first year. A small
hive is often called a nuc, short for nucleus.
3. Buying a package of bees
Many beekeepers prefer to start their bees from a two or three pound package. This will
be a box made of wood and wire screen containing the workers, a small cage containing the
queen, and a can of sugar syrup. This is sometimes called "buying a swarm" of bees because,
like a swarm, the bees are temporarily without a hive.
Important advantages of buying a package are that you can watch the colony grow from
a relatively small size to a vigorous population, and that you will not get brood diseases

25
(since no brood or comb comes with the package). Packages are usually purchased in the
spring. April or May is the time to install your package, just as many flowers are beginning
to bloom and the weather is turning warm. Place your order for a package in January if you
want to receive it in April.
Installing the package bees. This is an easy and interesting procedure that takes
only a few minutes once your hive is ready for the bees. Set up the hive as one deep hive
body, with nine or ten frames inside. You can use frames with new foundation, or frames
with drawn wax. Have a feeder full of sugar water ready.
The bees will be gentle when released from the package. But as a beginner you will
want your gloves, hive tool and smoker. Of course, your veil is always worn when working
with bees. Open the package by removing the syrup can. Next, remove the small queen cage
hanging inside of the package. Brush the bees off of it and examine it to be sure the queen
inside is alive. Sometimes a few of the worker bees in the queen cage will be found dead, but
that is not important. Now open the hive and empty the package of bees into it by pouring
them over the frames. Open the queen cage very carefully and set it with the workers. The
queen will walk out to join them.
Soon, all of the bees will move between the frames and begin housekeeping. Place the
inner cover on the hive. Lay the package next to the entrance of the hive. The bees remaining
in the package will soon be attracted into the hive by the smell of their nestmates.
Package bees must be fed, beginning immediately after they are installed, unless you
have provided them with frames of honey. If the bees need to add wax onto the foundation
(“draw out” the foundation), more feed will be needed than if they have drawn comb
provided. Place the syrup feeder over the hole in the inner cover. Then place an empty hive
body and outer cover over the feeder. (See Feeding bees, p. 37)
Refill the feeder as it is emptied, for a week. Then examine the hive to see whether
honey is being stored. Feed for a longer time if the weather has been very rainy. In May and
June, the bees will soon find abundant forage and become self-sufficient. Do not expect to
harvest any honey from your bees the first year if they have been installed from a package.
As you can see, they have plenty to do before they are able to make any surplus for their

26
keeper. Possibly, you will need to feed them sugar syrup in August and September to be sure
they have the reserves needed for the winter.
4. Catching and installing a swarm of bees
Swarm catching is one of joys of beekeeping. Often it is very simple and safe to catch
the swarm, if it is near the ground. You will usually be doing someone a favor by removing
unwanted bees from their property, and the bees are free! However, you should give yourself
a year or two of beekeeping experience before going after swarms.
The first step in finding swarms is to make it known that you are interested in collecting
them. Your county extension personnel, police and fire departments, and schools are often
willing to keep your name and phone number on hand in case someone reports a swarm.
When you get a call, first determine exactly where the bees are clustered. Are they
accessible? If they are high in a tree, for example, it will not be worthwhile to even come by
for a look. Ask how long the bees have been there. If they have arrived within the last day or
two, they should be fairly gentle and easy to handle. If they have been clustered for a week,
they will be more likely to sting. Perhaps they have begun to build comb there because they
haven't found a good place to live. A swarm that has settled for several days without finding
much food is a dry swarm, and will be more irritable.
Try to determine whether the caller knows that they really are honey bees. If they are
clustered in a ball, they are probably honey bees. Some people will report just a few bees or
other insects flying about. If the insects are nesting in the ground, suspect yellow jackets.
Yellow jackets are commonly reported in August and September while honey bees tend to
swarm in spring and early summer. I was once called for a swarm that turned out to be
simply an aggregation of Japanese beetles!
Is the cluster the size of a softball? A basketball? The bigger the swarm the better a
colony it will be for you. Also, assure the caller that honey bee swarms are usually quite
passive. They are settled only temporarily and are unlikely to sting anyone. Try to collect the
swarm as soon as possible. Remember that the bees are looking for a permanent place to live,
and may take off at any time, especially if the weather is good.

27
You should bring your veil, a smoker, a bee brush, a queen cage, and a hive body with
one frame of honey, bottom board and inner cover. Some wire screen and a staple gun will
also be useful for covering the entrance and holes in the hive. Rope to tie the hive together
for the trip to its new location is also a good idea. A few large pieces of stiff paper or
cardboard will be useful. I bring a large makeshift funnel made of metal sheeting or
cardboard.
The next step is to get those bees! This can depend a little on your ingenuity, and maybe
the help of a beekeeper friend the first time you try it. Find the swarm and position your hive
body or box just under it. If the swarm is hanging from a small branch, just shake the branch
sharply. Most of the bees will fall in, and many will fly around. Keep your eyes peeled for
the queen. If possible, scoop her into a queen cage and put her in with the rest of the bees
after they are all settled in the new hive. Shake and brush as many bees as you can into the
box, and then close it. If the bees are on a wall or another inconvenient spot, use sheets of
paper or thin cardboard to encourage them into their new home. Some of the bees will settle
back to their clustering spot.
Repeat the procedure, shaking, scooping and brushing the bees. Then use the smoker to
blow thick smoke across the original clustering spot. This will chase the last bees away, until
they recognize that most of the colony has moved to a new location. Note that many bees are
scent fanning at the entrance to the hive. (See Pheromones, p. 11) In this way they are
attracting the stragglers.
At this point some of the bees are out foraging for food or searching for nest sites. You
have three options. You can depart with your bees, knowing that you have most of them. In
doing so, tell the property owner some of bees out flying will cluster over the next day or
two, and eventually die because they are queenless and too few to form a viable colony.
Staple wire screen over the entrance and any other holes. Tie the hive together securely with
rope.
A second option is to do the above and also leave an empty hive at the location. The
returning bees may move into the empty box which you can pick up that evening or a later
evening. A third option, usually the best, is to collect the flying bees by leaving your hive at
that location and collect the hive at dusk. In this case, it's best to have the queen caged or the

28
entire colony confined by screen stapled across the entrance and any holes. Otherwise the
entire swarm may leave before you return. At dusk you will find many bees clustered on the
outside, but they will not bother you if you carry them with a minimum of jostling.
The rest is easy. Place the hive at your chosen location (see Choosing a location for the
bee hives, p. 21), and remove the screens. Add more frames so that the hive body has the
nine or ten frames it needs. Keep the queen caged for a few days and feed the bees. This is
because the bees may still be unsettled and prone to leave (abscond). Uncage the queen after
a few days to a week.
It is also possible to collect a swarm with a screened box. Follow the same procedure for
installing package bees (see Installing the package bees, p. 25). The bees will rapidly adapt
to their new site.
Unfortunately, mites have made a huge impact on swarming in Kentucky and the rest of
North America. Since the early 1990's, swarming has been reduced to a small fraction of
what it had once been. Every swarm caught should be treated for mites, especially varroa, as
soon as it goes into the hive.
How many hives?
Most beginners will be happy to start with one hive. But I suggest that you get a few
more soon. With several hives (or colonies), certain remedial activities are possible. For
example, in spring or summer, a weak hive can be strengthened with a frame of brood from a
stronger hive. By early fall, a hive too weak to be ready for winter can be united with another
hive. (See Uniting hives, p.63) and (Preparations for winter, p. 65) If one hive dies, you
can easily create a new hive by making a divide from another hive. (See Dividing hives,
p.62)
Three or four hives are not much more work than one hive if they are in the same apiary.
Once you get out to your bees, put your veil on and light your smoker, it's not much more
time to work with another two or three hives. The time it takes to extract honey from several
hives is only slightly more than the time to extract from one hive, considering all of the
preparation and clean up. But, on average, four hives will produce four times as much honey
as one hive. Your honey production will be more efficient.

29
Perhaps most important, you will learn more quickly about bees if you have several
hives. Each hive grows and behaves a little differently. You can experiment with different
techniques, queens or types of equipment if you have at least several hives.
GETTING READY TO WORK THE BEES
How the bees sense the world around them
The first step in understanding the way to work with bees is to understand how bees
perceive the world. As a part of the bees' world, the beekeeper must learn how to disrupt the
hive as little as possible. In this way the hive will function well and be less likely to sting.
Vision and the sense of smell are most important. (See also Communication in the hive, p.
10)
Vision. The bees see colors, but not exactly the same colors we see. They see a
spectrum of colors from orange to violet and then to the next "color" which is ultraviolet.
Bees can't see red, so red object looks black to them. Many flowers have ultraviolet patterns
invisible to us. In general, bee-pollinated flowers are not red.
Bees are inclined to sting dark objects because many natural predators are dark: bears,
skunks, etc. So the beekeeper wears white or light colors. And remember that red counts as
black for bees. Bees are also sensitive to rapid movements. Beekeepers, especially beginners,
should move slowly when the hive is opened.
The sense of smell. Like many insects, bees have a very acute sense of smell. They
need this ability for several reasons --to discover flowers, to detect the pheromones of the
other bees in their colony, and to detect enemies near their hive. And the bees will smell you
too especially if you carry a strong scent from soap, perfume, or other scent. It might smell
nice to your human friends, but the bees interpret it as a foreign odor and an invitation to
sting. When working the bees, try to be
"odor-neutral".
Hearing. Bees do hear, but sounds are much less important to bees than they are to
people. Beekeepers may talk as they work the hives, without any apparent effects on the
bees.

30
Fuzzy materials. Bees associate fuzzy clothing with their predators, which are also
pretty fuzzy. Beekeepers should avoid textured clothing in favor of smooth cotton or
synthetic fabrics. A white nylon windbreaker that is too smooth for the bees to get their
stingers into is one example. It's good in cool weather but too warm during the summer.
Some beekeepers like the full coveralls, but they are also hot in the summer. Suede leather
would be about the worst possible clothing to wear because it looks, smells and feels like an
animal.
Vibrations. Vibration of the hive or the ground nearby is important to the bees. If you
bump the hive or run a lawnmower nearby, the bees will be alerted and be more likely to
sting. If tractors, mowers or weed eaters must be near the bees, the operator should wear a
veil and full bee suit. Avoid opening the hive just after the bees have sensed vibrations and
exhaust odors of machines near the hive.
Weather changes. Bees are very sensitive to the weather, and they apparently have their
own internal barometers. When the barometric pressure drops, the bees sense that bad
weather is on the way. They all come home from foraging, and they definitely don't want
anyone opening the hive at that time. Windy, cool or rainy weather also makes the bees
grouchy.
Other factors which influence bee behavior
Recent experience. If you know that the hive has been badly disturbed recently, leave it
alone for a few days. A pass nearby with a lawnmower, nighttime visits by skunks, and other
disturbances will make the bees more likely to sting.
Large colony population. A hive with many bees is always more likely to sting,
because it has more worker bees on guard duty. This is one reason beginners may want to
start with a smaller colony, often called a nuc.
The end of a honey flow. In July you may notice that your industrious, gentle worker
bees have become lazy and cranky. This is because the honey flow has stopped, and the bees
have switched from forager duty to guarding, for lack of better activities.
31
Queenlessness. A hive without a queen is always more inclined to sting. Look for queen
cells and the absence of eggs and young larvae. Listen for the characteristic buzzing
common to queenless bees. (See Queenlessness, p. 50)
Genetics. Some strains of bees are just plain nastier than others. If you can rule out the
factors listed above, consider the possibility that the problem is a genetic trait. In this case,
the only solution is to requeen the hive (see Requeening a hive, p. 59).
Stings
Stings will always be a part of beekeeping but there are ways to greatly reduce the
number of stings you get. The trick is to imagine what the bees are sensing based on how
bees understand the world around them (above). With experience you will be able to
anticipate the behavior of your bees.
The worker bee has a barbed stinger with a small venom sac attached. When you are
stung, the barbs prevent the bee from removing her stinger from your skin. The bee breaks
away from her stinger and dies soon afterward. But the stinger continues to inject venom
even though the bee is gone. This is why you should remove the small, white venom sac left
by a sting. Scrape it off with a hive tool, knife blade or long fingernail.
The stinger releases a scent which can stimulate other bees to sting. This is called a sting
pheromone. If you receive many stings you may notice it -- a banana smell from the stingers.
By removing the venom sac you will eliminate the source of the pheromone. It's a good idea
to remove the stingers in your gloves and clothing also.
The queen has an unbarbed stinger which she uses only against rival queens. The drone
has no stinger.
Occasional stings are probably beneficial to the beekeeper, although most beginners
would not agree. Some evidence suggests that occasional stings prevent serious allergies to
bee stings from developing. This is one reason I encourage beekeepers to accept a few stings.
Over the years you will probably notice that your reaction to stings is less. Also, you will be
more agile in manipulating the hive if you don’t wear gloves. You will know that you are a
true beekeeper when you decide that the fascination with bees far outweighs the pain of an
occasional sting.
32
Bee sting allergy. If you experience any of the following symptoms, be aware that you
may have a serious reaction to stings: light headedness, a flushed face, wheezing. These
symptoms indicate a systemic (whole-body) reaction to the sting, and possibly an allergy.
You should consult your doctor.
In contrast, a swelling only near the spot you are stung is usually not so serious. In my
early experiences with bees, I would at times develop puffy hands. With continued and
occasional stings, my body became accustomed to this and the swelling no longer occurred.
EXAMINING THE HIVE
You may wish to have an experienced beekeeper with you the first few times you open
your hive. Watching another beekeeper work the bees is a big help. Try to get a feeling for
how the bees act as you work the hive. Remember that not all hives behave the same, so
experience with another beekeeper's bees may be a little different from work with your own.
Your goal in opening the hive is to disturb the bees as little as possible.
Opening the hive
In addition to your bee veil and gloves, you will always need your hive tool, smoker,
matches, and extra smoker fuel. Place a handful of smoker fuel inside your smoker and light
it. Puff the bellows a few times. When the fuel has burned down to about an inch of embers,
add a few more handfuls and continue puffing. Once you have it going use the bellows to
puff it occasionally. You should have thick smoke but no flame. Open your smoker
occasionally and add more fuel as needed.
Stand to the right or left side of the hive, not in front of the hive where you would block
bee flight. Puff a little smoke into the hive entrance. The bees at the entrance will move
inside. Now remove the outer cover and gently pry the inner cover off slowly with the hive
tool. Puff just a little smoke in at the top. Most of the bees will run down between the frames
and start buzzing.
Remove the inner cover. Soon the bees will come back up. Use smoke only to keep the
bees from getting irritable. Over-smoking the hive is stressful to the bees.

33
Now you will remove several frames for examination. Standing at the side of the hive,
use the hive tool as a lever to push the three or four frames nearest to you away from the side.
Then push the nearest frame a little bit back toward you. This procedure allows a little space
on either side of the first frame so that you can remove it without crushing bees against the
adjacent frame.
Slowly remove the frame, hold it up and examine both sides. Most of the bees will stay
on it. Lean the frame gently against the outside of the hive so that no bees are crushed.
Remove the second and third frames by first pushing them into the space where the first was
and lifting them out slowly.
By removing a frame nearest the side of the hive first, you will be least likely to hurt the
queen bee. She will probably be closer to the center of the hive. The most important rules to
follow when examining your hive are to work in a way that is safe to you and anyone nearby,
to avoid hurting the queen, and to disturb the bees as little as possible.
What to observe
The bees develop their nest according to some clear rules. The outermost frames (those
you remove first) will either be empty or have honey. As you examine frames closer to the
center of the hive, you will see less honey and more pollen and brood. A very strong hive
may have honey, pollen and brood even in the outer frames.
Frames in the center of the hive have a special pattern. Brood is in the center of the
frames, then a ring of brightly colored pollen around the brood, and honey around the edges.
This makes sense --the brood nest needs to be kept warm in cool weather, and pollen for the
nurse bees should be near the brood nest.
Look for the three stages of brood. The eggs are hardest to see. Hold the frame so that
direct sunlight is over your shoulder and down into the cells. Look for tiny white "hot dogs"
standing on end, one at the base of each cell. Larvae are the white worm shapes. See how
some are just barely larger than the eggs. Older larvae fill their cells. Other cells are capped
over. These capped brood cells contain the oldest larvae and the pupae. Use the corner of
your hive tool to uncap a few of these cells. Inside, the white pupae are going through the

34
complex changes that carry them from the larval to the adult stages. If you are observant and
lucky, you may see a few new adult bees chewing through the cells and emerging.
Look also for the queen. She will almost always be on a frame in the brood nest, looking
for an empty cell where she can lay an egg. She is sometimes hard to find. Direct sunlight on
the frame helps a lot. If the hive is upset, she will often run to a comer and hide among the
worker bees. A white mark on her back will make the queen much easier to find (see
Marking and clipping the Queen, p. 61).
Drones will be abundant in late spring and early summer. They are distinguished by
their very large eyes which actually touch each other at the top of the head. Drone brood in
larger cells will be seen too. Capped drone brood cells protrude from the surface of the comb.
On a nice afternoon many drones will be seen coming and going at the hive entrance.
Closing the hive
When you are done with your hive inspection, return the frames to the hive in their
original order. This keeps the arrangement of honey, pollen and brood that the bees prefer.
Use the hive tool to space the frames evenly. If you make the mistake of leaving too much
space between two frames, a strong colony will build a sheet of comb between them. This
“burr comb” makes hive examination and management difficult. You must remove it from
the hive, and then space the frames correctly.
Place the inner and outer covers back on and you're done. Any straggler bees left on the
ground will soon find their way back inside.
Extinguish the smoker carefully. I like to put my smoker inside of a large bucket with a
top that seals. This puts the smoker out, prevents it from getting wet in the rain and keeps it
from stinking up the building where I store it.
How thoroughly should a hive be examined?
There will be times when a very brief check on your hive is sufficient. At other times a
thorough examination is desirable.
The quick check. Beekeepers with many hives rely on a few signs that quickly give a
rough indication of how each hive is doing. These signs allow one person the efficiency to

35
manage a hundred hives or so. With experience, you will instinctively look for them. This
"quick check" will not teach a beginning beekeeper as much as the more extensive
examinations described below.
Look first for bees flying in and out. Depending on the weather and time of year, you
should see bee flight. Bees returning with pollen loads on their legs are always a good sign.
It tells you that the bees are rearing brood, and that pollen bearing flowers are available. Bees
waddling in with large balls of pollen indicate that pollen is abundant. At other times they
will carry very small loads, indicating that pollen has been hard to find. Estimate the number
of bees returning in a 10-second interval. During a honey flow in late spring, 50 or more bees
may return to a vigorous hive in 10 seconds. Returning bees will be far fewer for weak hives
and when they are not on a honey flow. If you see no pollen foragers returning, your colony
may be in trouble. Or worse, the colony may be dead. In this case, the bees entering may
actually be robber bees from another colony, raiding the leftover honey. Robbing bees never
carry pollen.
Remove the inner and outer covers. How many of the frame top bars are covered with
bees? Compare your observations with what you saw during the previous examination, and
consider what you would expect for the time of year and the colony's history. Look for tiny
bits of white wax added to the edges of the dark, older comb. This is also a good indicator of
colony health. It is commonly seen when the bees are on a honey flow. It may be observed
also when the bees are feeding on sugar syrup from a feeder.
Look for bees with deformed wings, often a sign of varroa infestation. Bees crawling in
the grass on warm days in late winter suggest tracheal mites. Flattened grass and skunk feces
in front of the hive point to the need for skunk guards. Lean over the opened hive and sniff
for honey in the making, or the unpleasant odor of American foulbrood. Listen for the
distinctive buzz of a queenless hive. (These and other problems are addressed later in this
publication.) If problems suggest themselves, you should take additional time to remove
frames for a thorough examination and to do some trouble shooting.
If the bees are on a honey flow, check to see whether they have enough storage space
(frames with many empty cells). Frames with most cells full of brood, honey and pollen tell
you it's time to add an extra hive body or super so that the colony can expand and store food.
36
In two or three minutes, this quick check will generally tell the experienced beekeeper of
obvious problems and needed maintenance.
The general examination. This is a set of observations generally sufficient for routine
visits to your hive. Once your veil is on and smoker puffing, this examination won't take
more than 10 minutes per hive.
After the "quick check" observations described above, you will need to look at a few
frames. If you have supers on the hive, pull several frames out to determine how many in
each super contain honey. By looking down between the frames you can tell the frames
which seem to be the outermost of the honey storage area.
Set each super aside, and remove several frames from the brood box or boxes. Examine
the brood nest for the brood pattern, an estimate of the total amount of brood, and signs of
brood disease. You can be encouraged by seeing many eggs and young larvae, since this tells
you the queen is laying well and the nurse bee workers are feeding the larvae well. Hold the
frame up so that sunlight shines directly into the brood cells. Ideally, each young larva in its
worker cell is surrounded by a bit of glistening white food, the worker jelly. A hive which is
struggling to feed itself cannot provide an abundance of worker jelly for each larva. A large
amount of capped worker brood tells you that many young worker bees will soon emerge and
support the activity of the colony. A bad brood pattern -- insufficient brood, scattered brood,
excessive drone brood, or disease -- means that remedial action is needed. In summer, use
tweezers or the sharp corner of your hive tool to break open a few capped drone cells and
check for reddish-brown varroa mites. See the following sections and other publications for
descriptions of these problems. Usually it is not necessary to look at every brood frame. A
serious problem will show itself on the first few frames with brood.
As always, compare your observations with what you saw the previous times you
examined that particular hive. Beginners and experienced beekeepers often keep a notebook
to follow the trends and compare one year to the next. The brood nest and adult bee
population should be increasing from February to June, and declining gradually from July to
November. If the supers are filling with honey, make a rough prediction about when the next
super will be needed. For example, if the bees are filling five frames a week, another 10-
37
frame super may be needed every two weeks. Of course, the honey flow can accelerate or
slow down according to the weather and what's blooming nearby.
The thorough examination: On certain occasions the beekeeper will need to go
through the whole hive frame by frame. If possible, do this on a warm, calm, sunny day. If
you are battling a case of American foulbrood I recommend that every brood frame be
examined for this disease, periodically over at least a year, until it is clearly eradicated. If you
are requeening your hive, it could be necessary to examine every frame in the brood boxes to
find the old queen. (See Finding the Queen, p. 56)
Also, it is very instructive to occasionally examine an entire hive. The experience will
give a beginner confidence to do this complete examination when it actually becomes
necessary.
PART 4: HIVE MANAGEMENT The transition from novice to expert beekeeper is largely a matter of three types of skill.
One is knowing how to nurture a struggling colony. A second, closely related to the first, is
learning to recognize and control the many problems that can arise. The third is working the
bees so that they can realize their potential when conditions are good.
FEEDING BEES
Honey bees lived for a long time before beekeepers came along, but they will do better
if they get a little help now and then. This is especially true when we are nursing weak hives,
establishing new hives, or getting them winterized.
Feeding sugar syrup
Bees are often fed sugar syrup as a substitute for nectar. They concentrate it into a
thicker syrup, and add enzymes as they do to nectar. But we can't really call it honey because
it's made from artificial feed. What ever the bees store in their comb from syrup feed cannot
be removed later and sold as honey. It would not taste much like honey anyway.

38
Syrup is made from common table sugar (a type of sugar called sucrose) and water. Mix
it up 50:50 sugar to hot water. In fall it's better to make it more concentrated (around 60:40)
because the bees need the sugar more than the water at that time. Several types of feeders
exist, and the difference is important. The best method is to feed the bees at the top of the
hive.
Bottle or pail on top. Most inner covers have a hole about 1" in diameter, in the center
of the cover. If yours do not, you should cut a hole which will help with feeding and also
allow the bees to ventilate their hive more effectively. This is the best location for a feeder.
Now find a large (one quart to one gallon), wide-mouth container with a lid that fits securely.
Put 20 to 30 small holes in the lid. A 1/16 " drill bit works for a plastic lid, or use a small nail
to punch holes in a metal lid. When the feeder is filled and inverted over the hole in the inner
cover, the bees can take the syrup If from the small holes very easily. Next take an empty,
deep hive body and place it on the inner cover, around the feeder. The outer cover goes on
top. It's good to elevate the feeder about l/4" above the hole so that the bees are able to reach
the entire feeder lid.
This has many advantages over other feeders: The bees take the feed readily because
they like to come up to the top of the hive, even in bad weather. You can replace an empty
feeder quickly, without opening the hive, bees from other hives have no access to it so it will
not stimulate robbing behavior, it's good for nursing weak hives, and it's free! The main
disadvantages are that (1) the bees tend to add Propolis to the holes in the feeder when it’s
empty, and (2) an extra hive body is needed to enclose the feeder. Use a paper clip or small
nail to open the feeder holes.
Reservoir feeder on top. Several beekeeping supply companies sell syrup feeders that
have the same dimensions as the hive bodies. These feeders rest on top of the hive, with the
outer cover on top of the feeder. The bees come up a slot inside of the feeder. It is easy to
remove the outer cover and fill the reservoirs with syrup. An added plus is that dry feed can
be fed in this type of feeder. Cold weather limits the ability of the bees to reach the syrup.
Plastic bags. Another practical method is to fill a 1-gallon zip-lock plastic bag with
syrup and lay it on the top bars of the hive. Then make one or two slits across the top of the
bag with a razor blade or similar. The bag will hold the syrup and the bees will drink it

39
easily through the slit. It’s simple to replace an emptied bag with another full bag as needed.
To allow space for the bag you will need to place a shallow super without frames on the hive,
and place the inner and outer covers above it.
Entrance or Boardman feeder. I mention this type because it's advertised in catalogs
and often comes with beginner kits. It's a small jar that attaches to the entrance of the hive.
Don't use it. The bees don't feed from it in bad weather or if the colony is weak. And bees
from other hives will often find it and start robbing from it. When the feeder is empty, the
robbers may then go into the hive you're trying to feed, and start to rob honey from it. So this
type of feeder may actually make the hive weaker, if it is near stronger hives. And the jar is
so small it needs to be refilled frequently.
Division board feeder. This is also advertised in catalogs, but I'm not a big fan of this
type either. It is plastic, the size of a standard, deep frame, and it fits inside a deep hive body
in place of a frame. It's hollow so that you can fill it with syrup. Sometimes it works great.
Other times you will come back to find it still full of syrup, with many dead bees floating in
it One problem is that the bees become chilled in cold weather when they leave the cluster to
crawl into the feeder, and then fall into the feeder. Even if the feeder has roughened inside
walls, and floating bits of wood inside, it is still not very functional. Weak colonies (those
that need the feed the most) will often not even find the syrup in the feeder. Another
disadvantage is that you need to open the hive to check and refill it
Open feeding. Some beekeepers feed the easiest way. They leave a large container of
syrup open near the hives. The bees find it quickly, especially during a dearth, and consume
it in no time. This is called open feeding and there are several reasons not to do it, especially
if you have more than one hive.
The first reason is that this method of feeding can stimulate robbing by the bees after
they finish the syrup (see Robber bees p. 51). Second, the strongest hives will get most of
the syrup while the hives that need it the most will get very little. Finally, the bees flying
over the feeder will defecate in the syrup, spreading diseases such as nosema to the bees
feeding there.
40
Feeding pollen supplements or substitutes
Beekeepers are often advised to feed solid cakes or powdered food containing protein-
rich materials such as soy flour or yeast. This is to supplement the pollen they normally eat.
The cakes are placed inside the hive where the bees eat them quickly. A reservoir feeder
(above) can be used also. Generally these are not necessary in Kentucky because we have an
abundance of pollen-producing plants. However, pollen supplements can be useful in spring
if an extended rainy period interferes with foraging.
WATER FOR BEES
In July and August the bees need to find water to cool the hive. Forager bees will collect
water from streams, lakes, puddles, dripping air conditioners, swimming pools and wherever
they can. The bee returns to the hive and deposits a water droplet inside an empty cell. Other
bees are busy fanning their wings to circulate the air through the hive. The hive is cooled by
the evaporation of water.
Since bees will fly several miles to find water, they will nearly always find some in
Kentucky. But it can be helpful to give them a water source if a good one is not already
nearby. If no clean water is within a quarter of a mile, you will save the bees energy by
providing one. In towns and cities, your neighbors may begin to find bees in their swimming
pools and complain to you. If you leave a water source near the hive, fewer bees will go
swimming with your neighbors.
One good water source for bees is a slowly dripping outdoor faucet or air conditioner.
Place a sloping board underneath so that the bees can line up along the trickle of water.
Another source is a basin or bucket of water. You will need to float pieces of wood in it so
that the bees can land easily to collect the water. And the basin should not be directly in front
of the hives, because that is where the bees will drop feces and dead nestmates.
MITES, DISEASES AND PREDATORS
Until recently, only a few diseases troubled bees in the U.S., and these were controlled
fairly easily. In the 1980's, everything changed. The tracheal mite was discovered in the U.S.

41
in 1984 and in Kentucky in 1989. The Varroa mite was reported in this country in 1987 and
in Kentucky in 1991. These two new parasites have devastated beekeeping. However,
treatments for both mites have been developed, and mite-resistant bees seem to be on the
way. The late 1990's were a time of recovery and regrowth for American and Kentucky
beekeeping.
Identification and treatment for beekeeping problems is not especially difficult or time
consuming. But it needs to be done. Separate publications which go into greater detail are
available through the Cooperative Extension Program at Kentucky State University. Ask for
"The tracheal mite: a microscopic parasite of honey bees" and "The Varroa mite: an external
parasite of honey bees".
Varroa mites
The varroa mite is a reddish-brown external parasite of bees, about 1/16" across. It
grows and reproduces in the capped brood and the mated female mites live on the adult bees.
This parasite is by far the most serious enemy of honey bees in the U.S. and most parts of the
world.
This mite can be seen easily, especially with a magnifying glass. To check your hive
remove pupae from capped cells, especially drone cells, and examine them carefully. This is
where most of the mites will be living during the warm season.
Varroa is controlled with a combination of chemical and non-chemical methods.
Chemical treatments in either plastic strips or gel packs should be placed in the hive during
both spring and fall each year. Several strains of bees are available which have some degree
of resistance to the mite. Also, modified hive bottom boards are helpful in reducing mite
populations.
Tracheal mites
The tracheal mite is still a serious problem, but we are past the epidemic period in which
thousands of hives died. This is a microscopic mite that lives in the "lungs", or tracheal tubes,
of the bee. Part of the problem is that the symptoms are not obvious when the mites are at

42
low levels, unless the bees are examined by microscope. So it's necessary to treat the hives
regularly even when the bees seem to be doing fine.
The symptoms of a bad infestation are bees crawling on the ground near the hive, unable
to fly and bees with wings at an odd angle on one side. This is called "K-wing" because the
wings and the body form the letter "K".
There are several treatments for tracheal mites. One is a mixture of vegetable shortening
(like Crisco) and sugar. A one-pound patty of shortening and sugar, mixed 50:50, is placed
inside the hive on a piece of wire screen where the bees will walk over it. A very fine coating
of shortening on the bees kills the mites. Menthol, ApiLife VAR (a mix of plant oils) and
Mite-away II (formic acid) are three products sold commercially. One of these may be
placed inside the hive where they evaporate and act as fumigants.
American foulbrood (AFB)
This is a bacterium which infects the larva. It is the most serious of the honey bee
diseases. Diseased larvae die quickly, turning to a chocolate brown liquid with a distinctive
"foul" odor. The brood cappings become greasy and perforated with small holes.
The disease can spread quickly within a hive and from hive to hive in an apiary by
drifting bees. If one hive in an apiary is diseased the beekeeper must examine all other hives,
and treat them with antibiotic.
Several control measures are possible. If a very few cells contain AFB, cut them out of
the comb with a knife. Then treat the hive with an antibiotic called terramycin, sold through
many beekeeping supply companies. Instructions on the terramycin package should be
followed carefully. Clean your gloves, hive tool and any other equipment which comes in
contact with diseased comb before opening another hive. A hive tool can be sterilized with
flames from a bee smoker.
A frame containing many cells with AFB must be removed and destroyed. In a badly
diseased hive this will mean removing all of the brood frames and transferring the adult bees
to clean hive bodies. Then treat with terramycin. Do not leave the diseased frames in the
open where bees may find the unprotected honey and go home with AFB.

43
This one treatment may not completely eliminate the disease, so it is necessary to follow
up with further hive inspections and treatments until no sign of AFB remains. Check every
brood frame once or twice weekly. Repeat the procedure of removing diseased brood comb
and then treating with terramycin.
Wooden hive parts including hive bodies and frames can be saved if you are willing to
carefully sterilize them. A gas torch or bleach diluted with water is effective in killing the
bacteria.
If you have had AFB problems within the past two or three years it is best to treat your
hives yearly with terramycin. Prevention is far easier than dealing with a full-blown AFB
problem.
Recently, AFB bacteria resistant to terramycin have been discovered. New antibiotics
are currently under study for AFB control in bee hives.
Chalkbrood
This is a fungal disease of the larvae, and is present at low levels almost everywhere in
Kentucky. It usually will not kill a hive, but it destroys enough larvae so that the hive is
weakened somewhat. The beekeeper will notice the dead larvae in cells and at the hive
entrance. These are white and dark gray, resembling pieces of chalk. Like most fungi, it does
best in cool, wet weather. When July and August come, chalkbrood often disappears.
No treatment for chalkbrood is approved for use in the U.S. A mild case is usually
ignored. A severe case should be treated like AFB (above) except that terramycin will be
ineffective.
Nosema
Nosema disease is caused by a microbe that infects the stomach lining of the adult bees.
It weakens the bees, especially in the winter and spring. Since this disease interferes with
food digestion, we can understand that the bees that must eat the most food are those that are
most seriously affected. The nurse worker bees must consume plenty of pollen in order to
generate plenty of the glandular food for larvae. Hence a nosema-infected hive will have a
diminished brood nest. Forager worker bees must fill up with honey before leaving the hive

44
and traveling a mile or more for nectar or pollen collection. Nosema disease can greatly
weaken them so that some bees will not make it home. Nosema infection in the queen is most
serious, especially when she must digest enough food to produce 1000 or more eggs daily.
When their queen is sick, the worker bees sense this in some way and initiate queen cells in
the process of supersedure. (See Supersedure, p. 48)
In early 2007, a new species of the nosema microbe was discovered in the U.S. This
goes by its scientific name “Nosema ceranae”. It appears to be much more virulent than the
more common species, Nosema apis. Much more about this disease will be learned in the
coming years.
As for tracheal mites, either type of nosema disease is difficult to diagnose without a
microscope. Treatment for either is with an antibiotic especially for this disease: fumagillin,
sold as "Fumagilin B".
Viruses
Several types of virus attack the adult bees or larvae. One is sacbrood which causes the
larvae to become soft and watery like a sack filled with water. Other viruses cause the adult
bees to tremble, become paralyzed or lose their hair. At least one virus is stimulated to kill
bees when the colony is infested with varroa mites.
Virus infections are difficult to control for several reasons. The symptoms are not
always clear cut and unambiguous. Viruses in bees can be detected only by sophisticated
laboratory tests or very powerful microscopes. Another problem is that there are no
antibiotics which kill bee viruses. Destroying comb with the disease (if it's sacbrood), and
requeening the colony is the best course of action, if the problem is bad or recurring. This
will eliminate viruses left on the comb. By requeening the colony, the genetic makeup of the
hive will change. This will be beneficial if the new queen carries traits for virus resistance.
Also, viruses can hide in the queen’s reproductive system and be passed on to her eggs. If
she is eliminated, she will no longer be a source of the virus.
45
European foulbrood (EFB)
This bacterium causes the older larvae to discolor and smell bad, but they do not become
dark brown as with AFB disease and the odor is a little different. The disease should be
treated like AFB. This disease is much less common than AFB in the United States.
Wax moths
This insect does not attack bees, but can be very destructive of comb that is in storage,
or on a weak or empty hive. Some beekeepers incorrectly refer to the wax moth as a
"weevil". This pest is very common. Nearly every beekeeper in the U.S. encounters wax
moth infestations sooner or later.
The moth larva consumes the wax and will also weaken the wooden parts by chewing on
them. The wax moth grows and reproduces very quickly under warm conditions. Comb
stored above 80 ° F is quite vulnerable. At temperatures below 50° the moth will hardly grow
at all.
The earliest signs are tunnels in the comb, with silk "webbing" left by the smallest
larvae. As the larvae grow, the damage they do is greater. Many large larvae can consume all
of the wax in a frame in just a few days. Infested equipment will often have many white
cocoons, each about 1/2" long, clustered together.
There is a common misconception that the moths will kill a hive. In fact, the moths
move into a hive only after it is killed or badly weakened for some other reason. For
example, mites, absconding, and starvation will leave the hive unprotected by the bees so that
wax moths can enter and do their damage.
Some beekeepers will report that the moth killed their hive. In fact, the moths came in
after the hive was weakened or killed by some other factor -- mites, starvation, etc. A strong
bee hive will keep all moths away from the comb inside.
Wax moth damage can be prevented in several ways. A healthy hive of bees will keep
the moths away with no difficulty. This is one reason to keep extra comb on the hives during
warm weather. Cold weather (below 50°) works well also. Combs stored in unheated
locations during winter will be moth-free (although they must be protected from mice in the
winter). For comb that must be stored in a warm location, away from the bees, use

46
paradichlorobenzene (PDB). This is sold by beekeeping supply companies as "Paramoth". It
is an effective fumigant. Stack hive bodies on top of each other with the frames and a few
ounces of PDB on the top of the stack, under the top cover. The PDB can be contained in a
pan or cloth sack so that it does not fall to the bottom. The top and bottom of the stack should
be sealed with covers and/or bottom boards. Holes should be sealed with duct tape so that the
fumes reach a high concentration inside the stack. In warm locations the PDB will evaporate
quickly and will then need to be replaced. Let the frames air out away from the PDB for at
least a day before returning them to the hives. Do not use napthalene or other chemicals sold
for clothes moth control.
Small hive beetles
In the late 1990's a beetle from southern Africa appeared in several states in the eastern
U.S. This insect, the small hive beetle, can be very destructive of weak hives and stored
comb. As a larva it is a worm-like creature which eats the comb including stored honey and
pollen. The larvae leave the hive when they are grown and burrow into the ground near the
hive. Underground they pass through the pupal stage, and emerge as adults later. The adult
beetle is a strong flyer and able to locate hives from some distance by the hive odor. The
black beetle is difficult to see when it mingles with bees on a frame. Although it originates
from a warm part of the world, the beetle can survive cold winters in the bee cluster.
The beetle is now in much of Kentucky and most other states. Chemical treatments for
the beetle are approved and found to be effective. Also, several types of beetle traps are sold.
These traps fit either inside the hive or on the bottom board.
The most important way to minimize beetle problems is to keep the hive vigorous and
full of bees. The beetles seek the weakest hives and do their worst damage there.
Skunks
These little guys are quite common around hives in rural locations. When getting ready
for winter, skunks want to engorge on anything tasty to fatten up. They approach the hive at
night, scratch at the entrance, and gobble up the bees that come out to investigate. Stings are

47
not a problem for them. Skunks can often catch the bees without being stung. Others are just
persistent -some have been found with dozens of bee stingers on the insides of their mouths.
The signs of skunk attack are scratch marks around the entrance of the hive, scratching
and bare ground just in front of the hive, skunk feces (often with recognizable bee remains in
them), and a familiar odor in the air. There are several approaches to skunk problems, but I
feel the best is a chicken wire screen wrapped around the entrance, stapled in place at the
right and left sides of the hive. This barrier angles up for at least two feet, so that the skunk
cannot reach the hive. It takes only a few minutes to put it in place.
Other approaches are less effective. Some beekeepers wait at night to shoot the skunk. This solves the immediate problem, but it does not eliminate the many skunk cousins, skunk
nephews and skunk friends who live nearby. All of the skunks I know prefer to be kept away
by, chicken wire rather than a shotgun. Hot pepper preparations sprinkled in front of the hive
are supposed to irritate the feet of the animals, but will wash away with the first rain. A
barrier that is not nailed or stapled in place is easily removed by the skunk.
Bears
Bears have reappearing in eastern Kentucky after a long absence. They had been hunted
out of existence in the state around 1900. In the 1980's bears moved into eastern Kentucky
from West Virginia and Virginia, where they had been re-established. Attacks on hives have
since been reported in the eastern part of the state. Bears have been sighted at several
locations in central Kentucky. Clearly they are continuing to move west. We can expect more
bear damage in the future.
A bear attack can be extremely destructive to hives. The animals can easily break open
the wooden hive bodies. Stings are not much of a deterrent when they are hungry. Contrary
to popular belief, they don't go after the honey. It's the brood they really like, a highly
nutritious meal.
The best course in bear regions is prevention. Elevated stands can be effective, but are
expensive to construct. Electric fences usually work well if erected and maintained correctly.
If bear problems persist, relocation of the hives or the bears is the only recourse. You may
48
wish to contact the nearest office of the Department of Fish and Wildlife regarding bear
relocation.
Mice
Mice will make nests inside hives with or without bees, especially in rural apiaries
during winter. If the hive is not protected from mouse invasion, the beekeeper may find a
nest during the first hive inspection of spring.
Usually the comb but not the wooden parts of the frame are destroyed. Mouse damage
can be prevented by stapling 4-mesh screen across the hive entrance in October as part of the
wintering preparations. The 1/4" holes in the screen allow bees to pass for flight when the
weather is warm enough. The screen should be removed in March.
Ants and other minor pests
Ants, roaches, earwigs and spiders will live in the space between the inner cover and the
outer cover. They are annoying but rarely do any damage, and will not affect the bees or the
honey. The best thing to do is brush them out when you find them. Avoid using pesticides in
the space above the inner cover, since they could contaminate the honey and poison the bees.
OTHER PROBLEMS
Swarming
Every strong, healthy hive will try to divide into two or more colonies in the spring. This
is the natural way for bee colonies to reproduce. (See The Life of a queen bee, p. 4)
However, swarming is a problem for three reasons: many productive bees are lost; the
original queen is replaced by her daughter; and the swarm can be a nuisance the neighbors.
The daughter queen will have half of the genes of her mother. She may or may not be as
good as the original mother queen. At best, the colony will suffer from a gap in brood rearing
while the daughter queen matures and mates.
Swarming is hard to prevent completely, but you can reduce swarming in several ways.
The bees are stimulated to swarm when the hive is crowded and if the queen is older. Most of
this activity occurs in swarm season -- May and June. During these months, reduce crowding
49
in the hive by separating frames containing brood and inserting one or two empty frames. If
the two lower hive bodies both have brood, reverse the positions of these bodies. Both of
these techniques break the brood nest and give the bees the impression that they are not
especially crowded. If possible, examine the brood nest every week or two during swarm
season. Keep your eyes open for queen cells and destroy any that you find.
Supersedure
Queen bees may fail because of diseases such as nosema, parasites, unsuccessful mating,
or age. The worker bees are able to recognize that their queen is weak, and will gradually
replace her with a new queen. (See The life of a queen bee, p. 4)
Very often, supersedure occurs without the beekeeper's knowledge. Only by marking the
queen or clipping a wing can the beekeeper know whether the original queen is still on duty.
(See Marking and clipping a queen, p. 61). As with swarming, the new queen is the
daughter of the original queen, so she has some of the same genetic traits. She may be
perfectly acceptable to the beekeeper.
Starvation
Insufficient stored honey during winter or long rainy periods in the spring, will lead to
starvation. A hive that has starved leaves a characteristic sign behind --many dead bees head
first in empty cells. Starvation is also common for colonies just getting established, for
example, from package bees or swarms, which have not had an opportunity to make honey.
The solution is to prepare the hives for winter and to keep track of the honey stored in the
hives during dearth periods. Generally, dearth conditions can be anticipated and starvation
avoided. (See Extreme weather, p. 53 and Feeding bees, p. 37)
It is possible for bees to starve even when some honey remains in the hive. This can
happen when a few frames with honey are not close to the cluster of bees. In cold weather,
the bees may be so tightly clustered that they are unable to move through the hive in search
of remaining honey in the comb.

50
Pesticide poisoning
Bees are killed very easily by insecticides. They have almost no resistance against these
chemicals, while many of the insect pests on crops have developed considerable resistance.
The sign of pesticide poisoning is the sudden appearance of many dead and weak bees in
front of the hive. This happens when forager bees return to the hive carrying nectar and
pollen laced with pesticides. The chemicals are passed among the house bees by trophallaxis,
causing them to die and be carried out of the hive by other bees.
If you have had pesticide problems from your neighbors, discuss the issue with them. If
at all possible, blooming plants attractive to bees should not be sprayed. Perhaps the land
owner can wait until the bloom is gone. If an application is necessary, the pesticides can
often be applied at dusk when the bees are in the hives. By morning, at least some of the
pesticide has dissipated. If problems cannot be resolved you may need to find a new apiary
site.
Other types of pesticides --like herbicides and fungicides --are not as likely to hurt the
bees because they are not designed to kill insects. But these chemicals can drift or be carried
by foragers to the hive, and contaminate the honey.
Queenlessness
If the queen disappears, a colony treats the problem as an emergency. The bees sense the
loss of their queen within an hour or two, because the queen pheromone which is normally
present in the hive disappears quickly. (See The life of a queen bee, p. 4)
If the colony has young worker larvae, it has the ability to requeen itself. As soon as the
queen pheromone diminishes, worker bees create emergency queen cells from cells with
young worker larvae. These cells are typically among the worker brood cells, unlike swarm
cells which are along the sides and bottom of the brood nest. Emergency queen cells are a
reliable sign that a hive is queenless. The queen may be lost because of disease, because she
did not return from a mating flight, or because the beekeeper accidentally killed her while
examining the hive.

51
Drone-laying queens and queens that produce bad brood patterns
Queens will occasionally have unsuccessful mating flights, or have some other problem
that prevents them from laying fertilized eggs. An unfertilized egg becomes a drone larva,
and eventually an adult drone. Drone-laying queens tend to lay eggs in worker cells. The
drones that develop in the smaller worker cells become smaller adults. So colony that has had
a drone-layer for over a month will have many small drones, each about the size of a worker
bee. A hive with much drone brood, and little or no worker brood, either has a drone-laying
queen or laying worker bees (below). A queen which generates a bad brood pattern should be
replaced with a good queen as soon as possible. (See Requeening a hive, p. 59)
Laying workers
Worker bees are nearly always sterile females, but on occasion will be able to lay a few
eggs. These laying workers develop if a colony has been queenless for several weeks. Their
ovaries enlarge and they represent the colony's last-ditch attempt to rear brood. The colony
will eventually die if it remains queenless.
Since worker bees are unable to mate, their eggs will not be fertilized and will develop
as drones. Also, laying workers are not skillful in placing their eggs in cells. Consequently,
there are clear signs of a laying worker colony: (1) many (often ten or more) eggs per cell,
(2) the eggs are placed every which-way in the cell, not neatly at the bottom, (3) capped
drone cells in worker comb, and (4) a "spotty" brood pattern, i.e. brood cells here and there
rather than a continuous sheet of brood on a frame. These signs distinguish a laying worker
colony from one with a drone-laying queen.
A laying worker colony is difficult to requeen. The best solution is to combine it with a
normal hive. (See Uniting hives, p. 63)
Robber bees
When the main honey flow of May and June ends, the bees will be looking intently for
food. Usually there is little for them to find in the dearth period of July and August, and they
may try to steal honey from another hive nearby. This is especially true if a drought stops the
nectar flow. Robbing will not be a problem for a lone hive far from any other hives.

52
It's important to avoid giving the bees the inclination to rob. The bees can be stimulated
to start robbing if they find honey outside of their hive. For example, if you open your hive
during a dearth, and set a few honey frames outside of the hive, bees from nearby hives will
smell the honey and go after it. Soon a mass of bees will be mobbing the frame. If this
happens, shake the bees from the frames, and put the hive back together as quickly as
possible. The bees will still be excited, however, and may try to get into the hive you just
opened or another hive nearby. If a hive is weak, the robbers may be able to get past the
guard bees and steal the honey. In a short time, this weak hive can be robbed of its honey and
then starve.
To prevent robbing, make your hive inspections as brief as possible during honey dearth
times. It may also be necessary to install robbing screens at the entrance of your hives. These
are screens that attach to the front of the hive, with an opening at the top. The bees leaving
the hive have to crawl up the screen before flying away. When they return they soon learn to
go back in the hive through the top opening. But robber bees are not adept at learning how to
get past this screen. Robber screens are easy to make from bits of wood and wire screen
material. They are not usually sold through bee supply companies.
Absconding
Bees are particular about where they live. If the hive is too small, too hot in summer, in
a windy location, or frequently bothered by pests, the bees may take off for a better spot. In
this case, all of the adult bees leave at once in a swarm. It looks like swarming, except that
new queens are not reared and no bees are left behind. You may need to do a little detective
work to decide whether the hive died or absconded. If it died, some evidence could be left
there --signs of disease, mites or starvation. If your bees have absconded, determine what
aspects of the hive conditions were undesirable, and fix them before re-establishing the hive.
Drifting
Bees will occasionally enter the wrong hive when they return from foraging, if another
hive is near their own. Often they will then join that colony, coming and going as if they had
always lived there. This drifting behavior can be worst when hives are in a windy location.

53
The returning bees will be inclined to join the down-wind hive, and soon that hive is full of
bees while the others are depleted. It is also common when the hives are very close together.
An irregular arrangement of hives, rather than a straight row, reduces drift. Landmarks
like bushes or fences, and hives painted different colors will also limit drift by helping the
bees identify their hives when they return.
In practice, drift is usually accepted as a minor problem for hives with some protection
from wind. However, it is responsible for the rapid spread of mites and disease within an
apiary. This is why the beekeeper must treat for mite infestations or American foulbrood in
all of the hives of one apiary at the same time. Drift is also a concern when establishing more
than one new hive from packages, at the same apiary. For the first several days the bees do
not have a strong affinity for the hive in which they are installed. The worker bees may
accumulate in one hive, leaving another with only a queen and a few workers. To minimize
drift from newly established hives, set them up at least 10 feet apart.
Extreme Weather
Unusual weather often requires the use of special management techniques. Under some
circumstances there is not much we can do, but it is important to understand the
consequences of extreme weather.
Excessive rain. Rain has two undesirable effects on the bees. First, it prevents the bees
from collecting nectar and pollen. Rainy weather in early spring can lead to starvation if the
bees have insufficient stored honey and pollen. In late spring, badly timed rain can ruin an
otherwise promising honey year.
Second, some diseases are promoted by rainy weather. The high humidity will
encourage chalkbrood disease. The confinement of the bees leads to nosema disease. Usually
the disease will lessen with the arrival of good weather, but the colony will be weakened.
Drought. If soil moisture is too low, plants will stop producing nectar. This will then
lead to starvation. Examine your hives during a drought to check the honey stores and brood
rearing. A severe drought can force a colony to stop brood rearing altogether. This will then
lead to a decline in the worker bee population. You will need to feed sugar syrup to your
hives during a serious drought.
54
Hot weather. Bees are able to endure hot weather fairly well as long as they can
circulate air through their hive and find a source of water. (See Water for Bees, p. 40) Be
sure the hive has an opening in the inner cover to allow air flow. In summer, I prefer to prop
the outer cover slightly off of the inner cover to improve air flow through this opening. On
summer evenings, a populous hive will have a "beard" of bees clustered outside of the
entrance. By this behavior the bees dissipate some heat outside of the hive.
A hard winter. Very cold weather is not detrimental to the bees if they are ready for it.
(See Preparations for Winter, p. 65) However, the length of the winter is very important.
The colony will stop brood rearing in the fall and begin brood rearing in late winter or early
spring, according to temperature and rainfall at those times. Honey stores run low if foraging
for the first nectar in the spring is delayed. Starvation, nosema disease and tracheal mites are
often problems in long winters.
A mild winter. Warm winter weather may not seem to be a problem for bees, but it can
be. If there are many days warm enough for the bees to fly, they will consume energy in the
form of honey stores but without the opportunity to find nectar to replace it. Brood rearing
will begin early in a mild winter, another factor causing the bees to consume stored honey
more rapidly. If the bees continue to rear brood ahead of schedule into spring, several other
concerns arise. First, swarming will be likely later on. Second, the colony's early brood
rearing allows the varroa mites to begin reproducing early. A beekeeper who wants more
colonies can turn the swarming impulse to an advantage by making divides following a mild
winter.
Ideal winter temperatures are in the 30's and 40's. This keeps the bees clustered, and
minimizes their honey consumption. An occasional warm day is beneficial also, allowing
bees to fly and defecate on cleansing flights.
High winds. Strong winds are difficult for any creature that flies. Forager bees that
have to fly upwind on their trip home may have trouble. We can readily understand this
when we examine worker bees under the microscope. Older bees with a lot of flight
experience have tattered wings that must be less efficient than the wings of young bees. A
bee with tracheal mite damage (see Tracheal mites, p. 41) is unable to get air to its flight
muscles efficiently.

55
In a windswept apiary with more than one hive, bees will often drift to the hive that is
farthest downwind (see Drifting, p. 52). Some returning foragers will enter the first hive
they reach, and join that colony, rather than struggle all the way home. This is a problem for
the beekeepers, they will then have hives of unequal strength and productivity.
High winds will also topple hives. If your apiary is windy, be sure to check it very soon
after a windstorm. If the hive has fallen over, it must be put back together as soon as
possible. Under warm, dry conditions the hive will not suffer much if it is put back together
soon. But when it’s wet or cold, the cluster of bees can die quickly from exposure. Under
either condition, the bees will not be cheerful when you arrive at the scene. Have your bee
suit, gloves and smoker ready.
Theft and vandalism
Theft and vandalism of bee hives are rare events if the hives are not accessible or visible
to people passing by. The hives should not be close to roads, especially heavily-traveled
roads. Trees, bushes, a house or barn are effective barriers which hide the hives.
Stolen hives are rarely recovered, however. Branding irons can be purchased, which
burn the beekeepers name or identifying letters into hive bodies and other wooden
equipment. These are available from beekeeping supply companies.
IMPORTANT ACTIVITIES
Interpreting the brood pattern
When the bee colony is rearing brood, there is much to learn from an examination of the
brood nest. The amount of comb containing eggs, larvae and capped brood tells the
beekeeper about the recent history of the hive, its present condition, and what can be
expected in the near future. The location of the brood in the hive also tells us much. The
amount and distribution of brood in the hive is the brood pattern.
The development times for worker brood (Table 1, p. 2) provide the basic information.
Note that the development time for larvae (6 days) is twice as long as for eggs (3 days). The
capped worker brood development time (12 days) is twice as long as for larvae. This
indicates that the larvae in the brood nest will cover twice as much comb as the eggs, if the
56
queen is laying the eggs at a steady rate and if no stressful factors interrupt brood rearing.
Likewise, the capped brood will cover twice as much comb as the larvae, if egg laying and
brood rearing are steady. For example, a colony might have 10 square inches of comb with
eggs, 20 with larvae and 40 with capped brood under these conditions.
The queen's egg laying does change, however. In March the queen benefits from the
warming weather and early bloom. Her egg production increases. At this time, the brood
pattern will include many more eggs and larvae than capped brood cells. In October, the
reverse is true. The queen is reducing her egg laying. Consequently, healthy hives will have
capped brood but very few eggs and larvae.
Drone rearing follows a different schedule (see The life of a drone bee, p. 9). Expect to
see more drone brood during April through June, especially in strong colonies. Drone
rearing will taper off through the summer. The hive will have little or no drone brood in the
fall.
Environmental conditions also affect the brood pattern. Most important are low
temperature, long rainy periods, and declining nectar and pollen forage. Cold snaps in spring
and fall will reduce the queen' s egg production. Also, if the cluster of adult bees cannot
completely cover the brood, the neglected eggs and larvae will die. Usually the capped brood
is not as vulnerable as the younger brood. When the weather warms up the beekeeper will
notice that much of the young brood is missing. If good weather continues, egg production
will resume. After a week or two, the "gap" in brood rearing will move to the capped brood
stage. An alert beekeeper observing this reduction in capped brood can conclude that
something stressful to the bees occurred a week or two earlier.
Several days of rain or a nectar dearth can affect the brood pattern the same way as a
cold snap. Both rain and food shortages lead to starvation, especially if the hive has little
stored honey and pollen. When the colony begins to starve the queen is fed less and lays
fewer eggs. If starvation is severe the colony destroys its eggs and youngest larvae, causing a
bigger gap in brood rearing.
Swarming causes a gap in the brood rearing of about a week. This is because no eggs are
laid from the time the old queen leaves until her daughter mates, matures and begins to lay.
57
Some pesticides affect the bee colony's brood more than the adult bees. A light dose of
pesticide can cause a temporary gap in brood rearing without killing many adult bees.
Finding the queen
It can be difficult to find the most important member of the hive. She is living with tens
of thousands of workers, and looks only slightly different. Also, the queen tends to avoid
light. If you hold a frame of bees horizontally, she may walk quickly to the darker underside
before you notice her. Even the most experienced beekeepers have trouble finding the queen
at times.
Here are a few tricks to finding your queen:
1. Open the hive with a minimum of smoke and disturbance. If the colony is badly
disrupted, the queen may run to a corner and hide under a layer of workers.
2. Look first on the brood nest frames. She will almost always be there, looking for an
empty cell to lay her next egg. Very rarely will she be on a honey frame or empty frame
outside of the brood nest.
3. Hold the frame in direct sunlight. It's amazing how much harder it is to find the queen
on a cloudy day.
4. Form a "search image" in your head. While you are looking, think about just how she
looks --a longer abdomen, often a slightly different color than the workers, walking slowly,
and surrounded by a circle of attending workers.
5. Some beekeepers will mark their queens with a bit of paint. (See Marking and
Clipping the Queen, p. 61) A white spot on her back makes her much easier to find. Some
queen producers will mark your queen for you if you specify this in your order.
6. Set an empty hive body near the hive, on a stand or another hive body. After
examining each frame place it (including the bees on it) in this hive body. This keeps the
queen from sneaking over to a frame you have just examined. Eventually you will narrow the
search down to the last few frames in the hive.
When examining frames be very careful that the queen does not fall from a frame to the
ground outside the hive. A queen left behind in the grass may be unable to return to her hive.
It's best to hold each brood nest frame above the opened hive as you examine it, so that the

58
queen can fall only into the hive. If the queen does fall to the ground, catch her gently and let
her loose on the top bar of a frame. She will quickly walk down between the frames. There is
no danger in holding a queen bee bare-handed. She uses her stinger only against rival queens.
Often it is not necessary to find the queen. The best indication of how she is doing
comes from the brood pattern.
However, the queen must be found and removed before requeening. If the original
queen was been marked, you may want to look for her to determine whether she has been
replaced by a daughter through supersedure or swarming.
When should a hive be requeened? A queen's productive life is around two years. For
this reason, requeening every second year is a good idea. Some queens do fine for a longer
time, some manage only one good year, and some do poorly from the start. Experience will
tell you when a queen is not up to expectations. Develop an idea of how much brood is
normally present through the year, according to weather and time of year. If you rule out the
effects of weather, season, hive location, mites and other problems you can usually determine
whether it's time to requeen.
Buying queen bees
The queen is the heart and soul of the hive. She is largely the key to a vigorous, disease-
free, gentle hive full of honey. Buy your queen from the best possible source, and be willing
to pay another dollar or two. Your investment will come back. Compare notes with other
beekeepers. Where do they get their best queens?
Queens are for sale mainly in springtime. You ought to place your order in January or
February if you want your queen in April. The commercial queen producers operate a tight
schedule through the spring. They may not be able to get your queens mailed when you want
them, especially if a late spring hurts their queen-producing hives. If you need to buy queens
in fall, only some queen producers in the south may have them for sale. One good source for
fall queens is Hawaii. Check beekeeping magazines for advertisements.
Queen bees experience some stress in the mail. If possible, collect your queens directly
from your post office. Contact the queen producer by phone or e-mail for the anticipated

59
shipment date. Then inform your post office that you will pick them up the day they arrive.
This will save the queens from the stress of being in a hot or cold mailbox.
When you get your queens, try to install them in the hives as soon as possible. However,
bad weather can force you to wait. In the meantime, find a safe place for her. A dark spot not
too warm or cold is ideal, for example a cabinet or drawer. Place a tiny drop of water on the
screen of the cage, every day. She should go into the hive within two or three days if at all
possible. She may die if she's in the cage too long.
Each queen cage will include about five worker bees, the attendants, which feed the
queen. Occasionally a few of the attendant bees will die in the cage. This is not a serious
problem if a few remain alive to care for the queen.
Requeening a hive
When a queen is old, failing, or of an undesirable genetic stock the hive should be
requeened. The first step is to find the old queen and remove her. This step is usually the
most difficult one, but important because the two queens cannot live together in the same
hive. (See Finding the queen, p. 56.) Let the hive remain queenless for several hours to two
days. In this time the queen pheromone will diminish and the workers will become eager to
accept a new queen.
When you are ready to introduce the queen, bring the queen cage to the hive and open
the hive. Next, note that the cage includes some white sugar paste, or “candy” at one end of
the cage. A small cork plugs a hole at the end of the queen cage with the candy. Remove
this cork with a pocket knife or hive tool.
Now place the queen cage inside the hive by suspending it between two of the frames.
This is often done by simply holding the cage between the frames while pushing the frames
together. The soft comb in the frames will hold the cage. Be sure that the screened opening
of the queen cage does not face one of the frames. This is important because the worker bees
in the hive need to contact the queen through the screen. In a short time, the bees will eat
through this sugar candy, allowing the queen to come out. The reason for this system is that it
allows a gradual introduction and release of the queen, as the bees become accustomed to her

60
odor. If the queen were simply placed in the hive without a gradual introduction, the worker
bees would probably kill her.
Wait for two days to a week. Open the hive very gently and examine the cage. Has the
candy been eaten and the queen released? If so, remove the cage and close the hive without
disturbing the bees further.
If the bees have not eaten through the candy to release the queen, poke a small hole
through the candy using a paper clip or small nail. Return the cage to its position between
the frames. This hole in the candy will encourage the bees to eat through the candy faster.
A week after the queen has left her cage, examine the hive for young brood. The
presence of eggs and perhaps young larvae tells you that the requeening process has been
successful.
If the queen dies in the cage, you will need to get another queen as soon as possible. A
queenless hive will begin to make its own queen if young female larvae are available. (See
Queenlessness, p. 50) In the meantime, however, no eggs are being laid. Eventually this will
mean fewer bees in your hive, less honey and other problems.
Introducing a queen to a newly divided hive or queenless hive
On occasion a beekeeper will need to introduce a queen to a hive which does not have
one. This is necessary when dividing a hive, and when establishing a queen in a hive that has
become queenless.
When making a new hive by dividing an existing hive, a new queen will be needed for
the divide which does not have the original queen (See Dividing hives, p. 62). Follow the
introduction procedure given above under Requeening a hive (p. 59).
A hive that has lost a queen through disease or some other factor is more difficult to
requeen if it has been queenless for more than several days. Over a long period of
queenlessness, some workers become aggressive toward a new queen and may kill her.
Consequently the beekeeper should take extra care in the procedure. Follow the procedure
above for queen introduction, and if possible add a frame with young brood from another
hive. This young brood emits a pheromone that encourages the workers to accept the queen.

61
Why not let a colony requeen itself? Beekeepers may be tempted to let a colony rear
its own queen. This is certainly easier on the beekeeper, as no queen must be purchased and
no hive manipulations are required. However, there are important disadvantages to this short
cut.
First, the hive may be unsuccessful in the process of rearing a new queen. Also, the
queen may be unsuccessful in mating with sufficient drones, especially if the weather is bad
when it’s time for her to take a mating flight. Second, the time for the hive to rear a queen
and for her to mate is around two or three weeks. This will be a long gap in egg laying, and
eventually a big drop in the worker bee population. Third, the new queen may mate with
drones of an undesirable stock.
Marking and clipping the queen
I like to have marked queens in my hives, but this is not essential to good beekeeping.
The advantages are that a marked queen is much easier to find, and that I can tell whether she
has been superseded. Some commercial queen producers will mark your queens before
sending them to you for a small additional charge.
To mark a queen, you need only a bottle of white hobby store paint or typewriter
correction fluid and a pair of steady hands. You must be very gentle in doing this. If she is
slightly injured, she will be rejected and killed by the workers. Paint on the queen's head,
wings or legs may also cause the workers to reject her. Practice on drone bees first --they
can't sting and are expendable!
Remove the queen by coaxing her into a cage. A queen catcher works very well. See
beekeeping supply catalogs for this clever device. If you scoop up a few workers in the
process, that's fine. Release them carefully with a little manipulation of the cage. Marking is
done best while sitting down and resting the hands against a table top. Now hold the queen
with one hand with just enough restraint to keep her immobilized. She will not sting you.
Dab a white spot on the back of her thorax, and blow on it to dry it. Be very careful to avoid
spotting her head. Let the liquid dry completely before releasing her. Now release her and
observe her carefully. Are all of her legs functioning correctly? Return her gently to the hive,
and let her walk down between the frames.

62
Some beekeepers like to have the queen's wings clipped on one side. This does not hurt
her, and it keeps her from flying. The reasoning is that the bees will not swarm or abscond if
they can't take their queen along. This much is true. But clipping does not prevent the queen
from attempting to fly. More than one exasperated beekeeper has had to search the grass in
front of the hive, looking for a clipped queen who thinks she is ready for swarming.
The best reason to clip a queen is that it is a sure way to tell whether you still have your
original queen, or she has been superseded. White spots can wear off eventually, but clipped
wings will never grow back.
Dividing Hives
One way to increase the number of hives you have is to divide the strong ones. This is
sometimes called making divides or splits. Divides should be made in May or June. This will
give them time to recover their strength before winter. In making divides you will be
sacrificing honey production. They will be too weak to generate much surplus honey in that
year.
To divide a strong hive into two smaller hives you will need another queen and an extra
set of hive parts including a bottom board, inner and outer covers, and a hive body. When
you have the new queen and hive parts ready, set up the empty hive and transfer frames so
that about half of the brood, honey and pollen are in the new hive. Do not shake the bees off
as you transfer the frames --they will be a part of the divide too. During this process, look for
the queen. She can remain in the original hive or be moved to the new one. Just remember
where she is, and introduce the new queen to the queenless bees. (See Introducing a queen
to a newly divided or queenless hive, p. 60)
Establishing the divide at the same apiary as the original hive. If your new hive is in
the original apiary, many of the older bees in it will fly back to their original hive. These are
the field bees that have learned where the hive is in relation to landmarks nearby. (See The
life of a worker bee, p. 7) The younger bees have had no experience outside of the hive, and
will orient to the new hive when they are older and begin to fly. To compensate for this,
shake about 2/3 of the adult bees into the new hive when making your divide. After many of
63
the older bees return to the original hive, you will have roughly similar populations in each
one.
Establishing the divide at a new apiary. If the new hive is to be established more than
a mile away, few or no bees will recognize their new surroundings and find their way back to
the original site. In this case, you should make the divide by transferring about half of the
adult bees. Divides are relatively easy to move because they are small. (See Moving Hives
p.63)
Uniting colonies
There will be times when two colonies must be united into one stronger colony. This
may be when some are not strong enough for winter, or when one colony has been queenless
so long that it can no longer be requeened. (See Laying worker bees, p. 50) The potential
difficulties are that any two hives have different odors which are easily sensed by the bees,
and that two brood nests must be arranged into one.
The problem of different hive odors is solved by separating the joined colonies by a
sheet of 4 newspapers so that they will mingle gradually. The rearrangement of the brood
nest will take the bees some time, since each of the original brood nests is roughly spherical,
surrounded by pollen 1 ~ and honey. Also, the beekeeper must be sure that the extra queen is
eliminated before the colonies are united. Two queens thrown together will probably fight. It
is not always true that the most desirable queen wins. In some cases they would kill each
other, resulting in one queenless hive.
A first step is to remove the queen from the hive that seems weakest. Next, remove the
outer and inner covers from the hive which still has a queen. Lay a sheet of newspaper across
that hive and make five to ten small holes in the paper with a knife or hive tool. Then place
the other hive (without the bottom board) on top of the newspaper. Last, the inner and outer
covers go on top. (If you are uniting three colonies it's the same procedure but of course you
must remove two queens). In this unification the bees mingle gradually and share a common
hive odor. If the colonies were combined without newspaper, the bees would fight, resulting
in dead worker bees and possibly a dead queen. The unification of hives during a nectar
dearth is more successful if the joined colonies are fed with sugar syrup for at least a week.

64
Leave the combined hive for at least a week. In this time the bees will gradually chew
through the newspaper, their odors will mingle, and they will begin to function as a single
colony. They will eventually create a single brood area, with honey above, like the other,
larger colonies. The next time you examine the hive, remove the remaining scraps of paper.
Moving Hives
For the experienced beekeeper with a strong back and a willing friend, hive
transportation is fairly routine. However, the beginner should not attempt this alone.
The hive must be prepared after sunset or before dawn when all of the field bees are
inside. Prepare the hive by closing the hive entrance with screen mesh to keep the bees
inside. Any openings at the top of the hive, or holes in the hive bodies, should also be sealed.
A staple gun is ideal for securing the mesh across the entrance. Tie the hive together very
tightly, from outer cover to bottom board with rope or straps.
The big move should be done soon after closing the hive --when it is still dark or early in
the morning, if possible. The bees will suffer if they are confined for a long daytime period.
Lifting the hive into the truck or trailer is generally a two-beekeeper operation. One person
on each side of the hive lifts while holding the bottom board, and the hive is then fastened
securely on the truck or trailer.
Consider your route before traveling. Try to avoid very steep and rough roads. Bring all
of your beekeeping equipment along, in case a problem develops. If the hive tips or opens on
the trip, the bees will be irritated and you will be very glad to have your bee suit, veil, gloves,
hive tool and smoker handy.
When you get to your chosen site, place your hive on a steady and level hive stand. Then
untie the hive and remove the screen from the entrance. The bees will begin to fly around and
will realize they that are in a new location. They will circle the area for the first day or two,
memorizing landmarks: trees, houses, and other conspicuous objects. By the third day (or
later if bad weather prevents flight) they will be coming and going as if they had always lived
there. For the first week or so they will still be irritable from the disruption, so it's best to
avoid opening the hive in that time. If the weather is good and forage abundant, the bees will
usually be very gentle one week following the move.
65
Culling old frames
Wax comb darkens as the bees use it, especially when the comb is used for rearing
brood. Maturing larvae and pupae leave behind very thin skins (called exuvia) as they molt,
and also tiny fecal pellets. In this way brood rearing thickens and darkens the comb.
Pigments from pollen also add to the comb color as they leach into the wax. Most important,
spores from nosema, foulbrood and chalkbrood diseases persist indefinitely in and on the
wax. Over five years as a substrate for brood rearing, new white wax becomes dark brown.
Older comb becomes solid black.
Frames with very dark wax comb, many drone cells, and holes through the wax should
be culled. The best times to remove these frames from the hive are when the bees will not be
needing them. In early spring the colony is too small for the bees to cover all of the frames in
the hive. At this time, good frames or frames with new foundation can be substituted for the
culls. Similarly in fall, the colony condenses and the beekeeper reduces the size of the hive -
another good time to pull bad comb out of circulation. (See Preparations for Winter, p. 65)
Any hive that dies or absconds also leaves untended comb behind, which could be culled.
Remove the wax comb from the frame with a stout knife or hive tool. In the process, you
will need to cut any embedded wire with wire cutters. The comb, even the oldest and darkest,
contains wax that can easily be rendered into clean light wax. (See Beeswax, p. 70) When
spring comes, install foundation in the frame and put it in a vigorous hive.
In spring and summer, it's important to replace the cull with a new frame. If you leave an
empty space where a frame had been, the bees are likely to fill it with burr comb.
If you want to allow brood to emerge from a frame before culling it, first move it out of
the brood area. Over several weeks the brood will mature, the bees in those cells will emerge,
and the queen will not return to the frame to lay eggs. Honey can be extracted before the wax
is cut from the frame.
PREPARATIONS FOR WINTER
The honey bee is the only insect in Kentucky that keeps warm all through the winter.
This is done through a wonderful set of traits, including the habits of living together in a
large colony and hoarding honey in the nest. Kentucky bees will survive our coldest winters

66
with temperatures briefly down to -20º. This would seem to be difficult for the bees, but
honey bee colonies will make it through the even longer winters in northern Canada without
heavy losses.
However, the bees often need assistance by the beekeeper to make overwintering
success routine. Preparations for winter begin in August and September. Here is a five-point
check list:
1. Are there enough bees in the hive?
2. Is there sufficient honey in the hive?
3. Are mites and diseases under control?
4. Is an entrance reducer installed and the hive reduced to one or two hive bodies?
5. Has the queen excluder been removed?
The remedies for the corresponding problems follow:
Increasing the number of bees by uniting weak colonies
By August or September the bees will be rearing less brood than earlier in the year, so
little growth can be expected before winter. At this time, weak colonies should be united with
each other or with stronger colonies. (See Uniting hives, p. 63) The goal is to have a hive
with at least eight to ten deep frames (most of one deep hive body or the equivalent) covered
with bees.
When estimating the population of bees in a hive, consider that the weather and time of
day make a difference in the number of frames they cover. During cool weather the bees will
cluster. The middle of a warm day, many field bees will be away from the hive. Either of
these conditions can lead the beekeeper to underestimate the number of bees in a hive.
Evaluating the hive for honey stores
Your bees will have no opportunity to collect nectar for about five months in late fall
and winter. During most of that time the weather will be too cold for them to accept sugar
syrup from a feeder. Therefore the hive must have plenty of honey, about 50 pounds, to
ensure that it will survive the winter. This amount of honey is equivalent to 10 to 12 deep

67
frames full of honey. If the bees do not have this amount stored by late summer, you should
feed them or add honey frames from another hive.
Mite and disease control
The most important pests in winter months are the tracheal mites and nosema disease.
Tracheal mites reproduce and spread from bee to bee easily in the winter when the colony is
clustered tightly. Nosema disease is worst when the bees are confined for a long period. No
young, uninfested bees appear because brood rearing has stopped. Both types of infestation
tend to get worse through the winter and into early spring. Varroa do not reproduce in winter
when there is no bee brood, but they can weaken the bees enough so that, if other problems
also exist, the hive dies.
Reducing the hive entrance
The bees do well at warming themselves in their winter cluster. But a tightly sealed hive
around them is essential. Hive bodies with holes should be patched or replaced before winter
begins. In November, constrict the entrance by attaching an entrance reducer. This is a strip
of wood which covers most of the opening. If you have chosen a hive location that is
sheltered from the direct wind, your bees will benefit especially in winter and spring. Most
entrance reducers are constructed to exclude mice also, if yours is not, staple 4-mesh screen
across the hive entrance.
Remember to remove the reducer when spring comes! Typically this will be in March
depending on how quickly the hive population increases. The bees will eventually need the
whole entrance to come and go. Also, as the spring temperatures rise and bee activity
increases, the colony will need an open entrance for good hive ventilation.
Removing queen excluders
The queen excluder can easily kill a hive if it is left on over winter. This happens when
the cluster of bees moves though the hive, consuming honey. If the honey is above the
excluder, and the queen below it, the workers will have to choose between the honey and
their queen. They will chose the honey, the queen will be left alone to die, and without the
68
queen the rest of colony will die quickly. Remember that in winter the colony has no brood,
no drones and hence no chance to make a new, fertile queen.
PART 4: BENEFITS FROM HEALTHY HIVES
PRODUCTS OF THE HIVE
Honey
Honey is a concentrated solution of sugars and other floral substances prepared by bees
from nectar. To be ready for harvest, honey should contain 18% water or less. The remainder
is mostly two sugars --glucose and fructose. Small amounts of other sugars, enzymes,
vitamins and minerals are present, plus the floral components that give it a distinctive color
and flavor.
Nectar is a watery, sweet liquid produced by the flowers of many types of plants. By
offering this reward, certain plants attract bees and are cross-pollinated when the bees carry
pollen from one plant to another. On returning to the hive, a bee places the nectar in a honey
comb cell. Other bees then process the nectar by adding enzymes and fanning air across the
nectar. Much of the water evaporates, and enzymes remove some of the water. Other
enzymes produce natural antibiotics, make the honey slightly acidic, and convert sucrose
sugar to glucose and fructose sugars. When the enzyme activity and the evaporation of water
reduces the water content sufficiently, the honey is ripe. Each cell full of ripe honey is then
covered with wax.
Crystallized honey. Honey has such a high concentration of certain types of sugar that
it will tend to form sugar crystals. Crystallized honey, also called granulated honey, is
perfectly safe to eat. It has the same flavor as liquid honey, but a different texture. Some
people prefer it to liquid honey. You may hear it said that crystallized honey has "turned to
sugar". Strictly speaking this is incorrect since the sugar has always been there.
If you want to liquefy your crystallized honey, warm it gently by placing the jar in warm
water for several hours. You can also use a microwave oven, but the only on the lowest
69
setting and for a short time. If the honey is overheated it will lose much of its fragrance and
be spoiled.
Honey from certain plants is especially prone to crystallization. This is because some
nectars have high glucose levels, and glucose crystals form very easily in honey. Canola, an
oil seed crop with a bright yellow flower, is one plant with high-glucose nectar. It has been
planted in western and central Kentucky. Canola honey will even granulate in the honey
comb. If you collect much canola honey, extract it as soon as possible and blend it with
honey from another floral source.
Large honey processing plants heat honey to melt tiny glucose crystals and force it
thorough fine filters. This process eliminates most of the microscopic particles which allow
crystallization to begin. For this reason, the honey we see in large stores rarely crystallizes.
Small scale beekeepers have to educate their customers about the desirability of crystallized
honey and how to re-liquidize it.
Fermented honey. Very rainy weather makes it difficult for the bees to remove the
moisture from the nectar in the honey making process. High water content allows yeast to
grow, either in the comb or in bottled honey. The sign of fermentation is bubbles in the
honey, and possibly an odor that indicates spoilage. Fermented honey is not good for human
consumption.
The best thing to do with this honey is either dispose of it or feed it back to the bees at a
time when they will eat it rather than store it in the comb. The adult worker bees will then
use the nutrients to sustain themselves and to rear brood. This may be in early spring to
stimulate brood rearing, or during the late summer dearth period.
Pollen
Pollen grains are the male germ cells of a plant. Some plants need bees or other flower
visitors to move their pollen from flower to flower. Most other flowers rely on wind to
spread their pollen. This process of pollination initiates fertilization and then the creation of
seeds. Kentucky apples, peaches, berries, cherries, cucumbers, squash, pumpkins, melons,
sunflowers, and many other crops begin with pollination by bees.

70
Plants usually produce much more pollen than they actually need for the cross
pollination of a few of the plants in the area. The surplus serves as a rich food for the
pollinators: protein, vitamins, minerals and other nutrients. When bees bring it back to the
hive, they will store it in the comb. Some workers may eat the pollen right away, particularly
the nurse bees which have active glands for feeding larvae and the queen. In a hive that is
desperate for pollen, nurse bees may snatch the pollen loads off of returning foragers just as
they enter the hive. Pollen is needed especially in springtime, when thousands of hungry
larvae are growing in each hive and the queen is laying 1000 or more eggs daily.
On a nice spring day, bees with pollen packed onto their hind legs are rushing back to
the hive in great numbers. During this pollen flow you can watch the entrance of your hive to
see many different colors of pollen. This will give you an idea of how many types of flowers
are visited by your bees. But anyone pollen forager generally carries only one type of pollen.
By specializing only on one plant species at a time, the bee is a more efficient pollen
collector and also better at pollinating that particular type of flower.
Beeswax
Beeswax is produced by a set of eight wax glands on the underside of the worker bee. A
bee secreting wax will pull a tiny scale of wax from her gland, and add it to the wax comb.
Using her mouth and antennae, she then shapes the wax scales into the hexagon pattern of the
comb. This comb pattern is truly remarkable: it is the most efficient use of space and the
strongest structure for the amount of wax used.
Bees produce wax most readily when they are foraging heavily on honey plants, or right
after they are installed in a hive from a package or as a recently captured swarm. This is
generally in the months April through June. At other times it is necessary to feed the hive
with sugar syrup to stimulate wax production. A strong, healthy hive is a much better wax
producer and comb builder than a weak one.
Over time, the wax will change from white to yellow. The wax will eventually become
very dark where the bees are rearing brood. It is a consequence of the growth of the larvae,
and pigments in pollen carried by bees walking over the comb. Old, black comb should be
removed and replaced with new foundation. (See Culling old frames, p. 64)

71
Wax collection and processing. If you want to collect wax for crafts or candles, use
new, light-colored wax. The cappings from the honey frames are best. The cappings will be
left over when you have extracted your honey. Wax is cleaned first with warm water to
remove any honey. It should be melted only under low heat.
Hot wax is flammable! For small amounts of wax, I like to use an old electric frying pan
so that there is no flame. Most of the debris in melted wax will float or sink. When the wax
has cooled to a solid block, it's easy to cut the debris away. Candles can be made with molds
or by dipping wicks into melted wax. Candles made from wax foundation rolled around a
wick have become popular recently. Foundation dyed in various colors can be purchased
from beekeeping supply companies.
A solar wax melter is useful for melting the wax from entire frames. This is simply a
box with a glass top, mounted at an angle. A metal tray inside collects the melted wax which
then trickles through a filter and into a collecting pan. On a sunny day the temperature inside
quickly rises above the 140º needed to melt the wax. When the pan cools, a block of clean
wax can be removed from it.
Propolis
Propolis is sometimes called "bee glue". We can see why when we try to open a hive
which is well propolized. Bees use it to seal cracks in the hive, to close or narrow holes, and
to control bee diseases through its antibiotic properties.
Bees make propolis from plant resins. The resin is carried to the hive on the bees' legs,
like pollen, and it then may be mixed with beeswax. A lot of propolizing is done in the fall
when the bees are sealing up the hive in preparation for winter. Some strains of bees are
heavy propolizers and will even cover part of the entrance of the hive with this sticky
substance. This habit gives propolis its name, "before the city" in Greek.
HEALTH AND NUTRITIONAL BENEFITS OF BEE PRODUCTS
Many claims are made about therapeutic effects of products from the bee hive. Some are
true, some exaggerated and some are false. Many claims cannot be evaluated because the
necessary research has not been done. Furthermore, most of what research has been done on
72
the therapeutic effects of hive products is from other countries. For what ever reason, the
results of that research have not been embraced by American doctors and medical
researchers. The use of bee products for human nourishment, to cure illness or to heal
injuries is called apitherapy.
Honey
Honey is predominantly water and several types of sugar. (See Honey p. 68) Small
amounts of enzymes from the bees and floral components give honey its distinctive flavor,
color and aroma. It contains only tiny amounts of protein, vitamins and minerals. Some
minerals, such as fluoride and boron, may be present at levels high enough to be significant
for human health. The minerals in honey originate from the soil in which nearby flowering
plants grow. Consequently, the mineral content of honey will depend on the soil within
foraging range of the hives.
A recent study showed that dark honey is higher in anti-oxidants than light honey. Foods
with antioxidants reduce the risk of cancer. This is good news for beekeepers who produce
mainly dark honey.
Many people feel that honey consumption reduces their pollen allergies. One hypothesis
is that consumption of the small amounts of pollen that accumulate in honey cause relief of
the allergies. If this happens to be true, the honey would be beneficial only if it had not been
put through very fine filters. The 80-mesh filter cloth used by many hobby and sideline
beekeepers will allow all pollen grains to pass. Honey consumption has no effect on pollen
allergies for many other people, including me.
Honey has been used to treat wounds effectively, but it is not clearly better than
conventional treatments. Honey does promote tooth decay because the bacteria that cause
cavities feed on the sugars in honey. Allergy to honey is extremely rare.
No honey for infants younger than 12 months: Children do not have a completely
developed digestive and immune systems when they are very young. For their first year they
are vulnerable to the slight chance of a few botulism spores in honey. Unlike most other
foods for infants, honey is not heated to a temperature that would kill these spores. Very few

73
cases of infant botulism have been identified, but this is an important precaution
nevertheless. Some other unpasteurized foods are also dangerous to infants for this reason.
Pollen
Pollen is high in protein, minerals and vitamins. It has become popular as a nutritional
supplement for this reason. Beekeepers collect it with pollen traps (see Pollen traps, p. 20)
installed on their hives. It is sold as "bee pollen", a somewhat misleading term. A better term
would be "bee-collected pollen".
When bees collect pollen from the flowers, they add a bit of liquid to make it stick
together in clumps or pellets. The liquid is either, nectar, honey or secretions from glands of
the worker bee. The bee packs the sticky pollen onto the corbiculae, or pollen baskets, of her
hind legs. When the bee returns to her hive and passes through the pollen trap, the pellets fall
into a tray. The beekeeper removes the pollen from the traps and cleans it of debris. The
pollen pellets are of many colors, according to the plant source, so the end product in a glass
jar is very attractive.
There are several issues pertaining to pollen for human consumption. First, there is some
danger for those who are allergic to pollen. I know of one person who began to wheeze after
eating only a single pellet. Since the pollen comes from many different plants, it is possible
to have a bad reaction to one type and not other types of pollen. Those who want to eat
pollen should start with very small amounts.
A second issue is whether pollen has any special nutritional value when compared to
other foods. All of the nutrients known to be in pollen are found in a conventional diet which
is less expensive. Also, the human digestive system is not well adapted for pollen. The pollen
grains often do not rupture in our stomachs or intestines as they do in the digestive system of
a bee. If the pollen grains remain intact they do not release many of their nutrients.
Finally, many vitamins in pollen degrade if the pollen is not frozen. All of the pollen I've
seen in stores is kept at room temperature. Who knows how long it has been since the bees
collected it?
Pollen is fed to domestic animals too. Many of the horse farms around Lexington add
pollen to the feed of their horses.
74
Propolis
Bees gather plant resins and mix it with beeswax, especially in fall, in the process of
propolizing their hives. This material has antibiotic properties which probably help the bees
fight their diseases. Extracts of propolis in alcohol have been used by people to fight
infections. Like other bee products, propolis has received little careful study in the U.S.
However, a new type of antibiotic would seem to be valuable if it were effective and had no
serious side effects. Human health is seriously threatened by bacteria and other microbes
which are now resistant to many of our standard antibiotics.
Royal jelly
The nutrient-rich food fed by bees to the larvae which are developing into queen bees
can be collected by beekeepers. (See The life of a queen bee, p. 4) This is more popular for
human consumption in Latin America than in the U.S.
Royal jelly does have many of the nutrients needed by humans. But many of the
concerns about pollen apply to royal jelly also. People have been known to suffer allergic
reactions from royal jelly consumption. It degrades rapidly if not frozen. The nutrients in
royal jelly are all available in a less expensive, conventional diet. Production and collection
of royal jelly is laborious for the beekeeper, so it is quite expensive.
Bee venom
Injections of bee venom have been used to treat certain diseases. Arthritis and multiple
sclerosis in particular are supposed to be cured by bee venom injections. Honey bees come
with their own hypodermic needles, so this is often called "bee sting therapy". To date there
have been many stories but little hard evidence on the effectiveness or dangers of this type of
treatment. At this writing a formal, controlled medical study of the effects of bee venom on
multiple sclerosis is underway in the United States.
THE HONEY HARVEST
The hive will make most of its honey crop in May and June although a smaller, second
flow in September can occur. Consequently, honey is often harvested in July. Harvest in
75
August or September is fine too. It is easiest to extract the honey from the frames in hot
weather when the honey runs and filters fastest.
Your crop is ready if many frames of honey are capped with wax. Generally, this means
the honey is "ripe" and ready for harvest. (See Honey, p. 68) It's time to remove the honey
frames, uncap the honey cells, spin them in the extractor, filter the honey and bottle it.
If the weather has been rainy the bees may have difficulty removing the moisture from
the honey. This will result in many uncapped honey cells. In this case, wait for a period of
hot, dry weather and check the honey cells afterward.
Honey harvesting tools
These tools are either necessary or very useful. All are sold by beekeeping supply
companies:
Uncapping knife. The wax cappings on honey frames must be removed before the
honey can be extracted. This is done with an electric uncapping knife. The knife contains a
heating element that gets it hot enough to melt wax. The beekeeper slices the cappings off of
the honey frame just before putting them in the extractor. If you have only a few frames to
uncap you can get by with a capping scratcher (below) or any stout knife.
Extractor. A honey extractor is a large centrifuge that spins the frames so that the honey
is thrown out of them. The honey collects at the bottom where a gate can be opened.
Alternatives to an extractor are described below.
Filters. As the honey comes out of the extractor, it is then filtered to remove bits of wax
and other foreign material. A good system is a pair of stainless steel filters which nest
together and rest on a plastic bucket. The honey then goes through a final filter of 80-mesh
cloth.
The following tools are not absolutely necessary, but can be useful:
Bee escape. This is essentially a one-way door for bees. When placed in the hive it
causes the bees to move away from the honey super. (See the description below.)
Cappings scratcher. This looks like a fork with many tines. It's inexpensive and handy
for opening the capped cells you can't reach with the knife.

76
A large basin. This is to catch the honey cappings. You can purchase a stainless steel
basin, or just use a large pan.
Refractometer. This is a device that measures the amount of water in honey. It's a help
when rainy conditions interfere with the ripening of honey. It costs several hundred dollars
and is usually not purchased by the beginner.
Extracting and bottling the honey
Before starting, be sure you have enough containers. One shallow super will hold up to
25 pounds of honey. That's about eight quarts.
Removing the honey frames from the hive. There are several methods for removing
the bees from the honey frames. If only a few frames are to be harvested, it's easiest to
simply shake and brush the bees from the frames. Hold the frame over the open hive and
shake the bees off with a hard snap. Most bees will fall off. Then brush those that are still
clinging to the frame.
A very good method for removing bees from one or more supers is to use a bee escape.
One small type fits into the oval hole in the inner cover. A better version consists of a board
with a set of triangular escapes. Place the bee escape between the honey supers and the rest
of the hive. Be sure to seal all holes in the supers above the escape so that bees will not find
their way back into the supers. The following day most of the bees will be below the bee
escape and it's easy to remove the supers. Be sure to orient the escape correctly --otherwise
the bees will move the wrong way and you will be surprised by a huge number of bees in
your supers!
Some beekeepers prefer to use a bee repellant to drive the bees from the supers. This is
poured onto an absorbent pad and placed above the top super and just below the inner cover.
I dislike this method because the repellant has a very bad smell.
Harvest those frames which have all, or nearly all, of their honey cells capped with wax.
It is handy to carry the frames inside supers. It may be necessary to take your honey frames
some distance from the hive and then brush the remaining bees off.
77
Uncapping the frames. Hold a frame over a large container that will collect the wax
you slice off. Plug the knife in and when it is hot enough, slice the cappings off. After you
have uncapped both sides, place the frame in the extractor.
Using the extractor. The simplest and least expensive extractor is the hand-cranked,
reversible model which holds either two or four frames. When it's loaded, spin it at a
moderate speed for about five minutes. If you spin too fast the comb may break due to the
weight of the honey on the inner side of the frame. Honey from the outer side will be thrown
out of the frames. Then reverse the position of the frames so that the honey will come out of
the other sides of the frames. This time spin the extractor as fast as you can. Finally, rotate
the frames back to their original position and spin them again as fast as you can.
This will get most of the honey out of the frames, although they will still have a little.
Return these "wet" frames to the bee hives. In a few hours the bees will clean up these
frames. If you're curious, take a look at these frames in the hive the following day to see how
quickly the bees clean and repair the honey cells.
Filtering and bottling. Arrange the filter under the outlet of the extractor and get the
bottles ready. Open the outlet and filter directly into the jars.
Let the bottles stand one or two days. A little fine debris and bubbles will come to the
surface. This is easily skimmed off with a spoon. You now have your first honey harvest.
The honey extractor costs at least $200 new. Is it really necessary to buy an extractor?
Since it used only once a year it can be shared. Some local beekeeping associations have
extractors available to members. Inexpensive "honey squeezers" and "honey presses" that
squeeze the honey out of the comb can be an alternative to an extractor. These devices have
two disadvantages. Squeezing the honey from comb is much slower than removing it with an
extractor. Also the comb is destroyed in the process, so the bees will need to build new comb
to replace it in the hive. The bees require more time and food, and produce less honey if they
need to build new comb for the next honey harvest.
HONEY PLANTS IN KENTUCKY
What makes a good honey year? Certain years have just the right weather pattern.
Honey plants, especially trees, will bloom profusely and we have little rain while they are

78
blooming. The year 1993 was an example. For about two weeks, black locust trees were
covered with white blossoms all across the state, and many beekeepers made an excellent
crop. It's not clear, however, just what sort of weather made this bloom happen.
What should I plant for my bees? Beekeepers generally don't plant annual crops only
for their bees. Economically, it isn't justified because the cost of planting will exceed the
value of increased honey production. If you plant one or two acres of a honey plant, that will
help the bees some but not give you a very large increase in your honey harvest. Remember
that bees will forage up to three miles from the hive. A circle three miles around the hive
includes about 20,000 acres. The bees depend on acres of good forage over this large area.
Trees are an exception if you are willing to wait a while. A large black locust or tulip
poplar tree will occupy a fairly small area and develop hundreds of blossoms.
Honey plants are usually established if they are valuable also as fruit or vegetable crops,
if they have aesthetic value (such as shade trees), or if they enhance soil conditions (to
control erosion, or as legumes that add nitrogen to soil).
FRUIT AND VEGETABLE POLLINATION
Some beekeepers have hives mainly for pollination of their fruit and vegetable crops.
Others rent their hives to farmers for this purpose. If you consider renting your hives for crop
pollination you should establish a good understanding with the farmer who owns the field or
orchard. Often, a pollination contract is written and signed by both parties. The contract
should include the time the hives are to be in a given location, the placement and number of
hives, an agreement on pesticide use, and the fee to be paid to the beekeeper. The following
guidelines are important:
Timing. The hives should be placed in or near the crop for the entire period of bloom.
Ideally, the hives are moved in just as the crop is beginning to bloom so that the forager bees
discover and focus on that particular flower. If the bees are moved in much earlier they will
tend to concentrate on other flora and be less inclined to shift to the crop when it begins to
bloom. Whether the hives are left there for a longer time is entirely up to the farmer and the
beekeeper. In some cases the hives are kept in that location all year.
79
Placement of hives. If more than ten acres are to be pollinated, it's best to distribute the
hives within the field or orchard. When foraging over a large acreage, the bees will
concentrate on the bloom closest to them. In a field or orchard of less than ten acres, the
hives may be placed either within or adjacent to the crop.
Number of hives. Most crops require around one hive per acre, although two or even
three hives per acre are recommended for some crops. For guidelines on specific crops,
consult your extension apiculture specialist.
Hive strength. The bees that are the best pollinators are those that are gathering pollen
from the flowers. Nectar foragers will pollinate also, but less effectively. Consequently, the
best pollinating hive is one with many pollen foragers. A hive full of bees and brood is ideal.
The bees need the pollen for its protein and vitamins, to keep rearing all of that brood.
Pesticide use. If you do not own the crop to be pollinated, discuss the issue of pesticide
use with the farmer before agreeing to the pollination job. If at all possible, insecticides
should not be applied while the crop is in bloom and the bees are nearby. Insecticides are
much more hazardous to bees than herbicides and fungicides. (See Pesticide poisoning, p.
41)
Competing bloom. The bees will look for whatever is in bloom near the crop. If
attractive honey and pollen plants are abundant, fewer bees will visit the crop to be
pollinated.
Pollination fee. Beekeepers receive a fee per hive for pollination services. The fee will
be relatively low if the beekeeper is not sacrificing a honey crop in the process, no pesticide
damage is allowed, and the hives are not moved a great distance.
Some crops, such as cucumbers, bloom several times within a year. Hives which provide
this pollination over an extended bloom period have higher rental fee, perhaps over $100 per
hive. Hives that are moved suffer a little as the forager bees must learn their new location and
the bloom that is available. If the location happens to be a good one for honey and the hives
are not in danger of pesticide damage, the beekeeper and farmer may decide to call it even:
no fee because the value of honey production is about equivalent to the pollination achieved.
80
Are the bees doing the job? In some cases the bloom is covered with bees, each with a
colorful load of pollen on her rear legs. This will give you confidence that the pollen is being
moved effectively from flower to flower.
In other cases, you may see very few bees on the flowers. This is not necessarily a bad
sign, for several reasons. Bees visit some flowers very early in the morning, even before their
keepers are awake. If the pollen and nectar is no longer available in the flower by mid-
morning, you will see few or no bees on the crop for the rest of the day. It's also good to
consider that a bee's visit to a flower is brief. The pollination visit by a bee is usually only a
few seconds. The proof of effective pollination comes after the flower falls from the plant
and a bulging is seen where the fruit is starting to form. Not all effectively pollinated flowers
will lead to mature fruits. Injury from late spring frosts, hail, insects, and plant disease will
reduce fruit set. Also, the plant itself can abort some fruit even when the flowers have been
well pollinated.
Other species of bees for pollination
The honey bee is by far the most versatile pollinator of crops. A hive with many
thousands of pollinating worker bees can be easily moved to the crop. In contrast, other
insects live in small colonies or are solitary.
However, the honey bee is not particularly good at pollinating some flowers, including
those of blueberry, cranberry, alfalfa and tomato. This is because the she does not manipulate
the flower in the necessary way. Blueberry, cranberry and tomato flowers need to be
"buzzed" by the bee. This means the bee must vibrate the flower by buzzing her wings to
shake the pollen loose.
Honey bees don't do this while other bee species like bumble bees are very good "buzz
pollinators". The alfalfa blossom is also a problem for honey bees, but for a different reason.
It has a trip mechanism that hits the bee on the head to deposit pollen on her. Soon the
foraging bee learns to avoid tripping the flower by sneaking nectar from the side of the
flower. But the honey bee then becomes a poor pollinator because she doesn't pick up any
pollen. Bumblebees, leaf cutter bees and orchard bees have become popular for the
pollination of certain crops.

81
PART 6: LEARNING MORE
BEEKEEEPING ASSOCIATIONS AND FIELD DAYS
The Kentucky State Beekeeping Association (KSBA) welcomes new members.
Members receive the Bee Line, a newsletter that comes out every two months, to inform
members of beekeeping news, advice and comment. The KSBA meets every spring, summer
and fall.
Approximately fifteen local beekeeping associations also exist in Kentucky. Regular
meetings provide excellent opportunities for beginners to meet experienced beekeepers.
Some associations hold field days. These are social occasions when hives are opened and
beekeeping techniques are demonstrated. Contact your apiculture extension specialist or the
KSBA president for more information on the KSBA and local associations near you.
The Heartland Apicultural Society (HAS) conducts a three day conference in the
Midwest or south, usually in July. About 50 topics are presented for beginners and
experienced beekeepers. Practical beekeeping skills and opportunities are emphasized. See
www.heartlandbees.com.
The Eastern Apicultural Society (EAS) holds meetings every August, at a location in the
eastern United States or Canada. They are usually five days long: a 2 1/2 day "short course"
on beekeeping topics followed by the 2 1/2 day conference on all aspects of beekeeping and
honey bee biology. Those who attend have an opportunity to take the Master Beekeeper
examination. See www.easternapiculture.org.
FURTHER READING
Many excellent magazines and books are available. There is no substitute for daily
experience with the bees, but reading about bees and beekeeping can help the beekeeper
answer questions and discover more about this remarkable creature. Nearly all beekeeping
related subjects are covered.
Books are valuable when a beekeeper wishes to pursue some topic in depth. Some
subjects have changed very little over the years: basic hive management, production and

82
processing of honey and other products; honey and pollen plants; methods for rearing queen
bees, basic honey bee biology.
However, new developments related to pests, diseases and Africanized bees are
occurring very rapidly. A good beekeeper must keep up through magazines, beekeeping
association meetings, and “bee schools” or workshops.
Magazines
I recommend that every beekeeper subscribe to one of the two magazines below. Each
costs around $25 for 12 monthly issues. Beekeeping tips and ideas, human interest stories,
columns which answer readers' questions, regular columns by national experts, national and
international beekeeping issues, announcements of meetings and short courses, research
reviews, recipes, and ads for queen bees and all types of beekeeping supplies are included.
American Bee Journal (Dadant & Sons, 51 S. Second St., Hamilton IL 62341 or
www.dadant.com). Recent articles have been: "My first big bee move", "Comb honey in the
cassette", "Control of drifting bees", "Mystery bears", "Bee jewelry", "Designing a bee
forage system", "Beekeeping history", "A documented loss of feral bees"
Bee Culture (A. I. Root Co., 623 W. Liberty St., Medina OH 44256 or
www.BeeCulture.com). Recent articles: I "Bees in the city", "Observation hives", "Propolis",
"Making honey beer", "Antique gardens", "Questions and answers".
Books
The Beekeeper's Handbook, by Diana Sammataro and Alphonse Available, 3rd
edition, published by Cornell University Press, Ithaca NY. (If you can buy only one book on
beekeeping, this is one of the best. It is thorough and well written.)
Beekeeping: a Practical Guide, by R. Bonney, published by Storey communications,
Pownal, VT (very good, practical)
A Year in the Beeyard, by R. A. Morse; published by Scribner and Sons, New York.
(very good, practical)

83
The Hive and the Honey Bee, J. M. Graham and Dadant & Sons, eds., 1992, Hamilton,
IL (essentially an encyclopedias for reference on nearly all beekeeping topics; with 27
chapters and over 1300 pages, it's a good investment for the serious beekeeper)
The ABC and XYZ of Bee Culture, by R. Morse & K. Flottum; published by A. I.
Root Co., Medina, OH (a handy, alphabetical listing of many beekeeping subjects; much like
an encyclopedia but shorter and more limited than The Hive and the Honey Bee)
How to Keep Bees and Sell Honey, by Walter T. Kelley; published by Walter T. Kelley
Co., Clarkson, KY (inexpensive and helpful but very limited in scope)
First Lessons in Beekeeping, by C.P. Dadant; published by Dadant & Sons, ed.,
Hamliton, IL (inexpensive and helpful but very limited in scope)
The New Starting Right with Bees, revised edition by K. Flottum, D. Sammataro and
C. Stephens; published by A. I. Root Co., Medina, OH (inexpensive and helpful but very
limited in scope)
American Honey Plants by F. C. Pellett; published by Dadant & Sons, Harnliton, IL -
(the most extensive book on bee forage, written many years ago but as good as ever; now out
of print)
Weeds of Kentucky and Adjacent States by P. Haragan; published by Univ. Press of
Kentucky, Lexington, KY -(a fine guide book with line drawings and descriptions that make
it easy to identify many of the "weeds" which happen to be good for bees)
Observation Hives by T. Webster and D. Caron, published by A. I. Root, Medina, OH
(a guide to the construction, use and maintenance of observation hives; for experienced
beekeepers)
Mites of the Honey Bee by T. Webster and K. Delaplane, published by Dadant and
Sons, Hamilton, IL. (an extensive review of current knowledge on tracheal mites, varroa
mites, and related pests; for the serious beekeeper)
THE INTERNET
Like most new technologies, the internet presents great opportunities and also some
hazards. Many good websites are available. I do not recommend any here because these sites
are continuously created and changed. Similarly, beekeeping "chat rooms" provide plenty of

84
both good and bad ideas. On occasion, illegal and dangerous treatments for mites are
suggested. Be cautious about adopting new ideas without first consulting someone with
appropriate authority and expertise.
BEEKEEPING SIGHTS IN KENTUCKY
Kentucky is one of the few states with two beekeeping supply companies: Walter T.
Kelley Company and Dadant and Sons. They are fascinating to visit. Beekeepers can save
shipping costs by picking up what they need at the companies. Both have a wide range of
supplies and books. It is always wise to check on equipment availability before a visit.
The Walter T. Kelley Co. is near Clarkson in western Kentucky. They may be contacted
at (270) 242-2012, (800) 233-2899, or www.kelleybees.com. The Dadant Company has a
branch office in Frankfort. They are at (888) 932-3268 or www.dadant.com
The Department of Fish and Wildlife operates its Game Farm just west of Frankfort on
U.S. Rt. 60. An observation bee hive is maintained in the Salato Wildlife Education Center
there, in addition to many other informative displays pertaining to Kentucky wildlife. The
Game Farm may be reached at (502) 564-4406.
WHAT’S NEXT?
Give yourself about two years to become familiar with the basics of beekeeping. When
you are confident with your understanding of the seasonal cycle and the most common
activities and problems, you might be ready to take another step.
More hives: You will soon have a feeling for how much time and resources are needed
for a few hives. More hives may seem like a natural progression. If you are efficient and the
hives are all in one apiary, the additional time and equipment for 10 or 20 hives will not be
very intimidating.
The largest investment for those harvesting more honey will be in extracting equipment.
See beekeeping supply catalogs or web pages for specifics. With this expense in mind, a
grant awarded to Kentucky State University has allowed the purchase and placement of large
honey extraction units at various locations around the state. These are available to

85
Kentuckians who have at least several hundred pounds to extract. Transportation of hive
bodies, supers and other heavy equipment will require a truck or van.
Generally one apiary will support 10 to 20 hives. If the beekeeper places more hives at
that site the bees will compete with each other for flora and suffer reduced yields.
Alternative products: The market for clean, carefully prepared pollen and beeswax is
very strong. Start out on a small scale to how much time and effort is required.
Queen rearing: The procedure for rearing queen honey bees is fascinating and
enjoyable. You can rear stock from your best bee stock, or from that of another beekeeper.
The equipment needed is inexpensive and readily available. Workshops in Kentucky and
books are devoted to this skill.
Nucs: New and established beekeepers are frequently looking to purchase additional
hives. The option of buying nucs from another beekeeper nearby is attractive. (See Buying a
nuc.) Once you are comfortable in managing your hives, you can see that it will be a simple
matter to transfer a few frames of bees, brood and honey from one of your hives to a nuc box.
The beekeeper buying the nuc may wish to supply the queen for the nuc, or you might want
to provide the queen along with the nuc. Note also that there is a value to many of us when
we buy and sell locally. By providing bees to another beekeeper in Kentucky, you are
helping to minimize the introduction of pests and diseases from other states.
Education: Many groups including schools are eager to hear presentations by
beekeepers. Your own experience and a thoughtful choice of reading material can make for a
wonderful talk. Bring some props, such as beekeeping suits and equipment, naturally drawn
beeswax, honey from various floral sources, pollen collected with pollen traps. The best
display of all is an observation hive full of bees. A one-frame observation hive weighs
perhaps five pounds. It’s safe and easy to carry around. Check the book on Observation
Hives (above).
An experienced beekeeper is also in demand as a mentor to new beekeepers, and a
speaker at beekeeping meetings and schools.
86
GLOSSARY OF BEEKEEPING TERMS
American foulbrood (AFB) -- a highly contagious disease of bee brood, known for the
distinctive foul odor it produces
apiary -- a location for bee hives
apiarist -- a person who is employed as a beekeeper or to aid beekeeping activities of others
apiculturist -- a person with formal training in the study of bees, sometimes including bee
species other than honey bees
bait hive -- a hive left without bees in the hope that a swarm of bees will find it and move in,
so that the beekeeper can obtain a new colony or catch a swarm leaving from one of
the hives in the beekeeper's apiary
bee brush -- a brush with long bristles, used to remove bees from honey frames and other
equipment
bee space -- a distance of 3/8 inch which the bees naturally maintain between adjacent
combs
bottom bar -- the bottom piece of a frame, usually wooden
bottom board -- the bottom part of a hive, which supports the rest of the hive
burr comb -- comb built not in the frames but between frames or between frames and the
inner wall of a hive body, usually because the frames are too far apart
chalkbrood disease -- a very common fungal disease of bee brood, which turns the brood to
a chalk- like white or gray
colony -- the bees which live together in a cohesive society, including adult bees and brood
but not necessarily including the hive they inhabit
comb -- the wax structure made of many hexagonal cells in a hive, which the bees use for
storing ,;;' honey and pollen, and for rearing brood
drawing out comb -- the process by which bees construct their comb by adding wax and
forming hexagonal cells on the foundation
drifting -- the movement of bees from their own hive to another hive nearby, usually
because they aren't orienting to their own hive very well
extract -- to spin honey frames rapidly so that the honey is thrown out of them, prior to the
filtering and bottling of the honey
87
extractor -- a large cylindrical device used to extract honey from frames by spinning them
rapidly, working much like a centrifuge
European foulbrood (EFB) -- a disease of bee brood caused by bacteria
feral bees -- bees not kept by a beekeeper but living without management, for example in a
hollow tree
foundation -- thin sheets of beeswax embossed with a hexagon pattern, used for guiding the
bees' construction of wax comb in a frame
frame -- a hive part which holds the comb and can be removed from the hive for
examination or honey extraction
gum hives -- hives kept by beekeepers in hollow logs or other non-standard equipment; also
called "bee gums"
hive -- the shelter used by bees, such as a wooden box or hollow tree; may include the bees
hive beetle – the small hive beetle, a recently introduced pest of bee hives now found in
Kentucky
hive bodies -- the wooden boxes used as part of the hive
hiving bees -- putting a swarm or package of bees into a hive
honey bound -- a hive condition in which so much honey has been stored by the bees, they
do not have room to store more honey or rear brood
honeydew -- a liquid similar to honey but made by bees from the secretions of homopterous
insects like aphids, instead of from flower nectar
inner cover -- the cover to a hive which rests directly over the hive bodies larva (larvae,
plural) --the worm-like immature form of a bee
larva (larvae, plural) – the worm-shaped immature form of the bee, which hatches from the
egg
laying worker -- worker bees that lay eggs, a problem in colonies that have been queenless
for a long time
mite -- a small arthropod with eight legs; not an insect but closely related to ticks and spiders
(see "tracheal mite" and "Varroa mite")
nectar -- the sweet liquid produced by flowers and collected by bees, and then made into
honey be the bees

88
nosema (pronounced “no-SEE-ma”) disease -- a disease of adult bees common in winter and
spring
nuc (pronounced "nuke", short for nucleus) --a very small hive, usually for sustaining queen
bees as they mature and mate or as hive that will eventually grow to full strength
observation hive -- a small hive with transparent sides, usually kept indoors for close
viewing of bee activities
outer cover -- the cover to a hive that fits over the inner cover and the rest of the hive; the
type which overlaps the hive body below it is called a telescoping cover
package bees -- a colony of bees including the queen, in a screened box purchased from a
commercial producer
pheromone (pronounced “FER-o-mone”) -- a chemical used by an animal to communicate
with one of its own kind; very important to honey bees and other social insects
pollen bound -- a hive condition in which so much pollen has been stored in the brood nest
by the bees, they do not have room for rearing brood
propolis (pronounced “PRO-po-lis”) -- a sticky substance made by bees to fill in cracks and
openings in their hive, and as an antibiotic to protect the bees from diseases
pupa (pronounced PYU-pah) (pupae, plural, pronounced Pyu-pee) -- the immature form of
a bee as it transforms from a larva to an adult rack --a local term for frame
robber bees -- bees that are stealing honey from another hive robbing the bees --removing
honey from a hive for harvest
royal jelly -- a nutritious food that worker bees secrete and place in queen cells to feed larvae
which will become queens
rustic hives -- hives kept by beekeepers in hollow logs or other non-standard equipment;
also called "gum hives" or "bee gums"
sacbrood disease -- a disease of bee larvae that causes the larva to die and then resemble a
sack of liquid; uncommon in Kentucky
scattered brood -- an irregular brood pattern (see "shot brood")
shot brood -- an irregular pattern of brood on a comb that shows many empty cells, like the
pattern made by a shotgun on a target; caused by a queen with fertility problems or by
laying workers stand -a local term for hive

89
super -- one of the upper hive bodies, which contains the honey frames
supersedure -- the process in which the original queen is gradually replaced by one of her
daughters, usually because she is old or diseased
swarm -- a colony of bees not in a hive which has not yet found a place to live; also, the bees
purchased in a package
swarming -- the process in which a colony naturally divides into two or more colonies top
bar --the top piece of a frame, usually wooden
tracheal (pronounced “TRAY-kee-al”) mite -- a highly destructive microscopic mite that
parasitizes bees
varroa (pronounced “va-RO-ah”) mite -- a highly destructive external mite that parasitizes
bees
wax moth -- a moth that destroys comb by eating it; also called "wax worm" or "weevil"
(although it is not a true worm or weevil)
wax worm -- see wax moth
weevil -- see wax moth
wild bees -- either honey bees not kept by a beekeeper (see "feral bees"), or other species of
bees such as bumblebees or orchard bees
yard -- a location for bee hives; same as apiary