keynote guide 2015 - john larkinlarkin.net.au/resources/keynote_guide.pdf · keynote is easily the...
TRANSCRIPT

Page !1
!
Keynote Presentations & Interactive Stories
!!!!©2015 John Larkin.
Do not use without permission. Please acknowledge use. http://www.larkin.net.au
Copyright 2013. This document created by John Larkin.

Page !2
Introduction !Keynote is easily the best presentation app available for the iPad. It is more than just a presentation tool. It can also be used to create interactive hyperlinked activities.
!!Copyright 2013. This document created by John Larkin.
Creating a new presentation !Upon launching Keynote you will be presented with either a blank slate or a selection or previously created presentations. Tap on the “+” icon in the top left hand corner of the screen. The window at right will give you several options: •create a new presentation •copy a presentation transferred
via iTunes •copy a presentation stored on a

Page !3
When you select “Create Presentation” the window illustrated below will appear giving you the chance to select a theme for your presentation. You can choose a standard or wide theme style.
Once you have selected a theme the opening slide window will appear.
!!!!!!!You can add additional slides by tapping on the “+” icon in the lower left corner of the screen. !Tap a slide to add to your presentation. !There are a variety of slide styles from which to choose.
Copyright 2013. This document created by John Larkin.

Page !4
As you develop the presentation you are able to tap and shift the individual slides in the sidebar at left in order to change the sequence of the slides in your presentation. Tap and drag the slide. !!!!!!!If you tap and hold on a slide the contextual menu displayed above will appear. This will allow you to cut, copy, delete, skip or apply a transition to the slide. !Transitions. If you select transition you will be provided a variety of effects from which to choose. !It is wise not to employ more than one transition effect in a presentation. Excessive use of transitions can be an annoying distraction and detract from the actual presentation.
!
Tapping on the options button allows the user to determine the duration of the transition. !The user can also choose whether or not the transition begins with a tap or follows after a previous transition.
Copyright 2013. This document created by John Larkin.

Page !5
Animating objects within the presentation !If you tap and hold on any object or element on a slide you will be able to cut, copy or delete the element. You are also able to replace any media attached or embedded within that element. You can lock the element. You are also able to animate the element so that is appears or disappears as required by your presentation. !!!
!
!!!!!
The animation can precede and/or follow the appearance of the object or element. A variety of effects, options, delivery methods and order can be applied to the animation. Explore each option.
Copyright 2013. This document created by John Larkin.

Page !6
Applying styles to objects on the slide !If you tap and hold on any object or element on a slide you will be able to apply a wide array of styles, masks and effects. You can also alter the object’s position in relation to other objects on the slide.
!Select the object on the slide and then tap on the Style icon at the top of the screen. The settings window displayed at left will appear. !!It will enable you to apply a variety of styles to the object including shadows and borders.
!Tap on the Style Options button to further manipulate the borders applied to the selected object. !!You can adjust the colour, width and appearance of the border. You can also switch off the border.
Copyright 2013. This document created by John Larkin.

Page !7
!Scrolling down the border window will allow you to select from a wide variety of border styles. !Tapping on the Effects tab will allow you to apply reflections to the object. You can also adjust the opacity of the effect as well as switching the shadow off altogether. !!!!
Tapping on the Image tab will allow you to adjust the mask the object. You can, in effect, “crop” the object so that you can focus on a particular aspect or area of the object or image. !You can apply Instant Alpha to the object by selecting a colour to make it transparent.You can flip the object, adjust its mask and then “lock” it in place.
Tapping on the Arrange tab will allow you to adjust the relative position of an object. You can flip an object, adjust its mask and then “lock” it in place.
Copyright 2013. This document created by John Larkin.

Page !8
!Applying styles to text !You can alter the style, formatting and fonts on text on each slide. If you select the text and tap on the style icon at the top right of the Keynote app you will be able to make changes to the appearance of the text. !!!!!!!!!!!!!!You can also add lists and change the paragraph formatting of the text by selecting those specific tabs.
Copyright 2013. This document created by John Larkin.

Page !9
Adding media, tables, charts and shapes !Tapping on the “+” icon at the top right of the screen will allow you to add media, tables, charts and shapes to the presentation.
!Adding Images !Selecting the media tab will allow you to add images, photographs and video. At this point in time the media window does not give you access to the audio files within the Music app on your iPad. You can import Keynote with audio previously added or simply embed a blank video with an audio soundtrack. !Scroll through the albums and select the image you wish to add to your presentation. !
Once the image is embedded on the slide you can resize and position the image quite easily. Guides are available to precisely place the image.
Tap on the image in order to view the mask slider. This enables you to “crop” the image so that you can emphasise the subject matter and eliminate unwanted areas around the perimeter of the image.
Copyright 2013. This document created by John Larkin.

Page !10
Adding video !Select the Media tab and scroll through the albums and select the video you wish to add to your presentation. The video files can be easily identified by the video icon and duration indicator at the foot of each video thumbnail in the Photo Library viewer. !One the video is embedded on the slide you can resize and position the video quite easily. You can also “animate” the video so that it appears at a particular cue in the presentation.
You can add a “border” to the video by placing a shape with no fill around the embedded video file. Effects can be applied to that border.
Please keep in mind that only video files in MP4, MOV and M4V file formats are supported. Video files in other formats such as AVI will need to be converted beforehand.
Copyright 2013. This document created by John Larkin.

Page !11
Adding Tables !Select the Tables tab and review the six screens of table styles and colour schemes. !Select a style that matches the theme for your presentation and meets the needs of the activity.
!!!
Once you have embedded the table you can easily add text. You are also able to add and subtract rows and columns from the table by tapping on the top right and bottom left corners of the chart. You can add data to rows and columns by selecting each. You can also adjust the height and width of rows and columns respectively when selected.
Copyright 2013. This document created by John Larkin.

Page !12
Adding Charts !Select the Charts tab and review the six screens of charts styles and colour schemes. !There are also 3D and interactive chart styles that can be manipulated once they are added to the slide. !Select a style that matches the theme for your presentation and meets your needs.
!!!!!Copyright 2013. This document created by John Larkin.

Page !13
Once you have embedded the chart tap once in order to show the contextual menu and then tap on the “Edit Data” tab.While you are in Chart editing mode you can enter data using a numeric keyboard. !!!!!!!!!!!!!Click on the settings icon on the op left. You can alter the text fields using a full character based keyboard. !You can also decide whether you plot the rows or columns in series.
!You can insert, cut, copy and delete rows and columns by tapping and holding on the left or top borders of the data entry tables. !Copyright 2013. This document created by John Larkin.

Page !14
!If you add a 3D Chart you can adjust its position in three dimensions by manipulating the icon in the centre of the chart.
Interactive charts allow you to manipulate the data with a slider. !Adding Shapes !Selecting the Shapes tab will allow you to add a variety of shapes to your presentation slide. Explore the different colour schemes until you locate the scheme that meets your needs. !Once a shape is embedded on the slide you can alter its style and add effects as you would with any object on the slide. You can also apply an animation so that it will appear and disappear on cue.
Copyright 2013. This document created by John Larkin.

Page !15
Working with the Tools !Tapping on the “Wrench” icon at the top right of the screen will allow you to work with a number of settings and important functions.
!You are able to apply transitions and builds as described earlier. Tapping on that menu item will reveal all the transitions on each slide. !You can search for terms, add presenter notes, set a password, explore the Help topics and set more advanced options. They are described below. !You are also able to print the presentation. !
Presentation Tools !Tapping on the Presentation Tools tab enables you to access some very useful features in Keynote. !In particular, you can set up interactive hyperlinks and determine whether your presentation is a straightforward linear presentation or a hyperlinked exploration of ideas. !You can also add a soundtrack to your presentation. This is useful if the presentation is a self playing “kiosk” style presentation.
Copyright 2013. This document created by John Larkin.

Page !16
Presentation Type !You can set the type of presentation that you desire for your Keynote. If your presentation is designed for a self playing set up you should switch on the Loop option. !You can also decide whether your presentation is Normal, Links Only or Self Playing. If you create an interactive Keynote that relies on Hyperlinked navigation then you should select Links only. !Soundtrack !Soundtracks can be added to Keynote presentations. These are suitable for Kiosk or standalone type presentations. Students require guidance in this area as more often than not music is chosen that can be distracting and simply inappropriate.
!As mentioned above, embedded soundtracks are suitable for standalone Kiosk style presentations which may be used during a class showcase or display. Soundtracks are not suitable for class presentations which involve a high degree of interactivity. !Tap on the Wrench Icon upper right to view the Presentation Tools Menu. Tap on the Soundtrack Menu item and then tap on the Choose Audio menu item. !
Copyright 2013. This document created by John Larkin.

Page !17
!!!!!!!!!!!!! !
You will then be linked up to your Music app. Select a suitable piece of music and tap on the title. You can choose whether the soundtrack plays once, repeats or is simply switched off. !If the Keynote presentation is designed for a Kiosk style presentation then you need you need to select the “Loop” option. !You can clear the Soundtrack. Background music can add considerably to the file size of a Keynote document if the embedded file is not a compressed file format such as a .mp3 or AAC. !Copyright 2013. This document created by John Larkin.
Page !18
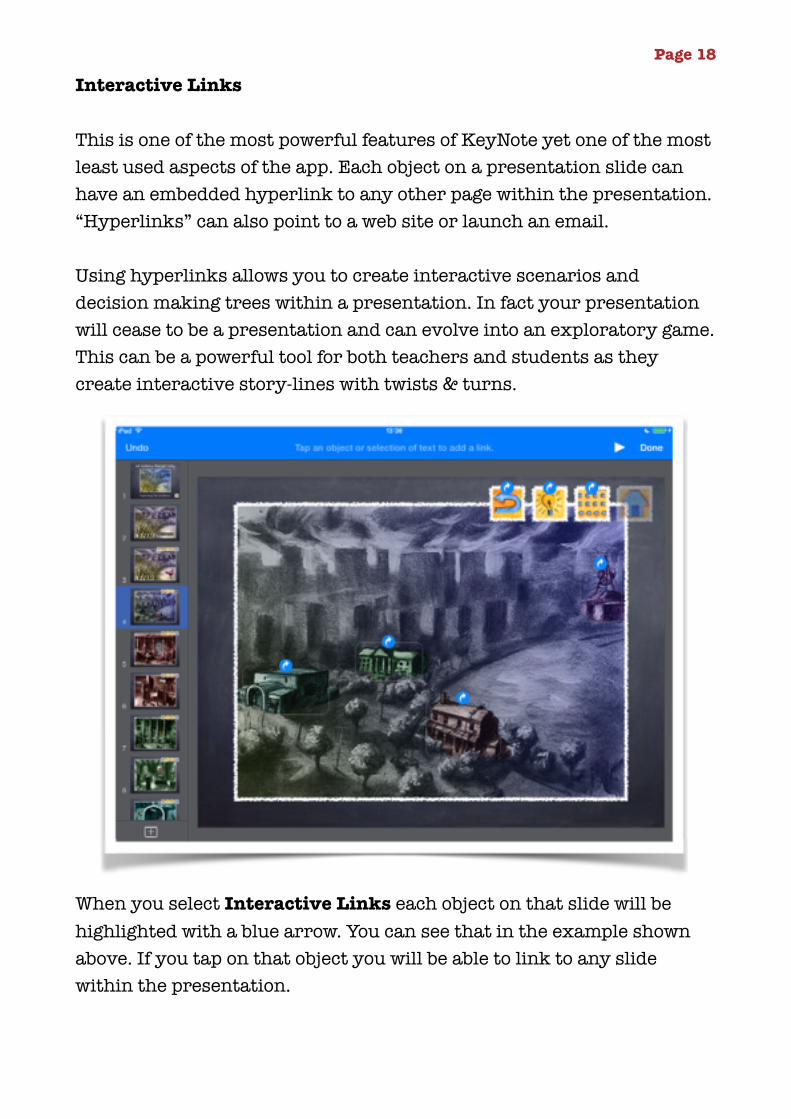
Interactive Links !This is one of the most powerful features of KeyNote yet one of the most least used aspects of the app. Each object on a presentation slide can have an embedded hyperlink to any other page within the presentation. “Hyperlinks” can also point to a web site or launch an email. !Using hyperlinks allows you to create interactive scenarios and decision making trees within a presentation. In fact your presentation will cease to be a presentation and can evolve into an exploratory game. This can be a powerful tool for both teachers and students as they create interactive story-lines with twists & turns.
When you select Interactive Links each object on that slide will be highlighted with a blue arrow. You can see that in the example shown above. If you tap on that object you will be able to link to any slide within the presentation. !Copyright 2013. This document created by John Larkin.

Page !19
It is wise to storyboard your interactive activity beforehand so that structuring the interactive links can be more intuitive. !An interactive presentation cannot be navigated with a simple forward or backwards swipe of the screen. !Users need to navigate the interactive Keynote presentation without getting lost or stuck on a particular slide. ! !
In the example at right “Last Slide Viewed” has been selected for a “Go Back” style of object so that users are always able to return to the slide that they had previously visited. !Such an object or button could be on each slide of the interactive presentation.
!As mentioned above you can also link to a web site or launch an email to a specific address. !!
Copyright 2013. This document created by John Larkin.

Page !20
It is most important that you set the Presentation Type as “Links Only” so that users can only navigate the presentation by tapping on links within the Keynote. They will not be able to swipe forwards or backwards through the presentation. !It is wise that your interactive presentation has a Site Map slide that can be easily accessed by users so that they can jump from one part of the activity to another. This can provide the users with a sense of control.
!The storyboard that had been utilised to plan and map out the interactive Keynote activity could be utilised to set out the Site Map. An example of a Site Map that illustrates all the interactive links is shown below.
Copyright 2013. This document created by John Larkin.

Page !21
Allow Remote Control !This setting allows you to enable the Keynote remote app on other devices so that you can manage your presentation from other points in the room.
Copyright 2013. This document created by John Larkin.
Select “Allow Remote Control” from the Presentation Tools menu.
Choose to Enable Remotes and ensure that the relevant iPhone or iPod has Bluetooth switched on so that it can communicate with the iPad to be used for the presentation.
If another device cannot be found you will be alerted of that fact. !You will need to ensure that Bluetooth has been switched on from within the settings on both devices.

Page !22
Settings !There are a range of settings that you can apply to your Keynote Presentation. Tap on the Wrench Icon upper right to view the Settings Menu. !Tap on the Soundtrack Menu item and then tap on the Choose Audio menu item.
!
!Tap on Settings and there are a number of choices that you can apply. !You can perform the following actions: !•Check Spelling •Add Slide Numbers to each slide •Utilise Guides during creation •Add Comments to each Slide •Add an Author Name. !!
!!!!!Copyright 2013. This document created by John Larkin.

Page !23
Guides !You should make full use of the Guides feature in Keynote. Simply put the Guides allow you to create a presentation that is neat and tidy. !Select Guides from the Settings menu and switch on the following: !
•Center Guides •Edge Guides •Spacing Guides
!The guides can assist students to neatly place elements within their presentation. !In some instances elements that are offset or poorly placed can detract from an otherwise good presentation. !The guides and rulers appear when you tap and position an object on the slide. !!!
Copyright 2013. This document created by John Larkin.

Page !24
Opening presentations from other sources !You can transfer Keynote presentations copied to iTunes on a Mac or PC. You can also download Keynote presentations saved to a WebDAV server. !When you launch Keynote and press the “+” icon in the top left hand corner of the screen you can choose to select a presentation transferred via iTunes or saved on a WebDAV server. !Files copied from iTunes would have previously been transferred to the iTunes application via the Apps tab and File Sharing Window within the iTunes application on the Mac or PC. !You can access those files when your iPad is connected to that specific laptop or computer. !!If your organisation has set up or has access to a WebDAV server you and your students can also exchange files using that method. Users will need to know the address of the WebDAV server and you will also need to be allocated a username and password.
Copyright 2013. This document created by John Larkin.

Page !25
Sharing Keynote presentations !When you launch Keynote or return to the Presentations library you can share, duplicate or trash selected presentations. Tap on any presentation once to select it. !You are able to email the presentation, open in another App, copy it to iTunes or copy it to a WebDAV server. !First of all tap and hold on the Sharing icon located on the upper left of the Keynote screen. Then, for example, tap on Select A Copy. You then tap the Keynote document that you wish to share. A number of choices will appear. !You can share: !•A link to the Keynote if it has been
shared via iCloud. •Send a Copy to iTunes or a service
in the Cloud such as DropBox, Google Drive, Box or iCloud.
•You can also open the Keynote in another App
•You can move the Keynote to a service in the Cloud
You then choose a format for the shared Keynote document. You can share the document as a: !•Keynote •PDF •PowerPoint !!
Copyright 2013. This document created by John Larkin.

Page !26
The file is converted to the format that you chose. In the example illustrated at right the file is being converted to a PDF file. !You can then chose how to send your file. There are quite a few choices. You are able to perform the following tasks: !You can: •Email the Keynote •Print the Keynote •Copy it to a iCloud, DropBox,
Box, Google Drive or another linked service in the “Cloud”
•Send the Keynote to iTunes •Copy it to a WebDav server
Copyright 2013. This document created by John Larkin.
You can also choose to open the Keynote file in another app. Once again you will have the choice to convert the Keynote file to either a PowerPoint or a PDF.

Page !27
Choosing to open a Keynote presentation in another app may not always function as expected and some apps may crash or freeze as they commence to open the converted file. This is particularly the case if the Keynote is a large file. !Managing your Keynote presentations !When you launch Keynote or return to the Presentations library you can manage your presentations in the follow ways. !
•Rename a presentation or folder •Delete a presentation •Create a folder •Drag a presentation to a folder
!Renaming a presentation or folder !Tap and hold on the name of a presentation and a window will appear that will allow you type in a new name. The names of folders can be changed in the same way. !
Copyright 2013. This document created by John Larkin.

Page !28
Deleting a presentation !Tap and hold any presentation. The presentations and folders will begin to jiggle on the screen. Select the presentation you wish to delete and tap on the trash can folder in the upper right area of the screen !!!!!!!!!!!!!Create a folder !Tap and drag any presentation on to another presentation. A folder will be created and you will have the chance to name the folder. You can tap and drag other presentations to that folder. !
Copyright 2013. This document created by John Larkin.