kirby morgan dive systems incorporated training guide-7-9-2014-new.pdf · kirby morgan dive systems...
TRANSCRIPT

KIRBY MORGAN DIVE SYSTEMS INCORPORATED
MAINTENANCE AND REPAIR TECHNICIAN TRAINING GUIDE
KIRBY MORGAN DIVE SYSTEMS 1430 JASON WAY
SANTA MARIA, CA 93455, USA TELEPHONE (805) 928-7772
FAX (805) 928-0342 WEB SITE: WWW.KIRBYMORGAN.COM E-MAIL: [email protected]
JULY 2014
Kirby Morgan, SuperLite, Band Mask, KMB Band Mask, EXO, SuperMask, SuperFlow, and Rex are all registered trademarks of Kirby Morgan Dive Systems, Inc. Use of these terms to describe products that are not manufactured by KMDSI is not permitted without written permission from KMDSI.
© Copyright 1970-2014 Kirby Morgan Dive Systems, Inc. All rights reserved. This manual is made available for the express use of owner of this Kirby Morgan product. No part of this manual may be reproduced, stored in any retrieval system, or transmitted, or used in any form or by any means, whether graphic, electronic, mechanical, photocopy, or otherwise by technology known or unknown, without the prior written permission of Kirby Morgan Dive Systems, Inc.
THIS BOOK IS FOR THE USE OF KIRBY MORGAN CUSTOMERS AND USERS OF KIRBY MORGAN DIVING EQUIPMENT ONLY. IT MAY BE DOWN LOADED FREE OF CHARGE FROM OUR WEB SITES FOR THAT USE ONLY UNTIL FURTHER NOTICE. IT MAY NOT BE CHANGED OR MODIFIED WITHOUT WRITTEN PERMISSION.
Prepared by Dive Lab®, Inc. 1415 Moylan Road, Panama City Beach, FL 32407 USA Telephone: (850) 235-2715 Web Site: www.divelab.com E-Mail: [email protected]
Document #TechTrnG 03101 1
Kirby Morgan, SuperLite, Band Mask, KMB Band Mask, EXO, SuperMask, SuperFlow, and Rex are all registered trademarks of Kirby Morgan Dive Systems, Inc. Use of these terms to describe products that are not manufactured by KMDSI is not permitted without written permission from KMDSI. © Copyright 1970-2014 Kirby Morgan Dive Systems, Inc. All rights reserved. KMDSI manuals, checklists and technical and training information is made available for the express use of owner/user of this Kirby Morgan products. No part of this material may be reproduced, stored in any retrieval system, or transmitted, or used in any form or by any means, whether graphic, electronic, mechanical, photocopy, or otherwise by technology known or unknown, without the prior written permission of Kirby Morgan Dive Systems, Inc
Copyright 2003-2014, Dive Lab®., Inc. All rights reserved. TechTrnG 03101
2
TABLE OF CONTENTS
TITLE PAGE 1
TABLE OF CONTENTS 2 - 3
INTRODUCTION 4
KMDSI MAINTENANCE AND TRAINING POLICY CHANGES 5 - 14
TECHNICIAN TRAINING ENABLING OBJECTIVES: SL-17A/B, SL-17C, SL-17K, SL-27, KM-37/SS, KM-47, KM-57, KM-77, KM-97 15 - 17
MAINTENANCE LOG 18
OVERHAUL, MAINTENANCE & INSPECTION A2.1: 19 - 27 SL-17A/B, SL-17C, SL-17K, SL-27, KM-37/SS, KM-47, KM-57, KM-77, KM-97
THREAD INSERT TESTING PROCEDURE 28 - 30
BLEED/RELIEF VALVE/CLEANING INSPECTION & OVERHAUL 31 - 34
MONTHLY INSPECTION & MAINTENANCE A2.2: SL-17A/B, SL-17C, SL-17K, SL-27, KM-37/SS, KM-47, KM-57, KM-77, KM-97 35 - 42
DAILY SET-UP A2.3: SL-17A/B, SL-17C, SL-17K, SL-27, KM-37/SS, KM-47 KM-57, KM-77, KM-97 43 - 48
SUPERVISORS EQUIPMENT CHECKS PRIOR TO ENTRY A2.4.1: SL-17A/B 49 - 52
SUPERVISORS EQUIPMENT CHECKS PRIOR TO ENTRY A2.4.2: SL-17C, SL-17K, SL-27, KM-37/SS, KM-47, KM-57, KM-77, KM-97 53 - 56
SUPERVISORS IN-WATER CHECKS A2.5: SL-17A/B, SL-17C, SL-17K, SL-27 KM-37/SS, KM-47, KM-57, KM-77, KM-97 57 - 58
DAILY POST DIVE CLEANING A2.6: SL-17A/B, SL-17C, SL-17K, SL-27 KM-37/SS, KM-47, KM-57, KM-77, KM-97 59 - 61
QUICK SANITIZING PROCEDURE 62 - 63
OVERHAUL, MAINTENANCE & INSPECTION A2.1: KMB 18/28 64 - 68
MONTHLY MASK INSPECTION A2.2: KMB 18/28 69 - 73
DAILY SET-UP A2.3: KMB 18/28 74 – 79

Kirby Morgan, SuperLite, Band Mask, KMB Band Mask, EXO, SuperMask, SuperFlow, and Rex are all registered trademarks of Kirby Morgan Dive Systems, Inc. Use of these terms to describe products that are not manufactured by KMDSI is not permitted without written permission from KMDSI. © Copyright 1970-2014 Kirby Morgan Dive Systems, Inc. All rights reserved. KMDSI manuals, checklists and technical and training information is made available for the express use of owner/user of this Kirby Morgan products. No part of this material may be reproduced, stored in any retrieval system, or transmitted, or used in any form or by any means, whether graphic, electronic, mechanical, photocopy, or otherwise by technology known or unknown, without the prior written permission of Kirby Morgan Dive Systems, Inc
Copyright 2003-2014, Dive Lab®., Inc. All rights reserved. TechTrnG 03101
3
TABLE OF CONTENTS
SUPERVISORS EQUIPMENT CHECKS PRIOR TO ENTRYA2.4: KMB 18/28 80 - 82
SUPERVISORS IN-WATER CHECKS A2.5: KMB 18/28 83 - 85
POST DIVE CLEANING, MAINTENANCE, AND INSPECTION A2.6: KMB 18/28 86 - 88
TEACHING THE OPERATOR / USER COURSE 89 - 90
OPERATOR / USER TRAINING / ALL SUPERLITE HELMETS, KM HELMETS AND KMB 18/28 BAND MASKS 91 - 104
INSTRUCTOR GUIDE
OPERATOR / USER TRAINING / ALL SUPERLITE HELMETS, KM HELMETS AND KMB 18/28 BAND MASKS: ENABLING OBJECTIVES 105 - 107
OPERATOR / USER TRAINING / KMB 18/28: ENABLING OBJECTIVES 108 - 109
OPERATOR / USER TRAINING / KMB 18/28 INSTRUCTOR GUIDE 110 - 122

Kirby Morgan, SuperLite, Band Mask, KMB Band Mask, EXO, SuperMask, SuperFlow, and Rex are all registered trademarks of Kirby Morgan Dive Systems, Inc. Use of these terms to describe products that are not manufactured by KMDSI is not permitted without written permission from KMDSI. © Copyright 1970-2014 Kirby Morgan Dive Systems, Inc. All rights reserved. KMDSI manuals, checklists and technical and training information is made available for the express use of owner/user of this Kirby Morgan products. No part of this material may be reproduced, stored in any retrieval system, or transmitted, or used in any form or by any means, whether graphic, electronic, mechanical, photocopy, or otherwise by technology known or unknown, without the prior written permission of Kirby Morgan Dive Systems, Inc
Copyright 2003-2014, Dive Lab®., Inc. All rights reserved. TechTrnG 03101
4
Dive Lab, Inc. 1415 Moylan Road
Panama City Beach, FL 32407 Office: (850)-235-2715 Fax: (850)-235-0858
E-Mail Address: [email protected]
Dive Lab, Inc., is a non-government, for-profit Florida Corporation located in Panama City Beach, Florida. Dive Lab’s primary purpose is to maintain and operate a state of the art test facility for testing surface supplied diving helmets, full face masks, and associated life support equipment in support of Kirby Morgan Diving Systems, Inc., (KMDSI) of Santa Maria, California. In addition to testing, Dive Lab is KMDSI’s official training center for all KMDSI dealer repair and maintenance technician training. Dive Lab also provides repair/maintenance and configuration training courses for the commercial, military, and scientific diving communities worldwide and provides the commercial diving community answers to all types of diving related questions. Dive Lab’s goal is the steady improvement of diving equipment and safety for all facets of diving.
Dive Lab is situated on five acres of land in beautiful Panama City Beach, Florida. The facility consists of four (4) 5000+ square foot buildings. One building houses administration and classrooms, as well as spaces dedicated to fabrication and prototyping. The other buildings provide for a well equipped machine shop with full CNC capabilities, a large fiberglass repair shop, boat and dive locker storage.
Dive Lab’s hyperbaric test facility includes a manned test tank for manned trials, a state of the art ANSTI wet breathing simulator with 200 meter sea water (msw) capability, as well as dry test chambers to 250 msw. Dive Lab’s testing assets, allow the capability to perform a vast variety of scientific performance and engineering tests/studies on all types of man worn life support equipment from scuba regulators and full face masks to diving helmets, mixed gas rebreathers, firefighting and respiratory equipment and other life support equipment and components. Some of the many tests that can be conducted include a wide range of environmental hot and cold temperature tests, field of vision, noise, CO2 breath by breath, oxygen consumption, mechanical, flow, pressure proof and burst testing. Manned equipment testing is also conducted.
Besides testing and training, Dive Lab provides specialty design and manufacturing services primarily for DOD, public safety and friendly foreign interests.
In addition to the facilities testing assets, Dive Lab is only minutes away from Saint Andrews Bay and the Gulf of Mexico for open-ocean testing. Besides the warm emerald waters of the Gulf, Dive Lab is within an hour drive of several of Northwest Florida’s clear fresh water springs such as Morrison, and Vortex Springs.

Kirby Morgan, SuperLite, Band Mask, KMB Band Mask, EXO, SuperMask, SuperFlow, and Rex are all registered trademarks of Kirby Morgan Dive Systems, Inc. Use of these terms to describe products that are not manufactured by KMDSI is not permitted without written permission from KMDSI. © Copyright 1970-2014 Kirby Morgan Dive Systems, Inc. All rights reserved. KMDSI manuals, checklists and technical and training information is made available for the express use of owner/user of this Kirby Morgan products. No part of this material may be reproduced, stored in any retrieval system, or transmitted, or used in any form or by any means, whether graphic, electronic, mechanical, photocopy, or otherwise by technology known or unknown, without the prior written permission of Kirby Morgan Dive Systems, Inc
Copyright 2003-2014, Dive Lab®., Inc. All rights reserved. TechTrnG 03101
5
KIRBY MORGAN DIVE SYSTEMS, INC. MAINTENANCE AND TRAINING POLICY CHANGES
4-14-09
Kirby Morgan Dive Systems, Inc., (“KMDSI”) and Dive Lab, Inc., constantly works on changes that will aid KMDSI dealers, diving contractors, and individual users of KMDSI equipment the ability to track helmet and band mask maintenance and/or repair.
KMDSI regularly revises all the SuperLite Helmet Operations and Maintenance Manuals and continuously works to improve all KMDSI equipment manuals. The current checklists are also available on the KMDSI website www.kirbymorgan.com, as a download. It is intended that users of KMDSI helmets and masks use these checklists when performing maintenance and/or using the equipment. These checklists are considered the minimum equipment guidelines. These checklists should be tailored by the user to meet the user requirements based on use and environmental conditions.
Diving Contractor Maintenance Policies: Most diving contractors are requiring that their divers have their helmets and masks inspected by an authorized KMDSI trained technician, and some even require that only a KMDSI Certified Technician conduct repairs. KMDSI cannot override the maintenance and repair policies set by companies or organizations, but does strongly recommend companies carefully evaluate their policies and incorporate the KMDSI maintenance and repair recommendations to minimize unnecessary and redundant procedures. The KMDSI maintenance checklists represent the minimum recommended maintenance.
All KMDSI Helmets and Masks are designed with the professional diver in mind. Most maintenance and repairs can be performed by the owner/user using common hand and test tools following the procedures in the appropriate KMDSI Operations and Maintenance Manual. The owner can purchase genuine Kirby Morgan parts and components from any Authorized KMDSI Dealer. KMDSI strongly recommends that person(s) electing to do their own maintenance and repairs, to do so only if they have the proper tools and background training and experience to perform the maintenance. Maintenance and repair training, is available by Dive Lab Inc., as well as other specially authorized KMDSI Dealers. The A2.1 Overhaul, Maintenance, and Inspection Checklist should be performed at least annually and as dictated by condition revealed during daily/monthly inspection. The A2.2 Monthly Inspection, and Maintenance Checklist should be performed at least once a month, and/or as stated in the procedure. The A2.3 Daily Set-up and Functional Checklist should be completed prior to commencement of diving operations. All persons performing repairs should keep good maintenance records and all receipts. Technical questions can be addressed to KMDSI or Dive Lab or any Authorized KMDSI Dealer.

Kirby Morgan, SuperLite, Band Mask, KMB Band Mask, EXO, SuperMask, SuperFlow, and Rex are all registered trademarks of Kirby Morgan Dive Systems, Inc. Use of these terms to describe products that are not manufactured by KMDSI is not permitted without written permission from KMDSI. © Copyright 1970-2014 Kirby Morgan Dive Systems, Inc. All rights reserved. KMDSI manuals, checklists and technical and training information is made available for the express use of owner/user of this Kirby Morgan products. No part of this material may be reproduced, stored in any retrieval system, or transmitted, or used in any form or by any means, whether graphic, electronic, mechanical, photocopy, or otherwise by technology known or unknown, without the prior written permission of Kirby Morgan Dive Systems, Inc
Copyright 2003-2014, Dive Lab®., Inc. All rights reserved. TechTrnG 03101
6
KIRBY MORGAN DIVE SYSTEMS, INC. MAINTENANCE AND TRAINING POLICY CHANGES
4-14-09
Appendices: All Helmet and Band Mask Checklists are similar. The checklists are kept separate from the operations and maintenance manuals to minimize time required for changes due to procedural or equipment changes.
Appendix 2: KMDSI Recommended Maintenance and Checklists for all SuperLite and KM Helmet models
A2.1 Overhaul, Inspection and Maintenance A2.2 Monthly Helmet Inspection A2.3 Daily Helmet and EGS Set-up and Functional Checklist A2.4 Supervisors Equipment Checks (prior to water entry) A2.5 Supervisors (in-water checks) A2.6 Post Dive Cleaning Maintenance and Inspection
Appendix 3: KMDSI Maintenance Log Appendix 4: Bleed/Relief Valve Appendix 5: Quick Sanitizing Procedures Appendix 6: Thread Insert Testing Procedure
MAINTENANCE AND INSPECTION PROCEDURES / POLICIES:
The following section describes details and specific maintenance and inspection procedures that are used to complete the daily, monthly, and annual checklists, to ensure optimum reliability and performance. These procedures are used in conjunction with the daily pre and post dive maintenance checklists. The periodicities called out in the appendix section of each checklist are the minimum recommended for Helmets for Bank Masks being used under good conditions. Equipment used in harsh conditions, i.e., contaminated water, welding / burning operations, or jetting, will require more frequent servicing.
The intention of the maintenance checklists is to help maintain all Helmet and Mask components in good working order in accordance with KMDSI factory specifications and to identify worn or damaged parts and components before they affect safety, performance, and reliability. Whenever the serviceability of a component or part is in question, or doubt exists, replace it. All components and parts have a service life and will eventually require replacement.
NOTE: The side block (43a or 43b) does not need to be removed from the helmet annually providing, after removal, helmet components do not show excessive

Kirby Morgan, SuperLite, Band Mask, KMB Band Mask, EXO, SuperMask, SuperFlow, and Rex are all registered trademarks of Kirby Morgan Dive Systems, Inc. Use of these terms to describe products that are not manufactured by KMDSI is not permitted without written permission from KMDSI. © Copyright 1970-2014 Kirby Morgan Dive Systems, Inc. All rights reserved. KMDSI manuals, checklists and technical and training information is made available for the express use of owner/user of this Kirby Morgan products. No part of this material may be reproduced, stored in any retrieval system, or transmitted, or used in any form or by any means, whether graphic, electronic, mechanical, photocopy, or otherwise by technology known or unknown, without the prior written permission of Kirby Morgan Dive Systems, Inc
Copyright 2003-2014, Dive Lab®., Inc. All rights reserved. TechTrnG 03101
7
KIRBY MORGAN DIVE SYSTEMS, INC. MAINTENANCE AND TRAINING POLICY CHANGES
4-14-09
corrosion and verdigris. KMDSI recommends that at a minimum, the side block be completely removed at least every three (3) years. Clean and inspect the stud and securing screw and replace it if bent, striped, or any damage is detected.
NOTE: The pipe thread fittings used on the umbilical adapter (67) and the emergency gas valve (50) are the only fittings that require sealing with Teflon® tape. Liquid Sealant is not recommended for pipe threads. When installing Teflon® tape on pipe threads, 3 mil tape should be used. Apply the tape starting one thread back from the end of the fitting in a clockwise direction under tension. 1- 1/2 wraps is all that is needed. The use of more than 1-1/2 wraps could cause excess Teflon® tape to travel into the breathing system.
In all, Helmet and Band Mask Manuals, chapters 5, 6, 7, and 8 gives guidance on all routine and corrective maintenance and repairs. Disassembly and reassembly of components is explained in a step-by-step manner that may not necessarily call out that all O-rings and normal consumable items will be replaced. The manual is written in this way so that if an assembly, component, or part is being inspected or disturbed between normal overhaul intervals it is acceptable to reuse O-rings and components providing they pass a visual inspection (Section 5.3.1.). When conducting scheduled overhauls all O-rings should be replaced. The side block should be removed from the helmet at least every three (3) years so that the stud and securing screw can be inspected. All O-rings should be lubricated with the appropriate lubricant.
Lubrication / Cleanliness:
All new Helmets and Band Masks are lubricated during assembly at KMDSI using Christo Lube. Seasoned Helmets and Band Masks that have previously been used for air diving but are also intended to be used with breathing gas mixtures in excess of 50% oxygen by volume, should be cleaned in accordance with the applicable Operations and Maintenance Manual and lubricated with oxygen compatible lubricants such as Christo-Lube®, Flourolube®, Krytox®, Tribolube® or other oxygen compatible lubricants. DO NOT MIX LUBRICANTS! All breathing air supply systems must be filtered and must meet the requirements of grade D quality air or better. Helmets and band masks used for air diving or enriched air at 50 % oxygen or less can be lubricated with food grade silicone grease Dow Corning 111® or equivalent. KMDSI uses Christo-Lube® at the factory for lubrication of all gas train components requiring lubrication, and highly recommends its use.

Kirby Morgan, SuperLite, Band Mask, KMB Band Mask, EXO, SuperMask, SuperFlow, and Rex are all registered trademarks of Kirby Morgan Dive Systems, Inc. Use of these terms to describe products that are not manufactured by KMDSI is not permitted without written permission from KMDSI. © Copyright 1970-2014 Kirby Morgan Dive Systems, Inc. All rights reserved. KMDSI manuals, checklists and technical and training information is made available for the express use of owner/user of this Kirby Morgan products. No part of this material may be reproduced, stored in any retrieval system, or transmitted, or used in any form or by any means, whether graphic, electronic, mechanical, photocopy, or otherwise by technology known or unknown, without the prior written permission of Kirby Morgan Dive Systems, Inc
Copyright 2003-2014, Dive Lab®., Inc. All rights reserved. TechTrnG 03101
8
KIRBY MORGAN DIVE SYSTEMS, INC. MAINTENANCE AND TRAINING POLICY CHANGES
4-14-09
Before 1999, Kirby Morgan Dive Systems, Inc., used Danger and Warning Notices in the helmet and mask owner’s manual limiting the breathing gas percentage to less than 23.5 percent oxygen. This was due primarily to cleaning issues in regards to possible fire hazards and was in compliance with the recommendations of the Association of Standard Test Methods (ASTM), National Fire Protection Agency (NFPA), and the Compressed Gas Association (CGA) as well as other industry standards. During the 1990’s open circuit scuba use of enriched-air (Nitrox) by technical and recreational divers became very popular, and as use increased, so did the number of combustion incidents during the mixing and handling of the breathing mixtures. These combustion incidents brought attention to the dangers and inherent risks associated with oxygen and oxygen enriched gas mixtures.
KMDSI cannot dictate or override regulations or recommendations set forth by industry standards or governing bodies pertaining to enriched gas use. However, it is the opinion of KMDSI and Dive Lab that breathing gas mixtures up to 50% oxygen by volume should not pose a significant increased risk of fire or combustion in Kirby Morgan Helmets and Masks low-pressure components and does not warrant the need for the stringent specialized oxygen cleaning and post-sampling particulate analysis normally accomplished for components used in high pressure oxygen valves, regulators, and piping systems. The decision for using 50% has been primarily based on a long history of operational field use of KMDSI helmets and masks, by the US Navy and Commercial Diving Industry. However, this is not intended to down play the need for cleaning and maintenance. All helmets and masks, as well as gas transporting components should be maintained carefully and cleaned at regular intervals and/or whenever contamination is found or suspected.
KMDSI feels confident that as long as Kirby Morgan helmets and masks are cleaned and maintained in accordance with the procedures set forth in the applicable maintenance manuals and maintenance checklist procedures, the equipment should not pose a significant increased risk of a fire or ignition originating in the helmet or mask low-pressure<250 psig (<17.2 bar) or less components when used with enriched gases of up to 50% oxygen. However, CAUTION should be exercised any time enriched gases are handled or used. In general, helmets and masks used primarily for mixed gas use are subject to far less oil and particulate contamination than those used for air diving. For this reason, helmets and masks commonly used with both air and enriched breathing gases should be cleaned and maintained with even greater care and vigilance. It is important that all internal gas-transporting components, i.e., side block, bent tube, and demand regulator assemblies remain clean and free of hydrocarbons, dirt, and particulates. Whenever the equipment is
Kirby Morgan, SuperLite, Band Mask, KMB Band Mask, EXO, SuperMask, SuperFlow, and Rex are all registered trademarks of Kirby Morgan Dive Systems, Inc. Use of these terms to describe products that are not manufactured by KMDSI is not permitted without written permission from KMDSI. © Copyright 1970-2014 Kirby Morgan Dive Systems, Inc. All rights reserved. KMDSI manuals, checklists and technical and training information is made available for the express use of owner/user of this Kirby Morgan products. No part of this material may be reproduced, stored in any retrieval system, or transmitted, or used in any form or by any means, whether graphic, electronic, mechanical, photocopy, or otherwise by technology known or unknown, without the prior written permission of Kirby Morgan Dive Systems, Inc
Copyright 2003-2014, Dive Lab®., Inc. All rights reserved. TechTrnG 03101
9
KIRBY MORGAN DIVE SYSTEMS, INC. MAINTENANCE AND TRAINING POLICY CHANGES
4-14-09
depressurized, all exposed ports or fittings should be plugged /capped to help maintain foreign material exclusion. Gas train components should be cleaned according to the
procedures outlined in the applicable Operations and Maintenance Manual at least annually and whenever contamination is suspected or found. Normal interior and exterior surfaces should be cleaned at least daily at the completion of daily diving operations.
Helmets and masks used in waters contaminated with oils and other petroleum or chemical contaminates will require cleaning after each dive.
Helmet and mask components requiring lubrication should be lubricated sparingly with lubricants approved for oxygen use such as Christo-Lube®, Krytox®, or Flourolube®. KMDSI highly recommends using Christo-Lube®, and uses Christo-Lube® during the assembly of all KMDSI gas train components.
Regardless of the approved lubricant used, avoid mixing different kinds of lubricants. Persons mixing, handling, and working with breathing gases should be properly trained in all aspects of gas safety handling and use.
CAUTION: Do not use lubricants of any kind on the diaphragm or exhaust valves. Use of lubricants on exhaust valves can attract and hold debris that could interfere with the component.
NOTE: Refer to Chapters 6, 7, and 8 for removal and disassembly / reassembly procedures.
NOTE: The helmet weights do not need to be removed from the helmet unless fiberglass damage is present or suspected.
NOTE: During annual or routine overhauls, all O-rings and soft goods including exhaust valves should be replaced. KMDSI offers standard overhaul kits that have all the necessary parts.
NOTE: The neck dam rubber need not be replaced as long as inspection reveals no damage, or significant wear and the rubber components are not dried out.
NOTE: The oral nasal mask requires replacement only if inspection reveals damage, distortion, or signs of damage. The oral nasal flapper valve should be replaced at least annually.
Kirby Morgan, SuperLite, Band Mask, KMB Band Mask, EXO, SuperMask, SuperFlow, and Rex are all registered trademarks of Kirby Morgan Dive Systems, Inc. Use of these terms to describe products that are not manufactured by KMDSI is not permitted without written permission from KMDSI. © Copyright 1970-2014 Kirby Morgan Dive Systems, Inc. All rights reserved. KMDSI manuals, checklists and technical and training information is made available for the express use of owner/user of this Kirby Morgan products. No part of this material may be reproduced, stored in any retrieval system, or transmitted, or used in any form or by any means, whether graphic, electronic, mechanical, photocopy, or otherwise by technology known or unknown, without the prior written permission of Kirby Morgan Dive Systems, Inc
Copyright 2003-2014, Dive Lab®., Inc. All rights reserved. TechTrnG 03101
10
KIRBY MORGAN DIVE SYSTEMS, INC. MAINTENANCE AND TRAINING POLICY CHANGES
4-14-09
NOTE: All threaded fasteners and parts require careful cleaning and inspection as well as the mating parts. Replace any and all threaded parts or components that show signs of wear or damage.
KIRBY MORGAN HELMETS AND BAND MASK CHECKLISTS/TRAINING:
Kirby Morgan Dive Systems, Inc., (“KMDSI”) has developed the pre and post dive maintenance checklists as well as the other maintenance checklists to assist divers, tenders, and diving supervisors. The new checklists are for all KMDSI SuperLite Helmets, KM-37, 47, 57, 77 and Band Masks and intended to be used as a guide to help ensure helmets and masks are set-up and maintained properly. In addition, KMDSI is in the process of standardizing all SuperLite helmet and band mask manuals for those who use multiple models of KMDSI equipment. KMDSI always welcomes all constructive criticism on the new checklists, manuals, and products.
Training Policies and Guidelines:
Dive Lab, Inc. oversees all (KMDSI) factory repair and maintenance training for all Kirby Morgan products. Kirby Morgan authorizes selected overseas dealers, depending on experience, knowledge, facility assets, and geographical location to teach KMDSI helmet and band mask technician training. Selected dealers receive additional training to allow them to teach specific equipment only. All KMDSI training certificates are issued by Dive Lab upon review of course completion documentation and verification of the technician trainer certification status. Only Dive Lab can conduct KMDSI dealer technician training. All KMDSI technicians are issued a technician certification number which is entered into the technician/operator/user data bank so that KMDSI product and part changes, as well as bulletins, repair notices, tech tips and updates can be e-mailed. All non-dealer technicians, as well as persons trained as Operator/User are also on the mailing list.
The KMDSI training policies and guidelines are intended to help persons performing repairs, maintenance and training that have received KMDSI standardized training on the equipment as the manufacture intended. The training also teaches the parameter of intended use and limitations of the equipment. Non KMDSI dealer technicians trained by authorized KMDSI dealers are encouraged to teach the KMDSI operator/user course, however, the course curriculum must be presented within the guidelines set-up in the basic repair technicians guide, Doc. # TechTmg 03101.
Kirby Morgan, SuperLite, Band Mask, KMB Band Mask, EXO, SuperMask, SuperFlow, and Rex are all registered trademarks of Kirby Morgan Dive Systems, Inc. Use of these terms to describe products that are not manufactured by KMDSI is not permitted without written permission from KMDSI. © Copyright 1970-2014 Kirby Morgan Dive Systems, Inc. All rights reserved. KMDSI manuals, checklists and technical and training information is made available for the express use of owner/user of this Kirby Morgan products. No part of this material may be reproduced, stored in any retrieval system, or transmitted, or used in any form or by any means, whether graphic, electronic, mechanical, photocopy, or otherwise by technology known or unknown, without the prior written permission of Kirby Morgan Dive Systems, Inc
Copyright 2003-2014, Dive Lab®., Inc. All rights reserved. TechTrnG 03101
11
KIRBY MORGAN DIVE SYSTEMS, INC. MAINTENANCE AND TRAINING POLICY CHANGES
4-14-09
Only KMDSI dealer technicians are authorized to perform repairs for profit. Non-dealer technicians must limit repairs to their own equipment, company owned equipment, and equipment belonging to company employees as dictated by company policy. Non-dealer technicians performing repairs for profit do so without authorization of KMDSI or Dive Lab.
It is strongly recommended that all technicians document all repairs and maintenance. KMDSI dealer technicians must document all work performed on all KMDSI helmets, band masks, and KMDSI equipment worked on, and records must be kept. All helmets and band masks must be accompanied by a log book. The log book is important because it shows the history of use, repair, and maintenance. Dealers receiving helmets or masks for repair or maintenance must have a log book so they can document the work they perform. Dealers working on helmets or masks not accompanied by a log or record of use and maintenance will require at a minimum an inspection IAW appendix A2.1. The A2.1 must be performed at least once every 12 months on helmets and masks in use. Helmets and masks that have been in storage for up to 2 years, which have not been used since the last A2.1 was performed will require a monthly inspection IAW the A2.2.
Fiberglass and Gel Coat: KMDSI Dealers should not work on helmets or masks that have had fiberglass
repairs done by someone other than KMDSI certified repair technicians that are certified to perform fiberglass repairs. Helmets that have been coated with coatings like Rhino Lining® or truck bed urethane should be turned away. Painting of helmets is not recommended and should be discouraged. Dealers can deny servicing helmets that have been painted, or show signs of repairs completed by non KMDSI trained technicians, or repairs made improperly.
All KMDSI certified technician trainers must certify or assist in certifying at least one technician course per year in order to remain as an active technician trainer. Dealer technicians are issued a new certificate each year for four years providing they remain active and abide by all the KMDSI technician guidelines and requirements. Dealers are required to keep records of repairs and training conducted.
Dealer qualifications are listed on the KMDSI and Dive Lab’s web site so that users of KMDSI products can review certification and qualification status. Non-Kirby Morgan dealers and persons not trained by Dive Lab that perform repairs for profit, do so against the recommendation of KMDSI and Dive Lab. Non-KMDSI certified persons that pose as certified KMDSI / Dive Lab trained technicians are a serious safety threat to the diving industry and all users of KMDSI equipment. Dive Lab trained technicians working for diving contractors or as free-lance divers cannot perform repairs for profit,
Kirby Morgan, SuperLite, Band Mask, KMB Band Mask, EXO, SuperMask, SuperFlow, and Rex are all registered trademarks of Kirby Morgan Dive Systems, Inc. Use of these terms to describe products that are not manufactured by KMDSI is not permitted without written permission from KMDSI. © Copyright 1970-2014 Kirby Morgan Dive Systems, Inc. All rights reserved. KMDSI manuals, checklists and technical and training information is made available for the express use of owner/user of this Kirby Morgan products. No part of this material may be reproduced, stored in any retrieval system, or transmitted, or used in any form or by any means, whether graphic, electronic, mechanical, photocopy, or otherwise by technology known or unknown, without the prior written permission of Kirby Morgan Dive Systems, Inc
Copyright 2003-2014, Dive Lab®., Inc. All rights reserved. TechTrnG 03101
12
KIRBY MORGAN DIVE SYSTEMS, INC. MAINTENANCE AND TRAINING POLICY CHANGES
4-14-09
and can only work on their own equipment, company equipment, and equipment belonging to the employees of the company, as dictated by company policy. This is done to prevent persons from trying to become back yard helmet mechanics. All work and repairs must be documented. Any helmets and masks presented for work that do not have a log book showing work history, must be overhauled IAW Appendix A2.1.
The KMDSI training and certification policies have been established to help protect the user, technician, and KMDSI dealers by promoting safety through knowledge, experience, and the proper maintenance of KMDSI products.
KMDSI dealers that have been trained and authorized to teach technician courses must teach the course set-up by Dive Lab. Dealers are not allowed to create their own course curriculum and must teach IAW the training guide and instruction provided by KMDSI and Dive Lab.
KMDSI technicians can only teach the equipment they were actually trained on as listed on their certification. All the equipment trained on during technician or operator / user training (Formally Inspector Training) must be listed on a properly filled out course completion form sent to Dive Lab no later than 30 days after completion of training with the $25.00 processing fee.
Dealer technicians that are authorized to teach helmet and band mask technician training must run at least one technician course per year in order to remain on the active instructor list.
Dealer Training: Dealer training is valid for 4 years. Dealer technician certification is renewable
annually by Dive Lab, as directed by KMDSI providing dealers remain eligible.
Dealer Repairs: Kirby Morgan Dealers that have not received technician training by Dive Lab
may not perform repairs or service on KMDSI equipment until training has been completed. Dealers may only perform repairs on the KMDSI equipment for which they have been trained on. Persons working as technicians at a KMDSI dealership that have not received training by Dive Lab, must only work under the supervision of a trained KMDSI dealer technician, and that technician is responsible for signing off all work completed.
Kirby Morgan, SuperLite, Band Mask, KMB Band Mask, EXO, SuperMask, SuperFlow, and Rex are all registered trademarks of Kirby Morgan Dive Systems, Inc. Use of these terms to describe products that are not manufactured by KMDSI is not permitted without written permission from KMDSI. © Copyright 1970-2014 Kirby Morgan Dive Systems, Inc. All rights reserved. KMDSI manuals, checklists and technical and training information is made available for the express use of owner/user of this Kirby Morgan products. No part of this material may be reproduced, stored in any retrieval system, or transmitted, or used in any form or by any means, whether graphic, electronic, mechanical, photocopy, or otherwise by technology known or unknown, without the prior written permission of Kirby Morgan Dive Systems, Inc
Copyright 2003-2014, Dive Lab®., Inc. All rights reserved. TechTrnG 03101
13
KIRBY MORGAN DIVE SYSTEMS, INC. MAINTENANCE AND TRAINING POLICY CHANGES
4-14-09
Fiberglass Repair: Face port insert repair, fiberglass, and gel-coat repairs can only be completed by
Dive Lab trained and certified technicians that have received fiberglass repair training.
Dealers are not allowed to contract out fiberglass, gel-coat or insert repairs made by boat yards or other non Dive Lab/KMDSI trained persons.
All fiberglass and gel-coat repairs should be documented with before and after pictures of work. The pictures will be available to the customer as well as KMDSI and Dive Lab.
All equipment repairs by KMDSI dealers must be documented. The dealer must provide customer with a cost estimate prior to start of any work or repairs. All work and repairs are to be clearly documented.
All KMDSI Helmet and Band Mask Technicians that have taken the KMDSI Repair Technicians Course may teach the KMDSI Operator/User Course IAW the guidelines laid out in the Repair Technician Training Guide # TechTmg 03101.
KMDSI Helmet and Band Mask Operator/User Course (5-7 hours): The KMDSI Helmet and Band Mask Operator/User Course is intended to instruct personnel in the manufacturer’s recommended maintenance and set-up procedures, as well as basic inspection and adjustment procedures. The operator course is not intended to be a repair technician course and does not qualify person(s) to perform repairs or overhauls. The course is intended to teach divers, tenders, and diving supervisors how to make pre-dive assessments as to the condition and serviceability of KMDSI helmets and band masks based on pre-dive visual inspection and functional tests using the applicable KMDSI checklists and Operations and Maintenance Manuals. The course usually takes 5-8 hours. The course certificate is valid for two years initially and three years upon re-certification.
KMDSI Maintenance and RepairTechnician Course (3 day): The KMDSI Technician Course is intended to instruct technicians and users of
KMDSI helmets and band masks how to perform routine and corrective maintenance procedures and equipment overhauls. The course covers demand regulator and side block overhauls, as well as all recommended owner level repairs, including face port insert testing. The course does not include insert repair or fiberglass and gel coat repair. The course certificate is valid for three years.
Kirby Morgan, SuperLite, Band Mask, KMB Band Mask, EXO, SuperMask, SuperFlow, and Rex are all registered trademarks of Kirby Morgan Dive Systems, Inc. Use of these terms to describe products that are not manufactured by KMDSI is not permitted without written permission from KMDSI. © Copyright 1970-2014 Kirby Morgan Dive Systems, Inc. All rights reserved. KMDSI manuals, checklists and technical and training information is made available for the express use of owner/user of this Kirby Morgan products. No part of this material may be reproduced, stored in any retrieval system, or transmitted, or used in any form or by any means, whether graphic, electronic, mechanical, photocopy, or otherwise by technology known or unknown, without the prior written permission of Kirby Morgan Dive Systems, Inc
Copyright 2003-2014, Dive Lab®., Inc. All rights reserved. TechTrnG 03101
14
KIRBY MORGAN DIVE SYSTEMS, INC. MAINTENANCE AND TRAINING POLICY CHANGES
4-14-09
Certification: Certificates and wallet cards are only issued by Dive Lab, Inc., upon review of
course completion paperwork. Any Technician or Operators Courses taught by “Dealer Technician must have each attendee complete a course completion form. The Technician
teaching the course should fill out the top portion of the form. All information should be filled out so that future important notices or changes to procedures can be e-mailed. The forms should be sent by the Instructor to Dive Lab, Inc., within 30 days of course completion along with $25.00 (for each certificate to be issued). KMDSI / Dive Lab has the right to deny certification to any individuals due to previous unethical or practices not in line with the intent of KMDSI Technician/Operator Courses.
Responsibility of Trained Personnel: All persons that have received Kirby Morgan training have a responsibility to ensure the helmets and masks they work on are set-up, and adjusted in accordance with the applicable pre-dive checklists and the Operations and Maintenance Manuals. Helmets or masks that fail inspections or tests, as well as those with worn, damaged, or non-approved components that could affect safety or performance, must be repaired prior to use. All scheduled maintenance, as well as daily pre and post dive maintenance, should be documented. Helmets or masks requiring fiberglass or insert repairs, or other repairs outside the scope of basic technician, must be only be repaired by a certified KMDSI repair technician trained and authorized to perform the repairs. Many of the checklists undergo changes from time to time. All Technicians and Operator/Users should periodically check the Dive Lab and KMDSI web page for manual changes and updates. New e-mail addresses should be sent to Dive Lab so files can be updated to ensure important notices and changes can be forwarded. For further information on training contact Dive Lab at [email protected]

Kirby Morgan, SuperLite, Band Mask, KMB Band Mask, EXO, SuperMask, SuperFlow, and Rex are all registered trademarks of Kirby Morgan Dive Systems, Inc. Use of these terms to describe products that are not manufactured by KMDSI is not permitted without written permission from KMDSI. © Copyright 1970-2014 Kirby Morgan Dive Systems, Inc. All rights reserved. KMDSI manuals, checklists and technical and training information is made available for the express use of owner/user of this Kirby Morgan products. No part of this material may be reproduced, stored in any retrieval system, or transmitted, or used in any form or by any means, whether graphic, electronic, mechanical, photocopy, or otherwise by technology known or unknown, without the prior written permission of Kirby Morgan Dive Systems, Inc
Copyright 2003-2014, Dive Lab®., Inc. All rights reserved. TechTrnG 03101
15
KIRBY MORGAN SUPERLITE DEEP SEA DIVING HELMET ALL MODELS
17A/B, 17-C, 17-K, 27, AND KM-37, KM-47, KM-57, KM-77 TECHNICIAN TRAINING ENABLING OBJECTIVES
4-14-09
Upon completion of the KMDSI SuperLite Helmet Technician Training course, the trainee will be able to state the recommended maintenance periodicities and explain in detail how the KMDSI maintenance checklists are used with all KMDSI SuperLite Helmets, KM-37 and KMB Band Masks. In addition, the trainee will be able to explain how to present and teach the KMDSI Helmet and band mask Operator / User Course. The trainee will also be able to explain in detail about the items listed below.
NECK DAM/RING ASSEMBLY
a) Describe/perform a proper inspection of yoke/neck clamp and neck dam ring b) Describe/perform a thorough inspection of the SL-17B Neck Clamp weldment areas. c) Describe the areas of inspection and the difference between the old style Push- Pin Plunger Latch Catch and the newer style Pull-Pin Plunger type and the reasons for the upgrade.
d) State the main physical differences between the SL-17A/B neck dam and yoke assembly as compared to the other KMDSI helmets.
e) Explain and demonstrate proper removal, inspection, cleaning and lubrication of Helmet Ring O-ring and/or Neck Dam Ring O-ring. f) Explain/demonstrate the inspection and maintenance procedures of all the major components of the SL-17K, C and SL-27 and KM-37 type neck ring
components. g) Describe/perform a thorough inspection of a Neck Dam both neoprene and latex, explain the types of contaminates and environmental conditions will cause deterioration of each.
HELMET ASSEMBLY
a) Explain/demonstrate a proper, thorough exterior Helmet Inspection and explain the types of damage that might be found, and areas of concern.
b) Explain/demonstrate how to inspect the View Port, View Port sealing area, and how to perform face port insert testing.
c) Describe/perform a thorough inspection of the Helmet Locking Collar assembly. (removed specific helmet type)
d) Describe/perform an inspection of the sealed pull-pins and how the pins should be serviced. (removed specific helmet type)

Kirby Morgan, SuperLite, Band Mask, KMB Band Mask, EXO, SuperMask, SuperFlow, and Rex are all registered trademarks of Kirby Morgan Dive Systems, Inc. Use of these terms to describe products that are not manufactured by KMDSI is not permitted without written permission from KMDSI. © Copyright 1970-2014 Kirby Morgan Dive Systems, Inc. All rights reserved. KMDSI manuals, checklists and technical and training information is made available for the express use of owner/user of this Kirby Morgan products. No part of this material may be reproduced, stored in any retrieval system, or transmitted, or used in any form or by any means, whether graphic, electronic, mechanical, photocopy, or otherwise by technology known or unknown, without the prior written permission of Kirby Morgan Dive Systems, Inc
Copyright 2003-2014, Dive Lab®., Inc. All rights reserved. TechTrnG 03101
16
e) Explain/demonstrate a thorough inspection of the swing catch assembly and the helmet ring, describing areas of concern for applicable helmets.
f) State the purpose of the helmet liner/cushion and why it should be maintained in good condition, how it can be tailored to fit.
g) Explain the proper maintenance and inspection of the oral/nasal mask and valve assembly.
h) Explain the purpose of the oral/nasal mask and valve assembly. i) Demonstrate proper removal/inspection of the exhaust whisker assembly. j) State the advantages/disadvantages and limitations of the double exhaust and
the reasons. k) Describe how to inspect the main exhaust /water dump valve and seat assembly.
SIDE BLOCK
a) Explain the inspection and overhaul procedures for the Side Block , and state KMDSI’s recommendation regarding Side Block removal.
b) Demonstrate/perform disassembly, inspection, proper cleaning, correct reassembly and testing of the.
-One-way Valve -Defogger Valve -Auxiliary Gas or (EGS) Valve -Valve knob components.
DEMAND REGULATOR
a) Explain the KMDSI recommendation with regards to the parts on the Demand Regulator that should be replaced on an annual basis regardless of the amount of use, and why.
b) Properly disassemble, clean and inspect using the operations manual, reassemble, adjust, fine tune and troubleshoot the Demand Regulator.
c) Explain sanitizing procedures of the Demand Regulator and associated components, and what safety precautions must be observed.
d) Explain how helmet parts and components are cleaned and corrosion is removed.
e) Explain how to perform O-ring inspections and how to lubricate components.
EMERGENCY GAS SUPPLY (EGS)
a) State the periodicity for the Hydrostatic and Visual Inspection for the emergency gas cylinder.

Kirby Morgan, SuperLite, Band Mask, KMB Band Mask, EXO, SuperMask, SuperFlow, and Rex are all registered trademarks of Kirby Morgan Dive Systems, Inc. Use of these terms to describe products that are not manufactured by KMDSI is not permitted without written permission from KMDSI. © Copyright 1970-2014 Kirby Morgan Dive Systems, Inc. All rights reserved. KMDSI manuals, checklists and technical and training information is made available for the express use of owner/user of this Kirby Morgan products. No part of this material may be reproduced, stored in any retrieval system, or transmitted, or used in any form or by any means, whether graphic, electronic, mechanical, photocopy, or otherwise by technology known or unknown, without the prior written permission of Kirby Morgan Dive Systems, Inc
Copyright 2003-2014, Dive Lab®., Inc. All rights reserved. TechTrnG 03101
17
b) Demonstrate how to conduct a thorough inspection of all EGS components. Explain the importance of complying with manufacturers recommendations.
c) Demonstrate/perform disassembly, inspection, proper cleaning, correct reassembly and testing on the First Stage Relief Valve.
d) Explain about the dangers of diving without emergency gas lined up to the first stage regulator.
e) Explain why good quality adjustable first stage regulators are recommended over non- adjustable piston type first stages.
f) Explain/demonstrate/perform the correct recommended setting of, the overbottom of the first stage regulator for the (EGS) Cylinder.
PROCEDURES AND CHECKLIST USE
a) Explain how the KMDSI maintenance and inspection procedures and instructions are to be
used. and where information may be found. b) Explain the basic procedures for conducting the KMDSI Inspectors Course. c) Explain what documents are used as hand outs for the Inspector Course. d) Explain the basic responsibilities of the KMDSI Technician.
END
Kirby Morgan, SuperLite, Band Mask, KMB Band Mask, EXO, SuperMask, SuperFlow, and Rex are all registered trademarks of Kirby Morgan Dive Systems, Inc. Use of these terms to describe products that are not manufactured by KMDSI is not permitted without written permission from KMDSI. © Copyright 1970-2014 Kirby Morgan Dive Systems, Inc. All rights reserved. KMDSI manuals, checklists and technical and training information is made available for the express use of owner/user of this Kirby Morgan products. No part of this material may be reproduced, stored in any retrieval system, or transmitted, or used in any form or by any means, whether graphic, electronic, mechanical, photocopy, or otherwise by technology known or unknown, without the prior written permission of Kirby Morgan Dive Systems, Inc
Copyright 2003-2014, Dive Lab®., Inc. All rights reserved. TechTrnG 03101
18
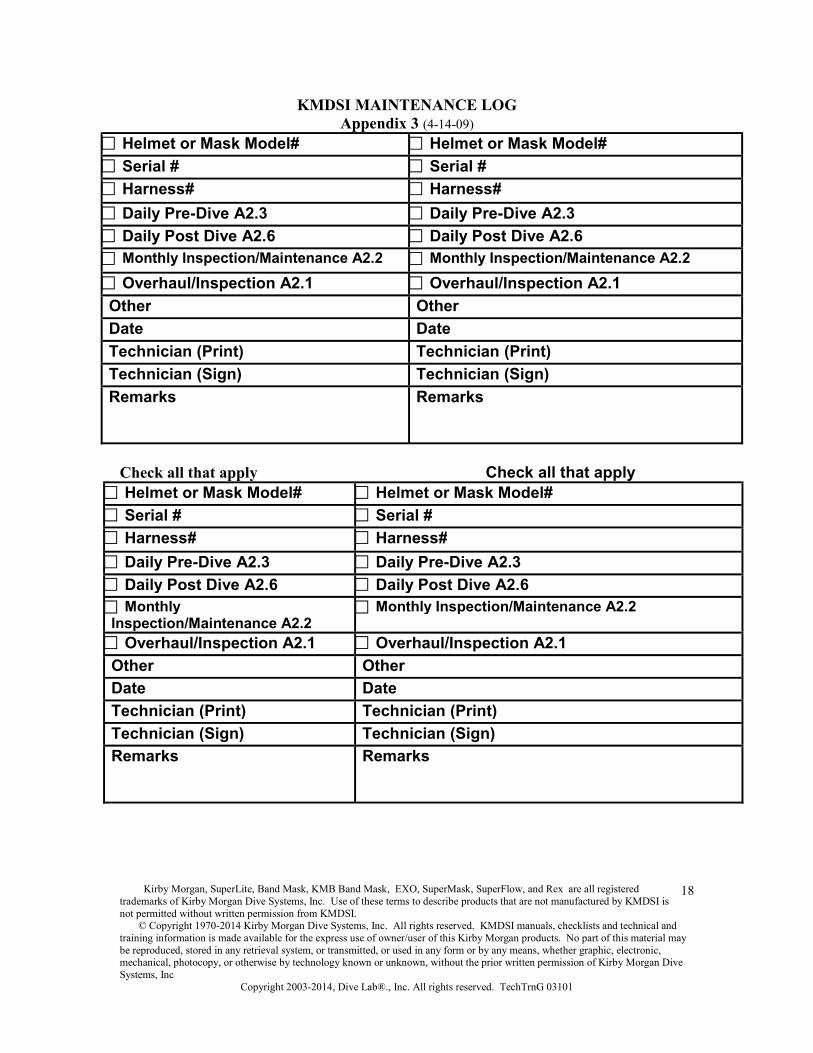
KMDSI MAINTENANCE LOG Appendix 3 (4-14-09)
Helmet or Mask Model# Helmet or Mask Model#Serial # Serial #Harness# Harness#Daily Pre-Dive A2.3 Daily Pre-Dive A2.3Daily Post Dive A2.6 Daily Post Dive A2.6Monthly Inspection/Maintenance A2.2 Monthly Inspection/Maintenance A2.2Overhaul/Inspection A2.1 Overhaul/Inspection A2.1
Other OtherDate DateTechnician (Print) Technician (Print)Technician (Sign) Technician (Sign)Remarks Remarks
Check all that apply Check all that applyHelmet or Mask Model# Helmet or Mask Model#Serial # Serial #Harness# Harness#Daily Pre-Dive A2.3 Daily Pre-Dive A2.3Daily Post Dive A2.6 Daily Post Dive A2.6Monthly
Inspection/Maintenance A2.2 Monthly Inspection/Maintenance A2.2
Overhaul/Inspection A2.1 Overhaul/Inspection A2.1Other OtherDate DateTechnician (Print) Technician (Print)Technician (Sign) Technician (Sign)Remarks Remarks

Kirby Morgan, SuperLite, Band Mask, KMB Band Mask, EXO, SuperMask, SuperFlow, and Rex are all registered trademarks of Kirby Morgan Dive Systems, Inc. Use of these terms to describe products that are not manufactured by KMDSI is not permitted without written permission from KMDSI. © Copyright 1970-2014 Kirby Morgan Dive Systems, Inc. All rights reserved. KMDSI manuals, checklists and technical and training information is made available for the express use of owner/user of this Kirby Morgan products. No part of this material may be reproduced, stored in any retrieval system, or transmitted, or used in any form or by any means, whether graphic, electronic, mechanical, photocopy, or otherwise by technology known or unknown, without the prior written permission of Kirby Morgan Dive Systems, Inc
Copyright 2003-2014, Dive Lab®., Inc. All rights reserved. TechTrnG 03101
19
KIRBY MORGAN DEEP SEA DIVING HELMETS ALL MODELS
OVERHAUL, MAINTENANCE, AND INSPECTION CHECKLIST APPENDIX A2.1
7-9-14 mw
THIS INSPECTION AND MAINTENANCE SHOULD BE PERFORMED AT LEAST ANNUALLY AND AS DICTATED BY CONDITION REVEALED DURING DAILY/MONTHLY INSPECTION. MONTHLY INSPECTIONS DETERMINE NECESSITY FOR OVERHAUL WITH MORE ACCURACY THAN SIMPLY PLACING A NUMBER OF HOURS OF USE.
This checklist is intended to aid persons performing routine overhauls of all KMDSI SuperLite and KM model helmets, both Fiberglass & Stainless steel. The checklist should be used in conjunction with the latest version of the applicable KMDSI Operations and Maintenance Manual for the model helmet being serviced. This checklist is primarily intended to guide and document the maintenance as it is completed and to help guide the technician during overhauls. Specific detailed procedures for each section of this checklist can be found in the latest version of the Operations and Maintenance Manuals and when completed should be retained in the equipment maintenance files. This checklist is generic in nature and should be used for all models of KMDSI Helmets.
WARNING: KMDSI strongly recommends that all repairs be performed by trained Personnel. Owners of equipment that are not trained and certified to perform maintenance and repairs do so against the recommendations of KMDSI and Dive Lab and at their own risk. Certified technician training is available to all users. Persons posing as certified / authorized KMDSI technicians pose a serious potential hazard to anyone using the equipment.
NOTE: When performing the A2.1, as a schedule overhaul, all O-rings must be replaced. When using the A2.1 as an “inspection” only, in-between annual overhauls, O-rings may be reused if inspection reveals the O-rings are serviceable.
NOTE: This checklist does not match all the KMDSI SuperLite Helmet Operations and Maintenance Manuals, chapter, page, and paragraph.
NOTE: Helmets being used in polluted waters, or extreme environments, will require more frequent inspection.
NOTE: This checklist should be used in conjunction with the most current Operations and Maintenance Manual. For latest Manual revisions please check the KMDSI web page at www.kirbymorgan.com

Kirby Morgan, SuperLite, Band Mask, KMB Band Mask, EXO, SuperMask, SuperFlow, and Rex are all registered trademarks of Kirby Morgan Dive Systems, Inc. Use of these terms to describe products that are not manufactured by KMDSI is not permitted without written permission from KMDSI. © Copyright 1970-2014 Kirby Morgan Dive Systems, Inc. All rights reserved. KMDSI manuals, checklists and technical and training information is made available for the express use of owner/user of this Kirby Morgan products. No part of this material may be reproduced, stored in any retrieval system, or transmitted, or used in any form or by any means, whether graphic, electronic, mechanical, photocopy, or otherwise by technology known or unknown, without the prior written permission of Kirby Morgan Dive Systems, Inc
Copyright 2003-2014, Dive Lab®., Inc. All rights reserved. TechTrnG 03101
20
Date: Helmet Serial #: Associated Equipment Serial # (s), if applicable:
Equipment belonging to:
Remarks:
PROCEDURES INITIALS
SL-17A/B YOKE / NECK CLAMP ASSEMBLY Helmet Attachment Components
NOTE: For SL-17K, SL-17C, SL-27, and KM-37/SS, KM-47, KM-57, KM-77, KM-97, skip to page 3, and start at step 1.
Note: KMDSI recommends that Neck Clamps older than five years old be removed from service and replaced. However, neck clamps that show no signs of damage and or deterioration and are kept in service, should be inspected at least weekly I.A.W. the Monthly Inspection A2.2, steps 1-7.
1. Remove Yoke / Neck Clamp Assembly (14) from Helmet. Remove the neoprene Neck Dam and carefully inspect for tears, holes, and damaged areas and deterioration. Replace or repair the Neck Dam if any damage is present or if the material shows signs of deterioration. Guidance 17A/B O&M Manual
2. Disassemble the Rear Hinge Tab, Hinge, and Sleeve from the Yoke/Neck Clamp and inspect for cracking replace if any damage is found. Replace parts as necessary. Reassemble using thread locker if the old style sleeve and bolts are used and torque fasteners to 20 inch lbs. If the new bolt and nylock® nut is used, tighten the nut until the bolt protrudes at least one thread past the nylon in the nut (do not tighten further at this time). Guidance SL-17 A/B O&M Manual.
3. Remove the Nylock nut, Lock Nut and washer from the clamp adjustment Stud. Clean the Stud with a wire brush and inspect for signs of line cracking, pitting, or corrosion damage. If any damage is present, the Neck Clamp will require replacement. Guidance SL-17 A/B O&M Manual
Kirby Morgan, SuperLite, Band Mask, KMB Band Mask, EXO, SuperMask, SuperFlow, and Rex are all registered trademarks of Kirby Morgan Dive Systems, Inc. Use of these terms to describe products that are not manufactured by KMDSI is not permitted without written permission from KMDSI. © Copyright 1970-2014 Kirby Morgan Dive Systems, Inc. All rights reserved. KMDSI manuals, checklists and technical and training information is made available for the express use of owner/user of this Kirby Morgan products. No part of this material may be reproduced, stored in any retrieval system, or transmitted, or used in any form or by any means, whether graphic, electronic, mechanical, photocopy, or otherwise by technology known or unknown, without the prior written permission of Kirby Morgan Dive Systems, Inc
Copyright 2003-2014, Dive Lab®., Inc. All rights reserved. TechTrnG 03101
21
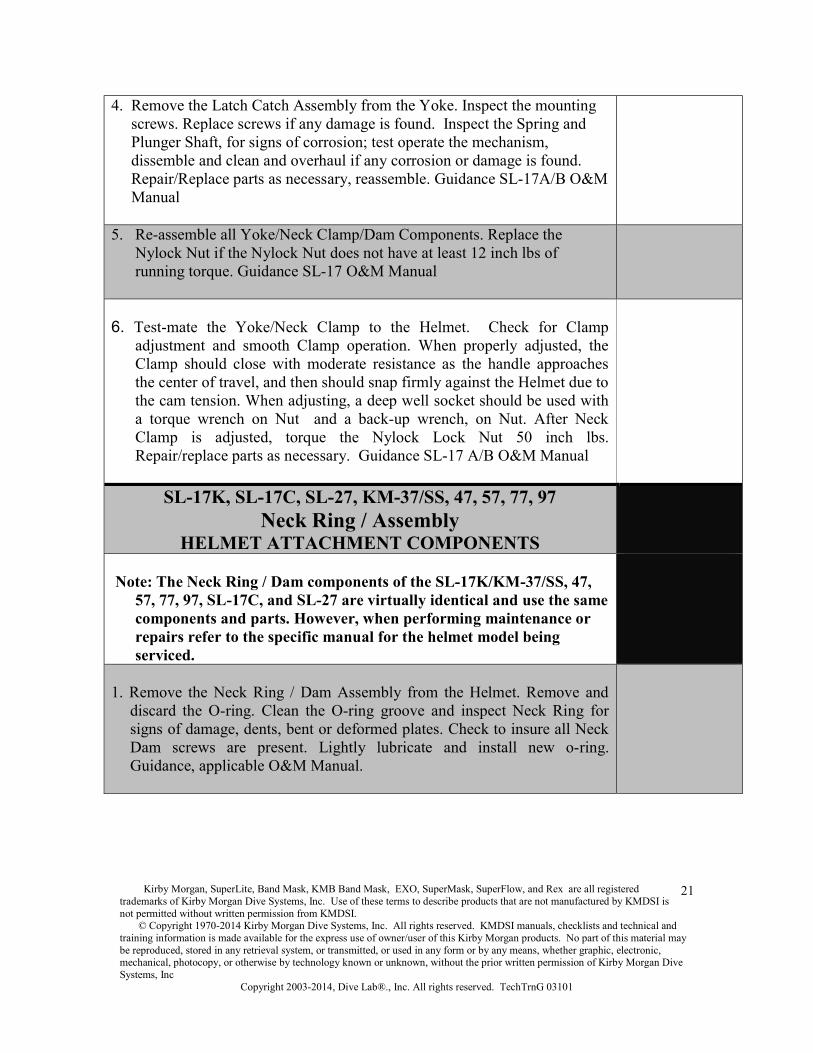
4. Remove the Latch Catch Assembly from the Yoke. Inspect the mounting screws. Replace screws if any damage is found. Inspect the Spring and Plunger Shaft, for signs of corrosion; test operate the mechanism, dissemble and clean and overhaul if any corrosion or damage is found. Repair/Replace parts as necessary, reassemble. Guidance SL-17A/B O&M Manual
5. Re-assemble all Yoke/Neck Clamp/Dam Components. Replace the Nylock Nut if the Nylock Nut does not have at least 12 inch lbs of running torque. Guidance SL-17 O&M Manual
6. Test-mate the Yoke/Neck Clamp to the Helmet. Check for Clamp adjustment and smooth Clamp operation. When properly adjusted, the Clamp should close with moderate resistance as the handle approaches the center of travel, and then should snap firmly against the Helmet due to the cam tension. When adjusting, a deep well socket should be used with a torque wrench on Nut and a back-up wrench, on Nut. After Neck Clamp is adjusted, torque the Nylock Lock Nut 50 inch lbs. Repair/replace parts as necessary. Guidance SL-17 A/B O&M Manual
SL-17K, SL-17C, SL-27, KM-37/SS, 47, 57, 77, 97 Neck Ring / Assembly
HELMET ATTACHMENT COMPONENTS
Note: The Neck Ring / Dam components of the SL-17K/KM-37/SS, 47, 57, 77, 97, SL-17C, and SL-27 are virtually identical and use the same components and parts. However, when performing maintenance or repairs refer to the specific manual for the helmet model being serviced.
1. Remove the Neck Ring / Dam Assembly from the Helmet. Remove and discard the O-ring. Clean the O-ring groove and inspect Neck Ring for signs of damage, dents, bent or deformed plates. Check to insure all Neck Dam screws are present. Lightly lubricate and install new o-ring. Guidance, applicable O&M Manual.

Kirby Morgan, SuperLite, Band Mask, KMB Band Mask, EXO, SuperMask, SuperFlow, and Rex are all registered trademarks of Kirby Morgan Dive Systems, Inc. Use of these terms to describe products that are not manufactured by KMDSI is not permitted without written permission from KMDSI. © Copyright 1970-2014 Kirby Morgan Dive Systems, Inc. All rights reserved. KMDSI manuals, checklists and technical and training information is made available for the express use of owner/user of this Kirby Morgan products. No part of this material may be reproduced, stored in any retrieval system, or transmitted, or used in any form or by any means, whether graphic, electronic, mechanical, photocopy, or otherwise by technology known or unknown, without the prior written permission of Kirby Morgan Dive Systems, Inc
Copyright 2003-2014, Dive Lab®., Inc. All rights reserved. TechTrnG 03101
22
2. Remove the four Neck Strap retainer screws, then remove the Neck Strap assembly. Inspect the Neck Strap for signs of wear or damage. Replace the strap and any components if any wear or damage is found. Guidance, applicable O&M Manual.
3. Carefully inspect the Neck Dam material for signs of wear, holes, tears, or any damage, replace if any damage is found. Guidance, applicable O&M Manual.
Note: The Sealed Pull Pins are filled at the factory with silicon oil. The Sealed Pull Pins should only be serviced by persons that have received the proper training.
4. Remove the Sealed Pull Pin Assemblies, clean, and inspect the pin recess. Inspect the pins for the presence of silicon oil, which would indicate that the seal is bad. Check for proper function. If the pins do not function smoothly, or if oil is present, the pins should be serviced by a trained technician. Pull Pins should be serviced at a minimum of once every 24 months, refer to helmet maintenance log for previous pull pin service/overhaul. Replace parts and components as necessary; reassemble Guidance, applicable O&M Manual.
5. Locking Collar: disassemble Locking Collar components including the Hinge Pins and Neck Pad components. Clean and inspect, replace components as necessary. Guidance, applicable O&M Manual.
6. Disassemble the Swing Tongue Catch Assembly, clean, and inspect all components. Replace components as necessary and reassemble, Guidance O&M Manual.
HELMET ASSEMBLY1. On the SL-17A/B only, KMDSI recommends yearly removal of the
Alignment Screw from the rear weight. Also, conduct a visual inspection of the tapped threads used by the Alignment Screw in the Rear Weight. Ensure the threads are in good condition. Guidance applicable O & M Manual
Kirby Morgan, SuperLite, Band Mask, KMB Band Mask, EXO, SuperMask, SuperFlow, and Rex are all registered trademarks of Kirby Morgan Dive Systems, Inc. Use of these terms to describe products that are not manufactured by KMDSI is not permitted without written permission from KMDSI. © Copyright 1970-2014 Kirby Morgan Dive Systems, Inc. All rights reserved. KMDSI manuals, checklists and technical and training information is made available for the express use of owner/user of this Kirby Morgan products. No part of this material may be reproduced, stored in any retrieval system, or transmitted, or used in any form or by any means, whether graphic, electronic, mechanical, photocopy, or otherwise by technology known or unknown, without the prior written permission of Kirby Morgan Dive Systems, Inc
Copyright 2003-2014, Dive Lab®., Inc. All rights reserved. TechTrnG 03101
23
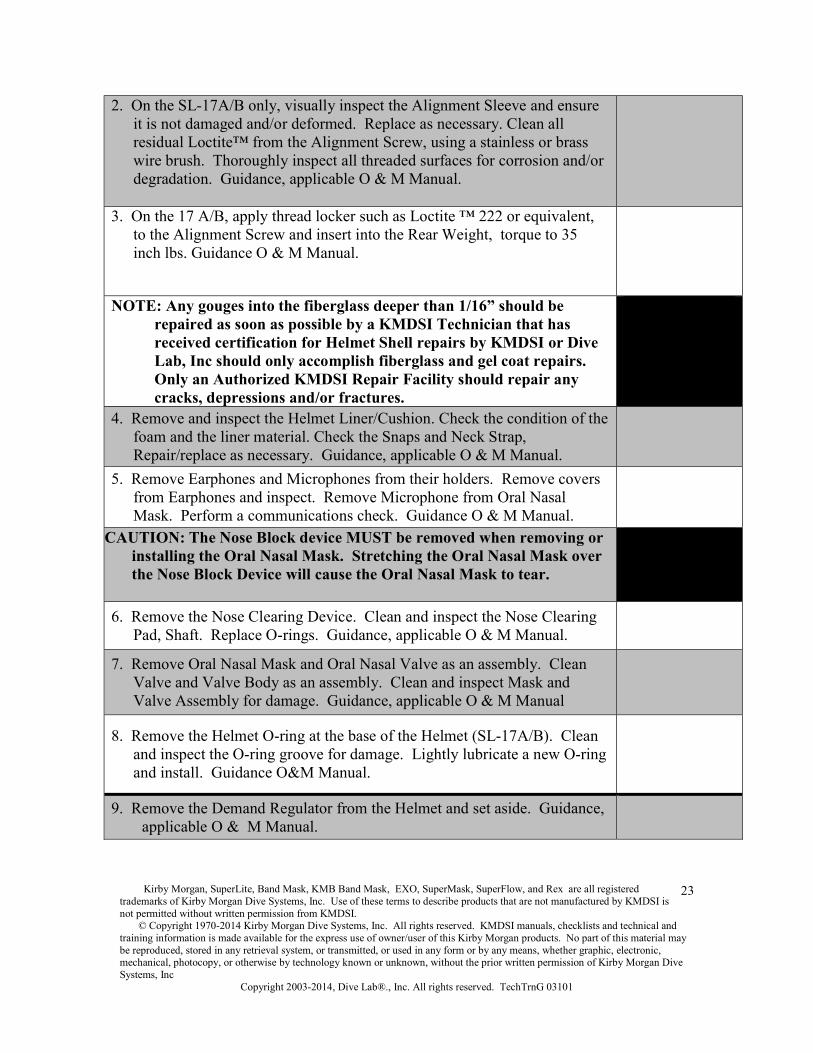
2. On the SL-17A/B only, visually inspect the Alignment Sleeve and ensure it is not damaged and/or deformed. Replace as necessary. Clean all residual Loctite™ from the Alignment Screw, using a stainless or brass wire brush. Thoroughly inspect all threaded surfaces for corrosion and/or degradation. Guidance, applicable O & M Manual.
3. On the 17 A/B, apply thread locker such as Loctite ™ 222 or equivalent, to the Alignment Screw and insert into the Rear Weight, torque to 35 inch lbs. Guidance O & M Manual.
NOTE: Any gouges into the fiberglass deeper than 1/16” should be repaired as soon as possible by a KMDSI Technician that has received certification for Helmet Shell repairs by KMDSI or Dive Lab, Inc should only accomplish fiberglass and gel coat repairs. Only an Authorized KMDSI Repair Facility should repair any cracks, depressions and/or fractures.
4. Remove and inspect the Helmet Liner/Cushion. Check the condition of the foam and the liner material. Check the Snaps and Neck Strap, Repair/replace as necessary. Guidance, applicable O & M Manual.
5. Remove Earphones and Microphones from their holders. Remove covers from Earphones and inspect. Remove Microphone from Oral Nasal Mask. Perform a communications check. Guidance O & M Manual.
CAUTION: The Nose Block device MUST be removed when removing or installing the Oral Nasal Mask. Stretching the Oral Nasal Mask over the Nose Block Device will cause the Oral Nasal Mask to tear.
6. Remove the Nose Clearing Device. Clean and inspect the Nose Clearing Pad, Shaft. Replace O-rings. Guidance, applicable O & M Manual.
7. Remove Oral Nasal Mask and Oral Nasal Valve as an assembly. Clean Valve and Valve Body as an assembly. Clean and inspect Mask and Valve Assembly for damage. Guidance, applicable O & M Manual
8. Remove the Helmet O-ring at the base of the Helmet (SL-17A/B). Clean and inspect the O-ring groove for damage. Lightly lubricate a new O-ring and install. Guidance O&M Manual.
9. Remove the Demand Regulator from the Helmet and set aside. Guidance, applicable O & M Manual.

Kirby Morgan, SuperLite, Band Mask, KMB Band Mask, EXO, SuperMask, SuperFlow, and Rex are all registered trademarks of Kirby Morgan Dive Systems, Inc. Use of these terms to describe products that are not manufactured by KMDSI is not permitted without written permission from KMDSI. © Copyright 1970-2014 Kirby Morgan Dive Systems, Inc. All rights reserved. KMDSI manuals, checklists and technical and training information is made available for the express use of owner/user of this Kirby Morgan products. No part of this material may be reproduced, stored in any retrieval system, or transmitted, or used in any form or by any means, whether graphic, electronic, mechanical, photocopy, or otherwise by technology known or unknown, without the prior written permission of Kirby Morgan Dive Systems, Inc
Copyright 2003-2014, Dive Lab®., Inc. All rights reserved. TechTrnG 03101
24
NOTE: For all demand regulators, except the REX on the KM-47/77, the Demand Regulator must be removed prior to removing the Whisker. Annual Demand Regulator maintenance is discussed in the Demand Regulator Section of each, applicable O & M manual.
NOTE: If using the Tri-Valve or Quad-Valve Exhaust System refer to applicable section of the pertinent O&M Manual.
NOTE: For installing Tri-Valve or Quad Valve, refer to applicable section of the pertinent O&M Manual.
10. Remove the Whisker from the Regulator Body, then clean and inspect. Clean and inspect the Whisker. Replace all Exhaust Valves at least annually or any time they show any signs of deterioration, wear, and/or damage. Guidance, applicable O & M Manual.
NOTE: If using the Old Style Latex Double Exhaust Whisker refer to applicable section of the pertinent O & M Manual.
11. Perform a View Port Insert Pull Test. Replace/repair inserts as necessary. Replace View Port O-ring. Guidance, applicable O & M Manual. Not necessary on Stainless steel helmets.
NOTE: Testing of the Port Inserts should be done ONCE A YEAR, and/or whenever Port Insert damage is present or suspected. (KMDSI P/N 525-115, Thread Insert Testing Block Kit) Guidance Basic Repair Technician Training Guide, Thread Insert Testing Procedure.
12. On all applicable helmets, remove the Main Exhaust Valve Cover / Quad cover and replace the Main Exhaust/Dewatering Valve. Clean and inspect the Seat for damage and/or contamination. For SL-27 cut the tie wrap and remove the cover clean and inspect the Seat for damage replace dewatering valve. Guidance, applicable O & M Manual. Service entire exhaust system with applicable O & M Manual
SIDE BLOCK All Helmet Models
NOTE: The Side Block does not need to be physically removed from the Helmet Shell every year in order to overhaul the Steady Flow, Emergency and One Way Valve providing excessive internal corrosion is not present in the side block passages or valve
Kirby Morgan, SuperLite, Band Mask, KMB Band Mask, EXO, SuperMask, SuperFlow, and Rex are all registered trademarks of Kirby Morgan Dive Systems, Inc. Use of these terms to describe products that are not manufactured by KMDSI is not permitted without written permission from KMDSI. © Copyright 1970-2014 Kirby Morgan Dive Systems, Inc. All rights reserved. KMDSI manuals, checklists and technical and training information is made available for the express use of owner/user of this Kirby Morgan products. No part of this material may be reproduced, stored in any retrieval system, or transmitted, or used in any form or by any means, whether graphic, electronic, mechanical, photocopy, or otherwise by technology known or unknown, without the prior written permission of Kirby Morgan Dive Systems, Inc
Copyright 2003-2014, Dive Lab®., Inc. All rights reserved. TechTrnG 03101
25
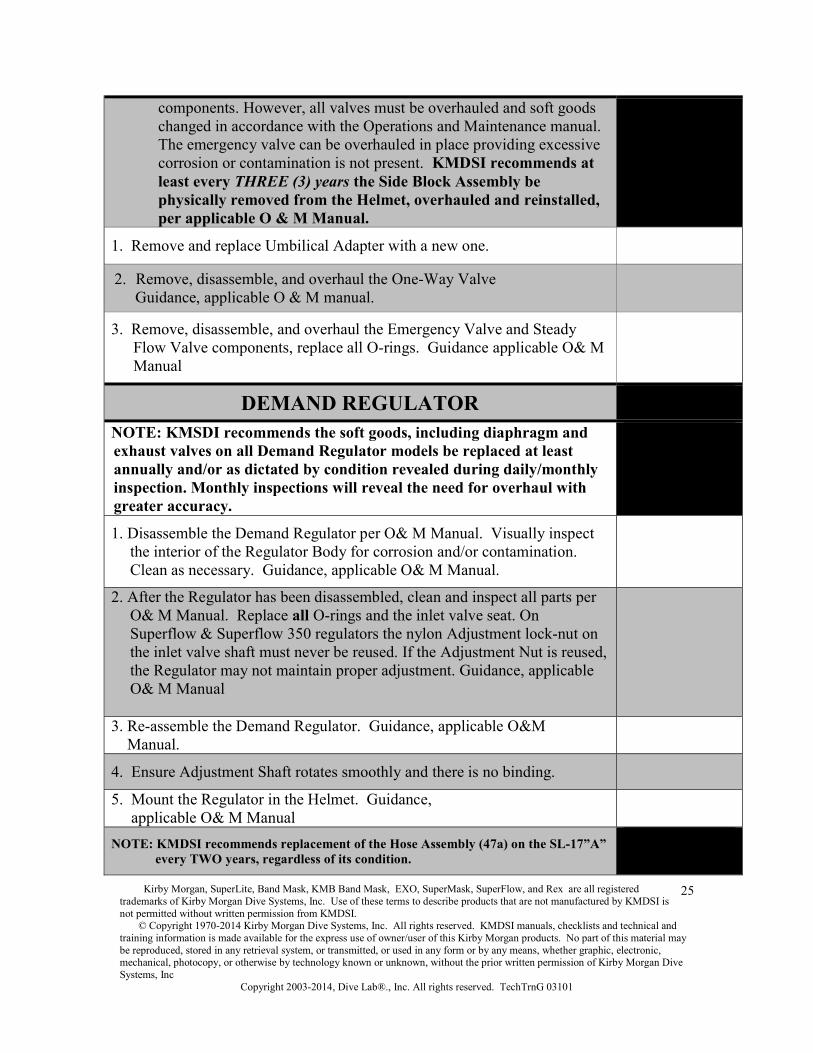
components. However, all valves must be overhauled and soft goods changed in accordance with the Operations and Maintenance manual. The emergency valve can be overhauled in place providing excessive corrosion or contamination is not present. KMDSI recommends at least every THREE (3) years the Side Block Assembly be physically removed from the Helmet, overhauled and reinstalled, per applicable O & M Manual.
1. Remove and replace Umbilical Adapter with a new one.
2. Remove, disassemble, and overhaul the One-Way Valve Guidance, applicable O & M manual.
3. Remove, disassemble, and overhaul the Emergency Valve and Steady Flow Valve components, replace all O-rings. Guidance applicable O& M Manual
DEMAND REGULATOR NOTE: KMSDI recommends the soft goods, including diaphragm and exhaust valves on all Demand Regulator models be replaced at least annually and/or as dictated by condition revealed during daily/monthly inspection. Monthly inspections will reveal the need for overhaul with greater accuracy.
1. Disassemble the Demand Regulator per O& M Manual. Visually inspect the interior of the Regulator Body for corrosion and/or contamination. Clean as necessary. Guidance, applicable O& M Manual.
2. After the Regulator has been disassembled, clean and inspect all parts per O& M Manual. Replace all O-rings and the inlet valve seat. On Superflow & Superflow 350 regulators the nylon Adjustment lock-nut on the inlet valve shaft must never be reused. If the Adjustment Nut is reused, the Regulator may not maintain proper adjustment. Guidance, applicable O& M Manual
3. Re-assemble the Demand Regulator. Guidance, applicable O&M Manual.
4. Ensure Adjustment Shaft rotates smoothly and there is no binding.
5. Mount the Regulator in the Helmet. Guidance, applicable O& M ManualNOTE: KMDSI recommends replacement of the Hose Assembly (47a) on the SL-17”A”
every TWO years, regardless of its condition.
Kirby Morgan, SuperLite, Band Mask, KMB Band Mask, EXO, SuperMask, SuperFlow, and Rex are all registered trademarks of Kirby Morgan Dive Systems, Inc. Use of these terms to describe products that are not manufactured by KMDSI is not permitted without written permission from KMDSI. © Copyright 1970-2014 Kirby Morgan Dive Systems, Inc. All rights reserved. KMDSI manuals, checklists and technical and training information is made available for the express use of owner/user of this Kirby Morgan products. No part of this material may be reproduced, stored in any retrieval system, or transmitted, or used in any form or by any means, whether graphic, electronic, mechanical, photocopy, or otherwise by technology known or unknown, without the prior written permission of Kirby Morgan Dive Systems, Inc
Copyright 2003-2014, Dive Lab®., Inc. All rights reserved. TechTrnG 03101
26
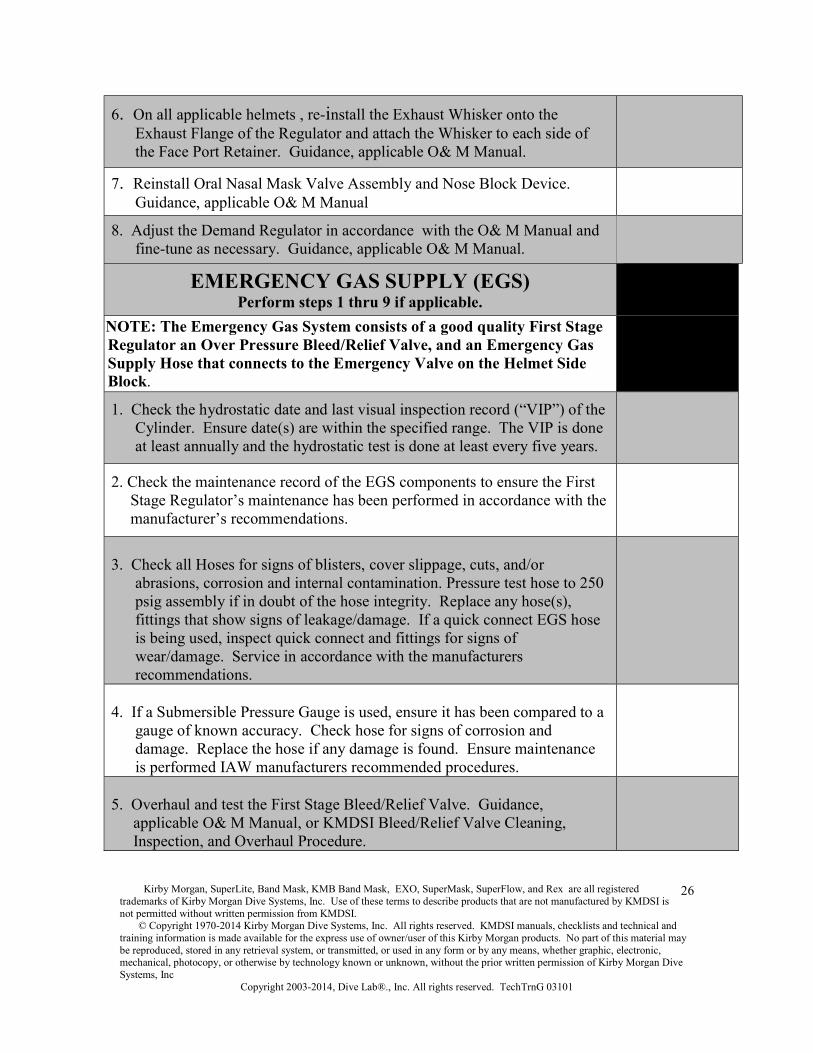
6. On all applicable helmets , re-install the Exhaust Whisker onto the Exhaust Flange of the Regulator and attach the Whisker to each side of the Face Port Retainer. Guidance, applicable O& M Manual.
7. Reinstall Oral Nasal Mask Valve Assembly and Nose Block Device. Guidance, applicable O& M Manual
8. Adjust the Demand Regulator in accordance with the O& M Manual and fine-tune as necessary. Guidance, applicable O& M Manual.
EMERGENCY GAS SUPPLY (EGS) Perform steps 1 thru 9 if applicable.
NOTE: The Emergency Gas System consists of a good quality First Stage Regulator an Over Pressure Bleed/Relief Valve, and an Emergency Gas Supply Hose that connects to the Emergency Valve on the Helmet Side Block.
1. Check the hydrostatic date and last visual inspection record (“VIP”) of the Cylinder. Ensure date(s) are within the specified range. The VIP is done at least annually and the hydrostatic test is done at least every five years.
2. Check the maintenance record of the EGS components to ensure the First Stage Regulator’s maintenance has been performed in accordance with the manufacturer’s recommendations.
3. Check all Hoses for signs of blisters, cover slippage, cuts, and/or abrasions, corrosion and internal contamination. Pressure test hose to 250 psig assembly if in doubt of the hose integrity. Replace any hose(s), fittings that show signs of leakage/damage. If a quick connect EGS hose is being used, inspect quick connect and fittings for signs of wear/damage. Service in accordance with the manufacturers recommendations.
4. If a Submersible Pressure Gauge is used, ensure it has been compared to a gauge of known accuracy. Check hose for signs of corrosion and damage. Replace the hose if any damage is found. Ensure maintenance is performed IAW manufacturers recommended procedures.
5. Overhaul and test the First Stage Bleed/Relief Valve. Guidance, applicable O& M Manual, or KMDSI Bleed/Relief Valve Cleaning, Inspection, and Overhaul Procedure.
Kirby Morgan, SuperLite, Band Mask, KMB Band Mask, EXO, SuperMask, SuperFlow, and Rex are all registered trademarks of Kirby Morgan Dive Systems, Inc. Use of these terms to describe products that are not manufactured by KMDSI is not permitted without written permission from KMDSI. © Copyright 1970-2014 Kirby Morgan Dive Systems, Inc. All rights reserved. KMDSI manuals, checklists and technical and training information is made available for the express use of owner/user of this Kirby Morgan products. No part of this material may be reproduced, stored in any retrieval system, or transmitted, or used in any form or by any means, whether graphic, electronic, mechanical, photocopy, or otherwise by technology known or unknown, without the prior written permission of Kirby Morgan Dive Systems, Inc
Copyright 2003-2014, Dive Lab®., Inc. All rights reserved. TechTrnG 03101
27
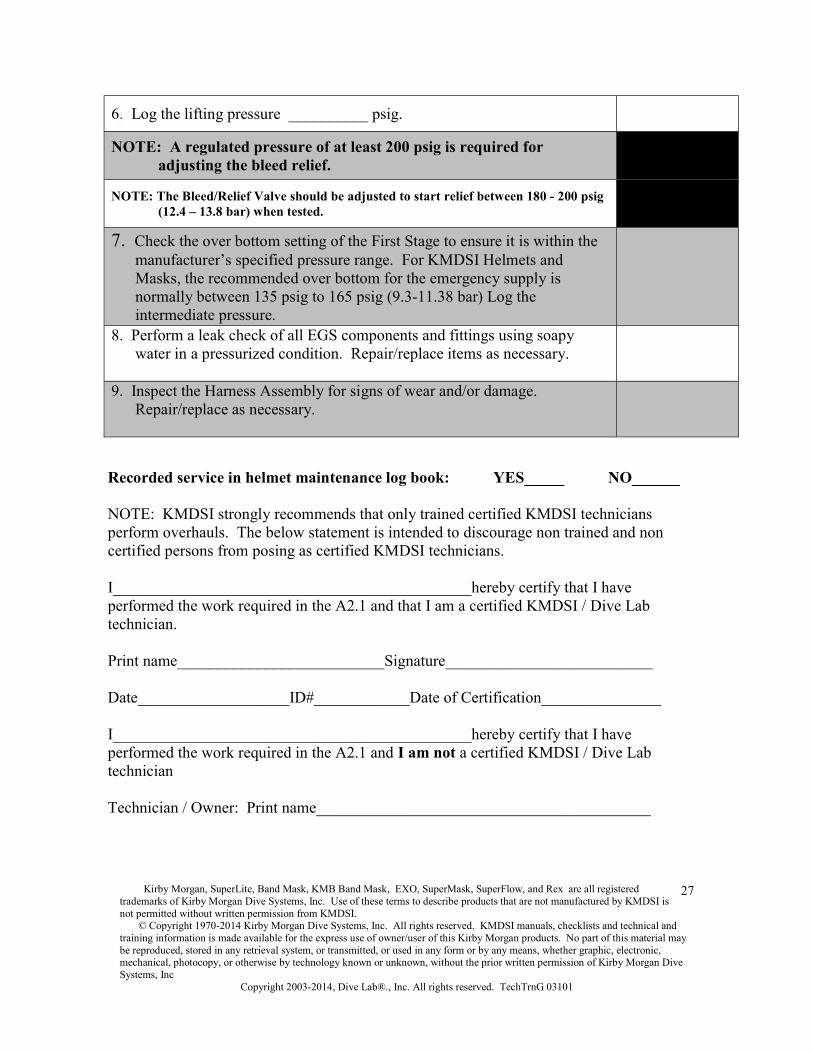
6. Log the lifting pressure __________ psig.
NOTE: A regulated pressure of at least 200 psig is required for adjusting the bleed relief.
NOTE: The Bleed/Relief Valve should be adjusted to start relief between 180 - 200 psig (12.4 – 13.8 bar) when tested.
7. Check the over bottom setting of the First Stage to ensure it is within the manufacturer’s specified pressure range. For KMDSI Helmets and Masks, the recommended over bottom for the emergency supply is normally between 135 psig to 165 psig (9.3-11.38 bar) Log the intermediate pressure.
8. Perform a leak check of all EGS components and fittings using soapy water in a pressurized condition. Repair/replace items as necessary.
9. Inspect the Harness Assembly for signs of wear and/or damage. Repair/replace as necessary.
Recorded service in helmet maintenance log book: YES_____ NO______
NOTE: KMDSI strongly recommends that only trained certified KMDSI technicians perform overhauls. The below statement is intended to discourage non trained and non certified persons from posing as certified KMDSI technicians.
I_____________________________________________hereby certify that I have performed the work required in the A2.1 and that I am a certified KMDSI / Dive Lab technician.
Print name__________________________Signature__________________________
Date___________________ID#____________Date of Certification_______________
I_____________________________________________hereby certify that I have performed the work required in the A2.1 and I am not a certified KMDSI / Dive Lab technician
Technician / Owner: Print name__________________________________________

Kirby Morgan, SuperLite, Band Mask, KMB Band Mask, EXO, SuperMask, SuperFlow, and Rex are all registered trademarks of Kirby Morgan Dive Systems, Inc. Use of these terms to describe products that are not manufactured by KMDSI is not permitted without written permission from KMDSI. © Copyright 1970-2014 Kirby Morgan Dive Systems, Inc. All rights reserved. KMDSI manuals, checklists and technical and training information is made available for the express use of owner/user of this Kirby Morgan products. No part of this material may be reproduced, stored in any retrieval system, or transmitted, or used in any form or by any means, whether graphic, electronic, mechanical, photocopy, or otherwise by technology known or unknown, without the prior written permission of Kirby Morgan Dive Systems, Inc
Copyright 2003-2014, Dive Lab®., Inc. All rights reserved. TechTrnG 03101
28
Comments____________________________________________________________
_____________________________________________________________________
KMDSI highly recommends that a certified KMDSI Repair Technician make all repairs and that only genuine KMDSI repair and replacement parts be used. All inspections, maintenance, and repairs, should be completed using the appropriate KMDSI Operations and Maintenance Manual(s). Should any questions on procedures, components, or repairs arise, please contact Kirby Morgan Dive Systems, Inc., by telephone at (805) 928-7772 or via e-mail at [email protected], or contact Dive Lab, Inc., by telephone at (850) 235-2715 or via e-mail at [email protected].
Kirby Morgan, SuperLite, Band Mask, KMB Band Mask, EXO, SuperMask, SuperFlow, and Rex are all registered trademarks of Kirby Morgan Dive Systems, Inc. Use of these terms to describe products that are not manufactured by KMDSI is not permitted without written permission from KMDSI. © Copyright 1970-2014 Kirby Morgan Dive Systems, Inc. All rights reserved. KMDSI manuals, checklists and technical and training information is made available for the express use of owner/user of this Kirby Morgan products. No part of this material may be reproduced, stored in any retrieval system, or transmitted, or used in any form or by any means, whether graphic, electronic, mechanical, photocopy, or otherwise by technology known or unknown, without the prior written permission of Kirby Morgan Dive Systems, Inc
Copyright 2003-2014, Dive Lab®., Inc. All rights reserved. TechTrnG 03101
29
Thread Insert Testing Procedure Appendix 6
4-14-09
The following is Kirby Morgan Dive Systems approved method for testing the Thread Inserts on the Kirby Morgan SuperLite-17B, 17C, 17K, 27 Helmets, KM-37, 47, 57 Helmet, KMB-18/28 Band Masks. In various manuals and written references through the years the viewing lens has been referred to as the lens, viewing lens, port and view port. All refer to the transparent lens that the diver sees through when wearing the mask or helmet. Testing of the inserts should be done at least ONCE A YEAR.
Thread Insert Testing When testing the Thread Inserts on a helmet or mask, or when removing and replacing the port retainer, it is crucial that the KMDSI recommended torque specs be followed when tightening the Port Retainer Screws. Any over torquing of a screw can result in serious damage to either the thread insert or the surrounding fiberglass in the port area. This can lead to loosening of the Port Retainer and in extreme instances to flooding of the helmet. This testing procedure is designed to locate any inserts that have been damaged and need replacing. Any replacement/ repair of inserts and the surrounding fiberglass port area must be carried out by an authorized KMDSI trained representative that has trained specifically in thread insert repair/replacement.
One of the main causes of insert damage is the over torquing of the Port Retainer Screws. This can be the final result of poor maintenance of the mask/helmet. Poor maintenance of the O-ring and O-ring groove on the mask/helmet can lead to leaks around the Port Retainer. Overtightening of the retainer will not solve the leak and will damage the fiberglass surrounding the inserts. Be sure that only a KMDSI Port O-ring is used for the seal under the Lexan Port. This O-ring is a specially molded soft compound and was designed specifically for this application. Other O-rings, while being approximately the same size, will not perform correctly and can cause leaks in the port area, leading to overtightening and insert damage.
Definitions:
Port Retainer: The metal frame that holds the Port in place against the sealing O-ring of the mask or helmet main body.
Face Port: The transparent Lexan port that the diver sees through.
Port Retainer Mount Screws: Screws that hold the Port Retainer to the main body of the mask/helmet.
Thread Inserts: The metal, female threaded, inserts that are bonded into the main body of the mask/helmet. These inserts receive the Port Retainer Mounting screws. The Port
Kirby Morgan, SuperLite, Band Mask, KMB Band Mask, EXO, SuperMask, SuperFlow, and Rex are all registered trademarks of Kirby Morgan Dive Systems, Inc. Use of these terms to describe products that are not manufactured by KMDSI is not permitted without written permission from KMDSI. © Copyright 1970-2014 Kirby Morgan Dive Systems, Inc. All rights reserved. KMDSI manuals, checklists and technical and training information is made available for the express use of owner/user of this Kirby Morgan products. No part of this material may be reproduced, stored in any retrieval system, or transmitted, or used in any form or by any means, whether graphic, electronic, mechanical, photocopy, or otherwise by technology known or unknown, without the prior written permission of Kirby Morgan Dive Systems, Inc
Copyright 2003-2014, Dive Lab®., Inc. All rights reserved. TechTrnG 03101
30
Retainer Mounting Screws hold the Port Retainer in place. The Port Retainer holds the Port in place on the main mask/helmet body.
Tools Required: Adjustable Torque Screwdriver Insert Test Jig Block, Screw & Washer
Test Procedure:
1. Remove the Port Retainer, Port and O-Ring according to the instructions in the mask/helmet manual.
2. Place the Insert Testing Jig block over one of the screw inserts and thread the testing jig screw through the washer and hole in the jig and into the insert, tightening it hand tight (Fig. B).
3. Using the Adjustable torque screwdriver, slowly tighten the test jig screw to 14 inch pounds. While tightening, observe the insert and surrounding area. The insert should not move at all and there should not be any cracks in the surrounding fiberglass. Also listen for cracking sounds as you tighten the screw. Any such sounds could be an indication that the fiberglass surrounding the insert has been stressed and damage may be present. Re-test a second time to be sure the insert is secure.
4. With the screw tightened, check for cracks around the outside edge of the port area (Fig. B). If any are found, this area must be repaired, as this is a sign that the insert has been over tightened and has damaged the fiberglass.
5. If, after checking all the inserts, they all check out O.K., place a drop of Super Glue around each insert where the insert meets the fiberglass, this will help keep the joint sealed. Replace the port, O-ring, and Port Retainer according to the manual instructions and tighten all Port Retainer screws to 12 inch pounds with the adjustable torque screwdriver.
6. Fig. A gives the specifications for the Testing Jig. The Block is machined from aluminum stock.
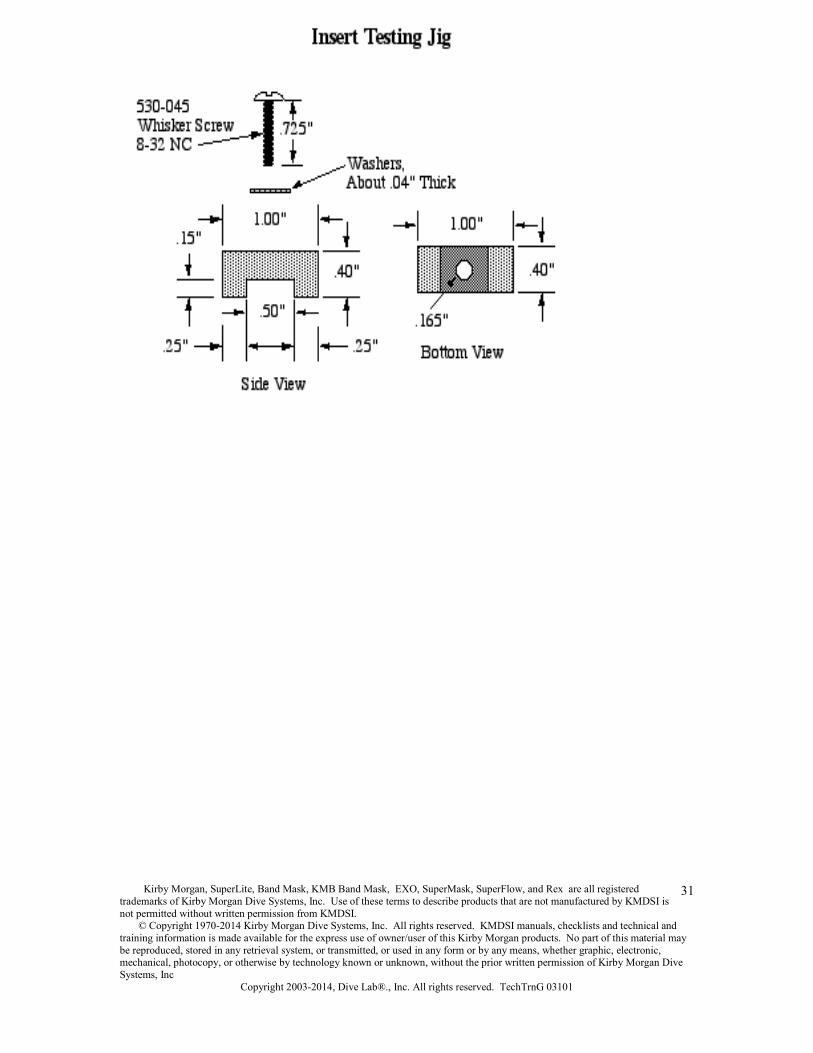
Kirby Morgan, SuperLite, Band Mask, KMB Band Mask, EXO, SuperMask, SuperFlow, and Rex are all registered trademarks of Kirby Morgan Dive Systems, Inc. Use of these terms to describe products that are not manufactured by KMDSI is not permitted without written permission from KMDSI. © Copyright 1970-2014 Kirby Morgan Dive Systems, Inc. All rights reserved. KMDSI manuals, checklists and technical and training information is made available for the express use of owner/user of this Kirby Morgan products. No part of this material may be reproduced, stored in any retrieval system, or transmitted, or used in any form or by any means, whether graphic, electronic, mechanical, photocopy, or otherwise by technology known or unknown, without the prior written permission of Kirby Morgan Dive Systems, Inc
Copyright 2003-2014, Dive Lab®., Inc. All rights reserved. TechTrnG 03101
31

Kirby Morgan, SuperLite, Band Mask, KMB Band Mask, EXO, SuperMask, SuperFlow, and Rex are all registered trademarks of Kirby Morgan Dive Systems, Inc. Use of these terms to describe products that are not manufactured by KMDSI is not permitted without written permission from KMDSI. © Copyright 1970-2014 Kirby Morgan Dive Systems, Inc. All rights reserved. KMDSI manuals, checklists and technical and training information is made available for the express use of owner/user of this Kirby Morgan products. No part of this material may be reproduced, stored in any retrieval system, or transmitted, or used in any form or by any means, whether graphic, electronic, mechanical, photocopy, or otherwise by technology known or unknown, without the prior written permission of Kirby Morgan Dive Systems, Inc
Copyright 2003-2014, Dive Lab®., Inc. All rights reserved. TechTrnG 03101
32
Kirby Morgan, SuperLite, Band Mask, KMB Band Mask, EXO, SuperMask, SuperFlow, and Rex are all registered trademarks of Kirby Morgan Dive Systems, Inc. Use of these terms to describe products that are not manufactured by KMDSI is not permitted without written permission from KMDSI. © Copyright 1970-2014 Kirby Morgan Dive Systems, Inc. All rights reserved. KMDSI manuals, checklists and technical and training information is made available for the express use of owner/user of this Kirby Morgan products. No part of this material may be reproduced, stored in any retrieval system, or transmitted, or used in any form or by any means, whether graphic, electronic, mechanical, photocopy, or otherwise by technology known or unknown, without the prior written permission of Kirby Morgan Dive Systems, Inc
Copyright 2003-2014, Dive Lab®., Inc. All rights reserved. TechTrnG 03101
33
BLEED/RELIEF VALVE CLEANING INSPECTION AND OVERHAUL PROCEDURES
Appendix 4 4-14-09
The bleed/relief valve should be disassembled, cleaned, and inspected at least once a year, andanytime the valve fails monthly lift testing, or fails to maintain a seal when within the specified range. The bleed/relief valve is easily cleaned using a nylon toothbrush and a 50/50 solution of vinegar and fresh water. Cleaning for 15 minutes in an ultrasonic sink, if available, with the 50/50 vinegar solution is highly recommended.
Repair parts are available from Kirby Morgan Dive Systems Inc. (KMDSI). Normal replacement parts include the o-ring, soft seat, spring, and hex nut. The O-ring should be replaced at least annually. The other parts require replacement only if worn or damaged. An exploded view of the valve is located in all KMDSI Helmet and Band Mask Operations and Maintenance Manuals.
CLEANING: Tools: 1/2” open-end wrench 1/8” Allen wrench Nylon toothbrush Vinegar Fresh water Mild dish detergent Ultrasonic sink, if available Magnifying glass New valve body o-ring
WARNING: DO NOT use cleaning solvents (i.e. mineral spirits, bleach, etc.) when cleaning the bleed/relief valve. The use of cleaning solvents may lead to failure of the bleed/relief valve.
1. Secure gas pressure to the first stage regulator, then bleed off.
2. Remove the bleed/relief valve from the regulator body using the 1/2” open-end wrench.
3. Remove, cut, and discard the bleed/relief valve body o-ring.
4. Using the 1/2” open-end wrench to hold the bleed/relief body, use the 1/8” Allen wrench to remove the Allen head adjustment screw. Then, shake out the spring and soft seat.
5. Place all parts in the 50/50 solution of vinegar and water and allow to soak for 15 to 30 minutes. If using an ultrasonic sink, reduce time to 15 minutes.
6. Using the nylon toothbrush, brush all components to remove corrosion and mineral deposits. Then, rinse with fresh water and blow or air dry.

Kirby Morgan, SuperLite, Band Mask, KMB Band Mask, EXO, SuperMask, SuperFlow, and Rex are all registered trademarks of Kirby Morgan Dive Systems, Inc. Use of these terms to describe products that are not manufactured by KMDSI is not permitted without written permission from KMDSI. © Copyright 1970-2014 Kirby Morgan Dive Systems, Inc. All rights reserved. KMDSI manuals, checklists and technical and training information is made available for the express use of owner/user of this Kirby Morgan products. No part of this material may be reproduced, stored in any retrieval system, or transmitted, or used in any form or by any means, whether graphic, electronic, mechanical, photocopy, or otherwise by technology known or unknown, without the prior written permission of Kirby Morgan Dive Systems, Inc
Copyright 2003-2014, Dive Lab®., Inc. All rights reserved. TechTrnG 03101
34
7. Using the magnifying glass, carefully inspect all components for excessive corrosion and/or damage. Replace the spring and/or adjustment nut, if either part is excessively corroded or shows signs of wear and/or damage. Inspect the soft seat for nicks, cuts, and wear and replace if any damage is found. Replace the entire assembly if any damage to the valve body is present.
NOTE: A deep groove in the soft seat is normal. Replacement is only necessary if the rubber seat is deteriorated, cut, and/or chipped.
REASSEMBLY:
1. After cleaning, inspection and/or parts replacement reassemble the valve by installing the soft seat, spring, and adjustment nut. Screw the adjustment nut down until it is approximately 1/2 thread from being flush with the top of the valve body.
2. Lightly lubricate a new o-ring, then install on the valve body.
3. Test the bleed/relief valve according to the test procedure below.
LIFT CHECK/SETTING THE BLEED/RELIEF VALVE:
Tools required: Adjustable first stage scuba regulator or controlled adjustable pressure source Intermediate test gauge 1/2” open-end wrench 1/8” Allen wrench HP air source at least 500 psig (34.4 bar). Mild dish detergent
The purpose of lift checking the bleed/relief valve is to ensure it operates properly, allowing excess pressure to escape in the event the first stage develops a slight leak. Without the bleed/relief valve, high-pressure gas will continue to increase until the emergency supply hose ruptures, possibly causing injury and a complete loss of the Emergency Gas System (EGS). This procedure explains the steps necessary for readjusting the bleed/relief valve after it is cleaned, overhauled or any time the valve is tested.
CAUTION: Ensure the bleed/relief valve is only installed in a low-pressure port of the first stage regulator.
DANGER: Do not use oxygen, or mixed gas containing more than 23% oxygen by volume, for lift checking the bleed/relief valve. The use of oxygen, or mixed gas, in a high-pressure supply system not designed and cleaned for oxygen service, can result in a fire or explosion causing serious injury or death.
NOTE: The bleed/relief valve is lift checked and/or adjusted using an adjustable first stage regulator, equipped with a low-pressure test gauge, which is used for adjusting the intermediate pressure of scuba regulators. The check/adjustment can be performed using a standard scuba test stand, or a gas control console, using air or mixed gas with an oxygen content below 23% by volume. If a first stage scuba regulator is used, it must be able to be adjusted to the desired lifting pressure. The pressure gauge should be compared to a gauge of known accuracy.
Kirby Morgan, SuperLite, Band Mask, KMB Band Mask, EXO, SuperMask, SuperFlow, and Rex are all registered trademarks of Kirby Morgan Dive Systems, Inc. Use of these terms to describe products that are not manufactured by KMDSI is not permitted without written permission from KMDSI. © Copyright 1970-2014 Kirby Morgan Dive Systems, Inc. All rights reserved. KMDSI manuals, checklists and technical and training information is made available for the express use of owner/user of this Kirby Morgan products. No part of this material may be reproduced, stored in any retrieval system, or transmitted, or used in any form or by any means, whether graphic, electronic, mechanical, photocopy, or otherwise by technology known or unknown, without the prior written permission of Kirby Morgan Dive Systems, Inc
Copyright 2003-2014, Dive Lab®., Inc. All rights reserved. TechTrnG 03101
35
1. Install the bleed/relief valve in a low-pressure port on an adjustable first stage regulator, or install on a scuba test stand that has an adjustable pressure supply, then tighten with the 1/2 ” open-end wrench.
2. Install an intermediate pressure gauge in one of the low-pressure ports of the first stage regulator.
3. Install the first stage regulator on the cylinder. Ensure the bleed/relief valve and intermediate pressure gauge are attached to low-pressure ports facing up.
4. Wet the bleed/relief valve with soapy water to help indicate when gas flow starts.
5. Slightly crack open the gas supply so a very slight flow of gas is traveling to the first stage, until the intermediate pressure gauge travels no further. Leave the supply valve only slightly cracked open. Most first stage regulators use an intermediate setting between 130 - 150 psig (9.3 – 10.3 bar).
6. Slowly, increase the intermediate setting of the first stage until the pressure gauge indicates 180 psig (12.4 bar). If the bleed/relief valve starts venting before a pressure of 180 psig (12.4 bar) is reached (as indicated by small bubbles forming or by “popping”), turn the adjustment screw in (clockwise) using the 1/8” Allen wrench on the bleed valve hex nut 1/16th -1/8th turn, or until all leakage stops as indicated with the soapy water. If a pressure above 200 psig (13.8 bar) is reached with out the bleed/relief valve forming bubbles or popping, slowly back out (counterclockwise) on the adjustment hex nut 1/16th of a turn at a time until bubbles form.
NOTE: If the Allen screw on the bleed/relief valve hex nut is rotated too far, too fast, the bleed/relief valve will pop open. This could possibly require the air to be secured at the cylinder to reset the seat before the adjustment can be accomplished.
7. Continue this procedure as necessary until the bleed/relief valve consistently starts to forms bubbles at a pressure between 180 and 200 psig (12.4 -13.8 bar). After the valve has been set to just bubble or pop off, back out on the regulator adjustment nut until the pressure is set back to 135 psig (9.3 bar), or at the factory setting of the first stage regulator.
8. Re-wet the bleed/relief valve, and then slowly increase the intermediate pressure on the first stage regulator to recheck the lift pressure once more. The bleed/relief valve should start forming bubbles between 180 - 200 psig (12.4 -13.8 bar) After final adjustment; reset the first stage regulator to 135 psig (9.3 bar), or to the manufacturer’s recommended pressure setting. Spray the bleed/relief valve with soapy water and ensure there are no leaks.
9. After a successful leak check, the bleed/relief valve may be reinstalled into the system.
NOTE: The bleed/relief valve can now be installed in any first stage regulator, providing the first stage has an intermediate setting of 135 - 165 psig (9.3 – 11.4 bar).
TROUBLESHOOTING:
Problem: Valve pops open and will not stop flowing: Check: If while setting the bleed/relief valve the valve pops open and will not stop flowing, secure the air supply valve and allow the valve to reseat. Try the procedure again, ensuring that the supply valve is only slightlycracked open, allowing full test pressure but minimizing high flow potential.

Kirby Morgan, SuperLite, Band Mask, KMB Band Mask, EXO, SuperMask, SuperFlow, and Rex are all registered trademarks of Kirby Morgan Dive Systems, Inc. Use of these terms to describe products that are not manufactured by KMDSI is not permitted without written permission from KMDSI. © Copyright 1970-2014 Kirby Morgan Dive Systems, Inc. All rights reserved. KMDSI manuals, checklists and technical and training information is made available for the express use of owner/user of this Kirby Morgan products. No part of this material may be reproduced, stored in any retrieval system, or transmitted, or used in any form or by any means, whether graphic, electronic, mechanical, photocopy, or otherwise by technology known or unknown, without the prior written permission of Kirby Morgan Dive Systems, Inc
Copyright 2003-2014, Dive Lab®., Inc. All rights reserved. TechTrnG 03101
36
Problem: After resetting the first stage to 135 psig (9.3 bar), the valve continues to leak:
Check: This indicates the valve body seating surface or the soft seat is either dirty or damaged. Usually, cleaning both the metal body seating surface in the valve body and the soft seat will fix the problem. If, after cleaning, the problem persists, replace the soft seat and spring and retest the unit. If, after this has been accomplished, the seat continues to leak, then replacement of the complete valve will be necessary.
Kirby Morgan, SuperLite, Band Mask, KMB Band Mask, EXO, SuperMask, SuperFlow, and Rex are all registered trademarks of Kirby Morgan Dive Systems, Inc. Use of these terms to describe products that are not manufactured by KMDSI is not permitted without written permission from KMDSI. © Copyright 1970-2014 Kirby Morgan Dive Systems, Inc. All rights reserved. KMDSI manuals, checklists and technical and training information is made available for the express use of owner/user of this Kirby Morgan products. No part of this material may be reproduced, stored in any retrieval system, or transmitted, or used in any form or by any means, whether graphic, electronic, mechanical, photocopy, or otherwise by technology known or unknown, without the prior written permission of Kirby Morgan Dive Systems, Inc
Copyright 2003-2014, Dive Lab®., Inc. All rights reserved. TechTrnG 03101
37
KIRBY MORGAN DEEP SEA DIVING HELMETS ALL MODELS
MONTHLY INSPECTION AND MAINTENANCE CHECKLIST Appendix A2.2
7-9-14 MW
This inspection is the minimum recommended maintenance and should be performed at least ONCE A MONTH with Helmet(s) in continuous use (used for more than 20 diving days in a month) or at least every TWO (2) MONTHS, with Helmet(s) used less than 10 diving days a month.
This checklist is intended to aid persons performing routine maintenance and inspections of all KMDSI Helmets. This checklist should be used in conjunction with the applicable Operations and Maintenance Manual for the model helmet being serviced and is primarily intended to document the maintenance as it is completed and act as a guide. Specific detailed procedures for each section of this checklist can be found in the Operations and Maintenance Manuals. This checklist when completed should be retained in the equipment maintenance files. This checklist is generic in nature and is intended to be used for all models of KMDSI Diving Helmets.
NOTE: KMDSI strongly recommends that all repairs be performed by trained Personnel.
NOTE: Helmets being used in polluted waters, or extreme environments, will require more frequent inspection and maintenance.
NOTE: This checklist should be used in conjunction with the most current Operations and Maintenance Manual. For latest Manual revisions please check the KMDSI web page at www.kirbymorgan.com.
NOTE: During removal of components for inspection, O-rings and other consumable items may be reused, providing they are clean and a visual inspection does not reveal any damage or deterioration.
NOTE: Perform the Yoke/Neck Clamp Assembly, Helmet, and Side Block/Demand Regulator inspection procedures with gas supplies not connected to the Side Block. Attach the gas supply at Step 5 of the “Side Block/Demand Regulator” inspection procedure.

Kirby Morgan, SuperLite, Band Mask, KMB Band Mask, EXO, SuperMask, SuperFlow, and Rex are all registered trademarks of Kirby Morgan Dive Systems, Inc. Use of these terms to describe products that are not manufactured by KMDSI is not permitted without written permission from KMDSI. © Copyright 1970-2014 Kirby Morgan Dive Systems, Inc. All rights reserved. KMDSI manuals, checklists and technical and training information is made available for the express use of owner/user of this Kirby Morgan products. No part of this material may be reproduced, stored in any retrieval system, or transmitted, or used in any form or by any means, whether graphic, electronic, mechanical, photocopy, or otherwise by technology known or unknown, without the prior written permission of Kirby Morgan Dive Systems, Inc
Copyright 2003-2014, Dive Lab®., Inc. All rights reserved. TechTrnG 03101
38
Date:
Helmet Serial #:
Associated Equipment Serial #(s):
Equipment belonging to: (print name):
PROCEDURES INITIALSSL-17A/B YOKE / NECK CLAMP ASSEMBLY
Helmet Attachment ComponentsNOTE: For SL-17K, SL-17C, SL-27, and KM-37/SS, KM-47, KM-57, KM-77, KM-97, skip to step 1, page 3
NOTE: KMDSI recommends that Neck Clamps older than five years old be removed from service and replaced. However, neck clamps that show no signs of damage and or deterioration can remain in service if the user/owner elects and should be inspected at least weekly I.A.W. Steps 1-6 of this procedure. 1. Remove the Yoke/Neck Clamp Assembly from the Helmet.
Perform a visual inspection of all components. Ensure the Neck Dam has no holes, tears, and/or damage. The neoprene must be firm. The Neck Dam should fit snug, but should never fit a diver tight enough to cause discomfort. Guidance SL-17A/B O&M Manual.
2. Visually inspect all metal parts of the Clamp Assembly for damage. Check the Hinge Pins for loose fit, signs of cracking, distortion, and/or any damage. Guidance SL-17A/B O&M Manual.
3. Visually inspect the Adjustment Stud on the Neck Clamp for signs of cracking, distortion, bending, stripped and/or damaged threads by loosening Nut (4) all the way to the shoulder of the Stud, and manually squeezing the Neck Dam Clamp to expose the portion of the Stud that is normally hidden by the Stud Block. If any damage is present the, Neck Clamp requires replacement. Guidance SL-17A/B O&M Manual.

Kirby Morgan, SuperLite, Band Mask, KMB Band Mask, EXO, SuperMask, SuperFlow, and Rex are all registered trademarks of Kirby Morgan Dive Systems, Inc. Use of these terms to describe products that are not manufactured by KMDSI is not permitted without written permission from KMDSI. © Copyright 1970-2014 Kirby Morgan Dive Systems, Inc. All rights reserved. KMDSI manuals, checklists and technical and training information is made available for the express use of owner/user of this Kirby Morgan products. No part of this material may be reproduced, stored in any retrieval system, or transmitted, or used in any form or by any means, whether graphic, electronic, mechanical, photocopy, or otherwise by technology known or unknown, without the prior written permission of Kirby Morgan Dive Systems, Inc
Copyright 2003-2014, Dive Lab®., Inc. All rights reserved. TechTrnG 03101
39
4. Check the Rear Hinge Tab and Hinge for signs of cracking, bending, distortion, and/or loose fasteners. Guidance, 7.9.4 SL-17A/B O&M manual
5. Check the Latch Catch Assembly for proper operation. Check for worn and/or damaged parts as well as loose and/or missing screws. Ensure the proper Safety Pin is present. Guidance SL-17 A/B O&M Manual.
6. Test mate the Yoke/Neck Clamp to the Helmet. Check for proper Clamp adjustment and smooth operation. When properly adjusted, use a 7/16” open-end wrench on Nut as a back-up wrench and a 7/16” deep well socket with a torque wrench. Ensure Lock Nut is torqued to 60 inch lbs. Repair/replace and/or adjust parts as necessary. Guidance 17A/B O&M Manual.
HELMET MODELS: SL-17K, SL-17C, SL-27, KM-37/SS, KM-47, KM-57, KM-77, KM-97
HELMET ATTACHMENT COMPONENTS (Neck Ring Assembly)
1. Remove the Neck Ring Assembly from the Helmet. Remove and inspect the O-ring for damage or deterioration, nicks and / or cuts. Clean and inspect the O-ring groove for damage. Lightly lubricate with recommended lubricant and reinstall. Guidance, applicable O&M Manual.
2. Inspect the Chin Strap of the head liner and/or new style chin strap attached inside helmet attachment components for signs of wear or damage. Guidance, applicable O&M Manual. Note: KMDSI recommends at least one style of the chin strap be used. Either the strap on the headliner or the chin strap that attaches inside the helmets. 3. Inspect the Neck Dam material for signs of wear or damage. Ensure the Neck Dam has no holes, tears, and/or damage. The neoprene must be firm. The Neck Dam should fit snug, but should never fit a diver tight enough to cause discomfort. Check to ensure it is free of deterioration. Guidance, applicable O&M Manual.

Kirby Morgan, SuperLite, Band Mask, KMB Band Mask, EXO, SuperMask, SuperFlow, and Rex are all registered trademarks of Kirby Morgan Dive Systems, Inc. Use of these terms to describe products that are not manufactured by KMDSI is not permitted without written permission from KMDSI. © Copyright 1970-2014 Kirby Morgan Dive Systems, Inc. All rights reserved. KMDSI manuals, checklists and technical and training information is made available for the express use of owner/user of this Kirby Morgan products. No part of this material may be reproduced, stored in any retrieval system, or transmitted, or used in any form or by any means, whether graphic, electronic, mechanical, photocopy, or otherwise by technology known or unknown, without the prior written permission of Kirby Morgan Dive Systems, Inc
Copyright 2003-2014, Dive Lab®., Inc. All rights reserved. TechTrnG 03101
40
4. Visually inspect the locking collar for signs of damage. Check to ensure the neck pad can slide to allow for proper adjustment. Check for loose or missing fasteners. Guidance, applicable O&M Manual.
5. Check the two sealed Pull Pins for smooth operation. Visually inspect for signs of oil leakage. Guidance, applicable O & M Manual.
Caution: If Sealed Pull Pins do not operate smoothly, or if oil is leaking, from the Pull Pins, the Pull Pins should be serviced by an Authorized / Certified KMDSI Repair Technician trained to overhaul Pull Pins.
6. Visually inspect the metal Helmet Ring at the base of the Helmet for signs of damage to the sealing surface. Any damage requires an inspection by an Authorized KMDSI Technician. Guidance Applicable O&M Manual.
7. Check the Swing Tongue Catch for smooth operation. Check for obvious worn or damaged parts and components. Guidance O&M Manual.
HELMET SHELL, ALL MODELS OF KMDSI DIVING HELMETS
1. Visually inspect Helmet Shell exterior for loose and/or missing fasteners and obvious signs of fiberglass damage; including cracks, gouges, and/or depressions.
NOTE: Any gouges deeper than 1/16” that shows bare fiberglass should be repaired. Fiberglass and gel coat repairs must be completed by a technician that has received certification for Helmet Shell repairs by KMDSI or Dive Lab, Inc.
2. Remove and inspect Helmet Liner/Cushion for tears, broken snaps and/or neck strap damage. Check the condition of the foam. Repair/replace as necessary. Guidance O&M Manual.

Kirby Morgan, SuperLite, Band Mask, KMB Band Mask, EXO, SuperMask, SuperFlow, and Rex are all registered trademarks of Kirby Morgan Dive Systems, Inc. Use of these terms to describe products that are not manufactured by KMDSI is not permitted without written permission from KMDSI. © Copyright 1970-2014 Kirby Morgan Dive Systems, Inc. All rights reserved. KMDSI manuals, checklists and technical and training information is made available for the express use of owner/user of this Kirby Morgan products. No part of this material may be reproduced, stored in any retrieval system, or transmitted, or used in any form or by any means, whether graphic, electronic, mechanical, photocopy, or otherwise by technology known or unknown, without the prior written permission of Kirby Morgan Dive Systems, Inc
Copyright 2003-2014, Dive Lab®., Inc. All rights reserved. TechTrnG 03101
41
3. Remove the Earphones and Microphones from their holders. Remove the covers from the Earphones and inspect. Remove microphone from Oral Nasal Mask. Clean and repair/replace as necessary. Perform a communications check. Guidance O & M Manual.
4. Remove the Nose Clearing Device and Oral Nasal Mask. Remove the Oral Nasal Valve body as an assembly. Clean the oral nasal valve and Valve Body as an assembly. Clean the Oral Nasal Mask. Inspect Mask and Valve Assembly for damage and/or deterioration. Replace the Oral Nasal Mask if any damage is found. Replace the Oral Nasal Valve if it appears dried, stiff, or does not lay flat. Clean and inspect the Nose Clearing Pad, Shaft and O-rings for wear. Replace the Pad if deteriorated and/or damaged. Replace O-rings if any signs of wear or damage is present. Lightly lubricate the Shaft O-rings and the Shaft, then reinstall. Reinstall Oral Nasal Mask and Valve Assembly. Guidance O & M Manual.
5. On The SL-17 A/B Remove Helmet O-ring at the base of the Helmet. Wipe O-ring and O-ring groove with a clean cloth. Inspect the O-ring groove for damage. Inspect the O-ring for cracking, cuts, and/or signs of damage/deterioration and replace if necessary. Lightly lubricate the Neck Dam O-ring and reinstall on the Helmet. Guidance O & M Manual.
6. Without air to the Helmet, check the operation of the Steady Flow Valve and Emergency Supply Valve. If the Valves do not operate smoothly they should be disassembled, cleaned, and lubricated. Guidance, applicable O&M manual.
7. Remove the Main Exhaust Valve Cover and inspect the Main Exhaust/Dewatering Valve and Seat for damage and/or contamination. Ensure the Valve material is not hardened, distorted, and/or warped. Replace the Valve if questionable. Reinstall the Cover. Guidance, applicable O&M manual.
SIDE BLOCK/DEMAND REGULATOR NOTE: Ensure gas supplies ARE NOT attached to the Helmet EGS
and steady flow valve; remove protective dust caps, DO NOTopen the Steady Flow/Defogging Valve.

Kirby Morgan, SuperLite, Band Mask, KMB Band Mask, EXO, SuperMask, SuperFlow, and Rex are all registered trademarks of Kirby Morgan Dive Systems, Inc. Use of these terms to describe products that are not manufactured by KMDSI is not permitted without written permission from KMDSI. © Copyright 1970-2014 Kirby Morgan Dive Systems, Inc. All rights reserved. KMDSI manuals, checklists and technical and training information is made available for the express use of owner/user of this Kirby Morgan products. No part of this material may be reproduced, stored in any retrieval system, or transmitted, or used in any form or by any means, whether graphic, electronic, mechanical, photocopy, or otherwise by technology known or unknown, without the prior written permission of Kirby Morgan Dive Systems, Inc
Copyright 2003-2014, Dive Lab®., Inc. All rights reserved. TechTrnG 03101
42
1. Check the Umbilical Supply One-Way Valve for proper operation by sucking on the Umbilical Adapter with the Emergency Valve open and the steady flow valve shut. No gas should be drawn through the One-Way Valve. Guidance applicable O&M manual.
2. Remove the Regulator Cover Clamp, Cover, and Diaphragm. Visually inspect the interior of the Regulator Body for corrosion and/or contamination. Clean as necessary. Guidance applicable O&M manual.
3. Carefully inspect the Diaphragm for cuts, tears, and/or deterioration. If any damage is found, replace the Diaphragm. Guidance applicable O&M manual.
4. Carefully check the Regulator Exhaust Valve for warping, distortion, stiffness, and/or damage. This is checked by pressing on the Flapper Valve from inside the Regulator. Check the Regulator Body Valve Seat Spokes. The Spokes should be flat and even. Straighten if deformed. If the Valve shows signs of damage and/or deterioration, replace the Valve. Guidance applicable O&M manual.
5. Attach an air supply source to the Umbilical Adapter and set the supply pressure to between 135 - 150 psig (9.3 – 10.3 bar). Adjust the Regulator Adjustment Knob out, until a slight free flow develops, then adjust in until the free flow just stops and check the Lever play. There should be between 1/16” - 1/8” of play in the Lever. Adjust as necessary. Guidance applicable O&M manual. Reinstall the Diaphragm, the Cover, and the Clamp.
6. Depress the purge button. On the SuperFlow and SuperFlow 350 regulators the purge button should travel between 1/16”-1/8” before air flow starts. On the 450 and 450 balance regulator, the flexible cover should travel 1/16”-1/8” before air starts to flow. For the REX the cover should travel between 3/16” and 1/4" before flow starts. With all regulators depressing the purge more than a 1/4" should result in a strong flow of gas. If the Regulator Purge travel is less than or greater than amount specified, re-adjust the Lever. Guidance O&M manual.
7. Check the Steady Flow Valve for proper operation.
Kirby Morgan, SuperLite, Band Mask, KMB Band Mask, EXO, SuperMask, SuperFlow, and Rex are all registered trademarks of Kirby Morgan Dive Systems, Inc. Use of these terms to describe products that are not manufactured by KMDSI is not permitted without written permission from KMDSI. © Copyright 1970-2014 Kirby Morgan Dive Systems, Inc. All rights reserved. KMDSI manuals, checklists and technical and training information is made available for the express use of owner/user of this Kirby Morgan products. No part of this material may be reproduced, stored in any retrieval system, or transmitted, or used in any form or by any means, whether graphic, electronic, mechanical, photocopy, or otherwise by technology known or unknown, without the prior written permission of Kirby Morgan Dive Systems, Inc
Copyright 2003-2014, Dive Lab®., Inc. All rights reserved. TechTrnG 03101
43
NOTE: The Steady Flow Valve will rotate approximately 1 3/4 revolutions from closed to full open. With the air pressure to the Helmet between 135 - 150 psig (9.3 - 10.3 bar), turning the Steady Flow Valve ½ turn open should result in a strong flow of gas through the Defogger Train.
8. Secure the gas supply, then bleed down and remove the umbilical from the Inlet Adapter.
9. Attach a regulated gas supply (normally the EGS system), adjusted to between 135 – 150 psig (9.3 – 10.3 bar), to the Emergency Valve on the Side Block. On the Side Block, open the Emergency Supply Valve all the way, and then slowly open the regulated gas supply. Check the function of the Regulator Purge, Regulator Adjustment Knob, and the Steady Flow Valve in accordance with previous steps 6 and 7. Check for gas exiting from the One-Way Valve. There should be no gas exiting the Umbilical Adapter.
NOTE: The Emergency Gas System consists of a good quality First Stage Regulator equipped with, an Over-Pressure Bleed/Relief Valve, and an Emergency Gas Supply Hose that connects to the Emergency Valve on the Helmet Side Block.
EMERGENCY GAS SUPPLY (EGS)1. Check the hydrostatic date and the last visual inspection record
(“VIP”) of the cylinder. Ensure the date(s) are within the specified range. The VIP is done at least annually and the hydrostatic test is done at least every five (5) years.
2. Check the maintenance record of the EGS components to ensure the First Stage Regulator maintenance has been performed in accordance with the manufacturer’s recommendations.
3. Check all of the Hoses for signs of blisters, cover slippage, cuts, and/or abrasions. Replace any Hose(s) that shows signs of leakage/damage. If a Quick Connect EGS Hose is being used, inspect the quick connect and fittings for signs of wear/damage.
4. If a Submersible Pressure Gauge is used, ensure it has been compared to a gauge of known accuracy and inspect the HP hose for signs of corrosion and damage.
5. Test the First Stage Regulator’s Bleed/Relief Valve. Guidance 6.12 or as per “Appendix 4”: Bleed/Relief Valve Cleaning, Inspection, and Overhaul Procedures”.
6. Perform a leak check of all EGS components and fittings using soapy water in a pressurized condition. Repair/replace items as necessary.

Kirby Morgan, SuperLite, Band Mask, KMB Band Mask, EXO, SuperMask, SuperFlow, and Rex are all registered trademarks of Kirby Morgan Dive Systems, Inc. Use of these terms to describe products that are not manufactured by KMDSI is not permitted without written permission from KMDSI. © Copyright 1970-2014 Kirby Morgan Dive Systems, Inc. All rights reserved. KMDSI manuals, checklists and technical and training information is made available for the express use of owner/user of this Kirby Morgan products. No part of this material may be reproduced, stored in any retrieval system, or transmitted, or used in any form or by any means, whether graphic, electronic, mechanical, photocopy, or otherwise by technology known or unknown, without the prior written permission of Kirby Morgan Dive Systems, Inc
Copyright 2003-2014, Dive Lab®., Inc. All rights reserved. TechTrnG 03101
44
7. Inspect the Harness Assembly for signs of wear or damage. Repair/replace as necessary.
Recorded service in helmet maintenance log book YES_______ NO______
NOTE: KMDSI strongly recommends that only trained certified KMDSI technicians perform overhauls. The below statement is intended to discourage non trained and non certified persons from posing as certified KMDSI technicians.
I_____________________________________________hereby certify that I have performed the work required in the A2.1 and that I am a certified KMDSI / Dive Lab technician.
Print name__________________________Signature__________________________
Date___________________ID#__________Date of Certification________________
I_____________________________________________hereby certify that I have performed the work required in the A2.1 and I am not a certified KMDSI / Dive Lab technician
Technician / Owner: Print name__________________________________________
KMDSI highly recommends that a certified KMDSI Repair Technician make all repairs and that only genuine KMDSI repair and replacement parts be used. Owners of KMDSI products that elect to do their own repairs and inspections should only do so if they possess the knowledge and experience. All inspections, maintenance, and repairs should be completed using the appropriate KMDSI Operations and Maintenance Manual(s). Persons performing repairs should retain copies all replacement component receipts for additional proof of maintenance history. Should any questions on procedures, components, or repairs arise, please contact Kirby Morgan Dive Systems, Inc., by telephone at (805) 928-7772 or via e-mail at [email protected], or contact Dive Lab, Inc., by telephone at (850) 235-2715 or via e-mail at [email protected].
NOTE: The Maintenance Log, Appendix 3, of the Operations and Maintenance Manual may be used as a template for creating blank pages to record all the maintenance performed.
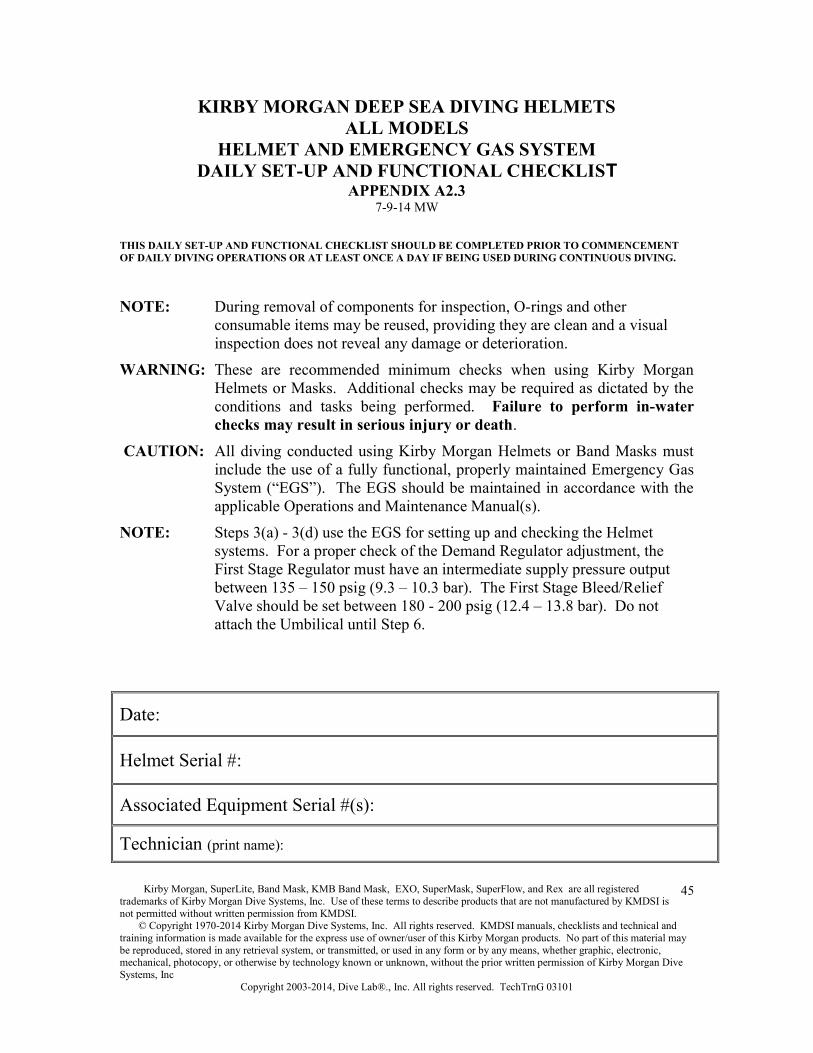
Kirby Morgan, SuperLite, Band Mask, KMB Band Mask, EXO, SuperMask, SuperFlow, and Rex are all registered trademarks of Kirby Morgan Dive Systems, Inc. Use of these terms to describe products that are not manufactured by KMDSI is not permitted without written permission from KMDSI. © Copyright 1970-2014 Kirby Morgan Dive Systems, Inc. All rights reserved. KMDSI manuals, checklists and technical and training information is made available for the express use of owner/user of this Kirby Morgan products. No part of this material may be reproduced, stored in any retrieval system, or transmitted, or used in any form or by any means, whether graphic, electronic, mechanical, photocopy, or otherwise by technology known or unknown, without the prior written permission of Kirby Morgan Dive Systems, Inc
Copyright 2003-2014, Dive Lab®., Inc. All rights reserved. TechTrnG 03101
45
KIRBY MORGAN DEEP SEA DIVING HELMETS ALL MODELS
HELMET AND EMERGENCY GAS SYSTEM DAILY SET-UP AND FUNCTIONAL CHECKLIST
APPENDIX A2.3 7-9-14 MW
THIS DAILY SET-UP AND FUNCTIONAL CHECKLIST SHOULD BE COMPLETED PRIOR TO COMMENCEMENT OF DAILY DIVING OPERATIONS OR AT LEAST ONCE A DAY IF BEING USED DURING CONTINUOUS DIVING.
NOTE: During removal of components for inspection, O-rings and other consumable items may be reused, providing they are clean and a visual inspection does not reveal any damage or deterioration.
WARNING: These are recommended minimum checks when using Kirby Morgan Helmets or Masks. Additional checks may be required as dictated by the conditions and tasks being performed. Failure to perform in-water checks may result in serious injury or death.
CAUTION: All diving conducted using Kirby Morgan Helmets or Band Masks must include the use of a fully functional, properly maintained Emergency Gas System (“EGS”). The EGS should be maintained in accordance with the applicable Operations and Maintenance Manual(s).
NOTE: Steps 3(a) - 3(d) use the EGS for setting up and checking the Helmet systems. For a proper check of the Demand Regulator adjustment, the First Stage Regulator must have an intermediate supply pressure output between 135 – 150 psig (9.3 – 10.3 bar). The First Stage Bleed/Relief Valve should be set between 180 - 200 psig (12.4 – 13.8 bar). Do not attach the Umbilical until Step 6.
Date:
Helmet Serial #:
Associated Equipment Serial #(s):
Technician (print name):

Kirby Morgan, SuperLite, Band Mask, KMB Band Mask, EXO, SuperMask, SuperFlow, and Rex are all registered trademarks of Kirby Morgan Dive Systems, Inc. Use of these terms to describe products that are not manufactured by KMDSI is not permitted without written permission from KMDSI. © Copyright 1970-2014 Kirby Morgan Dive Systems, Inc. All rights reserved. KMDSI manuals, checklists and technical and training information is made available for the express use of owner/user of this Kirby Morgan products. No part of this material may be reproduced, stored in any retrieval system, or transmitted, or used in any form or by any means, whether graphic, electronic, mechanical, photocopy, or otherwise by technology known or unknown, without the prior written permission of Kirby Morgan Dive Systems, Inc
Copyright 2003-2014, Dive Lab®., Inc. All rights reserved. TechTrnG 03101
46
STEP PROCEDURES INITIALS
SL-17 A/B YOKE / NECK CLAMP ASSEMBLY STEP 1.1 Helmet Attachment Components
Note: For SL-17K, SL-17C, SL-27, KM-37/SS, KM-47, KM-57, KM-77, KM-97, skip to step 1.2
WARNING: Anytime Helmets and Neck Clamps / Yoke Assemblies are mixed, the Neck Clamp must be checked for proper function, fit and adjustment prior to diving. 1.1 Yoke/Neck
Clamp Assembly SL-17 A/B
Note: Applicable to SL-17 A/B ONLY. For all other helmet models skip to step 1.2
Diver/Tender- Check the following (a - c):a. Visually inspect the Yoke/Neck Clamp
Assembly for signs of damage. Check the Neck Dam for tears, holes, and/or cuts. Ensure the Neck Dam is of the proper size and fit.
b. Test-mate the Yoke Assembly to the Helmet and check for proper Neck Clamp adjustment. If adjustment is necessary, use a 7/16” open-end wrench on Nut (4) as a back-up wrench and a 7/16” deep well socket with a torque wrench and ensure Lock Nut (6) is torqued to 40 inch lbs. Repair/replace and/or adjust parts as necessary. Guidance O&M Manual
c. Ensure the Latch Catch Assembly works properly, is not bent or deformed. Also check that the Safety Pin is present and attached with lanyard. Guidance O&M Manual
1.2 Neck Dam Ring Assembly 17K, 17C, 27, KM-37/SS, 47, 57, 77, 97
Diver/Tender – Check the following (a-d):
a. Visually inspect the Neck Dam Ring Assembly for signs of damage. Check the Neck for tears, holes, and/or cuts. Ensure the Neck Dam is of the proper size and fit. b. Lightly lubricate the Neck Ring O-ring if the O-ring appears dry.
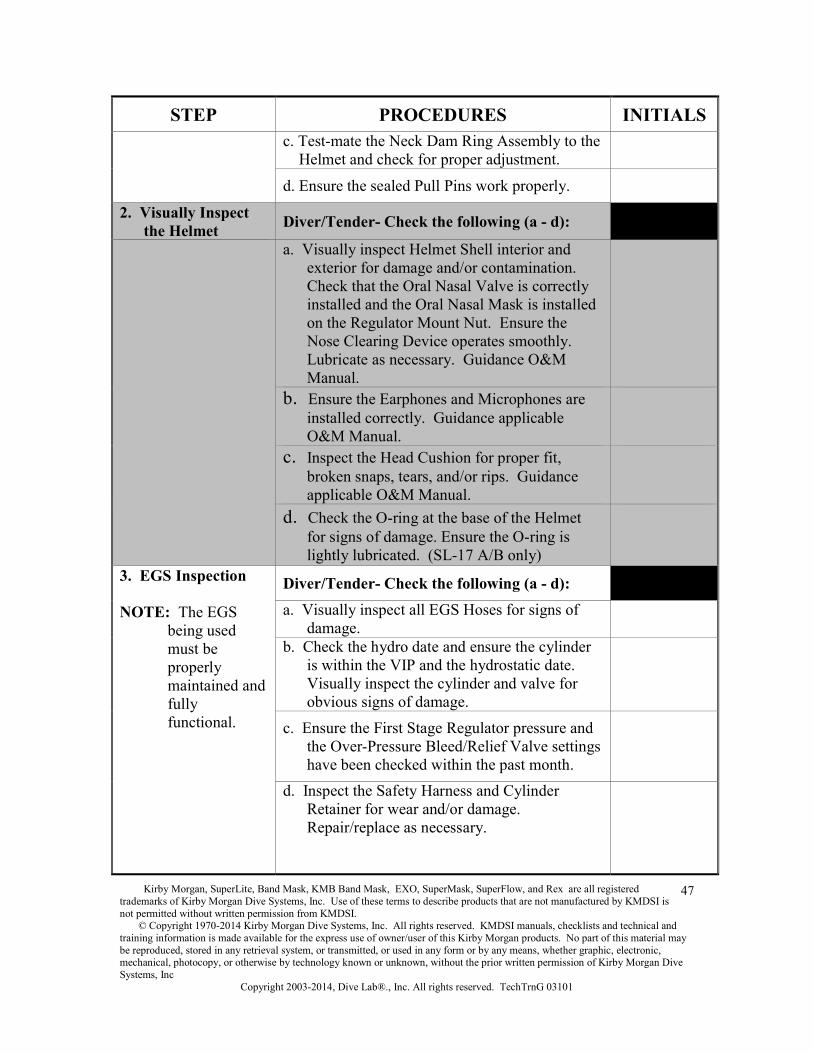
Kirby Morgan, SuperLite, Band Mask, KMB Band Mask, EXO, SuperMask, SuperFlow, and Rex are all registered trademarks of Kirby Morgan Dive Systems, Inc. Use of these terms to describe products that are not manufactured by KMDSI is not permitted without written permission from KMDSI. © Copyright 1970-2014 Kirby Morgan Dive Systems, Inc. All rights reserved. KMDSI manuals, checklists and technical and training information is made available for the express use of owner/user of this Kirby Morgan products. No part of this material may be reproduced, stored in any retrieval system, or transmitted, or used in any form or by any means, whether graphic, electronic, mechanical, photocopy, or otherwise by technology known or unknown, without the prior written permission of Kirby Morgan Dive Systems, Inc
Copyright 2003-2014, Dive Lab®., Inc. All rights reserved. TechTrnG 03101
47
STEP PROCEDURES INITIALS c. Test-mate the Neck Dam Ring Assembly to the Helmet and check for proper adjustment.
d. Ensure the sealed Pull Pins work properly.
2. Visually Inspect the Helmet Diver/Tender- Check the following (a - d):
a. Visually inspect Helmet Shell interior and exterior for damage and/or contamination. Check that the Oral Nasal Valve is correctly installed and the Oral Nasal Mask is installed on the Regulator Mount Nut. Ensure the Nose Clearing Device operates smoothly. Lubricate as necessary. Guidance O&M Manual.
b. Ensure the Earphones and Microphones are installed correctly. Guidance applicable O&M Manual.
c. Inspect the Head Cushion for proper fit, broken snaps, tears, and/or rips. Guidance applicable O&M Manual.
d. Check the O-ring at the base of the Helmet for signs of damage. Ensure the O-ring is lightly lubricated. (SL-17 A/B only)
3. EGS Inspection
NOTE: The EGS being used must be properly maintained andfully functional.
Diver/Tender- Check the following (a - d):a. Visually inspect all EGS Hoses for signs of
damage.b. Check the hydro date and ensure the cylinder
is within the VIP and the hydrostatic date. Visually inspect the cylinder and valve for obvious signs of damage.
c. Ensure the First Stage Regulator pressure and the Over-Pressure Bleed/Relief Valve settings have been checked within the past month.
d. Inspect the Safety Harness and Cylinder Retainer for wear and/or damage. Repair/replace as necessary.

Kirby Morgan, SuperLite, Band Mask, KMB Band Mask, EXO, SuperMask, SuperFlow, and Rex are all registered trademarks of Kirby Morgan Dive Systems, Inc. Use of these terms to describe products that are not manufactured by KMDSI is not permitted without written permission from KMDSI. © Copyright 1970-2014 Kirby Morgan Dive Systems, Inc. All rights reserved. KMDSI manuals, checklists and technical and training information is made available for the express use of owner/user of this Kirby Morgan products. No part of this material may be reproduced, stored in any retrieval system, or transmitted, or used in any form or by any means, whether graphic, electronic, mechanical, photocopy, or otherwise by technology known or unknown, without the prior written permission of Kirby Morgan Dive Systems, Inc
Copyright 2003-2014, Dive Lab®., Inc. All rights reserved. TechTrnG 03101
48
4. Check the Helmet EGS
Diver/Tender- Check the following (a - f):a. Orally check the One-Way Valve. Guidance
O&M Manual.b. Connect the First Stage Regulator to the EGS
Cylinder and the Helmet Emergency Supply Valve. With the cylinder turned OFF, open and close the Side Block Emergency Valve to check for smooth operation. Then open and close the Steady Flow/Defogger Valve to verify smooth operation.
c. Rotate the Regulator Adjustment Knob in fully (clockwise), then rotate out (counterclockwise) 3 – 4 rotations to check for smooth operation. d. Open the EGS Supply Valve on the cylinder.
Log the pressure _______ psig. Next open the Emergency Supply Valve on the Side Block.
e. Momentarily open the Helmet Steady Flow 3/4 to 1 full turn. Check for a strong flow of gas out of the Defogging Train, and then close.
f. Check for gas escaping from the One-Way Valve. If any gas flow is detected the One-Way valve should be overhauled or replaced.
5. Check the Demand Regulator adjustment
NOTE: If the Purge Button travels further than 1/8” before gas starts flowing, or has a weak flow of gas when fully depressed, the
Diver/Tender- Check the following (a - d):a. Rotate the Demand Regulator Adjustment
Knob out (counterclockwise) until a slight free flow develops. Next rotate in (clockwise) until the free flow stops.
b. For helmets with the SuperFlow or SF-350 regulators, slowly depress the purge button to check for too little travel or excessive travel. The purge button should travel no less than 1/16” and no more than 1/8” (1.5-3.0mm) before gas glow is heard. For the 450 and 455 regulators the flexible cover should travel 1/16”-1/8” before gas starts to flow. For the KM-77 – KM-47, the cover should travel 3/16” to 1/4" before a gas flow starts.
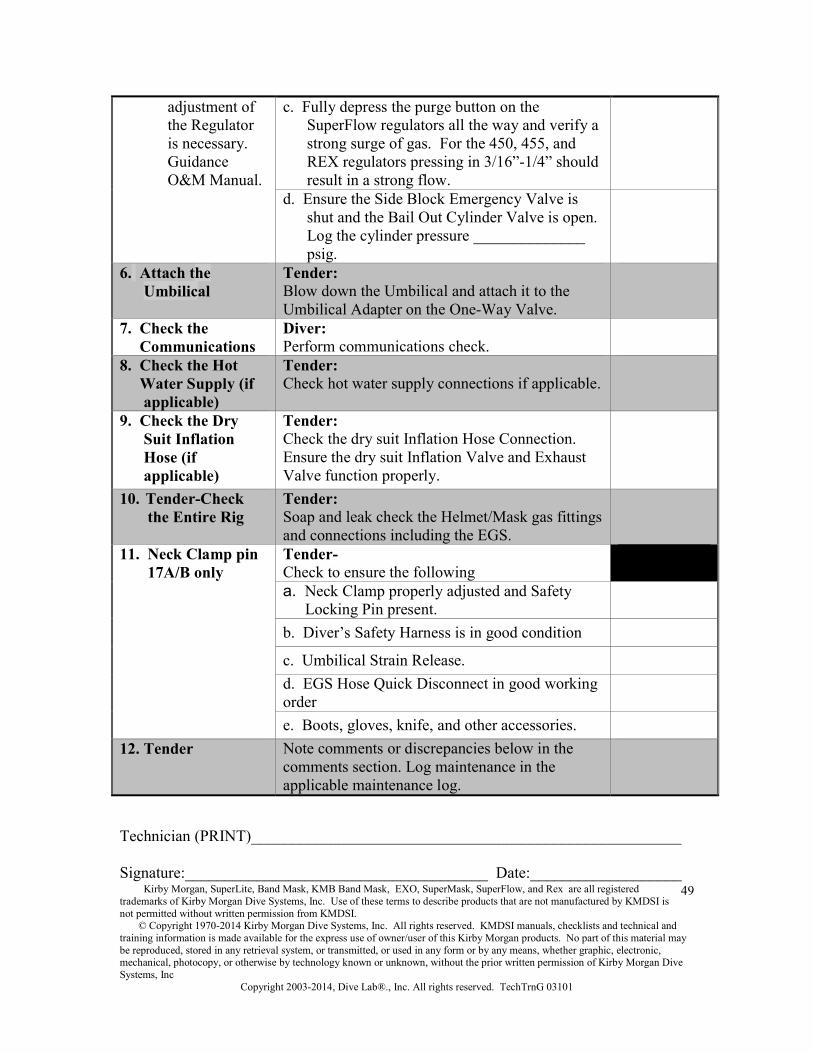
Kirby Morgan, SuperLite, Band Mask, KMB Band Mask, EXO, SuperMask, SuperFlow, and Rex are all registered trademarks of Kirby Morgan Dive Systems, Inc. Use of these terms to describe products that are not manufactured by KMDSI is not permitted without written permission from KMDSI. © Copyright 1970-2014 Kirby Morgan Dive Systems, Inc. All rights reserved. KMDSI manuals, checklists and technical and training information is made available for the express use of owner/user of this Kirby Morgan products. No part of this material may be reproduced, stored in any retrieval system, or transmitted, or used in any form or by any means, whether graphic, electronic, mechanical, photocopy, or otherwise by technology known or unknown, without the prior written permission of Kirby Morgan Dive Systems, Inc
Copyright 2003-2014, Dive Lab®., Inc. All rights reserved. TechTrnG 03101
49
adjustment of the Regulator is necessary. Guidance O&M Manual.
c. Fully depress the purge button on the SuperFlow regulators all the way and verify a strong surge of gas. For the 450, 455, and REX regulators pressing in 3/16”-1/4” should result in a strong flow.
d. Ensure the Side Block Emergency Valve is shut and the Bail Out Cylinder Valve is open. Log the cylinder pressure ______________ psig.
6. Attach the Umbilical
Tender: Blow down the Umbilical and attach it to the Umbilical Adapter on the One-Way Valve.
7. Check the Communications
Diver:Perform communications check.
8. Check the Hot Water Supply (if applicable)
Tender:Check hot water supply connections if applicable.
9. Check the Dry Suit Inflation Hose (if applicable)
Tender:Check the dry suit Inflation Hose Connection. Ensure the dry suit Inflation Valve and Exhaust Valve function properly.
10. Tender-Check the Entire Rig
Tender:Soap and leak check the Helmet/Mask gas fittings and connections including the EGS.
11. Neck Clamp pin 17A/B only
Tender- Check to ensure the following a. Neck Clamp properly adjusted and Safety
Locking Pin present.b. Diver’s Safety Harness is in good condition
c. Umbilical Strain Release.d. EGS Hose Quick Disconnect in good working ordere. Boots, gloves, knife, and other accessories.
12. Tender Note comments or discrepancies below in the comments section. Log maintenance in the applicable maintenance log.
Technician (PRINT)______________________________________________________
Signature:______________________________________ Date:___________________
Kirby Morgan, SuperLite, Band Mask, KMB Band Mask, EXO, SuperMask, SuperFlow, and Rex are all registered trademarks of Kirby Morgan Dive Systems, Inc. Use of these terms to describe products that are not manufactured by KMDSI is not permitted without written permission from KMDSI. © Copyright 1970-2014 Kirby Morgan Dive Systems, Inc. All rights reserved. KMDSI manuals, checklists and technical and training information is made available for the express use of owner/user of this Kirby Morgan products. No part of this material may be reproduced, stored in any retrieval system, or transmitted, or used in any form or by any means, whether graphic, electronic, mechanical, photocopy, or otherwise by technology known or unknown, without the prior written permission of Kirby Morgan Dive Systems, Inc
Copyright 2003-2014, Dive Lab®., Inc. All rights reserved. TechTrnG 03101
50
Comments:______________________________________________________________
_______________________________________________________________________
KMDSI strongly recommends that a certified KMDSI Repair Technician make all repairs and that only genuine KMDSI repair and replacement parts be used. Owners of KMDSI products that elect to do their own repairs and inspections should only do so if they possess the knowledge and experience. All inspections, maintenance, and repairs should be completed using the appropriate KMDSI Operations and Maintenance Manual(s). Persons performing repairs should retain all replacement component receipts for additional proof of maintenance history. Should any questions on procedures, components, or repairs arise, please contact Kirby Morgan Dive Systems, Inc., by telephone at (805) 928-7772 or via e-mail at [email protected], or contact Dive Lab, Inc., by telephone at (850) 235-2715 or via e-mail at [email protected]
NOTE: The Maintenance Log, Appendix 3, of the Operations and Maintenance Manual may be used as a template to create blank pages to record all the maintenance performed.
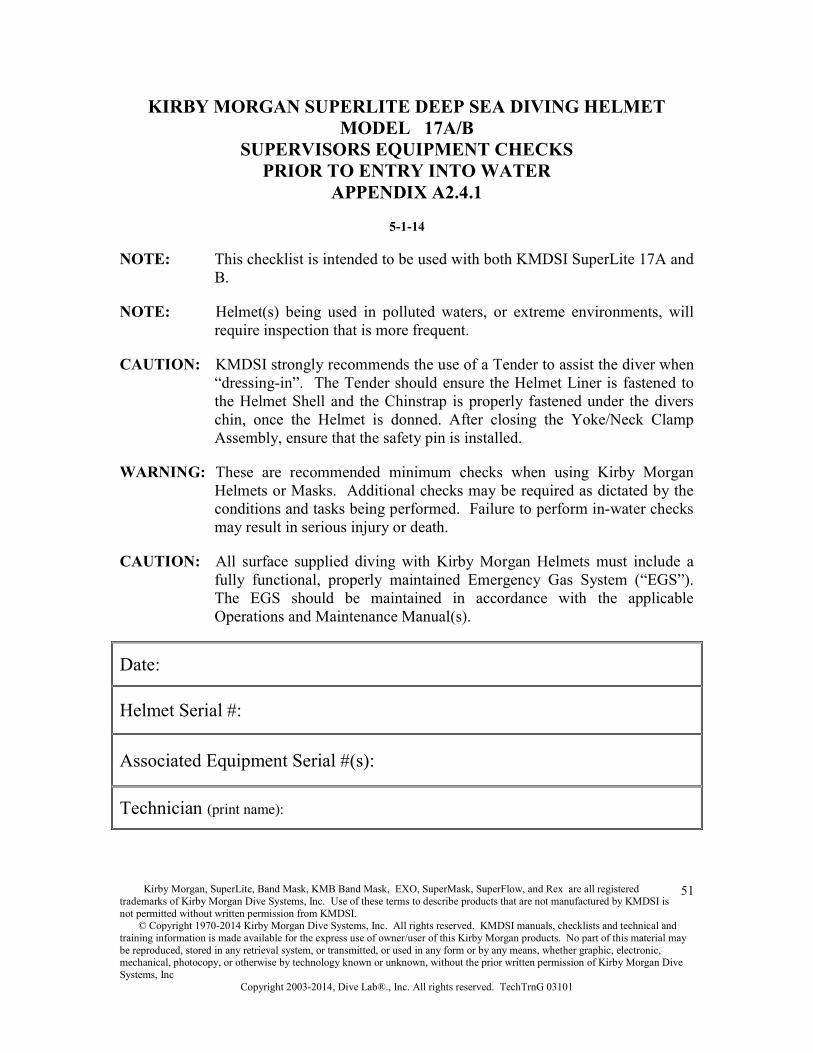
Kirby Morgan, SuperLite, Band Mask, KMB Band Mask, EXO, SuperMask, SuperFlow, and Rex are all registered trademarks of Kirby Morgan Dive Systems, Inc. Use of these terms to describe products that are not manufactured by KMDSI is not permitted without written permission from KMDSI. © Copyright 1970-2014 Kirby Morgan Dive Systems, Inc. All rights reserved. KMDSI manuals, checklists and technical and training information is made available for the express use of owner/user of this Kirby Morgan products. No part of this material may be reproduced, stored in any retrieval system, or transmitted, or used in any form or by any means, whether graphic, electronic, mechanical, photocopy, or otherwise by technology known or unknown, without the prior written permission of Kirby Morgan Dive Systems, Inc
Copyright 2003-2014, Dive Lab®., Inc. All rights reserved. TechTrnG 03101
51
KIRBY MORGAN SUPERLITE DEEP SEA DIVING HELMET MODEL 17A/B
SUPERVISORS EQUIPMENT CHECKS PRIOR TO ENTRY INTO WATER
APPENDIX A2.4.1
5-1-14
NOTE: This checklist is intended to be used with both KMDSI SuperLite 17A and B.
NOTE: Helmet(s) being used in polluted waters, or extreme environments, will require inspection that is more frequent.
CAUTION: KMDSI strongly recommends the use of a Tender to assist the diver when “dressing-in”. The Tender should ensure the Helmet Liner is fastened to the Helmet Shell and the Chinstrap is properly fastened under the divers chin, once the Helmet is donned. After closing the Yoke/Neck Clamp Assembly, ensure that the safety pin is installed.
WARNING: These are recommended minimum checks when using Kirby Morgan Helmets or Masks. Additional checks may be required as dictated by the conditions and tasks being performed. Failure to perform in-water checks may result in serious injury or death.
CAUTION: All surface supplied diving with Kirby Morgan Helmets must include a fully functional, properly maintained Emergency Gas System (“EGS”). The EGS should be maintained in accordance with the applicable Operations and Maintenance Manual(s).
Date:
Helmet Serial #:
Associated Equipment Serial #(s):
Technician (print name):

Kirby Morgan, SuperLite, Band Mask, KMB Band Mask, EXO, SuperMask, SuperFlow, and Rex are all registered trademarks of Kirby Morgan Dive Systems, Inc. Use of these terms to describe products that are not manufactured by KMDSI is not permitted without written permission from KMDSI. © Copyright 1970-2014 Kirby Morgan Dive Systems, Inc. All rights reserved. KMDSI manuals, checklists and technical and training information is made available for the express use of owner/user of this Kirby Morgan products. No part of this material may be reproduced, stored in any retrieval system, or transmitted, or used in any form or by any means, whether graphic, electronic, mechanical, photocopy, or otherwise by technology known or unknown, without the prior written permission of Kirby Morgan Dive Systems, Inc
Copyright 2003-2014, Dive Lab®., Inc. All rights reserved. TechTrnG 03101
52
STEP PROCEDURES INITIALS 1. Supply Gas Supervisor:
a. Ensure gas to the diver. 2. Check Breathing
System Diver- Check the following (a - e): a. Open and close the Steady-Flow Valve to
ensure proper operation.b. Check breathing resistance. Set Demand Regulator Adjustment Knob for minimum inhalation effort.c. Press Purge Button to check gas purge function.d. Ensure Nose Block Device slides freely.
e. Ensure Emergency Valve opens and closes properly. Then, ensure Emergency Valve is closed and the Bail Out Cylinder Valve is open.
3. Check Communications
Diver:Perform communications check.
4. Check Hot Water Supply (if applicable)
Tender: Check hot water supply connections. Ensure topside hot water supply has been switched to diver and verify flow to hot water shroud and suit (if used).
5. Check Dry Suit Inflation Hose (if applicable)
Tender: Check dry suit Inflation Hose Connection. Ensure dry suit Inflation Valve and Exhaust Valve function properly.
6. Check Entire Rig Tender: Soap and leak check Helmet/Mask gas fittings and connections, including Emergency Gas System.
7. Check Diver’s Entire Rig
NOTE: On the SL-17A/B, this procedure will ensure the
Supervisor/Tender- Check adjustment/fit of the entire rig, including the following (a – f):
a. On SuperLite 17 A/B, ensure the Rear
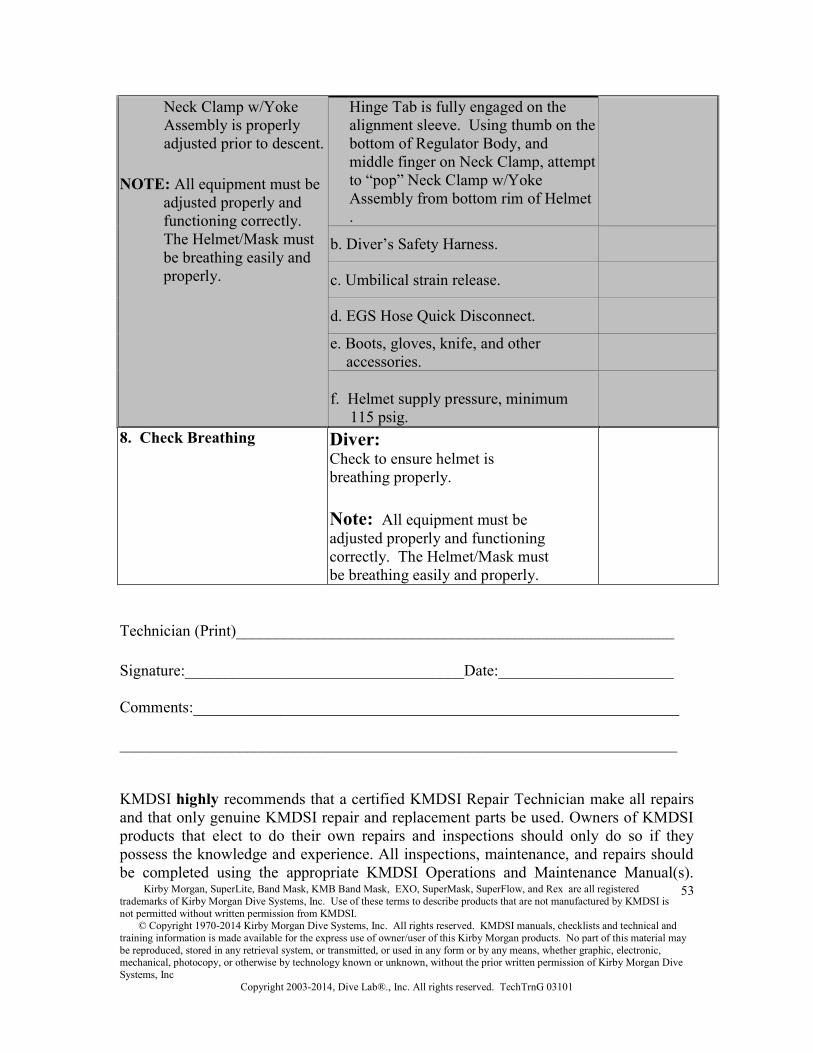
Kirby Morgan, SuperLite, Band Mask, KMB Band Mask, EXO, SuperMask, SuperFlow, and Rex are all registered trademarks of Kirby Morgan Dive Systems, Inc. Use of these terms to describe products that are not manufactured by KMDSI is not permitted without written permission from KMDSI. © Copyright 1970-2014 Kirby Morgan Dive Systems, Inc. All rights reserved. KMDSI manuals, checklists and technical and training information is made available for the express use of owner/user of this Kirby Morgan products. No part of this material may be reproduced, stored in any retrieval system, or transmitted, or used in any form or by any means, whether graphic, electronic, mechanical, photocopy, or otherwise by technology known or unknown, without the prior written permission of Kirby Morgan Dive Systems, Inc
Copyright 2003-2014, Dive Lab®., Inc. All rights reserved. TechTrnG 03101
53
Neck Clamp w/Yoke Assembly is properly adjusted prior to descent.
NOTE: All equipment must be adjusted properly and functioning correctly. The Helmet/Mask must be breathing easily and properly.
Hinge Tab is fully engaged on the alignment sleeve. Using thumb on the bottom of Regulator Body, and middle finger on Neck Clamp, attempt to “pop” Neck Clamp w/Yoke Assembly from bottom rim of Helmet .
b. Diver’s Safety Harness.
c. Umbilical strain release.
d. EGS Hose Quick Disconnect.
e. Boots, gloves, knife, and other accessories.
f. Helmet supply pressure, minimum 115 psig.
8. Check Breathing Diver: Check to ensure helmet is breathing properly.
Note: All equipment must be adjusted properly and functioning correctly. The Helmet/Mask must be breathing easily and properly.
Technician (Print)_______________________________________________________
Signature:___________________________________Date:______________________
Comments:_____________________________________________________________
______________________________________________________________________
KMDSI highly recommends that a certified KMDSI Repair Technician make all repairs and that only genuine KMDSI repair and replacement parts be used. Owners of KMDSI products that elect to do their own repairs and inspections should only do so if they possess the knowledge and experience. All inspections, maintenance, and repairs should be completed using the appropriate KMDSI Operations and Maintenance Manual(s).
Kirby Morgan, SuperLite, Band Mask, KMB Band Mask, EXO, SuperMask, SuperFlow, and Rex are all registered trademarks of Kirby Morgan Dive Systems, Inc. Use of these terms to describe products that are not manufactured by KMDSI is not permitted without written permission from KMDSI. © Copyright 1970-2014 Kirby Morgan Dive Systems, Inc. All rights reserved. KMDSI manuals, checklists and technical and training information is made available for the express use of owner/user of this Kirby Morgan products. No part of this material may be reproduced, stored in any retrieval system, or transmitted, or used in any form or by any means, whether graphic, electronic, mechanical, photocopy, or otherwise by technology known or unknown, without the prior written permission of Kirby Morgan Dive Systems, Inc
Copyright 2003-2014, Dive Lab®., Inc. All rights reserved. TechTrnG 03101
54
Persons performing repairs should retain all replacement component receipts for additional proof of maintenance history. Should any questions on procedures, components, or repairs arise, please contact Kirby Morgan Dive Systems, Inc., by telephone at (805) 928-7772 or via e-mail at [email protected], or contact Dive Lab, Inc., by telephone at (850) 235-2715 or via e-mail at [email protected]
NOTE: The Maintenance Log, Appendix 3, of the Operations and Maintenance Manual may be used as a template to create blank pages to record all the maintenance performed.

Kirby Morgan, SuperLite, Band Mask, KMB Band Mask, EXO, SuperMask, SuperFlow, and Rex are all registered trademarks of Kirby Morgan Dive Systems, Inc. Use of these terms to describe products that are not manufactured by KMDSI is not permitted without written permission from KMDSI. © Copyright 1970-2014 Kirby Morgan Dive Systems, Inc. All rights reserved. KMDSI manuals, checklists and technical and training information is made available for the express use of owner/user of this Kirby Morgan products. No part of this material may be reproduced, stored in any retrieval system, or transmitted, or used in any form or by any means, whether graphic, electronic, mechanical, photocopy, or otherwise by technology known or unknown, without the prior written permission of Kirby Morgan Dive Systems, Inc
Copyright 2003-2014, Dive Lab®., Inc. All rights reserved. TechTrnG 03101
55
KIRBY MORGAN SUPERLITE DEEP SEA DIVING HELMET MODELS 17C, 17K, 27, KM-37/SS, 47, 57, 77, 97
SUPERVISORS EQUIPMENT CHECKS PRIOR TO ENTRY INTO WATER
APPENDIX A2.4.2
7-9-14 MW
NOTE: This checklist is intended to be used with KMDSI SuperLite 17C, 17K, 27 and KM-37/SS, 47, 57, 77, 97. The diving supervisor or person appointed by the diving supervisor should use this checklist as a minimum prior to deploying divers.
NOTE: Helmet(s) being used in polluted waters, or extreme environments, will require inspection that is more frequent.
CAUTION: KMDSI strongly recommends the use of a Tender to assist the diver when “dressing-in”. The Tender should ensure the Helmet Liner is fastened to the Helmet Shell and the Chinstrap is properly fastened under the divers chin, once the Helmet is donned.
WARNING: These are recommended minimum checks when using Kirby Morgan Helmets or Masks. Additional checks may be required as dictated by the conditions and tasks being performed. Failure to perform in-water checks may result in serious injury or death.
CAUTION: All surface supplied diving with Kirby Morgan Helmets must include a fully functional, properly maintained Emergency Gas System (“EGS”). The EGS should be maintained in accordance with the applicable Operations and Maintenance Manual(s).
Date:
Helmet Serial #:
Associated Equipment Serial #(s):
Supervisor / Technician (print name):
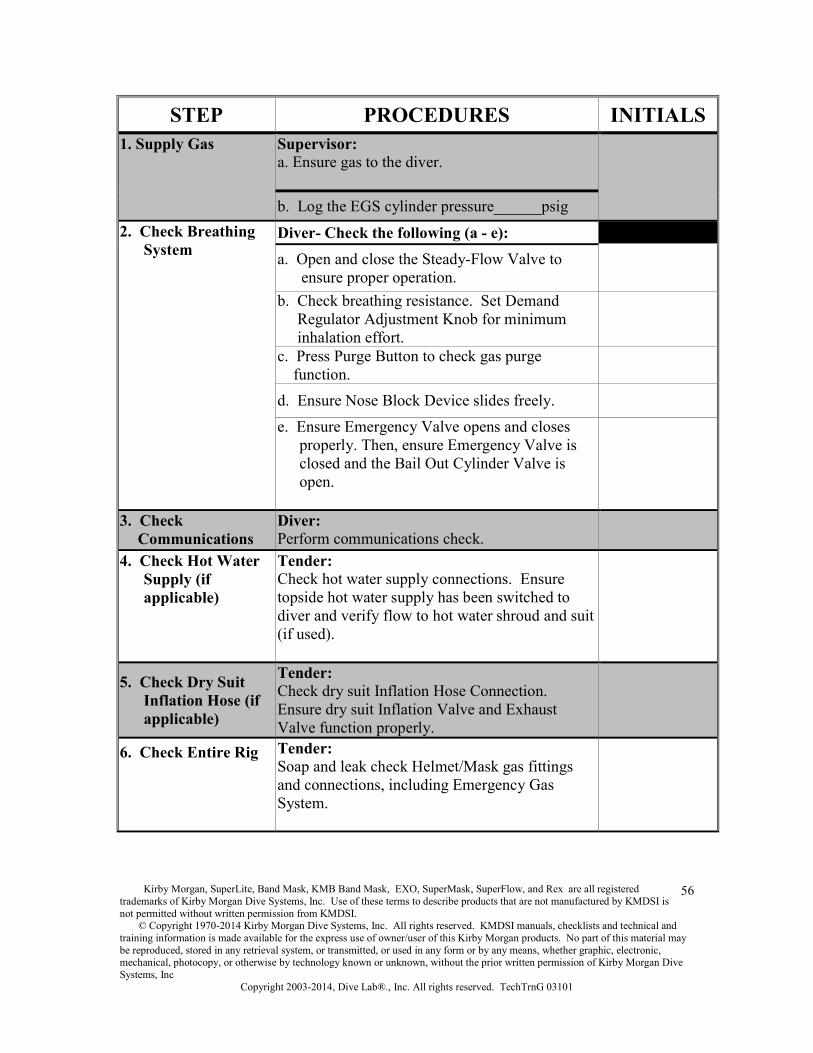
Kirby Morgan, SuperLite, Band Mask, KMB Band Mask, EXO, SuperMask, SuperFlow, and Rex are all registered trademarks of Kirby Morgan Dive Systems, Inc. Use of these terms to describe products that are not manufactured by KMDSI is not permitted without written permission from KMDSI. © Copyright 1970-2014 Kirby Morgan Dive Systems, Inc. All rights reserved. KMDSI manuals, checklists and technical and training information is made available for the express use of owner/user of this Kirby Morgan products. No part of this material may be reproduced, stored in any retrieval system, or transmitted, or used in any form or by any means, whether graphic, electronic, mechanical, photocopy, or otherwise by technology known or unknown, without the prior written permission of Kirby Morgan Dive Systems, Inc
Copyright 2003-2014, Dive Lab®., Inc. All rights reserved. TechTrnG 03101
56
STEP PROCEDURES INITIALS 1. Supply Gas Supervisor:
a. Ensure gas to the diver.
b. Log the EGS cylinder pressure______psig 2. Check Breathing
System Diver- Check the following (a - e): a. Open and close the Steady-Flow Valve to
ensure proper operation.b. Check breathing resistance. Set Demand Regulator Adjustment Knob for minimum inhalation effort.c. Press Purge Button to check gas purge function.d. Ensure Nose Block Device slides freely.
e. Ensure Emergency Valve opens and closes properly. Then, ensure Emergency Valve is closed and the Bail Out Cylinder Valve is open.
3. Check Communications
Diver:Perform communications check.
4. Check Hot Water Supply (if applicable)
Tender: Check hot water supply connections. Ensure topside hot water supply has been switched to diver and verify flow to hot water shroud and suit (if used).
5. Check Dry Suit Inflation Hose (if applicable)
Tender: Check dry suit Inflation Hose Connection. Ensure dry suit Inflation Valve and Exhaust Valve function properly.
6. Check Entire Rig Tender: Soap and leak check Helmet/Mask gas fittings and connections, including Emergency Gas System.

Kirby Morgan, SuperLite, Band Mask, KMB Band Mask, EXO, SuperMask, SuperFlow, and Rex are all registered trademarks of Kirby Morgan Dive Systems, Inc. Use of these terms to describe products that are not manufactured by KMDSI is not permitted without written permission from KMDSI. © Copyright 1970-2014 Kirby Morgan Dive Systems, Inc. All rights reserved. KMDSI manuals, checklists and technical and training information is made available for the express use of owner/user of this Kirby Morgan products. No part of this material may be reproduced, stored in any retrieval system, or transmitted, or used in any form or by any means, whether graphic, electronic, mechanical, photocopy, or otherwise by technology known or unknown, without the prior written permission of Kirby Morgan Dive Systems, Inc
Copyright 2003-2014, Dive Lab®., Inc. All rights reserved. TechTrnG 03101
57
7. Check Diver’s Entire Rig
Danger: Both Pull Pins must engage correctly Or
the Neck Dam Ring Assembly
could flood. Drowning may
result.
Attempt to rotate pull pins, if pin rotates this is an indication that pin is not correctly engaged
Supervisor/Tender- Check adjustment/fit of the entire rig, including the following (a – f):a. Ensure the sealed Pull Pins are fully
engaged on the base of the Helmet Ring into the Locking
Collar/Neck Pad Assembly.
b. Check the Diver’s Safety Harness.
c. Check the Umbilical strain release.
d. Check the EGS Hose Quick Disconnect e. Boots, gloves, knife, and other accessories f. Helmet supply pressure, minimum 115 psig (7.93 bar).
8. Check Breathing Diver: Check to ensure helmet is breathing properly.
Note: All equipment must be adjusted properly and functioning correctly. The Helmet/Mask must be breathing easily and properly.
Supervisor / Technician (Print): ___________________________________________
Signature:__________________________________________Date:_______________
Comments:_____________________________________________________________
______________________________________________________________________
KMDSI highly recommends that a certified KMDSI Repair Technician make all repairs and that only genuine KMDSI repair and replacement parts be used. Owners of KMDSI products that elect to do their own repairs and inspections should only do so if they possess the knowledge and experience. All inspections, maintenance, and repairs should be completed using the appropriate KMDSI Operations and Maintenance Manual(s). Persons performing repairs should retain all replacement component receipts for

Kirby Morgan, SuperLite, Band Mask, KMB Band Mask, EXO, SuperMask, SuperFlow, and Rex are all registered trademarks of Kirby Morgan Dive Systems, Inc. Use of these terms to describe products that are not manufactured by KMDSI is not permitted without written permission from KMDSI. © Copyright 1970-2014 Kirby Morgan Dive Systems, Inc. All rights reserved. KMDSI manuals, checklists and technical and training information is made available for the express use of owner/user of this Kirby Morgan products. No part of this material may be reproduced, stored in any retrieval system, or transmitted, or used in any form or by any means, whether graphic, electronic, mechanical, photocopy, or otherwise by technology known or unknown, without the prior written permission of Kirby Morgan Dive Systems, Inc
Copyright 2003-2014, Dive Lab®., Inc. All rights reserved. TechTrnG 03101
58
additional proof of maintenance history. Should any questions on procedures, components, or repairs arise, please contact Kirby Morgan Dive Systems, Inc., by telephone at (805) 928-7772 or via e-mail at [email protected], or contact Dive Lab, Inc., by telephone at (850) 235-2715 or via e-mail at [email protected]: The Maintenance Log, Appendix 3, of the Operations and Maintenance Manual
may be used as a template to create blank pages to record all the maintenance performed.

Kirby Morgan, SuperLite, Band Mask, KMB Band Mask, EXO, SuperMask, SuperFlow, and Rex are all registered trademarks of Kirby Morgan Dive Systems, Inc. Use of these terms to describe products that are not manufactured by KMDSI is not permitted without written permission from KMDSI. © Copyright 1970-2014 Kirby Morgan Dive Systems, Inc. All rights reserved. KMDSI manuals, checklists and technical and training information is made available for the express use of owner/user of this Kirby Morgan products. No part of this material may be reproduced, stored in any retrieval system, or transmitted, or used in any form or by any means, whether graphic, electronic, mechanical, photocopy, or otherwise by technology known or unknown, without the prior written permission of Kirby Morgan Dive Systems, Inc
Copyright 2003-2014, Dive Lab®., Inc. All rights reserved. TechTrnG 03101
59
KIRBY MORGAN SUPERLITE DEEP SEA DIVING HELMET MODELS 17A/B, 17C, 17K, 27, KM-37/SS, 47, 57, 77, 97
KMB 18/28 Band Masks SUPERVISORS IN-WATER CHECKS
APPENDIX A2.5
7-9-14 MW
WARNING: These are recommended minimum checks when using Kirby Morgan Helmets or Band Masks. Additional checks may be required as dictated by the conditions and tasks being performed. Failure to perform in-water checks may result in serious injury or death. See applicable Operations and Maintenance Manual for air supply requirements.
CAUTION: Diving with Kirby Morgan Helmets must include a fully functional, properly maintained Emergency Gas System (“EGS”). The EGS should be maintained in accordance with the applicable Operations and Maintenance Manual(s).
WARNING: If diving is conducted with less than the minimum recommended supply pressure, the diver must tailor the work to prevent over breathing the system, resulting in exhaustion.
Date:
Helmet Serial #:
Associated Equipment Serial #(s):
Technician (print name):
STEP PROCEDURES INITIALS
1. Check Breathing Diver: Ensure Helmet is breathing properly. Set the Demand Regulator Adjustment Knob for minimum inhalation effort. Report: Breathing OK
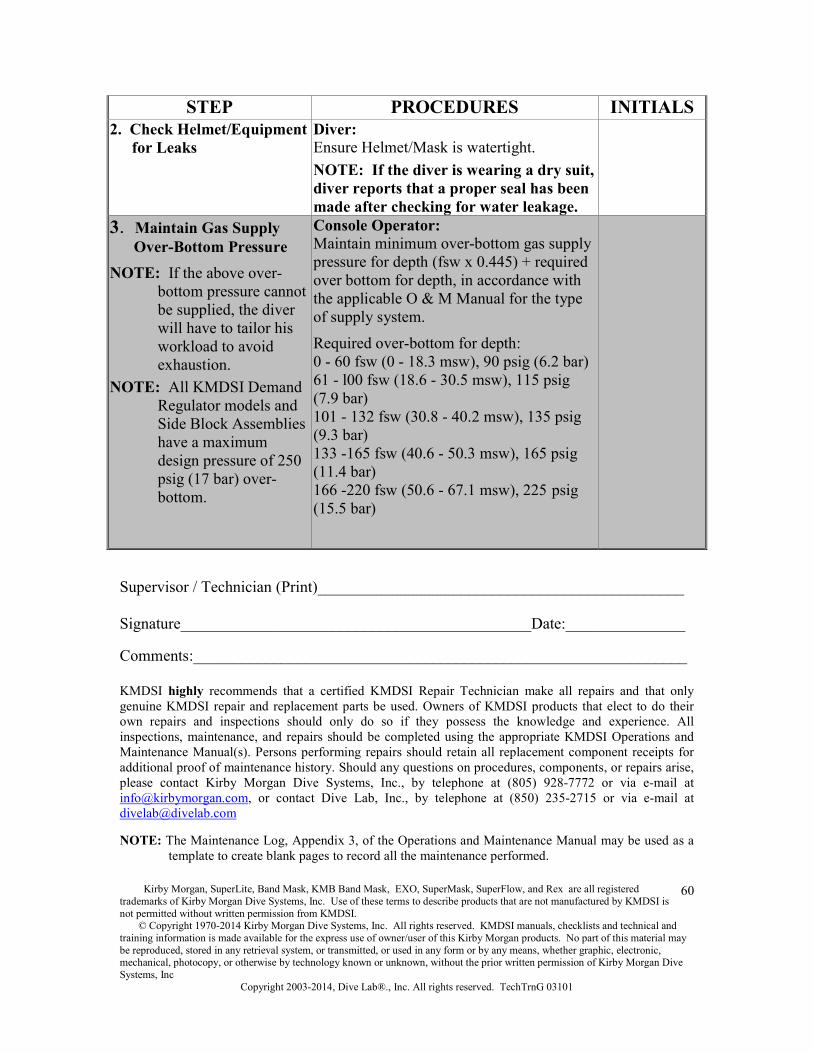
Kirby Morgan, SuperLite, Band Mask, KMB Band Mask, EXO, SuperMask, SuperFlow, and Rex are all registered trademarks of Kirby Morgan Dive Systems, Inc. Use of these terms to describe products that are not manufactured by KMDSI is not permitted without written permission from KMDSI. © Copyright 1970-2014 Kirby Morgan Dive Systems, Inc. All rights reserved. KMDSI manuals, checklists and technical and training information is made available for the express use of owner/user of this Kirby Morgan products. No part of this material may be reproduced, stored in any retrieval system, or transmitted, or used in any form or by any means, whether graphic, electronic, mechanical, photocopy, or otherwise by technology known or unknown, without the prior written permission of Kirby Morgan Dive Systems, Inc
Copyright 2003-2014, Dive Lab®., Inc. All rights reserved. TechTrnG 03101
60
STEP PROCEDURES INITIALS 2. Check Helmet/Equipment
for Leaks Diver: Ensure Helmet/Mask is watertight. NOTE: If the diver is wearing a dry suit, diver reports that a proper seal has been made after checking for water leakage.
3. Maintain Gas Supply Over-Bottom Pressure
NOTE: If the above over-bottom pressure cannot be supplied, the diver will have to tailor his workload to avoid exhaustion.
NOTE: All KMDSI Demand Regulator models and Side Block Assemblies have a maximum design pressure of 250 psig (17 bar) over-bottom.
Console Operator: Maintain minimum over-bottom gas supply pressure for depth (fsw x 0.445) + required over bottom for depth, in accordance with the applicable O & M Manual for the type of supply system.
Required over-bottom for depth: 0 - 60 fsw (0 - 18.3 msw), 90 psig (6.2 bar) 61 - l00 fsw (18.6 - 30.5 msw), 115 psig (7.9 bar) 101 - 132 fsw (30.8 - 40.2 msw), 135 psig (9.3 bar) 133 -165 fsw (40.6 - 50.3 msw), 165 psig (11.4 bar) 166 -220 fsw (50.6 - 67.1 msw), 225 psig(15.5 bar)
Supervisor / Technician (Print)______________________________________________
Signature____________________________________________Date:_______________
Comments:______________________________________________________________
KMDSI highly recommends that a certified KMDSI Repair Technician make all repairs and that only genuine KMDSI repair and replacement parts be used. Owners of KMDSI products that elect to do their own repairs and inspections should only do so if they possess the knowledge and experience. All inspections, maintenance, and repairs should be completed using the appropriate KMDSI Operations and Maintenance Manual(s). Persons performing repairs should retain all replacement component receipts for additional proof of maintenance history. Should any questions on procedures, components, or repairs arise, please contact Kirby Morgan Dive Systems, Inc., by telephone at (805) 928-7772 or via e-mail at [email protected], or contact Dive Lab, Inc., by telephone at (850) 235-2715 or via e-mail at [email protected]
NOTE: The Maintenance Log, Appendix 3, of the Operations and Maintenance Manual may be used as a template to create blank pages to record all the maintenance performed.

Kirby Morgan, SuperLite, Band Mask, KMB Band Mask, EXO, SuperMask, SuperFlow, and Rex are all registered trademarks of Kirby Morgan Dive Systems, Inc. Use of these terms to describe products that are not manufactured by KMDSI is not permitted without written permission from KMDSI. © Copyright 1970-2014 Kirby Morgan Dive Systems, Inc. All rights reserved. KMDSI manuals, checklists and technical and training information is made available for the express use of owner/user of this Kirby Morgan products. No part of this material may be reproduced, stored in any retrieval system, or transmitted, or used in any form or by any means, whether graphic, electronic, mechanical, photocopy, or otherwise by technology known or unknown, without the prior written permission of Kirby Morgan Dive Systems, Inc
Copyright 2003-2014, Dive Lab®., Inc. All rights reserved. TechTrnG 03101
61
KIRBY MORGAN SUPERLITE DEEP SEA DIVING HELMET MODELS 17A/B, 17C, 17K, 27, KM-37/SS, 47, 57, 77, 97
POST DIVE CLEANING, MAINTENANCE, AND INSPECTION CHECKLIST APPENDIX A2.6
7-9-14 MW
Post dive cleaning and inspection should be performed at the end of daily diving operations or at least every 24 hours during continuous diving operation.
NOTE: Helmet(s) being used in polluted waters, or extreme environments, will require more frequent cleaning, inspection and maintenance.
NOTE: During removal of components for inspection, O-rings and other consumable items may be reused, providing they are clean and a visual inspection does not reveal any damage or deterioration.
NOTE: This cleaning and maintenance schedule is recommended for all Kirby Morgan Diving Helmets and should be performed at least on a DAILYbasis.
NOTE: Detailed instructions are located in the applicable O & M Manual.
Date:
Helmet Serial #:
Associated Equipment Serial #(s):
Equipment belonging to (print name):
PROCEDURES INITIALS
1. Secure and bleed down gas supplies.
2. Disconnect and cap or tape the Helmet Gas Connections and disconnect the communication wires. Cap or tape the Umbilical End.
3. Wash the exterior surface of the Helmet with a solution of mild detergent and fresh water, then rinse. Inspect for signs of damage.
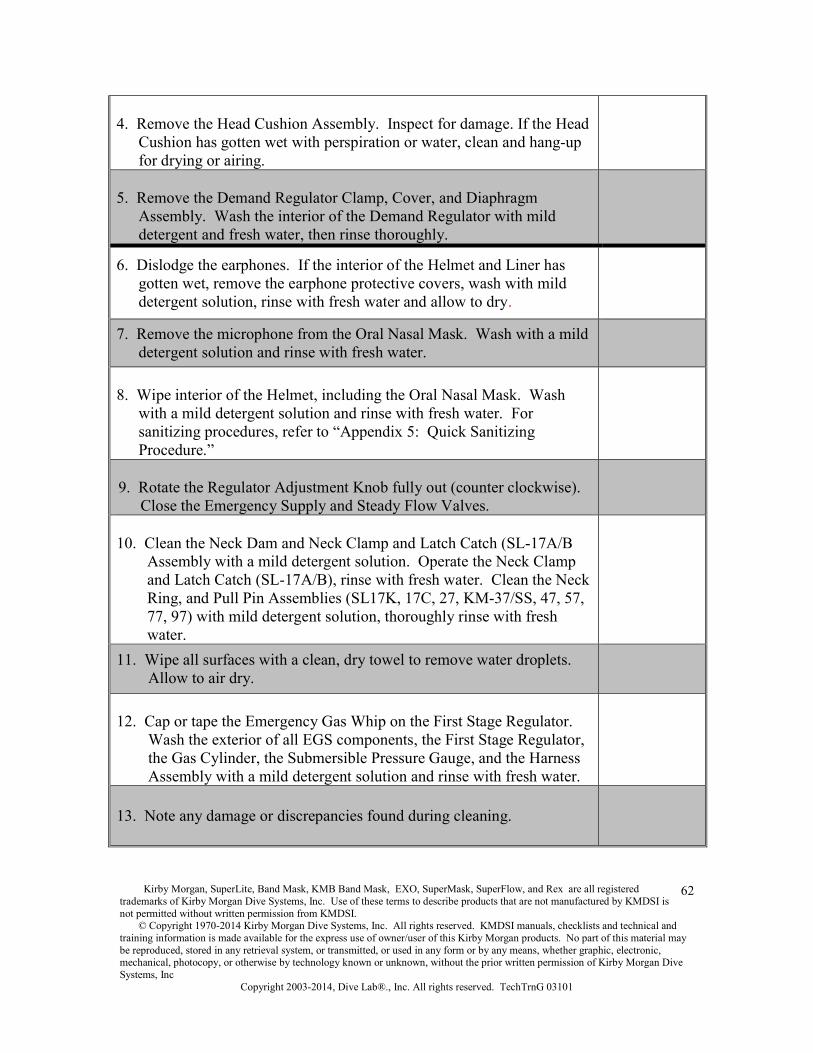
Kirby Morgan, SuperLite, Band Mask, KMB Band Mask, EXO, SuperMask, SuperFlow, and Rex are all registered trademarks of Kirby Morgan Dive Systems, Inc. Use of these terms to describe products that are not manufactured by KMDSI is not permitted without written permission from KMDSI. © Copyright 1970-2014 Kirby Morgan Dive Systems, Inc. All rights reserved. KMDSI manuals, checklists and technical and training information is made available for the express use of owner/user of this Kirby Morgan products. No part of this material may be reproduced, stored in any retrieval system, or transmitted, or used in any form or by any means, whether graphic, electronic, mechanical, photocopy, or otherwise by technology known or unknown, without the prior written permission of Kirby Morgan Dive Systems, Inc
Copyright 2003-2014, Dive Lab®., Inc. All rights reserved. TechTrnG 03101
62
4. Remove the Head Cushion Assembly. Inspect for damage. If the Head Cushion has gotten wet with perspiration or water, clean and hang-up for drying or airing.
5. Remove the Demand Regulator Clamp, Cover, and Diaphragm Assembly. Wash the interior of the Demand Regulator with mild detergent and fresh water, then rinse thoroughly.
6. Dislodge the earphones. If the interior of the Helmet and Liner has gotten wet, remove the earphone protective covers, wash with mild detergent solution, rinse with fresh water and allow to dry.
7. Remove the microphone from the Oral Nasal Mask. Wash with a mild detergent solution and rinse with fresh water.
8. Wipe interior of the Helmet, including the Oral Nasal Mask. Wash with a mild detergent solution and rinse with fresh water. For sanitizing procedures, refer to “Appendix 5: Quick Sanitizing Procedure.”
9. Rotate the Regulator Adjustment Knob fully out (counter clockwise). Close the Emergency Supply and Steady Flow Valves.
10. Clean the Neck Dam and Neck Clamp and Latch Catch (SL-17A/B Assembly with a mild detergent solution. Operate the Neck Clamp and Latch Catch (SL-17A/B), rinse with fresh water. Clean the Neck Ring, and Pull Pin Assemblies (SL17K, 17C, 27, KM-37/SS, 47, 57, 77, 97) with mild detergent solution, thoroughly rinse with fresh water.
11. Wipe all surfaces with a clean, dry towel to remove water droplets. Allow to air dry.
12. Cap or tape the Emergency Gas Whip on the First Stage Regulator. Wash the exterior of all EGS components, the First Stage Regulator, the Gas Cylinder, the Submersible Pressure Gauge, and the Harness Assembly with a mild detergent solution and rinse with fresh water.
13. Note any damage or discrepancies found during cleaning.
Kirby Morgan, SuperLite, Band Mask, KMB Band Mask, EXO, SuperMask, SuperFlow, and Rex are all registered trademarks of Kirby Morgan Dive Systems, Inc. Use of these terms to describe products that are not manufactured by KMDSI is not permitted without written permission from KMDSI. © Copyright 1970-2014 Kirby Morgan Dive Systems, Inc. All rights reserved. KMDSI manuals, checklists and technical and training information is made available for the express use of owner/user of this Kirby Morgan products. No part of this material may be reproduced, stored in any retrieval system, or transmitted, or used in any form or by any means, whether graphic, electronic, mechanical, photocopy, or otherwise by technology known or unknown, without the prior written permission of Kirby Morgan Dive Systems, Inc
Copyright 2003-2014, Dive Lab®., Inc. All rights reserved. TechTrnG 03101
63
Technician (Print)________________________________________________________
Signature_______________________________________Date____________________
Comments:______________________________________________________________
_______________________________________________________________________
_______________________________________________________________________
KMDSI highly recommends that a certified KMDSI Repair Technician make all repairs and that only genuine KMDSI repair and replacement parts be used. Owners of KMDSI products that elect to do their own repairs and inspections should only do so if they possess the knowledge and experience. All inspections, maintenance, and repairs should be completed using the appropriate KMDSI Operations and Maintenance Manual(s). Persons performing repairs should retain all replacement component receipts for additional proof of maintenance history. Should any questions on procedures, components, or repairs arise, please contact Kirby Morgan Dive Systems, Inc., by telephone at (805) 928-7772 or via e-mail at [email protected], or contact Dive Lab, Inc., by telephone at (850) 235-2715 or via e-mail at [email protected].
NOTE: The Maintenance Log, Appendix 3, may be used as a template to create blank pages to record all the maintenance performed.

Kirby Morgan, SuperLite, Band Mask, KMB Band Mask, EXO, SuperMask, SuperFlow, and Rex are all registered trademarks of Kirby Morgan Dive Systems, Inc. Use of these terms to describe products that are not manufactured by KMDSI is not permitted without written permission from KMDSI. © Copyright 1970-2014 Kirby Morgan Dive Systems, Inc. All rights reserved. KMDSI manuals, checklists and technical and training information is made available for the express use of owner/user of this Kirby Morgan products. No part of this material may be reproduced, stored in any retrieval system, or transmitted, or used in any form or by any means, whether graphic, electronic, mechanical, photocopy, or otherwise by technology known or unknown, without the prior written permission of Kirby Morgan Dive Systems, Inc
Copyright 2003-2014, Dive Lab®., Inc. All rights reserved. TechTrnG 03101
64
QUICK SANITIZING PROCEDURE Appendix 5
4-14-09
The purpose of this procedure is to sanitize the components directly exposed to each diver’s mouth and nose to help eliminate germs. KMDSI recommends sanitizing after each diver when in use by multiple divers, and after each diving day when used by a single diver. To accomplish this properly, all components exposed to the diver’s breathing should be sanitized. On the Helmets and KMB Band Masks, this will include the Oral Nasal Mask and internal cavity of the Demand Regulator. For best results, the Demand Regulator Cover and Diaphragm should be removed so the interior surfaces, as well as the Diaphragm, can be properly exposed to the cleaning solution and rinse water.
CAUTION: Carefully dilute germicidal cleansing solutions in accordance with the manufacturer’s recommendation. If solution is not of the recommended strength, it will not act as an effective disinfectant. Failure to thoroughly rinse germicidal cleansing solution from diving equipment may result in lung irritation and/or long-term degradation of rubber and silicone components.
Listed below are four solutions, used by the U.S. Militaries, which have proven to be effective when used in accordance with the manufacturer’s recommendations. If no other solutions are available, a solution of mild dish detergent and water and hand scrubbing with a soft brush or rag can be done. Note: to maximize germ killing, solutions should remain in contact with components for a minimum of 10 minutes.
1. SaniZide Plus: P/N: 34805 (spray) or 34810 (gallon), Ready to use; do not dilute. SAFETEC of America, Inc 1055 E. Delavan Ave. Buffalo, NY 14215 USA 1-800-456-7077
2. Advance TBE: P/N: AD160 (spray) or AD1128 (gallon), Infection Control Technology available): Ready to use. Infection Control Technology 1751 So. Redwood Rd. Woodscross, UT 84087 USA 1-800-551-0735

Kirby Morgan, SuperLite, Band Mask, KMB Band Mask, EXO, SuperMask, SuperFlow, and Rex are all registered trademarks of Kirby Morgan Dive Systems, Inc. Use of these terms to describe products that are not manufactured by KMDSI is not permitted without written permission from KMDSI. © Copyright 1970-2014 Kirby Morgan Dive Systems, Inc. All rights reserved. KMDSI manuals, checklists and technical and training information is made available for the express use of owner/user of this Kirby Morgan products. No part of this material may be reproduced, stored in any retrieval system, or transmitted, or used in any form or by any means, whether graphic, electronic, mechanical, photocopy, or otherwise by technology known or unknown, without the prior written permission of Kirby Morgan Dive Systems, Inc
Copyright 2003-2014, Dive Lab®., Inc. All rights reserved. TechTrnG 03101
65
3. Bi-Arrest 2: P/N: BP201 (4 ounces) or BP 222 (32 ounces), Infection Control Technology. Mix two pumps of the concentrate with 16 ounces of fresh water.
Infection Control Technology 1751 So. Redwood Rd. Woodscross, UT 84087 USA 1-800-551-0735
4. Confidence Plus: P/N: 10009971 (32 ounces) Mix one ounce of concentrate with one gallon of fresh water.
Mine Safety Appliances 1-800-MSA-2222
Sanitizing Procedure: Unless otherwise directed, use the following procedure to disinfect the Oral Nasal Mask and Demand Regulator: For disassembly and reassembly procedures, refer to the appropriate KMDSI Operations and Maintenance Manual.
1) Wet or immerse all components to be sanitized. Allow to stay in contact with the solution for at least 10 minutes while lightly scrubbing over the components with a nylon toothbrush or clean dishrag to help remove mucus or saliva build up.
2) If the solution appears to be drying, apply more solution to keep it wet for the full 10 minutes.
3) After 10 minutes, thoroughly rinse components under running potable water while brushing or rubbing.
4) If the equipment is not being used immediately, allow the components to air dry or pat dry with a clean towel and reassemble.
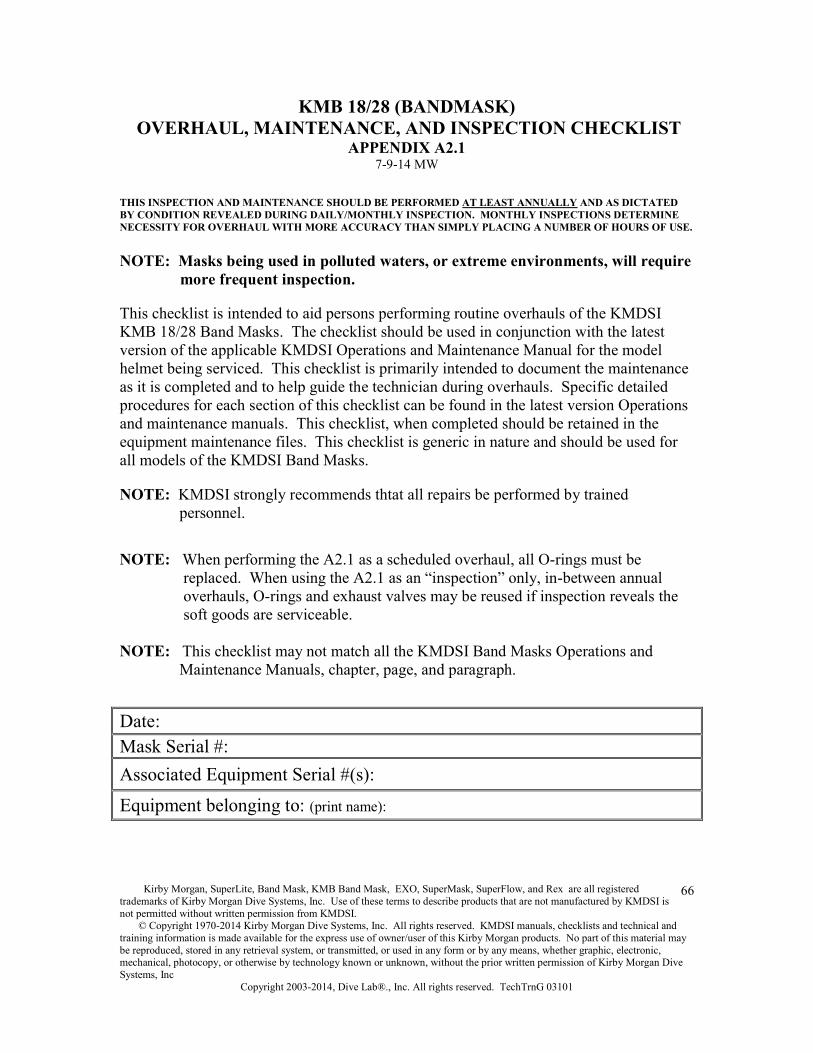
Kirby Morgan, SuperLite, Band Mask, KMB Band Mask, EXO, SuperMask, SuperFlow, and Rex are all registered trademarks of Kirby Morgan Dive Systems, Inc. Use of these terms to describe products that are not manufactured by KMDSI is not permitted without written permission from KMDSI. © Copyright 1970-2014 Kirby Morgan Dive Systems, Inc. All rights reserved. KMDSI manuals, checklists and technical and training information is made available for the express use of owner/user of this Kirby Morgan products. No part of this material may be reproduced, stored in any retrieval system, or transmitted, or used in any form or by any means, whether graphic, electronic, mechanical, photocopy, or otherwise by technology known or unknown, without the prior written permission of Kirby Morgan Dive Systems, Inc
Copyright 2003-2014, Dive Lab®., Inc. All rights reserved. TechTrnG 03101
66
KMB 18/28 (BANDMASK) OVERHAUL, MAINTENANCE, AND INSPECTION CHECKLIST
APPENDIX A2.1 7-9-14 MW
THIS INSPECTION AND MAINTENANCE SHOULD BE PERFORMED AT LEAST ANNUALLY AND AS DICTATED BY CONDITION REVEALED DURING DAILY/MONTHLY INSPECTION. MONTHLY INSPECTIONS DETERMINE NECESSITY FOR OVERHAUL WITH MORE ACCURACY THAN SIMPLY PLACING A NUMBER OF HOURS OF USE.
NOTE: Masks being used in polluted waters, or extreme environments, will require more frequent inspection.
This checklist is intended to aid persons performing routine overhauls of the KMDSI KMB 18/28 Band Masks. The checklist should be used in conjunction with the latest version of the applicable KMDSI Operations and Maintenance Manual for the model helmet being serviced. This checklist is primarily intended to document the maintenance as it is completed and to help guide the technician during overhauls. Specific detailed procedures for each section of this checklist can be found in the latest version Operations and maintenance manuals. This checklist, when completed should be retained in the equipment maintenance files. This checklist is generic in nature and should be used for all models of the KMDSI Band Masks.
NOTE: KMDSI strongly recommends thtat all repairs be performed by trained personnel.
NOTE: When performing the A2.1 as a scheduled overhaul, all O-rings must be replaced. When using the A2.1 as an “inspection” only, in-between annual overhauls, O-rings and exhaust valves may be reused if inspection reveals the soft goods are serviceable.
NOTE: This checklist may not match all the KMDSI Band Masks Operations and Maintenance Manuals, chapter, page, and paragraph.
Date: Mask Serial #: Associated Equipment Serial #(s):
Equipment belonging to: (print name):

Kirby Morgan, SuperLite, Band Mask, KMB Band Mask, EXO, SuperMask, SuperFlow, and Rex are all registered trademarks of Kirby Morgan Dive Systems, Inc. Use of these terms to describe products that are not manufactured by KMDSI is not permitted without written permission from KMDSI. © Copyright 1970-2014 Kirby Morgan Dive Systems, Inc. All rights reserved. KMDSI manuals, checklists and technical and training information is made available for the express use of owner/user of this Kirby Morgan products. No part of this material may be reproduced, stored in any retrieval system, or transmitted, or used in any form or by any means, whether graphic, electronic, mechanical, photocopy, or otherwise by technology known or unknown, without the prior written permission of Kirby Morgan Dive Systems, Inc
Copyright 2003-2014, Dive Lab®., Inc. All rights reserved. TechTrnG 03101
67
PROCEDURES INITIALS
HOOD ASSEMBLY 1. Remove the Earphones from their pockets in the Hood. Remove
the Hood from the Mask. Perform a visual inspection of all components. Guidance O & M Manual.
2. Visually inspect all metal parts of the Band Assembly and band keeper components, including the Band Screws, for damage. Replace if necessary. Guidance O & M Manual.
3. Visually inspect the Hood for signs of damage and/or deterioration. Guidance O & M Manual.
4. Check the Head Harness (Spider) (1) for signs of tearing, deterioration, and/or damage. Ensure all five legs of the Spider are present. Guidance O & M Manual.
MASK ASSEMBLY 1. Visually inspect the Mask exterior and interior for loose and/or
missing fasteners and obvious signs of damage; including cracks, gouges, and/or depressions.
NOTE: On the KMB-18 any gouges in the fiberglass shell deeper than 1/16” exposing fiberglass should be repaired. Fiberglass and gel coat repairs MUST be completed by a technician that has received certification for Helmet Shell repairs by KMDSI or Dive Lab, Inc. Any cracks or depressions with fractures must be checked by an Authorized KMDSI Repair Facility. Any cracks or damage in the plastic frame of the KMB-28 will require replacement of the frame. Further info contact Dive Lab.
2. Remove the Covers from the Earphones. Remove Microphone from the Oral Nasal Mask. Inspect and repair/replace as necessary. Perform a communications check. Guidance O & M Manual
CAUTION: The Nose Block device MUST be removed before installing a new Oral Nasal Mask. Stretching the Oral Nasal Mask over the Nose Block Device can cause the Oral Nasal Mask to tear.
3. Remove the Nose Clearing Device. Clean and inspect the Nose Clearing Pad and Shaft. Replace O-Rings.
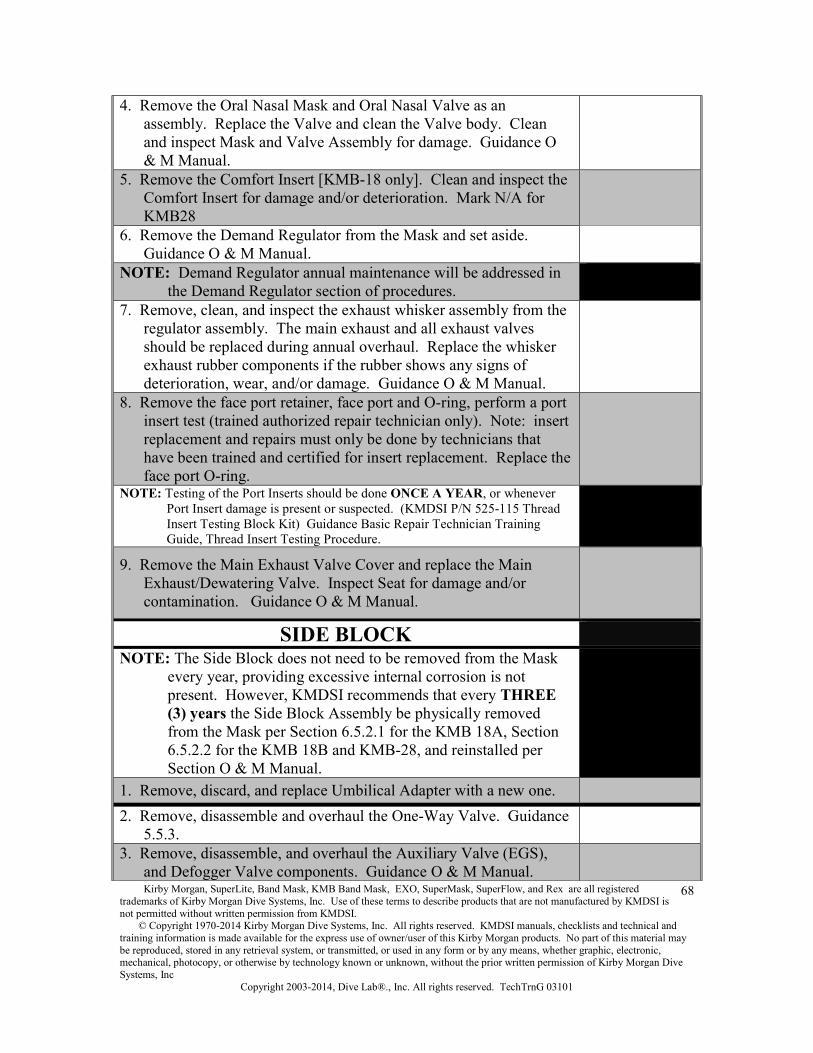
Kirby Morgan, SuperLite, Band Mask, KMB Band Mask, EXO, SuperMask, SuperFlow, and Rex are all registered trademarks of Kirby Morgan Dive Systems, Inc. Use of these terms to describe products that are not manufactured by KMDSI is not permitted without written permission from KMDSI. © Copyright 1970-2014 Kirby Morgan Dive Systems, Inc. All rights reserved. KMDSI manuals, checklists and technical and training information is made available for the express use of owner/user of this Kirby Morgan products. No part of this material may be reproduced, stored in any retrieval system, or transmitted, or used in any form or by any means, whether graphic, electronic, mechanical, photocopy, or otherwise by technology known or unknown, without the prior written permission of Kirby Morgan Dive Systems, Inc
Copyright 2003-2014, Dive Lab®., Inc. All rights reserved. TechTrnG 03101
68
4. Remove the Oral Nasal Mask and Oral Nasal Valve as an assembly. Replace the Valve and clean the Valve body. Clean and inspect Mask and Valve Assembly for damage. Guidance O & M Manual.
5. Remove the Comfort Insert [KMB-18 only]. Clean and inspect the Comfort Insert for damage and/or deterioration. Mark N/A for KMB28
6. Remove the Demand Regulator from the Mask and set aside. Guidance O & M Manual.
NOTE: Demand Regulator annual maintenance will be addressed in the Demand Regulator section of procedures.
7. Remove, clean, and inspect the exhaust whisker assembly from the regulator assembly. The main exhaust and all exhaust valves should be replaced during annual overhaul. Replace the whisker exhaust rubber components if the rubber shows any signs of deterioration, wear, and/or damage. Guidance O & M Manual.
8. Remove the face port retainer, face port and O-ring, perform a port insert test (trained authorized repair technician only). Note: insert replacement and repairs must only be done by technicians that have been trained and certified for insert replacement. Replace the face port O-ring.
NOTE: Testing of the Port Inserts should be done ONCE A YEAR, or whenever Port Insert damage is present or suspected. (KMDSI P/N 525-115 Thread Insert Testing Block Kit) Guidance Basic Repair Technician Training Guide, Thread Insert Testing Procedure.
9. Remove the Main Exhaust Valve Cover and replace the Main Exhaust/Dewatering Valve. Inspect Seat for damage and/or contamination. Guidance O & M Manual.
SIDE BLOCK NOTE: The Side Block does not need to be removed from the Mask
every year, providing excessive internal corrosion is not present. However, KMDSI recommends that every THREE (3) years the Side Block Assembly be physically removed from the Mask per Section 6.5.2.1 for the KMB 18A, Section 6.5.2.2 for the KMB 18B and KMB-28, and reinstalled per Section O & M Manual.
1. Remove, discard, and replace Umbilical Adapter with a new one. 2. Remove, disassemble and overhaul the One-Way Valve. Guidance
5.5.3. 3. Remove, disassemble, and overhaul the Auxiliary Valve (EGS),
and Defogger Valve components. Guidance O & M Manual.
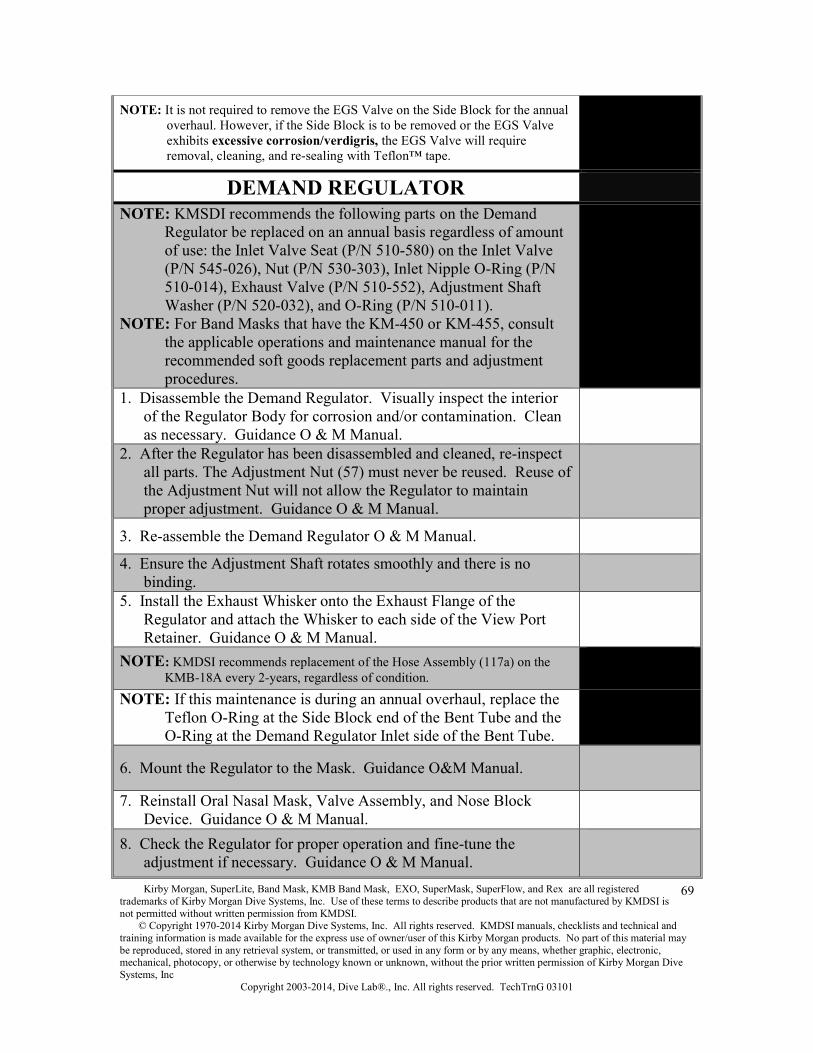
Kirby Morgan, SuperLite, Band Mask, KMB Band Mask, EXO, SuperMask, SuperFlow, and Rex are all registered trademarks of Kirby Morgan Dive Systems, Inc. Use of these terms to describe products that are not manufactured by KMDSI is not permitted without written permission from KMDSI. © Copyright 1970-2014 Kirby Morgan Dive Systems, Inc. All rights reserved. KMDSI manuals, checklists and technical and training information is made available for the express use of owner/user of this Kirby Morgan products. No part of this material may be reproduced, stored in any retrieval system, or transmitted, or used in any form or by any means, whether graphic, electronic, mechanical, photocopy, or otherwise by technology known or unknown, without the prior written permission of Kirby Morgan Dive Systems, Inc
Copyright 2003-2014, Dive Lab®., Inc. All rights reserved. TechTrnG 03101
69
NOTE: It is not required to remove the EGS Valve on the Side Block for the annual overhaul. However, if the Side Block is to be removed or the EGS Valve exhibits excessive corrosion/verdigris, the EGS Valve will require removal, cleaning, and re-sealing with Teflon™ tape.
DEMAND REGULATOR NOTE: KMSDI recommends the following parts on the Demand
Regulator be replaced on an annual basis regardless of amount of use: the Inlet Valve Seat (P/N 510-580) on the Inlet Valve (P/N 545-026), Nut (P/N 530-303), Inlet Nipple O-Ring (P/N 510-014), Exhaust Valve (P/N 510-552), Adjustment Shaft Washer (P/N 520-032), and O-Ring (P/N 510-011).
NOTE: For Band Masks that have the KM-450 or KM-455, consult the applicable operations and maintenance manual for the recommended soft goods replacement parts and adjustment procedures.
1. Disassemble the Demand Regulator. Visually inspect the interior of the Regulator Body for corrosion and/or contamination. Clean as necessary. Guidance O & M Manual.
2. After the Regulator has been disassembled and cleaned, re-inspect all parts. The Adjustment Nut (57) must never be reused. Reuse of the Adjustment Nut will not allow the Regulator to maintain proper adjustment. Guidance O & M Manual.
3. Re-assemble the Demand Regulator O & M Manual.
4. Ensure the Adjustment Shaft rotates smoothly and there is no binding.
5. Install the Exhaust Whisker onto the Exhaust Flange of the Regulator and attach the Whisker to each side of the View Port Retainer. Guidance O & M Manual.
NOTE: KMDSI recommends replacement of the Hose Assembly (117a) on the KMB-18A every 2-years, regardless of condition.
NOTE: If this maintenance is during an annual overhaul, replace the Teflon O-Ring at the Side Block end of the Bent Tube and the O-Ring at the Demand Regulator Inlet side of the Bent Tube.
6. Mount the Regulator to the Mask. Guidance O&M Manual.
7. Reinstall Oral Nasal Mask, Valve Assembly, and Nose Block Device. Guidance O & M Manual.
8. Check the Regulator for proper operation and fine-tune the adjustment if necessary. Guidance O & M Manual.
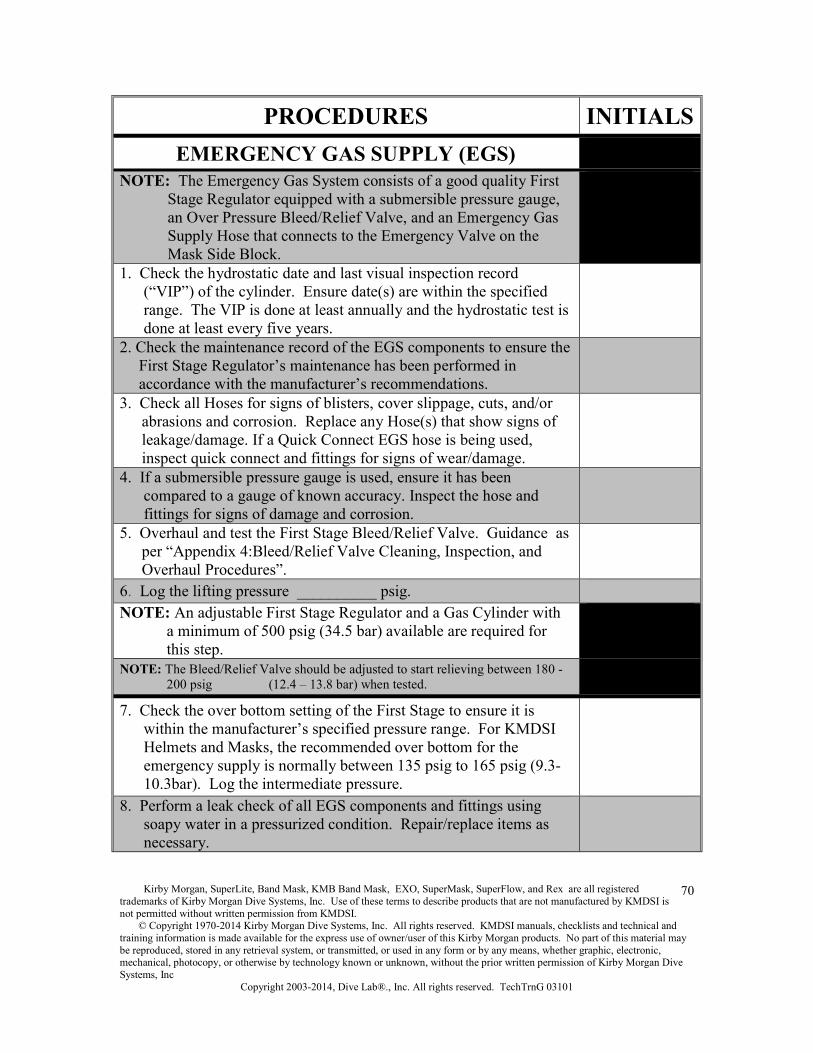
Kirby Morgan, SuperLite, Band Mask, KMB Band Mask, EXO, SuperMask, SuperFlow, and Rex are all registered trademarks of Kirby Morgan Dive Systems, Inc. Use of these terms to describe products that are not manufactured by KMDSI is not permitted without written permission from KMDSI. © Copyright 1970-2014 Kirby Morgan Dive Systems, Inc. All rights reserved. KMDSI manuals, checklists and technical and training information is made available for the express use of owner/user of this Kirby Morgan products. No part of this material may be reproduced, stored in any retrieval system, or transmitted, or used in any form or by any means, whether graphic, electronic, mechanical, photocopy, or otherwise by technology known or unknown, without the prior written permission of Kirby Morgan Dive Systems, Inc
Copyright 2003-2014, Dive Lab®., Inc. All rights reserved. TechTrnG 03101
70
PROCEDURES INITIALSEMERGENCY GAS SUPPLY (EGS)
NOTE: The Emergency Gas System consists of a good quality First Stage Regulator equipped with a submersible pressure gauge, an Over Pressure Bleed/Relief Valve, and an Emergency Gas Supply Hose that connects to the Emergency Valve on the Mask Side Block.
1. Check the hydrostatic date and last visual inspection record (“VIP”) of the cylinder. Ensure date(s) are within the specified range. The VIP is done at least annually and the hydrostatic test is done at least every five years.
2. Check the maintenance record of the EGS components to ensure the First Stage Regulator’s maintenance has been performed in accordance with the manufacturer’s recommendations.
3. Check all Hoses for signs of blisters, cover slippage, cuts, and/or abrasions and corrosion. Replace any Hose(s) that show signs of leakage/damage. If a Quick Connect EGS hose is being used, inspect quick connect and fittings for signs of wear/damage.
4. If a submersible pressure gauge is used, ensure it has been compared to a gauge of known accuracy. Inspect the hose and fittings for signs of damage and corrosion.
5. Overhaul and test the First Stage Bleed/Relief Valve. Guidance as per “Appendix 4:Bleed/Relief Valve Cleaning, Inspection, and Overhaul Procedures”.
6. Log the lifting pressure __________ psig. NOTE: An adjustable First Stage Regulator and a Gas Cylinder with
a minimum of 500 psig (34.5 bar) available are required for this step.
NOTE: The Bleed/Relief Valve should be adjusted to start relieving between 180 - 200 psig (12.4 – 13.8 bar) when tested.
7. Check the over bottom setting of the First Stage to ensure it is within the manufacturer’s specified pressure range. For KMDSI Helmets and Masks, the recommended over bottom for the emergency supply is normally between 135 psig to 165 psig (9.3-10.3bar). Log the intermediate pressure.
8. Perform a leak check of all EGS components and fittings using soapy water in a pressurized condition. Repair/replace items as necessary.

Kirby Morgan, SuperLite, Band Mask, KMB Band Mask, EXO, SuperMask, SuperFlow, and Rex are all registered trademarks of Kirby Morgan Dive Systems, Inc. Use of these terms to describe products that are not manufactured by KMDSI is not permitted without written permission from KMDSI. © Copyright 1970-2014 Kirby Morgan Dive Systems, Inc. All rights reserved. KMDSI manuals, checklists and technical and training information is made available for the express use of owner/user of this Kirby Morgan products. No part of this material may be reproduced, stored in any retrieval system, or transmitted, or used in any form or by any means, whether graphic, electronic, mechanical, photocopy, or otherwise by technology known or unknown, without the prior written permission of Kirby Morgan Dive Systems, Inc
Copyright 2003-2014, Dive Lab®., Inc. All rights reserved. TechTrnG 03101
71
9. Inspect the Harness Assembly for signs of wear and/or damage. Repair/replace as necessary. Document any inspection/maintenance on the Maintenance Log (Appendix 3).
Recorded service in helmet maintenance log book YES_______ NO______
NOTE: KMDSI strongly recommends that only trained certified KMDSI technicians perform overhauls. The below statement is intended to discourage non trained and non certified persons from posing as certified KMDSI technicians.
I_____________________________________________hereby certify that I have performed the work required in the A2.1 and that I am a certified KMDSI / Dive Lab technician.
Print name__________________________Signature__________________________
Date___________________ID#____________Expiration date__________________
I_____________________________________________hereby certify that I have performed the work required in the A2.1 and I am not a certified KMDSI / Dive Lab technician
Technician / Owner: Print name__________________________________________
Comments:___________________________________________________________
____________________________________________________________________
KMDSI highly recommends that a certified KMDSI Repair Technician make all repairs and that only genuine KMDSI repair and replacement parts be used. Owners of KMDSI products that elect to do their own repairs and inspections should only do so if they possess the knowledge and experience. All inspections, maintenance, and repairs should be completed using the appropriate KMDSI Operations and Maintenance Manual(s). Persons performing repairs should retain all replacement component receipts for additional proof of maintenance history. Should any questions on procedures, components, or repairs arise, please contact Kirby Morgan Dive Systems, Inc., by telephone at (805) 928-7772 or via e-mail at [email protected], or contact Dive Lab, Inc., by telephone at (850) 235-2715 or via e-mail at [email protected].
NOTE: The Maintenance Log, Appendix 3, may be used as a template for creating blank pages to record all the maintenance performed.
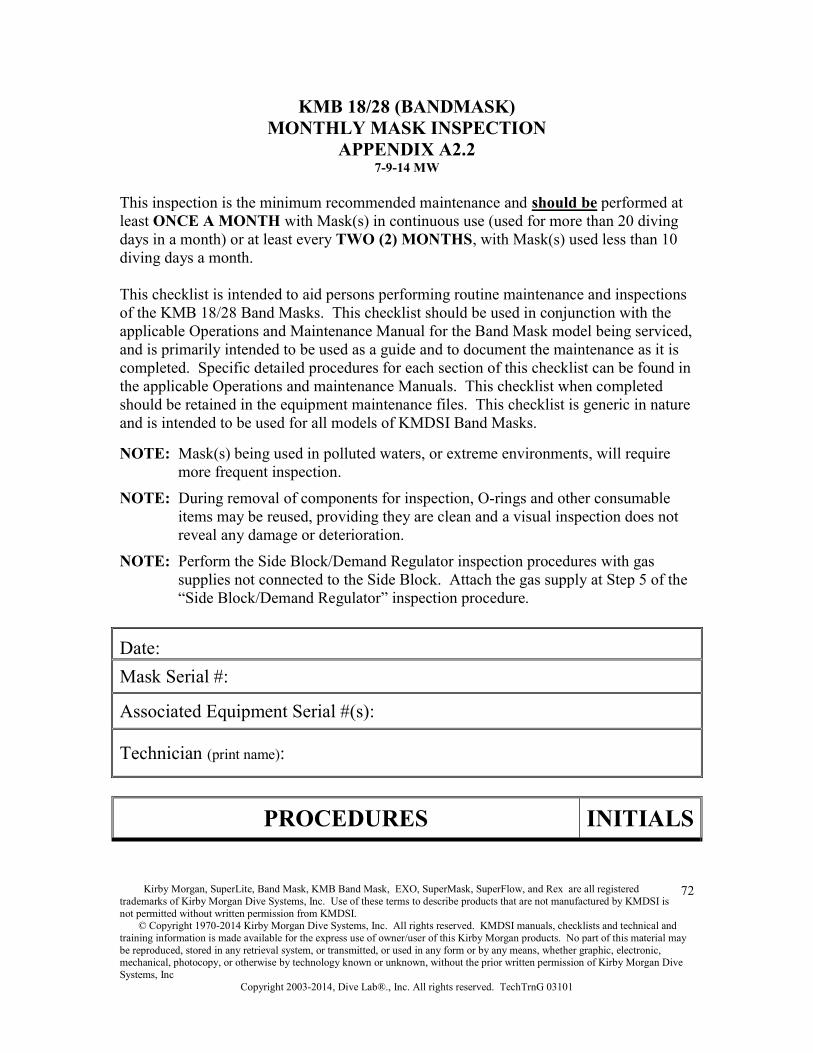
Kirby Morgan, SuperLite, Band Mask, KMB Band Mask, EXO, SuperMask, SuperFlow, and Rex are all registered trademarks of Kirby Morgan Dive Systems, Inc. Use of these terms to describe products that are not manufactured by KMDSI is not permitted without written permission from KMDSI. © Copyright 1970-2014 Kirby Morgan Dive Systems, Inc. All rights reserved. KMDSI manuals, checklists and technical and training information is made available for the express use of owner/user of this Kirby Morgan products. No part of this material may be reproduced, stored in any retrieval system, or transmitted, or used in any form or by any means, whether graphic, electronic, mechanical, photocopy, or otherwise by technology known or unknown, without the prior written permission of Kirby Morgan Dive Systems, Inc
Copyright 2003-2014, Dive Lab®., Inc. All rights reserved. TechTrnG 03101
72
KMB 18/28 (BANDMASK) MONTHLY MASK INSPECTION
APPENDIX A2.27-9-14 MW
This inspection is the minimum recommended maintenance and should be performed at least ONCE A MONTH with Mask(s) in continuous use (used for more than 20 diving days in a month) or at least every TWO (2) MONTHS, with Mask(s) used less than 10 diving days a month.
This checklist is intended to aid persons performing routine maintenance and inspections of the KMB 18/28 Band Masks. This checklist should be used in conjunction with the applicable Operations and Maintenance Manual for the Band Mask model being serviced, and is primarily intended to be used as a guide and to document the maintenance as it is completed. Specific detailed procedures for each section of this checklist can be found in the applicable Operations and maintenance Manuals. This checklist when completed should be retained in the equipment maintenance files. This checklist is generic in nature and is intended to be used for all models of KMDSI Band Masks.
NOTE: Mask(s) being used in polluted waters, or extreme environments, will require more frequent inspection.
NOTE: During removal of components for inspection, O-rings and other consumable items may be reused, providing they are clean and a visual inspection does not reveal any damage or deterioration.
NOTE: Perform the Side Block/Demand Regulator inspection procedures with gas supplies not connected to the Side Block. Attach the gas supply at Step 5 of the “Side Block/Demand Regulator” inspection procedure.
Date: Mask Serial #:
Associated Equipment Serial #(s):
Technician (print name):
PROCEDURES INITIALS

Kirby Morgan, SuperLite, Band Mask, KMB Band Mask, EXO, SuperMask, SuperFlow, and Rex are all registered trademarks of Kirby Morgan Dive Systems, Inc. Use of these terms to describe products that are not manufactured by KMDSI is not permitted without written permission from KMDSI. © Copyright 1970-2014 Kirby Morgan Dive Systems, Inc. All rights reserved. KMDSI manuals, checklists and technical and training information is made available for the express use of owner/user of this Kirby Morgan products. No part of this material may be reproduced, stored in any retrieval system, or transmitted, or used in any form or by any means, whether graphic, electronic, mechanical, photocopy, or otherwise by technology known or unknown, without the prior written permission of Kirby Morgan Dive Systems, Inc
Copyright 2003-2014, Dive Lab®., Inc. All rights reserved. TechTrnG 03101
73
HOOD ASSEMBLY 1. Remove the Earphones from their pockets in the Hood. Remove
the Hood (2) from the Mask. Perform a visual inspection of all components. Guidance O & M Manual.
2. Visually inspect all metal parts of the Band Assembly, band keeper, components, including the Band Screws, for damage. Replace if necessary. Guidance O & M Manual.
3. Visually inspect the Hood for signs of damage and/or deterioration. Guidance O & M Manual.
4. Check the Head Harness (Spider) for signs of tearing, deterioration, and/or damage. Ensure all five legs of the Spider are present. Guidance O & M Manual.
MASK ASSEMBLY 1. Visually inspect the Mask exterior for loose and/or missing
fasteners and obvious signs of fiberglass damage; including cracks, gouges or depressions.
NOTE: On the KMB-18, any gouges in the fiberglass shell deeper than 1/16” that expose fiberglass should be repaired. Fiberglass and gel coat repairs MUST be completed by a technician that has received certification for Helmet Shell repairs by KMDSI or Dive Lab, Inc. Any cracks or depressions with fractures must be checked by an Authorized KMDSI Repair Facility.
2. Remove the Covers from the Earphones. Remove Microphone from Oral Nasal Mask. Inspect and repair/replace as necessary. Perform a communications check. Guidance O & M Manual.
CAUTION: The Nose Block device MUST be replaced when installing a new Oral Nasal Mask. Stretching the Oral Nasal Mask over the Nose Block Device can cause the Oral Nasal Mask to tear.
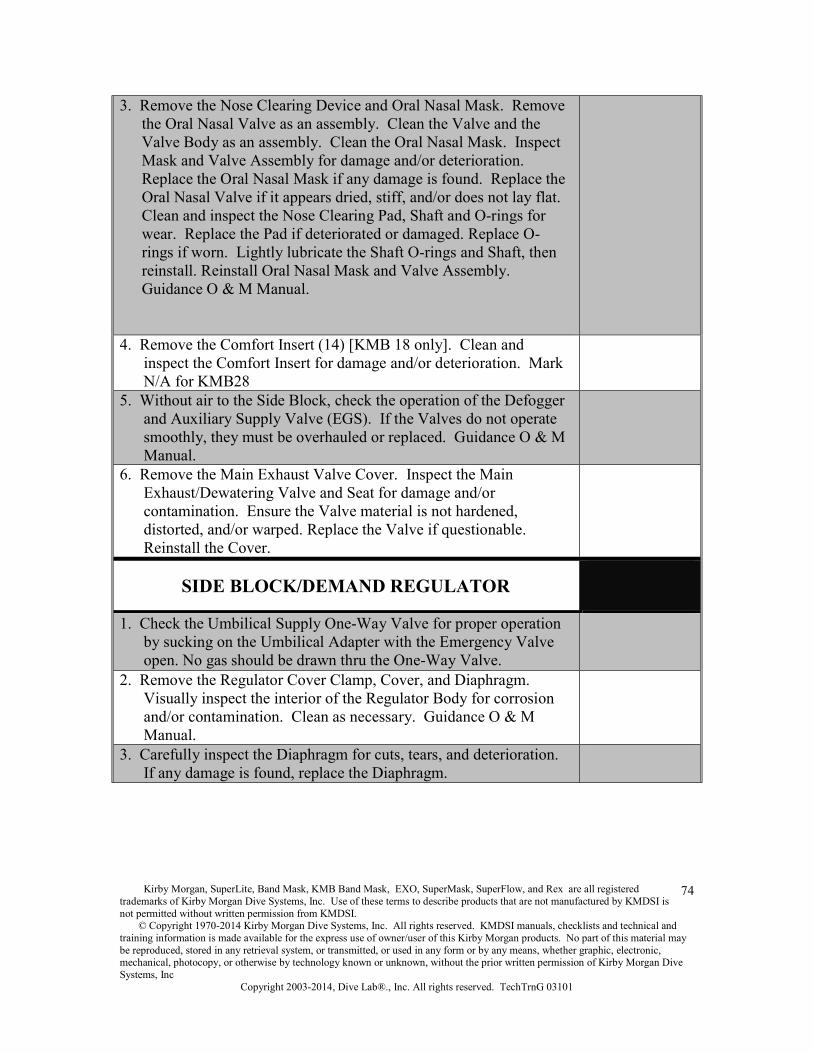
Kirby Morgan, SuperLite, Band Mask, KMB Band Mask, EXO, SuperMask, SuperFlow, and Rex are all registered trademarks of Kirby Morgan Dive Systems, Inc. Use of these terms to describe products that are not manufactured by KMDSI is not permitted without written permission from KMDSI. © Copyright 1970-2014 Kirby Morgan Dive Systems, Inc. All rights reserved. KMDSI manuals, checklists and technical and training information is made available for the express use of owner/user of this Kirby Morgan products. No part of this material may be reproduced, stored in any retrieval system, or transmitted, or used in any form or by any means, whether graphic, electronic, mechanical, photocopy, or otherwise by technology known or unknown, without the prior written permission of Kirby Morgan Dive Systems, Inc
Copyright 2003-2014, Dive Lab®., Inc. All rights reserved. TechTrnG 03101
74
3. Remove the Nose Clearing Device and Oral Nasal Mask. Remove the Oral Nasal Valve as an assembly. Clean the Valve and the Valve Body as an assembly. Clean the Oral Nasal Mask. Inspect Mask and Valve Assembly for damage and/or deterioration. Replace the Oral Nasal Mask if any damage is found. Replace the Oral Nasal Valve if it appears dried, stiff, and/or does not lay flat. Clean and inspect the Nose Clearing Pad, Shaft and O-rings for wear. Replace the Pad if deteriorated or damaged. Replace O-rings if worn. Lightly lubricate the Shaft O-rings and Shaft, then reinstall. Reinstall Oral Nasal Mask and Valve Assembly. Guidance O & M Manual.
4. Remove the Comfort Insert (14) [KMB 18 only]. Clean and inspect the Comfort Insert for damage and/or deterioration. Mark N/A for KMB28
5. Without air to the Side Block, check the operation of the Defogger and Auxiliary Supply Valve (EGS). If the Valves do not operate smoothly, they must be overhauled or replaced. Guidance O & M Manual.
6. Remove the Main Exhaust Valve Cover. Inspect the Main Exhaust/Dewatering Valve and Seat for damage and/or contamination. Ensure the Valve material is not hardened, distorted, and/or warped. Replace the Valve if questionable. Reinstall the Cover.
SIDE BLOCK/DEMAND REGULATOR
1. Check the Umbilical Supply One-Way Valve for proper operation by sucking on the Umbilical Adapter with the Emergency Valve open. No gas should be drawn thru the One-Way Valve.
2. Remove the Regulator Cover Clamp, Cover, and Diaphragm. Visually inspect the interior of the Regulator Body for corrosion and/or contamination. Clean as necessary. Guidance O & M Manual.
3. Carefully inspect the Diaphragm for cuts, tears, and deterioration. If any damage is found, replace the Diaphragm.

Kirby Morgan, SuperLite, Band Mask, KMB Band Mask, EXO, SuperMask, SuperFlow, and Rex are all registered trademarks of Kirby Morgan Dive Systems, Inc. Use of these terms to describe products that are not manufactured by KMDSI is not permitted without written permission from KMDSI. © Copyright 1970-2014 Kirby Morgan Dive Systems, Inc. All rights reserved. KMDSI manuals, checklists and technical and training information is made available for the express use of owner/user of this Kirby Morgan products. No part of this material may be reproduced, stored in any retrieval system, or transmitted, or used in any form or by any means, whether graphic, electronic, mechanical, photocopy, or otherwise by technology known or unknown, without the prior written permission of Kirby Morgan Dive Systems, Inc
Copyright 2003-2014, Dive Lab®., Inc. All rights reserved. TechTrnG 03101
75
4. Carefully check the Regulator Exhaust Valve for warping, distortion, stiffness, and/or damage. This is checked by pressing on the Flapper Valve from inside the Regulator. Check the Regulator Body Valve Seat Spokes. The Spokes should be flat and even. Straighten if deformed. If the Valve shows signs of damage and/or deterioration, replace the Valve. Guidance O & M Manual.
5. Reinstall the diaphragm and cover. Attach an air supply source to the Umbilical Adapter and set the supply pressure to between 135 - 150 psig (9.3 – 10.3 bar). Adjust the regulator adjustment knob out, until a slight free flow develops, then turn in until the free flow just stops. Guidance O & M Manual.
6. Depress the Purge Button. On the SuperFlow and SuperFlow 350 demand regulators the button should travel 1/16”-1/8” before gas starts to flow and a strong purge should be felt when the button is fully depressed. If the regulator purge travel is less than 1/16” or greater than 1/8”, readjust the lever, Guidance O & M Manual. For the 450 and 455 balanced regulators, when the cover is depressed between 1/16”-1/8” gas should start to flow and when pushed in ¼-1/2” a strong flow of gas should be present. Guidance O & M Manual.
7. Check the Steady Flow Valve for proper operation. NOTE: The Steady Flow Valve will rotate approximately two
complete revolutions from closed to full open. With the air pressure to the Mask between 135 - 150 psig (9.3 - 10.3 bar), turning the Steady Flow Valve one full rotation should result in a strong flow of gas through the Defogger Train.
8. Secure the gas supply, then bleed down and remove the gas supply from the Inlet Adapter.
9. Attach a regulated gas supply (normally the EGS system), adjusted to between 135 – 150 psig (9.3 – 10.3 bar), to the Emergency Valve on the Side Block. On the Side Block, open the Emergency Supply Valve all the way, and then slowly open the regulated gas supply. Check the function of the Regulator Purge, Regulator Adjustment Knob, and the Steady Flow Valve in accordance with previous steps 6 and 7. Check for gas exiting from the One-Way Valve. There should be no gas exiting the Umbilical Adapter.
EMERGENCY GAS SUPPLY (EGS)
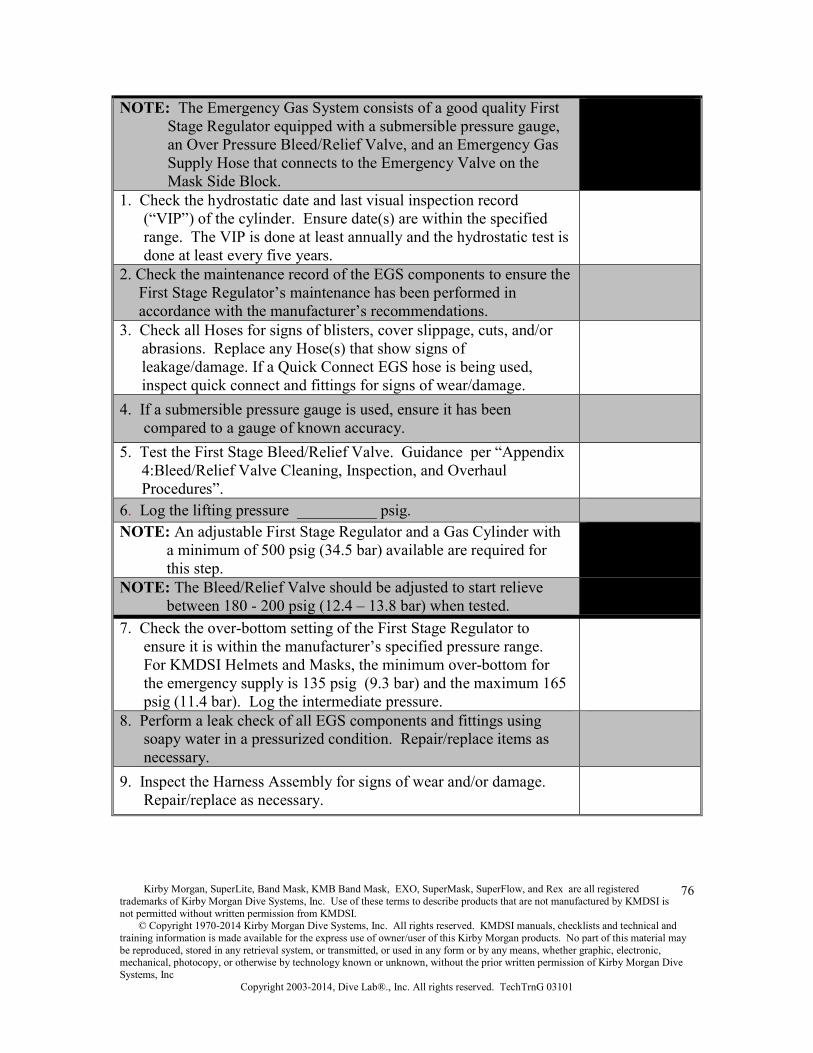
Kirby Morgan, SuperLite, Band Mask, KMB Band Mask, EXO, SuperMask, SuperFlow, and Rex are all registered trademarks of Kirby Morgan Dive Systems, Inc. Use of these terms to describe products that are not manufactured by KMDSI is not permitted without written permission from KMDSI. © Copyright 1970-2014 Kirby Morgan Dive Systems, Inc. All rights reserved. KMDSI manuals, checklists and technical and training information is made available for the express use of owner/user of this Kirby Morgan products. No part of this material may be reproduced, stored in any retrieval system, or transmitted, or used in any form or by any means, whether graphic, electronic, mechanical, photocopy, or otherwise by technology known or unknown, without the prior written permission of Kirby Morgan Dive Systems, Inc
Copyright 2003-2014, Dive Lab®., Inc. All rights reserved. TechTrnG 03101
76
NOTE: The Emergency Gas System consists of a good quality First Stage Regulator equipped with a submersible pressure gauge, an Over Pressure Bleed/Relief Valve, and an Emergency Gas Supply Hose that connects to the Emergency Valve on the Mask Side Block.
1. Check the hydrostatic date and last visual inspection record (“VIP”) of the cylinder. Ensure date(s) are within the specified range. The VIP is done at least annually and the hydrostatic test is done at least every five years.
2. Check the maintenance record of the EGS components to ensure the First Stage Regulator’s maintenance has been performed in accordance with the manufacturer’s recommendations.
3. Check all Hoses for signs of blisters, cover slippage, cuts, and/or abrasions. Replace any Hose(s) that show signs of leakage/damage. If a Quick Connect EGS hose is being used, inspect quick connect and fittings for signs of wear/damage.
4. If a submersible pressure gauge is used, ensure it has been compared to a gauge of known accuracy.
5. Test the First Stage Bleed/Relief Valve. Guidance per “Appendix 4:Bleed/Relief Valve Cleaning, Inspection, and Overhaul Procedures”.
6. Log the lifting pressure __________ psig. NOTE: An adjustable First Stage Regulator and a Gas Cylinder with
a minimum of 500 psig (34.5 bar) available are required for this step.
NOTE: The Bleed/Relief Valve should be adjusted to start relieve between 180 - 200 psig (12.4 – 13.8 bar) when tested.
7. Check the over-bottom setting of the First Stage Regulator to ensure it is within the manufacturer’s specified pressure range. For KMDSI Helmets and Masks, the minimum over-bottom for the emergency supply is 135 psig (9.3 bar) and the maximum 165 psig (11.4 bar). Log the intermediate pressure.
8. Perform a leak check of all EGS components and fittings using soapy water in a pressurized condition. Repair/replace items as necessary.
9. Inspect the Harness Assembly for signs of wear and/or damage. Repair/replace as necessary.

Kirby Morgan, SuperLite, Band Mask, KMB Band Mask, EXO, SuperMask, SuperFlow, and Rex are all registered trademarks of Kirby Morgan Dive Systems, Inc. Use of these terms to describe products that are not manufactured by KMDSI is not permitted without written permission from KMDSI. © Copyright 1970-2014 Kirby Morgan Dive Systems, Inc. All rights reserved. KMDSI manuals, checklists and technical and training information is made available for the express use of owner/user of this Kirby Morgan products. No part of this material may be reproduced, stored in any retrieval system, or transmitted, or used in any form or by any means, whether graphic, electronic, mechanical, photocopy, or otherwise by technology known or unknown, without the prior written permission of Kirby Morgan Dive Systems, Inc
Copyright 2003-2014, Dive Lab®., Inc. All rights reserved. TechTrnG 03101
77
Recorded service in helmet maintenance log book YES_______ NO______
NOTE: KMDSI strongly recommends that only trained certified KMDSI technicians perform overhauls. The below statement is intended to discourage non trained and non certified persons from posing as certified KMDSI technicians.
I_____________________________________________hereby certify that I have performed the work required in the A2.1 and that I am a certified KMDSI / Dive Lab technician.
Print name__________________________Signature__________________________
Date___________________ID#____________Expiration date__________________
I_____________________________________________hereby certify that I have performed the work required in the A2.1 and I am not a certified KMDSI / Dive Lab technician
Technician / Owner: Print name__________________________________________
Comments:___________________________________________________________
____________________________________________________________________
KMDSI highly recommends that a certified KMDSI Repair Technician make all repairs and that only genuine KMDSI repair and replacement parts be used. Owners of KMDSI products that elect to do their own repairs and inspections should only do so if they possess the knowledge and experience. All inspections, maintenance, and repairs should be completed using the appropriate KMDSI Operations and Maintenance Manual(s). Persons performing repairs should retain all replacement component receipts for additional proof of maintenance history. Should any questions on procedures, components, or repairs arise, please contact Kirby Morgan Dive Systems, Inc., by telephone at (805) 928-7772 or via e-mail at [email protected], or contact Dive Lab, Inc., by telephone at (850) 235-2715 or via e-mail at [email protected].
NOTE: The Maintenance Log, Appendix 3, of the Operations and Maintenance Manual may be used as a template for creating blank pages to record all the maintenance performed.

Kirby Morgan, SuperLite, Band Mask, KMB Band Mask, EXO, SuperMask, SuperFlow, and Rex are all registered trademarks of Kirby Morgan Dive Systems, Inc. Use of these terms to describe products that are not manufactured by KMDSI is not permitted without written permission from KMDSI. © Copyright 1970-2014 Kirby Morgan Dive Systems, Inc. All rights reserved. KMDSI manuals, checklists and technical and training information is made available for the express use of owner/user of this Kirby Morgan products. No part of this material may be reproduced, stored in any retrieval system, or transmitted, or used in any form or by any means, whether graphic, electronic, mechanical, photocopy, or otherwise by technology known or unknown, without the prior written permission of Kirby Morgan Dive Systems, Inc
Copyright 2003-2014, Dive Lab®., Inc. All rights reserved. TechTrnG 03101
78
KMB 18/28 (BAND MASK) DAILY MASK AND EMERGENCY GAS SYSTEM
SET-UP AND FUNCTIONAL CHECKLISTS APPENDIX A2.3
7-9-14 MW
THIS DAILY SET-UP AND FUNCTIONAL CHECKLIST SHOULD BE COMPLETED PRIOR TO COMMENCEMENT OF DAILY DIVING OPERATIONS AND AT LEAST EVERY 24 HOURS IF IN CONTINUOUS USE.
WARNING: These are recommended minimum checks when using Kirby Morgan KMB 18/28 Band Masks. Additional checks may be required as dictated by the conditions and tasks being performed. Failure to perform in-water checks
may result in serious injury or death.
NOTE: Mask(s) being used in polluted waters, or extreme environments, will require more frequent inspection.
NOTE: During removal of components for inspection, O-rings and other consumable items may be reused, providing they are clean and a visual inspection does not reveal any damage or deterioration.
NOTE: Perform the Side Block/Demand Regulator inspection procedures with gas supplies not connected to the Side Block. Attach the gas supply at Step 5 of the “Side Block/Demand Regulator” inspection procedure.
NOTE: Steps 3(a) - 3(e) use the EGS for setting up and checking the Mask’s systems. For a proper check of the Demand Regulator adjustment, the First Stage Regulator must have an intermediate supply pressure output between 135 – 150 psig (9.3 – 10.3 bar). The First Stage Bleed/Relief Valve should be set between 180 - 200 psig (12.4 – 13.8 bar). Do not attach the Umbilical until Step 6.
Date:
Mask Serial #:
Associated Equipment Serial #(s):
Technician (print name):
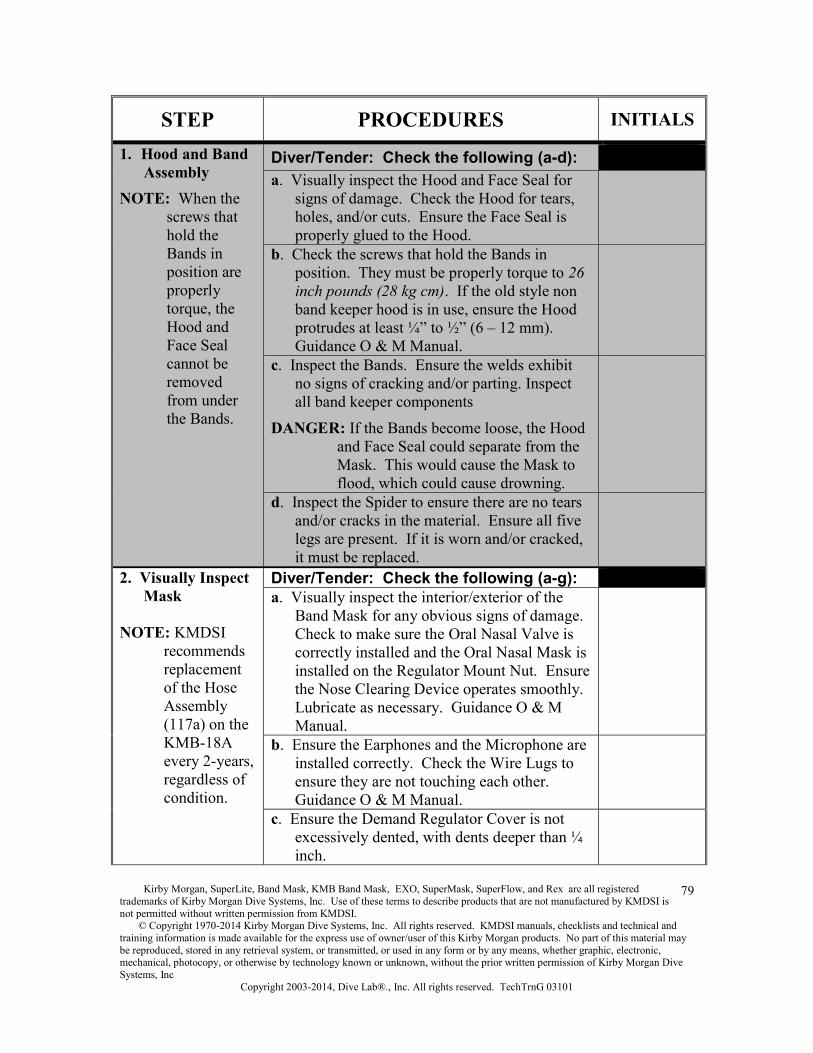
Kirby Morgan, SuperLite, Band Mask, KMB Band Mask, EXO, SuperMask, SuperFlow, and Rex are all registered trademarks of Kirby Morgan Dive Systems, Inc. Use of these terms to describe products that are not manufactured by KMDSI is not permitted without written permission from KMDSI. © Copyright 1970-2014 Kirby Morgan Dive Systems, Inc. All rights reserved. KMDSI manuals, checklists and technical and training information is made available for the express use of owner/user of this Kirby Morgan products. No part of this material may be reproduced, stored in any retrieval system, or transmitted, or used in any form or by any means, whether graphic, electronic, mechanical, photocopy, or otherwise by technology known or unknown, without the prior written permission of Kirby Morgan Dive Systems, Inc
Copyright 2003-2014, Dive Lab®., Inc. All rights reserved. TechTrnG 03101
79
STEP PROCEDURES INITIALS
1. Hood and Band Assembly
NOTE: When the screws that hold the Bands in position are properly torque, the Hood and Face Seal cannot be removed from under the Bands.
Diver/Tender: Check the following (a-d): a. Visually inspect the Hood and Face Seal for
signs of damage. Check the Hood for tears, holes, and/or cuts. Ensure the Face Seal is properly glued to the Hood.
b. Check the screws that hold the Bands in position. They must be properly torque to 26 inch pounds (28 kg cm). If the old style non band keeper hood is in use, ensure the Hood protrudes at least ¼” to ½” (6 – 12 mm). Guidance O & M Manual.
c. Inspect the Bands. Ensure the welds exhibit no signs of cracking and/or parting. Inspect all band keeper components
DANGER: If the Bands become loose, the Hood and Face Seal could separate from the Mask. This would cause the Mask to flood, which could cause drowning.
d. Inspect the Spider to ensure there are no tears and/or cracks in the material. Ensure all five legs are present. If it is worn and/or cracked, it must be replaced.
2. Visually Inspect Mask
NOTE: KMDSI recommends replacement of the Hose Assembly (117a) on the KMB-18A every 2-years, regardless of condition.
Diver/Tender: Check the following (a-g): a. Visually inspect the interior/exterior of the
Band Mask for any obvious signs of damage. Check to make sure the Oral Nasal Valve is correctly installed and the Oral Nasal Mask is installed on the Regulator Mount Nut. Ensure the Nose Clearing Device operates smoothly. Lubricate as necessary. Guidance O & M Manual.
b. Ensure the Earphones and the Microphone are installed correctly. Check the Wire Lugs to ensure they are not touching each other. Guidance O & M Manual.
c. Ensure the Demand Regulator Cover is not excessively dented, with dents deeper than ¼ inch.
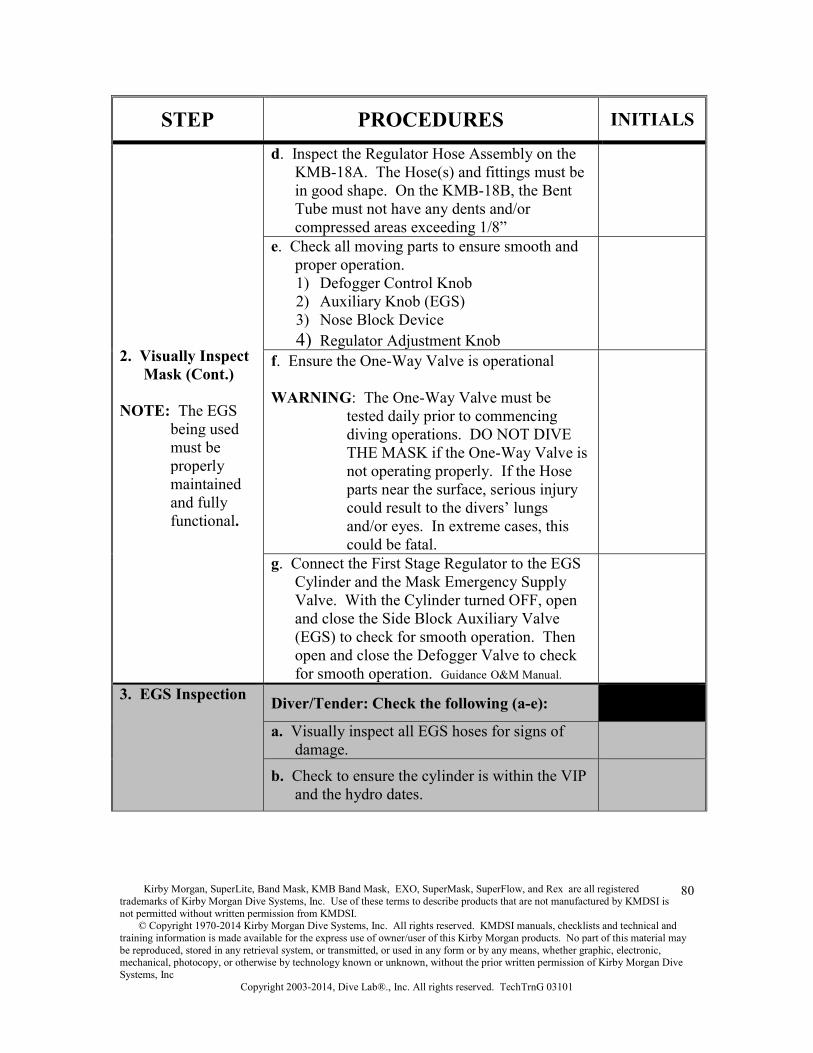
Kirby Morgan, SuperLite, Band Mask, KMB Band Mask, EXO, SuperMask, SuperFlow, and Rex are all registered trademarks of Kirby Morgan Dive Systems, Inc. Use of these terms to describe products that are not manufactured by KMDSI is not permitted without written permission from KMDSI. © Copyright 1970-2014 Kirby Morgan Dive Systems, Inc. All rights reserved. KMDSI manuals, checklists and technical and training information is made available for the express use of owner/user of this Kirby Morgan products. No part of this material may be reproduced, stored in any retrieval system, or transmitted, or used in any form or by any means, whether graphic, electronic, mechanical, photocopy, or otherwise by technology known or unknown, without the prior written permission of Kirby Morgan Dive Systems, Inc
Copyright 2003-2014, Dive Lab®., Inc. All rights reserved. TechTrnG 03101
80
STEP PROCEDURES INITIALS
2. Visually Inspect Mask (Cont.)
NOTE: The EGS being used must be properly maintainedand fully functional.
d. Inspect the Regulator Hose Assembly on the KMB-18A. The Hose(s) and fittings must be in good shape. On the KMB-18B, the Bent Tube must not have any dents and/or compressed areas exceeding 1/8”
e. Check all moving parts to ensure smooth and proper operation. 1) Defogger Control Knob 2) Auxiliary Knob (EGS) 3) Nose Block Device 4) Regulator Adjustment Knob
f. Ensure the One-Way Valve is operational
WARNING: The One-Way Valve must be tested daily prior to commencing diving operations. DO NOT DIVE THE MASK if the One-Way Valve is not operating properly. If the Hose parts near the surface, serious injury could result to the divers’ lungs and/or eyes. In extreme cases, this could be fatal.
g. Connect the First Stage Regulator to the EGS Cylinder and the Mask Emergency Supply Valve. With the Cylinder turned OFF, open and close the Side Block Auxiliary Valve (EGS) to check for smooth operation. Then open and close the Defogger Valve to check for smooth operation. Guidance O&M Manual.
3. EGS Inspection Diver/Tender: Check the following (a-e):
a. Visually inspect all EGS hoses for signs of damage.
b. Check to ensure the cylinder is within the VIP and the hydro dates.

Kirby Morgan, SuperLite, Band Mask, KMB Band Mask, EXO, SuperMask, SuperFlow, and Rex are all registered trademarks of Kirby Morgan Dive Systems, Inc. Use of these terms to describe products that are not manufactured by KMDSI is not permitted without written permission from KMDSI. © Copyright 1970-2014 Kirby Morgan Dive Systems, Inc. All rights reserved. KMDSI manuals, checklists and technical and training information is made available for the express use of owner/user of this Kirby Morgan products. No part of this material may be reproduced, stored in any retrieval system, or transmitted, or used in any form or by any means, whether graphic, electronic, mechanical, photocopy, or otherwise by technology known or unknown, without the prior written permission of Kirby Morgan Dive Systems, Inc
Copyright 2003-2014, Dive Lab®., Inc. All rights reserved. TechTrnG 03101
81
STEP PROCEDURES INITIALS
c. Ensure the First Stage Regulator pressure setting and the Over Pressure Bleed/Relief Valve settings have been checked within the past month. (Maintenance Log).
d. Inspect the Safety Harness and Cylinder Retainer for wear and damage. Repair/replace as necessary.
e. Document inspection/maintenance in Maintenance Log (Appendix 3).
4. Check the Mask Diver/Tender: Check the following (a-d):a. Rotate the Regulator Adjustment Knob in
fully (clockwise), then rotate out (counterclockwise) 3 – 4 rotations to check for smooth operation.
b. Open the EGS Supply Valve on the cylinder. Log the pressure _______ psig. Then open the Emergency Supply Valve on the Side Block.
c. Momentarily open the Mask Defogger ¾ to 1 full turn. Check for a strong flow of gas out of the Defogging Train, and then close.
d. Check for gas escaping from the One-Way Valve.
5. Attach the Umbilical
Tender: Blow down the Umbilical and attach it to the Umbilical Adapter on the One-Way Valve.
6. Check the Demand Regulator Adjustment
Diver/Tender: Check the following (a-d):a. Rotate out (counterclockwise) on the Demand
Regulator Adjustment Knob until a slight free flow develops. Then rotate in (clockwise) until the free flow stops.
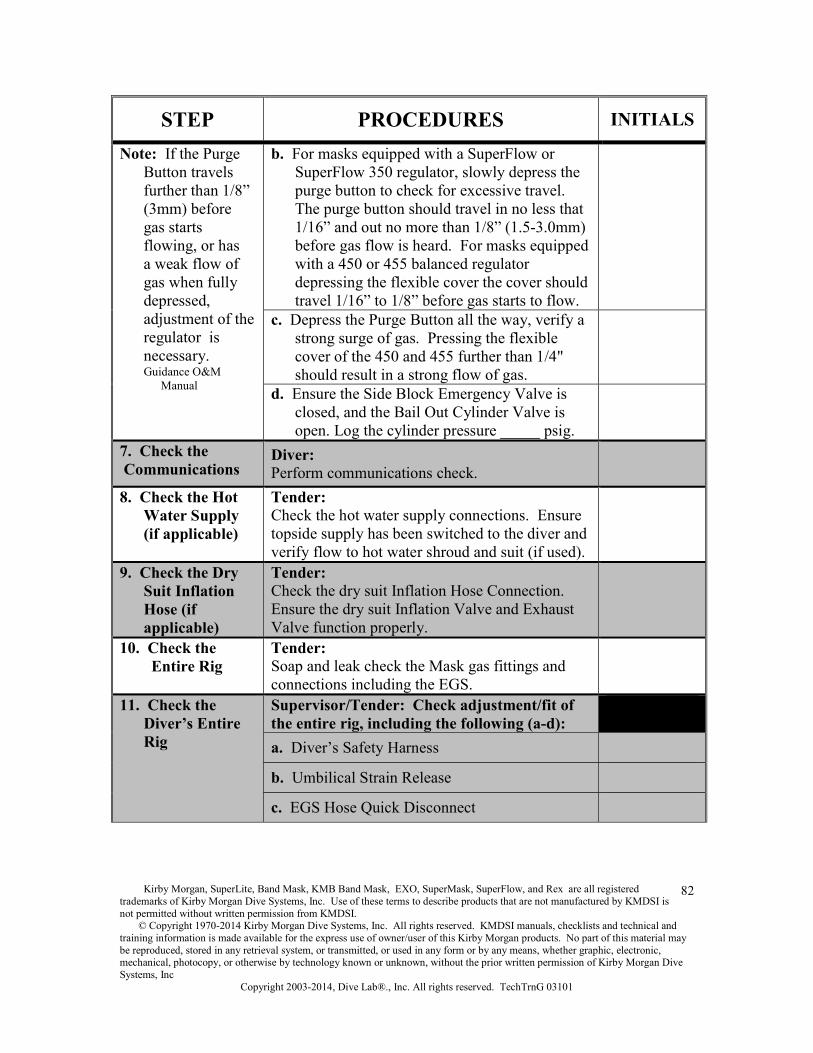
Kirby Morgan, SuperLite, Band Mask, KMB Band Mask, EXO, SuperMask, SuperFlow, and Rex are all registered trademarks of Kirby Morgan Dive Systems, Inc. Use of these terms to describe products that are not manufactured by KMDSI is not permitted without written permission from KMDSI. © Copyright 1970-2014 Kirby Morgan Dive Systems, Inc. All rights reserved. KMDSI manuals, checklists and technical and training information is made available for the express use of owner/user of this Kirby Morgan products. No part of this material may be reproduced, stored in any retrieval system, or transmitted, or used in any form or by any means, whether graphic, electronic, mechanical, photocopy, or otherwise by technology known or unknown, without the prior written permission of Kirby Morgan Dive Systems, Inc
Copyright 2003-2014, Dive Lab®., Inc. All rights reserved. TechTrnG 03101
82
STEP PROCEDURES INITIALS
Note: If the Purge Button travels further than 1/8” (3mm) before gas starts flowing, or has a weak flow of gas when fully depressed, adjustment of the regulator is necessary.
Guidance O&M Manual
b. For masks equipped with a SuperFlow or SuperFlow 350 regulator, slowly depress the purge button to check for excessive travel. The purge button should travel in no less that 1/16” and out no more than 1/8” (1.5-3.0mm) before gas flow is heard. For masks equipped with a 450 or 455 balanced regulator depressing the flexible cover the cover should travel 1/16” to 1/8” before gas starts to flow.
c. Depress the Purge Button all the way, verify a strong surge of gas. Pressing the flexible cover of the 450 and 455 further than 1/4" should result in a strong flow of gas.
d. Ensure the Side Block Emergency Valve is closed, and the Bail Out Cylinder Valve is open. Log the cylinder pressure _____ psig.
7. Check the Communications
Diver:Perform communications check.
8. Check the Hot Water Supply (if applicable)
Tender:Check the hot water supply connections. Ensure topside supply has been switched to the diver and verify flow to hot water shroud and suit (if used).
9. Check the Dry Suit Inflation Hose (if applicable)
Tender:Check the dry suit Inflation Hose Connection. Ensure the dry suit Inflation Valve and Exhaust Valve function properly.
10. Check the Entire Rig
Tender:Soap and leak check the Mask gas fittings and connections including the EGS.
11. Check the Diver’s Entire Rig
Supervisor/Tender: Check adjustment/fit of the entire rig, including the following (a-d): a. Diver’s Safety Harness
b. Umbilical Strain Release
c. EGS Hose Quick Disconnect

Kirby Morgan, SuperLite, Band Mask, KMB Band Mask, EXO, SuperMask, SuperFlow, and Rex are all registered trademarks of Kirby Morgan Dive Systems, Inc. Use of these terms to describe products that are not manufactured by KMDSI is not permitted without written permission from KMDSI. © Copyright 1970-2014 Kirby Morgan Dive Systems, Inc. All rights reserved. KMDSI manuals, checklists and technical and training information is made available for the express use of owner/user of this Kirby Morgan products. No part of this material may be reproduced, stored in any retrieval system, or transmitted, or used in any form or by any means, whether graphic, electronic, mechanical, photocopy, or otherwise by technology known or unknown, without the prior written permission of Kirby Morgan Dive Systems, Inc
Copyright 2003-2014, Dive Lab®., Inc. All rights reserved. TechTrnG 03101
83
STEP PROCEDURES INITIALS
d. Boots, gloves, knife, and other accessories
NOTE: All equipment must be adjusted properly and functioning correctly.
12. Check Breathing
Diver:Check to ensure the Mask is breathing easily.
NOTE: The Mask must be breathing easily and properly
13. Diver(s) Is Ready
Diver:Report when you are ready to enter the water.
Technician / Owner: print:____________________________ Date:________________
Signature_______________________________________________________________
Comments:_________________________________________________________
MDSI highly recommends that a certified KMDSI Repair Technician make all repairs and that only genuine KMDSI repair and replacement parts be used. Owners of KMDSI products that elect to do their own repairs and inspections should only do so if they possess the knowledge and experience. All inspections, maintenance, and repairs should be completed using the appropriate KMDSI Operations and Maintenance Manual(s). Persons performing repairs should retain all replacement component receipts for additional proof of maintenance history. Should any questions on procedures, components, or repairs arise, please contact Kirby Morgan Dive Systems, Inc., by telephone at (805) 928-7772 or via e-mail at [email protected], or contact Dive Lab, Inc., by telephone at (850) 235-2715 or via e-mail at [email protected].
NOTE: The Maintenance Log, Appendix 3, of the Operations and Maintenance Manual may be used as a template to create blank pages to record all the maintenance performed.
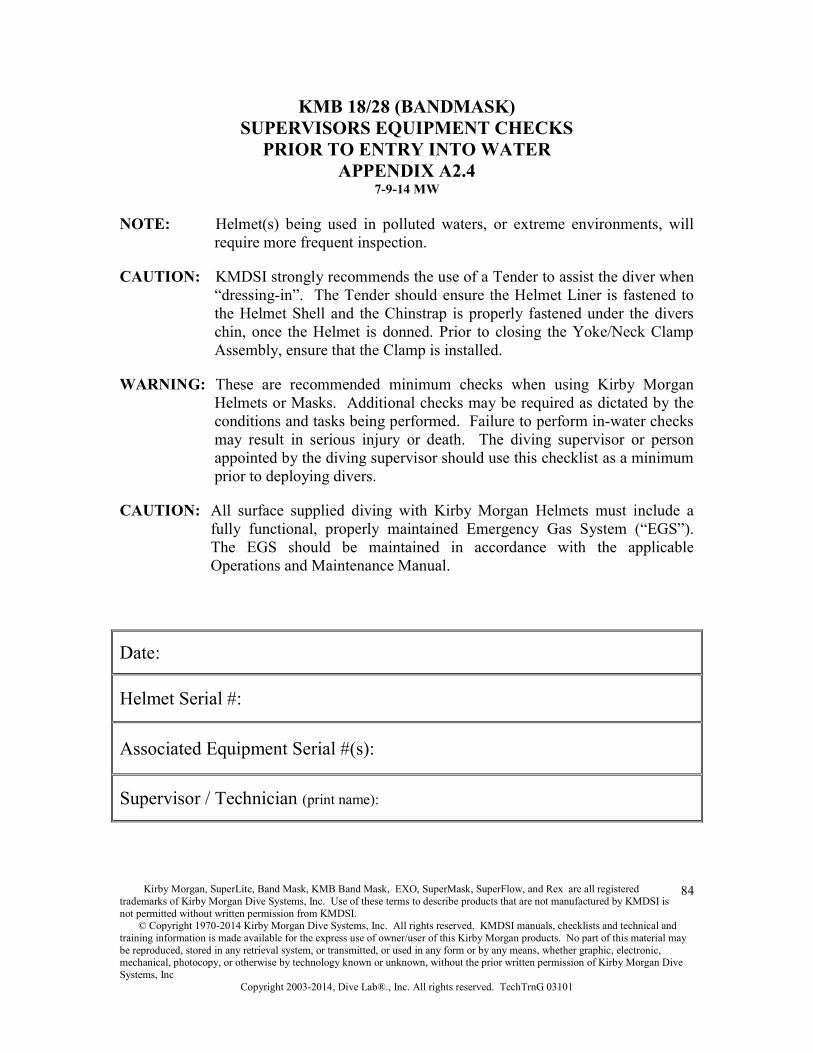
Kirby Morgan, SuperLite, Band Mask, KMB Band Mask, EXO, SuperMask, SuperFlow, and Rex are all registered trademarks of Kirby Morgan Dive Systems, Inc. Use of these terms to describe products that are not manufactured by KMDSI is not permitted without written permission from KMDSI. © Copyright 1970-2014 Kirby Morgan Dive Systems, Inc. All rights reserved. KMDSI manuals, checklists and technical and training information is made available for the express use of owner/user of this Kirby Morgan products. No part of this material may be reproduced, stored in any retrieval system, or transmitted, or used in any form or by any means, whether graphic, electronic, mechanical, photocopy, or otherwise by technology known or unknown, without the prior written permission of Kirby Morgan Dive Systems, Inc
Copyright 2003-2014, Dive Lab®., Inc. All rights reserved. TechTrnG 03101
84
KMB 18/28 (BANDMASK) SUPERVISORS EQUIPMENT CHECKS
PRIOR TO ENTRY INTO WATER APPENDIX A2.4
7-9-14 MW
NOTE: Helmet(s) being used in polluted waters, or extreme environments, will require more frequent inspection.
CAUTION: KMDSI strongly recommends the use of a Tender to assist the diver when “dressing-in”. The Tender should ensure the Helmet Liner is fastened to the Helmet Shell and the Chinstrap is properly fastened under the divers chin, once the Helmet is donned. Prior to closing the Yoke/Neck Clamp Assembly, ensure that the Clamp is installed.
WARNING: These are recommended minimum checks when using Kirby Morgan Helmets or Masks. Additional checks may be required as dictated by the conditions and tasks being performed. Failure to perform in-water checks may result in serious injury or death. The diving supervisor or person appointed by the diving supervisor should use this checklist as a minimum prior to deploying divers.
CAUTION: All surface supplied diving with Kirby Morgan Helmets must include a fully functional, properly maintained Emergency Gas System (“EGS”). The EGS should be maintained in accordance with the applicable Operations and Maintenance Manual.
Date:
Helmet Serial #:
Associated Equipment Serial #(s):
Supervisor / Technician (print name):
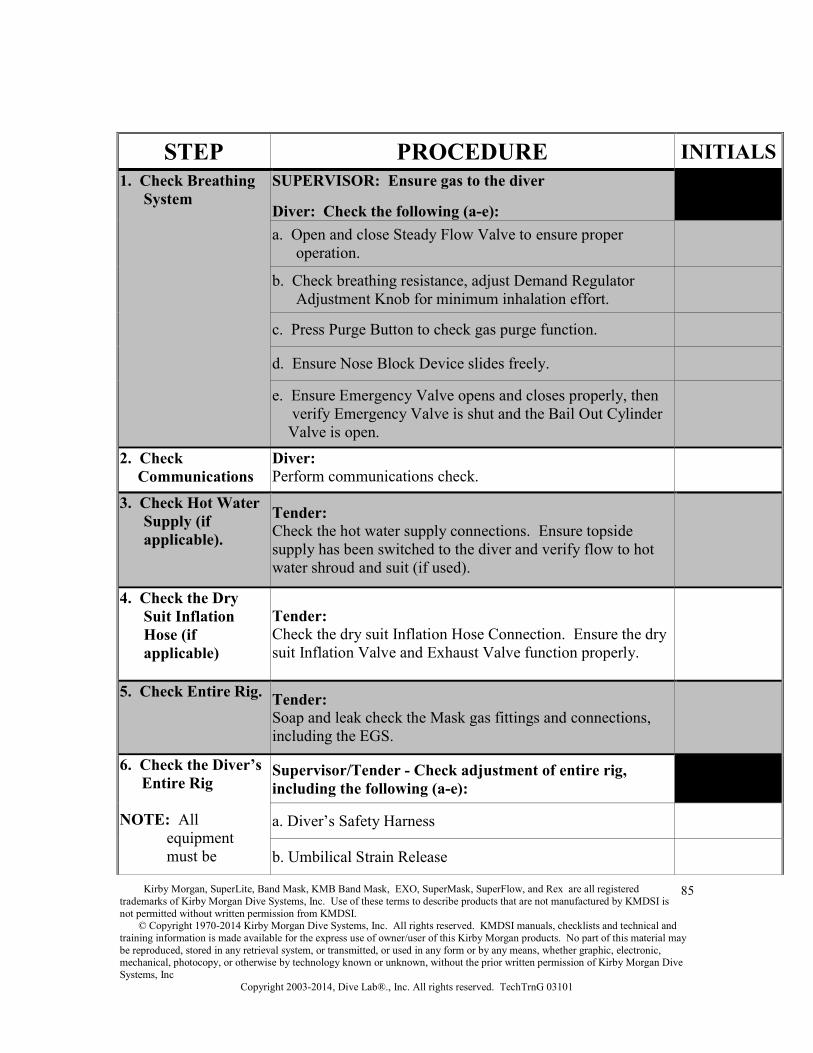
Kirby Morgan, SuperLite, Band Mask, KMB Band Mask, EXO, SuperMask, SuperFlow, and Rex are all registered trademarks of Kirby Morgan Dive Systems, Inc. Use of these terms to describe products that are not manufactured by KMDSI is not permitted without written permission from KMDSI. © Copyright 1970-2014 Kirby Morgan Dive Systems, Inc. All rights reserved. KMDSI manuals, checklists and technical and training information is made available for the express use of owner/user of this Kirby Morgan products. No part of this material may be reproduced, stored in any retrieval system, or transmitted, or used in any form or by any means, whether graphic, electronic, mechanical, photocopy, or otherwise by technology known or unknown, without the prior written permission of Kirby Morgan Dive Systems, Inc
Copyright 2003-2014, Dive Lab®., Inc. All rights reserved. TechTrnG 03101
85
STEP PROCEDURE INITIALS1. Check Breathing
System SUPERVISOR: Ensure gas to the diver
Diver: Check the following (a-e): a. Open and close Steady Flow Valve to ensure proper
operation.
b. Check breathing resistance, adjust Demand Regulator Adjustment Knob for minimum inhalation effort.
c. Press Purge Button to check gas purge function.
d. Ensure Nose Block Device slides freely.
e. Ensure Emergency Valve opens and closes properly, then verify Emergency Valve is shut and the Bail Out Cylinder Valve is open.
2. Check Communications
Diver: Perform communications check.
3. Check Hot Water Supply (if applicable).
Tender:Check the hot water supply connections. Ensure topside supply has been switched to the diver and verify flow to hot water shroud and suit (if used).
4. Check the Dry Suit Inflation Hose (if applicable)
Tender: Check the dry suit Inflation Hose Connection. Ensure the dry suit Inflation Valve and Exhaust Valve function properly.
5. Check Entire Rig. Tender:Soap and leak check the Mask gas fittings and connections, including the EGS.
6. Check the Diver’s Entire Rig
NOTE: All equipment must be
Supervisor/Tender - Check adjustment of entire rig, including the following (a-e):
a. Diver’s Safety Harness
b. Umbilical Strain Release
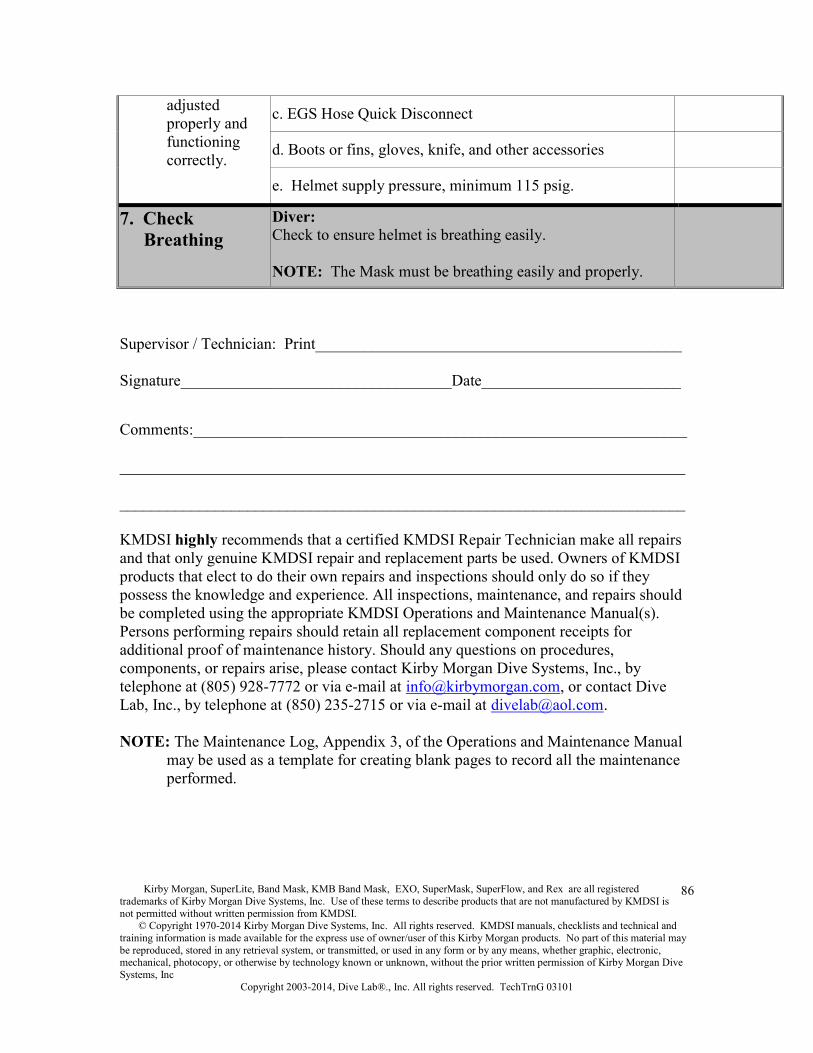
Kirby Morgan, SuperLite, Band Mask, KMB Band Mask, EXO, SuperMask, SuperFlow, and Rex are all registered trademarks of Kirby Morgan Dive Systems, Inc. Use of these terms to describe products that are not manufactured by KMDSI is not permitted without written permission from KMDSI. © Copyright 1970-2014 Kirby Morgan Dive Systems, Inc. All rights reserved. KMDSI manuals, checklists and technical and training information is made available for the express use of owner/user of this Kirby Morgan products. No part of this material may be reproduced, stored in any retrieval system, or transmitted, or used in any form or by any means, whether graphic, electronic, mechanical, photocopy, or otherwise by technology known or unknown, without the prior written permission of Kirby Morgan Dive Systems, Inc
Copyright 2003-2014, Dive Lab®., Inc. All rights reserved. TechTrnG 03101
86
adjusted properly and functioning correctly.
c. EGS Hose Quick Disconnect
d. Boots or fins, gloves, knife, and other accessories
e. Helmet supply pressure, minimum 115 psig.
7. Check Breathing
Diver: Check to ensure helmet is breathing easily.
NOTE: The Mask must be breathing easily and properly.
Supervisor / Technician: Print______________________________________________
Signature__________________________________Date_________________________
Comments:______________________________________________________________
_______________________________________________________________________
_______________________________________________________________________
KMDSI highly recommends that a certified KMDSI Repair Technician make all repairs and that only genuine KMDSI repair and replacement parts be used. Owners of KMDSI products that elect to do their own repairs and inspections should only do so if they possess the knowledge and experience. All inspections, maintenance, and repairs should be completed using the appropriate KMDSI Operations and Maintenance Manual(s). Persons performing repairs should retain all replacement component receipts for additional proof of maintenance history. Should any questions on procedures, components, or repairs arise, please contact Kirby Morgan Dive Systems, Inc., by telephone at (805) 928-7772 or via e-mail at [email protected], or contact Dive Lab, Inc., by telephone at (850) 235-2715 or via e-mail at [email protected].
NOTE: The Maintenance Log, Appendix 3, of the Operations and Maintenance Manual may be used as a template for creating blank pages to record all the maintenance performed.
Kirby Morgan, SuperLite, Band Mask, KMB Band Mask, EXO, SuperMask, SuperFlow, and Rex are all registered trademarks of Kirby Morgan Dive Systems, Inc. Use of these terms to describe products that are not manufactured by KMDSI is not permitted without written permission from KMDSI. © Copyright 1970-2014 Kirby Morgan Dive Systems, Inc. All rights reserved. KMDSI manuals, checklists and technical and training information is made available for the express use of owner/user of this Kirby Morgan products. No part of this material may be reproduced, stored in any retrieval system, or transmitted, or used in any form or by any means, whether graphic, electronic, mechanical, photocopy, or otherwise by technology known or unknown, without the prior written permission of Kirby Morgan Dive Systems, Inc
Copyright 2003-2014, Dive Lab®., Inc. All rights reserved. TechTrnG 03101
87
KMB 18/28 (BANDMASK) SUPERVISORS IN-WATER CHECKS
APPENDIX A2.57-9-14 MW
NOTE: Mask(s) being used in polluted waters, or extreme environments, will require more frequent inspection.
NOTE: During removal of components for inspection, O-rings and other consumable items may be reused, providing they are clean and a visual inspection does not reveal any damage or deterioration.
WARNING: These are recommended minimum checks when using Kirby Morgan Band Masks. Additional checks may be required as dictated by the conditions and tasks being performed. Failure to perform in-water checks may result in serious injury or death. See Chapter 2 of the KMDSI SuperLite 17A/B Operations and Maintenance Manual for air supply requirements.
CAUTION: All surface supplied diving with Kirby Morgan Band Mask(s) must include a fully functional, properly maintained Emergency Gas System (“EGS”). The EGS should be maintained in accordance with the applicable Operations and Maintenance Manual(s).
WARNING: If diving is conducted with less than the minimum recommended supply pressure, the diver must tailor the work to prevent exhaustion.
Date:
Mask Serial #:
Associated Equipment Serial #(s):
Technician (print name):

Kirby Morgan, SuperLite, Band Mask, KMB Band Mask, EXO, SuperMask, SuperFlow, and Rex are all registered trademarks of Kirby Morgan Dive Systems, Inc. Use of these terms to describe products that are not manufactured by KMDSI is not permitted without written permission from KMDSI. © Copyright 1970-2014 Kirby Morgan Dive Systems, Inc. All rights reserved. KMDSI manuals, checklists and technical and training information is made available for the express use of owner/user of this Kirby Morgan products. No part of this material may be reproduced, stored in any retrieval system, or transmitted, or used in any form or by any means, whether graphic, electronic, mechanical, photocopy, or otherwise by technology known or unknown, without the prior written permission of Kirby Morgan Dive Systems, Inc
Copyright 2003-2014, Dive Lab®., Inc. All rights reserved. TechTrnG 03101
88
STEP PROCEDURE INITIALS 1. Check Breathing Diver:
Ensure Mask is breathing properly. Adjust the Demand Regulator Adjustment Knob for easy inhalation. Report: Breathing OK
2. Check Mask/Equipment for Leaks
Diver: Ensure Mask is watertight. NOTE: If the diver is wearing a dry suit,
diver reports that a proper seal has been made after checking for water leakage.
3. Maintain Gas Supply Over-Bottom Pressure
NOTE: If the above over-bottom pressure cannot be supplied, the diver will have to tailor his workload to avoid exhaustion.
NOTE: The Demand Regulator and Side Block Assembly have a maximum design pressure of 250 psig (17 bar) over-bottom.
Console Operator: Maintain minimum over-bottom gas supply pressure for depth (fsw x 0.445) + required over-bottom for depth, in accordance with the applicable O & M manual for the type of supply system.
Required over-bottom for depth: 0 - 60 fsw (0 - 18.3 msw), 90 psig (6.2 bar) 61 - l00 fsw (18.6 - 30.5 msw), 115 psig (7.9 bar) 101 - 132 fsw (30.8 - 40.2 msw), 135 psig (9.3 bar) 133 -165 fsw (40.6 - 50.3 msw), 165 psig (11.4 bar) 166 -220 fsw (50.6 - 67.1 msw), 225 psig(15.5 bar)
Supervisor / Technician: Print_______________________________________________
Signature:____________________________________Date:_______________________
Comments:____________________________________________________________
_____________________________________________________________________

Kirby Morgan, SuperLite, Band Mask, KMB Band Mask, EXO, SuperMask, SuperFlow, and Rex are all registered trademarks of Kirby Morgan Dive Systems, Inc. Use of these terms to describe products that are not manufactured by KMDSI is not permitted without written permission from KMDSI. © Copyright 1970-2014 Kirby Morgan Dive Systems, Inc. All rights reserved. KMDSI manuals, checklists and technical and training information is made available for the express use of owner/user of this Kirby Morgan products. No part of this material may be reproduced, stored in any retrieval system, or transmitted, or used in any form or by any means, whether graphic, electronic, mechanical, photocopy, or otherwise by technology known or unknown, without the prior written permission of Kirby Morgan Dive Systems, Inc
Copyright 2003-2014, Dive Lab®., Inc. All rights reserved. TechTrnG 03101
89
_____________________________________________________________________
KMDSI highly recommends that a certified KMDSI Repair Technician make all repairs and that only genuine KMDSI repair and replacement parts be used. Owners of KMDSI products that elect to do their own repairs and inspections should only do so if they possess the knowledge and experience. All inspections, maintenance, and repairs should be completed using the appropriate KMDSI Operations and Maintenance Manual(s). Persons performing repairs should retain all replacement component receipts for additional proof of maintenance history. Should any questions on procedures, components, or repairs arise, please contact Kirby Morgan Dive Systems, Inc., by telephone at (805) 928-7772 or via e-mail at [email protected], or contact Dive Lab, Inc., by telephone at (850) 235-2715 or via e-mail at [email protected].
NOTE: The Maintenance Log, Appendix 3, may be used as a template to create blank pages to record all the maintenance performed.

Kirby Morgan, SuperLite, Band Mask, KMB Band Mask, EXO, SuperMask, SuperFlow, and Rex are all registered trademarks of Kirby Morgan Dive Systems, Inc. Use of these terms to describe products that are not manufactured by KMDSI is not permitted without written permission from KMDSI. © Copyright 1970-2014 Kirby Morgan Dive Systems, Inc. All rights reserved. KMDSI manuals, checklists and technical and training information is made available for the express use of owner/user of this Kirby Morgan products. No part of this material may be reproduced, stored in any retrieval system, or transmitted, or used in any form or by any means, whether graphic, electronic, mechanical, photocopy, or otherwise by technology known or unknown, without the prior written permission of Kirby Morgan Dive Systems, Inc
Copyright 2003-2014, Dive Lab®., Inc. All rights reserved. TechTrnG 03101
90
KMB 18/28 (BANDMASK) POST DIVE CLEANING
MAINTENANCE AND INSPECTION APPENDIX A2.6
7-9-14 MW
Post diving cleaning and inspection should be performed at end of daily diving operations or at least every 24 hours if in continuous use.
NOTE: Mask(s) being used in polluted waters, or extreme environments, will require more frequent inspection.
NOTE: During removal of components for inspection, O-rings and other consumable items may be reused, providing they are clean and a visual inspection does not reveal any damage or deterioration.
NOTE: This cleaning and maintenance schedule is recommended to be performed on a DAILY basis.
NOTE: Detailed instructions are located in Chapter 5.
Date:
Mask Serial #:
Associated Equipment Serial #(s):
Equipment belonging to: (print name):
Technician:
PROCEDURES INITIALS
1. Secure and bleed down gas supplies. 2. Disconnect and cap (or bag and tape) the Mask Gas Connections
and disconnect the communication wires. Cap (or bag and tape) the Umbilical End.

Kirby Morgan, SuperLite, Band Mask, KMB Band Mask, EXO, SuperMask, SuperFlow, and Rex are all registered trademarks of Kirby Morgan Dive Systems, Inc. Use of these terms to describe products that are not manufactured by KMDSI is not permitted without written permission from KMDSI. © Copyright 1970-2014 Kirby Morgan Dive Systems, Inc. All rights reserved. KMDSI manuals, checklists and technical and training information is made available for the express use of owner/user of this Kirby Morgan products. No part of this material may be reproduced, stored in any retrieval system, or transmitted, or used in any form or by any means, whether graphic, electronic, mechanical, photocopy, or otherwise by technology known or unknown, without the prior written permission of Kirby Morgan Dive Systems, Inc
Copyright 2003-2014, Dive Lab®., Inc. All rights reserved. TechTrnG 03101
91
3. Wash the exterior surface of the Mask with a solution of mild detergent and fresh water, then rinse. Inspect for signs of damage.
4. Dislodge the Earphones from their pockets in the Hood. Remove the Earphone protective covers, clean and rinse to allow to dry.
5. Clean Hood Assembly. Rinse with fresh water and inspect for damage. Hang-up for drying or airing.
6. Remove the Demand Regulator Clamp, Cover, and Diaphragm Assembly. Wash the interior of the Demand Regulator with mild detergent and fresh water, then rinse thoroughly.
NOTE: While rinsing the interior of the Demand Regulator DO NOT depress the Purge Button. This action will introduce foreign matter into the Inlet Valve and Seat.
7. Remove the Microphone from the Oral Nasal Mask. Avoid getting water on the Oral Nasal Mask, Microphone and Earphones.
8. Wipe down interior of the Mask, including the Oral Nasal Mask with a mild detergent and fresh water solution. Thoroughly rinse with fresh water while cycling the Defogger Knob, Auxiliary Gas Knob (EGS) and Regulator Adjustment Knob. For sanitizing procedures, refer to “Appendix 5: Quick Sanitizing Procedure.”
9. Fully back out on the Regulator Adjustment Knob, counterclockwise (this will prolong the life of the Inlet Valve Seat). Shut the Auxiliary Supply (EGS) and Steady Flow Valves.
10. Wipe all surfaces with a clean dry towel to remove water droplets. Allow to air dry.
11. Cap (or bag and tape) the Emergency Gas Whip on the First Stage Regulator. Wash the exterior of all EGS components, the First Stage Regulator, the Gas Cylinder, the submersible pressure gauge, and the Harness Assembly with a mild detergent solution and rinse with fresh water. Hang-up Harness Assembly for drying or airing.
Technician: Print_______________________________________________
Signature:____________________________________Date:_______________________
Comments:____________________________________________________________

Kirby Morgan, SuperLite, Band Mask, KMB Band Mask, EXO, SuperMask, SuperFlow, and Rex are all registered trademarks of Kirby Morgan Dive Systems, Inc. Use of these terms to describe products that are not manufactured by KMDSI is not permitted without written permission from KMDSI. © Copyright 1970-2014 Kirby Morgan Dive Systems, Inc. All rights reserved. KMDSI manuals, checklists and technical and training information is made available for the express use of owner/user of this Kirby Morgan products. No part of this material may be reproduced, stored in any retrieval system, or transmitted, or used in any form or by any means, whether graphic, electronic, mechanical, photocopy, or otherwise by technology known or unknown, without the prior written permission of Kirby Morgan Dive Systems, Inc
Copyright 2003-2014, Dive Lab®., Inc. All rights reserved. TechTrnG 03101
92
KMDSI highly recommends that a certified KMDSI Repair Technician make all repairs and that only genuine KMDSI repair and replacement parts be used. Owners of KMDSI products that elect to do their own repairs and inspections should only do so if they possess the knowledge and experience. All inspections, maintenance, and repairs should be completed using the appropriate KMDSI Operations and Maintenance Manual(s). Persons performing repairs should retain all replacement component receipts for additional proof of maintenance history. Should any questions on procedures, components, or repairs arise, please contact Kirby Morgan Dive Systems, Inc., by telephone at (805) 928-7772 or via e-mail at [email protected], or contact Dive Lab, Inc., by telephone at (850) 235-2715 or via e-mail at [email protected].
NOTE: The Maintenance Log, Appendix 3, of the Operations and Maintenance Manual may be used as a template to create blank pages to record all the maintenance performed.
Kirby Morgan, SuperLite, Band Mask, KMB Band Mask, EXO, SuperMask, SuperFlow, and Rex are all registered trademarks of Kirby Morgan Dive Systems, Inc. Use of these terms to describe products that are not manufactured by KMDSI is not permitted without written permission from KMDSI. © Copyright 1970-2014 Kirby Morgan Dive Systems, Inc. All rights reserved. KMDSI manuals, checklists and technical and training information is made available for the express use of owner/user of this Kirby Morgan products. No part of this material may be reproduced, stored in any retrieval system, or transmitted, or used in any form or by any means, whether graphic, electronic, mechanical, photocopy, or otherwise by technology known or unknown, without the prior written permission of Kirby Morgan Dive Systems, Inc
Copyright 2003-2014, Dive Lab®., Inc. All rights reserved. TechTrnG 03101
93
TEACHING THE KMDSI HELMETS AND BAND MASKS OPERATOR / USER COURSE
4-14-09
Kirby Morgan Dive Systems, Inc. (KMDSI) certified technicians, certified after October 2003, are authorized to teach the KMDSI SuperLite Helmets, KM-37 and Band Mask Operator / User Course. The purpose of the training is to teach standardized inspection, set-up and adjustment procedures as recommended by KMDSI. The procedures are written in a checklist format that includes Monthly, Daily Inspection, and Maintenance as well as Daily Pre-Dive and Post Dive Procedures. Also included are recommended Supervisor Pre-Dive Checks and In-Water Checks. The Checklists are designed to work in conjunction with the applicable KMDSI Operations and Maintenance Manual. The Operator / User Training also demonstrates how to identify worn, damaged, or misadjusted parts and components. “THE COURSE IS NOT A TECHNICIAN COURSE”, however, the course does teach normal adjustment procedures that users of KMDSI Helmets and Masks should be familiar with. These procedures include adjustment of the Demand Regulator and Helmet attachment mechanisms, as well as the Emergency Gas System overpressure Relief / Bleed Valve adjustment and testing. The Operator / User Training also demonstrates how to use the KMDSI Monthly and Daily Helmet and Band Mask Maintenance and Set-up Checklists. The Operator / User Course is normally taught covering all the currently manufactured KMDSI SuperLite Helmets and Band Masks. However, the course can be tailored to only cover specific equipment. As an example, in the case where individuals or companies request training on only the equipment models they use, they would only get certified on these items. The complete Operator / User Certification for all current KMDSI Helmets and Band Masks can be given as long as the course includes a SL-17A/B model, as well as a SL-27 and /or SL-SL-17C, 17K / KM-37, 47, 57, 77 and KMB 18 or 28. The rationale behind this is simple. The main differences between the SL-17A/B and all other helmet models is the neck ring/dam attachment. The neck ring/dam attachment of all model helmets (except the 17A/B) is virtually identical with only minor component changes as shown in the Manuals. Once the user understands the two types of basic attachment systems, the rest of the differences are minor. The KMB 18/28 Band Masks are basically the same with the exception of the frame material, regulator bore and comfort insert. The set up and adjustment for all SuperLite Helmet and Band Mask Demand Regulators is the same.
The minor differences between Helmet and Band Mask models can be adequately explained without having every model on hand providing the two types of Helmets and one Band Masks are available for hands on training and adjustment.
Class Size: There is no specific class size, however, the number of trainees should not be so many that there is insufficient time for hands on training with the equipment. Two technicians
Kirby Morgan, SuperLite, Band Mask, KMB Band Mask, EXO, SuperMask, SuperFlow, and Rex are all registered trademarks of Kirby Morgan Dive Systems, Inc. Use of these terms to describe products that are not manufactured by KMDSI is not permitted without written permission from KMDSI. © Copyright 1970-2014 Kirby Morgan Dive Systems, Inc. All rights reserved. KMDSI manuals, checklists and technical and training information is made available for the express use of owner/user of this Kirby Morgan products. No part of this material may be reproduced, stored in any retrieval system, or transmitted, or used in any form or by any means, whether graphic, electronic, mechanical, photocopy, or otherwise by technology known or unknown, without the prior written permission of Kirby Morgan Dive Systems, Inc
Copyright 2003-2014, Dive Lab®., Inc. All rights reserved. TechTrnG 03101
94
that have three to four Helmets for hands on practice, can easily teach 10-15 persons within a 4-6 hour period.
Tools and Equipment needed:
Helmets, Band Masks for demo, hands on Deluxe Tool Kit PN 525-620 3/8” Screw Driver Large Screw Driver (2) 7/16 OE Wrenches. #3 Philips Head Screwdriver SCUBA Cyl, with Adj 1st Stage 1 /8” Allen Wrench Soapy Water Solution Intermediate Pressure gage 0-300 PSIG Technician Guide Operator / User Training Guide (Each Trainee)
Instruction Process:
The Instructor should use the applicable Operator / User Training Instructor Guide for either the Helmets or the Band Masks. We recommend completing the Helmet training and then moving into the Band Mask training. The Instructor Guides for teaching the Helmet or Band Masks are made from the Monthly Inspection and Maintenance Checklists A2.2. The Guides have notes that prompt the Instructor to discuss each section. The Trainees follow along with the standard Monthly Checklist A2.2. . The Instructor should start off by giving a brief overview of the Daily Checklists and then go right into the Monthly A2.2. As an example, the first part of the Monthly Helmet Maintenance and Inspection starts off with the inspection of the Neck Clamp / Yoke Assembly. If the Helmet being inspected is not a SL-17A/B, the Monthly has you skipping to the next section. By the time the Instructor has gone completely though the Instructor Guide, all routine adjustments and inspections will have been explained and demonstrated as they pertain to each type of Helmet. Extra time can be allotted for additional hands on. There are no set ways in which the Instructor has to cover the material. The most important aspect of the training is teaching a standardized method of Helmet and Band Mask Set-up, and Maintenance. A ten to twenty question quiz should be given upon course completion.
Certification:
Upon completion of the course, each attendee is required to fill out a course completion form. The Technician teaching the course should fill out the top portion of the form. All information should be filled out so that future important notices or changes to procedures can be e-mailed. The forms should be sent by the Instructor to Dive Lab, Inc., along with $25.00 (for each certificate to be issued) with a check or money order made payable to Dive Lab, Inc.
Kirby Morgan, SuperLite, Band Mask, KMB Band Mask, EXO, SuperMask, SuperFlow, and Rex are all registered trademarks of Kirby Morgan Dive Systems, Inc. Use of these terms to describe products that are not manufactured by KMDSI is not permitted without written permission from KMDSI. © Copyright 1970-2014 Kirby Morgan Dive Systems, Inc. All rights reserved. KMDSI manuals, checklists and technical and training information is made available for the express use of owner/user of this Kirby Morgan products. No part of this material may be reproduced, stored in any retrieval system, or transmitted, or used in any form or by any means, whether graphic, electronic, mechanical, photocopy, or otherwise by technology known or unknown, without the prior written permission of Kirby Morgan Dive Systems, Inc
Copyright 2003-2014, Dive Lab®., Inc. All rights reserved. TechTrnG 03101
95
INSTRUCTOR GUIDE FOR TEACHING THE OPERATOR / USER COURSE
ALL KMDSI HELMETS 4-14-09
This guide is intended to assist Kirby Morgan Repair Technicians to teach the KMDSI Operator / User Course, and was derived from the SuperLite Helmet Monthly Inspection Checklist Appendix A2.2. Technicians teaching the Operator / User course should use this guide along with the other information provided in the Instructors packet to teach divers, tenders, and diving personnel how to perform routine maintenance set-up and adjustments. The Instructors guide follows along with the Monthly inspection checklists for all the KMDSI Helmet models and KM-37. Notes in various sections, guides and prompts the instructor to ensure all Helmet components are covered and gives notes to elaborate on. The Instructor should hand out a copy of “Appendix A2.2 Monthly Helmet Inspection” to all trainees as well as copies of all daily checklists.
NOTE: All of the checklists will constantly undergo minor changes, as with the operations and maintenance manuals. All users are urged to routinely check the KMDSI and Dive Lab web pages for updates to the checklists and procedures.
NOTE: The Monthly Maintenance Inspection Checklist Appendix A2.2 for each model of KMDSI Helmets is the KMDSI minimum recommended monthly maintenance and should be performed at least once a month with Helmet in continuous use, (used for more than 20 diving days in a month) or at least every two months with Helmets used less than 10 diving days a month. This inspection should also be performed any time the serviceability of the Helmet is in question. In addition to the Monthly inspection / Maintenance, all daily pre and post dive procedures should be completed as directed on the applicable checklist. Each Helmet and EGS system and associated diver worn equipment should have a permanent record (Log) and all routine and corrective maintenance should be recorded.
NOTE: Helmets being used in polluted waters, or extreme environments, will require more frequent inspection.
NOTE: During removal of components for Monthly inspection, O-rings and other consumable items may be reused, providing they are clean and visual inspection does not reveal any damage or deterioration. Qualified technicians using the Operations and Maintenance Manual should accomplish all repairs or component replacement.
NOTE: All cleaning of components should be done in accordance with the applicable Operation and Maintenance Manual.
Kirby Morgan, SuperLite, Band Mask, KMB Band Mask, EXO, SuperMask, SuperFlow, and Rex are all registered trademarks of Kirby Morgan Dive Systems, Inc. Use of these terms to describe products that are not manufactured by KMDSI is not permitted without written permission from KMDSI. © Copyright 1970-2014 Kirby Morgan Dive Systems, Inc. All rights reserved. KMDSI manuals, checklists and technical and training information is made available for the express use of owner/user of this Kirby Morgan products. No part of this material may be reproduced, stored in any retrieval system, or transmitted, or used in any form or by any means, whether graphic, electronic, mechanical, photocopy, or otherwise by technology known or unknown, without the prior written permission of Kirby Morgan Dive Systems, Inc
Copyright 2003-2014, Dive Lab®., Inc. All rights reserved. TechTrnG 03101
96
NOTE: Perform the Neck Dam/Ring Assembly, the Helmet, and the Side Block/Demand Regulator procedures with gas supplies not connected to the Side Block. Attach the gas supply at Step 5 of the Side Block/Demand Regulator procedure. This checklist is set-up in a format that allows the maintenance and inspection to proceed smoothly without adding redundant procedures. The checklist is only a guide, specific information on components and procedures are contained in the applicable Operations and Maintenance manual for the helmet being serviced.
PROCEDURES
SL-17 A/B NECK CLAMP / NECK DAM / YOKE ASSEMBLY
Note: For SL-17K, 17C, 27, KM-37, 47, 57, 77 -Skip to step 2 of page 4
Note: KMDSI recommends that Neck Clamps older than five years old be removed from service and replaced. However, neck clamps that show no signs of damage and or deterioration can remain in service if the user/owner elects and should be inspected at least weekly I.A.W. the Monthly Inspection A2.2, steps 1-7.
1. On the 17A/B, remove the Yoke/Neck Clamp Assembly from the Helmet. Perform visual inspection of all components. Ensure Neck Dam has no holes, tears, and/or damage. The neoprene must be firm. The neoprene Neck Dam should fit snug, but should never fit a diver too tight. Guidance O & M Manual.
Explain how a loose fitting Neck Dam, or holes and tears can cause the demand regulator to free flow.
Explain water leakage in the back of the neck from a loose fitting Neck Dam.
Explain how a tight fitting Neck Dam can restrict blood flow and cause headaches or in extreme cases, can cause the diver to pass out.
Kirby Morgan, SuperLite, Band Mask, KMB Band Mask, EXO, SuperMask, SuperFlow, and Rex are all registered trademarks of Kirby Morgan Dive Systems, Inc. Use of these terms to describe products that are not manufactured by KMDSI is not permitted without written permission from KMDSI. © Copyright 1970-2014 Kirby Morgan Dive Systems, Inc. All rights reserved. KMDSI manuals, checklists and technical and training information is made available for the express use of owner/user of this Kirby Morgan products. No part of this material may be reproduced, stored in any retrieval system, or transmitted, or used in any form or by any means, whether graphic, electronic, mechanical, photocopy, or otherwise by technology known or unknown, without the prior written permission of Kirby Morgan Dive Systems, Inc
Copyright 2003-2014, Dive Lab®., Inc. All rights reserved. TechTrnG 03101
97
2. Perform a visual inspection of all metal parts of the Clamp Assembly for damage. Check the Hinge Pins for a loose fit, signs of cracking, distortion or any damage. Guidance SL-17A/B O&M Manual.
Explain how the hinge pins are only welded on one side and can trap water, eventually allowing corrosion to cause the pin to break. Explain how water gets trapped inside the adjustment stud causing corrosion of the adjustment stud.
Explain how clamp components can get bent due to improper dressing and mating procedures.
Point out the weldment areas that should be checked. Use a Neck Clamp for demonstration.
Explain how the Diving Supervisor should pry between the demand regulator and the clamp to insure the clamp is engaged and secured properly.
Talk about how the clamp can sometimes get closed over the “ears” and how this can bend the clamp.
3. Inspect the Adjustment Stud on the Neck Clamp for signs of cracking, distortion, bending, and/or stripped or damaged threads by loosening nut all the way to the shoulder of the Stud and manually squeezing the Neck Dam Clamp to expose the portion of the Stud that is normally hidden by the Stud Block. If any damage is present, the Neck Clamp requires replacement. Guidance 17A/B O&M Manual.
Demonstrate how to check the adjustment stud and components.
Talk about inspecting under the adjustment block for corrosion damage.
Talk about over torque of the adjustment stud and how this can weaken the stud.
4. Check the Rear Hinge Tab and Hinge for signs of cracking, bending, distortion, and/or loose screw fastener. Guidance 17A/B O&M Manual
● Explain the importance of checking for damage, proper alignment. Explain about making sure the Hinge Tab and alignment stud align properly.
Kirby Morgan, SuperLite, Band Mask, KMB Band Mask, EXO, SuperMask, SuperFlow, and Rex are all registered trademarks of Kirby Morgan Dive Systems, Inc. Use of these terms to describe products that are not manufactured by KMDSI is not permitted without written permission from KMDSI. © Copyright 1970-2014 Kirby Morgan Dive Systems, Inc. All rights reserved. KMDSI manuals, checklists and technical and training information is made available for the express use of owner/user of this Kirby Morgan products. No part of this material may be reproduced, stored in any retrieval system, or transmitted, or used in any form or by any means, whether graphic, electronic, mechanical, photocopy, or otherwise by technology known or unknown, without the prior written permission of Kirby Morgan Dive Systems, Inc
Copyright 2003-2014, Dive Lab®., Inc. All rights reserved. TechTrnG 03101
98
5. Check the Latch Catch Assembly for proper operation. Check for worn and/or damaged parts, as well as loose and / or missing screws. Ensure the proper Safety Pin is present. Guidance O & M Manual.
Explain the importance of using the Safety Pin.
Explain the importance of proper Latch Catch operation.
Explain the difference between the old plunger type and the new pull type Latch Catch Mechanism.
6. Test-mate the Yoke/Neck Clamp to the Helmet. Check for proper Clamp adjustment and smooth operation. When properly adjusted, use a 7/16”open-end wrench on Nut as a back-up wrench, and a 7/16” deep well socket on the Nylock Nut , tighten with a torque wrench to 50 inch lbs. Adjust as necessary; replace the Neck Clamp if any damage is found. Guidance O & M Manual.
● Demonstrate proper installation of the Neck Dam.
● Demonstrate proper adjustment of the Neck Clamp, “ 1-2 inches snap back “.
● Demonstrate how the Tender and Supervisor should check. (Pull / Push between Demand Regulator and Clamp Bail)
SuperLite 27, 17K, 17C, KM-37, 47, 57, 77
NOTE: Steps 2 thru 6 applies to the lower end attachment components for the SL-27, 17K, 17C, and KM-37, 47, 57, 77 Helmets.
2. Visually inspect all metal parts of the Helmet Locking Collar assembly for damage. Guidance O & M Manual.
● Check the Locking Collar for misalignment and/or loose fasteners. Ensure the locking collar smoothly engages the sealed pull pins without binding or rubbing.
● Check for excessive side play, side play should be no greater than 5/64 (2.0 mm)
● Inspect the Neck Pad, the Washers and the “T”-Washers in the recesses of the Neck Pad. Ensure the screws are not loose or missing. Guidance O & M Manual.
Kirby Morgan, SuperLite, Band Mask, KMB Band Mask, EXO, SuperMask, SuperFlow, and Rex are all registered trademarks of Kirby Morgan Dive Systems, Inc. Use of these terms to describe products that are not manufactured by KMDSI is not permitted without written permission from KMDSI. © Copyright 1970-2014 Kirby Morgan Dive Systems, Inc. All rights reserved. KMDSI manuals, checklists and technical and training information is made available for the express use of owner/user of this Kirby Morgan products. No part of this material may be reproduced, stored in any retrieval system, or transmitted, or used in any form or by any means, whether graphic, electronic, mechanical, photocopy, or otherwise by technology known or unknown, without the prior written permission of Kirby Morgan Dive Systems, Inc
Copyright 2003-2014, Dive Lab®., Inc. All rights reserved. TechTrnG 03101
99
3. Visually inspect the two Sealed Pull Pins to ensure they operate smoothly and engage the Locking Collar Properly. Guidance O & M Manual.
Ensure the Sealed Pull Pins are not bent or damaged in any way.
The cam angle must be correct for the Pull Pins to operate properly.
NOTE: Damaged or worn Pull Pins must be repaired by a trained technician.
Explain about how the very early SL-27 Pins were not oil filled sealed units.
DANGER: If the Sealed Pull Pins do not operate correctly, the helmet could come off underwater or if they do not release properly, they could make it difficult to remove the helmet in a timely manner.
CAUTION: If the Sealed Pull Pins stick or do not provide adequate tension, it is essential to return Helmet to an authorized KMDSI Dealer for service. DO NOT attempt to service the Sealed Pull Pins.
4. Visually inspect the metal ring (Helmet Ring) at the base of the Helmet for damage to the sealing surface. If bent or damaged it should only be repaired by an authorized KMDSI repair facility.
Point out sealing surface and what to look for.
5. Check the Swing Tongue Catch for proper operation. Check for loose, worn or damaged parts. Guidance O&M Manual.
● Discuss visual inspection of the Spring, insure the Swing Tongue Catch is not damaged or bent.
6. Test mate, then remove the Neck Dam Ring Assembly / Locking Collar from the Helmet. Check for proper Pull Pin alignment and smooth operation.
● Explain how to Inspect the Neck Dam Ring, for contamination and damage

Kirby Morgan, SuperLite, Band Mask, KMB Band Mask, EXO, SuperMask, SuperFlow, and Rex are all registered trademarks of Kirby Morgan Dive Systems, Inc. Use of these terms to describe products that are not manufactured by KMDSI is not permitted without written permission from KMDSI. © Copyright 1970-2014 Kirby Morgan Dive Systems, Inc. All rights reserved. KMDSI manuals, checklists and technical and training information is made available for the express use of owner/user of this Kirby Morgan products. No part of this material may be reproduced, stored in any retrieval system, or transmitted, or used in any form or by any means, whether graphic, electronic, mechanical, photocopy, or otherwise by technology known or unknown, without the prior written permission of Kirby Morgan Dive Systems, Inc
Copyright 2003-2014, Dive Lab®., Inc. All rights reserved. TechTrnG 03101
100
Explain cleaning of the O-ring mating surface, then demonstrate mating of the Neck Ring / Dam assembly. Explain how the assembly fits into the Helmet Ring smoothly and does not require extraordinary force, other than what is required to overcome the O-ring friction. This will indicate a damaged, bent or deformed Neck Ring.
Demonstrate that there are no portions of the O-ring visibly present on exterior of the Neck Dam Ring once engaged on the Helmet Ring. This will indicate a stretched/damaged Neck Dam Ring O-ring.
Explain how the Locking Collar should engage the Sealed Pull Pins smoothly with no binding or rubbing on the Helmet Ring during engagement. Inspect the Chin Strap to insure it works properly and is not torn or damaged. Check to insure the fasteners are installed.
Discuss the need to insure all the Neck Dam Components work smoothly.
Discuss adjusting the Neck Slide Locking Collar, and how it works.
All Models of KMDSI Helmets
7. Remove the Helmet Liner, inspect liner fabric for tears, broken snaps and chin strap damage (17A/B). Inspect the Head and Chin foam for signs of crumbling/rot. Replace if required. Guidance O & M Manual.
Explain the importance of having a properly fitted Head Liner and the reason why the Chin Strap, and Snaps should always be used.
Explain the need to replace the Foam when worn, in order to maintain a proper “snug” fit, so that a good Oral Nasal seal is obtained.
Explain how a poor seal can result in CO2 build-up. (When the divers head turns, the helmet should follow). Foam can be custom cut to accommodate different size heads.
Kirby Morgan, SuperLite, Band Mask, KMB Band Mask, EXO, SuperMask, SuperFlow, and Rex are all registered trademarks of Kirby Morgan Dive Systems, Inc. Use of these terms to describe products that are not manufactured by KMDSI is not permitted without written permission from KMDSI. © Copyright 1970-2014 Kirby Morgan Dive Systems, Inc. All rights reserved. KMDSI manuals, checklists and technical and training information is made available for the express use of owner/user of this Kirby Morgan products. No part of this material may be reproduced, stored in any retrieval system, or transmitted, or used in any form or by any means, whether graphic, electronic, mechanical, photocopy, or otherwise by technology known or unknown, without the prior written permission of Kirby Morgan Dive Systems, Inc
Copyright 2003-2014, Dive Lab®., Inc. All rights reserved. TechTrnG 03101
101
Explain the need to ensure all the snaps are of good condition, operable and all are used. Look for worn chinstrap, damage to the buckle; bent or damaged “D” rings, loose or missing fasteners.
Explain the main causes of CO2 build up in any Demand Mode Helmet. Poor Oral Nasal Mask seal, and / or high breathing resistance resulting from improper regulator adjustment or diving beyond the performance capability of the equipment or the system supporting the equipment.
All Models of KMDSI Helmets
8. Remove the Earphones from their holders. Remove the Covers from the Earphones, inspect for corrosion and damage. Clean repair or replace as necessary. Remove the Microphone from the Oral Nasal Mask, remove the Cover from the Microphone and inspect. Guidance O&M Manual.
Explain removing the front rubber by turning it inside out, and then the rear rubber cover, now the protector is free. Check the wire connections they should be solid (no corrosion).
Explain that if the Mylar is torn or loose the speaker should be replaced. The speakers are chrome plated to resist corrosion. **Mylar speakers last longer than cardboard type**
9. Remove the Nose-Clearing Device, clean and inspect the Nose-Clearing Pad, and Shaft, inspect O-rings. Guidance O&M Manual.
● Explain how the shape of the device may be altered to fit by adding padding and or bending the V plate.
● Discuss what to look for regarding worn O-rings.

Kirby Morgan, SuperLite, Band Mask, KMB Band Mask, EXO, SuperMask, SuperFlow, and Rex are all registered trademarks of Kirby Morgan Dive Systems, Inc. Use of these terms to describe products that are not manufactured by KMDSI is not permitted without written permission from KMDSI. © Copyright 1970-2014 Kirby Morgan Dive Systems, Inc. All rights reserved. KMDSI manuals, checklists and technical and training information is made available for the express use of owner/user of this Kirby Morgan products. No part of this material may be reproduced, stored in any retrieval system, or transmitted, or used in any form or by any means, whether graphic, electronic, mechanical, photocopy, or otherwise by technology known or unknown, without the prior written permission of Kirby Morgan Dive Systems, Inc
Copyright 2003-2014, Dive Lab®., Inc. All rights reserved. TechTrnG 03101
102
10. Remove the Oral Nasal Mask as an assembly, clean the Valve and the Valve Body as an assembly. Clean the Oral Nasal Mask. Inspect mask and valve assembly for damage and deterioration. Replace the mask if any damage is found. Replace the Oral Nasal Valve, if Valve appears dried or stiff or does not lay flat. Clean and inspect the Nose Clearing Pad, Shaft, and O- rings for wear. Replace the pad if it is deteriorated or damaged. Replace O-rings, if worn. Lightly lubricate the shaft O- rings and the shaft, then reinstall. Reinstall Oral Nasal Mask and Valve Assembly. Guidance O & M Manual.
● Explain the dangers regarding improper fit or no use of Oral-Nasal.
● Demonstrate proper installation of Oral-Nasal Valve and reasons why the Valve opens into the Mask.
● Discuss the types of wear and damage the Valve may have.
11. Without air to the Helmet, check the operation of the defogger and auxiliary gas (EGS) Valve. If the Valves do not operate smooth and easy the valves should be serviced or overhauled by an authorized KMDSI Technician. Guidance O&M Manuals.
● Explain how the Valves often get neglected and how the Knob(s) get worn or damaged. “Gorilla Griping”
● Check the rotational play of the Emergency and Steady Flow Valves.
● Explain how the flats in the Knobs and the flats on the Stem get worn when the Valves become hard to turn, due to lack of service.
NOTE: Step 12 pertains to all Helmet models. However, the main exhaust / water dump on the SL-27 is located on the shroud assemble to maintain gas sensing.
Kirby Morgan, SuperLite, Band Mask, KMB Band Mask, EXO, SuperMask, SuperFlow, and Rex are all registered trademarks of Kirby Morgan Dive Systems, Inc. Use of these terms to describe products that are not manufactured by KMDSI is not permitted without written permission from KMDSI. © Copyright 1970-2014 Kirby Morgan Dive Systems, Inc. All rights reserved. KMDSI manuals, checklists and technical and training information is made available for the express use of owner/user of this Kirby Morgan products. No part of this material may be reproduced, stored in any retrieval system, or transmitted, or used in any form or by any means, whether graphic, electronic, mechanical, photocopy, or otherwise by technology known or unknown, without the prior written permission of Kirby Morgan Dive Systems, Inc
Copyright 2003-2014, Dive Lab®., Inc. All rights reserved. TechTrnG 03101
103
12. Remove the Main Exhaust Water Dump Valve Cover, on the SL-17A/B, K, C, KM-37, 47, 57, 77 Helmets. The Cover is held in place by two screws. Remove the Cover, clean and inspect the Flapper Valve and Seating Surface. Replace the Valve if it is dried out, damaged, or does not lay flat. On the SL-27, the Water Dump is on the left side next to the Regulator. The rubber Shroud needs to be removed by cutting the tie wrap before the Valve can be inspected. Clean and inspect the Valve, and replace the Valve if dried or damaged or does not lie flat. Inspect the rubber Whisker and Water Dump Shroud, for cracking and tears. Install a new tie wrap (SL-27 only). Guidance O&M Manual. On the SL-27 inspect the Shroud and replace if necessary.
● Explain how an excessively dented Regulator Cover could interfere with breathing performance.
● Explain about the Valve “Seating / Sealing Surface”. Stress the importance of keeping the Seating surface clean and free of corrosion.
● Explain how dirt can stick to the surfaces of Flapper Valves that have been lubricated causing leakage. Do not lubricate the Flapper Valves.
● Explain the need to use the proper Valves. Use of wrong Valve can cause Helmet flooding and/or poor breathing performance.
● Explain that the Helmet will free flow and or leak if this Valve is not in good condition.
● Explain the importance of the Shroud on the SL-27 main / Water Dump Valve. The Shroud allows the Water Dump Valve to sense the same pressure as the demand Regulator, keeping the Helmet from free flowing.
SIDE BLOCK / DEMAND REGULATOR 1. Check the umbilical supply one-way Valve for proper operation by orally sucking on the umbilical adapter. Gas should be drawn thru the one-way Valve. Guidance O & M Manual.
Demo Sucking – Blowing (Cycling) the Check Valve and explain “If the Check Valve will seal at the low pressure, it most certainly will seal at the higher differential pressures. The Valve is also checked using the intermediate pressure as well.

Kirby Morgan, SuperLite, Band Mask, KMB Band Mask, EXO, SuperMask, SuperFlow, and Rex are all registered trademarks of Kirby Morgan Dive Systems, Inc. Use of these terms to describe products that are not manufactured by KMDSI is not permitted without written permission from KMDSI. © Copyright 1970-2014 Kirby Morgan Dive Systems, Inc. All rights reserved. KMDSI manuals, checklists and technical and training information is made available for the express use of owner/user of this Kirby Morgan products. No part of this material may be reproduced, stored in any retrieval system, or transmitted, or used in any form or by any means, whether graphic, electronic, mechanical, photocopy, or otherwise by technology known or unknown, without the prior written permission of Kirby Morgan Dive Systems, Inc
Copyright 2003-2014, Dive Lab®., Inc. All rights reserved. TechTrnG 03101
104
2. Remove the Regulator Cover Clamp, Cover, and Diaphragm. Visually inspect the interior of the Regulator for dirt, contamination, and corrosion. Clean as necessary. Guidance O & M Manual.
● Demo how to clean the inside of the Demand Regulator and what to look for regarding cleanliness.
● Mention about not pushing on the lever when washing or rinsing to avoid introduction of water through the Inlet Valve.
● Discuss sanitizing procedures between different divers, and the procedure used.
● Talk about the importance of thoroughly rinsing sanitizing solution so that skin irritation does not occur.
● Explain the differences in the standard Small Bore Demand Regulator body and the Big bore. Small Bore ¾” is used on the standard SL-17 A/B, C, and KMB-28 Band Mask 7/8”. The Big Bore is used on the SL-17K, 27, KM-37, 57 and KMB 18 Band Mask.
● Explain why the Spring and Washer is used in the SL-17 A/B and the KMB 28.
3. Carefully inspect the Diaphragm for cuts, tears, and deterioration. If any damage is found, replace the Diaphragm.
● Demo inspection. Show how to pull and stretch.
● Stress importance of proper cleaning, inspection, and need for sterilization between different divers.
● Explain how the use of a different Diaphragm can cause interference with the Roller Lever and affect Regulator adjustment and performance.
Kirby Morgan, SuperLite, Band Mask, KMB Band Mask, EXO, SuperMask, SuperFlow, and Rex are all registered trademarks of Kirby Morgan Dive Systems, Inc. Use of these terms to describe products that are not manufactured by KMDSI is not permitted without written permission from KMDSI. © Copyright 1970-2014 Kirby Morgan Dive Systems, Inc. All rights reserved. KMDSI manuals, checklists and technical and training information is made available for the express use of owner/user of this Kirby Morgan products. No part of this material may be reproduced, stored in any retrieval system, or transmitted, or used in any form or by any means, whether graphic, electronic, mechanical, photocopy, or otherwise by technology known or unknown, without the prior written permission of Kirby Morgan Dive Systems, Inc
Copyright 2003-2014, Dive Lab®., Inc. All rights reserved. TechTrnG 03101
105
4. Carefully check the Regulator Exhaust Valve for warping, distortion, stiffness and any signs of damage. Poke at the Flapper Valve from inside the Regulator to check for stiffness of the Valve. Check the Regulator Body Valve for corrosion and contamination. Check for bent Valve Seat Spokes. The Spokes should not be bent or deformed. If the Valve shows signs of damage or deterioration, replace the Valve. Guidance O & M Manual.
● Explain “seating surface” and “bent spokes” and how to correct this.
● Stress the importance of keeping the seating surface free of contaminates and the reasons for not lubricating.
● Explain the Valve options including the double exhaust configurations for each of the Helmets.
● Explain how double exhaust configurations add to exhalation effort.
Explain how the Tri-Valve/Quad Valve has same exhalation effort as the standard single exhaust.
5. Attach a breathing quality air source to the Umbilical Adapter and set the supply pressure to between 135-150 psig (9.31-10.34 bar). Back out the Adjustment Knob until a slight free flow develops, then adjust in until the free flow just stops, depress the Lever a couple time to ensure the Regulator is stable and not free flowing, Check the Lever free play, Lever free play should be between 1/16”- 1/8” (1.5 – 3.0mm). Adjust as necessary. Guidance O & M Manual.
● Demo Regulator adjustment, using tools in the kit.
● Explain that bending the Lever should only be done after all other adjustment. It is rare that a Lever should have to be bent. Usually Levers only require bending because of damage inflicted during adjustment by persons not knowledgeable in proper adjustment procedures.
6. Depress the Purge Button. The button should travel 1/16” – 1/8” before gas starts to flow and when depressed fully should result in a strong flow of gas. Readjust the Lever if the Regulator purge travel is less than 1/16” or greater than 1/8” (1.5 – 3.0mm).
● Demonstrate

Kirby Morgan, SuperLite, Band Mask, KMB Band Mask, EXO, SuperMask, SuperFlow, and Rex are all registered trademarks of Kirby Morgan Dive Systems, Inc. Use of these terms to describe products that are not manufactured by KMDSI is not permitted without written permission from KMDSI. © Copyright 1970-2014 Kirby Morgan Dive Systems, Inc. All rights reserved. KMDSI manuals, checklists and technical and training information is made available for the express use of owner/user of this Kirby Morgan products. No part of this material may be reproduced, stored in any retrieval system, or transmitted, or used in any form or by any means, whether graphic, electronic, mechanical, photocopy, or otherwise by technology known or unknown, without the prior written permission of Kirby Morgan Dive Systems, Inc
Copyright 2003-2014, Dive Lab®., Inc. All rights reserved. TechTrnG 03101
106
7. Check/cycle the Steady Flow Valve for proper operation, ensure smooth operation, and strong gas flow from the air train when turned 1/2 turn. Normally, divers never have to open the Valve more than 1/4 turn.
●Demonstrate
NOTE: The Steady Flow Valve will rotate approximately two complete revolutions from shut to full open. With the air pressure adjusted to between 135-150 psig (9.3- 10.3 bar), opening the Steady Flow Valve one-quarter rotation should provide a high flow of gas. Reach inside the Helmet, to check for a strong flow of gas through the gas train.
8. Secure the gas supply. Bleed down and remove the gas supply from the Inlet Adapter.
9. With the emergency gas (EGS) Valve shut, attach a regulated gas supply (normally the EGS System), adjusted 135-150 psig (9.3-10.3 bar), to the EGS Valve on the Side Block and then slowly open the Emergency Valve. Back out counterclockwise on the Regulator Adjustment Knob until a slight free flow develops, then turn in until the free flow stops. Depress the Purge Button and check for a strong purge then momentarily crack open the Steady Flow Valve and insure a strong surge of gas. Check to ensure there is no gas escaping from the open umbilical adapter on the one- way Valve. If any leakage is found, the one way Valve should be overhauled or replaced.
NOTE: This is the “other” check for the one-way Valve.
● Demonstrate EMERGENCY GAS SUPPLY (EGS)
NOTE: The Emergency Gas System consists of an Emergency Gas Cylinder attached to a Harness Assembly, a good quality First Stage Regulator equipped with an over pressure Bleed Valve, an intermediate gas supply whip that attaches the EGS Valve on the Helmet Side Block.
● Explain about the different types of First Stage Regulators and why an adjustable First stage is preferred over a non adjustable.
● Explain why it is important to always have gas lined up to the First Stage Regulator to keep it from flooding with water.

Kirby Morgan, SuperLite, Band Mask, KMB Band Mask, EXO, SuperMask, SuperFlow, and Rex are all registered trademarks of Kirby Morgan Dive Systems, Inc. Use of these terms to describe products that are not manufactured by KMDSI is not permitted without written permission from KMDSI. © Copyright 1970-2014 Kirby Morgan Dive Systems, Inc. All rights reserved. KMDSI manuals, checklists and technical and training information is made available for the express use of owner/user of this Kirby Morgan products. No part of this material may be reproduced, stored in any retrieval system, or transmitted, or used in any form or by any means, whether graphic, electronic, mechanical, photocopy, or otherwise by technology known or unknown, without the prior written permission of Kirby Morgan Dive Systems, Inc
Copyright 2003-2014, Dive Lab®., Inc. All rights reserved. TechTrnG 03101
107
1. Check the hydrostatic date and the last visual inspection record (“VIP”) of the Cylinder. Ensure the hydrostatic test date is current. VIP is done at least annually and /or whenever contamination is suspected. The hydrostatic test is done at least every five years.
2. Check the maintenance record of the EGS components to ensure the first stage maintenance has been completed according to manufacturers recommendations.
● Document maintenance in accordance with Mfr. recommendations in appropriate Log.
● Talk about what types of First Stage Regulators work best as EGS Regulators and why. Always have the EGS cylinder on and side block EGS valve shut.
3. Check all of the Hoses for signs of blisters, cover slippage, cuts, and abrasions. Replace any Hose(s) that show signs of wear or damage if a quick connect EGS Hose is being used, inspect quick connect and fittings for signs of wear / damage, replace the quick connect if any damage is found.
● Ensure all chaffing gear is removed from LP Whips to accommodate a thorough inspection.
● Talk about the use of protective Covers on the Hoses, and the need to be able to inspect hoses easily.
● Explain the need of using good quality hoses and replacing Hose if any damage is found
4. If a Submersible Pressure Gauge is being used, verify that the Gauge has been compared with a Gauge of known accuracy within the past six months.
● Talk about the pros and cons of using a Submersible Pressure Gauge.

Kirby Morgan, SuperLite, Band Mask, KMB Band Mask, EXO, SuperMask, SuperFlow, and Rex are all registered trademarks of Kirby Morgan Dive Systems, Inc. Use of these terms to describe products that are not manufactured by KMDSI is not permitted without written permission from KMDSI. © Copyright 1970-2014 Kirby Morgan Dive Systems, Inc. All rights reserved. KMDSI manuals, checklists and technical and training information is made available for the express use of owner/user of this Kirby Morgan products. No part of this material may be reproduced, stored in any retrieval system, or transmitted, or used in any form or by any means, whether graphic, electronic, mechanical, photocopy, or otherwise by technology known or unknown, without the prior written permission of Kirby Morgan Dive Systems, Inc
Copyright 2003-2014, Dive Lab®., Inc. All rights reserved. TechTrnG 03101
108
5. Check the over pressure Bleed Valve for the proper relief setting. The bleed should be adjusted to relief at between 180-200 psig (12.41-13.79 bar), adjust as necessary.
● Hand out copies of the Relief / Bleed procedure to all Inspector Trainees and go over the adjustment procedures.
● Demonstrate and allow the trainees to practice setting the relief.
● Explain that the purpose of the relief is to protect the Hose in the event the First Stage creeps. It is not intended to keep up with a First Stage that has carried away.
● Document setting the relief in the log book.
6. Re-set and check the over bottom setting of the First Stage to insure it is within the manufacturers recommended setting. All KMDSI Helmets and Band Masks are intended to be used with an emergency supply pressure of between 135-165 psig (9.3- 11.4 bar).
7. Perform a leak check of all EGS components and fittings using soapy water while in a pressurized state. Repair leaks as necessary. Guidance O&M Manual.
8. Inspect the Harness Assembly for signs of wear or damage. Repair or replace as necessary.
● Explain the need to have the Harness in good condition.
● Document inspection of Harness Assembly in notes section of maintenance log2.
This Instructor Guide is intended to help the Instructor educate diving personnel. The Instructor should use past experiences and knowledge gained to aid in the instruction process. Any questions pertaining to this Guide or any of the KMDSI Checklists or Procedures, should be directed to KMDSI or Dive Lab, Inc., by telephone or e-mail. KMDSI can be reached by phone at 805-928-7772, e-mail www.kirbymorgan.com. Dive Lab, Inc. can be reached by phone at 850-235-2715, e-mail www.divelab.com.
2NOTE: The Maintenance Log is currently on the web at [email protected]. It may be used and reproduced as a template for creating blank pages to record all the maintenance performed.
Kirby Morgan, SuperLite, Band Mask, KMB Band Mask, EXO, SuperMask, SuperFlow, and Rex are all registered trademarks of Kirby Morgan Dive Systems, Inc. Use of these terms to describe products that are not manufactured by KMDSI is not permitted without written permission from KMDSI. © Copyright 1970-2014 Kirby Morgan Dive Systems, Inc. All rights reserved. KMDSI manuals, checklists and technical and training information is made available for the express use of owner/user of this Kirby Morgan products. No part of this material may be reproduced, stored in any retrieval system, or transmitted, or used in any form or by any means, whether graphic, electronic, mechanical, photocopy, or otherwise by technology known or unknown, without the prior written permission of Kirby Morgan Dive Systems, Inc
Copyright 2003-2014, Dive Lab®., Inc. All rights reserved. TechTrnG 03101
109
KIRBY MORGAN OPERATOR / USERS TRAINING SUPERLITE 17 SERIES HELMETS and KM-37, 47, 57, 77
ENABLING OBJECTIVES 4-14-09
● Upon completion of the KMDSI Operator / User Course, the trainee will be able to perform the KMDSI recommended pre-dive inspection and maintenance procedures in accordance with the KMDSI Inspection and Maintenance Checklists:
A2.2 Monthly Maintenance A2.3 Daily Set-Up and Functional Checklist A2.4 Supervisor’s Equipment Checks Prior to Entry A2.5 Supervisor’s Equipment Checks In-Water A2.6 Post Dive Cleaning
● State the KMDSI recommended maintenance periodicities and the definitions or guidelines for each.
NECK DAM/RING ASSEMBLY
● Upon instruction of this section the student will be able to: a) Describe/perform a proper inspection of Yoke/Neck Clamp Assemblies on the
SL-17 A/B Helmet b) Describe/perform a thorough inspection of the weldment areas of concern. c) Explain and demonstrate the proper adjustment of the Neck Clamp and Latch
Catch Mechanisms. d) The areas of inspection and the difference between the Push-Pin Plunger and
the new style Pull-Pin Plunger and the reasons for the upgrade. e) Demonstrate proper removal, inspection, cleaning, and lubrication of Helmet/Neck Ring O- ring and state the recommended lubricants. f) Explain the SL-27, KM-37 type Neck Dam with pull pins. How is it different
than the SL-17A/B. g) Explain/demonstrate the proper placement of the Safety Pin and Lanyard and
the reasons for it (17A/B only). h) Describe/perform a thorough inspection of a Neck Dam, both neoprene and
latex. Explain what type of contaminates and environmental conditions will cause deterioration of each.
Kirby Morgan, SuperLite, Band Mask, KMB Band Mask, EXO, SuperMask, SuperFlow, and Rex are all registered trademarks of Kirby Morgan Dive Systems, Inc. Use of these terms to describe products that are not manufactured by KMDSI is not permitted without written permission from KMDSI. © Copyright 1970-2014 Kirby Morgan Dive Systems, Inc. All rights reserved. KMDSI manuals, checklists and technical and training information is made available for the express use of owner/user of this Kirby Morgan products. No part of this material may be reproduced, stored in any retrieval system, or transmitted, or used in any form or by any means, whether graphic, electronic, mechanical, photocopy, or otherwise by technology known or unknown, without the prior written permission of Kirby Morgan Dive Systems, Inc
Copyright 2003-2014, Dive Lab®., Inc. All rights reserved. TechTrnG 03101
110
HELMET ASSEMBLY
● Upon instruction of this section the student will be able to explain:a) How the KMDSI maintenance and inspection procedures and instructions are
to be used. b) How the KMDSI maintenance system is structured and where information may be found. c) Explain the responsibilities of a KMDSI Technician and Operator / User. d) Explain/demonstrate a proper, thorough exterior Helmet Inspection and
explain the types of damage that might be found, and areas of concern. e) Explain and demonstrate the inspection of the Face Port and related
components. f) Describe/perform a thorough inspection of the Helmet Locking Collar assembly (KM-37 type). g) Describe/perform an inspection of the sealed Pull-Pins and state what they are looking for and how to identify a Rebuilt Pin from a New Pin and how the Pins should be serviced. h) Explain/demonstrate a thorough inspection of the Swing Catch Assembly and the Helmet Ring, describing areas of concern (KM-37 type). i) State the purpose of the Helmet Liner/Cushion and why it should be maintained in good condition, how it can be tailored to fit. j) Describe/perform proper inspection and required maintenance of Communications System.
k) Explain the proper maintenance and inspection of the Oral/Nasal Mask and Valve Assembly.
l) Explain the purpose of the Oral/Nasal Mask Valve Assembly. m) State the advantages/disadvantages and limitations of the Double Exhaust and the reasons. n) Perform Main Exhaust /Water Dump Valve Inspection, thoroughly describing, “seating surface”.
SIDE BLOCK
● Upon instruction of this section, the student will be able to explain the inspection and operation of the following Side Block Components:
a. One-way Valve b. Defogger Valve c. Auxiliary Gas or (EGS) Valve d. Valve Knob Components.

Kirby Morgan, SuperLite, Band Mask, KMB Band Mask, EXO, SuperMask, SuperFlow, and Rex are all registered trademarks of Kirby Morgan Dive Systems, Inc. Use of these terms to describe products that are not manufactured by KMDSI is not permitted without written permission from KMDSI. © Copyright 1970-2014 Kirby Morgan Dive Systems, Inc. All rights reserved. KMDSI manuals, checklists and technical and training information is made available for the express use of owner/user of this Kirby Morgan products. No part of this material may be reproduced, stored in any retrieval system, or transmitted, or used in any form or by any means, whether graphic, electronic, mechanical, photocopy, or otherwise by technology known or unknown, without the prior written permission of Kirby Morgan Dive Systems, Inc
Copyright 2003-2014, Dive Lab®., Inc. All rights reserved. TechTrnG 03101
111
DEMAND REGULATOR
● Upon instruction of this section, the student will be able to state and demonstrate: a) KMDSI recommended daily and monthly maintenance. b) Properly, clean and inspect using the daily post dive Checklist, reassemble, adjust, fine- tune the Demand Regulator. c) Explain sanitizing procedures of the Demand Regulator and associated components, and what safety precautions must be observed. d) Explain how Helmet parts and components are cleaned and corrosion is removed. e) Explain how to perform O-ring inspections and how to lubricate components.
EMERGENCY GAS SUPPLY
● Upon instruction of this section, the student will be able to: a) State the periodicity for the Hydrostatic and Visual Inspection for the Emergency Gas Cylinder. b) Conduct a thorough visual and functional test and inspection of all EGS components, including the maintenance records to ensure maintenance is in compliance with manufacturers recommendations. c) Demonstrate/perform testing of the First Stage Relief Valve. d) Check/demonstrate/perform the correct recommended setting of the over- bottom of the First Stage Regulator for the Emergency Gas Supply (EGS) Cylinder. e) Explain the hazards involved in not having EGS gas up to the First Stage when diving.

Kirby Morgan, SuperLite, Band Mask, KMB Band Mask, EXO, SuperMask, SuperFlow, and Rex are all registered trademarks of Kirby Morgan Dive Systems, Inc. Use of these terms to describe products that are not manufactured by KMDSI is not permitted without written permission from KMDSI. © Copyright 1970-2014 Kirby Morgan Dive Systems, Inc. All rights reserved. KMDSI manuals, checklists and technical and training information is made available for the express use of owner/user of this Kirby Morgan products. No part of this material may be reproduced, stored in any retrieval system, or transmitted, or used in any form or by any means, whether graphic, electronic, mechanical, photocopy, or otherwise by technology known or unknown, without the prior written permission of Kirby Morgan Dive Systems, Inc
Copyright 2003-2014, Dive Lab®., Inc. All rights reserved. TechTrnG 03101
112
KMDSI Operator / User Training KMB 18/28
Student Enabling Objectives7-12-06
STUDENT ENABLING OBJECTIVES
Perform set-up, adjustment and pre-dive functional inspection procedures for Kirby Morgan Band Masks; KMB 18 and KMB 28 in accordance with the applicable Operations and Maintenance Manuals and the following checklists:
A2.2 Monthly Maintenance A2.3 Daily Set-up and Functional Checklist A2.4 Supervisor’s Equipment Checks Prior to Entry A2.5 Supervisor’s Equipment Checks In-Water A2.6 Post Dive Cleaning
HOOD SPIDER and RETAINING CLAMP
Upon instruction of this section the student will be able to: a) Describe/perform a proper inspection of the Hood Assembly b) Describe/perform a thorough inspection of the Spider Assembly c) Describe/Perform a though inspection of the Clamp Assembly. d) Explain what conditions will hasten aging of the Hood and Spider rubber
components.
FRAME COMPONENT ASSEMBLY
Upon instruction of this section the student will be able to: a) Explain/demonstrate a proper visual inspection of the Frame Assembly. b) Explain the physical and material differences between the KMB 18 and KMB 28. c) Explain the Monthly, and Daily maintenance. d) Explain the purpose of the Oral Nasal Mask and Valve Assembly and the reason a correctly installed Valve is in the sealing surface out position. The student will also be able to elaborate upon the dangers involved with incorrectly installing the Valve, not using genuine KMDSI parts, or just not having an Oral Nasal Mask or Valve installed. e) Demonstrate proper inspection of the Whisker Assembly. f) State the advantages/disadvantages and limitations of the double exhaust and the reasons.

Kirby Morgan, SuperLite, Band Mask, KMB Band Mask, EXO, SuperMask, SuperFlow, and Rex are all registered trademarks of Kirby Morgan Dive Systems, Inc. Use of these terms to describe products that are not manufactured by KMDSI is not permitted without written permission from KMDSI. © Copyright 1970-2014 Kirby Morgan Dive Systems, Inc. All rights reserved. KMDSI manuals, checklists and technical and training information is made available for the express use of owner/user of this Kirby Morgan products. No part of this material may be reproduced, stored in any retrieval system, or transmitted, or used in any form or by any means, whether graphic, electronic, mechanical, photocopy, or otherwise by technology known or unknown, without the prior written permission of Kirby Morgan Dive Systems, Inc
Copyright 2003-2014, Dive Lab®., Inc. All rights reserved. TechTrnG 03101
113
g) Conduct an inspection on the Defogger and EGS Valves and explain “flats” and be able to point out what to look for regarding the serviceability of the control knobs. h) Perform Main Exhaust/Water Dump Valve inspection, thoroughly describing, “seating surface”. i) Describe/perform proper inspection or required maintenance of communications system.
SIDE BLOCK/DEMAND REGULATOR
Upon instruction of this section the student will be able to: a) Demonstrate/perform the two different ways of checking the One-Way Valve and explain which test is the most stringent and why. b) Demonstrate how to remove the Demand Regulator Cover to inspect, clean in accordance with recommended procedure, inspect and re-assemble, adjust, fine tune. c) Demonstrate how to properly perform an inspection on the Demand Regulator Diaphragm and state “satisfactory” criteria. d) Explain the purpose/reason for cleaning Oral Nasal Mask and Demand Regulator components with germicidal cleaning solutions.
EMERGENCY GAS SUPPLY
Upon instruction of this section the student will be able to: a) Conduct a thorough inspection of all EGS components including the maintenance records to ensure maintenance is in compliance with manufacturers recommendations. b) Demonstrate/perform both testing and adjusting on the First Stage Over- Pressure Relief Valve. c) Check/demonstrate/perform the correct recommended setting of the Over- Bottom of the First Stage Regulator for the Emergency Gas Supply (EGS) Cylinder. d) Demonstrate/perform proper inspections of Harness Assembly, pointing out trouble areas of high wear.
Kirby Morgan, SuperLite, Band Mask, KMB Band Mask, EXO, SuperMask, SuperFlow, and Rex are all registered trademarks of Kirby Morgan Dive Systems, Inc. Use of these terms to describe products that are not manufactured by KMDSI is not permitted without written permission from KMDSI. © Copyright 1970-2014 Kirby Morgan Dive Systems, Inc. All rights reserved. KMDSI manuals, checklists and technical and training information is made available for the express use of owner/user of this Kirby Morgan products. No part of this material may be reproduced, stored in any retrieval system, or transmitted, or used in any form or by any means, whether graphic, electronic, mechanical, photocopy, or otherwise by technology known or unknown, without the prior written permission of Kirby Morgan Dive Systems, Inc
Copyright 2003-2014, Dive Lab®., Inc. All rights reserved. TechTrnG 03101
114
INSTRUCTOR GUIDE FOR TEACHING THE KMB 18/28 (BANDMASK)
OPERATOR / USER COURSE
7-12-06
This guide is intended to assist Kirby Morgan Repair Technicians to teach the KMDSI Operator / User Course, and was derived from the KMB Monthly Inspection Checklist Appendix A2.2. Technicians teaching the Operator / User course should use this guide along with the other information provided in the Instructors packet to teach divers, tenders, and diving personnel how to perform routine maintenance set-up and adjustments. The Instructors guide follows along with the Monthly inspection checklists for all the KMDSI KMB 18 / 28 models. Notes in various sections, guides and prompts the instructor to ensure all Helmet components are covered and gives notes to elaborate on. The Instructor should hand out a copy of “Appendix A2.2 Monthly Band Mask Inspection” to all trainees as well as copies of all daily checklists.
NOTE: All of the checklists will be constantly under minor changes. All users are urged to routinely check the web pages for updates to the checklists and procedures.
NOTE: The Monthly Maintenance Inspection Checklist Appendix A2.2 for each model of KMDSI Helmets and 18 / 28 Band Masks is the minimum recommended monthly maintenance and should be performed at least once a month with Helmet and Masks in continuous use, (used for more than 20 diving days in a month) or at least every two months with Helmet used less than 10 diving days a month. This inspection should also be performed any time the serviceability of the Helmet or Mask is in question. In addition, to the Monthly inspection / Maintenance, all daily pre and post dive procedures should be completed as directed on the applicable checklist. Each Helmet and EGS system and associated diver worn equipment should have a permanent record (Log) and all routine and corrective maintenance should be recorded.
NOTE: During removal of components for Monthly inspection, O-rings and other consumable items may be reused, providing they are clean and visual inspection does not reveal any damage or deterioration. Qualified technicians using the Operations and Maintenance Manual should accomplish all repairs or component replacement.
NOTE: This instructor guide should be used in conjunction with the Operations and Maintenance Manual and the Band Masks. Each student should have a copy of the monthly, daily pre-dive, daily post-dive, diving supervisors pre-dive and in water checklists.

Kirby Morgan, SuperLite, Band Mask, KMB Band Mask, EXO, SuperMask, SuperFlow, and Rex are all registered trademarks of Kirby Morgan Dive Systems, Inc. Use of these terms to describe products that are not manufactured by KMDSI is not permitted without written permission from KMDSI. © Copyright 1970-2014 Kirby Morgan Dive Systems, Inc. All rights reserved. KMDSI manuals, checklists and technical and training information is made available for the express use of owner/user of this Kirby Morgan products. No part of this material may be reproduced, stored in any retrieval system, or transmitted, or used in any form or by any means, whether graphic, electronic, mechanical, photocopy, or otherwise by technology known or unknown, without the prior written permission of Kirby Morgan Dive Systems, Inc
Copyright 2003-2014, Dive Lab®., Inc. All rights reserved. TechTrnG 03101
115
NOTE: Masks being used in extreme environments will require more frequent inspection.
NOTE: During removal of components for inspection, O-rings and other consumable items may be reused, providing they are clean and a visual inspection does not reveal any damage or deterioration.
NOTE: Cleaning of components should be done in accordance with the Operations and Maintenance Manual.
KMDSI has instituted a course of instruction called the KMDSI Hemet and Band Mask Operator / User Course, formerly known as KMDSI Inspector Training. The course has been designed to assist divers, tenders, supervisors and other diving personnel to better understand the maintenance requirements for the safe use of KMDSI helmets and band masks. KMDSI technicians certified by KMDSI or Dive Lab after November of 2002 that want to train persons as KMDSI Operator / User may do so by using the guidelines set for in the KMB 18/28 Operator / User Training Guide and the SuperLite Helmet Training Guide. These training guides have been developed from the KMDSI operation and maintenance manual and designed to work with both the manuals and the maintenance checklist. Because the Operator / User program is relatively new, certain aspects are still under development and this program may change slightly in the future. All attempts will be made via e-mail, newsletters and the commercial diving network to notify participating technicians of changes. Questions regarding training, or training related issues as well as technical questions regarding KMDSI helmets mask should be directed to Dive Lab Inc, Dive lab may be reached by e-mail at www.divelab.com or by Telephone at 850-235-2715.
Guidelines The Operator / User Course is intended primarily for Commercial Scientific, Military, and Law Enforcement divers with previous experience with KMDSI Helmets and/or Band Masks. The time required to teach the course is usually 4-6 hours depending on the number of persons participating.
Instructor Training Aids Required Instructor Guide, Operation and maintenance manual for KMB 18/28
Band Masks KMB 18 and/or28
Operator / User Course:
Kirby Morgan, SuperLite, Band Mask, KMB Band Mask, EXO, SuperMask, SuperFlow, and Rex are all registered trademarks of Kirby Morgan Dive Systems, Inc. Use of these terms to describe products that are not manufactured by KMDSI is not permitted without written permission from KMDSI. © Copyright 1970-2014 Kirby Morgan Dive Systems, Inc. All rights reserved. KMDSI manuals, checklists and technical and training information is made available for the express use of owner/user of this Kirby Morgan products. No part of this material may be reproduced, stored in any retrieval system, or transmitted, or used in any form or by any means, whether graphic, electronic, mechanical, photocopy, or otherwise by technology known or unknown, without the prior written permission of Kirby Morgan Dive Systems, Inc
Copyright 2003-2014, Dive Lab®., Inc. All rights reserved. TechTrnG 03101
116
This course is NOT a Technician Course. The Operator / User course is intended to train experienced commercial diving personnel to conduct proper daily, set-up and post dive procedures, and adjust KMDSI Helmets and Band Masks and to help identify potential problems that could effect safety and performance. The KMDSI maintenance and inspection checklists should be used in conjunction with the latest revision of the applicable KMDSI Operations and Maintenance manual for the helmet or mask model being used.
The main training tools for conducting the Operator / User course is this instructors guide, along with the daily pre & post dive checklists. The instructor should give each trainee a copy of the Operator/User Guide any other applicable documents as listed in the instructor packet. All KMDSI Technicians teaching the Operator / User course should routinely check the KMDSI or Dive Lab web page for listings of any recent changes to the checklists, manuals or other documents. Technicians teaching the Operator / User course should have Helmets and Band Masks on hand to use for training as well as the necessary tools and support equipment so that the procedures can be properly practiced by those attending the training. Any questions regarding training should be directed to Dive Lab Inc, by telephone at 850-235-2715 or by e-mail at www.divelab.com
The Monthly inspection Checklist is the minimum recommended maintenance and should be performed at least ONCE A MONTH with Mask(s) in continuous use (used for more than 20 diving days in a month) or at least every TWO (2) MONTHS, with Mask(s) used less than 10 diving days a month. Masks used in severe or harsh environments will require more frequent maintenance.
NOTE: Prior to starting the monthly inspection, the log book should be checked to ensure the annual maintenance has been performed within the past 12 months in accordance with the KMDSI Annual Overhaul and Inspection Checklist and should be performed at least annually or as dictated by condition revealed during daily/monthly inspection.
NOTE: During removal of components for inspection, O-rings and other consumable items may be reused, providing they are clean and a visual inspection does not reveal any damage or deterioration.
NOTE: Perform the Side Block/Demand Regulator inspection procedures without gas supplies connected to the Side Block. Attach the gas supply at Step 5 of the “Side Block/Demand Regulator” inspection procedure.
Kirby Morgan, SuperLite, Band Mask, KMB Band Mask, EXO, SuperMask, SuperFlow, and Rex are all registered trademarks of Kirby Morgan Dive Systems, Inc. Use of these terms to describe products that are not manufactured by KMDSI is not permitted without written permission from KMDSI. © Copyright 1970-2014 Kirby Morgan Dive Systems, Inc. All rights reserved. KMDSI manuals, checklists and technical and training information is made available for the express use of owner/user of this Kirby Morgan products. No part of this material may be reproduced, stored in any retrieval system, or transmitted, or used in any form or by any means, whether graphic, electronic, mechanical, photocopy, or otherwise by technology known or unknown, without the prior written permission of Kirby Morgan Dive Systems, Inc
Copyright 2003-2014, Dive Lab®., Inc. All rights reserved. TechTrnG 03101
117
PROCEDURES
HOOD ASSEMBLY 1. Remove the Earphones from their pockets in the Hood. Remove the Hood from the Mask. Perform a visual inspection of all components. Guidance O & M Manual.
Explain about the new band keeper kit and how it attaches.
Visually inspect the overall condition of the mask, paying particular attention to the frame; inspect for damage and or cracking.
On the fiberglass KMB-18, any chips or gouges deeper than 1/16” must be repaired by a certified KMDSI technician trained and certified to perform fiberglass repairs.
On the KMB-28, cracks in the plastic frame, and/or bad inserts require that the frame be replaced.
Ensure all face port screws are in place.
2. Visually inspect all metal parts of the Band Assembly, including the Band Screws, for damage. Replace if necessary. Guidance O & M Manual.
Ensure all welded portions are thoroughly inspected for cracking.
Inspect the tapped portions of the bottom band where the screws engage to ensure the threads are in good condition.
Check all to the spider posts on both bands especially at their weldment(s), the top band should have 3 posts and the bottom band 2.
Talk about how the bands can be damaged, including striped threads and broken posts.

Kirby Morgan, SuperLite, Band Mask, KMB Band Mask, EXO, SuperMask, SuperFlow, and Rex are all registered trademarks of Kirby Morgan Dive Systems, Inc. Use of these terms to describe products that are not manufactured by KMDSI is not permitted without written permission from KMDSI. © Copyright 1970-2014 Kirby Morgan Dive Systems, Inc. All rights reserved. KMDSI manuals, checklists and technical and training information is made available for the express use of owner/user of this Kirby Morgan products. No part of this material may be reproduced, stored in any retrieval system, or transmitted, or used in any form or by any means, whether graphic, electronic, mechanical, photocopy, or otherwise by technology known or unknown, without the prior written permission of Kirby Morgan Dive Systems, Inc
Copyright 2003-2014, Dive Lab®., Inc. All rights reserved. TechTrnG 03101
118
3. Visually inspect the Hood for signs of damage and/or deterioration. Guidance O&M Manual. Inspect the zipper for broken teeth and tears.
Inspect the glue joint between the face seal rubber and the hood for separation and or deterioration.
Check the neoprene rubber and the entire hood for cuts tears degradation / deterioration. (Tears cuts or holes can cause regulator free-flow)
Inspect the earphone pockets for any holes or faulty seams.
Talk about how holes can make the regulator free flow.
4. Check the Head Harness (Spider) for signs of tearing, deterioration, and/or damage. Ensure all five legs of the Spider are present. Guidance O & M Manual.
Inspect the spider ensuring it is not torn anywhere and it is not degrading or dry rotted. Replace if deterioration or dry rot is present. Explain about the difference in the old spider and new molded spider.
Inspect the spider for dry cracking.
Explain about keeping the spider in a cool dark place when not in use.
PROCEDURES
MASK FRAME ASSEMBLY
1. Visually inspect the Mask exterior for loose and/or missing fasteners and obvious signs of fiberglass damage; including cracks, gouges or depressions.
Conduct a thorough inspection of the mask ensuring there are no soft spots in the frame that would indicate blunt damage.

Kirby Morgan, SuperLite, Band Mask, KMB Band Mask, EXO, SuperMask, SuperFlow, and Rex are all registered trademarks of Kirby Morgan Dive Systems, Inc. Use of these terms to describe products that are not manufactured by KMDSI is not permitted without written permission from KMDSI. © Copyright 1970-2014 Kirby Morgan Dive Systems, Inc. All rights reserved. KMDSI manuals, checklists and technical and training information is made available for the express use of owner/user of this Kirby Morgan products. No part of this material may be reproduced, stored in any retrieval system, or transmitted, or used in any form or by any means, whether graphic, electronic, mechanical, photocopy, or otherwise by technology known or unknown, without the prior written permission of Kirby Morgan Dive Systems, Inc
Copyright 2003-2014, Dive Lab®., Inc. All rights reserved. TechTrnG 03101
119
Pay particular attention to the side block area and the “ears” of the mask, additionally check the communication posts area.
Check top of face port area and explain “passing” criteria for cracks and at what point the helmet requires cracks chips or gouges. Fiberglass repairs must only be accomplished by a KMDSI certified technician certified to do fiberglass repairs.
The KMB-28 plastic frame is not repairable, and requires replacement if cracks or damage is present.
NOTE: On the KMB-18, any gouges in the fiberglass shell deeper than 1/16” must be repaired. Fiberglass and gel coat repairs MUST be completed by a technician that has received certification for Helmet Shell repairs by KMDSI or Dive Lab, Inc. Any cracks or depressions with fractures must be checked by an Authorized KMDSI Repair Facility.
2. Remove the Covers from the Earphones. Remove Microphone from Oral Nasal Mask. Clean Inspect and repair/replace as necessary. Perform a communications check. Guidance O & M Manual.
Clean all components using mild detergent and fresh water. Blow or air dry.
Remove the earphone covers by removing the front cover first, then remove the rear cover.
Closely check the wire connections they must be solid.
Check the Mylar® diaphragm, if it is torn, or loose replace unit with a corrosion resistant, chrome plated Mylar speaker. Clean with fresh water and a nylon brush. Lightly blow dry with compressed air or allow to air dry. Replace speakers if severely corroded**Mylar speakers last longer than cardboard**
Remove the microphone from the oral/nasal; the microphone has a special felt backing that is designed to absorb salt water to protect the microphone. If salt has accumulated on the microphone should be dipped in warm fresh water to remove excess salt. Lightly blow dry using compressed air or allow to air dry.
Explain the life span when exposed to salt water. Talk about sealed comms that are available and the pros and cons.

Kirby Morgan, SuperLite, Band Mask, KMB Band Mask, EXO, SuperMask, SuperFlow, and Rex are all registered trademarks of Kirby Morgan Dive Systems, Inc. Use of these terms to describe products that are not manufactured by KMDSI is not permitted without written permission from KMDSI. © Copyright 1970-2014 Kirby Morgan Dive Systems, Inc. All rights reserved. KMDSI manuals, checklists and technical and training information is made available for the express use of owner/user of this Kirby Morgan products. No part of this material may be reproduced, stored in any retrieval system, or transmitted, or used in any form or by any means, whether graphic, electronic, mechanical, photocopy, or otherwise by technology known or unknown, without the prior written permission of Kirby Morgan Dive Systems, Inc
Copyright 2003-2014, Dive Lab®., Inc. All rights reserved. TechTrnG 03101
120
3. Remove the Nose Clearing Device and Oral Nasal Mask. Remove the Oral Nasal Valve as an assembly. Clean the Valve and the Valve Body as an assembly. Clean the Oral Nasal Mask. Inspect Mask and Valve Assembly for damage and/or deterioration. Replace the Oral Nasal Mask if any damage is found. Replace the Oral Nasal Valve if it appears dried, stiff, and/or does not lay flat. Clean and inspect the Nose Clearing Pad, Shaft and O-rings for wear. Replace the Pad if deteriorated or damaged. Replace O-rings if worn. Lightly lubricate the Shaft O-rings and Shaft, then reinstall. Reinstall Oral Nasal Mask and Valve Assembly. Guidance O & M Manual.
CAUTION: The Nose Block device MUST be reinstalled when installing a new Oral Nasal Mask. Stretching the Oral Nasal Mask over the Nose Block Device can cause the Oral Nasal Mask to tear.
● Demonstrate how the shape of the device may be altered to fit.
● Discuss what to look for regarding worn or damaged O-rings when to replace them
● Discuss the need to lubricate the nose block shaft on a regular basis
● Maintaining the “Nose Pad” in good condition.
● Point out the necessity and dangers involved regarding improper or no use of oral- nasal.
● Point out proper installation of oral-nasal valve and reasons why. Valve opens inward toward the face. Allowing air to enter when the steady flow valve is activated. During exhalation the valve closes allowing exhaled breath to vent through the exhaust system and not enter the face cavity.
● Explain how the chin (dewatering) valve only opens during regulator purging or use of the steady flow valve. The chin valve is designed to have greater resistance to gas flow than the exhaust valve of the demand regulator.

Kirby Morgan, SuperLite, Band Mask, KMB Band Mask, EXO, SuperMask, SuperFlow, and Rex are all registered trademarks of Kirby Morgan Dive Systems, Inc. Use of these terms to describe products that are not manufactured by KMDSI is not permitted without written permission from KMDSI. © Copyright 1970-2014 Kirby Morgan Dive Systems, Inc. All rights reserved. KMDSI manuals, checklists and technical and training information is made available for the express use of owner/user of this Kirby Morgan products. No part of this material may be reproduced, stored in any retrieval system, or transmitted, or used in any form or by any means, whether graphic, electronic, mechanical, photocopy, or otherwise by technology known or unknown, without the prior written permission of Kirby Morgan Dive Systems, Inc
Copyright 2003-2014, Dive Lab®., Inc. All rights reserved. TechTrnG 03101
121
4. Without air to the Side Block, check the operation of the Defogger and Auxiliary Supply Valve (EGS). If the Valves do not operate smoothly, they must be overhauled or replaced. Guidance O & M Manual.
Check to ensure the (flats) on the respective valve knob(s) are not excessively worn to the point that they do not engage their relevant valve stem(s). Additionally ensure the knob(s) are not cracked or damaged in any way, if questionable, replace.
Ensure the valve stems operate concentrically and are not bent.
5. Remove the Main Exhaust Valve Cover. Inspect the Main Exhaust/Dewatering Valve and Seat for damage and/or contamination, clean as necessary. Ensure the Valve material is not hardened, distorted, and/or warped. Replace the Valve if questionable. Reinstall the Cover.
● Demo how a dented cover may interfere performance
● Explain “seating surface” and how the valve should lay flat.
● Stress the importance of keeping the seating surface free of contaminates an the reasons for not lubricating any of the water dumb valve or exhaust valve(s) regardless of material.
● Lubrication can hold dirt and debris
SIDE BLOCK/DEMAND REGULATOR 1. Check the Umbilical Supply One-Way Valve for proper operation by sucking on the Umbilical Adapter with the Emergency Valve open. No gas should be drawn thru the One-Way Valve.
Demo Sucking – Blowing (Cycling) the check valve and explain “If the check valve will seal at that low of a pressure < 2 psig” it will most certainly seat with 135-150 psig. The oral test is the most stringent. But it is also tested using intermediate pressure.
Kirby Morgan, SuperLite, Band Mask, KMB Band Mask, EXO, SuperMask, SuperFlow, and Rex are all registered trademarks of Kirby Morgan Dive Systems, Inc. Use of these terms to describe products that are not manufactured by KMDSI is not permitted without written permission from KMDSI. © Copyright 1970-2014 Kirby Morgan Dive Systems, Inc. All rights reserved. KMDSI manuals, checklists and technical and training information is made available for the express use of owner/user of this Kirby Morgan products. No part of this material may be reproduced, stored in any retrieval system, or transmitted, or used in any form or by any means, whether graphic, electronic, mechanical, photocopy, or otherwise by technology known or unknown, without the prior written permission of Kirby Morgan Dive Systems, Inc
Copyright 2003-2014, Dive Lab®., Inc. All rights reserved. TechTrnG 03101
122
2. Remove the Regulator Cover Clamp, Cover, and Diaphragm. Visually inspect the interior of the Regulator Body for corrosion and/or contamination. Clean as necessary. Guidance O & M Manual.
Demo how to clean the inside of the demand regulator and what to look for regarding cleanliness.
Mention about not pushing on the lever when washing or rinsing to avoid introduction of water behind the inlet valve.
Discuss daily sanitizing procedures and during use between different divers. Explain and talk about the sanitizing solutions and the importance of thoroughly rinsing. Review the KMDSI written procedure on sanitizing.
Discuss the danger of using an aftermarket diaphragm and how it may interfere with regulator adjustment and performance.
3. Carefully inspect the Diaphragm for cuts, tears, and deterioration. If any damage is found, replace the Diaphragm.
Demo inspection, holding to the light and pulling and stretching to reveal pin holes or deteriorated areas.
Explain the need for sanitizing.
4. Carefully check the Regulator Exhaust Valve for warping, distortion, stiffness, and/or damage. This is checked by pressing on the Flapper Valve from inside the Regulator. Check the Regulator Body Valve Seat Spokes. The Spokes should be flat and even. Straighten if deformed. If the Valve shows signs of damage and/or deterioration, replace the Valve. Guidance O & M Manual.
Explain “seating surface” and “bent spokes” and how dirty corroded surfaces can cause the flapper valve to leak. Explain how to straighten bent spokes.
Stress the importance of keeping the seating surface free of contaminates and the reasons for not lubricating any of the exhaust valve(s) regardless of material.
Kirby Morgan, SuperLite, Band Mask, KMB Band Mask, EXO, SuperMask, SuperFlow, and Rex are all registered trademarks of Kirby Morgan Dive Systems, Inc. Use of these terms to describe products that are not manufactured by KMDSI is not permitted without written permission from KMDSI. © Copyright 1970-2014 Kirby Morgan Dive Systems, Inc. All rights reserved. KMDSI manuals, checklists and technical and training information is made available for the express use of owner/user of this Kirby Morgan products. No part of this material may be reproduced, stored in any retrieval system, or transmitted, or used in any form or by any means, whether graphic, electronic, mechanical, photocopy, or otherwise by technology known or unknown, without the prior written permission of Kirby Morgan Dive Systems, Inc
Copyright 2003-2014, Dive Lab®., Inc. All rights reserved. TechTrnG 03101
123
5. Attach an air supply source to the Umbilical Adapter and set the supply pressure to between 135 - 150 psig (9.3 – 10.3 bar). Adjust the Regulator Adjustment Knob out, until a slight free flow develops, then adjust in until the free flow just stops and check the Lever play. There should be between 1/16” - 1/8” of play in the Lever. Adjust as necessary. Reinstall the Diaphragm, the Cover, and the Clamp. Guidance O & M Manual.
Demo regulator adjustment. Utilization of the tools in the kit.
Demo bending the lever and point out that it is rare that a lever should have to be bent, in a regulator that has been in service. Usually levers only require bending because the regulator had been improperly adjusted or serviced previously.
6. Depress the Purge Button. The Button should travel 1/16” – 1/8” before gas starts to flow and a strong purge should be felt when the Button is fully depressed. If the Regulator Purge travel is less than 1/16” or greater than 1/8”, readjust the Lever. Guidance O & M Manual.
7. Check the Steady Flow Valve for proper operation.
Ensure smooth operation and strong gas flow from the air train.
Explain that the valve should close without having to “Gorilla Grip.”
Steady flow operates full shut to full open in two revolutions.
With the steady flow valve open ½ turn the valve is flowing ¾ of flow capacity. At one turn open the valve is flowing maximum flow and opening further will not increase flow.
NOTE: The Steady Flow Valve will rotate approximately two complete revolutions from closed to full open. With the air pressure to the Mask between 135 - 150 psig (9.3 - 10.3 bar), turning the Steady Flow Valve one full rotation should result in a strong flow of gas through the Defogger Train.
8. Secure the gas supply, then bleed down and remove the gas supply from the Inlet Adapter.

Kirby Morgan, SuperLite, Band Mask, KMB Band Mask, EXO, SuperMask, SuperFlow, and Rex are all registered trademarks of Kirby Morgan Dive Systems, Inc. Use of these terms to describe products that are not manufactured by KMDSI is not permitted without written permission from KMDSI. © Copyright 1970-2014 Kirby Morgan Dive Systems, Inc. All rights reserved. KMDSI manuals, checklists and technical and training information is made available for the express use of owner/user of this Kirby Morgan products. No part of this material may be reproduced, stored in any retrieval system, or transmitted, or used in any form or by any means, whether graphic, electronic, mechanical, photocopy, or otherwise by technology known or unknown, without the prior written permission of Kirby Morgan Dive Systems, Inc
Copyright 2003-2014, Dive Lab®., Inc. All rights reserved. TechTrnG 03101
124
9. Attach a regulated gas supply (normally the EGS system), adjusted to between 135 – 150 psig (9.3 – 10.3 bar), to the Emergency Valve on the Side Block. On the Side Block, open the Emergency Supply note the way the valve feels, the valve should operate smoothly. Open the emergency valve all the way, and then slowly open the regulated gas supply. Check the function of the Regulator Purge, Regulator Adjustment Knob, and the Steady Flow Valve in accordance with previous steps 6 and 7. Check for gas exiting from the One-Way Valve. There should be no gas exiting the Umbilical Adapter.
NOTE – that this is the “other” check for the one-way valve.
IMPORTANT NOTES ON REGULATOR ADJUSTMENT If a new Inlet Valve or Soft Seat is installed, allow the Regulator to sit for 24
hours with the Adjustment Knob turned all the way in (clockwise) before adjusting. This will allow the rubber in the Inlet Valve Stem to set against the Inlet Nipple. If the Regulator is to be used immediately, be aware that the Rubber Seat will take a set, changing the Regulators adjustment and performance. This requires a readjustment of the Regulator after the first day of use.
Normally, if the Regulator leaks breathing gas, the Regulator Adjustment Nut is too tight and must be loosened until the lever has 1/16th - 1/8th of an inch of freedom at the end.
If the Regulator continues to leak after proper adjustment has been made, ensure a correct supply pressure of 135 - 150 psig (9.3 – 10.3 bar). Both the Inlet Valve Soft Seat and/or the Inlet Nipple must be inspected for damage. Generally, if the Inlet Nipple has missing chrome or a bent/damaged knife-edge it will damage the Soft Seat and will not make a proper seal. Best practice is to replace the Inlet Nipple and the Soft Seat.
PROCEDURES
EMERGENCY GAS SUPPLY (EGS)

Kirby Morgan, SuperLite, Band Mask, KMB Band Mask, EXO, SuperMask, SuperFlow, and Rex are all registered trademarks of Kirby Morgan Dive Systems, Inc. Use of these terms to describe products that are not manufactured by KMDSI is not permitted without written permission from KMDSI. © Copyright 1970-2014 Kirby Morgan Dive Systems, Inc. All rights reserved. KMDSI manuals, checklists and technical and training information is made available for the express use of owner/user of this Kirby Morgan products. No part of this material may be reproduced, stored in any retrieval system, or transmitted, or used in any form or by any means, whether graphic, electronic, mechanical, photocopy, or otherwise by technology known or unknown, without the prior written permission of Kirby Morgan Dive Systems, Inc
Copyright 2003-2014, Dive Lab®., Inc. All rights reserved. TechTrnG 03101
125
NOTE: The emergency gas system consists of a emergency gas cylinder attached to a harness assembly, a good quality first stage regulator equipped with an over pressure bleed valve, a intermediate gas supply whip that attaches the emergency gas the emergency valve on the helmet side block. Some divers also use a submersible pressure gauge.
1. Check the hydrostatic date and the last visual inspection record (“VIP”) of the cylinder. Ensure the date(s) are within the specified range. The VIP is done at least annually and the hydrostatic test is done at least every five years.
2. Check the maintenance record of the EGS components to ensure the first stage maintenance has been performed in accordance with the manufacturers recommendations.
Explain how to document maintenance in accordance with Mfr. recommendations of EGS components in notes section of maintenance log1.
3. Check all of the hoses for signs of blisters, cover slippage, cuts, and abrasions. Replace any hose(s) that shows signs of leakage / damage. If a quick connect EGS hose is being used, inspect quick connect and fittings for signs of wear / damage.
Explain about the need to remove chaffing gear on the hose, LP whips to accommodate a thorough inspection.
4. If a submersible pressure gauge is being used, verify that the submersible pressure gauge has been compared to a gauge of known accuracy within the past six months.
NOTE: The primary purpose of the submersible pressure gauge, is to allow the EGS cylinder to checked for charge prior to the start of the dive. If a submersible pressure gauge is not being used the EGS cylinder should be gauged prior to each dive.
1 NOTE: The maintenance log currently on the web at [email protected]. It may be used and reproduced as a template for creating blank pages to record all the maintenance performed.
Kirby Morgan, SuperLite, Band Mask, KMB Band Mask, EXO, SuperMask, SuperFlow, and Rex are all registered trademarks of Kirby Morgan Dive Systems, Inc. Use of these terms to describe products that are not manufactured by KMDSI is not permitted without written permission from KMDSI. © Copyright 1970-2014 Kirby Morgan Dive Systems, Inc. All rights reserved. KMDSI manuals, checklists and technical and training information is made available for the express use of owner/user of this Kirby Morgan products. No part of this material may be reproduced, stored in any retrieval system, or transmitted, or used in any form or by any means, whether graphic, electronic, mechanical, photocopy, or otherwise by technology known or unknown, without the prior written permission of Kirby Morgan Dive Systems, Inc
Copyright 2003-2014, Dive Lab®., Inc. All rights reserved. TechTrnG 03101
126
5. Check the over pressure bleed valve for the proper relief setting. The bleed should be adjusted to start relieving between 180-200 psig, adjust as necessary. Log the lifting pressure. _________psig. Guidance refer to Bleed Valve maintenance procedure.
Use the Relief / Bleed Valve procedure to explain and demonstrate. Explain the importance of having the relief valve and why.
Document overhaul of 1st Stage relief in notes section maintenance log2.
Explain that the relief is intended to keep a creeping first stage from over pressurizing and bursting the EGS hose.
6. Check the over bottom setting of the first stage to ensure it is within the manufacturers specified pressure range. For KMDSI helmets and masks, the minimum over bottom for the emergency supply is 135 psig and the maximum 165 psig (9.3-10.3bar). Log the intermediate pressure_______ psig.
● Discuss the need to use a good quality first stage regulator and what types of regulators work best.
● Discuss the importance of maintaining the first stage IAW the manufacturers recommendations.
● Discuss the importance of having gas open to the first stage to prevent water from entering, causing damage and or loss of the EGS supply.
● Discuss the importance of removing all chaffing gear from LP whips to accommodate a thorough inspection.
Talk about the use of protective covers on the hoses, and the need to be able to inspect.
Explain the need of using good quality hoses and replacing if any damage is found.
7. Perform a leak check of all EGS components and fittings using soapy water in a pressurized condition. Repair or replace items as necessary.

Kirby Morgan, SuperLite, Band Mask, KMB Band Mask, EXO, SuperMask, SuperFlow, and Rex are all registered trademarks of Kirby Morgan Dive Systems, Inc. Use of these terms to describe products that are not manufactured by KMDSI is not permitted without written permission from KMDSI. © Copyright 1970-2014 Kirby Morgan Dive Systems, Inc. All rights reserved. KMDSI manuals, checklists and technical and training information is made available for the express use of owner/user of this Kirby Morgan products. No part of this material may be reproduced, stored in any retrieval system, or transmitted, or used in any form or by any means, whether graphic, electronic, mechanical, photocopy, or otherwise by technology known or unknown, without the prior written permission of Kirby Morgan Dive Systems, Inc
Copyright 2003-2014, Dive Lab®., Inc. All rights reserved. TechTrnG 03101
127
8. Inspect the harness assembly for signs of wear or damage. Repair or replace as necessary. Refer to the manufacturers instructions.
Document inspection of harness assembly in notes section of maintenance log2.
Explain the importance of a good quality harness capable of safely lifting an unconscious diver from the water.
2 NOTE: The maintenance log currently on the web at [email protected]. It may be used and reproduced as a template for creating blank pages to record all the maintenance performed.