kitandpto
DESCRIPTION
kit and PTOTRANSCRIPT

((((((((((((
Kit or PTO Item is one and the same.
The Kit item itself is not a stored item, It has a fixed list of components to be shipped together.
If the Kit itself is to be stored along with its components (these shipped independently then), the kit has to be an asset item to be stored - this time 'assemble' through a WIP job (even if nonstandard) need to be used.
)))))))))))
What are the Item attribute settings required to create a PTO (Kit) Item? (Doc ID 1093134.1)
Selling Item A which is composed of Items B,C,D etc Need to enter a sales order for Item A, pick release and ship Items B,C and D.
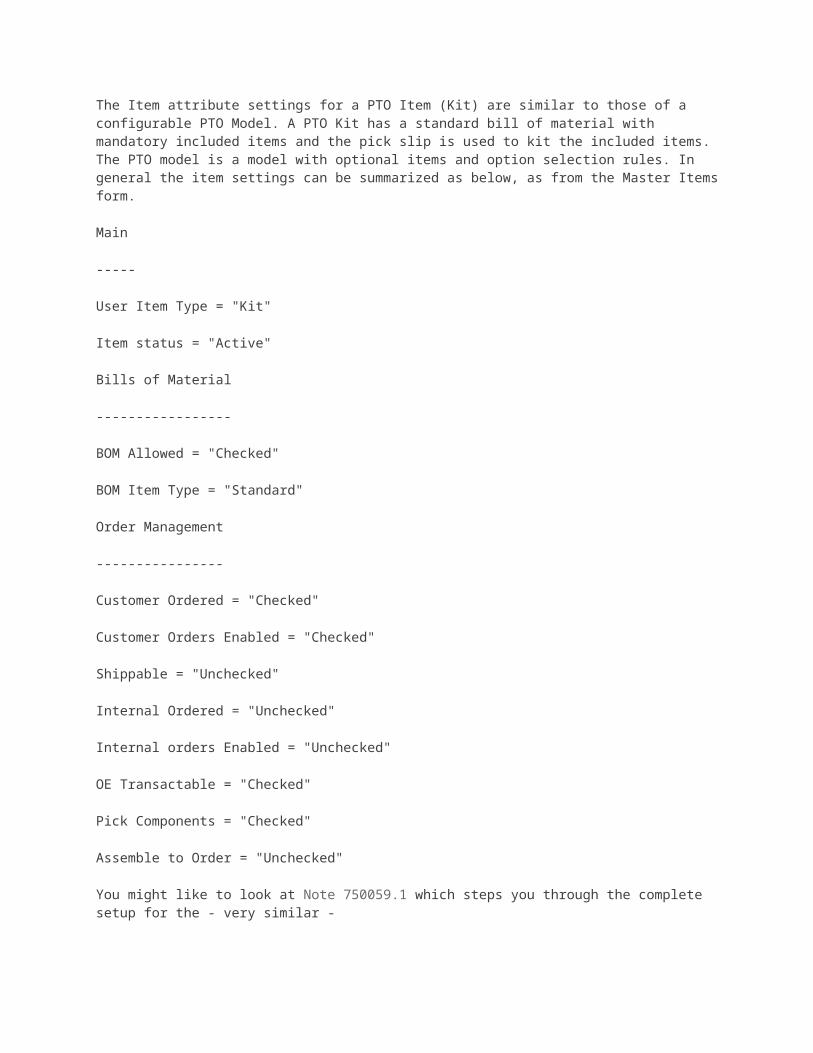
The Item attribute settings for a PTO Item (Kit) are similar to those of a configurable PTO Model. A PTO Kit has a standard bill of material with mandatory included items and the pick slip is used to kit the included items. The PTO model is a model with optional items and option selection rules.
In general the item settings can be summarized as below, as from the Master Items form. You might like to look at Note 750059.1 which steps you through the complete setup for the - very similar - PTO Model scenario.
Main-----User Item Type = "Kit"Item status = "Active"
Bills of Material-----------------BOM Allowed = "Checked"BOM Item Type = "Standard"
Order Management----------------Customer Ordered = "Checked"Customer Orders Enabled = "Checked"Shippable = "Unchecked"Internal Ordered = "Unchecked"

Internal orders Enabled = "Unchecked"OE Transactable = "Checked"Pick Components = "Checked"Assemble to Order = "Unchecked"
How to Manage a Kit Item in Order Management (JFr, April 21, 2011)
What is a Kit Item? A Kit is a virtual (not stockable) Item used to sell and to price together
a group of items.
A Kit Item is not managed in stock,
A Kit Item has to be priced,
The Sales Order is passed on the Kit Item, and the invoice is done for the Kit Item, the components are picked and shipped. Only the components are managed in stock.
Steps to follow: 1. Create a Kit Item and assign it to inventory organizations,
2. Add the Kit Item to a Price List,
3. Create the bill of materials for the Kit Item,
4. Enter a Sales Order and test.
1 Create a Kit Item: Inventory > Items > Mater Items There is a seeded template for Kit Item, its name is “Kit”. Key attributes for Kit Items are:
Stockable (Inventory Tab) = No
Customer Orders Enabled (Order Management Tab) = Yes
Pick Components (Order Management Tab) = Yes
Shippable (Order Management Tab) = No

Save the Kit Item and assign it to one or many Inventory Organizations


2 Add the Kit Item to a Price List: Add the Kit Item to a Price List, it is a manatory step: Order Management >Price Lists > Price List Set up
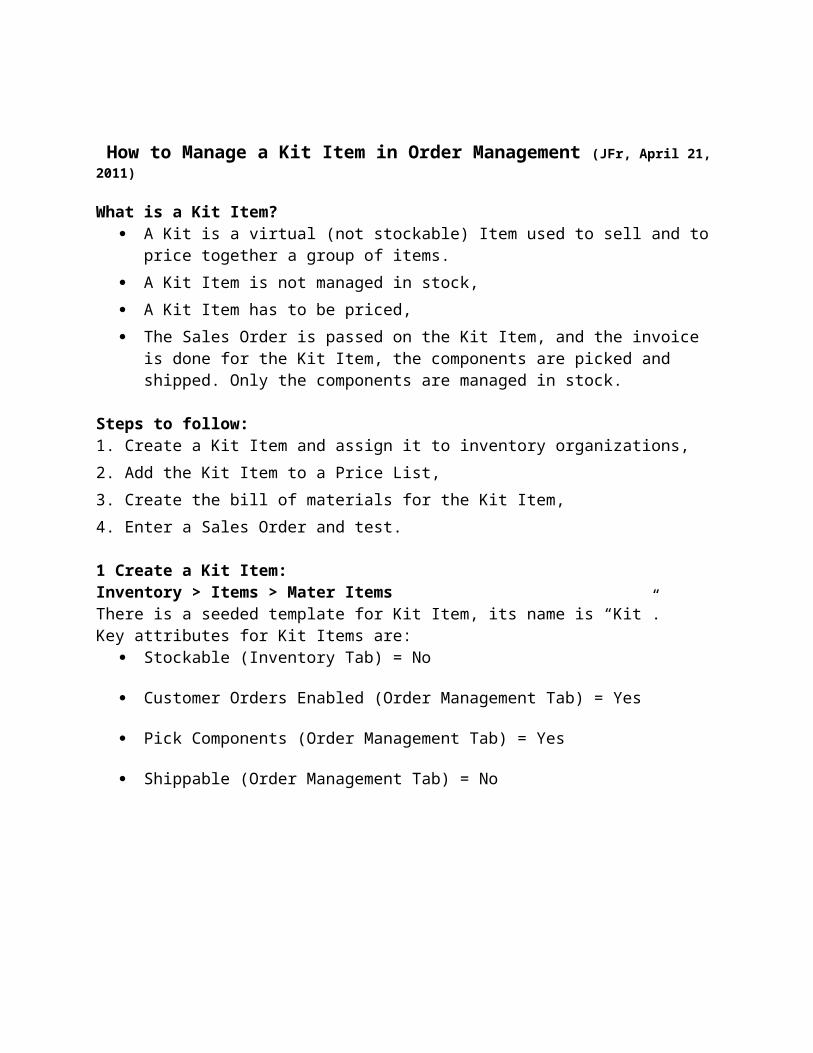
Note: There is no directs relationships between the price of the Kit Item and the price of its components. 3 Create the bill of materials for the Kit Item. The Bill of Materials has to be created in the Item Validation Organization to be shared between all the inventory organizations. Order Management > Setup > System Parameters > Values
Order Management > Change Organization Go to the Item Validation Organization Bill of Materials > Bills > Bills

4 Enter a Sales Order and test Order Management > Orders, Returns > Sales Order Sales Order after Entry
Sales Order after Booking
Sales Order after Picking
Sales Order after Shipping

Sales Order after Fulfilment How to Manage a Kit Item in Order Management
Invoices created for the Kit Item and not for the components.


PTO Configuration Cycle In Order Management (Doc ID 750059.1)
Setup Steps
Create Items
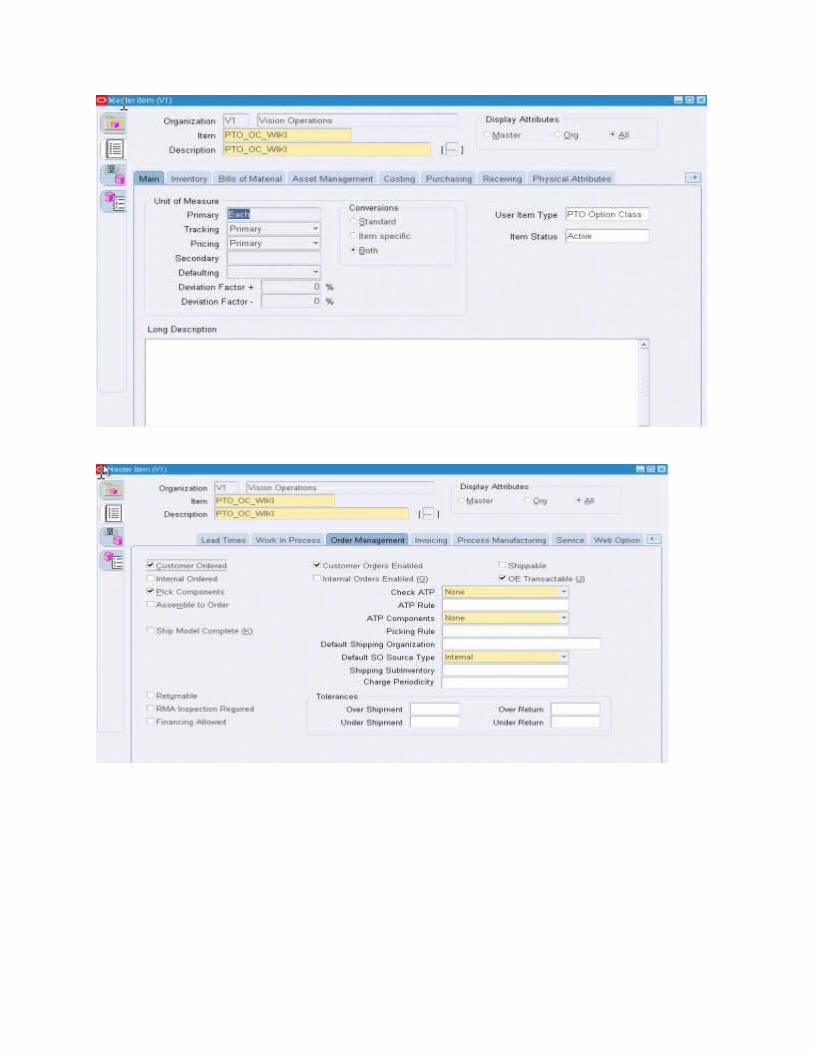
Create PTO Model (PTO_MODEL_WIKI) using the PTO Model item template and assign it to organization M1
Ensure that the BOM Item type is Model in the Bills of Material tab and the Pick Components check box is checked in the Order Management tab

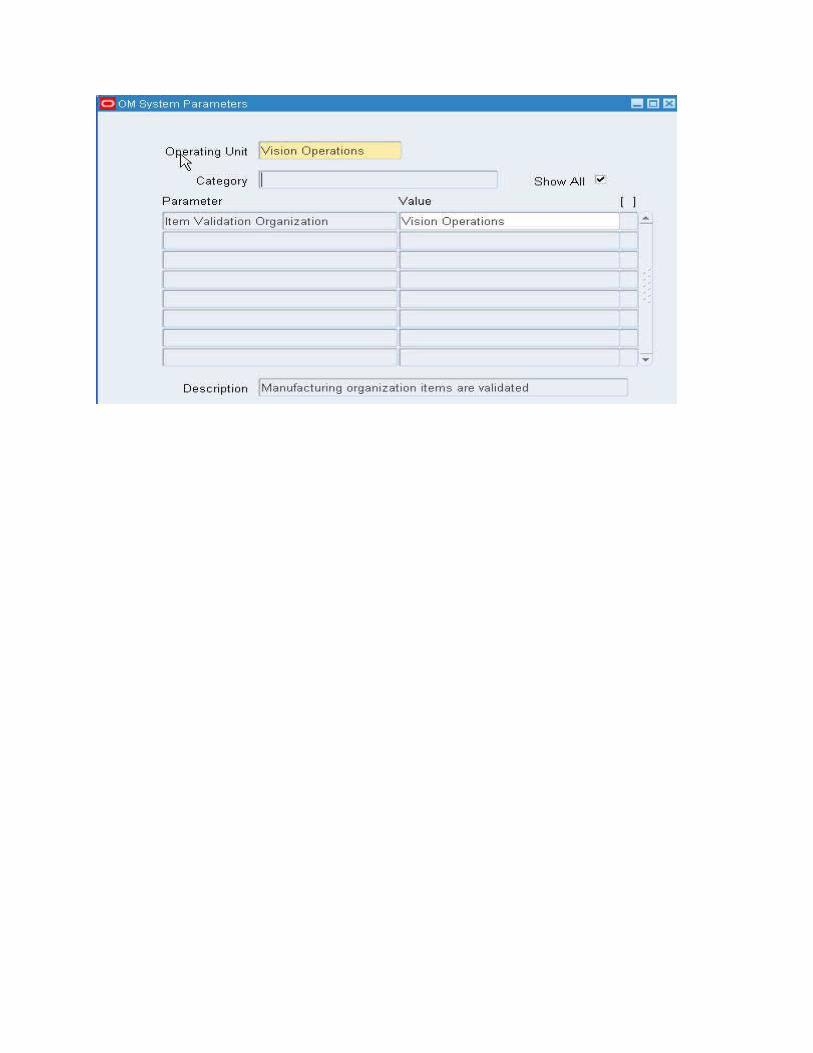
- Create PTO Option Class (PTO_OC_WIKI) using the PTO Option Class item template and assign it to organization M1.
Ensure that the BOM Item type is Option Class in the Bills of Material tab and the Pick Components check box is checked in the Order Management tab

- Create 3 Items (PTO_ITEM, PTO_ITEM_1 & PTO_ITEM2) using the Finished Goods Item Template and assign it to M1 Org
Add the Items to a Price List
- Navigate to Oracle Pricing Manager responsibility, query an Active Price list and add the items to the Price List (PTO_ITEM, PTO_ITEM_1 & PTO_ITEM2) and mention a value for price
- Navigation: Oracle Pricing Manager ->Price Lists

Create stock for the options for a sufficient test quantity
- Navigation: Inventory Responsibility ->Miscellaneous Transactions ->Miscellaneous Receipt
Create Bill Of Materials (BOMs)
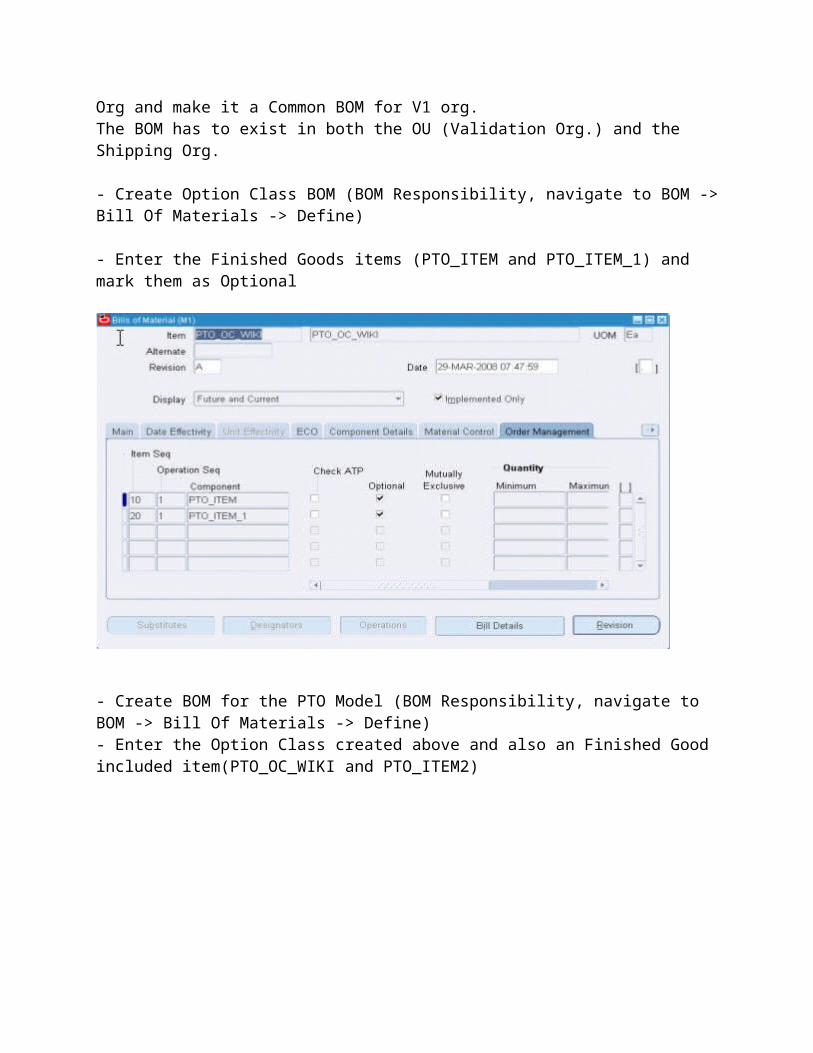
Using a BOM Responsibility, create the BOM for both Model and Option Class in V1 Org and then copy it to M1. OR create it in M1 Org and make it a Common BOM for V1 org.

The BOM has to exist in both the OU (Validation Org.) and the Shipping Org.
- Create Option Class BOM (BOM Responsibility, navigate to BOM -> Bill Of Materials -> Define)
- Enter the Finished Goods items (PTO_ITEM and PTO_ITEM_1) and mark them as Optional
- Create BOM for the PTO Model (BOM Responsibility, navigate to BOM -> Bill Of Materials -> Define)- Enter the Option Class created above and also an Finished Good included item(PTO_OC_WIKI and PTO_ITEM2)

Indented BOM - final result is as depicted below
Test flow steps
Creation of a Sales Order and Configuration of the PTO Model
- Enter a Sales Order Header

- Enter PTO_MODEL_WIKI as the Ordered Item and save the Order Line
- Click on Configurator Button and select the Options

Selection of the Mandatory Options satisfies the Configuration. Observe that the Unsatisfied Box is empty . Click on Finish to complete the Configuration
The cursor is back to the sales order entry form and the order can be booked as the configuration is complete.
Note that the Options are in a status of Awaiting Shipping

Pick Release the Sales Order
- Navigation: Order Management->Shipping->Transactions->Input the Order number->Select both the Options->Actions->Launch Pick Release
Ship Confirm the Sales Order

- Navigation: Order Management->Shipping->Transactions->Query the Sales Order->- Navigate to Delivery Tab->Actions->Ship Confirm->Click OK
- Navigate to Sales Order ->Lines tab. The Options are in Shipped Status
the Lines are in Fulfill Deferred Status

Run the Workflow Background Process
- Navigation: OM Responsibility->Requests->Run Requests

After the above program completes, the Sales Order Lines are in Closed Status
Accessing the Receivables Interface to observe the Sales Order
- Navigation: Accounts Receivables->Control->Auto Invoice->Interface LinesDo a F11->Enter the Order Number->Cntl F11
The Sales Order lines are now in the auto invoice interface table, ready to be

processed by Receivables . Observe that only components marked as optional in BOM can be shown on invoice in addition to the PTO model.
-- This completes the steps for the PTO Configurations test flow
Configure To Order (CTO)
This is when manufacturer has few configurable base models. An example is heavy equipment manufacturers which usually have several base tractor & truck models, but where customers can choose configuration option for each order, like air con, radio, bucket size, boom length, etc. Without CTO software, the number of combination of finished good stored in the system will be ridiculously high. Using CTO software, manufacturer only has to store a master base (or generic) item along with its generic BOM & routing, plus some configuration question which adds or remove parts/operations. When customer books an order, the sales rep asks series of questions (would you like air con? which bucket size would you like? and so on) then records the answers in the system. The CTO software then automatically creates a new product variant specifically according to the configuration required by the customer. The product variant will automatically have customized BOM & routing per customer request as well, so that when the production is executed in the shop floor, correct materials & routings are followed.

Note: Customer to choose a base product at the very moment of ordering and then configure all the variable parameters (features) associated with that product from defined/available options. Based on these selections, configurable items on each quote or order typically generates the "unique product" configuration and manufacturing routing and/or bill of materials based on various features and options.
Assemble to Order (ATO)
They are standard products and are often configured by customers.Subassemblies are manufactured prior to receiving the order and when the order is received, the subassemblies are assembled to make the finished products. For Example: Automobiles, Computers. Assemble-to-order is usefulwhere a large number of finished products can be assembled from common components.
Note: No Manufacturing involved.
Pick to Order (PTO)
A Variety of shippable components are stocked.
Customers order kits or collection of these parts under a single item number.Kits can be predefined or configured by the customer during the order entry process.There is no additional value added after the customer order.For Example: Computer System (CPU, Monitor, and Printer)
Note : No additional value is added after the order.
Make to Order (MTO)
Standard Products are designed and published in catalogs.The actual product is built on receipt of the customer order.Customer might be able to choose certain characteristics optionally.An example of this would be a machine building
The Item attribute settings for a PTO Item (Kit) are similar to those of a configurable PTO Model.

A PTO Kit has a standard bill of material with mandatory included items and the pick slip is used to kit the included items.
The PTO model is a model with optional items and option selection rules.

Create Items
- Create PTO Model (PTO_MODEL_WIKI) using the PTO Model item template and assign it toorganization M1
Ensure that the BOM Item type is Model in the Bills of Material tab and the Pick Components check box is checked in the Order Management tab
PTO Configuration Cycle In Order Management (Doc ID 750059.1)

- Create PTO Option Class (PTO_OC_WIKI) using the PTO Option Class item template and assign it to organization M1.
Ensure that the BOM Item type is Option Class in the Bills of Material tab and the Pick Components check box is checked in the Order Management tab

- Create 3 Items (PTO_ITEM, PTO_ITEM_1 & PTO_ITEM2) using the Finished Goods Item Template and assign it to M1 Org
Add the Items to a Price List
- Navigate to Oracle Pricing Manager responsibility, query an Active Price list and add the items to the Price List and mention a value for price
- Navigation: Oracle Pricing Manager ->Price Lists

Create stock for the options for a sufficient test quantity
- Navigation: Inventory Responsibility ->Miscellaneous Transactions ->Miscellaneous Receipt
Create Bill Of Materials (BOMs)
Using a BOM Responsibility, create the BOM for both Model and Option Class in V1 Org and then copy it to M1. OR create it in M1 Org and make it a Common BOM for V1 org.

The BOM has to exist in both the OU (Validation Org.) and the Shipping Org.
- Create Option Class BOM (BOM Responsibility, navigate to BOM -> Bill Of Materials -> Define)
- Enter the Finished Goods items (PTO_ITEM and PTO_ITEM_1) and mark them as Optional
- Create BOM for the PTO Model (BOM Responsibility, navigate to BOM -> Bill Of Materials -> Define)- Enter the Option Class created above and also an Finished Good included item(PTO_OC_WIKI and PTO_ITEM2)

Indented BOM - final result is as depicted below
Testflow steps
Creation of a Sales Order and Configuration of the PTO Model
- Enter a Sales Order Header
- Enter PTO_MODEL_WIKI as the Ordered Item and save the Order Line
- Click on Configurator Button and select the Options

Selection of the Mandatory Options satisfies the Configuration. Observe that the Unsatisfied Box is empty . Click on Finish to complete the Configuration
The cursor is back to the sales order entry form and the order can be booked as the configuration is complete.
Note that the Options are in a status of Awaiting Shipping

Pick Release the Sales Order
- Navigation: Order Management->Shipping->Transactions->Input the Order number->Select both the Options->Actions->Launch Pick Release
Ship Confirm the Sales Order

- Navigation: Order Management->Shipping->Transactions->Query the Sales Order->- Navigate to Delivery Tab->Actions->Ship Confirm->Click OK
- Navigate to Sales Order ->Lines tab . The Options are in Shipped Status

The Lines are in Fulfill Deferred Status
Run the Workflow Background Process
- Navigation: OM Responsibility->Requests->Run Requests

After the above program completes, the Sales Order Lines are in Closed Status
Accessing the Receivables Interface to observe the Sales Order
- Navigation: Accounts Receivables->Control->Auto Invoice->Interface LinesDo a F11->Enter the Order Number->Cntl F11
The Sales Order lines are now in the auto invoice interface table, ready to be

processed by Receivables . Observe that only components marked as optional in BOM can be shown on invoice in addition to the PTO model.
-- This completes the steps for the PTO Configurations testflow

Flow for ATO Configurations (Doc ID 190028.1)
Item
Functional Test
Steps/References Values/Entries
Verified
1
Create ATO Model Item
Inventory -> Items -> Master Items ->
Main Tab:
Item: ATP-CPU-ATO
Description: ATP ATO Model
Menu Tools -> Copy From
Template: ATO Model
Click Apply.
Click Done
Save
Menu Tools -> Organization Assignment
Assign the item to your Shipping Organization
Save
Item Created:
2
Create ATO Option Classes
Place the cursor on the Item field and click on the + Icon on the Toolbar
1. Item: ATP-Hard-Drive
Description: ATP-Hard-Drive Option Class
Item Created:
Item Created:
Item Created:

Menu Tools -> Copy From
Template: ATO Option Class
2. Repeat same steps for 1 above starting with “Place the cursor…”
Item Name: ATP-Processor
Description: ATP-Processor Option Class
3. Repeat same steps for 1 above starting with “Place the cursor…”
Item Name: ATP-Memory
Description: ATP-Memory Option Class
Save
Verify that message at lower left hand states that three records were
applied and saved.
Menu Tools -> Organization Assignment
Assign the items to your Shipping Organization
3
Finish Creating the Options for the ATO Configurati
Repeat Step 2 using the ‘Finished Good’ Template:
1. Item Name: ATP-Modem
Description: ATP-Modem Optional
2. Item Name: ATP-8X-DVD
Item Created:
Item Created:
Item Created:
Item Created:

onROM
Description: ATP-8X-DVD ROM Mandatory Component
3. Item Name: ATP-450MHZ
Description: ATP-450MHZ Pentium II
4. Item Name: ATP-600MHZ
Description: ATP-600MHZ Pentium III
5. Item Name: ATP-8G
Description: ATP-8G Seagate Hard Drive
6. Item Name: ATP-12G
Description: ATP-12G Seagate Hard Drive
7. Item Name: ATP-64Meg
Description: ATP-64Meg SIMM
8. Item Name: ATP-128Meg
Description: ATP-128Meg SIMM
Save
Message at the lower left hand screen should state that 8 records were
applied and saved.
Menu Tools -> Organization Assignment
Item Created:
Item Created:
Item Created:
Item Created:

Assign the items to your Shipping Organization.
4
Assign Items to a Price List
OM Responsibility -> Pricing -> Price Lists -> Price List Setup
Query on Price List ATP-PRC-01
List Lines T:p>
Product Value: ATP-CPU-ATO
Line Type: Price List Line
Application Method: Unit Price
Value: 1300
Save
Item Price:
5
Finish assigning Items to a Price List
Place the cursor on the Product Context field and click on the + Icon on the Toolbar
1. Product Context: Item
Product Attribute: Item Number
Product Value: ATP-Hard-Drive
Line Type: Price List Line
Application Method: Unit Price
Value: 0
For Items 2 –11, repeat Step 1 above starting with “Place the ...”
2. Product Value: ATP-
Item Price:
Item Price:
class=MsoNormal>Item Price:
Item Price:
Item Price:
Item Price:
Item Price:
Item Price:

Processor Value: 0
3. Product Value: ATP-Memory Value:0
4. Product Value: ATP-Modem Value:25
5. Product Value: ATP-8X-DVD ROM Value:0
6. Product Value: ATP-450MHZ Value:0
7. Product Value: ATP-600MHZ Value:250
8. Product Value: ATP-8G Value:0
9. Product Value: ATP-12G Value:100
10. Product Value: ATP-64Meg Value:0
11. Product Value: ATP-128Meg Value:50
Save
Message at the lower left hand screen should state that 11 records were applied and saved
6
Receive Items into Inventory
Inventory -> Transactions -> Miscellaneous Transaction ->
1. Type: Choose Miscellaneous Receipt from the LOV
Item: ATP-Modem
Subinventory: Standard
Quantity:
Quantity:
Quantity:
Quantity:

Subinventory
UOM:Ea
Quantity: 100
Account: Choose any valid account from the LOV
Arrow down key
2. Item: ATP-8X-DVD ROM
For items 2-8, repeat steps for 1 above
3. Item: ATP-450MHZ
4. Item: ATP-600MHZ
5. Item: ATP-8G
6. Item: ATP-12G
7. Item: ATP-64Meg
8. Item: ATP-128Meg
Save
Message at the lower left hand screen should state that 11 records were applied and saved
Quantity:
Quantity:
Quantity:
Quantity:
7
Define Assemblies and Components
Sign on into your Master Organization
BOM Responsibility -> Bills -> Bills
Header:
Item: ATP-Hard-Drive

Main Tab:
Item Seq = 10
Component = ATP-8G
Quantity = 1
Order Management Tab = Check Optional
Item Seq = 20
Component = ATP-12G
Quantity = 1
Order Management Tab = Check Optional
Save
Place cursor on Item field and click on the + Icon on the Toolbar
Repeat Step above for the Option Classes below
1. Item: ATP-Processor
Component = ATP-450MHZ
Component = ATP-600MHZ
2. Item: ATP-Memory
Component = ATP-64Meg
Component = ATP-128Meg 8
Define the ATO Model
BOM Responsibility -> Bills -> Bills
Header:

Item: ATP-CPU-ATO
Main Tab:
Item Seq = 10
Component = ATP-Processor
Quantity = 1
Item Seq = 20
Component = ATP-Hard-Drive
Quantity = 1
Item Seq = 30
Quantity = 1
Quantity = 1
Item Seq = 50
Component = ATP-Modem
Quantity = 1
Order Management Tab = Check Optional radio button
Save9
Verify the BOM
BOM Responsibility -> Bills -> Indented Bills
Item = ATP-CPU-ATO
Click Find
Notice the three Option Classes along with the Optional and Mandatory Item
Click on the ++ sign to expand the BOM to its lower

levels of components
Verify that the Option Classes are as defined above.
10
Copy the BOMs into Shipping Organization
Inventory -> Change Organization
Organizations:
Select your Shipping Organization
Click Ok
BOM Responsibility -> Bills -> Bills
Header:
Item = ATP-Hard-Drive
Tools -> Copy Bill from
Organization: Master Organization
Item: ATP-Hard-Drive
Click on the Copy Button
Repeat the Steps above for:
Item: ATP-Processor
Item: ATP-Memory
Item: ATP-CPU-ATO11
Enter Order
OM Responsibility -> Orders, Returns -> Sales Orders
Main Tab:
Customer = Standard
Order Number:
Order Status:

Customer
Order Type = Standard Order Type for ATO’s
Price List = Price List ATP-PRC-01
Sales Person = Any value from LOV
Ship To Location: Select from LOV if not defaulted
Bill To Location: Select from LOV if not defaulted
Others Tab:
Payment Terms: Select from LOV if not defaulted
Warehouse: Select from LOV if not defaulted
Lines Items Tab:
Line 1.1:
Ordered Item: ATP-CPU-ATO
Qty = 1
UOM = Ea
Save12
Configure the ATO Model Lines
Place the cursor on line 1.1
Press the Configurator button
Click on the ATP-CPU Model button to the left
Select the ATP-Modem

Option
Click on the ATP-Processor Option Class to the left
Select the ATP-600MHZ Option
Click on the ATP-Hard-Drive Option Class to the left
Select the ATP-8G Option
Click on the ATP-Memory Option Class
Select the ATP-64Meg Option
Press the Done button to Save the Configuration
Sales Order Form:
Click the Book Order button
13
Display the Detail Lines
Line Items Tab:
Tools -> Show Line Details
All selected options and classes should display.
All lines should have a schedule date
Schedule Date:
14
Create Config Item Eligible
Line Items Tab:
Place Cursor on the model line 1.1
Actions Button -> Progress Order -> Ok
Create Configuration - Eligible
Request ID:
Model Line #: 1.1
Config Item Line #:
Con style='width:63.0pt;bo

-> OK
Record Workflow Request Id
Click Ok
Line Items Tab:
View the Configured Item Number.
It will start wither followed by *
rder-top:none;border-left:none; border-bottom:solid windowtext .5pt;border-right:solid windowtext .5pt; mso-border-top-alt:solid windowtext .5pt;mso-border-left-alt:solid windowtext .5pt; padding:0in 5.4pt 0in 5.4pt;height:4.9pt'>
15
Create Supply Order Eligible
OM Responsibility -> Orders, Returns -> Sales Orders
Press F11 to enter a query
Order Number = Enter Order Number
Press Ctrl+F11 to execute the query
Lines Item Tab:
Place Cursor on the configured item line
Actions -> Progress Order -> Ok
Select Create Supply Order-Eligible
Press Ok
Document Request ID
View Menu -> Requests
Click on the Find button
Request ID:
Request Status:
Job Number:

Find your ID
Locate Program Name AutoCreate Final Assembly Orders
Click on the Output button
Document the Job Number16
Release the Job
<!--[if !supportEmptyParas]--> <!--[endif]-->
WIP Responsibility -> Discrete -> Discrete Jobs
Select your Standard Organization
Job: Enter Job Number
Click Find
Change the Status from Unreleased to ReleasedRouting Tab:
Enter your Standard Subinventory
Save
Issue Material to the Job
WIP Responsibility -> Material Transactions -> WIP Material Transactions
Job: Enter Job Number
Subinventory: Enter your Standard Subinventory
Assembly Quantity: Enter 1
Click the Continue button
Record quantity available for all components
Click Done
ATP-Modem:
ATP-8X-DVD ROM:
ATP-600MHZ:
ATP-8G:
ATP-64Meg:

18
Complete the Job
WIP Responsibility -> Material Transactions -> Completion Transactions
Job: Enter job number
Click the Continue Button
Quantity: 1
Click the Done button19
Confirm Item is Available in Inventory
Inventory -> On-hand, Availability -> On-hand Quantity
Organization: Select your Shipping Organization
Item: Enter your configured item number
Click the Find button
On-hand Quantity:
20
Pick Release
OM Responsibility -> Shipping -> Release Sales Orders -> Release Sales Orders
Order Tab:
Order Number: Enter order number
Shipping Tab:
Release Sequence Rule: Any from the LOV
AutoCreate Deliveries: Yes
Inventory Tab:
Warehouse: Enter your Shipping Organization
Pick Slip Grouping Rule: Any
Request Number:
Request Status:

from LOV
Auto Allocate: Yes
Auto Pick Confirm: Yes
Click the Concurrent button
Document the concurrent request number
View Menu -> Requests
Click on the Find button.
Find your ID for the “Pick Selection List Generation” request.
Record the status of the request
21
Ship Confirm
Order Number = Enter Order Number
Click Find
Lines/LPNs Tab
Using the horizontal scroll bar, scroll to the right to see the ‘Pick Status’
of the delivery line (should be ‘Released’)
Delivery Tab
Click on Actions: Ship Confirm. Click Go
Ship Options
Ship All: Highlight the radio button
Pick Status:
Request ID:
Request Status:

Ensure that Defer Interface is not enabled.
Click Ok
Document the Interface Trip Stop request id
View Menu -> Requests
Click on the Find button.
Find your ID for the “Interface Trip Stop” request.
Record the status of the request
22
View Sales Order
OM Responsibility -> Orders, Returns -> Order Organizer
Order Number = Enter order number
Click Find
Verify the Results: Line # 1.1 Req Qty = 1, Shipped Qty =1
Order Number:
Req Qty:
Shipped Qty:
<!--[if !supportEmptyParas]--> <!--[endif]-->
The Item attribute settings for a PTO Item (Kit) are similar to those of a configurable PTO Model. A PTO Kit has a standard bill of material with mandatory included items and the pick slip is used to kit the included items. The PTO model is a model with optional items and option selection rules. In general the item settings can be summarized as below, as from the Master Items form.
Main
-----
User Item Type = "Kit"
Item status = "Active"
Bills of Material

-----------------
BOM Allowed = "Checked"
BOM Item Type = "Standard"
Order Management
----------------
Customer Ordered = "Checked"
Customer Orders Enabled = "Checked"
Shippable = "Unchecked"
Internal Ordered = "Unchecked"
Internal orders Enabled = "Unchecked"
OE Transactable = "Checked"
Pick Components = "Checked"
Assemble to Order = "Unchecked"
You might like to look at Note 750059.1 which steps you through the complete setup for the - very similar -

Difference Between MTS, ATO, MTO ,PTO ,CTO and ETO.Make-to-stock (MTS)
In MTS environments, products are created before receipt of a customer order. Customer orders are then filled from existing stock, and then those stocks are replenished through production orders. MTS environments have the advantage of decoupling manufacturing processes from customer orders. Theoretically, this enables customer orders to be filled immediately from readily available stock. It also allows the manufacturer to organize production in ways that minimize costly changeovers and other disruptions.
However, there are risks associated with placing finished goods into inventory without having a firm customer order or an established need. These risks tend to limit MTS environments to simple, low-variety, or commodity products whose demand can be forecasted readily.
Assemble-to-order (ATO)
In ATO environments, products are assembled from components after the receipt of a customer order. The key components in the assembly or finishing process are planned and stocked in anticipation of a customer order. Receipt of an order initiates assembly of the customized product. This strategy is useful when a large number of end products based on the selection of options and accessories can be assembled from common components.
When products are too complex or customer demand is unpredictable, manufacturers may choose to hold subassemblies or products in a semi-finished state. The final assembly operation is then held until a firm customer order is received. In this environment, manufacturers theoretically cannot deliver products to customers as quickly as MTS environments, since some additional time is required to complete the final assembly.
Make-to-order (MTO)
In MTO environments, products are made entirely after the receipt of a customer order. The final product usually is a combination of standardized and custom items to meet the customer's specific needs. MTO environments are more prevalent when customers are prepared to wait in order to get a

product with unique features—usually customized or highly engineered products. This is analogous to the difference between a fast-food restaurant and a full-service chain restaurant. MTO environments are slower to fulfill demand than MTS and ATO environments, because time is required to make the products from scratch. There also is less risk involved with building a product when a firm customer order is in hand.
Engineer-to-order (ETO)
In ETO environments, customer specifications require unique engineering design, significant customization, or new purchased materials. Each customer order results in a unique set of part numbers, bills of material, and routings. ETO environments theoretically are the slowest to fulfill: Time is required not only to build the product, but to custom design it to meet the customer's unique requirements.
Assemble to Order (ATO) and Pick to Order (PTO) are stocking strategies that are used by manufacturers, when they can produce a variety of finished products from a relatively small number of subassemblies and components. This stocking strategy is widely known as the “hourglass” strategy, where you maintain your inventory at the narrowest level in your bill structure. This maintains inventory in a more flexible state and helps minimize your inventory investment. An ATO environment is where you wait until you have an actual sales order before you begin manufacturing the finished product. PTO implies that you will pick multiple items based on one line item on a sales order.
Configure To Order Environment
In both ATO and PTO environments you might actually configure products based on the customer order, or simply manufacture or ship standard products or predefined configurations. A configure to order environment is where you allow your customers to configure the finished product that they intend to buy. Typically you will offer a variety of choices to your customer from which they can choose the best options that suit them.
Market Orientation versus Stocking Strategies

Whether you offer configurable products depends on your market orientation; but if you do, you cannot follow a Make to Stock strategy. You will potentially follow one of the three possible stocking strategies—Make to Order (MTO), ATO, or PTO, depending on the complexity of your products (how configurable your products are). On the contrary, you can operate with an MTO/ATO/PTO stocking strategy but still choose not to offer configurable products. The difference between MTO and ATO is the level at which you stock your components. So, from here on, when we mention ATO we really mean both ATO and MTO because the business processes are similar albeit the stocking levels are different.
ATO/PTO ScenariosIn a configuration scenario, a model bill of material is used to represent the list of choices; if there’s no need to offer choices, a standard bill of material is used. The difference between models and items is essentially the ability to configure an item while creating an order. Beyond this creation of the configuration item, the manufacturing and distribution processes are the same for both models and standard items
In an ATO environment, the strategy is to forecast, build, and stock the subassemblies and parts that are used in the model. Oracle offers two flavors of ATO—the first one is the ATO model in which the customers can configure the product to their liking, and the other one is the ATO item that is preconfigured. Once the customer order is received, the subassemblies and components are assembled, according to the instructions in the routing, and shipped.
For configurable models, the subassembly/component list will vary with respect to each order and so will the manufacturing instructions (routing). So, a notional item is created for each unique combination of options using an automatic process. This item can be numbered and named according to your business needs. For example, when a model called MD45890 is ordered with a set of chosen options, the system will create a notional item to represent the chosen options, and numbers the new item as MD45890*99, based on your BOM parameters. This item is referred to as the configuration item in Oracle Applications.
The strategy in PTO is similar, although there is no manufacturing. There are two flavors of PTO as well—PTO models that can be configured by the customers and PTO kits that are ordered as they are. Because there is no manufacturing involved, PTO models or PTO kits can be shipped as soon as

they are ordered, depending on the availability of the required items. When the pick list is generated for these items, the individual items that were selected (in the case of a PTO model) or that were part of the standard PTO kit will be printed in the pick list, which can then be picked and shipped.
Oracle allows you to have hybrid items such as an ATO model within a PTO model. Starting with Release 11i5, Oracle supports multiple levels of configuration within a model; the applications will generate a unique configured item for each ATO model within a structure. Prior to Release 11i5, however, multiple ATO models could be used, but the result was one flat bill of material for all levels of configuration in the structure.
Below table gives attributes to be enabled in Oracle EBS for different types of items
OE-ATO: ATO/PTO - FAQ (Doc ID 99861.1)
FREQUENTLY ASKED QUESTIONS
1. What are the available types of configurations?
ATO Model - Assemble-To-Order Configuration� Model bill of material with optional items and options selection rules (mutually exclusive/mandatory).� Configuration manufactured from included items and selected options.
Standard Assemble-To-Order Items - ATO Item� Standard Bill of Material with mandatory standard components.� Item manufactured from mandatory standard components.
PTO Model - Pick-To-Order Configurations� Model Bill of Material with optional items and option selection rules� Pick Slip used to kit included items and selected options.
KIT (PTO Item)� Standard Bill of Material with mandatory included items.� Pick Slip used to kit included items.
HYBRIDS� Pick-To-Order model with optional Assemble-To-Order items.� Pick-To-Order model containing Assemble-To-Order model.
2. What are the item attributes that effect configurations?
BOM Item Type (BOM alternate region)Pick Components (Order Entry alternate region)Assemble To Order (Order Entry alternate region)ATP Components (Order Entry alternate region)Ship Model Complete (Order Entry alternate region)Check ATP (Order Entry alternate region)OE Transactable (Order Entry alternate region)
3. Can I cancel a configuration?
A configuration can be cancelled any time during the order fulfillment process. But the scheduling actions (reserve/demand) need to be removed before canceling.
4. How do I make changes to the Sales Order after a configuration has been created?
First, the sales order needs to be unassigned from the configuration.Second, the sales order assigned to the work order in WIP needs to be cancelled.Third, the changes can now be made to the sales order.And fourth, the link between the sales order and work order needs to be reestablished to further process the order.
5. How do I make changes after a Final Assembly Order has been opened?
No changes can be made after the final assembly order has opened. To make any changes the whole order line has to be pick released, and backordered.
6. Why don't my changes to a Bill of Materials (BOM) reflect on the Configuration screen?
Any changes made to the BOM (i.e. adding new options), should be automatically reflected in the Configurator screen, if they are not then run the BOM Pre-explode Configurations program (OE Superuser Reponsibility>Bills>Pre-explode). This will explode all the Bills and update the table BOM_EXPLOSIONS.
7. How can I internally order a configuration?
Configurations cannot be ordered internally (i.e. they cannot be used on internal orders from Purchasing).
8. Why does the Selling Price on the Sales Order screen only display the model price and not include the options?
This is functionality. The combined model and options total will be

displayed on the line total field at the bottom of the form.
9. How do I do an RMA on a configuration?
RMA of configurations can only be done when referencing a Sales Order number or an Invoice.
10. How do I delink a work order from a sales order?
a. (N) WIP: Discrete-> Discrete Jobs b. Query the Assembly. c. Click on the Button labeled Sales Order. d. Delete the sales order line and commit.
11. When does change to BOM affect the ATO configuration?
ATO configuration will not be affected until the BOM_EXPLOSIONS table is loaded since this table contains permanent explosions of all model bills for use by Order Entry/Shipping.
12. Can I delete an ATO order line once order is booked?
No, you can only cancel the ATO order line once the order is booked.
13. You cancelled an ATO order but demand has NOT been released?
Scenario: You have a single line ATO sales order that a discrete job was created for. You realized that this single line was entered incorrectly; therefore, You go to Order Entry and cancel this line and add a new one. You then went to Inventory and found out that demand for the original line had not been released.
If this is a 10.7 environment, please run incdpg.sql (located under $INV_TOP/sql directory) and then apply Patch 354306.
For Rel. 11 environment, incdpg.sql should be run followed by Patch 735666.
14. When running the Autocreate Final Assembly Order program, there is a parameter called Load Type which offers three values:
- Configured items only- Both configured and non-configured items - Non-configured items onlyWhy would the system pick up non-configured items?
The first option is used for items created from a model and options using the Autocreate Configuration Items program in BOM.
The second option is the default and used to create work order from Sales Orders for both configuration and non-configuration items.
The third option is used for non-configuration items such as, items where you have a standard part but which you do not build until you receive a sales order. BOM autocreate configuration is required for ATO model - not ATO item.
15. I would like to pick release even before I have inventory to give advance notice to the warehouse to schedule shipping trucks and plan shipping activity. Can we do this?
Oracle will not allow this. Playing with the reservation profile option and are able to generate a pick slip for the Full Quanity with the option set to NO. OE: Reservation must be set to Yes for ATO items/models to work.If you have OE: Reservations set to YES then pick release will reserve anyquantities that appear on a pick slip. You can only reserve quantities that are in stock and available, so it will only print on the pick slip quantities that are in stock and available. If you have OE: Reservations set to NO then pick release does not attempt to reserve. So all eligible items will print on the pick slip irrespective of whether there is stock or not. The validation will occur when records are inserted into the mtl_transactions_interface and fail if pick release picks up lines with no onhand qty. Note that you cannot safely change the profile value while there are outstanding sal

Definitions
Assemble–to–Order Model (ATO Configuration):
Model bill of material with optional items and option selection rules Configuration manufactured from mandatory components and selected
options, or purchased from a supplier
Assemble-to-Order Item:
Standard bill of material with mandatory standard components Item manufactured from mandatory standard components, or
purchased from a supplier
Pick-to-Order Model (PTO Configuration):
Model bill of material with optional items and option selection rules Pick slip used to kit included items and selected options
Pick-to-Order Item (Kit):
Standard bill of material with mandatory included items Pick slip used to kit included items
Hybrid:
Pick-to-Order models with optional Assemble-to-Order items Pick-to-Order model containing Assemble-to-Order model
Multi-Level Assemble-to-Order Model (Multi-Level ATO Configuration):
A model bill of material with a non-phantom model as a component Configuration manufactured from mandatory components selected
options, configured sub-assemblies, or purchased from a supplier.
Multi-Level Assemble-to-Order Items:
Standard bill of material with standard components and configured components

Item manufactured from standard components and configured components
Multi-Organization Assemble-to-Order Model(Multi-Organization ATO):
An ATO model which will be transferred from another organization Pick-to-Order Model (PTO Configuration) Pick-to-Order model consists of: • Model bill of material with optional items and option selection rules • Pick slip used to kit included items and selected options
Pick-to-Order Item (Kit) Kit consists of: • Standard bill of material with mandatory included items • Pick slip used to kit included items
Hybrid Hybrid consists of: • Pick-to-Order models with optional Assemble-to-Order items • Pick-to-Order model containing Assemble-to-Order model
A PTO model can have another PTO model or an ATO model as its components.
BOM Types:
1. Standard Bill2. Model Bill3. Option Class4. Planning Bill
BOM Models:
•Create Model bills to represent products and service that allow user-selected options:# Option Classes are groups of optional items# Optional Items# Required Items•Model bills and Option Class bills of material can include:# Stock Items# Assemble-to-Order Models# Mandatory and Optional Components
PTO and ATO BOM Models:

•ATO BOM Models:# Represent product models that require assembly “downstream” in Oracle Work In Process# Are assembled using manufacturing work orders that can be costed•PTO BOM Models:# Represent product Models in which included items appear on pick slips and selected when the order ships# Are not costed
Configurable PTO and ATO BOM Models:
# The inventory Item that represents the top level in your BOM Model must have the BOM Item Type attribute set to Model# PTO and ATO BOM Models can contain Standard Items and Option Classes as components# ATO and PTO BOM Models can also contain other ATO BOM Models as components# An ATO BOM Model cannot contain a PTO BOM Model# A PTO BOM Model can contain a PTO BOM Model
Implicit Rules:
•Basic rules are included with Oracle Bills of Material:# Optional or Required# Mutually Exclusive# Maximum and Minimum Quantity# Quantity Cascade•These rules provided by Oracle Bills of Material are called Implicit Rules.•Oracle Configurator honors these rules as well as the rules defined using Oracle Configurator Developer
Option Classes:
Option Class is an element of a Configuration Model. The purposes of Option

Classes are to group and prevent viable alternatives. The end user typically selects one or more options from each Option Class during runtime to create a valid configuration.
Option Class Selection Rules:
BOM Model rules for selecting options from an Option Class during order entry:•Required and Mutually exclusive: You must select one and only one Item in this Option Class•Required: You must select one or more optional items in this Option Class•Optional and Mutually Exclusive: You can select only one optional item in this Option Class•Optional: Select none, some, or all optional items in this Option Class
BOM Example:

Hybrid Configurations in Order Management
Business needs in ‘Configure to Order’ scenarios are highly flexible. This may be a standard trait of ATO
modeling with the rule and constraint-based options and option classes, or it may be a trait of ‘Pick to
Order’ modeling with mandatory and optional choices to be knitted together. Some of the complex
environments that can arise are the hybrid configurations, i.e. building a PTO model with options and
option classes along with the ATO model within the structure. In this discussion, we will discuss how
different hybrid configuration needs can be met with Oracle order management by discussing business
examples and order flows.
A hybrid configuration is a model where we can include ATO modeling within the PTO structure to cater to
complex business needs. An example would be a promotional model which comes with a base ATO
model along with standard included items as a kit additional to what the customer is ordering for the base
model. A typical business scenario would be a promotional TV, complemented by standard accessories
such as an accessory kit and DVD player. In this scenario, the customer is given the option for modeling
his own type of TV and the included items such as the accessories kit and DVD player as part of the
order. Below is the PTO model of this structure that would be defined in the bill of materials.

PTO model with ATO as an included model ATO bill of material for configurations.
In this model, you can have constraints such as the size of the LED TV being mutually exclusive so that
the user can select only the one size option. Now, let us review how order entry is possible with this
complex configuration. In order entry, you can enter the promotional TV model and schedule it as per the
delivery. Once you’ve opened the configurator modeling window, the PTO model is exploded with all the
included items in it as SO lines, then you will be allowed to model the ATO model. A typical modeling is
shown below.

The selection of the ATO model will make sure that the included items are in it, as well as that we can
specify the customer preference in the size options class. The entire structure after the configuration is
shown below. Once you book the orders, all the PTO model included items that are exploded will be
shown with the status ‘Awaiting Shipping’ since these are pick components. The rest of the models and
option classes will be shown with the status ‘Booked’. Now, a configuration item can be created from the
ATO model SO line.The * item created is as below.

PTO Model Configured Configuration Item created for ATO Model line
As you can observe, the configured item has the line status ‘Supply Eligible’ making it eligible through the
word order creation process. At this point, the shipping department can execute kitting PTO included
items together, and the manufacturing department can start executing the WIP job created from the Auto-
Create Final Assembly program. The line status before and after the job completion is shown below.

Pre-Job Completion and Post-Job Completion
After the shipping execution process has been completed and the hybrid model has been shipped to the
customer, all the eligible lines are available for invoicing. A typical line flow status post shipping is shown
below.
Another business scenario would be an additional PTO option included in the PTO model. To continue
our previous example, let’s say there is a wall mount kit option added on the additional price. A typical
configuration window in this scenario is shown below. The rest of the process after the configuration will
remain the same as per the flow demonstrated previously.
The business can also make sure to ship the complete model instead of the options being shipped
separately by enabling the ‘Ship Complete Model’ option in the item master attributes for the PTO model.
In keeping to our previous example, to add more complexity to the situation, the 32” LED can be an ATO
item. This function was not supported in the initial release of R12 but is now available with the R12.2
version. To enable this function, you must set the value of the profile options as OM: Allow Standard ATO
Items as PTO/Kit Included Components, and BOM: Allow ATO item in a KIT or as a mandatory item in the
PTO Model to ‘Yes’ at the site level. Also, you can create lower level supply with the ‘Auto Create Final
Assembly’ program by enabling the ‘Create Lower Level Supply’ in the BOM parameters. These BOM
configurations are required at validation to make sure your order process flows.
Order management can help cater various business needs in the area of hybrid configurations, provided
the right CTO requirements are incorporated with the right configuration to cater fulfillment and pricing
needs.
Oracle Manufacturing enables one to define options available for products and to process orders for unique product conigurations while maintaining control of inventory , planning and cost accounting.
Oracle manufacturing enables one to process orders for configurations in assemble to order (ATO) and pick to order (PTO) environments. The following diagram illustrates the flow of the steps involved in processing orders for configurations in assemble-to-order ATO and pick to order PTO environments.
One can define model and option class bills of material that list the options customers can choose from when they place a sales order for an assemble to order configuration. To define assemble to order models whose configuration one assemble using manufacturing work orders, one must set the assemble to order item master field to yes for the model and option class items.
A model bill lists the option classes , option and standard items that exist for a model. The bill of material for a PTO model lists the option classes, options, and included items that exist for that model.
Option Class bills can contain standard components, options, as well as other option classes. Oracle manufacturing lets one structure any number of levels of option classes within option classes so one can create an intended hierarchy of choices. One can also specify a mandatory component under any option class in the indented structure that would automatically be included anytime one chooses an option from that option class or a lower level option class.