kneaded - atco blue flame kitchen€¦ · 1 read the recipe through first. it will familiarize you...
TRANSCRIPT

• 10 of our best handmade breads •from rustic to sophisticated
Kneaded

Here at ATCO Blue Flame Kitchen, we have a diverse and multi-talented group of individuals who develop our cookbooks every year, but there is one individual who stands out as a skilled bread enthusiast. The rest of us marvel at the ease with which she is able to knead, braid and roll bread. It just looks so easy in her hands! And so, we have endeavored to capture that passion and skill to share with you. Bread baking can seem intimidating, but if you’re able to persevere, the reward will be grand. With practice, you too can make world-class breads at home. Taking the time and having the patience to make bread at home will reward you with some of the best bread you’ve ever had – because you made it! We hope that with this book, we can make bread baking fun, inspire new bakers and offer a challenge to serious bread enthusiasts.
Kneaded

1 Read the recipe through first. It will familiarize you with the recipe so that you will know how much time to budget and what tools are required.
2 Collect and measure all your ingredients beforehand to make sure you have enough.
3 When using a measuring cup, do not use it to scoop because you will end up cramming more in your cup than you need. Always level off measuring cups and spoons with a straightedge without shaking or tapping.
4 Always use unsalted butter when it’s called for. If you only have salted butter, use the same amount that the recipe needs, but remove V tsp salt for every cup of butter called for.
5 Allow the dough to rise at room temperature, between 15 – 20°C. If the temperature is too high, the dough will rise too quickly. A slower rise is preferred for better flavour. Grains and other ingredients are given enough time to release their sugars during fermentation.
6 Keep the oven door closed. Opening the door to take a peek will drop the oven temperature and can affect baking times. Keeping the door closed is especially important in the first 10 – 20 minutes of baking bread. This is when yeast breads experience “oven-spring”, which is when gasses expand from the heat, water starts to turn into steam and the yeast growth gets supercharged in the warm environment, plumping up the dough.
7 When making substitutions in a bread recipe, we recommend that you make the recipe a couple of times as written to get an impression for how the dough feels. Make only one substitution at a time so that any recipe failures can be easily explained. When substituting whole wheat flour for white flour, you can sometimes sub up to 25% of the flour volume without noticing any texture changes. Note, the more whole wheat flour you add, the more liquid you will need to add, because it absorbs more water than white flours. On another note, gluten-free (GF) flours do not behave the same way as gluten flours in bread baking, so we recommend using them in recipes where they are already called for.
Using our rec ipes

Crispy and Chewy
Focaccia
Swirly Cinnamon
Buns
Pita Bread
Individual Panettones
Simply Brioche
Caramelized Onion and Asiago Rolls
Simple Steamed Buns or Pork Buns
Multigrain Boules
Pain d’Épi (Wheat Stalk Baguettes)
Pepperoni Pizza Bites
Contents
Ski l ls Section 15
Tools/Equipment 19
Glossary 20
5 10
11
12
13
14
6
7
8
9

Crispy and Chewy Focaccia
I N G R E D I E N T S
3 X cups bread flour
2 W tsp instant yeast (one 8 g package)
1 V tsp salt
1 X cups warm water (100 – 110°F)
1/3 cup cooked, plain mashed potato
4 tsp extra-virgin olive oil
1 tbsp extra-virgin olive oil
6 tbsp extra-virgin olive oil
2 tsp basil, crumbled
1 tsp oregano, crumbled
1 cup freshly grated Parmesan cheese
MAKES 24 WEDGESSKILL REQUIRED
1 In the bowl of your stand mixer, add flour, instant yeast and salt. Mix with a flat beater attachment on low to combine.
2 In a medium sized bowl, stir together water, mashed potato and 4 tsp oil. Make sure to break up any clumps of potato. The mashed potato may seem like an odd ingredient, but it will make the bread very moist and chewy.
3 Add potato mixture to flour mixture and mix on low speed until dough comes together. Switch to a dough hook attachment and knead on low for 8 minutes.
4 Add 1 tbsp oil to a large bowl, spreading the oil around until the bowl is evenly covered. Transfer the dough from the mixer bowl to the oiled bowl. Pat dough with oil and cover with plastic wrap. Let dough ferment until doubled in volume, about 2 hours. The dough will be very soft and somewhat bubbly.
5 Spray a large rimmed baking sheet with non-stick cooking spray.
6 Transfer dough to pan and gently stretch the dough by hand to fill the pan.
7 Drizzle and spread 6 tbsp olive oil onto dough. If possible, use a good quality olive oil. You will taste the difference!
8 Create dimples in the dough by making indentations with the tips of your fingers. You don’t want to press your fingers through to the bottom of the pan, otherwise, oil will seep to the bottom and burn during baking.
9 Sprinkle dough with herbs and cheese. Fresh herbs tend to burn, so we recommend dried herbs for this recipe. Feel free to switch up seasonings to suit your tastes.
10 Loosely cover dough with plastic wrap and let proof for 1 hour.
11 Preheat oven to 375°F.12 Remove plastic wrap and bake until
golden brown, about 35 – 45 minutes.13 Cool in pan until cool enough to handle before
transferring to a rack. Cut into wedges.
COOK’S NOTEThe next time you’re
making mashed potatoes, measure out 1/3 cup portions
before adding any other ingredients and freeze them on a baking sheet lined with parchment paper. When they are frozen solid, transfer them
into an air-tight container and freeze for up to 1 month. Defrost mashed potato balls
in the microwave in 10-second increments until thawed.
5

Swirly Cinnamon Buns
MAKES 12 CINNAMON BUNSSKILL REQUIRED
1 In the bowl of your stand mixer, combine bread flour, 1/3 cup plus 1 tbsp brown sugar, instant yeast and 1 tsp salt. Mix with a flat beater attachment on low speed. Add the water and milk. Continue to mix until a shaggy dough is formed, then switch to a dough hook attachment. Knead on low for a couple of minutes to bring the dough together. Beat in 1/3 cup butter, one cube at a time. Keep speed on low and knead for 8 minutes.
2 Add 1 tbsp of oil to a large bowl, spreading the oil around until the bowl is evenly covered. Transfer the dough from the mixer bowl to the oiled bowl. Pat the dough with a bit of the bowl’s oil to prevent it from drying out, then cover with plastic wrap. Let the dough ferment until doubled in volume, about 1 V – 2 hours.
3 When the dough is just about finished fermenting, make the filling. In a small bowl, mix 1 cup brown sugar, cinnamon and V tsp salt together; set aside.
4 Lightly flour the counter and transfer the dough from the bowl. Using a rolling pin, roll dough out into an 18x12 inch rectangle. Gently spread the V cup butter over the dough. Make sure the butter is very soft, but not melted, so it won’t pull at the dough when you try to spread it.
5 Sprinkle cinnamon mixture evenly over dough. Make sure that the cinnamon mixture covers the dough right to the short edges, but leave roughly 1 inch uncovered on the long edges. Gently roll your rolling pin over the filling to press it into the dough.
6 Fold top long edge of dough over by 1 inch. Roll the dough toward you, coaxing it into a 24 inch log. Working slowly will help to keep the edges aligned and ensure the long edge is rolled down evenly.
7 Measure and score log into 12 equal pieces, 2 inches wide. If you cut halfway through at each mark and go back to fully cut each roll, the log will be easier to work with and your rolls will be more uniform in size.
8 To make your buns look exceptionally good, use the following tucking technique. Carefully separate the edge on the outside of each roll by a few inches. Stretch and pull that piece to the bottom-centre of the bun. Make sure it’s tightly wrapped before tucking it underneath. Push the centre of the bun up slightly so the different layers pop out a little at the top. Check out our skills section to see how this is done.
9 Spray a 9x13 inch baking pan with non-stick cooking spray and line with parchment paper.
10 Place buns in the prepared pan, spacing them out evenly. You can then proceed with one of the following options:
a Loosely cover with greased plastic wrap and allow cinnamon buns to proof for 45 minutes to an hour, then uncover and bake.
b Wrap cinnamon buns with greased plastic wrap and refrigerate buns overnight to bake the next morning. Set the buns out for 3 hours at room temperature before uncovering and baking.
c Wrap cinnamon buns well with greased plastic wrap and freeze for up to 3 months. Remove buns from freezer. Refrigerate for 8 – 10 hours (overnight is perfect) to thaw. Set the buns out at room temperature for 3 hours before uncovering and baking.
11 Preheat oven to 350°F and bake until browned and filling is bubbly, about 35 – 40 minutes.
12 Allow to cool in pan on a rack for at least 10 minutes before cutting. Spread each roll with Cream Cheese Frosting while buns are still warm and enjoy.
1 In the bowl of your stand mixer, add all the ingredients and mix with a flat beater attachment. Start with the speed on low to combine the ingredients. As the icing sugar gets incorporated, you can increase the speed to medium-high until the frosting becomes light and fluffy. This will take about 3 minutes.
Makes about 2 cups.
I N G R E D I E N T S
• D O U G H
4 cups bread flour
1/3 cup + packed dark 1 tbsp brown sugar
2 tsp instant yeast
1 tsp salt
1 V cups warm water (100 – 110°F)
2 tbsp homogenized milk
1/3 cup unsalted butter, cubed and softened
1 tbsp canola oil
• F I L L I N G
1 cup packed dark brown sugar
2 tbsp cinnamon
V tsp salt
V cup unsalted butter, softened
2 cups Cream Cheese Frosting (recipe follows)
C R E A M C H E E S E F R O S T I N G
1 cup cream cheese, softened
1 cup icing sugar
X cup salted butter, softened
1 tsp vanilla
See skills section
6

Pita Bread
MAKES 12 PITASSKILL REQUIRED
1 In the bowl of your stand mixer combine bread flour, whole wheat flour, yeast and salt.
2 Add warm water, 2 tbsp oil and honey. Using the flat beater attachment, mix on low until a shaggy dough is formed. Switch to dough hook attachment and knead on low until a smooth dough is formed, about 8 – 10 minutes.
3 Add 1 tbsp oil to a large bowl, spreading the oil around until the bowl is evenly covered. Transfer the dough to the oiled bowl and pat dough with oil to prevent it from drying out; cover dough with plastic wrap. Allow to rise until doubled in volume, about 1 V – 2 hours.
4 Place your pizza stone on the middle rack of your oven, removing any racks above. Preheat your oven to 450°F. Your stone needs to preheat in the oven for at least 1 hour before baking your pitas.
5 Meanwhile, transfer your dough to a lightly floured counter and divide into 12 equal pieces.
6 Line a baking sheet with parchment paper or dust with flour so dough pieces will not stick. Transfer dough pieces to baking sheet and loosely cover with plastic wrap. Allow dough to rest for 30 minutes.
7 Add 1 cup of all-purpose flour to a bowl.8 Dredge each dough piece in flour, adding
remaining 1 cup all-purpose flour to bowl as needed. Roll each dredged piece into a 6 inch circle, covering remaining dough as you work.
9 Let rolled dough rest, uncovered, for 30 minutes.10 Your pizza stone should be preheated by now.
With pizza stone in oven, carefully place as many pitas that will fit onto the stone and watch them puff up right before your eyes! Bake them until puffed, about 3 – 4 minutes. Every once in a while, you’ll get a pita that won’t rise up. Don’t worry about it; it happens to the best of us.
11 Cool pitas on racks. May be frozen.
I N G R E D I E N T S
2 cups bread flour
1 cup whole wheat flour
2 tsp instant yeast
1 tsp salt
1 W cups warm water (100 – 110ºF)
2 tbsp grapeseed oil or canola oil
1 tbsp liquid honey
1 tbsp grapeseed oil or canola oil
1 – 2 cups all-purpose flour (for dredging dough pieces)
How to Make Pita Bread
7

Individual Panettones
MAKES 24 PANETTONES
1 Start your dough by developing the sponge. Combine buttermilk, X cup flour and instant yeast in the bowl of your stand mixer. The sponge will resemble a pancake batter at this time. Cover with plastic wrap and leave for 90 minutes at room temperature.
2 In a small pot over medium heat, bring the filling ingredients (raisins through vanilla) to a boil, then remove from heat. Let stand, covered, until the fruit is softened; set aside.
3 To the sponge mixture, add 4 V cups flour, 5 eggs, granulated sugar and butter. Beat on low with the flat beater attachment. When a shaggy dough has formed, switch to a dough hook attachment and knead on low for 8 minutes (10 minutes if kneading by hand).
4 Transfer dough to the counter and stretch into a 10x12 inch rectangle. Evenly spread softened fruit mixture and almonds over dough. Begin working fruit and almonds into dough by folding and overlapping the corners, then kneading until everything is well incorporated. See our skills section for tips on the proper kneading technique. It will take about 2 – 3 minutes for the filling to be incorporated into the dough. This will be messy and sticky work, but trust that it will incorporate.
5 Add 1 tbsp of oil to a large bowl, spreading the oil around until the bowl is evenly covered. Transfer the dough to the oiled bowl and pat the dough with a bit of the bowl’s oil to prevent it from drying out; cover with plastic wrap. Allow to rise until doubled in volume, about 1 – 2 hours.
6 While you wait, you can fit tulip parchment paper cups into 24 muffin cups. They are like regular paper cups, but taller and may be found in larger grocery stores. The taller tulip cups will help the dough rise up and not out over the sides of the muffin cups. The final presentation will look a lot more polished too.
7 After your dough has risen, divide the dough into the 24 pieces. Roll the pieces into balls on a clean counter to build the surface tension. See the skills section for a refresher on how this is done. Insert the dough balls into the tulip cups. The cups should be about 1/3 of the way full. Cover both pans with plastic wrap and proof until almost doubled in volume, about 1 hour. Alternatively, you can set the pans in the fridge overnight and bake them the next day. Just allow them to sit at room temperature for 2 – 3 hours to proof before baking. They should almost double in volume.
8 Preheat oven to 350°F. 9 To make egg wash, whisk together 1 egg
and water in a small bowl.10 Remove plastic wrap. Lightly brush each
panettone with some egg wash and generously coat the tops with sugar crystals. Only apply the sugar crystals immediately before the panettones are about to go in the oven or the sugar will dissolve.
11 Bake until panettones are golden brown, about 25 – 30 minutes.
12 Allow panettones to cool for 30 minutes before serving to prevent them from sticking to the sides of the wrapper. Serve warm or cool on a rack. May be frozen.
I N G R E D I E N T S
• S P O N G E
1 cup buttermilk, heated to 100 – 110°F
X cup all-purpose flour
2 tsp instant yeast
• F I L L I N G
1 cup golden raisins
1/3 cup chopped dried apricots
1/3 cup chopped dried Mission figs
1/3 cup dried cranberries
V cup brandy or fresh orange juice
2 – 3 tsp grated orange peel
1 – 2 tsp grated lemon peel
1 tbsp vanilla
• D O U G H
4 V cups all-purpose flour
5 large eggs
1/3 cup granulated sugar
V cup unsalted butter, softened
1 cup slivered almonds, toasted
1 tbsp canola oil
1 large egg
1 tsp water
1/3 cup golden granulated sugar crystals
SKILL REQUIRED
COOK’S NOTEPanettone is an Italian sweet
bread traditionally served during the holidays. Though it is often baked in a tall, cylindrical
panettone pan, our family-friendly version uses muffin
cups lined with tulip parchment paper cups.
8

Simply Brioche
1 In a small bowl, combine your sponge ingredients (bread flour through yeast). Make sure everything is thoroughly combined then cover with plastic wrap and leave for 1 V – 2 hours to double in volume.
2 In the bowl of your stand mixer, combine your sponge with the all-purpose flour, sugar, salt and eggs. Mix with the flat beater attachment on low until a shaggy dough is formed. Let dough stand for 5 minutes. Switch to a dough hook attachment and beat in butter, a couple of cubes at a time, using low speed. Keep the speed on low and knead for 8 minutes. Cover bowl with plastic wrap and leave to rise until doubled in volume, about 1 V – 2 hours.
3 Preheat oven to 375°F.
I N G R E D I E N T S
• S P O N G E
X cup bread flour
V cup homogenized milk, heated to 100 – 110°F
1 tbsp liquid honey
2 tsp instant yeast
• D O U G H
3 cups all-purpose flour
W cup granulated sugar
2 tsp salt
4 large eggs
V cup unsalted butter, chilled and cubed
1 large egg
1 tsp water
MAKES 2 MEDIUM LOAVES, 4 SMALL LOAVES
OR 18 BUNS SKILL REQUIRED
FOR BU NS1 Lightly flour counter and
transfer dough from bowl. Divide dough into 18 balls and roll each ball into a bun. Check out our skills section to see how to properly roll dough into buns.
2 In a small bowl, whisk 1 egg with 1 tsp of water to make an egg wash.
3 Line a baking sheet with parchment paper and transfer buns to the pan. Lightly brush each bun with some of the egg wash; cover loosely with plastic wrap and leave until doubled in volume, about 45 minutes to an hour.
4 Uncover and lightly brush buns with egg wash a second time. Bake until golden brown, about 18 – 20 minutes.
5 Cool buns on a rack.
FOR LOAVES1 Lightly flour counter and
transfer dough from bowl. This recipe makes 2 medium-sized loaves or 4 small loaves. Divide dough into 2 medium or 4 small pieces. For each piece, form into a bâtard. Check out the skills section for instructions on loaf finishing techniques.
2 In a small bowl, whisk 1 egg with 1 tsp of water to make an egg wash.
3 Grease two 9x5 inch loaf pans or line a baking sheet with parchment paper. Transfer formed loaves into pans or onto baking sheet. Brush loaves with some of the egg wash and loosely cover with plastic wrap. Leave dough until doubled in volume, about 45 minutes to an hour.
4 Uncover and brush loaves again with egg wash. Bake until golden brown, about 25 – 30 minutes.
5 Cool loaves on rack.
How to Make a Single Strand
Braided Bread
See skills section
9

Caramelized Onion and Asiago Rolls
MAKES 12 BUNS
1 Build your sponge by combining X cup bread flour, add W cup whole wheat flour and instant yeast in a medium bowl. Add your 2/3 cup water and stir until the mixture is smooth. Cover bowl with plastic wrap and leave at room temperature to ferment for 16 – 48 hours. The longer time results in better flavour.
2 Once the sponge has fermented, add it to the bowl of a stand mixer. Fit your machine with the flat beater attachment and add the first 5 ingredients of the dough (1 V cups bread flour through salt). Mix on low until a shaggy dough is formed. Switch to the dough hook attachment and knead for 8 minutes (or 10 minutes if kneading by hand). If dough is sticking to the sides of the bowl, beat in remaining W cup flour, 1 tbsp at a time, until dough doesn’t stick. The dough will be smooth, elastic and very moist.
3 Lightly flour the counter and remove dough from the bowl. Working by hand, stretch the dough into an 8x10 inch rectangle.
4 Sprinkle dough with herbs, 1 cup cheese and Port Caramelized Onions. Fold the four corners of the dough into the centre. Knead dough until the ingredients are mixed in throughout, about 2 – 3 minutes. If you need a refresher on kneading, check out our skills section. While you knead, the dough will be moist, but shouldn’t be too sticky. This step will also be very messy and, initially, it may seem like the ingredients won’t work into the dough, but be patient and after about 2 minutes you should see it incorporate.
5 Add 1 tbsp of oil to a large bowl, spreading the oil around until the bowl is evenly covered. Transfer the dough into the oiled bowl and pat dough with a bit of oil to prevent it from drying out; cover with plastic wrap. Leave dough to double in volume for 2 hours.
6 Divide dough into 12 pieces of equal weight. If you don’t have a scale, divide the dough as evenly as you can.
7 Roll each piece into buns. Don’t flour the counter when rolling in order to build surface tension on the top of the bun. See the skills section for how to properly roll buns. Place buns on a parchment paper-lined rimmed baking sheet. Since they will rise more up than out, they can be spaced about 1 – 1 V inches apart. Cover loosely with greased plastic wrap and let rise until doubled in volume, about 1 hour.
8 Preheat oven to 375°F.9 For egg wash, whisk egg and 1 tsp water
together in a small bowl.10 Lightly coat each bun with some of the
egg wash and a sprinkling of W cup of the cheese.
11 Bake buns until golden brown, about 30 – 35 minutes.
12 Cool buns on a rack. May be frozen.
SKILL REQUIRED
I N G R E D I E N T S
• S P O N G E
X cup bread flour
W cup whole wheat flour
W tsp instant yeast
2/3 cup room temperature water
• D O U G H
1 X cups bread flour, divided
V cup whole wheat flour
V cup room temperature water
1 tbsp extra-virgin olive oil
1 tsp salt
1 tbsp chopped fresh oregano OR
1 tsp dried oregano, crumbled
2 tsp chopped fresh thyme OR
V tsp dried thyme, crumbled
1 cup shredded Asiago cheese OR Parmesan cheese
V cup Port Caramelized Onions (recipe follows)
1 tbsp extra-virgin olive oil
W cup shredded Asiago cheese or Parmesan cheese
1 large egg
1 tsp water
1 Heat oil in a medium non-stick frypan over medium heat.
2 Add onions and cook until golden brown, about 8 – 10 minutes. Make sure to give them an occasional stir.
3 Add port and cook, stirring, until the liquid is evaporated, about 4 minutes.
4 Transfer to a heatproof bowl and allow to cool completely. Makes V cup.
P O R T C A R A M E L I Z E D O N I O N S
1 tsp canola oil
1 cup finely chopped onions
W cup port or red wine
How to Make Cheese and Onion Buns
See skills section
10

Simple Steamed Buns or Pork Buns
MAKES 12 SIMPLE STEAMED BUNSOR 24 PORK BUNS
MAKING THE DOUGH 1 Start your dough by adding all dough ingredients,
except the shortening, oil, and sesame seeds to the bowl of your stand mixer. Fit your mixer with the flat beater attachment and mix on low until a shaggy dough is formed. Switch to a dough hook attachment and, kneading on low, add shortening one cube at a time. Continue kneading for 8 minutes. If you prefer, you can knead by hand for 10 minutes to achieve the same results. When the dough is ready, it should be smooth and elastic, but also firm.
2 Add oil to a large bowl, spreading the oil around until the bowl is evenly covered. Transfer the dough to the oiled bowl and pat with oil to prevent the dough from drying out; cover bowl with plastic wrap. Leave dough until doubled in volume, about 1 V – 2 hours. Here’s a tip: to accurately measure if dough has doubled, place unrisen dough into an oiled 8-cup measuring cup and pat dough with oil to prevent it from drying out. Mark the starting volume on the side with a washable marker. Cover with plastic wrap. After the dough has risen enough, it should measure twice as high.
MAKING SIMPLE STEAMED BUNS 3 Measure and then cut out twelve 4x4 inch squares
of parchment paper. Lay out your parchment squares on a baking sheet; set the baking sheet aside for now.
4 When dough has finished doubling in volume, divide it into 12 equal pieces. Place them under a clean damp tea towel to keep them from drying out.
5 On a clean unfloured surface, roll each piece of dough into a bun. Check out our skills section for a refresher on how this is done.
6 Place a small amount of sesame seeds in a small bowl. Once shaped, dip top of each bun in sesame seeds and place, seeds facing up, on a square of parchment paper. If the seeds aren’t sticking, you can brush the top of the bun with a little water before dipping it again. Cover loosely with greased plastic wrap. Allow buns to rest until doubled in volume, about 45 minutes.
7 Meanwhile, fill a Dutch oven that is slightly less wide than your bamboo steamer with 2 – 3 inches of water. Set your bamboo steamer on top of the Dutch oven. Alternatively, a metal basket steamer may be placed above 1 inch of water in a Dutch oven with a tight-fitting lid. Place lid on bamboo steamer and bring water to a boil.
8 When your buns have finished proofing, remove your steamer from the Dutch oven. Place only enough buns (with parchment squares attached) into steamer to form a single layer. You don’t want to overcrowd the buns in the steamer. Replace bamboo steamer onto Dutch oven and replace lid. If using a metal basket steamer, place into Dutch oven and cover. Steam buns until done, about 12 – 15 minutes. Remove the steamer from the Dutch oven and remove the buns; transfer buns to a rack to cool. Be careful, as steam is extremely hot and can cause burns. Repeat steaming procedure with remaining buns. Replace water as needed, bringing water back to a boil before steaming more buns.
9 Buns are best served warm. Once cooled, buns may be frozen.
MAKING STEAMED PORK BUNS 3 While the dough is fermenting (rising), prepare
the filling for your buns. Heat oil in a wok over medium-high heat. If you don’t have a wok, a medium non-reactive frypan will work just as well. When the oil is hot, add the shallots and sauté for 2 minutes. Add the next 4 ingredients (soy sauce to sesame oil) and stir until mixture begins to bubble.
4 Whisk in chicken broth. Gradually whisk in flour, whisking until no flour clumps are left. Reduce heat to medium-low and allow mixture to cook, uncovered, until thickened, about 1 – 2 minutes. Make sure to stir the mixture constantly to keep ingredients from sticking to the bottom.
5 Remove wok from heat and stir in cha siu. Let mixture cool before filling dough.
6 Measure and then cut out twenty-four 4x4 inch squares of parchment paper. Lay out your parchment squares on a baking sheet; set the baking sheet aside for now.
7 When dough has doubled in volume, divide into 24 equal pieces. As you divide each piece, place it under a clean damp tea towel to keep it from drying out.
8 Working with one piece at a time, flatten a piece with the palm of your hand and use a rolling pin to roll it out into a circle about 5 inches in diameter. Place each circle under the damp tea towel after rolling.
9 Working with one dough circle at a time, place 1 tbsp filling on the centre of dough circle. To enclose filling, pull up and gather 4 sides of dough circle over filling. Pinch dough edges together to cover any exposed filling. Twist gathered dough to seal.
10 Once shaped, place each bun on a square of parchment paper. Cover loosely with same damp tea towel. Allow buns to rest for 20 minutes.
11 Meanwhile, fill a Dutch oven that is slightly less wide than your bamboo steamer with 2 – 3 inches of water. Set your bamboo steamer on top of the Dutch oven. Alternatively, a metal basket steamer may be placed above 1 inch of water in a Dutch oven with a tight-fitting lid. Place lid on bamboo steamer and bring water to a boil.
12 Remove your steamer from Dutch oven. Place only enough buns (with parchment squares underneath) into steamer to form a single layer. Replace bamboo steamer on top of Dutch oven and replace lid. If using a metal basket steamer, remove basket steamer, fill it and place it back into Dutch oven; cover. Steam pork buns until done, about 6 minutes. Remove the steamer from the Dutch oven and remove the buns; transfer to a rack to cool. Be careful, as steam is extremely hot and can cause burns. Repeat steaming procedure with remaining pork buns. Replace water as needed, bringing water back to a boil before steaming more buns.
13 These pork buns are best served warm, but can also be cooled and refrigerated for up to 3 days.
SKILL REQUIRED
I N G R E D I E N T S
• D O U G H
2 cups bread flour
X cup warm water (100 – 110ºF)
3 tbsp granulated sugar
2 tbsp skim milk powder
2 tsp instant yeast
2 tsp salt
V tsp baking powder
W tsp baking soda
1/3 cup shortening, cubed
1 tbsp canola oil
2 – 4 tbsp black sesame seeds (optional)
I N G R E D I E N T S
• F I L L I N G
1 tbsp canola oil
V cup finely chopped shallots or red onion
2 V tbsp soy sauce
2 tbsp oyster sauce
2 tbsp granulated sugar
1 V tbsp sesame oil
X cup no-salt-added chicken broth
3 tbsp all-purpose flour
2 cups diced cha siu (Chinese barbecued pork) or diced freshly cooked pork
COOK’S NOTECha siu is a Chinese
barbecued pork that can be found in the deli section of Asian
grocery stores. For this recipe, you can instead use freshly
barbecued or roasted pork. It doesn’t matter if it is pork chops, loin, etc., but note, if you’re not
using cha siu, the bun filling might not be as flavourful – though still very delicious!
See skills section
11

Multigrain Boules
MAKES 2 LOAVES
1 In a medium bowl, build your sponge by combining X cup bread flour, W cup whole wheat flour, 2/3 cup warm water and W tsp yeast. Stir mixture for 100 strokes (about 1 minute) to develop the gluten. Cover bowl with plastic wrap and leave at room temperature for 16 – 48 hours. If you are able to leave it for the full 48 hours, we would recommend you do so. The longer time results in a better flavour. The sponge will rise, double in size, then fall. This process has to occur before you can move on, so check on your dough every so often.
2 Keep track of the time, because 1 – 4 hours before the sponge is ready you will make the soaker. In a small bowl, combine the cereal and water. Allow the cereal to soak until the sponge is ready.
3 In a stand mixer bowl, combine first 7 dough ingredients (2 X cups bread flour through X tsp yeast) with the sponge on low until dough forms a ball. Switch to a dough hook attachment and knead on low for about 6 minutes. Add the soaker and knead until the soaker is fully mixed in, about 2 minutes. If the dough is sticky, gradually knead in the remaining W cup flour.
4 Add 1 tbsp of oil to a large bowl, spreading the oil around until the bowl is evenly covered. Transfer the dough from the mixer bowl to the oiled bowl. Pat dough with a bit of the bowl’s oil to prevent it from drying out; cover with plastic wrap. Let dough ferment until doubled in volume, about 1 V hours.
5 Set your pizza stone on the centre rack of your oven and preheat to 450°F. If you don’t have a pizza stone, you can bake boules on a baking sheet. Do not preheat the baking sheet.
6 On a clean surface, divide dough into 2 even pieces. Working with one piece at a time, hold the dough in both hands and move the dough around in small circles on the counter to pull the outside edges of the dough down. This creates surface tension and you should be left with a nice, round top. This technique will trap the gas that has developed during fermentation and will also help the dough keep its shape while baking.
7 Dust each boule generously with flour and place, seam side up, in its own 8 inch bowl. Wrap bowls with plastic wrap and let proof until doubled in volume, about 45 minutes.
8 Dust a baker’s peel with flour or cornmeal. Alternatively, you can use the underside of a baking sheet.
9 Carefully invert one boule on the peel and score the loaf however you like. For design ideas, check out our skills section. Gently slide the boule onto the pizza stone and bake until deep brown. This will take about 20 – 22 minutes. Bake boules one at a time unless your pizza stone has room for both. Leave remaining boule in bowl at room temperature until ready to bake. Loaves may look overcooked compared to other bread recipes, but the longer cooking time helps to bring out the wheat flavour.
SKILL REQUIRED
I N G R E D I E N T S
• S P O N G E
X cup bread flour
W cup whole wheat flour
2/3 cup warm water (100 – 110ºF)
W tsp instant yeast
• S O A K E R
1 cup cracked wheat, rye and flax cereal
V cup water
• D O U G H
3 cups bread flour, divided
X cup whole wheat flour
W cup spelt or rye flour
1 W cups warm water (100 – 110ºF)
2 tbsp liquid honey
2 tsp salt
X tsp instant yeast
1 tbsp canola oil
COOK’S NOTEWe prefer to use pizza stones in this recipe. The initial heat from the stones creates crispy crusts and will also help the boules to
keep their shapes.We used Sunny Boy Hot Cereal,
which is a mixture of wheat, rye and flax. If you’re using another
pre-packaged mix, check the ingredient list to make sure it doesn’t contain any rice. You
can also build your own cereal mixture out of flax seed, sesame
seed, hemp seed, rolled oats, wheat bran, quinoa or chia seeds.
See skills section
12

Pain d’Épi (Wheat Stalk Baguettes)
MAKES 2 BAGUETTES
1 Begin developing your poolish by combining bread flour, V cup warm water and V tsp yeast in a medium bowl. Stir ingredients for 1 minute (about 100 strokes) to be sure the gluten develops. The mixture should resemble a thick pancake batter. Cover with plastic wrap and let poolish stand at room temperature to double in volume, about 1 V – 2 hours.
2 Transfer poolish into your stand mixer’s bowl and add 2 W cups all-purpose flour, 1 cup warm water, salt and W tsp yeast.
3 Fit your mixer with a flat beater attachment and mix on low until the dough begins to pull away from the sides of the bowl. If dough is too sticky, gradually add remaining W cup all-purpose flour. Switch to a dough hook attachment and increase speed to medium. Knead for 8 minutes, then transfer dough to a lightly floured counter and knead by hand for 1 – 2 minutes. The dough will feel very smooth, elastic and soft.
4 Add 1 tbsp of oil to a large bowl, spreading the oil around until it’s evenly covered. Transfer the dough to the oiled bowl and pat dough with a bit of the bowl’s oil to prevent it from drying out. Cover with plastic wrap and leave dough to double in volume, about 1 V – 2 hours. Make note of how long it takes for the dough to double in volume, as this will come into play later.
5 Lightly flour your counter and transfer dough from covered bowl. Using a bench scraper or a sharp knife, divide dough into 2 equal pieces. First, shape pieces into bâtards, then roll into baguettes the length of your baking sheet. See our skills section for instruction on shaping a bâtard.
6 Line a large rimmed baking sheet with parchment paper, leaving an overhang on long sides, and sprinkle generously with flour. Place the first baguette snugly along the edge of the pan. Pull parchment paper up in centre of pan to form a divider. Place second baguette snugly against the divider. Roll a clean, damp cloth and place underneath remaining edge of parchment paper to encourage the dough to rise up, not spread out.
7 Cover baguettes loosely with plastic wrap and leave to proof for half the time it initially took for the dough to rise. For example, if you had to wait 2 hours for the dough to ferment, then they will need 1 hour to proof this time.
8 Preheat oven to 450°F.9 Uncover baguettes and carefully transfer to a
new unlined baking sheet. Place each baguette on pan vertically (directly in front of you). About 2 V inches from the end, use a clean pair of kitchen shears and snip down on top of baguette at a 45° angle, cutting the dough about X of the way through. Gently pull the cut section up and out to the side so that it sticks out to the side like a leaf on a branch. Continue snipping downward on the baguette every 2 V inches and laying the cut pieces to alternating sides. To see how this shaping technique is done, watch our YouTube tutorial.
10 Bake baguettes until the crust is golden brown, about 20 – 26 minutes.
11 Remove baguettes from pan and cool on a rack. These are also delicious served toasty warm.
SKILL REQUIRED
I N G R E D I E N T S
• P O O L I S H
X cup bread flour
V cup warm water (100 – 110°F)
V tsp instant yeast
• D O U G H
2 V cups all-purpose flour, divided
1 cup warm water (100 – 110°F)
2 tsp salt
W tsp instant yeast
1 tbsp canola oil
COOK’S NOTEIf you don’t have
kitchen shears, baguettes can be baked as-is after
they have proofed.
How to Make Pain d’Épi
13

Pepperoni Pizza Bites
MAKES 18 PIZZA BITES
MAKING THE PIZZA DOUGH 1 Set up your stand mixer with a dough hook
attachment. Combine 4 cups double zero flour, bread flour, salt and yeast in the bowl. Set the mixer to low speed and slowly pour in 2 cups of warm water. When that water has been incorporated, add the remaining 1 cup of warm water. Continue kneading dough for 5 minutes. Turn mixer off and cover bowl with plastic wrap. Set a timer for 20 minutes.
2 When the timer goes off, uncover the bowl and knead for another 5 minutes.
3 Add 1 tbsp oil to a large bowl and spread the oil around until the bowl is evenly coated. Transfer your dough to the oiled bowl, turning it to coat with some oil; cover with plastic wrap. Set bowl in the fridge and refrigerate for 4 hours or up to 8 hours (overnight). The dough should be wet and bubbly when it is ready.
4 Flour a clean surface with some of the 1 V cups of double zero flour. Remove dough from fridge and transfer to your work station. You’ll want to make sure your hands are thoroughly coated in flour to knead the dough, as it will be very sticky. Gradually knead in enough of the remaining double zero flour until dough is no longer sticky, but still soft. This will take about 2 minutes and you may not need all of the flour. For kneading instructions, see our skills section.
5 Using a floured bench scraper or a sharp knife, divide dough into 6 equal pieces.
6 To remove air pockets from each dough ball, follow the same method for forming buns, but stop before rolling dough on the counter (see our skills section).
7 Transfer dough balls to a parchment paper-lined baking sheet, sprinkle with double zero flour and cover with plastic wrap. Refrigerate for at least 4 hours or for up to 2 days. Dough balls may be individually wrapped and frozen for up to 1 month. Thaw in refrigerator before using.
MAKING PIZZA BITES 1 If you have a pizza stone, place it on the middle
rack of a cool oven. Preheat your oven and pizza stone to 550°F. A hotter oven will bake a better crust. If you don’t have a pizza stone, you can bake your pizza bites on a baking sheet, but the crust won’t be as crispy. Do not preheat the baking sheet.
2 Grab a ball of dough (it’s easier to work with when it’s cold from the fridge). Using a rolling pin, roll the dough out on a lightly floured surface to make a 14 inch circle. You can stretch the dough by hand first before using your rolling pin. If you find the dough is sticking, lightly dust your rolling pin with double zero flour. Make sure the dough doesn’t get thinner than W inch thick. If you happen to make holes in the dough, just pinch them closed and keep rolling the dough until the holes are sealed. If you find the dough keeps shrinking as you roll it, set the dough aside, cover it with a clean damp tea towel and allow it to rest for 10 minutes.
3 Using a bench scraper or a sharp knife, cut the dough circle in half.
4 Spread a thin layer of pizza sauce on both dough halves, leaving a 1 inch border along the edges uncovered. Top with a thin layer of cheese and pepperoni (3 slices per half). You don’t need to add too many toppings or sauce. Less is more when making pizza. Too many toppings will make it difficult to roll the dough up without ripping and will weigh it down when baking.
5 Turn one dough half so that the curved edge is pointing towards you. Fold sides of dough half in by about 1 inch. This will prevent the filling from oozing out the ends. Working from the straight edge, roll the dough towards you over the filling to make a log. Pinch seam to seal. Repeat with remaining dough half.
6 Place logs, seam side down, on a lightly floured baker’s peel (or lightly floured underside of a baking sheet). Brush logs with 1 tbsp of oil to get the crust crispy.
7 Slide logs onto your preheated pizza stone or a baking sheet. For less of a fuss, we recommend cooking one roll at a time on the stone, but you can bake both at the same time on the sheet.
8 Bake logs until crusts turn a light golden brown, which will take about 10 – 12 minutes.
9 Remove logs from your pizza stone and let cool on a rack until you are able to handle them.
10 Cut each log into 9 rolls. Serve them warm.
MAKING A PIZZA 1 Preheat a pizza stone in the middle rack of your
oven to 550°F. If you don’t have a pizza stone, you can bake your pizza on a baking sheet; however, the crust will not get as crispy on the bottom. Do not preheat the baking sheet.
2 Lightly flour a clean surface. Knead, stretch and roll a dough ball until you reach your desired pizza crust size.
3 Spread a thin coating of tomato sauce over your dough, leaving about 1 inch on the edge of the dough uncovered.
4 Top dough with your choice of toppings. For best results, we recommend not using too many toppings, as your pizza can get heavy and soggy.
5 Place your pizza on a lightly floured baker’s peel (or lightly floured underside of a baking sheet) and carefully transfer your pizza to the pizza stone. Bake until your crust is golden brown and your toppings are hot, about 7 – 10 minutes.
SKILL REQUIRED
I N G R E D I E N T S
• P I Z Z A D O U G H
4 cups double zero (00) flour
1 cup bread flour
1 tbsp salt
1 tsp instant yeast
3 cups warm water (100 – 110°F)
1 tbsp extra-virgin olive oil
1 V cups double zero (00) flour
• P I Z Z A B I T E S
1 dough ball
V cup store- bought or homemade pizza sauce
1 cup shredded mozzarella cheese
6 slices good- quality pepperoni
1 tbsp extra-virgin olive oil
COOK’S NOTEYou can also use
your barbecue to bake pizza. With the stone on the grill,
preheat your barbecue to 500 – 600°F and bake the pizza with
the lid down.
COOK’S NOTEDouble zero (00) flour refers to Italian-milled flour with a very
fine grind. If using for pizza-making, it results in a light airy dough that, when baked, has a
crispy crust. It can be substituted with bread flour, but the pizza might be chewier when baked.
How to Make Pizza on a Barbeque
How to Stretch Pizza Dough
14

1 Refer to recipe for flouring directions when kneading. Turn dough onto counter.
4 Use the heel of the your hand to press the dough together.
2 Lift one side of the dough. 3 Fold the dough in half.
Kneading
5 You can also use both hands to knead. Repeat folding and pressing, occasionally rotating the dough.
1 Tuck the edges of the dough underneath to create a smooth round top.
4 The dough should be able to move within your hand.
2 Pinch the bottom together.
6 When finished, the bottom should look like this.
Buns
5 The dough should stick a little to the counter; if it keeps sliding apply a small amount of water onto the counter.
3 Place the dough round side up and, with a light grip, roll dough on the counter.
Cinnamon Buns
1 Start by unrolling the edge of the roll.
3 Tightly pull the end back around the bun.
5 Hold the bun gently around the sides.
2 Unpeel about 2 – 3 inches of the roll.
4 Pull the end to the bottom of the bun.
6 Press the layers up into the bun through the bottom.
15
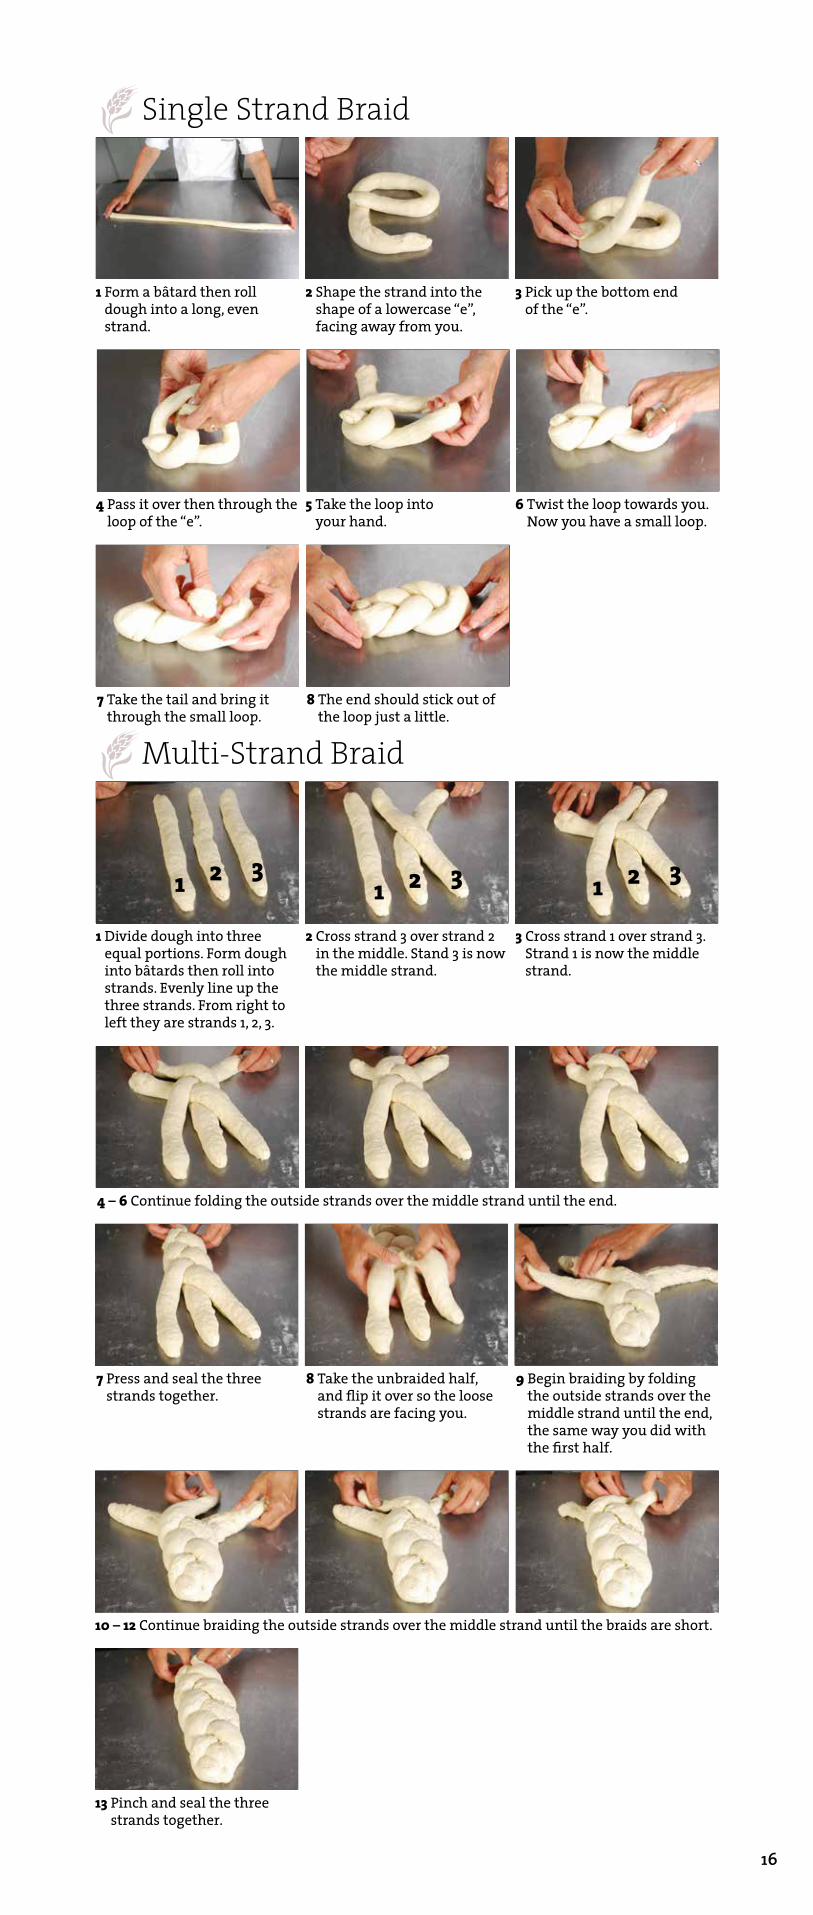
Multi-Strand Braid
1 Divide dough into three equal portions. Form dough into bâtards then roll into strands. Evenly line up the three strands. From right to left they are strands 1, 2, 3.
2 Cross strand 3 over strand 2 in the middle. Stand 3 is now the middle strand.
7 Press and seal the three strands together.
9 Begin braiding by folding the outside strands over the middle strand until the end, the same way you did with the first half.
3 Cross strand 1 over strand 3. Strand 1 is now the middle strand.
8 Take the unbraided half, and flip it over so the loose strands are facing you.
4 – 6 Continue folding the outside strands over the middle strand until the end.
10 – 12 Continue braiding the outside strands over the middle strand until the braids are short.
13 Pinch and seal the three strands together.
1 1 12 2 23 3 3
1 Form a bâtard then roll dough into a long, even strand.
4 Pass it over then through the loop of the “e”.
7 Take the tail and bring it through the small loop.
2 Shape the strand into the shape of a lowercase “e”, facing away from you.
3 Pick up the bottom end of the “e”.
6 Twist the loop towards you. Now you have a small loop.
Single Strand Braid
5 Take the loop into your hand.
8 The end should stick out of the loop just a little.
16

1 Shape the dough into a rough rectangle or square.
4 Loosely roll dough in small circles on the counter.
2 Fold the four corners under to form a round top.
3 Gently cup the dough ball in your hands.
6 Dust the dough with flour and place the dough seam side up in a bowl.
Shaping Your Boule
5 Prepare the bowl by dusting with flour.
Inverting Your Boule
1 Gently place your hand over boule.
2 Carefully invert boule onto a floured baker’s peel.
3 Carefully remove the bowl from the boule.
Scoring Your Boule, Scissor Method
1 Using clean kitchen shears, make small cuts into the surface of the dough. The cuts should be about 1 inch wide and V inch deep.
3 Cut a smaller circle inside the first circle you made.
2 Cut all around the circumference of the boule.
Scoring Your Boule, Lame or Knife Method
1 Using a lame or a sharp knife, cut four lines into the surface of the dough.
2 The cuts should be about W – V inch into the dough, nothing too deep.
3 When finished, the surface should look similar to this pattern.
4 If desired, cut 2 – 3 more cuts in the centre of the smaller circle.
5 When finished, the surface should look similar to this pattern.
17

Bâtard or Bâtard Loaf
1 Using finger tips, gently flatten and stretch dough into a small rectangle.
4 Fold the top edge in to the centre.
2 Fold the bottom edge to the centre.
5 Press both seams down.
7 Pinch to seal the folded edge.
3 Press down firmly along the folded centre edge.
6 Fold the dough in half.
8 For a bâtard loaf: transfer bâtard seam side down into a loaf pan or on a baking sheet.
18
Here’s a list of speciality items that we use when making our bread recipes. If you’re missing an item below, an alternative is likely to be found in your kitchen.
• Bench Scraper For bread baking, we find bench scrapers are handy when dividing dough as they won’t damage counter tops. It is also a quick and efficient way to scrape your counters clean, helping you get all that flour and sticky dough off. If it’s a sticky or messy job, we even use this tool when kneading to help lift and fold the dough. Bench scrapers are relatively inexpensive and a versatile tool to have in the kitchen. In some cases, you can substitute a bench scraper with a sharp knife (for example, when you’re dividing dough.)
• Food Scale Food scales can serve multiple purposes in the kitchen. For this book, we use one to evenly portion out dough. If you’re a perfectionist, we highly recommend this tool for dividing dough into balls for buns or strands to braid. If you’re not concerned with having exactly even pieces, then it is perfectly acceptable to roughly estimate and divide your dough.
• Pizza Stone We recommend using a pizza stone to bake your Multigrain Boules, Pita Bread, and Pepperoni Pizza Bites because you get instant heat when they’re set on the stone. A baking sheet can be used whenever we say to use a pizza stone in the oven, but the bread won’t achieve that crisp bottom we are looking for.
• Bamboo or Metal Basket Steamer A bamboo steamer is a cooking tray with a slatted bamboo bottom that allows steam to circulate and gently cook food. Bamboo steamers are most commonly found in cookware stores. We used a bamboo steamer for our Slider Steamed Buns and Steamed Pork Buns, but a regular metal steamer basket will work just as well. Due to the low initial amount of water in some standing basket steamers, you may find that you need to add water more often than steamers held up by a Dutch oven.
• Tulip Papers Instead of a cylindrical panettone pan, we use tulip papers in a regular muffin pan for our Individual Panettones. They are like parchment paper muffin paper cups, but much taller and not crinkled on the sides, which help to keep the panettones from spilling out. These can be found in large grocery stores, typically where the other muffin cups are kept.
• Parchment Paper We go through a lot of parchment paper when making bread. It prevents doughs from sticking to baking sheets so we don’t have to add more oil. Most brands of parchment paper can be used up to 420°F without burning. Wax paper is not a substitute for parchment paper in baking, as it can burn even at low temperatures. If it’s in good condition, you can store and reuse parchment paper after baking loaves. You may be able to do without parchment paper, but it’s one item we find ourselves constantly reaching for.
• Kitchen Shears A clean pair of kitchen shears are used for scoring our Multigrain Boules and shaping our Pains d’Épis. There are other tools (such as a bread lame) that can be used for scoring loaves, but they are not good for shaping baguettes into wheat stalks. On the other hand, shaping the Pains d’Épis isn’t required for baking so if you are missing shears, you can definitely still make this recipe.
• Bread Lame Pronounced LAHM, which means “blade” in French, it’s a tool with a sharp blade used to score the surface of bread. If you don’t own one, you can use a new single-edged razor blade or a sharp knife to achieve the same effect. Just watch out for your fingers!
• Baker’s Peel Believe it or not, peels are not only handy when making pizza. We recommend it for making pizza and Pepperoni Pizza Bites, but we also use this tool for our Multigrain Boules. It makes sliding the dough on and off the pizza stone easy and keeps your hands away from the heat. If you don’t have one, simply use the underside of a baking sheet. Whether using a baker’s peel or a baking sheet, be sure to dust it with flour or cornmeal beforehand for easy dough release.
• Serrated Bread Knife Serrated knives are best for cutting through the crust of breads. Soft breads are sliced without being squished by the knife and crusty breads get a clean edge without losing too much of their golden exterior. Wash your knives by hand in hot soapy water to prevent dulling and rusting in the dishwasher.
Tools/Equipment
19

Bakers often use many foreign terms that sprinkle their already colourful “baking language”. Let us simplify things for you by giving you a straightforward glossary of words used in this book.
• Bâtard Pronounced bah-TAHRD, a bâtard is an oval or oblong–shaped loaf of bread.
• Boule Pronounced BOOL, the word means “ball” in French. In bread baking, it’s a round–shaped loaf of bread.
• Brioche Pronounced BREE-ohsh, it’s a rich dough that contains eggs, butter, sugar or cream. Brioche typically has a buttery or slightly sweet flavour.
• Fermenting Simply put, it is the breakdown of sugar by yeast into gas (carbon dioxide) and alcohol. Generally, baker’s use it to refer to the first rise of dough. This reaction causes your dough to rise and also adds flavour to your bread.
• Poolish A poolish, like a sponge, is a type of pre-fermentation used to add depth of flavour to bread. It is a wet, batter-like mixture of yeast and equal parts water and flour. Salt is not added to a poolish, as it can inhibit growth of yeast. To make a poolish, some dough ingredients are mixed together and allowed to sit at room temperature, usually overnight, to break down sugars and develop flavour. Pre-fermentations can help soften ingredients and allow yeast to be more evenly distributed throughout the dough.
• Proofing Generally, “proofing” is used to describe the second rise of dough that occurs after shaping, but it can also mean the initial activation of commercial yeast with warm water. “Proofing” and “fermenting” are interchangeable words, as the yeast feeds off sugars, causing the shaped dough to rise.
• Scoring/Slashing/Slitting All of these terms refer to when you cut markings on the surface of the dough to control the expansion of the loaves. By scoring, you allow the steam to escape during baking and can control the appearance of the final product.
• Soaker A soaker is the hydration of whole grains in water before they are added to the dough. This can help develop flavour, because grains will release their sugars.
• Sponge A sponge, like a poolish, is a type of pre-fermentation. It differs from a poolish because it appears to be stiffer and has less liquid. Salt is not added to a sponge, as it can inhibit growth of yeast. To make a sponge, some dough ingredients are mixed together and allowed to sit at room temperature, usually overnight, to break down sugars and develop flavour. Pre-fermentations can help soften ingredients and allow yeast to be more evenly distributed throughout the dough.
Glossary
20