knitting for beginners - · pdf file28/5/2015 · knitting for beginners lesson plan...
TRANSCRIPT
SENECA COLLEGE
Knitting for Beginners Lesson Plan
Jacky Moran
5/28/2015
For: Ash Patel
HST860NUU
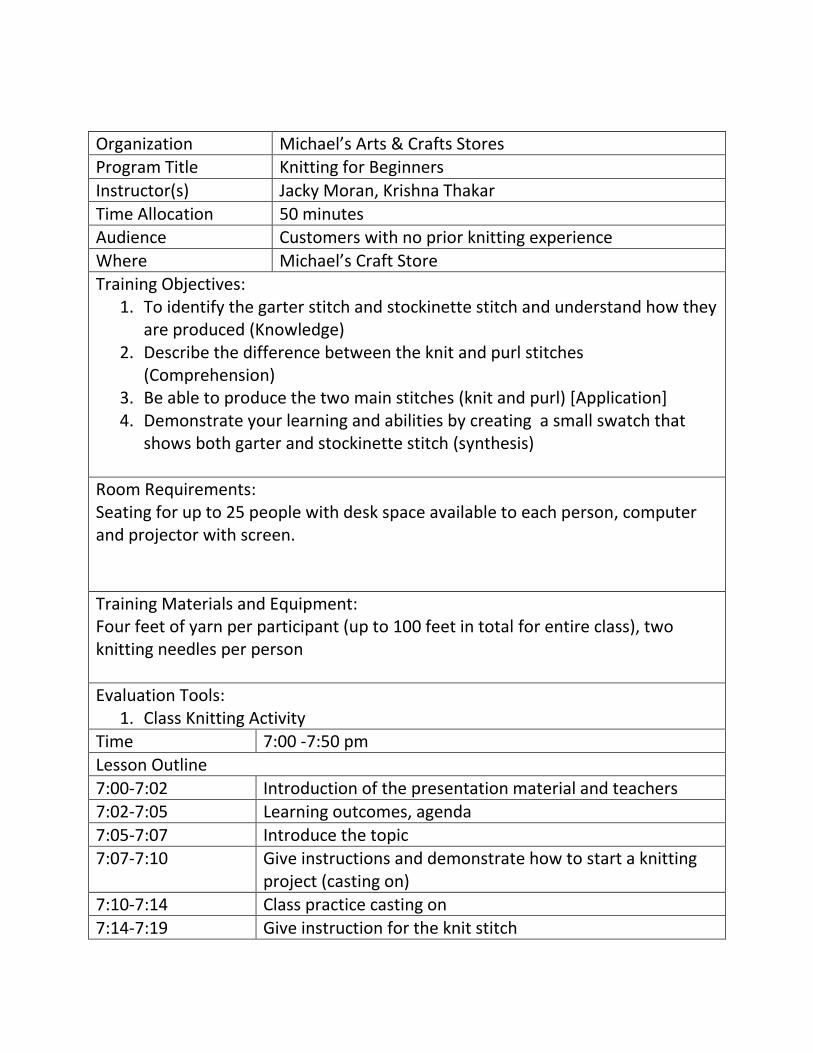
Organization Michael’s Arts & Crafts Stores Program Title Knitting for Beginners
Instructor(s) Jacky Moran, Krishna Thakar
Time Allocation 50 minutes Audience Customers with no prior knitting experience
Where Michael’s Craft Store Training Objectives:
1. To identify the garter stitch and stockinette stitch and understand how they are produced (Knowledge)
2. Describe the difference between the knit and purl stitches (Comprehension)
3. Be able to produce the two main stitches (knit and purl) [Application] 4. Demonstrate your learning and abilities by creating a small swatch that
shows both garter and stockinette stitch (synthesis)
Room Requirements: Seating for up to 25 people with desk space available to each person, computer and projector with screen.
Training Materials and Equipment: Four feet of yarn per participant (up to 100 feet in total for entire class), two knitting needles per person Evaluation Tools:
1. Class Knitting Activity Time 7:00 -7:50 pm
Lesson Outline
7:00-7:02 Introduction of the presentation material and teachers 7:02-7:05 Learning outcomes, agenda
7:05-7:07 Introduce the topic 7:07-7:10 Give instructions and demonstrate how to start a knitting
project (casting on) 7:10-7:14 Class practice casting on
7:14-7:19 Give instruction for the knit stitch
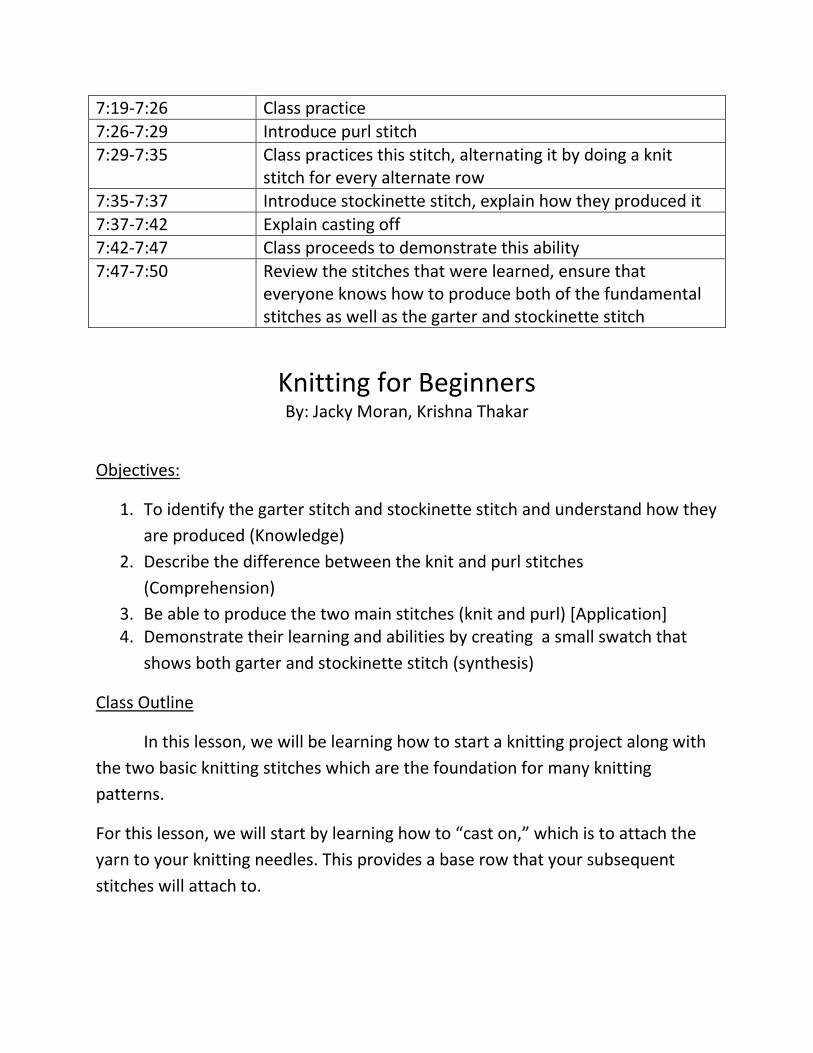
7:19-7:26 Class practice
7:26-7:29 Introduce purl stitch 7:29-7:35 Class practices this stitch, alternating it by doing a knit
stitch for every alternate row 7:35-7:37 Introduce stockinette stitch, explain how they produced it
7:37-7:42 Explain casting off 7:42-7:47 Class proceeds to demonstrate this ability
7:47-7:50 Review the stitches that were learned, ensure that everyone knows how to produce both of the fundamental stitches as well as the garter and stockinette stitch
Knitting for Beginners By: Jacky Moran, Krishna Thakar
Objectives:
1. To identify the garter stitch and stockinette stitch and understand how they
are produced (Knowledge)
2. Describe the difference between the knit and purl stitches
(Comprehension)
3. Be able to produce the two main stitches (knit and purl) [Application] 4. Demonstrate their learning and abilities by creating a small swatch that
shows both garter and stockinette stitch (synthesis)
Class Outline
In this lesson, we will be learning how to start a knitting project along with
the two basic knitting stitches which are the foundation for many knitting
patterns.
For this lesson, we will start by learning how to “cast on,” which is to attach the
yarn to your knitting needles. This provides a base row that your subsequent
stitches will attach to.
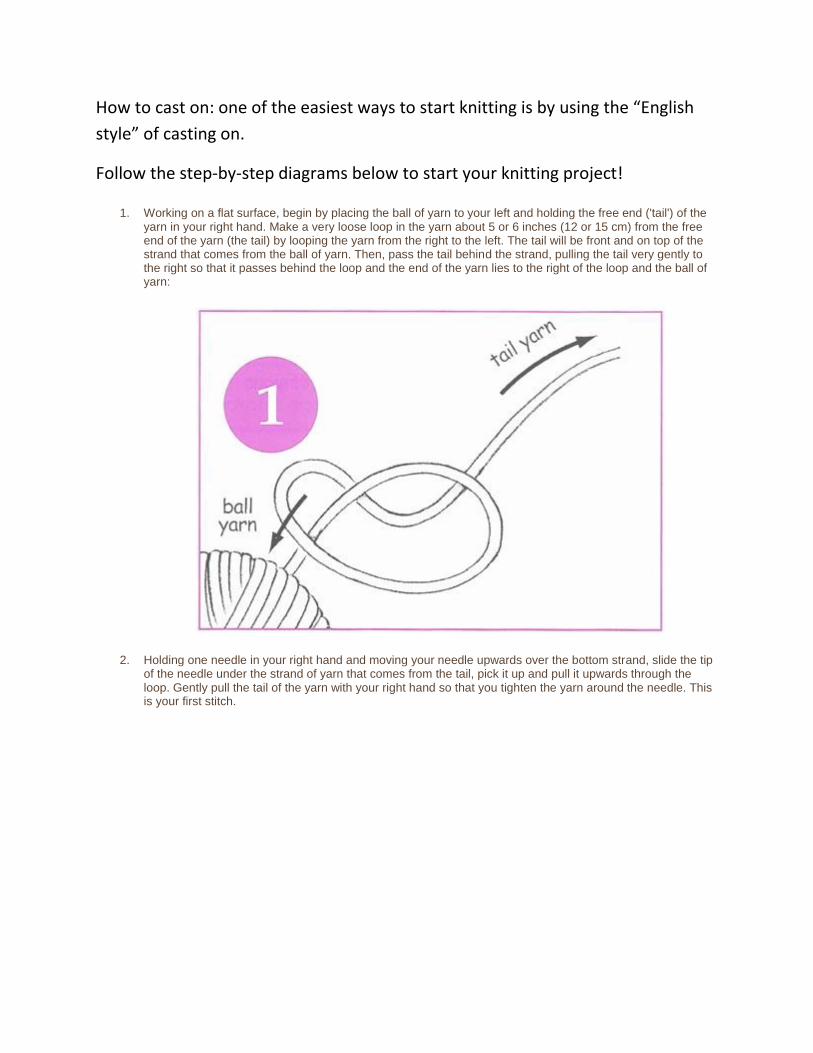
How to cast on: one of the easiest ways to start knitting is by using the “English
style” of casting on.
Follow the step-by-step diagrams below to start your knitting project!
1. Working on a flat surface, begin by placing the ball of yarn to your left and holding the free end ('tail') of the yarn in your right hand. Make a very loose loop in the yarn about 5 or 6 inches (12 or 15 cm) from the free end of the yarn (the tail) by looping the yarn from the right to the left. The tail will be front and on top of the strand that comes from the ball of yarn. Then, pass the tail behind the strand, pulling the tail very gently to the right so that it passes behind the loop and the end of the yarn lies to the right of the loop and the ball of yarn:
2. Holding one needle in your right hand and moving your needle upwards over the bottom strand, slide the tip of the needle under the strand of yarn that comes from the tail, pick it up and pull it upwards through the loop. Gently pull the tail of the yarn with your right hand so that you tighten the yarn around the needle. This is your first stitch.
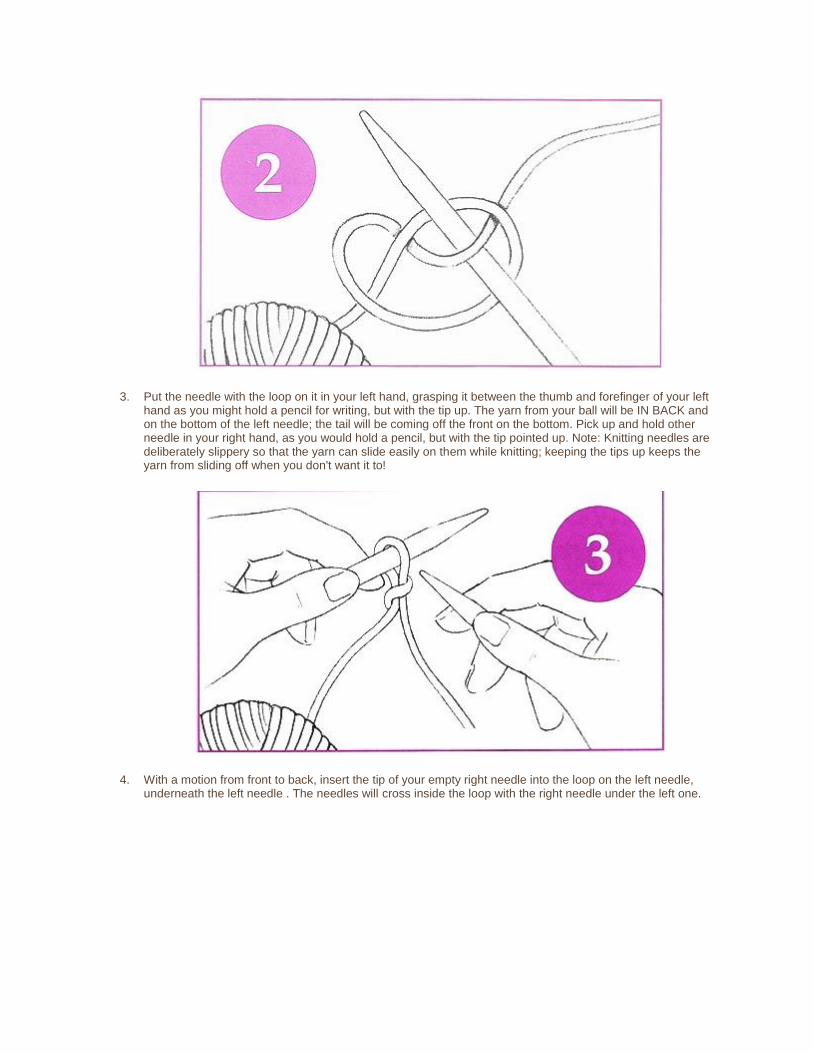
3. Put the needle with the loop on it in your left hand, grasping it between the thumb and forefinger of your left hand as you might hold a pencil for writing, but with the tip up. The yarn from your ball will be IN BACK and on the bottom of the left needle; the tail will be coming off the front on the bottom. Pick up and hold other needle in your right hand, as you would hold a pencil, but with the tip pointed up. Note: Knitting needles are deliberately slippery so that the yarn can slide easily on them while knitting; keeping the tips up keeps the yarn from sliding off when you don't want it to!
4. With a motion from front to back, insert the tip of your empty right needle into the loop on the left needle, underneath the left needle . The needles will cross inside the loop with the right needle under the left one.
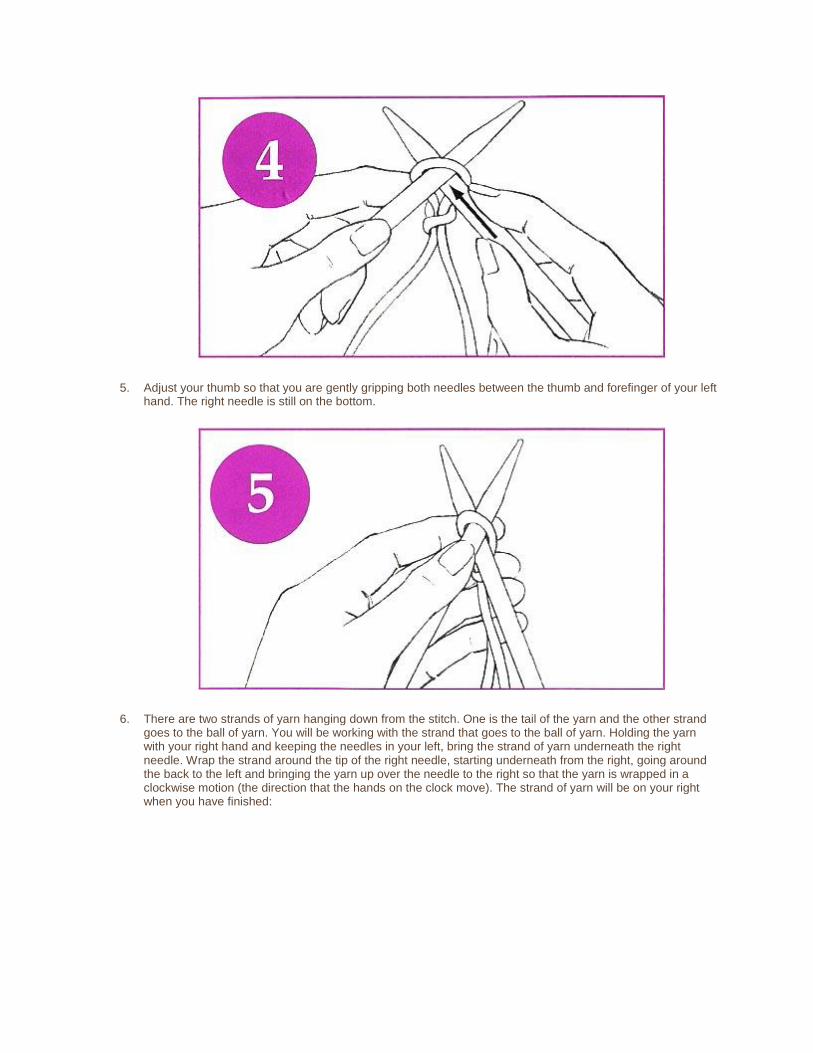
5. Adjust your thumb so that you are gently gripping both needles between the thumb and forefinger of your left hand. The right needle is still on the bottom.
6. There are two strands of yarn hanging down from the stitch. One is the tail of the yarn and the other strand goes to the ball of yarn. You will be working with the strand that goes to the ball of yarn. Holding the yarn with your right hand and keeping the needles in your left, bring the strand of yarn underneath the right needle. Wrap the strand around the tip of the right needle, starting underneath from the right, going around the back to the left and bringing the yarn up over the needle to the right so that the yarn is wrapped in a clockwise motion (the direction that the hands on the clock move). The strand of yarn will be on your right when you have finished:
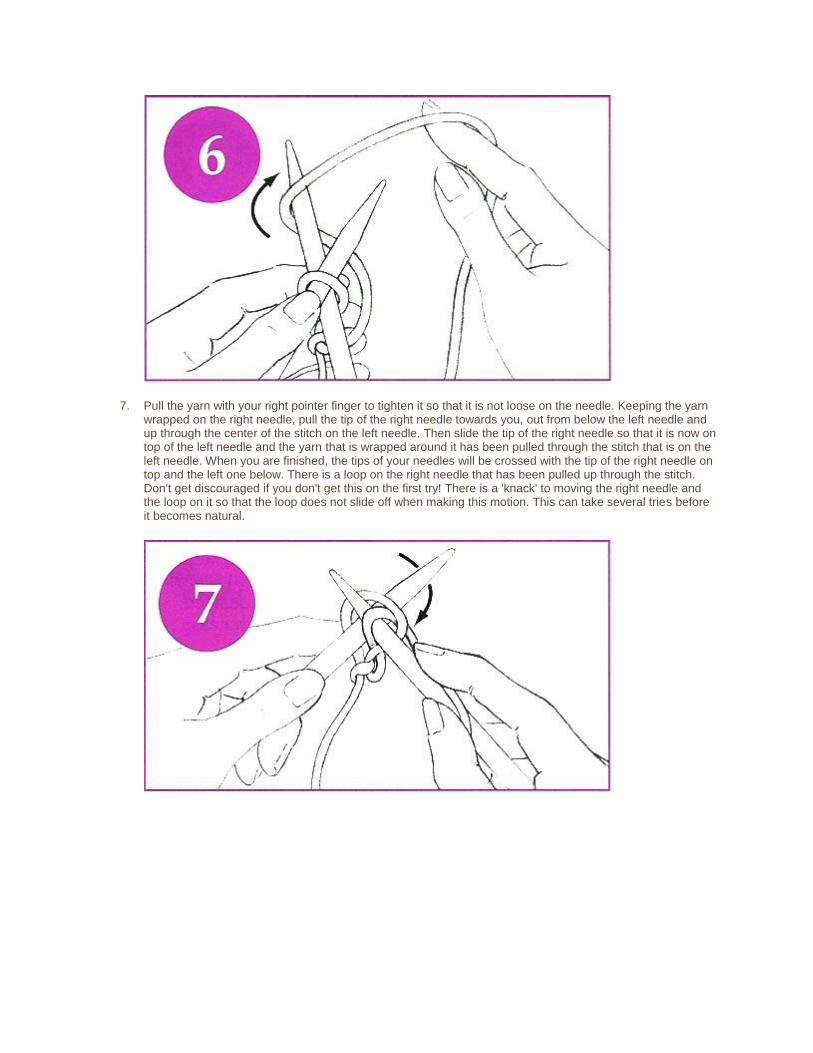
7. Pull the yarn with your right pointer finger to tighten it so that it is not loose on the needle. Keeping the yarn wrapped on the right needle, pull the tip of the right needle towards you, out from below the left needle and up through the center of the stitch on the left needle. Then slide the tip of the right needle so that it is now on top of the left needle and the yarn that is wrapped around it has been pulled through the stitch that is on the left needle. When you are finished, the tips of your needles will be crossed with the tip of the right needle on top and the left one below. There is a loop on the right needle that has been pulled up through the stitch. Don't get discouraged if you don't get this on the first try! There is a 'knack' to moving the right needle and the loop on it so that the loop does not slide off when making this motion. This can take several tries before it becomes natural.
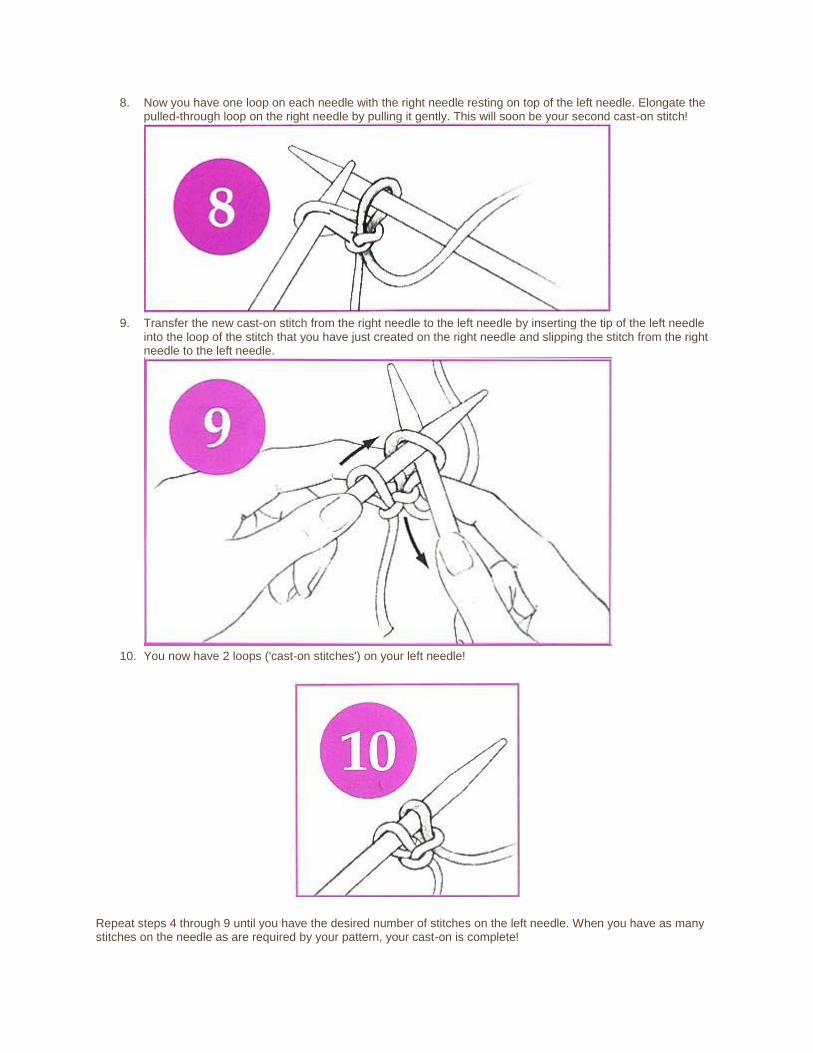
8. Now you have one loop on each needle with the right needle resting on top of the left needle. Elongate the pulled-through loop on the right needle by pulling it gently. This will soon be your second cast-on stitch!
9. Transfer the new cast-on stitch from the right needle to the left needle by inserting the tip of the left needle
into the loop of the stitch that you have just created on the right needle and slipping the stitch from the right needle to the left needle.
10. You now have 2 loops ('cast-on stitches') on your left needle!
Repeat steps 4 through 9 until you have the desired number of stitches on the left needle. When you have as many stitches on the needle as are required by your pattern, your cast-on is complete!
This needle that now carries all of your stitches is called your main needle and
while knitting it is held in your left hand. In your right hand is the working needle,
the needle which will affix new stitches to your piece. Once you have attached a
new stitch to all of the stitches on the main needle, and the main needle is empty,
the working needle (which is now full of all the new rows and stitches) is
transferred into your left hand and becomes your new main needle. The other
needle then becomes your new working needle.
Creating the knit stitch:
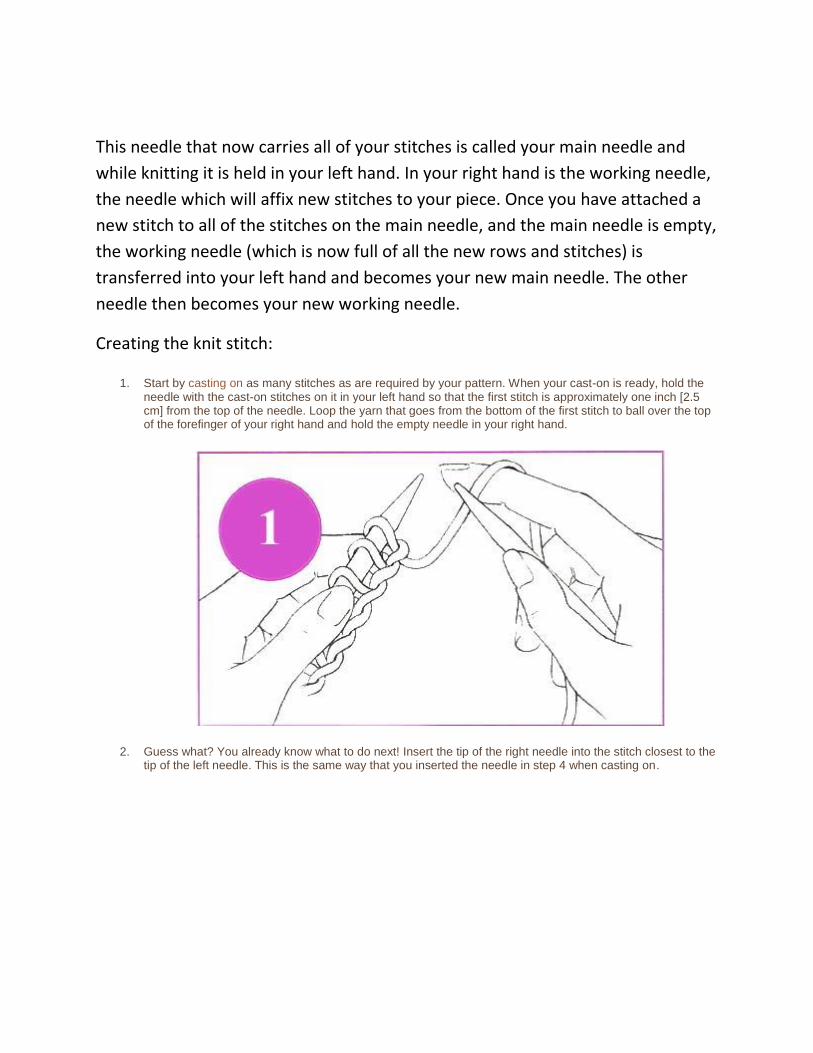
1. Start by casting on as many stitches as are required by your pattern. When your cast-on is ready, hold the needle with the cast-on stitches on it in your left hand so that the first stitch is approximately one inch [2.5 cm] from the top of the needle. Loop the yarn that goes from the bottom of the first stitch to ball over the top of the forefinger of your right hand and hold the empty needle in your right hand.
2. Guess what? You already know what to do next! Insert the tip of the right needle into the stitch closest to the tip of the left needle. This is the same way that you inserted the needle in step 4 when casting on.
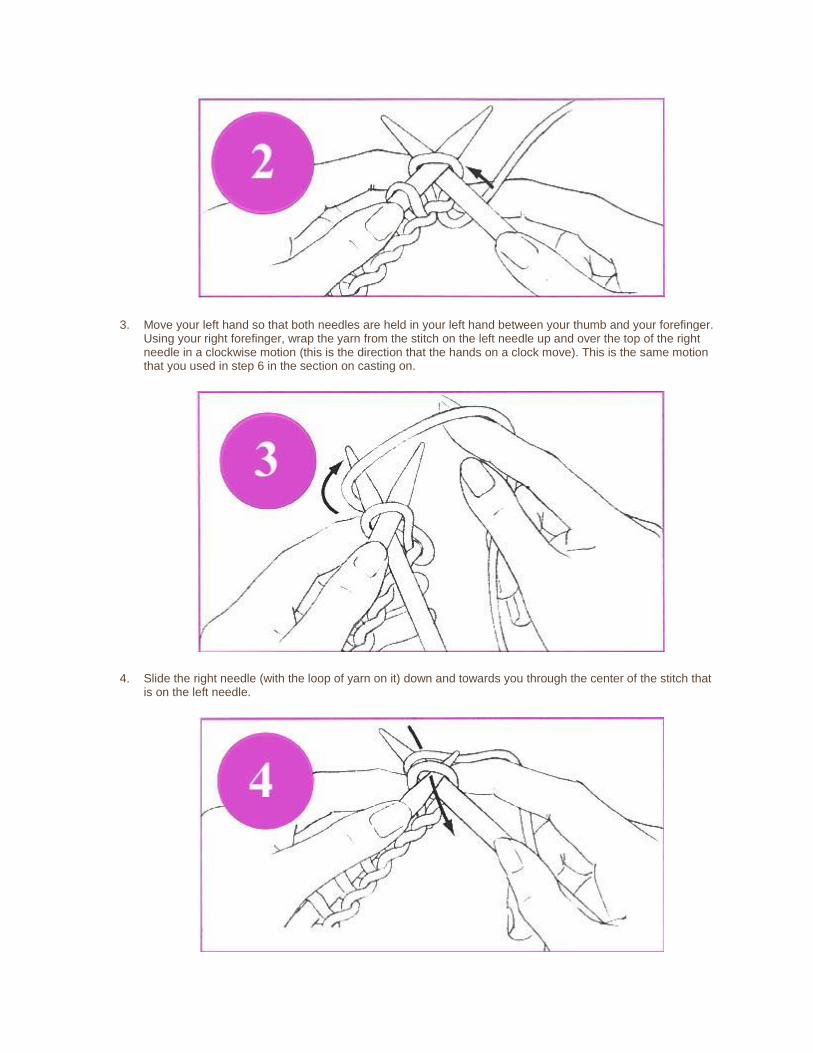
3. Move your left hand so that both needles are held in your left hand between your thumb and your forefinger. Using your right forefinger, wrap the yarn from the stitch on the left needle up and over the top of the right needle in a clockwise motion (this is the direction that the hands on a clock move). This is the same motion that you used in step 6 in the section on casting on.
4. Slide the right needle (with the loop of yarn on it) down and towards you through the center of the stitch that is on the left needle.
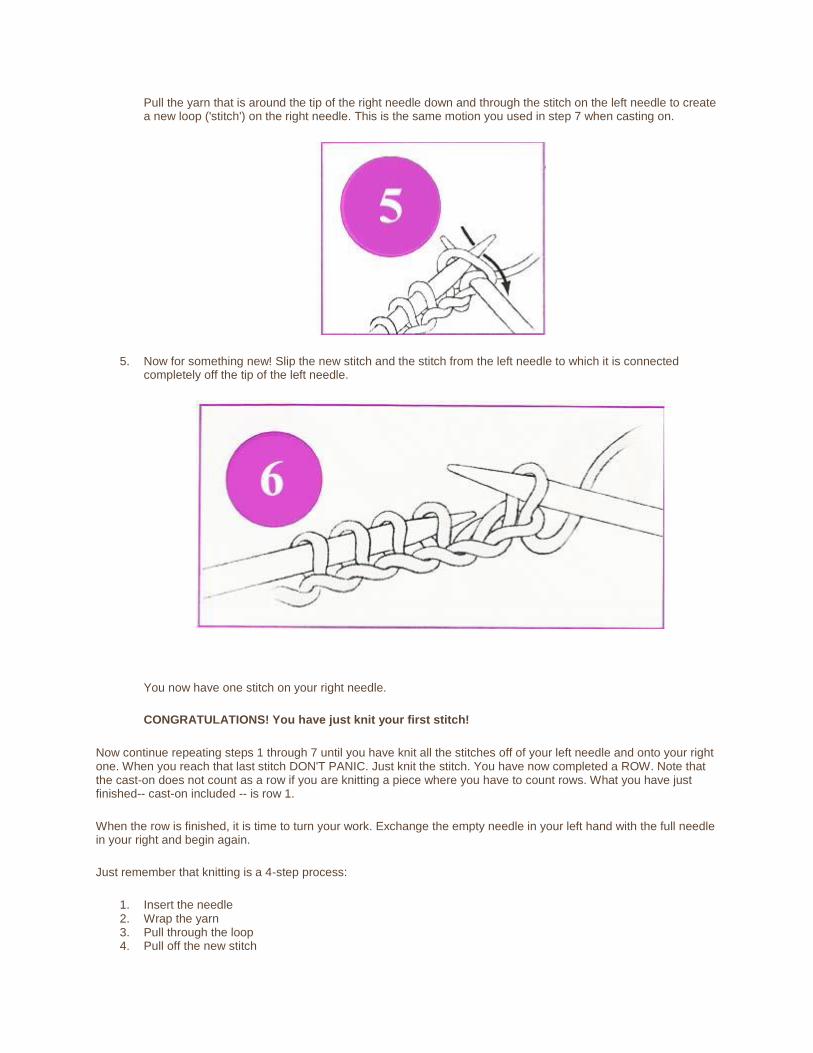
Pull the yarn that is around the tip of the right needle down and through the stitch on the left needle to create a new loop ('stitch') on the right needle. This is the same motion you used in step 7 when casting on.
5. Now for something new! Slip the new stitch and the stitch from the left needle to which it is connected completely off the tip of the left needle.
You now have one stitch on your right needle.
CONGRATULATIONS! You have just knit your first stitch!
Now continue repeating steps 1 through 7 until you have knit all the stitches off of your left needle and onto your right one. When you reach that last stitch DON'T PANIC. Just knit the stitch. You have now completed a ROW. Note that the cast-on does not count as a row if you are knitting a piece where you have to count rows. What you have just finished-- cast-on included -- is row 1.
When the row is finished, it is time to turn your work. Exchange the empty needle in your left hand with the full needle in your right and begin again.
Just remember that knitting is a 4-step process:
1. Insert the needle 2. Wrap the yarn 3. Pull through the loop 4. Pull off the new stitch
Now that we know how to create the knit stitch, let’s practice by making a few
rows.
(7 minute break to allow students to practice)
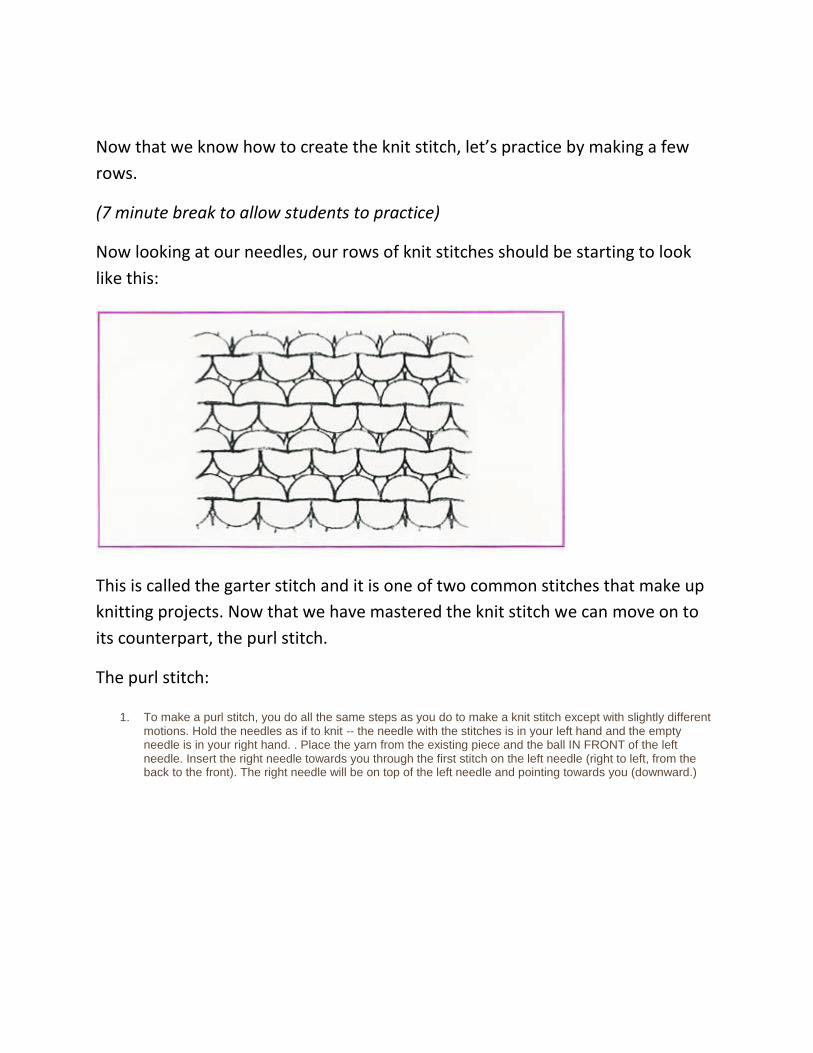
Now looking at our needles, our rows of knit stitches should be starting to look
like this:
This is called the garter stitch and it is one of two common stitches that make up
knitting projects. Now that we have mastered the knit stitch we can move on to
its counterpart, the purl stitch.
The purl stitch:
1. To make a purl stitch, you do all the same steps as you do to make a knit stitch except with slightly different motions. Hold the needles as if to knit -- the needle with the stitches is in your left hand and the empty needle is in your right hand. . Place the yarn from the existing piece and the ball IN FRONT of the left needle. Insert the right needle towards you through the first stitch on the left needle (right to left, from the back to the front). The right needle will be on top of the left needle and pointing towards you (downward.)
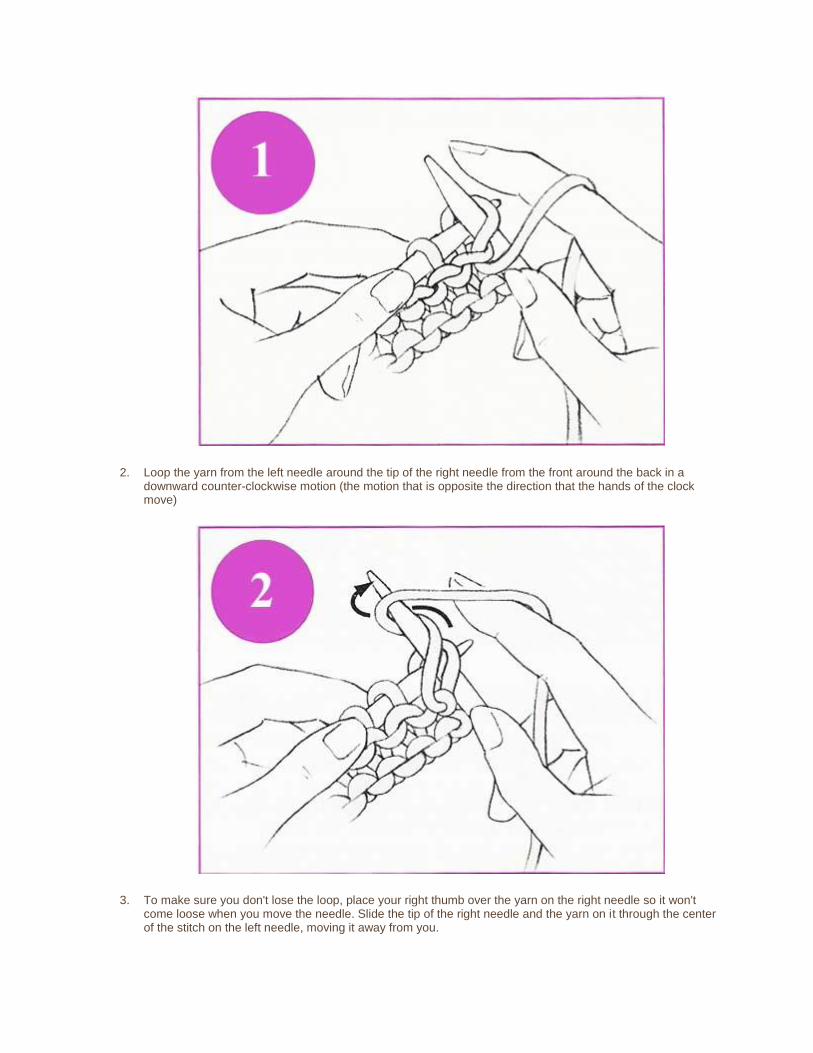
2. Loop the yarn from the left needle around the tip of the right needle from the front around the back in a downward counter-clockwise motion (the motion that is opposite the direction that the hands of the clock move)
3. To make sure you don't lose the loop, place your right thumb over the yarn on the right needle so it won't come loose when you move the needle. Slide the tip of the right needle and the yarn on it through the center of the stitch on the left needle, moving it away from you.

4. With the tip of the right needle, pull the new loop off the tip of the left needle.
5. You now have a stitch on your right needle.
Continue making your row of purl stitches, but this time instead of purling all our
rows; let’s alternate each row by purling one and knitting the next.
(5 minute break to allow this exercise)
Examining our work so far, it should resemble this picture:
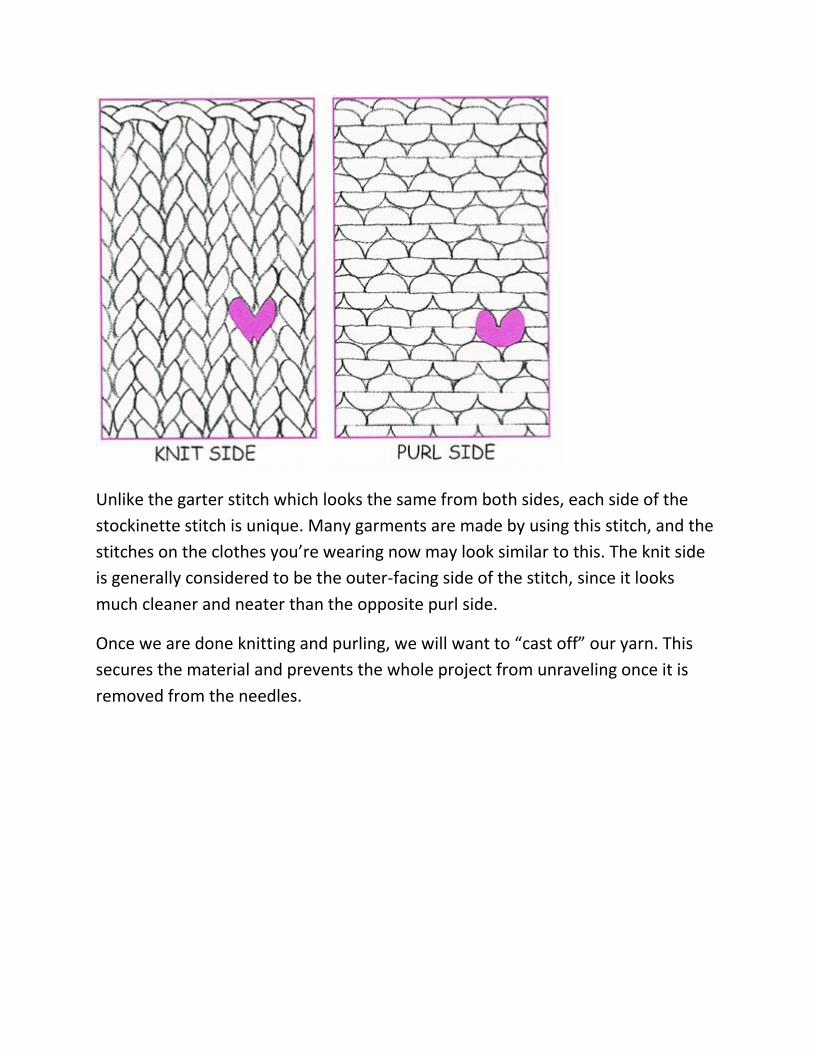
Unlike the garter stitch which looks the same from both sides, each side of the
stockinette stitch is unique. Many garments are made by using this stitch, and the
stitches on the clothes you’re wearing now may look similar to this. The knit side
is generally considered to be the outer-facing side of the stitch, since it looks
much cleaner and neater than the opposite purl side.
Once we are done knitting and purling, we will want to “cast off” our yarn. This
secures the material and prevents the whole project from unraveling once it is
removed from the needles.
How to cast off:
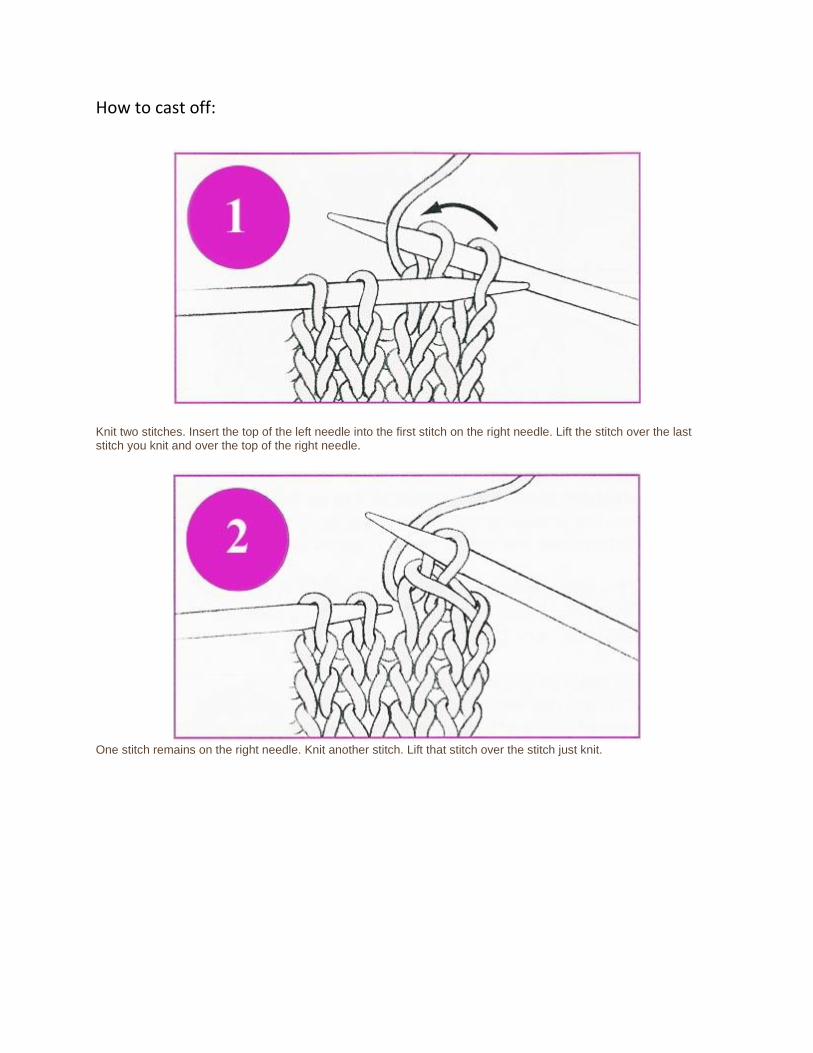
Knit two stitches. Insert the top of the left needle into the first stitch on the right needle. Lift the stitch over the last stitch you knit and over the top of the right needle.
One stitch remains on the right needle. Knit another stitch. Lift that stitch over the stitch just knit.
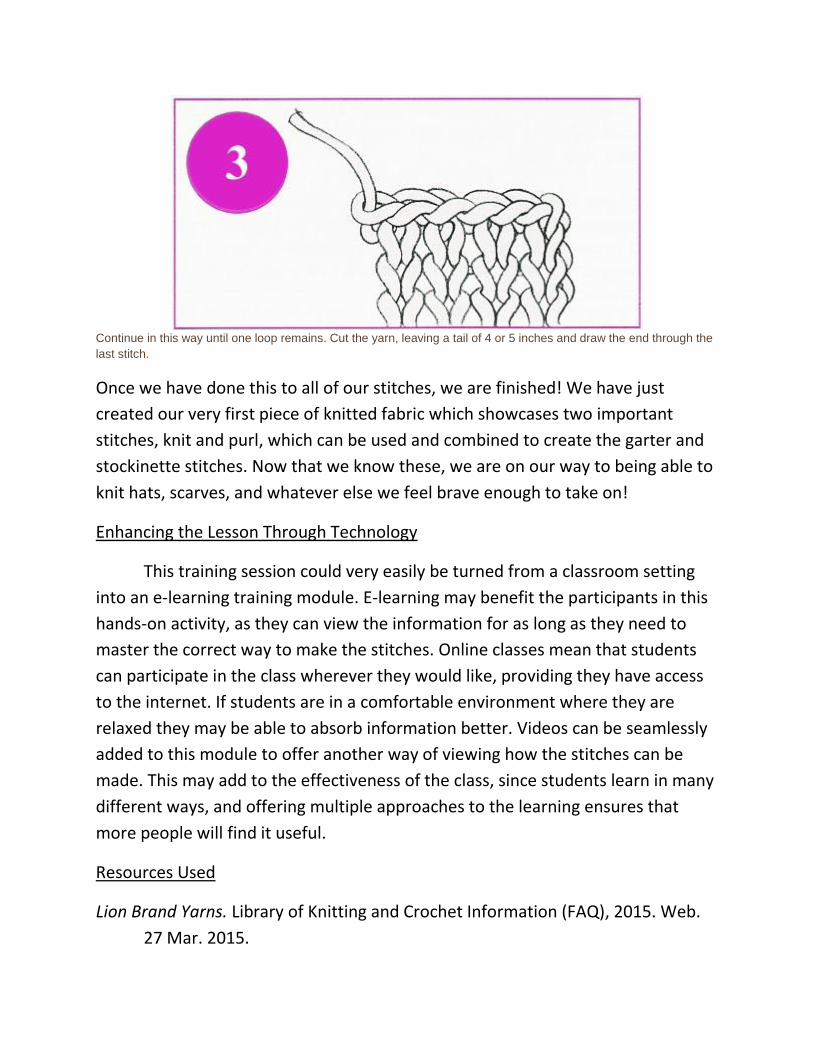
Continue in this way until one loop remains. Cut the yarn, leaving a tail of 4 or 5 inches and draw the end through the
last stitch.
Once we have done this to all of our stitches, we are finished! We have just
created our very first piece of knitted fabric which showcases two important
stitches, knit and purl, which can be used and combined to create the garter and
stockinette stitches. Now that we know these, we are on our way to being able to
knit hats, scarves, and whatever else we feel brave enough to take on!
Enhancing the Lesson Through Technology
This training session could very easily be turned from a classroom setting
into an e-learning training module. E-learning may benefit the participants in this
hands-on activity, as they can view the information for as long as they need to
master the correct way to make the stitches. Online classes mean that students
can participate in the class wherever they would like, providing they have access
to the internet. If students are in a comfortable environment where they are
relaxed they may be able to absorb information better. Videos can be seamlessly
added to this module to offer another way of viewing how the stitches can be
made. This may add to the effectiveness of the class, since students learn in many
different ways, and offering multiple approaches to the learning ensures that
more people will find it useful.
Resources Used
Lion Brand Yarns. Library of Knitting and Crochet Information (FAQ), 2015. Web.
27 Mar. 2015.