knitting machine instructions & projects -...
TRANSCRIPT
No. 7590-08BConforms to ASTM-D4236
This product contains smallpieces not suitable for
children under 3 years old.Plastic needle possesses
functional sharp point
Ages 14 and up
Dear Customer,We hope you enjoy your Innovations™ Knitting Machine. If you find that we have made an error or if something is missing or damaged, let us know so that we can correct the problem for you. Please include the following information:
*Name of Item *Date of Purchase *Purchase Price (please include the sales slip)*Model number *Place of Purchase *Brief Description of problem
Do not return the kit to the store where you purchased it, they will not have the replacement parts!
Send all correspondence to: NSI International, Inc. You can call us at 105 Price Parkway (888) 425-9113Farmingdale, NY 11735-1318Attn: Quality Control Department
Knitting Machine Instructions & ProjectsVisit our website: www.nsiinnovations.com
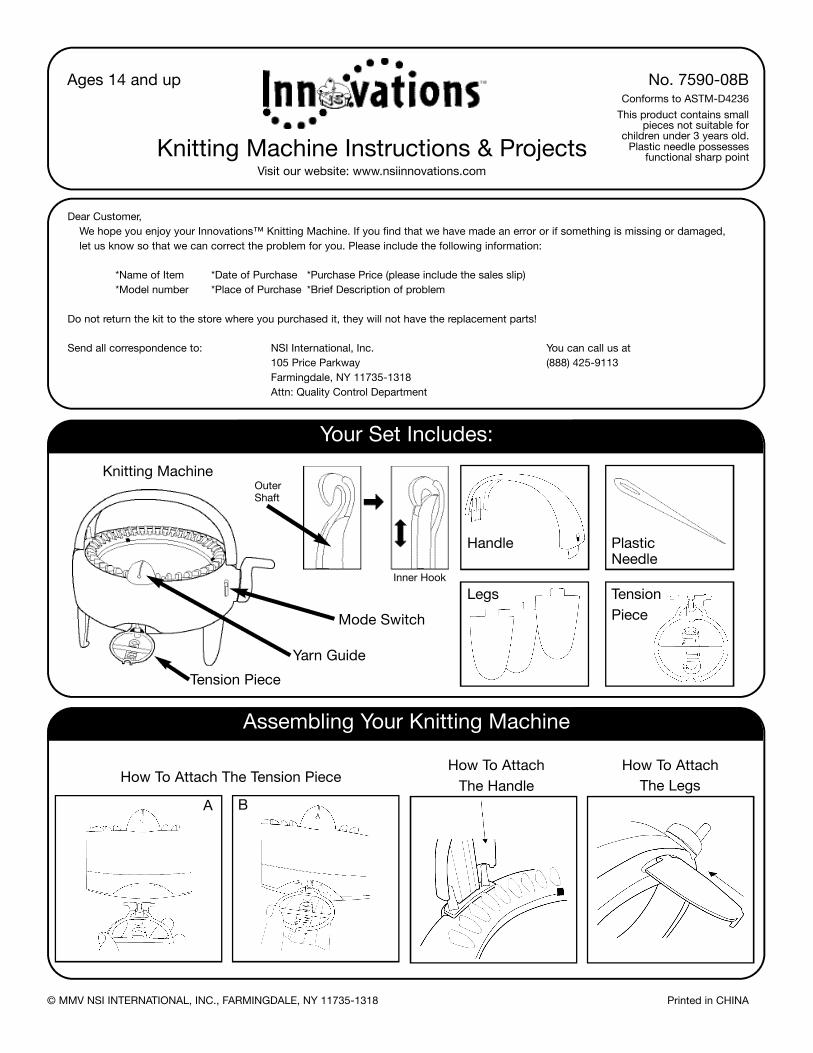
Assembling Your Knitting Machine
Legs
Handle PlasticNeedle
TensionPieceMode Switch
Yarn Guide
Your Set Includes:
Knitting Machine
How To Attach The Tension Piece
A B
How To AttachThe Handle
How To AttachThe Legs
Tension Piece
Inner Hook
Outer Shaft
© MMV NSI INTERNATIONAL, INC., FARMINGDALE, NY 11735-1318 Printed in CHINA
2
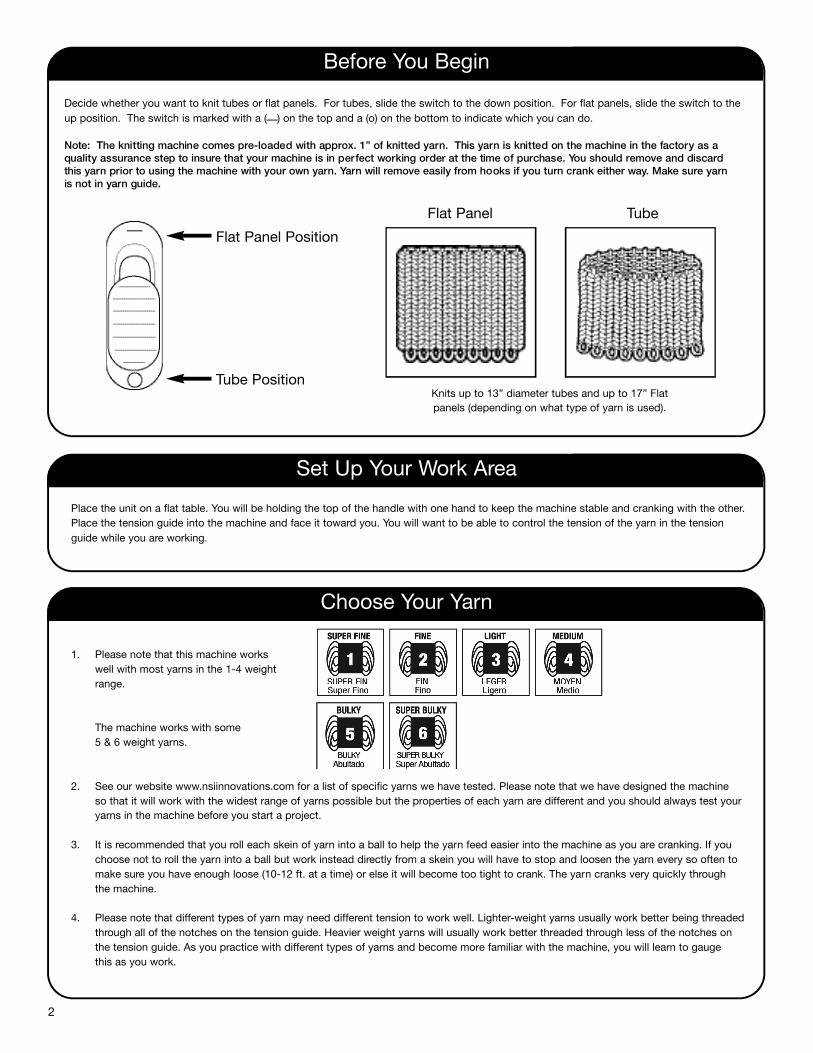
Decide whether you want to knit tubes or flat panels. For tubes, slide the switch to the down position. For flat panels, slide the switch to theup position. The switch is marked with a (––) on the top and a (o) on the bottom to indicate which you can do.
Note: The knitting machine comes pre-loaded with approx. 1” of knitted yarn. This yarn is knitted on the machine in the factory as a
quality assurance step to insure that your machine is in perfect working order at the time of purchase. You should remove and discard
this yarn prior to using the machine with your own yarn. Yarn will remove easily from hooks if you turn crank either way. Make sure yarn
is not in yarn guide.
Before You Begin
Set Up Your Work Area
Tube Position
Flat Panel Position
1. Please note that this machine works well with most yarns in the 1-4 weight range.
The machine works with some 5 & 6 weight yarns.
2. See our website www.nsiinnovations.com for a list of specific yarns we have tested. Please note that we have designed the machine so that it will work with the widest range of yarns possible but the properties of each yarn are different and you should always test youryarns in the machine before you start a project.
3. It is recommended that you roll each skein of yarn into a ball to help the yarn feed easier into the machine as you are cranking. If you choose not to roll the yarn into a ball but work instead directly from a skein you will have to stop and loosen the yarn every so often to make sure you have enough loose (10-12 ft. at a time) or else it will become too tight to crank. The yarn cranks very quickly through the machine.
4. Please note that different types of yarn may need different tension to work well. Lighter-weight yarns usually work better being threadedthrough all of the notches on the tension guide. Heavier weight yarns will usually work better threaded through less of the notches on the tension guide. As you practice with different types of yarns and become more familiar with the machine, you will learn to gauge this as you work.
Choose Your Yarn
Flat Panel Tube
Knits up to 13” diameter tubes and up to 17” Flat panels (depending on what type of yarn is used).
Place the unit on a flat table. You will be holding the top of the handle with one hand to keep the machine stable and cranking with the other.Place the tension guide into the machine and face it toward you. You will want to be able to control the tension of the yarn in the tensionguide while you are working.

3
1. Feed approximately 12” of yarn through the center of the machine (see diagram A).
2. Crank handle forward until the colored hook is directly to the right of the feeder.
3. Hook the yarn under the colored hook (see diagram B).
4. Pull the end of the yarn under the machine and hold taut with the crank. You are going to turn the crank away from you (clockwise) to pull the yarn and proceed to thread the yarn onto every other hook as it rises, passing it front and back until a full rotation has been completed and you are back to the colored hook (see diagram C). Thread under the colored hook again–Pull both pieces of yarn up to make sure it is taut then thread through 5 more hooks – without skipping any hooks (see diagram D).
5. Now you need to pass the yarn through the gap in the yarn guide and pull it down so that it is seated all the way down into the groove (see diagram E).
6. Put the tension arm into the raised position (45 degree angle) and thread the yarn through until it comes out the bottom (see diagram F).
7. Remember that you may need to adjust the yarn tension holder depending on the weight of the yarn. Heavier or bulkier yarns may require less tension. This can be achieved by removing the yarn from one of the rungs on the tension guide working from the bottom up.
Threading The Machine For A Tube
1. Hold the handle on the top of the machine with your left hand and crank the handle away from you (clockwise) with your right hand.
2. Keep an eye on your yarn to make sure you have enough loosened to feed easily into the machine.
3. Once you come back around to the colored hook you have done one row. If you need to keep count of the rows for your project,
count one row each time you come to the colored hook.
4. Periodically pull down gently on the knitted fabric as it comes out of the bottom, to prevent it from snagging.
Now You Are Ready To Start Knitting!
Diagram D
Diagram E
Handle missing for illustration purposes only.
Diagram CDiagram A
Diagram B
Diagram F
4
After you have achieved the desired length of tube you will need to remove (bind off) your tube from the machine.
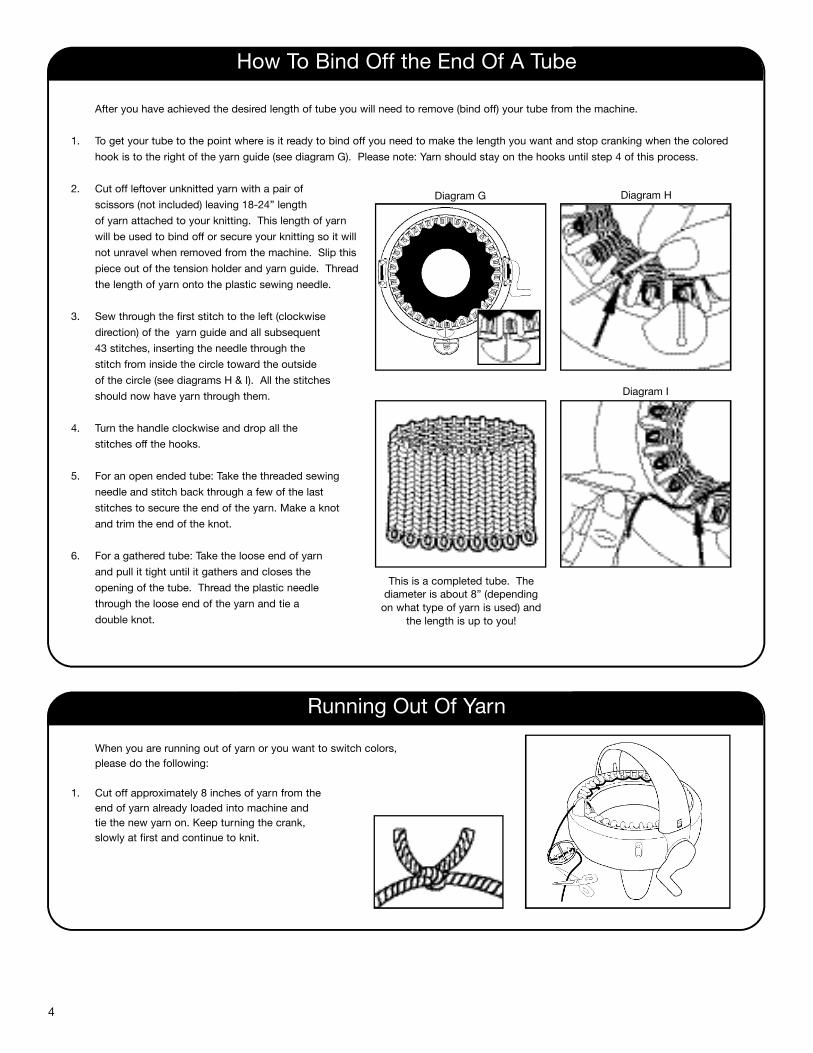
1. To get your tube to the point where is it ready to bind off you need to make the length you want and stop cranking when the colored
hook is to the right of the yarn guide (see diagram G). Please note: Yarn should stay on the hooks until step 4 of this process.
2. Cut off leftover unknitted yarn with a pair of
scissors (not included) leaving 18-24” length
of yarn attached to your knitting. This length of yarn
will be used to bind off or secure your knitting so it will
not unravel when removed from the machine. Slip this
piece out of the tension holder and yarn guide. Thread
the length of yarn onto the plastic sewing needle.
3. Sew through the first stitch to the left (clockwise
direction) of the yarn guide and all subsequent
43 stitches, inserting the needle through the
stitch from inside the circle toward the outside
of the circle (see diagrams H & I). All the stitches
should now have yarn through them.
4. Turn the handle clockwise and drop all the
stitches off the hooks.
5. For an open ended tube: Take the threaded sewing
needle and stitch back through a few of the last
stitches to secure the end of the yarn. Make a knot
and trim the end of the knot.
6. For a gathered tube: Take the loose end of yarn
and pull it tight until it gathers and closes the
opening of the tube. Thread the plastic needle
through the loose end of the yarn and tie a
double knot.
How To Bind Off the End Of A Tube
When you are running out of yarn or you want to switch colors, please do the following:
1. Cut off approximately 8 inches of yarn from the end of yarn already loaded into machine and tie the new yarn on. Keep turning the crank, slowly at first and continue to knit.
Running Out Of Yarn
This is a completed tube. Thediameter is about 8” (depending
on what type of yarn is used) andthe length is up to you!
Diagram G Diagram H
Diagram I
5
1. Slide the mode switch on the front of the machine into the UP position.
2. Turn the crank toward you (counterclockwise) until it stops. The colored hook should be slightly to the right of the yarn guide.
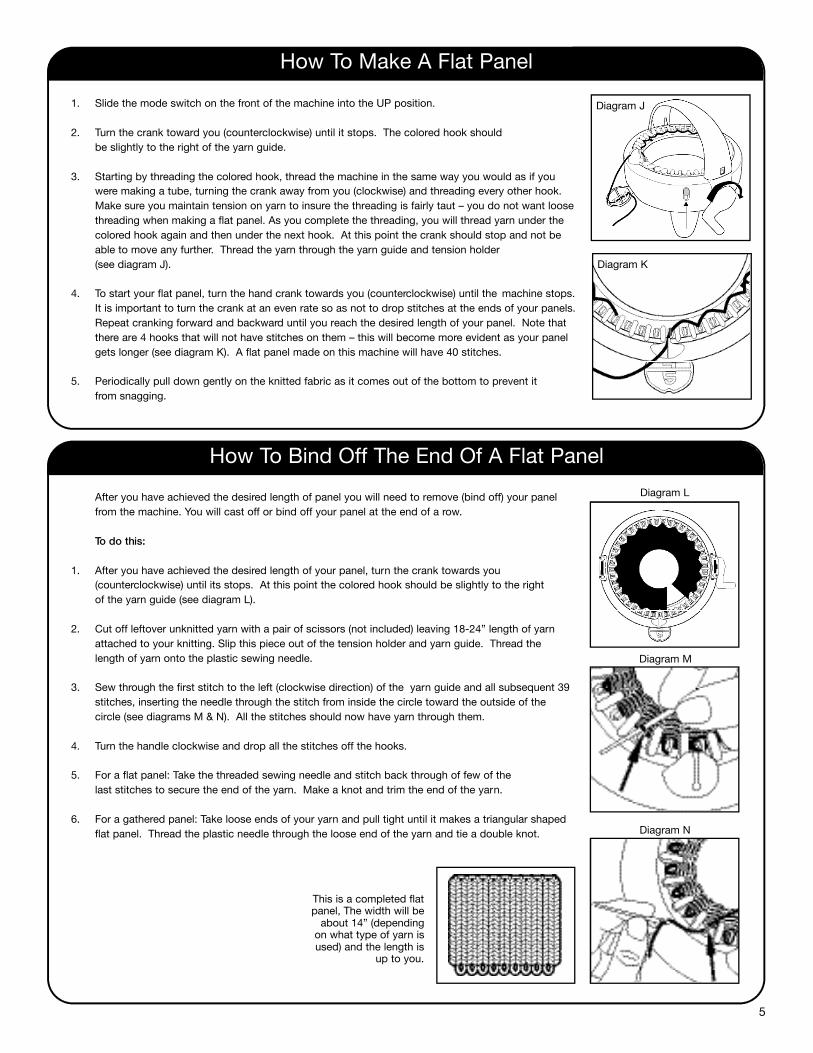
3. Starting by threading the colored hook, thread the machine in the same way you would as if you were making a tube, turning the crank away from you (clockwise) and threading every other hook. Make sure you maintain tension on yarn to insure the threading is fairly taut – you do not want loose threading when making a flat panel. As you complete the threading, you will thread yarn under the colored hook again and then under the next hook. At this point the crank should stop and not be able to move any further. Thread the yarn through the yarn guide and tension holder (see diagram J).
4. To start your flat panel, turn the hand crank towards you (counterclockwise) until the machine stops. It is important to turn the crank at an even rate so as not to drop stitches at the ends of your panels.Repeat cranking forward and backward until you reach the desired length of your panel. Note that there are 4 hooks that will not have stitches on them – this will become more evident as your panel gets longer (see diagram K). A flat panel made on this machine will have 40 stitches.
5. Periodically pull down gently on the knitted fabric as it comes out of the bottom to prevent it from snagging.
How To Make A Flat Panel
After you have achieved the desired length of panel you will need to remove (bind off) your panel from the machine. You will cast off or bind off your panel at the end of a row.
To do this:
1. After you have achieved the desired length of your panel, turn the crank towards you (counterclockwise) until its stops. At this point the colored hook should be slightly to the right of the yarn guide (see diagram L).
2. Cut off leftover unknitted yarn with a pair of scissors (not included) leaving 18-24” length of yarnattached to your knitting. Slip this piece out of the tension holder and yarn guide. Thread the length of yarn onto the plastic sewing needle.
3. Sew through the first stitch to the left (clockwise direction) of the yarn guide and all subsequent 39 stitches, inserting the needle through the stitch from inside the circle toward the outside of the circle (see diagrams M & N). All the stitches should now have yarn through them.
4. Turn the handle clockwise and drop all the stitches off the hooks.
5. For a flat panel: Take the threaded sewing needle and stitch back through of few of the last stitches to secure the end of the yarn. Make a knot and trim the end of the yarn.
6. For a gathered panel: Take loose ends of your yarn and pull tight until it makes a triangular shaped flat panel. Thread the plastic needle through the loose end of the yarn and tie a double knot.
How To Bind Off The End Of A Flat Panel
This is a completed flatpanel, The width will be
about 14” (dependingon what type of yarn isused) and the length is
up to you.
Diagram J
Diagram K
Diagram L
Diagram M
Diagram N
6
1. Do not turn the crank handle too hard or too fast as this may damage the machine. Turning the crank too fast may also cause dropped stitches.
2. If yarn seems “stuck” on a hook, push the stitch or stitches that are on the hook from the bottom of the hook towards the back of the needle.
3. You must maintain proper tension on the yarn through the tension piece, otherwise you may drop a stitch.
4. When starting out, be sure that yarn is fed through the notch in the yarn guide.
5. Some textured yarns may not work as they will get caught in the yarn guide.
6. Different weights of yarn will require different amounts of tension. You want it to be tight but not pulling. If it is too tight, try loosening the yarn one by one from the slots on the tension guide.
7. If stitches are being dropped at ends of flat panel, make sure you are turning crank all the way in each direction until the machine comes to a complete stop.
8. Occasionally pull down the yarn you are knitting to make sure it does not get snagged.
Helpful Hints
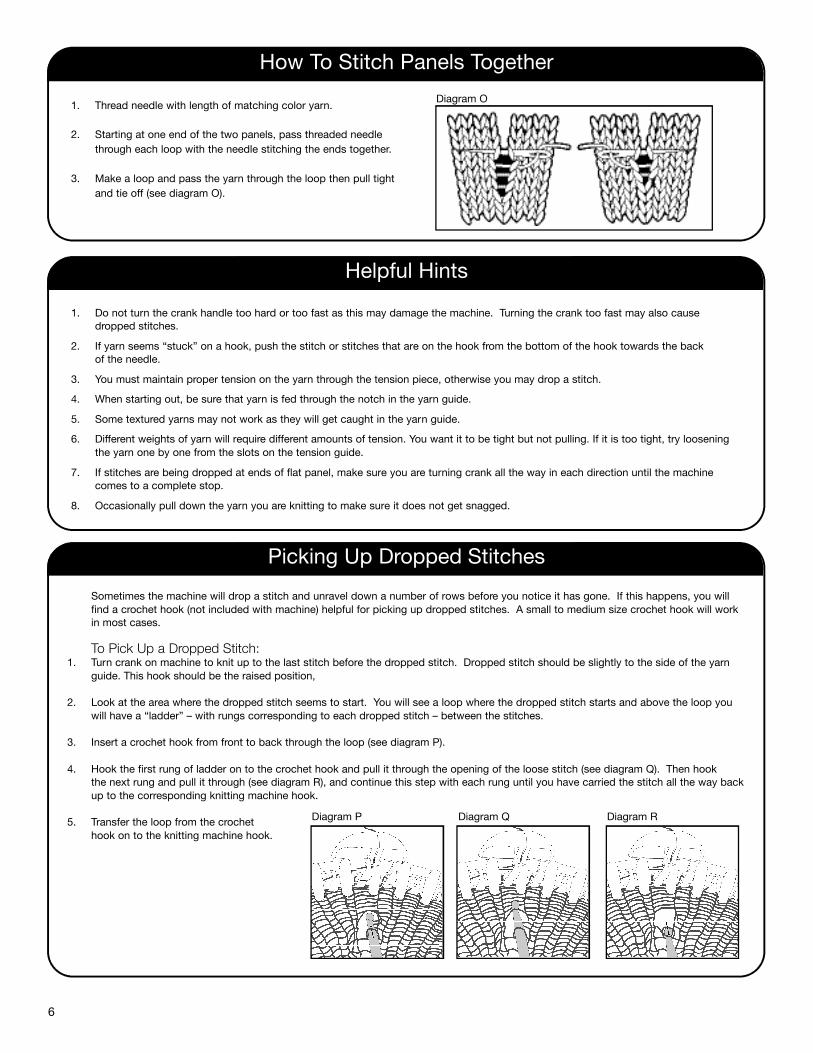
1. Thread needle with length of matching color yarn.
2. Starting at one end of the two panels, pass threaded needle through each loop with the needle stitching the ends together.
3. Make a loop and pass the yarn through the loop then pull tight and tie off (see diagram O).
How To Stitch Panels Together
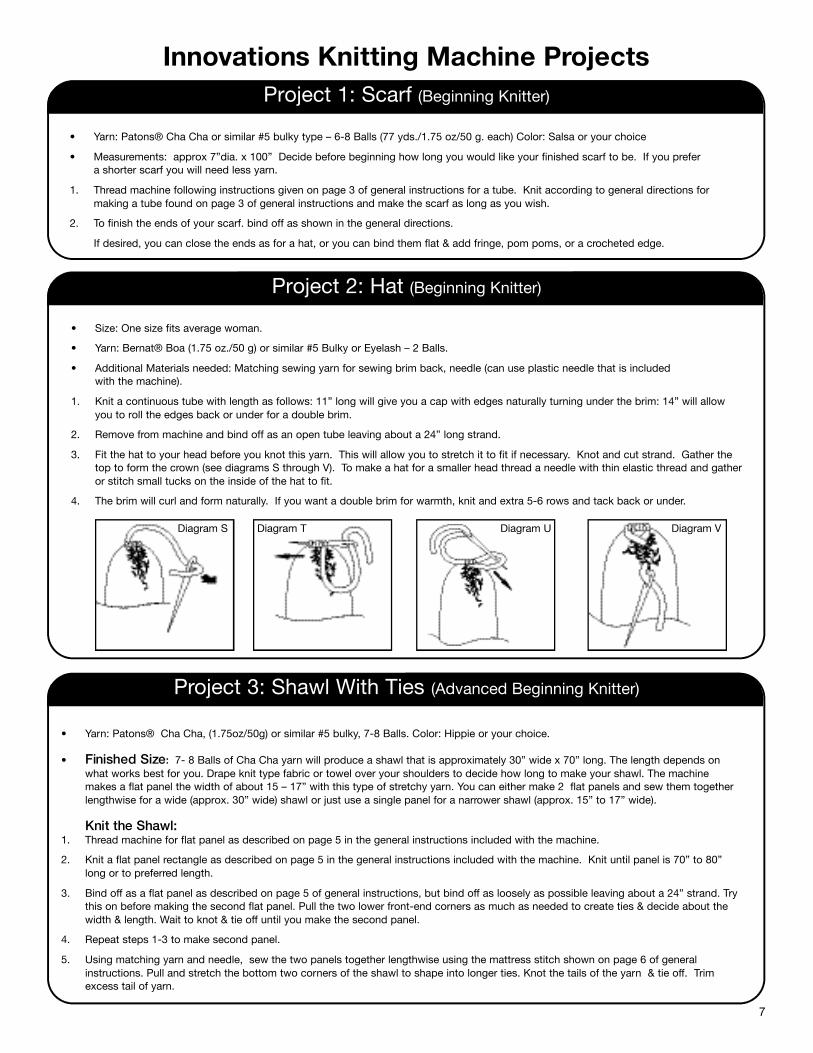
Sometimes the machine will drop a stitch and unravel down a number of rows before you notice it has gone. If this happens, you will find a crochet hook (not included with machine) helpful for picking up dropped stitches. A small to medium size crochet hook will work in most cases.
To Pick Up a Dropped Stitch:1. Turn crank on machine to knit up to the last stitch before the dropped stitch. Dropped stitch should be slightly to the side of the yarn
guide. This hook should be the raised position,
2. Look at the area where the dropped stitch seems to start. You will see a loop where the dropped stitch starts and above the loop you will have a “ladder” – with rungs corresponding to each dropped stitch – between the stitches.
3. Insert a crochet hook from front to back through the loop (see diagram P).
4. Hook the first rung of ladder on to the crochet hook and pull it through the opening of the loose stitch (see diagram Q). Then hook the next rung and pull it through (see diagram R), and continue this step with each rung until you have carried the stitch all the way back up to the corresponding knitting machine hook.
5. Transfer the loop from the crochet hook on to the knitting machine hook.
Picking Up Dropped Stitches
Diagram O
Diagram P Diagram Q Diagram R
7
• Yarn: Patons® Cha Cha or similar #5 bulky type – 6-8 Balls (77 yds./1.75 oz/50 g. each) Color: Salsa or your choice
• Measurements: approx 7”dia. x 100” Decide before beginning how long you would like your finished scarf to be. If you prefer a shorter scarf you will need less yarn.
1. Thread machine following instructions given on page 3 of general instructions for a tube. Knit according to general directions for making a tube found on page 3 of general instructions and make the scarf as long as you wish.
2. To finish the ends of your scarf. bind off as shown in the general directions.
If desired, you can close the ends as for a hat, or you can bind them flat & add fringe, pom poms, or a crocheted edge.
Project 1: Scarf (Beginning Knitter)
• Size: One size fits average woman.
• Yarn: Bernat® Boa (1.75 oz./50 g) or similar #5 Bulky or Eyelash – 2 Balls.
• Additional Materials needed: Matching sewing yarn for sewing brim back, needle (can use plastic needle that is included with the machine).
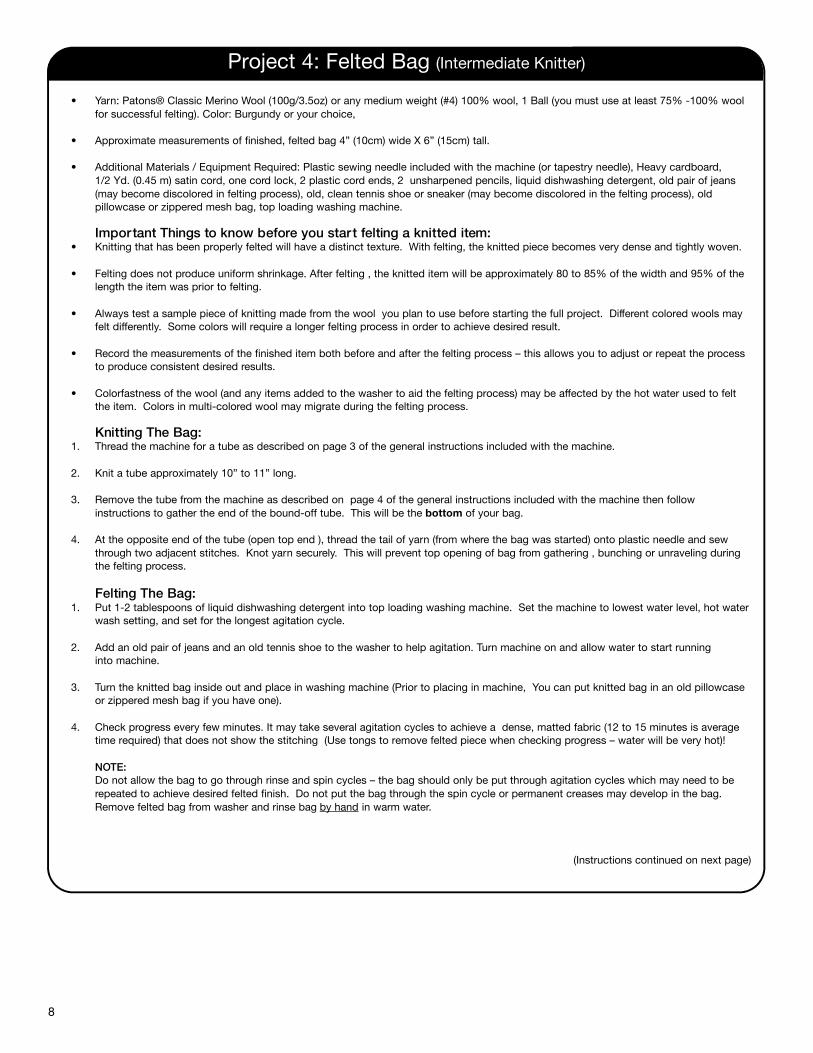
1. Knit a continuous tube with length as follows: 11” long will give you a cap with edges naturally turning under the brim: 14” will allow you to roll the edges back or under for a double brim.
2. Remove from machine and bind off as an open tube leaving about a 24” long strand.
3. Fit the hat to your head before you knot this yarn. This will allow you to stretch it to fit if necessary. Knot and cut strand. Gather the top to form the crown (see diagrams S through V). To make a hat for a smaller head thread a needle with thin elastic thread and gather or stitch small tucks on the inside of the hat to fit.
4. The brim will curl and form naturally. If you want a double brim for warmth, knit and extra 5-6 rows and tack back or under.
Project 2: Hat (Beginning Knitter)
Diagram S Diagram T Diagram U Diagram V
• Yarn: Patons® Cha Cha, (1.75oz/50g) or similar #5 bulky, 7-8 Balls. Color: Hippie or your choice.
• Finished Size: 7- 8 Balls of Cha Cha yarn will produce a shawl that is approximately 30” wide x 70” long. The length depends on what works best for you. Drape knit type fabric or towel over your shoulders to decide how long to make your shawl. The machine makes a flat panel the width of about 15 – 17” with this type of stretchy yarn. You can either make 2 flat panels and sew them together lengthwise for a wide (approx. 30” wide) shawl or just use a single panel for a narrower shawl (approx. 15” to 17” wide).
Knit the Shawl:1. Thread machine for flat panel as described on page 5 in the general instructions included with the machine.
2. Knit a flat panel rectangle as described on page 5 in the general instructions included with the machine. Knit until panel is 70” to 80” long or to preferred length.
3. Bind off as a flat panel as described on page 5 of general instructions, but bind off as loosely as possible leaving about a 24” strand. Try this on before making the second flat panel. Pull the two lower front-end corners as much as needed to create ties & decide about the width & length. Wait to knot & tie off until you make the second panel.
4. Repeat steps 1-3 to make second panel.
5. Using matching yarn and needle, sew the two panels together lengthwise using the mattress stitch shown on page 6 of general instructions. Pull and stretch the bottom two corners of the shawl to shape into longer ties. Knot the tails of the yarn & tie off. Trim excess tail of yarn.
Project 3: Shawl With Ties (Advanced Beginning Knitter)
Innovations Knitting Machine Projects
8
Project 4: Felted Bag (Intermediate Knitter)
• Yarn: Patons® Classic Merino Wool (100g/3.5oz) or any medium weight (#4) 100% wool, 1 Ball (you must use at least 75% -100% wool for successful felting). Color: Burgundy or your choice,
• Approximate measurements of finished, felted bag 4” (10cm) wide X 6” (15cm) tall.
• Additional Materials / Equipment Required: Plastic sewing needle included with the machine (or tapestry needle), Heavy cardboard, 1/2 Yd. (0.45 m) satin cord, one cord lock, 2 plastic cord ends, 2 unsharpened pencils, liquid dishwashing detergent, old pair of jeans (may become discolored in felting process), old, clean tennis shoe or sneaker (may become discolored in the felting process), old pillowcase or zippered mesh bag, top loading washing machine.
Important Things to know before you star t felting a knitted item:• Knitting that has been properly felted will have a distinct texture. With felting, the knitted piece becomes very dense and tightly woven.
• Felting does not produce uniform shrinkage. After felting , the knitted item will be approximately 80 to 85% of the width and 95% of the length the item was prior to felting.
• Always test a sample piece of knitting made from the wool you plan to use before starting the full project. Different colored wools may felt differently. Some colors will require a longer felting process in order to achieve desired result.
• Record the measurements of the finished item both before and after the felting process – this allows you to adjust or repeat the process to produce consistent desired results.
• Colorfastness of the wool (and any items added to the washer to aid the felting process) may be affected by the hot water used to felt the item. Colors in multi-colored wool may migrate during the felting process.
Knitting The Bag:1. Thread the machine for a tube as described on page 3 of the general instructions included with the machine.
2. Knit a tube approximately 10” to 11” long.
3. Remove the tube from the machine as described on page 4 of the general instructions included with the machine then follow instructions to gather the end of the bound-off tube. This will be the bottom of your bag.
4. At the opposite end of the tube (open top end ), thread the tail of yarn (from where the bag was started) onto plastic needle and sew through two adjacent stitches. Knot yarn securely. This will prevent top opening of bag from gathering , bunching or unraveling during the felting process.
Felting The Bag:1. Put 1-2 tablespoons of liquid dishwashing detergent into top loading washing machine. Set the machine to lowest water level, hot water
wash setting, and set for the longest agitation cycle.
2. Add an old pair of jeans and an old tennis shoe to the washer to help agitation. Turn machine on and allow water to start running into machine.
3. Turn the knitted bag inside out and place in washing machine (Prior to placing in machine, You can put knitted bag in an old pillowcase or zippered mesh bag if you have one).
4. Check progress every few minutes. It may take several agitation cycles to achieve a dense, matted fabric (12 to 15 minutes is average time required) that does not show the stitching (Use tongs to remove felted piece when checking progress – water will be very hot)!
NOTE:
Do not allow the bag to go through rinse and spin cycles – the bag should only be put through agitation cycles which may need to be repeated to achieve desired felted finish. Do not put the bag through the spin cycle or permanent creases may develop in the bag. Remove felted bag from washer and rinse bag by hand in warm water.
(Instructions continued on next page)
9
Shaping and Air Drying The Bag:1. Turn bag right side out & roll in towel to remove excess water.
2. Shape & stuff with something like plastic bags to hold shape.
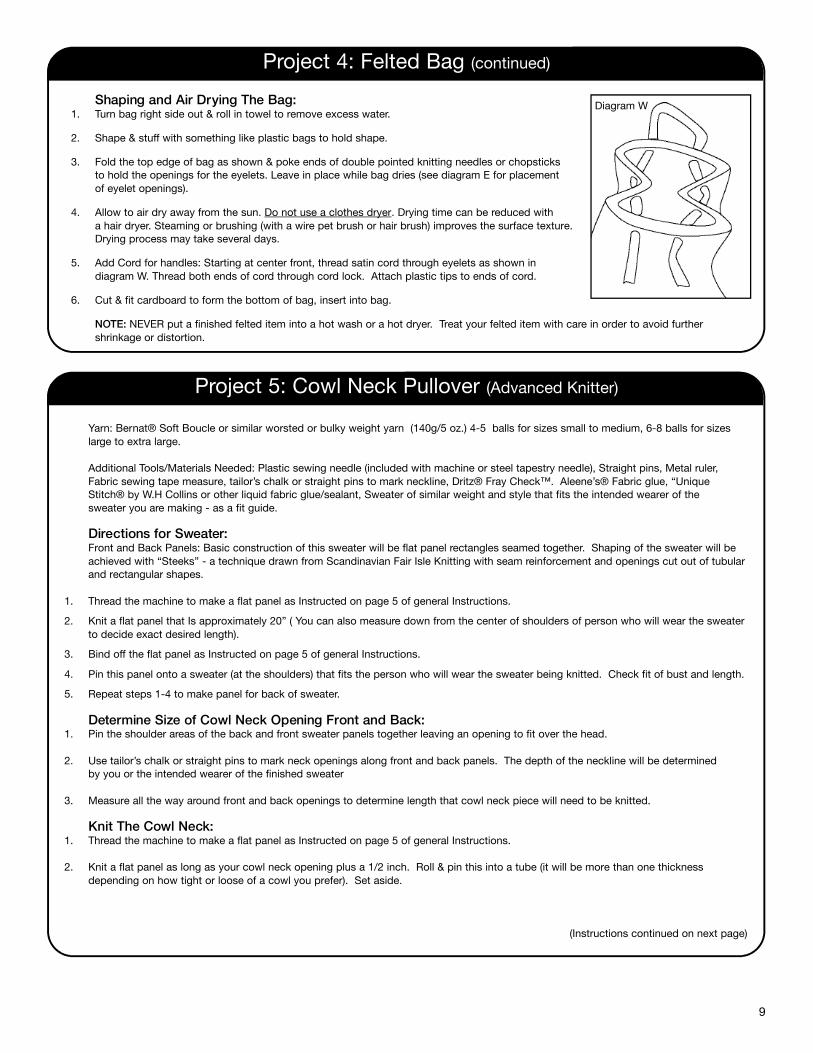
3. Fold the top edge of bag as shown & poke ends of double pointed knitting needles or chopsticks to hold the openings for the eyelets. Leave in place while bag dries (see diagram E for placement of eyelet openings).
4. Allow to air dry away from the sun. Do not use a clothes dryer. Drying time can be reduced with a hair dryer. Steaming or brushing (with a wire pet brush or hair brush) improves the surface texture.Drying process may take several days.
5. Add Cord for handles: Starting at center front, thread satin cord through eyelets as shown in diagram W. Thread both ends of cord through cord lock. Attach plastic tips to ends of cord.
6. Cut & fit cardboard to form the bottom of bag, insert into bag.
NOTE: NEVER put a finished felted item into a hot wash or a hot dryer. Treat your felted item with care in order to avoid further shrinkage or distortion.
Project 4: Felted Bag (continued)
Diagram W
Yarn: Bernat® Soft Boucle or similar worsted or bulky weight yarn (140g/5 oz.) 4-5 balls for sizes small to medium, 6-8 balls for sizes large to extra large.
Additional Tools/Materials Needed: Plastic sewing needle (included with machine or steel tapestry needle), Straight pins, Metal ruler,Fabric sewing tape measure, tailor’s chalk or straight pins to mark neckline, Dritz® Fray Check™. Aleene’s® Fabric glue, “Unique Stitch® by W.H Collins or other liquid fabric glue/sealant, Sweater of similar weight and style that fits the intended wearer of the sweater you are making - as a fit guide.
Directions for Sweater:Front and Back Panels: Basic construction of this sweater will be flat panel rectangles seamed together. Shaping of the sweater will be achieved with “Steeks” - a technique drawn from Scandinavian Fair Isle Knitting with seam reinforcement and openings cut out of tubularand rectangular shapes.
1. Thread the machine to make a flat panel as Instructed on page 5 of general Instructions.
2. Knit a flat panel that Is approximately 20” ( You can also measure down from the center of shoulders of person who will wear the sweaterto decide exact desired length).
3. Bind off the flat panel as Instructed on page 5 of general Instructions.
4. Pin this panel onto a sweater (at the shoulders) that fits the person who will wear the sweater being knitted. Check fit of bust and length.
5. Repeat steps 1-4 to make panel for back of sweater.
Determine Size of Cowl Neck Opening Front and Back:1. Pin the shoulder areas of the back and front sweater panels together leaving an opening to fit over the head.
2. Use tailor’s chalk or straight pins to mark neck openings along front and back panels. The depth of the neckline will be determined by you or the intended wearer of the finished sweater
3. Measure all the way around front and back openings to determine length that cowl neck piece will need to be knitted.
Knit The Cowl Neck: 1. Thread the machine to make a flat panel as Instructed on page 5 of general Instructions.
2. Knit a flat panel as long as your cowl neck opening plus a 1/2 inch. Roll & pin this into a tube (it will be more than one thickness depending on how tight or loose of a cowl you prefer). Set aside.
(Instructions continued on next page)
Project 5: Cowl Neck Pullover (Advanced Knitter)
10
Create The Neck Opening: 1. Thread plastic sewing needle with 36” of matching yarn. Following the line made with the tailor’s chalk or pins, baste around the neck
opening with small, secure stitches (you can use sewing machine or serger also). Cut out above basting line to leave enough knitted area for seaming the cowl to the neck opening.
2. Seal cut edges of neckline with Dritz® Fray Check™, Aleene’s® Fabric Glue, or other similar product. Set aside.
Sleeves:1. Measure your arms (or arms of intended wearer) from the edge of your shoulders to the wrists (add a few inches extra if you want the
edges to curl into rolled cuffs).
2. Thread the machine to make a flat panel as Instructed on page 5 of general Instructions.
3. Knit flat panel to the determined length. Bind off as flat panel.
4. Repeat steps 2 and 3 to make second sleeve.
5. Set sleeve panels aside.
Pin All Pieces Together and Try it On:1. Pin front & back at shoulders & put on over head.
2. Pin sides, taking in to fit as you prefer, leaving ample openings for sleeves.
3. Pin rolled cowl all the way around adjusting roll to be tight or loose as you wish.
4. Turn sleeves wrong side out & pin into openings adjusting the armholes to fit.
5. Pin on inside to taper sleeves making seams with the extra knitted fabric on the inside to be cut away after stitching. Keep in mind that you can leave sleeves looser and do not have to taper them. Adjust length & try rolling back the edges for cuffs if you want.
Assemble The Sweater:NOTE: All pieces will be stitched together using a mattress stitch. See page 6 of General Instructions - “How to Stitch Panels Together”
1. Thread tapestry needle with matching yarn (about 36”).
2. Stitch cowl neck piece into tube as pinned.
3. Stitch sleeves together on wrong sides as pinned & turn right side out.
4. Stitch front & back wrong sides together at shoulders and sides leaving openings for sleeves as determined in pinning stage.
5. Turn sleeves wrong sides out & pin into armholes. Stitch in place making as small seams as possible.
6. Next pin cowl to neckline & stitch. (pin on the wrong side of sweater).
7. Turn right side out & try on.
8. Steam lightly without allowing iron or heavy steam to touch sweater, or you can block by laying on folded towels, spraying with water,pinning to towels to desired shape, & letting dry.
9. Hand wash or dry clean only. Follow yarn manufacturers care instructions on yarn label.
Project 5: Cowl Neck Pullover (Continued)
11
• YARN: Bernat® Softee Chunky (100g/3.5oz), Color: Grey Ragg, 8 – 12 Balls (S to XL).
• Additional Materials Needed: Plastic sewing needle included with machine or Steel tapestry needle with big eye, Tailor’s chalk , Optional - depending on choice of how to create V neck - Dritz® Fray Check™.
Measurements & Sizing: 1. Gauge Swatch: Make a test rectangular panel to the gauge with your yarn. This can be the first panel you make according to the
directions. If your first calculations are correct, you can use this panel & proceed. Measure it carefully with a steel or wooden ruler.Successful sizing depends on your measurements matching the gauge produced with the yarn you are using. You will be making a custom fitted garment.
2. Measure your bust, sleeve length, sweater length. Find a similar sweater that fits you and measure it also as a guide. It is OK to start offwith the panels a little oversized because the seaming may result in a smaller size than you would think.
Sweater Construction: Sweater will consist of two rectangular flat panels for the front panels, two for the back, and two tubes for the sleeves.
Knit The Front and Back panel pieces: (FOR SIZES X SMALL.TO SMALL (bust 28-34 ins., finished bust 37”). Larger sizes can be constructed by piecing flat panels together to make correct size pieces to fit you or your intended recipient.)
1. Thread the machine to make a flat panel as instructed on page 5 of General Instruction booklet.
2. Knit a flat panel that Is 29” to 31” long or to preferred length.
3. Bind off flat panel as Instructed on page 5 of General Instruction booklet.
4. Pin the completed panel at your shoulder to check length of panel and fit across bust (width of panel).
5. Repeat steps 1 through 3 to make 3 more identical panels.
Knit The Sleeves:1. Thread the machine to make a tube as instructed on page 3 of general instructions.
2. Knit a tube 20-22” long or to preferred length ). If cuffs are desired, knit tube a few inches longer.
3. Bind off tube as described on page 4 of general instructions included with machine. Try on arm to check length.
4. Repeat steps 1 to 3 to make second sleeve.
Seam Final Pieces Together:
Thread plastic needle or tapestry needle with matching yarn. Using the mattress stitch illustration from page 6 of the general instructions included with the machine, seam together as follows:
Sew Shoulder Seams: 1. Place pieces back into position on table. Remove and set aside one of the front panels and the two sleeves.
2. With wrong sides together, sew the top edge of the back piece and the top edge of the front left panel together. Start stitching at the point that the V opening begins, i.e.,where you marked it with a pin; and sew to the outside edge. This will be the shoulder seam.
3. Repeat step 2 to attach other front panel to back panel. Now you will have a vest type garment.
4. Turn right side out & try on to determine how you want the sleeves to fit.
Mark and Sew Sleeve/Armhole Openings: 1. Pin sides together from bottom up to right below where you would like the sleeve openings to be. Make sure it feels comfortable.
2. With wrong sides together sew the sides of the front and back together, sewing from underneath the armhole/sleeve opening to the bottom edge.
Insert Sleeves: 1. With wrong sides together, sew sleeves into armhole openings making narrow seams.
2. Let the cuff edges curl back naturally at the wrists for a rolled cuff.
(Instructions continued on next page)
Project 6: Belted Cardigan Sweater (Advanced Knitter)
12
Create Lapels or V-Neck Opening:
For Lapels: 1. Try sweater on & pin the front panels back to form lapels. This is the easiest option. Use matching yarn to tack the front panels back
with small stitches.
For V-Neck Opening (Using Either Fold-and-Tack Method OR Cut-and-Whip Stitch Technique border):
Fold and Tack method1. Use tailor’s chalk to mark or straight pins to mark the angle where V-neck fold should be. You can decide the best angle by trying on
sweater, closing the front panels and then folding them UNDER to form desired size V-opening then pin in place and tack in place using matching yarn and needle.
Cut and Whip Stitch Technique1. As directed above, use tailor’s chalk to mark or straight pins to mark the angled where V-neck fold should be.
2. Thread tapestry needle with matching yarn and baste with small stitches (or use sewing machine or serger) 1/2” outside the line you have pinned or made with tailor’s chalk for the slant of each front panel. Lay sweater flat on table or floor and cut where the tailor’schalk line or pins are which should be right outside the basting stitches. Cut from the bottom corner to where V begins at the top. Do this on both sides. Immediately cover edges with Fray Check® or similar fabric glue. Allow glue to dry.
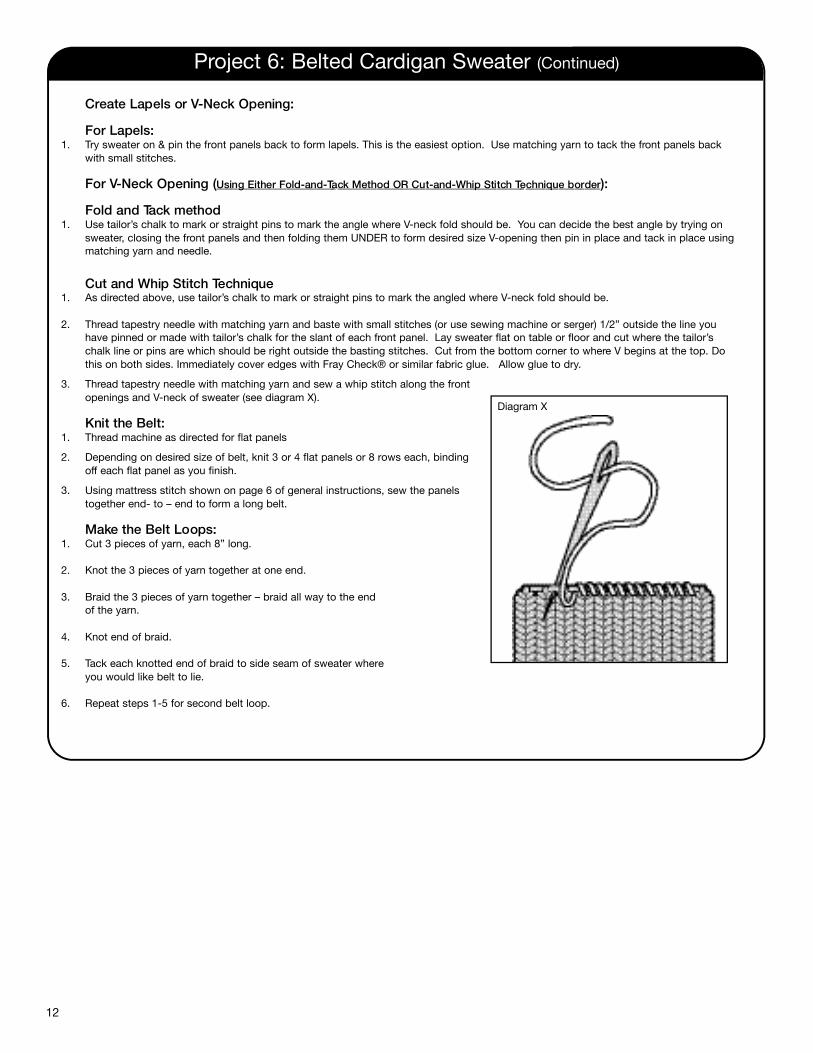
3. Thread tapestry needle with matching yarn and sew a whip stitch along the front openings and V-neck of sweater (see diagram X).
Knit the Belt: 1. Thread machine as directed for flat panels
2. Depending on desired size of belt, knit 3 or 4 flat panels or 8 rows each, binding off each flat panel as you finish.
3. Using mattress stitch shown on page 6 of general instructions, sew the panels together end- to – end to form a long belt.
Make the Belt Loops:1. Cut 3 pieces of yarn, each 8” long.
2. Knot the 3 pieces of yarn together at one end.
3. Braid the 3 pieces of yarn together – braid all way to the end of the yarn.
4. Knot end of braid.
5. Tack each knotted end of braid to side seam of sweater whereyou would like belt to lie.
6. Repeat steps 1-5 for second belt loop.
Project 6: Belted Cardigan Sweater (Continued)
Diagram X