knot master submitted knots - troop 270 - constructiontroop270.ocbsa.org/knot master challenge/knot...
TRANSCRIPT
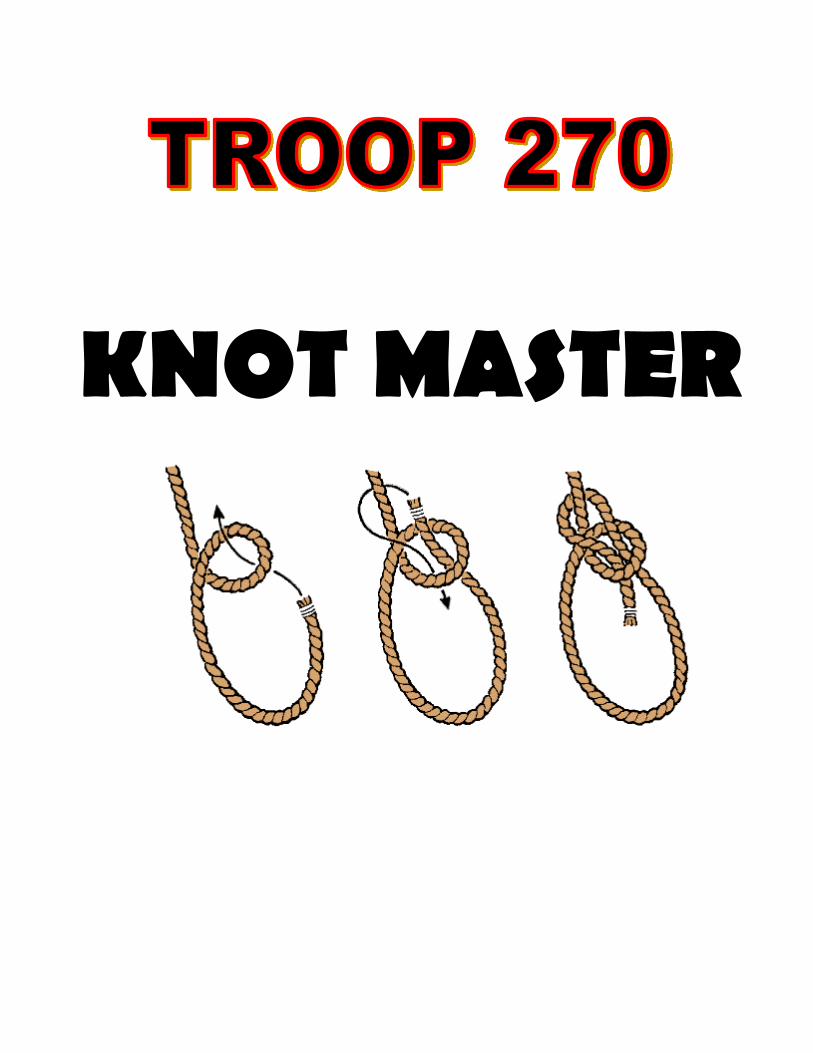
KNOT MASTER

Knot Master – Troop 270
Page 2 Rev 1.2
Table of Contents
Introduction ........................................................................................................................................................... 4
Colors of the levels .............................................................................................................................................. 5
Rules and Bylaws of the Program ........................................................................................................................ 5
How to Begin ....................................................................................................................................................... 5
Challenging ......................................................................................................................................................... 5
Testing ................................................................................................................................................................. 6
Practice Rope ....................................................................................................................................................... 6
Exemption ........................................................................................................................................................... 6
Level One – White Seizing ................................................................................................................................... 7
Square Knot ......................................................................................................................................................... 7
Two Half Hitches ................................................................................................................................................. 7
Taut-line Hitch ..................................................................................................................................................... 7
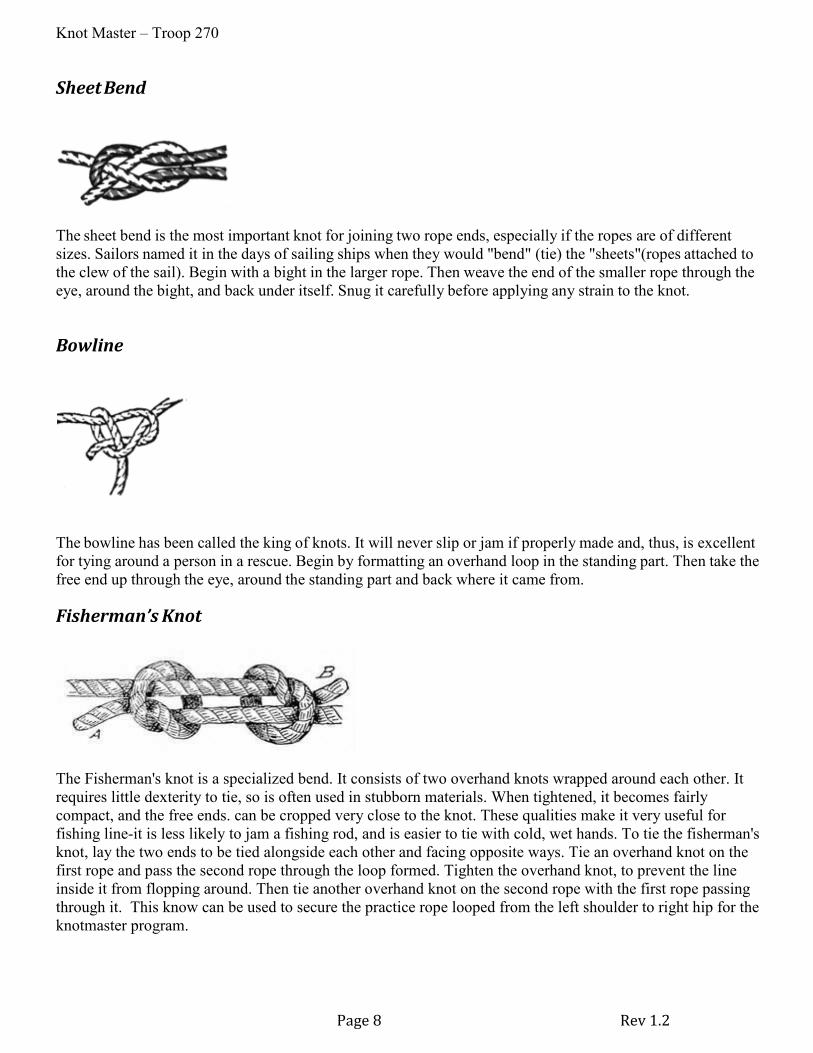
Sheet Bend ........................................................................................................................................................... 8
Bowline ............................................................................................................................................................... 8
Fisherman’s Knot ................................................................................................................................................ 8
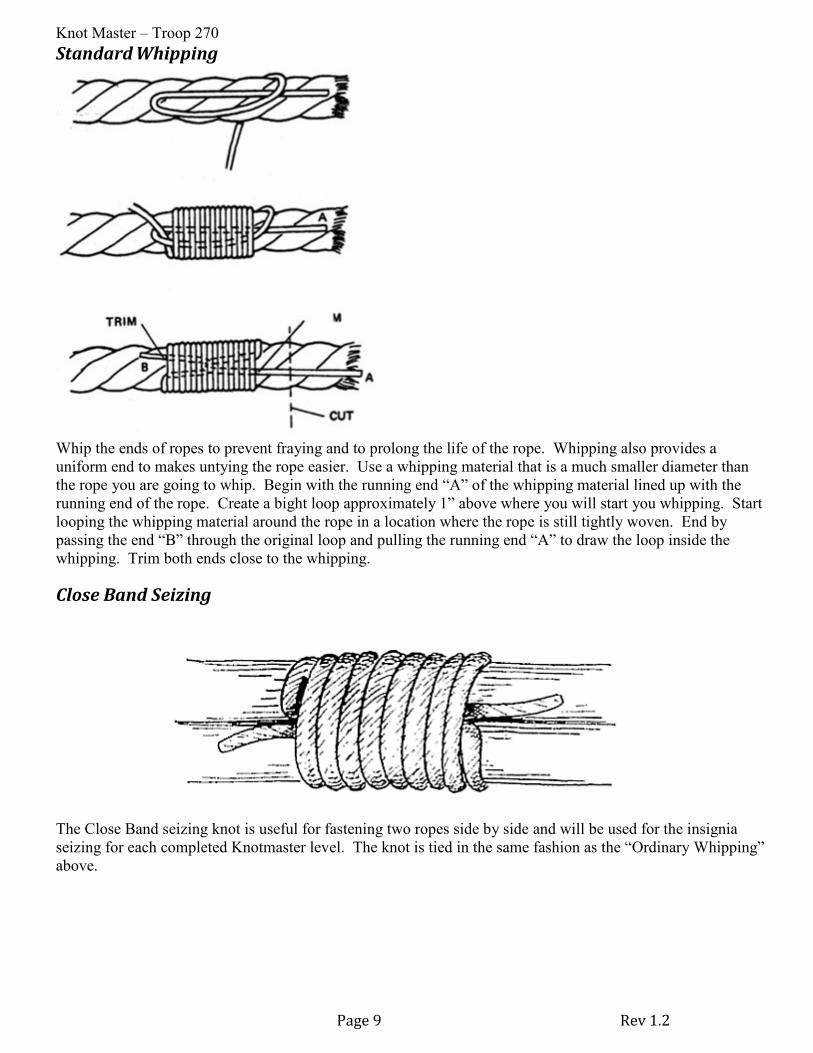
Standard Whipping .............................................................................................................................................. 9
Close Band Seizing ............................................................................................................................................. 9
Level Two – Gold Seizing ................................................................................................................................... 10
Clove Hitch ........................................................................................................................................................ 10
Timber Hitch ...................................................................................................................................................... 10
Square Lashing .................................................................................................................................................. 11
Diagonal Lashing ............................................................................................................................................... 12
Sheer Lashing .................................................................................................................................................... 13
Tripod Lashing .................................................................................................................................................. 13
Tripod Lashing For Light Structures ................................................................................................................. 14
Round Lashing .................................................................................................................................................. 14
Level Three –Blue Seizing .................................................................................................................................. 15
Surgeons Knot ................................................................................................................................................... 15
Double Fisherman’s Knot .................................................................................................................................. 15
Larks Head Knot................................................................................................................................................ 16
Cinch Knot ......................................................................................................................................................... 16
Slip Knot ............................................................................................................................................................ 17
Double Sheet Bend ............................................................................................................................................ 17
Constrictor Knot ................................................................................................................................................ 17
Level Four – Green Seizing ................................................................................................................................. 18
Figure Eight Knot .............................................................................................................................................. 18
Alpine Butterfly ................................................................................................................................................. 18
Water/Bow Knot ................................................................................................................................................ 18

Knot Master – Troop 270
Page 3 Rev 1.2
Zeppelin(or Rosendahl) Bend ............................................................................................................................ 19
Figure Eight Loop .............................................................................................................................................. 19
Munter Hitch ..................................................................................................................................................... 20
Prusik Knot ........................................................................................................................................................ 20
Level Five – Red Seizing .................................................................................................................................... 21
Truckers Hitch ................................................................................................................................................... 21
Sheepshank Knot ............................................................................................................................................... 21
Yosemite Bowline ............................................................................................................................................. 22
Bowline on a Bight ............................................................................................................................................ 22
French Bowline ................................................................................................................................................. 23
Perfection Loop ................................................................................................................................................. 23
Level Six – Brown Seizing ................................................................................................................................... 24
Anchor Bend ..................................................................................................................................................... 24
Double Carrick Bend ......................................................................................................................................... 24
Clove Hitch on a Bight ...................................................................................................................................... 25
Mooring Hitch ................................................................................................................................................... 25
Pipe Hitch .......................................................................................................................................................... 26
Rolling Hitch ...................................................................................................................................................... 26
Level Seven – Black Seizing ............................................................................................................................... 27
Half Windsor Tie ............................................................................................................................................... 27
Full Windsor Tie ............................................................................................................................................... 27
Masthead Knot .................................................................................................................................................. 28
Diamond Knot .................................................................................................................................................... 29
Monkey Fist Knot .............................................................................................................................................. 30
Turks Head Knot ................................................................................................................................................ 31
Thief Knot .......................................................................................................................................................... 32
Your Knot .......................................................................................................................................................... 32
Knot Master Submitted Knots ............................................................................................................................ 34
One-handed Bowline- Jim Clements ................................................................................................................. 34
Dave’s Loop ...................................................................................................................................................... 35
The Eye Splice .................................................................................................................................................. 36

Knot Master – Troop 270
Page 4 Rev 1.2
Introduction Knots have been around since the dawn of man and have played a crucial role in the advancement of
civilizations for centuries. Early ropes were made from the simplest things such as weeds, bark and animal
intestines. Over the years better and better materials were discovered and rope became stronger and stronger.
As the rope became more advanced, so did the methods for which it was being used. Knots were created for
special purposes and the knowledge of how to tie those knots were passed down from generation to generation.
Knots in scouting have been a fundamental skill and requirement for rank advancement since its beginning
over a hundred years ago. By each scout learning and mastering how to tie knots, they help keep an age old art
alive that has been developed over thousands of years.
The “Troop 270 Knot Master Program” is designed to provide each scout an opportunity to learn essential
knots, as well as the fun knots that you can use to amaze your friends. When starting the program, the scout
will be given a 36” inch piece of Troop Paracord rope tied with a Diamond Knot also known as your
“Noodles”.
The Noodles will be worn attached to the scouts right epaulette strap button. Upon completion of the first
level the Scout will seize the two ends of the rope together with a Close Band Seizing knot in the color of
Level One (White). Once a seizing has been applied, it is no longer referred to as Noodles, it is now the Knot
Master Seizing.
The rope shall be worn as part of the uniform allowing the scout to wear the rope at all scout functions, and
displays his success in completing Levels. After successful completion of each additional level of the Knot
Master Program they will earn an additional color seizing on the rope depicting the level completed. The scout
can continue to progress through all 7 levels of the Knot Master Program receiving a different color seizing
for each level.
Knot Master – Troop 270
Page 5 Rev 1.2
Colors of the levels
The colors of the levels also have meanings and are borrowed from liturgical traditions. The scout will learn
the significance and meaning of each color as he progresses through the Knot Master Program. The levels of
the program are:
Level 1 – White symbolizes purity and virtue
Level 2 – Gold symbolizes light and value
Level 3 – Blue symbolizes hope and grace
Level 4 – Green symbolizes nature and growth
Level 5 – Crimson Red symbolizes fire and blood
Level 6 – Brown symbolizes earth and humility
Level 7 – Black symbolizes authority and power
Rules and Bylaws of the Program
There are 6 to 8 items on each level of the program. They may be knots, lashings, whippings, seizings or
splices. As the levels go higher, the items become more difficult and require increased determination to
perfect
How to Begin
To begin the scout must learn and become proficient with the knots of the Level One. He will have to tie all
the knots and explain their purpose or use. When he is ready to be tested, a Knot Master Chief (an adult that
has demonstrated that he knows all the knots in the knot master program) or a scout that has reached the Knot
Master Level will test him. The knot will be judged for correctness and dress. If the knot is basically correct
but tied sloppy, the scout will need to retie the knot again making sure it is neat and dressed correctly. He will
be allowed 10 minutes to tie all the knots for the level he is testing for. He will only be allowed two attempts
for any one knot. If he is unsuccessful in tying any single knot after his second attempt, he will not be
successful for that level and will need to wait until the next meeting to try again.
Challenging
A scout or scouter can be challenged by another scout or scouter at the same level or above, to tie one knot
required at his level. Using his practice rope, he will only get two attempts to tie the knot correctly. If the
scout(er) fails to tie the knot that he is being challenged to tie, he will drop back one level. The seizing on his
paracord rope will be removed and he will have to re-earn it again.
The challenger must also be able to tie the knot he is challenging the other scout(master) to tie. Once the first
scout finishes the attempt, the challenger must also tie the knot. However, the challenger will only get one
attempt to tie the knot correctly. If he fails to tie the knot he has challenged the other scout to tie, he will lose
his seizing and drop back one level or to the level of the knot he was unable to tie, regardless if the first scout
was successful or not.

Knot Master – Troop 270
Page 6 Rev 1.2
Testing
Testing will only take place on troop outings and at troop meetings, as time allows. Individual Patrol outings or
meetings (other than during a troop meeting) are not valid testing times. Testing will not be done at any other
time other than the above.
Practice Rope
A practice rope and carabiner should be carried at all times by the scout who is participating in the Knot
Master Program. It will be coiled neatly and carried on a carabiner on the right hip or tied together using a
Single or Double Fisherman’s Knot and looped from the left shoulder to right hip. The practice rope is
important because if you are challenged and you do not have a rope, or cannot find one, you will be dropped
back one level, and one level only, automatically. A good quality 5mm climbing style rope is recommended
for its excellent knot tying feel.
Exemption
Once a scout has reached the 7th level of the Knot Master Program and has earned his Black seizing, he is
exempt from being challenged by other scouts that are not Knot Masters. A Knot Master can only be
challenged by another Knot Master or a Knot Master Chief.

Knot Master – Troop 270
Page 7 Rev 1.2
Level One – White Seizing
This level introduces the eight basic knots of scouting. These knots are the most common used throughout
scouting and for the rest of your life. In addition, these are the basis for future knots and lashings. They are
Square Knot, Sheet Bend, Clove Hitch, Two Half Hitches, Bowline, Timber Hitch, Taut-Line Hitch and the
Sheepshank
Square Knot
The Square Knot is a common and simple binding knot. It is used to connect two ropes of equal size. You can
loosen the square knot easily by either pushing the ends toward the knot or by "upsetting" the knot by pulling
back on one end and pulling the other through the loops.
Two Half Hitches
This is a reliable and useful knot for attaching a rope to a pole or boat mooring. As its name suggests, it is two
half hitches, one after the other. To finish, push them together and snug them by pulling on the standing part.
Taut-line Hitch
The Taut-line hitch is an adjustable loop knot for use on lines under tension. It is useful when the length of a
line will need to be periodically adjusted in order to maintain tension. It is made by tying a Rolling hitch
around the standing part after passing around an anchor object. Tension is maintained by sliding the hitch to
adjust size of the loop, thus changing the effective length of the standing part without retying the knot. It is
typically used for securing tent lines in outdoor activities involving camping.
Knot Master – Troop 270
Page 8 Rev 1.2
Sheet Bend
The sheet bend is the most important knot for joining two rope ends, especially if the ropes are of different
sizes. Sailors named it in the days of sailing ships when they would "bend" (tie) the "sheets"(ropes attached to
the clew of the sail). Begin with a bight in the larger rope. Then weave the end of the smaller rope through the
eye, around the bight, and back under itself. Snug it carefully before applying any strain to the knot.
Bowline
The bowline has been called the king of knots. It will never slip or jam if properly made and, thus, is excellent
for tying around a person in a rescue. Begin by formatting an overhand loop in the standing part. Then take the
free end up through the eye, around the standing part and back where it came from.
Fisherman’s Knot
The Fisherman's knot is a specialized bend. It consists of two overhand knots wrapped around each other. It
requires little dexterity to tie, so is often used in stubborn materials. When tightened, it becomes fairly
compact, and the free ends. can be cropped very close to the knot. These qualities make it very useful for
fishing line-it is less likely to jam a fishing rod, and is easier to tie with cold, wet hands. To tie the fisherman's
knot, lay the two ends to be tied alongside each other and facing opposite ways. Tie an overhand knot on the
first rope and pass the second rope through the loop formed. Tighten the overhand knot, to prevent the line
inside it from flopping around. Then tie another overhand knot on the second rope with the first rope passing
through it. This know can be used to secure the practice rope looped from the left shoulder to right hip for the
knotmaster program.
Knot Master – Troop 270
Page 9 Rev 1.2
Standard Whipping
Whip the ends of ropes to prevent fraying and to prolong the life of the rope. Whipping also provides a
uniform end to makes untying the rope easier. Use a whipping material that is a much smaller diameter than
the rope you are going to whip. Begin with the running end “A” of the whipping material lined up with the
running end of the rope. Create a bight loop approximately 1” above where you will start you whipping. Start
looping the whipping material around the rope in a location where the rope is still tightly woven. End by
passing the end “B” through the original loop and pulling the running end “A” to draw the loop inside the
whipping. Trim both ends close to the whipping.
Close Band Seizing
The Close Band seizing knot is useful for fastening two ropes side by side and will be used for the insignia
seizing for each completed Knotmaster level. The knot is tied in the same fashion as the “Ordinary Whipping”
above.
Knot Master – Troop 270
Page 10 Rev 1.2
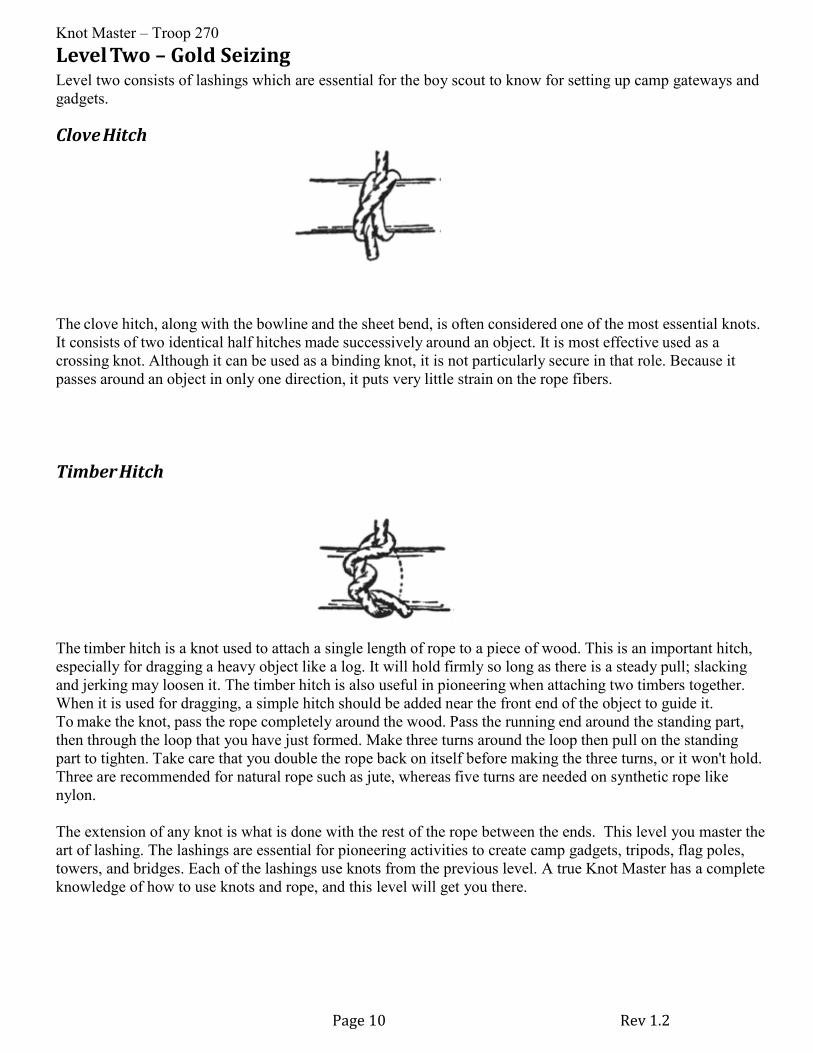
Level Two – Gold Seizing Level two consists of lashings which are essential for the boy scout to know for setting up camp gateways and
gadgets.
Clove Hitch
The clove hitch, along with the bowline and the sheet bend, is often considered one of the most essential knots.
It consists of two identical half hitches made successively around an object. It is most effective used as a
crossing knot. Although it can be used as a binding knot, it is not particularly secure in that role. Because it
passes around an object in only one direction, it puts very little strain on the rope fibers.
Timber Hitch
The timber hitch is a knot used to attach a single length of rope to a piece of wood. This is an important hitch,
especially for dragging a heavy object like a log. It will hold firmly so long as there is a steady pull; slacking
and jerking may loosen it. The timber hitch is also useful in pioneering when attaching two timbers together.
When it is used for dragging, a simple hitch should be added near the front end of the object to guide it.
To make the knot, pass the rope completely around the wood. Pass the running end around the standing part,
then through the loop that you have just formed. Make three turns around the loop then pull on the standing
part to tighten. Take care that you double the rope back on itself before making the three turns, or it won't hold.
Three are recommended for natural rope such as jute, whereas five turns are needed on synthetic rope like
nylon.
The extension of any knot is what is done with the rest of the rope between the ends. This level you master the
art of lashing. The lashings are essential for pioneering activities to create camp gadgets, tripods, flag poles,
towers, and bridges. Each of the lashings use knots from the previous level. A true Knot Master has a complete
knowledge of how to use knots and rope, and this level will get you there.
Knot Master – Troop 270
Page 11 Rev 1.2
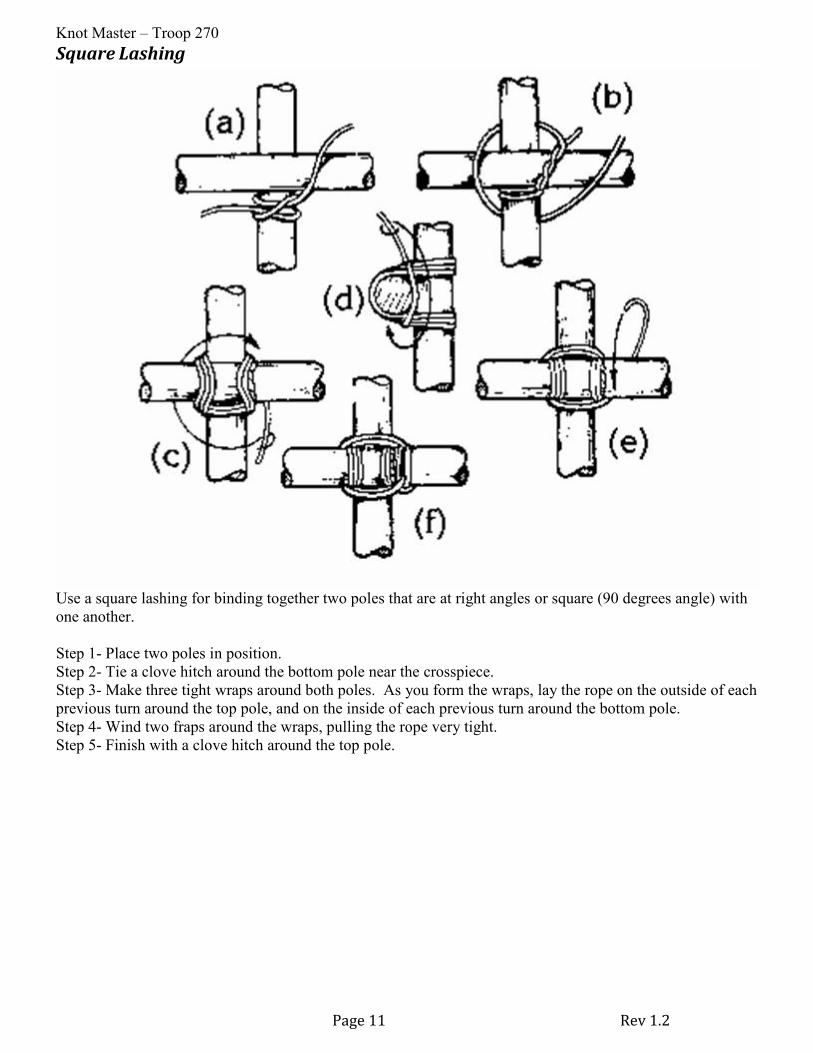
Square Lashing
Use a square lashing for binding together two poles that are at right angles or square (90 degrees angle) with
one another.
Step 1- Place two poles in position.
Step 2- Tie a clove hitch around the bottom pole near the crosspiece.
Step 3- Make three tight wraps around both poles. As you form the wraps, lay the rope on the outside of each
previous turn around the top pole, and on the inside of each previous turn around the bottom pole.
Step 4- Wind two fraps around the wraps, pulling the rope very tight.
Step 5- Finish with a clove hitch around the top pole.
Knot Master – Troop 270
Page 12 Rev 1.2
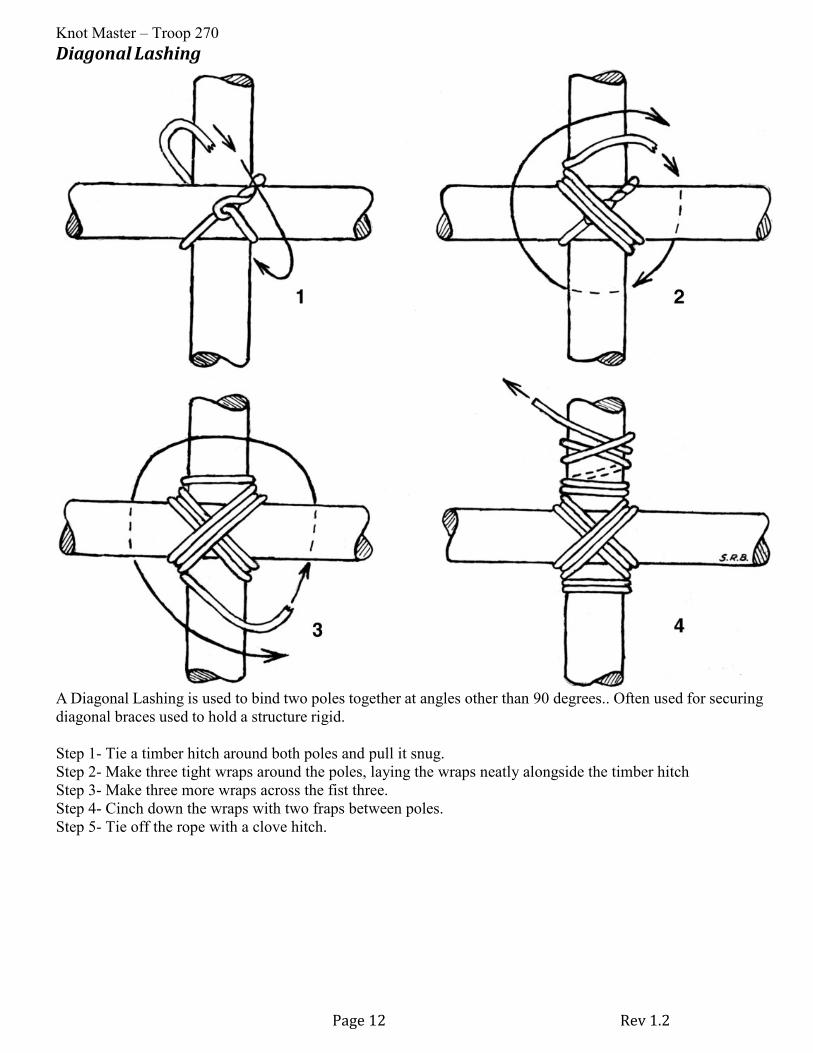
Diagonal Lashing
A Diagonal Lashing is used to bind two poles together at angles other than 90 degrees.. Often used for securing
diagonal braces used to hold a structure rigid.
Step 1- Tie a timber hitch around both poles and pull it snug.
Step 2- Make three tight wraps around the poles, laying the wraps neatly alongside the timber hitch
Step 3- Make three more wraps across the fist three.
Step 4- Cinch down the wraps with two fraps between poles.
Step 5- Tie off the rope with a clove hitch.

Knot Master – Troop 270
Page 13 Rev 1.2
Sheer Lashing
A sheer lashing is often used to bind adjacent poles together. The frapping turns are used to tighten the lashing.
A loose Sheer Lashing made around the ends of two poles will allow the poles to be opened out and used as an
A-frame. Use an over under technique to allow room for frapping.
Tripod Lashing
The tripod lashing is a shear lashing that binds three poles together at the same point. The tripod lashing gets it
name from the fact that its most common use is the construction of a tripod. The tripod lashing can be used just
about anywhere in a structure that three poles cross each other at the same point and the same time in the
sequence of construction. Tripod lashing takes two main forms; with racked wrapping turns (the rope is woven
between the poles) and with plain wrapping turns (the rope is wrapped around the poles without weaving the
rope between the poles). When the lashing is made with racking turns the rope contacts each pole around its
entire circumference; this contact makes the tripod lashing with racking turns the most secure form of tripod
lashing: therefore tripod lashing with racking turns should be used when safety is important. However, for light
structures where there would be no danger if the lashing slipped, the faster to tie tripod lashing with plain
wrapping turns may be used.

Knot Master – Troop 270
Page 14 Rev 1.2
Tripod Lashing For Light Structures
Hold spars as in drawing. Place rope end in groove between spars. Wrap lightly a few times around spars and
bring rope end up in groove. Finish with Square Knot and open tripod.
Round Lashing
Used to lash two poles together (constructing a flagpole). Use the same tying technique as the Standard
Whipping and Close Band Seizing.

Knot Master – Troop 270
Page 15 Rev 1.2
Level Three –Blue Seizing Level three consist of a combination of utility and fishing knots.
Surgeons Knot
The surgeon's knot is a simple modification to the square knot. It adds an extra twist when tying the first
throw, forming a double overhand knot, thus adding friction which makes the knot more secure. This knot is
named for the fact that it is commonly used by surgeons in situations where it is important to maintain tension
on a suture. Surgeon's knots are used in fly fishing as well as in tying packages.
Double Fisherman’s Knot
The Double Fisherman’s Knot is the traditional knot to tie two ropes together for rappelling but has generally
fallen out of favor for other knots like the double figure-8 knot. It can be difficult to check visually and is often
difficult to untie after being weighted, particularly if the ropes are wet. This knot is best used for tying thin
pieces of accessory cord like Spectra together for anchors or slinging nuts like Hexentrics. It's also called the
grapevine knot.

Knot Master – Troop 270
Page 16 Rev 1.2
Larks Head Knot
Securely attaches a rope to a ring or pole.
Cinch Knot
The Clinch knot provides one good method of securing fishing line to a hook, lure, or swivel. The "improved"
version used here includes an extra tuck under the final turn. It is commonly used to fasten the leader to the fly.
It is not recommended if you are using
over 12lb test line. When tying it, it is important to wind the loops as a neat spiral round the standing line. Hold
the loops under your fingers as you wind the line on.
Knot Master – Troop 270
Page 17 Rev 1.2
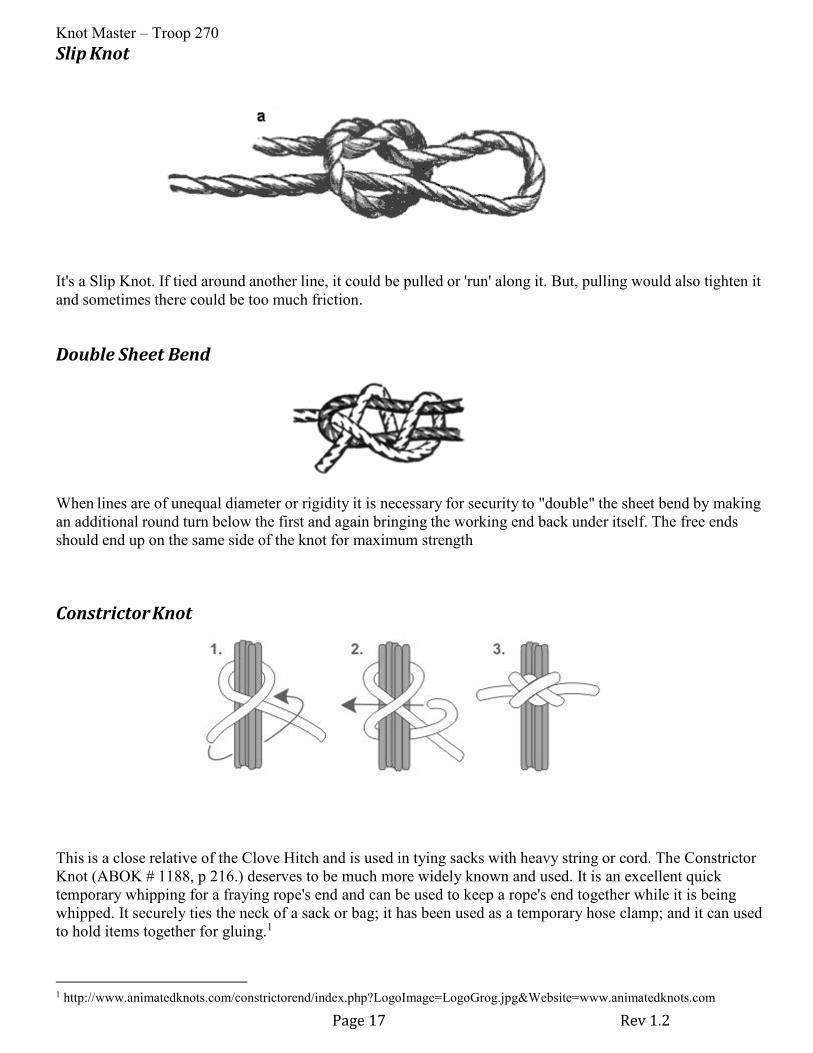
Slip Knot
It's a Slip Knot. If tied around another line, it could be pulled or 'run' along it. But, pulling would also tighten it
and sometimes there could be too much friction.
Double Sheet Bend
When lines are of unequal diameter or rigidity it is necessary for security to "double" the sheet bend by making
an additional round turn below the first and again bringing the working end back under itself. The free ends
should end up on the same side of the knot for maximum strength
Constrictor Knot
This is a close relative of the Clove Hitch and is used in tying sacks with heavy string or cord. The Constrictor
Knot (ABOK # 1188, p 216.) deserves to be much more widely known and used. It is an excellent quick
temporary whipping for a fraying rope's end and can be used to keep a rope's end together while it is being
whipped. It securely ties the neck of a sack or bag; it has been used as a temporary hose clamp; and it can used
to hold items together for gluing.1
1 http://www.animatedknots.com/constrictorend/index.php?LogoImage=LogoGrog.jpg&Website=www.animatedknots.com

Knot Master – Troop 270
Page 18 Rev 1.2
Level Four – Green Seizing Level four consist of a useful knots for climbing
Figure Eight Knot
The figure-eight knot is very important in both sailing and rock climbing as a method of stopping ropes from
running out of retaining devices.
Alpine Butterfly
This is the best knot for making a nonslip loop in the bight of a rope. Simply twist two loops into the rope.
Bring the top of the top loop around the bottom of the rope and back through backside of the second loop.
Adjust as necessary.
Water/Bow Knot
This knot is known as a Water Knot to the climbing folk and as a Retrace Overhand because of how it is tied. It
is often used for tying flat webbing into a continuous loop to make a runner (which can be tricky) It is quite
strong but can be very difficult to untie. That is actually a good thing when you're hanging off a rock on one!

Knot Master – Troop 270
Page 19 Rev 1.2
Zeppelin(or Rosendahl) Bend
The Zeppelin Bend is exceptionally secure and slip-resistant. Used to bend two lines together, it is jerk
resistant, jam resistant, and symmetric. It is also easy to untie, making it the best way to connect two ropes
together.
Figure Eight Loop
Much used by mountain climbers, it makes a nonslip loop in any part of the rope. It can be tied quickly and
easily in difficult situations. This can be another loop end knot that can be used to form a running loop.

Knot Master – Troop 270
Page 20 Rev 1.2
Munter Hitch
The handy Munter hitch serves both as a belay and rappel knot for single person belays and systems only.
Works whether the rope is being paid out or in and can also be used as part of a load release hitch.2
Prusik Knot
Its principal use is allowing a rope to be climbed. Two Prusik loops are alternately slid up the static rope: a
long Prusik loop allows the climber to lift himself using leg power, and a second short Prusik loop is attached
to the harness.
2 http://www.rescueresponse.com/html/news04-02/technique.html

Knot Master – Troop 270
Page 21 Rev 1.2
Level Five – Red Seizing
Truckers Hitch
The Trucker's Hitch has the distinctive feature of providing a three to one mechanical advantage when being
tightened. It is a valuable knot – particularly for securing loads or tarpaulins. There are several variations of the
knot, all of which use a loop in the standing part of the rope as a make-shift pulley in order to obtain a 3 to 1
mechanical advantage. The diagram above is widely used today. It is composed of three parts: a loop, a
purchase, and two half hitches. An eye is formed by twisting the rope after which a loop is passed through the
eye. The purchase is then created by passing the free end round the hook and then back through the loop. After
tightening, the tail is used to tie two half hitches below the original loop.
Sheepshank Knot
Sheepshank
Sheepshank Knot finished with two half-hitches
The Sheepshank knot is used to shorten a length of rope. The knots will only hold as long as there is tension
on the rope. Adding an extra half-hitch will help hold knots when not under tension.
Knot Master – Troop 270
Page 22 Rev 1.2
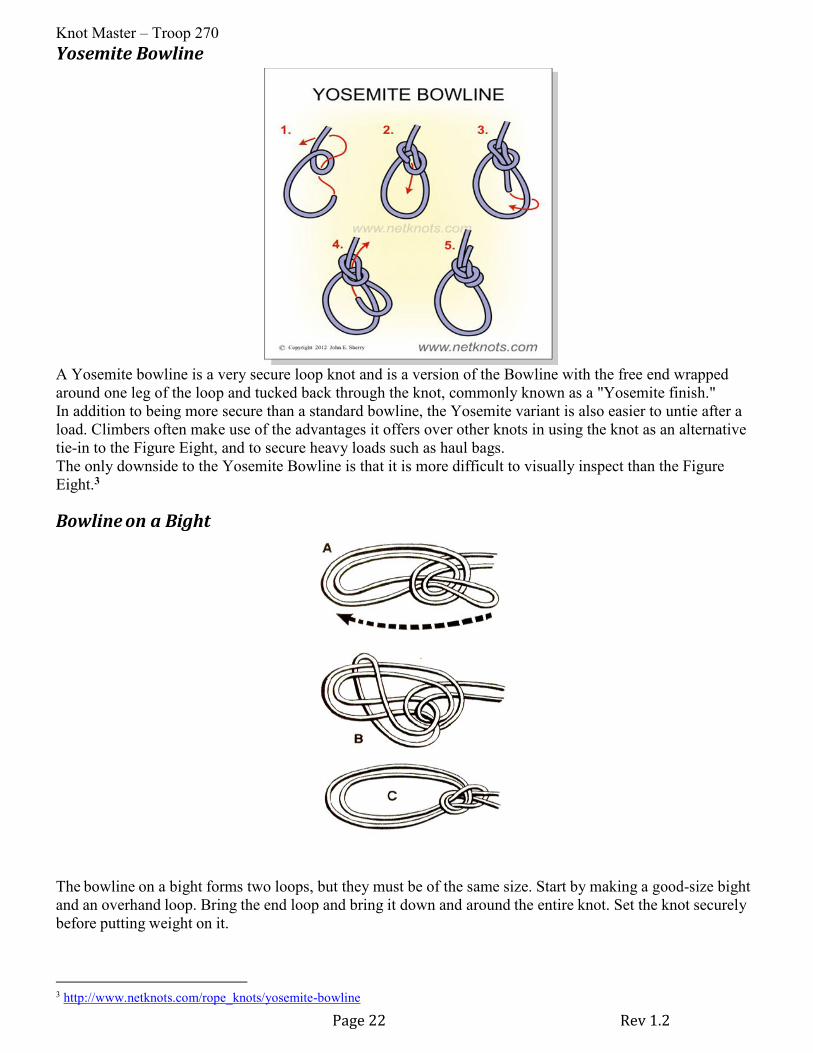
Yosemite Bowline
A Yosemite bowline is a very secure loop knot and is a version of the Bowline with the free end wrapped
around one leg of the loop and tucked back through the knot, commonly known as a "Yosemite finish."
In addition to being more secure than a standard bowline, the Yosemite variant is also easier to untie after a
load. Climbers often make use of the advantages it offers over other knots in using the knot as an alternative
tie-in to the Figure Eight, and to secure heavy loads such as haul bags.
The only downside to the Yosemite Bowline is that it is more difficult to visually inspect than the Figure
Eight.3
Bowline on a Bight
The bowline on a bight forms two loops, but they must be of the same size. Start by making a good-size bight
and an overhand loop. Bring the end loop and bring it down and around the entire knot. Set the knot securely
before putting weight on it.
3 http://www.netknots.com/rope_knots/yosemite-bowline

Knot Master – Troop 270
Page 23 Rev 1.2
French Bowline
The French Bowline, also known as the Portuguese Bowline, is similar to the regular bowline but it has two
loops. The two loops are adjustable in size. You can pull rope from one loop into the other, even when the knot
is tight.
Perfection Loop
The Perfection Loop is a fixed loop at the end of a rope or leader. It is unique in that the standing end of the
rope is centered on the loop.

Knot Master – Troop 270
Page 24 Rev 1.2
Level Six – Brown Seizing These Bends and Bights are advanced knots but they are still very common in the overall family of knots. The
advanced Scout should be able to use these knots at will for everything from setting up camp to First Aid
techniques. The Advanced Knot Master at this level is becoming the authority on knots and can assist any level
of scout with the correct knot for a particular use.
Anchor Bend
The Anchor bend, which is actually a hitch not a bend, is also called the Fisherman's Bend. This knot is one of
the strongest hitches. Begin by taking two turns around the post or ring. Then bring the end over the standing
part and through the loop. Finish with two half hitches on the standing end. This can be made more secure by
seizing the ends of the rope.
Double Carrick Bend
The Double Carrick bend is a knot used for joining two lines. It is particularly appropriate for very heavy rope
or cable that is too large and stiff to easily be formed into other common bends. It will not jam even after
carrying a significant load or being soaked with water.

Knot Master – Troop 270
Page 25 Rev 1.2
Clove Hitch on a Bight
The nearest there is to a general utility hitch. It is easy to tie in a number of different ways and to untie. It has a
wide variety of uses.
Mooring Hitch
An underhand loop toggled to the standing part with a bight made in the running end. Used to securely tie off a
rope so that it can be quickly untied, especially a small boat to a dock or piling. A secure knot that is easily tied
or untied in wet or dry rope; when
properly tied a non-closing loop is formed, this allows the hitch to move up or down a piling as the water level
changes. (1) Take a bight around an object. (2) Form an underhand loop in the running part. (3) Place the eye
of the underhand loop over the standing part. (4) Pull a bight of the standing part through the eye of the
underhand loop. (5) Pull the underhand loop tight around the bight. (6) Place the running part under the eye of
the bight that was pulled through the underhand loop. (7) Pull a bight of the running part through the eye of the
standing part bight. (8) Pull on the standing part to tighten the standing part bight around the running part
bight.
Knot Master – Troop 270
Page 26 Rev 1.2
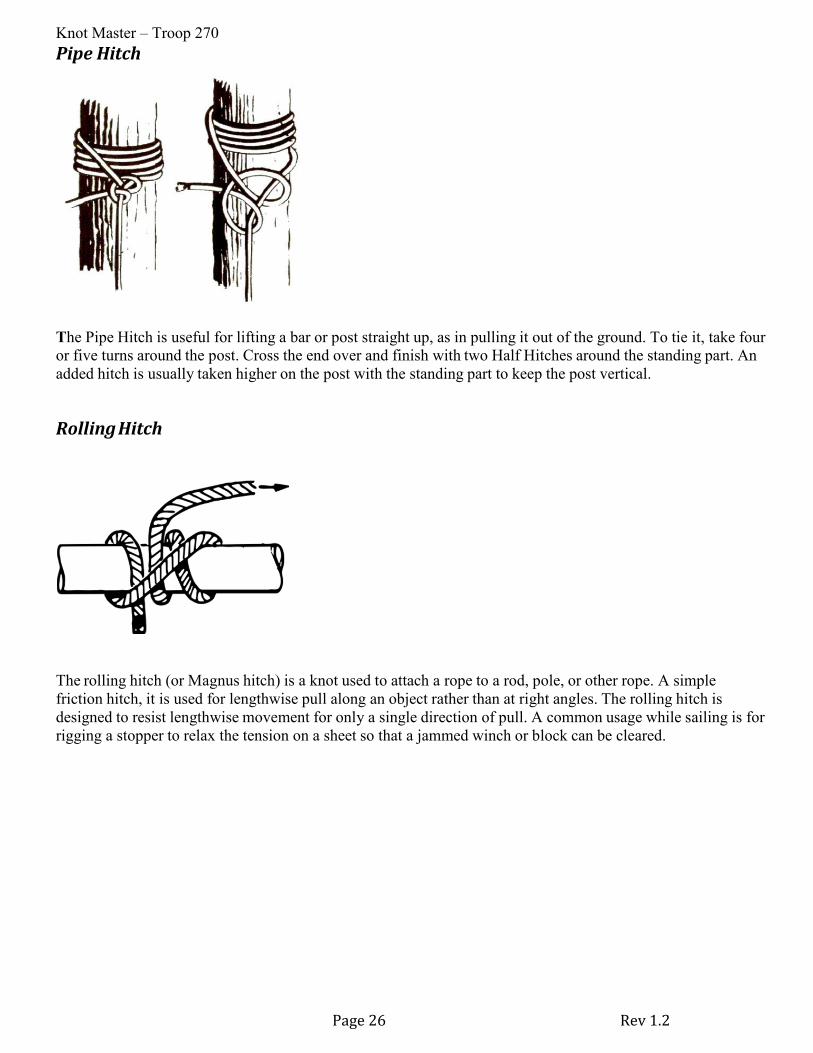
Pipe Hitch
The Pipe Hitch is useful for lifting a bar or post straight up, as in pulling it out of the ground. To tie it, take four
or five turns around the post. Cross the end over and finish with two Half Hitches around the standing part. An
added hitch is usually taken higher on the post with the standing part to keep the post vertical.
Rolling Hitch
The rolling hitch (or Magnus hitch) is a knot used to attach a rope to a rod, pole, or other rope. A simple
friction hitch, it is used for lengthwise pull along an object rather than at right angles. The rolling hitch is
designed to resist lengthwise movement for only a single direction of pull. A common usage while sailing is for
rigging a stopper to relax the tension on a sheet so that a jammed winch or block can be cleared.

Knot Master – Troop 270
Page 27 Rev 1.2
Level Seven – Black Seizing These knots are going to be a little more challenging than the rest of the knots you have mastered thus far. A
few of these are very useful in your daily lives and will be used for years to come as the “goto” knots. Others
are more for decoration and plain skill. Once you have mastered these knots you will truly be a Knot Master!
Half Windsor Tie
Full Windsor Tie

Knot Master – Troop 270
Page 28 Rev 1.2
Masthead Knot
A multiple loop knot formed by reeving the loosely made loops of two over hand knots through each other and
then securing the knot to a mast (pole).
On board ship, a masthead knot was used to rig a temporary mast if the mast was lost in battle or during a
storm. On land a masthead knot can be used to rig a gin pole or a flag pole.
There are several forms of the Masthead Knot. This form of the Masthead Knot was chosen for its symmetry
and the ease of transition to the running half hitches used to secure it to the pole.
(1) Loosely tie two over hand knots. (2) Place the loop of one overhand knot on top of the loop of the loop of
the other over hand knot. (3&4) Reeve the loops of the overhand knot through the half knot part of the
opposite overhand knot. (5) Place over a pole and draw the three loops up even. (6) Secure to the pole with a
series of running half hitches above and below the mast head knot.

Knot Master – Troop 270
Page 29 Rev 1.2
Diamond Knot
The Diamond Knot (or knife lanyard knot or friendship knot) is used as a decoration and joining knot in a cord
with a loop such as a Whistle lanyard. This is the knot that was used to create the Knot Master lanyard to host
the colored seizings that you earn.
Step 1 the diamond knot begins as a carrick bend with the ends exiting diagonally opposite each other.
Step 2 each working end is then passed over the other ropes standing part.
Step 3 Then the ends are passed up through the center of the carrick bend from below. The knot is then gently
rearranged and tightened so that the ends emerge from the knot parallel and opposite their standing part.
Knot Master – Troop 270
Page 30 Rev 1.2
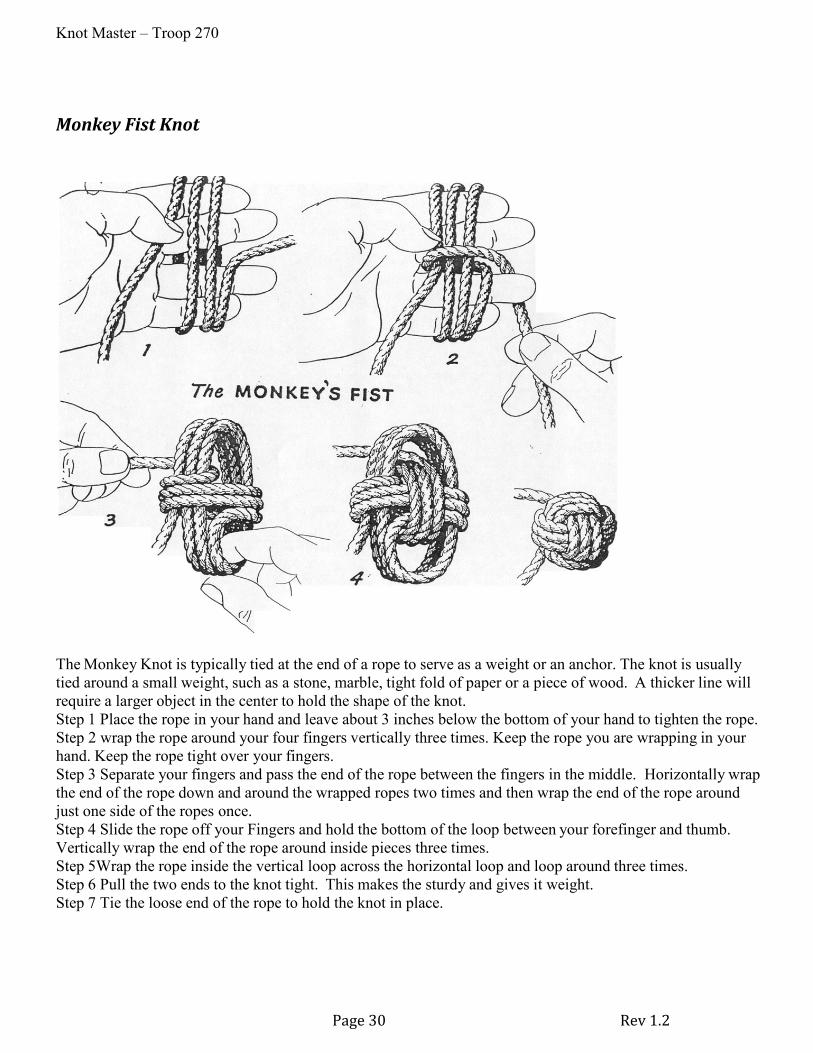
Monkey Fist Knot
The Monkey Knot is typically tied at the end of a rope to serve as a weight or an anchor. The knot is usually
tied around a small weight, such as a stone, marble, tight fold of paper or a piece of wood. A thicker line will
require a larger object in the center to hold the shape of the knot.
Step 1 Place the rope in your hand and leave about 3 inches below the bottom of your hand to tighten the rope.
Step 2 wrap the rope around your four fingers vertically three times. Keep the rope you are wrapping in your
hand. Keep the rope tight over your fingers.
Step 3 Separate your fingers and pass the end of the rope between the fingers in the middle. Horizontally wrap
the end of the rope down and around the wrapped ropes two times and then wrap the end of the rope around
just one side of the ropes once.
Step 4 Slide the rope off your Fingers and hold the bottom of the loop between your forefinger and thumb.
Vertically wrap the end of the rope around inside pieces three times.
Step 5Wrap the rope inside the vertical loop across the horizontal loop and loop around three times.
Step 6 Pull the two ends to the knot tight. This makes the sturdy and gives it weight.
Step 7 Tie the loose end of the rope to hold the knot in place.

Knot Master – Troop 270
Page 31 Rev 1.2
Turks Head Knot
A Turks head Knot is a decorative knot with variable number of interwoven strands, forming a closed loop. The
name is used to describe the general family of all such knots rather than one individual knot. While generally
seen made around a cylinder, the knot can be deformed into a flat mat-like shape. The Turks head is used as a
woggle by Scouts Leaders who complete their training course were thus awarded with the Wood Badge
insignia.
Each type of Turk’s head knot is classified according to the number of leads and bights and method of
construction. The number of bights is the number of crossings it makes as it goes around the circumference of
the cylinder. The number of leads is the number of strands around the circumference of the cylinder, before
doubling, tripling, etc. Depending on the number of bights and leads, a Turk’s head may be tied using a single
strand or multiple stands.
Knot Master – Troop 270
Page 32 Rev 1.2
Thief Knot
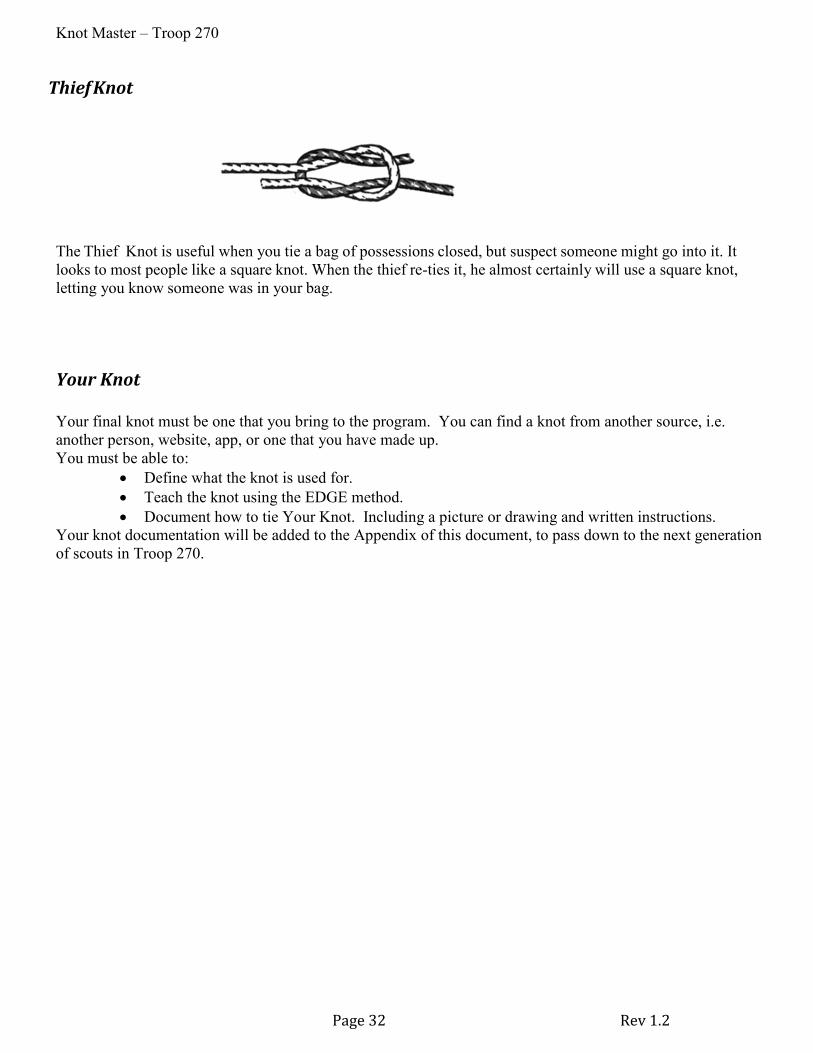
The Thief Knot is useful when you tie a bag of possessions closed, but suspect someone might go into it. It
looks to most people like a square knot. When the thief re-ties it, he almost certainly will use a square knot,
letting you know someone was in your bag.
Your Knot
Your final knot must be one that you bring to the program. You can find a knot from another source, i.e.
another person, website, app, or one that you have made up.
You must be able to:
• Define what the knot is used for.
• Teach the knot using the EDGE method.
• Document how to tie Your Knot. Including a picture or drawing and written instructions.
Your knot documentation will be added to the Appendix of this document, to pass down to the next generation
of scouts in Troop 270.

Knot Master – Troop 270
Page 33 Rev 1.2
Appendix
Many thanks to Troop 727 from whom we learned of this program!!!
Web Links: http://www.animatedknots.com/
http://notableknotindex.webs.com/Zeppelin.html
iPhone Apps Knot Guide
Animated Knots
Have fun learning and tying knots!
Troop 270 Knot Masters
Who will be the first?????

Knot Master – Troop 270
Page 34 Rev 1.2
Knot Master Submitted Knots
One-handed Bowline- Jim Clements
Submitted by Scoutmaster Jim Clements.
The One-handed Bowline is the same as a regular Bowline with the exception you tie it with only one hand.
This will come in handy if you are in a sticky predicament and you must use one hand to hold onto the rescue
rope and the other to tie a bowline.

Knot Master – Troop 270
Page 35 Rev 1.2
Dave’s Loop
Submitted by Assistant Scoutmaster Dave Dalke.
Dave’s Loop is a fixed loop and utilizes the best qualities of various knot techniques. The loop and the
standing end and the loop are perfectly aligned. The Running end is held cleanly in place above and below the
coiled seizing portion of the knot using loops similar to those used in a seizing. The knot portion of the loop is
also perfectly symmetrical, giving the knot a very pleasing look. Once a load is applied to the loop, it will be
difficult but “knot” impossible to untie.
Knot Master – Troop 270
Page 36 Rev 1.2
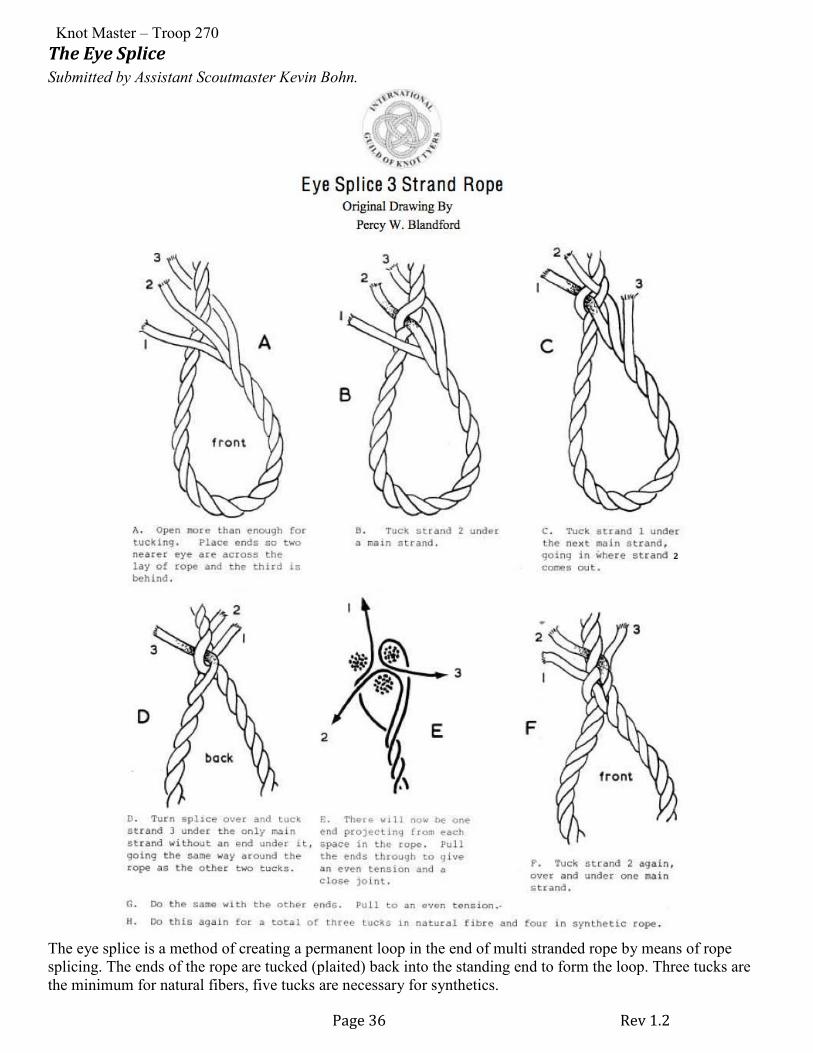
The Eye Splice
Submitted by Assistant Scoutmaster Kevin Bohn.
The eye splice is a method of creating a permanent loop in the end of multi stranded rope by means of rope
splicing. The ends of the rope are tucked (plaited) back into the standing end to form the loop. Three tucks are
the minimum for natural fibers, five tucks are necessary for synthetics.
Knot Master – Troop 270
Page 37 Rev 1.2
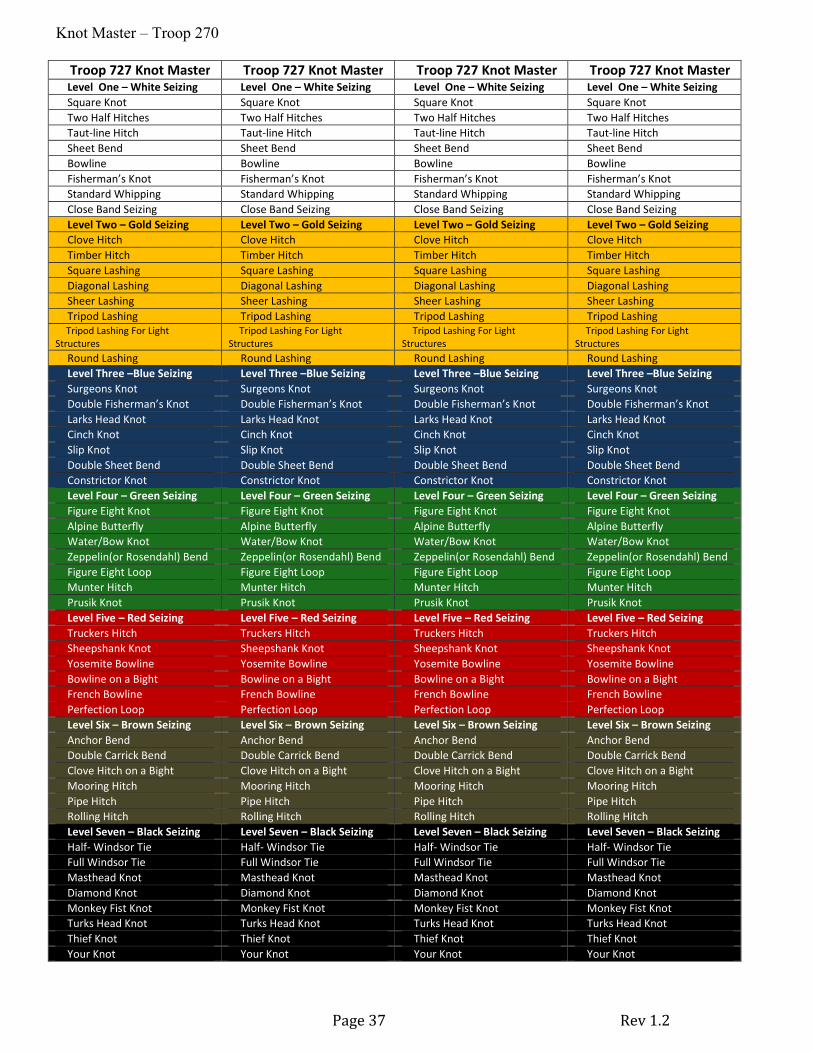
Troop 727 Knot Master Troop 727 Knot Master Troop 727 Knot Master Troop 727 Knot Master
Level One – White Seizing Level One – White Seizing Level One – White Seizing Level One – White Seizing
Square Knot Square Knot Square Knot Square Knot
Two Half Hitches Two Half Hitches Two Half Hitches Two Half Hitches
Taut-line Hitch Taut-line Hitch Taut-line Hitch Taut-line Hitch
Sheet Bend Sheet Bend Sheet Bend Sheet Bend
Bowline Bowline Bowline Bowline
Fisherman’s Knot Fisherman’s Knot Fisherman’s Knot Fisherman’s Knot
Standard Whipping Standard Whipping Standard Whipping Standard Whipping
Close Band Seizing Close Band Seizing Close Band Seizing Close Band Seizing
Level Two – Gold Seizing Level Two – Gold Seizing Level Two – Gold Seizing Level Two – Gold Seizing
Clove Hitch Clove Hitch Clove Hitch Clove Hitch
Timber Hitch Timber Hitch Timber Hitch Timber Hitch
Square Lashing Square Lashing Square Lashing Square Lashing
Diagonal Lashing Diagonal Lashing Diagonal Lashing Diagonal Lashing
Sheer Lashing Sheer Lashing Sheer Lashing Sheer Lashing
Tripod Lashing Tripod Lashing Tripod Lashing Tripod Lashing
Tripod Lashing For Light
Structures
Tripod Lashing For Light
Structures
Tripod Lashing For Light
Structures
Tripod Lashing For Light
Structures
Round Lashing Round Lashing Round Lashing Round Lashing
Level Three –Blue Seizing Level Three –Blue Seizing Level Three –Blue Seizing Level Three –Blue Seizing
Surgeons Knot Surgeons Knot Surgeons Knot Surgeons Knot
Double Fisherman’s Knot Double Fisherman’s Knot Double Fisherman’s Knot Double Fisherman’s Knot
Larks Head Knot Larks Head Knot Larks Head Knot Larks Head Knot
Cinch Knot Cinch Knot Cinch Knot Cinch Knot
Slip Knot Slip Knot Slip Knot Slip Knot
Double Sheet Bend Double Sheet Bend Double Sheet Bend Double Sheet Bend
Constrictor Knot Constrictor Knot Constrictor Knot Constrictor Knot
Level Four – Green Seizing Level Four – Green Seizing Level Four – Green Seizing Level Four – Green Seizing
Figure Eight Knot Figure Eight Knot Figure Eight Knot Figure Eight Knot
Alpine Butterfly Alpine Butterfly Alpine Butterfly Alpine Butterfly
Water/Bow Knot Water/Bow Knot Water/Bow Knot Water/Bow Knot
Zeppelin(or Rosendahl) Bend Zeppelin(or Rosendahl) Bend Zeppelin(or Rosendahl) Bend Zeppelin(or Rosendahl) Bend
Figure Eight Loop Figure Eight Loop Figure Eight Loop Figure Eight Loop
Munter Hitch Munter Hitch Munter Hitch Munter Hitch
Prusik Knot Prusik Knot Prusik Knot Prusik Knot
Level Five – Red Seizing Level Five – Red Seizing Level Five – Red Seizing Level Five – Red Seizing
Truckers Hitch Truckers Hitch Truckers Hitch Truckers Hitch
Sheepshank Knot Sheepshank Knot Sheepshank Knot Sheepshank Knot
Yosemite Bowline Yosemite Bowline Yosemite Bowline Yosemite Bowline
Bowline on a Bight Bowline on a Bight Bowline on a Bight Bowline on a Bight
French Bowline French Bowline French Bowline French Bowline
Perfection Loop Perfection Loop Perfection Loop Perfection Loop
Level Six – Brown Seizing Level Six – Brown Seizing Level Six – Brown Seizing Level Six – Brown Seizing
Anchor Bend Anchor Bend Anchor Bend Anchor Bend
Double Carrick Bend Double Carrick Bend Double Carrick Bend Double Carrick Bend
Clove Hitch on a Bight Clove Hitch on a Bight Clove Hitch on a Bight Clove Hitch on a Bight
Mooring Hitch Mooring Hitch Mooring Hitch Mooring Hitch
Pipe Hitch Pipe Hitch Pipe Hitch Pipe Hitch
Rolling Hitch Rolling Hitch Rolling Hitch Rolling Hitch
Level Seven – Black Seizing Level Seven – Black Seizing Level Seven – Black Seizing Level Seven – Black Seizing
Half- Windsor Tie Half- Windsor Tie Half- Windsor Tie Half- Windsor Tie
Full Windsor Tie Full Windsor Tie Full Windsor Tie Full Windsor Tie
Masthead Knot Masthead Knot Masthead Knot Masthead Knot
Diamond Knot Diamond Knot Diamond Knot Diamond Knot
Monkey Fist Knot Monkey Fist Knot Monkey Fist Knot Monkey Fist Knot
Turks Head Knot Turks Head Knot Turks Head Knot Turks Head Knot
Thief Knot Thief Knot Thief Knot Thief Knot
Your Knot Your Knot Your Knot Your Knot