know your vehicle basic operation, starting, stopping
TRANSCRIPT

Know Your Vehicle: Basic Operation, Starting, Stopping, & Steering

Key Information From Owner’s Manual 1. Initial Vehicle Set Up
2. How to Check Vehicle Fluids
3. Tips for Better Driving Practices (Optimizing Gas Mileage)
4. How to Troubleshoot Common Problems
5. How to Clean Vehicle Surfaces
6. Vehicle Specifications (Tire Size, Oil Type)
7. What Does This “Button” Do?
8. Dashboard Light Recognition
9. What Warranty Covers

Recognizing Dashboard Warning Lights
• Though dashboard warning lights vary from vehicle to vehicle, some common warning symbols and controls are pictured on the following slides.
Why is it important to recognize dashboard warning lights?
1

1

1

Warning Light Recognition Activity Explain the importance of the following warning lights:
• Engine Temperature
• Oil Pressure
• Battery Charging Light
• Brake Warning Light
• Check Engine Light

Developing Good Driving Habits
Good driving habits, including adequate preparation, are essential to safely and efficiently operate a vehicle.
What might you do to prepare yourself, your vehicle, and your passengers before a drive?
What potential consequences could result if the driver, vehicle or passengers are not prepared to drive?

Pre-Driving Check Activity
• Working in pairs, draft a pre-drive checklist.
• Checklists should cover preparation for both the vehicle and the driver.
• Be prepared to discuss pre-drive checklists as a group

As You Approach Your Vehicle• Have your keys in hand before approaching
your vehicle or entering the parking area. If you have a keyless-entry remote with a panic alarm button, keep it in your hand.
• Be alert to other pedestrians and drivers.• Look for signs of movement around your
vehicle.• Make sure other drivers see you. Walk well
away from parked vehicles.• If parked at the curb, face traffic as you
approach the driver’s door.

Before Starting Your Drive….• Place your key in the ignition (if applicable).• Make sure all door are closed tightly and locked.• Check windows and wipers– clean and/or defrost as needed.• Check items that could block your view or strike an occupant in the event of a
quick stop or crash – make sure nothing is hanging from rearview mirror.• Adjust the seat, steering-wheel/column, accelerator/brake pedals and head
restraints – ensure nothing can roll out from under the seat.• Fasten and adjust seat belt and make sure all passengers are buckled
appropriately.• Adjust air vents and temperature control.• Check that electronic devices are stowed.• Consider assigning a passenger to be a co-pilot to help out, especially if you
are a new driver.

Adjusting the Vehicle What adjustments can be made to better match the fit between you and your vehicle?
• Seat position / head restraint• Steering wheel• Mirrors• Seat belt

Body PositionHow should the drivers body be positioned, relative to the vehicle controls?• You should be seated in a comfortable, upright
position, squarely behind the steering wheel.
• The seat should be positioned forward or back, up or down, so that you can easily operate the accelerator, brake and clutch pedals without having to lift your heel from the floor.
• Drivers should not sit closer than 10 inches from the steering wheel to ensure air bag has adequate room to deploy safely.

Adjusting the Head Restraint• Adjust the head
restraint so it is at ear level.
• This can protect you from injury should you be involved in a rear end crash.

Steering Wheel-Hand Position• Hand position-check for thumb
tabs.• Adjust your steering wheel if it is
telescopic (up or down).• You may also be able to adjust the
distance between the steering wheel and your chest (in and out).
• Also check for ability to reach secondary controls.

Adjusting the Steering Wheel/Column • An adjustment lever on the
underside of the steering column permits the driver to raise or lower the steering column for better steering wheel angle and height.
• In a number of newer-model vehicles, the steering column is also telescopic, allowing the driver to adjust the distance between the steering wheel and the driver’s chest.

Adjusting the Seat BeltsUsing your seat belt is the single most effective way to protect yourself in the event of a crash.• The lap belt and shoulder belt should be secured across
the pelvis and rib cage, which are better able to withstand crash forces than other parts of the body.
• Place the shoulder belt across the middle of the chest and away from the neck.
• The lap belt should rest across the hips, not the stomach.• NEVER put the shoulder belt behind the back or under
the arm.

Seat Belt Height Adjustment• The height of the seat belt can also be adjusted for
better fit.
• Check your owner’s manual for further information.

Mirror Settings • It is important to how to adjust
your mirrors, what can and can’t be seen in them, and where your blind spots are.
• Let’s review different strategies for setting your mirrors as well as the associated advantages and disadvantages.
Strategies for Setting Your Mirrors 1

Adjusting Rearview Mirror
• Adjust the rearview mirror so that it covers the entire rear window.
• To use this mirror you should have to move only your eyes, not turn your head.

Know Where Important Controls Are• Door Locks• Window Controls• Mirror Adjustments • Windshield Wipers• Headlights• Emergency Hazards• Hood Release• Truck Release• Fuel Door Release
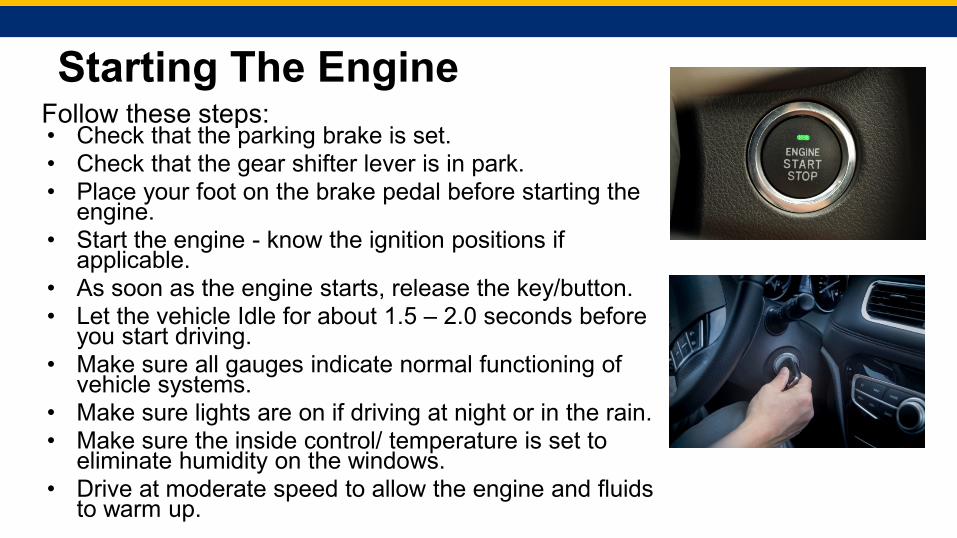
Starting The EngineFollow these steps:• Check that the parking brake is set.• Check that the gear shifter lever is in park.• Place your foot on the brake pedal before starting the
engine.• Start the engine - know the ignition positions if
applicable.• As soon as the engine starts, release the key/button.• Let the vehicle Idle for about 1.5 – 2.0 seconds before
you start driving.• Make sure all gauges indicate normal functioning of
vehicle systems.• Make sure lights are on if driving at night or in the rain.• Make sure the inside control/ temperature is set to
eliminate humidity on the windows.• Drive at moderate speed to allow the engine and fluids
to warm up.

Steering TechniquesThree steering techniques:
1. Hand-over-hand steering2. Hand-to-hand steering3. One-hand steering
Keep your thumbs poised on the outside of the wheel rather than a full, tight grip.

Hand-Over-Hand Steering• Grasp the steering wheel with your right hand at 3 o’clock
and your left hand at 9 o’clock. • Use the opposite hand of the turning direction to start the
turn.• One hand pushes the steering wheel up, past the 12
o’clock position, while the other hand reaches up to the 12 o’clock position, and pulls down towards 9 or 3 o’clockrotating the wheel in this fashion for the degree of turning needed.
• Hence called “hand over hand”, H-O-H technique.
2

Hand-to-Hand Steering• This is another steering method that may be used for making
turns.• Starting at the 9-3 position on the wheel, one hand pushes up
on the steering wheel to the 12 o’clock position while the other hand slides to the top and then pulls the wheel down, repeating the action until the turn is complete.
• This is sometimes called “feeding” the wheel or “H-T-H” hand to hand steering technique. Both hands are always employed in the steering and wrists never cross.
• Try testing both H-O-H or H-T-H to see which technique works best for you.
2

One-Handed Steering• One-handed steering is not recommended.
Why?
• Steering with one hand should be used only when backing up in a “straight line” back up or only briefly when adjusting dashboard controls.
• When turning while backing i.e. parallel parking, use both hands on the wheel.
• Palming the wheel is not recommended.
2

Steering Wheel Grip• Grip the steering wheel with your
arms bent at the elbows.• For better control and road feel, use
your fingers instead of the palms of your hands.
• Keep your thumbs up along the face of the steering wheel.
• Place your left hand around 9 o’clock and your right hand at about 3 o’clock as on the face of a clock.
2

Steering Errors
Research shows that a substantial percentage of crashes involving 16-year old drivers result from failure to make a quick turn or from improper evasive steering.
Of the three controls a driver has when driving, accelerating, braking and steering, steering is a “primary function”.
• What steering errors could drivers commit?
• What could be the results of such errors?

Operating Foot PedalsTips for operating the accelerator and brake pedals smoothly:
1. Wear good shoes - not flip flops or wide sole shoes. Be careful of boots or non flexible soles on shoes.
2. Rest the heel of your right foot on the floor, centered in front of the brake pedal.
3. Pivot your foot between the accelerator and brake.
4. Make sure you can depress the brake fully without toes slipping off the pedal.

Accelerating the VehicleThe ability to control speed depends upon good accelerator techniques.
Know the four levels of acceleration:• Idling acceleration- sometimes referred to as coasting, no gas, no
brake.• Light acceleration- holding steady, not increasing speed.• Progressive acceleration- gradually building to desired speed.• Thrust acceleration- moving quickly to increase speed.

Braking and DeceleratingBraking requires practice if it is to be performed smoothly and precisely.Know the four levels of deceleration:
• Release the accelerator - quick release of the accelerator “is” a braking action.
• Controlled or “squeeze” braking - as the pedal is depressed anything over a 20% braking action can be considered slowing.
• Threshold braking - using most of the braking available without a full sudden brake to a stop.
• Trail braking or “squeeze off” braking - allows the vehicle to start slowing but can be easily reversed.
Practice targeting where you want to stop and then use reference points to help determine how much to brake.

Occupant Protection-Vehicle IntegrityHow do these safety features help protect you?
• Seat belts - shoulder belt and lap belt
• Head restraints - adjustable vs stationary
• Air bags - side and frontal protection, other types
• Collapsible steering column and padded dash
• Driver compartment crumble zones

Communication and Visibility FeaturesThese are considered secondary controls:• Horn• Turn signals• Hazard flashers• Windshield wipers and
washers• HeadlightsCan you list any others?

Tips on Using the Primary and Secondary Controls
• Gear selector lever- Don’t get ahead of yourself- always check which gear you are in.
• Accelerator pedal- Understand that once you reach cruising speed light pressure is only needed to maintain speed.
• Brake pedal- Braking is used to slow down the vehicle but the driver’s foot should not rest on the pedal; this give off false messages to following drivers by way of activating the brake lights.
• Clutch pedal- In manual shift vehicle the driver must use this to switch gears and also hold the vehicle on a hill. Don’t stop too close to the vehicle ahead of you as the vehicle may roll backwards.

Tips on Using the Primary and Secondary Controls
Parking BrakeWhen to Use: When on hills, in addition to curbing your front wheels.
Cruise/Speed Control:When to Use: On long drives that cover straight flat roads; can help reduce foot/leg fatigue.
Special technology is being developed to help identify lane drifting, following distance and other controls. Which ones are in your vehicle?

Checking Under the HoodKnowing what to check to make sure your vehicle can operate properly is important. Make the following checks at least once a month or have a mechanic help you. We will discuss these further in one of the later sessions. • Battery (clean and level charge)• Engine coolant reservoir (radiator fluid)• Windshield washer fluid reservoir• Power steering fluid reservoir• Drive belts (tension and wear)• Engine oil dipstick• Transmission fluid dipstick (automatic transmission only)• Brake fluid reservoir• Air filter assembly

How many cylinders does this car have? What does this mean for the car?
1 2 3 4

References 1. Used with permission from Western Oregon University. Oregon Driver Risk Prevention
Curriculum Playbook. Oregon Department of Transportation. May 2016. http://oregondriveredplaybook.org/
2. Used with permission from National Highway Traffic Safety Association. Using Efficient Steering Techniques.https://www.nhtsa.gov/sites/nhtsa.dot.gov/files/steeringtechniques.pdf