kraftwerks sc installation yxz1000 ms 01 02 20 v2
TRANSCRIPT

#150-19-1000
| 2016-2018 YAMAHA YXZ1000RSUPERCHARGER SYSTEM
YXZ1000R
INSTALLATION
INSTRUCTIONSINSTRUCTIONS

2 TECHNICAL SUPPORT • [email protected] • 951.808.9888
The Kraftwerks Supercharger kit for the ’16-’18 Yamaha YXZ1000R was designed for easy installation. Competent mechanics with the appropriate tools will find the process to be relatively simple. This is a GENERAL installation guide; the installation and vehicle may vary slightly and some parts may not reflect current production pieces.
PLEASE BE AWARE THAT SOME PARTS MAY COME PRE-ASSEMBLED BUT ARE NOT TORQUED TO SPEC.
Review the installations in its entirety before beginning the installation. If you have any questions about your ability to perform the installation, take your vehicle to a qualified installer. If you cannot find an installer, please contact the seller or Kraftwerks directly for a referral.
If you will be using a floor jack, be sure to have properly rated jack stands to safely keep the vehicle in the air while it is being worked on. NEVER WORK UNDER A VEHICLE WITHOUT APPROPRIATE JACK STANDS.
INTRODUCTION
• Engine Rev Limiter must be set below 10,500 RPM. Any higher RPM will OVER-SPIN the Rotrex Supercharger head and WILL void its warranty.
• Kraftwerks Supercharger Kits do not require break-in or warm-up periods. However, always warm your engine up properly before operating at full boost.
• If an engine oil and filter change has not been performed recently, do so now using a high quality oil and filter.
• A minimum of 91 OCTANE fuel must be used.
• Fuel Filters with more than 50,000 miles of use must be replaced prior to operating engine under boost (this is critical to proper fuel flow and engine performance).
• Vehicles with more than 100,000 miles of use, consider installing a new radiator and thermostat (coolant / water with high calcium content can leave deposits over time that can inhibit proper cooling.
DISCLAIMER
• Only use genuine Rotrex SX150 Traction Oil for supercharger lubrication. The proprietary traction formula protects the supercharger where other oils would fail, and is what allows its high-RPM operating levels. Use of Non-Genuine Rotrex SX150 Traction Oil WILL void the warranty of the Rotrex Supercharger.
• Keep all Pipes and Hoses sealed and clean until ready for installation. The Rotrex Supercharger operates at speeds as high as 120,000 RPM on this application. ANY debris that inadvertently enters the inlet pipes or becomes stuck to the silicone hoses can enter the Rotrex Supercharger and damage its compressor blades. Compressor blade damage is NOT covered by the Rotrex two-year warranty.
• NEVER rotate the Rotrex Supercharger counter-clockwise. Rotating the Rotrex Supercharger counter-clockwise will void the warranty.
THIS SUPERCHARGER KIT MAY NOT BE LEGAL FOR USE ON PUBLIC ROADS OR POLLUTION CONTROLLEDENVIRONMENTS. CHECK YOUR LOCAL REGULATIONS BEFORE INSTALLING THIS SUPERCHARGER KIT.
ROTREX DISCLAIMER

INSTALLATION INSTRUCTIONS
3www.KraftwerksUSA.com
2016-2018 YAMAHA YXZ 1000R SUPERCHARGER KIT
SUPPORT PARTS» The Kraftwerks Quick Release LED Buggy Whip is the best way to make sure you’re seen in style!
Package Includes:- 17" x 18" Orange Kraftwerks Safety Flag- 4’ 9" Fiber-Optic Whip Pole- Anodized Billet Aluminum Quick Release Pole Base- 3" Anodized Billet Aluminum LED Quick Release Mount- 120" Quick Release Wire Harness- 1-1/2" Bolt, Nut, Washer, and Lock Washer
KRAFTWERKS QUICK RELEASE LED BUGGY WHIP
GRAMS PERFORMANCE 550 CC FUEL INJECTORS» Grams Performance is proud to offer the most innovative high-performance fuel injectors for today’s performance vehicles. Premium materials, advanced manufacturing techniques, and stringent quality control procedures make Grams Performance the leader in high-performance fuel injectors.

4 TECHNICAL SUPPORT • [email protected] • 951.808.9888
ITEM NO. PART NUMBER DESCRIPTION QTY.1 C032-0242-06 REV C SC BRACKET, YAMAHA YXZ SC KIT 12 C032-0241-06 REV A SIDE COVER, YAMAHA YXZ SC KIT 13 C032-0243-06 REV A BELT COVER, YAMAHA YXZ SC KIT 14 C022-0094-08 REV B GASKET, SIDE CASE, YAMAHA YXZ SC KIT 15 C022-0095-08 REV B GASKET, SC PLATE, YAMAHA YXZ SC KIT 16 C022-0096-03 REV A GASKET, BELT COVER, YXZ SC KIT 17 C025-0020-03 DOWEL PIN, 6.0 OD X 10MM LENGTH 28 C2AC-0600-25 AHCS M6X1.00X25 19 C2AC-0600-30 SCREW, AHCS, M6 X 1.0 X 30 710 C050-0019-00 REV NC OIL SEAL, YAMAHA YXZ SC KIT 1
11 C014-0159-12 REV NC ADAPTER, CRANK PULLEY, YAMAHA YXZ SC KIT 1
12 C002-0194-05 REV NC CRANK BOLT, YAMAHA YXZ SC KIT 113 C2AC-0600-12 AHCS, M6 X 1.0 X 12MM 6
14 C2SS-0825-10 SET SCREW, HEX SOCKET, FLAT TIP, M8 X 1.25 X 10MM 2
15 C2SS-0600-10 SET SCREW, HEX SOCKET, FLAT TIP, M6 x 1.0 x 10MM 2
16 C014-0160-12 REV A IDLER PULLEY SPACER, YAMAHA YXZ SC KIT 217 C081-0060-05 REV B TENSIONER, YAMAHA YXZ SC KIT 118 C2CS-0825-18 SCREW, ALLEN SUNK CAP, M8X1.25X18 119 A120-SMO-38 REV NC SMOOTH IDLER ASSY, 38 X 24 3
20 C3FT-1207-015 Washer, Flat, M6, 12mmOD x 7mmID x 1.5mm 3
21 C2AC-0600-15 SCREW, AHCS M6X1.0X15MM 1
22 C2HH-0600-50 SCREW, CAP, M6 X 1.0 X 50, FULLY THREADED 1
23 C030-0125-04 REV A 5/8" HOSE FITTING, 3/4"-16 WITH O-RING 224 C2AC-0600-10 SCREW, AHCS, M6 X 1.0 X 10 1325 C1FN-0600-CZ NUT, FLANGE, M6 X 1.0 10AF 126 C092-0176-01 REV NC PULLEY, CRANK, 82.5 ED, 6 RIB K 127 C119-0336-18 BELT, 336 RPM, K-BELT, 5 RIB 128 C2AC-0600-35 SCREW, AHCS, M6 X 1.0 X 35 229 C092-0175-01 REV NC PULLEY, ROTREX, 92.5 ED, 6 RIB K 130 A121-1560-240 S/C, Rotrex, C15-60, 240DEG 1
23
30
42
5
1
9
10
11
29
6
3
24
13
19
27
26
17
18
16 15
22
25
12
21
20
28
7
14
COMPONENT DIAGRAMS

INSTALLATION INSTRUCTIONS
5www.KraftwerksUSA.com
2016-2018 YAMAHA YXZ 1000R SUPERCHARGER KIT

6 TECHNICAL SUPPORT • [email protected] • 951.808.9888
» Tools Required for Installation:
- Metric Wrench Set- Screw Driver Set- Metric Socket Set- Dremel Tool- Drill Bit Set- Hole Cutter Set- Hose Cutter- Plier Set- Torque Wrench
PRE-INSTALLATION1
» Disconnect the Battery Ground/ Negative Cable and drain the motor oil from the Dry Sump Tank.
DRAIN OIL DRY SUMP2
» Drain the Oil from the Engine.
DRAIN ENGINE OIL3

INSTALLATION INSTRUCTIONS
7www.KraftwerksUSA.com
2016-2018 YAMAHA YXZ 1000R SUPERCHARGER KIT
» Remove the side panels, and the rear cargo bed.
REMOVE PANELS AND CARGO BED4
» Remove the Header.
HEADER REMOVAL5
» Remove the Dry Sump Assembly and Lines but retain the OEM Spring Clamps for use later in the installation process.
OIL DRY SUMP AND LINES6

8 TECHNICAL SUPPORT • [email protected] • 951.808.9888
» Remove the Brake Caliper and remove all the bolts from the Brake Rotor.
BRAKE COMPONENTS REMOVAL7
» Remove the Breather Assembly.
BREATHER ASSEMBLY REMOVAL8
» Remove the Air Intake Box
AIR INTAKE BOX9

INSTALLATION INSTRUCTIONS
9www.KraftwerksUSA.com
2016-2018 YAMAHA YXZ 1000R SUPERCHARGER KIT
» Remove the Stater Assembly from the Crank Case.
STATER ASSEMBLY REMOVAL10
» Install the Factory Stator Components to the Kraftwerks Crank Case drive plate. Red Loctite the Qty 3 Allen Bolts and torque to 9 ft lbs.
STATER COMPONENTS11
» Install the Suction Tube to the Kraftwerks Crank Case and Red Loctite the Qty 1 Allen Bolt and torque to 9 ft lbs.
SUCTION TUBE INSTALL12

10 TECHNICAL SUPPORT • [email protected] • 951.808.9888
» Remove the Crank Shaft Bolt and Washer.
CRANK SHAFT BOLT REMOVAL13
» Install the new Crank Case Gasket.
CRANK CASE GASKET INSTALL14
» Add Silicone to the Stator Harness that exits the Crank Case Cover to ensure that there are no fluid leaks.
SILICONE STATER HARNESS15

INSTALLATION INSTRUCTIONS
11www.KraftwerksUSA.com
2016-2018 YAMAHA YXZ 1000R SUPERCHARGER KIT
» Install the New Crank Case cover Drive Plate, Red Loctite the Qty 12 factory bolts and torque to 9ft lbs.
CRANK CASE COVER DRIVE PLATE16
» Remove the stock washer from the crank bolt, clean and then add silicone to both sides. Install on the new Crank Bolt.
SILICONE NEW CRANK BOLT17
» Install the new bolt to the Crank Pulley Adapter as shown and then add Red Loctite to the threads.
CRANK PULLEY ADAPTER18

12 TECHNICAL SUPPORT • [email protected] • 951.808.9888
» Install the Hub Adapter and torque the new bolt to 90ft lbs.
HUB ADAPTER19
» Remove the side covers and the air filters from the air box.
AIR BOX PARTS REMOVAL20
» Make a mark 1-7/8" from the Air Filter Lid as shown.
MEASURE/MARK AIR FILTER LID21

INSTALLATION INSTRUCTIONS
13www.KraftwerksUSA.com
2016-2018 YAMAHA YXZ 1000R SUPERCHARGER KIT
» Drill a ¾" hole as shown based on the marking from the prior step.
DRILL HOLE IN AIR FILTER LID22
» Locate the Barb Fitting and Nut as shown here.
BARB FITTING AND NUT23
» Add Blue Loctite and install into the Air Box Lid.
INSTALL BARB FITTING AND NUT24

14 TECHNICAL SUPPORT • [email protected] • 951.808.9888
» Remove the factory rubber gasket from the factory side cover.
SIDE COVER RUBBER GASKET25
» Install the rubber gasket from the prior step into the new Rotrex Side Cover as shown.
INSTALL RUBBER GASKET26
» Heavily silicone the INLET side of the secondary air filter as shown.
SILICONE AIR FILTER ASSEMBLY27

INSTALLATION INSTRUCTIONS
15www.KraftwerksUSA.com
2016-2018 YAMAHA YXZ 1000R SUPERCHARGER KIT
» Install the secondary air filter back into the Air Box.
Heavily silicone the OUTLET side of the secondary air fiter.
SILICONE OUTLET SIDE28
» Heavily silicone the new Kraftwerks side cover, hand tighten all screws
SILICONE KRAFTWERKS SIDE COVER29
» Install the Plug on the lower backside of the air box and secure with a Zip-Tie.
PLUG AIR BOX30

16 TECHNICAL SUPPORT • [email protected] • 951.808.9888
» Install the ECU management. The YXZ1000R Kit was tuned using the DynoJet Power Commander V. Please refer to the Power Commander V Instructions for installation.
ECU INSTALLATION31
» Install the supplied T-Fitting and attach the Vacuum line for the Blow-Off Valve as shown.
BLOW-OFF VALVE VACUUM LINE32
» Remove the factory smog pump plates, hoses and solenoid.
SMOG PUMP REMOVAL33

INSTALLATION INSTRUCTIONS
17www.KraftwerksUSA.com
2016-2018 YAMAHA YXZ 1000R SUPERCHARGER KIT
» Install the Kraftwerks Block-Off Plate and Red Loctite the bolts. Torque to 8ft lbs.
BLOCK-OFF PLATE INSTALL34
» Install the Kraftwerks Air Box Assembly.
KRAFTWERKS AIR BOX ASSEMBLY35
» Install the Intake Air Temperature (IAT) Clip.
IAT CLIP INSTALL36

18 TECHNICAL SUPPORT • [email protected] • 951.808.9888
» Install the Idle Air Control Valve (IACV) Tube as shown.and secure with provided Worm Gear Clamp.
IACV VALVE TUBE37
» Install the Oil Separator and Bracket.
OIL SEPARATOR BRACKET38
» Cut and modify the OEM Oil Separator Tube with a Union Barb Connector and secure using the supplied Zip-Ties.
UNION BARB CONNECTOR39

INSTALLATION INSTRUCTIONS
19www.KraftwerksUSA.com
2016-2018 YAMAHA YXZ 1000R SUPERCHARGER KIT
» Install the new Kraftwerks Breather Hoses marked (Trim to fit as needed).
BREATHER HOSE SET INSTALL40
» Re-Install the Dry Sump Tank but DO NOT tighten the bolts at this time.
DRY SUMP OIL TANK41
» Install the new Kraftwerks Oil Hoses (these are different than the BREATHER Hose in Step #40) and secure with the OEM Spring Clamps removed from Step #6.
DRY SUMP TANK OIL HOSES42
20 TECHNICAL SUPPORT • [email protected] • 951.808.9888
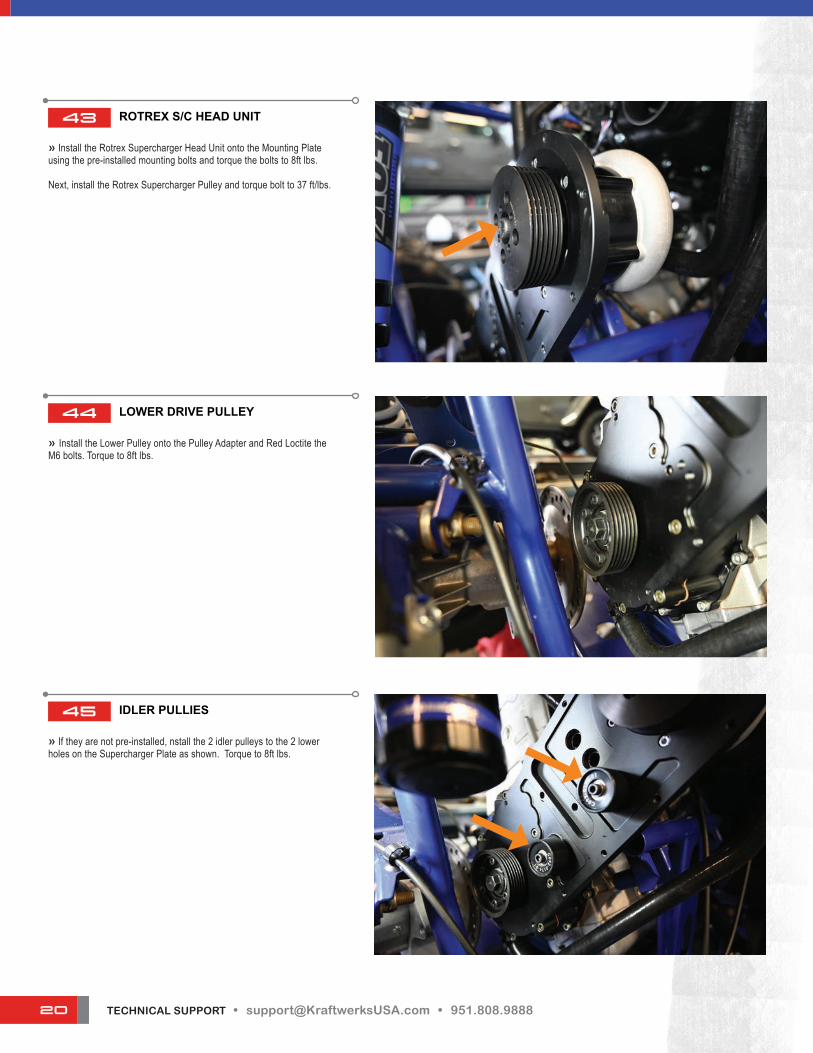
» Install the Rotrex Supercharger Head Unit onto the Mounting Plate using the pre-installed mounting bolts and torque the bolts to 8ft lbs.
Next, install the Rotrex Supercharger Pulley and torque bolt to 37 ft/lbs.
ROTREX S/C HEAD UNIT43
» Install the Lower Pulley onto the Pulley Adapter and Red Loctite the M6 bolts. Torque to 8ft lbs.
LOWER DRIVE PULLEY44
» If they are not pre-installed, nstall the 2 idler pulleys to the 2 lower holes on the Supercharger Plate as shown. Torque to 8ft lbs.
IDLER PULLIES45

INSTALLATION INSTRUCTIONS
21www.KraftwerksUSA.com
2016-2018 YAMAHA YXZ 1000R SUPERCHARGER KIT
» Install and route the Supercharger Belt as shown. Loosely install the Static Tensioner Assembly (do not tighten bolt at this time).
S/C BELT / TENSIONER46
» Download the “Gates Carbon Belt” App for your smartphone. This App will be used to measure the viibration and tension of the belt.
Open the App and place the Smartphone Microphone next to the longest section of the belt. Flick the belt and it will give a HZ reading.
Tighten the Adjustment bolt until the belt tension is between 140-145 Hz.
Torque the Pulley Bolts to 15ft lbs and tighten the 10mm nut to lock the setting in place.
TENSIONER ADJUSTMENT47
» Install the Belt Cover Plate and Gasket using the supplied M6 Allen Bolts. Red Loctite the bolts and torque to 8ft lbs.
BELT COVER PLATE48

22 TECHNICAL SUPPORT • [email protected] • 951.808.9888
» Re-install the factory Brake Rotor. Torque bolts to 10ft lbs.
RE-INSTALL BRAKE ROTOR49
» Re-install the factory Brake Caliper. Torque bolts to 25ft lbs.
RE-INSTALL BRAKE CALIPER50
» Using the supplied Template, drill 3 holes in the Rear Cargo Cover using Hole Saw sizes 2-½" ,1 ¼", and 3". Next drill the Qty 6, 11/32" holes as shown.
DRILL HOLES IN CARGO COVER51

INSTALLATION INSTRUCTIONS
23www.KraftwerksUSA.com
2016-2018 YAMAHA YXZ 1000R SUPERCHARGER KIT
» Install the Kraftwerks Charge Pipe Plate. Install the Qty 6 Allen Bolts as shown and tighten to 10ft lbs.
CHARGE PIPE PLATE INSTALL52
» Remove the Qty 3 bolts holding the Dry Sump Tank and let it rest on the tire.
REMOVE DRY SUMP OIL TANK53
» Re-install the rear cargo cover.
RE-INSTALL CARGO COVER54

24 TECHNICAL SUPPORT • [email protected] • 951.808.9888
» Install the Dry Sump Tank Cover and torque the bolts to 8ft lbs.
DRY SUMP TANK COVER55
» Locate the Rotrex Oil Filter Clamps and 5/16" hose. Cut one 10" and one 15" piece of the hose. Connect the 10" length to the hose INLET of the oil filter. Connect the 15" length to the OUTLET of the oil filter. Install clamps and banjos and the end of the hoses.
ROTREX OIL FILTER ASSEMBLY56
» These are mounting locations for the Rotrex Oil Filter Assembly and the Rotrex Oil Reservoir:
Location 1= Oil Filter BracketLocation 2= Rotrex Oil Reservoir
ROTREX OIL RESERVOIR/FILTER57
2
1

INSTALLATION INSTRUCTIONS
25www.KraftwerksUSA.com
2016-2018 YAMAHA YXZ 1000R SUPERCHARGER KIT
» Install the Oil Filter Assembly onto the frame as shown using the supplied P-Clamp and hardware.
OIL FILTER ASSEMBLY INSTALL58
» Locate the Rotrex Oil Reservoir Assembly.
ROTREX OIL RESERVOIR ASSEMBLY59
» Install the Rotrex Oil Reservoir Assembly as shown (NOTE: Production Model may differ from what is pictured).
ROTREX OIL RESERVOIR INSTALL60

26 TECHNICAL SUPPORT • [email protected] • 951.808.9888
» Install the 10" Oil Hose to the bottom of the Rotrex Oil Reservoir as shown (NOTE: Place the Spring Clamp on the Hose FIRST).
10" OIL RESERVOIR HOSE61
» Install the 15" hose to the INLET of the Rotrex.
15" OIL FILTER HOSE62
» Locate the Intercooler Assembly and Mounting Brackets.
Mount Brackets to the Roll Cage a shown on BOTH sides.
INTERCOOLER MOUNTS63

INSTALLATION INSTRUCTIONS
27www.KraftwerksUSA.com
2016-2018 YAMAHA YXZ 1000R SUPERCHARGER KIT
» Mount the Intercooler to the Brackets. Center the Intercooler as shown and tighten down the bolts.
MOUNT INTERCOOLER64
» Locate the Rotrex Oil Cooler Assembly and install the Qty 2 54" 5/16" Oil Hose Lengths onto each Fitting.
ROTREX OIL COOLER ASSEMBLY65
» Install the Oil Cooler Assembly to the Intercooler as shown using the included Mounting Hardware.
MOUNT ROTREX OIL COOLER66

28 TECHNICAL SUPPORT • [email protected] • 951.808.9888
» Run the Oil Cooler Lines towards the passenger side and Zip-Tie them together as shown.
OIL COOLER LINES67
» Install one of the Oil Cooler Lines to the INLET (Top) of the Rotrex Oil Reservoir as shown (NOTE: Place the Spring Clamp on the Hose FIRST).
ROTREX OIL RESERVOIR INLET LINE68
» Install the other Oil Cooler Line to the “OIL OUT” fitting of the Rotrex Supercharger Head Unit as shown (NOTE: Place the Spring Clamp on the Hose FIRST).
ROTREX S/C OUTLET OIL LINE69

INSTALLATION INSTRUCTIONS
29www.KraftwerksUSA.com
2016-2018 YAMAHA YXZ 1000R SUPERCHARGER KIT
» Re-Install the header.
RE-INSTALL HEADER70
» Locate the Blow-Off Valve Silicone Hose Assembly as shown.
BLOW-OFF VALVE HOSE ASSEMBLY71
» FIRST, connect the Vacuum Hose from Step #32 to the Vacuum Port on TOP of the Blow-Off Valve and secure with a Zip-Tie.
Next, install the Cold Side Hose using the provided Lined Hose Clamps.
COLD SIDE HOSE INSTALL72

30 TECHNICAL SUPPORT • [email protected] • 951.808.9888
» Locate the Rotrex INLET Silicone Hose as shown..
ROTREX S/C INLET HOSE73
» Install the Rotrex INLET Silicone Hose by attaching it to BOTH the Rotrex Supercharger Head Unit and New Intake Air Box (NOTE: Place the Lined Hose Clamps on the Silicone Hose PRIOR to installion).
ROTREX S/C INLET HOSE INSTALL74
» Locate the HOT Side Silicone Hose as shown.
ROTREX S/C OUTLET HOSE75

INSTALLATION INSTRUCTIONS
31www.KraftwerksUSA.com
2016-2018 YAMAHA YXZ 1000R SUPERCHARGER KIT
» Install the HOT Side Silicone Hose as shown (NOTE: Place the Lined Hose Clamps on the Silicone Hose PRIOR to installation).
ROTREX S/C HOT SIDE HOSE INSTALL76
» Connect the Breather Hose from Step #40 to the BACK of the Center Tube.
BREATHER HOSE77
» Refill the Fluids starting with the Motor Oil Fluid ensuring BOTH the engine and Dry Sump are full. Make sure that there is nothing near the INLET and OUTLET Charge Tubes.
PRE-START UP CHECK78

32 TECHNICAL SUPPORT • [email protected] • 951.808.9888
» Fill the Rotrex Fluid so that it shows the “Maximum” Level on the Dipstick (NOTE: Rotrex Fluid Level must be checked when the Dipstick on the Rotrex Oil Reservoir is FULLY twisted on).
FILL ROTREX OIL RESERVOIR79
» Loosen the “OIL IN” Bolt at the Rotrex Head Unit but do not remove fitting.
Using a LOW PRESSURE (+/- 30 psi) Air Pump, use a Rag and Air Nozzle to push air through the Rorex Oil Line until you see Rotrex Traction Fluid bleeding through the fitting you just loosened.
Once you see Rotrex Traction Oil. tighten the Banjo Bolt back down.
Re-Fill the Rotrex Oil Reservoir as needed until the Fluid is at the Maximum Level.
Priming the Rotrex Head Unit is vital to ensure that the Rotrex Supercharger itself does not run dry on initial start-up.
PRIME ROTREX OIL LINE80
» Once the fluids have been check, remove the Dipstick from the Rotrex Oil Reservoir (so someone can check the level). Ensure that the Tuning Map has been loaded in the Power Commander V and Start Engine and let idle.
While the engine is running, make sure that there are no leaks and make sure that the Rotrex Fluid is were it needs to be and fill as necessary.
Once the Rotrex Fluid Level has stabilized, screw Dipstick back onto the Rotrex Oil Reservoir and stop the engine.
Check the Engine Oil Fluid Level and top off as necessary.
INITIAL START-UP81

INSTALLATION INSTRUCTIONS
33www.KraftwerksUSA.com
2016-2018 YAMAHA YXZ 1000R SUPERCHARGER KIT
» Locate the Cargo Cover. Using a Dremel or other cut-out tool, cut a hole for the Rotrex Oil Lines on the UPPER section of the Cargo Cover as shown.
CARGO COVER MODIFICATION82
» Install the Upper Cargo Cover as shown.
UPPER CARGO COVER INSTALL83
» Locate the 2.5" COLD Side Intercooler Charge Pipe Assembly. Install it between the RIGHT side Intercooler Inlet and RIGHT side Larger Port on the Kraftwerks Plate as shown.
COLD SIDE INTERCOOLER PIPE84

34 TECHNICAL SUPPORT • [email protected] • 951.808.9888
» Locate the 2.0" HOT Side Intercooler Charge Pipe Assembly. Install it between the LEFT side Intercooler Outlet and LEFT side Smaller Port on the Kraftwerks Plate as shown.
HOT SIDE INTERCOOLER PIPE85
» Locate the Breather and Install it on the Center Port of the Kraftwerks Plate as shown.
BREATHER86
» Check all Fluids, Charge Pipe Connections, and Hose Lines. Start-up the engine and let it idle for 5 minutes checking all fluids and connections during the process. After 5 minutes rev engine progressively to make sure that there are no issues.
ENJOY AND SAFE RIDING OUT THERE!
FINAL START-UP87

INSTALLATION INSTRUCTIONS
35www.KraftwerksUSA.com
2016-2018 YAMAHA YXZ 1000R SUPERCHARGER KIT
Kraftwerks USA offers a 12 MONTH Limited Warranty against defects in materials, components, and workmanship unless specified otherwise. The warranty period starts on the ORIGINAL date of retail purchase directly from Kraftwerks or from your local dealer (Warranty of the Rotrex Supercharger Head Unit is also ONE YEAR from original purchase date). This limited warranty is only offered to the ORIGINAL OWNER (receipt will be required for verification). Furthermore, the warranty excludes any electronic components manufactured by other companies. IF THE KRAFTWERKS SUPERCHARGER KIT IS ALTERED FROM THE FACTORY SETTINGS, THE WARRANTY MAY BE VOID.
This includes but is not limited to the following:• Over spinning of the Rotrex supercharger head unit• Use of non-approved or custom hubs/pulleys• Alteration of brackets, pulleys, and other drive components• Modification or re-routing of any charge piping or intake system that is included in the “FULL” Kits
Kraftwerks will honor a warranty claim at its sole discretion after the component in question is inspected at the Kraftwerks facility and/or the Rotrex A/S facility located in Denmark. NO WARRANTY CLAIM WILL BE ACCEPTED IF THE COMPONENT IS FOUND TO HAVE BEEN TAMPERED, MISINSTALLED, MISUSED, OR MISHANDLED (I.E. DROPPED) IN ANY WAY. Furthermore, disassembly of the Rotrex Supercharger Head Unit voids ALL warranty claims. No Kraftwerks dealer is authorized to make any warranty claims, repair, or modification. Any claims for freight/shipping damages will need to be directed towards the freight/shipping company.
• -If the component in question is covered under the Kraftwerks USA limited warranty, the product will be repaired or replaced at the discretion of Kraftwerks USA.
• -If the component in question is not covered by the Kraftwerks USA limited warranty, our Kraftwerks staff will advise you on the specific reason, the cost of replacement/repair, and the estimated time it will take.
TO PROCEED WITH A WARRANTY CLAIM
Contact KraftwerksUSA directly at (951) 808-9888 and be prepared to send the following information to [email protected]
1. Copy of original receipt or invoice. Please note that PayPal payment verification alone is not accepted2. Pictures and description of issue. Please limit 1-2 pictures per email or compress images3. Contact information: Name, address, and phone number4. Vehicle description: Year, make, model, and any additional/supporting modifications
Once all of the above have been received and the warranty claim has been INITIALLY approved by Kraftwerks USA; you will be contacted with a Return Merchandise Authorization (RMA) number. You will then be directed to package the component(s) in question, write the RMA number (in BOLD) on the outside of the box, and a call tag will be issued to pick up the package from your location.
Kraftwerks USA is located in California. Please be aware that warranty claims will be shipping GROUND (faster shipping available at an additional cost to you) so please allow enough lead time for shipping and inspection of the component(s). Please package components securely as any damage to components due to improper packaging will NOT be covered by the limited warranty. Please note that if a Rotrex supercharger head unit is being sent in for warranty inspection, the lead time will be longer due all head unit warranty inspections are handled by Rotrex in Denmark. Only Rotrex can approve or deny head unit warranty claims (if this is a time sensitive case, we do offer CORE CHARGE options. Please contact a KraftwerksUSA representative for more information).
Please note that KRAFTWERKS USA is NOT liable for the voiding of your factory warranty nor any damage(s) to clutch, transmission, and/or drive-line components.
LIMITED WARRANTY

36 TECHNICAL SUPPORT • [email protected] • 951.808.9888REV. 12.19