kronos 3.8 administrator guidehr.commerce.gov/s/groups/public/@doc/@cfoasa/@ohrm/documents/... ·...
TRANSCRIPT

webTA 3.8 Administrator’s Guide

webTA 3.8 Administrator’s Guide ©2009 Kronos Incorporated.
Document History
Date Revision Description Author
2/17/09 Initial release Bruce McGarvey
Contents
Introduction . . . . . . . . . . . . . . . . . . . . . . . . . . . . . . . . . . . . . . . . . . . . . . . . . . . . . . . . . . . 1
About employee profiles . . . . . . . . . . . . . . . . . . . . . . . . . . . . . . . . . . . . . . . . . . . . . . . 2
User IDs ............................................................................................................ 3
Passwords.......................................................................................................... 3
First Pay Period................................................................................................. 3
Roles ................................................................................................................. 3
Active Status ..................................................................................................... 4
Adding an employee . . . . . . . . . . . . . . . . . . . . . . . . . . . . . . . . . . . . . . . . . . . . . . . . . . . 5
Reactivating an employee . . . . . . . . . . . . . . . . . . . . . . . . . . . . . . . . . . . . . . . . . . . . . . 6
Modifying an employee profile . . . . . . . . . . . . . . . . . . . . . . . . . . . . . . . . . . . . . . . . . . 7
About Build Maintenance . . . . . . . . . . . . . . . . . . . . . . . . . . . . . . . . . . . . . . . . . . . . . . 8
Building a transmission file . . . . . . . . . . . . . . . . . . . . . . . . . . . . . . . . . . . . . 8
Re-transmitting after a transmission error . . . . . . . . . . . . . . . . . . . . . . . . . 9
Building a transmission file early . . . . . . . . . . . . . . . . . . . . . . . . . . . . . . . 10
About scheduled builds. . . . . . . . . . . . . . . . . . . . . . . . . . . . . . . . . . . . . . . 11
About Build History . . . . . . . . . . . . . . . . . . . . . . . . . . . . . . . . . . . . . . . . . . 13
Comparing transmission files . . . . . . . . . . . . . . . . . . . . . . . . . . . . . . . . . . 16
About configuring webTA . . . . . . . . . . . . . . . . . . . . . . . . . . . . . . . . . . . . . . . . . . . . . 18
Changing login and banner messages. . . . . . . . . . . . . . . . . . . . . . . . . . . 18
Configuring password policy. . . . . . . . . . . . . . . . . . . . . . . . . . . . . . . . . . . 21
Managing licenses . . . . . . . . . . . . . . . . . . . . . . . . . . . . . . . . . . . . . . . . . . 22
Configuring e-mail task notification . . . . . . . . . . . . . . . . . . . . . . . . . . . . . 25
Configuring Build File FTP . . . . . . . . . . . . . . . . . . . . . . . . . . . . . . . . . . . . 27
Managing audits . . . . . . . . . . . . . . . . . . . . . . . . . . . . . . . . . . . . . . . . . . . . 29
Managing sessions . . . . . . . . . . . . . . . . . . . . . . . . . . . . . . . . . . . . . . . . . . 30
Managing holidays . . . . . . . . . . . . . . . . . . . . . . . . . . . . . . . . . . . . . . . . . . . . . . . . . . . . . . 32
Modifying a Timekeeper’s profile . . . . . . . . . . . . . . . . . . . . . . . . . . . . . . . . . . . . . . 38
webTA 3.8 Administrator’s Guide i ©2009 Kronos Incorporated

About webTA reports . . . . . . . . . . . . . . . . . . . . . . . . . . . . . . . . . . . . . . . . . . . . . . . . . 39
Generating the View Agency Status report . . . . . . . . . . . . . . . . . . . . . . . 39
Generating the Employee Assignment by Supervisor report. . . . . . . . . . 41
Generating the Employee Assignment by Timekeeper report . . . . . . . . . 43
Generating the User Role Assignment report . . . . . . . . . . . . . . . . . . . . . 45
Delegating the Administrator role to another employee . . . . . . . . . . . . . . . . . . 47
webTA 3.8 Administrator’s Guide ii ©2009 Kronos Incorporated
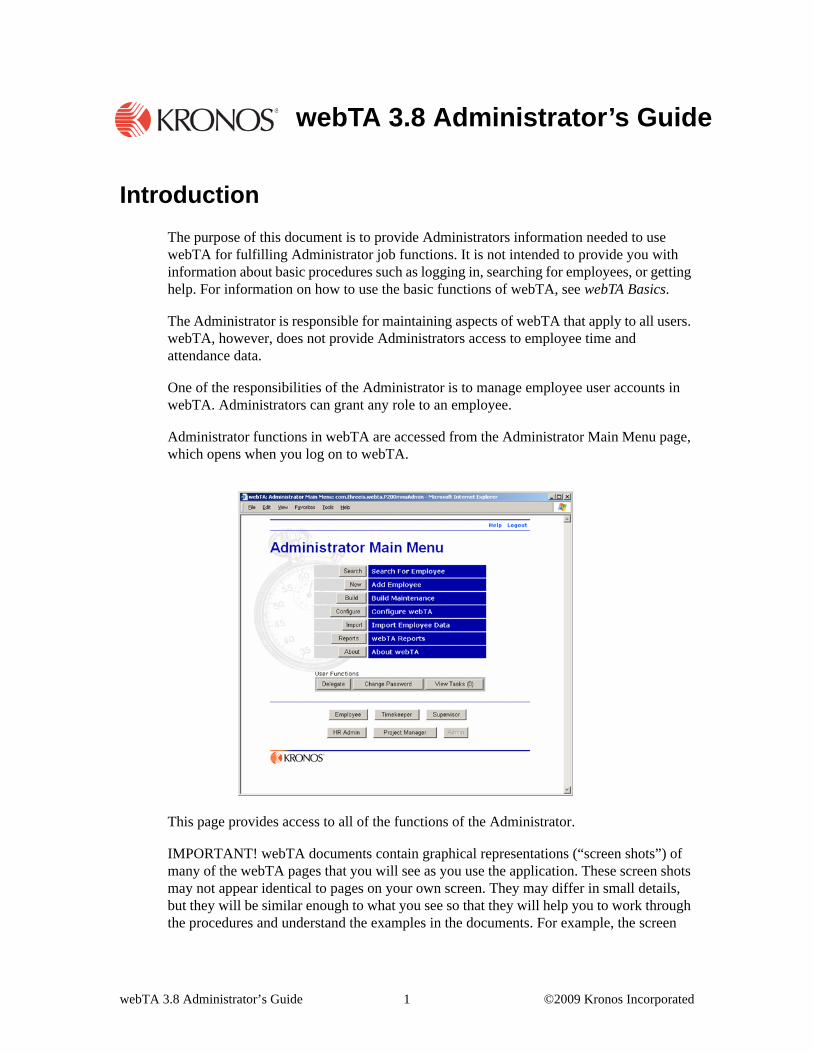
Introduction
The purpose of this document is to provide Administrators information needed to use webTA for fulfilling Administrator job functions. It is not intended to provide you with information about basic procedures such as logging in, searching for employees, or getting help. For information on how to use the basic functions of webTA, see webTA Basics.
The Administrator is responsible for maintaining aspects of webTA that apply to all users. webTA, however, does not provide Administrators access to employee time and attendance data.
One of the responsibilities of the Administrator is to manage employee user accounts in webTA. Administrators can grant any role to an employee.
Administrator functions in webTA are accessed from the Administrator Main Menu page, which opens when you log on to webTA.
This page provides access to all of the functions of the Administrator.
IMPORTANT! webTA documents contain graphical representations (“screen shots”) of many of the webTA pages that you will see as you use the application. These screen shots may not appear identical to pages on your own screen. They may differ in small details, but they will be similar enough to what you see so that they will help you to work through the procedures and understand the examples in the documents. For example, the screen
webTA 3.8 Administrator’s Guide
webTA 3.8 Administrator’s Guide 1 ©2009 Kronos Incorporated

shot of the Administrator Main Menu page contains role buttons for all roles, but your main menu page will show only those roles you have been assigned to.
About employee profiles
The Employee Profile page is used when adding or modifying employee profiles.
When adding a new employee, the Employee Profile page opens when you click New.
When modifying employee profiles, the Employee Profile page for the employee opens when you click Search, then select the employee after he or she is located.
webTA 3.8 Administrator’s Guide 2 ©2009 Kronos Incorporated
The Employee Profile may include these sections, depending on how webTA is configured for your agency:
• User ID and password fields
• First, middle, and last name fields
• Social Security number
• Supervisor's and Timekeeper's user IDs
• Organization
• First Pay Period
• Roles options
• Active Status
User IDs
User IDs may be up to 32 characters long.
A user ID must be unique. If you try to save the information with a user ID that already exists, you will see an error message.
Passwords
User passwords may be as many as 32 characters long.
Passwords should not be easy to guess. Avoid using proper names, birthdays, and other significant dates, or any name or number easily associated with the employee. (The best passwords are random alpha-numeric strings.)
If your organization has password policies, they may be enforced in webTA. Some password policies may require:
• A minimum length
• Both alphabetic and numeric characters
• Upper and lower case characters
• Special characters
Some policies may also prohibit passwords derived from common words or alphanumeric sequences
First, Middle, and Last Names
Entries in these boxes should be specific, and should not contain any information not designated by the field. For example, full names must not be entered into the First or Last Name boxes. However, “Jr.,” “Sr.,” or other name suffixes may be added after the last name in the Last Name box.
First Pay Period
This option lets you specify the pay period to which the new record applies.
webTA 3.8 Administrator’s Guide 3 ©2009 Kronos Incorporated

If the person started within the current pay period, select Current. If the person started in the previous pay period, select Previous.
Social Security Number
The full Social Security number must be entered into this box. Separators in the number such as hyphens or spaces are optional.
Supervisor’s and Timekeeper’s user IDs
These user IDs may be entered directly or searched for and selected using the search function.
Role section
Access to various modules of webTA is controlled by roles. Everyone in the system is considered an employee. However, access to some webTA functions depends on the role of the employee:
• Timekeepers can edit, correct, and validate T&A data, and add or edit T&A Profiles, employee profiles, and locator information such as addresses, phone numbers, and e-mail addresses. They may also be able to reset passwords for a specified set of employees.
• Master Timekeepers perform the same functions as Timekeepers except that, in addition, they can change the employee’s agency, and override validations. A Master Timekeeper can be designated as Read Only, which means he or she can view data for any user, but not edit data. Administrators for sites with multiple agencies may also designate a Master Timekeeper as Restricted by Agency, limiting a Master Timekeeper to administering or viewing users within their agency.
• Supervisors review and certify T&A reports and leave or premium pay requests for a given set of employees.
• Master Supervisors can review and certify T&A reports for any employee within webTA (unless restricted by their administrators) before their data is sent to NFC for payroll processing, though this is not required if Supervisors have completed the task.
• Project Managers create, modify, and deactivate projects, including adding individual employees or groups of employees to projects, adding subprojects to projects, and tracking hours charged to projects.
• HR Administrators manage employees within their agencies, and also manage leave transfer programs.
• Administrators perform system maintenance functions, such as adding users, assigning roles, scheduling and building transmission files, and configuring the system.
IMPORTANT: Some Master Timekeeper and Master Supervisor role assignments are agency-specific. webTA functions used by those with agency-specific roles are restricted to employees in their own agencies. Also, there is an additional Master Timekeeper read-only role that restricts those assigned to it to viewing employee data, but not adding to,
webTA 3.8 Administrator’s Guide 4 ©2009 Kronos Incorporated

removing, or changing it, and a Supervisor role that lets Supervisors certify their own time cards.
Roles are assigned to an employee by clicking the role options in the Grant Role column.
Select Role Property
IMPORTANT: The Select Role Property section contains items specifically configured for your installation. Therefore, not all of the items described here may be available to you.
This section provides check boxes to enable or disable employee functions by role:
• Selecting Read Only restricts Master Timekeepers to seeing a non-editable version of their employees’ T&A.
• Selecting Account Menu Off, LTP Menu Off, and Org Tree Menu removes the Account, Leave Transfer Program, and Organization Tree menus from the HR Administrator’s main menu.
Active Status
The Active Status check box on the Employee Profile page, by default, indicates that the employee is active. If an employee becomes inactive, click to clear the check box.
When employees are made inactive, only unsubmitted time card data is deleted from the system, but they will no longer be able to log into the T&A system, and their records will be ignored during verification, certification, and transmission file builds.
If an employee's account has been rendered inactive, and the employee returns to the organization, the account can be reactivated. There is no need to create a new webTA user record for the returning employee.
To access the record for an inactive user:
1. On the Administrator Main menu page, click Search.
The Search for Employee page opens.
2. If you want to restrict the results of the search, type in all or part of the employee’s first or last name, or the employee’s complete Social Security number, type.
IMPORTANT! To search by SSN, you must enter the employee’s complete Social Security number.
webTA 3.8 Administrator’s Guide 5 ©2009 Kronos Incorporated

NOTE: See the section “Searching for Employees” in webTA Basics for details about how webTA searches using partial entries, wild cards, and blank fields.
3. Select Inactive from the Status list.
4. Click Search.
webTA returns a list of all inactive employees meeting the search criteria you specified.
Adding an employee
To add a new employee:
1. On the Administrator Main Menu page, click New.
A blank Employee Profile page opens.
webTA 3.8 Administrator’s Guide 6 ©2009 Kronos Incorporated

For descriptions of the fields and options on the Employee Profile page, see “About employee profiles” on page 2
2. Type the new user ID, password, first and last names, a user ID, and the employee’s Social Security number in the appropriate boxes.
An employee's first and last names must be in separate fields. Do not combine first and last names in one field. You may include a suffix, such as Jr. or III, in the Last Name field.
NOTE: User IDs and passwords may be up to 32 characters long. The user ID must be unique in webTA.
3. Type in, or search for and select, the employee’s Supervisor and Timekeeper user IDs.
4. Type in, or search for and select, the organization that the employee is to be associated with.
5. In the Roles area, click to select the appropriate roles for the employee.
NOTE: When selected, the Read Only option associated with the Master Timekeeper role gives the Master Timekeeper viewing privileges for T&A records, but not editing privileges.
6. In the Special Case area, click to select or clear the appropriate special case options for the employee.
7. Click Save.
Changing an employee’s active status
For details about status designations, see “Active Status” on page 5.
To deactivate an employee:
1. Search for and select the employee.
2. Click Emp Profile.
The employee’s profile page opens.
3. Click to clear the Active Employee check box.
4. Click Save.
webTA 3.8 Administrator’s Guide 7 ©2009 Kronos Incorporated

To reactivate an employee:
1. Search for the employee you want to reactivate, selecting Inactive from the Status list on the Search for Employee page.
ALT
The Search Results page opens listing only inactive employees.
2. Click to select the employee you want to reactivate, then click Emp Profile.
The Employee Profile page for the selected employee opens.
3. If necessary, change the profile by assigning a Timekeeper and Supervisor, appropriate roles, and so forth.
4. Click to select the Active Employee check box.
5. Click Save.
webTA returns you to the Search Results page. The employee you reactivated no longer appears in the list of search results for an inactive employee.
Modifying an employee profile
For descriptions of the fields and options on the Employee Profile page, see “About employee profiles” on page 2.
webTA 3.8 Administrator’s Guide 8 ©2009 Kronos Incorporated

To modify an employee profile:
1. Search for and select the employee whose profile you want to modify.
2. On the Search Results page, click to select the employee, then click Emp Profile.
The employee’s Employee Profile page opens.
3. Type the new information in the appropriate fields and click to select the appropriate check boxes.
IMPORTANT! An employee's first and last names must be in separate fields. Do not combine fields. You may include a suffix, such as Jr. or III, in the Last Name field.
NOTE: Supervisor’s User ID, Timekeeper’s User ID, and Organization for the employee may be selected by clicking the Search button next to the appropriate box, then searching for the name or selecting from the list of organizations.
webTA 3.8 Administrator’s Guide 9 ©2009 Kronos Incorporated

4. Click Save.
About Build Maintenance
When transmission files are built, they are sent to the payroll office for processing.
Transmission files can be built automatically, or built on demand.
Building a transmission file
When a build is run, transmission records are created for all certified employees in the system (unless their time cards are in a future pay period). Supervisors cannot certify or decertify records while a build is in progress.
You can build a transmission file at any time. All certified records for the current pay period are built.
NOTE: webTA only processes records for pay periods that have ended, unless there is an early build. Only by using the Early Build function can records in the current pay period be built.
To manually build a transmission file:
1. In the Administrator Main Menu, click Build.
The Build Maintenance page opens:
2. Click Build.
The build starts.
When the build is complete, a message tells you that the build completed successfully.
3. Click OK.
webTA 3.8 Administrator’s Guide 10 ©2009 Kronos Incorporated
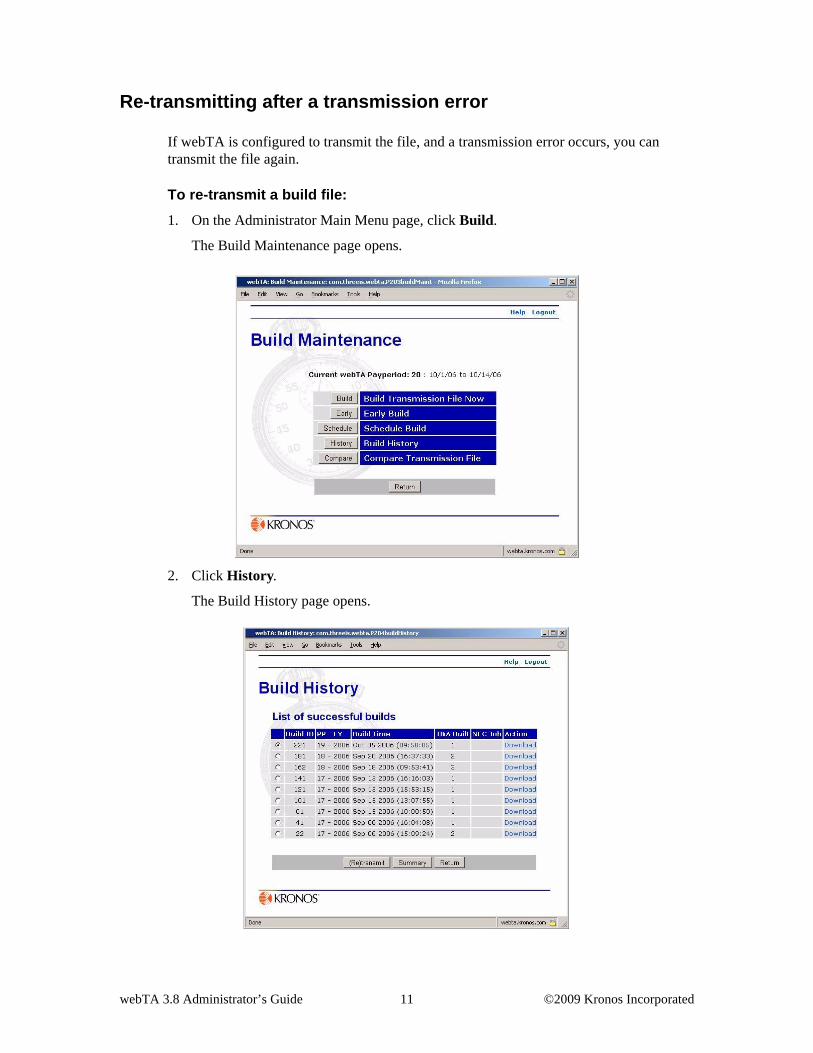
Re-transmitting after a transmission error
If webTA is configured to transmit the file, and a transmission error occurs, you can transmit the file again.
To re-transmit a build file:
1. On the Administrator Main Menu page, click Build.
The Build Maintenance page opens.
2. Click History.
The Build History page opens.
webTA 3.8 Administrator’s Guide 11 ©2009 Kronos Incorporated

For details about the Build History page, see “About Build History” on page 16.
3. Click to select the build you want to re-transmit.
4. Click (Re)transmit.
The build data set is re-transmitted to the location configured as the transmission destination.
Building a transmission file early
The Early Build function lets you create a transmission file during the second week of the current pay period to include the records from that period. This function is used in circumstances that require a build to occur on the Friday of the second week of the current pay period.
To build a transmission file early:
1. On the Administrator Main Menu page, click Build.
The Build Maintenance page opens.
2. Click Early.
webTA asks you if you’re sure that you want to process the build before the end of a pay period.
webTA 3.8 Administrator’s Guide 12 ©2009 Kronos Incorporated

3. If you want to continue with the build, click Early Build.
All certified T&A records for the current or prior pay periods are processed.
About scheduled builds
Scheduled builds are performed in the first week of a new pay period. They may be scheduled for Sunday through Saturday on the hour from midnight until 11:00 p.m.
There is no limit to the number of scheduled builds you can set up, but they should not be done too frequently because they interfere with other processing. It is best to schedule builds at off-hours, such as very early morning.
To schedule a build:
1. On the Administrator Main Menu page, click Build.
The Build Maintenance page opens.
webTA 3.8 Administrator’s Guide 13 ©2009 Kronos Incorporated

2. Click Schedule.
The Schedule Build page opens.
3. From the table, for each build, select the day of the week and time you want the build to occur, then click Save.
webTA schedules the build and adds new rows in the Schedule Build table showing the new scheduled build and for adding an additional scheduled build.
To remove a scheduled build:
1. On the Administrator Main Menu page, click Build.
The Build Maintenance page opens.
webTA 3.8 Administrator’s Guide 14 ©2009 Kronos Incorporated

2. Click Schedule.
The Schedule Build page opens.
3. For the scheduled build that you want to remove, in the Day column, select No Selection, then click Save.
webTA removes the scheduled build from the system.
webTA 3.8 Administrator’s Guide 15 ©2009 Kronos Incorporated

About Build History
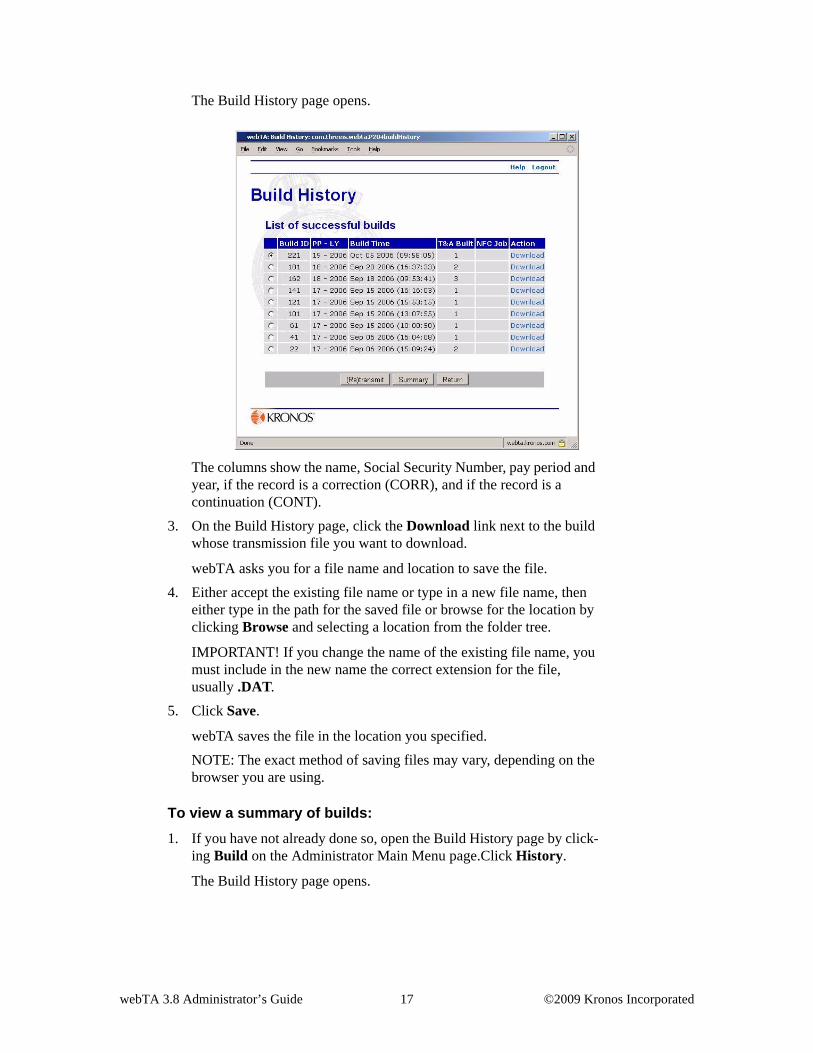
When a build process runs, the records are stored in a database table. From the Build History page you can review build results, download the transmission file to a disk drive, or re-transmit the file, if necessary (for example, if a transmission error occurred) from the Build History page.
To open the Build History page:
• Click Build History on the Administrator Main Menu page.
In the list of successful builds:
• Build ID shows the unique identifier for each build.
• PP - LY shows the pay period and leave year when the T&As were built.
• Build Time shows the date and time of the build.
• T&A Built shows the number of time cards submitted and built.
• NFC Job shows the JES Job Number, as returned by NFC at the time of submission. If the job has been transmitted multiple times, all Job Numbers are listed in this column, with the most recent transmission listed first.
• Action shows the actions available for the build. (Downloading the build file is currently the only action available.)
To download a build history:
1. If you have not already done so, open the Build Maintenance page by clicking Build on the Administrator Main Menu page.
2. On the Build Maintenance page, click History.
webTA 3.8 Administrator’s Guide 16 ©2009 Kronos Incorporated
The Build History page opens.
The columns show the name, Social Security Number, pay period and year, if the record is a correction (CORR), and if the record is a continuation (CONT).
3. On the Build History page, click the Download link next to the build whose transmission file you want to download.
webTA asks you for a file name and location to save the file.
4. Either accept the existing file name or type in a new file name, then either type in the path for the saved file or browse for the location by clicking Browse and selecting a location from the folder tree.
IMPORTANT! If you change the name of the existing file name, you must include in the new name the correct extension for the file, usually .DAT.
5. Click Save.
webTA saves the file in the location you specified.
NOTE: The exact method of saving files may vary, depending on the browser you are using.
To view a summary of builds:
1. If you have not already done so, open the Build History page by click-ing Build on the Administrator Main Menu page.Click History.
The Build History page opens.
webTA 3.8 Administrator’s Guide 17 ©2009 Kronos Incorporated

2. Click to select the build history you want a summary of, then click Summary.
The Build History Summary page opens for the history you chose.
Comparing transmission files
After payroll records have been processed by NFC, you can compare the transmission records on file at NFC with the data contained in webTA.
Transmission file comparison is not required for normal payroll operations in webTA. It is only used when you must ensure that existing transmission files match the transmission records contained in webTA.
webTA 3.8 Administrator’s Guide 18 ©2009 Kronos Incorporated

To compare a transmission file:
1. Click Build on the Administrator Main Menu page.
The Build Maintenance page opens.
2. Click Compare.
The Upload Transmission File page opens.
3. Type the location of the file in the Transmission File box.
If you do not know the file’s location, click Browse to find it on your computer.
4. Click Compare.
The result of the comparison appears in the Status column of the Transmission File Comparison page.
XXX
Three results are possible for this comparison:
• The transmission records you upload fail to match any records contained in webTA.
This can happen if you try to compare an old file, such as one generated outside of webTA.
• webTA finds an associated payroll record, but the transmission records contained in webTA do not match the data in the transmission file.
This indicates that either the transmission file has been changed or that a newer record has since been generated in webTA. In this case, you must manually compare the two records to determine the differences. The comparison results page identifies the appropriate build number, so you can download the corresponding transmission file from the build history page.
• webTA determines that the two records match exactly.
This indicates that the most recent build of payroll records for the employee for that pay period matches the file you transmitted.
webTA 3.8 Administrator’s Guide 19 ©2009 Kronos Incorporated

About configuring webTA
The Configure webTA page lets Administrators configure various aspects of webTA. The Configure webTA page opens by clicking Configure on the Administrator Main Menu page.
• Messages provides functions for creating or editing the messages appearing on the login page and on the top left of every webTA page.
• Policy provides functions for establishing the rules for creating passwords.
• License displays the status of webTA licenses for your installation, and provides functions for adding and deleting licenses.
• Tasks provides functions for establishing how webTA delivers tasks, configuring message body headers and footers, setting task expiration, and configuring mail server parameters.
• FTP provides functions for configuring FTP parameters.
• Audit provides options for setting what information is logged actions performed on the database.
• Session provides options for setting login and session time out parameters.
• Holiday provides the option to enable or disable automatic insertion of Federal holiday leave for full-time employees.
• Structures provides functions to create, edit, copy, delete, and validate account structures.
• Edit Codes provides options for viewing and editing transaction code descriptions, and to enable and disable transaction codes.
• Reorder Codes lets you change the order in which transactions codes are displayed.
webTA 3.8 Administrator’s Guide 20 ©2009 Kronos Incorporated

Changing login and banner messages
The login message appears on the webTA Login page.
The banner message appears at the top of each page in webTA.
Password instructions appear on the Change Password pages for all roles.
Welcome to webTA
webTA 3.8 Administrator’s Guide 21 ©2009 Kronos Incorporated

You can change login, banner, or password messages to provide information or important announcements for users of the system.
To change login, banner, and password instruction messages:
1. Click Configure on the Administrator Main Menu page.
The Configure webTA page opens.
Password instructions
Welcome to webTA
webTA 3.8 Administrator’s Guide 22 ©2009 Kronos Incorporated

2. Click Messages.
The Configure Messages page opens.
3. In the appropriate text boxes, either edit the existing message or type in a new message.
You can use any standard HTML tags to format the message, including links to other Web sites and figures.
IMPORTANT! Make sure that the password instructions accurately describe your organization’s password policy.
Configuring password policy
As Administrator, you can configure password policies to enforce a variety of requirements. Some parameters are activated using check boxes, and some are selected from lists of options.
To configure password policy:
1. Click Configure on the Administrator Main Menu page.
The Configure webTA page opens
webTA 3.8 Administrator’s Guide 23 ©2009 Kronos Incorporated

2. Click Policy.
The Password Policy page opens.
3. Configure your password policy by selecting the appropriate options from the lists and by clicking to select the appropriate options.
4. Click Save.
webTA 3.8 Administrator’s Guide 24 ©2009 Kronos Incorporated
Managing licenses
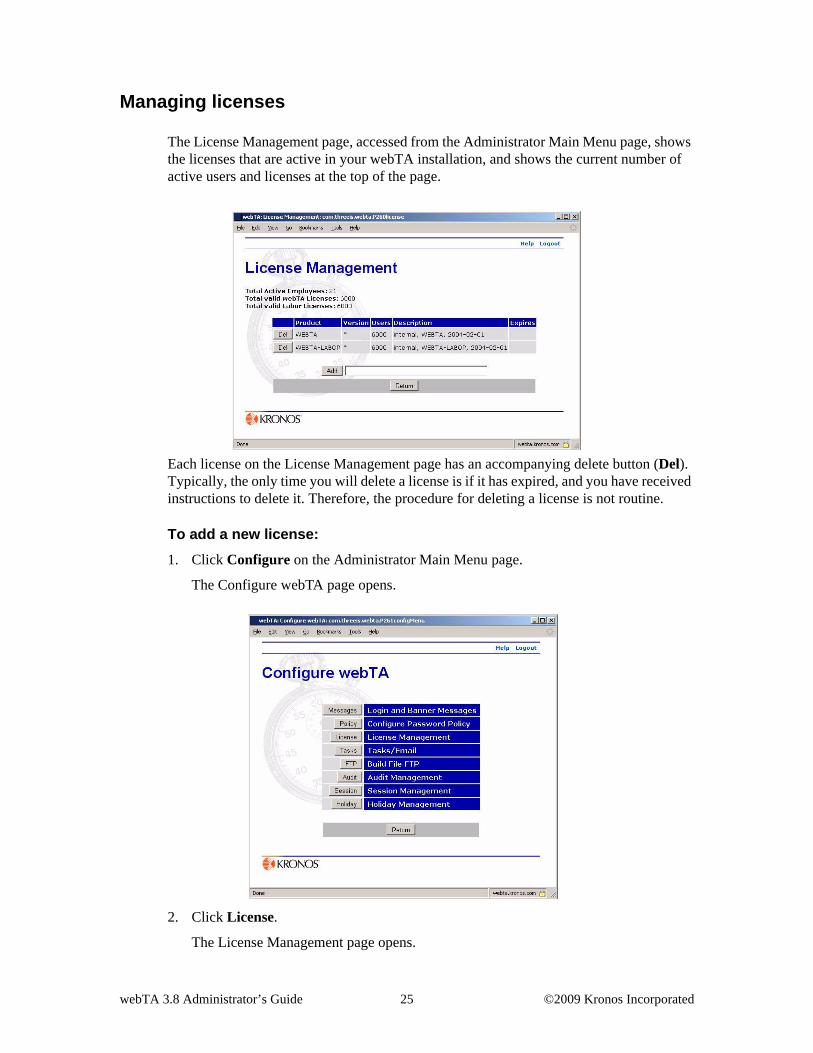
The License Management page, accessed from the Administrator Main Menu page, shows the licenses that are active in your webTA installation, and shows the current number of active users and licenses at the top of the page.
Each license on the License Management page has an accompanying delete button (Del). Typically, the only time you will delete a license is if it has expired, and you have received instructions to delete it. Therefore, the procedure for deleting a license is not routine.
To add a new license:
1. Click Configure on the Administrator Main Menu page.
The Configure webTA page opens.
2. Click License.
The License Management page opens.
webTA 3.8 Administrator’s Guide 25 ©2009 Kronos Incorporated

3. In the text box next to the Add button, type the characters in the license string exactly as it was received from Kronos, then click Add.
webTA adds the license.
To delete a license:
1. Click Configure on the Administrator Main Menu page.
The Configure webTA page opens.
2. Click License.
The License Management page opens.
webTA 3.8 Administrator’s Guide 26 ©2009 Kronos Incorporated

3. Click Del to the left of the license you want to remove.
webTA deletes the license.
Configuring e-mail task notification
The task function in webTA can be configured to send tasks using various delivery methods: by e-mail, to tasks lists, or both. This function also lets you set the expiration date of tasks and include header and footer messages on every message.
To configure e-mail task notification:
1. Click Configure on the Administrator Main Menu page.
The Configure webTA page opens
2. Click Tasks.
webTA 3.8 Administrator’s Guide 27 ©2009 Kronos Incorporated

The Task/E-mail Configuration page opens.
3. Select task delivery and e-mail options by clicking to select options and typing in the appropriate text boxes.
IMPORTANT! If you enable the e-mail option in the Task Delivery section of the screen, you must complete all but the optional message fields. The From: field must include a valid e-mail address in case mail is returned, and that e-mail account should be checked periodically to ensure that it is current.
Also, employee e-mail addresses must also be entered in the Locator form in the Timekeeper module for e-mails to be received. Locator information may be entered by employees or Timekeepers.
If there is a problem sending the mail message, webTA adds the task to the appropriate task list.
4. Click Save.
5. If you want to test for the correct e-mail configuration by sending a test message to the e-mail address you provided, click Test.
IMPORTANT: The person you send the test message to must have an e-mail address set up in their Locator Info page.
webTA 3.8 Administrator’s Guide 28 ©2009 Kronos Incorporated

webTA 3.8 Administrator’s Guide 29 ©2009 Kronos Incorporated
Configuring Build File FTP
The Build File FTP page lets Administrators initialize and configure webTA to automatically transfer build files to remote FTP servers. Although this feature can be used to transfer the file to any servers reachable from the database server, the most common primary FTP server is the server maintained by the National Finance Center (NFC) for accepting files from their customers.
To configure build file FTP:
1. On the Administrator Main Menu click Configure.
The Configure webTA page opens.
2. Click FTP.
The Configure Build File FTP page opens.

3. In the top section, select the appropriate setting to enable or disable FTP, and type in the appropriate information in the text boxes.
• Use Automatic Build File FTP - Enables or disables the FTP feature. If disabled, none of the other settings in this page have effect.
• FTP server hostname or IP address - The host name or IP address of the destination FTP server. Examples:
ftp.someplace.gov
192.168.1.17
• FTP account userid - The user ID that webTA will use to log into the remote account. On many FTP servers, this is case sensitive.
• FTP password - The password used to log into the remote FTP server.
On many FTP servers, this is case sensitive. Note that this string is encrypted before webTA stores it with the rest of the configuration data, and is decrypted only when needed to connect to the remote FTP server.
• FTP site command - A site command is a special FTP command which is used to tell remote FTP servers about special processing required for the file.
webTA users often use a site command when connecting directly to the NFC FTP server. When doing so, the site command filetype=jes instructs the NFC server to submit the file to the job queue rather than saving it to disk. When connecting to a FTP server other than at NFC, this field is usually left blank.
• JCL - The NFC transmission specification requires a block of JCL to be included at the top of the transmission file, before any actual T&A data.
Text in this field will be prepended to the T&A data before it is transmitted. If transmitting directly to NFC, you should put the JCL required by NFC in this field. Otherwise, leave this field blank.
4. Click Save.
Managing audits
The Audit Management function lets you log certain types of auditing information. There are predefined channels that must be turned on to start auditing changes to the system. An example of such a channel is “Audit T&A Validations.”
Each such channel can be individually turned on or off by the Administrator. Auditing is turned off by default.
To manage audits:
1. On the Administrator Main Menu click Configure.
The Configure webTA page opens.
webTA 3.8 Administrator’s Guide 30 ©2009 Kronos Incorporated

2. Click Audit.
The Audit Management page opens.
3. Click to select or clear the check boxes for the types of audits you want.
4. Click Save.
webTA 3.8 Administrator’s Guide 31 ©2009 Kronos Incorporated

Managing sessions
The Session Management function lets you set the number of minutes a session can be idle before an employee is automatically logged off, and provides an option that prevents multiple simultaneous logins by the same employee.
To manage sessions:
1. On the Administrator Main Menu click Configure.
The Configure webTA page opens.
2. Click Session.
The Session Management page opens.
3. Select the appropriate options and change the timeout value.
webTA 3.8 Administrator’s Guide 32 ©2009 Kronos Incorporated

• If Prevent Multiple Logins is selected, webTA stops any attempt to log in more than once in a session using the same user ID and password combination.
NOTE: Saving changes to this check box invalidates all existing sessions. The users of these sessions are alerted that a configuration feature has been modified that will require them to log in again.
• Session Timeout lets you set the length of time (in minutes) a session my be idle before being automatically closed. Changes to this feature take affect immediately upon clicking Save.
• If the Never Timeout option is selected, sessions remain open regardless of any entry in the Session Timeout box.
4. Click Save.
Managing holidays
The Holiday Management page lists all holidays for current leave year. If the holiday is on a weekend, then the date when the holiday is observed is listed.
When enabled, this feature automatically inserts holidays in the new pay periods at build time.
NOTE: Holiday management functions are configurable. The options available to you depend on how your webTA installation was set up, and may differ somewhat from what you see in this section.
To manage holidays:
1. On the Administrator Main Menu click Configure.
The Configure webTA page opens.
webTA 3.8 Administrator’s Guide 33 ©2009 Kronos Incorporated

2. Click Holiday.
The Automatic Holiday Entry page opens.
3. Click Enable or Disable, as required.
Working with Account Structures
An account structure is a definition of how webTA interprets an account string. An account string consists of set of fields, each with its own settings and attributes.
webTA’s account structure management functions let you create, copy, modify, or remove account structures. Also, cross-field validation rules can be defined that enforce relationships between account field values.
All Manage Account Structures functions are accessed by clicking Configure on the Administrator Main Menu page, then clicking Structures on the Configure webTA page.
The Manage Account Structures page opens when you click Structures.
webTA 3.8 Administrator’s Guide 34 ©2009 Kronos Incorporated
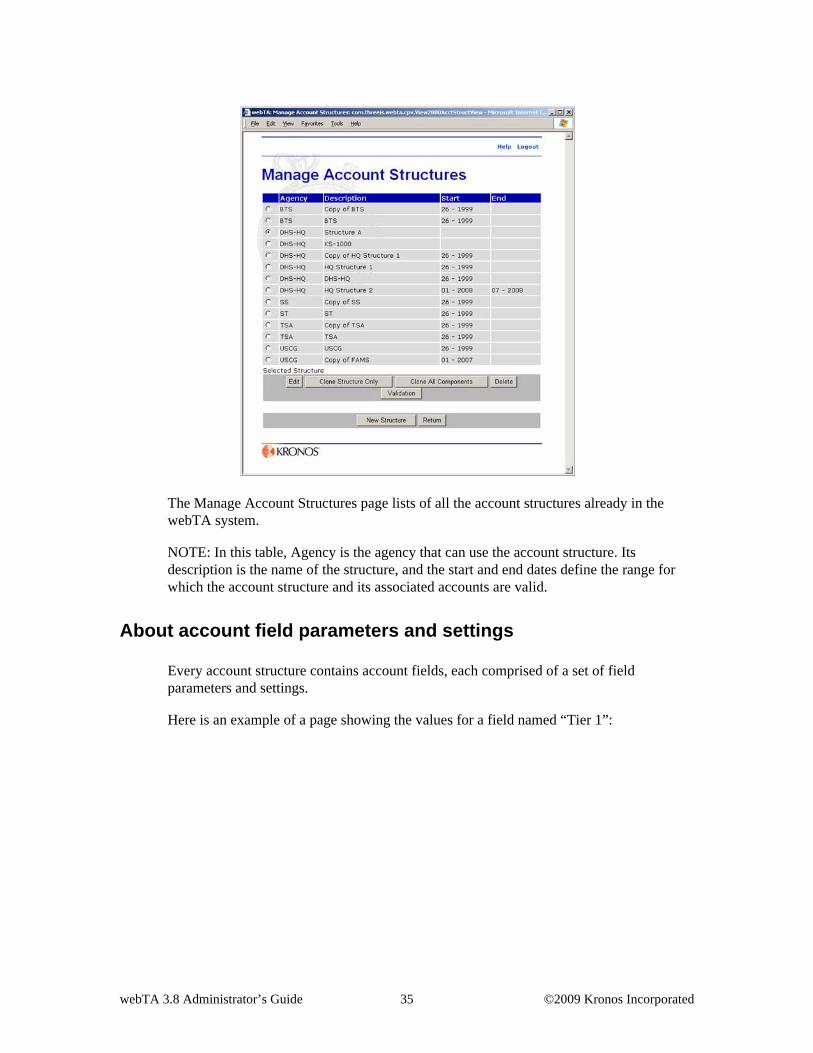
The Manage Account Structures page lists of all the account structures already in the webTA system.
NOTE: In this table, Agency is the agency that can use the account structure. Its description is the name of the structure, and the start and end dates define the range for which the account structure and its associated accounts are valid.
About account field parameters and settings
Every account structure contains account fields, each comprised of a set of field parameters and settings.
Here is an example of a page showing the values for a field named “Tier 1”:
webTA 3.8 Administrator’s Guide 35 ©2009 Kronos Incorporated
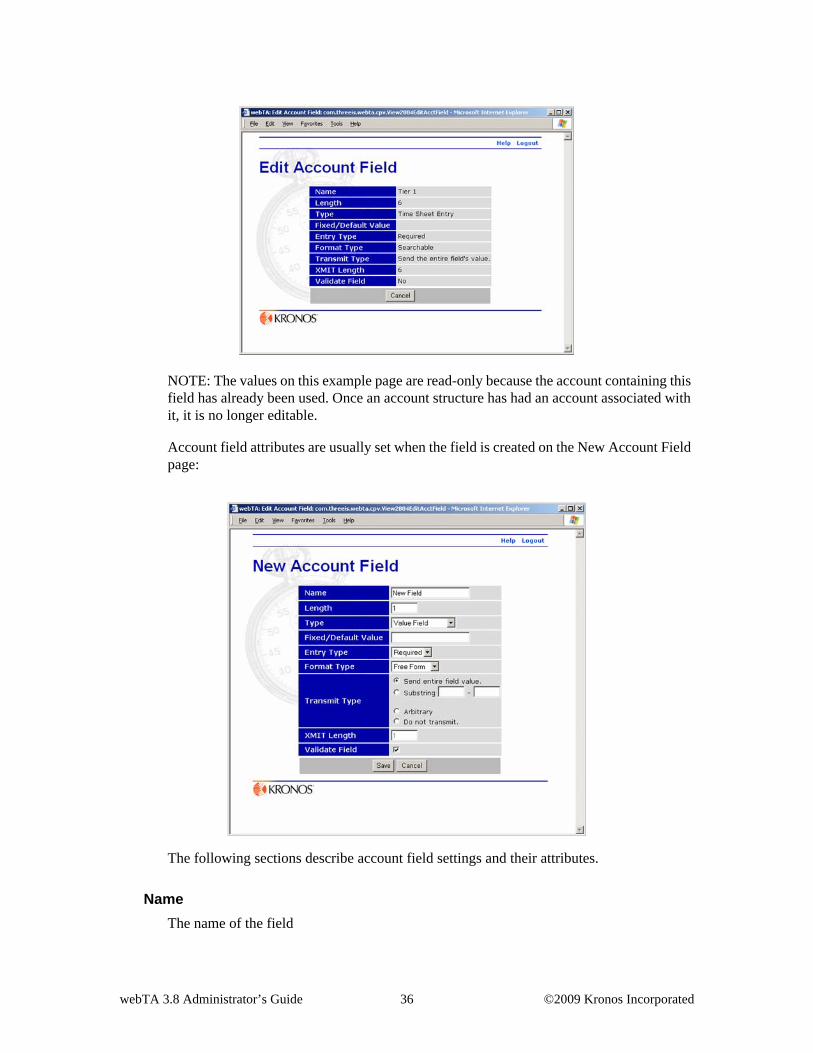
NOTE: The values on this example page are read-only because the account containing this field has already been used. Once an account structure has had an account associated with it, it is no longer editable.
Account field attributes are usually set when the field is created on the New Account Field page:
The following sections describe account field settings and their attributes.
Name
The name of the field
webTA 3.8 Administrator’s Guide 36 ©2009 Kronos Incorporated

Length
The length of the field that is displayed in webTA. (Other properties may cause a different length to be transmitted to NFC.)
Type
The field type. That is, fiscal year, value, fixed type, key, key value, time sheet entry, and so on.
• Fiscal Year
This field contains the fiscal year information usually located at the beginning of each account. The fiscal year is determined when building the T&A data. Therefore, the value for this field can not be directly entered during account creation process.
For “Fiscal year field” type fields, the value entered in the Fixed/Default Value field are converted into the fiscal year for an account. One to four asterisks are used to specify how the fiscal year portion of the account will appear.
Examples for fiscal year 2008:
* appears as “8”
** appears as “08”
*** appears as “008”
**** appears as “2008”
Therefore, G** would generate G05 if used during fiscal year 2005, and G** would generate G08 when used in fiscal year 2008.
• Fixed Type
Fixed Type fields contain the value specified in the Fixed/Default Value field of the field. These fields are read-only when creating the account.
• Key
A key field represents a unique combination of key values. It is used to transmit a unique identifier that can be used to find key values for the account in the webTA database. The value for a key field is automatically generated, and cannot be explicitly entered in webTA.
• Key value
A Key value field contains a value to which the key refers. (A single key may refer to multiple key values.) Key values are not be transmitted; the key is transmitted in place of all key values in an account when the transmission record is generated.
• Value
webTA 3.8 Administrator’s Guide 37 ©2009 Kronos Incorporated

This is a regular field in which a value must be entered when creating the account.
• Time Sheet Entry
IMPORTANT! We recommend that you do not use Time Sheet Entry fields unless your webTA system has been specifically customized for your agency to use this feature.
A Time Sheet Entry type field is used to create fields specified when a user adds a new transaction to the time sheet. For example, a time sheet entry field could be used to give an employee the ability to select a work order when creating a new line on the time sheet. This value is not entered during account creation, but is added to the account when the account is selected for the time sheet. For example, in the following employee Edit Work Time Activity page, the fields Tier 1 and Tier 2 were created by the Administrator as Time Sheet Entry type fields, and are available with in customized view of the transaction page.
Fixed/Default Value
A value must be entered in this box for Fiscal Year or Fixed Field type fields, and its value must be of the length specified in the XMIT Length box.
A fixed/default value may also be specified for Value or Key Value Field fields. In these cases, values you enter into the Fixed/Default Value field will be used if another value is not entered when you create an account.
This field is not used with Time Sheet Entry or Key Field field types. Time Sheet Entry field values are entered on the time sheet, and Key Field values are generated automatically by webTA.
Entry Type
Required fields must contain a value and that value must be exactly the length specified above. This is usually enforced at account creation time.
webTA 3.8 Administrator’s Guide 38 ©2009 Kronos Incorporated

Optional fields may contain no value or a value with a length exactly equal to the length specified in the Length box. Also, an optional field must appear at the end of the structure.
Format type
Format types indicate how the field value will be entered or selected on the account creation wizard.
• Free Form fields are fields in which users enter the value for the field in a text box.
• Drop Down fields are fields from which users select a value from a drop-down list of valid and available values.
• Hidden fields are fields that do not appear on the account creation wizard, and the values for these fields can not be entered on the account creation wizard.
• Searchable fields map to a lookup table that contains the valid and available values for the field. This table can be searched and a value can be selected from there.
Transmission Type
The transmission type specifies how the field appears when an account of this structure is transmitted to NFC.
• Send entire field value causes the entire field values to be sent.
• Substring causes a substring of the field's value to be transmitted. When this option is selected, the substring boundaries must be specified in the Substring boxes. These boundaries are the positions of the first and last characters in the field. The positions are inclusive, and start with 1, for example if a field of length 6 is of transmission type “substring” with a start and end position of 1 and 4, the field value ABCDEF would be sent as ABCD.
• Arbitrary sends an unrelated value for Arbitrary type fields to NFC instead of the value you enter. For example, an Arbitrary transmission type field may be used to transmit a value that you may not want other webTA users to see, such as an employee’s Social Security number, replacing the SSN with an unrelated value.
The display/transmit value mapping is done on the Edit Account Field Values page. The displayed value refers to the value of the field shown in webTA, and is stored in the account string in the webTA database.
• Do not transmit causes the field not to be transmitted. A field of this type leaves no empty space in the transmitted version of the account.
Whenever an account is prepared for transmission to NFC, all underscore characters (_) are replaced with spaces.
XMIT Length
This value specifies the transmission length of the field. This property is only editable if the transmission type is set to Arbitrary.
Validate Field check box
This check box is used to choose if the field value is to be validated against the lookup table that stores the possible valid/available values for the field. The field format type automatically sets the
webTA 3.8 Administrator’s Guide 39 ©2009 Kronos Incorporated

valid/available values from the lookup table, but Free Form format values can be explicitly validated by selecting this option.
Creating an account structure
Account structures may be created from scratch or by cloning and then editing existing structures.
The process of creating an account structure from scratch consists of setting up a structure by naming the structure and designating the agency for which it is created and the start and end dates for which it is valid. After the structure is set up, you create fields for the structure. Creating fields includes setting each field’s parameters such as field type, transmission length, default value, and establishing validation rules.
For information about cloning, see “Copying (cloning) an account structure” on page 43.
To set up an account structure:
1. On the Manage Account Structures page, click New Structure.
The Edit Account Structure page opens.
2. In the Name box, type in the name of the new structure.
3. If want to set a start and end dates for the structure, type the pay periods and years in the Start (PP-LY) and the End (PP-LY) boxes.
NOTE: Establishing start and end dates is optional. Leaving the start date blank makes the structure available for all cases since the structure was created. Leaving the end date blank makes the structure available for all future cases.
4. Click New Field.
webTA 3.8 Administrator’s Guide 40 ©2009 Kronos Incorporated

The New Account Field page opens.
5. Type in or select the appropriate parameters and options for the field’s attributes.
For detailed information about setting field attributes, see “About account field parameters and settings” on page 35.
6. Click Save.
webTA validates the field, and tells you if errors have been made.
IMPORTANT: Field validation is selected by default. If you chose to turn off the default Validate Field option, webTA returns you to the Edit Account Structure page without checking for errors.
7. Correct any errors, then click Save.
The new account structure field appears in the table on the Edit Account Structure page.
webTA 3.8 Administrator’s Guide 41 ©2009 Kronos Incorporated

8. If you need to add more fields to the account structure, repeat Steps 4 through 17.
9. When you have finished adding fields, click Save Structure, then click Return.
The Manage Account Structures page opens. The account structure you created appears in the account structures list.
webTA 3.8 Administrator’s Guide 42 ©2009 Kronos Incorporated

Copying (cloning) an account structure
By cloning an account structure, you duplicate a structure, including all its fields. However, the copy does not contain the field values for the structure, only its definition.
Using the Clone All Components function, however, you can not only copy the structure of a selected account, but also its field values.
To clone an account structure:
1. On the Manage Account Structures page, click to select the account structure you want to clone.
2. Click Clone Structure Only.
webTA copies the account structure and opens The Edit Account Structure page for that structure and designates the structure as a copy in the Name field by appending “Copy of” to the original structure name.
3. If necessary rename and edit the cloned structure.
4. When you are finished working with the structure, click Save Structure, then click Return.
webTA returns you to the Manage Account Structures page. The cloned structure appears in the account structures list.
To clone an account structure and its values:
1. On the Manage Account Structures page, click to select the account structure you want to clone.
2. Click Clone All Components.
webTA copies the account structure and its field values and opens The Edit Account Structure page for that structure and designates the copy as such in the Name field by appending “Copy of” to the original structure name.
3. If necessary, rename and edit the copied structure on this page.
4. When you are finished working with the structure, click Save Structure, then click Return.
webTA returns you to the Manage Account Structures page. The cloned structure appears in the account structures list.
Viewing, creating, and editing account structure fields
Fields in account structures that do not have associated accounts can be edited, and new fields added.
Account structures that have accounts associated with them cannot be modified.
webTA 3.8 Administrator’s Guide 43 ©2009 Kronos Incorporated
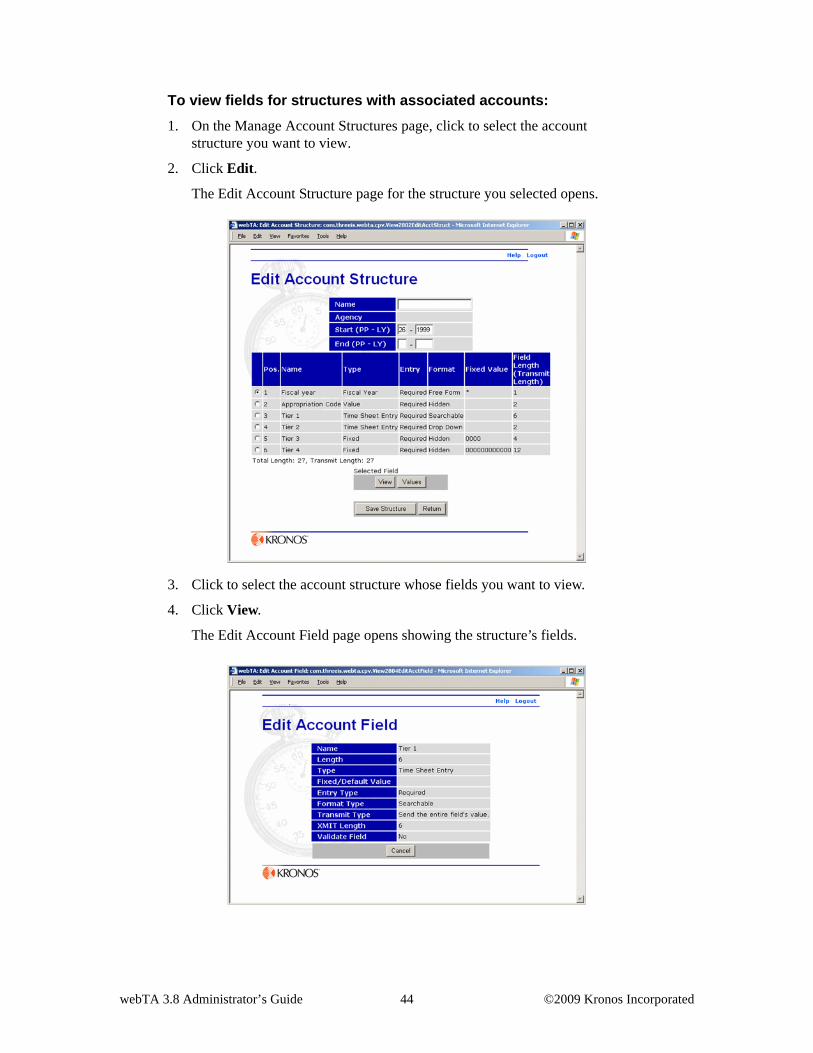
To view fields for structures with associated accounts:
1. On the Manage Account Structures page, click to select the account structure you want to view.
2. Click Edit.
The Edit Account Structure page for the structure you selected opens.
3. Click to select the account structure whose fields you want to view.
4. Click View.
The Edit Account Field page opens showing the structure’s fields.
webTA 3.8 Administrator’s Guide 44 ©2009 Kronos Incorporated

To view, create, or edit fields for structures with no associated accounts:
1. On the Manage Account Structures page, click to select the account structure you want to view.
2. Click Edit.
The Edit Account Structure page for the structure you selected opens.
3. If you want to edit a field, click to select the field, then click Edit, then type the appropriate values in the text boxes, select the type from the drop-down list, and click to select or clear options, then click Save.
4. If you want to create a new field, in the Edit Account Structure page, click New Field, then in the New Account Field page that opens, type the appropriate values in the text boxes, select the type from the drop-down list, and click to select or clear options, then click Save.
5. On the Edit Account Structure page, click Save Structure.
Viewing, creating, and editing field values
Only field values for Required or Optional fields can be edited.
To view, create, or edit field values:
1. On the Manage Account Structures page, click to select the account structure whose field values you want to see.
2. Click Edit.
The Edit Account Structure page opens for the selected structure.
webTA 3.8 Administrator’s Guide 45 ©2009 Kronos Incorporated

3. Click to select the field whose values you want to view, then click Values.
The Edit Account Field Values page opens showing the values for the selected field.
4. If you want to add a new field value, type the value parameters in the text boxes, then click Add.
5. If you want to edit a field value, click Edit for the appropriate field value, modify the values on the Edit Account Field Value page as necessary, then click Save.
6. If you want to delete individual field values, click Del next to each field value.
- OR -
If you want to delete all field values for the account, click Delete All.
webTA 3.8 Administrator’s Guide 46 ©2009 Kronos Incorporated

Modifying an account structure
Only fields for account structures that have no associated accounts can be modified. These structures, however, can be renamed and their start and end dates changed.
To modify an account structure:
1. On the Manage Account Structures page, click to select the account structure whose field values you want to see.
2. Click Edit.
The Edit Account Structure page opens for the selected structure.
NOTE: If accounts have already been created using the structure you are trying to edit, the fields on the Edit Account Field page will be read-only.
3. If you want only to change the name or start and end dates, make the necessary changes by typing in the boxes, then click Save Structure.
4. If you want to remove a field, click to select the field, then click Remove.
- OR -
If you want to edit or add field values, go to “Viewing, creating, and editing field values” on page 45.
- OR -
If you want to change the order of the fields, go to “Changing the order of fields in an account structure” on page 48.
- OR -
webTA 3.8 Administrator’s Guide 47 ©2009 Kronos Incorporated

If you want to create a new field, click New Field, type in and select the values for the field in the New Account Field page, then click Save.
Changing the order of fields in an account structure
To change the order of fields in an account structure:
1. On the Manage Account Structures page, click to select the structure whose fields you want to reorder.
2. Click Edit.
The Edit Account Structure page opens.
3. Click to select the field that you want to move, then click Move Up or Move Down.
4. Repeat the previous step until the field order is acceptable, then click Save Structure.
Account Field Validation
An administrator can create or modify cross-field validation rules. Cross-field validations are used by the system to enforce certain relationships among account field values. These rules are used by webTA to determine if a given account may be used. They are also used to aid in account creation.
Each cross-field validation rule can have start and end dates that determine the period for which the rule applies. If either of the Start or End date fields are left blank then the rule's period of availability is considered to have no start or end date.
Comparison operators
Comparison operators are used to compare a particular account field to a particular value. For example, field1 = ABCD.
The comparison operators are:
• Equals (=)
• Not equals (<>)
• Less than (<)
• Less than or equals (<=)
• Greater than (>)
• Greater than or equals (>=)
webTA 3.8 Administrator’s Guide 48 ©2009 Kronos Incorporated

Logical operators
Logical operators are used to combine two expressions in a logical way. There are three logical operators:
• AND requires that both expressions must be true.
• OR requires that at least one expression must be true
• NOT requires that the expression not be true
Leaf node expression
A leaf node expression is the simplest type of expression in a cross-field validation rule. It uses the comparison operators and specifies an account field and the comparison value. For example, field1 = ABCD.
When specifying the comparison value of a leaf node expression, certain wild card characters may be used.
• % is a wildcard for any number of characters with any value. For example, A% matches ABCD, ABCDEFG, A123, AB234C, etc.
• _ (the underscore character) is a wildcard for any single character. For example, A_CD matches ABCD, AZCD, A3CD, etc.
Composite expression
A composite expression is made up of two expressions joined by a logical operator. For example, field1 = ABCD AND field2 <= XYZ is a composite expression because it consists of two expressions joined by the AND logical operator.
About cross-field validation rules
A cross-field validation rule contains an IF expression and a THEN expression. When webTA applies a rule to an account it first checks that the IF expression is satisfied by the account. If so, the THEN expression is applied to the account.
The account is considered valid if the THEN expression is satisfied. Should the IF expression not be satisfied, the account is still considered valid for that rule.
On the Edit Account Field Validation Rule page, the IF expression and THEN expression are represented in separate tables on the page. Each table is a work space in which the administrator may add and edit expressions or combine multiple expressions into the a single rule. Each rule can contain only one expression. However, until the expressions are saved, the clause lists may contain multiple expressions.
Editing and creating the IF and THEN expressions is done by selecting the appropriate expressions and clicking the appropriate function buttons.
Logical relationships (“logical operations”) between expressions in the clause tables are created using these buttons:
webTA 3.8 Administrator’s Guide 49 ©2009 Kronos Incorporated

• AND combines two expressions with an AND operator. This function requires that two expressions be selected.
• OR combines two expressions with an OR operator. This function requires that two expressions be selected
• NOT negates the selected expression by altering its operators in such a way that the resulting expression is opposite the selected one. This function requires that one expression be selected.
These buttons are also available for working with expressions:
• Delete removes a selected expression from the table.
• Break splits a composite expressions into two component expressions.
• Edit lets the administrator modify a selected leaf node expression.
• New creates a new leaf node expression.
NOTE: Using the Break button breaks a composite expressions into two expressions only. It will not break composite expressions contained in the main composite expression down further. If necessary, continue to break down composite expressions by selecting them and clicking Break until you reach the detail level you want.
Adding an account field validation rule
Validations restrict which account fields values can be used together across fields.
To add an account field validation:
1. On the Manage Account Structures page, click to select the account structure to which you want to add an account field validation.
2. Click Validation.
The Edit Account Field Validations page opens.
3. Click New.
The Edit Account Field Validation Rule page opens for the selected account structure.
webTA 3.8 Administrator’s Guide 50 ©2009 Kronos Incorporated

4. If necessary, establish the period for which the validation is active by typing in the Start (PP-LY) and End (PP-LY) pay period boxes.
NOTE: Establishing start and end dates is optional. Leaving the start date blank applies the validation to all cases since the field was created. Leaving the end date blank applies the validation to all future cases.
5. If desired, type in the error message that will be displayed for an invalid field entry.
6. In the If Clause section, click New.
The Edit Rule Expression page opens.
7. Select the field and comparison operator from the drop-down menus, type in the value for the expression in the Value box, then click Save.
The Edit Account Field Validation Rule page opens. The rule you added appears in the If Clause list.
webTA 3.8 Administrator’s Guide 51 ©2009 Kronos Incorporated

8. If you want to add further If clauses, repeat Steps 6 through 7.
Example
Three If clauses have been added to the rule.
Note that these three rules, at this point, will be applied independently. That is, if any one of these rules is satisfied, the If statement will be considered valid.
9. As necessary, link the rules with operators by selecting two rules and clicking the appropriate AND, OR, or NOT conditional button.
webTA 3.8 Administrator’s Guide 52 ©2009 Kronos Incorporated

The If Clause list changes to reflect your choice.
Example
The first two clauses in the previous example have been linked by the AND operator, and appear as one IF expression.
NOTE:
• An expression can be removed by clicking to select the expression, then clicking Delete.
• A composite expression can be separated into two components by clicking to select an expression, then clicking Break.
10. If necessary, create further relationships between If clauses by repeating the previous step.
Example
The composite IF expression created in Step 10 has been linked with the remaining expression by the AND operator, creating one IF expression combining the three conditions of the original three clauses.
webTA 3.8 Administrator’s Guide 53 ©2009 Kronos Incorporated

11. Repeat Steps 6 through 10 using the Then Clause section and its buttons to create the appropriate THEN clauses.
12. Click Save.
13. The Edit Account Field Validations page opens, showing the validation rule that you created.
Editing a validation rule
To edit a validation rule:
1. On the Manage Account Structures page, click to select the structure whose rule you want to edit.
webTA 3.8 Administrator’s Guide 54 ©2009 Kronos Incorporated

2. Click Validation.
The Edit Account Field Validations page for the rule opens.
3. Click to select the rule you want to edit.
4. Click Edit.
The Edit Account Field Validation Rule page opens.
5. If the expression is an individual expression, not a composite, click to select the expression you want to edit.
- OR -
If the expression is a composite, break the expression into its components by clicking Break for every composite expression contained in the original until you see the expression you want to edit, then click to select the expression.
6. Click Edit.
The Edit Rule Expression page opens.
7. Edit the expression as needed, then click Save.
Deleting a validation rule
To delete a validation rule:
1. On the Manage Account Structures page, click to select the structure containing the rule you want to remove.
2. Click Validation.
The Edit Account Field Validations page for the rule opens.
3. Click to select the rule you want to delete.
4. Click Delete.
webTA Reports
The webTA reports section contains these pre-defined Administrator reports:
• Agency Status Report
• Employee Assignment by Supervisor Report
• Employee Assignment by Timekeeper Report
• User Role Assignment Report
• Organization Account Validation Report
webTA 3.8 Administrator’s Guide 55 ©2009 Kronos Incorporated
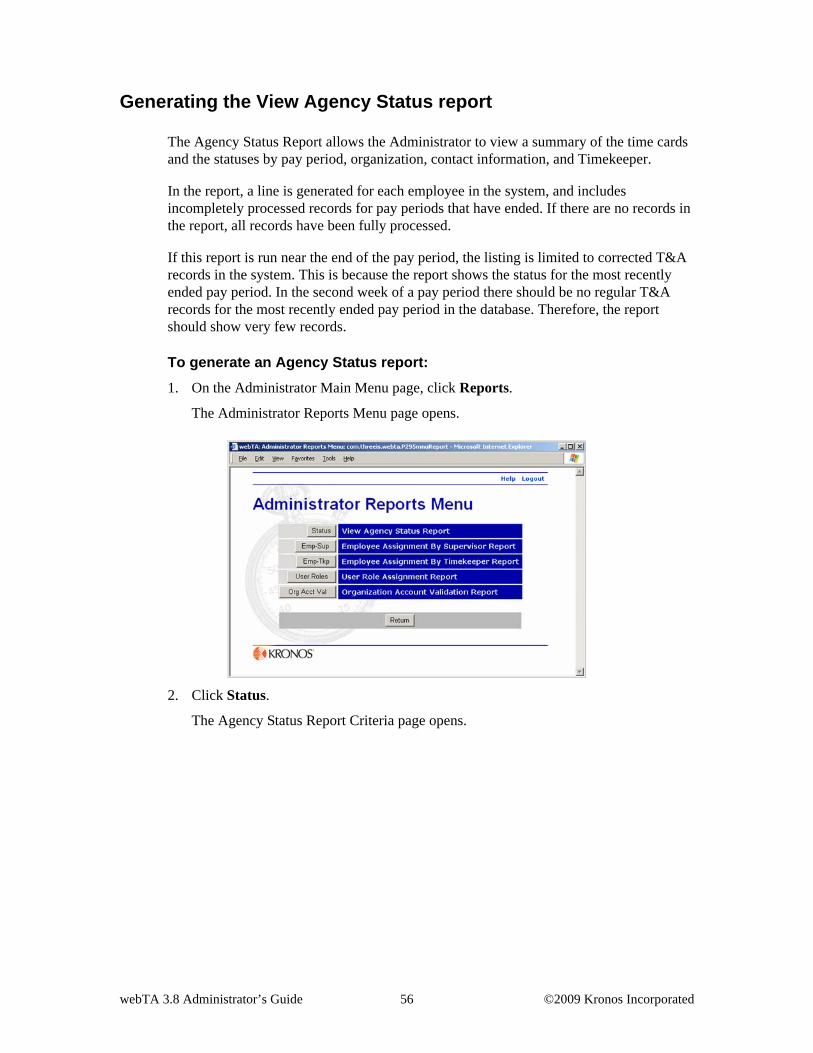
Generating the View Agency Status report
The Agency Status Report allows the Administrator to view a summary of the time cards and the statuses by pay period, organization, contact information, and Timekeeper.
In the report, a line is generated for each employee in the system, and includes incompletely processed records for pay periods that have ended. If there are no records in the report, all records have been fully processed.
If this report is run near the end of the pay period, the listing is limited to corrected T&A records in the system. This is because the report shows the status for the most recently ended pay period. In the second week of a pay period there should be no regular T&A records for the most recently ended pay period in the database. Therefore, the report should show very few records.
To generate an Agency Status report:
1. On the Administrator Main Menu page, click Reports.
The Administrator Reports Menu page opens.
2. Click Status.
The Agency Status Report Criteria page opens.
webTA 3.8 Administrator’s Guide 56 ©2009 Kronos Incorporated

3. Set the pay period range for the report by selecting the beginning and ending dates from the From and To lists, and select the employee status. You may also designate the timekeeper’s organization, choose to include subordinate organizations, and select the Timekeeper’s activity status.
4. Click Continue.
webTA generates the Agency Status Report, based the parameters you entered.
NOTE: A single Timekeeper may appear in the table more than once if that Timekeeper is assigned employees from different contact points or organizations, though this usually will not be the case.)
webTA 3.8 Administrator’s Guide 57 ©2009 Kronos Incorporated

Generating the Employee Assignment by Supervisor report
The Employee Assignment by Supervisor Report lists the names of Supervisors and their corresponding employees, and is available to those with HR Administrator or Administrator roles only.
When the report is viewed by an Administrator, it contains all the employees in the system. When the report is viewed by an HR Administrator, results are restricted to the HR Administrator's organization.
The report is generated for every Supervisor/Employee relationship in webTA, but can be filtered by Supervisor, organization, and status.
To generate an Employee Assignment by Supervisor report:
1. On the Administrator Main Menu page, click Reports.
The Administrator Reports Menu page opens.
2. Click Emp-Sup.
The Emp-Sup Assignment Report Criteria page opens.
webTA 3.8 Administrator’s Guide 58 ©2009 Kronos Incorporated

3. Type in, or search for and select, the Supervisor’s user ID, select the Supervisor’s organization (optional) and employees’ status, and choose if you want the Supervisor’s subordinate organizations included in the report.
4. Click Continue.
The Emp-Sup Assignment Report page opens.
Generating the Employee Assignment by Timekeeper report
The Employee Assignment by Timkeeper Report lists all Timekeeper-Employee associations that exist in webTA.
webTA 3.8 Administrator’s Guide 59 ©2009 Kronos Incorporated

This report is available to HR Administrators and Administrators only. When the report is viewed by an Administrator, it contains all the employees in the system. When the report is viewed by an HR Administrator, results are restricted to the HR Administrator's organization. The organization name is displayed at the top of the report.
The report can be further filtered by specifying a Timekeeper, organization, and active status.
To generate an Employee Assignment by Timekeeper report:
1. On the Administrator Main Menu page, click Reports.
The Administrator Reports Menu page opens.
2. Click Emp-Tkp.
The Emp-Tpk Assignment Report Criteria page opens.
webTA 3.8 Administrator’s Guide 60 ©2009 Kronos Incorporated

3. Type in, or search for and select, the Timekeeper’s user ID, then select the Timekeeper’s organization (optional) and the employees’ status.
4. Click Continue.
The Emp-Tkp Assignment Report page opens.
The report lists the names of the employees and their corresponding timekeepers.
Generating the User Role Assignment report
The User Role Assignment Report gives the Administrator access to a list of active and inactive employees grouped by their roles. The role can be selected from the list at the top of the report. The report changes when the role is changed. For any role that can be delegated, there will be an additional column in the report to show delegates’ information.
There are two options: to download T&A profile data or to download employee profile
data. Both these data files can be downloaded and opened in Microsoft® Excel.
webTA 3.8 Administrator’s Guide 61 ©2009 Kronos Incorporated
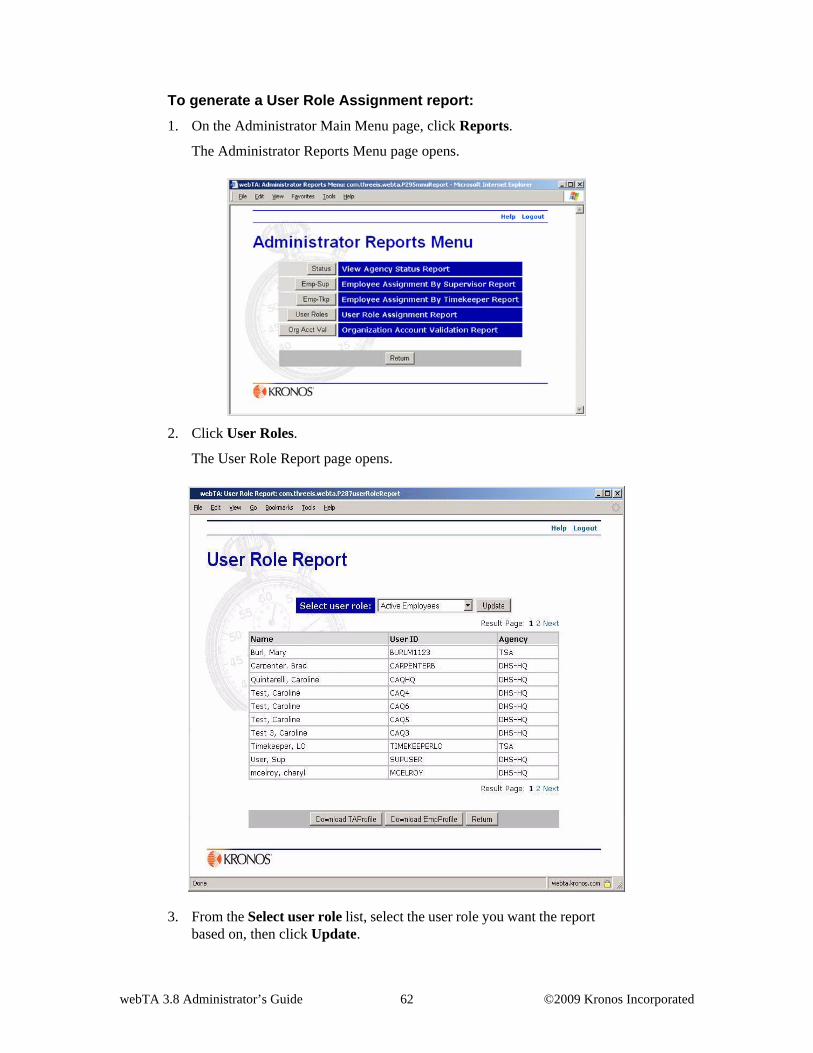
To generate a User Role Assignment report:
1. On the Administrator Main Menu page, click Reports.
The Administrator Reports Menu page opens.
2. Click User Roles.
The User Role Report page opens.
3. From the Select user role list, select the user role you want the report based on, then click Update.
webTA 3.8 Administrator’s Guide 62 ©2009 Kronos Incorporated

4. The report changes to show results only for the role you selected.
5. If you want to view report results as T&A profiles or Employee profiles, click either Download TA Profile or Download Emp Profile, click to select Open with Microsoft Excel, then click OK.
The report you chose opens Microsoft® Excel.
6. If you want to download report results in Microsoft® Excel .XLS format, click either Download TA Profile or Download Emp Profile, click to select Save to Disk, then click OK.
webTA downloads the chosen profile results to your disk in .XLS format.
Generating the Organization Account Validation report
This report displays all account validation errors for current T&As, ordered hierarchically by organization.
The report is generated nightly and the results are cached.
To view the Organization Account Validation report:
1. On the Administrator Main Menu page, click Reports.
The Administrator Reports Menu page opens.
2. Click Org Acct Val.
The Organization Account Validation report opens.
webTA 3.8 Administrator’s Guide 63 ©2009 Kronos Incorporated

Although the report is generated nightly, you can regenerate the report at any time.
3. If you want to regenerate the report, click Regenerate.
Any updates to the report since it was last generated appear on the report page.
Delegating the Administrator role
You may delegate your webTA Administrator role to as many alternates as you want to have access to your role in the event of your absence. The delegates you assign have all rights to administer webTA records.
If you have more than one privileged role in webTA (such as being both a Supervisor and Administrator), you must separately delegate each role. The Main Menu page from which you access the delegate function determines the role you delegate.
The delegation remains in effect until you remove the user ID of the delegate from your list of delegates.
To delegate the Administrator role:
1. On the Administrator Main Menu page, click Delegate.
The Delegate Administrator Role page opens.
webTA 3.8 Administrator’s Guide 64 ©2009 Kronos Incorporated

2. Type the user ID of the employee you want to delegate the role to, or search for the employee using webTA’s search function. then click Add.
The delegated person is added to the Current Delegates table.
To remove a delegate:
1. On the Administrator Main Menu page, click Delegate.
The Delegate Administrator Role page opens.
Employees who have been delegated the Administrator role appear in the Current Delegates section.
webTA 3.8 Administrator’s Guide 65 ©2009 Kronos Incorporated

2. If you want to undelegate an individual employee, click Del next to the person’s name in the Current Delegates table.
- OR -
If you want to remove all delegates, click Undelegate All.
webTA 3.8 Administrator’s Guide 66 ©2009 Kronos Incorporated