kronos - welcome to mmc e-learning learncenter...
TRANSCRIPT

Kronos Workforce Central v5.1™
Parallel TestA Preparation Guide for
Managers
Page 1 of 20

Kronos Workforce Central v5.1Kronos TRAIN Icon Setup
(Shortcut)
Page 2 of 20

Parallel Test Preparation
The following steps should be taken by each manager to ensure their area of responsibility is prepared and ready for the Kronos Parallel Test. A checklist of necessary procedures is provided below and should be completed prior to the start of the pay period that will begin the Parallel Test process.
It should also be noted that all parallel testing must be completed in the ‘Test’ environment and should not be confused with the ‘Production’ environment used for all departments that are now live on the Kronos system. You will know you are accessing the Test environment as the navigation bar displayed upon logon will appear in pink.
All instructions for successful Parallel Test are listed below with directions for each attached. However, if additional assistance is needed, forward an email to [email protected]. A project team member will contact you as soon as possible with any assistance you may require.
Checklist for Parallel Test
Train Your Employees
Train your employees to use the time clock and its functions. (Reference the Employee User Guide for training)
Prior to start of pay period
1. Setup an icon on your desktop to access the test environment – Page 3
2. Logon to Kronos in the test environment – Page 5
3. View Your Employees – Page 6
4. View Other Employees – Page 7
Page 3 of 20

Kronos Workforce Central v5.1Kronos TRAIN Icon Setup
(Shortcut)
5. Build schedules for each of your employees – Page 9
Daily activities during pay period
6. Daily timecard reconciliation – Page 11
7. Manager’s Weekly Checklist (finalize the timecard/payroll processing) – Page 13
Page 4 of 20
Kronos Workforce Central v5.1Kronos TRAIN Icon Setup
(Shortcut)
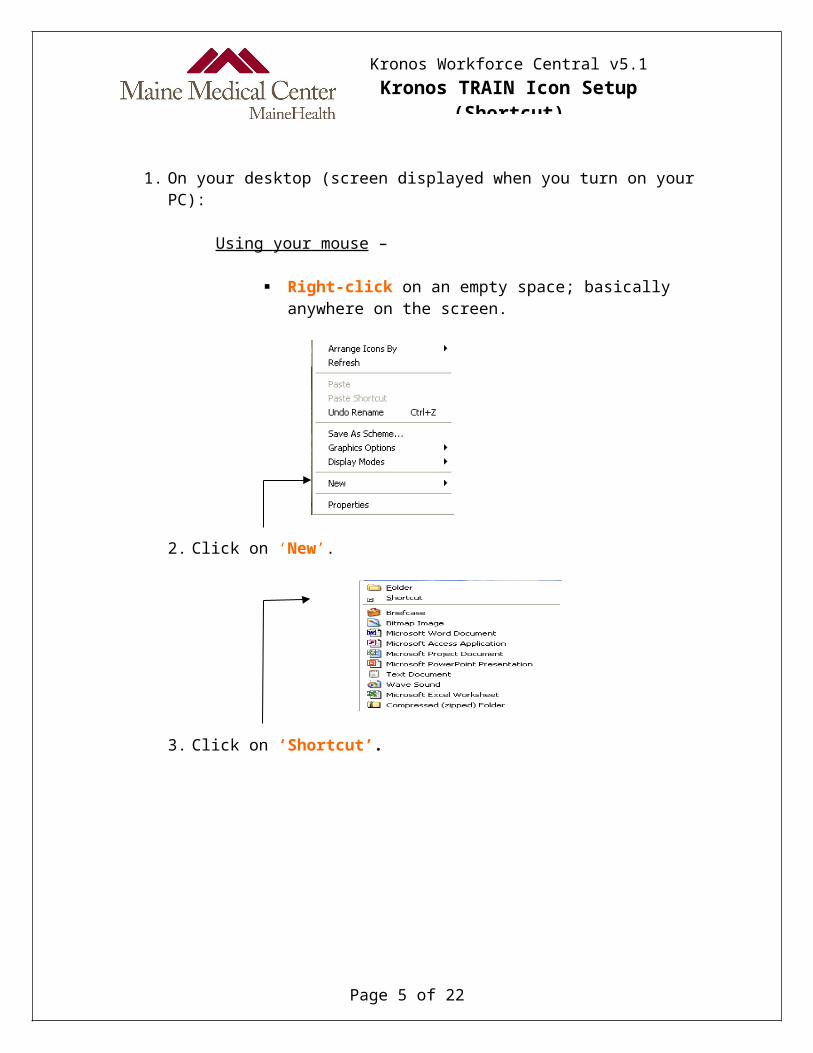
1. On your desktop (screen displayed when you turn on your PC):
Using your mouse –
Right-click on an empty space; basically anywhere on the screen.
2. Click on ‘New’.
3. Click on ‘Shortcut’.
Page 5 of 20

Kronos Workforce Central v5.1Kronos TRAIN Icon Setup
(Shortcut)4. In the ‘Type the location of the item:’, enter
http://vmkronostrain/wfc/portal
5. Click ‘Next’.
6. In the ‘Type a name for this shortcut’ box, type in Kronos TRAIN.
7. Click on ‘Finish’.
The Kronos Test icon should be setup on your desktop. You can proceed to the Kronos application by simply double-clicking on the icon.
Note: If you are unable to successfully complete steps 1-7, assistance will be provided by forwarding an email to [email protected] with the words ‘Icon Setup Unsuccessful’ in the subject line. You will be contacted with assistance.
Page 6 of 20

Kronos Workforce Central v5.1Kronos TRAIN Icon Setup
(Shortcut)
Page 7 of 20

Kronos Workforce Central v5.1Logon to Kronos
TRAIN Environment ONLY
When accessing the Kronos Train environment, you will see the following screen:
1. Enter your User Name (the same as all other applications; smithp)
2. Enter your Password (temporary password is ‘smithp0000’, where 0000 is the last 4 digits of your SSN)
Page 8 of 20

Kronos Workforce Central v5.1Logon to Kronos
TRAIN Environment ONLY
If you are in the TRAIN environment, the Navigation Bar will appear in TEAL.
Note:
If you cannot logon after completing steps 1 and 2 above , forward an email to [email protected] with the words ‘Logon Unsuccessful’ in the subject line. Your email will be automatically forwarded to the Kronos System Administrator for immediate resolution.
Page 9 of 20
NavigationBar

Kronos Workforce Central v5.1Employee Groups
View Your Employees
Steps to View Your Employees
1. Logon to Kronos2. In the Navigation Bar, select [QuickFind-MMC].3. All employees you are responsible for should appear in the
workspace.
Troubleshooting
If you are unable to view all the employees you are responsible for, perform the following steps:
1. Click on your employee record.
If your employee record does not appear with your group of employees, enter your last name in the Name or ID field in the Header Bar. Press [Enter]. Your employee record should now appear in the workspace area.
2. In the Header Bar, click on the [People] Editor button. Your employee demographics record will appear.
3. Click on the Job Assignment tab.
4. Click on [Manager Role – General].
5. The Employee Group field should be populated with your position code and your department number.
Example: C492EEM20
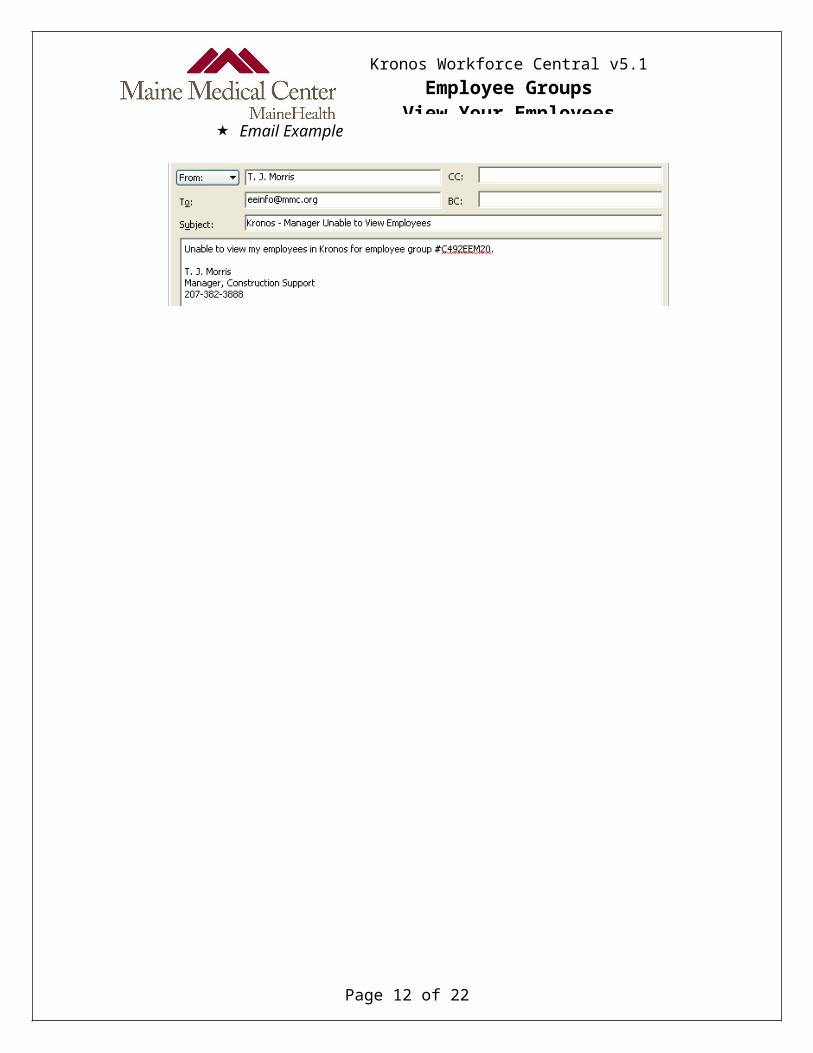
6. If you do not see an associated employee group number, contact the Human Resource department by emailing the results of this test to [email protected].
Email Example
Page 10 of 20

Kronos Workforce Central v5.1Employee Groups
View Your Employees
Page 11 of 20
Kronos Workforce Central v5.1Labor Level Sets
View Other Employees
Steps to View Other Employees
As a manager, you are able to view all the employees you are responsible for. However, there may be times you will serve as an interim until a specific position is filled or you may serve as a backup to another manager for timecard approval should that manager be unavailable (absent, vacation, leave of absence, etc.)
If this situation occurs, you will need to notify the Kronos System Administrator for an update to your Kronos employee demographics record. You can do this by forwarding an email to [email protected].
Email example
Your email will be forwarded to the Kronos System Administrator automatically for setup.
Page 12 of 20

Kronos Workforce Central v5.1Build Kronos Schedules
The most logical way to build an employee schedule is to build a rotating pattern that will create a schedule for the upcoming 52 weeks. Once the pattern is built, you can modify shifts or add pay codes (PTO) as changes to the weekly schedule occur. You can do this by executing the following steps:
1. In the Navigation Bar, click on Scheduling>Schedule Editor.
The employees within your area will appear in the workspace.
2. In the Header Bar, click on Time Period>Current Schedule Period.
3. In the workspace area, double-click on the employee that requires a schedule. The Pattern Editor will appear.
4. In the ‘Work Start Date’ field, enter the start date of the current pay period.
Page 13 of 20

Kronos Workforce Central v5.1Build Kronos Schedules
5. In the ‘Pattern Start Date’ field, enter the beginning date of the pay period; 9/99/9999.
6. The following default fields should remain the same.
The ‘Forever’ box should be checked.
The ‘Recurring’ field is equal to 1.
The ‘Weeks’ box should be checked.
The ‘Items in Rotation’ field should display this.
7. Click on the cell that corresponds to the first day the employee is scheduled to work.
Example: Monday
8. To the right of the daily cells, click on ‘Insert Pattern’. Scroll through the pre-defined patterns and make your selection. The schedule will be populated with the pattern you selected.
To delete the pattern, move your cursor to the first cell and hold down the left mouse key while sliding your cursor across each cell. When you have reached the last cell, right-click on the mouse and select ‘Delete’. The pattern will be removed.
9. If a pattern is not available, follow step 8, defined above, but select ‘Insert Shift’. This will allow you to enter the appropriate shifts for each day of the schedule. You can copy and paste any shift placed in the schedule by right-clicking on the cell and selecting copy or paste.
10. Once your schedule is complete, click ‘OK’ and the schedule will be saved.
Page 14 of 20

Kronos Workforce Central v5.1Build Kronos Schedules
You can access the HELP documentation at any time for assistance by clicking on the HELP key at the bottom of the Pattern Editor screen.
11. You can return to the Scheduler Editor at any time by simply clicking on the ‘Schedule Editor’ selection in the Navigation Bar.
Note: If you need assistance to complete schedules for your employees, forward an email to [email protected] with the words ‘Scheduling Assistance Needed’ in the subject line. You will be contacted and a date/time established for assistance.
Page 15 of 20

Kronos Workforce Central v5.1Kronos Daily Timecard
Reconciliation
Timecards should be reviewed on a daily basis to determine unexcused absences, missed punches, early-in and late-out punches. If you are responsible for numerous employee timecards, a daily timecard review will eliminate excessive time needed to resolve problems at the end of each week.
An easy method of reviewing timecard discrepancies is the ‘Reconcile Timecard Genie’. You can list all your employees and immediately note the timecards with problems. In addition, you will readily see the timecards that may have produced unauthorized overtime.
For a quick review, execute the following:
1. Login to Kronos. The default ‘QuickFind’ screen will appear.
2. In the Navigation Bar to the left of the QuickFind work space, Click ‘Timekeeping>Reconcile Timecard’.
Page 16 of 20

Kronos Workforce Central v5.1Kronos Daily Timecard
Reconciliation
3. The Reconcile Timecard screen will appear with those employees that require your review.
4. In the Header, from the drop-down box next to the Time Period section, click ‘Current Pay Period’ so each timecard reviewed will
contain all daily entries for the current pay period.
5. Scroll down the list to determine those employees with a ‘Missing Punch’. A check mark will appear in the missing punch column next to
the employee name. Double-click on the employee and their timecard will appear.
A solid red cell indicates the location of the missing punch.
Page 17 of 20

Kronos Workforce Central v5.1Kronos Daily Timecard
Reconciliation6. Make the necessary corrections and ‘SAVE’ the timecard.
7. You can return to the list of employees by clicking on ‘Reconcile Timecard’ again.
Page 18 of 20

Kronos Workforce Central v5.1Manager’s Weekly Checklist
Friday - Missing Punch Review
Click on [Timekeeping>Reconcile Timecard] in the Navigation Bar.
Select [Time Period>Current Pay Period] from the drop-down menu located in the Header above the workspace.
Review the “Missing Punch” column for check marks. If found:
Double-click on the employee name and when the timecard appears, correct each cell in solid red
Right-click on the corrected punch; click [Add Comment] and select the reason from the drop-down list
Select [Save] in the left corner of the menu bar.Click on [Timekeeping>Reconcile Timecard] in the
Navigation Bar to return to the employee listing.Repeat steps 3-5 until all check marks have been removed from
the Reconcile Timecard screen.
Friday – Rounding Rule Review
Review the “Early In” and “Early Out” columns for check marks. If found, double-click on the employee record and their timecard will appear.
Follow HR guidelines for employee notification of rounding rules and how overtime can be generated when punches occur outside the seven (7) minute window.
Do not modify these punches . If overtime has occurred because the seven (7) minute rule was not adhered to, notify the employee and adjust the time the employee will start or stop their shift the following day.
Friday –Exceptions
Enter all PTO requests, sick leave and comments into the timecard or schedule for the current or next pay period.
Monday – Final Review and Approval
Perform final timecard review.Approve all timecards. Highlight each employee record in the
Reconcile Timecard screen and select [Approvals>Approve].
Deadline 12:00 Noon
Page 19 of 20 5/7/2023

Kronos Workforce Central v5.1Manager’s Weekly Checklist
Monday – Payroll Notification
Once managers complete their edits and all employee timecards are approved for your department, notify Payroll via email @ [email protected] or follow the guidelines set forth for your department.
Monday – Reports (optional)
Page 20 of 20 5/7/2023
Time Detail Report ExceptionsActual vs. Schedule by Labor Account
Employee Exceptions and Totals
Employee Hours by Labor Account
Hours by Labor Account