kylone microcms installation & setup guide for tbs iptv … · kylone microcms installation...
TRANSCRIPT
Kylone MicroCMS Installation & Setup Guide
for TBS IPTV System
V1.0
TBS Technologies International Ltd., http://www.tbsiptv.com
Kylone Technology International Ltd., http://kylone.com
DISCLAIMER
This document contains experimental materials provided
by TBS Technologies International Ltd. (hereinafter
referred to as TBS) and Kylone Technology International
Ltd. (hereinafter referred to as Kylone).
This document, information and ideas herein totally
experimental and may not be disclosed, copied, reproduced or distributed
to anyone outside TBS and Kylone without prior written consent of TBS or
Kylone.
TBS and Kylone MAKES NO WARRANTIES, EXPRESS OR IMPLIED, WITH THIS
DOCUMENT.
TBS and Kylone intend the information contained in this document and
materials provided to be accurate and reliable. However, errors may
occasionally occur. Therefore, all information and materials are provided
"AS IS" without any warranty of any kind.
This document and materials are subject to change without notice.
TBS and Kylone may have patents, patent applications, trademarks,
copyrights or other intellectual property rights covering subject matter in
this document. Furnishing of the documents or materials delivered does
not give you any license to trademarks, copyrights or other intellectual
property.
Trademarks: Products, Brands and Visuals mentioned in this document are
trademarks or registered trademarks of their respective holders
OVERVIEW • Acknowledgment
• Topology
• System Installation
• WEB UI ACCESS
• Content
General Setting
Categories (IPTV VOD Settings)
Live TV Management
IPTV Encoders Settings
• Monitor
• FAQ
Acknowledgment
• Kylone MicroCMS consists of software components like content
management and streaming features on the server side besides embedded
and mobile applications on the end-user side.
• Live streams coming through DVB cards, Encoders or from any other
resources which sends streams through network will be organised, indexed
and distributed to the end-user systems including STBs and mobile
applications on Android and iOS platforms.
• This framework can be used with only available mobile applications, STB
units, Tuner Cards, IPTV streaming server provided by TBS & Kylone.
• There will no any transcoding feature provided with current release (6.1).
Instead, you can do transcoding by using an external system and then send
streams to the framework through network.
• Source code changes of existing Open-Source projects used in this
framework are published on the internet under
https://github.com/uboreas.
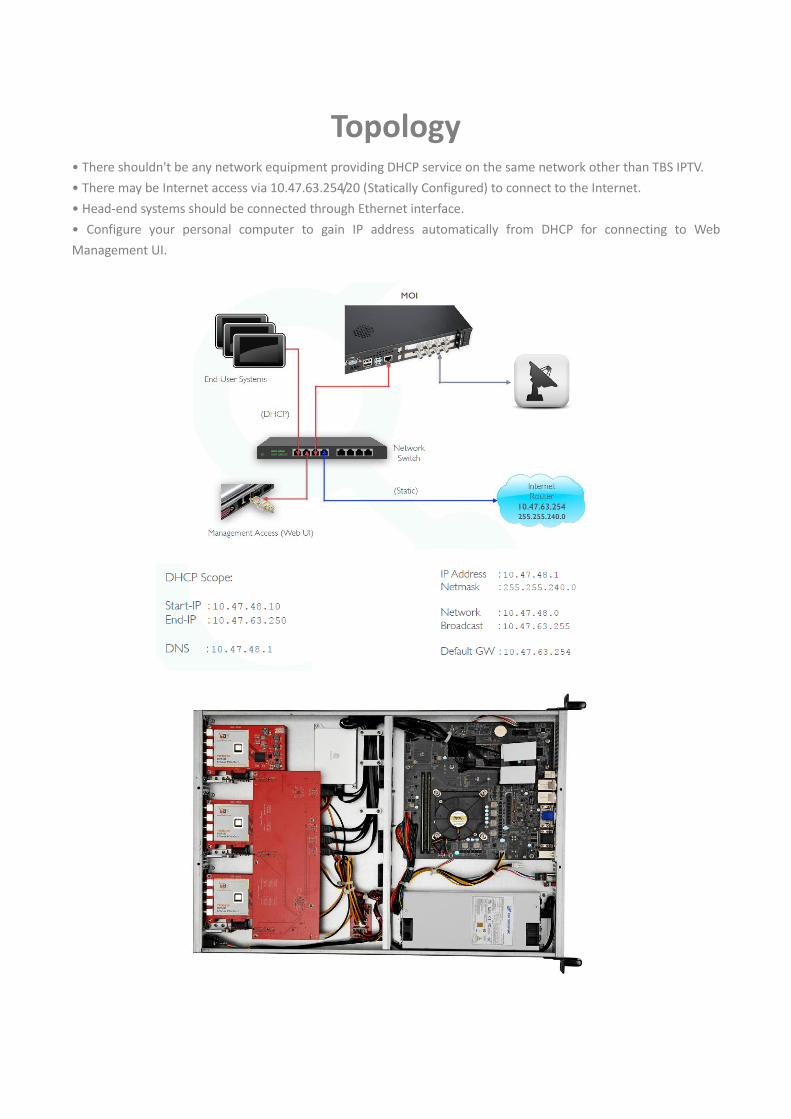
Topology
• There shouldn't be any network equipment providing DHCP service on the same network other than TBS IPTV.
• There may be Internet access via 10.47.63.254/20 (Statically Configured) to connect to the Internet.
• Head-end systems should be connected through Ethernet interface.
• Configure your personal computer to gain IP address automatically from DHCP for connecting to Web
Management UI.
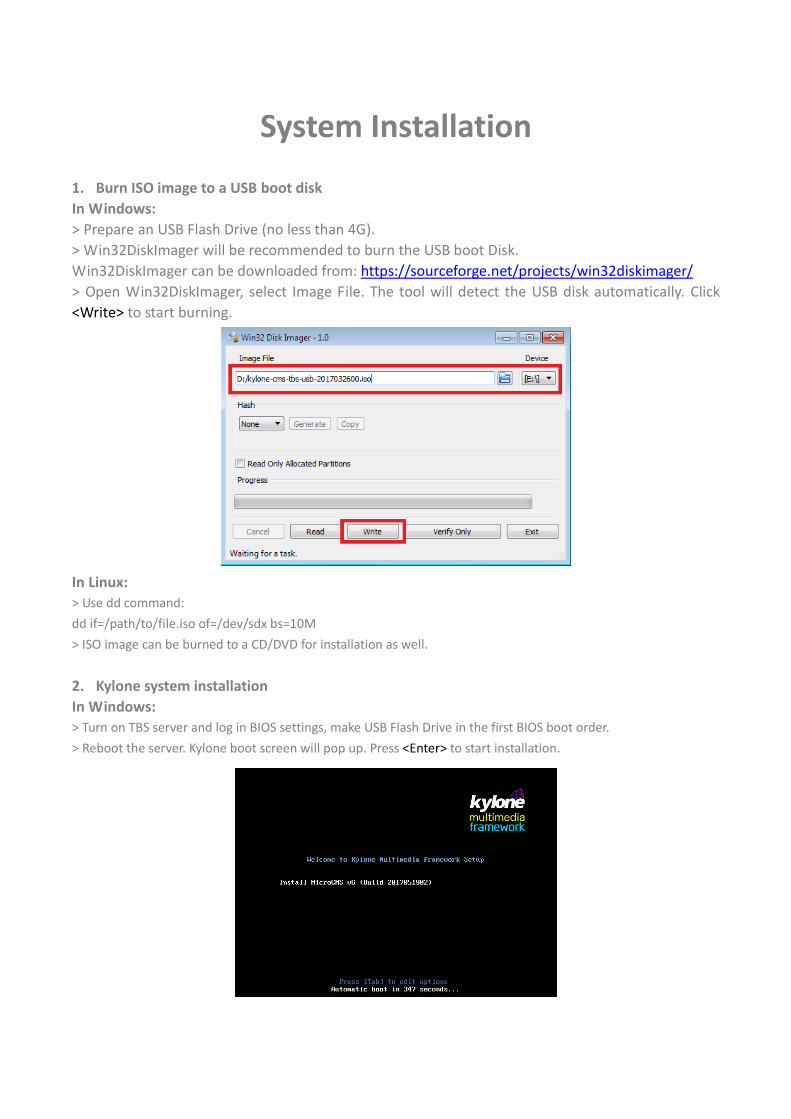
System Installation
1. Burn ISO image to a USB boot disk
In Windows:
> Prepare an USB Flash Drive (no less than 4G).
> Win32DiskImager will be recommended to burn the USB boot Disk.
Win32DiskImager can be downloaded from: https://sourceforge.net/projects/win32diskimager/
> Open Win32DiskImager, select Image File. The tool will detect the USB disk automatically. Click
<Write> to start burning.
In Linux:
> Use dd command:
dd if=/path/to/file.iso of=/dev/sdx bs=10M
> ISO image can be burned to a CD/DVD for installation as well.
2. Kylone system installation
In Windows:
> Turn on TBS server and log in BIOS settings, make USB Flash Drive in the first BIOS boot order.
> Reboot the server. Kylone boot screen will pop up. Press <Enter> to start installation.
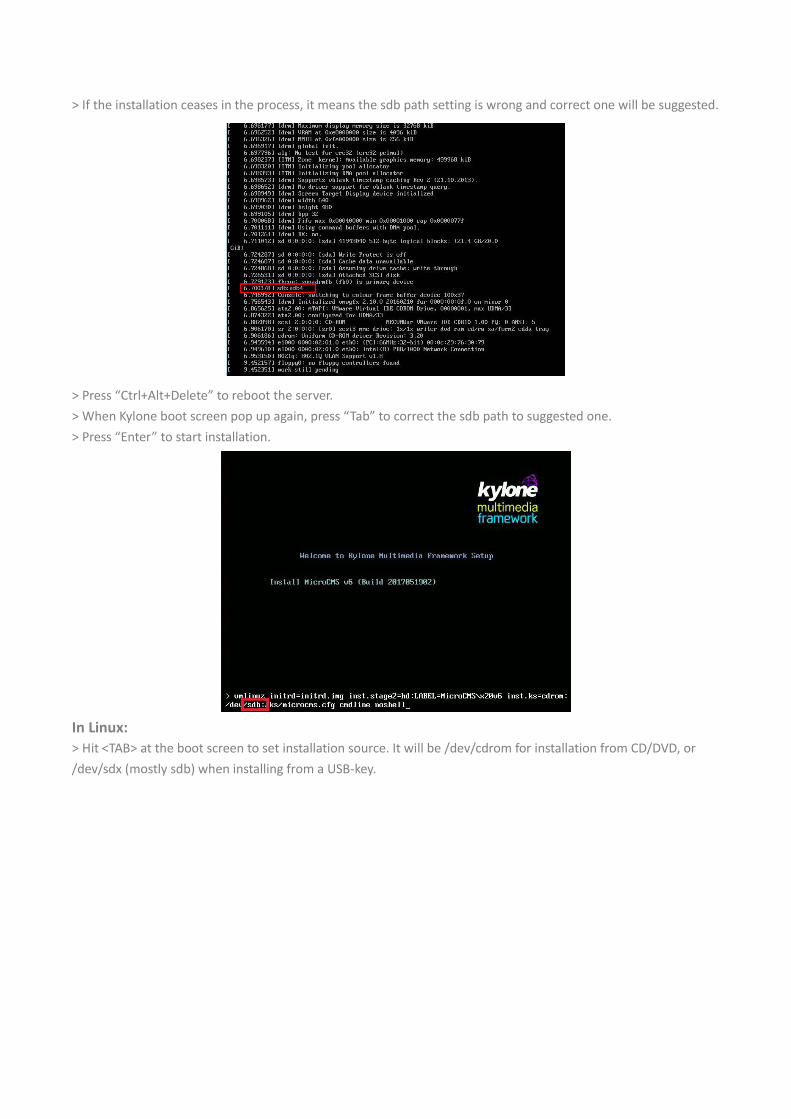
> If the installation ceases in the process, it means the sdb path setting is wrong and correct one will be suggested.
> Press “Ctrl+Alt+Delete” to reboot the server.
> When Kylone boot screen pop up again, press “Tab” to correct the sdb path to suggested one.
> Press “Enter” to start installation.
In Linux:
> Hit <TAB> at the boot screen to set installation source. It will be /dev/cdrom for installation from CD/DVD, or
/dev/sdx (mostly sdb) when installing from a USB-key.
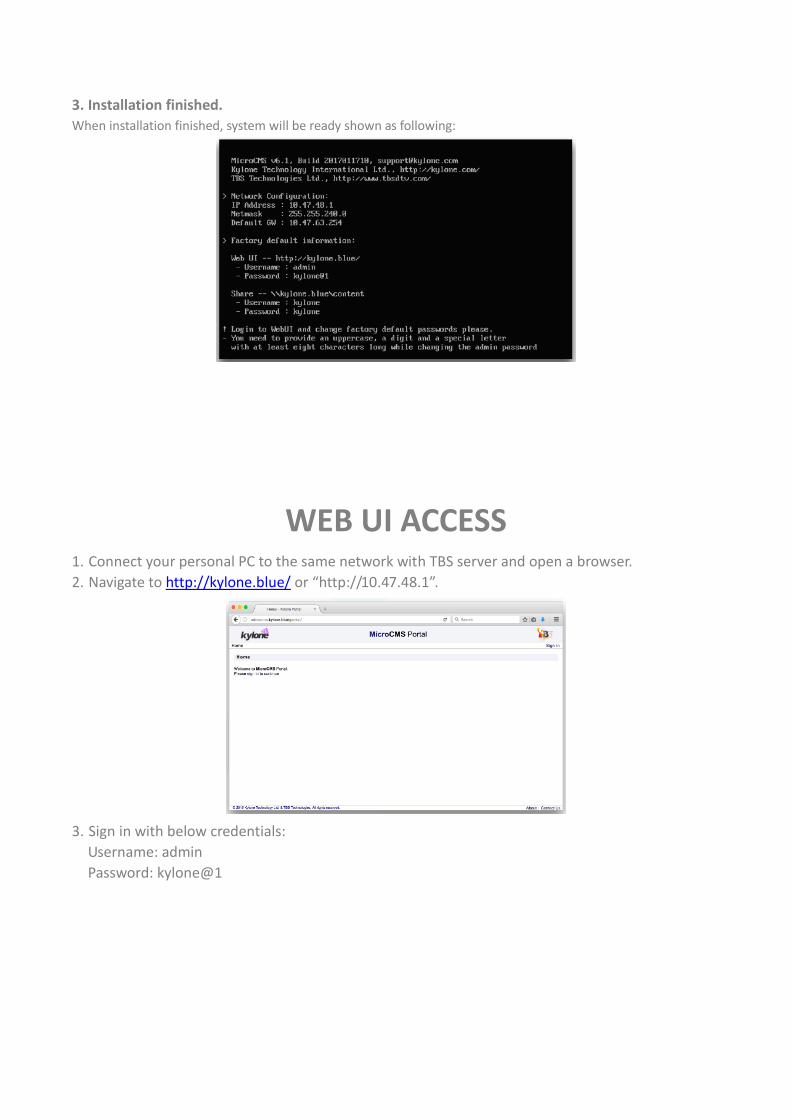
3. Installation finished.
When installation finished, system will be ready shown as following:
WEB UI ACCESS
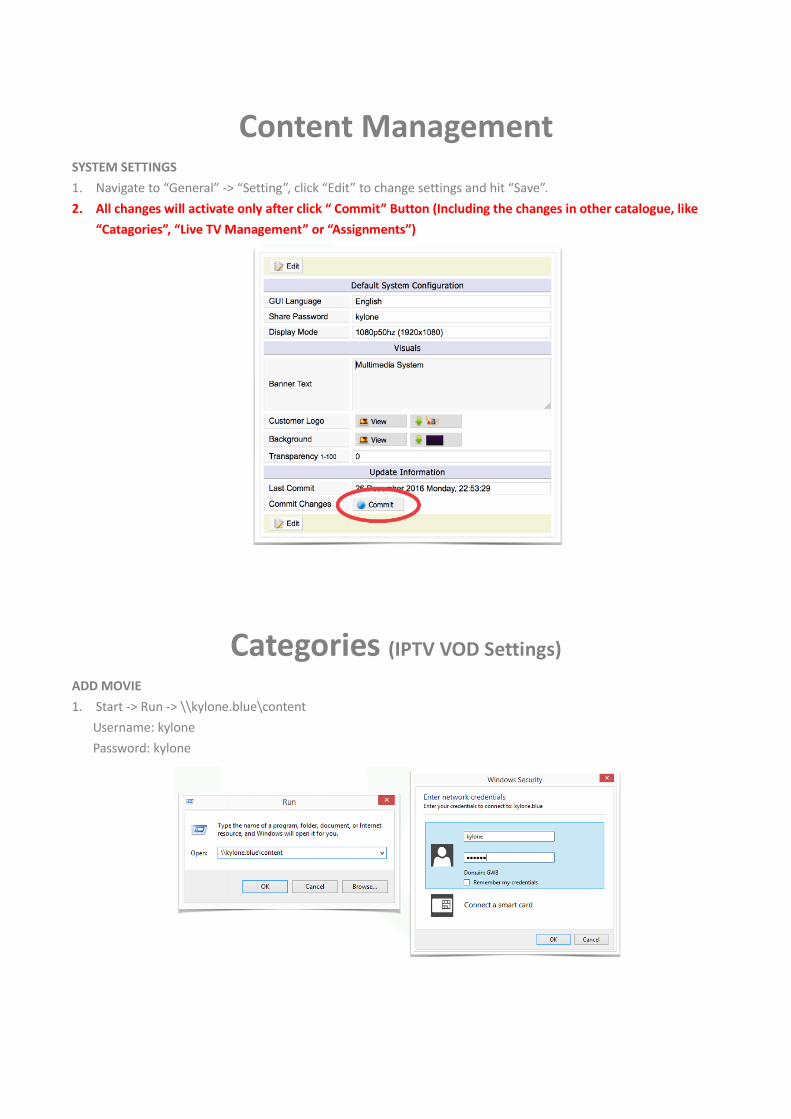
1. Connect your personal PC to the same network with TBS server and open a browser.
2. Navigate to http://kylone.blue/ or “http://10.47.48.1”.
3. Sign in with below credentials:
Username: admin
Password: kylone@1
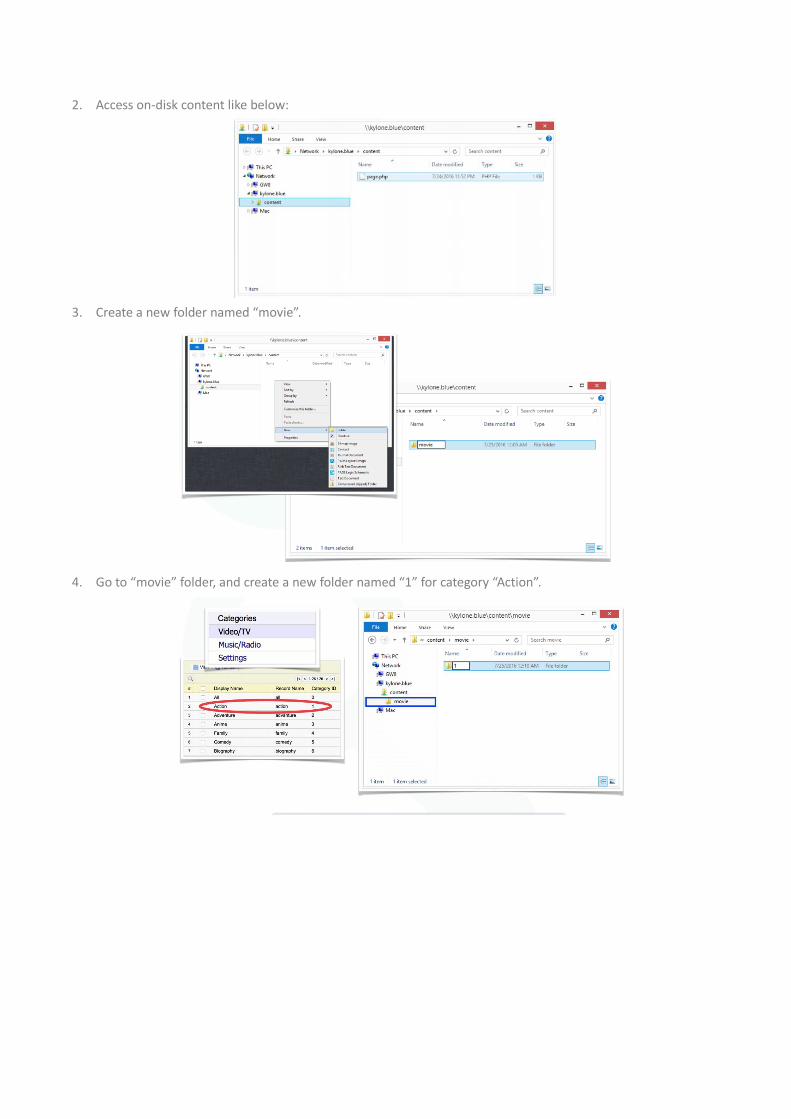
Content Management SYSTEM SETTINGS
1. Navigate to “General” -> “Setting”, click “Edit” to change settings and hit “Save”.
2. All changes will activate only after click “ Commit” Button (Including the changes in other catalogue, like
“Catagories”, “Live TV Management” or “Assignments”)
Categories (IPTV VOD Settings)
ADD MOVIE
1. Start -> Run -> \\kylone.blue\content
Username: kylone
Password: kylone
2. Access on-disk content like below:
3. Create a new folder named “movie”.
4. Go to “movie” folder, and create a new folder named “1” for category “Action”.
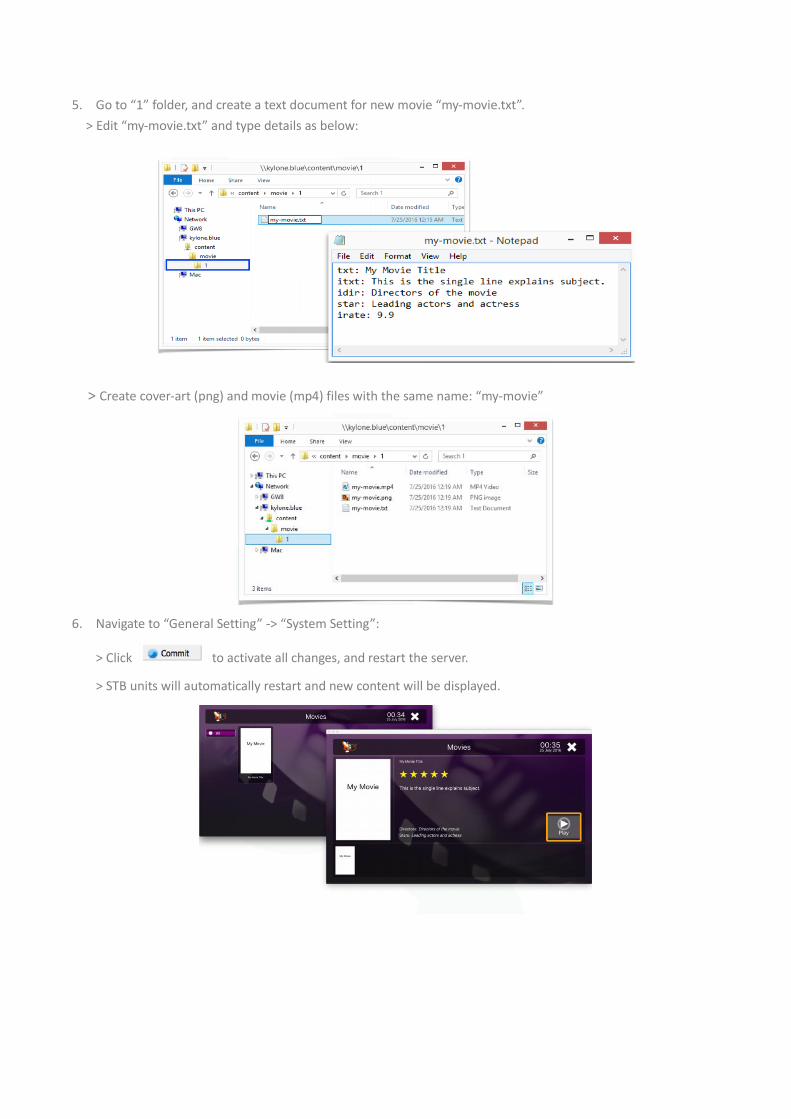
5. Go to “1” folder, and create a text document for new movie “my-movie.txt”.
> Edit “my-movie.txt” and type details as below:
> Create cover-art (png) and movie (mp4) files with the same name: “my-movie”
6. Navigate to “General Setting” -> “System Setting”:
> Click to activate all changes, and restart the server.
> STB units will automatically restart and new content will be displayed.
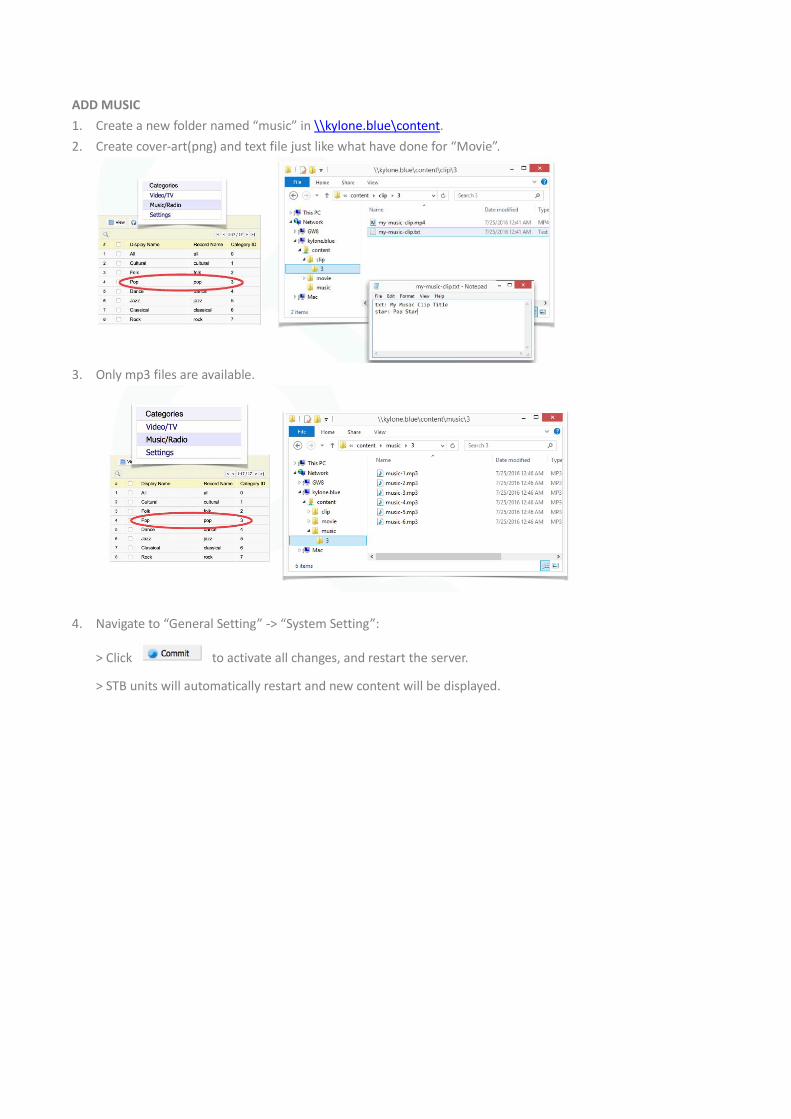
ADD MUSIC
1. Create a new folder named “music” in \\kylone.blue\content.
2. Create cover-art(png) and text file just like what have done for “Movie”.
3. Only mp3 files are available.
4. Navigate to “General Setting” -> “System Setting”:
> Click to activate all changes, and restart the server.
> STB units will automatically restart and new content will be displayed.
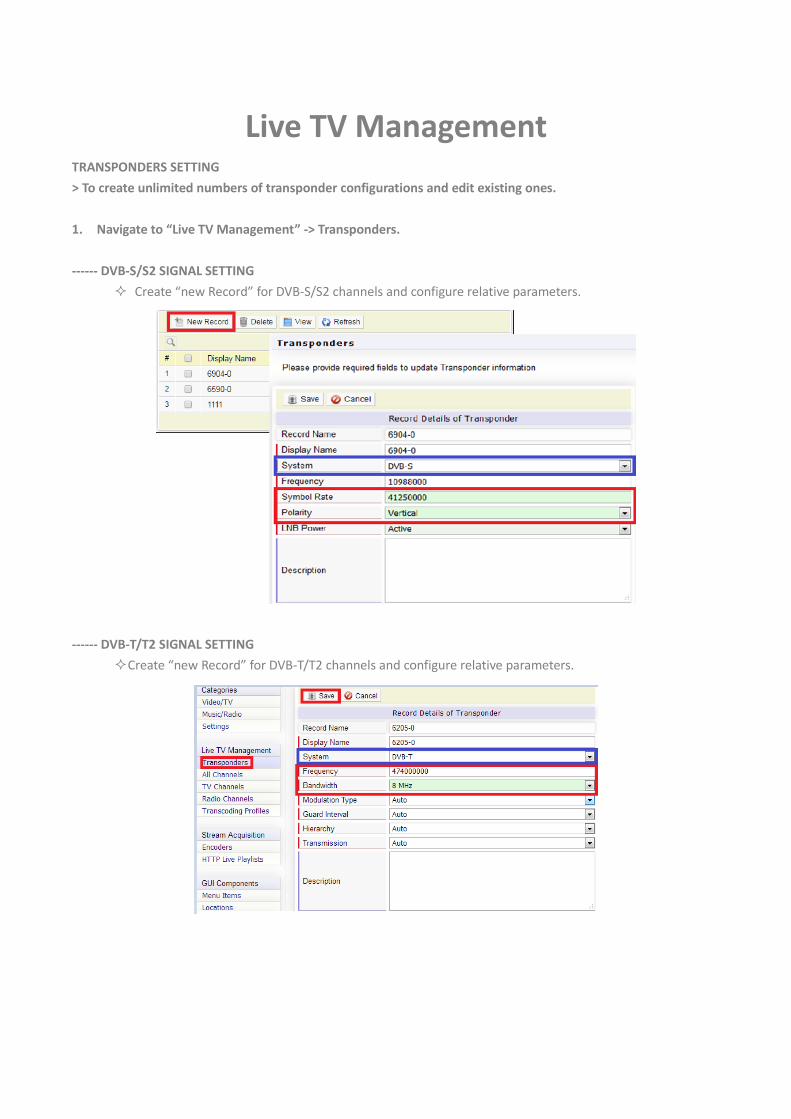
Live TV Management TRANSPONDERS SETTING
> To create unlimited numbers of transponder configurations and edit existing ones.
1. Navigate to “Live TV Management” -> Transponders.
------ DVB-S/S2 SIGNAL SETTING
Create “new Record” for DVB-S/S2 channels and configure relative parameters.
------ DVB-T/T2 SIGNAL SETTING
Create “new Record” for DVB-T/T2 channels and configure relative parameters.
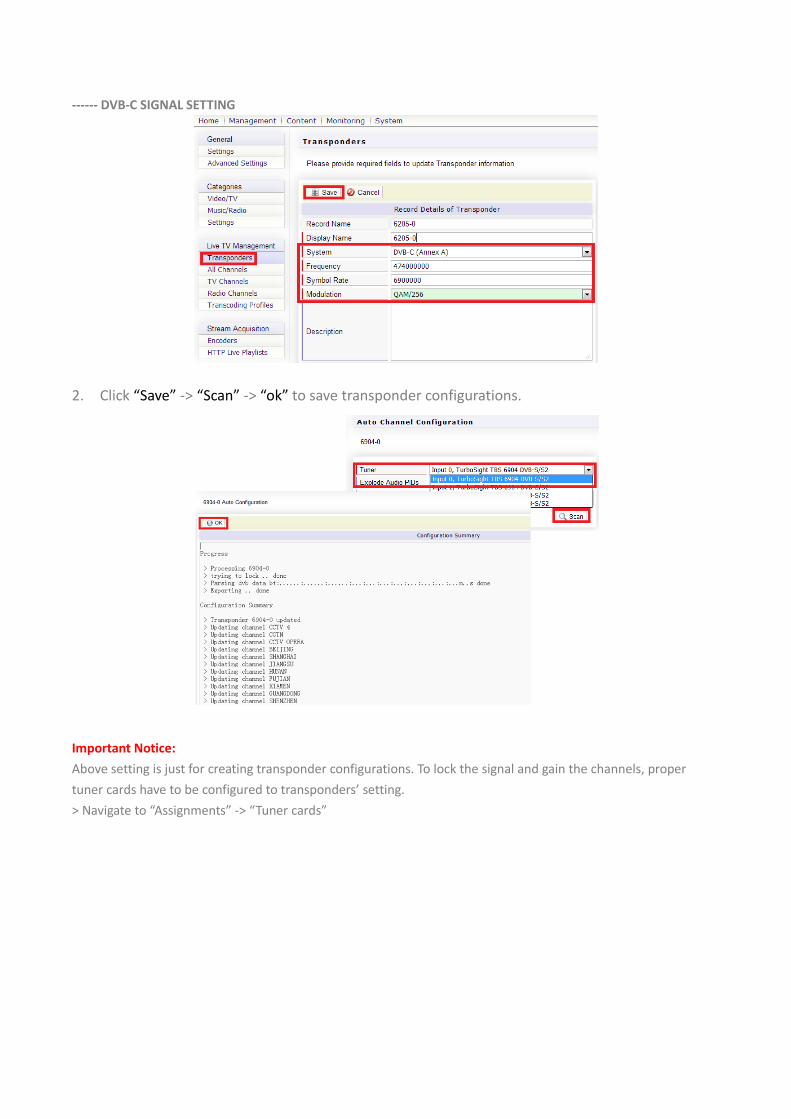
------ DVB-C SIGNAL SETTING
2. Click “Save” -> “Scan” -> “ok” to save transponder configurations.
Important Notice:
Above setting is just for creating transponder configurations. To lock the signal and gain the channels, proper
tuner cards have to be configured to transponders’ setting.
> Navigate to “Assignments” -> “Tuner cards”
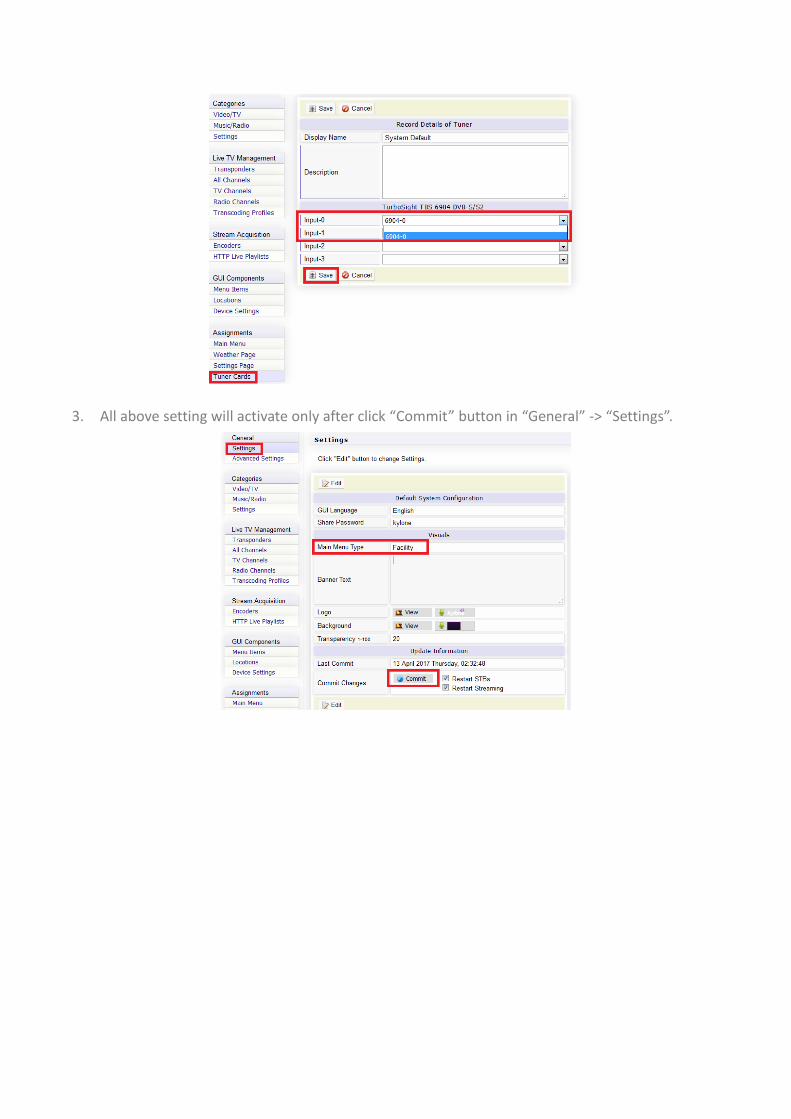
3. All above setting will activate only after click “Commit” button in “General” -> “Settings”.
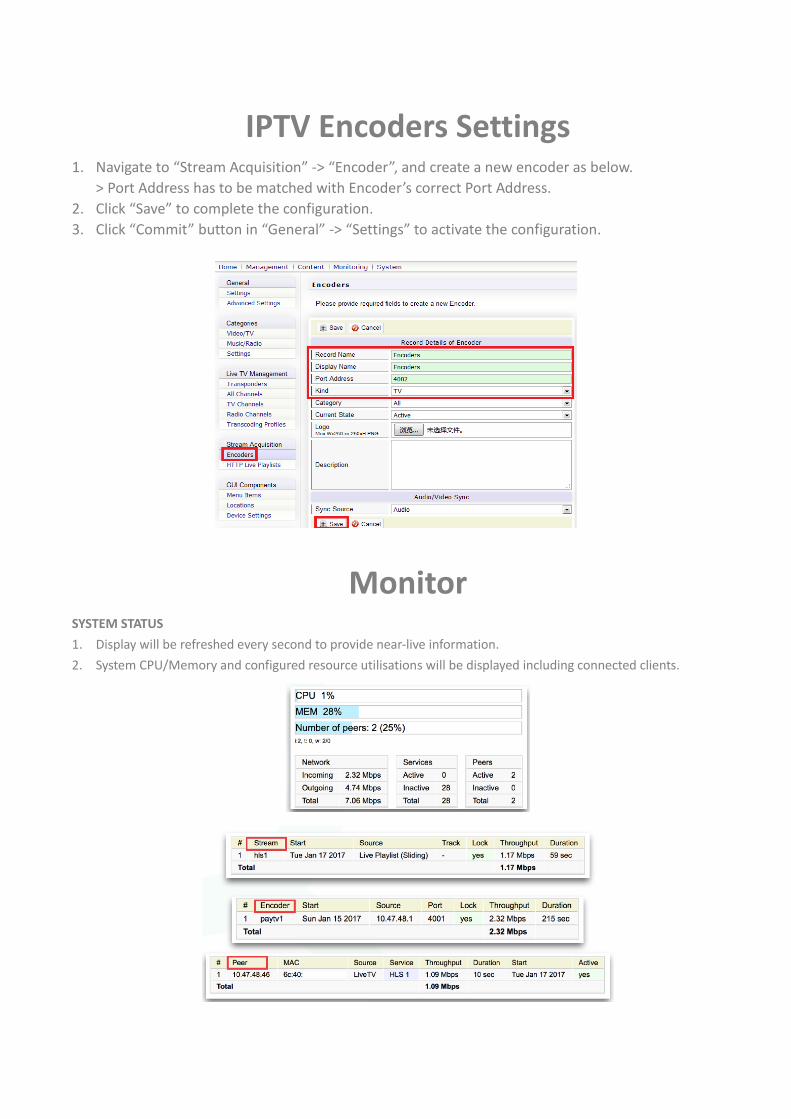
IPTV Encoders Settings 1. Navigate to “Stream Acquisition” -> “Encoder”, and create a new encoder as below.
> Port Address has to be matched with Encoder’s correct Port Address.
2. Click “Save” to complete the configuration.
3. Click “Commit” button in “General” -> “Settings” to activate the configuration.
Monitor SYSTEM STATUS
1. Display will be refreshed every second to provide near-live information.
2. System CPU/Memory and configured resource utilisations will be displayed including connected clients.
FAQ
1. Fail to lock the Live TV signals, what should I do?
> Check if the signal is working well --- Connect the LNB to another STB or other tuner card for
testing.
> Check if the tuner card is working well --- Connect the tuner to another transponder or even
another LNB for testing.
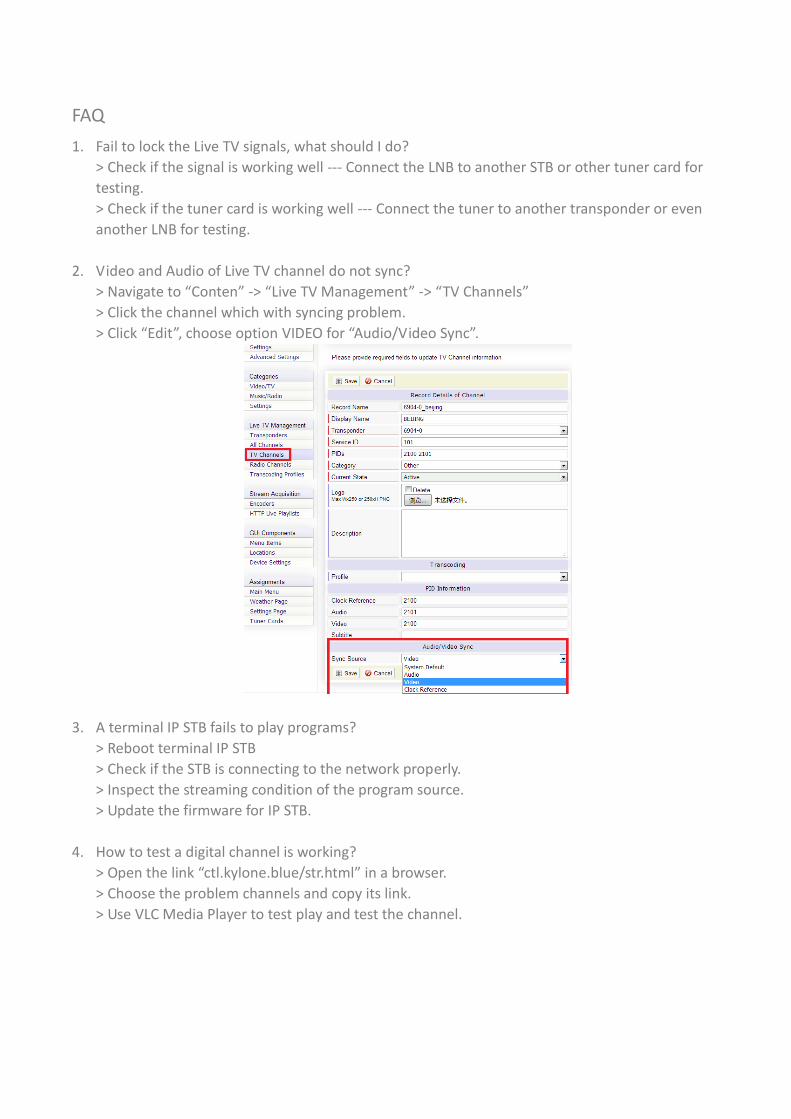
2. Video and Audio of Live TV channel do not sync?
> Navigate to “Conten” -> “Live TV Management” -> “TV Channels”
> Click the channel which with syncing problem.
> Click “Edit”, choose option VIDEO for “Audio/Video Sync”.
3. A terminal IP STB fails to play programs?
> Reboot terminal IP STB
> Check if the STB is connecting to the network properly.
> Inspect the streaming condition of the program source.
> Update the firmware for IP STB.
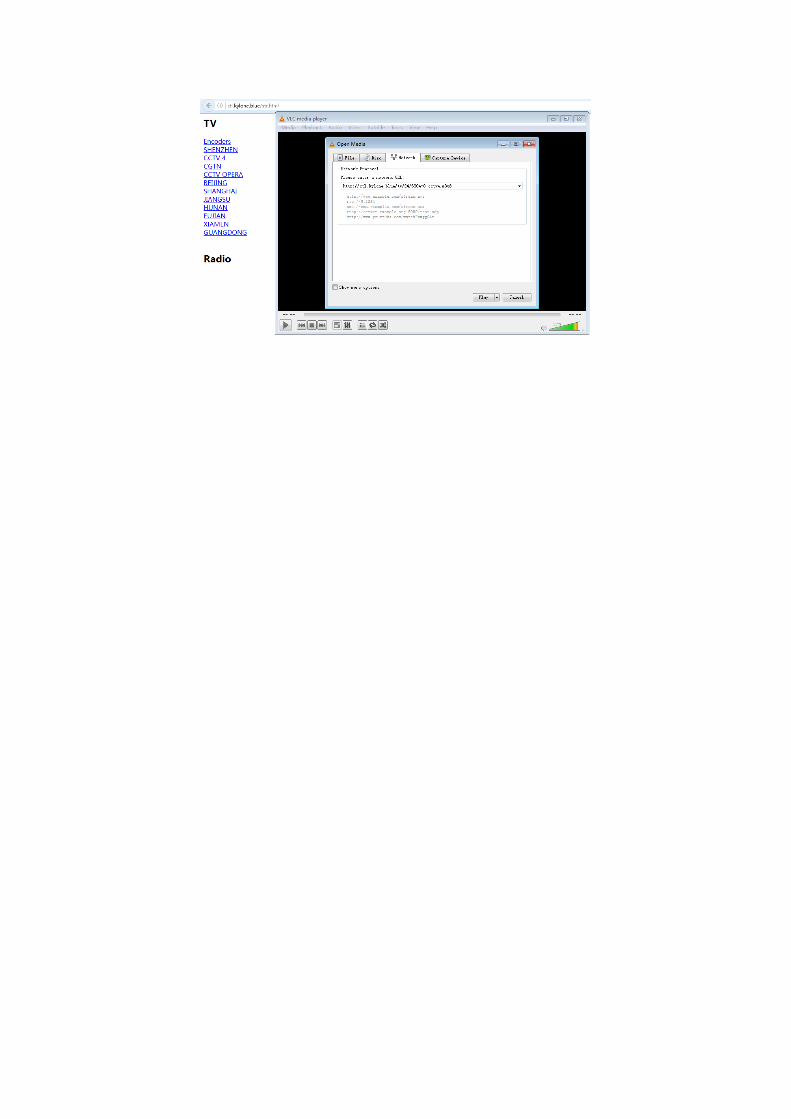
4. How to test a digital channel is working?
> Open the link “ctl.kylone.blue/str.html” in a browser.
> Choose the problem channels and copy its link.
> Use VLC Media Player to test play and test the channel.