lab 09 application provisioning.pdf
DESCRIPTION
Lab 09 Application Provisioning.pdfTRANSCRIPT
Notes/Domino 8.5 Workshop
Lab Manual
Lab 9
Application Provisioning
COPYRIGHT IBM CORPORATION 2009. ALL RIGHTS RESERVED. IBM ISV & DEVELOPER RELATIONS.
Page 1 of 21

Introduction: In the latest Lotus Notes and Domino, there are several new concepts to understand, particularly in relation to the architecture and features of the Eclipse based Lotus Notes client. Concepts such as Provisioning, Composite Applications, plug-ins, components and Eclipse are all important within the context of Lotus Notes and Domino 8.5. For example, Provisioning as a concept is new to Lotus Notes and Domino 8, although it has roots in some earlier tools used to help manage updates to client workstations, such as Smart Upgrade. Outside of Notes and Domino, provisioning has been used by other tools and frameworks such as Eclipse and Lotus Expeditor, as a way to automatically manage and provision software updates to users. In Notes and Domino 8.5, Provisioning encompasses a number of different interrelated concepts and functions. It is worthwhile for Domino Administrators and Architects in particular to take the time to understand the components that comprise the new Lotus Notes client itself, the components that comprise Provisioning, Composite applications, and other features of Lotus Notes and Domino 8.5. In general terms, provisioning describes both the function and act of automatically sending client software updates to end users. In terms of the Lotus Notes client, Provisioning encompasses two main features:
• Traditional Notes client provisioning; for example, Smart Upgrade: o Smart Upgrade has been available since Notes and Domino 6.0, and provides the ability
to send (provision) updates to the Notes client software itself out to Notes users. Uses the Smart Upgrade database to manage updates. Other client packaging tools may also be used for this purpose.
• Plug-in and non-Notes Component provisioning; for example, the Domino Update Site: o This type of provisioning is new to Notes and Domino. The Domino Update Site database
provides the ability to send (provision) plug-in components and non-Notes Composite applications to Notes users, and to update them when required. Other (non-Domino) Eclipse Update Sites may also be used for this purpose.
Description: As a first step to understanding the new features and concepts of Notes and Domino 8.5 provisioning, this lab aims to present a short, clear and concise walkthrough of each of the major new concepts and elements of the software.
Objective: At the end of the lab, you should be able to:
• Setup a Domino Update Site to provision applications to Notes
• Configure a Desktop Settings Policy to allow Notes users to manually install plug-ins
• Use Notes client to install an application from the Domino Update Site
• Understand the Smart Upgrade feature of the Notes 8.5 client
COPYRIGHT IBM CORPORATION 2009. ALL RIGHTS RESERVED. IBM ISV & DEVELOPER RELATIONS.
Page 2 of 21

Procedure:
SECTION 1: SETUP A DOMINO UPDATE SITE
In this section, you will create a Domino Update Site on the Domino Server. A Domino Server can act as an Update Site server for the purpose of manual and automatic provisioning of features and plug-ins o the Notes client. The Update Site template is a new Advanced template which is installed with the Domino 8.5 server and Notes 8.5 client. It provides storage for features and plug-ins (and all their associated files) as well as tools to inspect and manage content inside Eclipse Update Sites.
Using Domino as an Update Site server has specific benefits for Domino Administrators because it provides the Update Site functionality in a familiar Notes database interface, with the additional security and functionality benefits that Domino databases provide. Such as ACLs and reader fields can be used to control access to the plug-ins and features stored in the database.
Step 1 Make sure the Domino server is running, entry and if you don’t see its status as started, double-click on Lotus Domino Server on Windows desktop. Close the Services panel once Domino has started.
Step 2 Open the Notes client, if it is not already opened. Log-in as Domino Admin / passw0rd.
Step 3 To create a Domino Update Site database from the template, select File > Application > New.
Step 4 In the New Application Name and Location area, select the DOM85/ibm from the drop-down list for the Server.
Step 5 Enter a title of Update Site. Verify the file name is UpdateSi.nsf.
Step 6 In the Specify Template for New Application area, select DOM85/ibm as the Server.
Step 7 Check the box for Show advanced templates so you can see the Eclipse Update Site template in the list.
Step 8 Select Eclipse Update Site (8.5) for the Template.
Step 9 Click OK to create the database.
COPYRIGHT IBM CORPORATION 2009. ALL RIGHTS RESERVED. IBM ISV & DEVELOPER RELATIONS.
Page 3 of 21

Step 10 The new Update Site will open automatically in the Notes client. In just a minute, you will review all the features within the update site using this view. However, first, you will want to set the security for the Update Site.
Step 11 Add the required users and groups to the ACL of the database using File > Application > Access Control. This will provide user access to the new Update Site database.
Step 12 You will want to add the Notes client users to the ACL of the database. Click Add… to add the users. The Add User window will pop-up asking for people. Click the Select Users icon, which looks like a silhouette of a person.
Step 13 In the Select Names window, select Manisha Annam, and click the Add > button. Repeat this step for Lucas Chaney & David Dewell then click OK to add the users to the ACL.
COPYRIGHT IBM CORPORATION 2009. ALL RIGHTS RESERVED. IBM ISV & DEVELOPER RELATIONS.
Page 4 of 21

Step 14 Set the Attributes for each user as User type of Person and Access of Reader. Click OK to save the changes to the Access Control of the Update Site database. The Notes client users can now use this as an update site.
Note: Typically, you would add just groups to the ACL’s as the users would already be a part of a specified group. For example, the users that work in the marketing department would be in the marketing group and the sales department in the sales group. This makes it a lot easier to manage the ACL’s of the Update Site database.
Step 15 Now that you have the Update Site database created, you will need to populate it with Features and plug-ins. You will do that in the next few steps. From the Update Site features view, click the Import Local Update Site… button to display the Import Local Update Site dialogue.
To import a local update site, you must be able to access the site files from your Notes Client workstation. In other words, you need to be able to access the standard Eclipse set of files which make up an Eclipse Update Site (i.e. a site.xml file with \features and \plugins subdirectories below it, each containing the features and plug-ins files).
Tip: An Eclipse Update Site is not normally something a Domino Administrator would create. Most often, these files would be provided to you by a Java or Eclipse developer. Using an Eclipse-based development environment allows a developer both to create the Features and plug-ins, and to create the site.xml and associated site structure.
Step 16 In the Import dialogue box, click the Browse… button to locate the Update Site.
Step 17 For this lab, we have already created and Eclipse Update Site for you and stored it in the LabFiles directory. The application that resides in the update site is a Stock Quote application. In the Select File dialogue, navigate to the C:\LabFiles\com.xriva.updateSite\ directory and select the site.xml file. Click Open.
COPYRIGHT IBM CORPORATION 2009. ALL RIGHTS RESERVED. IBM ISV & DEVELOPER RELATIONS.
Page 5 of 21
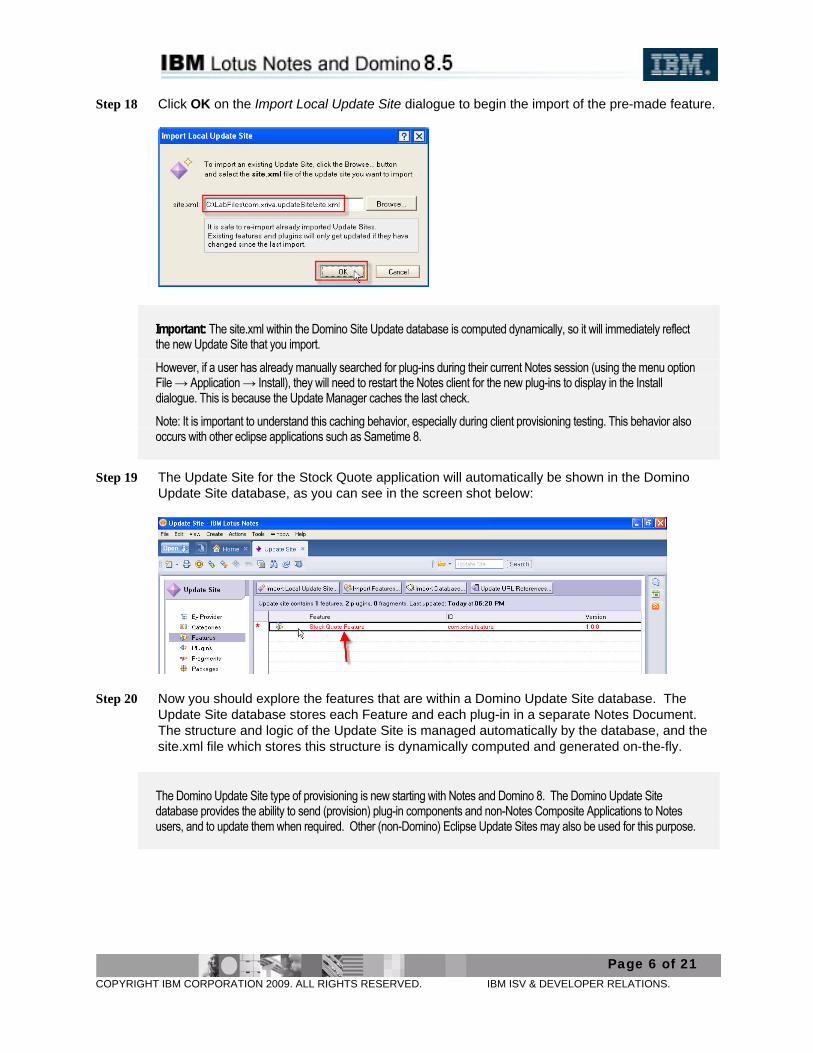
Step 18 Click OK on the Import Local Update Site dialogue to begin the import of the pre-made feature.
Important: The site.xml within the Domino Site Update database is computed dynamically, so it will immediately reflect the new Update Site that you import.
However, if a user has already manually searched for plug-ins during their current Notes session (using the menu option File → Application → Install), they will need to restart the Notes client for the new plug-ins to display in the Install dialogue. This is because the Update Manager caches the last check.
Note: It is important to understand this caching behavior, especially during client provisioning testing. This behavior also occurs with other eclipse applications such as Sametime 8.
Step 19 The Update Site for the Stock Quote application will automatically be shown in the Domino Update Site database, as you can see in the screen shot below:
Step 20 Now you should explore the features that are within a Domino Update Site database. The Update Site database stores each Feature and each plug-in in a separate Notes Document. The structure and logic of the Update Site is managed automatically by the database, and the site.xml file which stores this structure is dynamically computed and generated on-the-fly.
The Domino Update Site type of provisioning is new starting with Notes and Domino 8. The Domino Update Site database provides the ability to send (provision) plug-in components and non-Notes Composite Applications to Notes users, and to update them when required. Other (non-Domino) Eclipse Update Sites may also be used for this purpose.
COPYRIGHT IBM CORPORATION 2009. ALL RIGHTS RESERVED. IBM ISV & DEVELOPER RELATIONS.
Page 6 of 21
Step 21 There are four action buttons available on the toolbar within the Update Site database, to allow you to manage the plug-ins and features stored in the database. These four actions are as follows:
Action Button(s) Usage Import Local Update Site Import Feature Import Database
Use these actions to import features and plug-ins. The Import Database option allows you to import the contents of a Domino Update Site into another Domino Update Site. This is useful if you have been using multiple sites for different purposes (or perhaps in different Domino Domains) and now need to combine them.
Update URL References This action updates existing URL References stored in the Features documents and attached .jar files in the database.
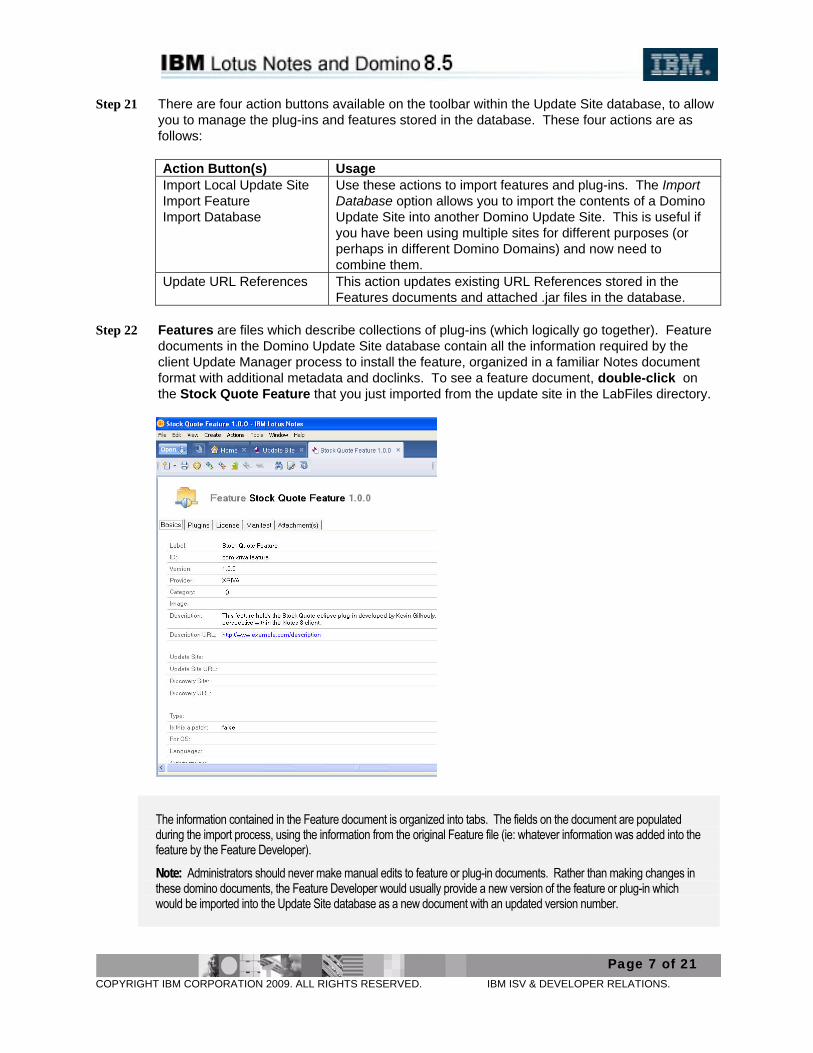
Step 22 Features are files which describe collections of plug-ins (which logically go together). Feature
documents in the Domino Update Site database contain all the information required by the client Update Manager process to install the feature, organized in a familiar Notes document format with additional metadata and doclinks. To see a feature document, double-click on the Stock Quote Feature that you just imported from the update site in the LabFiles directory.
The information contained in the Feature document is organized into tabs. The fields on the document are populated during the import process, using the information from the original Feature file (ie: whatever information was added into the feature by the Feature Developer).
Note: Administrators should never make manual edits to feature or plug-in documents. Rather than making changes in these domino documents, the Feature Developer would usually provide a new version of the feature or plug-in which would be imported into the Update Site database as a new document with an updated version number.
COPYRIGHT IBM CORPORATION 2009. ALL RIGHTS RESERVED. IBM ISV & DEVELOPER RELATIONS.
Page 7 of 21
Step 23 Here is the information that is contained in the Feature Document. After reviewing all the information and looking around in the document, close the Stock Quote Feature document.
Tab Contents and Usage Basics Contains metadata describing the Feature, such as version, update
information, and language. • Provides easy access to information about each feature.
Plug-ins Contains a list of plug-ins bundled (used) by this Feature, along with a Notes Doclink to each plug-in document. • Provides a readily available reference list of plug-ins used by the
feature, along with the ability to access each one via the Doclink. License Displays features license information (license information can be added by
the Feature Developer) • Provides easy access to Feature Copyright and License Information.
Manifest Displays the content of the manifest file (feature.xml). Attachment(s) Contains the original features .jar file(s) as attachments.
Step 24 Before the Feature is ready for installation in the Notes 8 and 8.5 clients, you will need to
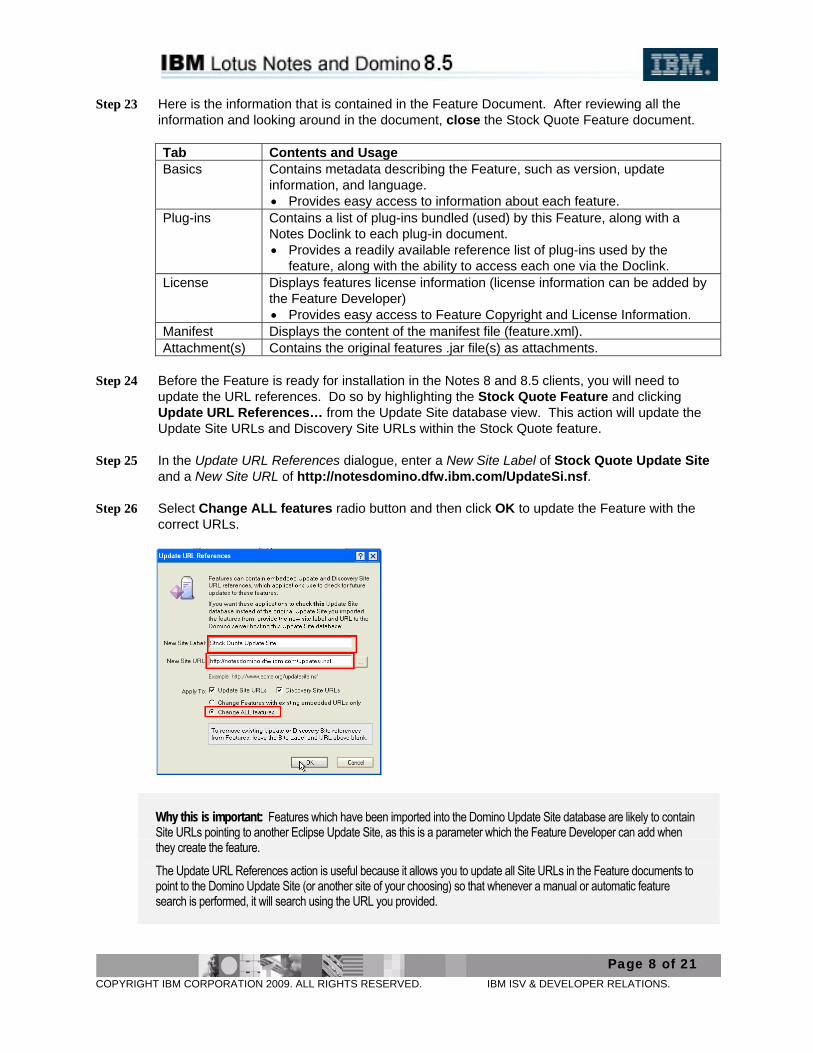
update the URL references. Do so by highlighting the Stock Quote Feature and clicking Update URL References… from the Update Site database view. This action will update the Update Site URLs and Discovery Site URLs within the Stock Quote feature.
Step 25 In the Update URL References dialogue, enter a New Site Label of Stock Quote Update Site and a New Site URL of http://notesdomino.dfw.ibm.com/UpdateSi.nsf.
Step 26 Select Change ALL features radio button and then click OK to update the Feature with the correct URLs.
Why this is important: Features which have been imported into the Domino Update Site database are likely to contain Site URLs pointing to another Eclipse Update Site, as this is a parameter which the Feature Developer can add when they create the feature.
The Update URL References action is useful because it allows you to update all Site URLs in the Feature documents to point to the Domino Update Site (or another site of your choosing) so that whenever a manual or automatic feature search is performed, it will search using the URL you provided.
COPYRIGHT IBM CORPORATION 2009. ALL RIGHTS RESERVED. IBM ISV & DEVELOPER RELATIONS.
Page 8 of 21

Step 27 Open the Stock Quote Feature document to see the update Site and Discovery URL fields.
Step 28 Close the Feature document and then close the Update Site database.
Step 29 Exit the Notes client.
The content of a Domino Update Site database can also be viewed via a web browser. The browser view provides a list of the Features available on the Update Site, along with the actual URL to use for provisioning them.
To access the Update Site via a browser, use the database URL in the form: http://serverFQHN/updatesite.nsf
Step 30 Open Internet Explorer.
Step 31 Enter the following Address: http://notesdomino.dfw.ibm.com/UpdateSi.nsf.
Notice how you will be able to view all of the features that are in this Domino Update Site database from within the web browser. The version number is also shown so version tracking of the features can be monitored.
COPYRIGHT IBM CORPORATION 2009. ALL RIGHTS RESERVED. IBM ISV & DEVELOPER RELATIONS.
Page 9 of 21

SECTION 2: SETUP NOTES CLIENTS FOR MANUAL INSTALLATION OF PLUG-INS
In this section, you will learn how to enable feature installation (provisioning) for Notes users.
The Update Manager process (which is installed as part of the Notes 8.5 client) is responsible for managing the update process for installed features. The Update Manager process can automatically check for updates to any installed features which have an Update Site URL or Discovery Site UR L in them. Features can also be provisioned to users automatically via the component palette in the Composite Application Editor, or due to the user opening a Composite Application that includes a component which is a feature that requires provisioning.
You can also allow Notes users to manually invoke updates to existing features and installations of new features. With this function enabled, users will see two additional menu items on the Notes client File Menu:
• File > Application > Install -- to search for and install new plug-ins
• File > Application > Application Management -- to manage installed plug-ins
Step 1 In this workshop, you will be installing the application manually. Thus, you will need to allow the users to manually invoke updates. The next few steps will teach you how to enable manual installations within the Notes client. Open the Domino Admin from the desktop.
Step 2 Login as Domino Admin \ passw0rd.
Step 3 Switch to the Configuration tab so you can create the Desktop Policy Settings document.
Step 4 Expand Policies and select by Settings. You will notice that there are no Policy settings for this domain yet. You will need to create one for the desktop to allow users to be able to install plug-ins manually. On the right-hand side, expand the Policies option and click Create…
Step 5 Select Settings radio button and select Dynamic Desktop from the drop-down list. Click OK to continue to create the new policy.
Step 6 In the Basics section, enter a Name of Desktop Policy Settings. Enter a Description of Settings to allow users to manually install plug-ins into Notes clients.
Step 7 Still on the Basics tab, scroll down to the bottom and under the Provisioning section, switch the disabled to Enabled. This is the setting that will allow the end users to install their own applications.
COPYRIGHT IBM CORPORATION 2009. ALL RIGHTS RESERVED. IBM ISV & DEVELOPER RELATIONS.
Page 10 of 21
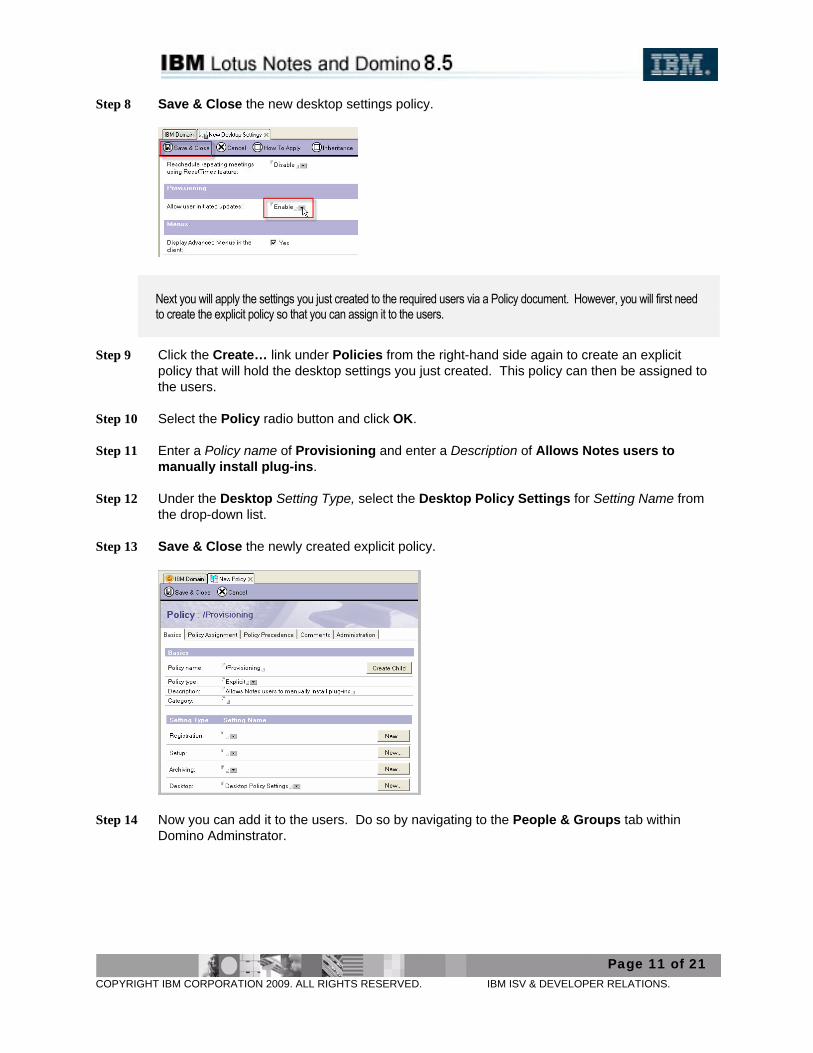
Step 8 Save & Close the new desktop settings policy.
Next you will apply the settings you just created to the required users via a Policy document. However, you will first need to create the explicit policy so that you can assign it to the users.
Step 9 Click the Create… link under Policies from the right-hand side again to create an explicit policy that will hold the desktop settings you just created. This policy can then be assigned to the users.
Step 10 Select the Policy radio button and click OK.
Step 11 Enter a Policy name of Provisioning and enter a Description of Allows Notes users to manually install plug-ins.
Step 12 Under the Desktop Setting Type, select the Desktop Policy Settings for Setting Name from the drop-down list.
Step 13 Save & Close the newly created explicit policy.
Step 14 Now you can add it to the users. Do so by navigating to the People & Groups tab within Domino Adminstrator.
COPYRIGHT IBM CORPORATION 2009. ALL RIGHTS RESERVED. IBM ISV & DEVELOPER RELATIONS.
Page 11 of 21

Step 15 Select People in the navigation view on the left side. Then check each of the Notes client users you will want to be able to manually install plug-ins, which are Domino Admin, Manisha Annam, Lucas Chaney, and David Dewell. Expand the People task in the right-hand side and click Assign Policy….
Step 16 Read the message that pops up and click OK.
Step 17 In the Assign Policy Options dialogue, select the /Provisioning policy and click OK.
Step 18 Click Yes to the warning, then Click OK on the pop-up box that lets you know the 4 users were processed.
Step 19 The Notes clients are now ready setup and ready for end users to manually install new plug-ins themselves. Exit the Domino Administrator.
SECTION 3: INSTALL AN APPLICATION FROM THE DOMINO UPDATE SITE
In this section, you will learn how to walk through an installation of an application from the Domino Update Site you created in section 1. The Update Manager task is installed as part of the Notes 8 client, and this process takes care of Eclipse feature and plug-in provisioning on the client.
If manual feature installation is enabled, users will be able to manually search for and install features from within the Notes client. Users can also optionally add new Update Sites to the list of Sites to search.
Manually initiating a search in the Notes client provides the ability for users to search for updates to currently installed features, and for new features to install.
COPYRIGHT IBM CORPORATION 2009. ALL RIGHTS RESERVED. IBM ISV & DEVELOPER RELATIONS.
Page 12 of 21

Step 1 Open the Notes client from the desktop. Login as Domino Admin with the password of passw0rd. After Domino Admin logs in, any of the 4 users should now be able to manually install plug-ins because of the policy you created in section 2. Note: You must login as Domino Admin first for the policy to take effect.
Step 2 Click File >Open >Lotus Notes Application and open the current users mail file inside the Mail folder on DOM85/ibm.
Step 3 Close the application after it is done loading.
Opening and closing the user’s mail file will ensure the previous user is not maintained in cache.
Step 4 To initiate a search for new Eclipse features for installation, select the menu option File > Application > Install. Note: If you do not see this option in your Notes client, let your instructor know so they can help you troubleshoot the issue.
Step 5 Select Search for new features to install and then click Next.
Step 6 You will need to add the new Domino Update Site location to search. In the Install dialogue, click the Add Remote Location… button to add a new Domino Update Site database.
Tip: Adding new Update Sites in the Notes client interface updates the bookmarks.xml file on the workstation. This file stores the list of Update Sites which display in the manual feature installation dialogue.
COPYRIGHT IBM CORPORATION 2009. ALL RIGHTS RESERVED. IBM ISV & DEVELOPER RELATIONS.
Page 13 of 21

Step 7 In the New Update Site dialogue, type in a descriptive name for the site, such as Domino Update Site, and the HTTP URL reference of http://notesdomino.dfw.ibm.com/UpdateSi.nsf/site.xml. Click OK to continue.
Step 8 Back in the Install dialogue, check the newly added remote update site Domino Update Site and click Finish to search for new features to install.
Step 9 In the Updates dialog, expand the Domino Update Site until you see the Stock Quote Feature 1.0.0 and check it. Notice the description of the feature is displayed to the end user within this dialogue. Click Next to continue with the installation.
Step 10 In the License dialogue, select I accept the terms in the license agreements and click Next.
Step 11 Review the information for the feature that you will be installing and then click Finish to begin the installation process.
COPYRIGHT IBM CORPORATION 2009. ALL RIGHTS RESERVED. IBM ISV & DEVELOPER RELATIONS.
Page 14 of 21
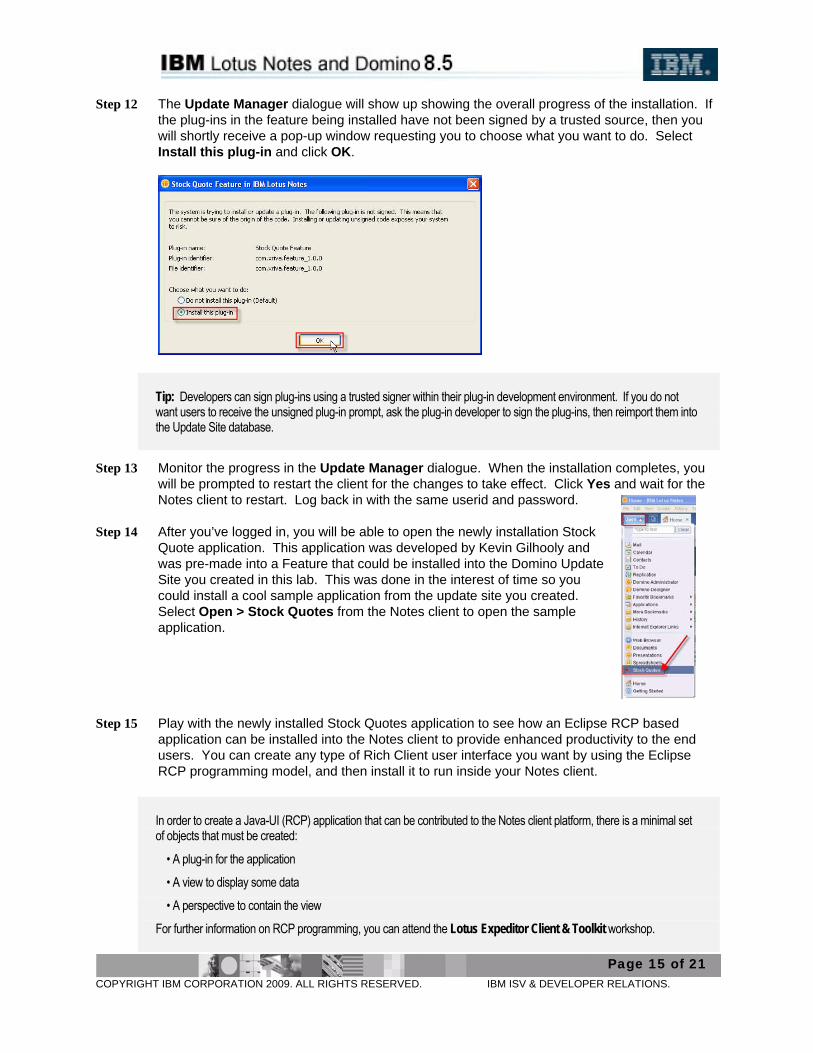
Step 12 The Update Manager dialogue will show up showing the overall progress of the installation. If the plug-ins in the feature being installed have not been signed by a trusted source, then you will shortly receive a pop-up window requesting you to choose what you want to do. Select Install this plug-in and click OK.
Tip: Developers can sign plug-ins using a trusted signer within their plug-in development environment. If you do not want users to receive the unsigned plug-in prompt, ask the plug-in developer to sign the plug-ins, then reimport them into the Update Site database.
Step 13 Monitor the progress in the Update Manager dialogue. When the installation completes, you will be prompted to restart the client for the changes to take effect. Click Yes and wait for the Notes client to restart. Log back in with the same userid and password.
Step 14 After you’ve logged in, you will be able to open the newly installation Stock Quote application. This application was developed by Kevin Gilhooly and was pre-made into a Feature that could be installed into the Domino Update Site you created in this lab. This was done in the interest of time so you could install a cool sample application from the update site you created. Select Open > Stock Quotes from the Notes client to open the sample application.
Step 15 Play with the newly installed Stock Quotes application to see how an Eclipse RCP based application can be installed into the Notes client to provide enhanced productivity to the end users. You can create any type of Rich Client user interface you want by using the Eclipse RCP programming model, and then install it to run inside your Notes client.
In order to create a Java-UI (RCP) application that can be contributed to the Notes client platform, there is a minimal set of objects that must be created:
• A plug-in for the application
• A view to display some data
• A perspective to contain the view
For further information on RCP programming, you can attend the Lotus Expeditor Client & Toolkit workshop.
COPYRIGHT IBM CORPORATION 2009. ALL RIGHTS RESERVED. IBM ISV & DEVELOPER RELATIONS.
Page 15 of 21

Step 16 After you have finished using the Stock Quotes sample application, close it.
SECTION 4: PROVISION A NOTES (NSF) BASED COMPOSITE APPLICATION TO NOTES CLIENTS
In this section, you will learn how to upload your new MyCompApp composite application to the Domino Server and then how to provision a Notes based composite application to Notes clients. The composite application you provision will be a NSF version of the Stock Quote application. This is because the Notes client already has the MyCompApp application running inside it, so you wouldn’t be able to re-provision it.
The following steps outline what you have to do in order to deploy your application on a Lotus Domino Server. This is a somewhat simplified scenario because in a corporate environment, certain company policies will apply.
Step 1 Your Notes client should still be open. You have assembled a new NSF based Composite Application which is stored locally right now, named MyCompApp (from Lab 1). Since you would want to give other users access to this application as well, you need to deploy it to the Lotus Domino server. Open your workspace view by clicking Open > Applications > Workspace.
Step 2 Locate the application icon representing the MyCompApp composite application. Right-click the icon and select Application > New Copy to open the Copy Application dialogue.
Step 3 Specify the Server where you want to place your copy, which is DOM85/ibm.
Step 4 The application Title and File name should be filled out already.
COPYRIGHT IBM CORPORATION 2009. ALL RIGHTS RESERVED. IBM ISV & DEVELOPER RELATIONS.
Page 16 of 21

Step 5 At the bottom you can specify what should be copied. Make sure that both Application design and documents as well as Access Control List is selected.
Step 6 To start the copy process, select OK.
Step 7 You can see the progress of the copying in the status bar of the Notes client. Once the copy to the Domino Server has been completed, you will see a Database Copy Completed message in the status bar. You will also see a new link in the workspace for MyCompApp on DOM85 Close the workspace view.
Now that the MyCompApp composite application has been copied to the Domino Server, other Notes client users in the organization would be able to access it and open it within their clients for usage.
To demonstrate how an end user would “pull” a NSF based composite application to their Notes client, you will obtain the NSF version of the Stock Quotes application from the server. The next few steps will show you how this is accomplished.
Step 8 Using Lotus Notes, you can access the NSF composite application like any other Notes application. Just point your client to the Domino server and locate the Notes application. Click File > Open > Lotus Notes Application.
Step 9 In the Open Application dialogue, change the Look in to the DOM85/ibm server.
Step 10 Scroll down in the list and select DemoStockCharts, then click Open. Typically, an administrator or deployer would send an e-mail all the Notes client users who should have the new Notes Composite Application. In that e-mail there would be a link to the application running on the Domino Server. The users would simply have to click on the Notes database link to open the application. They could then create a local replica, like you are about to do.
COPYRIGHT IBM CORPORATION 2009. ALL RIGHTS RESERVED. IBM ISV & DEVELOPER RELATIONS.
Page 17 of 21

Step 11 On the Execution Security Alert screen, select the Start trusting the signer to execute this action radio button and then click OK. You will have to do this multiple times as there are multiple actions that need to be trusted. If you receive a “Filter” option window, put in the IBM stock ticker as the filter.
Step 12 Review the Notes based composite application that shows Stock Quote information.
StockCharts is a Lotus Notes composite application demo. It uses a Java background agent to connect to Yahoo Finance and download current stock quotes on a timer (default is every 10 minutes while the market is open – using Central Standard Time).
The composite application displays the stocks in the portfolio and as stocks are selected, it displays the latest price available (and the daily change), a history of prices during the day (by time) and a history of prices during the history of the database (by price).
To add a stock to the portfolio, create a new PortfolioStock form, and the database will start retrieving quotes for it the next time the agent executes.
Since the agent runs in the background, background agents must be enabled in your client. (Make sure “Enable Local Scheduled Agents” is checked in the Preferences on the Basic Notes Client Configuration pane).
The difference between a composite and regular Notes application is that when Eclipse components are part of the composite application, they are getting installed when you open the composite application the first time. At that point, you need to accept the installation of the Eclipse plug-ins in order for the application to work properly.
COPYRIGHT IBM CORPORATION 2009. ALL RIGHTS RESERVED. IBM ISV & DEVELOPER RELATIONS.
Page 18 of 21

Step 13 The composite application design elements of the Notes application behave like any other design element, in terms of replication for example. This means that you can easily create a replica of the composite application to run locally on your Notes client. Do so by first Open > Applications > Workspace.
Step 14 You should see the DemoStockCharts on DOM85 icon on your workspace. Right-click on that icon and select Replication > New Replica…
Step 15 Select Local for the Server field and click OK.
Step 16 This will start the replication process and copy the DemoStockCharts composite application from the Domino Server to the local Notes client. You will now be able to run the application locally on the Notes client. You can close the Replication window after it replicates successfully.
Step 17 Back on the Workspace, you will notice that the DemoStockCharts icon now states “on Local”. This is because you just replicated the application. Double-click on the icon to run the composite application locally. You will notice that the application UI doesn’t change, it is just now processing and running locally.
COPYRIGHT IBM CORPORATION 2009. ALL RIGHTS RESERVED. IBM ISV & DEVELOPER RELATIONS.
Page 19 of 21

SECTION 5: UNDERSTAND THE SMART UPGRADE FEATURE OF THE NOTES CLIENT
In this section, you will gain further understanding of the Smart Upgrade feature of the Lotus Notes clients. This section is just for reference information so you know what this feature of the client does. Since your lab environment is already running Lotus Notes 8.5 client, you will not have to use the Smart Upgrade feature in the machine.
Lotus Smart Upgrade enables administrators to push out a Notes client upgrade with ease to an entire company or selected users using policy and settings documents. Users would get a Smart Upgrade notification to update their Notes clients to later releases, with the option to delay the upgrade if the time is inconvenient.
Lotus Smart Upgrade was introduced in Release 6.x to assist Lotus Domino administrators in centrally managing and automating Notes client upgrades. Smart Upgrade can be used to upgrade the Notes clients from Release 6.x or later to Release 8.5. Using Smart Upgrade has three important benefits:
• Prevents administrators and support staff from having to visit each desktop • Reduces the dependency on third-party tools • Reduces the total cost of upgrading
If you are planning to use Smart Upgrade to upgrade your Notes clients from 6.5.x to 8.5, it is worthwhile to understand the client, template and server dependencies for the functions of Smart Upgrade. For example, if you are upgrading from 6.5.2 or earlier, Smart Upgrade kit download will not occur as a background task in the Notes client so users will not be able to use their Notes client while kit download is occurring.
What you need to know before setting up Smart Upgrade
1. If you are running a version of Lotus Notes that was released prior to Notes 6.5, you need to upgrade to at least Lotus Notes 6.5 before upgrading to Lotus Notes 8.5 release. You can choose to have multiple upgrade kits: one to upgrade the client to 6.5.x and the other to upgrade from Lotus Notes release 6.5.x or 7.x to Lotus Notes 8.5 release.
2. Smart Upgrade is not supported in Lotus Notes 8.5 Beta, neither is any form of upgrading from a Beta version to Gold version. If you have installed a previous Beta version of Lotus Notes 8, you must uninstall it before installing Lotus Notes 8.5.
COPYRIGHT IBM CORPORATION 2009. ALL RIGHTS RESERVED. IBM ISV & DEVELOPER RELATIONS.
Page 20 of 21

Changes in the Smart Upgrade Kit document
In Notes and Domino 8.5, the Smart Upgrade Kit document now has a new Configuration field (see screenshot below), where you can choose to install the standard installation or basic configuration of the Notes Client.
The system memory requirements for running the Lotus Notes 8.5 client with the Eclipse interface are higher than those required for running previous versions of the Lotus Notes client. You may find that some percentage of your workstations do not yet meet the requirements to run the Eclipse interface.
However, this does not mean you cannot deploy Notes 8.5. A basic configuration of Lotus Notes 8.5 is available that requires no more resources than Lotus Notes 6.5/7.x client. Although some features will not be available, the basic configuration may be a good option for your deployment.
Note: You can install the Lotus Notes 8.5 client with the Eclipse interface but still run the basic portion of the Lotus Notes 8.5 client by adding the -sa command line parameter until the workstation has been upgraded to the required specification.
For details on how Smart Upgrade works, its features, and steps to deploying the Notes Client using Smart Upgrade, refer to the IBM Redpaper, Understanding Lotus Notes Smart Upgrade:
http://www.redbooks.ibm.com/abstracts/redp4180.html?Open
Summary:
Congratulations! You have finished all the sections and have used your Notes application provisioning skills and new features and functions in Lotus Notes and Domino Administrator to create a Domino Update Site database and provision an eclipse-based application to the Notes client. You also learned how to deploy NSF composite apps.
COPYRIGHT IBM CORPORATION 2009. ALL RIGHTS RESERVED. IBM ISV & DEVELOPER RELATIONS.
Page 21 of 21